Nors kai kuriais atvejais pranešimai yra būtini, kartais tai tampa blaškymo elementu. Kaip ir jūsų telefonas, kompiuteris taip pat gali atitraukti jūsų dėmesį pranešimais. Štai kodėl „Windows 11“ turi „Focus Assist“ funkciją, kuri leidžia išvengti dėmesį blaškančių pranešimų. Naudodami šią funkciją galite dirbti visiškai susikaupę, o ne blaškytis dėl atsitiktinių pranešimų ir pranešimų. Pranešimai taip pat gali pakenkti jūsų produktyvumui, todėl juos reikia nuslopinti tinkamu laiku.
Vos keliais paspaudimais galite paslėpti visus pranešimus, įspėjimus ir pranešimus jūsų kompiuteryje. Jei neseniai atnaujinote sistemą į „Windows 11“ ir negalite išsiaiškinti naujos vartotojo sąsajos, šiame straipsnyje rasite išsamų vadovą, kaip naudoti „Focus Assist“ sistemoje „Windows 11“, norint atsikratyti pranešimų.
Susiję: Kaip daryti ekrano kopijas sistemoje „Windows 11“.
Turinys
Kas yra „Windows 11“ fokusavimo pagalba?
„Focus Assist“ yra tiesiog netrukdymo režimas jūsų kompiuteriui – kaip ir tie, kuriuos turite savo telefonuose. Tai patogi „Windows 11“ funkcija, leidžianti atsikratyti nereikalingų pranešimų, pranešimų ir įspėjimų. Focus assist funkcija leidžia tinkinti savo prioritetų sąrašą, o ne užblokuoti kompiuterį nuo visų pranešimų.
Išsiblaškymas gali pakenkti jūsų produktyvumui. Taigi, naudodami „Focus Assist“ funkciją, galite paslėpti visus pranešimus, įspėjimus ir pranešimus, kai dirbate su svarbiu dalyku. Užuot jus įspėję, jie eis tiesiai į veiksmų centrą. Paslėptus pranešimus galite peržiūrėti veiksmų centre savo laiku.
Kaip „Focus assist“ veikia „Windows 11“?
Focus Assist suteikia galimybę lanksčiai pasirinkti, kada blokuoti blaškymąsi, pvz., pranešimus, pranešimus ir įspėjimus. Focus Assist galite įjungti bet kuriuo metu arba nustatymuose galite suplanuoti laiko intervalą, kuris automatiškai įjungs fokusavimo pagalbą.
Focus assist funkcija leidžia sudaryti prioritetų sąrašą, kad nepraleistumėte jokių pranešimų iš svarbiausių jūsų kontakto žmonių. Jūsų prioritetų sąraše esantys žmonės visada gali su jumis susisiekti, net kai dirbate kokį nors svarbų darbą. Jei jums reikia visiškai susikaupti dirbant, taip pat galite pasirinkti blokuoti visus pranešimus. Norėdami peržiūrėti visus užblokuotus pranešimus, kuriuos gavote dirbdami, atidarykite sistemos veiksmų centrą.
Susiję: Kaip sustabdyti iššokančiuosius langus sistemoje „Windows 11“.
Kaip įjungti fokusavimo pagalbą
Focus Assist pagal numatytuosius nustatymus yra išjungtas. Bet jei norite, kad jis nebegautų pranešimų, atlikite toliau nurodytus veiksmus.
1 būdas: nustatymų naudojimas
Spustelėkite paieškos piktogramą, kuri užduočių juostoje atrodo kaip didinamasis stiklas.
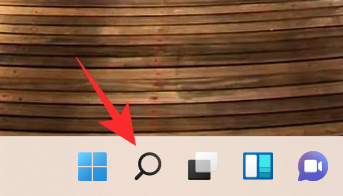
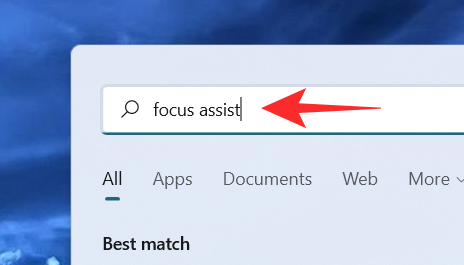
Paieškos juostoje įveskite fokusavimo pagalbą .
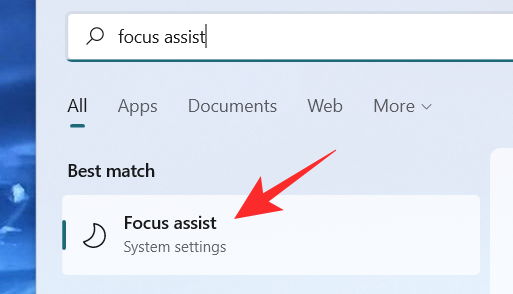
Spustelėkite Focus Assist sistemos nustatymus.
Ekrane pasirodo Focus Assist sistemos nustatymų langas. Dalyje Focus Assist pasirinkite vieną iš šių parinkčių:
- Išjungta – išjungiama Focus Assist funkcija ir leidžia gauti pranešimus iš programų ir kontaktų.
- Tik aliarmai – ši funkcija slopina visus pranešimus, išskyrus žadintuvą.
- Tik prioritetas – ši funkcija leidžia gauti pranešimus tik iš jūsų prioritetų sąrašo, kurį turite tinkinti.
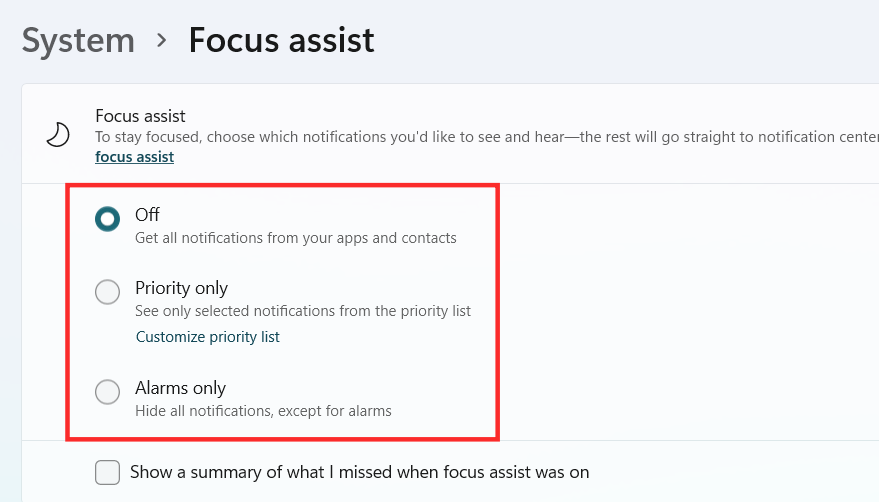
„Focus Assist“ dabar turėtų būti įjungta sistemoje „Windows 11“, atsižvelgiant į jūsų pasirinkimą.
2 metodas: veiksmų centro naudojimas
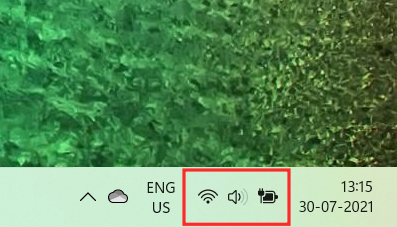
Spustelėkite veiksmų centrą, kuriame kartu rodoma „Wi-Fi“, garsumo ir akumuliatoriaus piktograma.
Tiesiog po „Bluetooth“ piktograma galite pamatyti „ Focus Assist“ piktogramą, kuri atrodo kaip pusmėnulis.
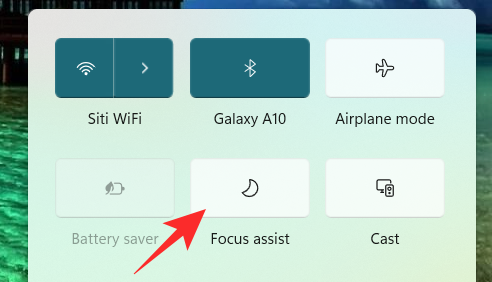
Pagal numatytuosius nustatymus Focus Assist funkcija bus išjungta. Spustelėkite jį ir funkcija bus tiesiogiai nustatyta kaip tik prioritetinė .
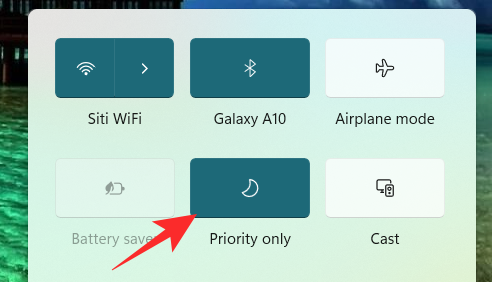
Spustelėkite jį dar kartą, kad nustatytumėte funkciją Focus Assist į Tik aliarmai .
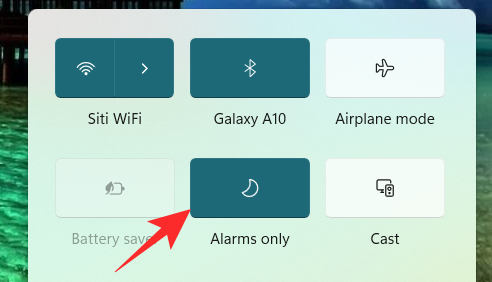
Norėdami išjungti funkciją Focus Assist, spustelėkite ją dar kartą.
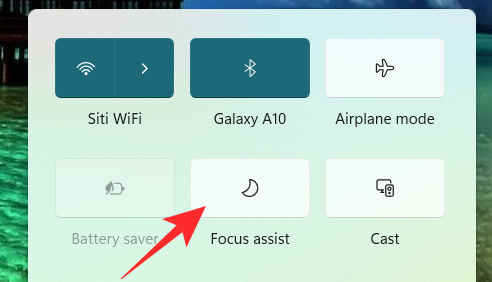
Tiesiog spustelėję Focus Assist piktogramą veiksmų centre, galite pakeisti jos funkciją į išjungtą, tik pirmenybę ir tik pavojaus signalus. Tačiau norėdami atlikti kitus būtinus Focus Assist nustatymų pakeitimus veiksmų centre, dešiniuoju pelės mygtuku spustelėkite Focus Assist piktogramą veiksmų centre ir spustelėkite Eiti į nustatymus .
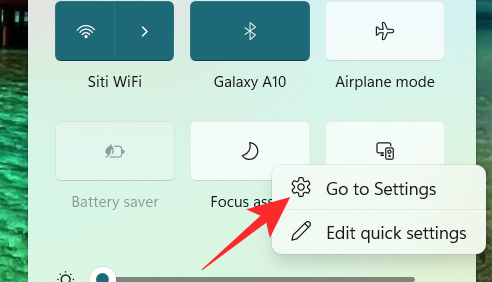
Taip pateksite į nustatymų programą, kurioje galėsite lengvai atlikti visus numatytus pakeitimus. Štai ir viskas! Dabar „Windows 11“ turėtų būti įjungta fokusavimo pagalba tiesiai iš veiksmų centro.
3 metodas: grupės strategijos redaktoriaus naudojimas
Taip pat galite įjungti fokusavimo pagalbos režimą naudodami grupės strategijos rengyklę, jei esate administratorius. Norėdami padėti atlikti šį procesą, naudokite toliau pateiktą vadovą.
Paspauskite Windows + Rklaviatūrą ir dialogo lange Vykdyti įveskite toliau pateiktą informaciją. Paspauskite klavišą Enter, kad atidarytumėte grupės strategijos rengyklę.
gpedit.msc
Eikite į toliau nurodytą mazgą.
User configuration > Administrative Templates > Start Menu and Taskbar > Notifications
Dešinėje raskite ir dukart spustelėkite reikšmę „Išjungti tylias valandas“.
Dabar viršutiniame kairiajame ypatybių lango kampe pasirinkite vieną iš šių parinkčių, atsižvelgdami į dabartinius poreikius.
- Įjungti: pasirinktoje sistemoje bus įjungta fokusavimo pagalba.
- Išjungti: pasirinktai sistemai bus išjungta fokusavimo pagalba.
Štai ir viskas! Fokusavimo pagalba dabar bus įjungta arba išjungta grupės strategijos rengyklėje, atsižvelgiant į jūsų nuostatas. Deja, jūs negalite tinkinti fokusavimo pagalbos kaip administratorius. Šis gebėjimas vis dar priklauso vartotojui. Galimybę naudoti Focus Assist sistemoje galite įjungti arba išjungti tik naudodami grupės strategijos rengyklę.
Kaip naudotis fokusavimo pagalba
Focus assist yra įvairių nustatymų ir tinkinimo parinkčių, kurios gali padėti pakeisti jos elgseną pagal dabartinius poreikius. Naudokite vieną iš toliau pateiktų vadovų, kurie geriausiai atitinka jūsų dabartinius poreikius.
1 būdas: įjunkite tik signalų režimą
Focus Assist lange esantis režimas Tik aliarmai leidžia paslėpti visus pranešimus, išskyrus aliarmą. Atlikite toliau nurodytus veiksmus, kad įjungtumėte tik signalų režimą.
Užduočių juostoje spustelėkite paieškos piktogramą.

Tipas Focus assist

Spustelėkite Focus Assist .

Dalyje Focus Assist spustelėkite Tik įspėjimai, kad nebegautumėte pranešimų, išskyrus įspėjimus.
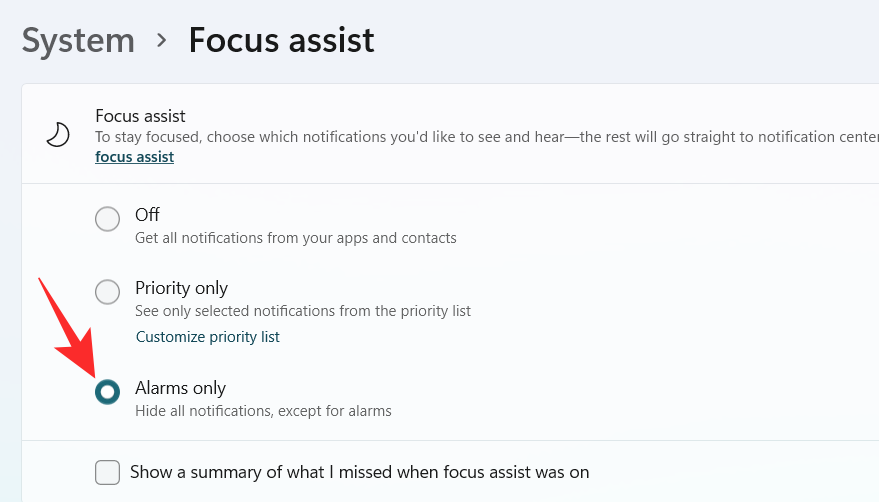
Štai ir viskas! Dabar būsite informuoti tik apie jūsų sistemoje esančius pavojaus signalus. Visi kiti pranešimai, neatsižvelgiant į jų prioritetą, sistemoje „Windows 11“ bus nutildyti.
2 metodas: įgalinkite prioritetą tik naudodami tinkintą sąrašą
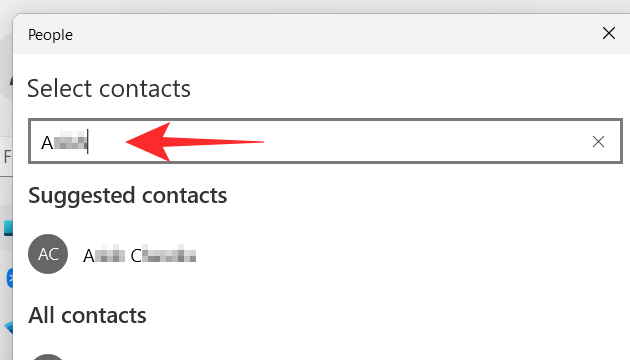
Žmonės langas ekrane. Pasirinkite norimus žmones įvesdami jų vardus paieškos juostoje.
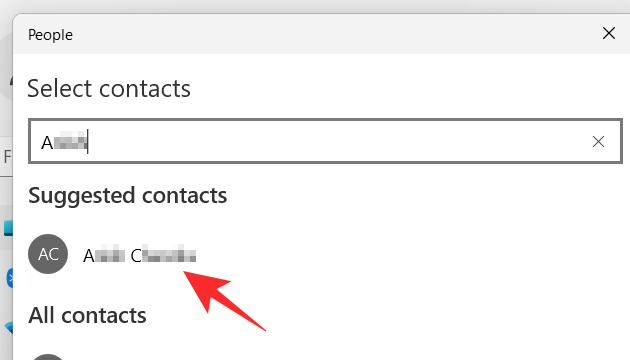
Spustelėkite asmens vardą.
Spustelėkite varnelės mygtuką apatiniame dešiniajame lango Žmonės kampe.
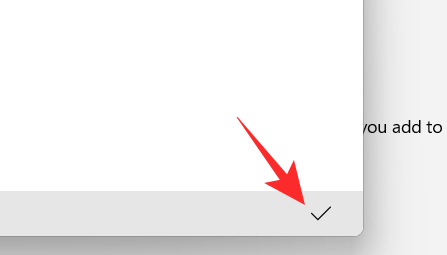
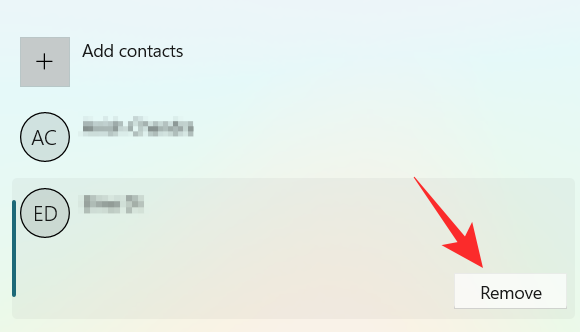
Jūsų prioritetų sąrašas sukurtas. Dabar, jei norite pašalinti kontaktą iš savo prioritetų sąrašo, spustelėkite kontaktą, esantį skiltyje Žmonės .

Spustelėkite Pašalinti .
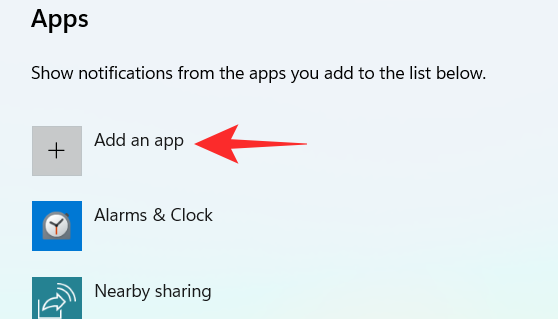
Dabar skiltyje „ Programos“ galite pasirinkti programas, kurios gali praleisti ramias valandas. Norėdami leisti programoms rodyti pranešimus, spustelėkite mygtuką Pridėti programą .
Ekrane pasirodys programų sąrašas. Spustelėkite programą, kurią norite įtraukti į savo prioritetų sąrašą.
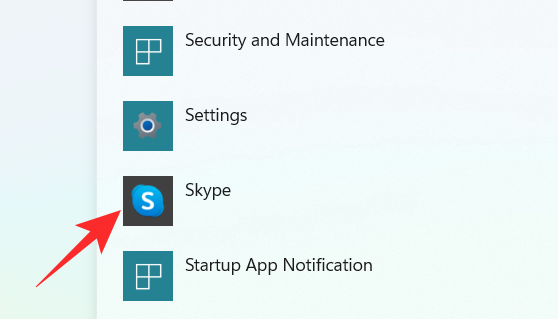
Tęskite šį procesą, kol baigsite pasirinkti programas. Jei norite pašalinti programą iš savo prioritetų sąrašo, galite tiesiog spustelėti programą skiltyje Programėlė .
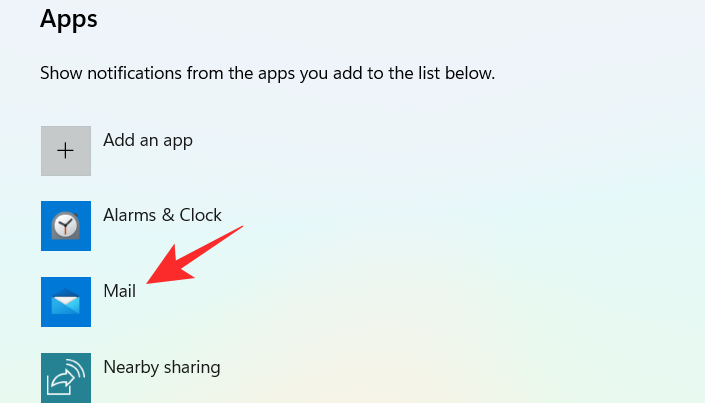
Spustelėkite Pašalinti .
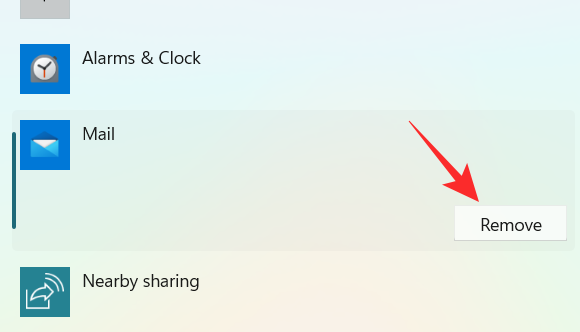
Taip galite tinkinti „Focus assist“ prioritetų sąrašą ir pasinaudoti juo, kad gautumėte pranešimus tik iš svarbių kontaktų.
3 būdas: įgalinkite pranešimų suvestinę, kai fokusavimo pagalba išjungta
Užduočių juostoje spustelėkite paieškos piktogramą.

Tipas Focus assist

Spustelėkite Focus Assist .

Spustelėkite norimą parinktį Tik prioritetas arba Tik signalai .
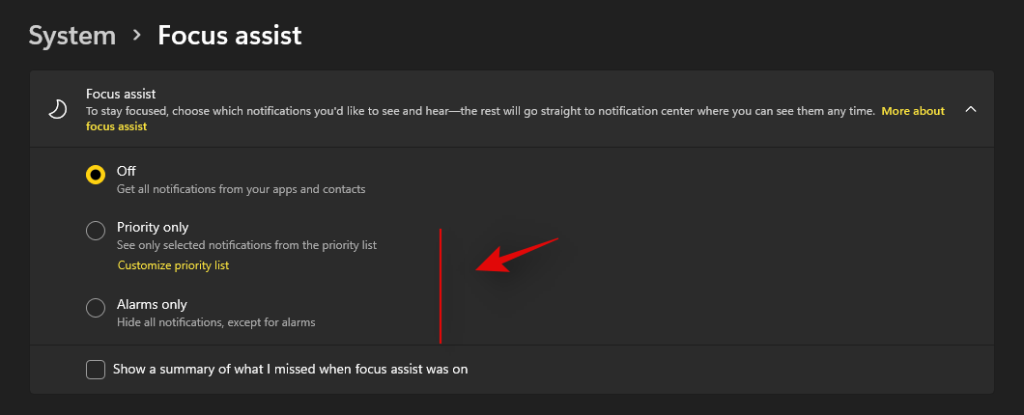
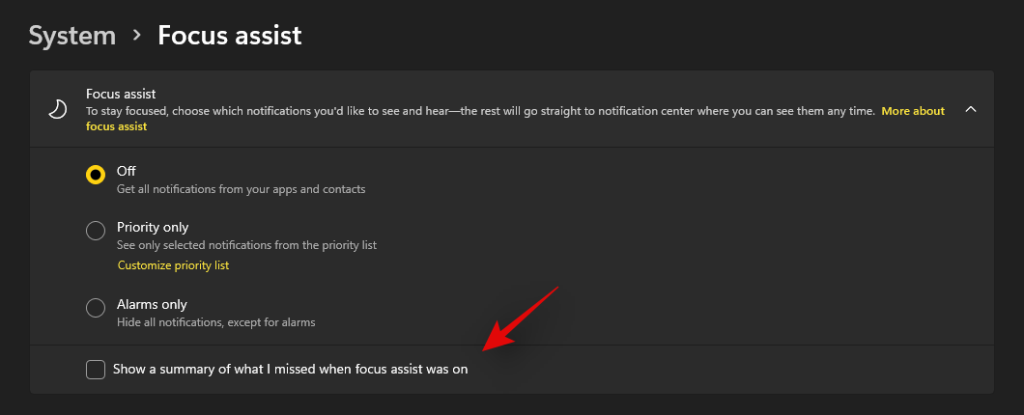
Pažymėkite langelį Rodyti santrauką, ko praleidau, kai buvo įjungta fokusavimo pagalba .
4 metodas: įjunkite arba išjunkite automatines fokusavimo pagalbos taisykles
„Focus assist“ automatinės taisyklės leidžia nustatyti sąlygas, kurios gali automatiškai suaktyvinti fokusavimo pagalbą. Focus Assist nustatymų lange yra keturios skirtingos automatinės taisyklės, kurias galima tinkinti. Peržiūrėkite toliau nurodytus veiksmus, kad tinkintumėte automatines taisykles „Focus assist“.
Užduočių juostoje spustelėkite paieškos piktogramą.

Tipas Focus assist

Spustelėkite Focus Assist .

Skiltyje Automatinės taisyklės yra keturi skyriai. Įjunkite norimos parinkties perjungimo jungiklį.
- Šiuo laikotarpiu – ši funkcija leidžia nustatyti konkretų laiko intervalą, priklausomai nuo to, kuri fokusavimo pagalbinė funkcija automatiškai įsijungia arba išsijungia.
- Kai dubliuoju savo ekraną – ši funkcija automatiškai įjungia Focus Assist, kai nustato, kad ekranas yra bendrinamas. Šią funkciją ypač galima naudoti norint, kad pranešimai nepasirodytų, kai esate pristatymo viduryje.
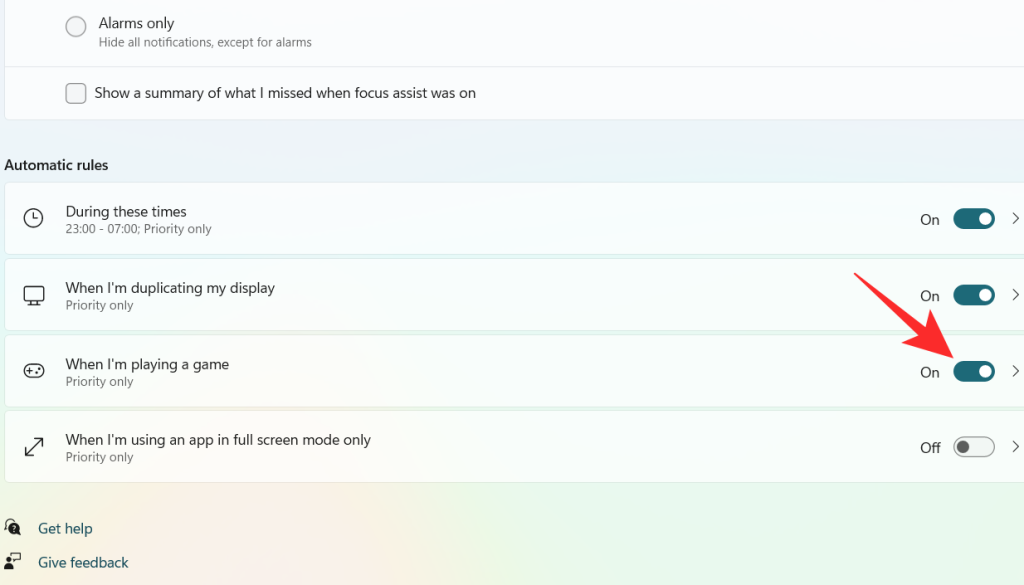
- Kai žaidžiu žaidimą – kai žaidžiate viso ekrano režimu, ši funkcija leidžia Focus Assist užblokuoti pranešimus, kad jie nepasirodytų ekrane.
- Kai naudoju programą tik viso ekrano režimu – ši funkcija įgalina Focus Assist automatiškai įsijungti, kai nustato, kad naudojate programą viso ekrano režimu. Negausite jokių pranešimų, kol programa nebus atidaryta viso ekrano režimu.
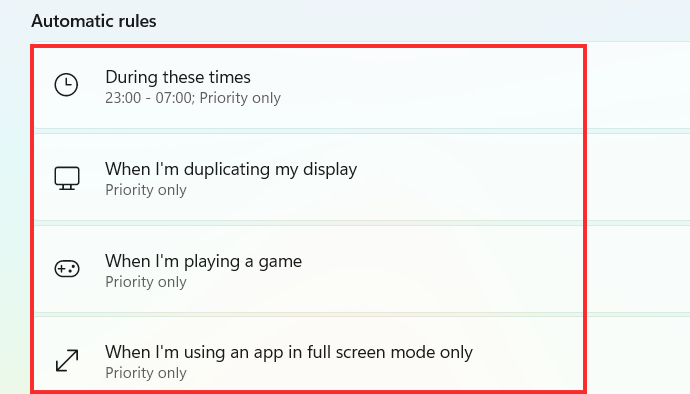
Dabar pažiūrėkime, kaip tinkinti pirmiau minėtas parinktis skiltyje Automatinės taisyklės.
1. Šiais laikais
Įjunkite perjungimo jungiklio, kuris yra itin teisė į Tais laikais kortelėje.
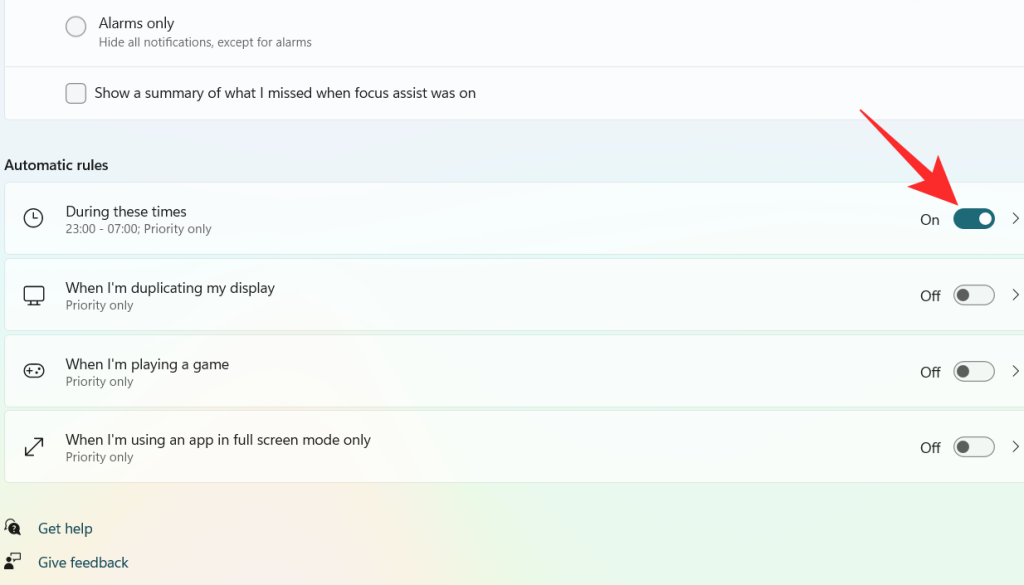
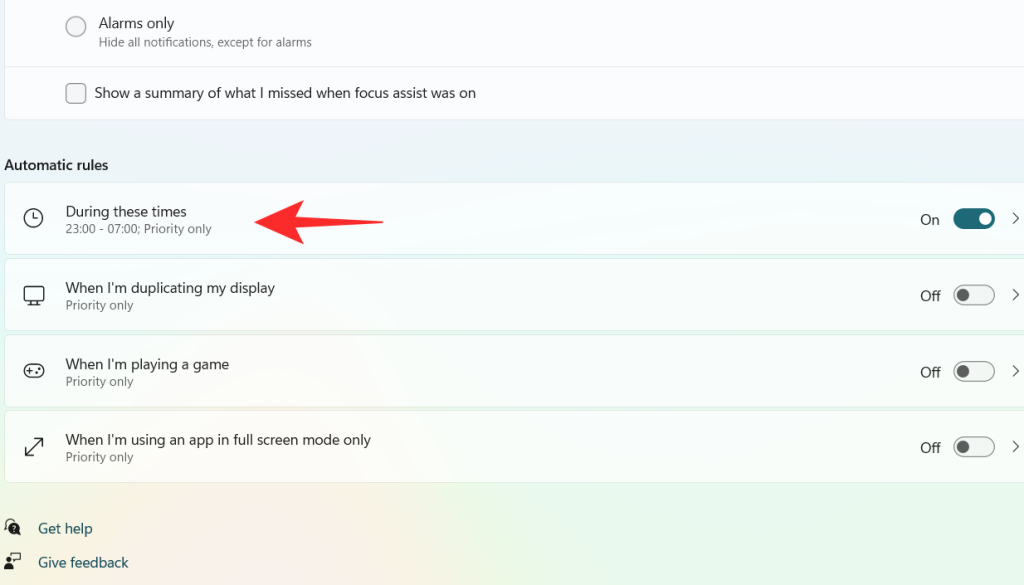
Spauskite Tais laikais kortelėje.
Spustelėkite laukelį, esantį po Pradžios laikas .
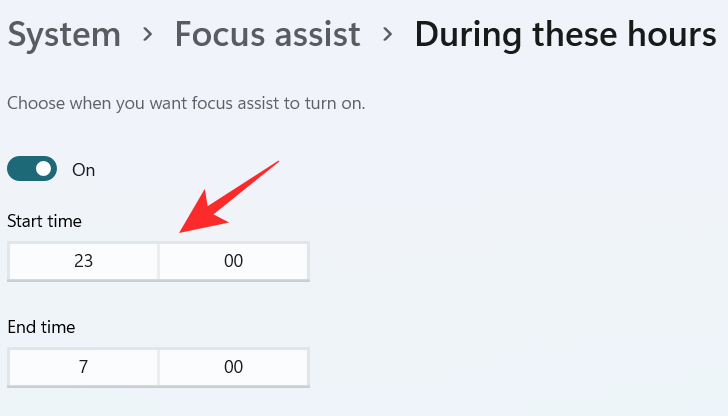
Pasirinkite laiką, kada norite įjungti Focus Assist, ir spustelėkite varnelę išskleidžiamojo meniu apačioje.
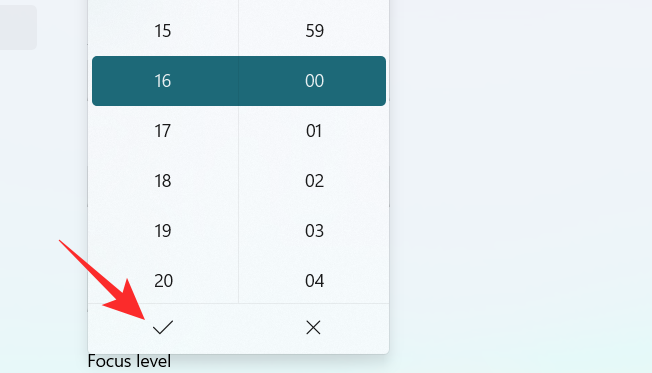
Spustelėkite laukelį, esantį po Pabaigos laikas .
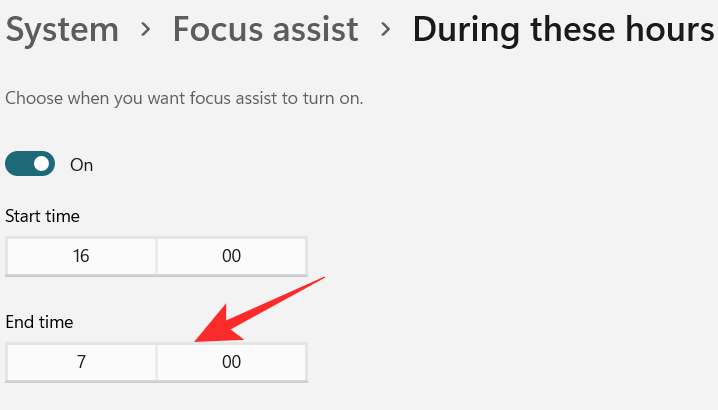
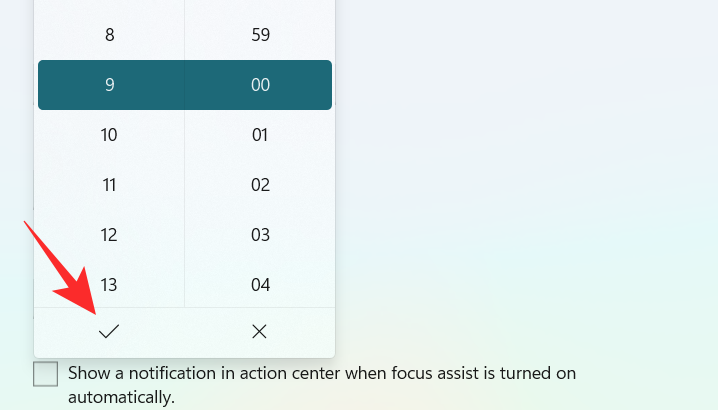
Pasirinkite laiką, kada norite, kad „Focus Assist“ išsijungtų, ir spustelėkite varnelę išskleidžiamojo meniu apačioje.
Spustelėkite laukelį, esantį po Kartoja .
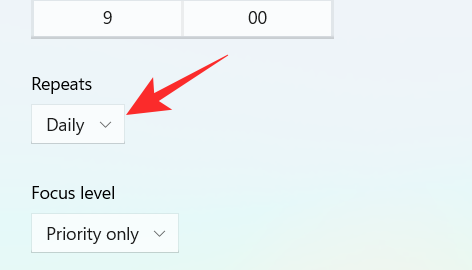
Pasirodo mažas išskleidžiamasis meniu. Nustatykite tvarkaraštį į Kasdien, Savaitgaliais arba Darbo dienomis .
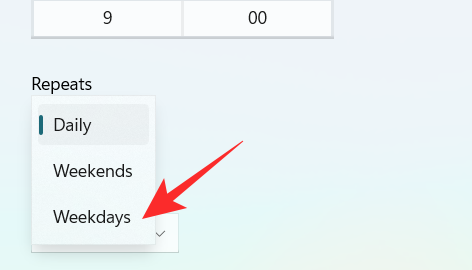
Spustelėkite laukelį po Focus level .
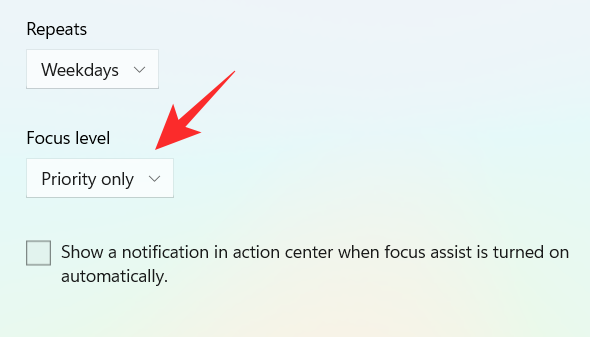
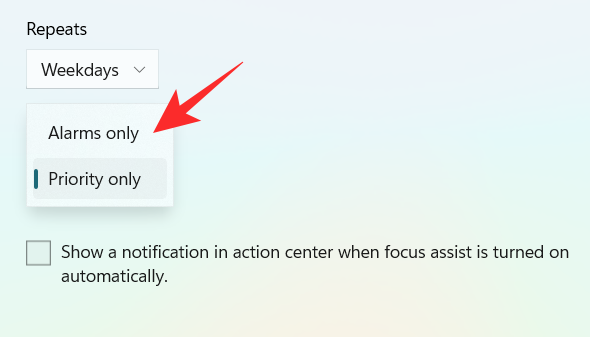
Pasirodo mažas išskleidžiamasis meniu. Pasirinkite tik signalą arba tik prioritetą .
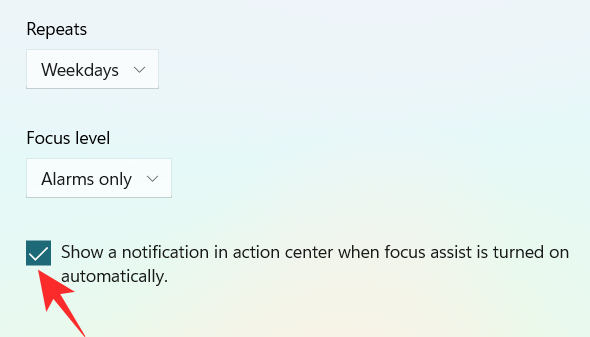
Galiausiai, norėdami gauti pranešimą, kai įjungta fokusavimo pagalba, pažymėkite langelį „ Rodyti pranešimą veiksmų centre, kai fokusavimo pagalba įjungiama automatiškai “.
2. Kai dubliuoju savo ekraną
Įjunkite perjungimo jungiklį, esantį dešinėje, skirtuke Kai dubliuoju ekraną .
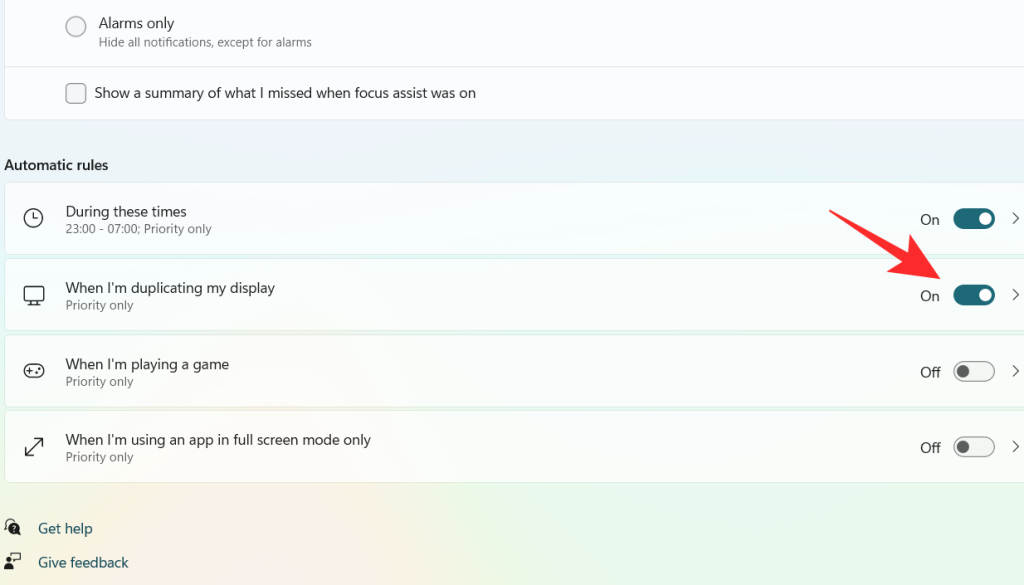
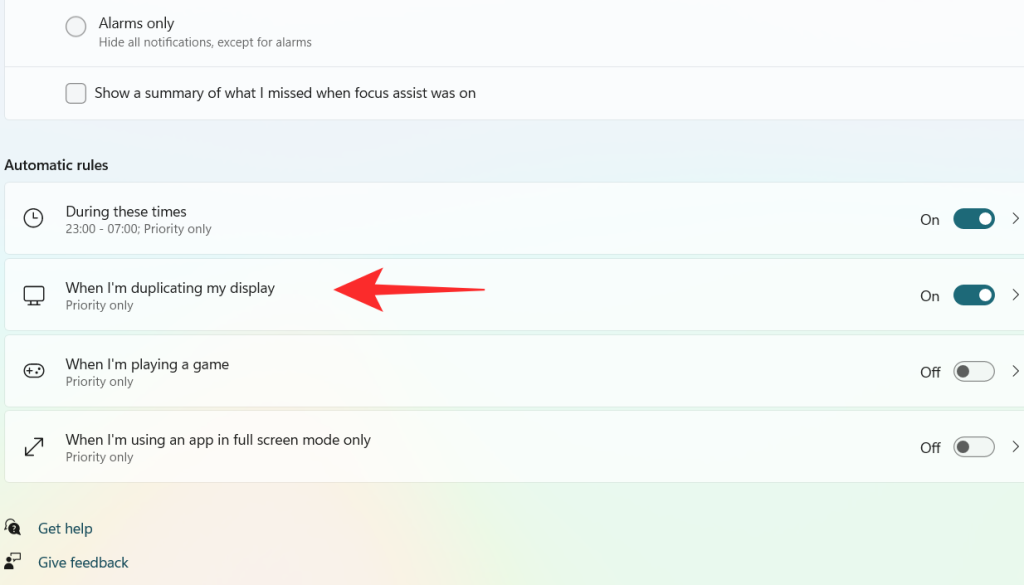
Spustelėkite skirtuką Kai dubliuoju ekraną .
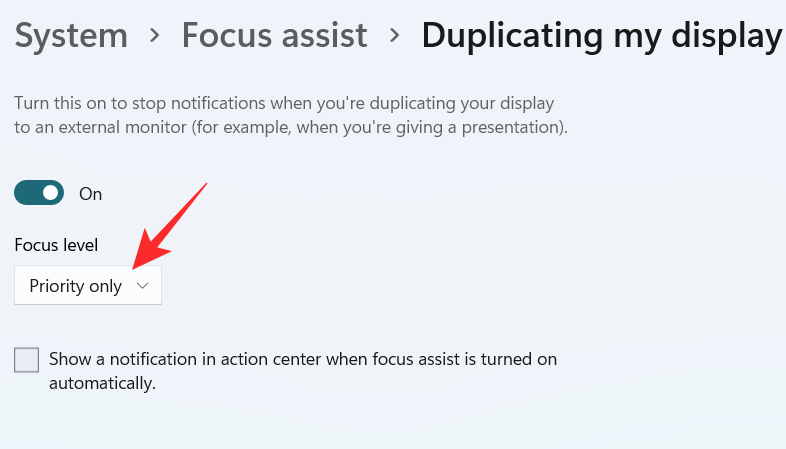
Spustelėkite laukelį po Focus level .
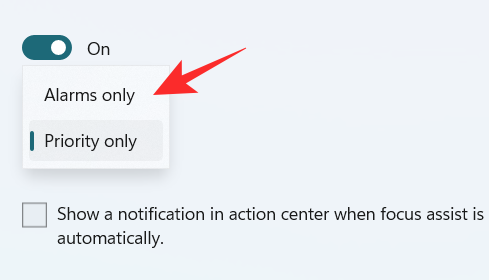
A dropdown menu appears, click on your desired option between Priority only and Alarms only.
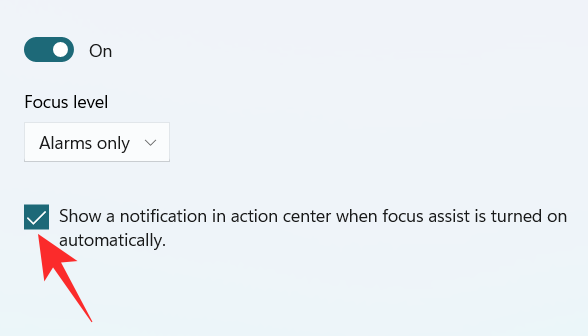
To get a notification when the Focus assist is turned on, check the box “Show a notification in action center when Focus assist is turned on automatically“
3. When I’m playing a game
Turn on the toggle switch, which is extreme right to the When I’m playing a game tab.
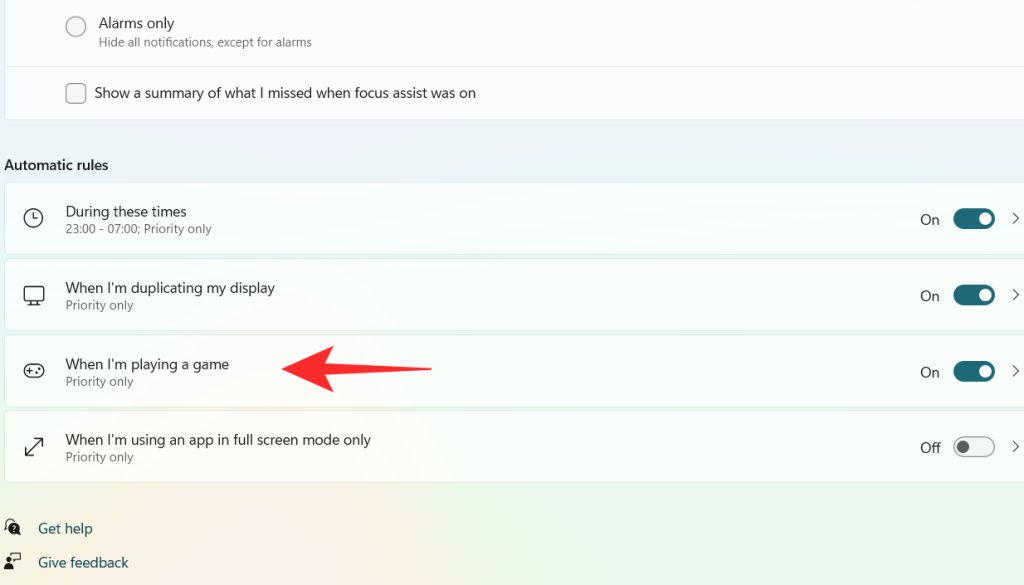
Click on the When I’m playing a game tab
Click on the box under Focus Level.
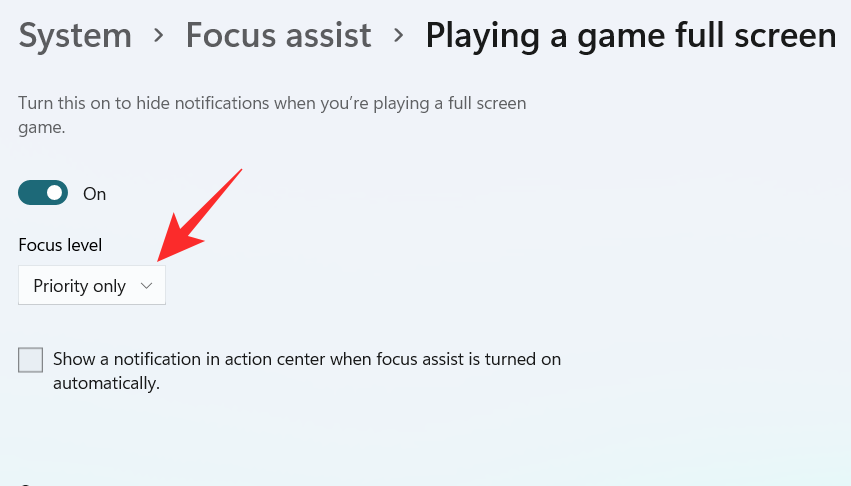
A dropdown menu appears, click on your desired option between Priority only and Alarms only.

To get a notification when the Focus assist is turned on, check the box “Show a notification in action center when Focus assist is turned on automatically“

4. When I’m using an app in full-screen mode only
Turn on the toggle switch, which is extreme right to the When I’m using an app in full-screen mode only tab.
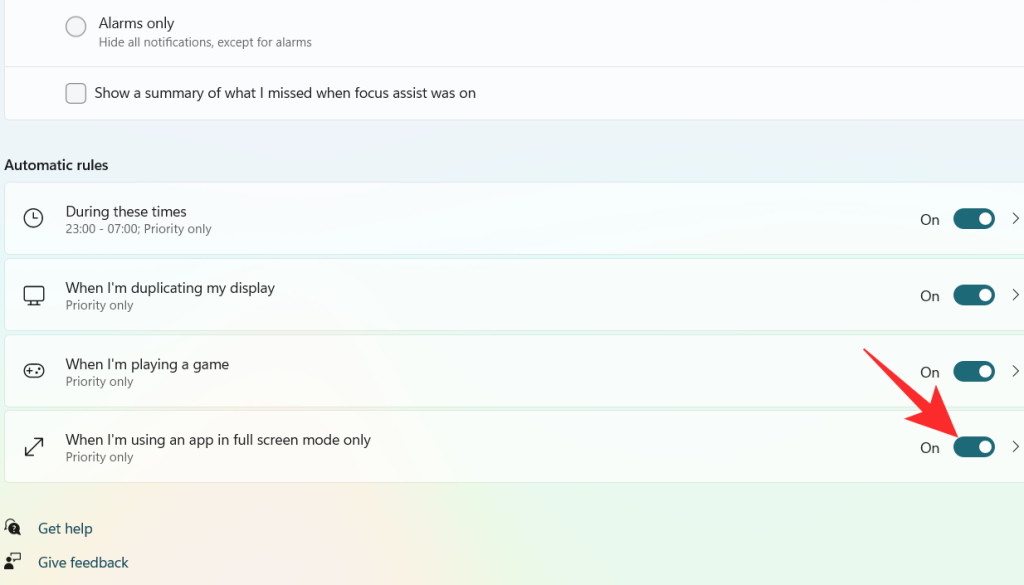
Click on the When I’m using an app in full-screen mode only tab
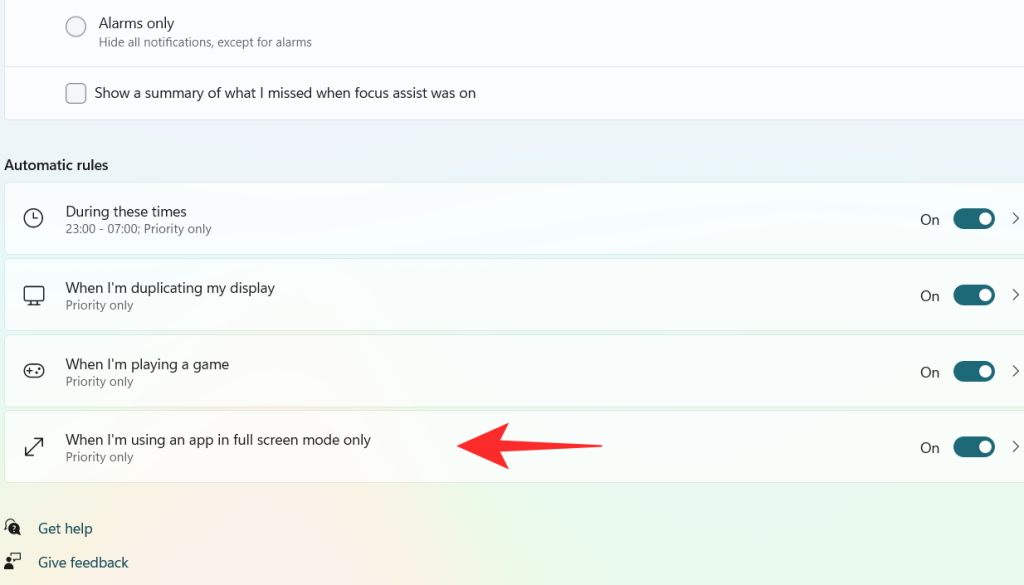
Click on the box under Focus Level.
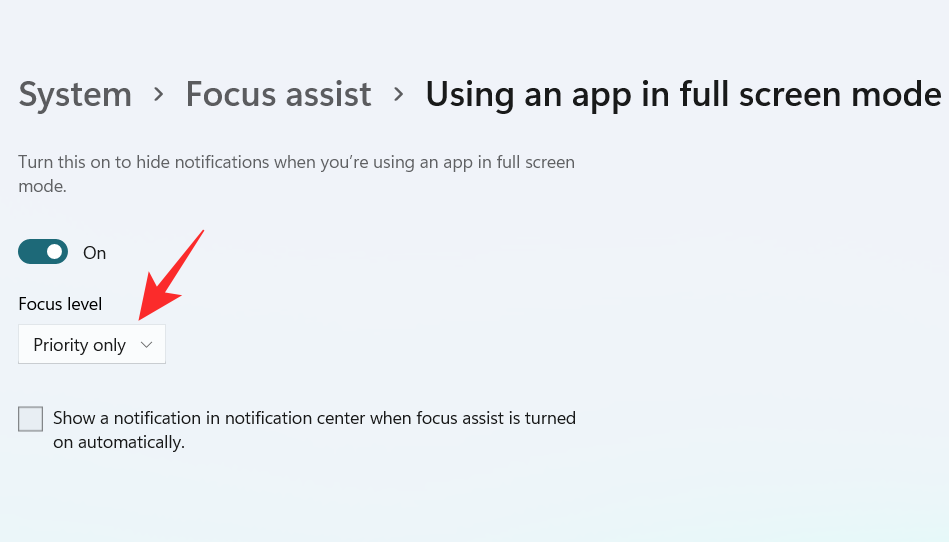
A dropdown menu appears, click on your desired option between Priority only and Alarms only.

To get a notification when the Focus assist is turned on, check the box “Show a notification in action center when Focus assist is turned on automatically“.

Using the above customizations, you can schedule and control Focus assist’s behavior according to your workflow for maximum efficiency no matter the task at hand.
Can you remove the Focus Assist icon from the Action Center?
Yes, you can easily remove the Focus Assist icon from the Action Center. Windows 11 brings a host of new cosmetic and UI changes and one of them has been the ability to customize your action center. You can now add or remove icons from the action center depending on your needs and opt for a more minimal or productive look depending on your workflow.
For now, you can only add and remove certain system modules but in the future, some users expect Microsoft to add the support for third-party apps as well. This would be a much welcome change that would allow you to manage dedicated system settings managed by third-party apps directly from your action center.
Customize your Focus assist icon in the action center
Depending on your current needs you can either remove or add the Focus assist module to the action center. Use one of the guides below depending on your current requirements.
1. Remove it
Click on the Action Center which shows the icon of Wifi, volume, and battery together.

Right-click on an empty place or on any icon and click on Edit quick settings.
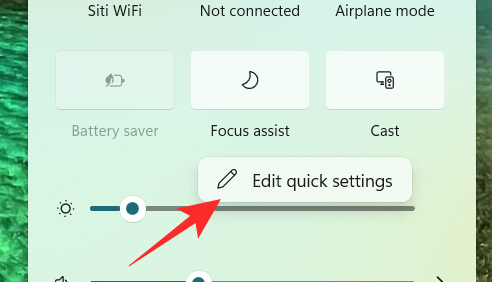
Click on the unpin symbol at the top right corner of the Focus Assist icon to remove the Focus Assist icon from the Action Center.
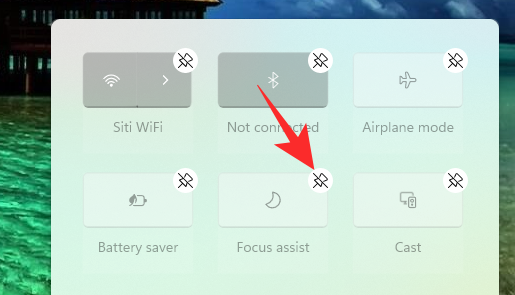
The Focus assist module should now have been removed from your action center. If not, we recommend you restart explorer.exe or your PC for the changes to take effect.
2. Restore it
Click on the Action Center which shows the icon of Wifi, volume, and battery together.

Right-click on an empty place or on any icon and click on Edit quick settings.
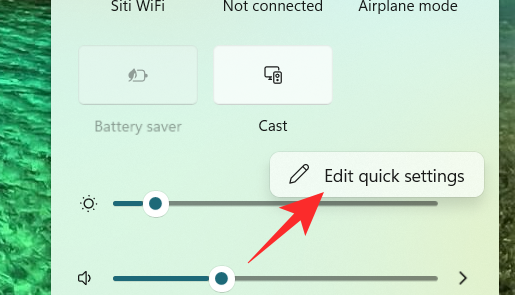
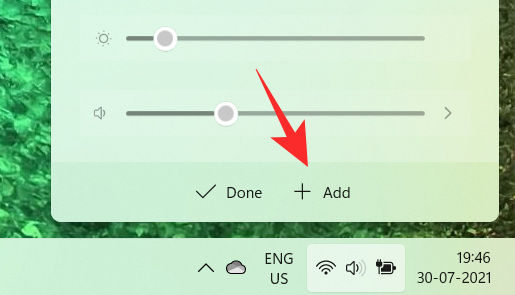
Now, click on the Add button at the bottom of the action center.
A list of different settings appears. Click on Focus Assist from the list and you will get to see the Focus Assist icon on the Action Center again.
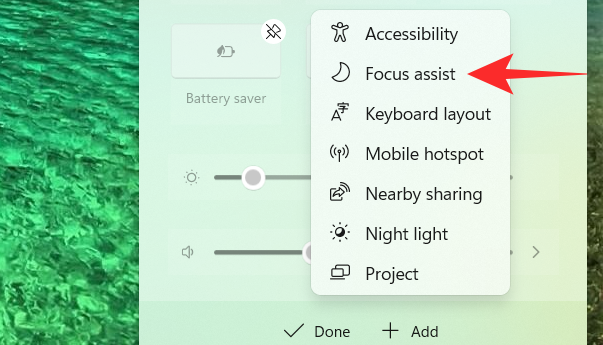
And that’s how you can add the Focus assist module back in the action center.
Focus assist keeps turning on automatically Issue: How to fix
If Focus assist keeps turning on automatically then there could be a couple of reasons for this behavior. Depending on its cause we can either fix it or use a workaround to manage the issue. Let’s find out why Focus assist keeps turning on automatically on your system.
Fix #1: Check Automatic Rules
Are you having this issue when projecting to a secondary display? Or when sharing your screen with a public computer? Then it is likely that focus assist is getting turned on automatically due to the default automatic rules in Windows 11.
By default, focus assist will silence all notifications in such scenarios to help maintain your privacy. But this can be counterproductive in case you are just trying to use a bigger display from a portable system like a laptop or an NUC.
It could also be that scheduled Focus assist was turned on your system by mistake which will enable and disable Focus assist automatically during certain hours. If any of these situations sounds like what you are facing then you can use the guide below to disable all automatic rules that enable Focus assist during certain scenarios and workflows on Windows 11. Let’s get started.
Press Windows + i on your keyboard to open the Settings app. Ensure ‘System’ is selected on your left and then click on ‘Focus Assist’ on your right.
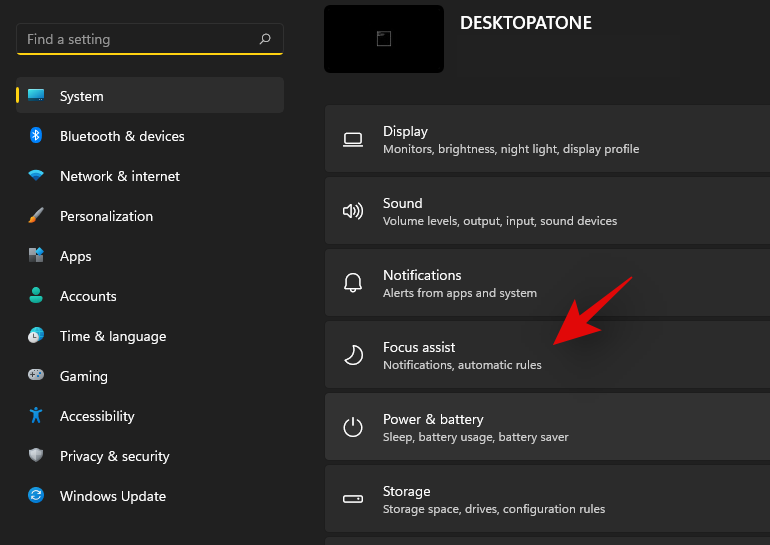
Go down to automatic rules and turn off the following toggles.
- During these times
- When I’m duplicating my display
- When I’m playing a game
- When I’m using an app in full-screen mode only
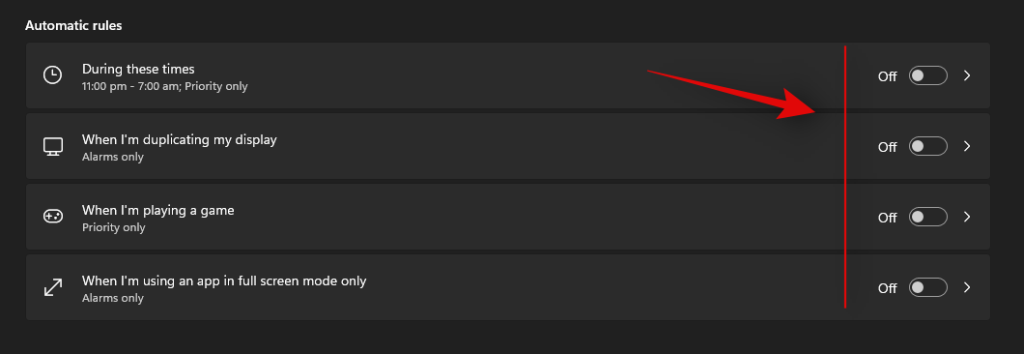
Once these rules are disabled, Windows 11 will not turn on Focus assist automatically on your system.
Fix #2: Turn of GeForce Overlay
This is another way to solve Focus assist misbehaving on your system. If you have a dGPU from Nvidia and are using the GeForce experience app then we recommend disabling its overlay option and restarting your system. With the automatic rule for ‘When I’m using an app in full-screen mode only’ turned on, Windows will mistake the Nvidia overlay detection on your desktop for a full-screen app which will trigger the Focus assist settings in return. You can also disable this automatic rule in case you wish to keep the Geforce Experience overlay enabled on your system.
Focus assist greyed out, option missing or not working; How to fix
Is the focus assist option missing from Windows 11 settings app? Is the module greyed out in the action center? This is a known bug that shows up occasionally with every feature update of Windows. Even certain versions of Windows 10 faced huge issues with this bug until a fix was released.
Fix #1: Enable in Group Policy Editor
If Focus assist seems to be missing from your system then it is likely disabled using the group policy editor. If your PC is managed by your organization or your workplace then it is likely disabled by your administrator. If you have access to the group policy editor then you can use the guide below to enable focus assist on your system. However, in case you have limited access, then you might need to get in touch with your administrator to enable Focus assist on your system.
Press Windows + R on your keyboard to bring up the Run dialog box and type in the following command to launch the Group Policy Editor. Click on ‘Ok’ once you are done.
gpedit.msc
Navigate to the following node.
User configuration > Administrative Templates > Start Menu and Taskbar > Notifications
Double click on ‘Turn off Quiet Hours’ on your right.
Click and select ‘Disabled’ in the top left corner.
Click on ‘Ok’ to save your changes.
And that’s it! Focus assist should now be enabled on your system in case it was disabled using the group policy editor.
Fix #2: Reinstall and repair default Windows UWP apps and system apps
If Focus assist is still missing from your system then let’s check if all the necessary apps and utilities are installed properly on your system. Use the guide below to check and repair Windows 11’s basic apps and functionality on your system.
Press Windows + S and search for PowerShell. Click on ‘Run as administrator’ once it shows up in your search results.
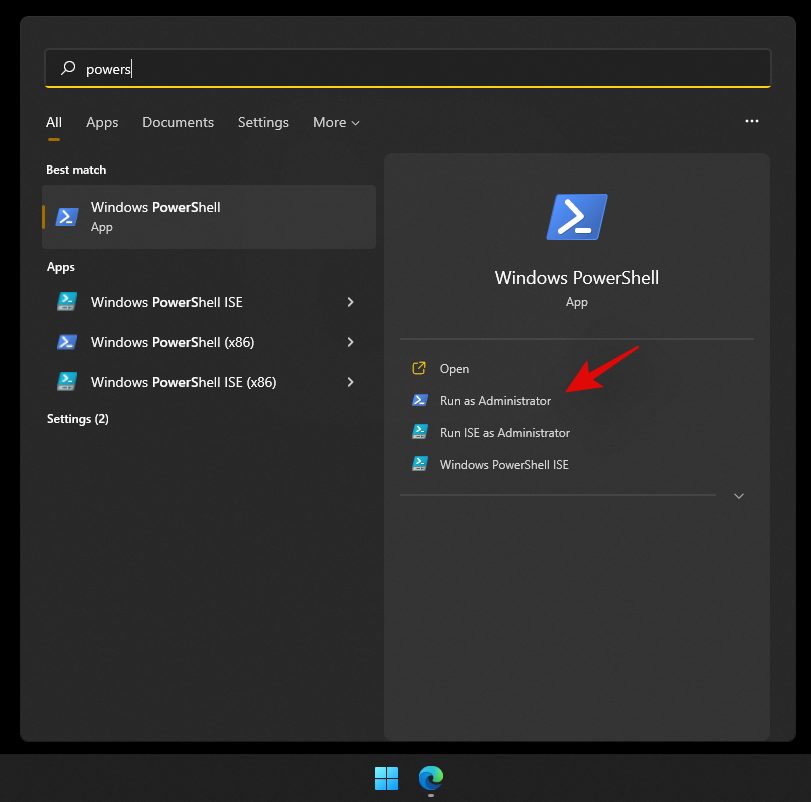
Once PowerShell is launched, execute the following command to reinstall all UWP apps and check and repair other default utilities required by Windows 11 in the background.
Get-AppXPackage -AllUsers | Foreach {Add-AppxPackage -DisableDevelopmentMode -Register "$ ($ _. InstallLocation) \ AppXManifest.xml"}

Wait for the process to finish and restart your PC for good measure. If Focus assist was corrupted or missing from your system, then this fix should help solve all your issues.
Fix #3: Check for a Windows Update
Haven’t updated in a while? We recommend checking for recent Windows Updates. While updates rarely disable major features like Focus assist, a new feature update installation can help refresh your registry, fix mismatched values and more importantly iron out bugs that could be preventing you from accessing Focus assist on your system. Use the guide below to check for recent Windows updates on your system.
Press Windows + i on your keyboard to open the Settings app and click on ‘Windows Update’ on your left.
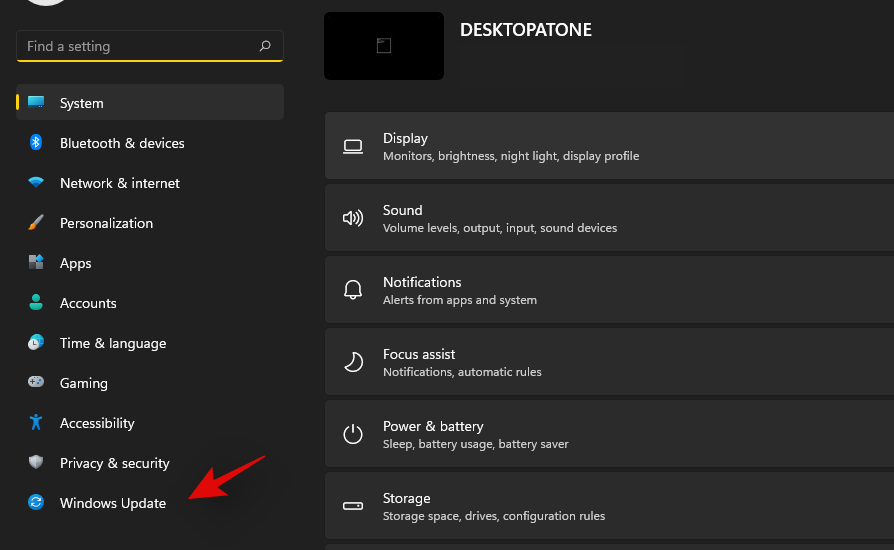
Click on ‘Check for updates’.

In case any new updates show up, let them install on your system and restart if prompted. In case you are using a metered connection then you will need to click on ‘Download now’ manually to avoid any unexpected data charges.
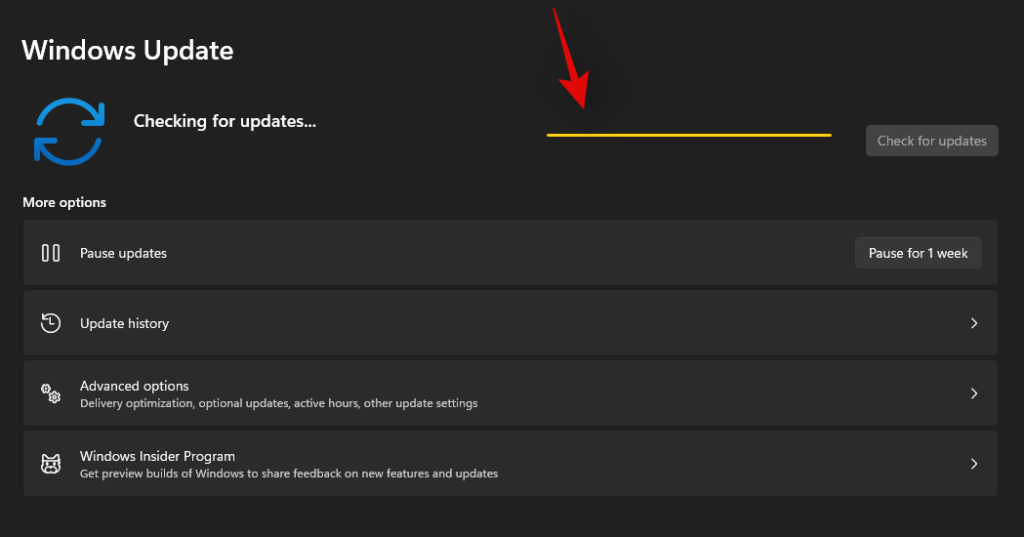
Once the necessary Windows updates are installed on your system, Focus assist should be restored in your action center and the Settings app.
Last Resort: Reset your PC
If Focus assist is still missing from your PC then this indicates a corrupted Windows installation on your system. The best way to fix this without wasting much time on troubleshooting would be to simply reset your PC while keeping all your files intact. This will refresh the entire Windows 11 installation and reinstall all the apps which should help restore functionality for all Windows features including Focus assist. Follow the guide below to reset your PC while keeping your files.
Note: The reset process will remove all installed applications and only retain files stored manually on your local storage. A list of all the removed apps will be available in .txt format on your desktop once your PC has been reset.
Press Windows + i on your keyboard and click on ‘Windows Update’ on your left.
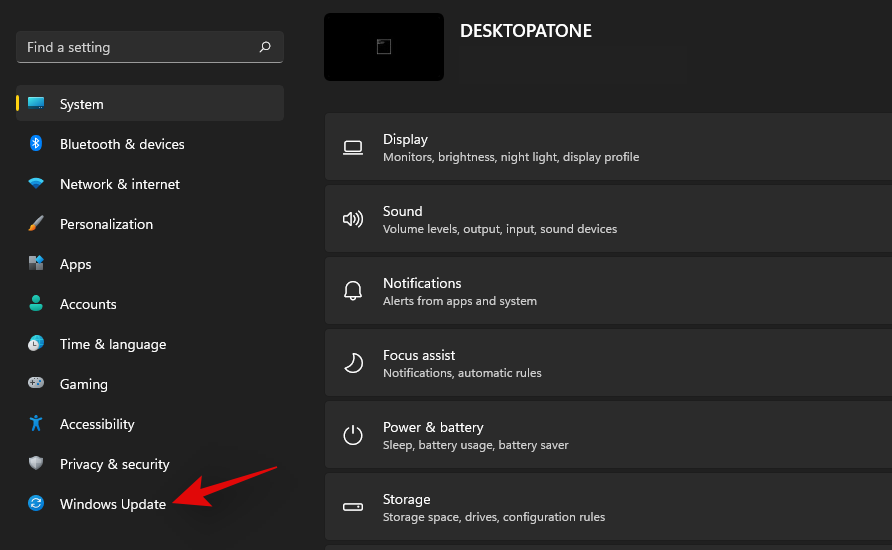
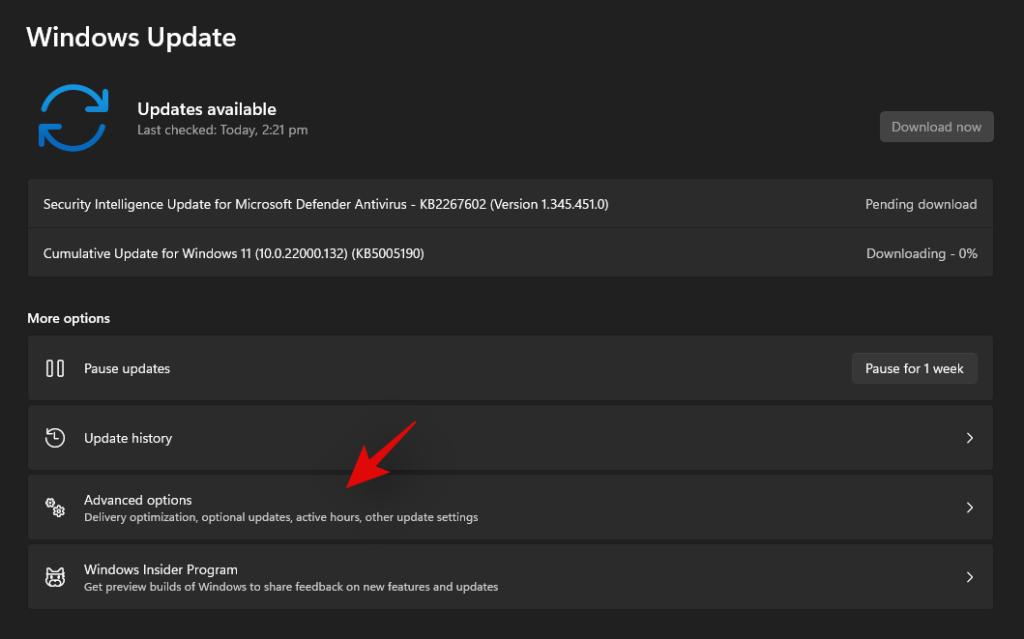
Click on ‘Advanced options’.
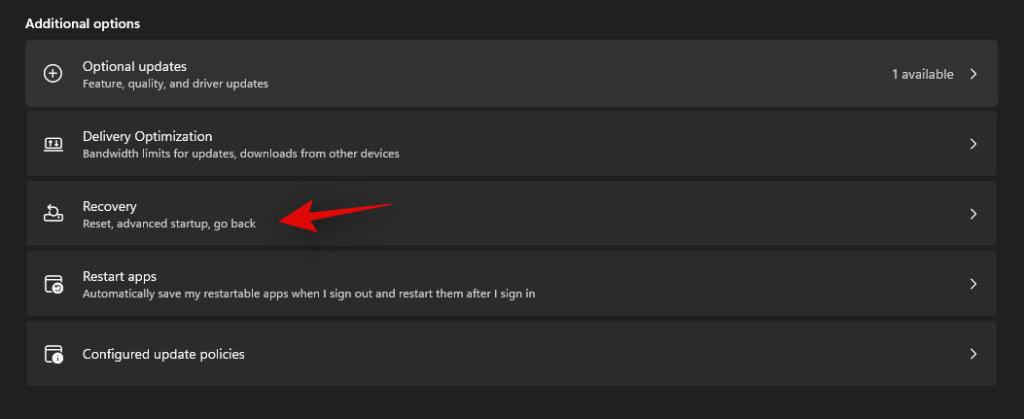
Click and select ‘Recovery’.
Click on ‘Reset PC’ beside Reset this PC.

Click on ‘Keep my files’.
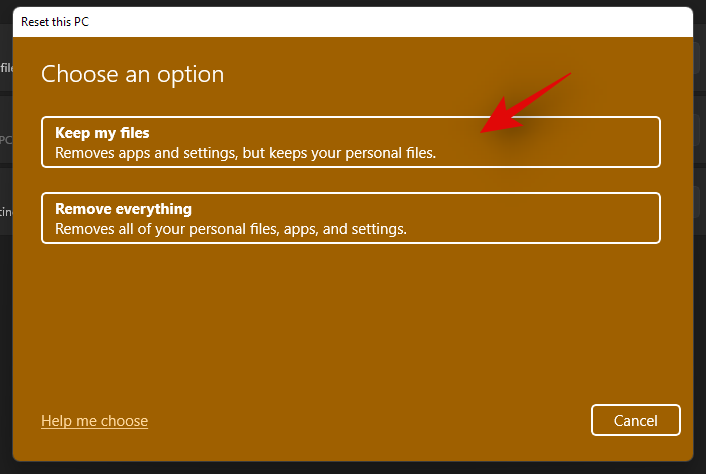
Windows will now process all the files on your local storage. Click on ‘Reset’.
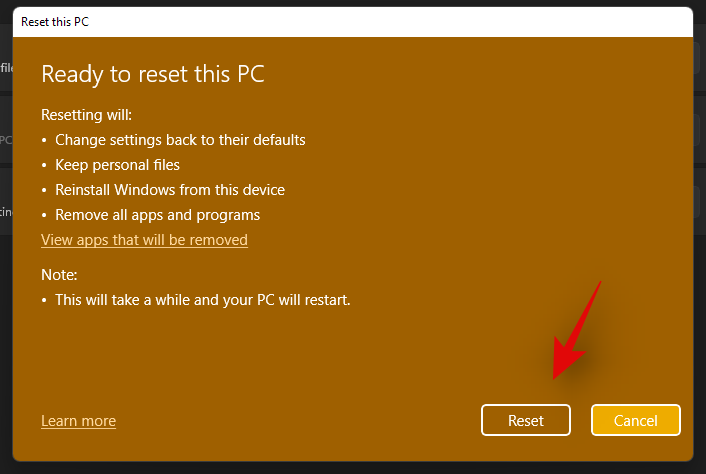
Note: If you are using Windows 11 Pro or higher then you will get the option to use a local installation/recovery media to reinstall Windows 11 as well. However, this option will be missing for Windows 11 Home users.
Windows will now reset your PC while retaining all your files. Your PC will restart several times during this process. This is completely normal and you should let Windows do its thing. If you are using a laptop or a portable NUC, then ensure that your unit is plugged into the power at all times during this process.
How to turn off Focus assist permanently
Do you wish to turn off Focus assist permanently in all scenarios? Then you can use the guide below to do so. The best way to disable Focus assist is by using the group policy editor. But in case you are using Windows 11 Home Edition, then you can use the first method in this guide to disable Focus assist permanently.
Method #1: Disable all settings and rules
Once you disable all the settings and rules for Focus assist, the feature should be turned off automatically on your system. Use the guide below to get you started.
Press Windows + i on your keyboard to open the Settings app and click on ‘Focus assist’ on your right.

Click and select ‘Off’ at the top.
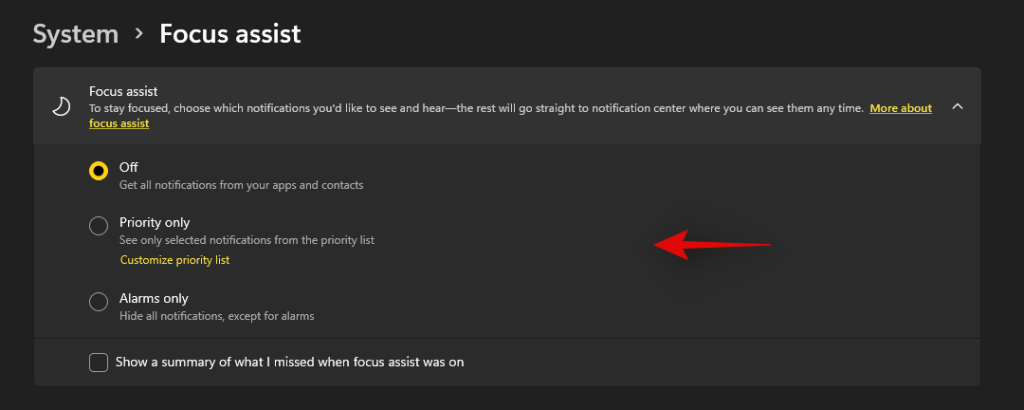
Uncheck the box for ‘Show a summary of what I missed when focus assist was on’.

Subsequently, disable all the toggles under ‘Automatic rules’ as shown below.

We also recommend turning off notifications for unnecessary apps using the guide after this section to avoid unnecessary notifications from interrupting you when focus assist is disabled.
Method #2: Using Group Policy Editor
The group policy editor will permanently disable focus assist on your system and even prevent you from accessing it in your settings. However, this method will only work on Windows 11 Pro or higher versions. In case you have the Windows 11 home edition, you can use the guide above to disable Focus assist instead.
Press Windows + R and type in the following to open Froup Policy EDitor. Click on ‘Ok’ once done.
gpedit.msc
Navigate to the following node.
User configuration > Administrative Templates > Start Menu and Taskbar > Notifications
Find and double-click on ‘Turn on Quiet Hours’ on your right.
Select ‘Enabled’ in the top left and click on ‘Ok’.
Focus assist will now be permanently disabled on the selected system. We recommend you restart your system or explorer.exe in case the changes do not take place immediately.
Is there any other way to disable notifications?
Yes, you can disable notifications individually on a per-app basis in Windows 11 to customize the notifications you receive. This is another way to ensure that you are only notified about the apps and notifications that you intended. Customizing your notifications this way will also allow you to retain the full functionality of the focus assist mode without having to disable certain rules to avoid mismatched scenarios in your workflow.
However, the only downside to managing your notifications this way is that you have to keep enabling and disabling notifications for apps every few months depending on your new installs and uninstalls. You can use the guide below to disable notifications on a per-app basis in Windows 11.
Disable notifications permanently on a per-app basis
Here’s how you can disable notifications on a per-app basis in Windows 11.
Press Windows + i on your keyboard to open the Settings app and then click on ‘Notifications’ on your right.
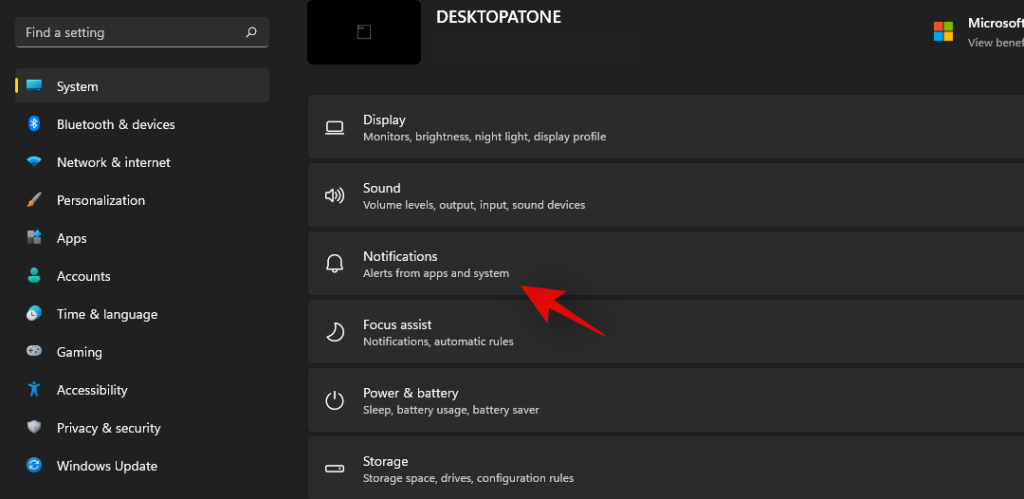
You will now get a list of all the apps that have the permission to deliver notifications on your system. Scroll the list to find the necessary apps and turn off the toggle beside them to disable notifications.
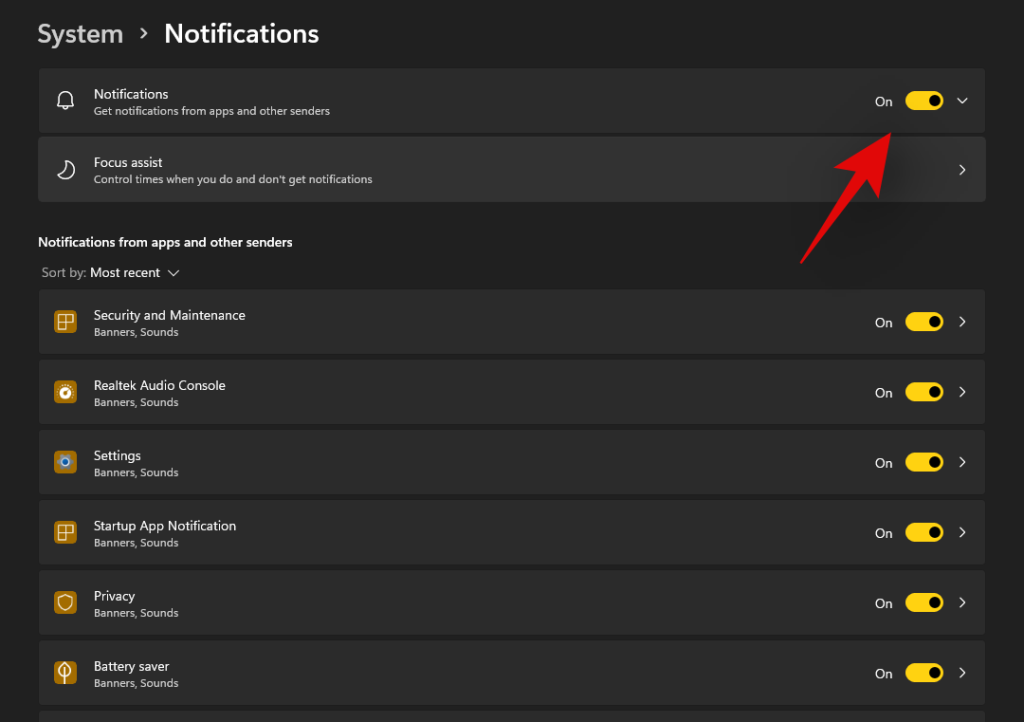
Repeat the steps above for all the intended apps to disable notifications.
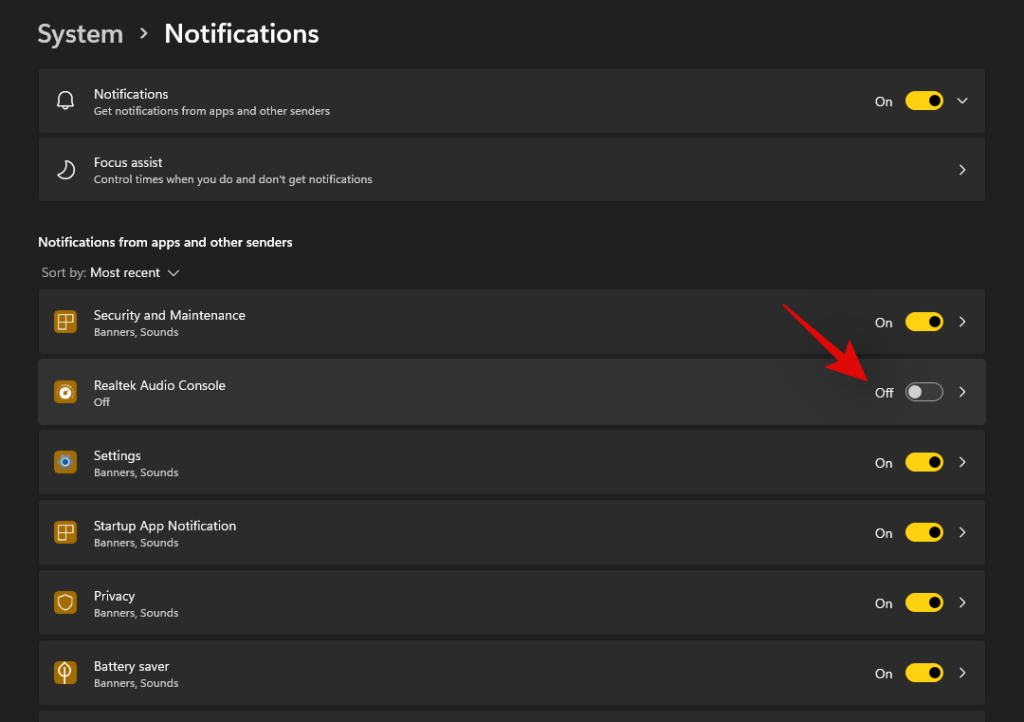
Close the Settings app and notifications for the selected apps should now be permanently disabled on your system.
Can you customize notifications in Windows 11?
Well, not exactly. Windows 11 currently has very limited options when it comes to customizing your notifications. You can not change the look, behavior, or color palette of your notifications without changing the accent color of your overall UI. However, you can customize the way your notifications sound. You can set a nice quiet notification sound that does not interrupt your workflow or opt for a quirky take that makes for a few good laughs each time you get a notification. The choice is completely up to you. Use the guide below to customize your Windows 11 notification sounds.
Required
- A .wav file for the sound you wish to set as your custom notification on Windows 11
Guide
Let’s start by first placing the .wav file in a compatible media folder so that you can set it as your default notification sound in Windows 11. Navigate to the concerned .wav file and copy it to your clipboard.
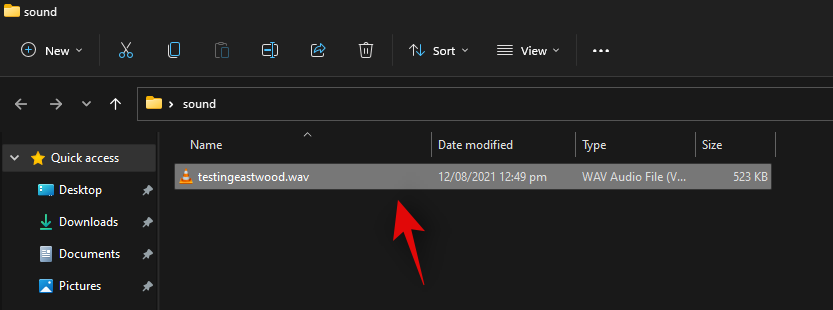
Now navigate to the following path given below. Paste your .wav file in this location. Click on ‘Continue’ when you will be prompted for administrator permission.
C:\Windows\media
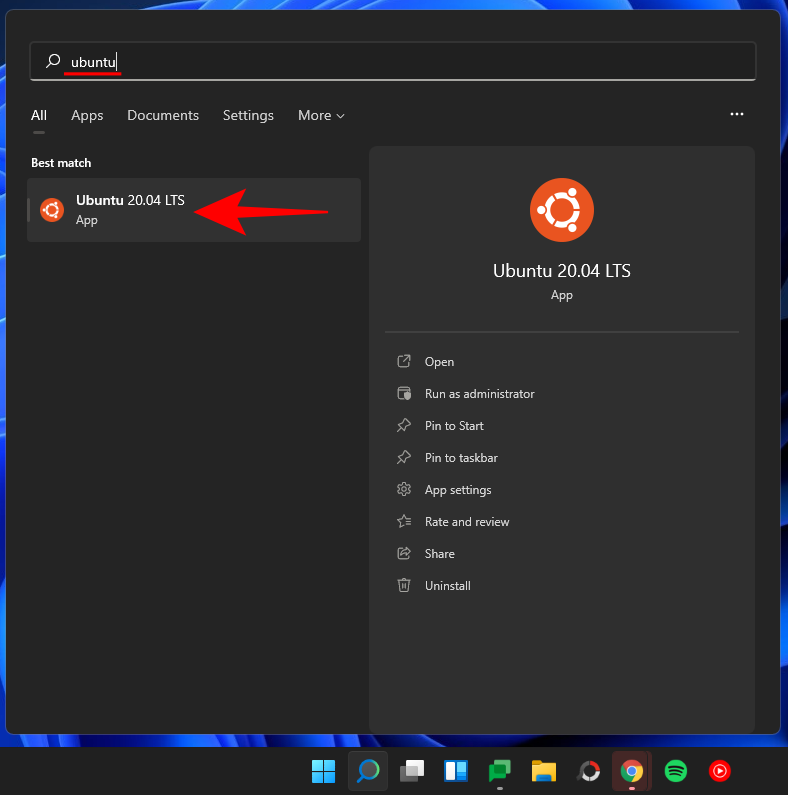
We can now use the .wav file as our default notification sound. Press Windows + i on your keyboard to open the Settings app and then click on ‘Sound’ on your right.
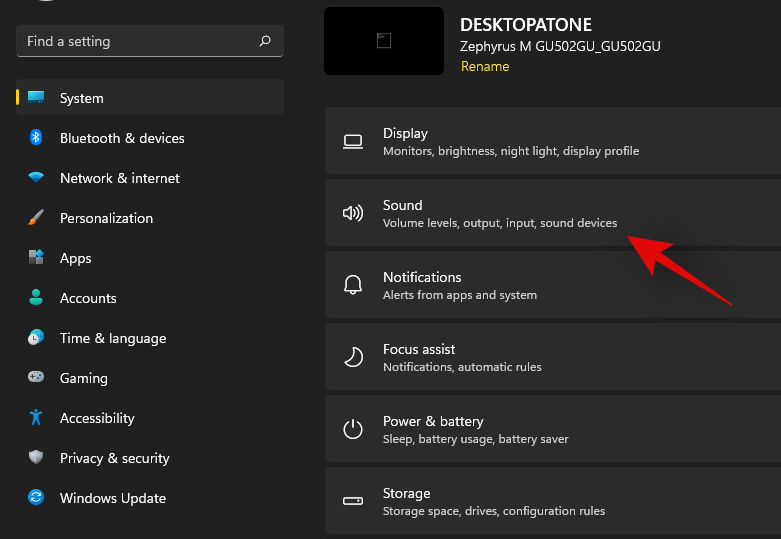
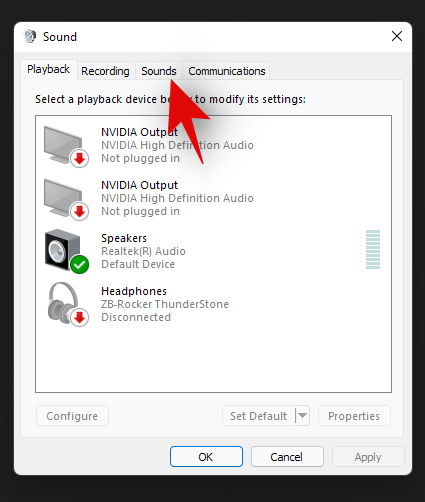
Scroll to the bottom and click on ‘More sound settings’.

Click and switch to the ‘Sounds’ tab at the top.
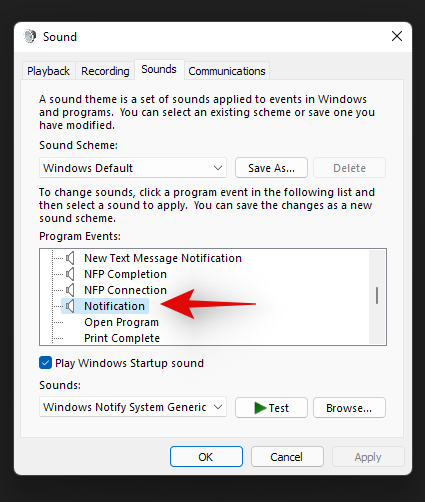
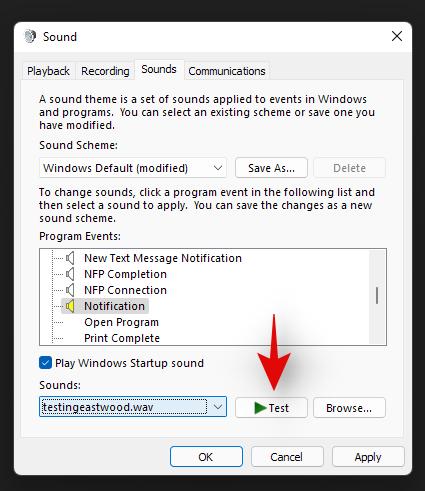
Under ‘Program Events’ scroll the list and find ‘Notifications’. Click on ‘Notifications’ to select it.
Now click on the drop-down arrow under Sounds and select the .wav file we pasted in the Media folder.
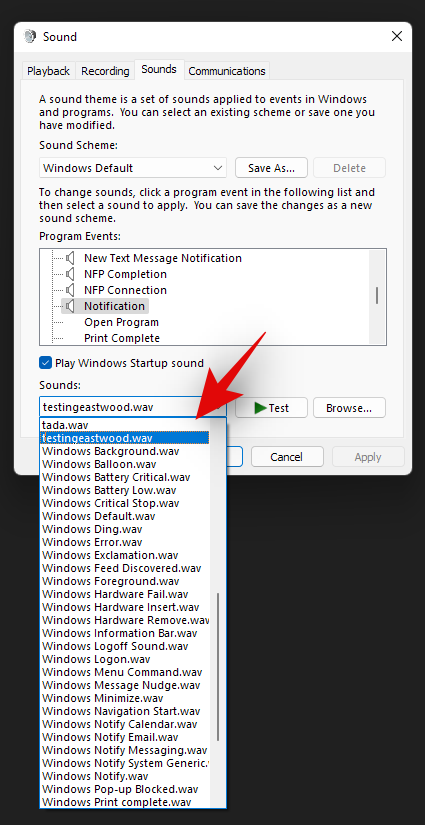
You can click on ‘Test’ to test your custom notification sound.
Click on ‘Ok’ to save your changes.
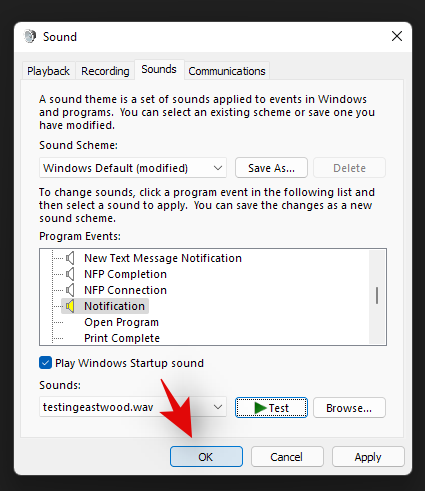
And that’s it! You will now have set a custom sound as your default notification sound in Windows 11.
Distractions from notifications are a huge problem especially when you are into some important work. Using the steps mentioned above, now, you can easily get rid of unnecessary notifications and work peacefully with full concentration.
Related:




![Kaip įvesti akcentus „Windows 11“ [6 būdai] Kaip įvesti akcentus „Windows 11“ [6 būdai]](https://blog.webtech360.com/resources8/images31/image-285-0105182715408.png)


