Trūksta naujos failų naršyklės „Windows 11“? Štai kaip tai gauti

Sužinokite, kaip išspręsti „Windows 11“ failų naršyklės problemas ir atnaujinti į modernią sąsają su mūsų naudingais patarimais.
„Windows“ užduočių juosta buvo visų dėmesio centre nuo tada, kai išleidus „Windows 11“, ji įgijo naują atnaujintą išvaizdą. Dabar galite centruoti užduočių juostą, mėgautis nauju veiksmų centru, pakeisti jos lygiavimą ir įdėti ją abiejose ekrano pusėse. Deja, šios funkcijos įdiegimas nebuvo sėkmingas, nes vis daugiau vartotojų keletą mėnesių stengiasi, kad užduočių juosta veiktų sistemoje „Windows 11“.
Nors „Microsoft“ pripažino problemą, išleido sprendimą ir šiuo metu dirba su pataisymu, atrodo, kad vartotojai vis tiek negali atkurti užduočių juostos. Jei esate toje pačioje valtyje, sudarėme visų galimų pataisymų sąrašą, kad užduočių juosta vėl veiktų ir vėl veiktų sistemoje „Windows 11“. Norėdami pradėti, vadovaukitės toliau pateiktu vadovu.
Turinys
Kodėl mano užduočių juosta nerodoma?
„Windows 11“ užduočių juosta turi naują išvaizdą, kuri atsirado dėl atnaujinto jos veikimo. Kad tinkamai veiktų, užduočių juosta dabar priklauso nuo kelių paslaugų ir paties meniu Pradėti. Atrodo, kad naujinimas iš „Windows 10“ į „Windows 11“ sujaukia užduočių juostą, atsižvelgiant į tai, kurią „Windows 10“ versiją įdiegėte savo sistemoje ir į kurią „Windows 11“ versiją atnaujinate.
Be to, pastarasis praėjusį mėnesį išleistas „Windows“ naujinimas, atrodo, taip pat sukelia šią problemą kai kuriems vartotojams, o kiti susiduria su tuo pačiu dėl nesutampančio sistemos laiko, nepaisant to, kad viskas nustatyta tinkamai. Yra daug būdų, kaip taisyti užduočių juostą, todėl rekomenduojame pradėti nuo toliau pateiktų pataisymų po vieną.
12 būdų, kaip išspręsti užduočių juostos problemas sistemoje „Windows 11“.
Norėdami pradėti taisyti užduočių juostą sistemoje „Windows 11“, naudokite toliau nurodytus metodus. Jei jau bandėte iš naujo paleisti sistemą, galite praleisti pirmąjį metodą.
1 pataisymas: paleiskite kompiuterį iš naujo
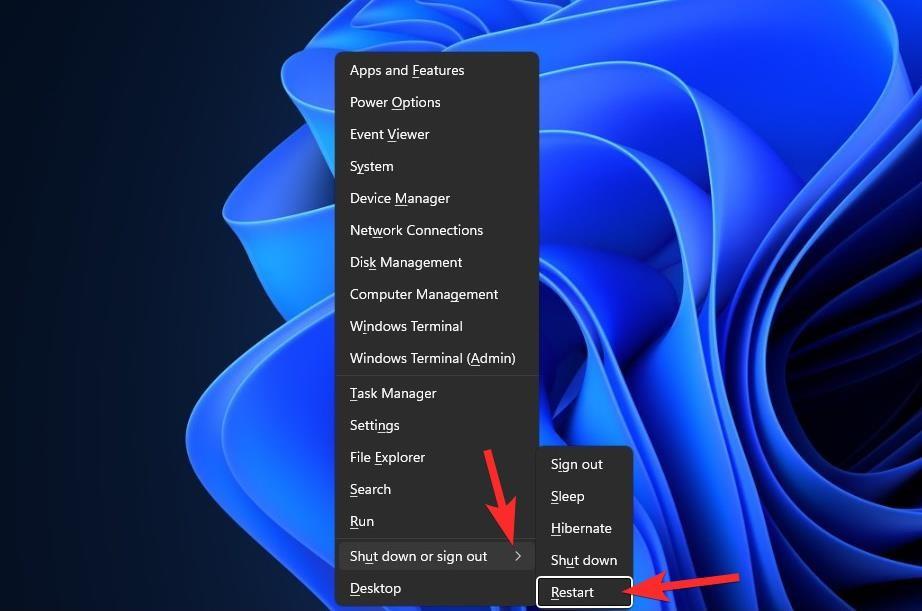
Prieš išbandydami ką nors įmantraus, pravartu išbandyti paprastesnes priemones, pvz., iš naujo paleisti kompiuterį arba „Windows Explorer“ (žr. toliau). Tai atlikus sistema bus iš naujo nustatyta, kad duomenys būtų įkeliami iš naujo ir, galbūt, išspręstos užduočių juostos ir meniu Pradėti problemos.
2 pataisymas: įsitikinkite, kad „Automatiškai slėpti užduočių juostą“ išjungta
Paspauskite Windows + iklaviatūrą ir kairėje pusėje spustelėkite „Personalizavimas“.
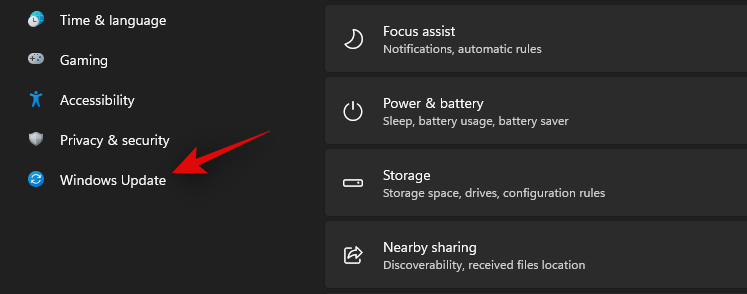
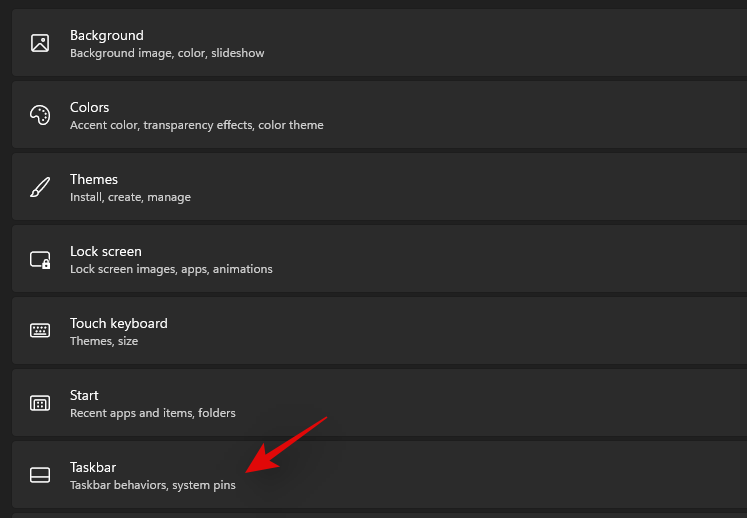
Spustelėkite „Užduočių juosta“.
Dabar spustelėkite „Užduočių juostos elgesys“.
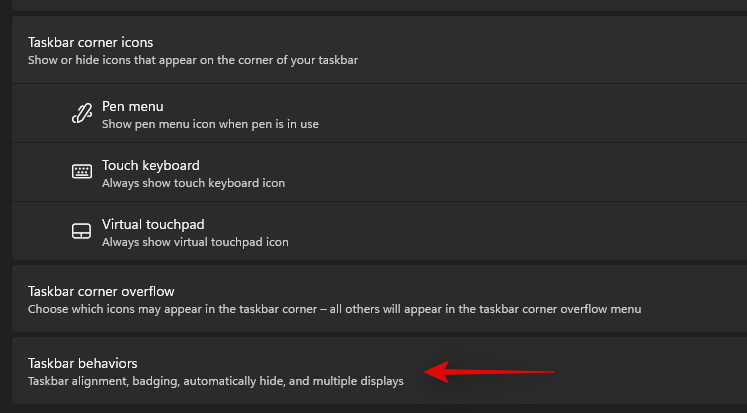
Atžymėkite laukelį „Automatiškai slėpti užduočių juostą“.

Dabar uždarykite programą „Nustatymai“ ir, jei jūsų užduočių juosta buvo automatiškai paslėpta, ji dabar turėtų būti išjungta jūsų sistemoje.
3 pataisymas: iš naujo paleiskite būtinas paslaugas
Kaip minėta anksčiau, „Windows 11“ atnaujino užduočių juostą, o tai dabar reiškia, kad ji priklauso nuo kelių paslaugų, kad tinkamai veiktų bet kurioje sistemoje. Paleiskite visas šias paslaugas iš naujo, kad įsitikintume, jog fono konfliktas netrukdo jūsų užduočių juostai tinkamai veikti jūsų sistemoje.
Paspauskite Ctrl + Shift + Escsavo sistemoje, kad paleistumėte užduočių tvarkyklę. Perjunkite į viršuje esantį skirtuką „Išsami informacija“.
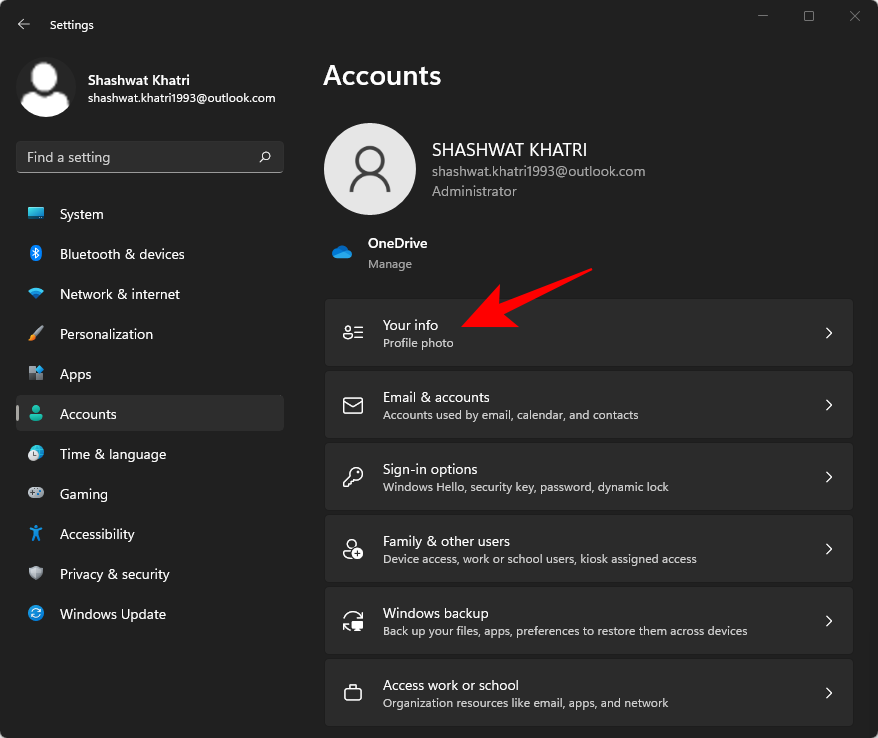
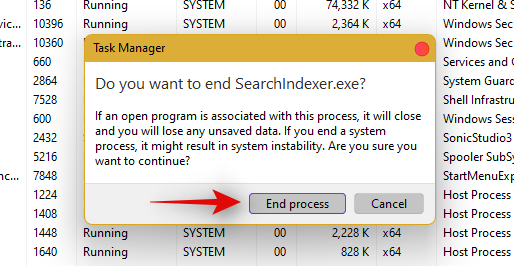
Dabar suraskite šias veikiančias paslaugas ir pasirinkite jas spustelėdami. Klaviatūroje paspauskite „Ištrinti“ ir patvirtinkite savo pasirinkimą pasirinkdami „Baigti procesą“.
Dabar iš naujo paleiskite „Windows Explorer“. Viršutiniame kairiajame kampe spustelėkite „Failas“ ir pasirinkite „Vykdyti naują užduotį“.
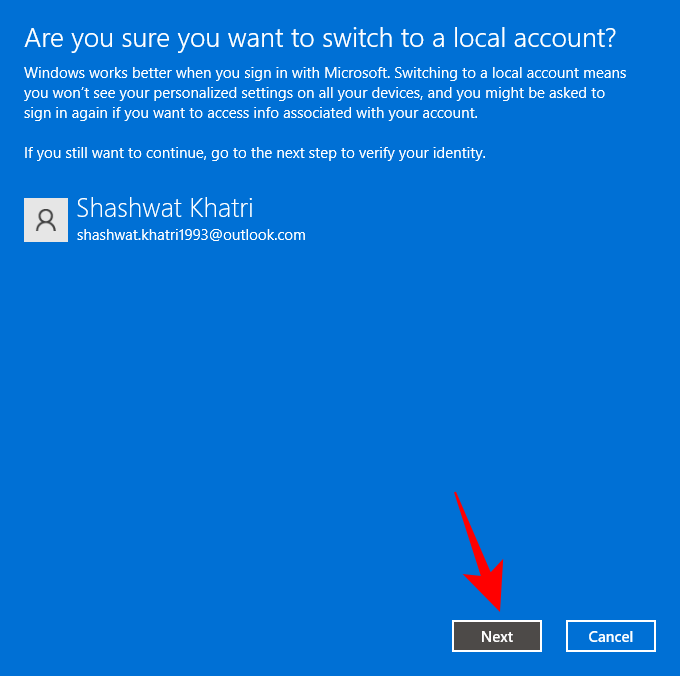
Įveskite „explorer.exe“ ir klaviatūroje paspauskite „Enter“. Jei reikia, taip pat galite spustelėti „Gerai“.
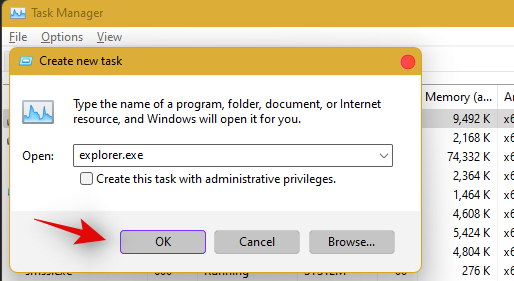
Kai naršyklė bus paleista iš naujo, tiesiog iš naujo paleiskite kompiuterį, kad iš naujo paleistumėte kitas sistemos paslaugas.
Užduočių juosta dabar turėtų būti atkurta, jei problemos priežastis buvo fono paslaugų konfliktas.
4 pataisymas: ištrinkite „IrisService“ iš registro ir paleiskite iš naujo
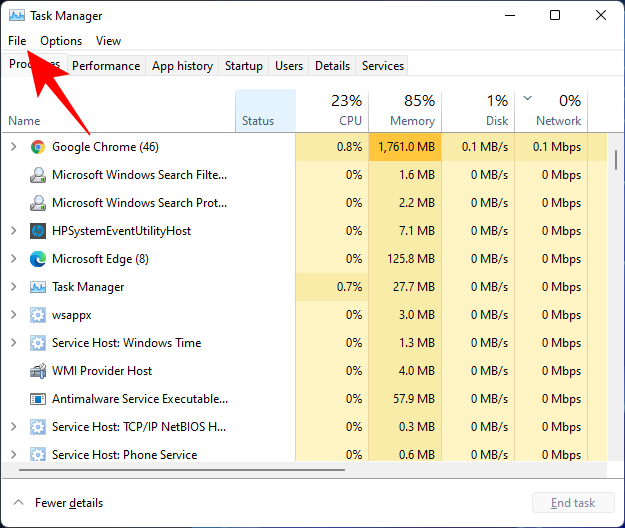
Paspauskite, Ctrl + Shift + Esckad atidarytumėte užduočių tvarkyklę. Tada spustelėkite Failas viršutiniame kairiajame kampe.
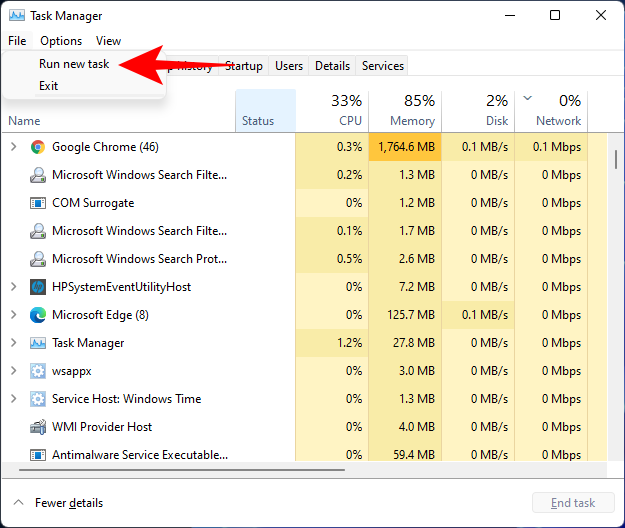
Pasirinkite Vykdyti naują užduotį .
Įveskite cmd ir paspauskite Enter.
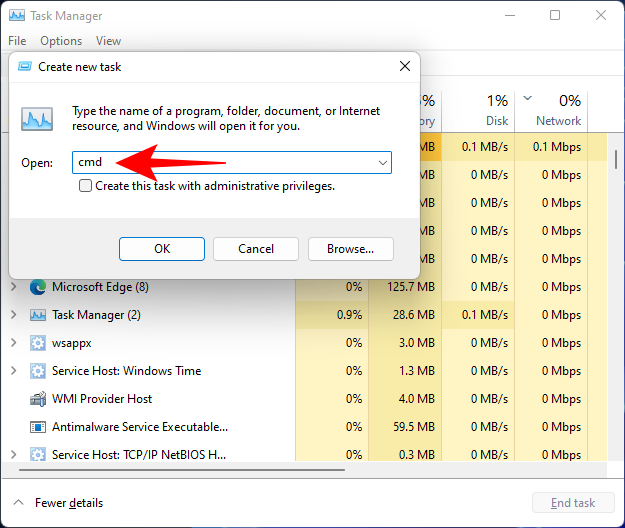
Tai atvers padidintą komandų eilutės egzempliorių. Dabar nukopijuokite šią komandą ir įklijuokite ją į komandų eilutę:
reg delete HKCU\SOFTWARE\Microsoft\Windows\CurrentVersion\IrisService /f && shutdown -r -t 0

Tada paspauskite Enter. Kai tik tai padarysite, jūsų kompiuteris bus paleistas iš naujo. Pradėjus kurti atsarginę kopiją, viskas, įskaitant užduočių juostą, turėtų grįžti į įprastas vėžes.
5 pataisymas: registre pridėkite atjungimo išjungimą
Paspauskite, Ctrl + Shift + Esckad atidarytumėte užduočių tvarkyklę. Tada spustelėkite Failas (viršutiniame kairiajame kampe) ir Vykdykite naują užduotį .
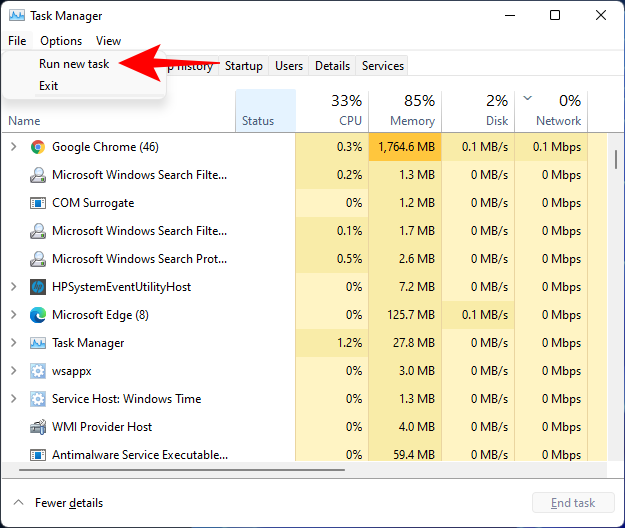
Įveskite regedit ir paspauskite Enter.
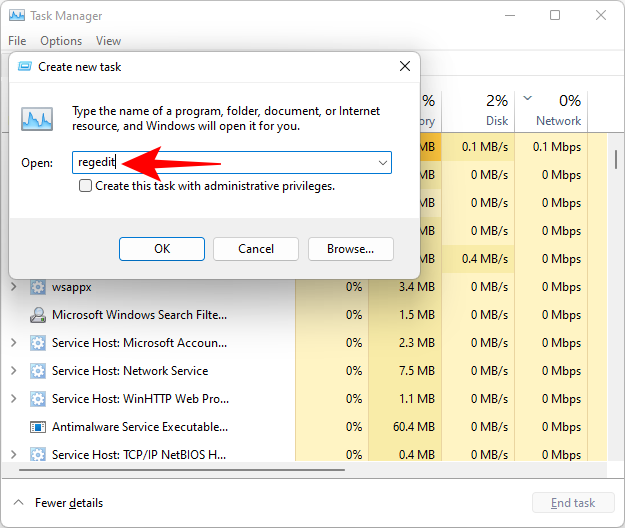
Tai atidarys registro rengyklę. Dabar eikite į šį adresą:
Computer\HKEY_LOCAL_MACHINE\SOFTWARE\Microsoft\Windows\CurrentVersion\Shell\Update\Packages
Arba tiesiog nukopijuokite aukščiau pateiktą tekstą ir įklijuokite jį į registro rengyklės adreso juostą, pavyzdžiui:

Kai paspausite Enter, būsite nukreipti į nurodytą klavišą. Dešinėje dešiniuoju pelės mygtuku spustelėkite tarpą ir pasirinkite Naujas > DWORD (32 bitų) reikšmė .
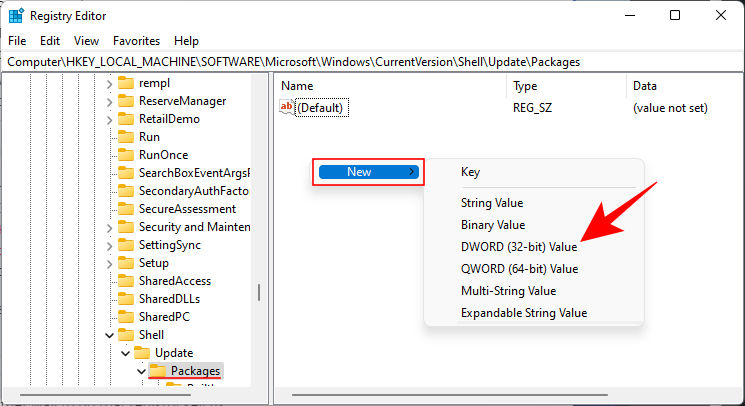
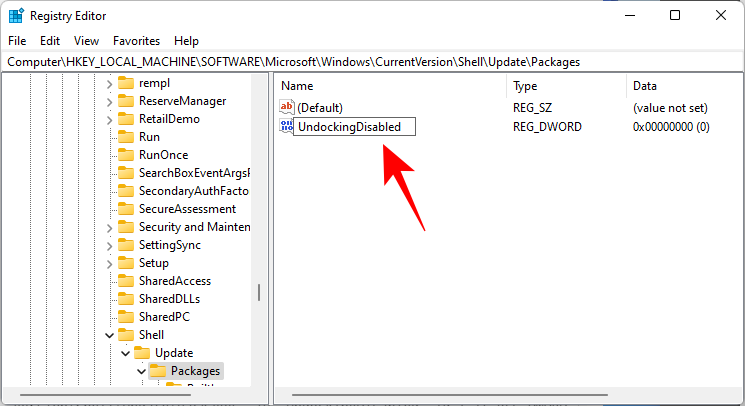
Pavadinkite šį naujai sukurtą DWORD UndockingDisabled .
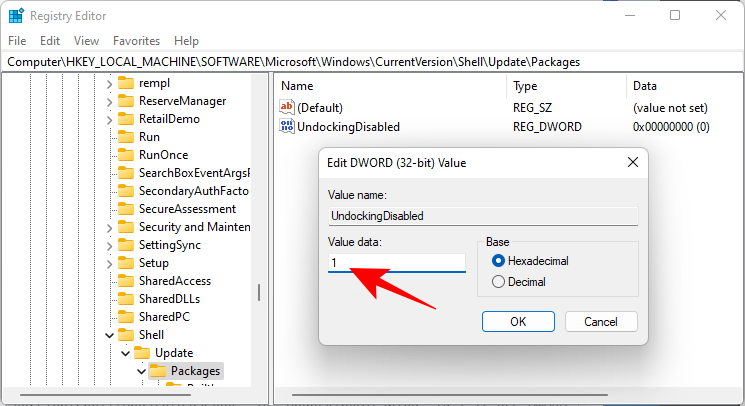
Tada dukart spustelėkite jį ir pakeiskite „Vertės duomenys“ į 1 . Tada spustelėkite Gerai .
Iš naujo paleiskite kompiuterį, kad pakeitimai įsigaliotų.
6 pataisymas: paleiskite SFC ir DISM komandas
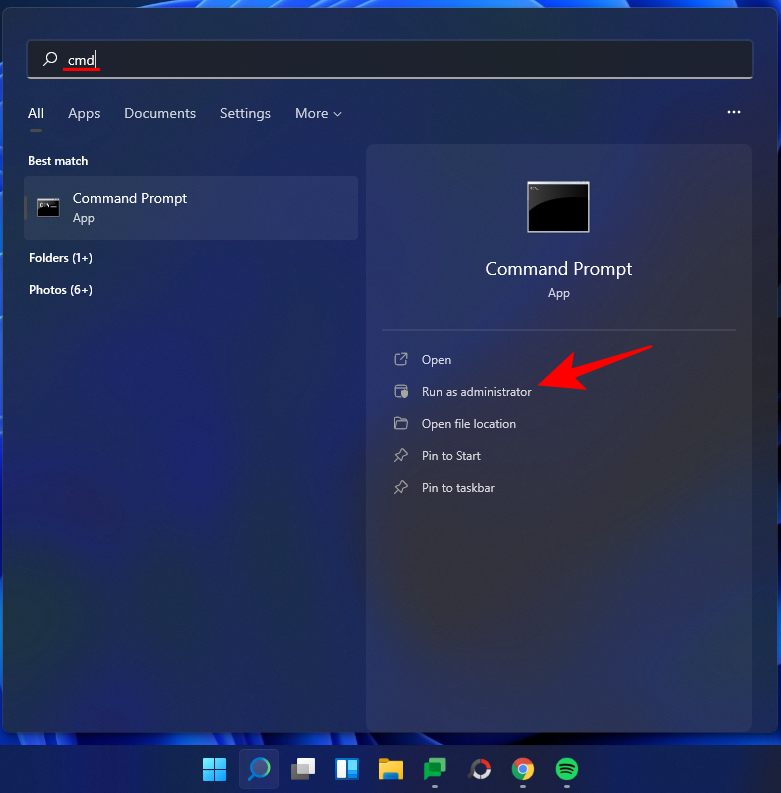
Paspauskite Pradėti, įveskite cmd ir spustelėkite Vykdyti kaip administratorių .
Dabar įveskite šią komandą:
sfc /scannow
Paspauskite ENTER. Palaukite, kol SFC baigs nuskaitymą ir išspręs visas rastas problemas.

Toliau paleiskite šią DISM komandą, skirtą Diegimo vaizdo aptarnavimo ir valdymo įrankiui:
dism /online /cleanup-image /scanhealth
Tada paspauskite Enter. Vėlgi, palaukite, kol nuskaitymas bus baigtas.

Dabar paleiskite šią DISM komandą:
dism /online /cleanup-image /restorehealth

Paspauskite ENTER. Palaukite, kol DISM atkurs sveikatą.

Galiausiai paleiskite komandą „chkdsk“, kad paleistumėte „Check Disk“ įrankį:
chkdsk c: /r
Paspauskite ENTER. Komandinė eilutė parodys pranešimą, kad „negali užrakinti dabartinio disko... nes tomą naudoja kitas procesas“, ir paprašys jūsų leidimo suplanuoti nuskaitymą prieš kitą paleidimą. Įveskite, Ykad atitiktų.

Ir paspauskite Enter. Dabar iš naujo paleiskite kompiuterį, leiskite „Check Disk“ įrankiui atlikti savo darbą ir patikrinkite, ar užduočių juosta vėl normaliai funkcionuoja.
7 pataisymas: iš naujo įdiekite UWP
Paspauskite Ctrl + Shift + Escklaviatūrą, kad paleistumėte užduočių tvarkyklę. Spustelėkite „Failas“ ir pasirinkite „Vykdyti naują užduotį“.
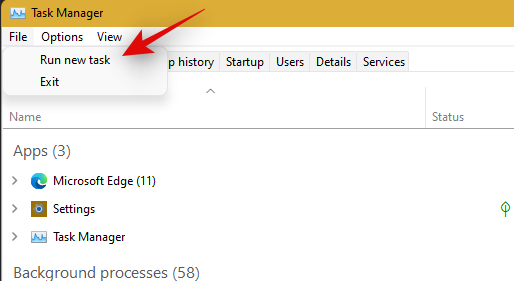
Įveskite „PowerShell“ ir paspauskite Ctrl + Shift + Enterklaviatūrą.
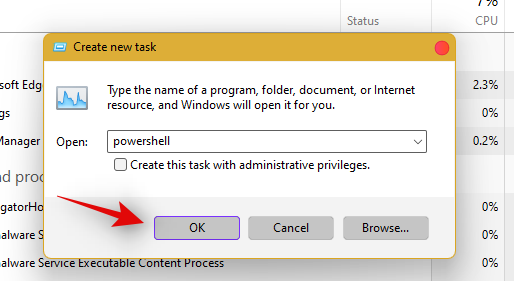
Dabar „PowerShell“ bus paleista kaip jūsų sistemos administratorius. Įveskite šią komandą:
Get-AppxPackage -AllUsers | Foreach {Add-AppxPackage -DisableDevelopmentMode -Register “$ ($ _. InstallLocation) \ AppXManifest.xml”}
Paspauskite ENTER. „PowerShell“ raudonai parodys einamąjį pranešimų sąrašą. Bet nesijaudink dėl to. Tiesiog palaukite, kol komanda baigs vykdyti.

8 pataisymas: patikrinkite UAC ir prireikus pridėkite redaguoti registrą
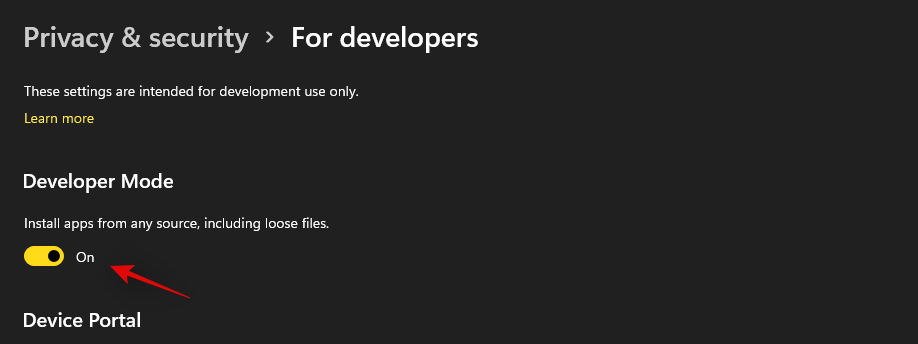
UAC yra būtinas visoms šiuolaikinėms programoms ir funkcijoms, įskaitant meniu Pradėti ir užduočių juostą. Pirmiausia turėtumėte įjungti UAC, jei jis išjungtas, ir iš naujo paleiskite sistemą. Jei užduočių juosta vis tiek neveikia, rekomenduojame pabandyti į savo registro rengyklę įtraukti Xaml Start meniu reikšmę.
Atrodo, kad pridėjus šią vertę iš naujo paleidžiamos ir iš naujo užregistruojamos užduočių juostos paslaugos, dėl kurių užduočių juosta vėl veikia daugelyje sistemų. Norėdami pradėti, vadovaukitės toliau pateiktu vadovu.
Patikrinkite ir įjunkite UAC, jei išjungta
Paspauskite Ctrl + Shift + Escklaviatūrą, kad paleistumėte užduočių tvarkyklę. Dabar viršutiniame kairiajame ekrano kampe spustelėkite „Failas“ ir pasirinkite „Vykdyti naują užduotį“.

Įveskite „cmd“ ir paspauskite Ctrl + Shift + Enterklaviatūrą.
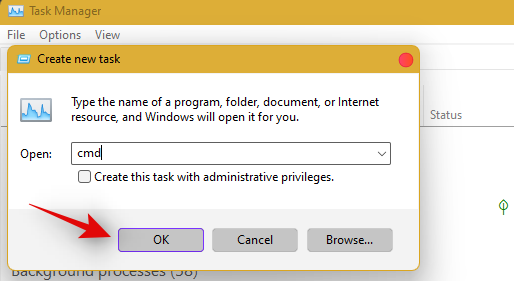
Dabar įveskite šią komandą ir paspauskite Enter, kad vykdytumėte komandą.
C:\Windows\System32\cmd.exe /k %windir%\System32\reg.exe ADD HKLM\SOFTWARE\Microsoft\Windows\CurrentVersion\Policies\System /v EnableLUA /t REG_DWORD /d 0 /f
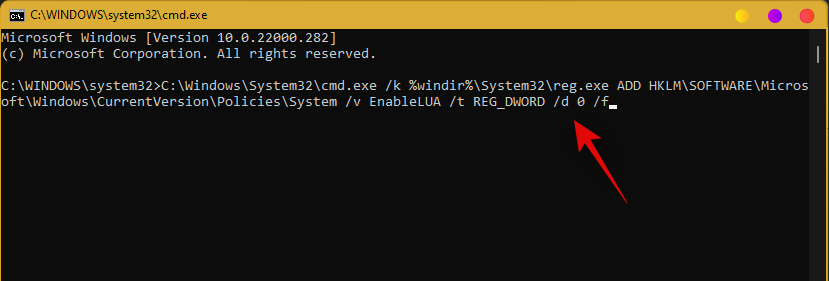
UAC dabar bus įjungta jūsų sistemoje. Iš naujo paleiskite kompiuterį, kad pakeitimai įsigaliotų jūsų sistemoje. Paleidus iš naujo, užduočių juosta turėtų veikti jūsų sistemoje, jei UAC buvo problema. Jei ne, naudokite toliau pateiktą vadovą, kad suaktyvintumėte užduočių juostos funkcijas savo sistemoje.
Pridėti registro vertę
Paspauskite, Ctrl + Shift + Esckad paleistumėte užduočių tvarkyklę. Dabar viršutiniame kairiajame kampe spustelėkite „Failas“ ir pasirinkite „Vykdyti naują užduotį“.

Įveskite „cmd“ ir paspauskite Ctrl + Shift + Enterklaviatūrą.

Dabar įveskite šią komandą ir klaviatūroje paspauskite Enter.
REG ADD "HKCU\Software\Microsoft\Windows\CurrentVersion\Explorer\Advanced" /V EnableXamlStartMenu /T REG_DWORD /D 1 /F
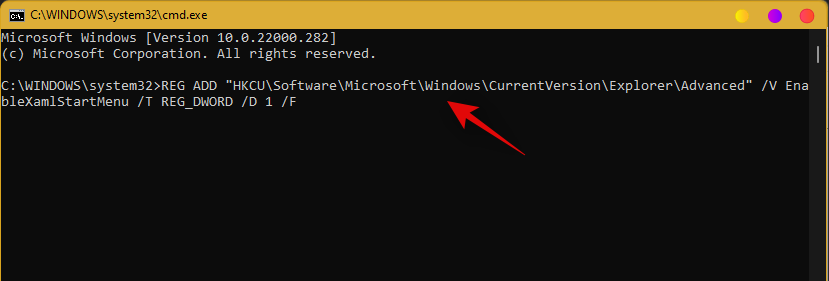
Dabar grįžkite į užduočių tvarkyklę, sąraše raskite „Windows Explorer“ ir spustelėkite ją dešiniuoju pelės mygtuku. Pasirinkite Paleisti iš naujo, kad paleistumėte explorer.exe iš naujo.
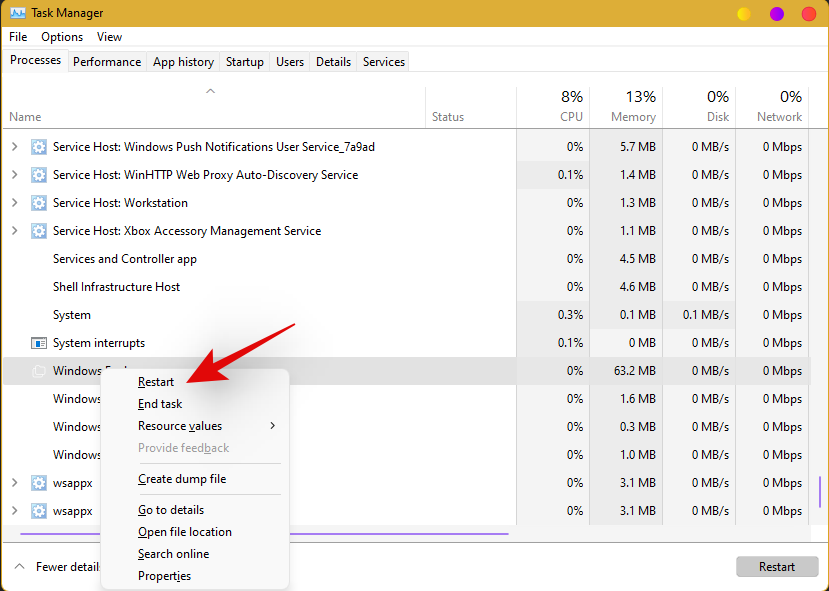
Paleidę iš naujo, pabandykite pasiekti užduočių juostą. Užduočių juosta dabar turėtų būti pasiekiama jūsų sistemoje.
9 pataisymas: redaguokite datą ir laiką, kad pataisytumėte užduočių juostą
Atrodo, kad datos ir laiko nustatymai yra pagrindinė „Windows 11“ užduočių juostos problemų priežastis. Naudokite toliau pateiktą vadovą, kad išbandytumėte toliau pateiktas laiko pataisas, kad sužinotumėte, kuris iš jų jums labiausiai tinka.
Įsitikinkite, kad jūsų laikas tinkamai sinchronizuojamas su laiko serveriu
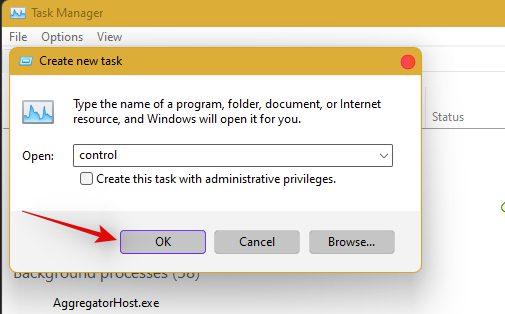
Paspauskite Ctrl + Shift + Escklaviatūrą ir spustelėkite „Failas“. Pasirinkite „Vykdyti naują užduotį“.

Įveskite „Control“ ir klaviatūroje paspauskite Enter.
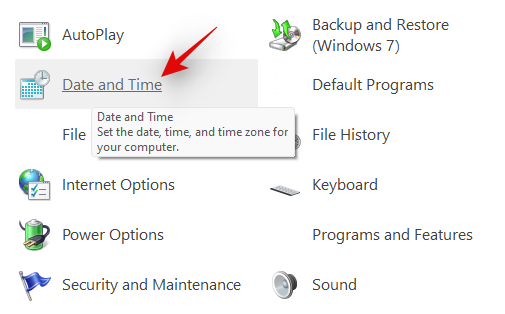
Spustelėkite „Data ir laikas“.
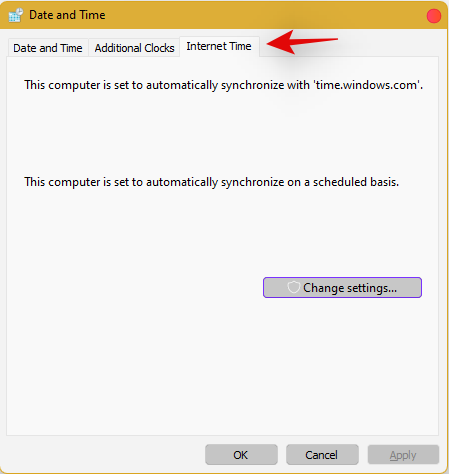
Viršuje pasirinkite „Interneto laikas“.
Spustelėkite „Keisti nustatymus“.
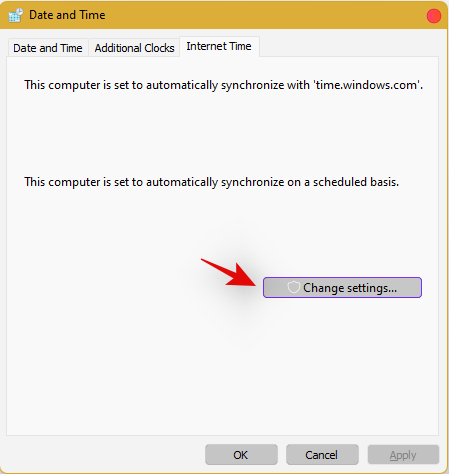
Atžymėkite laukelį „Sinchronizuoti su interneto laiko serveriu“.
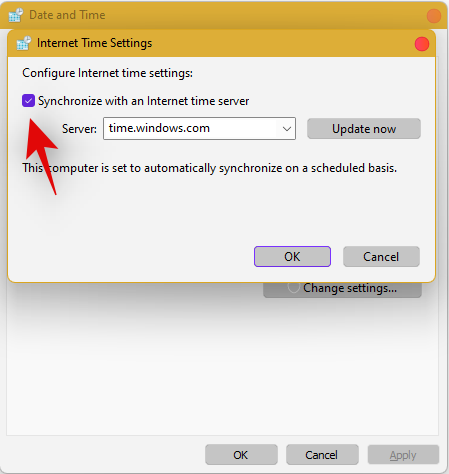
Baigę spustelėkite „Gerai“.
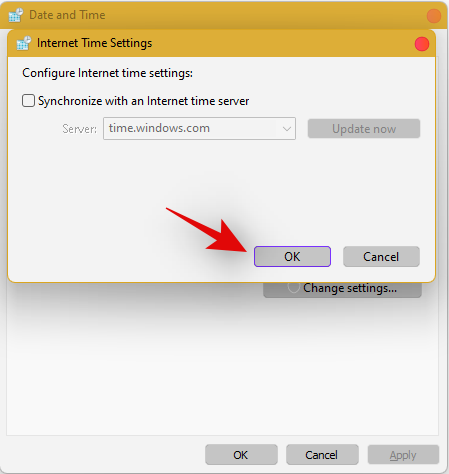
Šiuo metu iš naujo paleiskite kompiuterį ir patikrinkite užduočių juostą. Jei jis vis dar išjungtas, nesijaudinkite, atlikite aukščiau nurodytus veiksmus ir vėl įjunkite sinchronizavimą su interneto laiko serveriu.
Įjungę, paspauskite Ctrl + Shift + Escklaviatūrą ir ekrano sąraše raskite „Windows Explorer“. Dešiniuoju pelės mygtuku spustelėkite sąrašą ir pasirinkite „Paleisti iš naujo“.

Kai naršyklė paleis iš naujo, pabandykite naudoti užduočių juostą. Jei sinchronizavimas buvo jūsų problema, dabar ji turėtų būti išspręsta jūsų sistemoje. Jei ne, tęskite kitus toliau nurodytus laiko pataisymus.
Pakeiskite datą į 1 dieną į priekį
Atidarykite užduočių tvarkyklę Ctrl + Shift + Escvienu metu paspausdami . Tada spustelėkite Failas .
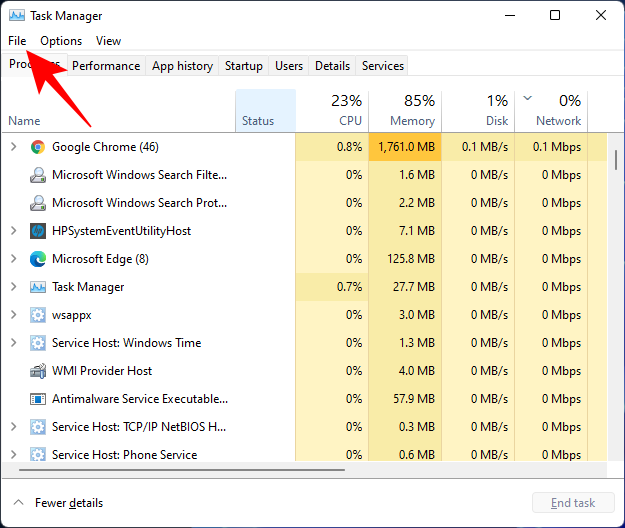
Spustelėkite Vykdyti naują užduotį .
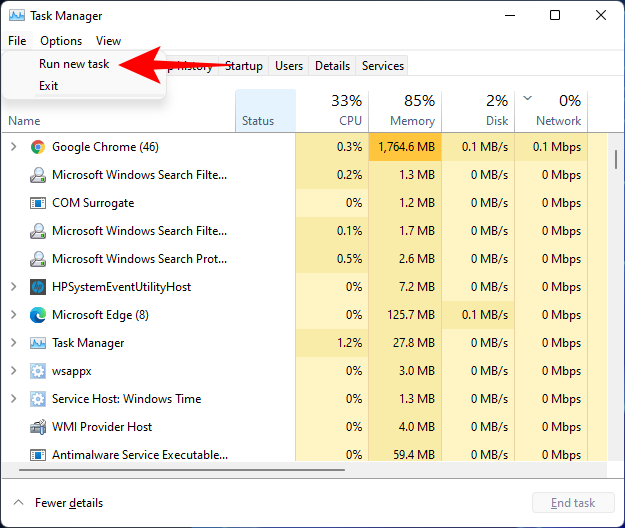
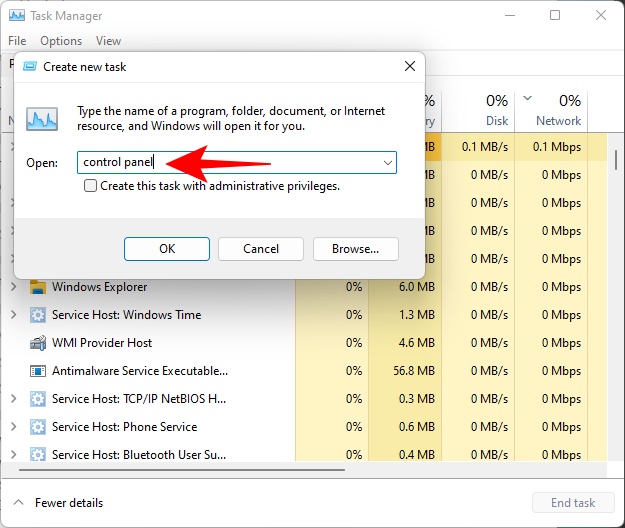
Įveskite valdymo skydelį ir paspauskite Enter.
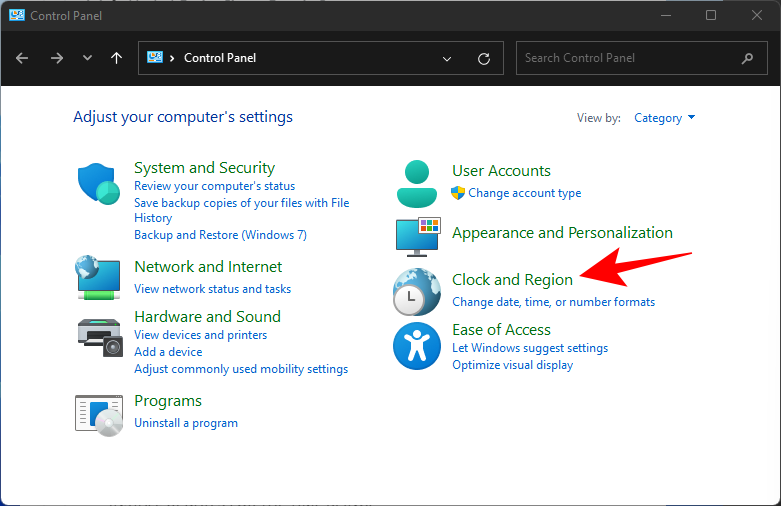
Dabar spustelėkite Laikrodis ir regionas .
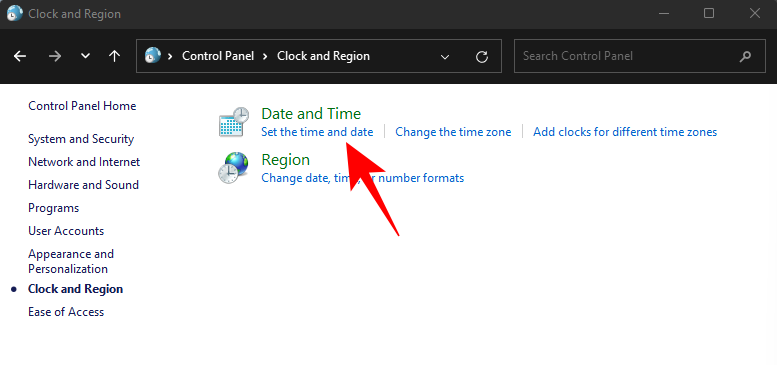
Skiltyje „Data ir laikas“ spustelėkite Nustatyti laiką ir datą .
Spustelėkite skirtuką Interneto laikas, kad į jį perjungtumėte.
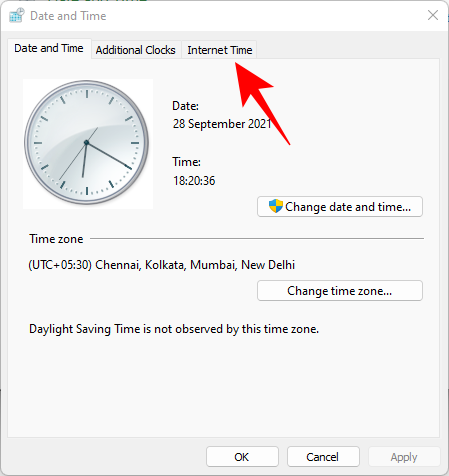
Click on Change settings…
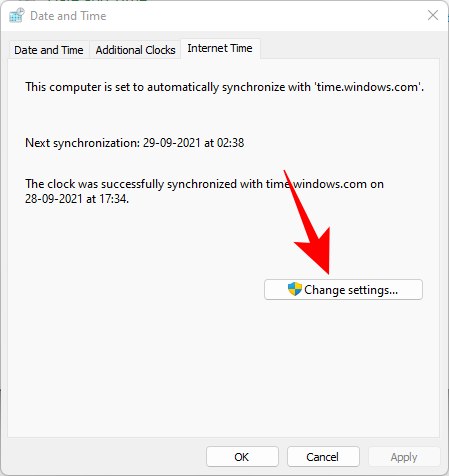
Uncheck Synchronize with an Internet time server, then click OK.
Now click on the Date and Time tab to switch back to it.
Here, click on Change date and time…
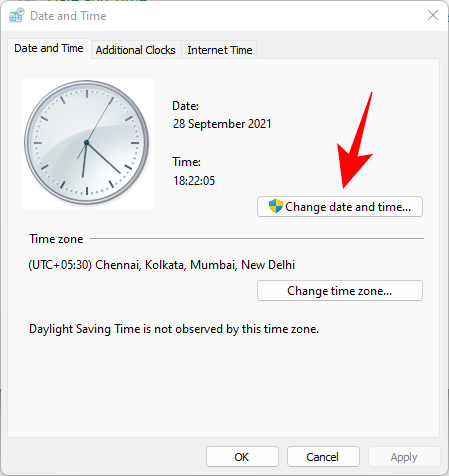
Now change the date and time to reflect tomorrow. As of writing this post, it is the 1st November so we will be changing the date to 2nd November.
Change Dates to last cumulative updates
If you are still unable to get the Taskbar working then you will have to jump through a few hoops to change your date and time multiple times and get the taskbar working on your system. Follow the guide below to get you started.
Press Ctrl + Shift + Esc on your keyboard, click on ‘File’ and select ‘Run new task’.

Type in ‘Control’ and press Enter on your keyboard.

Select ‘Date and Time’.

Switch to ‘Internet time’.

Click on ‘Change Settings’.

Uncheck the box for ‘Synchronize with an Internet Time Server’.

Click on ‘Ok’.

Switch back to ‘Date and Time’. Click on ‘Change Date and Time’ and select your date as 2nd September.
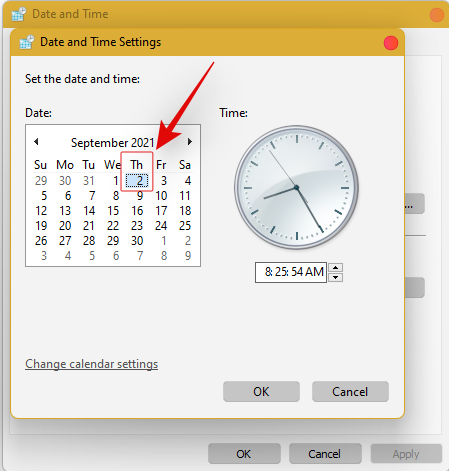
Close all windows and restart your system. Once restarted, open the ‘Date and Time’ dialog box again and change your date to 7th October this time.
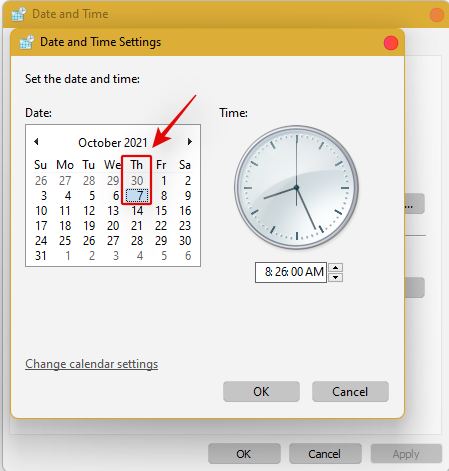
Restart your system again and Taskbar should now be back up and running on your system again. You can now enable synchronization for time again using the steps above on your system.
If synchronizing time does not work, move a month ahead to restore Taskbar
If you are still unable to get Taskbar up and running on your system again you can try the last date change fix. We recommend you use the steps above to change your date and time to a month ahead of your current date. Once changed, restart your system, and the taskbar should be up and running on your system now.
The downside of this fix is that if you revert to your normal date, Taskbar will stop working on your system. Having a mismatched date can cause issues with background syncs for various applications and cause some websites to malfunction. You will also have issues installing and getting the latest Windows Updates, so you will need to check all of these manually when updating in the future.
Fix #10: Uninstall the latest cumulative Windows Update ie: KB5006050
The cumulative update released in September for Windows 11 seems to also cause issues with the taskbar on some desktops and laptops. Use the guide below to uninstall the necessary update from your system.
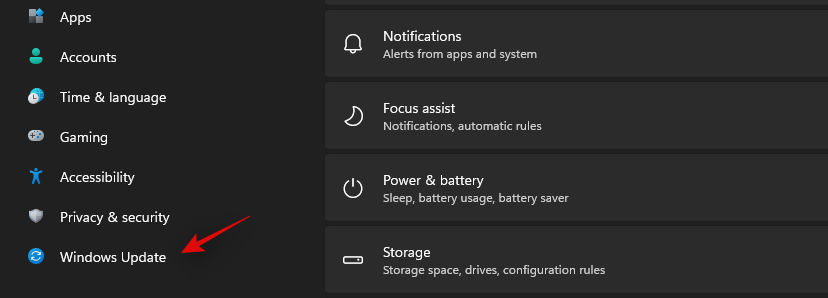
Press Windows + i and select Windows Update from the left.
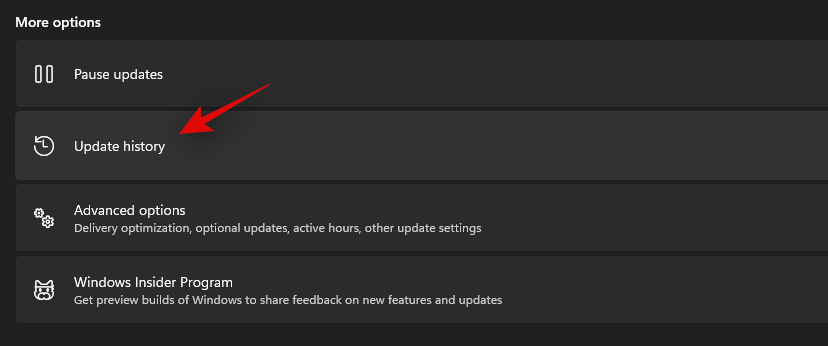
Click on ‘Update history’.
Now select ‘Uninstall updates’.
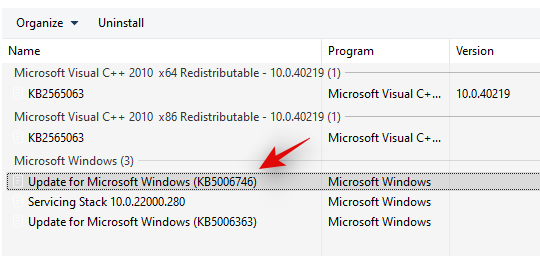
Click and select Windows Cumulative update KB5006050 from the list.
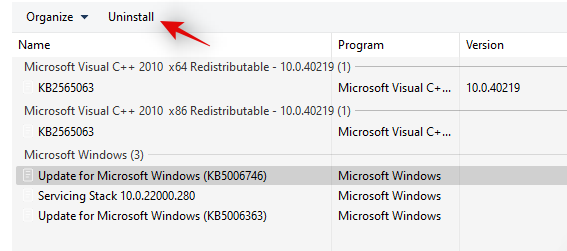
Now click on ‘Uninstall’ at the top and confirm your choice to uninstall the selected update.
Restart your system and taskbar functionality should now be restored on your system.
Fix #11: Restore PC to a previous restore point
If you had the taskbar working at a previous point in time then we recommend you restore your PC to a previously available restore point on your system. Follow the guide below to get you started.
Press Ctrl + Shift + Esc on your keyboard and click on ‘File’. Select ‘Run new task’ once you are done.

Type in CMD and press Ctrl + Shift + Enter on your keyboard.

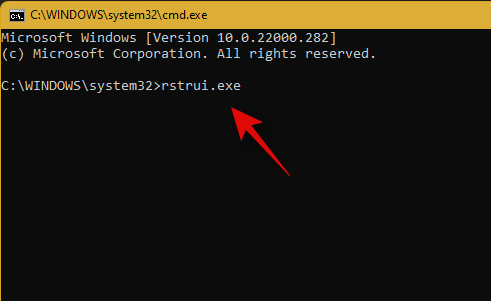
Now type in ‘rstrui.exe’ and press Enter on your keyboard.
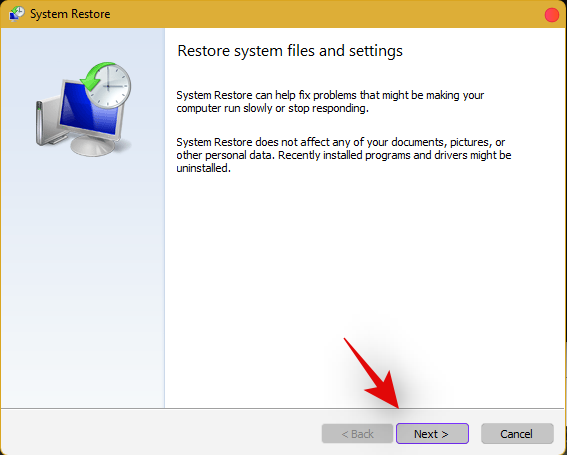
The system restore utility will now launch on your system. Click on ‘Next’.
Select the desired restore point from the list on your screen. Click on ‘Next’ once you are done.
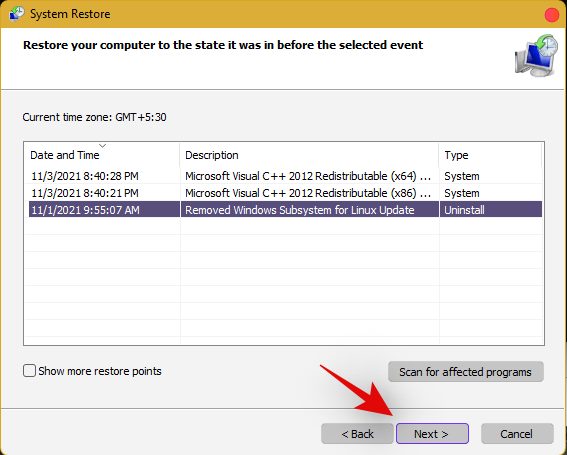
Tip: Click on ‘Scan for affected programs’ to view a list of installed programs that will be removed from your system during the restore process.
Click on ‘Finish’ once the restore finishes and restart your system.
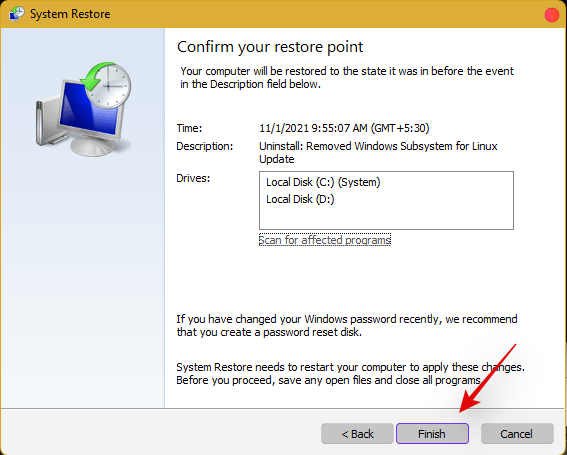
The taskbar should now be back up and running on your system again.
Fix #12: Last Resort: Create a new local admin account and transfer all your data
If by this point Taskbar still fails to work for you then it’s time for some drastic measures. You can create a new local admin account, check if Taskbar is working there, and then transfer all your data to the new account. This will be a tedious process but it is the next best way to get the taskbar working on your system without resetting your PC. Follow the guide below to get you started.
Create a new local admin account
Herre’s how you can create a new local admin account on your system.
Note: Most users facing the taskbar issue are unable to access the Settings app as well. Hence we will be using CMD to add a new local admin account to your PC. However, if the Settings app is available to you then you can use the same to add a new account as well.
Press Ctrl + Shift + Esc on your keyboard, click on ‘File’ and select ‘Run new task’.

Type in ‘cmd’ and press Ctrl + Shift + Enter on your keyboard.

CMD will now be launched as an administrator. Use the command below to add a new local admin account. Replace NAME with the Username of your choice for the new account. You can add a password later once you have confirmed that the taskbar is available in the new account.
net user /add NAME 
Once you have added the new user, use the command below to convert it to an administrator account on your PC. As usual, replace NAME with the Username for the new account you created earlier.
net localgroup Administrators NAME /add

Now type in the following to log out of your current account.
logoff

Once logged out, click on the newly added account to log in to the same. Once logged in, check if the taskbar is available in the new account. If it is, you can use the next section to transfer all your data. However, if the taskbar is still missing then you have no choice but to perform a fresh install of Windows 11 on your PC from a removable USB media drive.
Transfer all your data
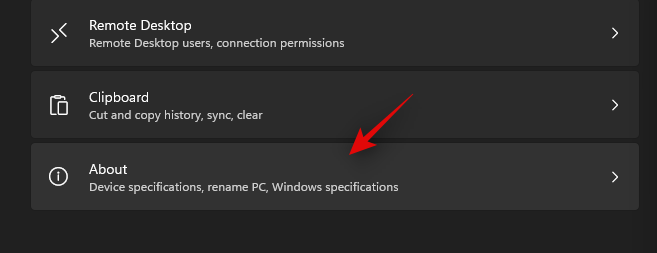
Press Windows + i on your keyboard and click on ‘About’ on your right.
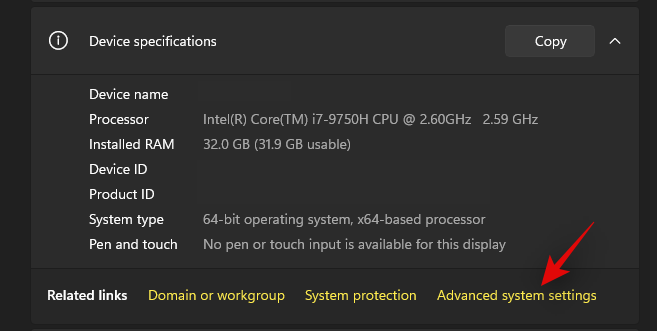
Click on ‘Advanced system settings’.
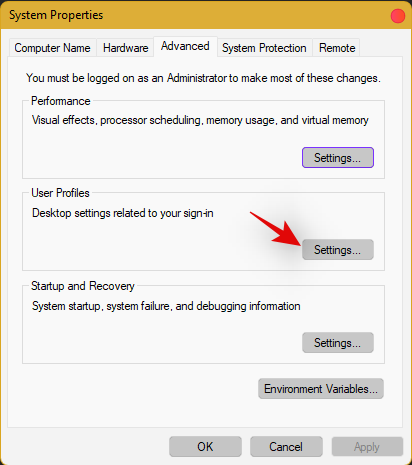
Click on ‘Settings’ under ‘User Profiles’.
Select your original profile by clicking on it and selecting ‘Copy To’.
Now enter the following path under ‘Copy profile to’. Rename NAME to the username of your previous profile from where you wish to copy all your data.
C:\Users\NAME
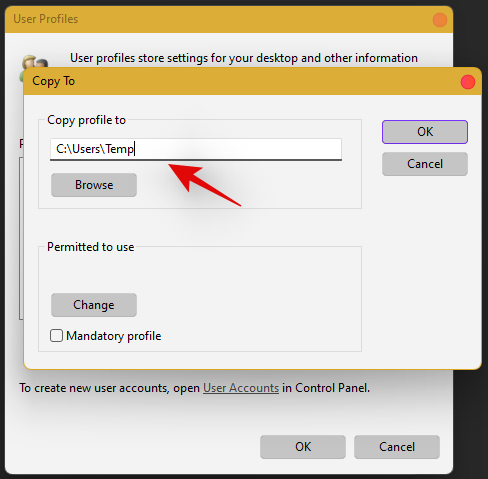
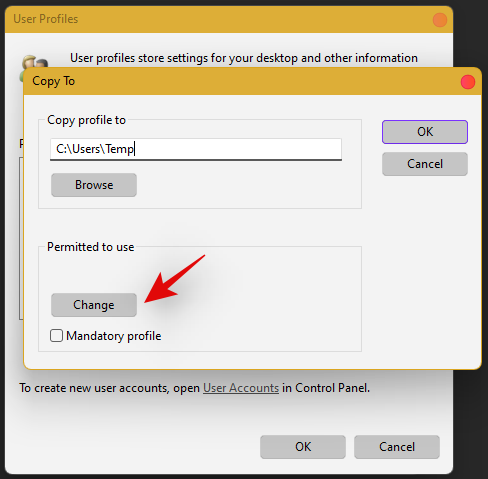
Click on ‘Change’.
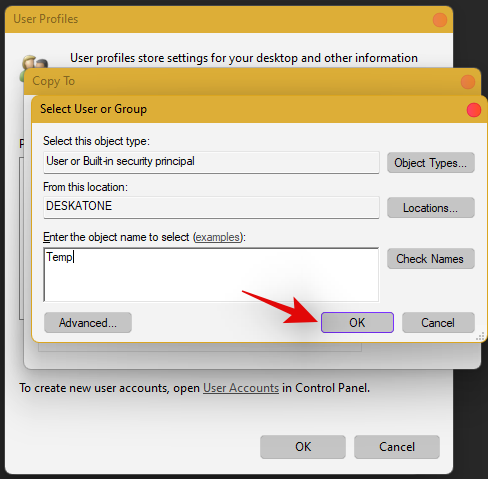
Enter the name for your new user profile and press Enter on your keyboard.
Click on ‘Ok’ once you are done.
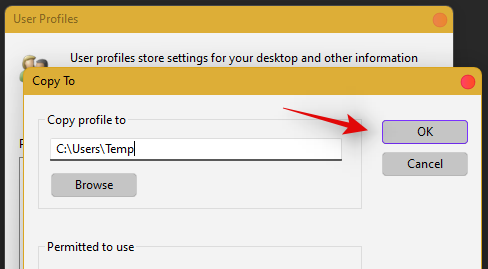
All your data will now be copied over to the new profile where the taskbar is functional on your PC. You can now delete your previous user account and set a password for your new account as well.
Frequently Asked Questions (FAQs):
With so many fixes, you are bound to have a few questions on your mind. Here are some commonly asked ones that should help you get up to speed.
How do I access Windows apps and Settings without a taskbar?
You can use the Task Manager to launch almost any program or Settings page on your system. To launch the desired program, launch the Taskbar > File > Run new task and enter the path to the program you wish to launch. Press Enter if you wish to launch the program normally or press Ctrl + Shift + Enter if you wish to launch the program with administrator privileges.
Is it safe to edit the Registry?
Registry edits are never safe as they have the potential to break your system. Fixes from trusted sources can help you avoid such issues but a good rule of thumb is to always back up your registry before making any edits. This way you can easily restore your Registry values in case some get messed up when editing the Registry.
When will Microsoft fix this issue?
Sadly, Microsoft is yet to release a proper fix for this issue. The company has tried to release a fix in the past cumulative updates to Windows 11 but they have been a hit and miss. We expect Microsoft to completely fix this issue in the upcoming feature update to Windows 11 when the OS gets the ability to run Android apps officially.
Can I update my Windows 11 after fixing the taskbar?
This will depend on the fix that you’re currently using. If you are using a date fix then you won’t be able to install updates until you restore to the current time. This will, however, cause the taskbar to be disabled again and the changes will be carried over after you update your PC. However, if you are using any other fix then you can easily update Windows.
For users with the date fix, you should try updating with the modified time first. If the update gets stuck on ‘Installing 0%’ or ‘Downloading 100%’ then change your date and time to the current date and time and update your PC. Ensure that you do not restart explorer or your PC during this process to keep the current instance of the taskbar alive on your system during the update process. This should help fix the issue for you once Microsoft officially releases an update to fix the issue.
We hope you were able to easily get the taskbar back up and running on your system using the guide above. If you face any more issues, feel free to reach out to us using the comments section below.
Related:
Sužinokite, kaip išspręsti „Windows 11“ failų naršyklės problemas ir atnaujinti į modernią sąsają su mūsų naudingais patarimais.
Jei „Windows Search“ naudoja ypač didelius procesoriaus arba disko išteklius, „Windows 11“ galite naudoti šiuos trikčių šalinimo metodus. Problemos sprendimo būdai apima paprastesnius metodus...
2021 m. vasario 20 d.: „Google“ dabar užblokavo visus „Meet“ plėtinius, kurie padėjo sukurti tinklelio vaizdą, įskaitant toliau nurodytus. Šie plėtiniai nebeveikia ir atrodo, kad vienintelė alternatyva yra…
Vienas ekranas, kurio „Windows“ vartotojai baiminasi, yra mėlynasis mirties ekranas. BSOD gyvuoja jau dešimtmečius, bėgant metams keitėsi labai mažai, tačiau vis dar pakankamai galingas, kad galėtų...
Dėl gilios integracijos su Microsoft Office 365 Microsoft Teams tapo įprastu vaizdo skambučių sprendimu milijonams žmonių visame pasaulyje. Nepaisant to, kad nesate labiausiai vartotojas…
„Microsoft Teams“ yra išsamus įrankis, kuris pastaruoju metu buvo gana populiarus dėl komandos bendradarbiavimo funkcijų. Paslauga leidžia sukurti konkrečias komandas jūsų organizacijai, pakviesti di…
2021 m. spalio 12 d.: didelis atnaujinimas! Atminkite, kad jums nebereikia keisti failo appraiserres.dll, kad galėtumėte apeiti TPM patikrinimą ir ištaisyti diegimo klaidą diegiant „Windows 11“.…
Praėjo keli mėnesiai nuo „Windows 11“ išleidimo ir nuo to laiko vartotojai pereina prie naujos OS. Kadangi vis daugiau vartotojų išbando naujas „Windows 11“ problemas, klaidos ir nustatymai yra diske…
„Windows 11“ dabar buvo išleista visuomenei po to, kai ji buvo prieštaringai nutekėjusi šių metų birželį. Nuo to laiko OS įvyko daug pakeitimų, tarp kurių buvo labai sveikintini šalti…
„Windows“ užduočių juosta buvo visų dėmesio centre nuo tada, kai išleidus „Windows 11“, ji įgijo naują atnaujintą išvaizdą. Dabar galite sutelkti užduočių juostą, mėgautis nauju veiksmų centru, pakeisti...
„Windows 11“ bus pristatyta viešai po kelių mėnesių, ir visi labai norėjo įsisavinti naująją OS. Jame yra naujas pradžios meniu, galimybė įdiegti „Android“ programas savaime ir…
„Microsoft Teams“ yra puiki komunikacijos priemonė visų platformų naudotojams, tačiau baigus ja naudotis programa pradeda erzinti. Jei nenaudojate Te…
Bet kuri internete pasiekiama paslauga turi savo problemų, o „Microsoft Teams“ nėra išimtis. Bendradarbiavimo įrankis pastebimai išaugo vartotojų bazėje COVID-19 pandemoje…
Kai pasauliui buvo atskleista „Windows 11“, „Snap Layouts“ buvo pirmasis dalykas, kuris patraukė visų dėmesį. Jie buvo novatoriški, nauji ir iš tikrųjų naudingi dirbant su Windows sistema...
„Windows 11“ ką tik buvo išleista visuomenei ir atrodo, kad ji pritraukia daug naujų vartotojų. Daugelis vartotojų peršoko į laivą ir atnaujino į Windows 11, o kiti nori pasinaudoti…
„Google Meet“ tapo viena iš labiausiai aptarinėjamų nuotolinio bendradarbiavimo platformų, kurios šiuo metu yra rinkoje. Jis siūlo daugybę nuostabių funkcijų ir pasižymi patikimumu…
Kadangi „Zoom“ perėmė didžiąją dalį mūsų darbo ir netgi socialinio gyvenimo, pradėjome juo pasikliauti gana daug. „Zoom“ leidžia vartotojams susikurti savo virtualias susitikimų patalpas ir kalbėtis…
„Windows 11“ neseniai buvo nutekinta į viešumą ir visi visame pasaulyje suskubo įdiegti naują OS virtualioje mašinoje naudodami įrankius liike VirtualBox. „Windows 11“ ateina…
Tie, kurie pakankamai nekantrauja įsisavinti „Windows 11 Dev“ versiją naudodami „Insider“ programą, pamažu pradėjo suprasti, kodėl dauguma vartotojų linkę laukti, kol bus išleistas stabilus leidimas. Būdami pirmieji…
Nuo pandemijos pradžios „Zoom“ buvo „goto“ vaizdo konferencijų paslauga, skirta visiems. Tai leidžia iki 500 vartotojų vienu metu dalyvauti vaizdo pokalbiuose, o paslauga netgi siūlo nemokamą...
Atraskite paprastus, nuoseklius metodus, kaip patikrinti „Windows 11“ versiją ir komponavimo numerį. Gaukite naujausias funkcijas ir užtikrinkite, kad jūsų sistema būtų optimizuota maksimaliam našumui.
Sunku išspręsti šrifto paryškinimo ir kursyvo problemas? Atraskite patikrintus, nuoseklius sprendimus, skirtus „Word“, „Google“ dokumentams, CSS ir kt. Atkurkite teksto formatavimą jau šiandien!
Kyla problemų dėl spausdintuvo neprisijungus rodomos klaidos 709 sistemoje „Windows 11“? Atraskite patikrintus, nuoseklius sprendimus, kaip išspręsti šią varginančią problemą ir atkurti sklandų spausdinimą. Nereikia jokių techninių žinių!
Kyla problemų dėl „Windows 11“ įstrigusio „Chkdsk“ ties 10 % arba 100 %? Atraskite nuoseklius trikčių šalinimo patarimus, kaip greitai ir saugiai išspręsti disko klaidas ir užtikrinti sklandų kompiuterio veikimą.
Lėtas veikimas arba strigimai sistemoje „Windows 11“? Atraskite saugius, nuoseklius metodus, kaip ištaisyti registro klaidas nerizikuojant savo sistema. Ekspertų patarimai, kaip naudotis be rūpesčių.
Kyla problemų dėl „Windows 11“ „iCloud“ medijos bibliotekos klaidos? Atraskite patikrintus veiksmus, kaip išspręsti „iCloud“ sinchronizavimo problemas, atkurti nuotraukas, muziką ir kt. Grįžkite prie sklandžios integracijos be jokių rūpesčių.
Ar „Game Bar“ užima daug vietos sistemoje „Windows 11“? Susipažinkite su nuosekliu vadovu, kaip visiškai pašalinti „Game Bar“, atgauti sistemos išteklius ir mėgautis sklandesne patirtimi. Pateikiami paprasti ir saugūs metodai.
Vargina erzinanti puslapio gedimo klaida nepuslapiuotoje srityje „Windows 11“ sistemoje? Atraskite patikrintus, nuoseklius sprendimus, kurie padės greitai išspręsti BSOD gedimus ir atkurti sklandų kompiuterio veikimą. Nereikia jokių techninių žinių!
Kyla problemų dėl neveikiančios „Windows 11“ kameros? Atraskite nuoseklius sprendimus, kaip išspręsti neryškaus vaizdo, programų strigimo ir kitas problemas. Greitai atkurkite savo internetinės kameros veikimą pasinaudodami mūsų ekspertų patarimais.
Sunku valdyti ventiliatoriaus greitį „Windows 11“ sistemoje? Atraskite patikrintus sprendimus, kurie padės atgauti kompiuterio kontrolę.

