6 τρόποι για να ενημερώσετε τα προγράμματα οδήγησης στα Windows 11
Ανακαλύψτε πώς να ενημερώσετε τα προγράμματα οδήγησης στα Windows 11 για να βελτιώσετε τη συμβατότητα και τις επιδόσεις.
Τα πλήκτρα πρόσβασης φορητών υπολογιστών είναι απαραίτητα εργαλεία όταν προσπαθείτε να αποκτήσετε πρόσβαση σε βασικές λειτουργίες της συσκευής σας. Σας επιτρέπουν να ελέγχετε την ένταση του ήχου, να προσαρμόζετε τη φωτεινότητα , τον οπίσθιο φωτισμό του πληκτρολογίου, τη συμπεριφορά του touchpad και πολλά άλλα. Ανάλογα με τη συσκευή σας, θα μπορούσατε να έχετε πρόσθετα πλήκτρα πρόσβασης για αποκλειστικές λειτουργίες, όπως η ενεργοποίηση της αλλαγής πλήκτρων n, η απενεργοποίηση της επιφάνειας αφής, η απενεργοποίηση του πληκτρολογίου , η ενεργοποίηση της λειτουργίας πτήσης, η αλλαγή των λειτουργιών τροφοδοσίας και πολλά άλλα.
Ωστόσο, ο φορητός υπολογιστής σας μπορεί να χάσει τη λειτουργικότητα και την αποτελεσματικότητά του σε περίπτωση που σταματήσουν να λειτουργούν τα πλήκτρα πρόσβασης. Αυτό θα σας ανάγκαζε να αλλάξετε/επεξεργαστείτε κάθε ρύθμιση χρησιμοποιώντας τις αποκλειστικές επιλογές τους στην εφαρμογή Ρυθμίσεις των Windows, η οποία μπορεί να είναι αρκετά δυσκίνητη. Εάν τα πλήκτρα πρόσβασης φορητού υπολογιστή δεν λειτουργούν στον φορητό υπολογιστή σας, τότε μπορείτε να χρησιμοποιήσετε τις παρακάτω μεθόδους για να διορθώσετε τα πλήκτρα πρόσβασης.
Σχετικό: Πώς να μετακινήσετε τη γραμμή εργασιών στην κορυφή στα Windows 11
Περιεχόμενα
Γιατί τα πλήκτρα πρόσβασης δεν λειτουργούν;

Τα πλήκτρα πρόσβασης στον φορητό υπολογιστή σας μπορεί να σταματήσουν να λειτουργούν για διάφορους λόγους, αλλά καθώς τα Windows 11 είναι αρκετά νέα, ο πιο συνηθισμένος λόγος φαίνεται να είναι οι διενέξεις προγραμμάτων οδήγησης και οι διενέξεις βοηθητικών προγραμμάτων OEM στο παρασκήνιο. Αυτό οφείλεται στο γεγονός ότι τα περισσότερα προγράμματα οδήγησης που κυκλοφορούν αυτήν τη στιγμή από OEM είναι σχεδιασμένα για Windows 10. Τα Windows 11 εισάγουν πολλές διαφορετικές αλλαγές στο παρασκήνιο και τον τρόπο χειρισμού των προγραμμάτων οδήγησης που φαίνεται να διαταράσσουν τη λειτουργικότητα των πλήκτρων πρόσβασης σε πολλές διαφορετικές συσκευές.
Οι μονάδες που επηρεάζονται περισσότερο φαίνεται να προέρχονται από την Asus και τη Lenovo λόγω των αποκλειστικών βοηθητικών προγραμμάτων τους, όπως το Armory Crate Service που πρέπει να ενημερωθούν για τα Windows 11. Αυτό δεν σημαίνει ότι άλλοι κατασκευαστές εξαιρούνται από αυτό το ζήτημα, πολλές μονάδες Dell και Acer επίσης φαίνεται να χάνουν τη λειτουργικότητα του πλήκτρου πρόσβασης με τα Windows 11.
Εάν διαθέτετε κάποια από αυτές τις συσκευές ή εάν τα πλήκτρα πρόσβασης του φορητού υπολογιστή σας δεν λειτουργούν γενικά στα Windows 11, τότε μπορείτε να χρησιμοποιήσετε τις παρακάτω μεθόδους για να προσπαθήσετε να διορθώσετε το πρόβλημά σας. Ας αρχίσουμε.
Σχετικό: Πώς να δημιουργήσετε ένα σημείο επαναφοράς στα Windows 11
Πώς να διορθώσετε τα πλήκτρα πρόσβασης σε φορητούς υπολογιστές με Windows 11
Μπορείτε να χρησιμοποιήσετε τις ακόλουθες μεθόδους για να προσπαθήσετε να επαναφέρετε τα πλήκτρα πρόσβασης στον φορητό υπολογιστή σας. Οι μέθοδοι έχουν παρατεθεί με τη σειρά της προτεραιότητάς τους και οι πιο συνηθισμένες επιδιορθώσεις έχουν παρατεθεί στην κορυφή. Μπορείτε να ξεκινήσετε με την πρώτη επιδιόρθωση και να προχωρήσετε στη λίστα για να προσπαθήσετε να βρείτε την επιδιόρθωση που λειτουργεί για το σύστημά σας. Ας αρχίσουμε.
Μέθοδος #1: Ελέγξτε για ενημερώσεις OEM
Εάν έχετε ένα αποκλειστικό βοηθητικό πρόγραμμα πληκτρολογίου που διαχειρίζεται τα πλήκτρα πρόσβασης στο παρασκήνιο, όπως το Armory Crate Service ή το βοηθητικό πρόγραμμα Synaptics, τότε μπορείτε να δοκιμάσετε να ενημερώσετε τα προγράμματα οδήγησης από τον ιστότοπο του OEM σας. Αυτά τα βοηθητικά προγράμματα διαφέρουν από συγκεκριμένα προγράμματα οδήγησης πληκτρολογίου και εκτελούν υπηρεσίες και εργασίες στο παρασκήνιο που βοηθούν στην ενεργοποίηση των πλήκτρων πρόσβασης στον φορητό υπολογιστή σας.
Εάν κάποιο από αυτά τα βοηθητικά προγράμματα είναι χαλασμένο ή δεν λειτουργεί, τότε συνιστούμε να ελέγξετε για τις πιο πρόσφατες ενημερώσεις ή να εγκαταστήσετε ξανά την τρέχουσα έκδοση στον φορητό υπολογιστή σας. Χρησιμοποιήστε τους παρακάτω συνδέσμους για να επισκεφτείτε τον ιστότοπο υποστήριξης του OEM σας και να ελέγξετε για τις πιο πρόσφατες ενημερώσεις βοηθητικού προγράμματος. Μόλις τα βρείτε, κάντε κλικ και κατεβάστε τα στον τοπικό σας χώρο αποθήκευσης και εγκαταστήστε τα στον φορητό υπολογιστή σας το συντομότερο.
Μόλις εγκατασταθούν, τα πλήκτρα πρόσβασης θα αρχίσουν να λειτουργούν ξανά στον φορητό υπολογιστή σας. Σας συνιστούμε να κάνετε επανεκκίνηση του φορητού υπολογιστή σας για να αποφύγετε τυχόν διενέξεις με προηγούμενα εγκατεστημένες εκδόσεις στο παρασκήνιο. Εάν τα πλήκτρα πρόσβασης εξακολουθούν να μην λειτουργούν, τότε μπορείτε να χρησιμοποιήσετε τον παρακάτω οδηγό για να επαναφέρετε και να ανανεώσετε τα βοηθητικά προγράμματα OEM στον φορητό υπολογιστή σας.
Σχετικό: Πώς να επιδιορθώσετε τα Windows 11
Μέθοδος #2: Βεβαιωθείτε ότι τα βοηθητικά προγράμματα OEM λειτουργούν σωστά
Εάν τα βοηθητικά προγράμματα OEM φαίνεται να αποτυγχάνουν να λειτουργούν στο παρασκήνιο, ακολουθούν μερικές μέθοδοι αντιμετώπισης προβλημάτων για την επαναφορά της λειτουργικότητάς τους. Ας αρχίσουμε.
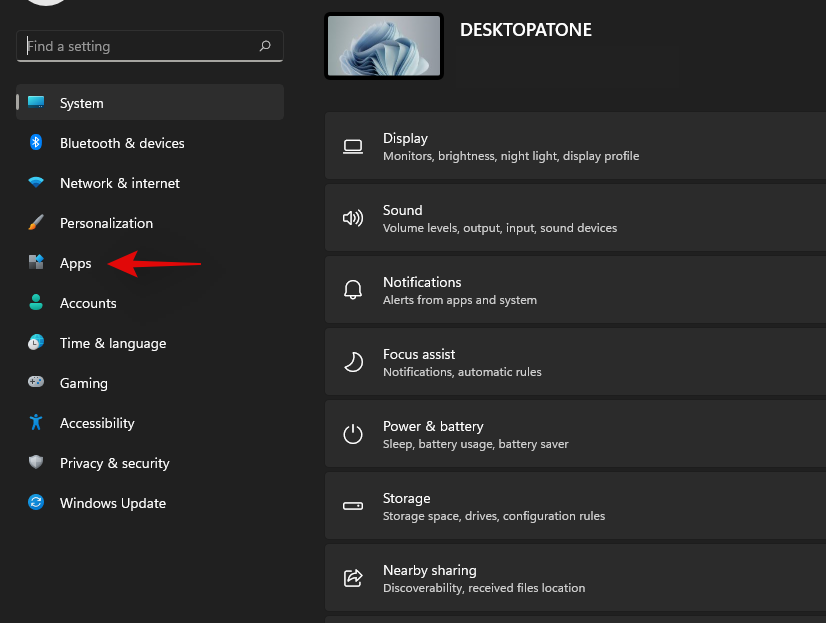
Πατήστε Windows + iστο πληκτρολόγιό σας και κάντε κλικ στις «Εφαρμογές» στα αριστερά σας.
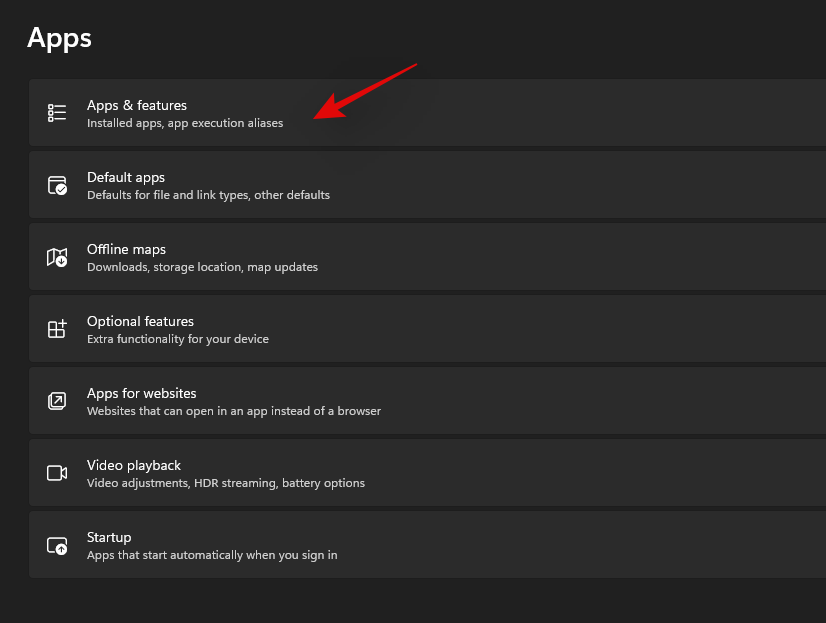
Κάντε κλικ στις «Εφαρμογές και λειτουργίες».
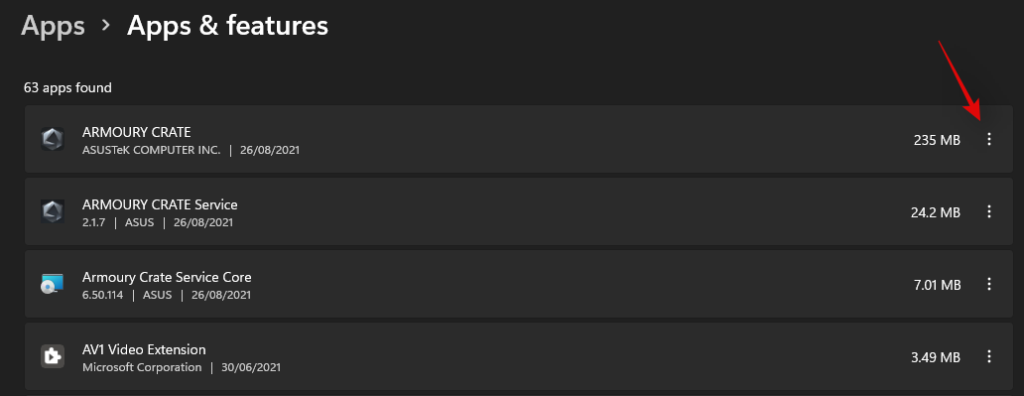
Βρείτε τη σχετική εφαρμογή σε αυτήν τη λίστα και κάντε κλικ στο εικονίδιο μενού "3-κουκκίδες" δίπλα της.
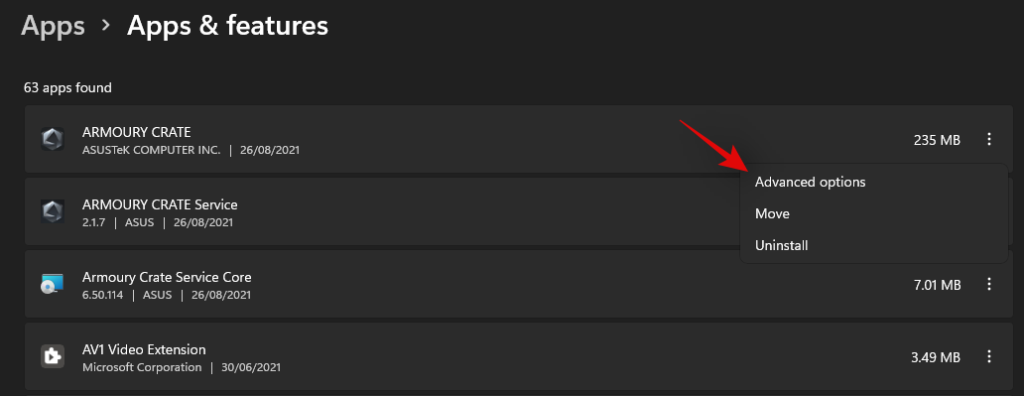
Επιλέξτε «Σύνθετες επιλογές».
Τώρα ακολουθήστε μία από τις παρακάτω ενότητες ανάλογα με το τι θέλετε να κάνετε με την επιλεγμένη εφαρμογή.
2.1 Ενεργοποιήστε τη λειτουργία φόντου
Κάντε κλικ στο αναπτυσσόμενο μενού στην περιοχή "Δικαιώματα εφαρμογών παρασκηνίου" και επιλέξτε "Βελτιστοποιημένη ενέργεια" ή "Πάντα".
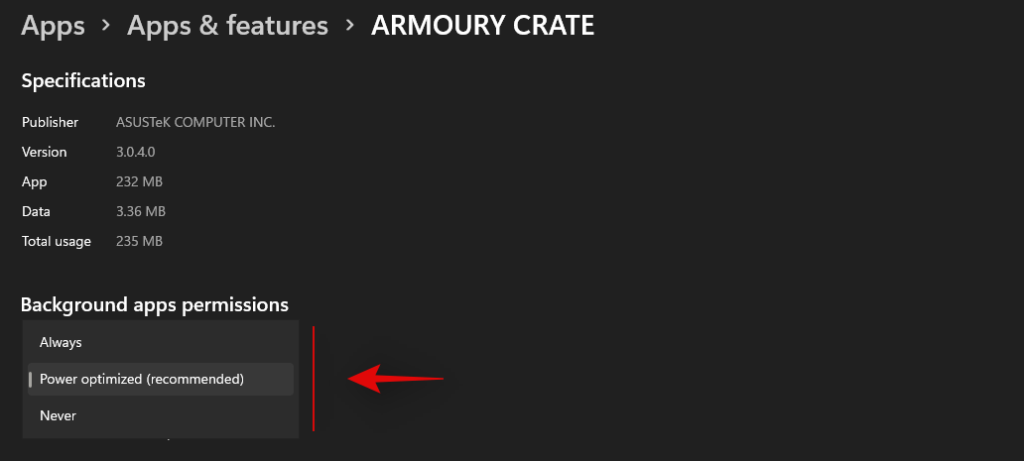
Το "Power optimized" θα επιτρέψει στην εφαρμογή να λειτουργεί στο παρασκήνιο ανάλογα με το τρέχον σχέδιο παροχής ενέργειας. Το "Always" από την άλλη πλευρά θα δώσει στην εφαρμογή άδεια να παραμείνει ενεργή και να εργάζεται στο παρασκήνιο, ανεξάρτητα από το τρέχον επιλεγμένο σχέδιο παροχής ενέργειας.
2.2 Επισκευάστε την εφαρμογή
Τα Windows 11 σάς επιτρέπουν επίσης να επιδιορθώσετε την εφαρμογή σας. Απλώς μετακινηθείτε προς τα κάτω και κάντε πρώτα κλικ στο «Τερματισμός».
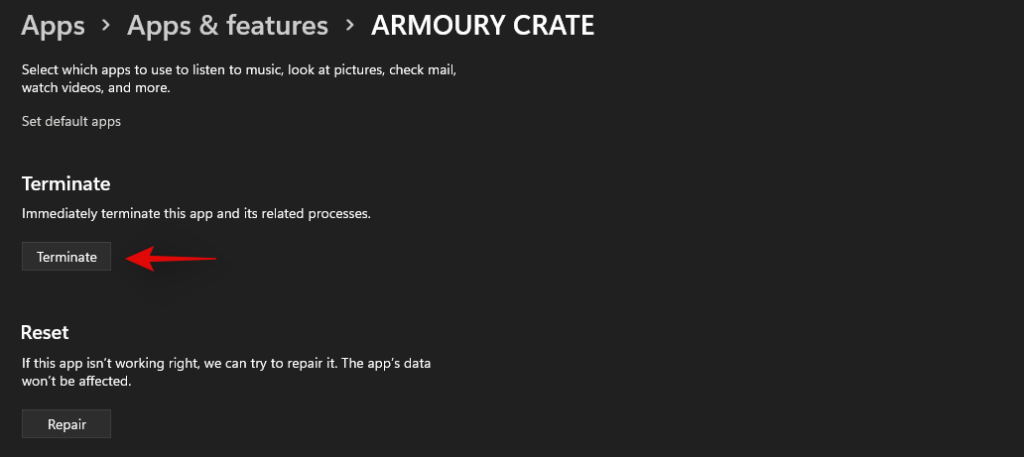
Τώρα κάντε κλικ στο «Επισκευή».

Περιμένετε τα Windows να κάνουν τη δουλειά τους, μόλις εμφανιστεί ένα σημάδι επιλογής δίπλα στην επιλογή προσπαθήστε να εκκινήσετε τη σχετική εφαρμογή στον φορητό υπολογιστή σας.

Δοκιμάστε τα πλήκτρα πρόσβασης τώρα, εάν ένα δευτερεύον ζήτημα ή διένεξη προκαλούσε τη μη λειτουργία της εφαρμογής στο παρασκήνιο, τότε η λειτουργία των πλήκτρων πρόσβασης θα πρέπει τώρα να αποκατασταθεί στον φορητό υπολογιστή σας.
2.3 Επαναφέρετε την εφαρμογή
Εάν οι παραπάνω μέθοδοι δεν λειτούργησαν για εσάς, μπορείτε να επαναφέρετε την εφαρμογή OEM. Αυτό θα επαναφέρει τα δεδομένα του και θα σας δώσει μια νέα αρχή σαν να είχε μόλις εγκατασταθεί η εφαρμογή στον φορητό υπολογιστή σας. Αυτό θα βοηθήσει στην επαναφορά της λειτουργικότητας του πλήκτρου πρόσβασης στις περισσότερες περιπτώσεις. Ωστόσο, λάβετε υπόψη ότι τα δεδομένα της εφαρμογής σας θα επαναφερθούν, κάτι που θα σας αναγκάσει να συνδεθείτε ξανά στην εφαρμογή, εάν υπάρχει. Επιπλέον, τυχόν αλλαγές ή προσαρμογές που κάνατε στην εφαρμογή θα επαναφερθούν επίσης. Ακολουθήστε τα παρακάτω βήματα για να ξεκινήσετε.
Κάντε κλικ στο «Τερματισμός» για να κλείσετε την εφαρμογή.

Τώρα κάντε κλικ στο 'Επαναφορά'.

Κάντε ξανά κλικ στο 'Επαναφορά' για να επιβεβαιώσετε την επιλογή σας.

Τώρα θα γίνει επαναφορά της εφαρμογής στον φορητό υπολογιστή σας. Σας συνιστούμε να επανεκκινήσετε τον φορητό υπολογιστή σας και να δοκιμάσετε να χρησιμοποιήσετε ξανά τα πλήκτρα πρόσβασης. Εάν η εφαρμογή δεν λειτουργούσε σωστά στα Windows 11, τότε η λειτουργία του πλήκτρου πρόσβασης θα πρέπει τώρα να αποκατασταθεί στον φορητό υπολογιστή σας.
Μέθοδος #3: Ενημέρωση προγραμμάτων οδήγησης
Ένας άλλος λόγος για τη δυσλειτουργία του πληκτρολογίου σας θα ήταν τα παλιά προγράμματα οδήγησης. Εάν δεν έχετε ενημερώσει τα προγράμματα οδήγησης του πληκτρολογίου σας στο παρελθόν, είναι πιθανός ο λόγος που τα πλήκτρα πρόσβασης του πληκτρολογίου σας δεν λειτουργούν στα Windows 11. Τα Windows 11 διαχειρίζονται και εγκαθιστούν τα προγράμματα οδήγησης με διαφορετικό τρόπο, επιπλέον, σε ορισμένες περιπτώσεις, τα Windows 11 είναι γνωστό ότι αντικαταστήστε το πρόγραμμα οδήγησης πληκτρολογίου OEM προς όφελος ενός γενικού προγράμματος οδήγησης σε περίπτωση που είναι το πιο πρόσφατο.
Εάν τα πλήκτρα πρόσβασης εξακολουθούν να μην λειτουργούν για εσάς, συνιστούμε να ενημερώσετε τα προγράμματα οδήγησης και να εγκαταστήσετε τα πιο πρόσφατα προγράμματα οδήγησης πληκτρολογίου που είναι διαθέσιμα από τον OEM σας. Απλώς επισκεφτείτε τον ιστότοπό σας OEM χρησιμοποιώντας έναν από τους παρακάτω συνδέσμους και πραγματοποιήστε λήψη του αντίστοιχου προγράμματος οδήγησης στον τοπικό σας χώρο αποθήκευσης.
Μετά τη λήψη, εγκαταστήστε το πρόγραμμα οδήγησης και επανεκκινήστε το φορητό υπολογιστή σας. Απορρίψτε τυχόν ενημερώσεις προγραμμάτων οδήγησης πληκτρολογίου που προσφέρονται από τα Windows 11 και τα πλήκτρα πρόσβασης θα αρχίσουν να λειτουργούν ξανά. Χρησιμοποιήστε τους παρακάτω συνδέσμους για να ξεκινήσετε.
Εάν τα προγράμματα οδήγησης του πληκτρολογίου σας είναι ακόμα παλιά και τα πλήκτρα πρόσβασης δεν λειτουργούν, ίσως είναι καιρός να ελέγξετε για ενημερώσεις προγραμμάτων οδήγησης μέσω των Windows. Ο OEM σας είναι πιθανό να σας παραδίδει τις πιο πρόσφατες ενημερώσεις προγραμμάτων οδήγησης μέσω των Windows Updates. Ελέγξτε για ενημερώσεις προγραμμάτων οδήγησης πληκτρολογίου στις ενημερώσεις των Windows στον φορητό υπολογιστή σας χρησιμοποιώντας τον παρακάτω οδηγό. Θα βεβαιωθούμε πρώτα ότι ο φορητός υπολογιστής σας λαμβάνει ενημερώσεις προγραμμάτων οδήγησης μέσω του Windows Update. Ακολουθήστε τον παρακάτω οδηγό για να ξεκινήσετε.
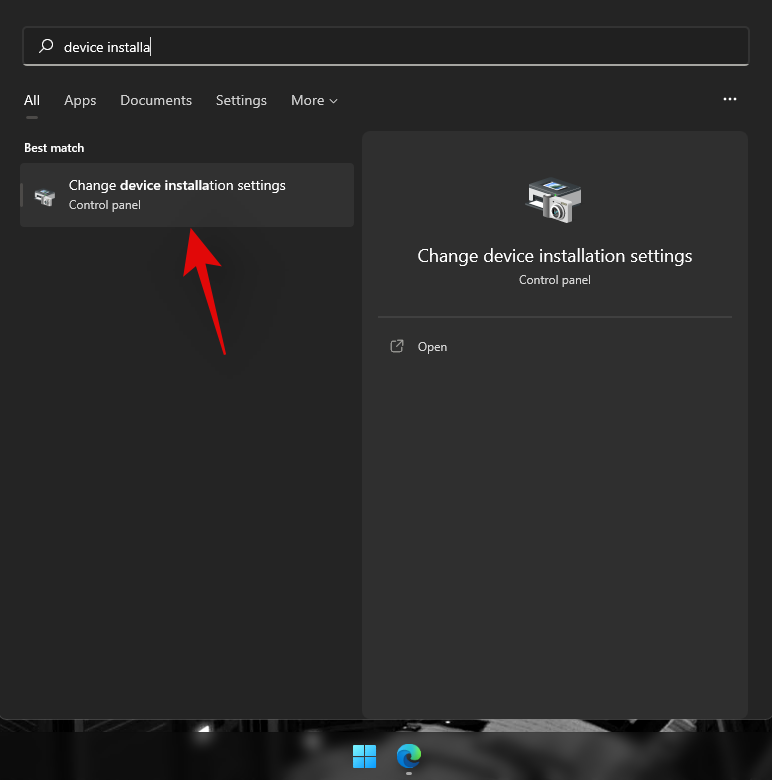
Πατήστε Windows + Sστο πληκτρολόγιό σας και αναζητήστε "Αλλαγή ρυθμίσεων εγκατάστασης συσκευής". Κάντε κλικ και ξεκινήστε την εφαρμογή μόλις εμφανιστεί στα αποτελέσματα αναζήτησής σας.
Επιλέξτε «Ναι (συνιστάται)».
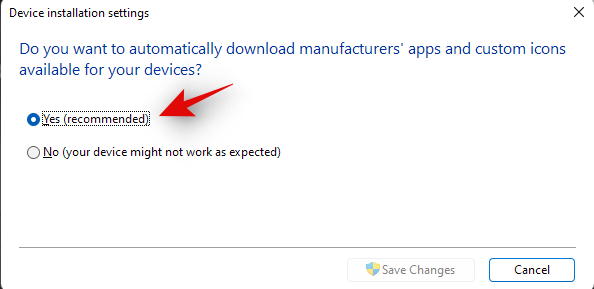
Κάντε κλικ στο «Αποθήκευση αλλαγών».
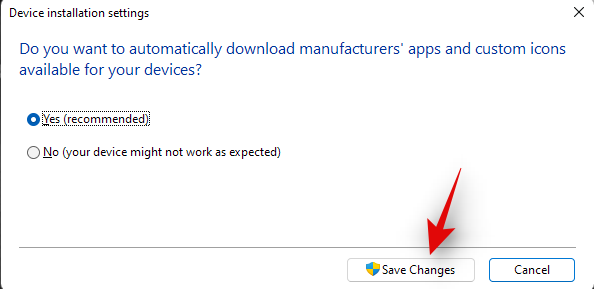
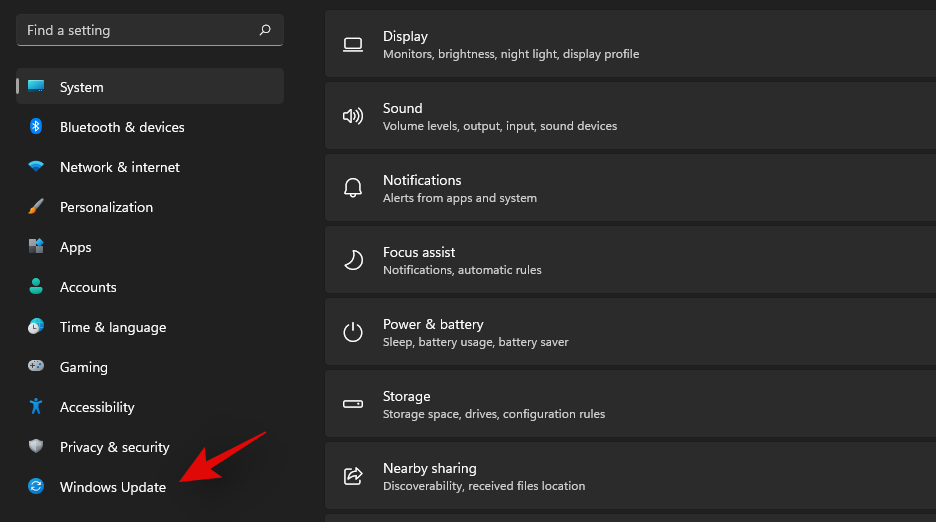
Περιμένετε μέχρι τα Windows να ενεργοποιήσουν τις ενημερώσεις προγραμμάτων οδήγησης για τον φορητό υπολογιστή σας. Μόλις ενεργοποιηθεί, κλείστε το παράθυρο ρυθμίσεων εγκατάστασης της συσκευής και πατήστε Windows + iστο πληκτρολόγιό σας. Επιλέξτε «Windows Update» από τα αριστερά σας.
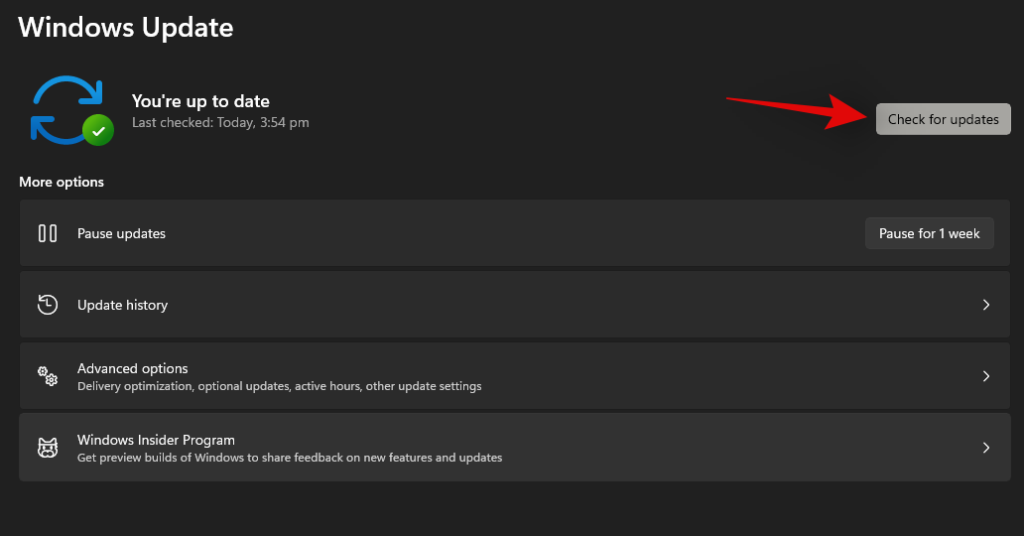
Κάντε κλικ στο «Έλεγχος ενημερώσεων» στο επάνω μέρος και εγκαταστήστε τυχόν ενημερώσεις που εμφανίζονται.
Μόλις εγκατασταθεί, κάντε κλικ στις «Σύνθετες επιλογές» στο κάτω μέρος.
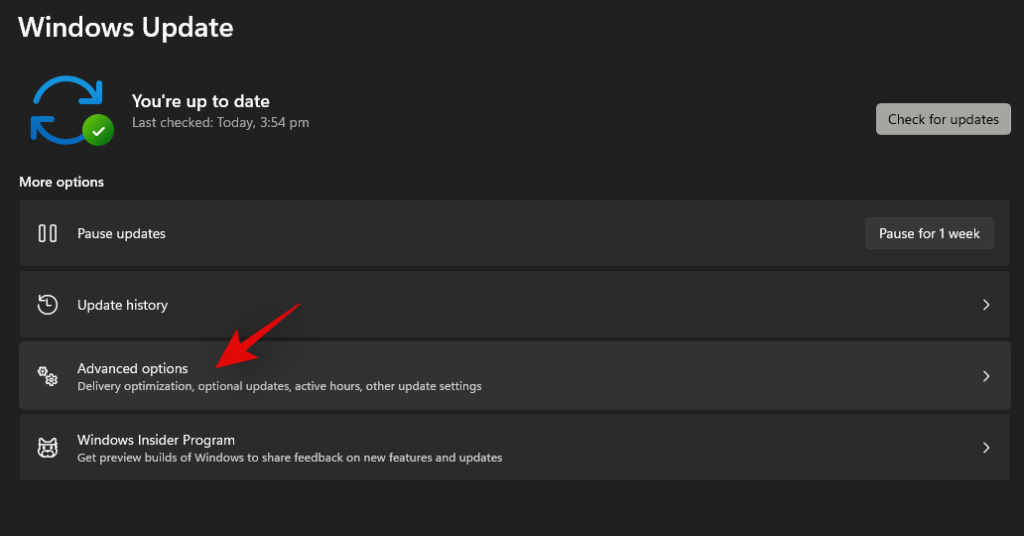
Τώρα κάντε κλικ στις «Προαιρετικές ενημερώσεις».
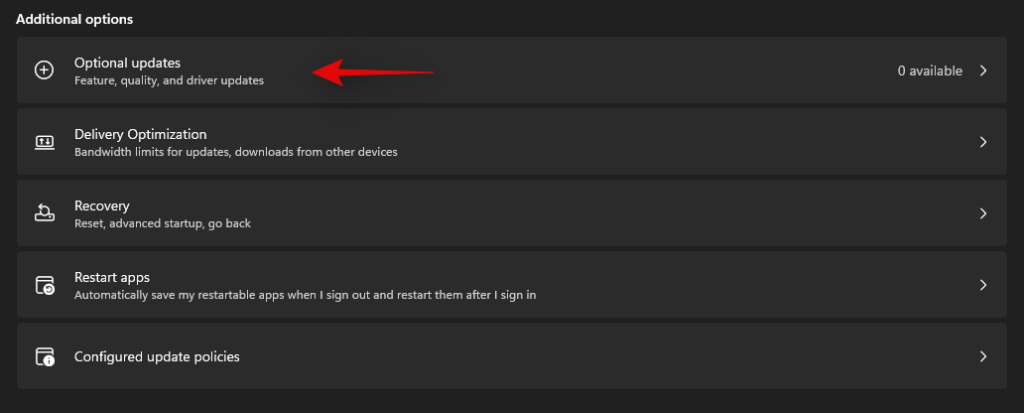
Κάντε κλικ και αναπτύξτε τις «Ενημερώσεις προγραμμάτων οδήγησης (n)», όπου το n αντιπροσωπεύει τον τρέχοντα αριθμό ενημερώσεων προγραμμάτων οδήγησης που είναι διαθέσιμες για τον φορητό υπολογιστή σας. Επιλέξτε το πλαίσιο για τυχόν προγράμματα οδήγησης πληκτρολογίου που εμφανίζονται σε αυτήν τη λίστα. Κάντε κλικ στο «Λήψη και εγκατάσταση» στο κάτω μέρος της οθόνης σας. Κάντε επανεκκίνηση του φορητού υπολογιστή σας για καλό μέτρο, ακόμα κι αν δεν σας ζητηθεί από μια ενημέρωση των Windows.
Και τέλος! Τα πιο πρόσφατα προγράμματα οδήγησης πληκτρολογίου θα πρέπει τώρα να εγκατασταθούν στον φορητό υπολογιστή σας, κάτι που θα σας βοηθήσει να επαναφέρετε τη λειτουργικότητα των πλήκτρων πρόσβασης για εσάς. Εάν όχι, μπορείτε να συνεχίσετε με τις παρακάτω επιδιορθώσεις για να προσπαθήσετε να διορθώσετε τα πλήκτρα πρόσβασης.
Μέθοδος #4: Επανεγκαταστήστε τα προγράμματα οδήγησης πληκτρολογίου
Εάν καμία από τις παραπάνω μεθόδους δεν λειτουργεί για εσάς, τότε ήρθε η ώρα να εγκαταστήσετε ξανά τα προγράμματα οδήγησης του πληκτρολογίου σας. Ενώ τα προγράμματα οδήγησης σπάνια αντιμετωπίζουν διενέξεις στο παρασκήνιο, οι εσφαλμένες εγκαταστάσεις, τα ασύμβατα στοιχεία και οι λανθασμένες ενημερώσεις μπορεί να ανακατέψουν τα προγράμματα οδήγησης του πληκτρολογίου σας, ειδικά αν έχετε προσαρμοσμένο οπίσθιο φωτισμό RGB που διαχειρίζεται ένα βοηθητικό πρόγραμμα OEM.
Κάθε μία από αυτές τις εφαρμογές χρησιμοποιεί έναν διαφορετικό τρόπο σύνδεσης στον οπίσθιο φωτισμό του πληκτρολογίου σας για να τον προσαρμόσετε σύμφωνα με τις ανάγκες σας. Αυτοί οι τρόποι σύνδεσης στο σύστημα δεν παίζουν καλά με άλλες εφαρμογές τρίτων που διαχειρίζονται τη χαρτογράφηση, τη διάταξη και πολλά άλλα του πληκτρολογίου σας. Η επανεγκατάσταση του προγράμματος οδήγησης του πληκτρολογίου σας μπορεί να βοηθήσει στην επίλυση των περισσότερων τέτοιων προβλημάτων και μπορείτε να το κάνετε είτε εγκαθιστώντας ένα αποκλειστικό πρόγραμμα οδήγησης από τον OEM σας είτε χρησιμοποιώντας ένα γενικό πρόγραμμα οδήγησης που προέρχεται από τα Windows. Ας αρχίσουμε.
4.1 Επανεγκαταστήστε το γενικό πρόγραμμα οδήγησης πληκτρολογίου
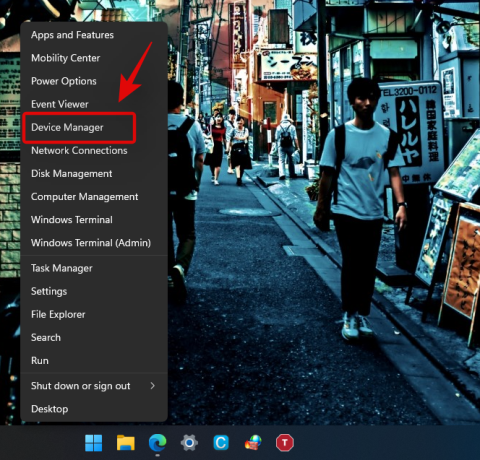
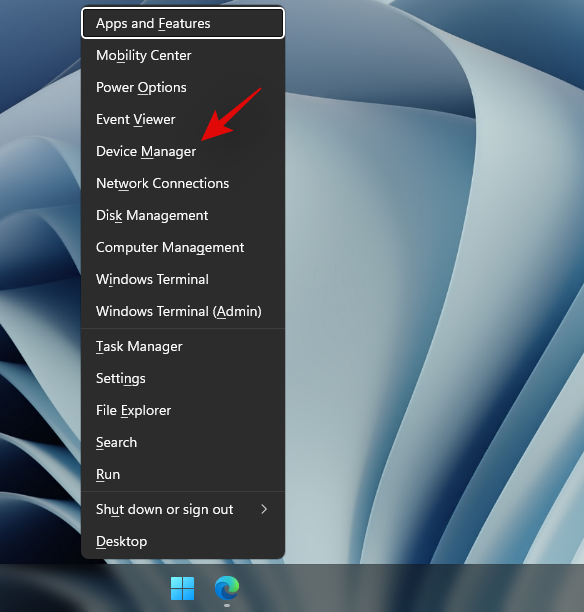
Πατήστε Windows + Xστο πληκτρολόγιό σας και κάντε κλικ στο «Διαχείριση Συσκευών».
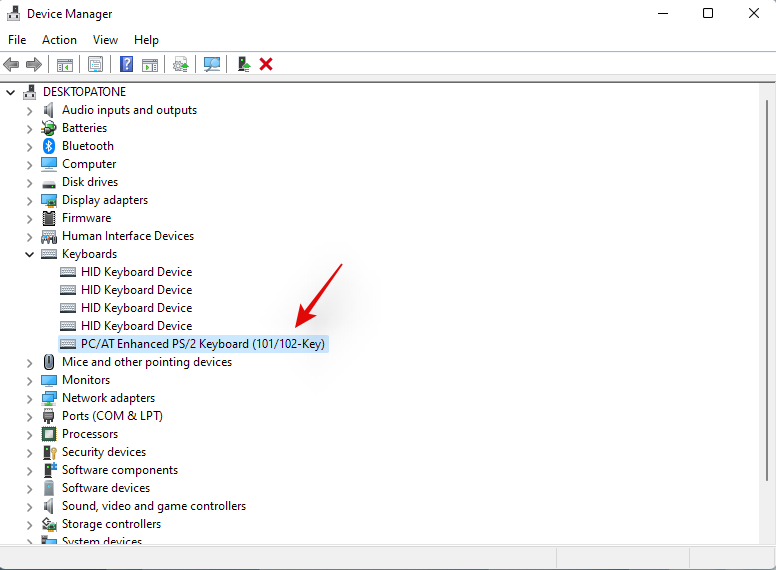
Μόλις ανοίξει, βρείτε το πληκτρολόγιο που σας ενδιαφέρει στη λίστα και κάντε δεξί κλικ πάνω του. Εάν δεν μπορείτε να βρείτε το πληκτρολόγιό σας ή έχετε πολλές καταχωρίσεις, τότε μπορείτε να τις επιλέξετε και να τις απεγκαταστήσετε όλες. Μόλις απεγκατασταθούν, τα προγράμματα οδήγησης που έχουν απομείνει θα αφαιρεθούν ενώ τα απαραίτητα θα ληφθούν ξανά αυτόματα.
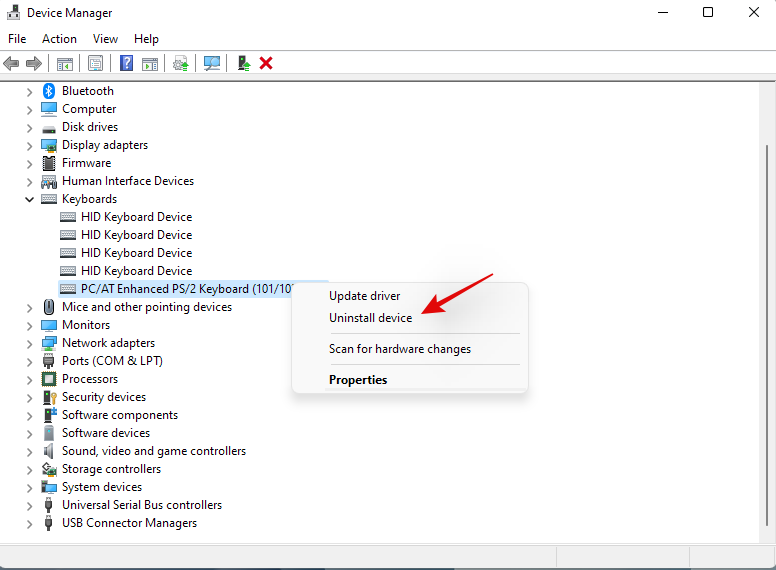
Κάντε κλικ στο «Κατάργηση εγκατάστασης συσκευής».
Κάντε ξανά κλικ στο 'Κατάργηση εγκατάστασης' για να επιβεβαιώσετε την επιλογή σας.
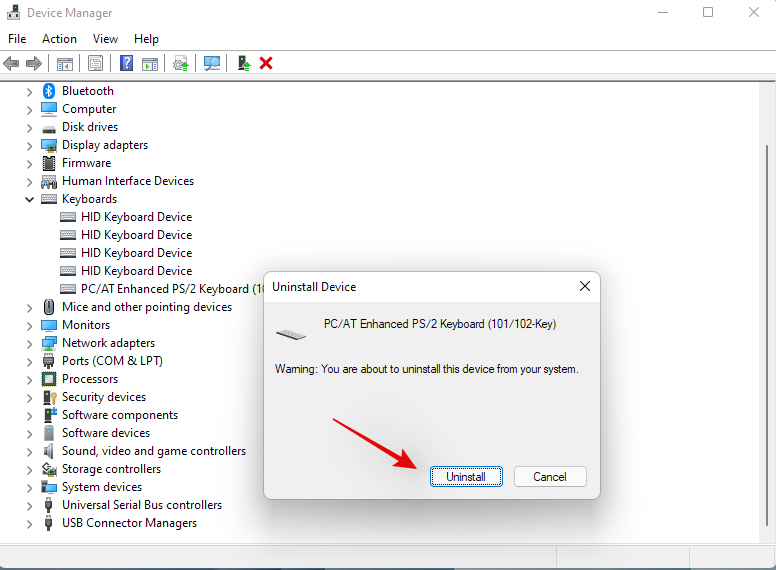
Κάντε επανεκκίνηση του φορητού υπολογιστή σας εάν σας ζητηθεί και επαναλάβετε τα παραπάνω βήματα για να αφαιρέσετε όλα τα απαραίτητα προγράμματα οδήγησης πληκτρολογίου που είναι εγκατεστημένα στο σύστημά σας. Αφού απεγκατασταθεί, κάντε δεξί κλικ σε μια κενή περιοχή και επιλέξτε «Σάρωση για αλλαγές υλικού». Μπορείτε επίσης να κάνετε κλικ στο ειδικό εικονίδιο για το ίδιο στη γραμμή εργαλείων σας.

Τα Windows θα αναζητήσουν τώρα γενικά προγράμματα οδήγησης που λείπουν για το εγγενές πληκτρολόγιό σας και θα τα επανεγκαταστήσουν αυτόματα στον φορητό υπολογιστή σας.
If however, your drivers aren’t found by Windows, then you can use the guide below to manually install the dedicated keyboard drivers from your OEM.
4.2 Reinstall keyboard drivers manually
Download and install the necessary keyboard drivers to your local storage. Ensure that you extract the file beforehand in case you downloaded an archive. You should find a .inf file inside which is the driver we will be installed manually on your system. Follow the steps below to get you started.
Press Windows + X on your keyboard and select ‘Device Manager’.

Now expand the ‘Keyboards’ section and right-click on your concerned keyboard. If you have multiple HID devices under ‘Keyboards’ then we recommend you uninstall all unnecessary drivers to avoid conflicts.
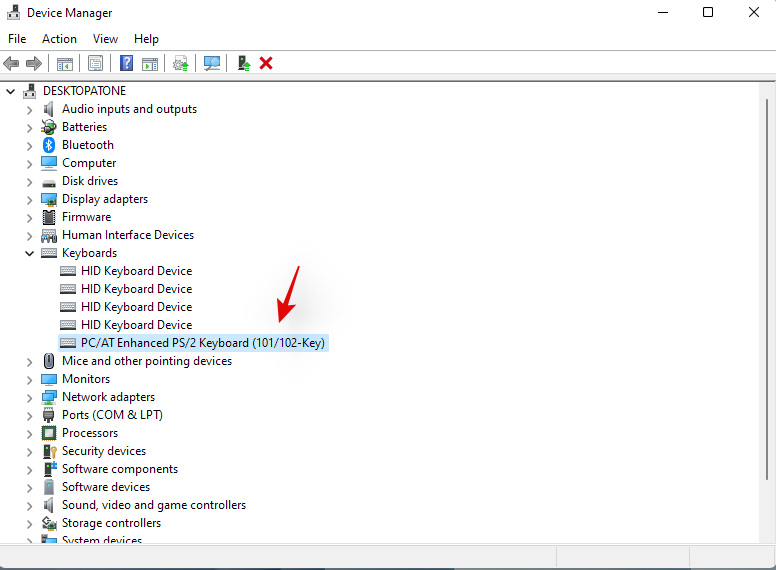
Select ‘Uninstall device’.

Check the box for ‘Attempt to remove the driver for this device’ if the option is available. Click on ‘Uninstall’ to confirm your choice.

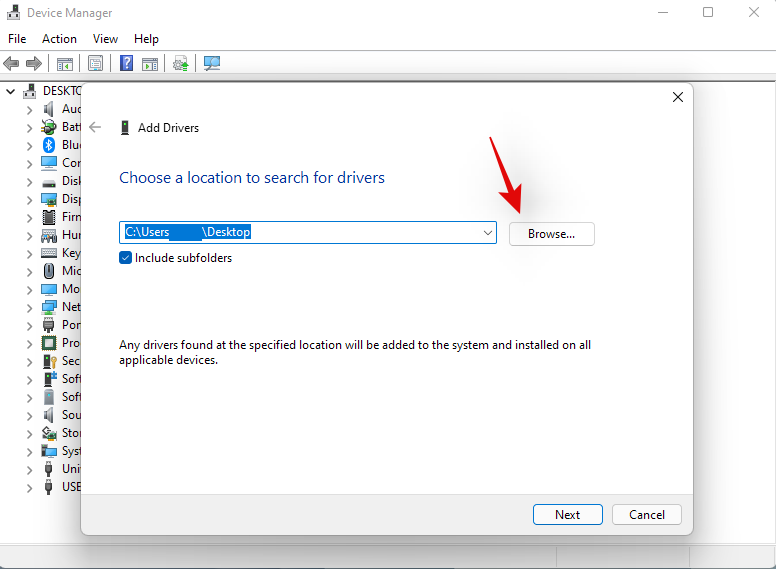
The selected keyboard will now be uninstalled from your system. Your keyboard will stop working after the concerned driver has been uninstalled. This is normal behavior and your keyboard’s functionality should be restored once we reinstall the necessary drivers. Repeat the steps above for all HID devices you wish to remove. Once the necessary devices have been removed, click on the ‘Add drivers’ icon in your toolbar.

Click on ‘Browse’.
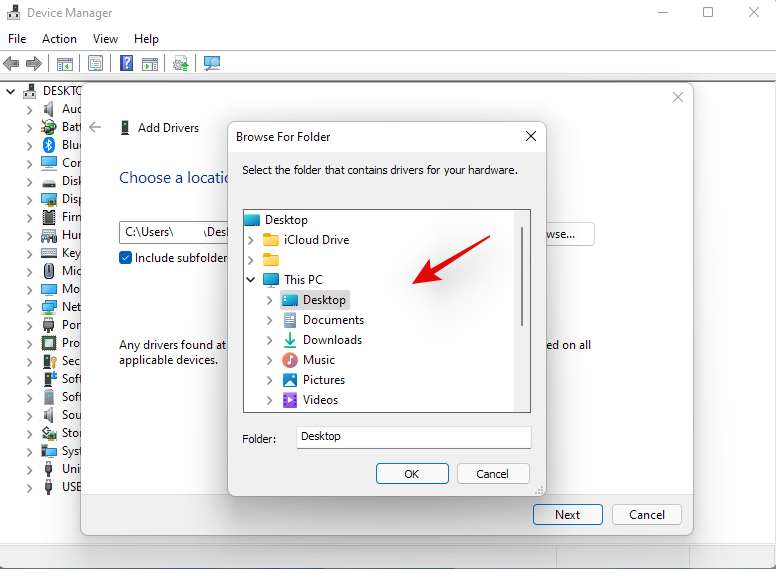
Navigate to the folder where you have stored your OEM drivers and click on ‘OK’.
Check the box for ‘Include subfolders’ just to be safe. Click on ‘Next’ once you are done.
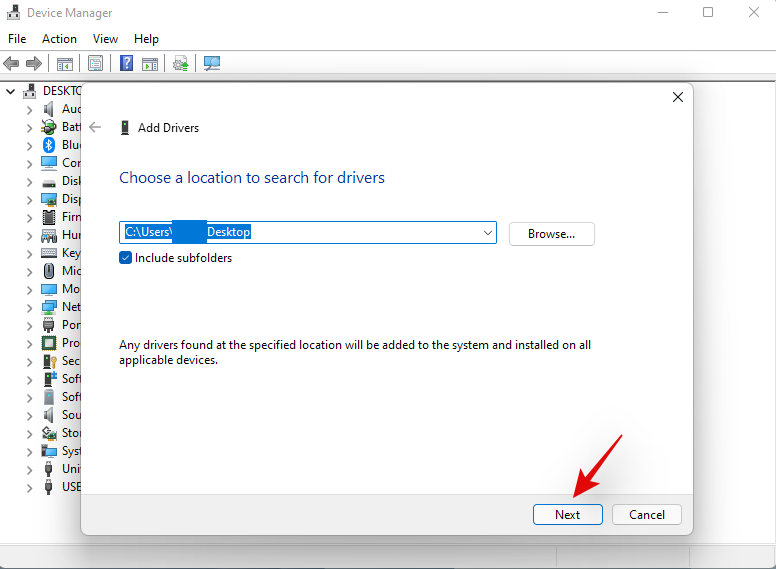
Windows will now scan the location for compatible drivers and automatically install them on your system.
Once installed, we recommend you restart your laptop for good measure.
And that’s it! Your hotkey functionality should now be restored on your system if a background driver conflict was causing issues on your system.
Note: Do not install any keyboard drivers via Windows Update in the future to avoid losing hotkey functionality again.
Method #5: Disable gaming mode
Gaming mode within Windows is known to cause issues on certain laptops. Microsoft’s gaming mode has gotten smarter and the mode automatically tries to apply the best peripheral settings for your gaming experience. This includes tweaking your audio, mouse settings, enabling n key rollover on your keyboard, windows key lock, and a lot more.
However, automatically enabling these settings requires hooking into dedicated drivers and tools which are often managed by your OEM. This could create conflicts in the background which might be preventing you from using your hotkeys on Windows 11. Use the guide below to disable gaming mode on your laptop.
Press Windows + i on your keyboard and click on ‘Personalization’ on your left.
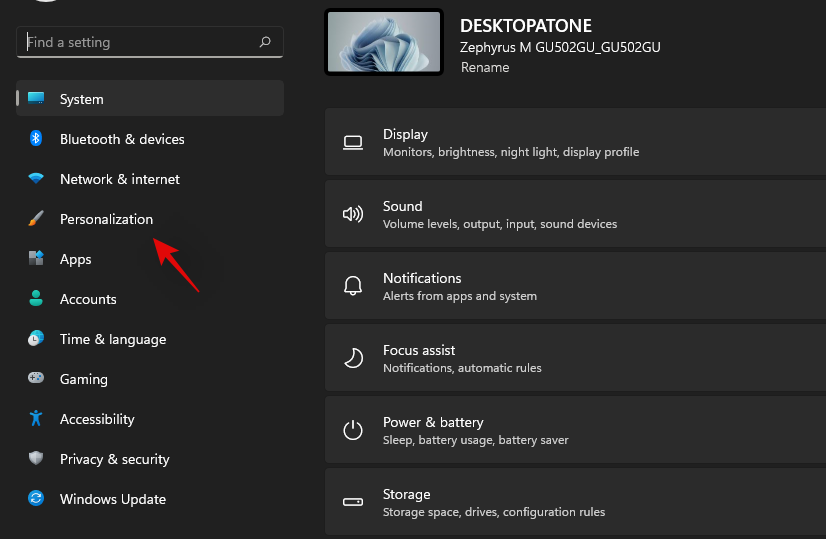
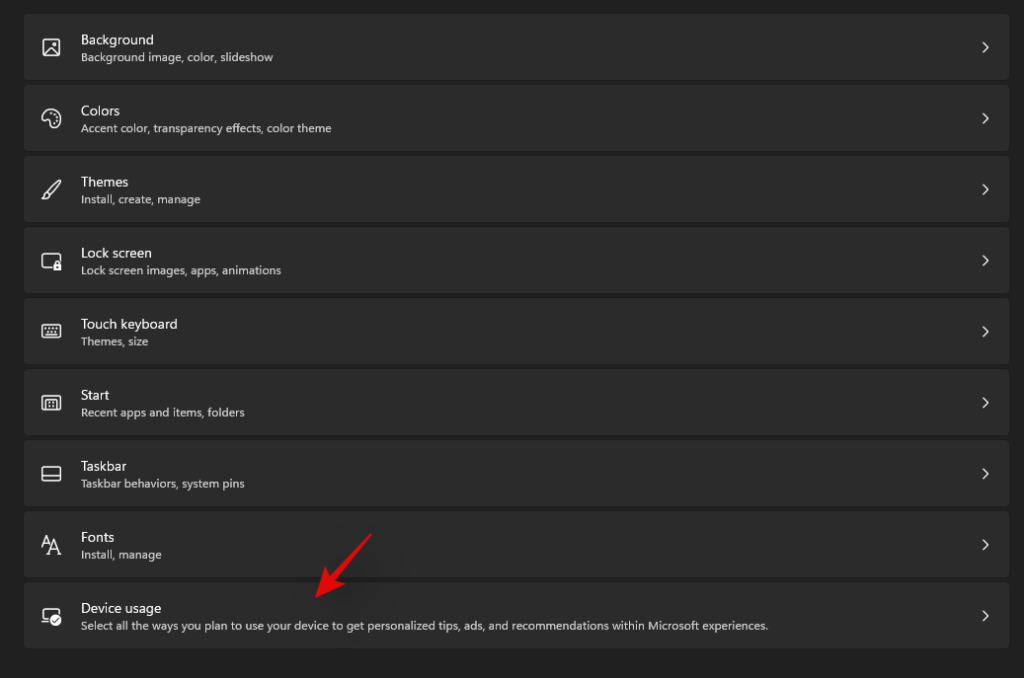
Click on ‘Device usage’.
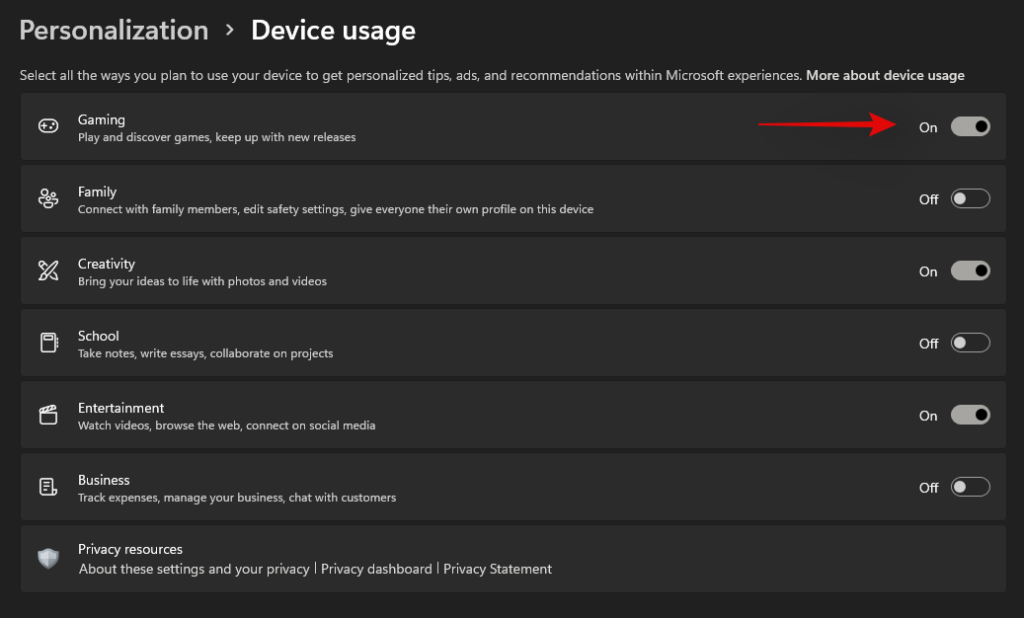
Disable the toggle for ‘Gaming’.
Click on ‘Gaming’ on your left now.
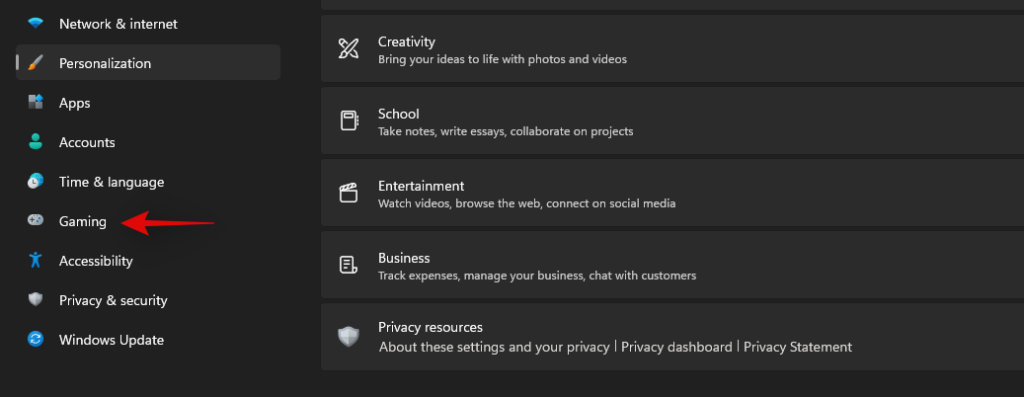
Click on ‘Game Mode’ on your right.

Disable the toggle for ‘Game mode’ at the top of your screen.

Close the Settings app and restart your laptop.
If your hotkeys start working upon a restart then game mode was likely interfering with your hotkeys in the background.
Method #6: Restart HID service
You can also restart your HID service which should help restart all your HID or Human Interface Devices. This includes your keyboard and restarting the HID service should help fix your hotkeys if your custom software or mapper was unable to hook into the HID service. Use the guide below to get you started.
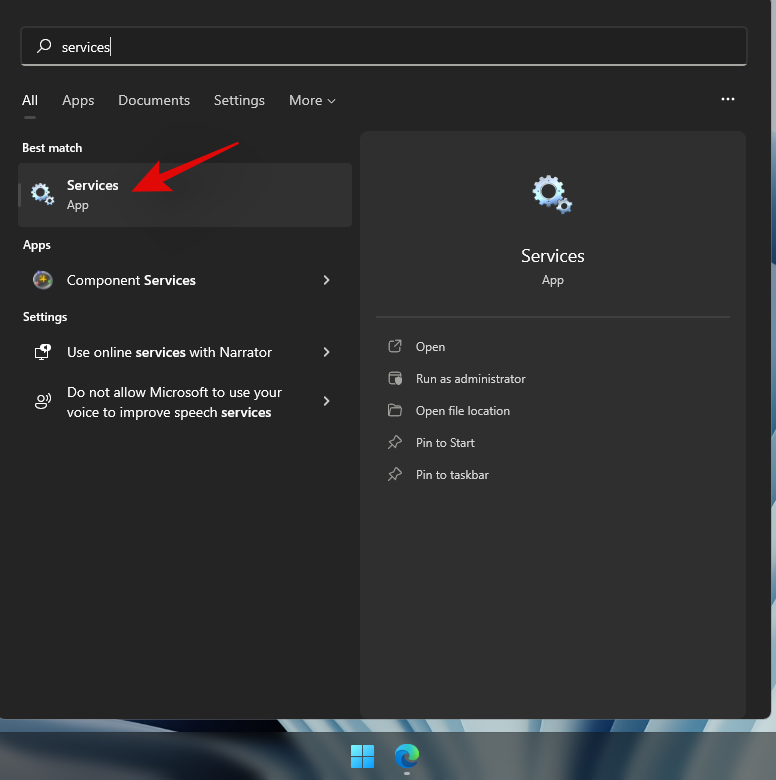
Press Windows + S and search for ‘Services’. Click and launch the app once it shows up in your search results.
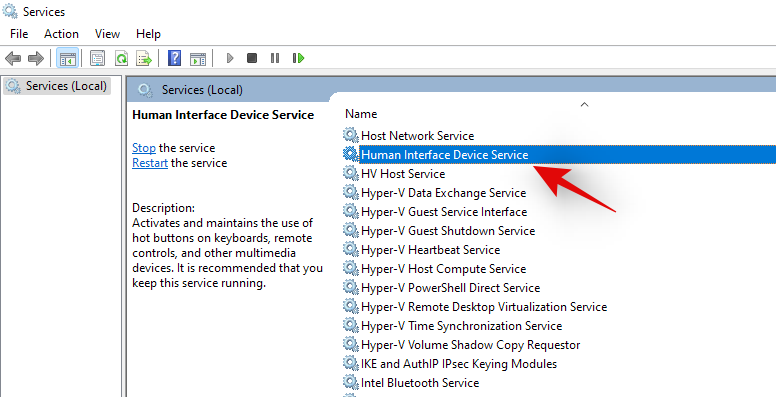
Look for ‘Human Interface Device Service’ and right-click on it.
Select ‘Restart’.
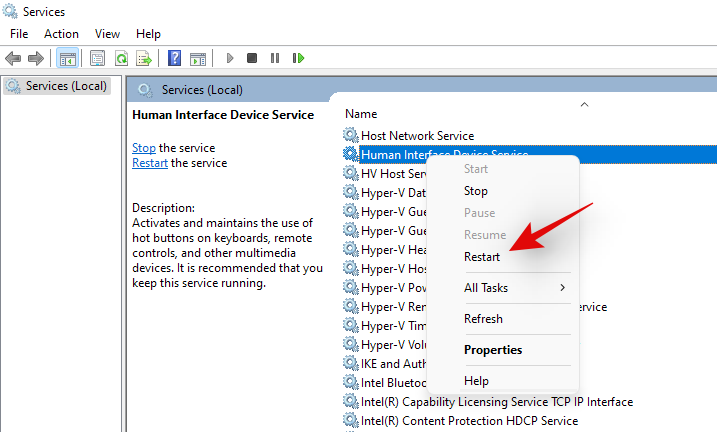
Windows will now restart your HID service.
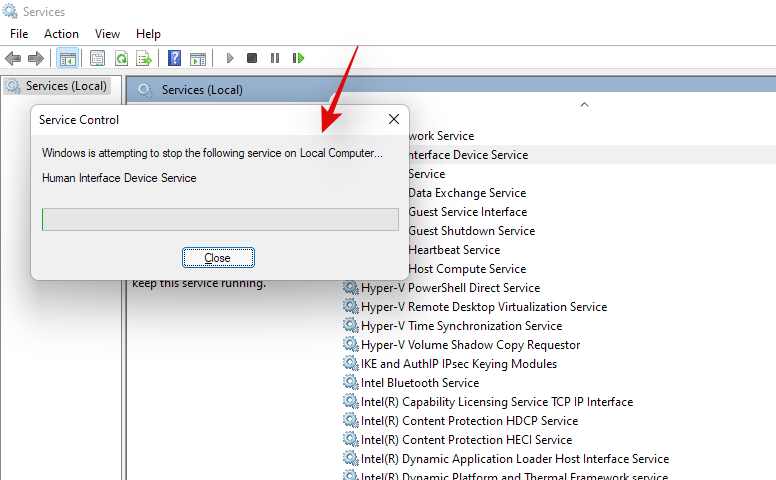
You can try testing out your hotkeys now. If a conflict in the background was preventing your custom software from hooking into the HID service, then this issue should now be fixed and your hotkey functionality should now be restored.
Method #7: Disable filter keys
Filter keys are another culprit within Windows that is known to cause issues on many devices. Ideally, Filter keys is an accessibility feature meant to be used so that you can avoid brief repeated key inputs which is quite useful for users with anxiety, hyperactivity, hand tremors, and other similar conditions.
However, if this feature has been enabled by mistake, then it could prevent Windows from detecting your hotkey inputs and combinations. You can check if Filter keys are enabled on your system and disable them using the guide below.
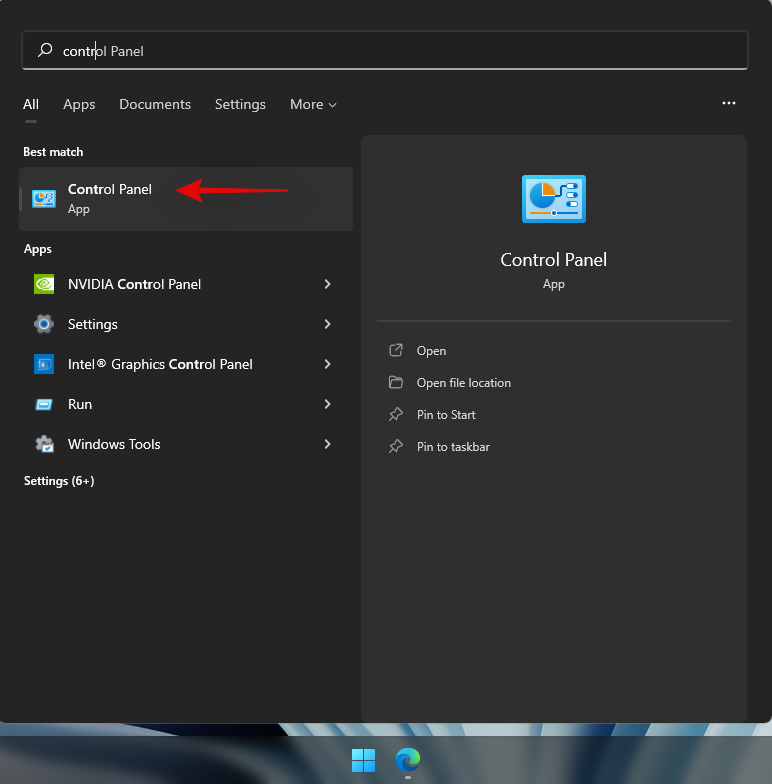
Press Windows + S and search for Control Panel. Click and launch the app once it shows up in your search results.
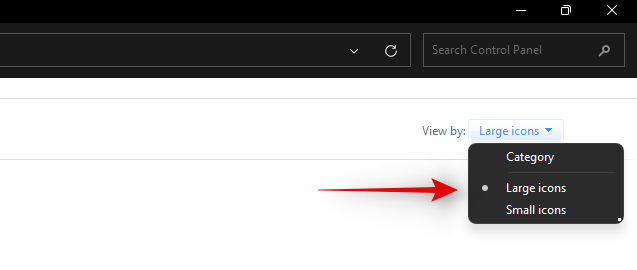
Switch to ‘Large icons’ by clicking on the drop-down menu in the top right corner.
Click on ‘Ease of Access Center’.

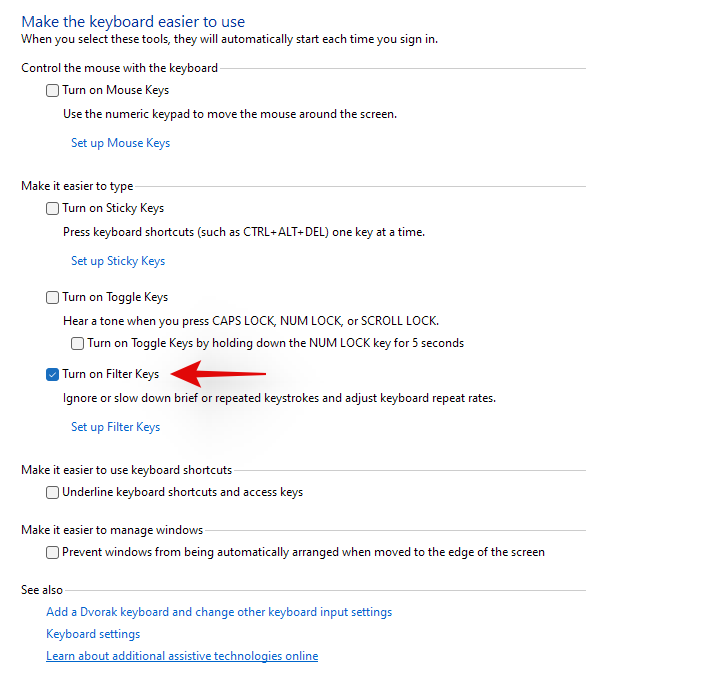
Click on ‘Make the keyboard easier to use’.
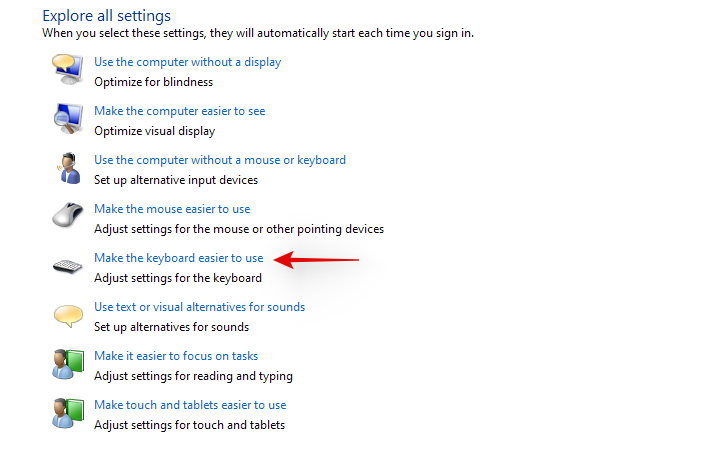
Now uncheck the box for ‘Turn on filter keys’.
Click on ‘Ok’ at the bottom.
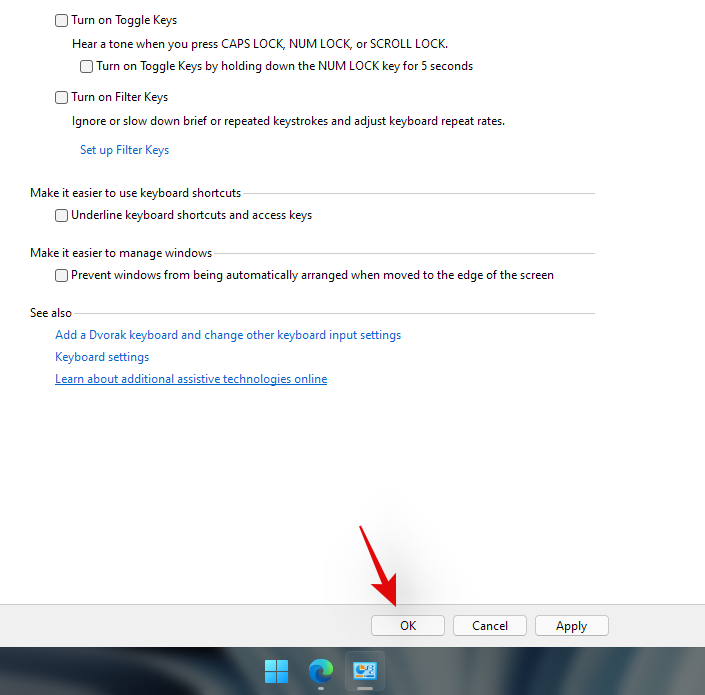
And that’s it! Filter keys should now be disabled on your system. Check your hotkey combinations and their functionality should now be restored on your system.
Method #8: Disable Function (Fn) lock if available
Fn lock is a feature in most laptops that allows you to lock and use the Fn keys and their functionality. Most systems use Fn keys as alternate keys mapped to functions and utilities that will be needed to manage your system. For example, F7 could be used to increase brightness and F8 could be used to decrease brightness. If directly pressing these keys helps you manage your brightness then the Fn lock is disabled on your laptop.
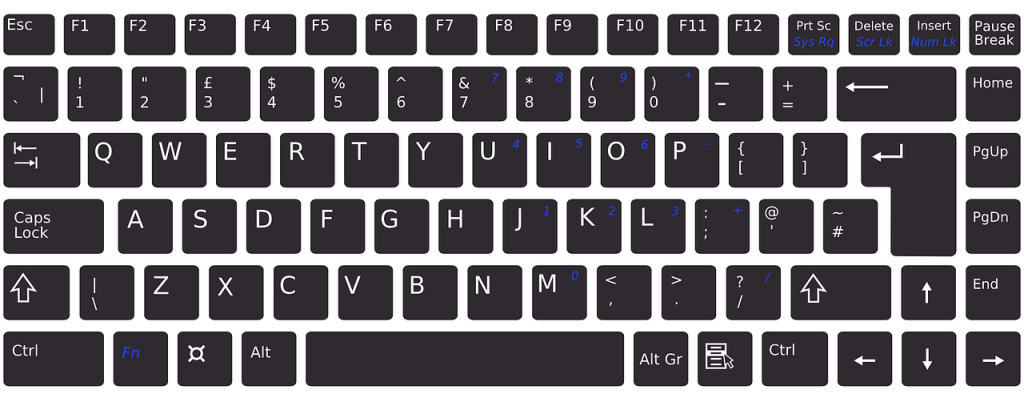
However, if hitting F7 and F8 registers as the respective key then the Fn lock is enabled on your device. In such cases, your Fn keys will behave normally and you will need to use Fn + F7 or F8 combination to adjust your brightness. You can disable or toggle this lock using keyboard shortcuts on most laptops. Look for an ‘Fn Lock’ icon on one of your keys and pres Fn + the respective key, on your keyboard. This should help disable Fn lock on your keyboard if enabled, and restore your hotkeys functionality.
In case a key combination is not available on your device, then you will most likely need to access your BIOS. Most manufacturers allow you to disable and enable Fn lock from the BIOS for easy access. Simply press F2 on your splash screen once your laptop is booting to enter the BIOS menu. Once in the BIOS menu, find the relevant option and toggle the Fn lock for your laptop.
In case a BIOS menu option is also not available to you then your laptop most likely uses the default Fn lock combination which is ‘Fn + Esc’ on your keyboard. This will help toggle the Fn lock on your system which should help restore your hotkeys.
Method #9: Check the on-screen keyboard
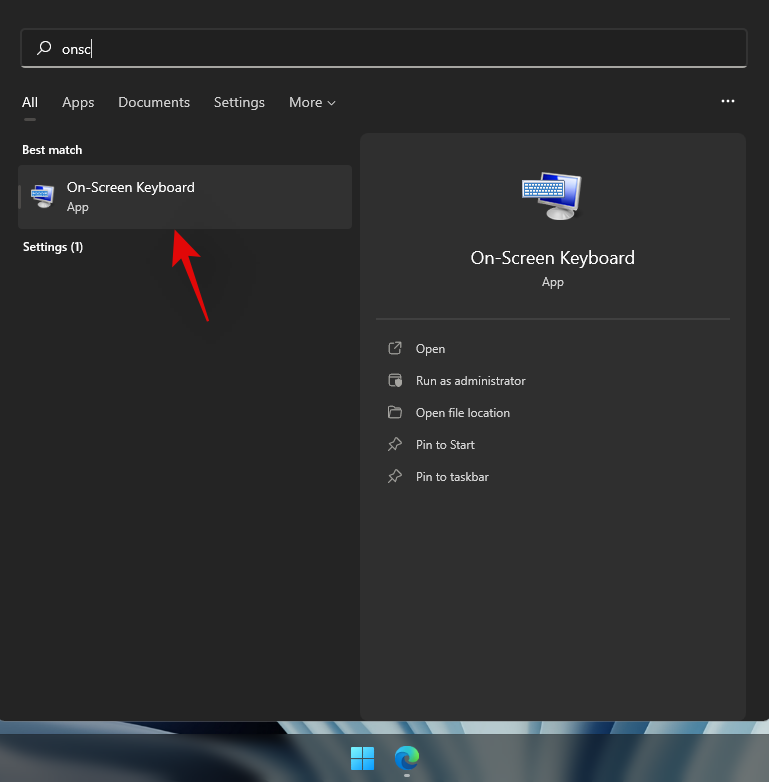
On-Screen keyboard within Windows can help you determine if your hotkeys have actually stopped working or you are facing a software issue. Start by launching the on-screen keyboard on your laptop using the taskbar icon. If the icon is hidden, press Windows + S on your keyboard and search for ‘On-Screen Keyboard’. Click and launch the app from your search results.
Now try using a hotkey that does not use Fn keys on your keyboard as they would be unavailable on your on-screen keyboard. If not try testing out each key and see if it still works on your laptop.
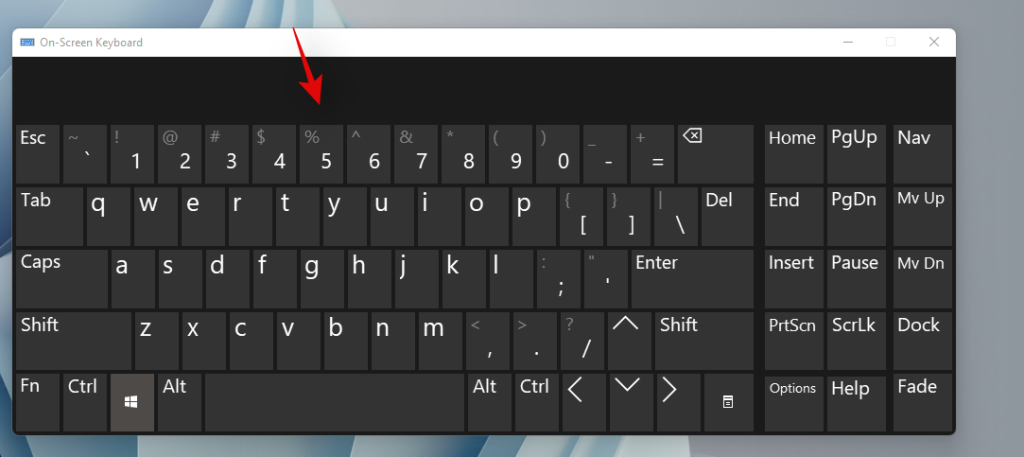
If all your keys seem to be registering with hotkeys working via the on-screen keyboard, then this indicates a hardware issue with your keyboard. In such cases, we recommend you get in touch with your OEM support team and try to solve your issue. If however, you are unable to activate your hotkeys via the on-screen keyboard as well, then you can use the fixes below to try and solve your issue.
Method #10: Use Windows troubleshooter
If hotkeys still fail to work on your system then it’s time to run a dedicated Windows troubleshooter. Windows troubleshooters have become highly advanced in the past few years and they can help fix most issues with your system nowadays. Use the guide below to run a keyboard troubleshooter on Windows 11.
Press Windows + i on your keyboard and click on ‘Troubleshoot’ on your right.
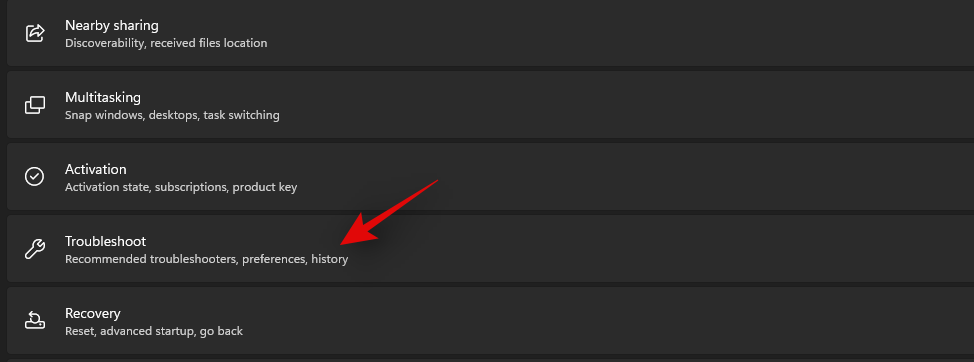
Now click on ‘Other troubleshooters’.
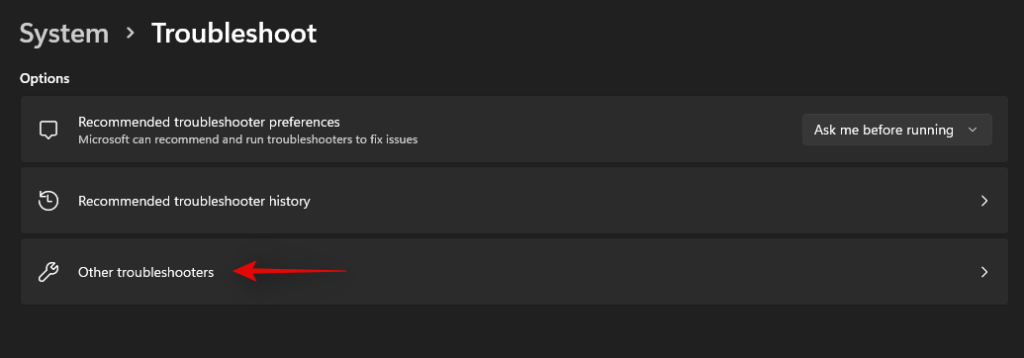
Scroll down and click on ‘Run’ beside ‘Keyboard’.

Windows troubleshooter will now do its thing and try to find issues with your keyboard.
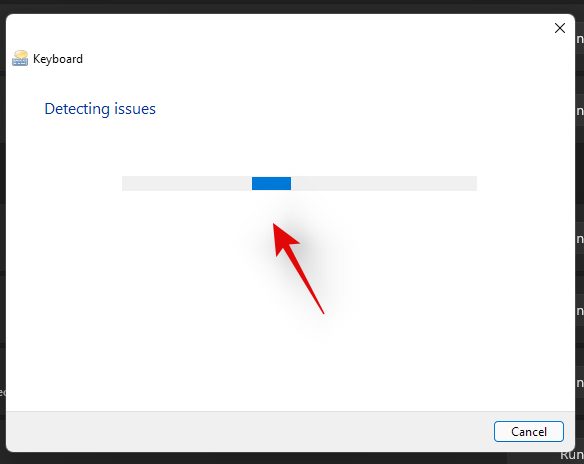
If any are found, follow the on-screen instructions to apply the relevant fixes. However, if the troubleshooter does not find anything then you can use the methods below to try and get your hotkeys working again.
Method #11: Run SFC scan
If hotkeys still aren’t working on your laptop then this might indicate an issue with your Windows installation. Let’s try to fix Windows system files and Windows 11 image on your laptop to try and fix hotkeys on your system. Use the guide below to get you started.
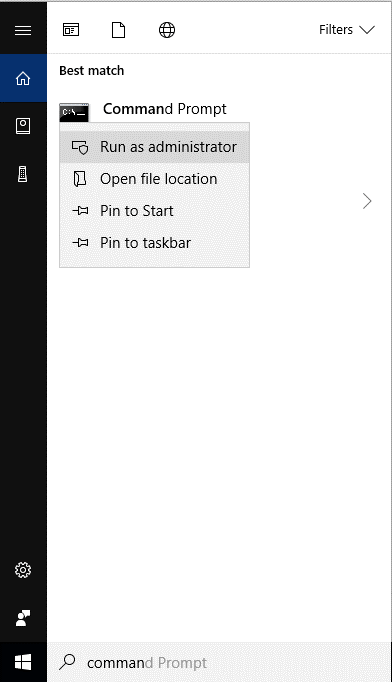
Press Windows + S on your keyboard and search for ‘CMD’. Click on ‘Run as administrator’ once it shows up in your search results.
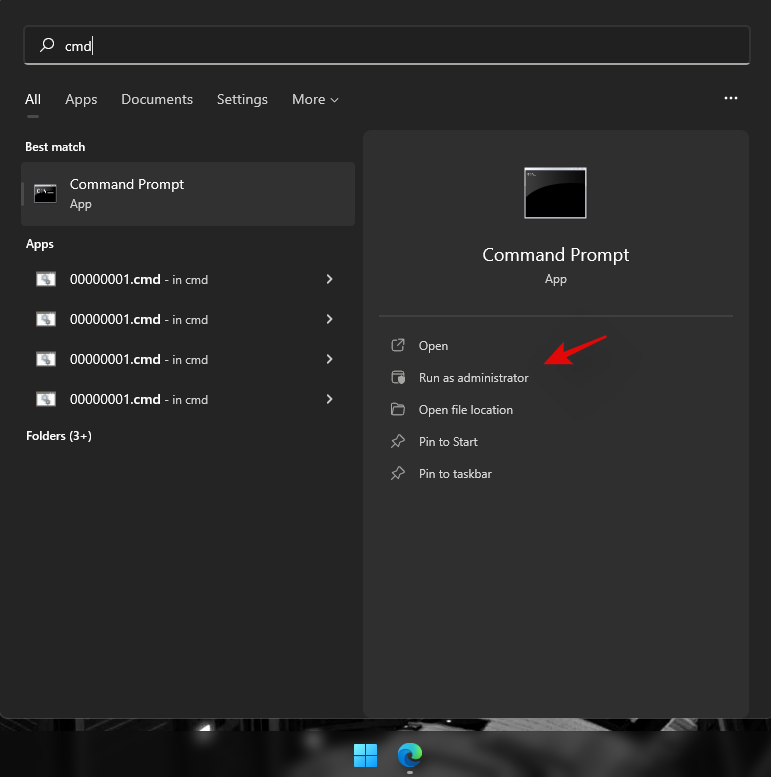
Now type in the following command and press Enter on your keyboard to execute it.
sfc /scannow

Windows will now scan and verify all of your system files and replace corrupted ones with fresh system files. If a corrupted Windows 11 installation broke your hotkeys functionality, then this should help fix it on your laptop.
Method #12: Run DISM fixes to restore Windows image
If you got the following message after running the SFC scan above, then it is highly important to run the DISM commands to fix your Windows 11 image.
“Windows Resource Protection found corrupt files but was unable to fix some (or all) of them”
Additionally, if the SFC scan is completed successfully but your hotkeys still do not work, then you can use the DISM commands to try and fix your Windows image as well. This will restore system files and solve background conflicts that might be preventing you from using your hotkeys. Follow the steps below to get you started.
Press Windows + S on your keyboard, search for CMD and click on ‘Run as administrator’ once it shows up in your search results.

Type in the following command and press Enter on your keyboard to execute it.
DISM /Online /Cleanup-Image /RestoreHealth

Wait for the process to complete and restart your laptop for good measure.
If a corrupted Windows image was the cause of your issue, then hotkey functionality should now be restored on your laptop.
Method #13: Uninstall any third-party tools
If you have any third-party tools customizing your keyboard then we recommend you disable or uninstall them at once. This includes the likes of key mappers, macro customizers, keyboard backlighting customizers, keyboard layout changes, and more. Such apps use different ways to hook into your keyboard drivers via Windows and any one of these could be outdated and not compatible with Windows 11 on your system.
We recommend you uninstall any such tools from your system at the earliest and remove any additional leftover configuration files if available. You should also check for driver updates to your keyboard and roll back to a previously known driver to revert any major changes applicable to your system. Use the guide below to roll back your keyboard driver.
13.1 How to rollback your keyboard driver
Press Windows + X on your keyboard and click on ‘Device manager’.

Find the desired keyboard in your list of devices and right-click on it once found.

Select ‘Properties’.
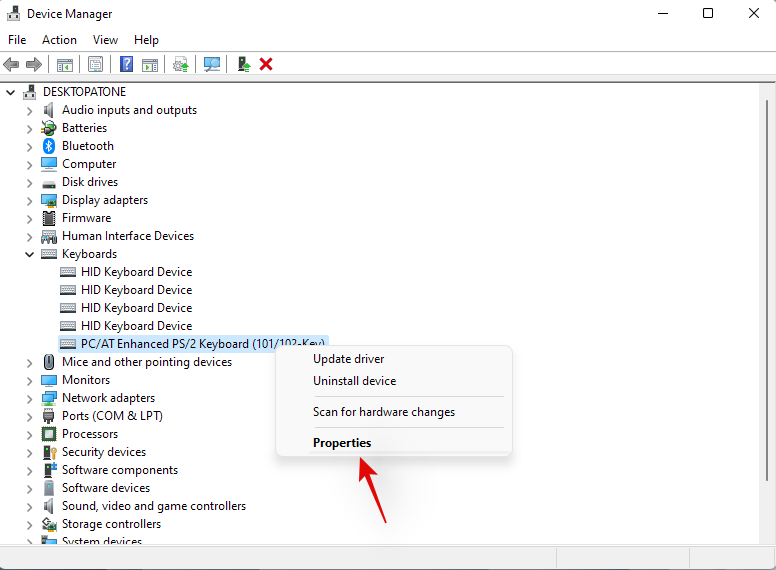
Click and switch to the Driver tab.
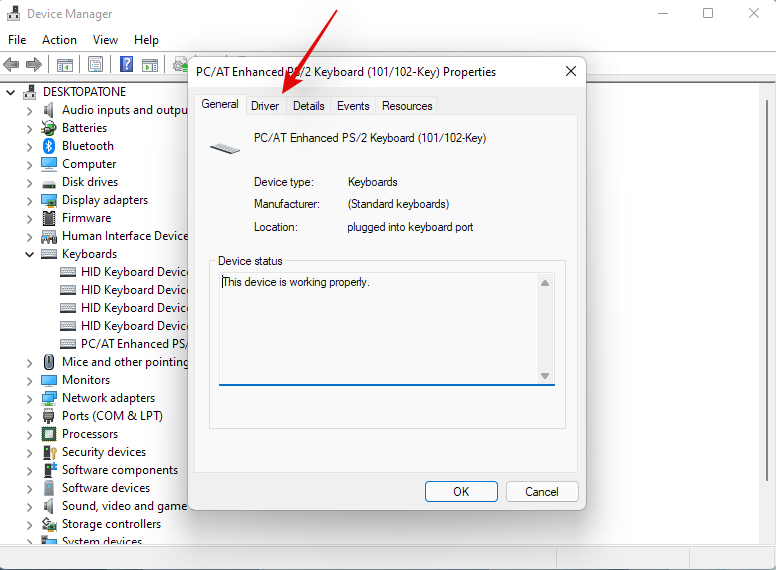
Click on ‘Rollback driver’ if available.
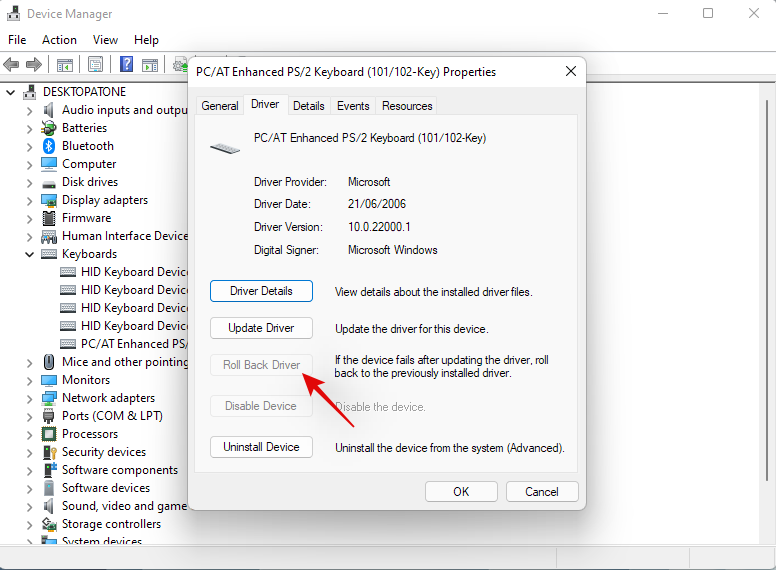
Follow the on-screen instructions to finish rolling back your driver.
Restart your system if prompted.
Once the driver is reverted to its previous iteration hotkeys should start working on your system again.
However, if you don’t have the option to roll back your driver then you will need to uninstall the installed drivers for your keyboard and hope that Windows sources the correct drivers when it scans for new hardware on your system. If you have dedicated drivers available for your keyboard on your OEM support site, then you can install them manually. Follow Method #10 below to reinstall your keyboard drivers manually or through Windows in this case.
Method #14: Connect to a different USB port (external keyboards only)
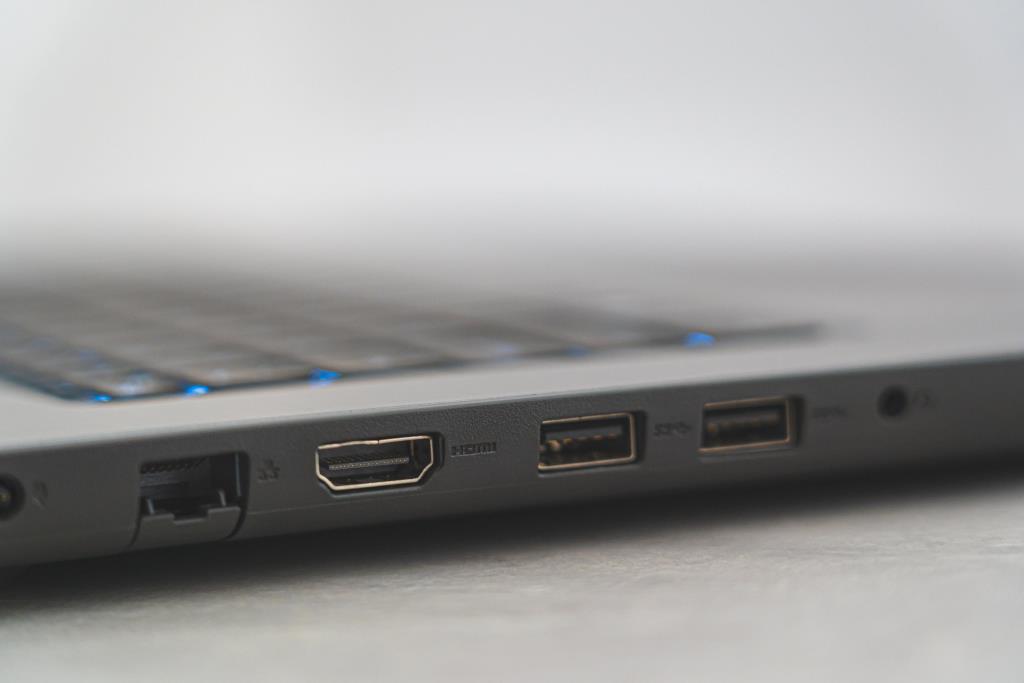
If you are using an external keyboard then we recommend using a different USB port. Depending on your keyboard you might need a USB 2.0 or USB 3.0 port for compatibility and keyboard layout reasons. Additionally, if your keyboard uses fancy backlighting and other custom features then it likely requires a USB 3.0 port on your system to power all of its features.
In contrast, if you are trying to use a legacy keyboard via adapters then you will likely need to test USB 2.0 and USB 1.2 for best performance depending on your unit. Moreover, we recommend you ensure that your laptop is plugged into power so that it can power your USB ports properly.
If however, your external keyboard still fails to work then you can try reinstalling its drivers on your system using the guide in this post.
Method #15: Check GPO and re-enable hotkeys if disabled
If you are using Windows Pro or higher that has been issued by your organization or your educational institute then it is likely that hotkeys have been disabled on your system by your administrator. This could be a side effect due to a recent change, or it could be your new company policy.
Administrators tend to disable third-party apps on company-issued and education systems which also, in turn, disables hotkey functionality for most laptops. You can fix this issue by contacting your administrator and whitelisting your hotkey app in case you don’t have access to the Group Policy Editor. However,
If you are an administrator, with access to GPO, then you can use the guide below to re-enable hotkeys on your system.
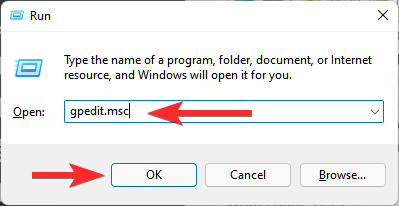
Press Windows + R on your keyboard, type in the following term, and press Enter on your keyboard.
gpedit.msc
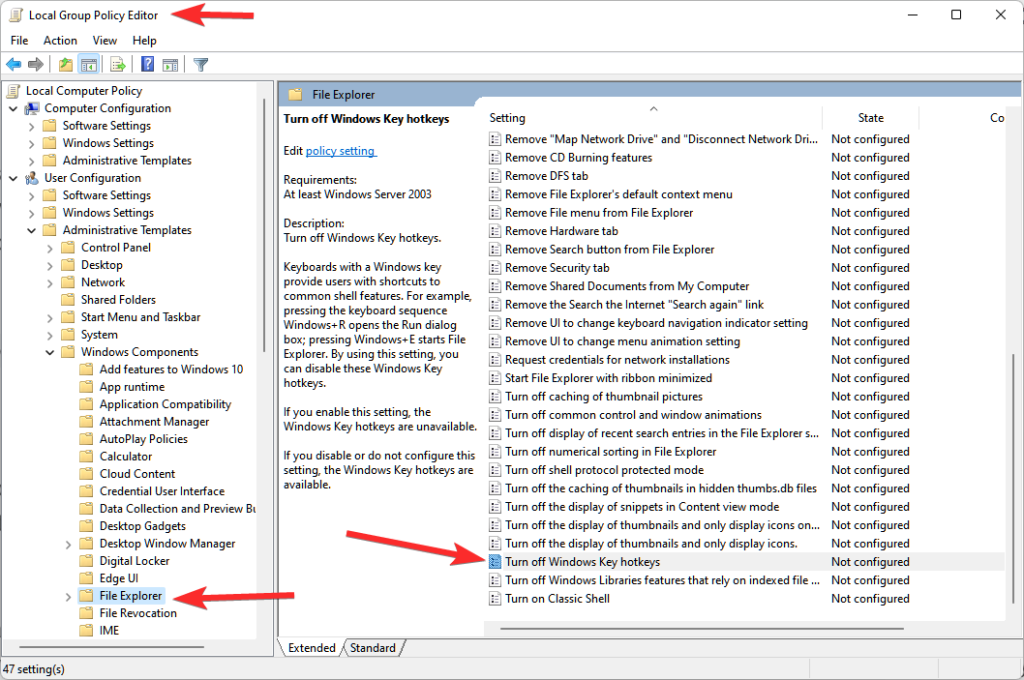
Navigate to the following path.
User Configuration > Administrative Templates > Windows Components > File Explorer
Double click on ‘Turn off Windows Key hotkeys’.
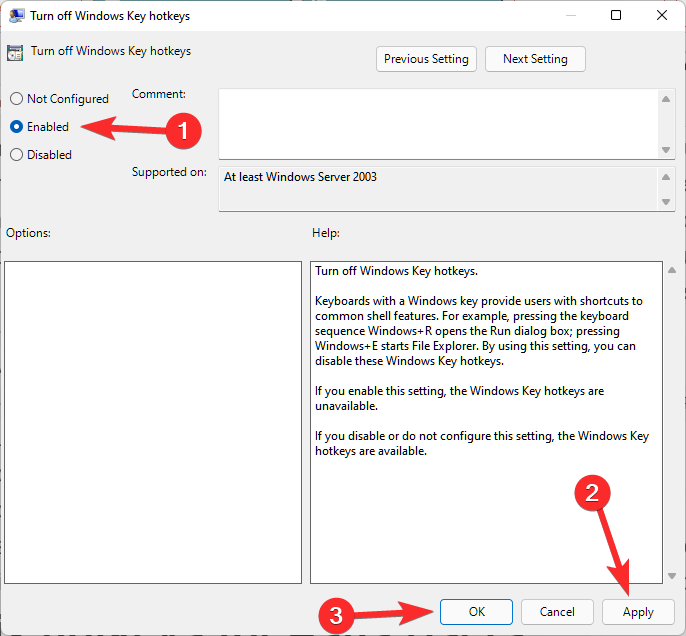
Click and select ‘Enabled’ in the top left. Then click ‘Apply’ in the bottom right and then click ‘OK’.
Restart your laptop for good measure and hotkey functionality will now be restored on your system. Please keep in mind that this will only work for OEMs that hook into Windows shortcuts natively to get hotkeys working again. For manufacturers that have dedicated utilities, you can use one of the guides below.
Fix hotkeys for Asus Users
If you are an Asus user with a ROG or a TUF unit, then it is likely that you are dealing with Armoury Crate. Armoury Crate is Asus’s utility that helps you manage your power plan, performance plan, overclocking, keyboard backlighting, and more depending on your laptop. Over the years Armoury Crate has grown to be quite finicky and has been riddled with telemetry and adware.
Moreover, the Aura Sync utility seems to be a hit or miss when syncing your peripherals’ backlighting with each other. If you have an Asus unit and hotkeys don’t seem to be working for you then it is likely that the Asus hotkeys app hasn’t been launching in the background. In this case, you can either try to manually start the app or reinstall AC service and the Asus System interface reconfigure your hotkeys and restore their functionality. Use one of the guides below that best fits your current needs and requirements.
Method #1: Try to manually start AsusHotkeyExec.exe
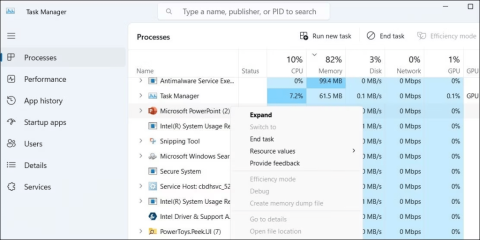
Press Ctrl + Shift + Esc on your system to open the Task Manager and switch to the ‘Details’ tab.
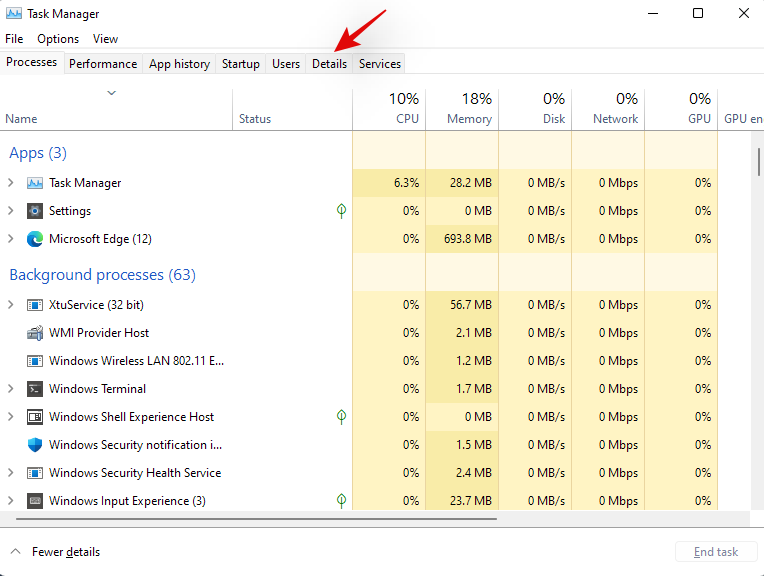
Depending on your preferences, the install location of AsusHotKeyExec.exe could vary. Hence we will use an already running process to find its install location. Start by right-clicking on either of the following ongoing tasks.
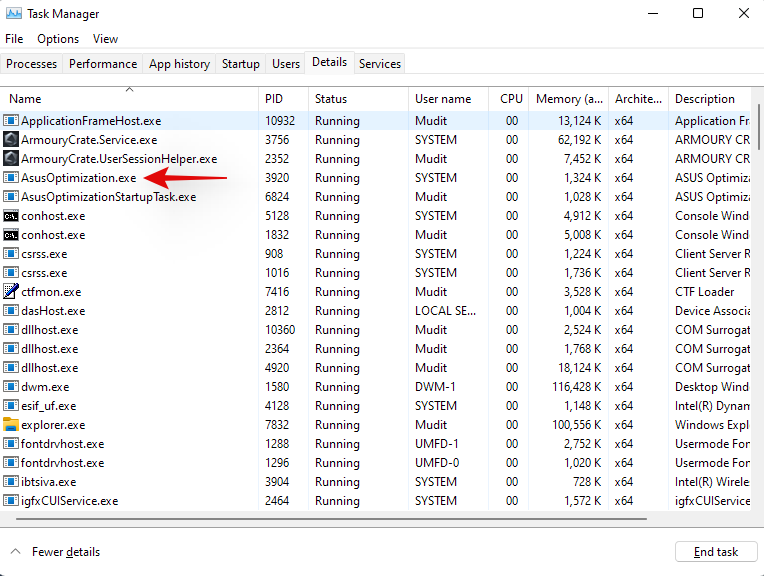
Select ‘Open file location’.
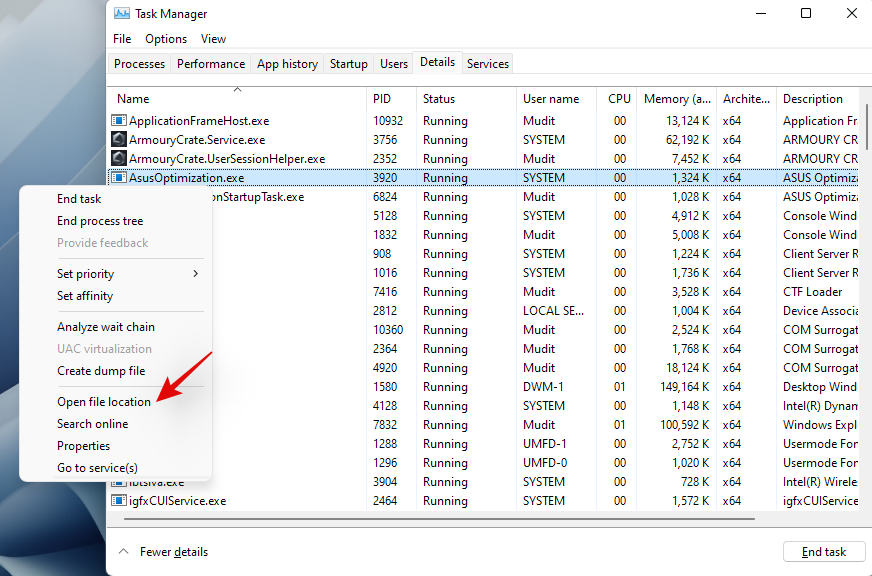
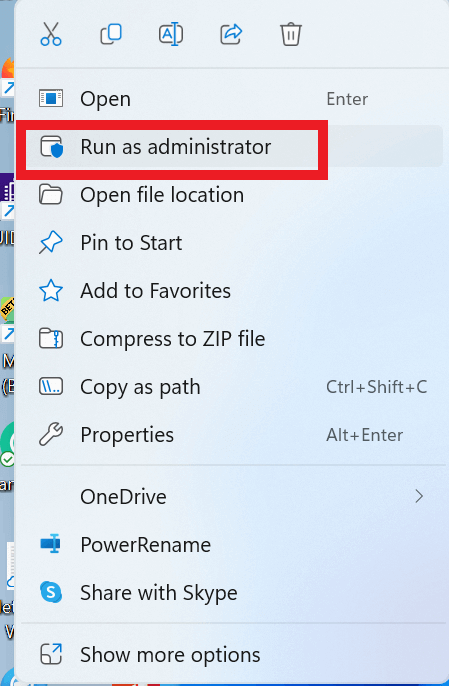
You should now be taken to the ‘C:\Windows\System32’ ideally, where you should find the ‘AsusHotkeyExec.exe’. Right-click on the app and select ‘Run as administrator’.
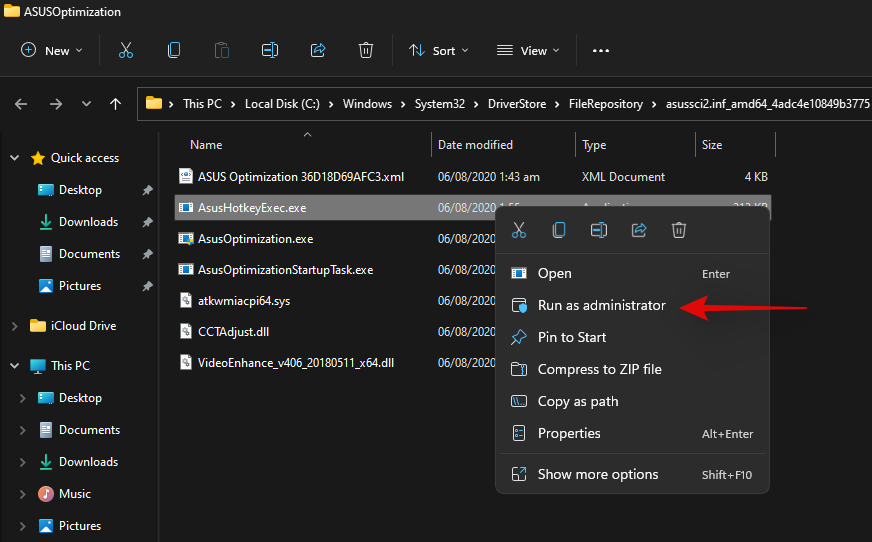
The app will now launch in the background and restore hotkey functionality on your system.
Try using one of your hotkeys now, if it seems to be working then, likely, AsusHotkeyExec.exe did not automatically launch in the background. This could be an isolated incident but if the app fails to launch even after a restart, then you will need to re-enable its auto start functionality.
You can do this by reinstalling Asus System Interface and Armoury Crate Service on your laptop using the guide below.
Method #2: Re-install Asus System Interface and Armoury Crate service
Asus System Control Interface is a prominent utility regularly updated by Asus that helps most tools like Armoury Crate, Armoury Crate Service, MyAsus System Diagnosis, and more to run properly on your system. Armoury Crate service on the other hand is your overclocking utility bundled with specific overclocking and power management configurations for your specific device. Depending on your ROG or TUF unit, AsusHotkeyExec.exe could be bundled with either of these services. Let’s re-install both of them on your system.
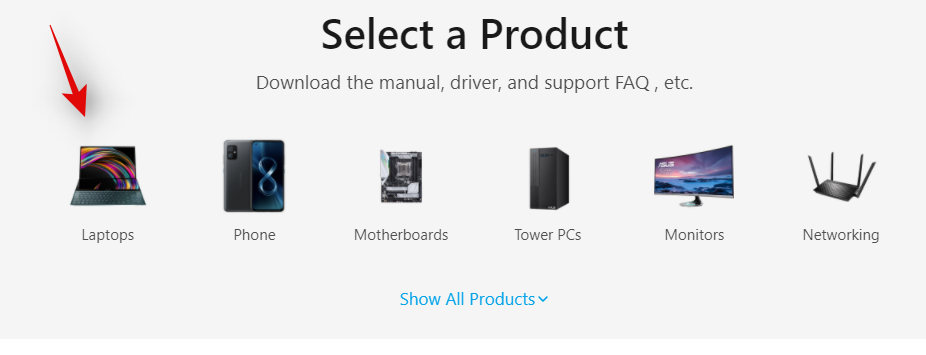
Visit the link above and click on ‘Laptops’.
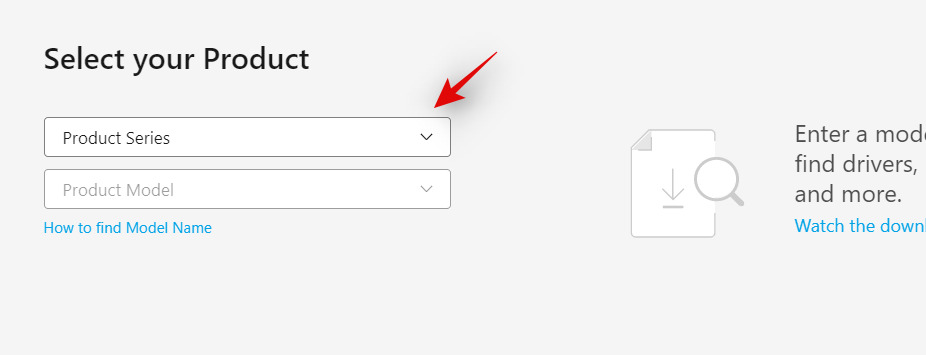
Click on ‘Product Series’ and select your Series from the drop-down menu.
Click on the next drop-down menu and select your laptop from the list.
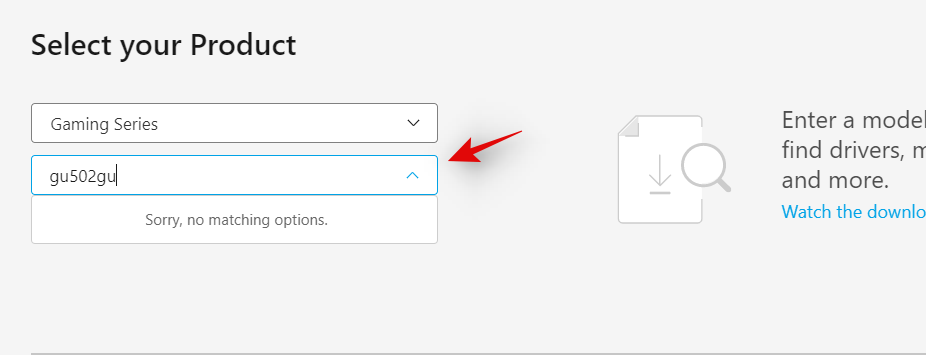
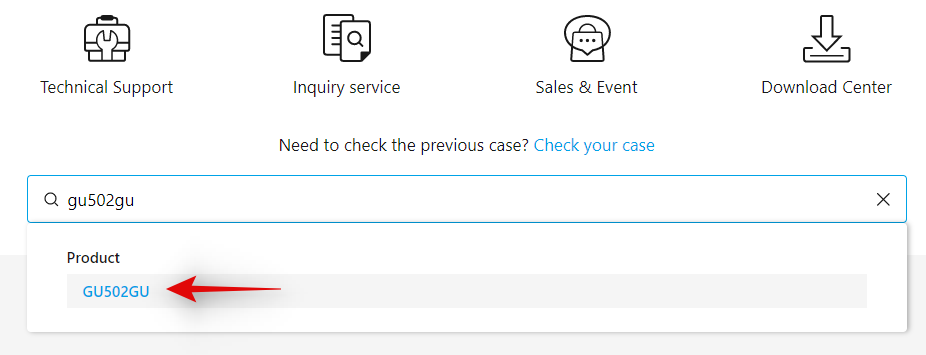
If your unit is not listed in this list, then you can search for it using the search bar at the top. Click on your laptop model once it shows up in your search results under ‘Products’.
Click on ‘Driver & Utility’.
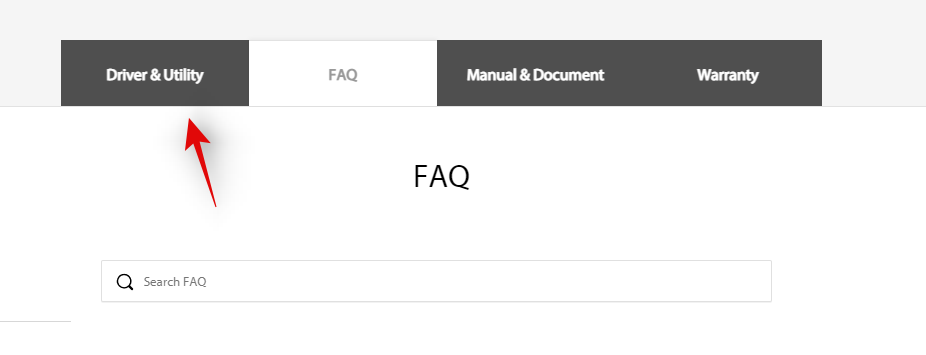
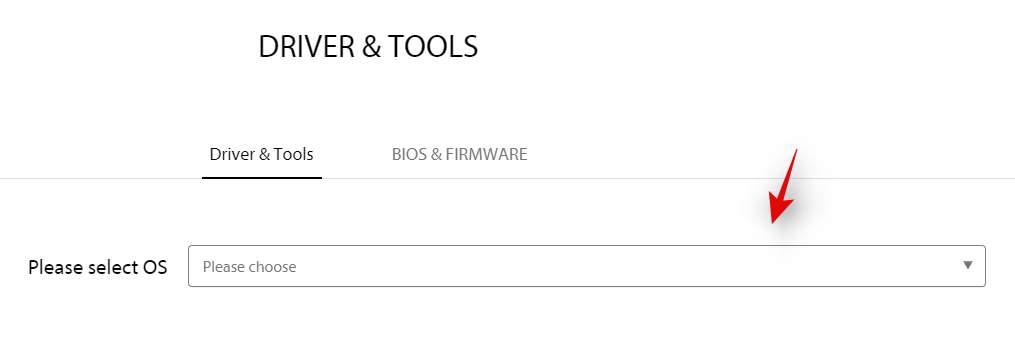
Choose ‘Windows 10 64-bit’ as your OS.
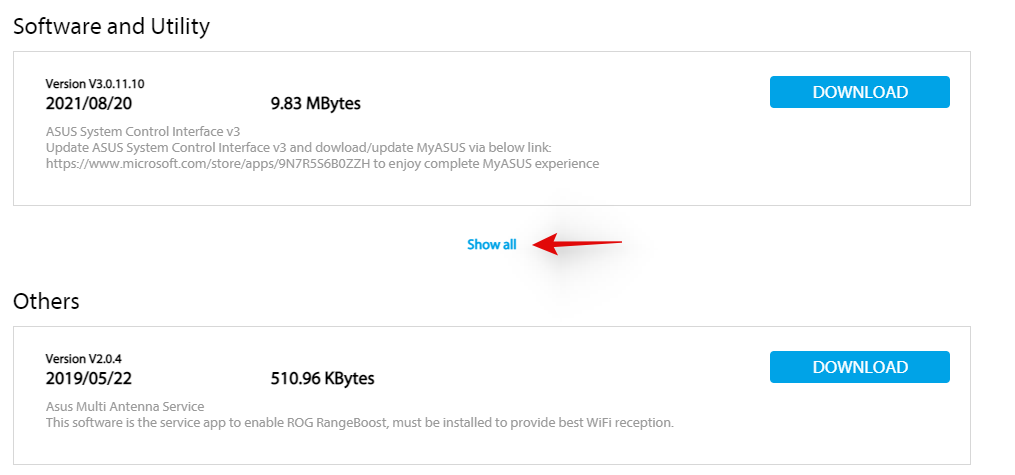
Now scroll down to the ‘Software and Utility’ section and click on ‘Show all’.
Click on ‘Download’ beside the latest version of ASUS System Control Interface.
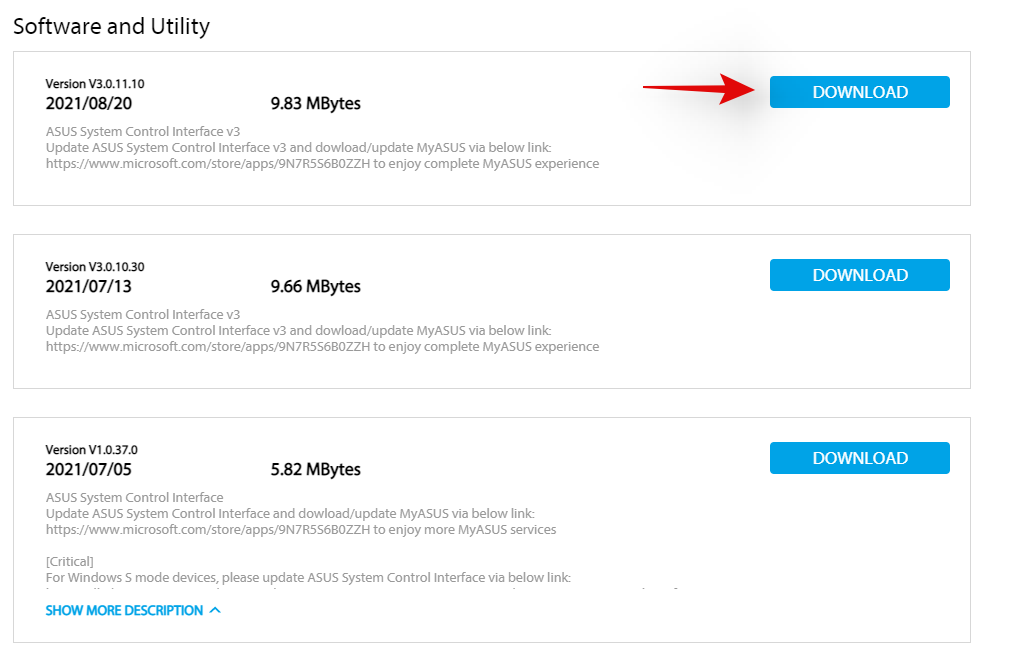
Similarly, click on ‘Download’ beside Armoury Crate Service.
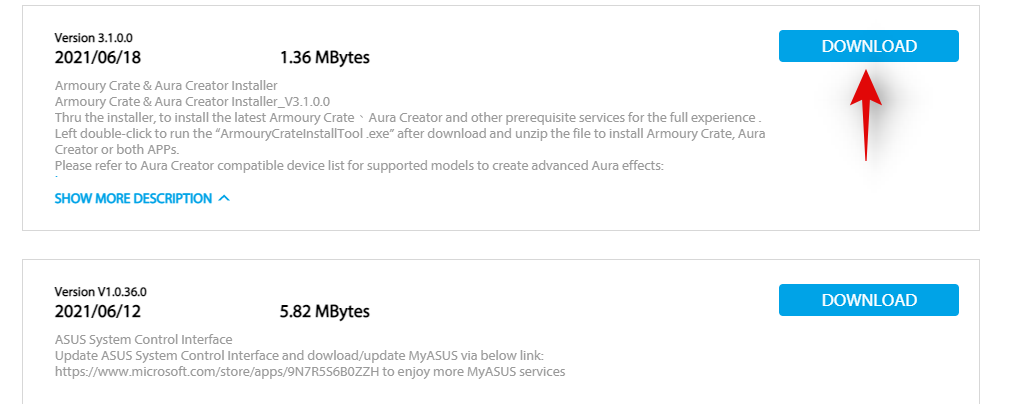
Note: Asus has now started bundling the Armoury Crate app, Armoury Crate Service, Aura Sync app, and Aura Sync service in a single package for many laptops. If this is the case for your unit as well, then you can download this package.
Now let’s remove all installed services and packages that we are going to reinstall. Press Windows + i on your keyboard and click on ‘Apps’ on your left.

Click on ‘Apps and features’.

Now uninstall the following applications if you managed to source the Armoury Crate Service package from the download page.

However, if you got a single package to install Armoury Crate, Armoury Crate Service, Aura Sync app, and Aura Sync service, then uninstall the following applications from your laptop.
To uninstall an app, click on the 3-dot menu beside it and select ‘Uninstall’. Click on ‘Uninstall’ again to confirm your choice. Repeat the steps above to uninstall all the necessary apps from your system.
Note: Do not remove services like Refresh Rate service, Pointing device service, and more from your laptop during this process. Even though they hook into the Armoury crate, there is no need to uninstall them as the existing installation will work with your reinstalled Armoury Crate and its services.
We will now uninstall Asus System Control Interface from your system. The best way to do this is by using the Device Manager. Follow the guide below to get you started.
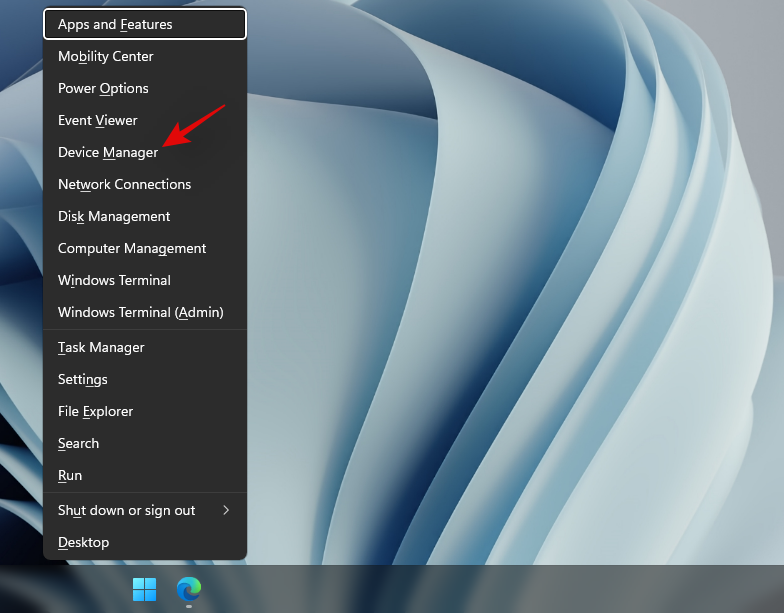
Press Windows + X on your keyboard instead and select ‘Device Manager’.
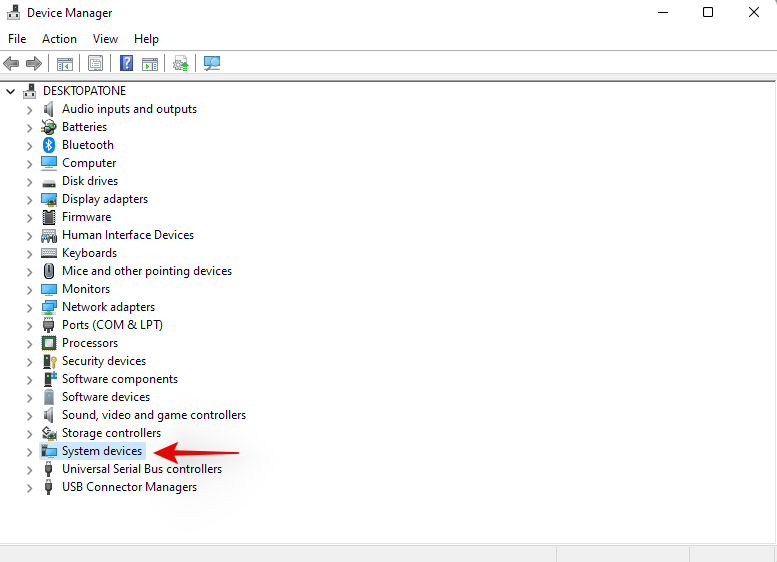
Click and expand ‘System devices’ in Device Manager.
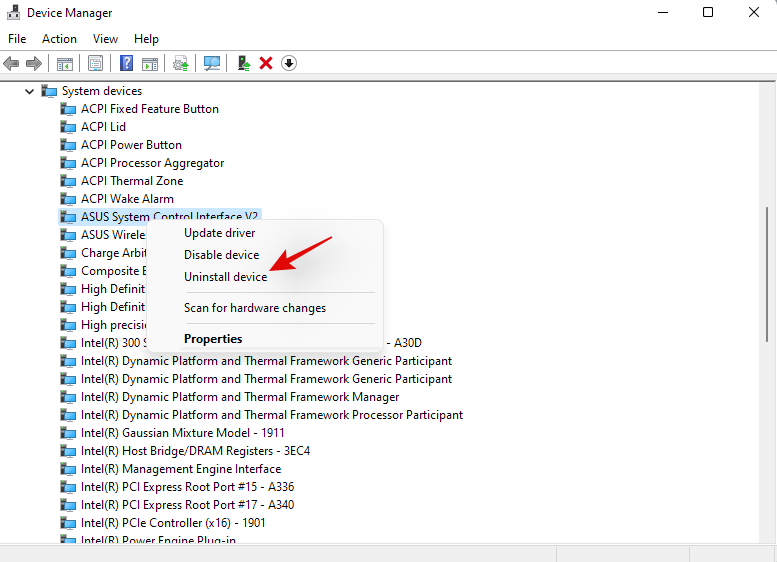
Right-click on ‘Asus System Control Interface’ and select ‘Uninstall device’.
Click on ‘Uninstall’ to confirm your choice. Additionally, check the box for ‘Attempt to remove the driver for this device’ if available.
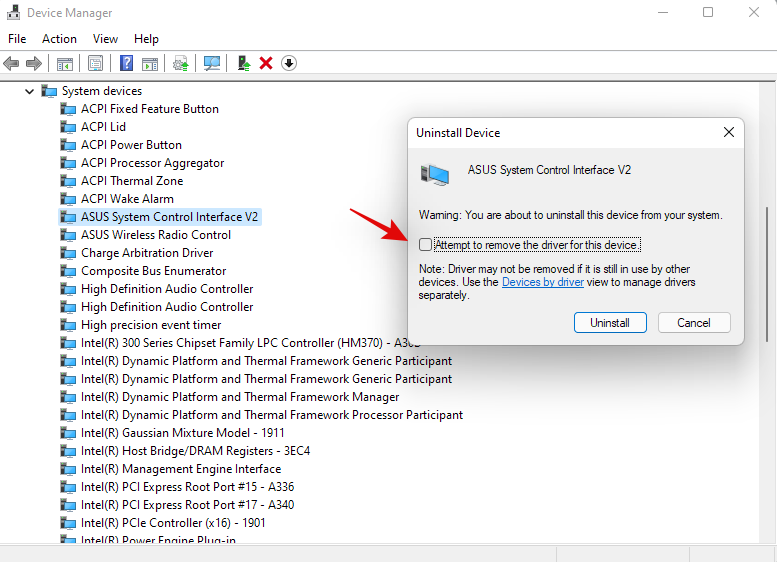
If Asus System Control Interface is unavailable in your device manager then you can restart your laptop at this point. Once restarted, follow the subsequent steps to re-install Armoury Crate and Asus System Control Interface on your system. The concerned drivers will now be uninstalled from your system. You can now restart your laptop for the changes to take effect.
Once your laptop restarts, navigate to the packages we downloaded from Asus’s website on your local storage and start by installing Asus System Control Interface first. Double-click and launch the .exe file and follow the on-screen instructions to install Asus System Control Interface on your laptop. You will be prompted to restart your system once the process completes. We recommend you restart your system at this point before proceeding with the installation of Armoury Crate on your system.
Once your system restarts, double click and launch the Armoury Crate package.
Select the utilities you wish to install on your system. Unless you have other Asus peripherals that support RGB backlighting through Aura Sync, there is no point in installing Aura Sync. Once you have selected the desired utilities, click on ‘Next’.
Click on ‘Install’ to start the installation process.
The package will now connect to Asus’s servers, identify your laptop and install the necessary compatible utilities. Once installed, we recommend you restart your system for good measure.
And that’s it! Once your system restarts, hotkeys should be back up and running again on your system.
Fix hotkeys for Lenovo users
If you own a Lenovo unit especially from the ThinkPad or IdeaPad series, then you will need to try out the following fixes. Lenovo’s professional lineup of laptops is bundled with tons of hotkeys and there are mainly 3 fixes you can try to fix your issue. Let’s first verify if your hotkeys have actually stopped working. Follow the steps below to get you started.
Method #1: Disable all shortcuts and enhancements
Let’s start by disabling all keyboard shortcuts and keyboard enhancements within Windows for your laptop’s keyboard. Follow the guide below to get you started.
Press Windows + S on your keyboard and search for ‘Control Panel’. Click and launch the app from your search results.
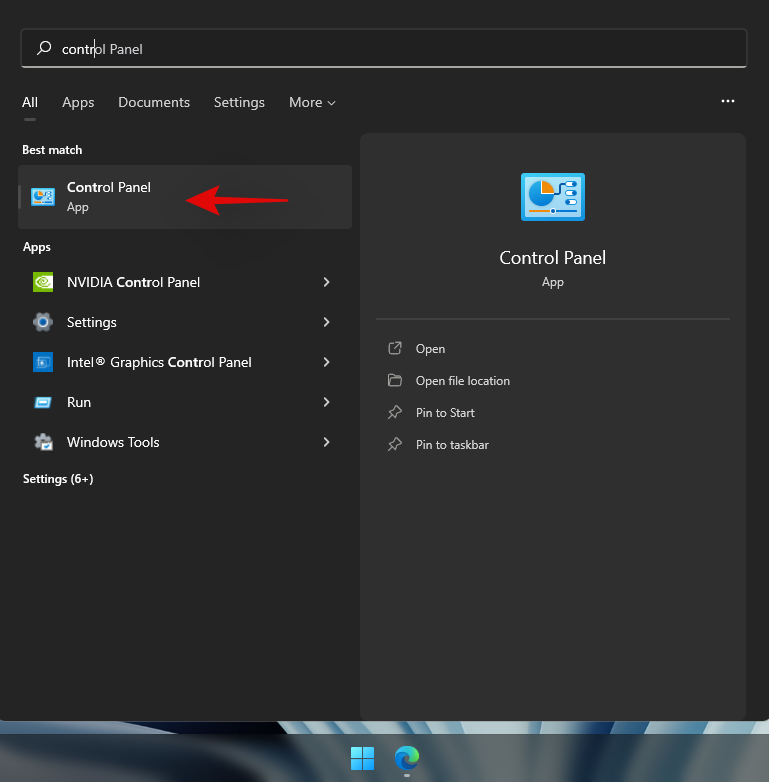
Click on the drop-down menu in the top right corner and select ‘Large icons’.

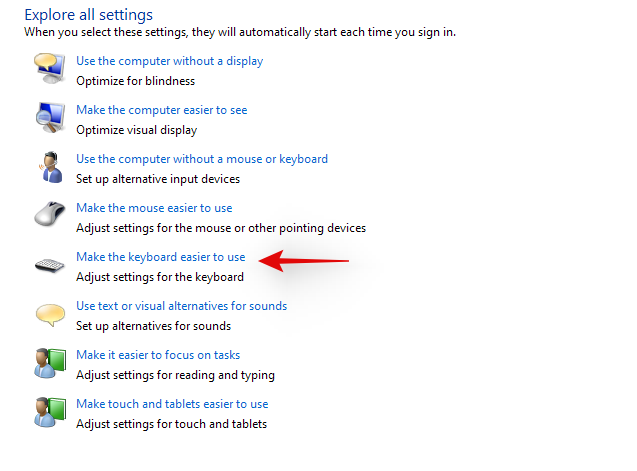
Click on ‘Ease of access center’.

Click on ‘Make the keyboard easier to use’.
Uncheck all the options available on your screen.
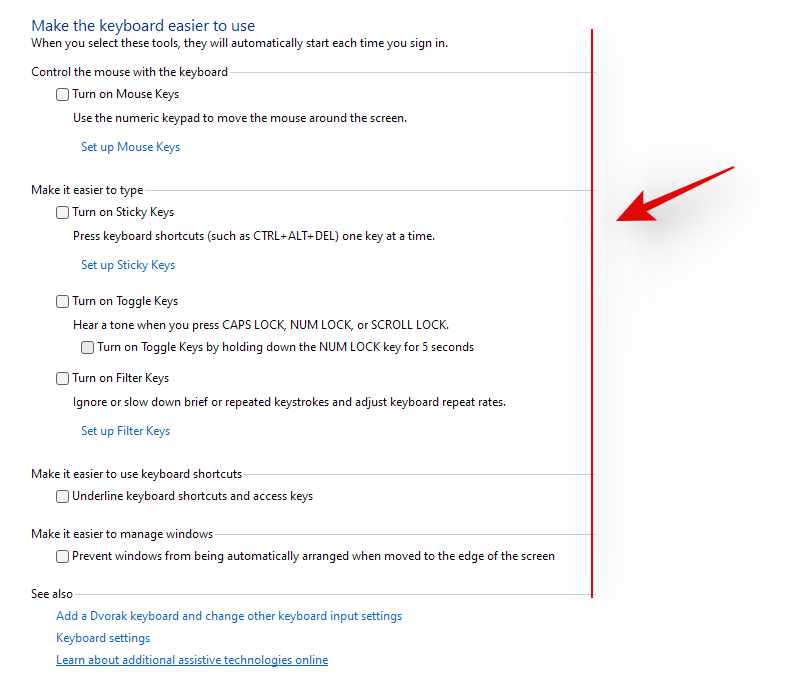
Save your changes and restart your laptop for good measure.

If keyboard enhancements enabled by Windows were causing conflicts with your hotkeys, then your hotkey functionality should be restored on your laptop by now.
Method #2: Update your drivers using Lenovo support
You might have manually updated your drivers, you might have reinstalled and rolled back your drivers, but this isn’t similar to downloading and installing drivers through the support app. Most OEM support apps are designed to automatically scan for known issues with your hardware in the background and fix them automatically. These support app also come with hotfixes and patches that aren’t readily available to the end consumer. These hotfixes and patches are applied when downloading and installing the concerned driver or utility,
Hence we recommend that you download and reinstall the following drivers on your system through the Lenovo support app. Depending on your unit’s make and model, you could be using a different Lenovo app like Lenovo Vantage and more. The process is similar for all these apps and you simply need to manually uninstall your keyboard drivers first and then reinstall the corresponding ones from your support app.
Note: We won’t be removing your power management drivers and instead we will be simply reinstalling them. Removing power management drivers can end up harming your vital components especially if your laptop is doing some resource-heavy work in the background.
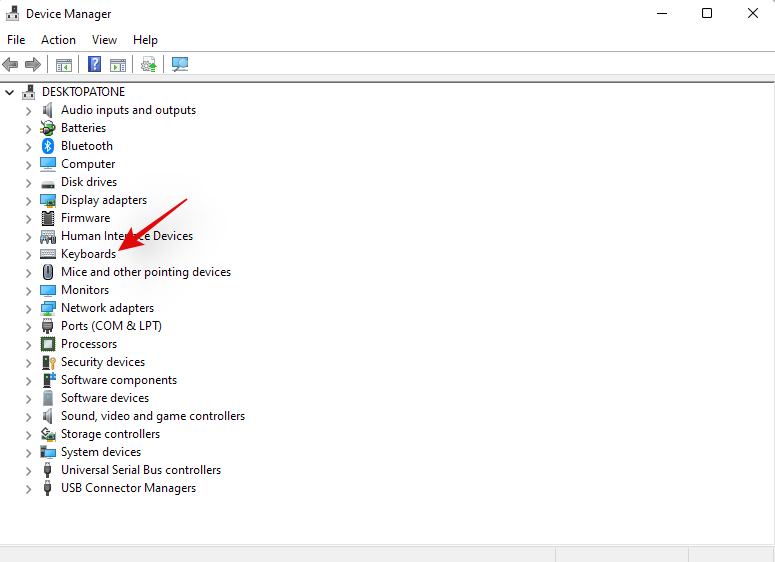
Press Windows + X and select ‘Device Manager’.

Find your keyboard under ‘Keyboards’ and right-click on it.
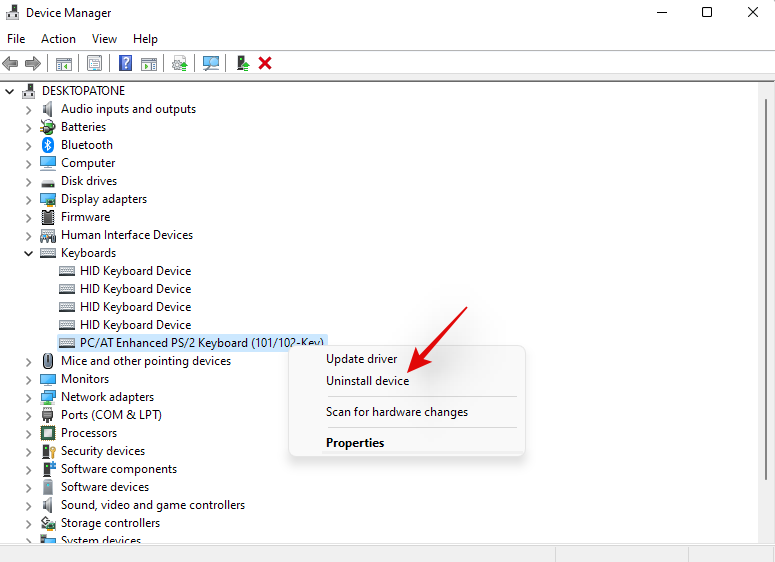
Select ‘Uninstall device’.
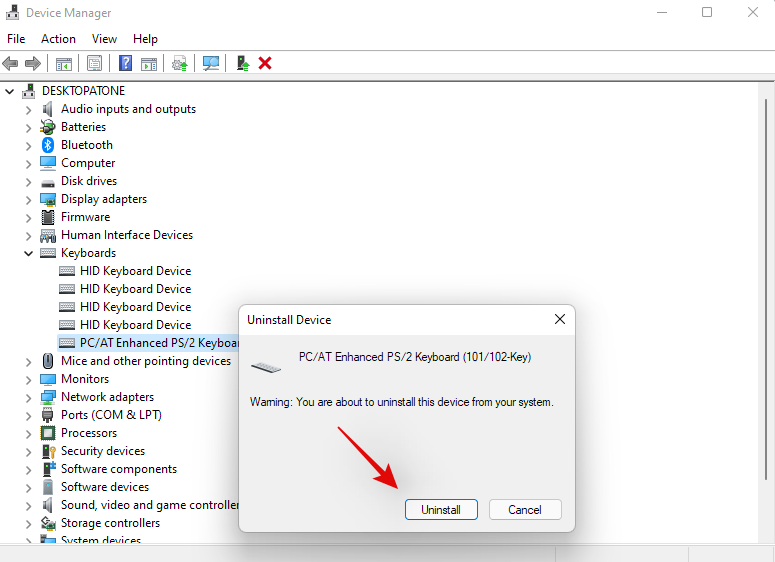
Check the box for ‘Attempt to remove the driver for this device’ if available. Click on ‘Uninstall’.
Your keyboard driver will now be uninstalled. Open the Lenovo System Update, Lenovo Vantage, or the corresponding Lenovo support app depending on your current laptop. We will be using the Lenovo System update app for this guide as that will be used by most modern systems currently and in the future. If you do not have the app installed on your unit, then you can use the link below to download it to your laptop.
Download and install the app on your system using the link above. Once installed, launch the app and log in with your device and account details if prompted.
Click on ‘Get new updates’ on your left.
Lenovo System update app will now detect your configuration and look for compatible upgrades accordingly. Once the process completes, all available updates will be shown on your screen according to their priority. Check each of the following sections and check the boxes for the updates you wish to install on your laptop. Your keyboard driver will also show up in this list as it is currently missing from your system. Ensure that you check the box for your keyboard driver before moving to the next step.
Note: Do not check the boxes for your bios updates. We recommend you download and install bios updates, individually and separately so that your laptop does not face installation conflicts in the background during this process.
Click on ‘Download’ in the bottom right corner.
Lenovo system update will now download and install all the selected drivers on your system. Your laptop could automatically restart a few times during this process which is normal. Simply log back into your account and wait until the installation process has been completed.
Once all the drivers are installed on your system, try using your keyboard hotkeys again. In most cases for Lenovo devices, your hotkeys should be back up and running on your system again. Lenovo is known to apply certain patches in the background when installing hotkey drivers and create certain tasks to maintain the functionality of your hotkeys. A reinstallation should have reinitiated this process again which should have fixed your hotkeys.
Fix hotkeys for Acer users
If you are using an Acer system then there isn’t much you can do at this point. Acer is known to keep its hotkeys simple with minimal customization available to the end-user. This in turn means that if the above-stated general fixes did not work for you then it is unlikely that resetting the CMOS will. However, if you have overclocked your unit or have been messing around with voltage values, then you can try resetting your CMOS to get hotkeys back up and running on your system again.
Resetting the CMOS does a lot of things but it mainly helps reset changes to core system values like your voltage, frequency speed, and more. Resetting the CMOS also helps discharge capacitors on some laptops which can give you a sudo-fresh start which is known to solve many persistent errors and issues with systems in the past. Use this comprehensive guide by us to reset your CMOS on your Acer unit.
Check out: How to Reset BIOS in Windows 11
Facing error codes when restarting HID services? Try these fixes!

If you decided to restart your HID service using the guide at the top, then you could end up facing two common errors depending on how your system has been configured. These are known errors and can be fixed on your system using the guides below. Follow the steps to get you started.
Method #1: For error code 126
Error code 126 can be fixed by replacing the Hidserv.dll to your system 32 folder. Follow the guide below to get you started.
Note: You will need a Windows 11 installation media or ISO in case the .dll file is unavailable on your system. Make sure you have either of these handy before proceeding with the guide below. In case you do not have an installation media handy, then you can use the link below to download Hidserv.dll to your local storage.
Open the Windows installation media you have handy and search for Hidserv.dll using the search box in your top right corner.
Once found, copy the file to a convenient location on your local storage. If however, you downloaded the file to your local storage using the link above, then extract the archive to a convenient location and follow the steps below to edit its security permissions.
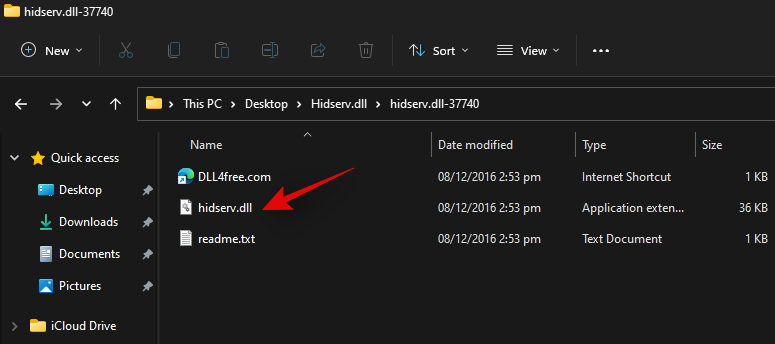
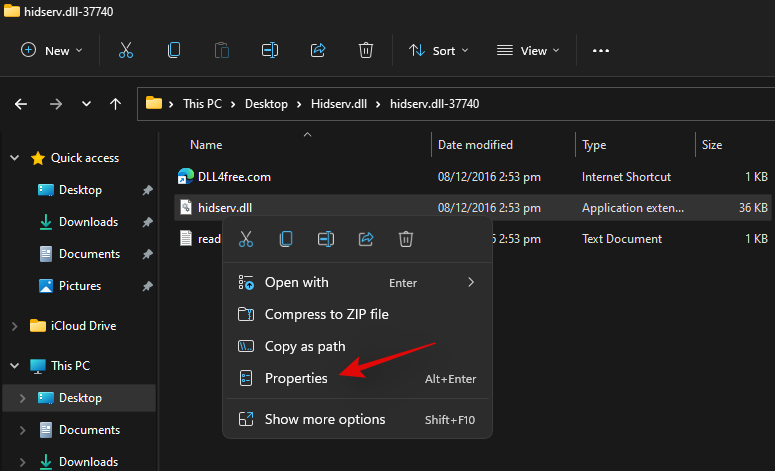
Right-click on the downloaded Hidserv.dll and select ‘Properties’.
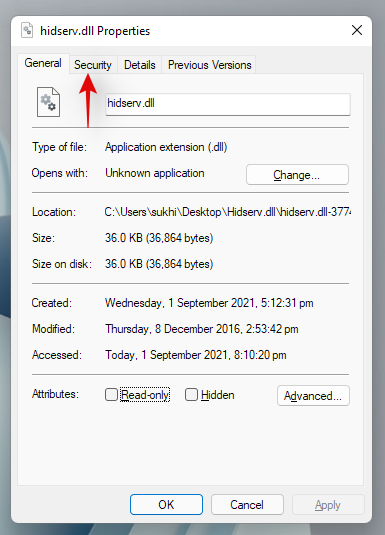
We will now need to manually grant permissions to the necessary users and applications so that Hidserv.dll can work properly on your system. Switch to the Security tab at the top.
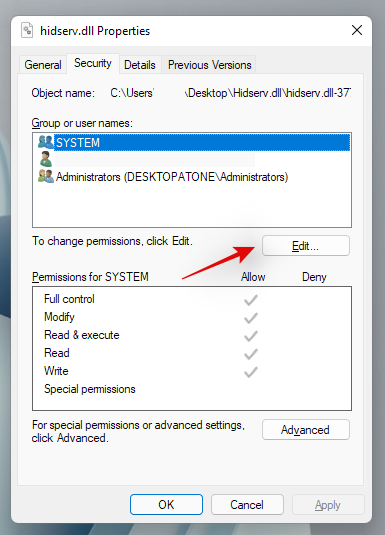
Click on ‘Edit’ at the top.
Click on ‘System’ at the top and check the box for ‘Write’
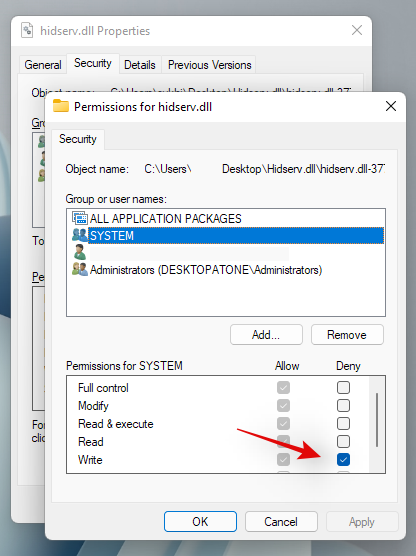
Click on ‘Apply’ once done. Select ‘Yes’ to confirm your choice. Repeat the steps above and restrict permissions for Administrators and other users in the list above. Once you are done, click on ‘Add’.
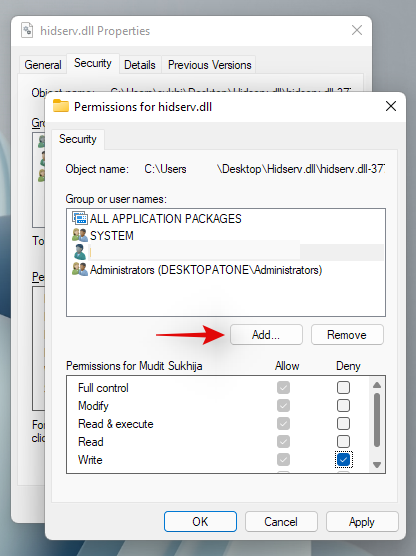
Now enter the following term and press Enter on your keyboard.
All Application Packages
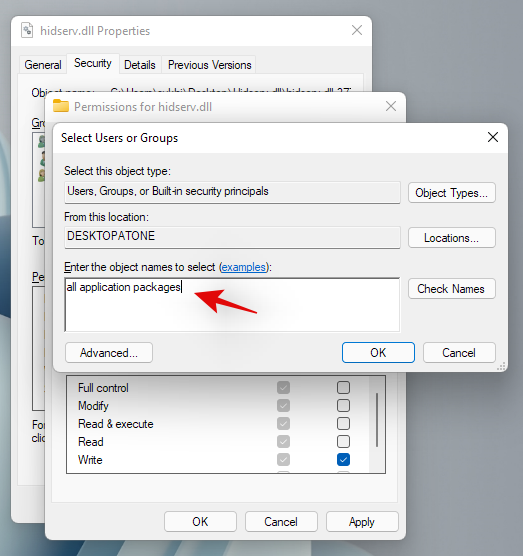
Select the following permissions for ‘ALL APPLICATION PACKAGES’.
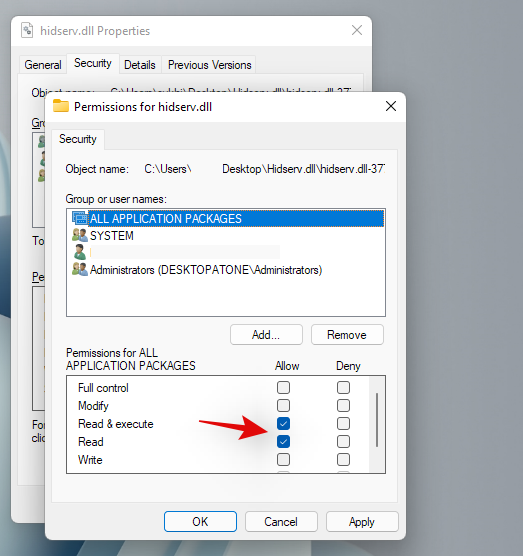
Similarly, click on ‘Add’ again.

Now enter the following term and click on ‘Ok’.
NT Service\TrustedInstaller
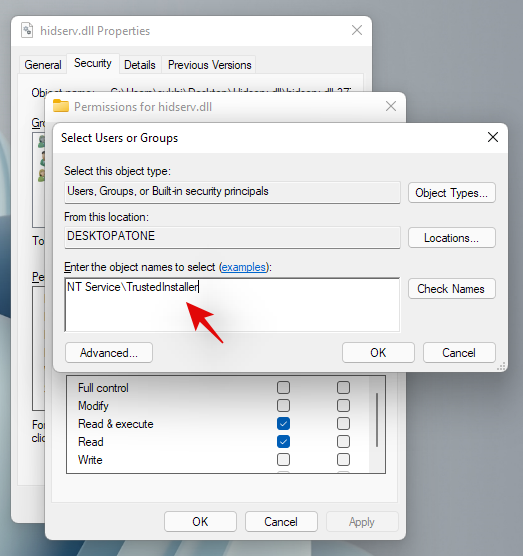
Check the boxes for the same permissions as we did for the application packages above.
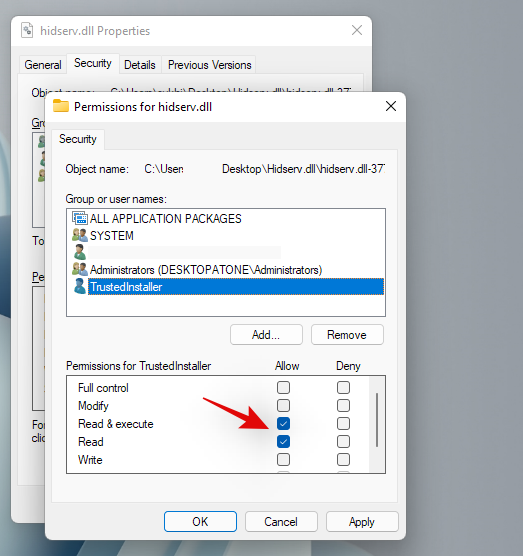
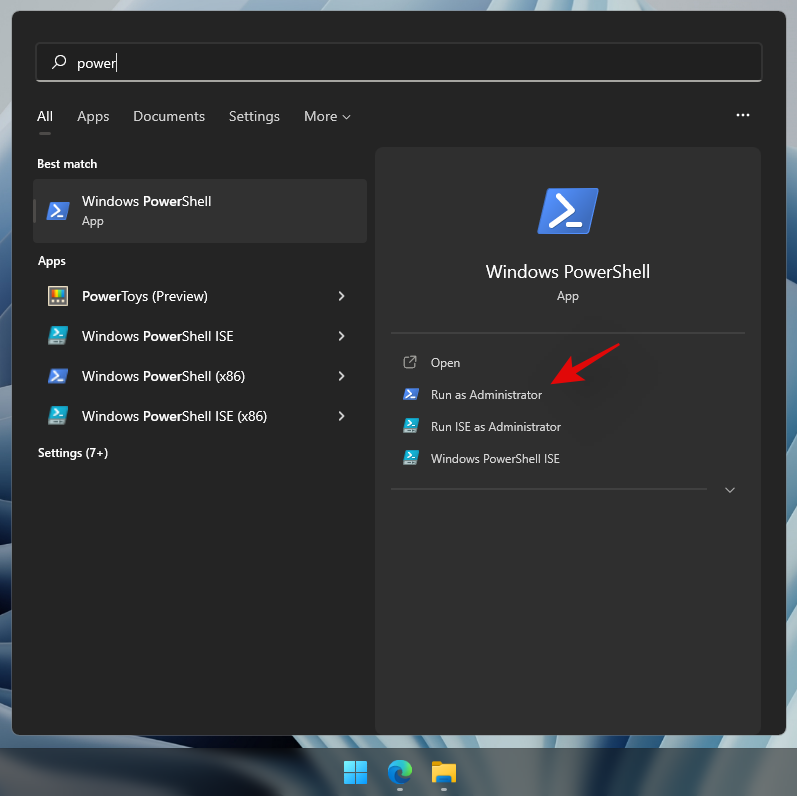
We now need to add permissions for restricted UMP packages on your system. There is no way to do this using the Windows File Explorer, so we will be using a PowerShell script instead. Press Windows + S on your keyboard and search for PowerShell. Click on ‘Run as administrator’ once it shows up in your search results.
Once PowerShell launches, copy and paste the code below in your PowerShell window. Do not execute the commands just yet.
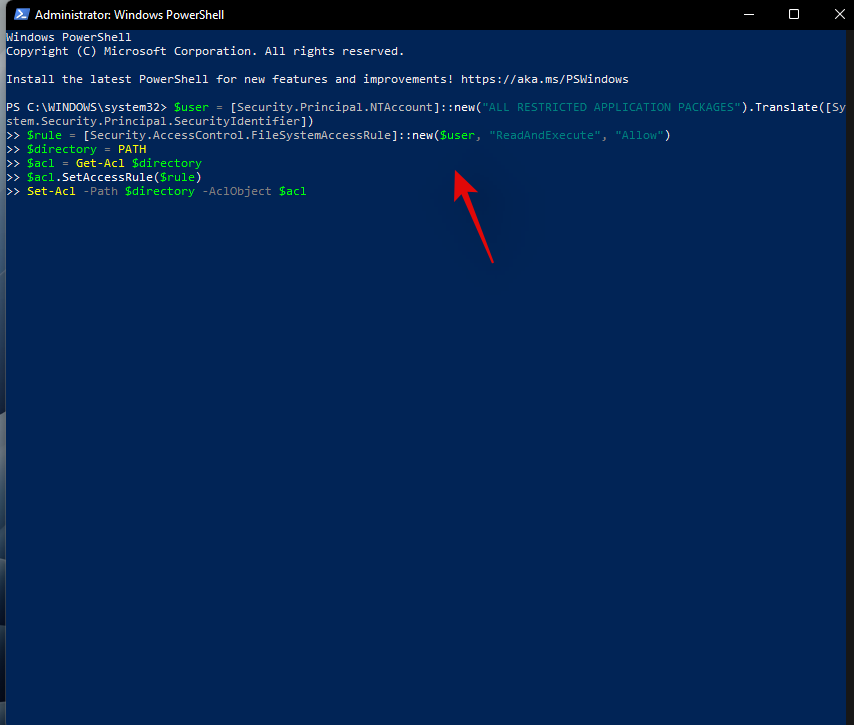
$user = [Security.Principal.NTAccount]::new("ALL RESTRICTED APPLICATION PACKAGES").Translate([System.Security.Principal.SecurityIdentifier])
$rule = [Security.AccessControl.FileSystemAccessRule]::new($user, "ReadAndExecute", "Allow")
$directory = PATH
$acl = Get-Acl $directory
$acl.SetAccessRule($rule)
Set-Acl -Path $directory -AclObject $acl
Now navigate to the Hidserv.dll file that we just edited the permissions for and right-click on it. Select ‘Copy as path’.
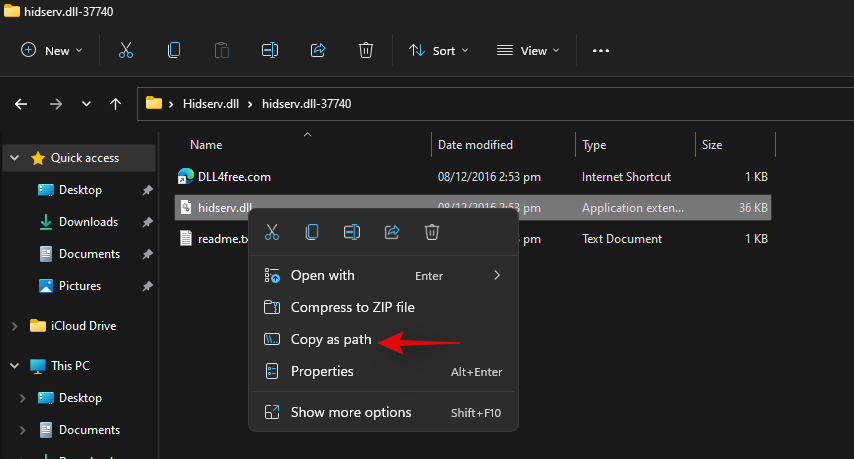
Go back to your PowerShell window and replace “PATH” with the path we just copied.
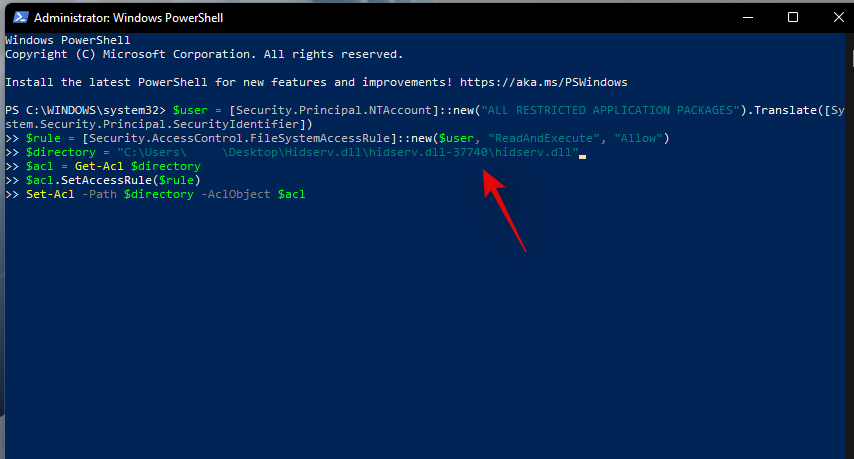
Once replaced, hit Enter on your keyboard to execute the command. Once completed, the new permissions for restricted application packages should now be added to your new Hidserv.dll file.
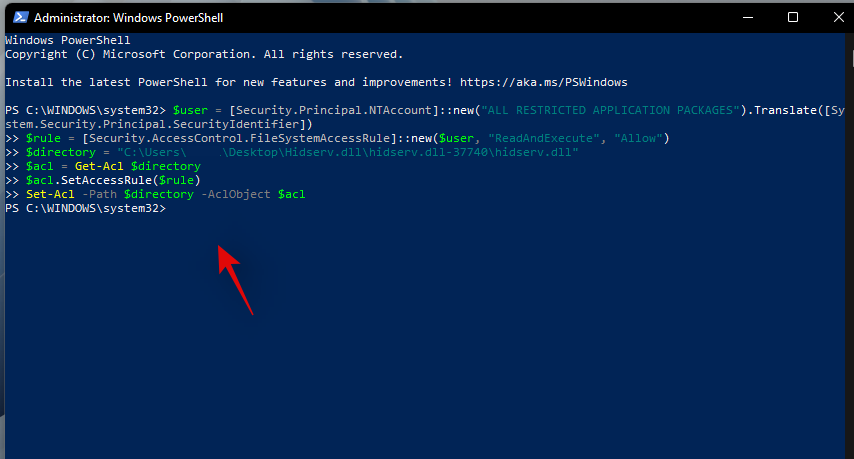
Note: If you are typing in the path manually then you will need to include in double-quotes as shown in the final screenshot. Pasting a copied path using the method above will automatically add double quotes to it.
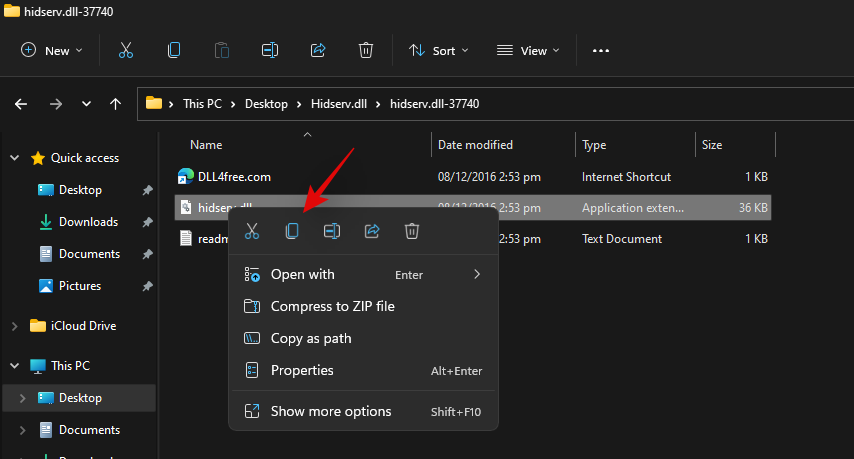
It’s now time to replace or add the file to your boot directory. Navigate to the Hidserv.dll file we just created and copy it to your clipboard.
Press Windows + E on your keyboard and navigate to the following path.
C:\Windows\System32
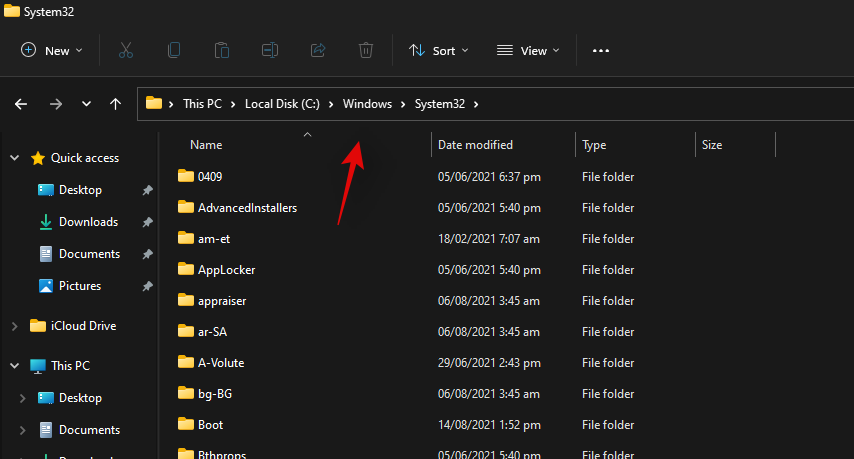
Paste your file in this location. Click on ‘Replace the file in the destination’.
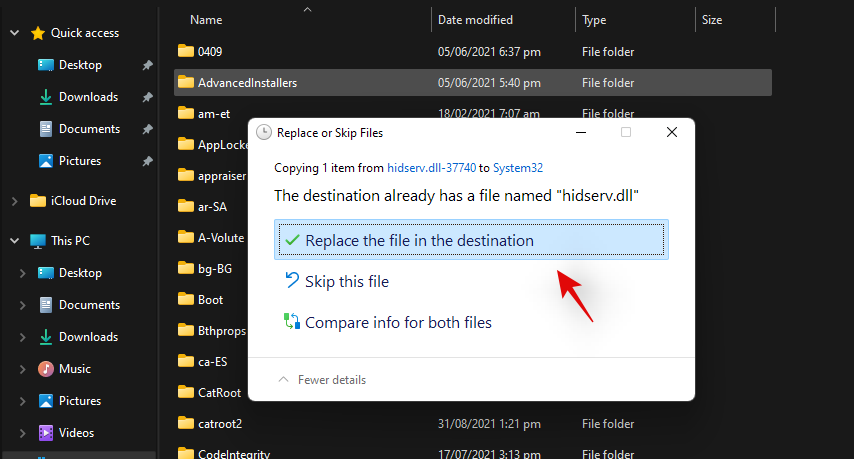
Click on ‘Yes’ to grant the necessary administrator permissions. Once the file is replaced, restart your system for good measure. You can now check your HID services in the Services app to see if it is back up and running again. If not, you can try starting it manually, and you should no longer be facing Error code 126 on your system.
Method #2: For Error code 2
If you are getting Error code 2 after trying to restart the HID service then there could be a couple of reasons why you are facing this error. The main reason is due to unwanted registry changes for the HID service. This could have happened due to recently applied manual hacks or registry cleaners used by you. We will need to check for these changes and revert them if any have been made on your system. Follow the guide below to get you started.
Press Windows + R on your keyboard, type in the following term, and hit Enter on your keyboard.
regedit
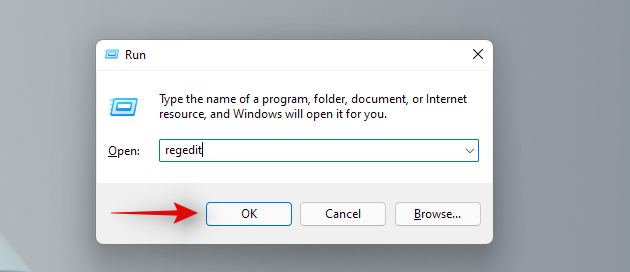
Navigate to the following registry key. You can also copy-paste the same in the address bar at the top of your screen.
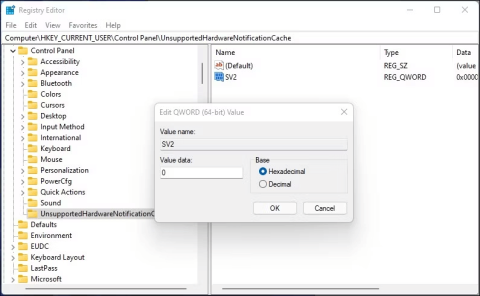
Computer\HKEY_LOCAL_MACHINE\SYSTEM\ControlSet001\Services\hidserv
Double click on the ‘Type’ value on your right.
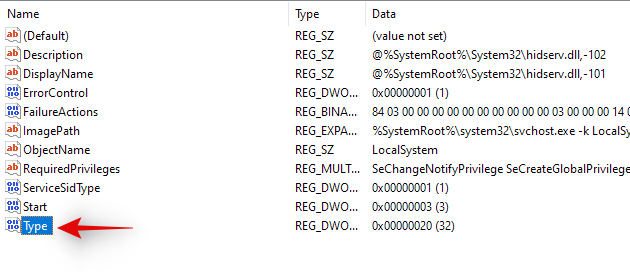
Set the value to ’20’ if it is something different and click on ‘Ok’.
Now click on ‘Parameters’ under Hidserv on your left.
Double click on ServiceDll on your right.
Enter the following path in its Value data field. Even if the same path exists, copy-paste the one below just to be sure. Ensure that there are no spaces at the starting or end of the path below.
%SystemRoot%\System32\hidserv.dll
Once done, repeat the steps above for the following registry locations given below.
Additionally, if folders named ControlSet002 or more exist in the location below, then we recommend repeating the steps above for the Hidserv folder in those locations as well.
Once you have made these changes, restart your system, and HID service should be automatically working on your laptop again. If not, launch the service manually and you should no longer face Error code 2 on your laptop.
Laptop hotkeys can be quite finicky and we hope you were able to get the back up and running again on your system using the guides above. If you face any issues or have any questions for us, feel free to reach out using the comments section below.
Related:
Ανακαλύψτε πώς να ενημερώσετε τα προγράμματα οδήγησης στα Windows 11 για να βελτιώσετε τη συμβατότητα και τις επιδόσεις.
Ανακαλύψτε πώς να αλλάξετε το χρώμα της γραμμής εργασιών στα Windows 11 με απλές μεθόδους για να προσαρμόσετε την εμφάνιση του υπολογιστή σας.
Όλα όσα πρέπει να γνωρίζετε για να δημιουργήσετε έναν νέο λογαριασμό χρήστη στα Windows 11, είτε τοπικό είτε διαδικτυακό.
Μάθετε πώς να εγκαταστήσετε τα Windows 11 χωρίς TPM χρησιμοποιώντας διαφορετικές μεθόδους για να παρακάμψετε τις απαιτήσεις ασφαλείας. Διαβάστε τον οδηγό μας για πληροφορίες και λύσεις.
Τα στιγμιότυπα οθόνης στα Windows 11 περιλαμβάνουν ποικιλία μεθόδων, συμπεριλαμβανομένων των Print Screen, Snip & Sketch και περισσότερο. Μάθετε πώς να τα χρησιμοποιήσετε!
Ανακαλύψτε πού βρίσκεται το My Computer στα Windows 11 και πώς να το επαναφέρετε εύκολα. Χρήσιμες μέθοδοι για Γενικές Χρήστες και Προχωρημένους.
Ανακαλύψτε πώς να σηκώσετε το χέρι στο Zoom με εύκολο και κατανοητό τρόπο. Ιδανικό για ομάδες τηλεδιάσκεψης. Δείτε λεπτομέρειες στα βήματα!
Το Zoom είναι μία από τις πιο δημοφιλείς εφαρμογές απομακρυσμένης συνεργασίας. Αποκαλύπτουμε χρήσιμες λύσεις για φαινόμενα ήχου και βίντεο.
Μην δημοσιεύετε τις φωτογραφίες σας δωρεάν στο Instagram όταν μπορείτε να πληρωθείτε για αυτές. Διαβάστε και μάθετε πώς να κερδίσετε χρήματα στο Instagram και να αξιοποιήσετε στο έπακρο αυτήν την πλατφόρμα κοινωνικής δικτύωσης.
Μάθετε πώς να επεξεργάζεστε και να αφαιρείτε μεταδεδομένα PDF με ευκολία. Αυτός ο οδηγός θα σας βοηθήσει να επεξεργαστείτε ή να αφαιρέσετε εύκολα τα μεταδεδομένα PDF με μερικούς εύκολους τρόπους.
Γνωρίζετε ότι το Facebook έχει μια πλήρη λίστα με τις επαφές του τηλεφωνικού σας καταλόγου μαζί με το όνομα, τον αριθμό και τη διεύθυνση email τους.
Το πρόβλημα μπορεί να εμποδίσει τη σωστή λειτουργία του υπολογιστή σας και μπορεί να χρειαστεί να αλλάξετε τις ρυθμίσεις ασφαλείας ή να ενημερώσετε τα προγράμματα οδήγησης για να τις διορθώσετε.
Αυτό το ιστολόγιο θα βοηθήσει τους αναγνώστες να μετατρέψουν το USB με δυνατότητα εκκίνησης σε αρχείο ISO χρησιμοποιώντας λογισμικό τρίτων κατασκευαστών που είναι δωρεάν στη χρήση και ασφαλές από κακόβουλο λογισμικό.
Αντιμετώπισε τον κωδικό σφάλματος 0x8007139F του Windows Defender και δυσκολεύεστε να εκτελέσετε σαρώσεις; Ακολουθούν τρόποι με τους οποίους μπορείτε να διορθώσετε το πρόβλημα.
Αυτός ο περιεκτικός οδηγός θα σας βοηθήσει να διορθώσετε το «Σφάλμα χρονοπρογραμματιστή εργασιών 0xe0434352» στον υπολογιστή σας με Windows 11/10. Δείτε τις διορθώσεις τώρα.
Το σφάλμα Windows LiveKernelEvent 117 προκαλεί απροσδόκητο πάγωμα ή απροσδόκητη διακοπή λειτουργίας του υπολογιστή σας. Μάθετε πώς να το διαγνώσετε και να το διορθώσετε με βήματα που προτείνουν οι ειδικοί.
Αυτό το ιστολόγιο θα βοηθήσει τους αναγνώστες να διορθώσουν το PowerPoint δεν θα μου επιτρέψει να εγγράψω προβλήματα ήχου σε υπολογιστή με Windows και ακόμη και να προτείνω άλλα υποκατάστατα εγγραφής οθόνης.
Αναρωτιέστε πώς να γράψετε σε ένα έγγραφο PDF αφού πρέπει να συμπληρώσετε φόρμες, να προσθέσετε σχολιασμούς και να βάλετε τις υπογραφές σας. Βρήκατε τη σωστή ανάρτηση, διαβάστε!
Αυτό το ιστολόγιο θα βοηθήσει τους χρήστες να αφαιρέσουν το υδατογράφημα Απαιτήσεις συστήματος που δεν πληρούνται για να απολαύσουν μια πιο ομαλή και ασφαλή εμπειρία με τα Windows 11, καθώς και μια πιο καθαρή επιφάνεια εργασίας.
Αυτό το ιστολόγιο θα βοηθήσει τους χρήστες MacBook να κατανοήσουν γιατί παρουσιάζονται τα προβλήματα με την ροζ οθόνη και πώς να τα διορθώσουν με γρήγορα και απλά βήματα.
Ανακαλύψτε πώς να ενεργοποιήσετε την κρυπτογράφηση BitLocker των Windows 11 χωρίς κόπο. Προστατέψτε τα αρχεία σας με αυτόν τον ολοκληρωμένο οδηγό, που περιλαμβάνει προαπαιτούμενα, βήματα και βέλτιστες πρακτικές για απόλυτη ασφάλεια δεδομένων.
Ρίξτε μια ματιά στον αναλυτικό οδηγό μας για το πώς να χρησιμοποιήσετε το Clipchamp Video Editor των Windows 11. Δημιουργήστε επαγγελματικά βίντεο χωρίς κόπο με συμβουλές, κόλπα και τις πιο πρόσφατες δυνατότητες για αρχάριους και επαγγελματίες.
Δυσκολεύεστε με το σφάλμα "Δεν βρέθηκε το VCRUNTIME140.dll των Windows 11"; Ανακαλύψτε δοκιμασμένες λύσεις βήμα προς βήμα για να το διορθώσετε γρήγορα και να επαναφέρετε τις εφαρμογές σας σε λειτουργία ομαλά. Δεν απαιτούνται τεχνικές γνώσεις!
Δυσκολεύεστε με σφάλματα τεχνητής νοημοσύνης της Cortana και του Copilot στα Windows 11; Ανακαλύψτε αποδεδειγμένες λύσεις για την επίλυση προβλημάτων σφαλμάτων, μη ανταπόκρισης και ενσωμάτωσης. Επαναφέρετε τους βοηθούς τεχνητής νοημοσύνης σας στην σωστή λειτουργία χωρίς κόπο.
Δυσκολεύεστε με το σφάλμα "Δεν βρέθηκε το SSID" στα Windows 11 κατά τη σύνδεση σε κρυφό Wi-Fi; Αυτός ο οδηγός βήμα προς βήμα προσφέρει αποδεδειγμένες λύσεις για να συνδεθείτε ξανά στο διαδίκτυο γρήγορα και με ασφάλεια. Ανακαλύψτε εύκολες συμβουλές αντιμετώπισης προβλημάτων για απρόσκοπτη συνδεσιμότητα.
Ανακαλύψτε πώς να αξιοποιήσετε τις πιο πρόσφατες δυνατότητες προσβασιμότητας των Windows 11 το 2026 για να κάνετε την πληροφορική ευκολότερη και πιο συμπεριληπτική. Οδηγοί βήμα προς βήμα για οπτικά, ακουστικά, κινητικά και γνωστικά βοηθήματα που ενδυναμώνουν όλους τους χρήστες.
Δυσκολεύεστε με αργές ταχύτητες PyCharm και IntelliJ στα Windows 11; Ανακαλύψτε δοκιμασμένες λύσεις για να επιταχύνετε τα IDE σας, να βελτιστοποιήσετε την απόδοση και να ανακτήσετε την παραγωγικότητά σας. Λύσεις βήμα προς βήμα για προγραμματιστές.
Δυσκολεύεστε με το ενοχλητικό σφάλμα κλικ στον σκληρό δίσκο των Windows 11; Ανακαλύψτε δοκιμασμένες, βήμα προς βήμα λύσεις για να αποκαταστήσετε την ομαλή απόδοση και να αποτρέψετε την απώλεια δεδομένων. Επαναφέρετε τον υπολογιστή σας σε καλή κατάσταση σήμερα!
Ανακαλύψτε πώς να χρησιμοποιήσετε το Storage Sense των Windows 11 για να ελευθερώσετε αυτόματα χώρο στον δίσκο. Οδηγός βήμα προς βήμα για τη βελτιστοποίηση του χώρου αποθήκευσης, τη διαγραφή προσωρινών αρχείων και τη διατήρηση της ομαλής λειτουργίας του υπολογιστή σας. Βασικές συμβουλές για αρχάριους.
Ανακαλύψτε πώς να ρυθμίσετε με ασφάλεια ένα αντίγραφο ασφαλείας του μητρώου των Windows 11 με οδηγίες βήμα προς βήμα. Προστατέψτε τις ρυθμίσεις του συστήματός σας χωρίς κόπο και αποφύγετε συνήθεις παγίδες για μια ασφαλή εμπειρία υπολογιστή.

