6 τρόποι για να ενημερώσετε τα προγράμματα οδήγησης στα Windows 11
Ανακαλύψτε πώς να ενημερώσετε τα προγράμματα οδήγησης στα Windows 11 για να βελτιώσετε τη συμβατότητα και τις επιδόσεις.
Ενώ οι ειδοποιήσεις είναι απαραίτητες σε ορισμένες περιπτώσεις, μερικές φορές γίνεται στοιχείο απόσπασης της προσοχής. Ακριβώς όπως το τηλέφωνό σας, ένας υπολογιστής μπορεί επίσης να σας αποσπάσει την προσοχή με ειδοποιήσεις. Αυτός είναι ο λόγος για τον οποίο τα Windows 11 περιλαμβάνουν τη δυνατότητα Focus Assist, η οποία σας επιτρέπει να αποφεύγετε ειδοποιήσεις που αποσπούν την προσοχή. Χρησιμοποιώντας αυτήν τη δυνατότητα, μπορείτε να κάνετε τη δουλειά σας με πλήρη συγκέντρωση αντί να αποσπάτε την προσοχή σας από τυχαία μηνύματα και ειδοποιήσεις. Οι ειδοποιήσεις μπορεί επίσης να βλάψουν την παραγωγικότητά σας και, επομένως, πρέπει να καταργηθούν την κατάλληλη στιγμή.
Μερικά μόνο κλικ μπορούν να κρύψουν όλες τις ειδοποιήσεις, τις ειδοποιήσεις και τα μηνύματα στον υπολογιστή σας. Εάν έχετε αναβαθμίσει πρόσφατα το σύστημά σας σε Windows 11 και δεν μπορείτε να καταλάβετε τη νέα διεπαφή χρήστη, αυτό το άρθρο θα σας βοηθήσει με έναν ολοκληρωμένο οδηγό σχετικά με τον τρόπο χρήσης του Focus Assist στα Windows 11 για να απαλλαγείτε από ειδοποιήσεις.
Σχετικά: Πώς να τραβήξετε στιγμιότυπα οθόνης στα Windows 11
Περιεχόμενα
Τι είναι η υποβοήθηση εστίασης στα Windows 11;
Το Focus Assist είναι απλώς μια λειτουργία Μην ενοχλείτε για τον υπολογιστή σας – ακριβώς όπως αυτά που έχετε στα τηλέφωνά σας. Είναι μια εύχρηστη λειτουργία στα Windows 11 που σας επιτρέπει να απαλλαγείτε από περιττές ειδοποιήσεις, μηνύματα και ειδοποιήσεις. Η λειτουργία υποστήριξης εστίασης σάς δίνει τη δυνατότητα να προσαρμόσετε τη λίστα προτεραιοτήτων σας αντί να εμποδίζετε τον υπολογιστή σας από όλες τις ειδοποιήσεις.
Η απόσπαση της προσοχής μπορεί να βλάψει την παραγωγικότητά σας. Ως εκ τούτου, με τη λειτουργία Focus Assist, μπορείτε να αποκρύψετε όλες τις ειδοποιήσεις, τις ειδοποιήσεις και τα μηνύματα ενώ εργάζεστε σε κάτι σημαντικό. Αντί να σας ειδοποιήσουν, θα πάνε κατευθείαν στο κέντρο δράσης. Μπορείτε να δείτε τις κρυφές ειδοποιήσεις στο κέντρο ενεργειών τη δική σας ώρα.
Πώς λειτουργεί το Focus assist στα Windows 11;
Το Focus Assist σάς παρέχει την ευελιξία να επιλέγετε πότε να αποκλείετε τυχόν περισπασμούς όπως μηνύματα, ειδοποιήσεις και ειδοποιήσεις. Μπορείτε να ενεργοποιήσετε το Focus Assist οποιαδήποτε στιγμή ή μπορείτε επίσης να προγραμματίσετε ένα χρονικό εύρος στις Ρυθμίσεις, το οποίο θα ενεργοποιήσει αυτόματα το Focus Assist.
Η λειτουργία υποβοήθησης εστίασης σάς επιτρέπει να δημιουργήσετε μια λίστα προτεραιοτήτων για να βεβαιωθείτε ότι δεν χάνετε καμία ειδοποίηση από τα πιο σημαντικά άτομα στην επαφή σας. Τα άτομα στη λίστα προτεραιοτήτων σας μπορούν πάντα να σας προσεγγίσουν, ακόμα και όταν ασχολείστε με κάποια σημαντική δουλειά. Σε περίπτωση που χρειάζεστε πλήρη συγκέντρωση ενώ εργάζεστε, μπορείτε επίσης να επιλέξετε να αποκλείσετε όλες τις ειδοποιήσεις. Για να δείτε όλες τις αποκλεισμένες ειδοποιήσεις που λάβατε ενώ ήσασταν στην εργασία σας, ανοίξτε το κέντρο ενεργειών του συστήματός σας.
Σχετικό: Πώς να σταματήσετε τα αναδυόμενα παράθυρα στα Windows 11
Πώς να ενεργοποιήσετε την υποβοήθηση εστίασης
Το Focus Assist είναι απενεργοποιημένο από προεπιλογή. Αλλά αν θέλετε να το ενεργοποιήσετε ώστε να σταματήσει να λαμβάνει ειδοποιήσεις, ακολουθήστε τα παρακάτω βήματα.
Μέθοδος #1: Χρήση ρυθμίσεων
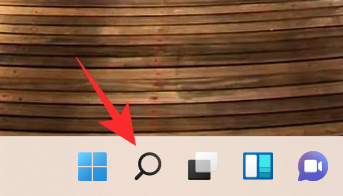
Κάντε κλικ στο εικονίδιο Αναζήτηση , το οποίο μοιάζει με μεγεθυντικό φακό στη γραμμή εργασιών.
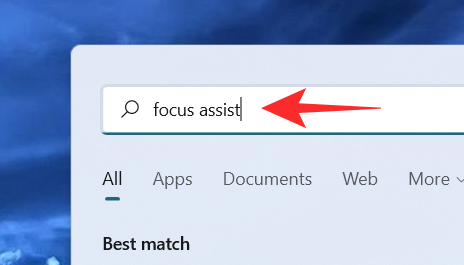
Πληκτρολογήστε υποστήριξη εστίασης στη γραμμή αναζήτησης.
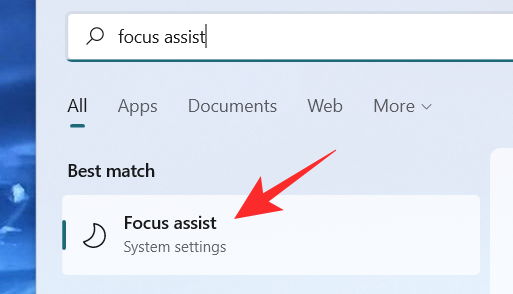
Κάντε κλικ στις ρυθμίσεις συστήματος Focus Assist .
Το παράθυρο ρυθμίσεων συστήματος Focus Assist εμφανίζεται στην οθόνη. Κάτω από το Focus Assist , ορίστε μία από αυτές τις επιλογές:
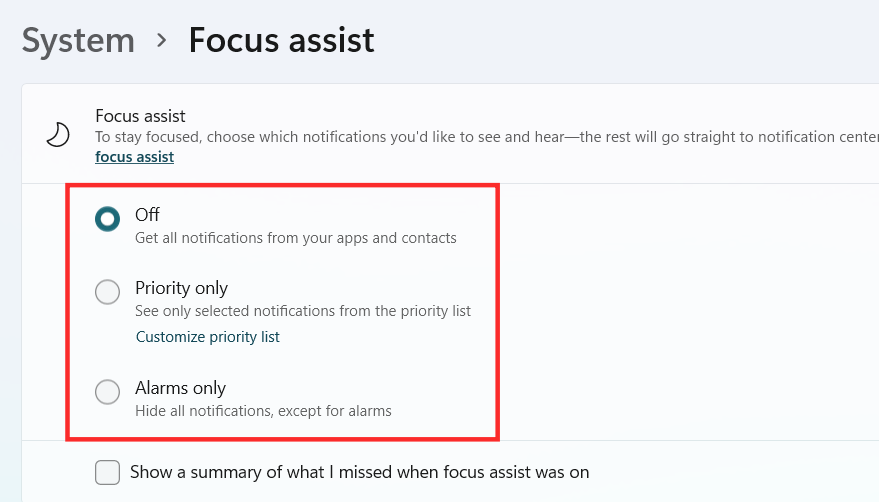
Το Focus Assist θα πρέπει τώρα να είναι ενεργοποιημένο στα Windows 11 ανάλογα με την επιλογή που κάνατε.
Μέθοδος #2: Χρήση Κέντρου δράσης
Κάντε κλικ στο Κέντρο δράσης που εμφανίζει το εικονίδιο Wi-Fi, ένταση ήχου και μπαταρία μαζί.
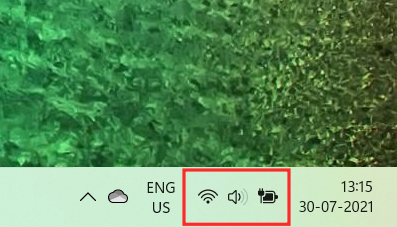
Ακριβώς κάτω από το εικονίδιο Bluetooth, μπορείτε να δείτε το εικονίδιο Focus Assist που μοιάζει με μισοφέγγαρο.
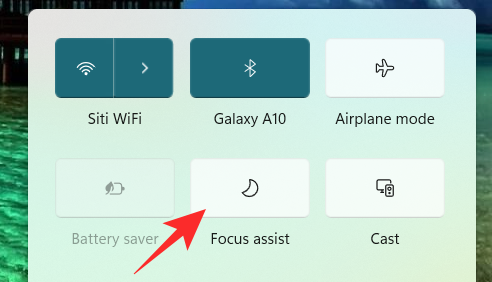
Από προεπιλογή, η λειτουργία Focus Assist θα είναι απενεργοποιημένη. Κάντε κλικ σε αυτό και η δυνατότητα θα οριστεί απευθείας σε μόνο προτεραιότητα .
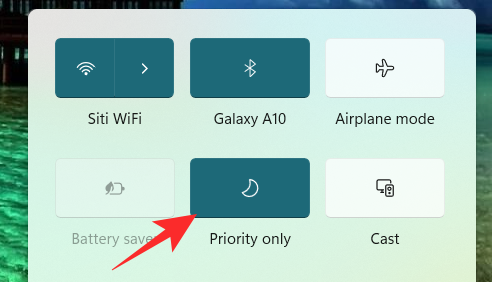
Κάντε κλικ σε αυτό ξανά, για να ορίσετε τη λειτουργία Focus Assist σε Alarm only .
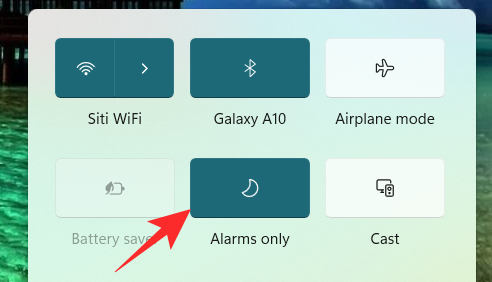
Για να απενεργοποιήσετε τη δυνατότητα Focus Assist, κάντε ξανά κλικ σε αυτήν.
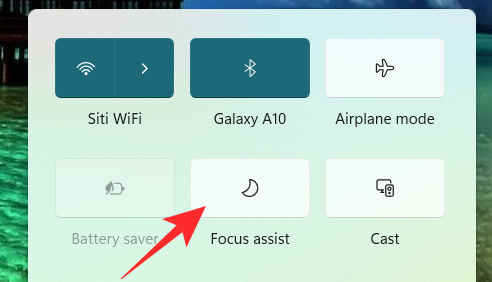
Απλώς κάνοντας κλικ στο εικονίδιο Focus Assist στο Κέντρο ενεργειών, μπορείτε να αλλάξετε τη λειτουργία του σε απενεργοποίηση, μόνο προτεραιότητα και μόνο ξυπνητήρια. Ωστόσο, για να κάνετε άλλες απαραίτητες αλλαγές στις ρυθμίσεις του Focus Assist από το Action Center, κάντε δεξί κλικ στο εικονίδιο Focus Assist στο Κέντρο ενεργειών και κάντε κλικ στο Go to Settings .
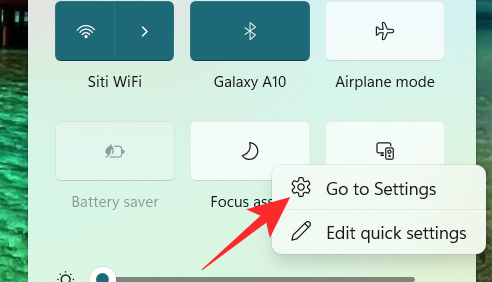
Αυτό θα σας μεταφέρει στην εφαρμογή Ρυθμίσεις όπου μπορείτε να κάνετε εύκολα όλες τις αλλαγές που θέλετε. Και τέλος! Η υποβοήθηση εστίασης θα πρέπει τώρα να είναι ενεργοποιημένη στα Windows 11 απευθείας από το κέντρο ενεργειών.
Μέθοδος #3: Χρήση του προγράμματος επεξεργασίας πολιτικής ομάδας
Μπορείτε επίσης να ενεργοποιήσετε τη λειτουργία υποβοήθησης εστίασης χρησιμοποιώντας το πρόγραμμα επεξεργασίας πολιτικής ομάδας σε περίπτωση που είστε διαχειριστής. Χρησιμοποιήστε τον παρακάτω οδηγό για να σας βοηθήσει με τη διαδικασία.
Πατήστε Windows + Rστο πληκτρολόγιό σας και πληκτρολογήστε τα παρακάτω στο πλαίσιο διαλόγου Εκτέλεση. Πατήστε enter στο πληκτρολόγιό σας για να ανοίξετε το πρόγραμμα επεξεργασίας πολιτικής ομάδας.
gpedit.msc
Πλοηγηθείτε στον παρακάτω κόμβο που αναφέρεται παρακάτω.
User configuration > Administrative Templates > Start Menu and Taskbar > Notifications
Βρείτε και κάντε διπλό κλικ στην τιμή "Απενεργοποίηση ωρών ησυχίας" στα δεξιά σας.
Επιλέξτε τώρα μία από τις παρακάτω επιλογές ανάλογα με τις τρέχουσες ανάγκες σας στην επάνω αριστερή γωνία του παραθύρου ιδιοτήτων.
Και τέλος! Η υποβοήθηση εστίασης θα ενεργοποιηθεί ή θα απενεργοποιηθεί τώρα από το πρόγραμμα επεξεργασίας πολιτικής ομάδας ανάλογα με τις προτιμήσεις σας. Δυστυχώς, δεν μπορείτε να προσαρμόσετε τη συμπεριφορά της υποστήριξης εστίασης ως διαχειριστής. Αυτή η ικανότητα εξακολουθεί να ανήκει στον χρή��τη. Μπορείτε να ενεργοποιήσετε ή να απενεργοποιήσετε τη δυνατότητα χρήσης του Focus Assist για ένα σύστημα μόνο χρησιμοποιώντας το πρόγραμμα επεξεργασίας πολιτικής ομάδας.
Πώς να χρησιμοποιήσετε τη βοήθεια εστίασης
Το Focus assist έχει διάφορες ρυθμίσεις και επιλογές προσαρμογής που μπορούν να σας βοηθήσουν να αλλάξετε τη συμπεριφορά του σύμφωνα με τις τρέχουσες ανάγκες σας. Χρησιμοποιήστε έναν από τους παρακάτω οδηγούς που ταιριάζει καλύτερα στις τρέχουσες απαιτήσεις σας.
Μέθοδος #1: Ενεργοποιήστε τη λειτουργία μόνο ξυπνητήρια
Η λειτουργία "Alarms Only" στο παράθυρο Focus Assist σάς επιτρέπει να αποκρύψετε όλες τις ειδοποιήσεις εκτός από το ξυπνητήρι. Ακολουθήστε τα βήματα που αναφέρονται παρακάτω για να ενεργοποιήσετε τη λειτουργία "Μόνο συναγερμοί".
Κάντε κλικ στο εικονίδιο Αναζήτηση στη γραμμή εργασιών.

Πληκτρολογήστε Focus assist

Κάντε κλικ στο Focus Assist .

Κάτω από το Focus Assist, κάντε κλικ στο Alarm Only για να σταματήσετε να λαμβάνετε ειδοποιήσεις, εκτός από τους συναγερμούς.
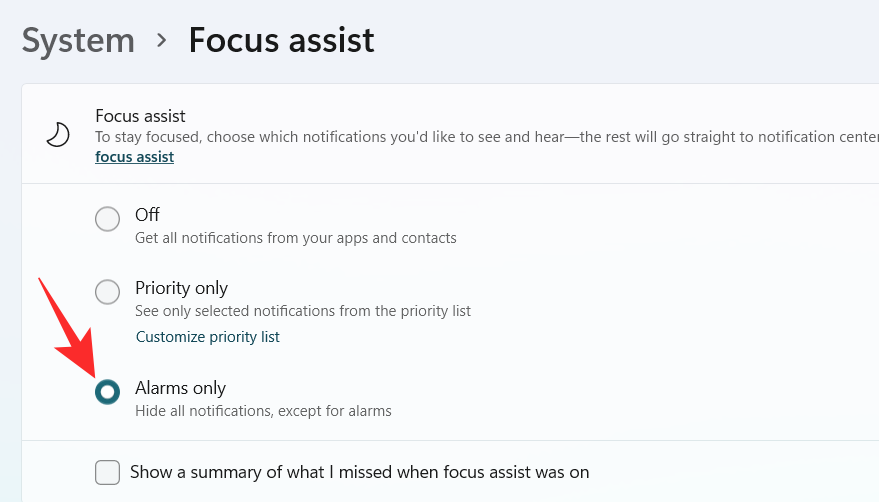
Και τέλος! Τώρα θα ενημερώνεστε μόνο για συναγερμούς στο σύστημά σας. Όλες οι άλλες ειδοποιήσεις, ανεξάρτητα από την προτεραιότητά τους, θα σιωπούν στα Windows 11.
Μέθοδος #2: Ενεργοποιήστε την προτεραιότητα μόνο με μια προσαρμοσμένη λίστα
Το παράθυρο Άτομα θα εμφανιστεί στην οθόνη. Επιλέξτε τα άτομα που προτιμάτε πληκτρολογώντας τα ονόματά τους στη γραμμή αναζήτησης.
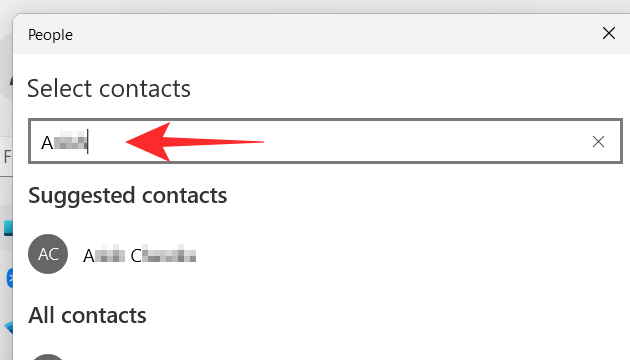
Κάντε κλικ στο όνομα του ατόμου.
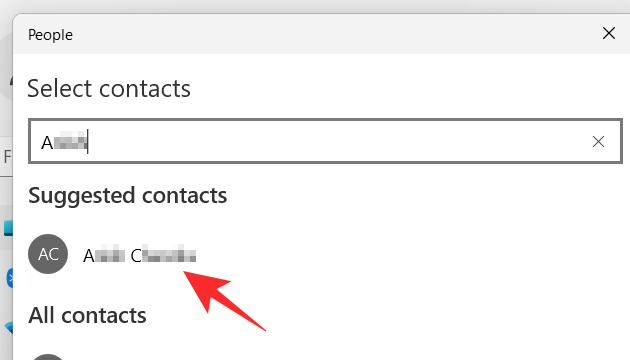
Κάντε κλικ στο κουμπί επιλογής στην κάτω δεξιά γωνία του παραθύρου Άτομα.
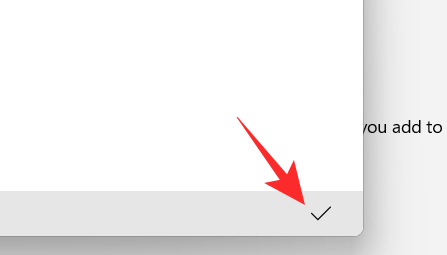
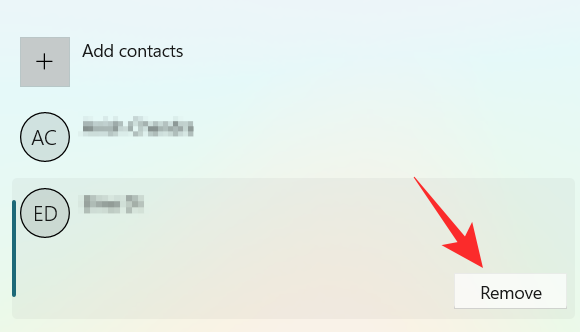
Η λίστα προτεραιοτήτων σας δημιουργήθηκε. Τώρα, εάν θέλετε να αφαιρέσετε μια επαφή από τη λίστα προτεραιοτήτων σας, κάντε κλικ στην επαφή στην περιοχή Άτομα .

Κάντε κλικ στο Κατάργηση .
Τώρα, στην ενότητα Εφαρμογές , μπορείτε να επιλέξετε τις εφαρμογές που μπορούν να ξεπεράσουν τις ώρες ησυχίας σας. Για να επιτρέψετε στις εφαρμογές να εμφανίζουν ειδοποιήσεις, κάντε κλικ στο κουμπί Προσθήκη εφαρμογής .
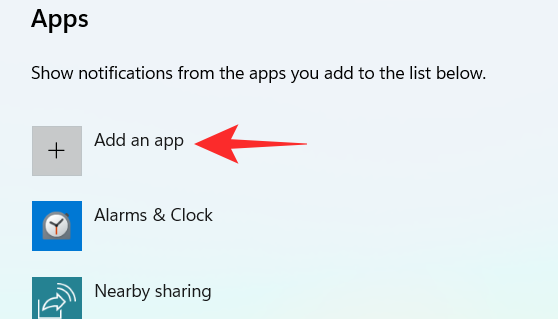
Στην οθόνη σας εμφανίζεται μια λίστα εφαρμογών. Κάντε κλικ στην εφαρμογή που θέλετε να προσθέσετε στη λίστα προτεραιοτήτων σας.
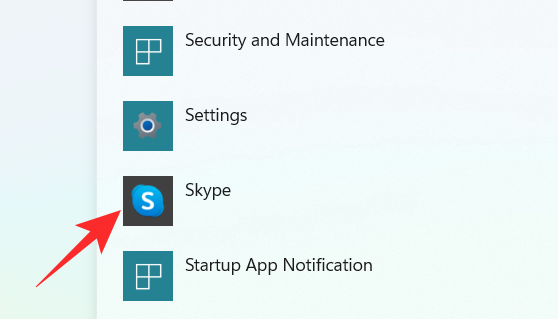
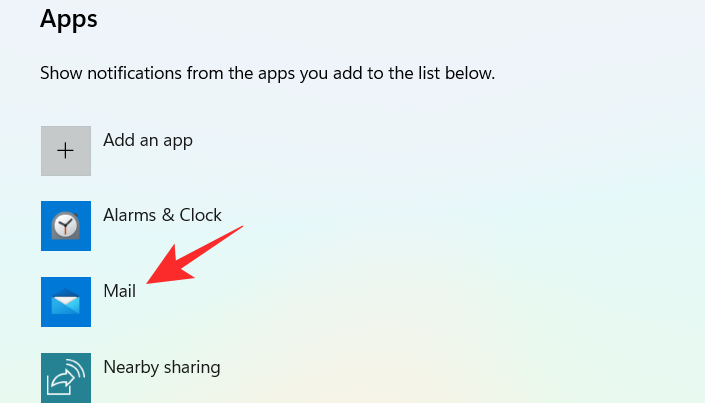
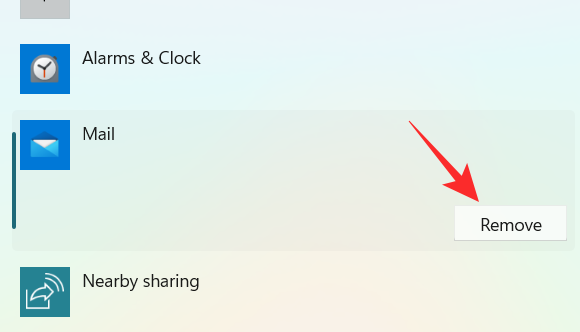
Συνεχίστε αυτή τη διαδικασία μέχρι να ολοκληρώσετε την επιλογή των εφαρμογών. Σε περίπτωση που θέλετε να αφαιρέσετε μια εφαρμογή από τη λίστα προτεραιοτήτων σας, μπορείτε απλώς να κάνετε κλικ στην εφαρμογή στην ενότητα Εφαρμογές .
Κάντε κλικ στο Κατάργηση .
Και με αυτόν τον τρόπο μπορείτε να προσαρμόσετε τη λίστα προτεραιότητας στο Focus assist και να τη χρησιμοποιήσετε προς όφελός σας για να λαμβάνετε ειδοποιήσεις μόνο από σημαντικές επαφές.
Μέθοδος #3: Ενεργοποιήστε τη σύνοψη ειδοποιήσεων όταν είναι απενεργοποιημένη η υποστήριξη εστίασης
Κάντε κλικ στο εικονίδιο Αναζήτηση στη γραμμή εργασιών.

Πληκτρολογήστε Focus assist

Κάντε κλικ στο Focus Assist .

Κάντε κλικ στην επιλογή που επιθυμείτε Μόνο προτεραιότητα ή Μόνο συναγερμοί .
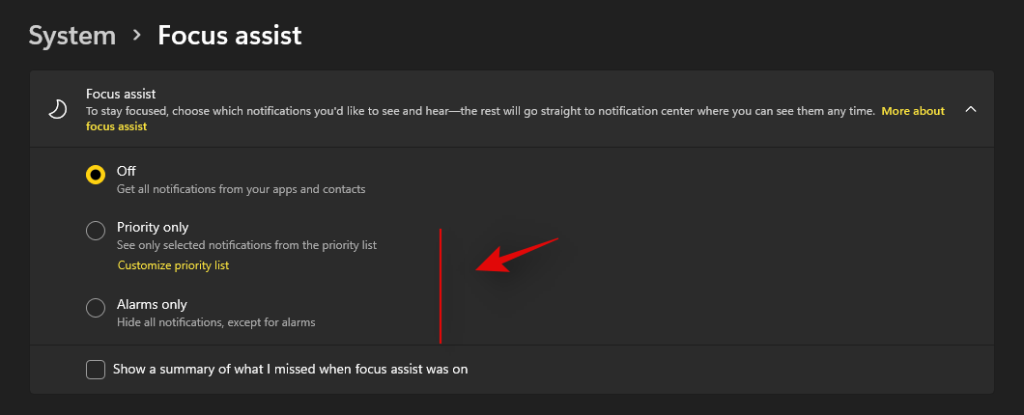
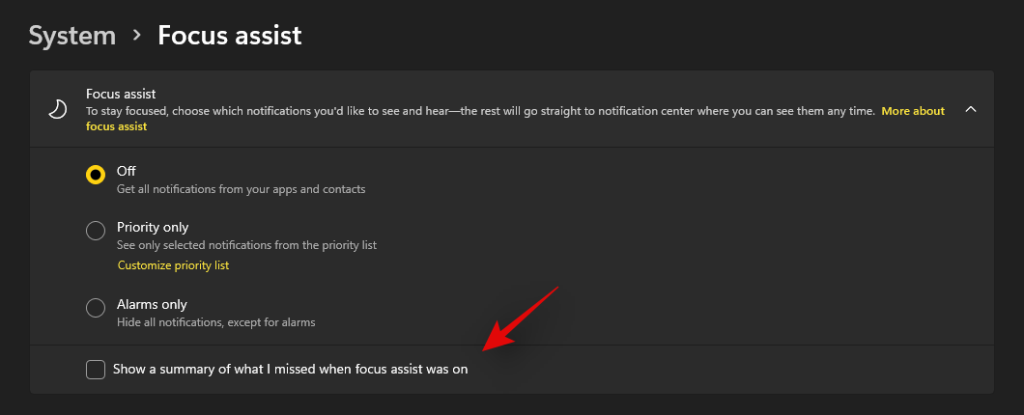
Επιλέξτε το πλαίσιο Εμφάνιση περίληψης του τι έχασα όταν ήταν ενεργοποιημένη η υποβοήθηση εστίασης .
Μέθοδος #4: Ενεργοποιήστε ή απενεργοποιήστε τους κανόνες αυτόματης υποβοήθησης εστίασης
The Automatic rules in Focus assist allow you to determine the conditions that can activate the Focus assist automatically. There are four different automatic rules in the Focus Assist settings window that can be customized. Check out the steps mentioned below to customize automatic rules in Focus assist.
Click on the Search icon on the taskbar.

Type Focus assist

Click on Focus Assist.

Under the Automatic rules section, there are four sections. Turn on the toggle switch for the option you want to choose.
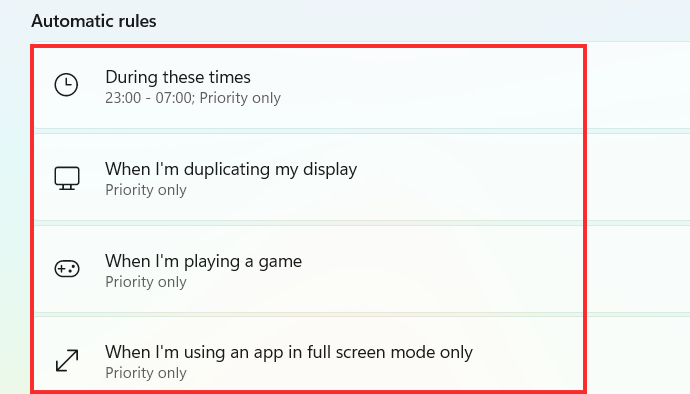
Now, let’s have a look at how to customize the above-mentioned options under Automatic rules.
1. During these times
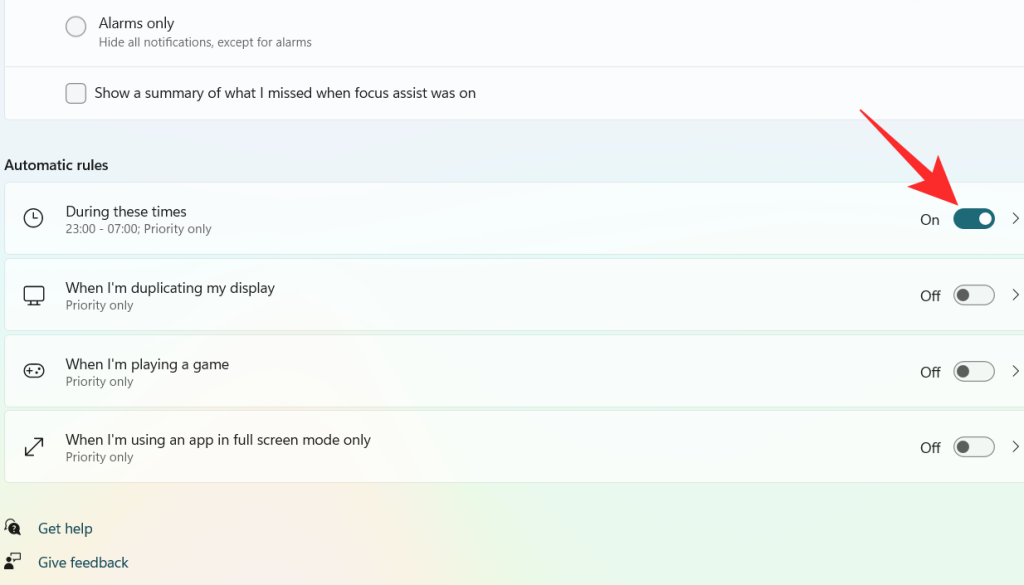
Turn on the toggle switch, which is extreme right to the During these times tab.
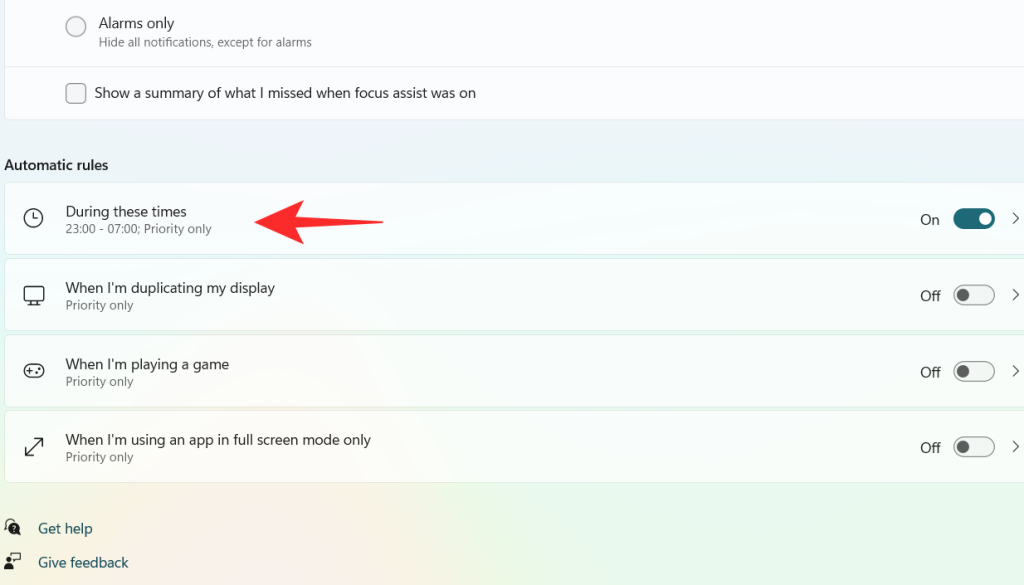
Click on the During these times tab.
Click on the box under Start time.
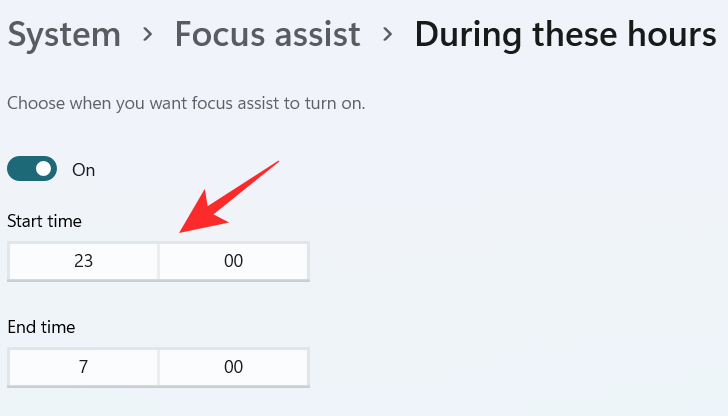
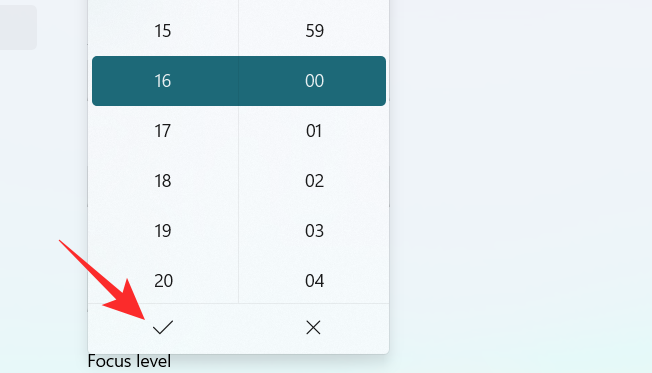
Select the time when you want the Focus Assist to turn on and click on the tick on the bottom of the dropdown menu.
Click on the box under End time.
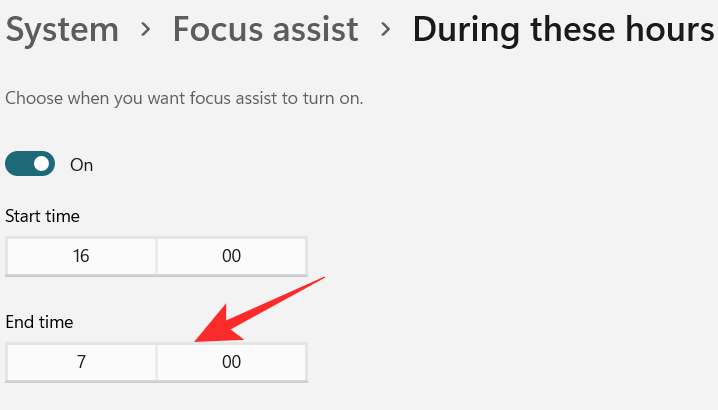
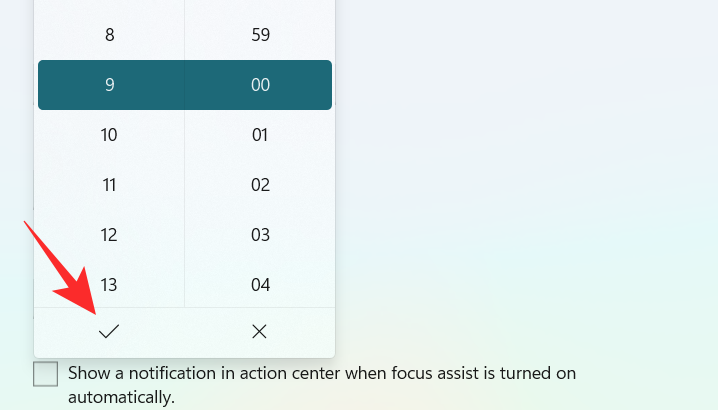
Select the time when you want the Focus Assist to turn off and click on the tick on the bottom of the dropdown menu.
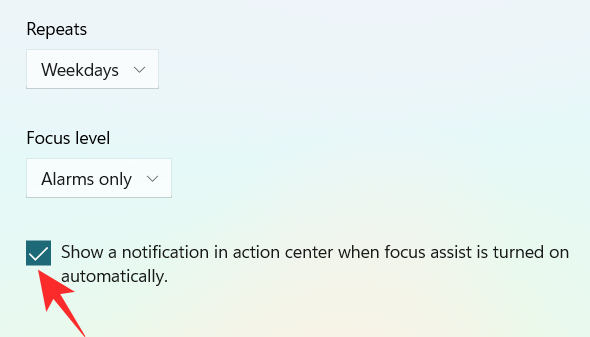
Click on the box under Repeats.
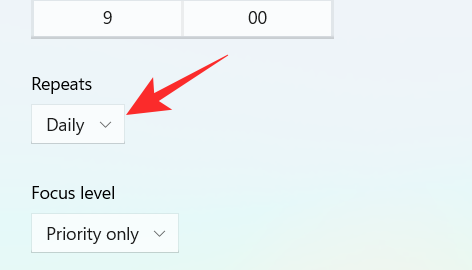
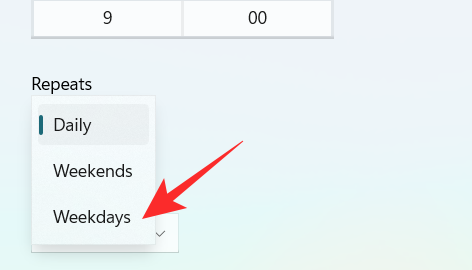
A small dropdown menu appears. Set the schedule to Daily, Weekends, or Weekdays.
Click on the box under Focus level.
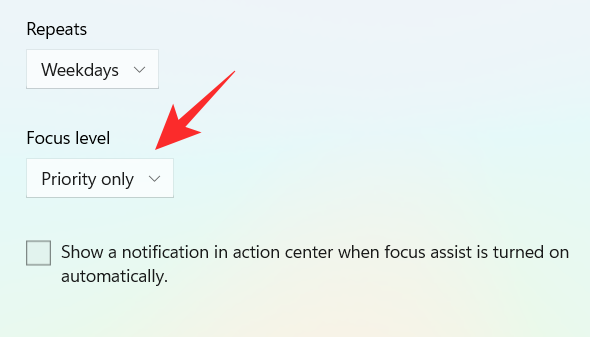
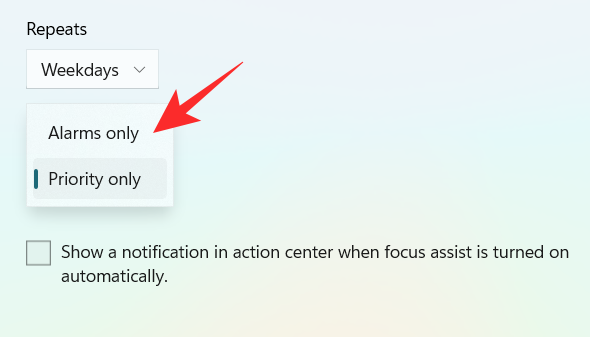
A small dropdown menu appears. Choose between Alarm only or Priority only.
Finally, to get a notification when the Focus assist is turned on, check the box “Show a notification in action center when Focus assist is turned on automatically“.
2. When I’m duplicating my display
Turn on the toggle switch, which is extreme right to the When I’m duplicating my display tab.
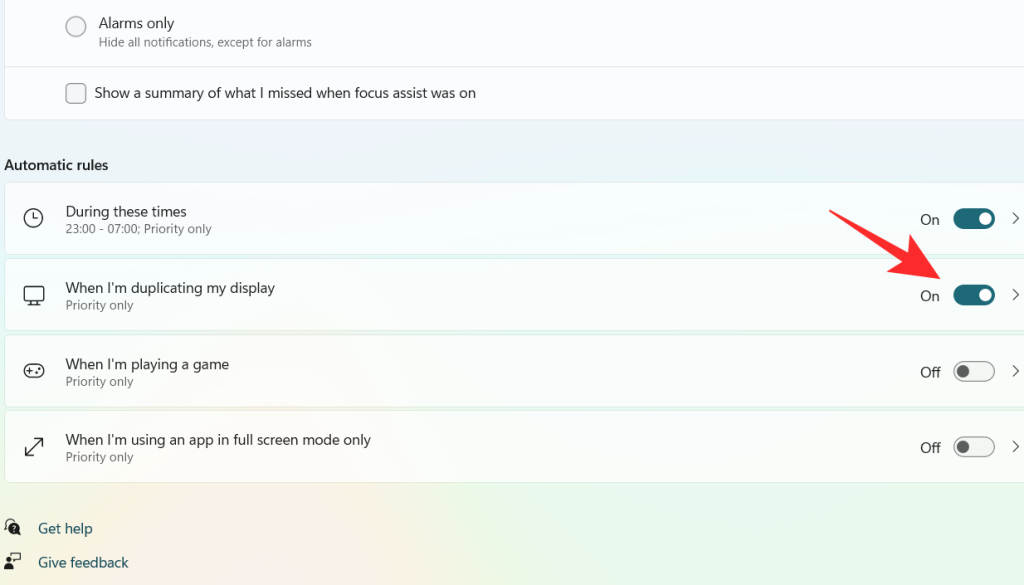
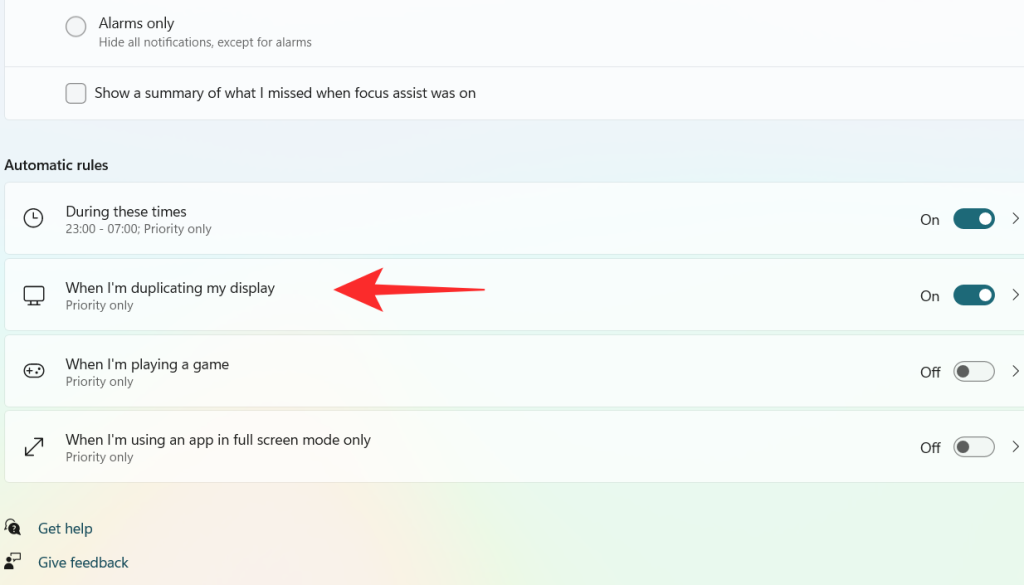
Click on the When I’m duplicating my display tab.
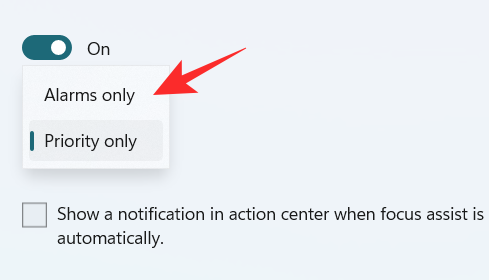
Click on the box under Focus level.
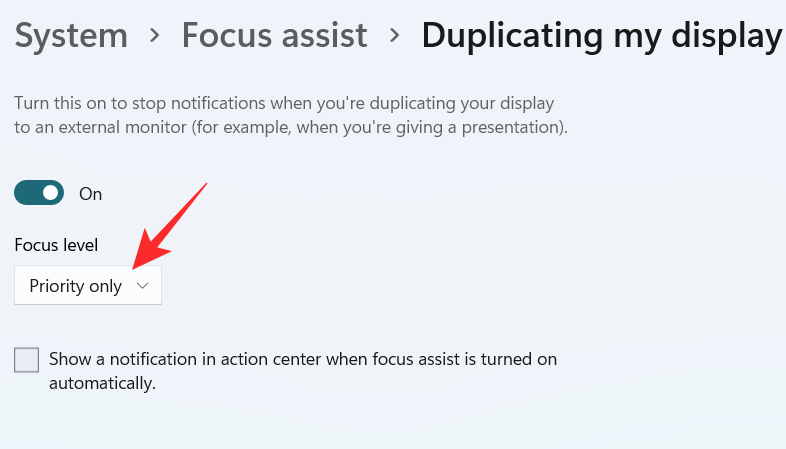
A dropdown menu appears, click on your desired option between Priority only and Alarms only.
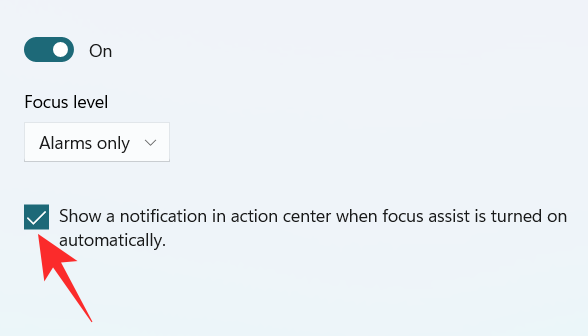
To get a notification when the Focus assist is turned on, check the box “Show a notification in action center when Focus assist is turned on automatically“
3. When I’m playing a game
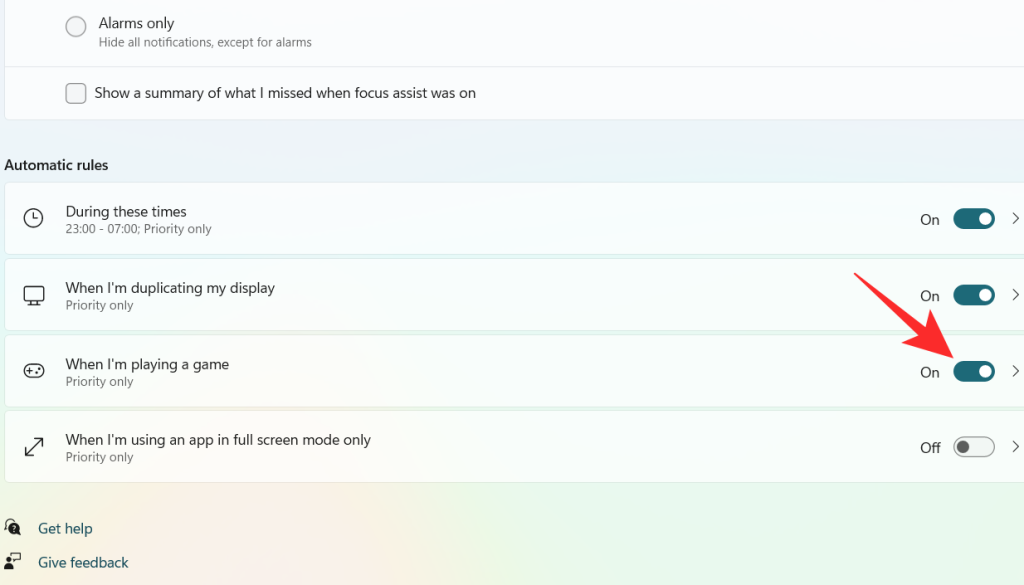
Turn on the toggle switch, which is extreme right to the When I’m playing a game tab.
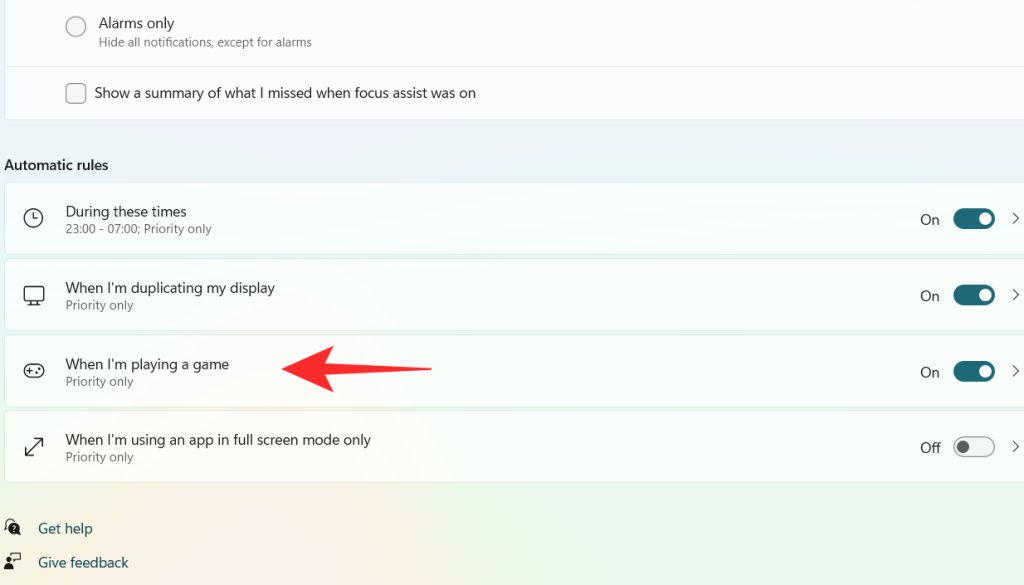
Click on the When I’m playing a game tab
Click on the box under Focus Level.
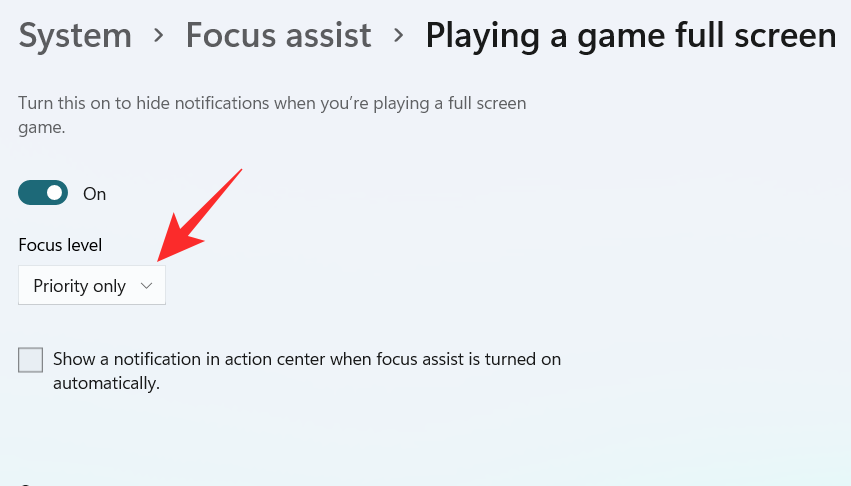
A dropdown menu appears, click on your desired option between Priority only and Alarms only.

To get a notification when the Focus assist is turned on, check the box “Show a notification in action center when Focus assist is turned on automatically“

4. When I’m using an app in full-screen mode only
Turn on the toggle switch, which is extreme right to the When I’m using an app in full-screen mode only tab.
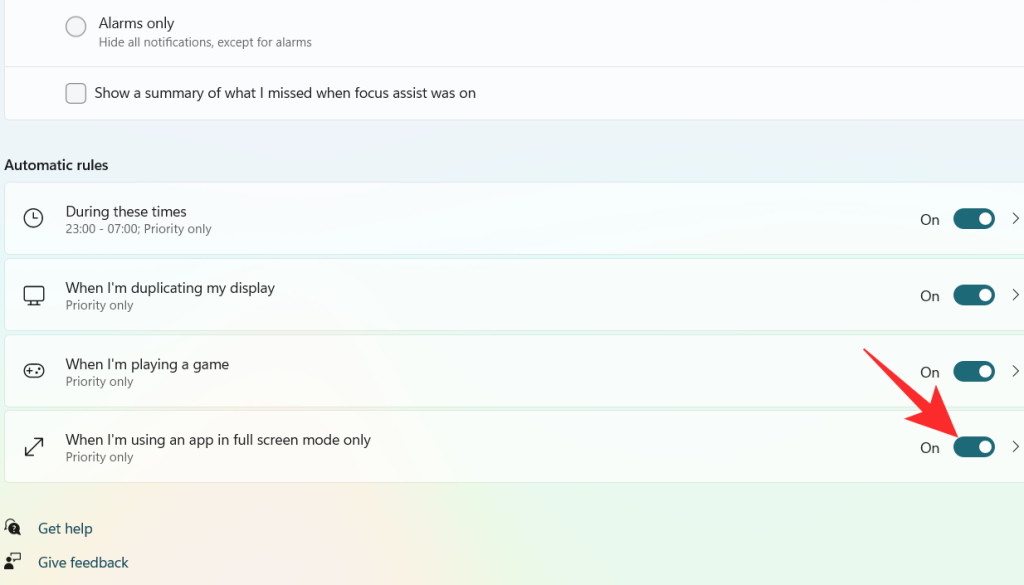
Click on the When I’m using an app in full-screen mode only tab
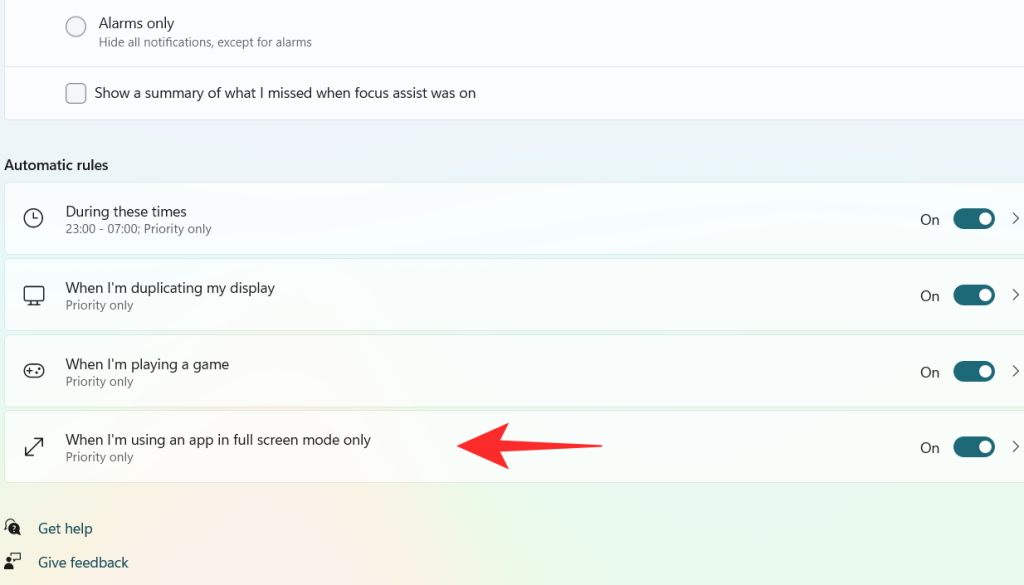
Click on the box under Focus Level.
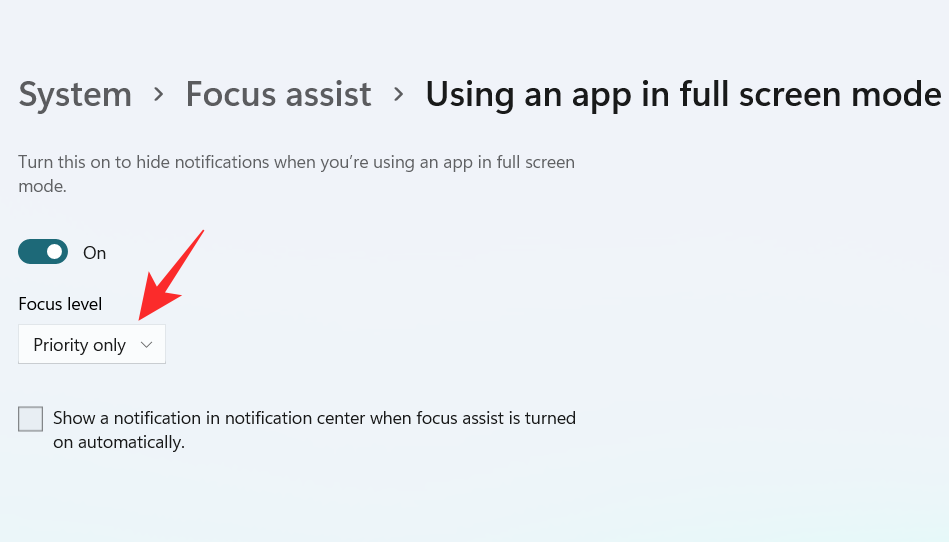
A dropdown menu appears, click on your desired option between Priority only and Alarms only.

To get a notification when the Focus assist is turned on, check the box “Show a notification in action center when Focus assist is turned on automatically“.

Using the above customizations, you can schedule and control Focus assist’s behavior according to your workflow for maximum efficiency no matter the task at hand.
Can you remove the Focus Assist icon from the Action Center?
Yes, you can easily remove the Focus Assist icon from the Action Center. Windows 11 brings a host of new cosmetic and UI changes and one of them has been the ability to customize your action center. You can now add or remove icons from the action center depending on your needs and opt for a more minimal or productive look depending on your workflow.
For now, you can only add and remove certain system modules but in the future, some users expect Microsoft to add the support for third-party apps as well. This would be a much welcome change that would allow you to manage dedicated system settings managed by third-party apps directly from your action center.
Customize your Focus assist icon in the action center
Depending on your current needs you can either remove or add the Focus assist module to the action center. Use one of the guides below depending on your current requirements.
1. Remove it
Click on the Action Center which shows the icon of Wifi, volume, and battery together.

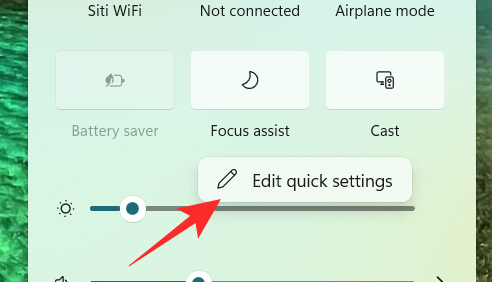
Right-click on an empty place or on any icon and click on Edit quick settings.
Click on the unpin symbol at the top right corner of the Focus Assist icon to remove the Focus Assist icon from the Action Center.
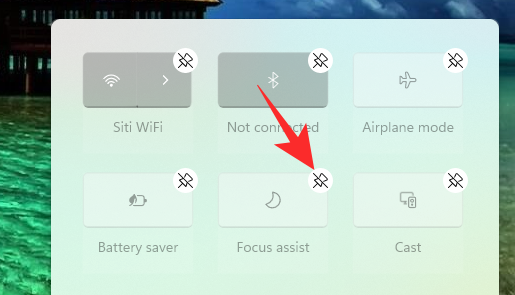
The Focus assist module should now have been removed from your action center. If not, we recommend you restart explorer.exe or your PC for the changes to take effect.
2. Restore it
Click on the Action Center which shows the icon of Wifi, volume, and battery together.

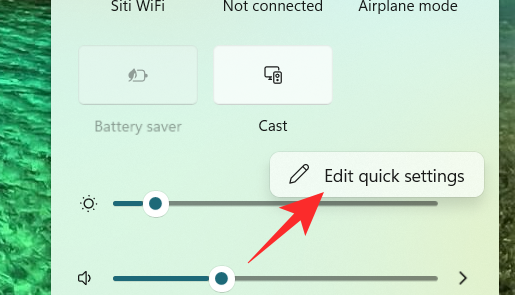
Right-click on an empty place or on any icon and click on Edit quick settings.
Now, click on the Add button at the bottom of the action center.
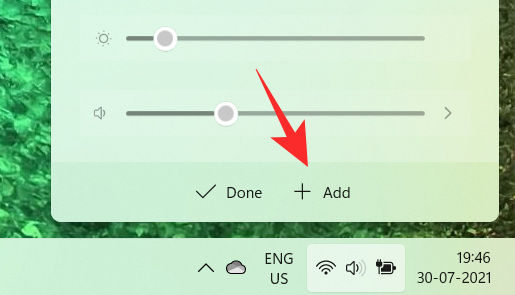
A list of different settings appears. Click on Focus Assist from the list and you will get to see the Focus Assist icon on the Action Center again.
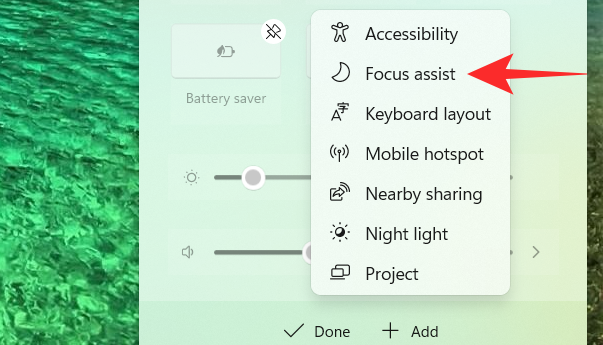
And that’s how you can add the Focus assist module back in the action center.
Focus assist keeps turning on automatically Issue: How to fix
If Focus assist keeps turning on automatically then there could be a couple of reasons for this behavior. Depending on its cause we can either fix it or use a workaround to manage the issue. Let’s find out why Focus assist keeps turning on automatically on your system.
Fix #1: Check Automatic Rules
Are you having this issue when projecting to a secondary display? Or when sharing your screen with a public computer? Then it is likely that focus assist is getting turned on automatically due to the default automatic rules in Windows 11.
By default, focus assist will silence all notifications in such scenarios to help maintain your privacy. But this can be counterproductive in case you are just trying to use a bigger display from a portable system like a laptop or an NUC.
It could also be that scheduled Focus assist was turned on your system by mistake which will enable and disable Focus assist automatically during certain hours. If any of these situations sounds like what you are facing then you can use the guide below to disable all automatic rules that enable Focus assist during certain scenarios and workflows on Windows 11. Let’s get started.
Press Windows + i on your keyboard to open the Settings app. Ensure ‘System’ is selected on your left and then click on ‘Focus Assist’ on your right.
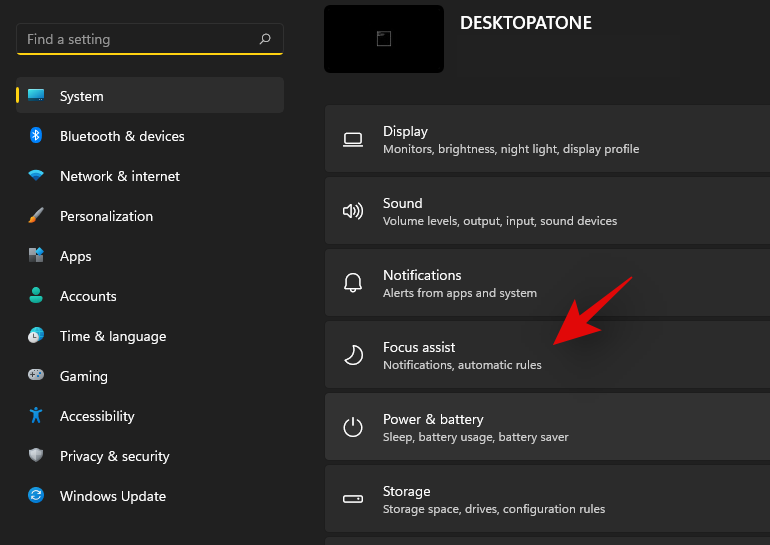
Go down to automatic rules and turn off the following toggles.
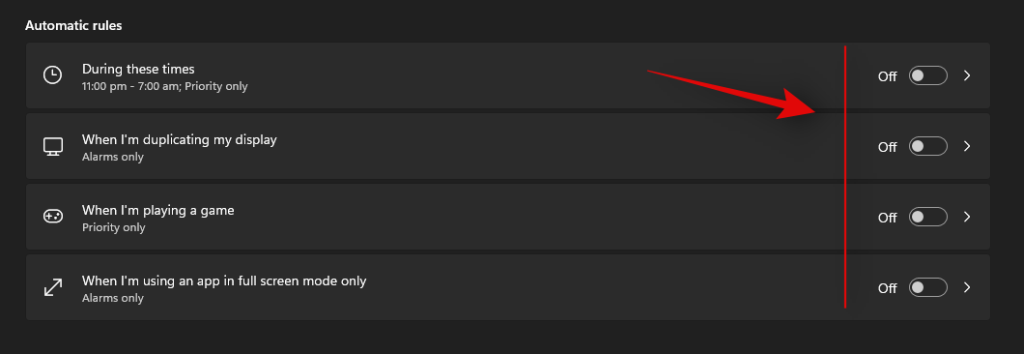
Once these rules are disabled, Windows 11 will not turn on Focus assist automatically on your system.
Fix #2: Turn of GeForce Overlay
This is another way to solve Focus assist misbehaving on your system. If you have a dGPU from Nvidia and are using the GeForce experience app then we recommend disabling its overlay option and restarting your system. With the automatic rule for ‘When I’m using an app in full-screen mode only’ turned on, Windows will mistake the Nvidia overlay detection on your desktop for a full-screen app which will trigger the Focus assist settings in return. You can also disable this automatic rule in case you wish to keep the Geforce Experience overlay enabled on your system.
Focus assist greyed out, option missing or not working; How to fix
Is the focus assist option missing from Windows 11 settings app? Is the module greyed out in the action center? This is a known bug that shows up occasionally with every feature update of Windows. Even certain versions of Windows 10 faced huge issues with this bug until a fix was released.
Fix #1: Enable in Group Policy Editor
If Focus assist seems to be missing from your system then it is likely disabled using the group policy editor. If your PC is managed by your organization or your workplace then it is likely disabled by your administrator. If you have access to the group policy editor then you can use the guide below to enable focus assist on your system. However, in case you have limited access, then you might need to get in touch with your administrator to enable Focus assist on your system.
Press Windows + R on your keyboard to bring up the Run dialog box and type in the following command to launch the Group Policy Editor. Click on ‘Ok’ once you are done.
gpedit.msc
Navigate to the following node.
User configuration > Administrative Templates > Start Menu and Taskbar > Notifications
Double click on ‘Turn off Quiet Hours’ on your right.
Click and select ‘Disabled’ in the top left corner.
Click on ‘Ok’ to save your changes.
And that’s it! Focus assist should now be enabled on your system in case it was disabled using the group policy editor.
Fix #2: Reinstall and repair default Windows UWP apps and system apps
If Focus assist is still missing from your system then let’s check if all the necessary apps and utilities are installed properly on your system. Use the guide below to check and repair Windows 11’s basic apps and functionality on your system.
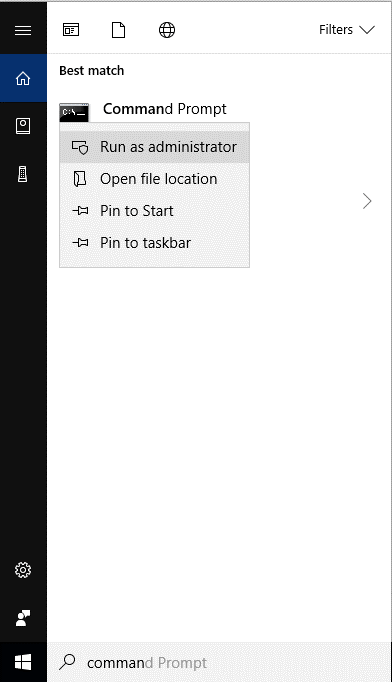
Press Windows + S and search for PowerShell. Click on ‘Run as administrator’ once it shows up in your search results.
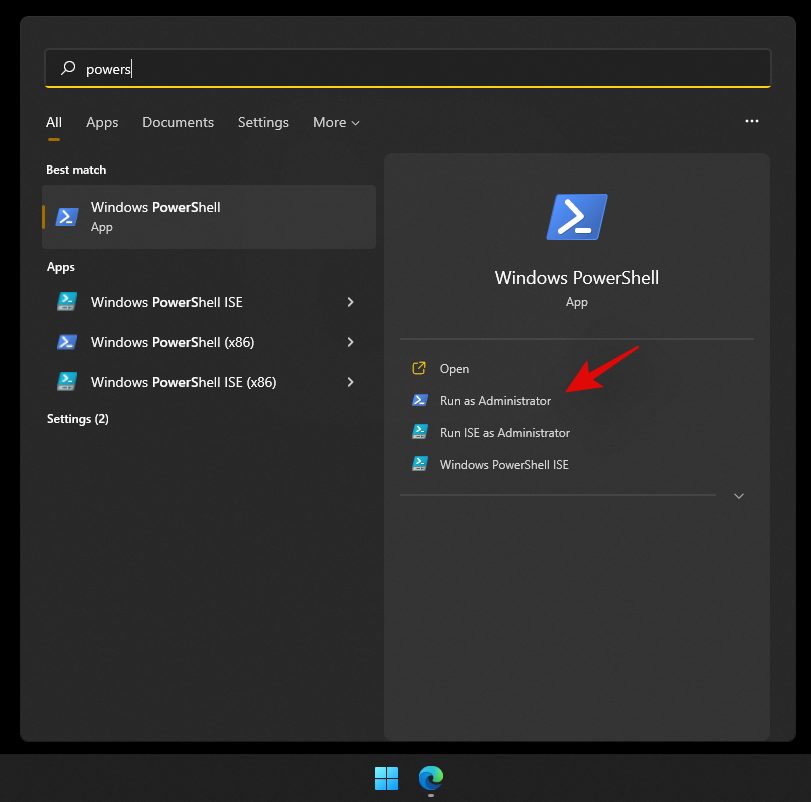
Once PowerShell is launched, execute the following command to reinstall all UWP apps and check and repair other default utilities required by Windows 11 in the background.
Get-AppXPackage -AllUsers | Foreach {Add-AppxPackage -DisableDevelopmentMode -Register "$ ($ _. InstallLocation) \ AppXManifest.xml"}

Wait for the process to finish and restart your PC for good measure. If Focus assist was corrupted or missing from your system, then this fix should help solve all your issues.
Fix #3: Check for a Windows Update
Haven’t updated in a while? We recommend checking for recent Windows Updates. While updates rarely disable major features like Focus assist, a new feature update installation can help refresh your registry, fix mismatched values and more importantly iron out bugs that could be preventing you from accessing Focus assist on your system. Use the guide below to check for recent Windows updates on your system.
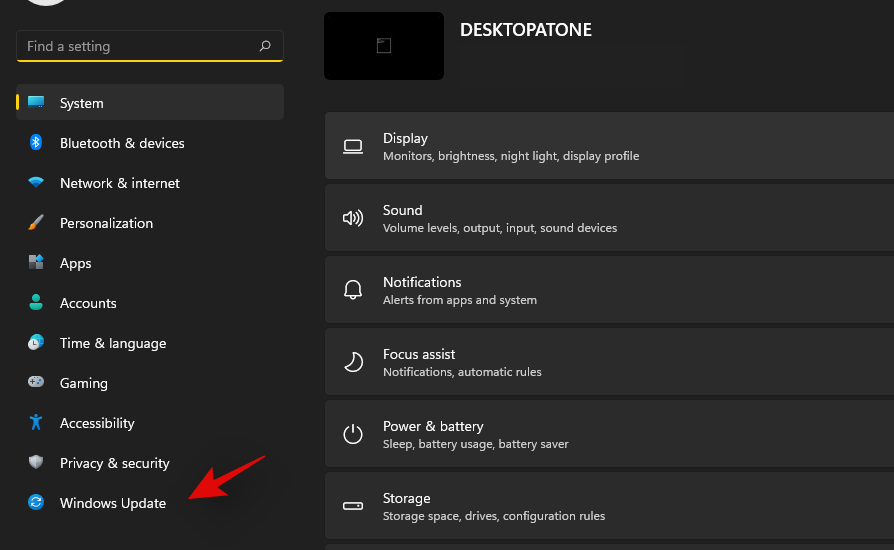
Press Windows + i on your keyboard to open the Settings app and click on ‘Windows Update’ on your left.
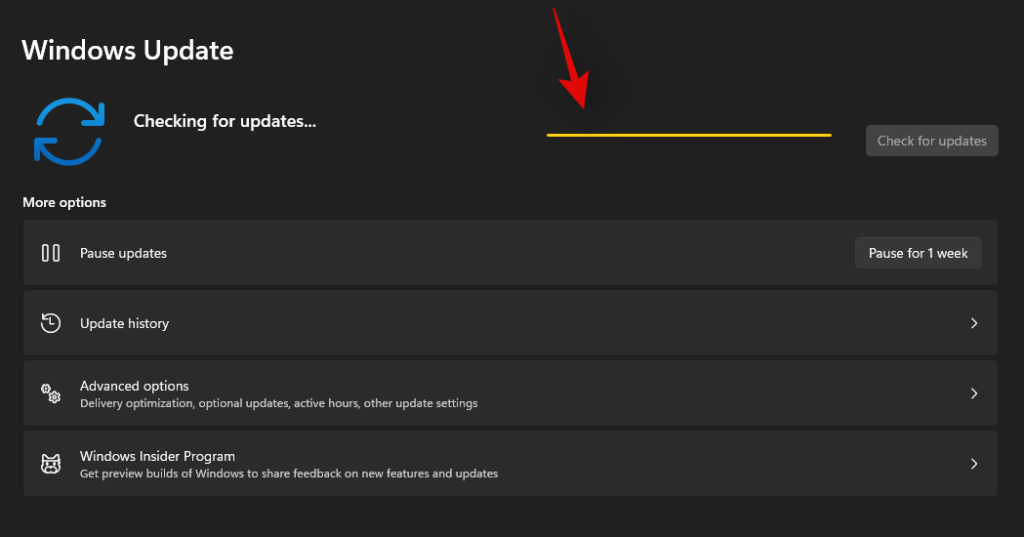
Click on ‘Check for updates’.

In case any new updates show up, let them install on your system and restart if prompted. In case you are using a metered connection then you will need to click on ‘Download now’ manually to avoid any unexpected data charges.
Once the necessary Windows updates are installed on your system, Focus assist should be restored in your action center and the Settings app.
Last Resort: Reset your PC
If Focus assist is still missing from your PC then this indicates a corrupted Windows installation on your system. The best way to fix this without wasting much time on troubleshooting would be to simply reset your PC while keeping all your files intact. This will refresh the entire Windows 11 installation and reinstall all the apps which should help restore functionality for all Windows features including Focus assist. Follow the guide below to reset your PC while keeping your files.
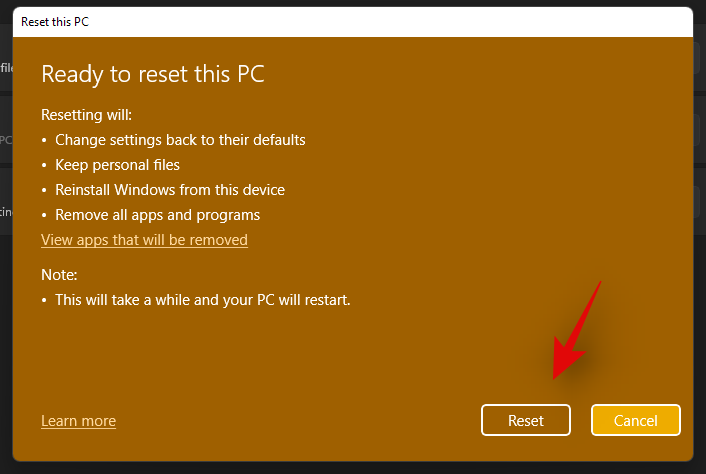
Note: The reset process will remove all installed applications and only retain files stored manually on your local storage. A list of all the removed apps will be available in .txt format on your desktop once your PC has been reset.
Press Windows + i on your keyboard and click on ‘Windows Update’ on your left.
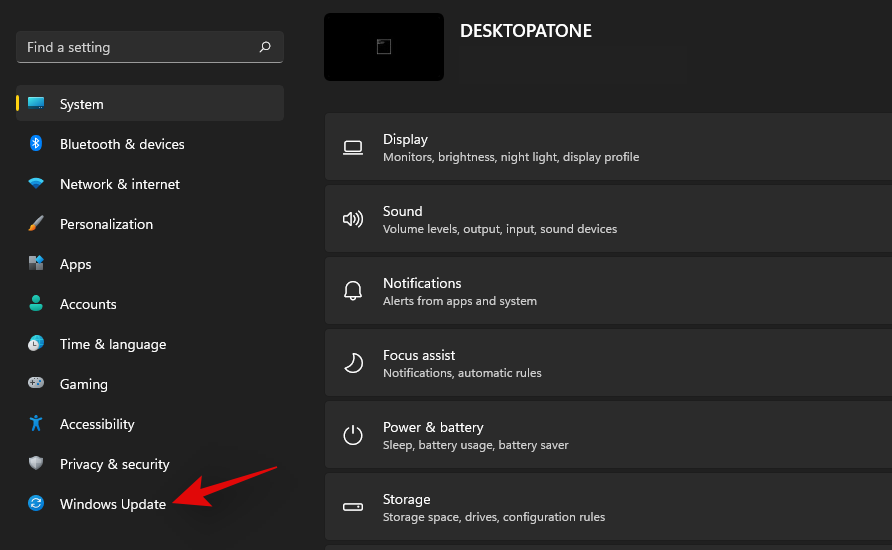
Click on ‘Advanced options’.
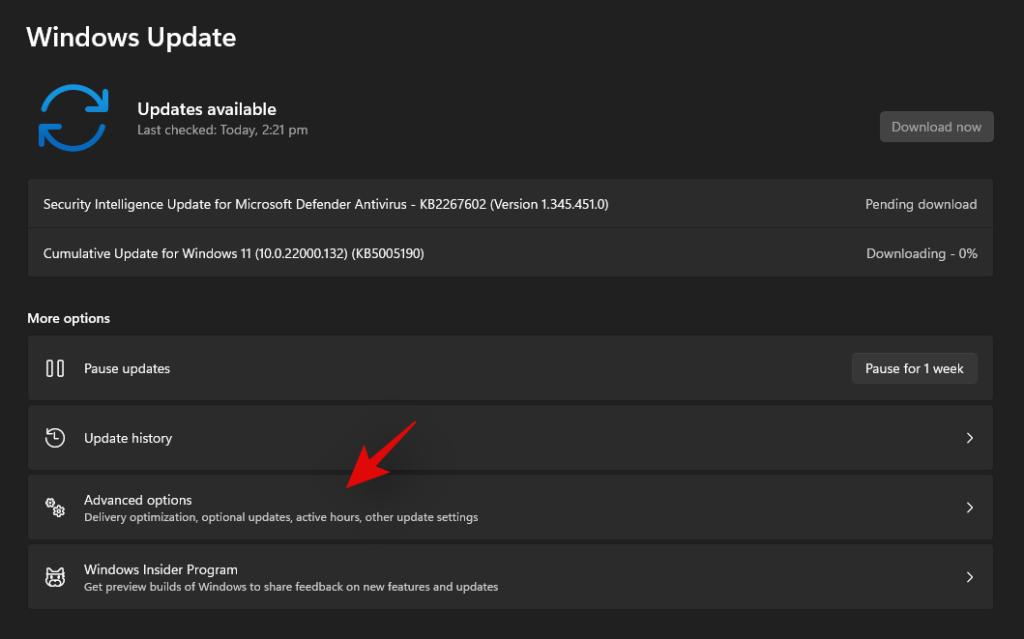
Click and select ‘Recovery’.
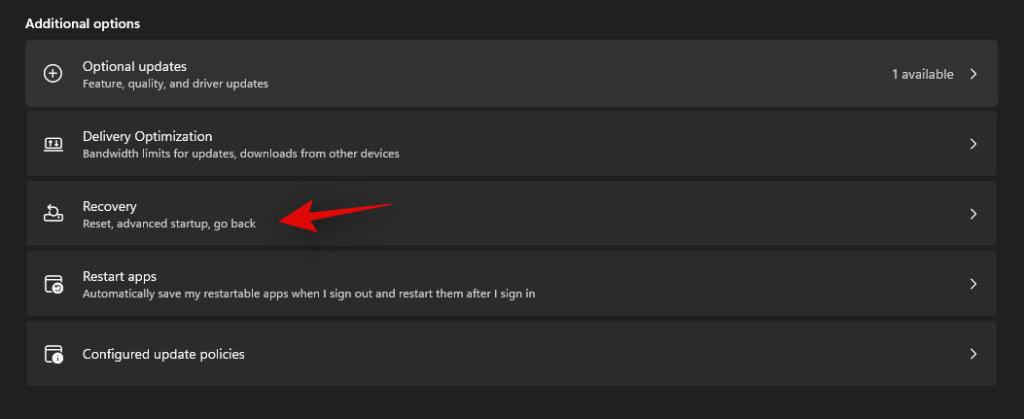
Click on ‘Reset PC’ beside Reset this PC.

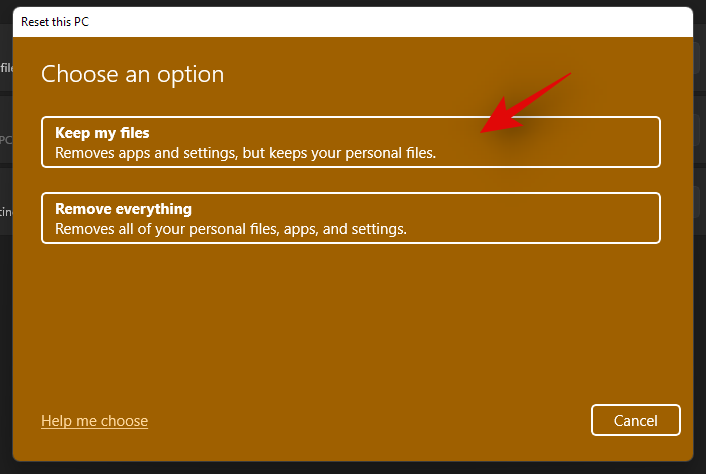
Click on ‘Keep my files’.
Windows will now process all the files on your local storage. Click on ‘Reset’.
Note: If you are using Windows 11 Pro or higher then you will get the option to use a local installation/recovery media to reinstall Windows 11 as well. However, this option will be missing for Windows 11 Home users.
Windows will now reset your PC while retaining all your files. Your PC will restart several times during this process. This is completely normal and you should let Windows do its thing. If you are using a laptop or a portable NUC, then ensure that your unit is plugged into the power at all times during this process.
How to turn off Focus assist permanently
Do you wish to turn off Focus assist permanently in all scenarios? Then you can use the guide below to do so. The best way to disable Focus assist is by using the group policy editor. But in case you are using Windows 11 Home Edition, then you can use the first method in this guide to disable Focus assist permanently.
Method #1: Disable all settings and rules
Once you disable all the settings and rules for Focus assist, the feature should be turned off automatically on your system. Use the guide below to get you started.
Press Windows + i on your keyboard to open the Settings app and click on ‘Focus assist’ on your right.

Click and select ‘Off’ at the top.
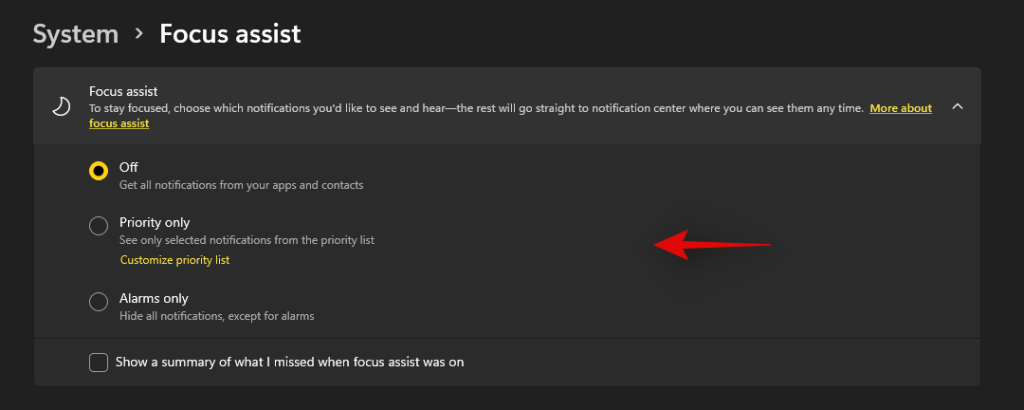
Uncheck the box for ‘Show a summary of what I missed when focus assist was on’.

Subsequently, disable all the toggles under ‘Automatic rules’ as shown below.

We also recommend turning off notifications for unnecessary apps using the guide after this section to avoid unnecessary notifications from interrupting you when focus assist is disabled.
Method #2: Using Group Policy Editor
The group policy editor will permanently disable focus assist on your system and even prevent you from accessing it in your settings. However, this method will only work on Windows 11 Pro or higher versions. In case you have the Windows 11 home edition, you can use the guide above to disable Focus assist instead.
Press Windows + R and type in the following to open Froup Policy EDitor. Click on ‘Ok’ once done.
gpedit.msc
Navigate to the following node.
User configuration > Administrative Templates > Start Menu and Taskbar > Notifications
Find and double-click on ‘Turn on Quiet Hours’ on your right.
Select ‘Enabled’ in the top left and click on ‘Ok’.
Focus assist will now be permanently disabled on the selected system. We recommend you restart your system or explorer.exe in case the changes do not take place immediately.
Is there any other way to disable notifications?
Yes, you can disable notifications individually on a per-app basis in Windows 11 to customize the notifications you receive. This is another way to ensure that you are only notified about the apps and notifications that you intended. Customizing your notifications this way will also allow you to retain the full functionality of the focus assist mode without having to disable certain rules to avoid mismatched scenarios in your workflow.
However, the only downside to managing your notifications this way is that you have to keep enabling and disabling notifications for apps every few months depending on your new installs and uninstalls. You can use the guide below to disable notifications on a per-app basis in Windows 11.
Disable notifications permanently on a per-app basis
Here’s how you can disable notifications on a per-app basis in Windows 11.
Press Windows + i on your keyboard to open the Settings app and then click on ‘Notifications’ on your right.
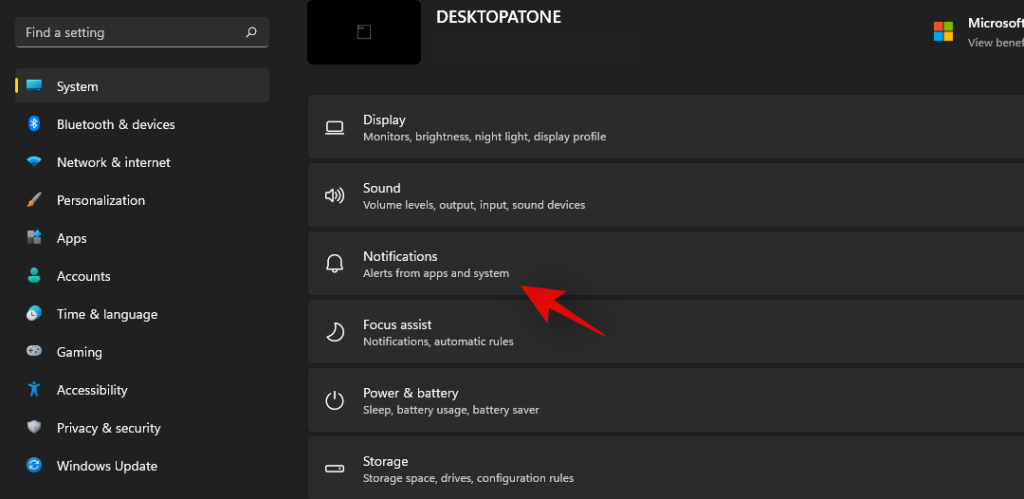
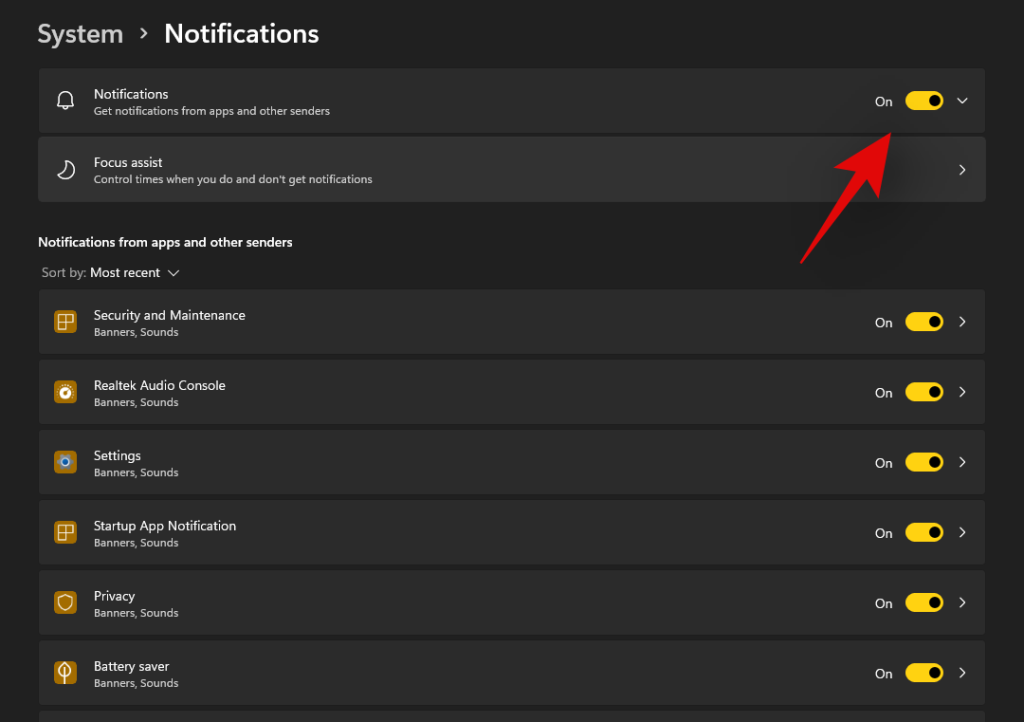
You will now get a list of all the apps that have the permission to deliver notifications on your system. Scroll the list to find the necessary apps and turn off the toggle beside them to disable notifications.
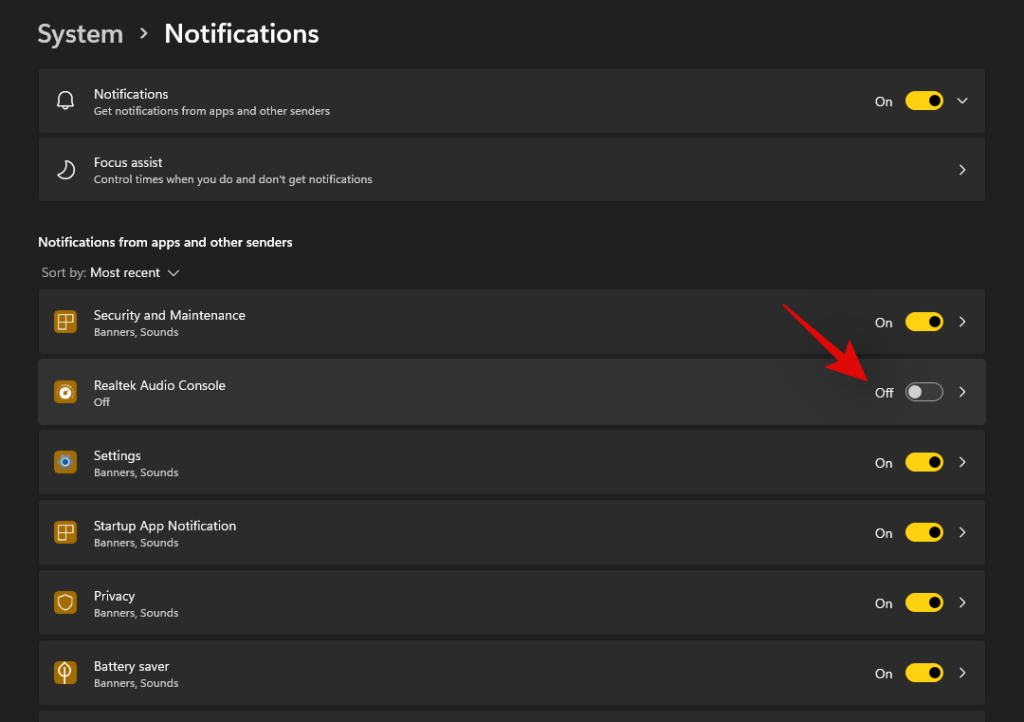
Repeat the steps above for all the intended apps to disable notifications.
Close the Settings app and notifications for the selected apps should now be permanently disabled on your system.
Can you customize notifications in Windows 11?
Well, not exactly. Windows 11 currently has very limited options when it comes to customizing your notifications. You can not change the look, behavior, or color palette of your notifications without changing the accent color of your overall UI. However, you can customize the way your notifications sound. You can set a nice quiet notification sound that does not interrupt your workflow or opt for a quirky take that makes for a few good laughs each time you get a notification. The choice is completely up to you. Use the guide below to customize your Windows 11 notification sounds.
Required
Guide
Let’s start by first placing the .wav file in a compatible media folder so that you can set it as your default notification sound in Windows 11. Navigate to the concerned .wav file and copy it to your clipboard.
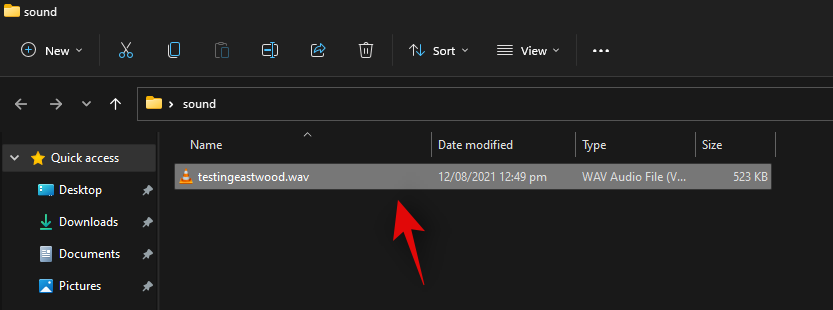
Now navigate to the following path given below. Paste your .wav file in this location. Click on ‘Continue’ when you will be prompted for administrator permission.
C:\Windows\media
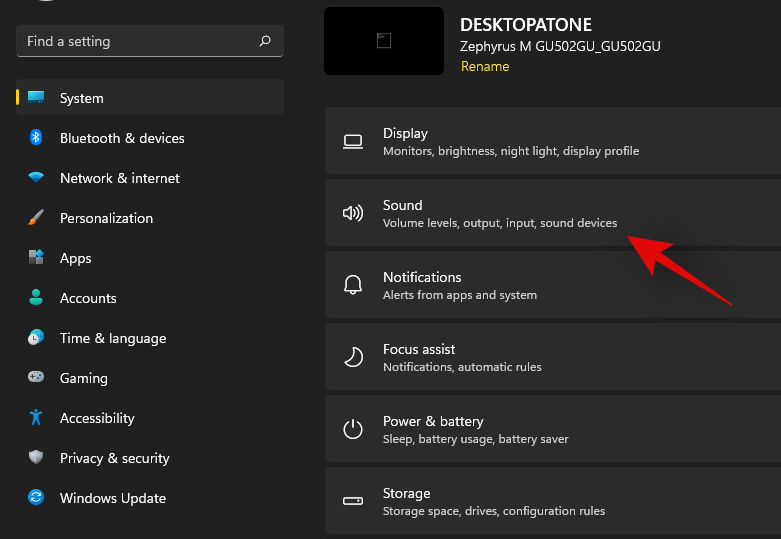
We can now use the .wav file as our default notification sound. Press Windows + i on your keyboard to open the Settings app and then click on ‘Sound’ on your right.
Scroll to the bottom and click on ‘More sound settings’.

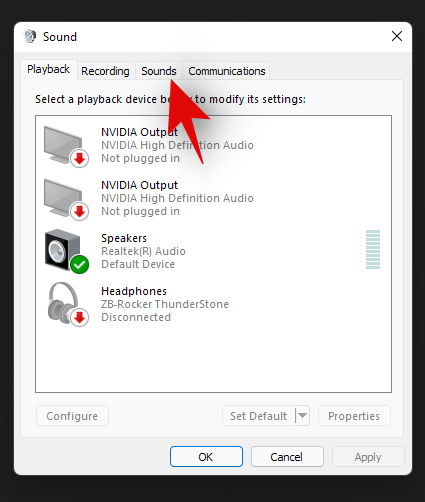
Click and switch to the ‘Sounds’ tab at the top.
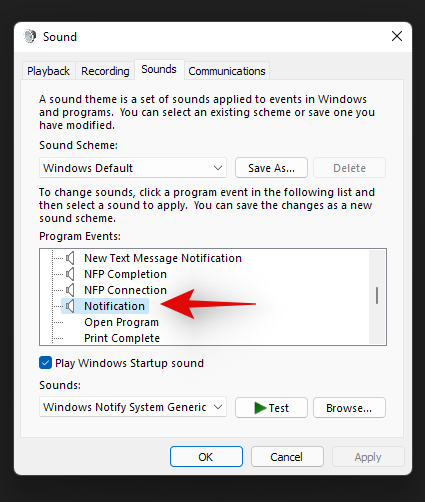
Under ‘Program Events’ scroll the list and find ‘Notifications’. Click on ‘Notifications’ to select it.
Now click on the drop-down arrow under Sounds and select the .wav file we pasted in the Media folder.
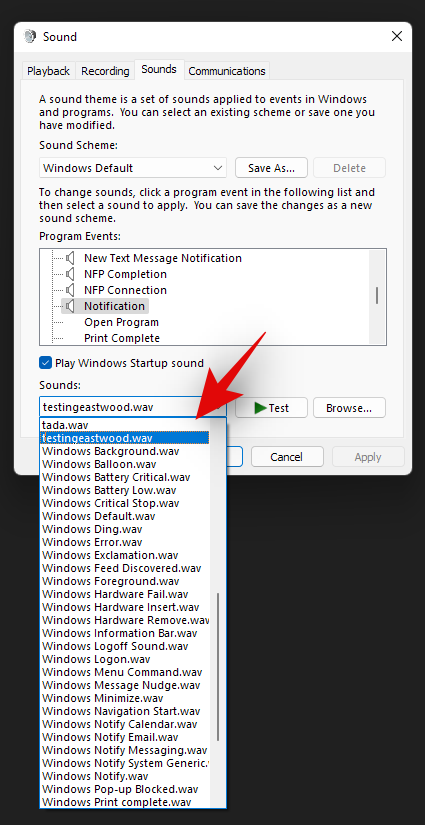
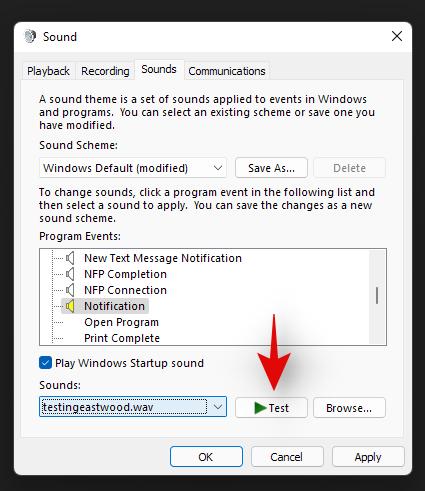
You can click on ‘Test’ to test your custom notification sound.
Click on ‘Ok’ to save your changes.
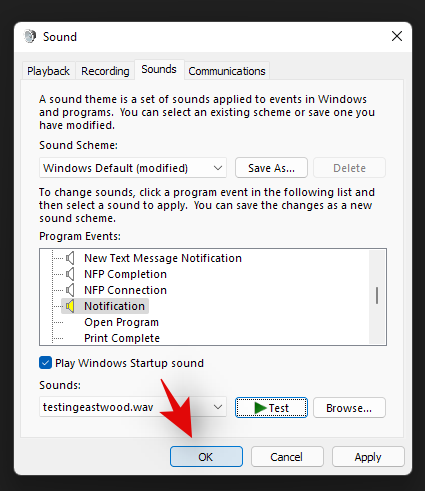
And that’s it! You will now have set a custom sound as your default notification sound in Windows 11.
Distractions from notifications are a huge problem especially when you are into some important work. Using the steps mentioned above, now, you can easily get rid of unnecessary notifications and work peacefully with full concentration.
Related:
Ανακαλύψτε πώς να ενημερώσετε τα προγράμματα οδήγησης στα Windows 11 για να βελτιώσετε τη συμβατότητα και τις επιδόσεις.
Ανακαλύψτε πώς να αλλάξετε το χρώμα της γραμμής εργασιών στα Windows 11 με απλές μεθόδους για να προσαρμόσετε την εμφάνιση του υπολογιστή σας.
Όλα όσα πρέπει να γνωρίζετε για να δημιουργήσετε έναν νέο λογαριασμό χρήστη στα Windows 11, είτε τοπικό είτε διαδικτυακό.
Μάθετε πώς να εγκαταστήσετε τα Windows 11 χωρίς TPM χρησιμοποιώντας διαφορετικές μεθόδους για να παρακάμψετε τις απαιτήσεις ασφαλείας. Διαβάστε τον οδηγό μας για πληροφορίες και λύσεις.
Τα στιγμιότυπα οθόνης στα Windows 11 περιλαμβάνουν ποικιλία μεθόδων, συμπεριλαμβανομένων των Print Screen, Snip & Sketch και περισσότερο. Μάθετε πώς να τα χρησιμοποιήσετε!
Ανακαλύψτε πού βρίσκεται το My Computer στα Windows 11 και πώς να το επαναφέρετε εύκολα. Χρήσιμες μέθοδοι για Γενικές Χρήστες και Προχωρημένους.
Ανακαλύψτε πώς να σηκώσετε το χέρι στο Zoom με εύκολο και κατανοητό τρόπο. Ιδανικό για ομάδες τηλεδιάσκεψης. Δείτε λεπτομέρειες στα βήματα!
Το Zoom είναι μία από τις πιο δημοφιλείς εφαρμογές απομακρυσμένης συνεργασίας. Αποκαλύπτουμε χρήσιμες λύσεις για φαινόμενα ήχου και βίντεο.
Μην δημοσιεύετε τις φωτογραφίες σας δωρεάν στο Instagram όταν μπορείτε να πληρωθείτε για αυτές. Διαβάστε και μάθετε πώς να κερδίσετε χρήματα στο Instagram και να αξιοποιήσετε στο έπακρο αυτήν την πλατφόρμα κοινωνικής δικτύωσης.
Μάθετε πώς να επεξεργάζεστε και να αφαιρείτε μεταδεδομένα PDF με ευκολία. Αυτός ο οδηγός θα σας βοηθήσει να επεξεργαστείτε ή να αφαιρέσετε εύκολα τα μεταδεδομένα PDF με μερικούς εύκολους τρόπους.
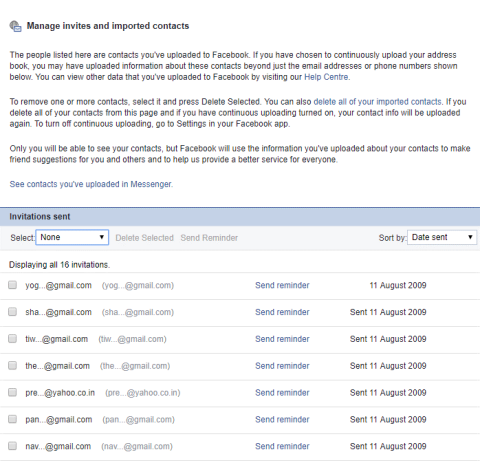
Γνωρίζετε ότι το Facebook έχει μια πλήρη λίστα με τις επαφές του τηλεφωνικού σας καταλόγου μαζί με το όνομα, τον αριθμό και τη διεύθυνση email τους.
Το πρόβλημα μπορεί να εμποδίσει τη σωστή λειτουργία του υπολογιστή σας και μπορεί να χρειαστεί να αλλάξετε τις ρυθμίσεις ασφαλείας ή να ενημερώσετε τα προγράμματα οδήγησης για να τις διορθώσετε.
Αυτό το ιστολόγιο θα βοηθήσει τους αναγνώστες να μετατρέψουν το USB με δυνατότητα εκκίνησης σε αρχείο ISO χρησιμοποιώντας λογισμικό τρίτων κατασκευαστών που είναι δωρεάν στη χρήση και ασφαλές από κακόβουλο λογισμικό.
Αντιμετώπισε τον κωδικό σφάλματος 0x8007139F του Windows Defender και δυσκολεύεστε να εκτελέσετε σαρώσεις; Ακολουθούν τρόποι με τους οποίους μπορείτε να διορθώσετε το πρόβλημα.
Αυτός ο περιεκτικός οδηγός θα σας βοηθήσει να διορθώσετε το «Σφάλμα χρονοπρογραμματιστή εργασιών 0xe0434352» στον υπολογιστή σας με Windows 11/10. Δείτε τις διορθώσεις τώρα.
Το σφάλμα Windows LiveKernelEvent 117 προκαλεί απροσδόκητο πάγωμα ή απροσδόκητη διακοπή λειτουργίας του υπολογιστή σας. Μάθετε πώς να το διαγνώσετε και να το διορθώσετε με βήματα που προτείνουν οι ειδικοί.
Αυτό το ιστολόγιο θα βοηθήσει τους αναγνώστες να διορθώσουν το PowerPoint δεν θα μου επιτρέψει να εγγράψω προβλήματα ήχου σε υπολογιστή με Windows και ακόμη και να προτείνω άλλα υποκατάστατα εγγραφής οθόνης.
Αναρωτιέστε πώς να γράψετε σε ένα έγγραφο PDF αφού πρέπει να συμπληρώσετε φόρμες, να προσθέσετε σχολιασμούς και να βάλετε τις υπογραφές σας. Βρήκατε τη σωστή ανάρτηση, διαβάστε!
Αυτό το ιστολόγιο θα βοηθήσει τους χρήστες να αφαιρέσουν το υδατογράφημα Απαιτήσεις συστήματος που δεν πληρούνται για να απολαύσουν μια πιο ομαλή και ασφαλή εμπειρία με τα Windows 11, καθώς και μια πιο καθαρή επιφάνεια εργασίας.
Αυτό το ιστολόγιο θα βοηθήσει τους χρήστες MacBook να κατανοήσουν γιατί παρουσιάζονται τα προβλήματα με την ροζ οθόνη και πώς να τα διορθώσουν με γρήγορα και απλά βήματα.
Δυσκολεύεστε με το σφάλμα "Δεν βρέθηκε το VCRUNTIME140.dll των Windows 11"; Ανακαλύψτε δοκιμασμένες λύσεις βήμα προς βήμα για να το διορθώσετε γρήγορα και να επαναφέρετε τις εφαρμογές σας σε λειτουργία ομαλά. Δεν απαιτούνται τεχνικές γνώσεις!
Δυσκολεύεστε με σφάλματα τεχνητής νοημοσύνης της Cortana και του Copilot στα Windows 11; Ανακαλύψτε αποδεδειγμένες λύσεις για την επίλυση προβλημάτων σφαλμάτων, μη ανταπόκρισης και ενσωμάτωσης. Επαναφέρετε τους βοηθούς τεχνητής νοημοσύνης σας στην σωστή λειτουργία χωρίς κόπο.
Δυσκολεύεστε με το σφάλμα "Δεν βρέθηκε το SSID" στα Windows 11 κατά τη σύνδεση σε κρυφό Wi-Fi; Αυτός ο οδηγός βήμα προς βήμα προσφέρει αποδεδειγμένες λύσεις για να συνδεθείτε ξανά στο διαδίκτυο γρήγορα και με ασφάλεια. Ανακαλύψτε εύκολες συμβουλές αντιμετώπισης προβλημάτων για απρόσκοπτη συνδεσιμότητα.
Ανακαλύψτε πώς να αξιοποιήσετε τις πιο πρόσφατες δυνατότητες προσβασιμότητας των Windows 11 το 2026 για να κάνετε την πληροφορική ευκολότερη και πιο συμπεριληπτική. Οδηγοί βήμα προς βήμα για οπτικά, ακουστικά, κινητικά και γνωστικά βοηθήματα που ενδυναμώνουν όλους τους χρήστες.
Δυσκολεύεστε με αργές ταχύτητες PyCharm και IntelliJ στα Windows 11; Ανακαλύψτε δοκιμασμένες λύσεις για να επιταχύνετε τα IDE σας, να βελτιστοποιήσετε την απόδοση και να ανακτήσετε την παραγωγικότητά σας. Λύσεις βήμα προς βήμα για προγραμματιστές.
Δυσκολεύεστε με το ενοχλητικό σφάλμα κλικ στον σκληρό δίσκο των Windows 11; Ανακαλύψτε δοκιμασμένες, βήμα προς βήμα λύσεις για να αποκαταστήσετε την ομαλή απόδοση και να αποτρέψετε την απώλεια δεδομένων. Επαναφέρετε τον υπολογιστή σας σε καλή κατάσταση σήμερα!
Ανακαλύψτε πώς να χρησιμοποιήσετε το Storage Sense των Windows 11 για να ελευθερώσετε αυτόματα χώρο στον δίσκο. Οδηγός βήμα προς βήμα για τη βελτιστοποίηση του χώρου αποθήκευσης, τη διαγραφή προσωρινών αρχείων και τη διατήρηση της ομαλής λειτουργίας του υπολογιστή σας. Βασικές συμβουλές για αρχάριους.
Ανακαλύψτε πώς να ρυθμίσετε με ασφάλεια ένα αντίγραφο ασφαλείας του μητρώου των Windows 11 με οδηγίες βήμα προς βήμα. Προστατέψτε τις ρυθμίσεις του συστήματός σας χωρίς κόπο και αποφύγετε συνήθεις παγίδες για μια ασφαλή εμπειρία υπολογιστή.
Αντιμετωπίζετε προβλήματα εκτύπωσης δικτύου μεταξύ των Windows 10 και των Windows 11; Ανακαλύψτε δοκιμασμένες λύσεις βήμα προς βήμα για να κάνετε την κοινή χρήση των εκτυπωτών σας ομαλά στο οικιακό ή το επαγγελματικό σας δίκτυο. Τέλος στην απογοήτευση—εκτυπώστε χωρίς κόπο σήμερα!
Αντιμετωπίζετε προβλήματα με σφάλματα αλλαγής φόντου στα Windows 11 Pro; Ανακαλύψτε δοκιμασμένες, βήμα προς βήμα λύσεις για να επαναφέρετε την εξατομίκευση της επιφάνειας εργασίας σας. Διορθώστε το γρήγορα και επιστρέψτε σε μια προσαρμοσμένη εμπειρία!

