Hur man öppnar kontrollpanelen i Windows 11
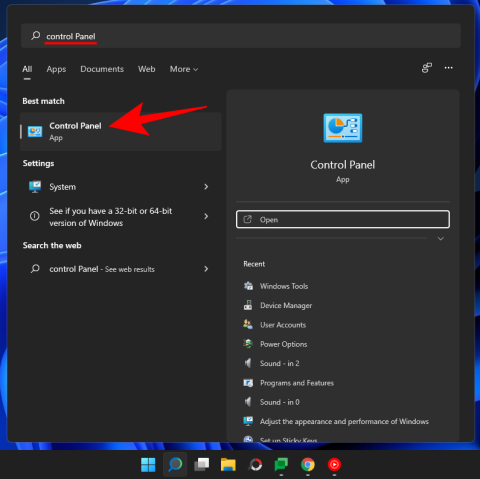
För de av oss som har varit med Windows genom åren vet att Kontrollpanelen är en pålitlig följeslagare. Upptäck effektivt sätt att öppna Kontrollpanelen i Windows 11.
Även om aviseringar är viktiga i vissa fall, blir det ibland ett element av distraktion. Precis som din telefon kan en dator också distrahera dig med aviseringar. Det är därför Windows 11 inkluderar Focus Assist-funktionen, som låter dig undvika distraherande meddelanden. Med den här funktionen kan du utföra ditt arbete med full koncentration istället för att bli distraherad av slumpmässiga meddelanden och aviseringar. Aviseringar kan också skada din produktivitet och därför måste de undertryckas vid rätt tidpunkt.
Bara några få klick kan dölja alla aviseringar, varningar och meddelanden på din dator. Om du nyligen har uppgraderat ditt system till Windows 11 och inte kan ta reda på det nya användargränssnittet, hjälper den här artikeln dig med en omfattande guide om hur du använder Focus Assist på Windows 11 för att bli av med aviseringar.
Relaterat: Hur man tar skärmdumpar på Windows 11
Innehåll
Vad är Focus assist på Windows 11?
Focus Assist är helt enkelt ett Stör ej-läge för din PC – precis som de du har på dina telefoner. Det är en praktisk funktion på Windows 11 som låter dig bli av med onödiga meddelanden, meddelanden och varningar. Focus assist-funktionen gör att du kan anpassa din prioriteringslista istället för att spärra din dator från alla meddelanden.
Distraktion kan skada din produktivitet. Därför kan du med Focus Assist-funktionen dölja alla aviseringar, varningar och meddelanden medan du arbetar med något viktigt. Istället för att varna dig går de direkt till actioncentret. Du kan se de dolda aviseringarna i åtgärdscentret på din egen tid.
Hur fungerar Focus assist på Windows 11?
Focus Assist ger dig flexibiliteten att välja när du vill blockera distraktioner som meddelanden, aviseringar och varningar. Du kan aktivera Focus Assist när som helst eller så kan du också schemalägga ett tidsintervall i inställningarna som slår på Focus Assist automatiskt.
Focus assist-funktionen låter dig skapa en prioriteringslista för att se till att du inte missar några aviseringar från de viktigaste personerna i din kontakt. Personerna på din prioriteringslista kan alltid nå dig, även när du är inne på något viktigt arbete. Om du behöver full koncentration medan du arbetar kan du också välja att blockera alla aviseringar. Om du vill se alla blockerade aviseringar som du fick när du arbetade, öppnar du systemets åtgärdscenter.
Relaterat: Hur man stoppar popup-fönster på Windows 11
Hur man aktiverar Focus assist
Focus Assist är avstängd som standard. Men om du vill aktivera den för att sluta ta emot aviseringar, följ stegen nedan.
Metod #1: Använda inställningar
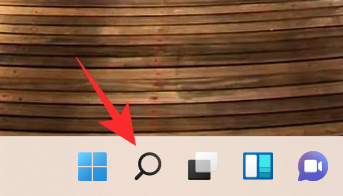
Klicka på sökikonen , som ser ut som ett förstoringsglas i aktivitetsfältet.
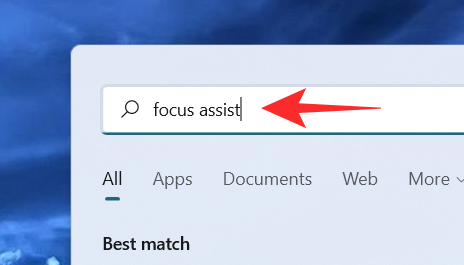
Skriv fokushjälp i sökfältet.
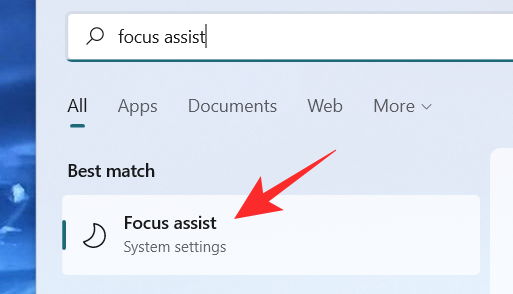
Klicka på Focus Assist- systeminställningarna.
Fönstret för Focus Assist-systeminställningar visas på skärmen. Under Focus Assist väljer du ett av dessa alternativ:
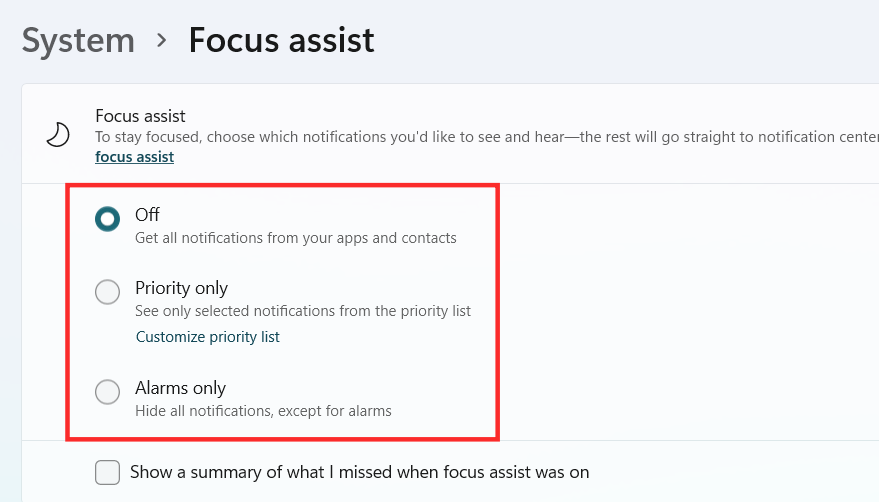
Focus Assist ska nu vara aktiverat i Windows 11 beroende på vilket val du gjorde.
Metod #2: Använda Action Center
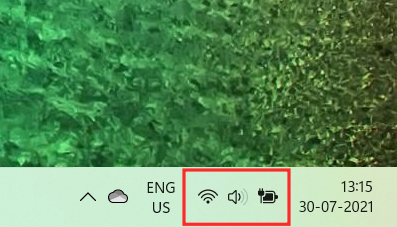
Klicka på Action Center som visar ikonen för Wifi, volym och batteri tillsammans.
Precis under Bluetooth-ikonen kan du se Focus Assist- ikonen som ser ut som en halvmåne.
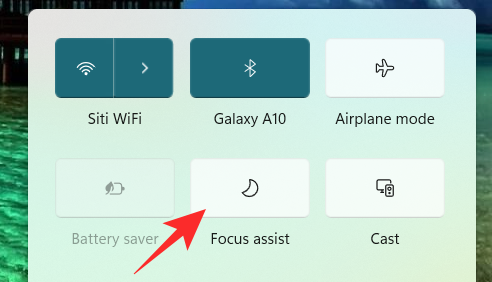
Som standard är Focus Assist-funktionen inaktiverad. Klicka på den så ställs funktionen direkt in på Priority Only .
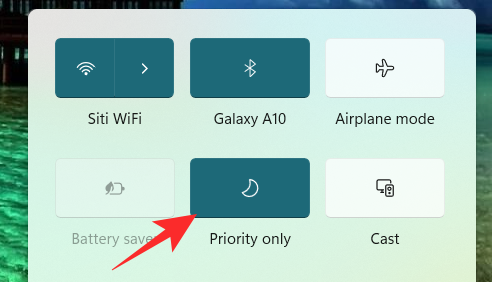
Klicka på den igen för att ställa in Focus Assist-funktionen på endast larm .
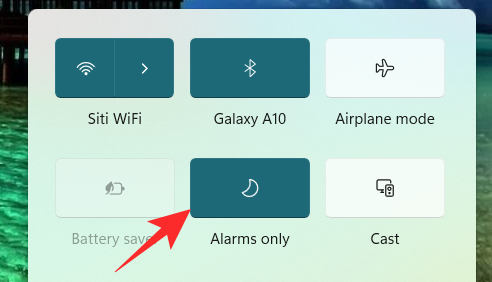
För att inaktivera Focus Assist-funktionen, klicka på den igen.
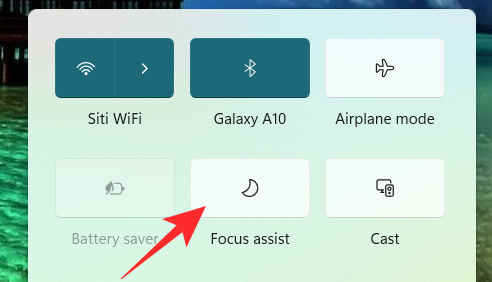
Bara genom att klicka på Focus Assist-ikonen på Action Center kan du ändra dess funktion till av, endast prioritet och endast larm. Men för att göra andra nödvändiga ändringar i Focus Assist-inställningarna från Action Center, högerklicka på Focus Assist- ikonen på Action Center och klicka på Gå till Inställningar .
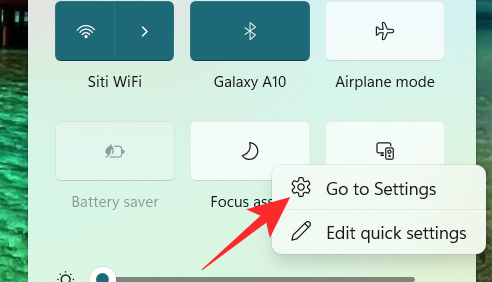
Detta tar dig till appen Inställningar där du enkelt kan göra alla avsedda ändringar. Och det är allt! Fokushjälp ska nu aktiveras i Windows 11 direkt från åtgärdscentret.
Metod #3: Använda grupprincipredigerare
Du kan också aktivera fokushjälpläget med hjälp av grupprincipredigeraren om du är administratör. Använd guiden nedan för att hjälpa dig med processen.
Tryck Windows + Rpå ditt tangentbord och skriv in följande i dialogrutan Kör. Tryck på enter på ditt tangentbord för att öppna grupprincipredigeraren.
gpedit.msc
Navigera till följande nod som nämns nedan.
User configuration > Administrative Templates > Start Menu and Taskbar > Notifications
Hitta och dubbelklicka på värdet "Stäng av tysta timmar" till höger.
Välj nu ett av följande alternativ beroende på dina aktuella behov i det övre vänstra hörnet av egenskapsfönstret.
Och det är allt! Fokushjälp kommer nu att aktiveras eller inaktiveras från grupprincipredigeraren beroende på dina preferenser. Tyvärr kan du inte anpassa Focus-hjälpbeteendet som administratör. Den förmågan ligger fortfarande hos användaren. Du kan bara aktivera eller inaktivera möjligheten att använda Focus Assist för ett system med hjälp av grupprincipredigeraren.
Hur man använder Focus assist
Focus assist har olika inställningar och anpassningsalternativ som kan hjälpa dig att ändra dess beteende efter dina nuvarande behov. Använd en av guiderna nedan som bäst passar dina nuvarande krav.
Metod #1: Aktivera endast larmläge
Läget Endast larm i Focus Assist-fönstret låter dig dölja alla aviseringar förutom larmet. Följ stegen nedan för att aktivera läget Endast larm.
Klicka på Sök -ikonen i aktivitetsfältet.

Typ Focus assist

Klicka på Focus Assist .

Under Focus Assist klickar du på Endast larm för att sluta ta emot aviseringar, förutom larm.
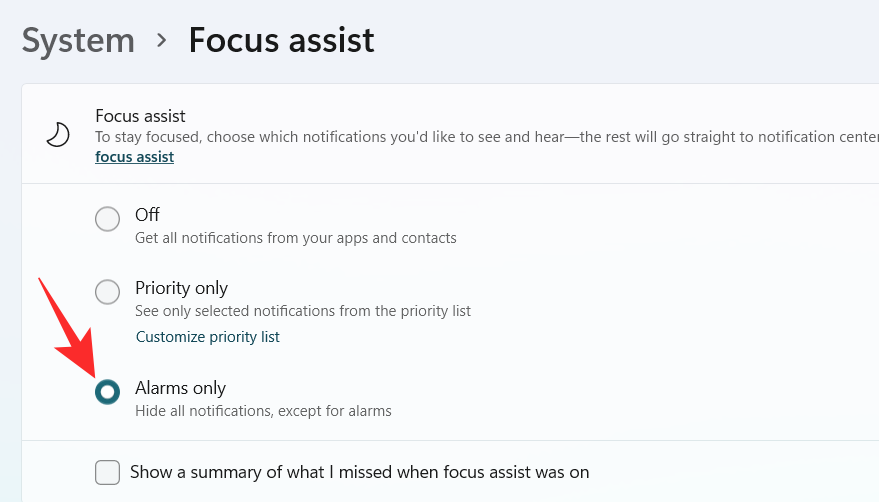
Och det är allt! Du kommer nu endast att informeras om larm på ditt system. Alla andra meddelanden, oavsett prioritet, tystas i Windows 11.
Metod #2: Aktivera prioritet endast med en anpassad lista
Den Folk fönster visas på skärmen. Välj dina favoritpersoner genom att skriva deras namn i sökfältet.
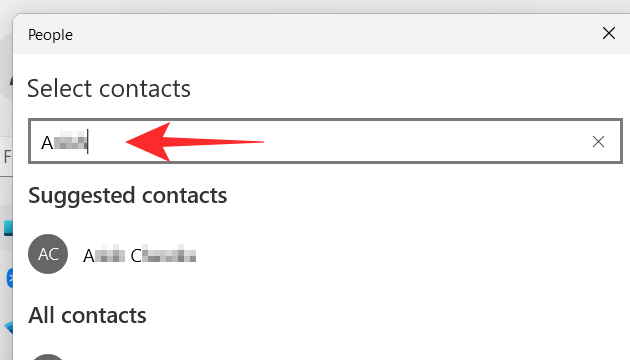
Klicka på personens namn.
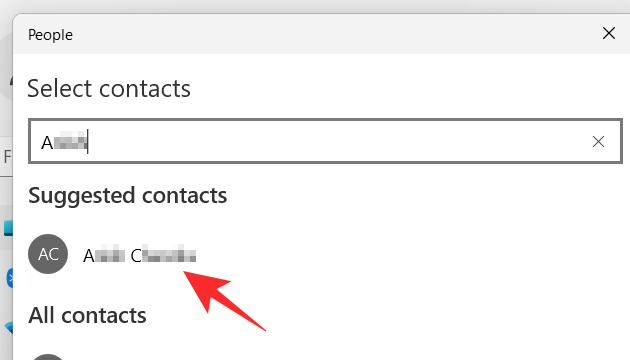
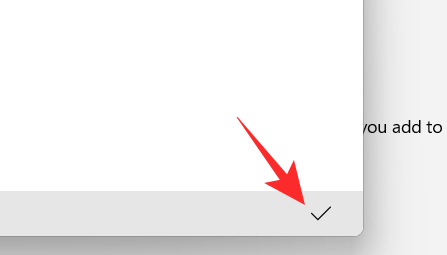
Klicka på bockknappen i det nedre högra hörnet av fönstret Personer.
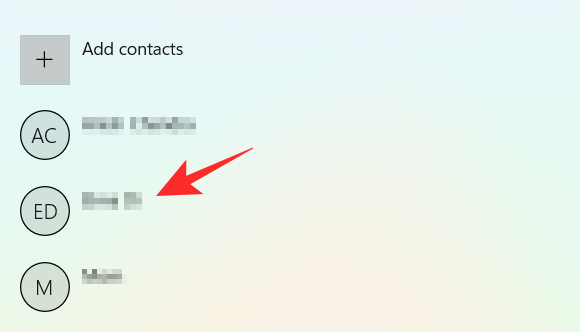
Din prioritetslista har skapats. Om du nu vill ta bort en kontakt från din prioritetslista, klicka på kontakten under Personer .
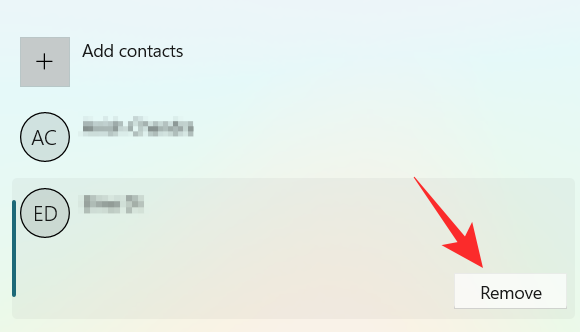
Klicka på Ta bort .
Nu, i avsnittet Appar , kan du välja de appar som kan bryta igenom dina tysta timmar. För att tillåta apparna att visa aviseringar, klicka på knappen Lägg till en app .
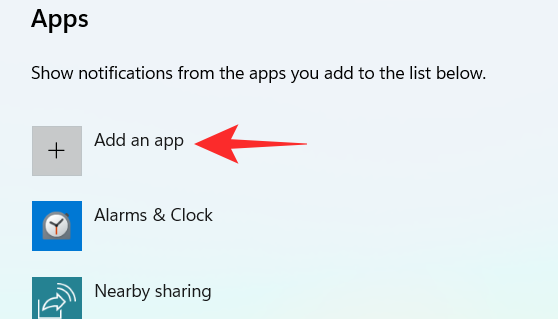
En lista med appar visas på skärmen. Klicka på appen du vill lägga till i din prioriteringslista.
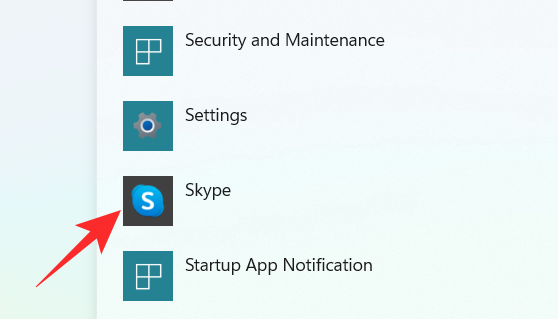
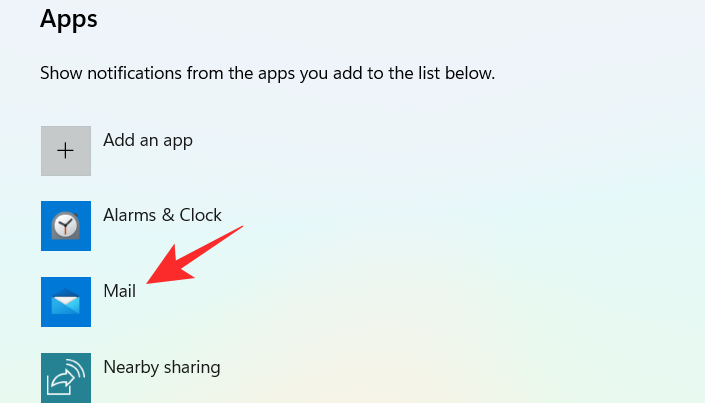
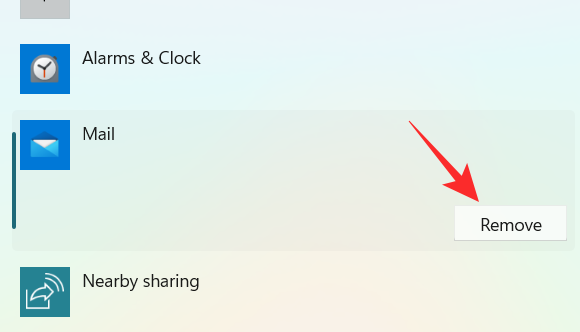
Fortsätt den här processen tills du är klar med att välja apparna. Om du vill ta bort en app från din prioritetslista kan du helt enkelt klicka på appen under App- sektionen.
Klicka på Ta bort .
Och det är så du kan anpassa prioriteringslistan i Focus assist och använda den till din fördel för att bara få aviseringar från viktiga kontakter.
Metod #3: Aktivera aviseringssammanfattning när fokushjälp är inaktiverat
Klicka på Sök -ikonen i aktivitetsfältet.

Typ Focus assist

Klicka på Focus Assist .

Klicka på önskat alternativ Endast prioritet eller Endast larm .
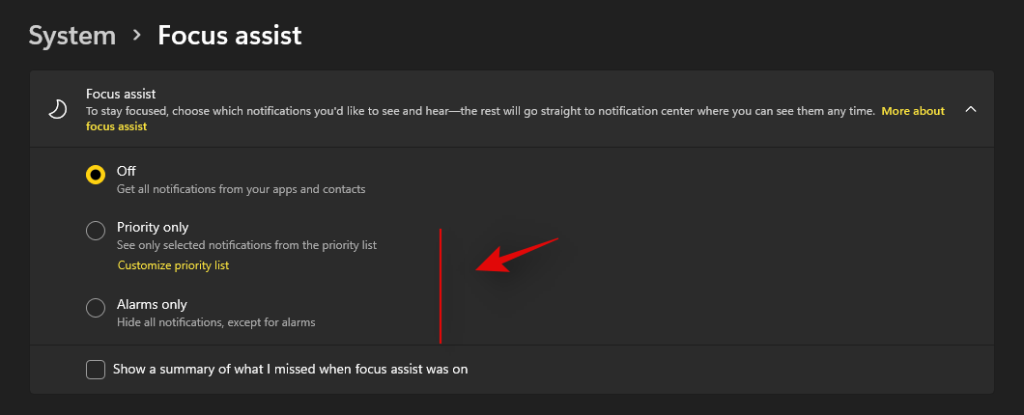
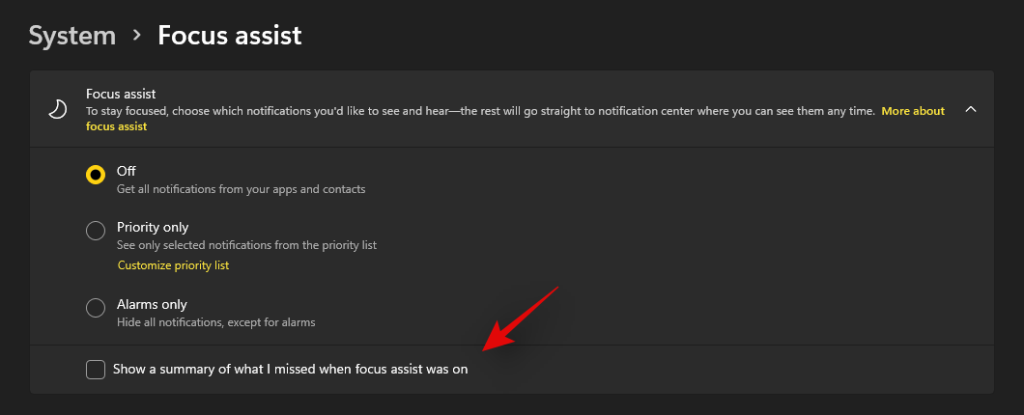
Markera rutan Visa en sammanfattning av vad jag missade när Focus assist var på .
Metod #4: Aktivera eller inaktivera automatiska fokushjälpsregler
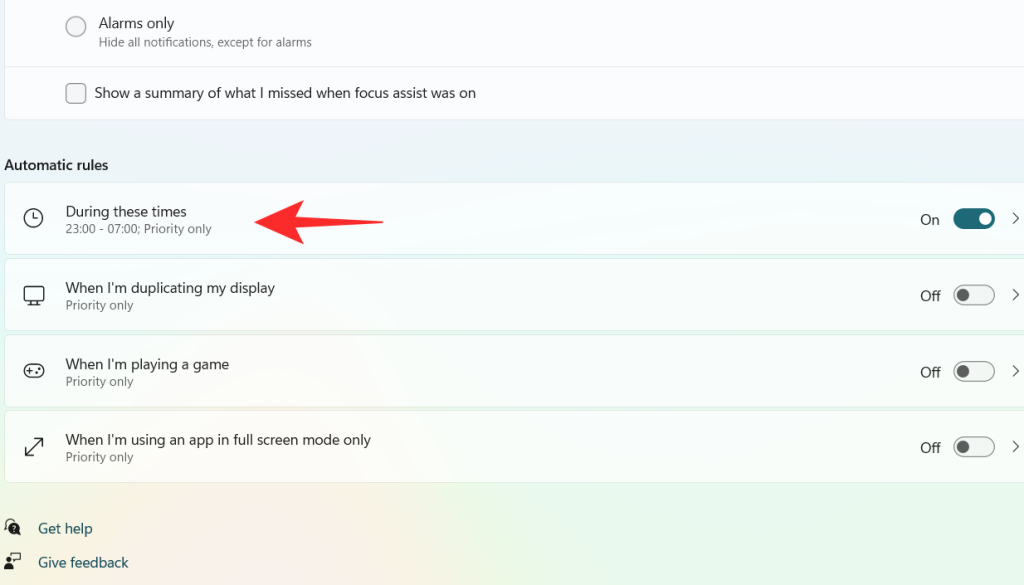
De automatiska reglerna i Focus assist låter dig bestämma villkoren som kan aktivera Focus assist automatiskt. Det finns fyra olika automatiska regler i inställningsfönstret för Focus Assist som kan anpassas. Kolla in stegen som nämns nedan för att anpassa automatiska regler i Focus assist.
Klicka på Sök -ikonen i aktivitetsfältet.

Typ Focus assist

Klicka på Focus Assist .

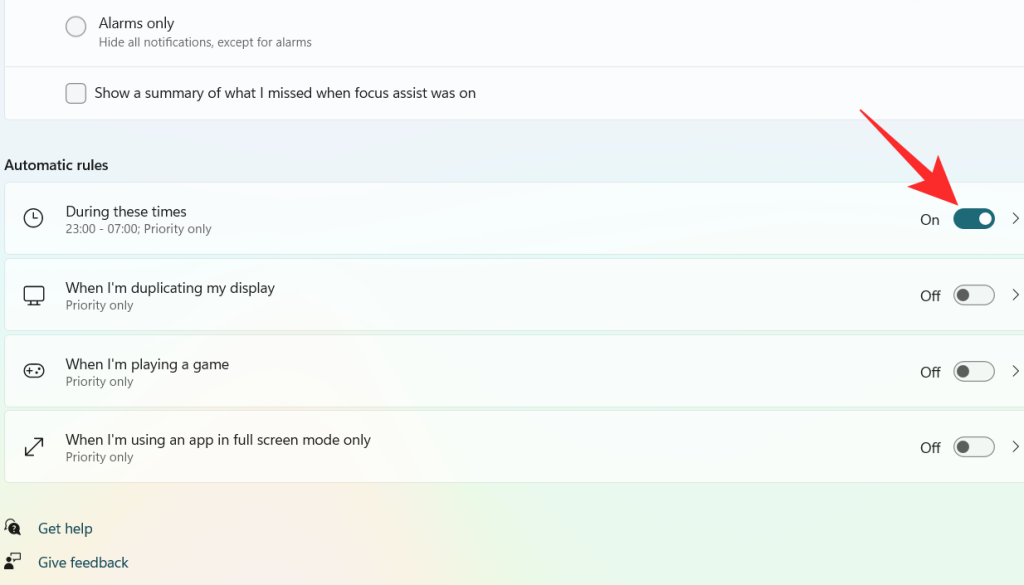
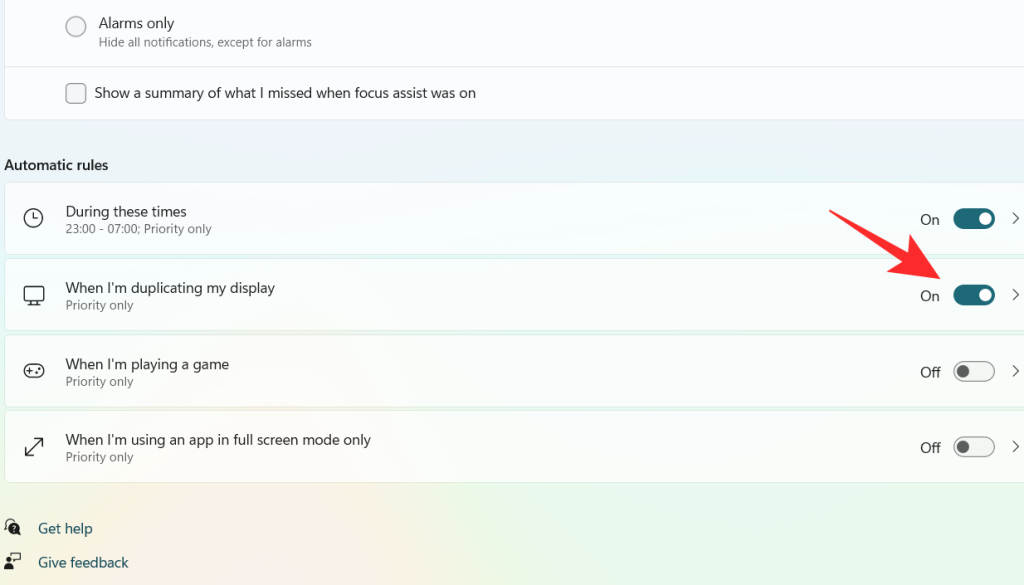
Under avsnittet Automatiska regler finns det fyra avsnitt. Slå på vippknappen för det alternativ du vill välja.
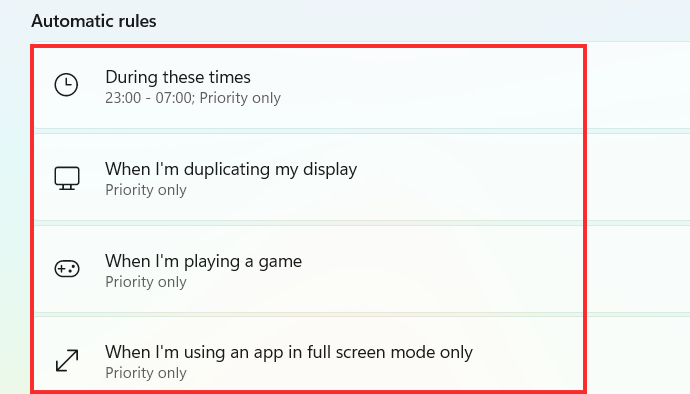
Låt oss nu ta en titt på hur man anpassar de ovan nämnda alternativen under Automatiska regler.
1. Under dessa tider
Slå på vippströmbrytaren, som är extremt till höger på fliken Under dessa tider .
Klicka på fliken Under dessa tider .
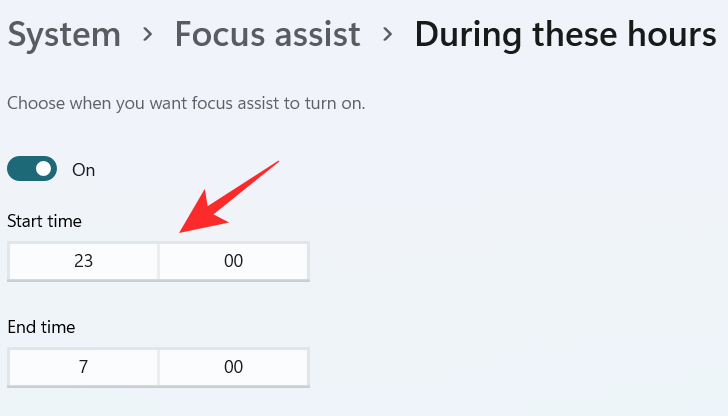
Klicka på rutan under Starttid .
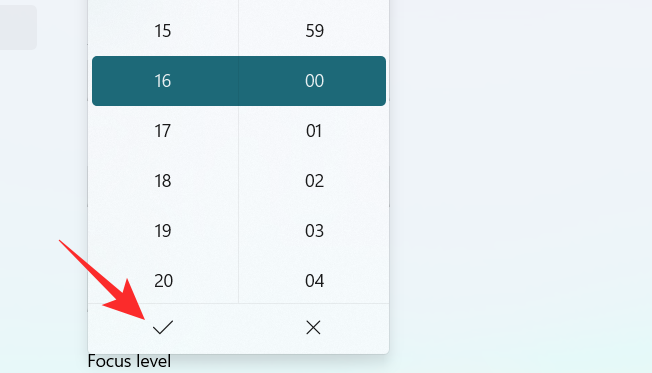
Välj den tidpunkt då du vill att Focus Assist ska slås på och klicka på bocken längst ned i rullgardinsmenyn.
Klicka på rutan under Sluttid .
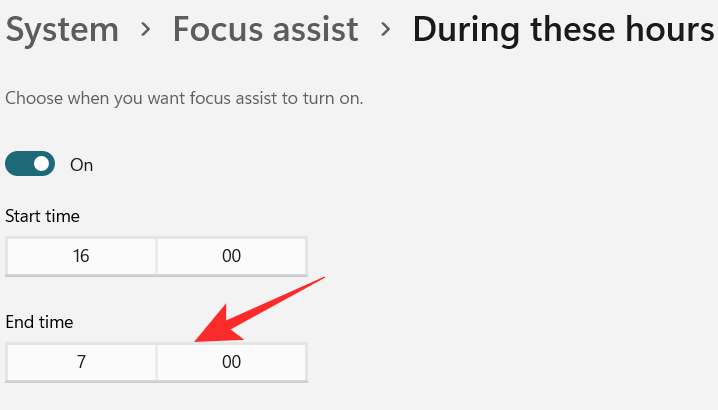
Välj den tidpunkt då du vill att Focus Assist ska stängas av och klicka på bocken längst ned i rullgardinsmenyn.
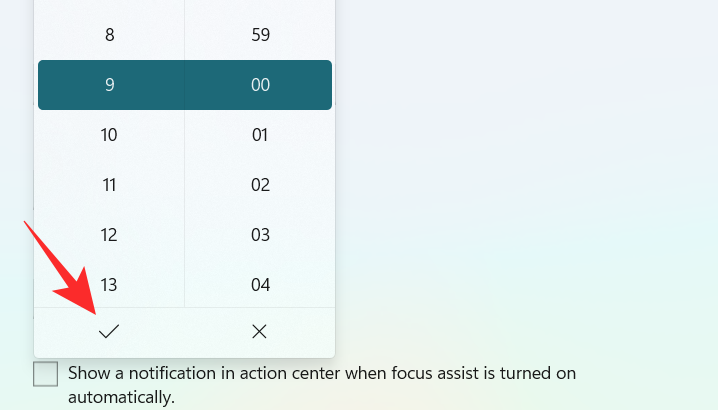
Klicka på rutan under Upprepningar .
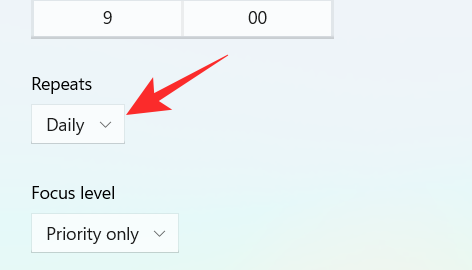
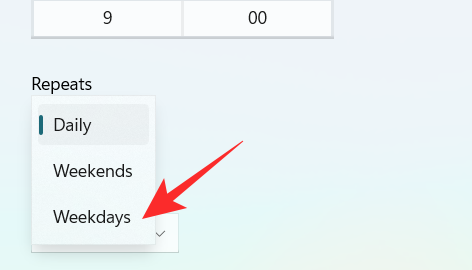
En liten rullgardinsmeny visas. Ställ in schemat på Dagligen, Helger eller Vardagar .
Klicka på rutan under Fokusnivå .
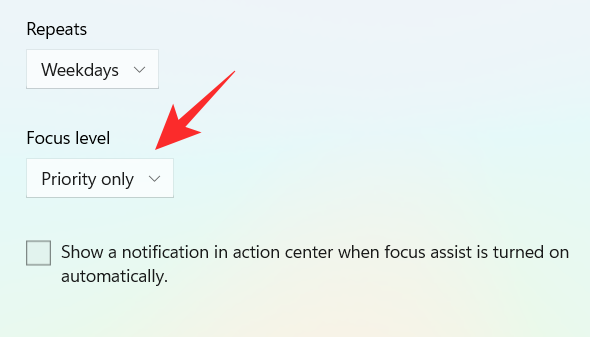
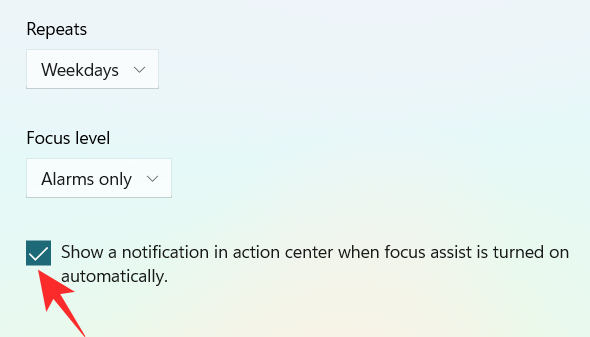
En liten rullgardinsmeny visas. Välj mellan endast larm eller endast prioritet .
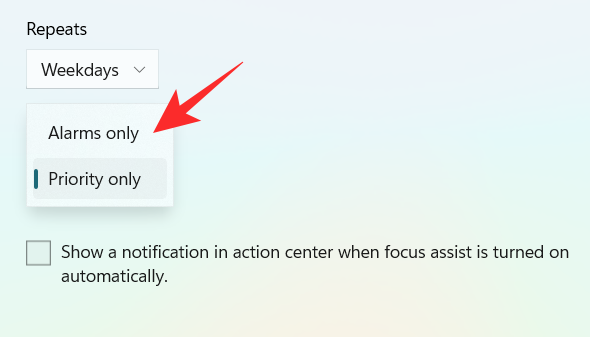
Slutligen, för att få ett meddelande när fokushjälpen är påslagen, markera rutan " Visa ett meddelande i åtgärdscentret när fokushjälpen aktiveras automatiskt ".
2. När jag kopierar min skärm
Slå på vippomkopplaren, som är extremt höger om fliken När jag duplicerar min bildskärm .
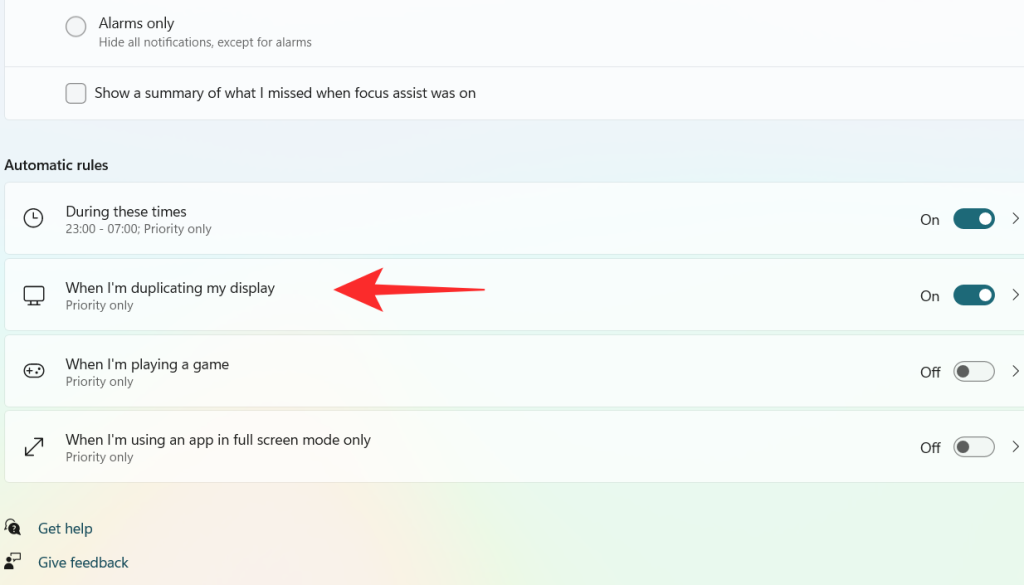
Klicka på fliken När jag duplicerar min visning .
Klicka på rutan under Fokusnivå .
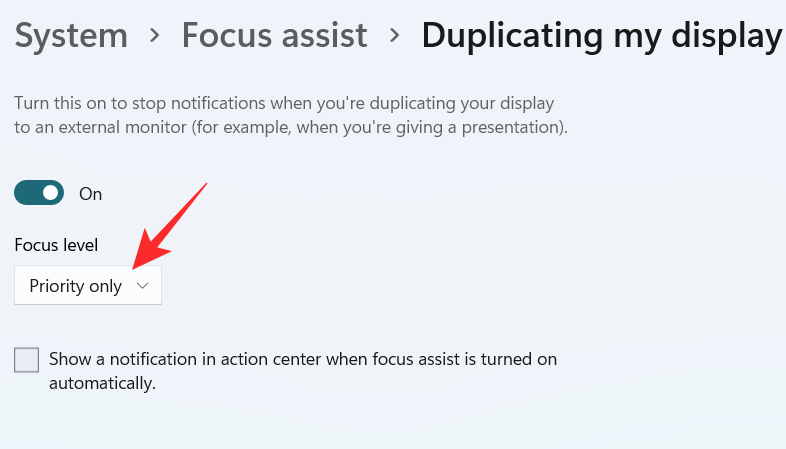
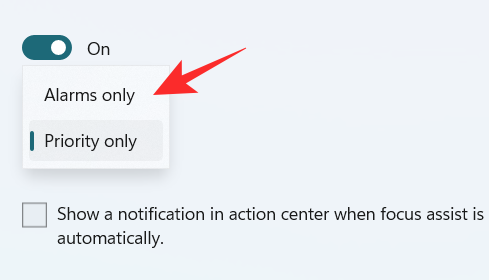
A dropdown menu appears, click on your desired option between Priority only and Alarms only.
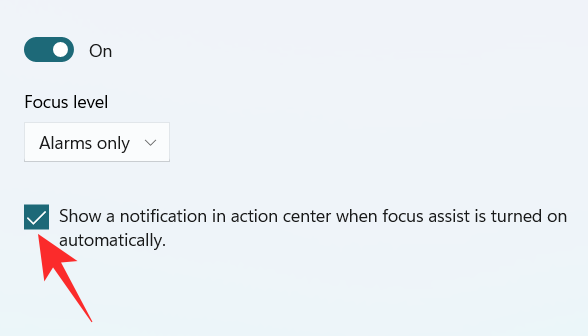
To get a notification when the Focus assist is turned on, check the box “Show a notification in action center when Focus assist is turned on automatically“
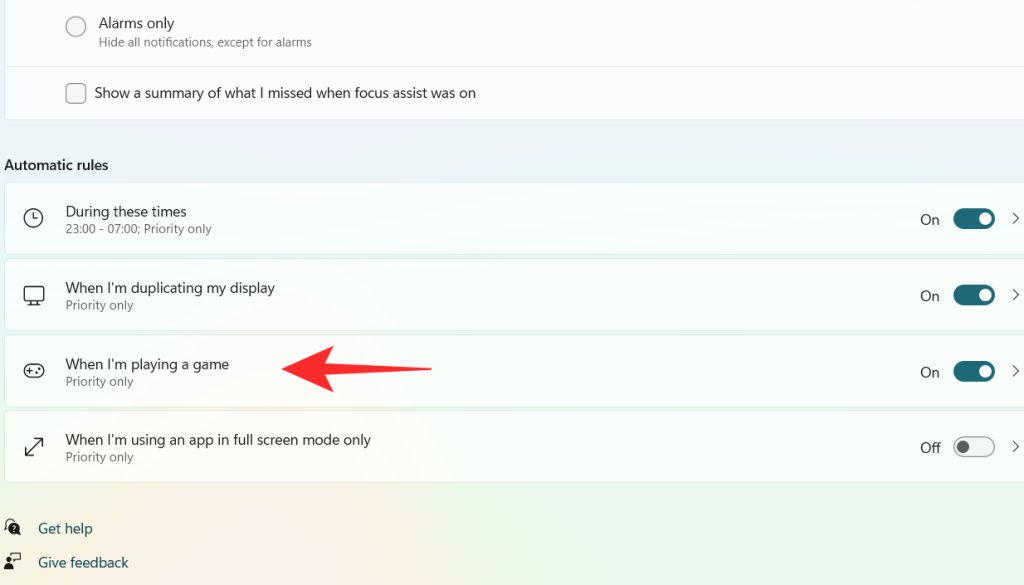
3. When I’m playing a game
Turn on the toggle switch, which is extreme right to the When I’m playing a game tab.
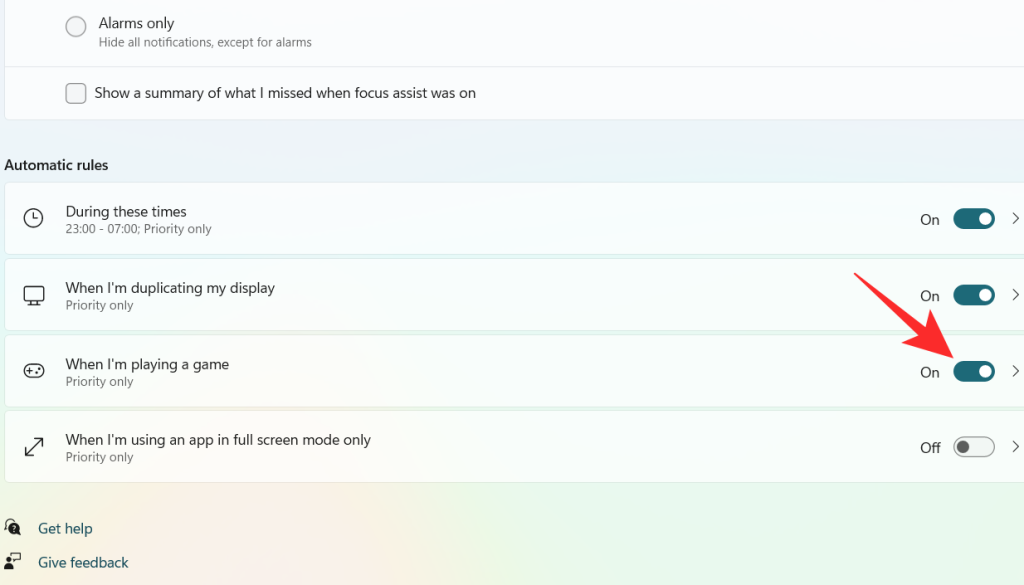
Click on the When I’m playing a game tab
Click on the box under Focus Level.
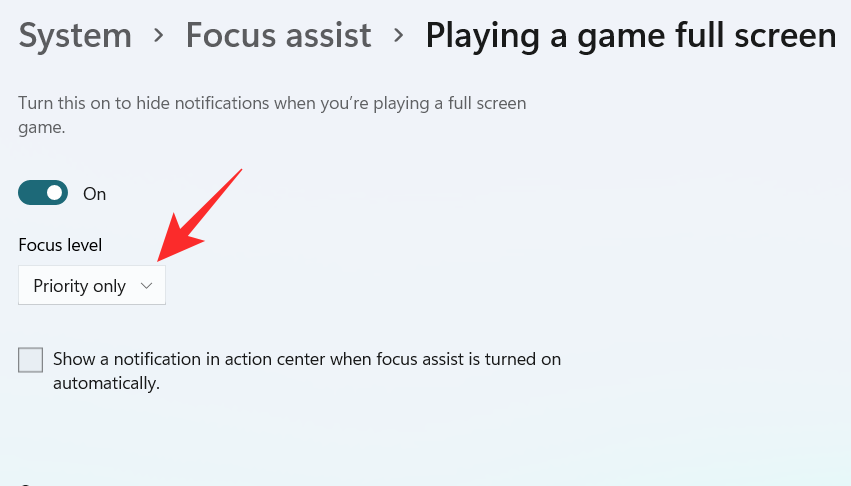
A dropdown menu appears, click on your desired option between Priority only and Alarms only.

To get a notification when the Focus assist is turned on, check the box “Show a notification in action center when Focus assist is turned on automatically“

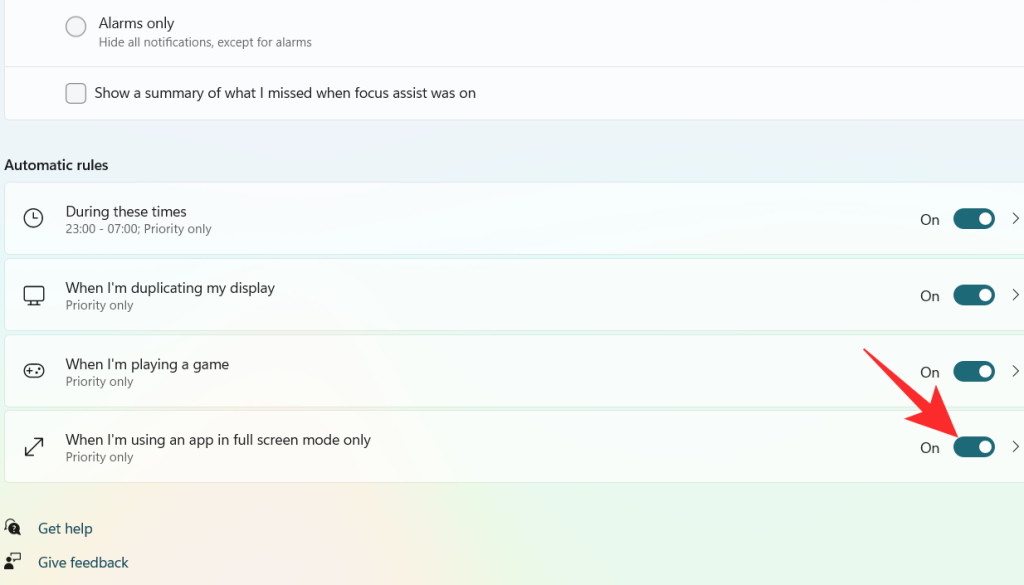
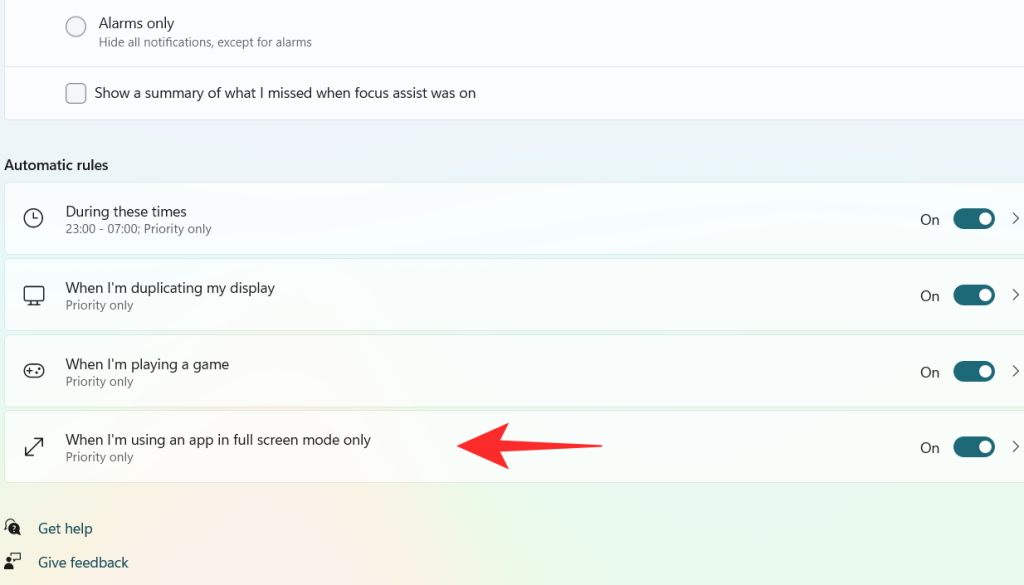
4. When I’m using an app in full-screen mode only
Turn on the toggle switch, which is extreme right to the When I’m using an app in full-screen mode only tab.
Click on the When I’m using an app in full-screen mode only tab
Click on the box under Focus Level.
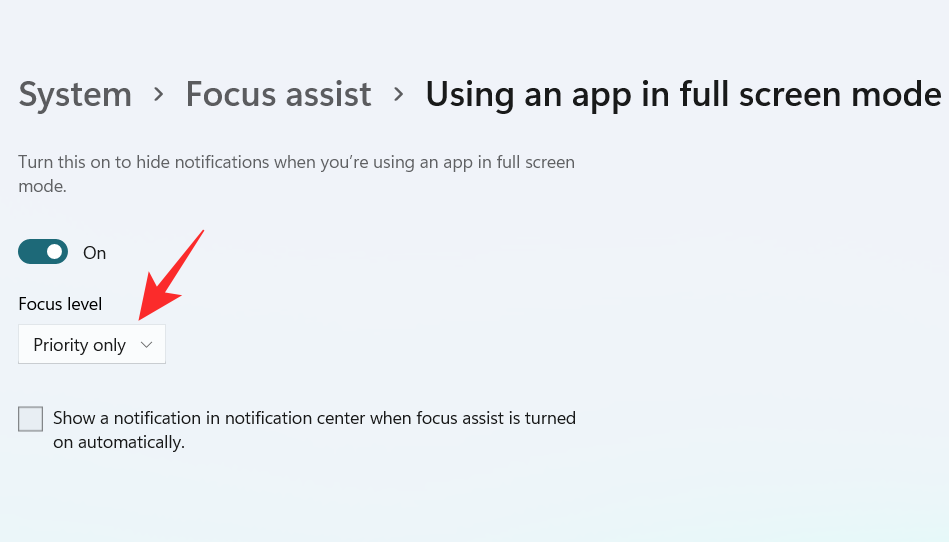
A dropdown menu appears, click on your desired option between Priority only and Alarms only.

To get a notification when the Focus assist is turned on, check the box “Show a notification in action center when Focus assist is turned on automatically“.

Using the above customizations, you can schedule and control Focus assist’s behavior according to your workflow for maximum efficiency no matter the task at hand.
Can you remove the Focus Assist icon from the Action Center?
Yes, you can easily remove the Focus Assist icon from the Action Center. Windows 11 brings a host of new cosmetic and UI changes and one of them has been the ability to customize your action center. You can now add or remove icons from the action center depending on your needs and opt for a more minimal or productive look depending on your workflow.
For now, you can only add and remove certain system modules but in the future, some users expect Microsoft to add the support for third-party apps as well. This would be a much welcome change that would allow you to manage dedicated system settings managed by third-party apps directly from your action center.
Customize your Focus assist icon in the action center
Depending on your current needs you can either remove or add the Focus assist module to the action center. Use one of the guides below depending on your current requirements.
1. Remove it
Click on the Action Center which shows the icon of Wifi, volume, and battery together.

Right-click on an empty place or on any icon and click on Edit quick settings.
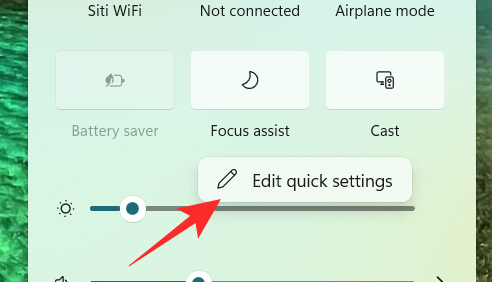
Click on the unpin symbol at the top right corner of the Focus Assist icon to remove the Focus Assist icon from the Action Center.
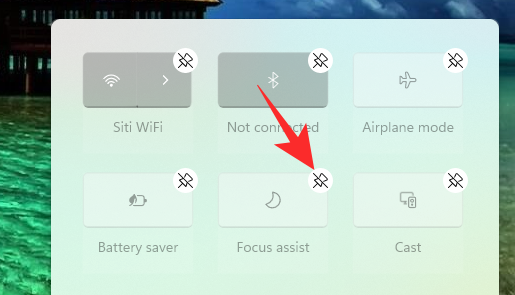
The Focus assist module should now have been removed from your action center. If not, we recommend you restart explorer.exe or your PC for the changes to take effect.
2. Restore it
Click on the Action Center which shows the icon of Wifi, volume, and battery together.

Right-click on an empty place or on any icon and click on Edit quick settings.
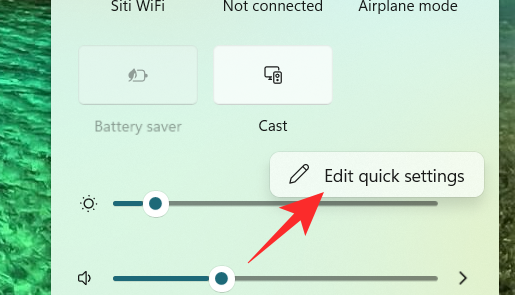
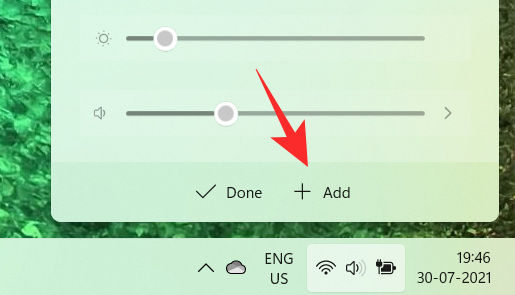
Now, click on the Add button at the bottom of the action center.
A list of different settings appears. Click on Focus Assist from the list and you will get to see the Focus Assist icon on the Action Center again.
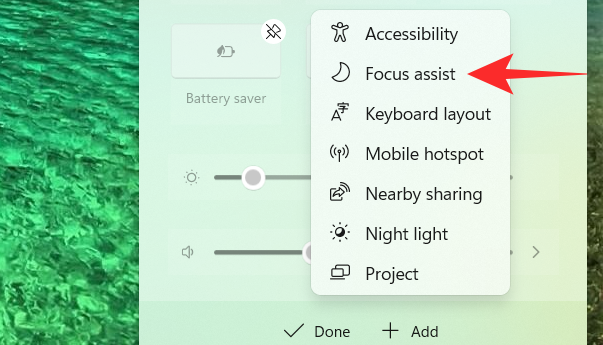
And that’s how you can add the Focus assist module back in the action center.
Focus assist keeps turning on automatically Issue: How to fix
If Focus assist keeps turning on automatically then there could be a couple of reasons for this behavior. Depending on its cause we can either fix it or use a workaround to manage the issue. Let’s find out why Focus assist keeps turning on automatically on your system.
Fix #1: Check Automatic Rules
Are you having this issue when projecting to a secondary display? Or when sharing your screen with a public computer? Then it is likely that focus assist is getting turned on automatically due to the default automatic rules in Windows 11.
By default, focus assist will silence all notifications in such scenarios to help maintain your privacy. But this can be counterproductive in case you are just trying to use a bigger display from a portable system like a laptop or an NUC.
It could also be that scheduled Focus assist was turned on your system by mistake which will enable and disable Focus assist automatically during certain hours. If any of these situations sounds like what you are facing then you can use the guide below to disable all automatic rules that enable Focus assist during certain scenarios and workflows on Windows 11. Let’s get started.
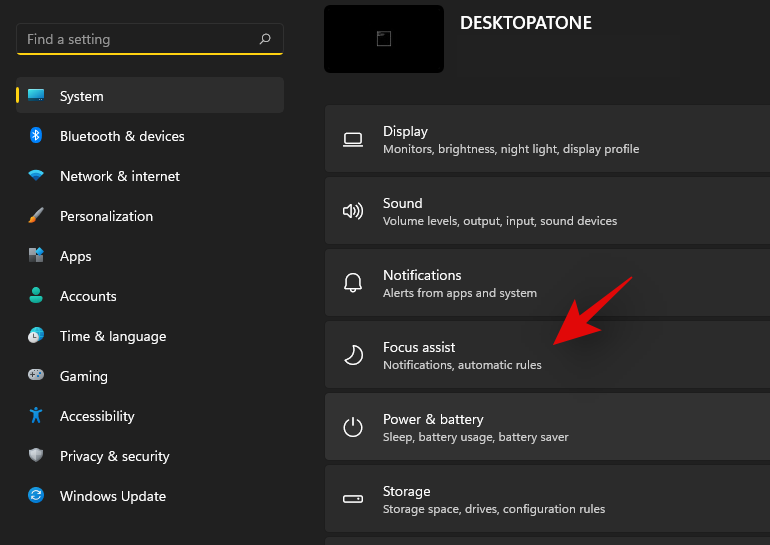
Press Windows + i on your keyboard to open the Settings app. Ensure ‘System’ is selected on your left and then click on ‘Focus Assist’ on your right.
Go down to automatic rules and turn off the following toggles.
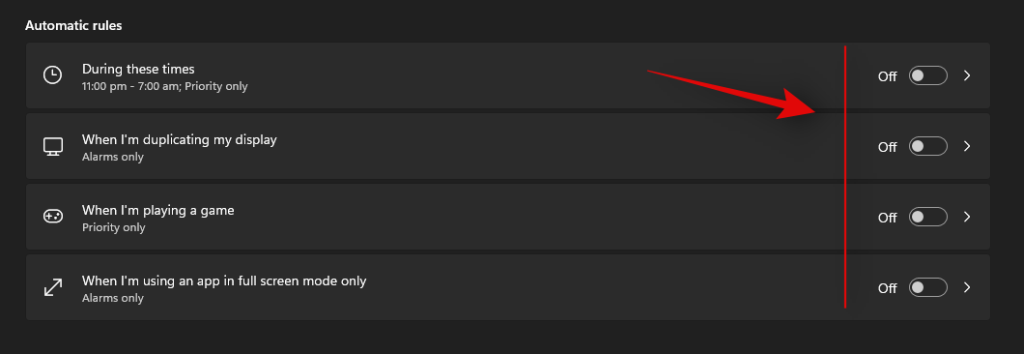
Once these rules are disabled, Windows 11 will not turn on Focus assist automatically on your system.
Fix #2: Turn of GeForce Overlay
This is another way to solve Focus assist misbehaving on your system. If you have a dGPU from Nvidia and are using the GeForce experience app then we recommend disabling its overlay option and restarting your system. With the automatic rule for ‘When I’m using an app in full-screen mode only’ turned on, Windows will mistake the Nvidia overlay detection on your desktop for a full-screen app which will trigger the Focus assist settings in return. You can also disable this automatic rule in case you wish to keep the Geforce Experience overlay enabled on your system.
Focus assist greyed out, option missing or not working; How to fix
Is the focus assist option missing from Windows 11 settings app? Is the module greyed out in the action center? This is a known bug that shows up occasionally with every feature update of Windows. Even certain versions of Windows 10 faced huge issues with this bug until a fix was released.
Fix #1: Enable in Group Policy Editor
If Focus assist seems to be missing from your system then it is likely disabled using the group policy editor. If your PC is managed by your organization or your workplace then it is likely disabled by your administrator. If you have access to the group policy editor then you can use the guide below to enable focus assist on your system. However, in case you have limited access, then you might need to get in touch with your administrator to enable Focus assist on your system.
Press Windows + R on your keyboard to bring up the Run dialog box and type in the following command to launch the Group Policy Editor. Click on ‘Ok’ once you are done.
gpedit.msc
Navigate to the following node.
User configuration > Administrative Templates > Start Menu and Taskbar > Notifications
Double click on ‘Turn off Quiet Hours’ on your right.
Click and select ‘Disabled’ in the top left corner.
Click on ‘Ok’ to save your changes.
And that’s it! Focus assist should now be enabled on your system in case it was disabled using the group policy editor.
Fix #2: Reinstall and repair default Windows UWP apps and system apps
If Focus assist is still missing from your system then let’s check if all the necessary apps and utilities are installed properly on your system. Use the guide below to check and repair Windows 11’s basic apps and functionality on your system.
Press Windows + S and search for PowerShell. Click on ‘Run as administrator’ once it shows up in your search results.
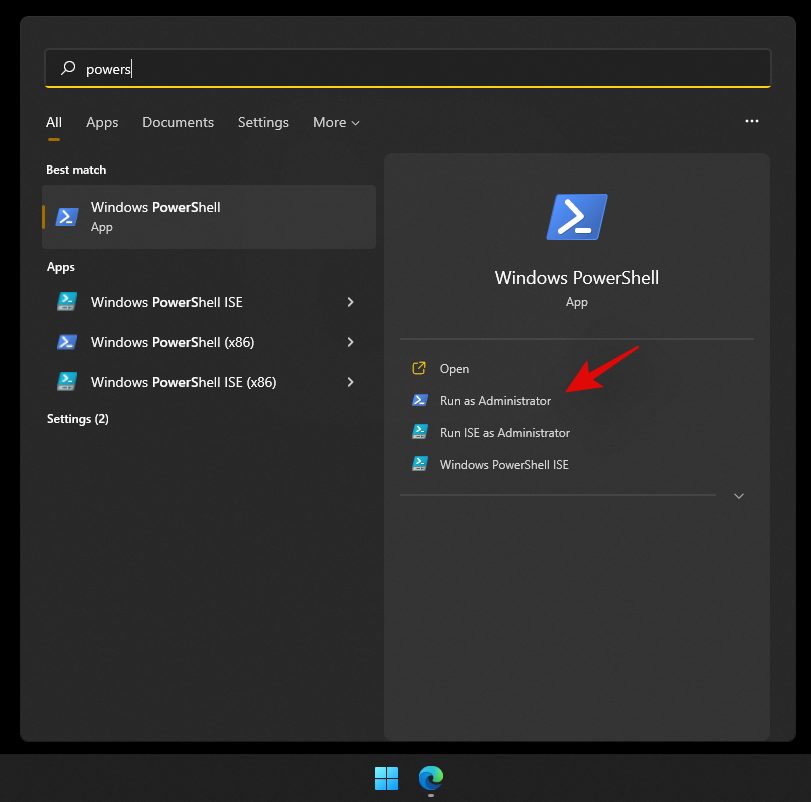
Once PowerShell is launched, execute the following command to reinstall all UWP apps and check and repair other default utilities required by Windows 11 in the background.
Get-AppXPackage -AllUsers | Foreach {Add-AppxPackage -DisableDevelopmentMode -Register "$ ($ _. InstallLocation) \ AppXManifest.xml"}

Wait for the process to finish and restart your PC for good measure. If Focus assist was corrupted or missing from your system, then this fix should help solve all your issues.
Fix #3: Check for a Windows Update
Haven’t updated in a while? We recommend checking for recent Windows Updates. While updates rarely disable major features like Focus assist, a new feature update installation can help refresh your registry, fix mismatched values and more importantly iron out bugs that could be preventing you from accessing Focus assist on your system. Use the guide below to check for recent Windows updates on your system.
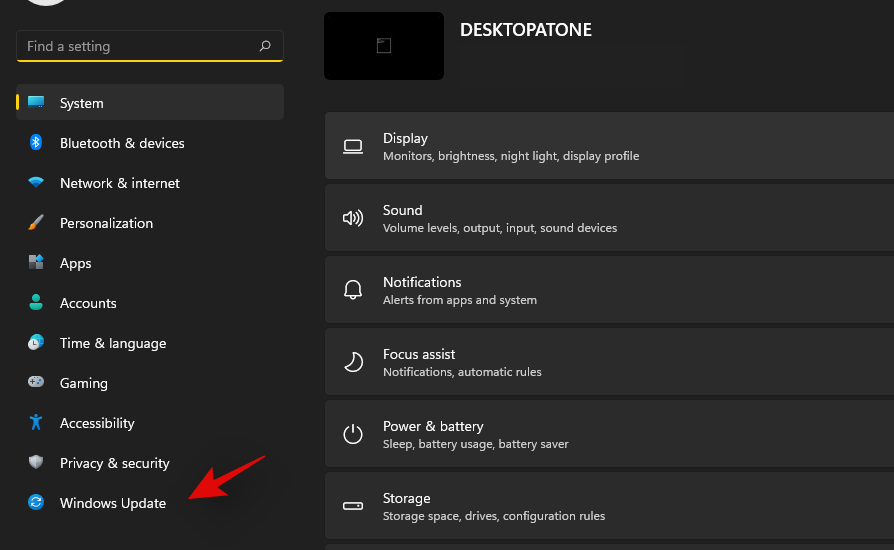
Press Windows + i on your keyboard to open the Settings app and click on ‘Windows Update’ on your left.
Click on ‘Check for updates’.

In case any new updates show up, let them install on your system and restart if prompted. In case you are using a metered connection then you will need to click on ‘Download now’ manually to avoid any unexpected data charges.
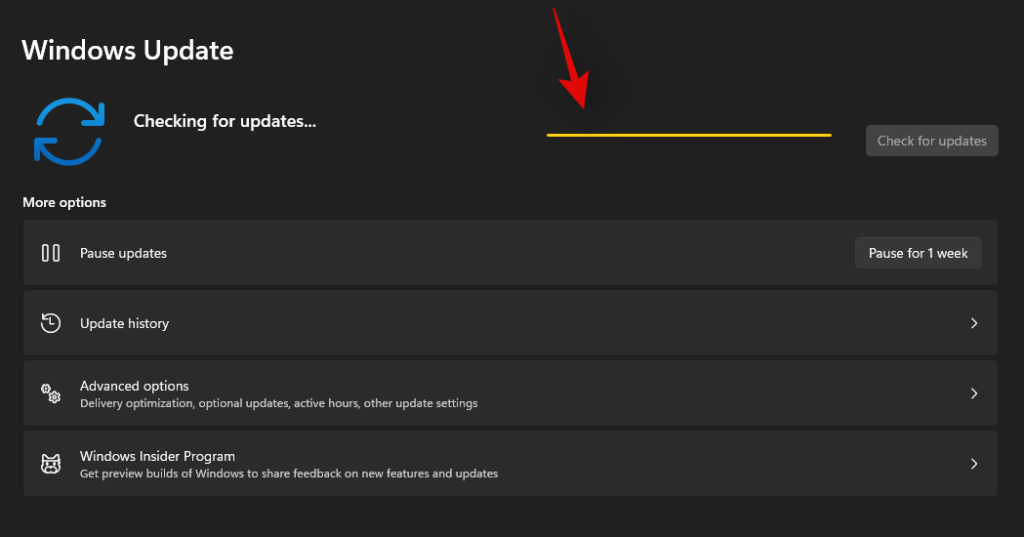
Once the necessary Windows updates are installed on your system, Focus assist should be restored in your action center and the Settings app.
Last Resort: Reset your PC
If Focus assist is still missing from your PC then this indicates a corrupted Windows installation on your system. The best way to fix this without wasting much time on troubleshooting would be to simply reset your PC while keeping all your files intact. This will refresh the entire Windows 11 installation and reinstall all the apps which should help restore functionality for all Windows features including Focus assist. Follow the guide below to reset your PC while keeping your files.
Note: The reset process will remove all installed applications and only retain files stored manually on your local storage. A list of all the removed apps will be available in .txt format on your desktop once your PC has been reset.
Press Windows + i on your keyboard and click on ‘Windows Update’ on your left.
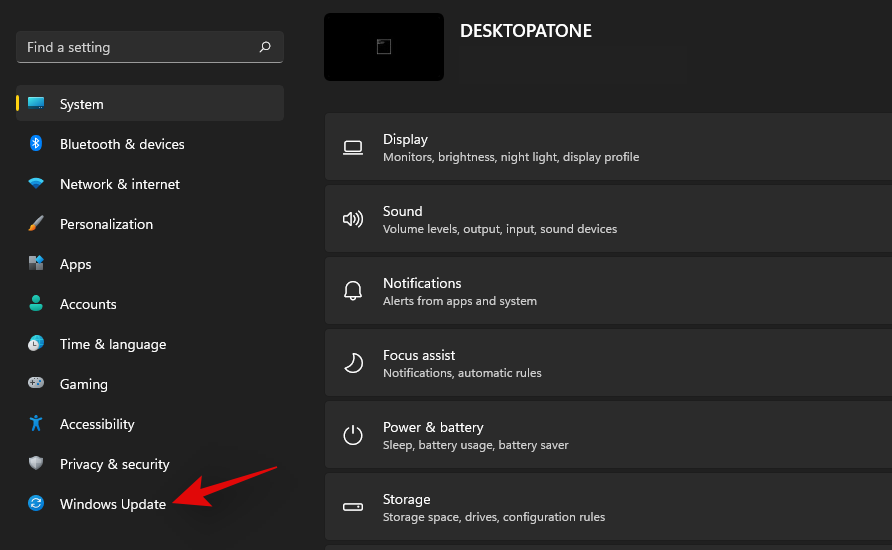
Click on ‘Advanced options’.
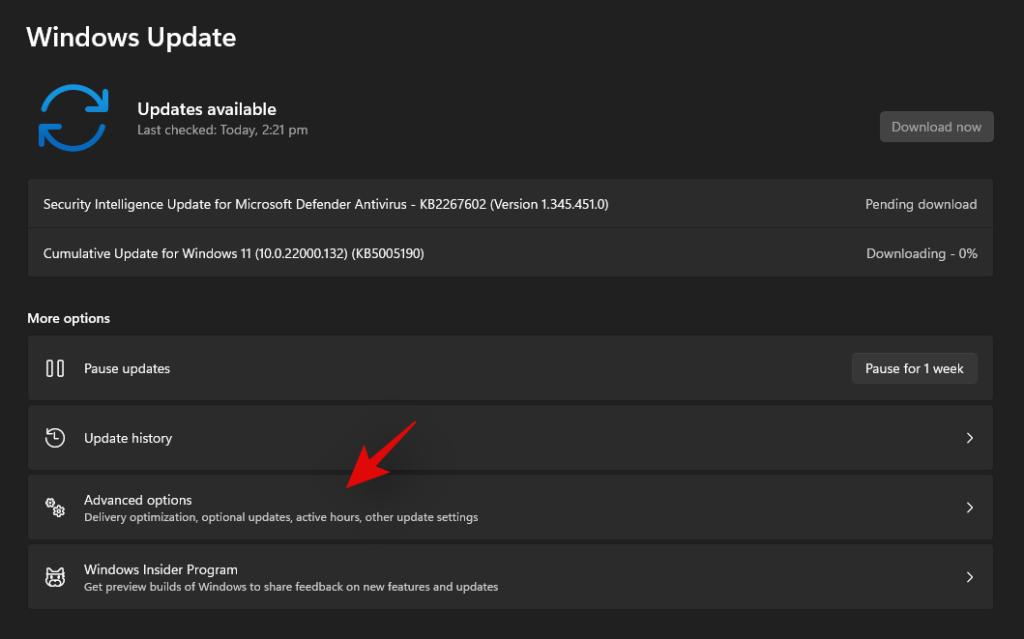
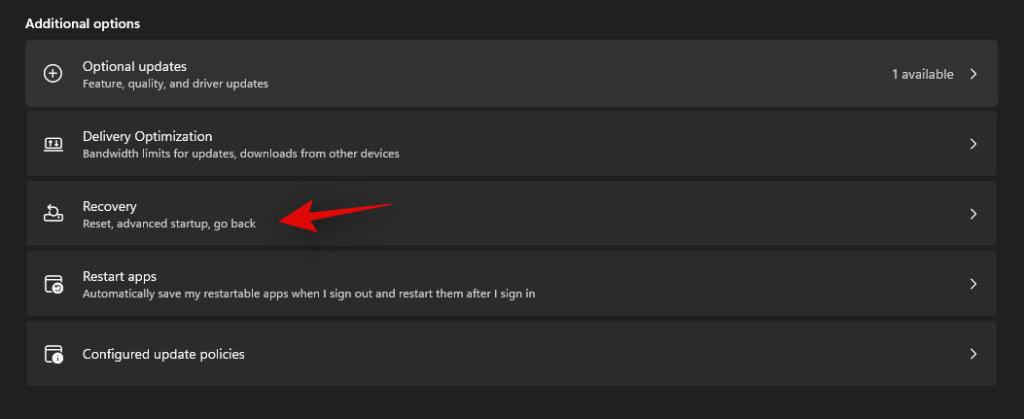
Click and select ‘Recovery’.
Click on ‘Reset PC’ beside Reset this PC.

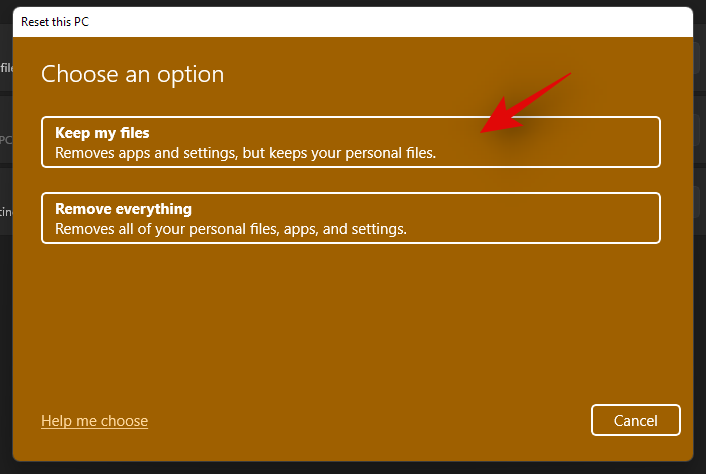
Click on ‘Keep my files’.
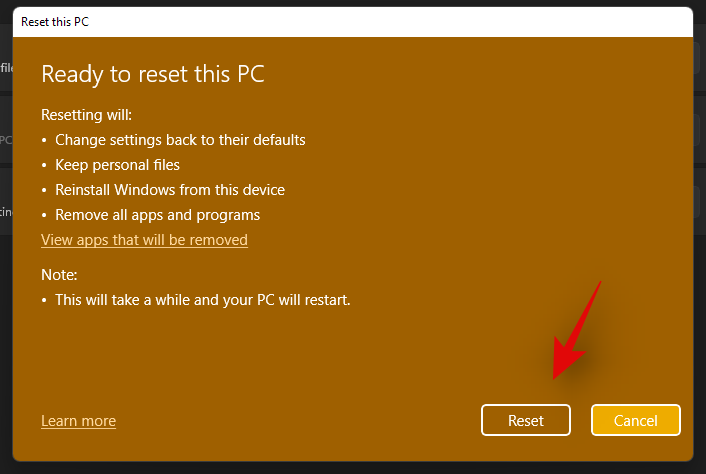
Windows will now process all the files on your local storage. Click on ‘Reset’.
Note: If you are using Windows 11 Pro or higher then you will get the option to use a local installation/recovery media to reinstall Windows 11 as well. However, this option will be missing for Windows 11 Home users.
Windows will now reset your PC while retaining all your files. Your PC will restart several times during this process. This is completely normal and you should let Windows do its thing. If you are using a laptop or a portable NUC, then ensure that your unit is plugged into the power at all times during this process.
How to turn off Focus assist permanently
Do you wish to turn off Focus assist permanently in all scenarios? Then you can use the guide below to do so. The best way to disable Focus assist is by using the group policy editor. But in case you are using Windows 11 Home Edition, then you can use the first method in this guide to disable Focus assist permanently.
Method #1: Disable all settings and rules
Once you disable all the settings and rules for Focus assist, the feature should be turned off automatically on your system. Use the guide below to get you started.
Press Windows + i on your keyboard to open the Settings app and click on ‘Focus assist’ on your right.

Click and select ‘Off’ at the top.
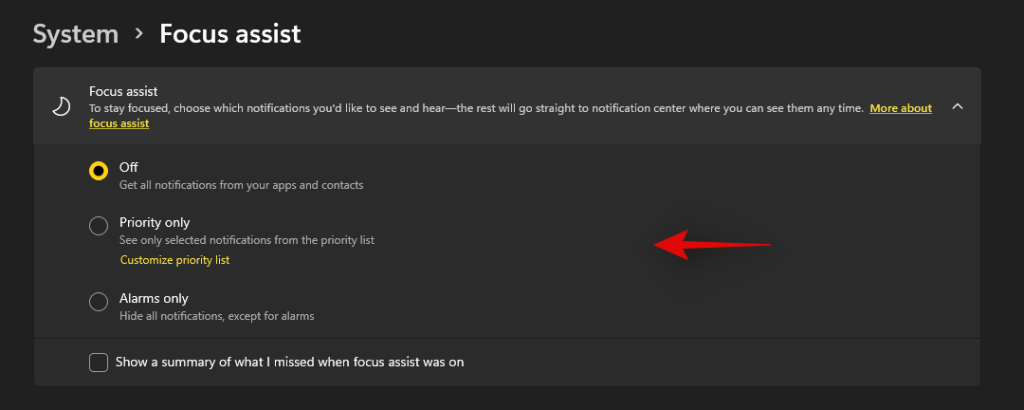
Uncheck the box for ‘Show a summary of what I missed when focus assist was on’.

Subsequently, disable all the toggles under ‘Automatic rules’ as shown below.

We also recommend turning off notifications for unnecessary apps using the guide after this section to avoid unnecessary notifications from interrupting you when focus assist is disabled.
Method #2: Using Group Policy Editor
The group policy editor will permanently disable focus assist on your system and even prevent you from accessing it in your settings. However, this method will only work on Windows 11 Pro or higher versions. In case you have the Windows 11 home edition, you can use the guide above to disable Focus assist instead.
Press Windows + R and type in the following to open Froup Policy EDitor. Click on ‘Ok’ once done.
gpedit.msc
Navigate to the following node.
User configuration > Administrative Templates > Start Menu and Taskbar > Notifications
Find and double-click on ‘Turn on Quiet Hours’ on your right.
Select ‘Enabled’ in the top left and click on ‘Ok’.
Focus assist will now be permanently disabled on the selected system. We recommend you restart your system or explorer.exe in case the changes do not take place immediately.
Is there any other way to disable notifications?
Yes, you can disable notifications individually on a per-app basis in Windows 11 to customize the notifications you receive. This is another way to ensure that you are only notified about the apps and notifications that you intended. Customizing your notifications this way will also allow you to retain the full functionality of the focus assist mode without having to disable certain rules to avoid mismatched scenarios in your workflow.
However, the only downside to managing your notifications this way is that you have to keep enabling and disabling notifications for apps every few months depending on your new installs and uninstalls. You can use the guide below to disable notifications on a per-app basis in Windows 11.
Disable notifications permanently on a per-app basis
Here’s how you can disable notifications on a per-app basis in Windows 11.
Press Windows + i on your keyboard to open the Settings app and then click on ‘Notifications’ on your right.
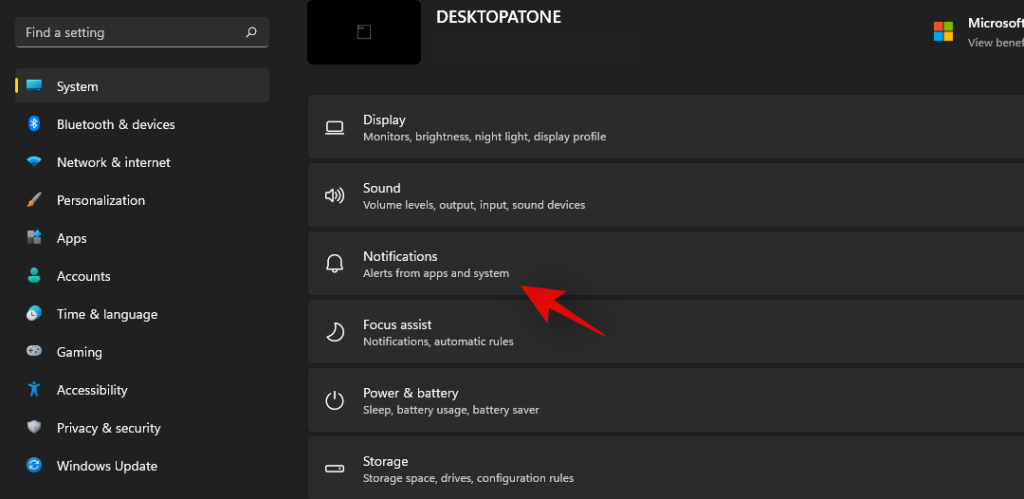
You will now get a list of all the apps that have the permission to deliver notifications on your system. Scroll the list to find the necessary apps and turn off the toggle beside them to disable notifications.
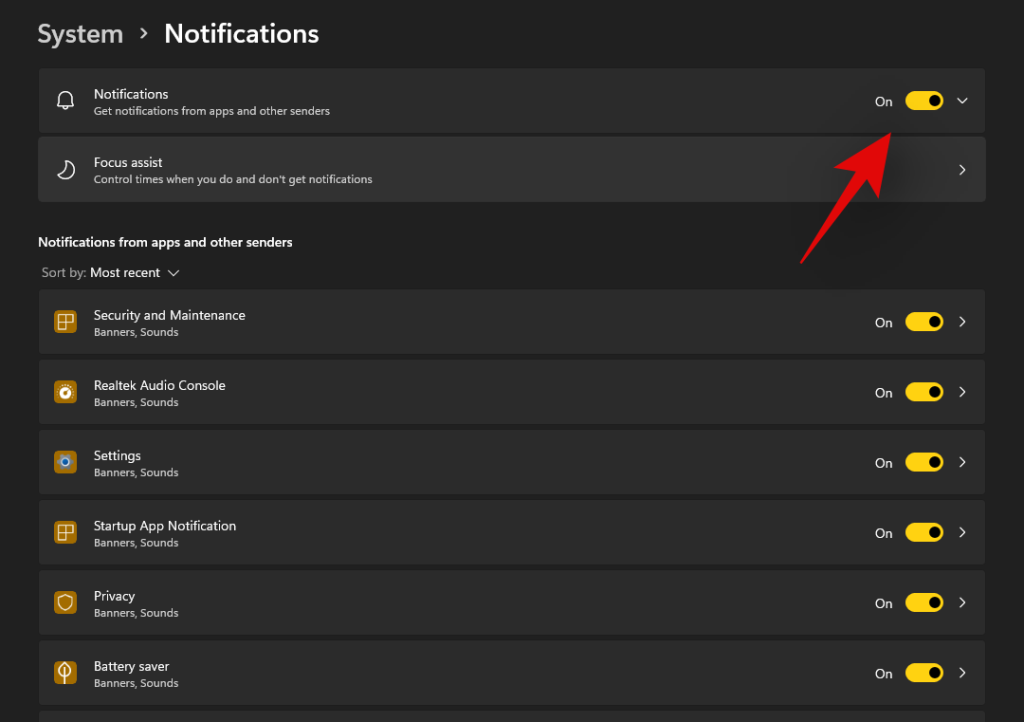
Repeat the steps above for all the intended apps to disable notifications.
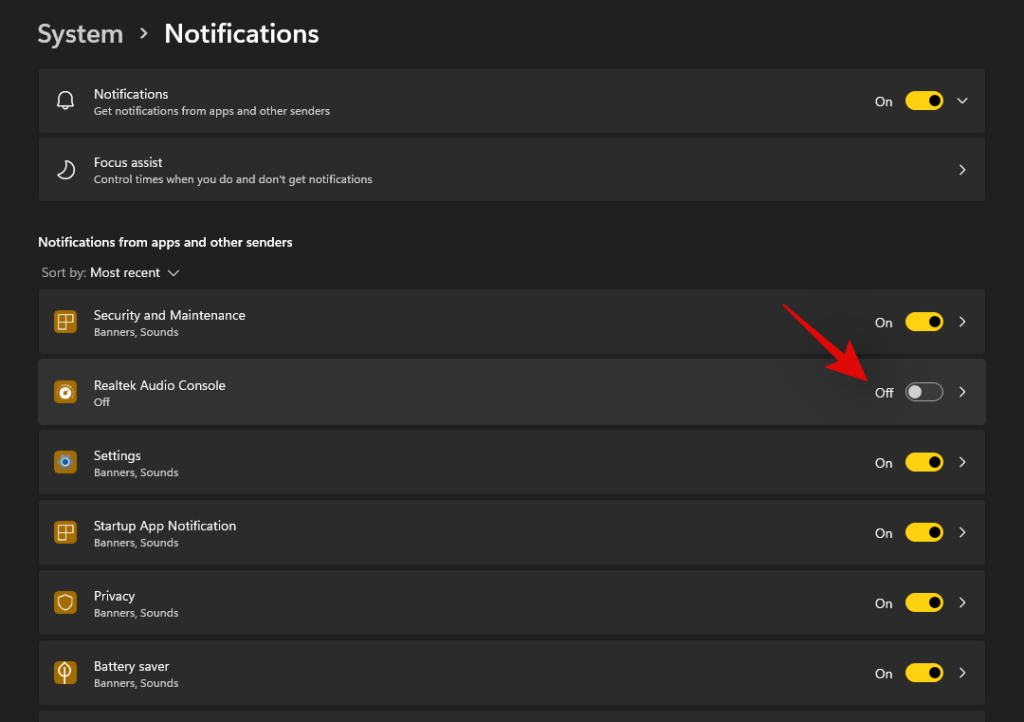
Close the Settings app and notifications for the selected apps should now be permanently disabled on your system.
Can you customize notifications in Windows 11?
Well, not exactly. Windows 11 currently has very limited options when it comes to customizing your notifications. You can not change the look, behavior, or color palette of your notifications without changing the accent color of your overall UI. However, you can customize the way your notifications sound. You can set a nice quiet notification sound that does not interrupt your workflow or opt for a quirky take that makes for a few good laughs each time you get a notification. The choice is completely up to you. Use the guide below to customize your Windows 11 notification sounds.
Required
Guide
Let’s start by first placing the .wav file in a compatible media folder so that you can set it as your default notification sound in Windows 11. Navigate to the concerned .wav file and copy it to your clipboard.
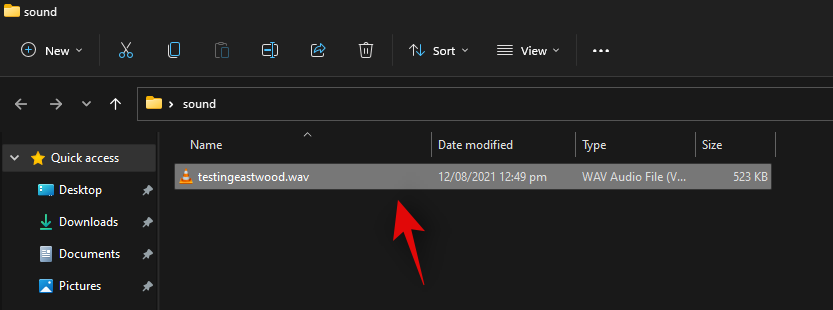
Now navigate to the following path given below. Paste your .wav file in this location. Click on ‘Continue’ when you will be prompted for administrator permission.
C:\Windows\media
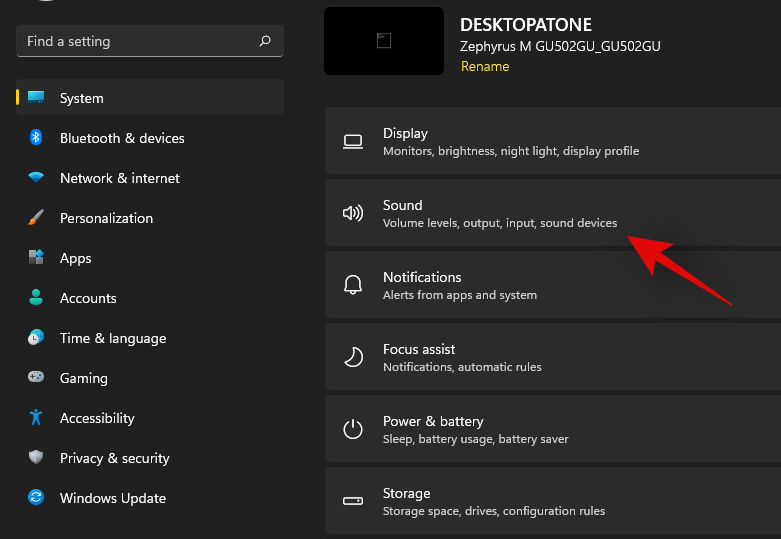
We can now use the .wav file as our default notification sound. Press Windows + i on your keyboard to open the Settings app and then click on ‘Sound’ on your right.
Scroll to the bottom and click on ‘More sound settings’.

Click and switch to the ‘Sounds’ tab at the top.
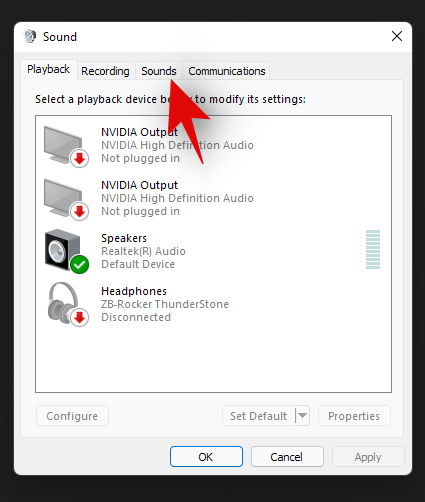
Under ‘Program Events’ scroll the list and find ‘Notifications’. Click on ‘Notifications’ to select it.
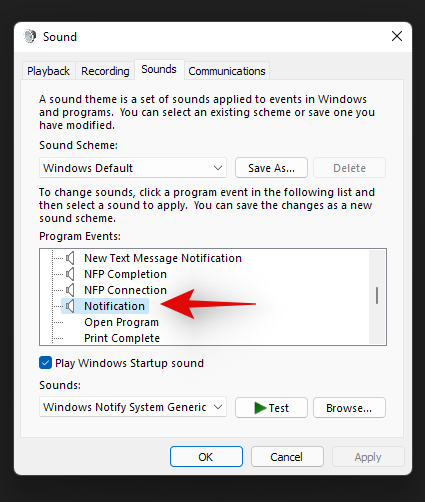
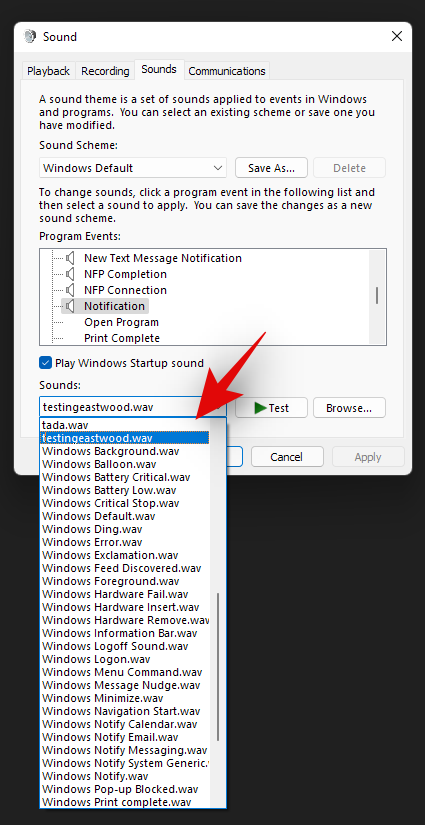
Now click on the drop-down arrow under Sounds and select the .wav file we pasted in the Media folder.
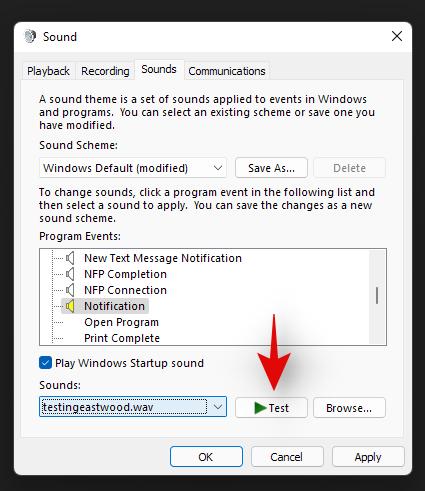
You can click on ‘Test’ to test your custom notification sound.
Click on ‘Ok’ to save your changes.
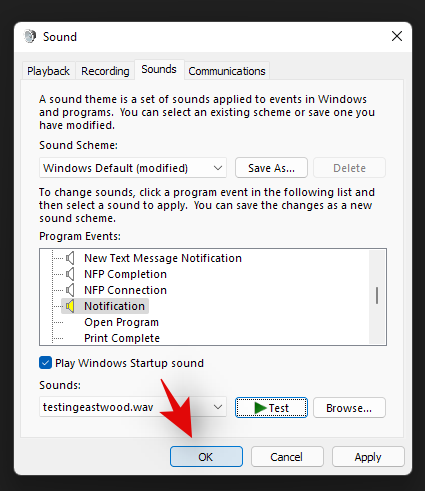
And that’s it! You will now have set a custom sound as your default notification sound in Windows 11.
Distractions from notifications are a huge problem especially when you are into some important work. Using the steps mentioned above, now, you can easily get rid of unnecessary notifications and work peacefully with full concentration.
Related:
För de av oss som har varit med Windows genom åren vet att Kontrollpanelen är en pålitlig följeslagare. Upptäck effektivt sätt att öppna Kontrollpanelen i Windows 11.
Skärmdumpar har alltid varit det bästa sättet att fånga din skärm på Windows 11 med olika metoder som Print Screen och Snip & Sketch.
Lär dig hur man kontrollerar batteristatus på Windows 11 för att optimera batterihälsan på din bärbara dator. Tips och metoder ingår.
Lär dig hur man enkelt tar bort temporära filer i Windows 11 för att frigöra utrymme och förbättra datorns prestanda.
Lär dig aktivera TPM 2.0, ett viktigt systemkrav för Windows 11. Följ denna guid för att säkerställa att din dator kan köra Windows 11.
Lär dig hur du enkelt kan ändra bakgrund i Windows 11 genom flera metoder. Här är 6 effektiva sätt att anpassa din skrivbordsbakgrund.
Windows 11 har släppts för allmänheten och Microsoft har släppt en ny personlig assistent som hjälper dig att komma ombord. Windows 11 för med sig många förändringar inklusive möjligheten att installera...
20 februari 2021: Google har nu blockerat alla Meet-tillägg som hjälpte till med rutnätsvyn, inklusive de som nämns nedan. Dessa tillägg fungerar inte längre och det enda alternativet verkar vara...
Windows 11 Insider Build har släppts lös i det vilda och drar mycket uppmärksamhet från både beundrare och kritiker. Den nya designen är generellt sett tilltalande för ögonen, men det finns några element som...
Windows 11-läckan och Insider Dev Build har lett till miljontals virtuella och inbyggda installationer av operativsystemet på lite över en veckas tid. Om du också har hoppat till Windows 11 kan du...
Även om aviseringar är viktiga i vissa fall, blir det ibland ett element av distraktion. Precis som din telefon kan en dator också distrahera dig med aviseringar. Det är därför Windows 11 innehåller...
Windows 11 har funnits länge och detta operativsystem är inte utan en enorm mängd förändringar. Det är naturligt att känna sig kränkt av förändringarna, men i sin kärna är operativsystemet fortfarande troget sitt...
Windows 11 har kommit långt sedan det tillkännagavs och betaversionerna verkar få fler och fler testare varje dag. Windows flyttade till UWP-appar för sitt system och Windows Store tillbaka ...
Handlingen att namnge saker är en karaktäristisk mänsklig egenskap. Det hjälper oss att enkelt kategorisera, symbolisera, beskriva och hänvisa till saker, och som sådan hittar du namn på nästan allt...
Om du har problem med anslutningen kan du prova att tömma din DNS-cache. Oroa dig inte, att göra det kräver ingen teknisk kunskap från din sida och är ganska enkelt...
Efter nästan 6 år av underhåll av anpassningar får ett OS som vi var så bekanta med nu en rejäl uppgradering. Det finns förändringar i grunderna i designen som nu inkluderar en cente…
Windows är det mest populära operativsystemet för konsumenter i dagens tid. Men det kan finnas tillfällen du behöver växla mellan operativsystem för att använda en viss funktion eller bara prova andra alternativ. Wipi...
Väntan är äntligen över, gott folk! Windows 11 har äntligen släppts för allmänheten och du kan nu uppgradera din dator gratis från Windows 10 med en giltig licens. Det nya operativsystemet tar med sig många ch...
För den oinvigde är engelska ett germanskt språk, medan språk som spanska, franska, portugisiska, italienska och rumänska är "romanska" språk (som i de som kommer från Vulgar L...
När du ansluter till ett nätverk kommer Windows att automatiskt spara lösenorden och andra anslutningsdata så att du kan logga in på det igen när det är inom räckhåll. Men vad händer om du vill glömma en Wi-...
Upptäck steg-för-steg hur du konfigurerar Windows 11-skrivbordsgenvägar Pro för optimal effektivitet. Förbättra ditt arbetsflöde med anpassade genvägar, tips och bästa praxis.
Upptäck hur du inaktiverar Hibernate i Windows 11 för att frigöra värdefullt SSD-utrymme. Följ vår enkla steg-för-steg-guide och återställ GB-utrymme utan problem, vilket ger din dator en boost.
Kämpar du med den frustrerande loopen med lösenordsförfrågningar i Windows 11 och Outlook? Upptäck beprövade steg-för-steg-lösningar för att återfå kontrollen över din e-post utan oändliga popup-fönster. Uppdaterad med de senaste lösningarna för sömlös produktivitet.
Upptäck pålitliga källor för att köpa en laglig Windows 11 Pro-nyckel år 2026. Få experttips om hur du undviker förfalskningar, säkrar äkta licenser och njuter av problemfri aktivering för optimal produktivitet.
Kämpar du med det fruktade felet System Thread Exception Not Handled i Windows 11? Den här omfattande guiden guidar dig genom beprövade lösningar, från grundläggande omstarter till avancerade drivrutinsuppdateringar, för att få din dator att fungera smidigt igen. Säg adjö till frustrerande blå skärmar!
Har du problem med inmatningsfördröjning i webbläsare i Windows 11? Upptäck beprövade lösningar för att eliminera fördröjningar, förbättra svarstiden och njuta av sömlös webbsurfning. Steg-för-steg-lösningar inuti.
Har du problem med felet "Den valda disken har GPT-partitionstil" under Windows-installationen? Upptäck beprövade lösningar för att lösa problemet med GPT kontra MBR utan problem och få igång systemet smidigt.
Upptäck hur du enkelt aktiverar utvecklarläget i Windows 11. Den här omfattande guiden guidar dig genom stegen, fördelarna och tipsen för att låsa upp avancerade funktioner för utvecklare och avancerade användare.
Kämpar du med en borttappad Windows 11-aktiveringsnyckel? Upptäck de bästa sätten att återställa den snabbt och enkelt, vilket sparar tid och besvär. Steg-för-steg-guider ingår för problemfri återaktivering.
Kämpar du med det frustrerande felet i Windows 11 Registry Filter Driver? Upptäck beprövade steg-för-steg-lösningar för att snabbt åtgärda det och få ditt system att fungera smidigt igen. Ingen teknisk expertis krävs!





![Hur man skriver accenter i Windows 11 [6 sätt] Hur man skriver accenter i Windows 11 [6 sätt]](https://blog.webtech360.com/resources8/images31/image-285-0105182715408.png)


