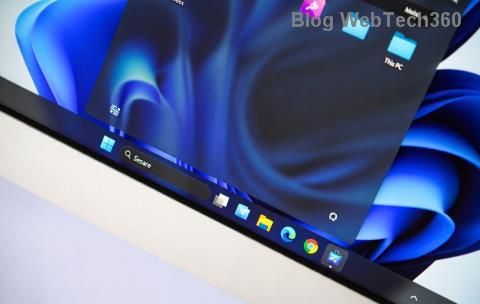
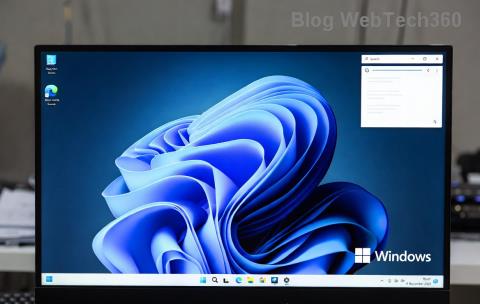
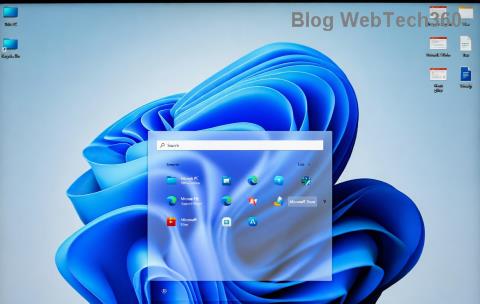
Виндовс 11 је представио нови минималистички изглед мат стакла који изгледа веома добро пристаје свима. Заобљени углови заједно са распоређеним елементима корисничког интерфејса дају Виндовс 11 футуристички изглед који се може додатно прилагодити постављањем прилагођене позадине и боје акцента . Али зар не би било лепо када бисте могли да промените боју траке задатака ?
Можда да буде у складу са вашом позадином или да буде иста као боја вашег акцента? Па, постоји неколико начина да то урадите у оперативном систему Виндовс 11 Ево свега што треба да знате о прилагођавању боје траке задатака у оперативном систему Виндовс 11.
Садржај
Можете ли да промените боју траке задатака изворно у оперативном систему Виндовс 11?
Да, можете да подесите траку задатака да користи вашу тренутну боју акцента једноставним прекидачем. На овај начин ваша трака задатака ће бити исте боје као и боја нагласка која се користи у окну за брза подешавања, клизачу за јачину звука и још много тога. У случају да се ваша акцентна боја аутоматски бира са ваше позадине, тада ће и боја ваше траке задатака бити аутоматски изабрана са ваше позадине. Ако желите да промените боју траке задатака, можете користити доленаведене водиче да бисте започели.
Како променити боју траке задатака
Можете да промените боју траке задатака помоћу апликације Подешавања, промене регистра или помоћу алата треће стране. Свака од ових метода има своје предности и мане. Пронађите ону која најбоље одговара вашим потребама да започнете и промените боју траке задатака у оперативном систему Виндовс 11.
Метод #01: Коришћење подешавања
Апликација Подешавања вам омогућава да обојите траку задатака у оперативном систему Виндовс 11. Ово користи боју вашег акцента без обзира да ли користите прилагођену боју или ону са ваше позадине, која ће бити постављена као боја траке задатака. Пратите водич у наставку да бисте започели.
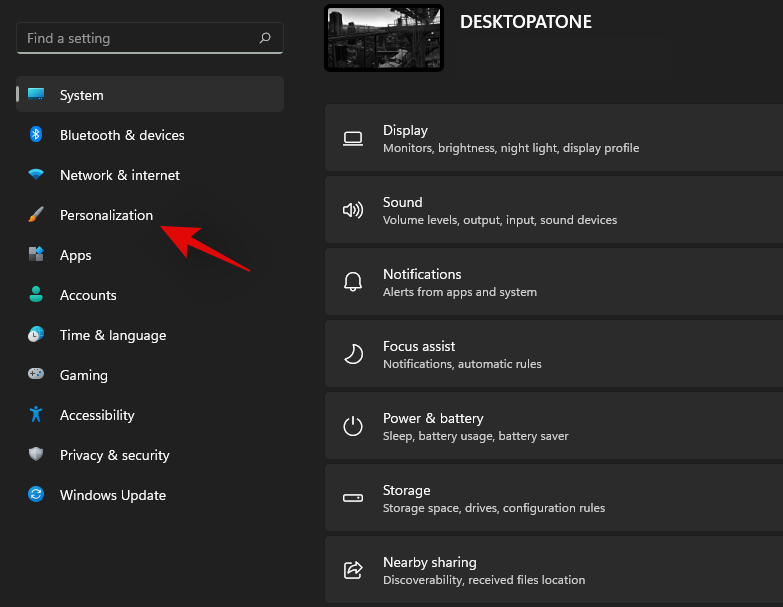
Притисните Windows + iна тастатури да бисте отворили апликацију Подешавања. Кликните на 'Персонализација' са леве стране.
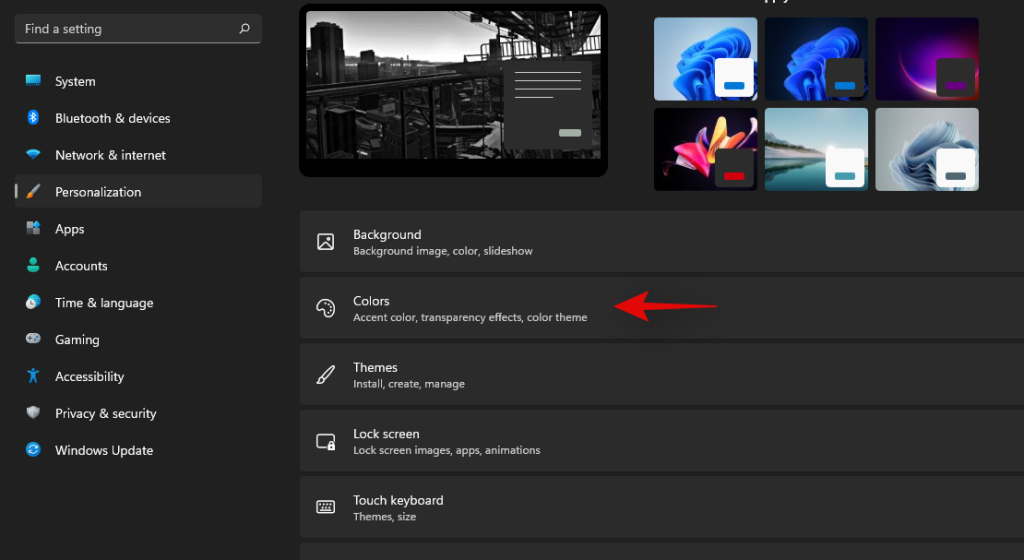
Кликните на 'Боје'.
Кликните на падајући мени поред „Боја акцента“ и изаберите опцију у зависности од ваших преференција.
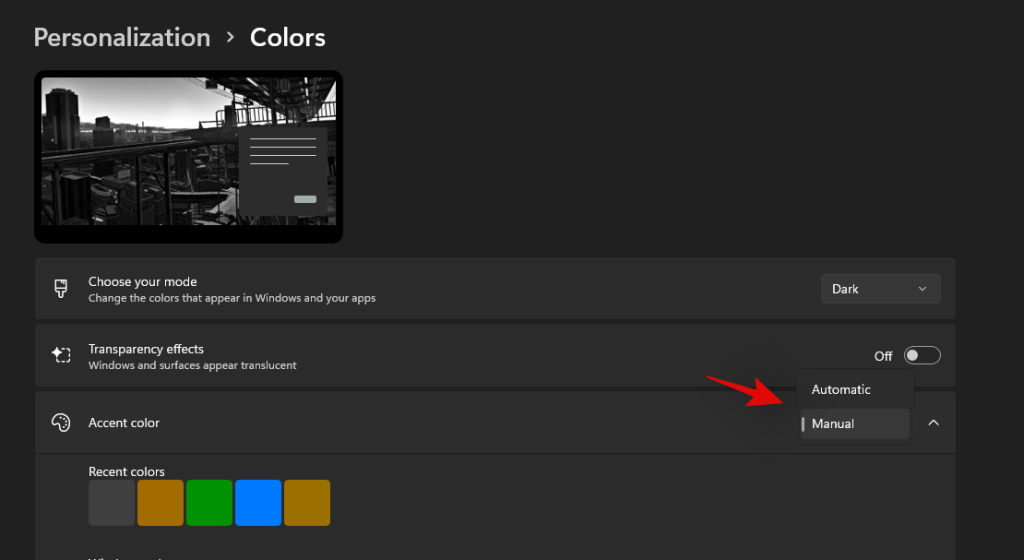
- Аутоматски: Виндовс ће аутоматски одабрати боју акцента из ваше тренутне позадине.
- Ручно: Можете ручно да изаберете боју акцента за Виндовс кориснички интерфејс из једног од избора који су вам дати.
Ако желите да користите прилагођену акцентну боју, кликните на „Прикажи боје“ поред „Прилагођене боје“.
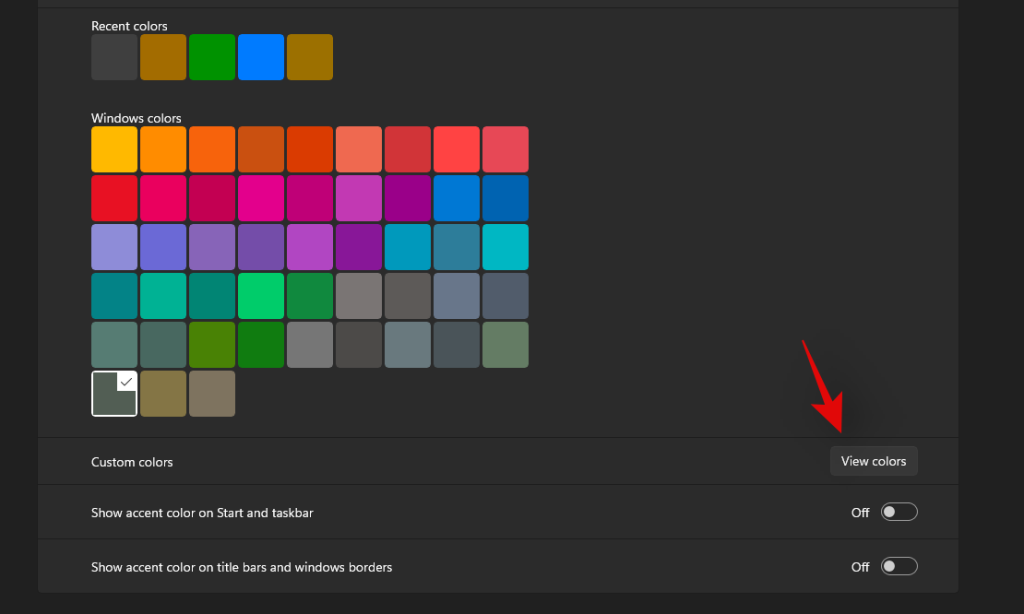
Изаберите боју која вам се свиђа из ГУИ на екрану.
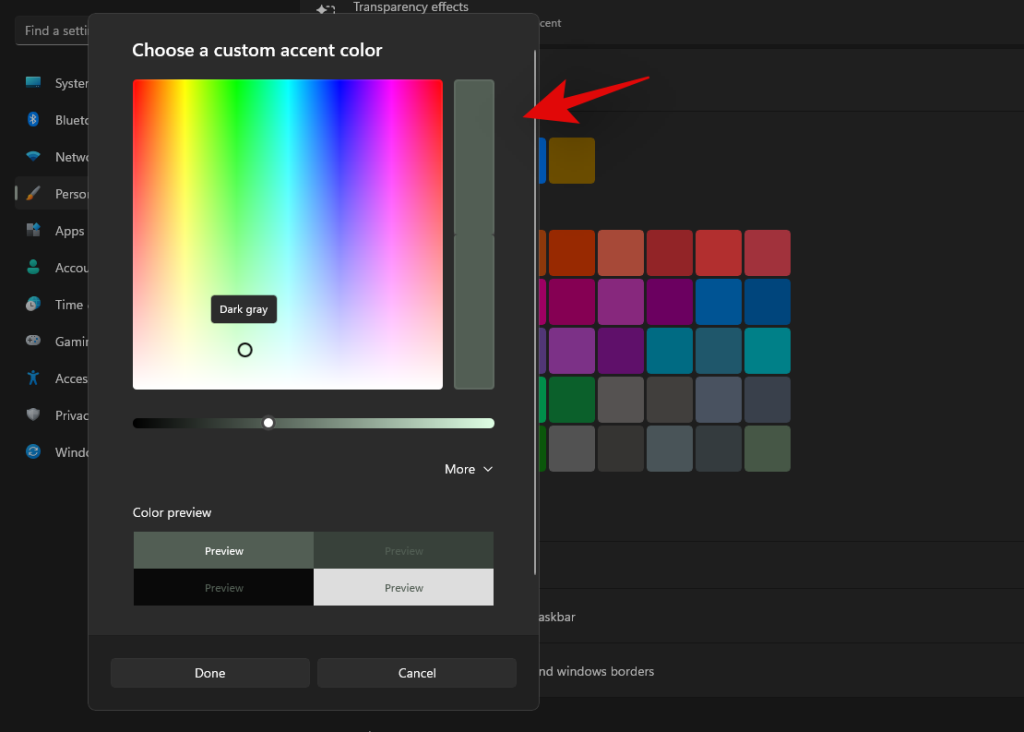
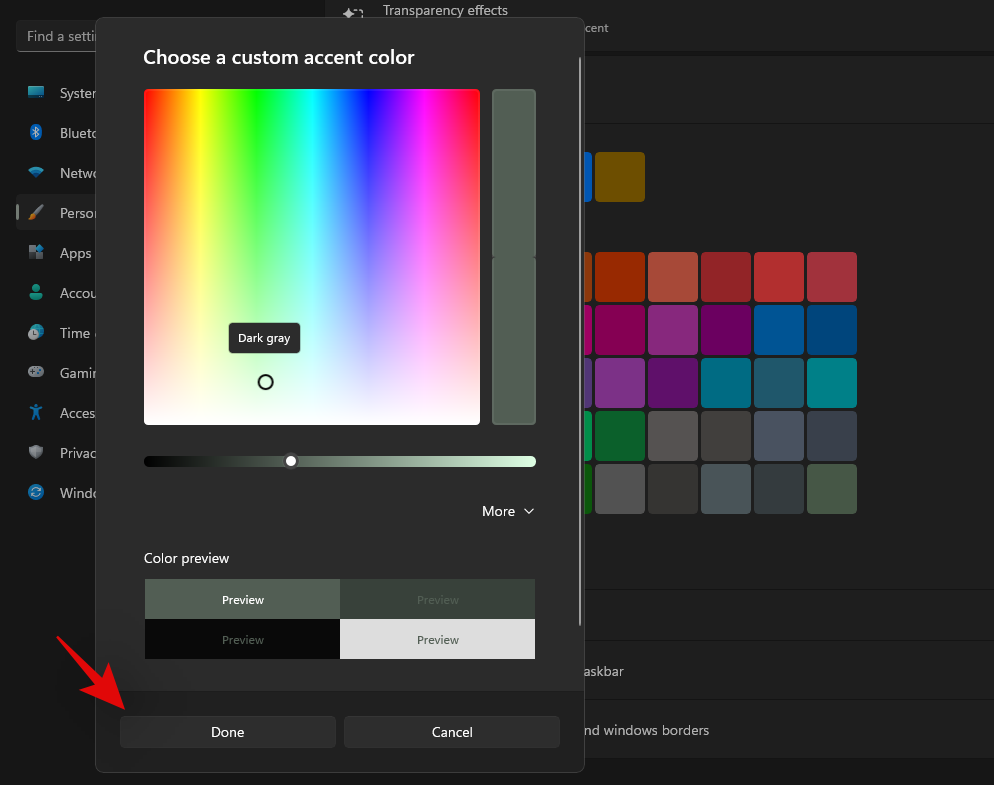
Кликните на 'више' ако желите да користите РГБ или ХЕКС вредности да дефинишете своју прилагођену боју. Кликните на 'Готово' након што одаберете жељену боју.
Померите се до дна и омогућите прекидач за „Прикажи боју акцента на старту и траци задатака“.

Истраживач би сада требало да се освежи и нова боја акцента би сада требало да се одрази на вашој траци задатака.

Ако не, можете користити водич испод да поново покренете истраживач на вашем систему што би требало да помогне да промене одмах ступе на снагу.
Како поново покренути Виндовс Филе Екплорер:
Притисните Ctrl + Shift + Escна тастатури и пређите на картицу „Детаљи“.
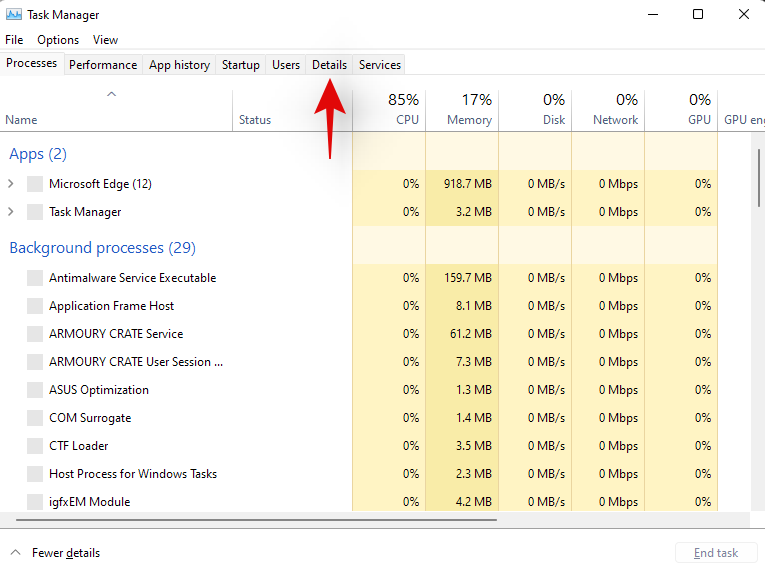
Кликните на 'екплорер.еке' и притисните делете на тастатури.
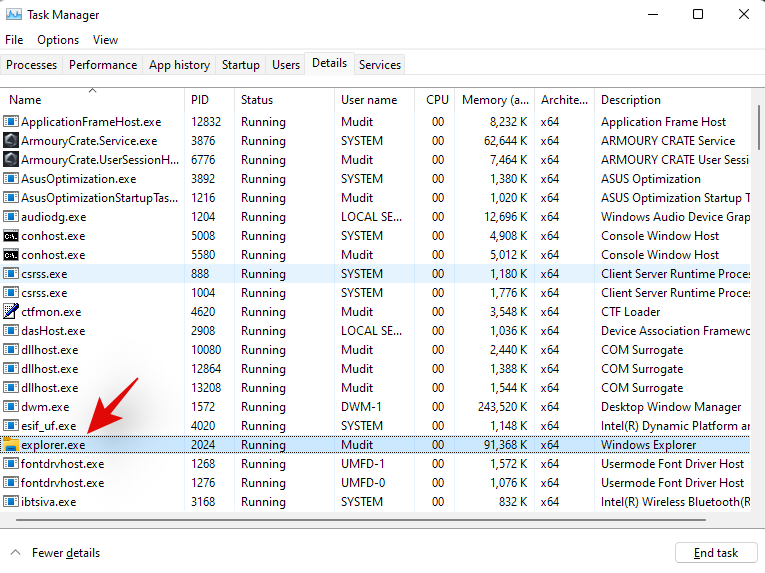
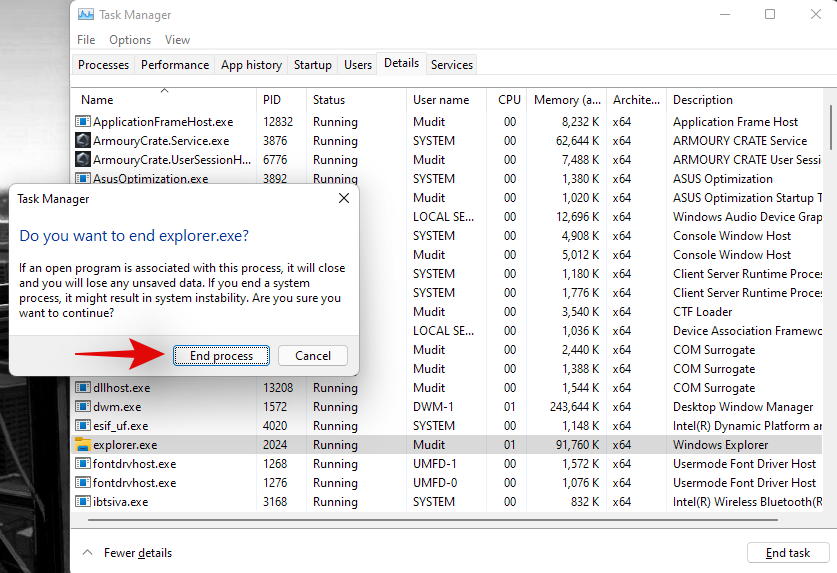
Кликните на „Заврши процес“ да бисте потврдили свој избор.
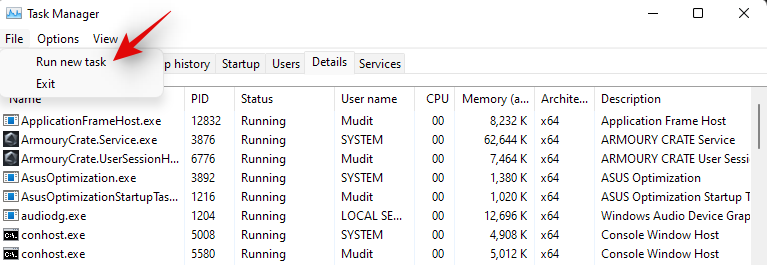
Сада кликните на „Датотека“ у горњем левом углу екрана и изаберите „Покрени нови задатак“.
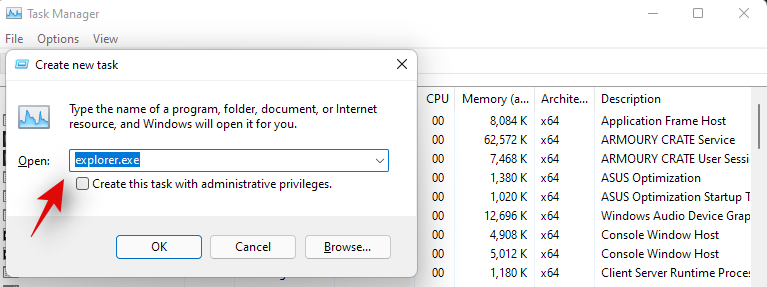
Унесите следеће име и притисните Ентер на тастатури.
explorer.exe
Експлорер би сада требало да се поново покрене на вашем систему и нова боја акцента би сада требало да се одрази на вашој траци задатака.
Како променити боју траке задатака у оперативном систему Виндовс 11 помоћу алата треће стране:
Такође можете да користите алатке треће стране да бисте прилагодили траку задатака. Ови алати долазе са додатним функцијама које помажу у модификацији траке задатака, али већина њих користи стари код који је развијен за Виндовс 10. Ово би могло да створи проблеме са постојећим елементима Виндовс 11, па препоручујемо да користите алатке у наставку само да бисте променили боју акцента на траци задатака.
Метод #02: Коришћење ОпенСхелл-а
ОпенСхелл је новоуређени пројекат који жели да одржи ЦлассицСхелл живим за модерне кориснике. ЦлассицСхелл је дугогодишњи услужни програм који су користили корисници широм света да би прилагодили свој старт мени и траку задатака. Можемо користити ОпенСхелл у нашу предност и лако обојати нашу траку задатака. Пратите водич у наставку да бисте започели.
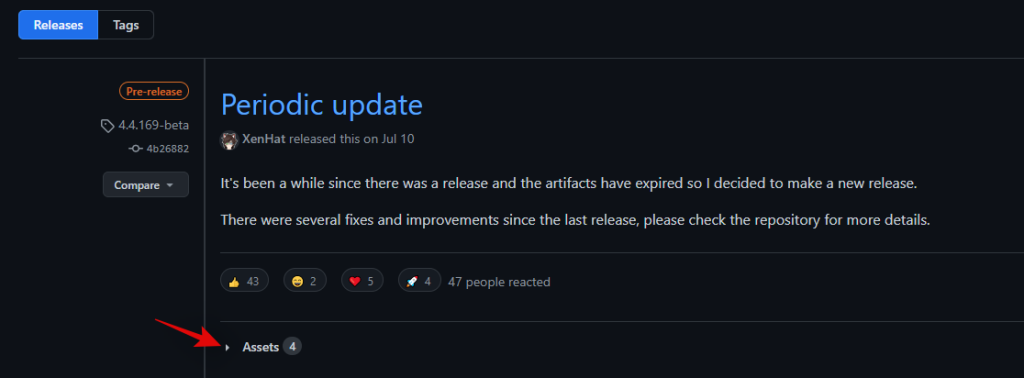
Кликните на везу изнад да бисте отворили страницу за преузимање. Кликните и проширите „Актива“.
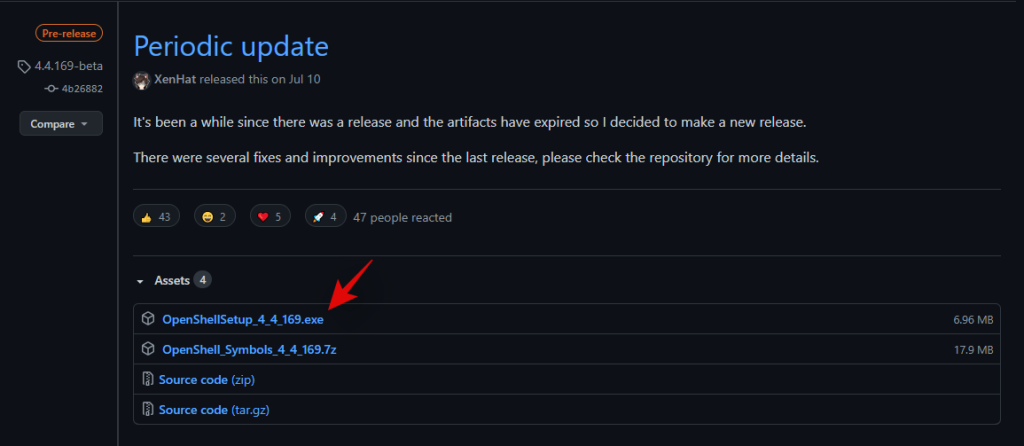
Сада кликните на .еке датотеку да бисте је преузели на свој рачунар. Након преузимања, двапут кликните на њу и инсталирајте апликацију.
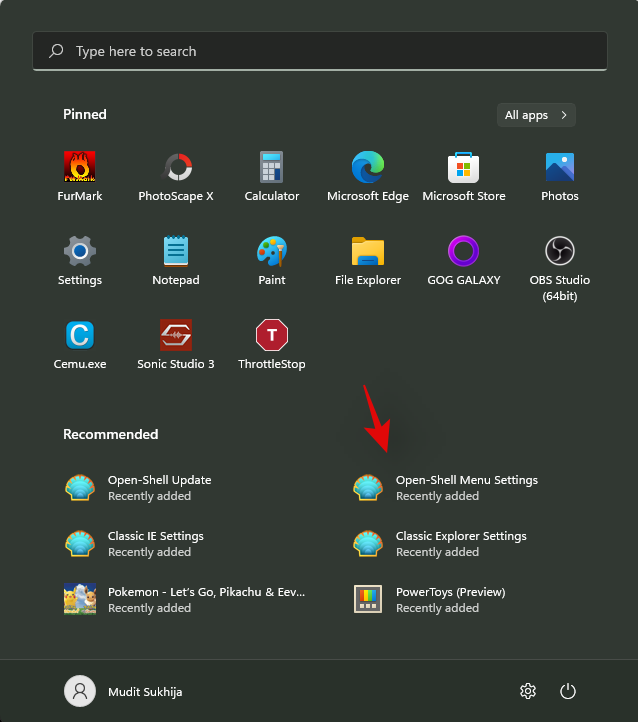
Када се инсталира, покрените поставке ОпенСхелл менија. Немојте се узнемирити ако откријете да је ваш старт мени другачији. Ускоро ћемо вратити промене.
Кликните и пређите на картицу „Основна подешавања“.
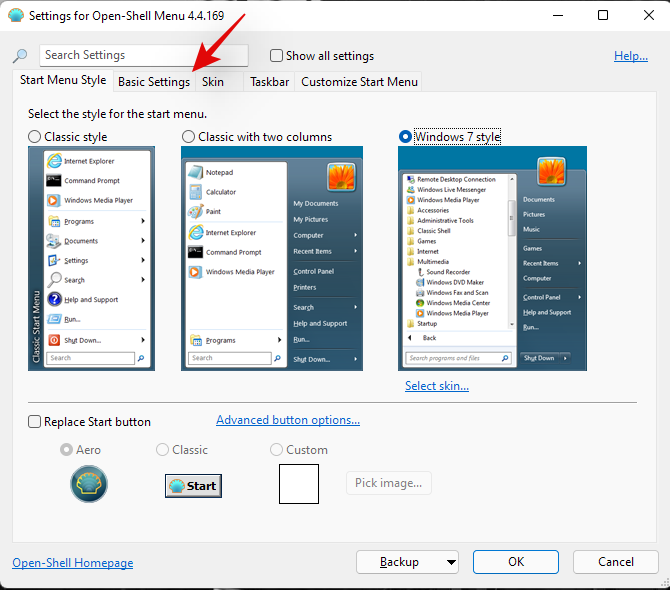
Сада промените следеће вредности да бисте вратили почетни мени и наставили да користите нови „Старт мени за Виндовс 11“.
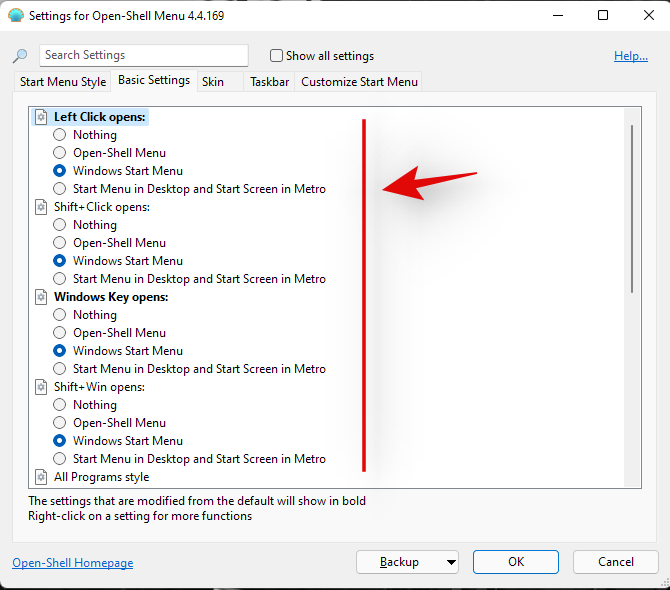
- Отвара се леви клик: Виндовс Старт мени
- Отвара се Схифт + клик: Виндовс Старт мени
- Отвара се Виндовс тастер: Виндовс Старт мени
- Схифт + Вин се отвара: Виндовс Старт мени
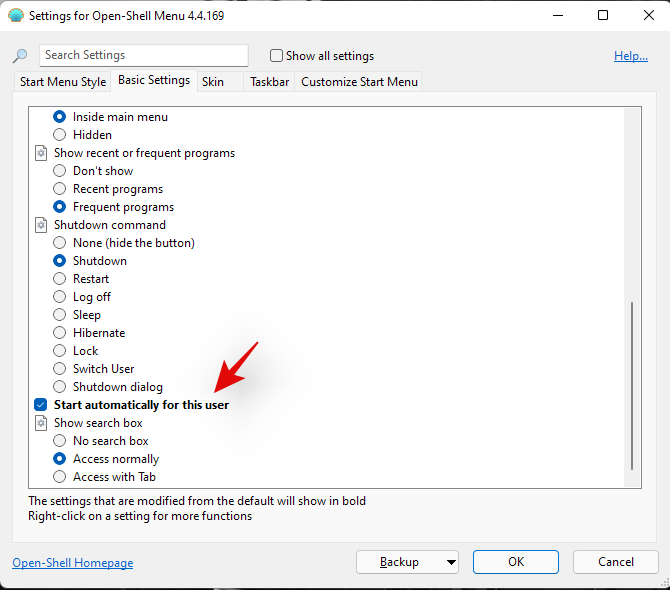
Поред тога, опозовите избор у пољу за потврду „Покрени аутоматски за овог корисника“ ако желите да онемогућите аутоматско покретање за ОпенСхелл.
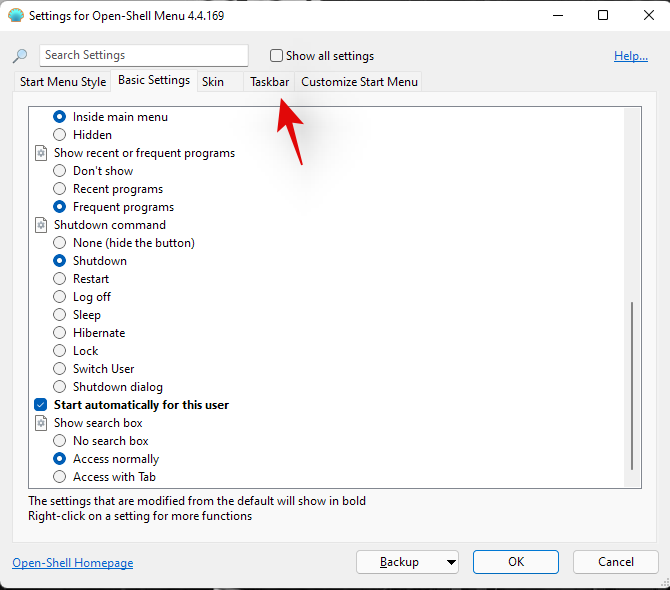
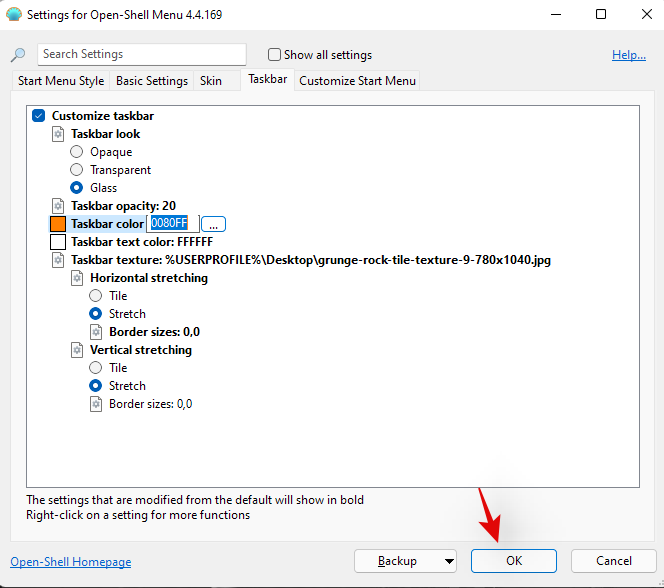
Сада пређите на картицу 'Таскбар' тако што ћете кликнути на њу.
Изаберите једну од опција у наставку у зависности од ваших естетских преференција.
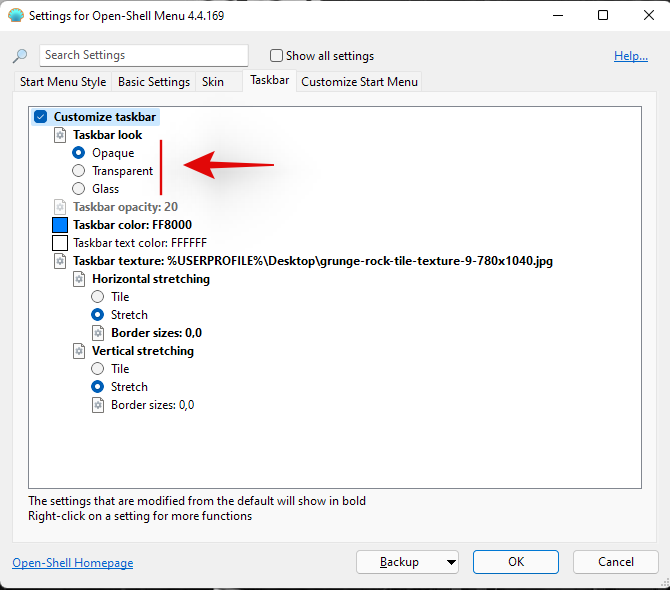
- Непрозирно: Нема нагиба или провидности на траци задатака. Уместо тога добијате једнобојну непрозирну траку задатака.
- Транспарентна: Потпуно провидна и прозирна трака задатака означена изабраном бојом акцента. Позадина је у потпуности видљива кроз траку задатака када користите ову опцију.
- Стакло: Стакло је слично опцији 'Транспарентно'. То чини вашу траку задатака провидном, а истовремено задржава изабрану боју акцента. Али вредност замућења се примењује на траку задатака да би јој се дао изглед мало мат стакла. Ваша позадина неће бити у потпуности видљива на траци задатака.
Ако сте изабрали, прозирни или стаклени, користите 'Прозирност траке задатака' да дефинишете транспарентност траке задатака. Можете да промените ове вредности да бисте фино подесили транспарентност траке задатака на основу ваших преференција и теме.
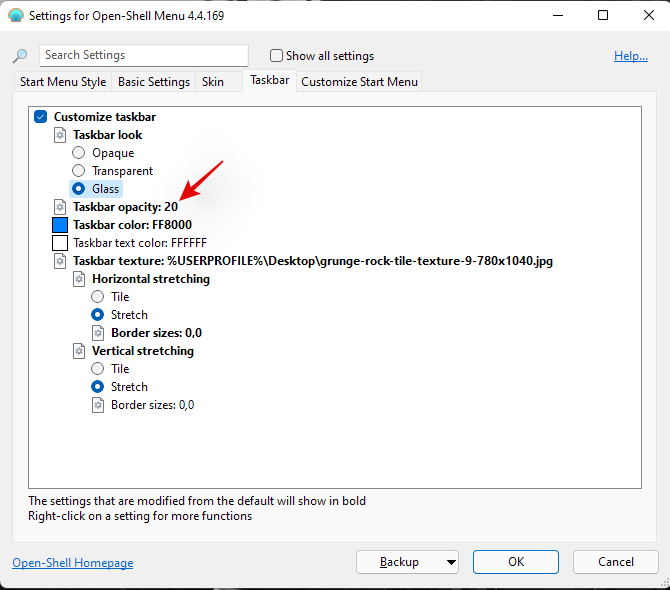
Сада кликните на „Боја траке задатака“ и изаберите икону менија „3 тачке“ поред ње.
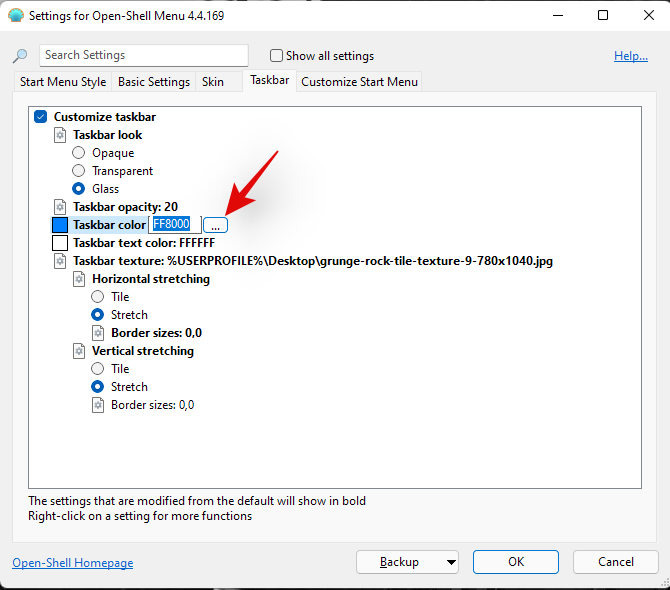
Изаберите боју која вам се свиђа из бирача боја. Такође можете користити прилагођену боју тако што ћете кликнути на жељени простор са десне стране.
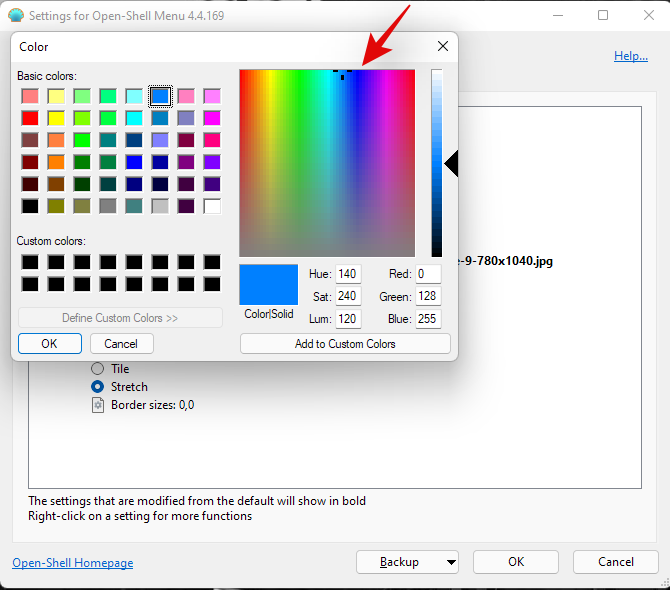
Када изаберете жељену боју, кликните на 'ОК'.
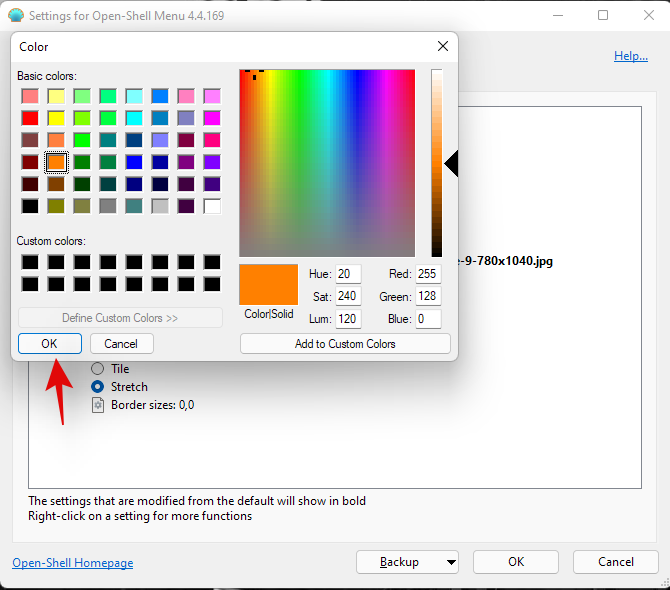
Промена боје би сада требало да се аутоматски одрази на вашој траци задатака.

Кликните на 'ОК' још једном.
И то је то! Сада ћете променити боју траке задатака користећи ОпенСхелл. Имајте на уму да након што подесите боју и тип преко ОпенСхелл поставки, на вашу траку задатака више неће утицати промене боје акцента. То значи да иако можете да користите боју акцента за прилагођавање корисничког сучеља Виндовс 11, мораћете да промените боју траке задатака да би одговарала вашој теми појединачно.
Метод #03: Коришћење ТаскбарКс-а
ТаскбарКс је још један дугогодишњи услужни програм који су корисници углавном користили да центрирају своју траку задатака, то јест све док Виндовс 11 није објављен са истом као изворном функцијом. Ипак, постоји много сјајних ствари које ТаскбарКс може да вам помогне да постигнете, а једна од њих је промена боје траке задатака. Баш као и ОпенСхелл, ТаскбарКс ће променити боју траке задатака појединачно и на њега неће утицати укупна боја акцента коју сте изабрали у Виндовс-у 11. Ово можете користити у своју корист и креирати комбинације боја које иначе не би биле могуће у Виндовс 11 Ево како можете користити ТаскбарКс у своју корист и променити боју траке задатака.
Кликните на горњу везу и преузмите ТаскбарКс на свој рачунар. Извуците архиву на погодну локацију и двапут кликните и покрените 'ТаскбарКс Цонфигуратор'.
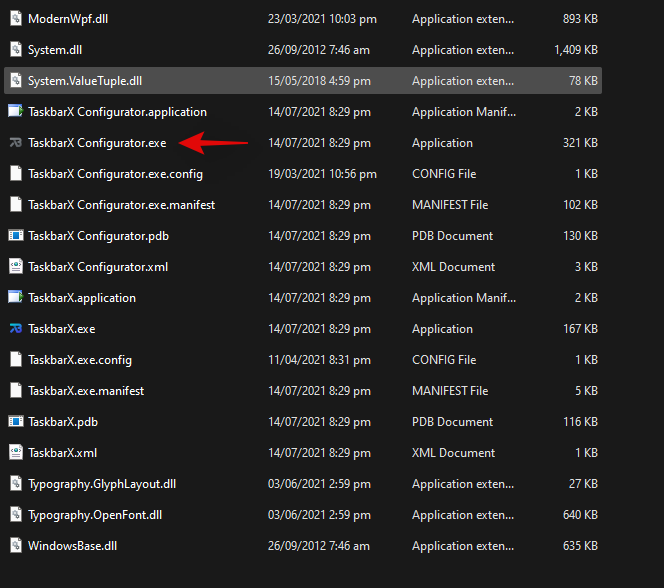
Note: Make sure you download the correct version based on your system. If you aren’t aware of your system’s compatibility, then you shoudl download ‘TaskbarX_1.7.2.0_x64.zip‘ for most modern PCs. Keep in mind that the version number could be different if you are downloading TaskbarX in the future.
Ensure that ‘Style’ is selected on your left and select one of the taskbar materials below.
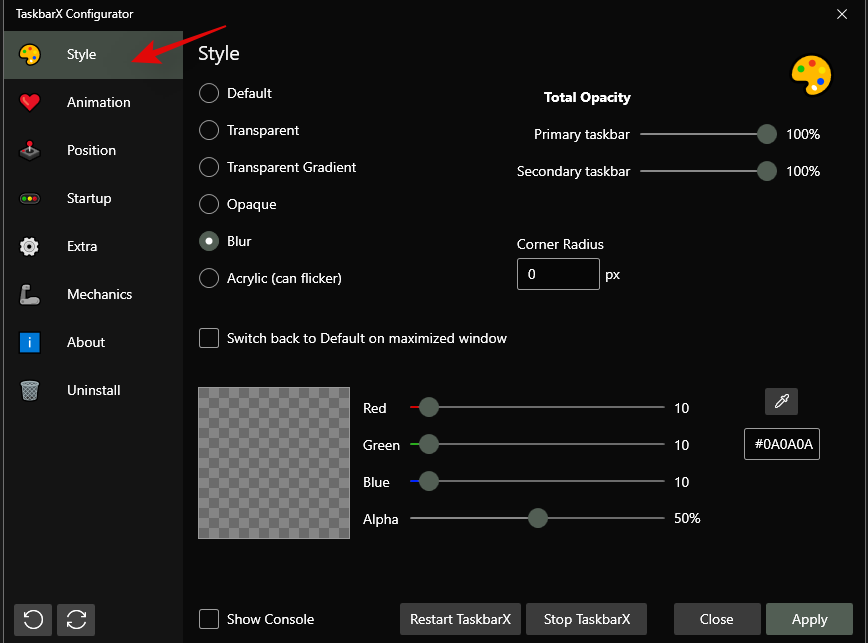
These materials will define the texture, transparency, and behavior of your taskbar. You can use different materials and find the one that best fits your current needs and requirements.
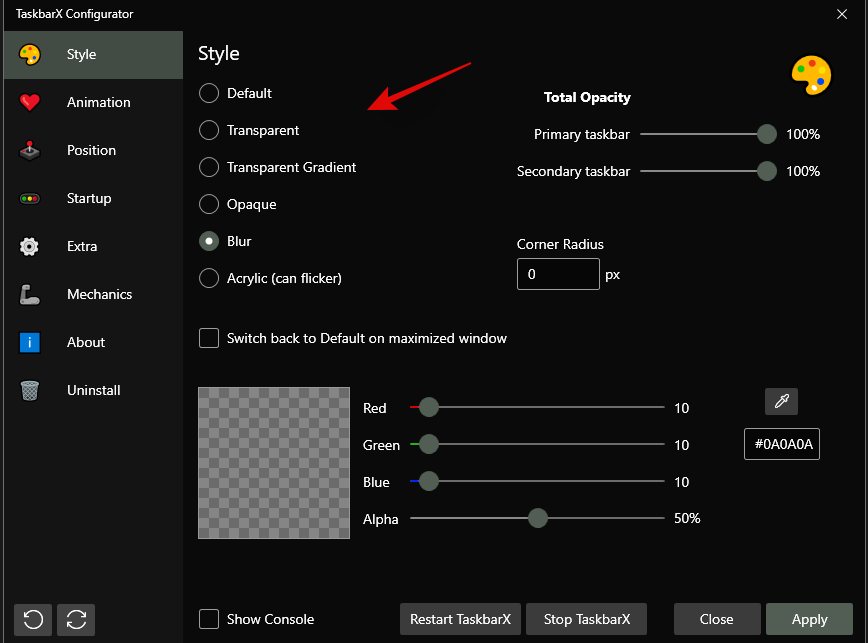
- Default: The default Windows 11 taskbar texture and transparency are used.
- Transparent: The taskbar becomes completely see-through.
- Transparent Gradient: The taskbar is completely transparent with a slight gradient on it to help differentiate the taskbar from other elements on your desktop. This gradient can be changed by redefining the ‘Alpha’ value at the bottom.
- Opaque: The taskbar is completely opaque with no transparency effects applied to it.
- Blur: The taskbar gets a see-through blur texture applied to it. This makes the taskbar transparent enough to make out your wallpaper but blurred enough so that the details of your wallpaper do not interfere with taskbar elements.
- Acrylic: This is a new texture that emulates acrylic surfaces. Slightly transparent, slightly blurred, and a slight gradient help produce this texture. This is an experimental feature and can cause your taskbar to flicker especially if used in conjunction with other taskbar customization third-party apps.
Once you have selected the desired option, change the RGB sliders at the bottom to reflect the desired custom color you wish to use.
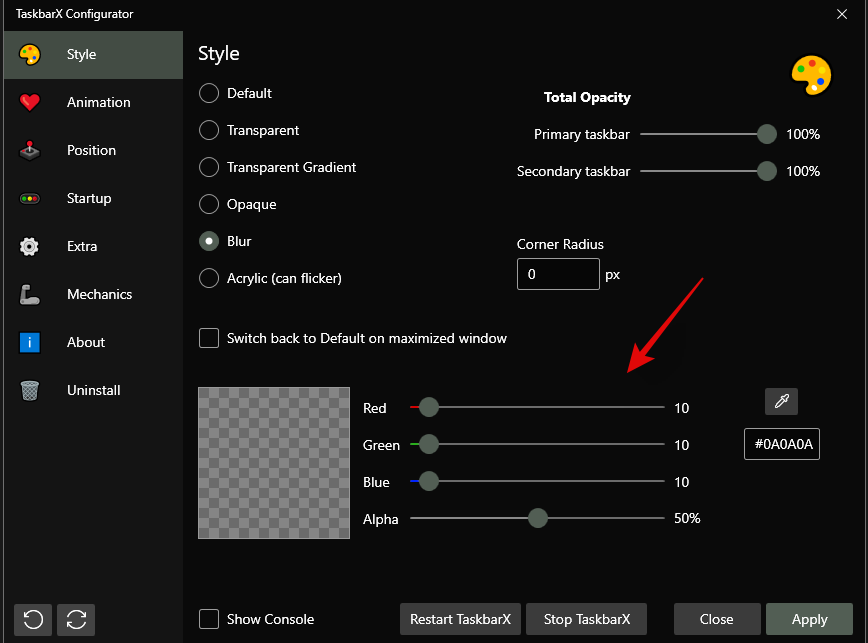
You can also click on the dropper icon to pick a color from your screen.
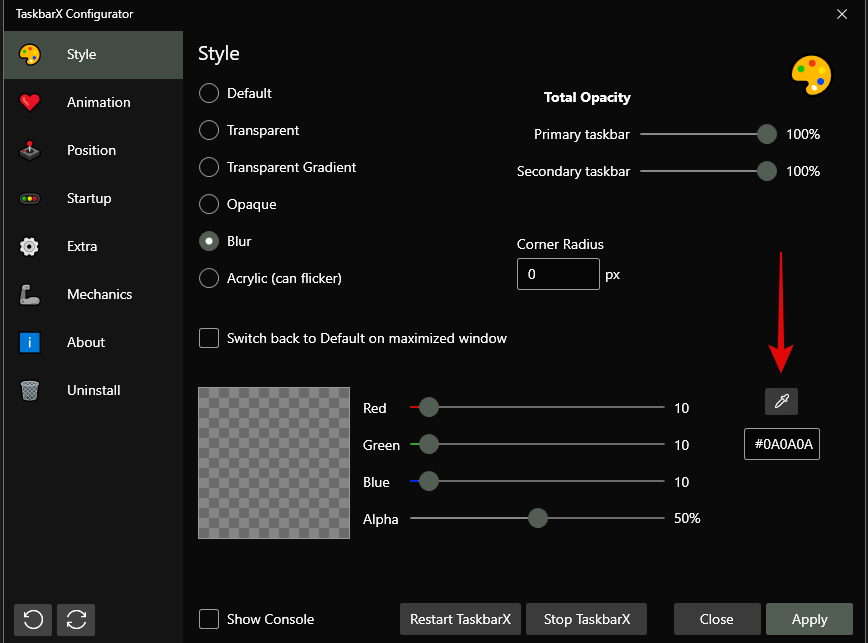
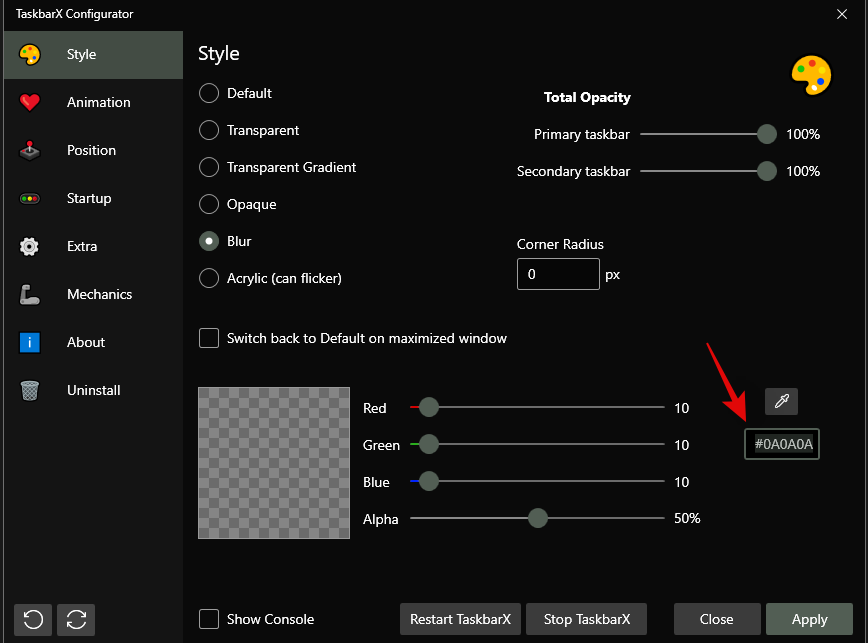
Additionally, if you have HEX values then you can enter them in the following text box as shown below.
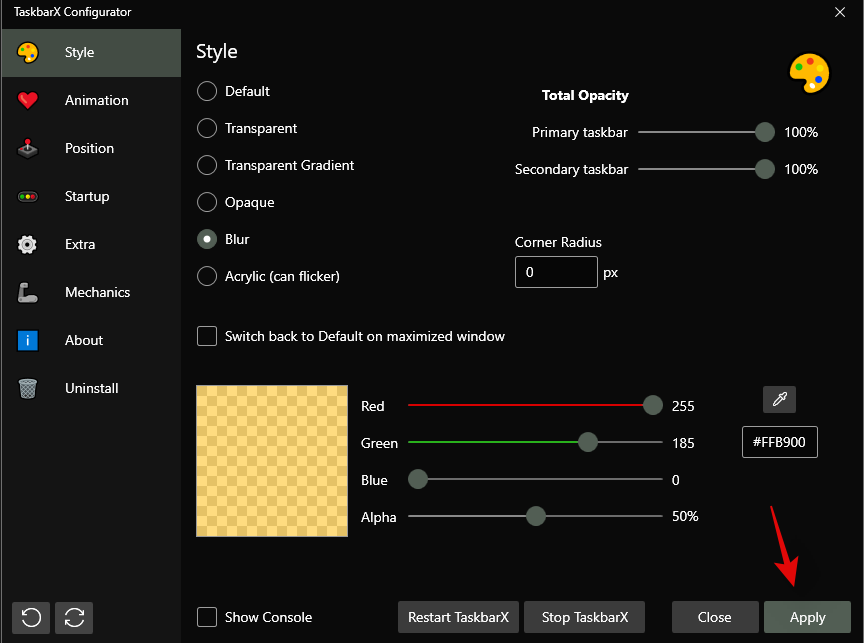
Click on ‘Apply’ once you are done.
TaskbarX needs to be configured to auto-start on your PC for a seamless experience. Click on ‘Startup’ to get started.
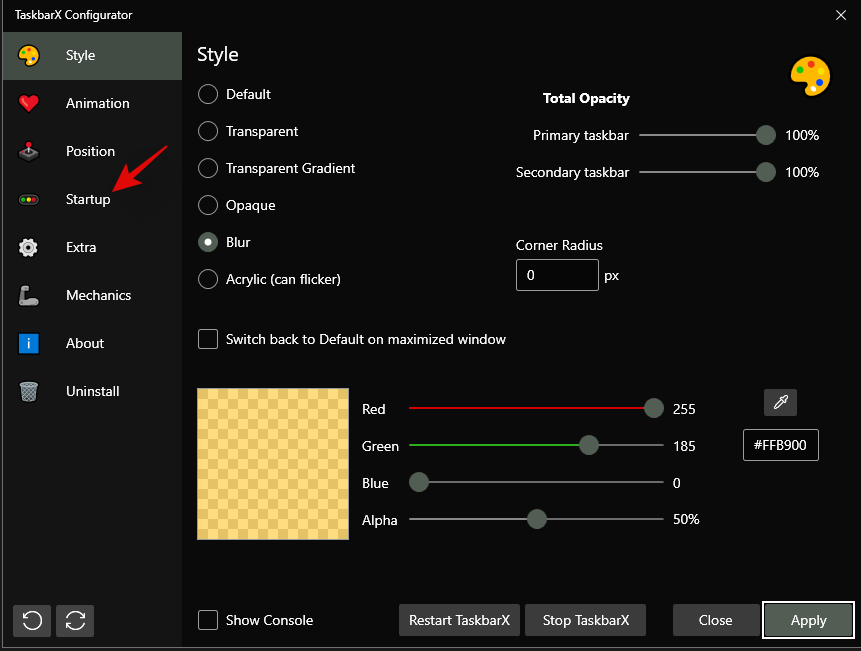
If you have a 4 core or less CPU, then set the ‘Delay’ to 10s or higher. If you have a 6 core CPU or higher, then let the time be 6s. You can reduce the startup interval further if you wish TaskbarX to be launched immediately upon logging in to your user account.
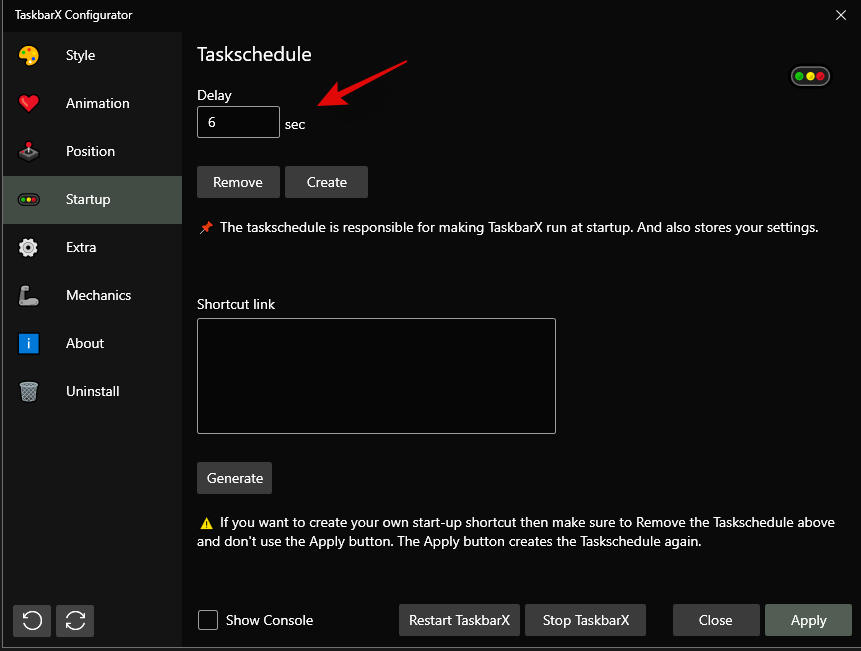
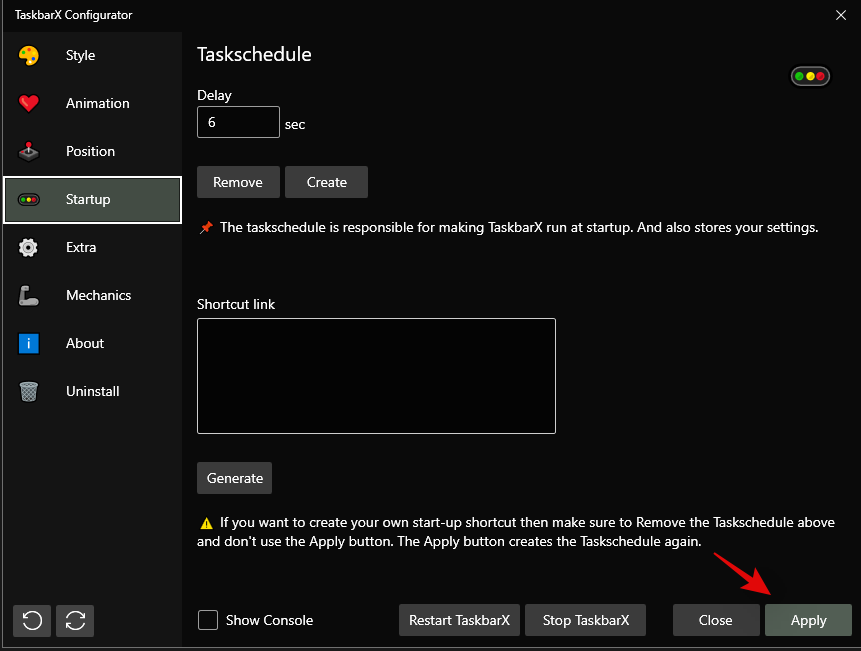
Click on ‘Apply’.
Now click on ‘Restart TaskbarX’ if changes are not reflected in your taskbar.
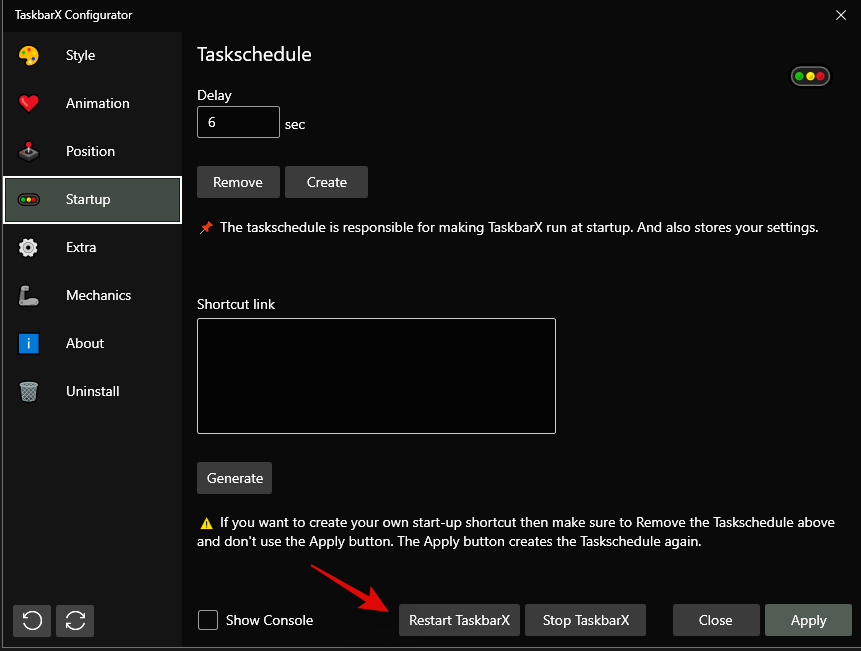
And that’s it! You will now have changed your taskbar color using TaskbarX in Windows 11.
Method #04: Using Windows 10 Color Control
Color Control is another popular utility that was developed to only change your DWM and accent color in Windows 10. However, the utility seems to work great on Windows 11 as well so you can use it to easily change the accent color of your taskbar in Windows 11. Use the guide below to get you started.
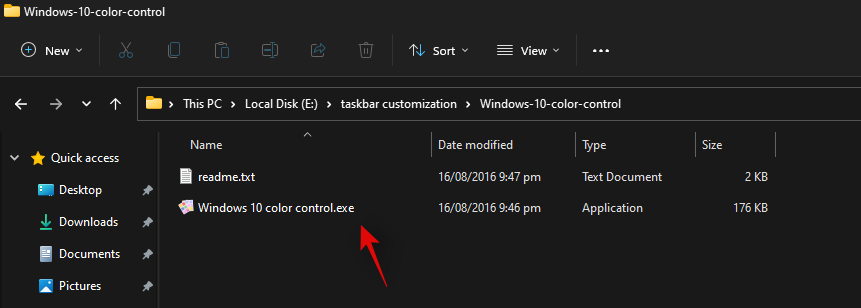
Download the archive using the link above to your local storage. Extract the archive and launch the .exe file by double-clicking on it.
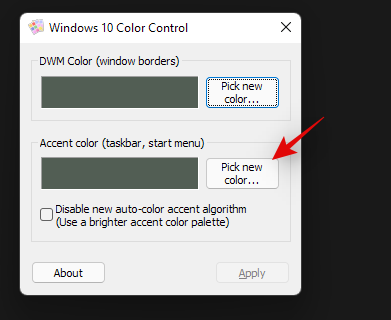
Click on ‘Pick new color’ beside ‘Accent color’.
Choose a new color for your taskbar now. The same color will be used for your Start menu as well.
Check the box for ‘Disable new auto-color accent algorithm’.
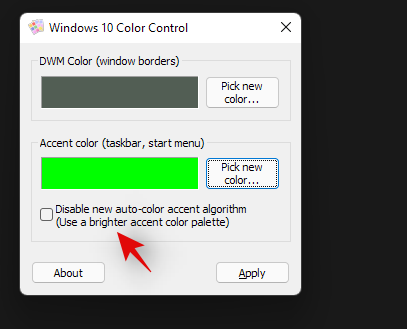
Click on ‘Apply’.
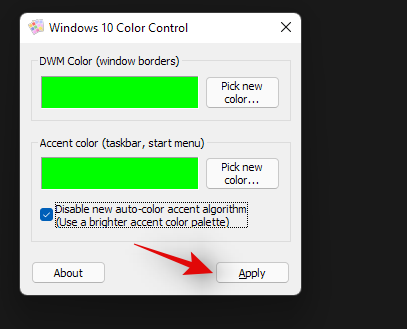
The newly selected color should now be reflected in your taskbar.

You can use the steps above to set a custom color for desktop windows manager as well. And that’s it! You will now have chosen a custom color for your taskbar using Windows 10 Color Control.
Can you set an accent color only for your taskbar?
Yes, you can set a custom accent color only for your taskbar provided that you are using one of the third-party utilities mentioned above. Either one of them can help you easily set a custom color for your taskbar. However, if you are looking to do the same natively in Windows 11, then sadly it is not possible. You will need to use one of the third-party utilities listed above. We would suggest you use TaskbarX as you won’t have to manage other tweaks in the third-party utility that can’t be disabled.
Unable to change Windows 11 taskbar color? How to fix
Have you been unable to change your Windows 11 taskbar color? Then there could be a couple of reasons for this issue. Use the troubleshooting guide below to fix this issue on your system.
- Ensure that you aren’t using a deactivated version or trial version of Windows 11. These versions do not allow you to customize and personalize Windows 11 which could be the reason why you are unable to change the taskbar color on your PC.
- Restart explorer.exe to refresh DWM which should help reflect the changes in the overall Windows 11 UI. Explorer.exe can sometimes fail to reflect changes recently made in Windows 11. You can manually restart the application from your task manager to have explorer reflect the changes immediately.
- Uninstall any third-party apps that customize your taskbar and try changing your accent color natively in Windows 11.
- Use Windows 10 Color Control to change your taskbar. This GUI uses the same Windows Settings options to change your accent and DWM colors in Windows 11. If the app can change the taskbar color on your PC then it is likely that the Settings app is facing issues on your system. In such cases, you can try restart explroer.exe to fix your issue.
- Install latest Windows Updates: Windows 11 is fairly new and it could be that your system is facing a known bug or conflict in the background. Installing the latest updates will help fix this issue on your system and fix any background service conflicts as well.
- Ensure that Windows is not automatically picking a custom accent color from your wallpaper. If this option is enabled then a custom accent color will be automatically selected by Windows 11 regardless of your choice and changes in the custom color section in the Settings app.
- Lastly, if nothing works for you then we recommend you check Windows for corrupted and missing files. This can be done by using SFC and DISM commands on your machine. You can use this detailed guide by us to run these commands on your PC and fix your Windows 11 installation.
Can you make the taskbar on Windows 11 transparent?
Yes, you can easily make Windows 11 taskbar transparent on your PC using a third-party utility. You can use the following apps to get a transparent taskbar on your PC.
Use the detailed guides above at the top of this post to help you choose a transparent taskbar on your PC. You can even add gradients and blur to your transparent taskbar to further customize it to match the look of your PC.
Can you further customize your taskbar?
Yes, you can use TaskbarX to further customize your taskbar on your PC. You can use the following options to further customize your taskbar in Windows 11.
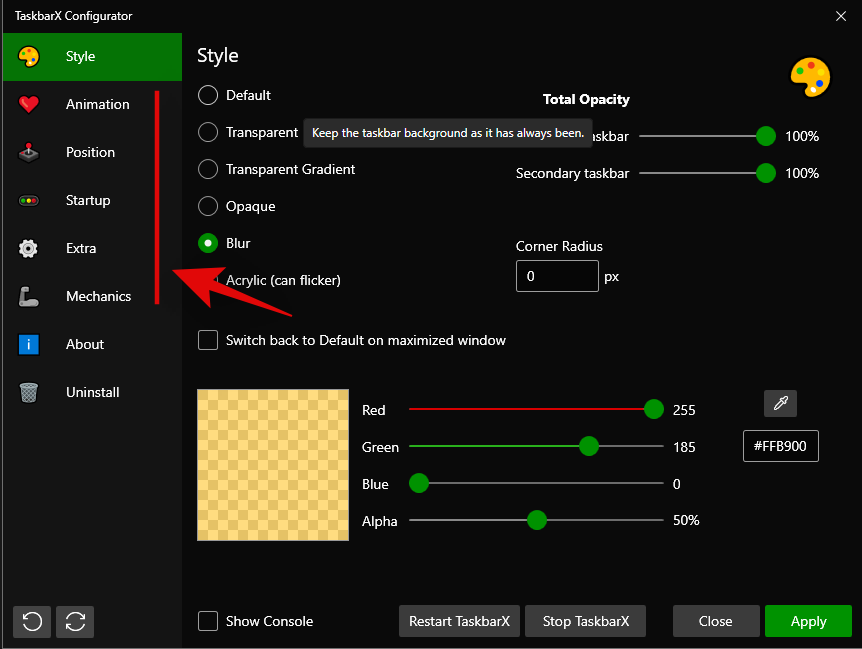
- Animation: Change your animation, type, and duration using this option. These changes are applied to taskbar animations and taskbar window animations.
- Position: Windows 11 no longer allows you to reposition your taskbar but you can use this option to move your taskbar around on your desktop. You can also use the options in this section to offset taskbar elements and create a completely new look on your PC.
- Extra: You can use options in this section to customize your taskbar behavior depending on your current setup and what you are currently doing on your PC.
- Mechanics: This section will allow you to change the refresh rate of your taskbar elements when using TaskbarX.
You can also use OpenShell to further customize your taskbar in Windows 11. OpenShell was recently updated for Windows 11 and hence comes with a few dedicated tweaks for the new OS. It offers similar options to TaskbarX to customize your taskbar. Simply switch to the ‘Tasksbar’ tab at the top and make the desired changes to customize your taskbar.
Apart from the above-discussed apps, you can also use Winaero Tweaker on your PC to customize your taskbar in Windows 11. Use the guide below to get familiar with Winaero Tweaker in Windows 11.
How to use Winaero Tweaker to customize the taskbar
Winaero Tweaker is a long-standing utility that has been used to customize Windows UI for a long time. The app was recently updated with some dedicated options to customize Windows 11 and here’s how you can use them to your advantage.
Download and install Winaero Tweaker to your PC using the link above. You can also extract a portable to your local storage if needed. Once installed/extracted, launch the .exe file on your system.
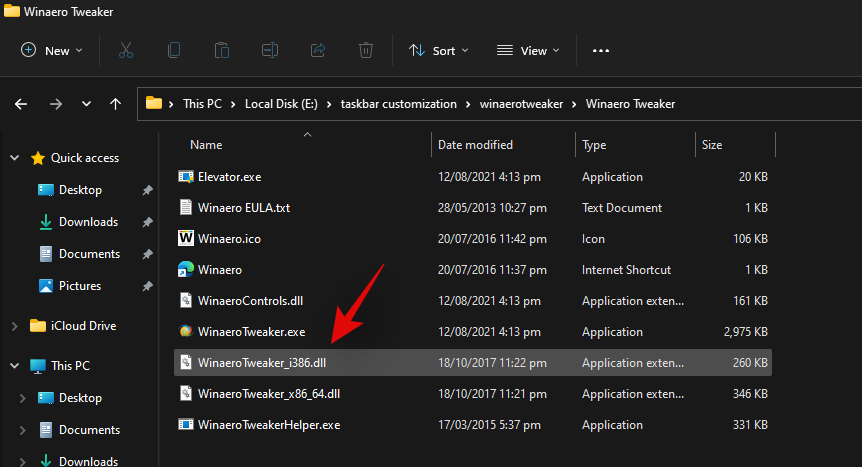
Click and expand Windows 11 on your left.
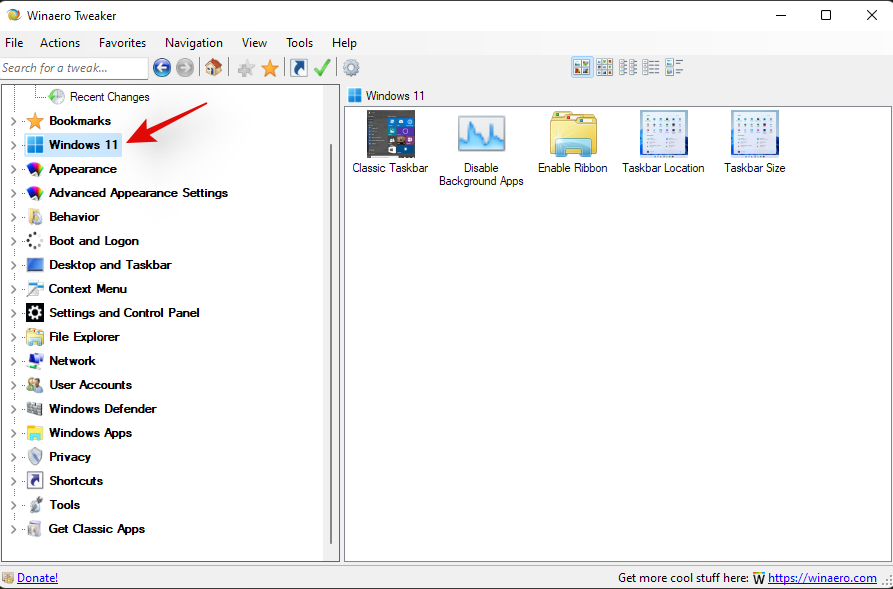
Now enable the following tweaks depending on your preferences.
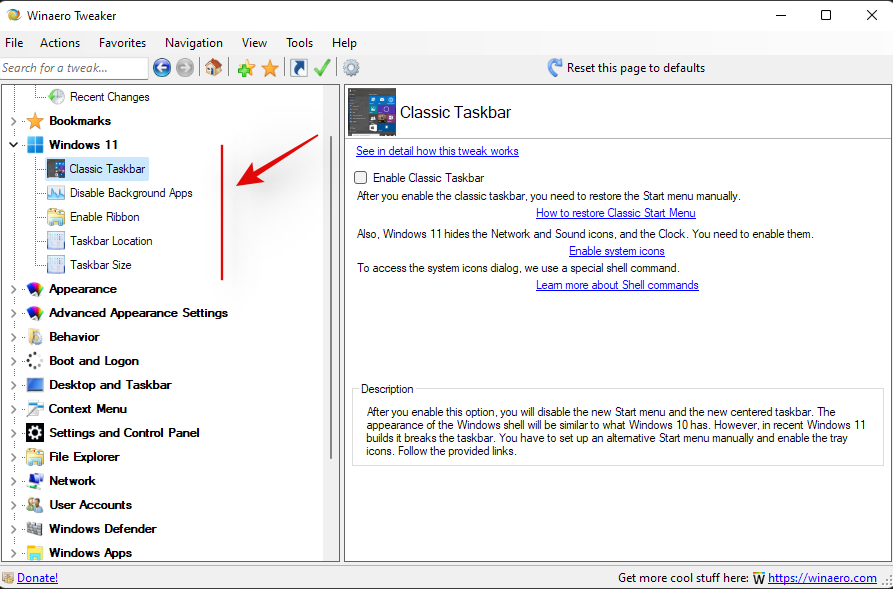
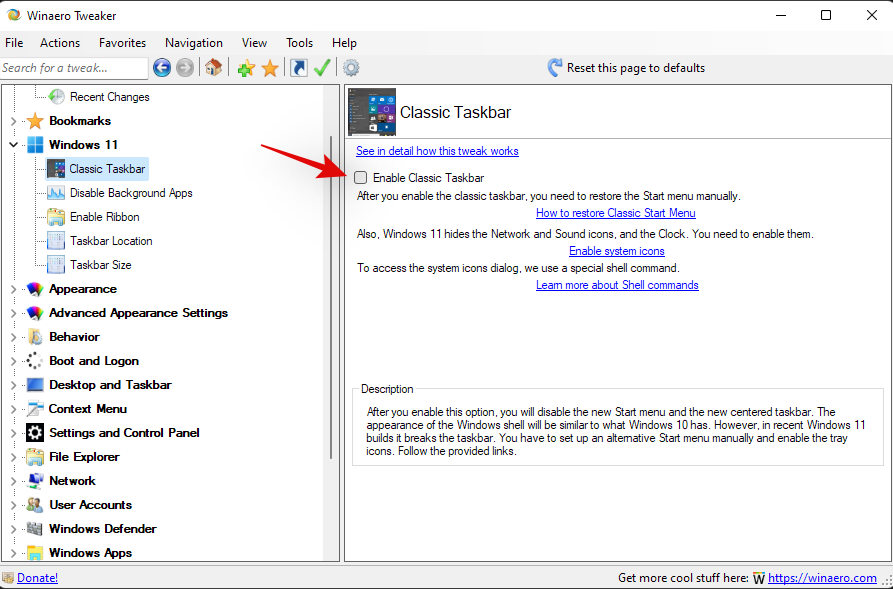
- Classic Taskbar: Use this option to get the old classic taskbar back on your PC. Check the box for ‘Enable Classic Taskbar’ and then follow the subsequent guides to set up the old taskbar on your system.
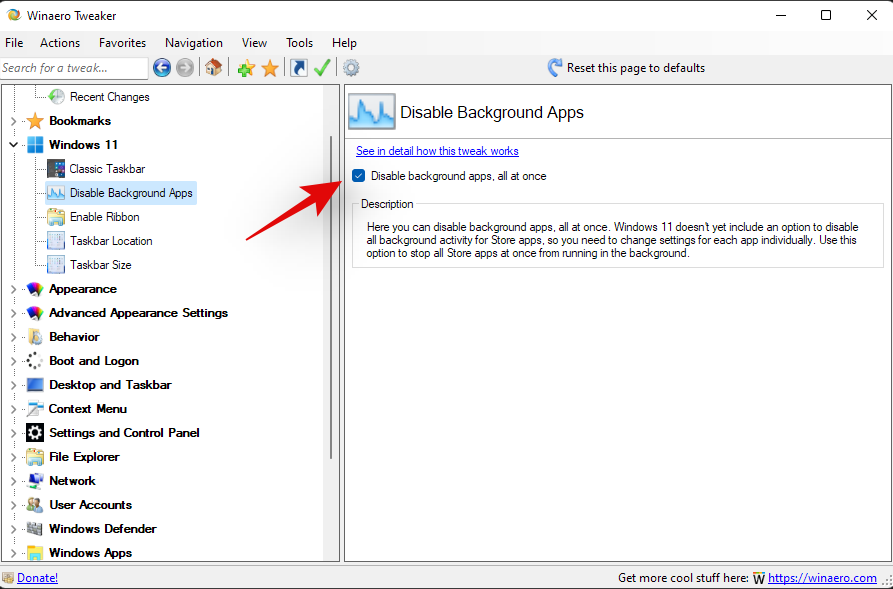
- Disable Background apps: Windows 11 has reduced the capability to disable background applications. You can use this option to disable most background apps in Windows 11.
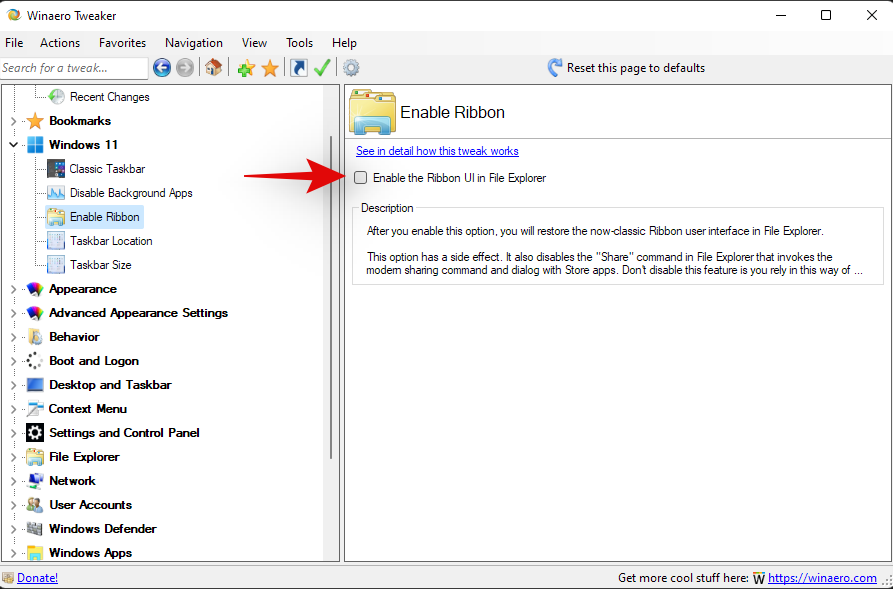
- Enable Ribbon: This will enable the old File Explorer ribbon in the new Windows 11 file explorer. Enabling this option will break the functionality of the ‘Share’ menu in the file explorer.
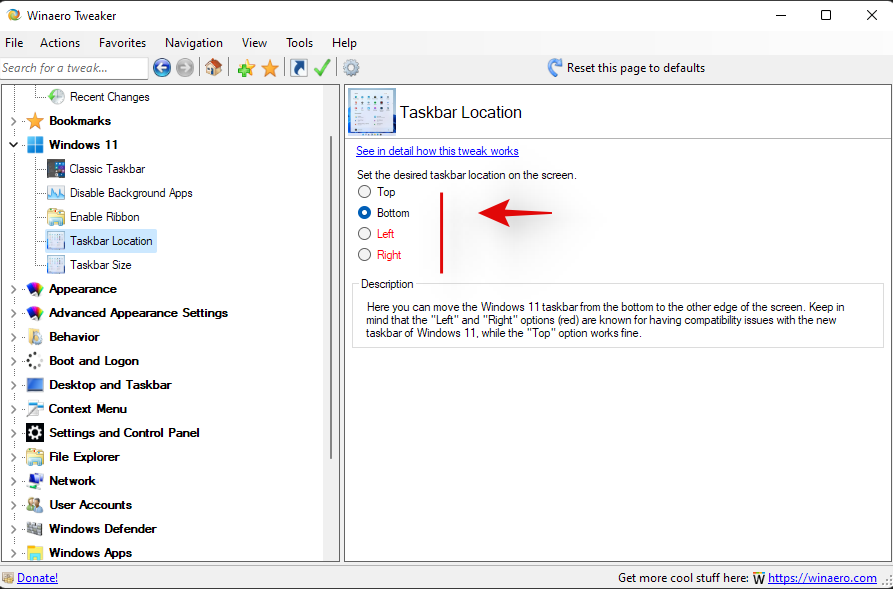
- Taskbar Location: This option can be used to reposition the taskbar on your desktop. Repositioning your taskbar to the left or right is known to cause compatibility issues. A fix is expected for the same in future updates to Winaero Tweaker.
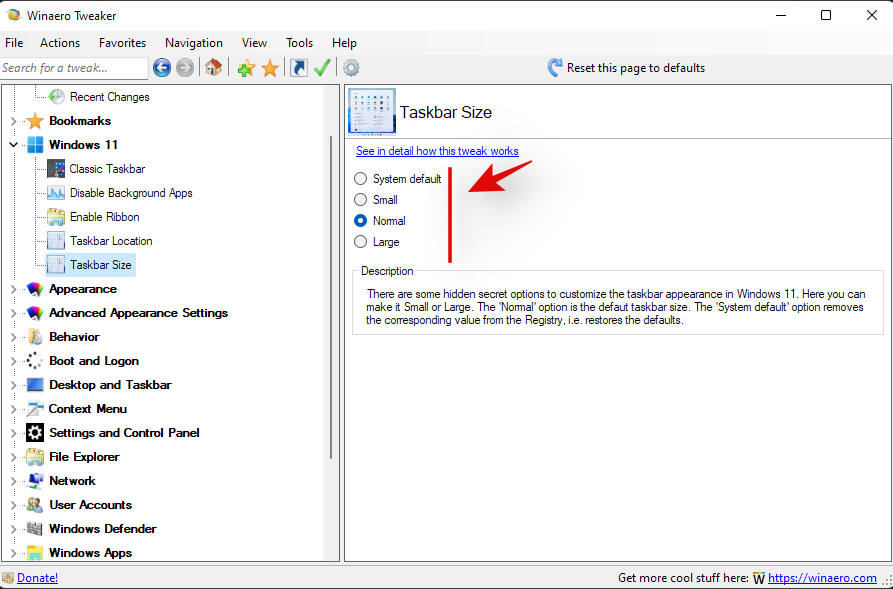
- Taskbar Size: You can change your taskbar’s size using this option. Changing the size of your taskbar will also change the size of your taskbar icons. Additionally, on some systems, you might find that the taskbar overflow is not properly displayed on your screen. This is a known issue and a fix is expected in subsequent updates to the Winaero tweaker.
Click on ‘Restart explorer’ at the bottom of your screen, if prompted, after enabling any one of the options above.
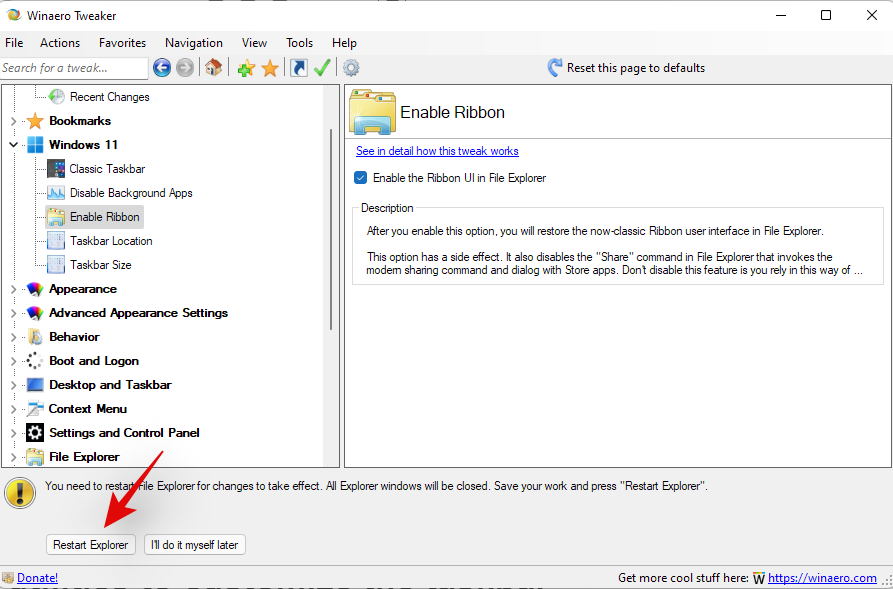
Note: You could also be prompted to sign out and sign back in to your account depending on the changes you decide to make on your PC.
And that’s it! You will now have customized your Windows 11 taskbar using Winaero tweaker.
Should you use third-party utilities to customize the taskbar?
As long as the third-party utility is trusted and compatible with Windows 11, you should have no problems using a third-party utility to customize your taskbar. However, if a utility is developed for Windows 10 then we recommend you avoid using it until it has been verified to work on Windows 11. The new OS comes with additional background services and changes to the registry that could get messed up if using incompatible applications. This could break the functionality of DWM in Windows and introduce glitches that might force you to reset your PC. Hence we recommend you verify the functionality of the concerned utility before using it on your system.
We hope this guide helped you easily change the color of your taskbar in Windows 11. If you face any issues or have any questions for us, feel free to reach out using the comments section below.


