Иако су обавештења у неким случајевима неопходна, понекад постају елемент ометања. Баш као и ваш телефон, рачунар такође може да вам одвуче пажњу обавештењима. Због тога Виндовс 11 укључује функцију Фоцус Ассист, која вам омогућава да избегнете обавештења која вас ометају. Користећи ову функцију, можете да радите свој посао са пуном концентрацијом уместо да вас ометају насумичне поруке и обавештења. Обавештења такође могу да нашкоде вашој продуктивности, па се морају потиснути у право време.
Само неколико кликова може сакрити сва обавештења, упозорења и поруке на вашем рачунару. Ако сте недавно надоградили свој систем на Виндовс 11 и не можете да схватите нови кориснички интерфејс, овај чланак ће вам помоћи са свеобухватним водичем о томе како да користите Фоцус Ассист на Виндовс 11 да бисте се решили обавештења.
Повезано: Како направити снимке екрана на Виндовс 11
Садржај
Шта је помоћ за фокусирање у оперативном систему Виндовс 11?
Фоцус Ассист је једноставно режим Не узнемиравај за ваш рачунар – баш као и они које имате на својим телефонима. То је згодна функција у оперативном систему Виндовс 11 која вам омогућава да се решите непотребних обавештења, порука и упозорења. Функција помоћи при фокусирању вам омогућава да прилагодите своју листу приоритета уместо да блокирате рачунар од свих обавештења.
Ометање може наштетити вашој продуктивности. Дакле, са функцијом Фоцус Ассист, можете сакрити сва обавештења, упозорења и поруке док радите на нечем важном. Уместо да вас обавесте, они ће отићи право у акциони центар. Можете да видите скривена обавештења у акционом центру када желите.
Како Фоцус Ассист ради на Виндовс 11?
Фоцус Ассист вам пружа флексибилност да изаберете када да блокирате ометања као што су поруке, обавештења и упозорења. Можете да укључите Фоцус Ассист у било ком тренутку или такође можете да закажете временски опсег у подешавањима која ће аутоматски укључити Фоцус Ассист.
Функција помоћи за фокусирање вам омогућава да креирате листу приоритета како бисте били сигурни да не пропустите ниједно обавештење од најважнијих људи у вашем контакту. Људи на вашој листи приоритета увек могу да вас контактирају, чак и када се бавите неким важним послом. У случају да вам је потребна потпуна концентрација током рада, такође можете да изаберете да блокирате сва обавештења. Да бисте видели сва блокирана обавештења која сте примили док сте радили, отворите акциони центар свог система.
Повезано: Како зауставити искачуће прозоре у оперативном систему Виндовс 11
Како омогућити помоћ за фокусирање
Фоцус Ассист је подразумевано искључен. Али ако желите да му омогућите да престане да прима обавештења, следите кораке у наставку.
Метод #1: Коришћење подешавања
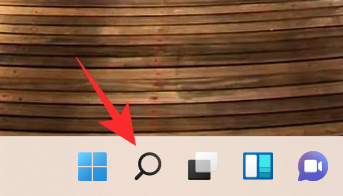
Кликните на икону Претрага , која изгледа као лупа на траци задатака.
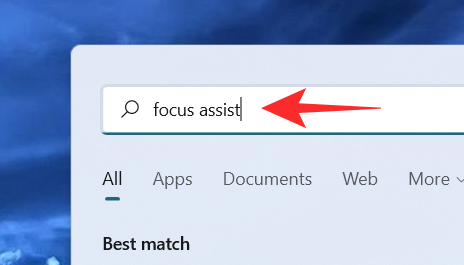
Унесите помоћ за фокусирање у траку за претрагу.
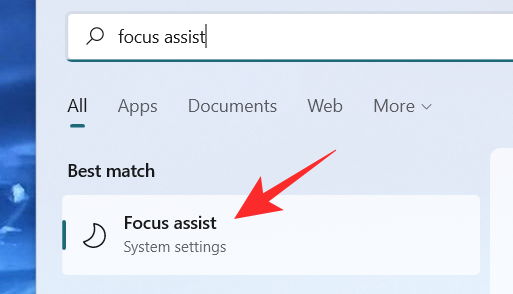
Кликните на подешавања система Фоцус Ассист .
На екрану се појављује прозор поставки система Фоцус Ассист. У оквиру Фоцус Ассист изаберите једну од ових опција:
- Искључено – Онемогућава функцију Фоцус Ассист и омогућава вам да примате обавештења од апликација и контаката.
- Само аларми – Ова функција потискује сва обавештења, осим аларма.
- Само приоритет – Ова функција дозвољава обавештења само са листе приоритета коју треба да прилагодите.
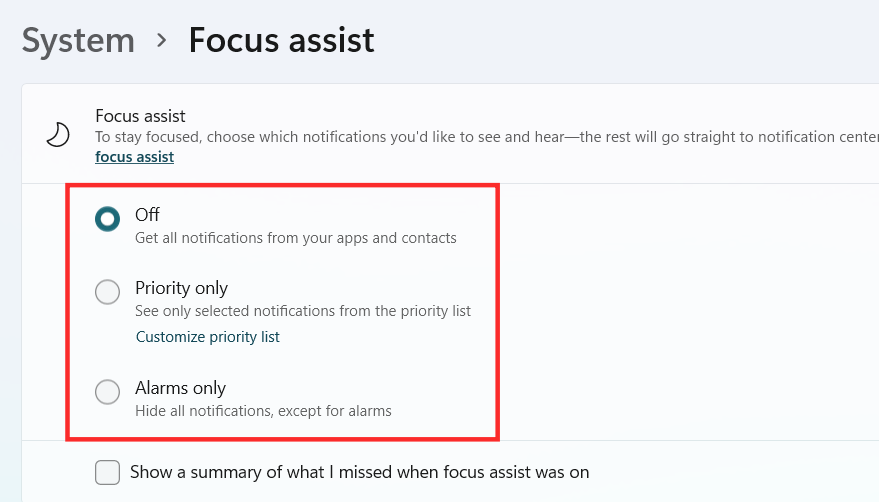
Фоцус Ассист би сада требало да буде омогућен у Виндовс 11 у зависности од избора који сте направили.
Метод #2: Коришћење Акционог центра
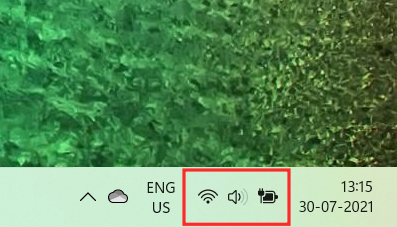
Кликните на Акциони центар који приказује икону Вифи, јачине звука и батерије заједно.
Одмах испод иконе Блуетоотх, можете видети икону Фоцус Ассист која изгледа као полумесец.
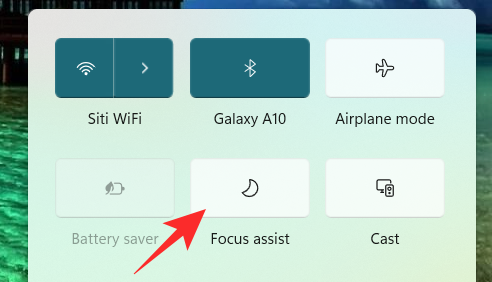
Подразумевано, функција Фоцус Ассист ће бити онемогућена. Кликните на њу и функција ће се директно поставити на само приоритет .
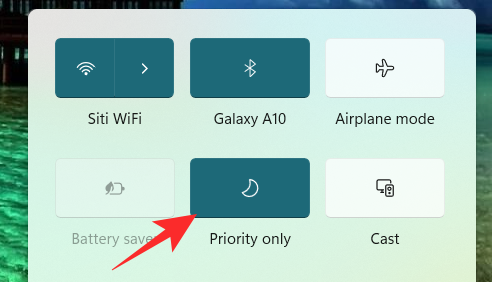
Кликните поново да бисте функцију Фоцус Ассист поставили на Само аларми .
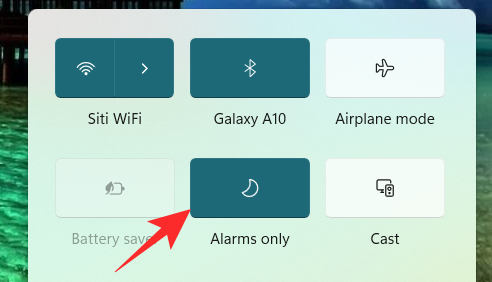
Да бисте онемогућили функцију Фоцус Ассист, кликните на њу поново.
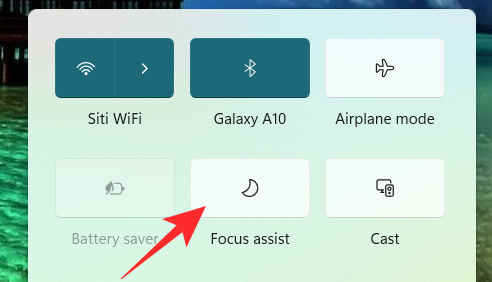
Само кликом на икону Фоцус Ассист у Акционом центру, можете променити његову функцију на искључено, само приоритет и само аларме. Међутим, да бисте извршили друге неопходне промене у подешавањима Фоцус Ассист из Ацтион центра, кликните десним тастером миша на икону Фоцус Ассист у Ацтион Центру и кликните на Иди на подешавања .
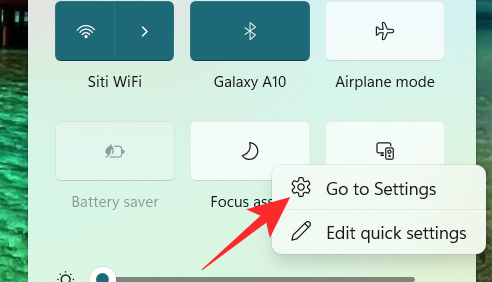
Ово ће вас одвести у апликацију Подешавања где можете лако да извршите све намераване промене. И то је то! Помоћ при фокусирању би сада требало да буде омогућена у оквиру Виндовс 11 директно из акционог центра.
Метод #3: Коришћење уређивача групних смерница
Такође можете да омогућите режим помоћи за фокусирање помоћу уређивача смерница групе у случају да сте администратор. Користите водич испод који ће вам помоћи у процесу.
Притисните Windows + Rна тастатури и откуцајте следеће у дијалогу Покрени. Притисните ентер на тастатури да бисте отворили уређивач смерница групе.
gpedit.msc
Идите до следећег чвора поменутог у наставку.
User configuration > Administrative Templates > Start Menu and Taskbar > Notifications
Пронађите и двапут кликните на вредност „Искључи мирне сате“ на десној страни.
Сада изаберите једну од следећих опција у зависности од ваших тренутних потреба у горњем левом углу прозора са својствима.
- Омогући: Ово ће омогућити помоћ при фокусирању на изабраном систему.
- Онемогући: Ово ће онемогућити помоћ при фокусирању за изабрани систем.
И то је то! Помоћ при фокусирању ће сада бити омогућена или онемогућена у уређивачу смерница групе у зависности од ваших преференција. Нажалост, не можете да прилагодите понашање Фоцус Ассист као администратор. Та способност и даље лежи на кориснику. Можете само да омогућите или онемогућите могућност коришћења Фоцус Ассист за систем помоћу уређивача смерница групе.
Како се користи Фоцус Ассист
Фоцус Ассист има различита подешавања и опције прилагођавања које вам могу помоћи да промените његово понашање у складу са вашим тренутним потребама. Користите један од водича у наставку који најбоље одговара вашим тренутним захтевима.
Метод #1: Омогућите режим само аларма
Режим Само аларми у прозору Фоцус Ассист вам омогућава да сакријете сва обавештења осим аларма. Пратите доле наведене кораке да бисте омогућили режим Само аларми.
Кликните на икону Претрага на траци задатака.

Тип Фоцус Ассист

Кликните на Фоцус Ассист .

У оквиру Фоцус Ассист кликните на Само аларми да престанете да примате обавештења, осим за аларме.
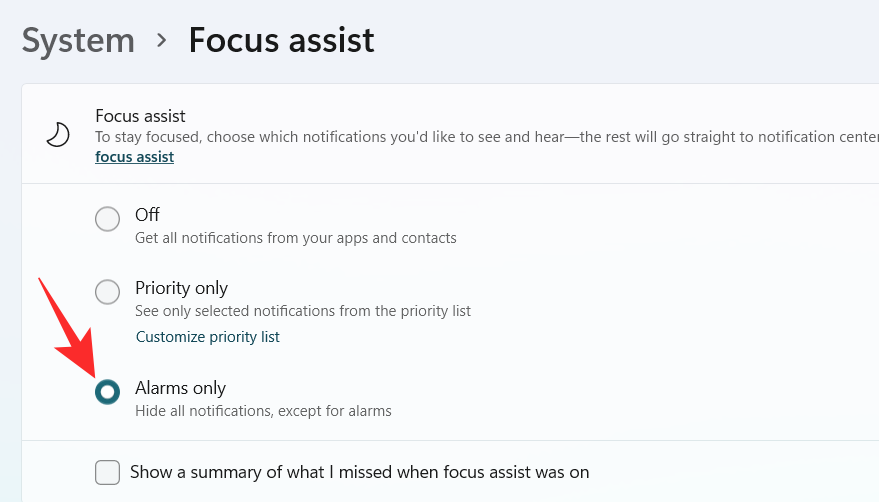
И то је то! Сада ћете бити информисани само о алармима на вашем систему. Сва друга обавештења, без обзира на њихов приоритет, биће утишана у Виндовс 11.
Метод #2: Омогућите приоритет само са прилагођеном листом
Људи прозор ће се појавити на екрану. Одаберите жељене људе тако што ћете уписати њихова имена у траку за претрагу.
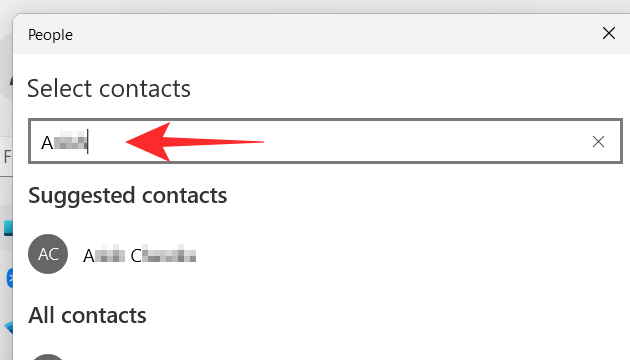
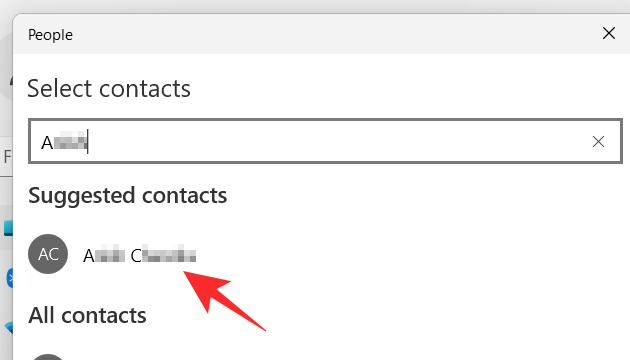
Кликните на име особе.
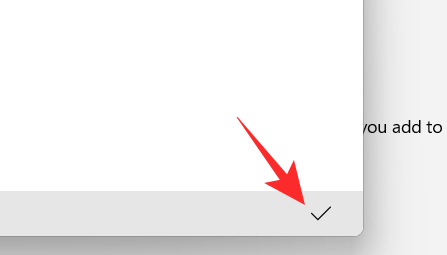
Кликните на дугме за квачицу у доњем десном углу прозора Људи.
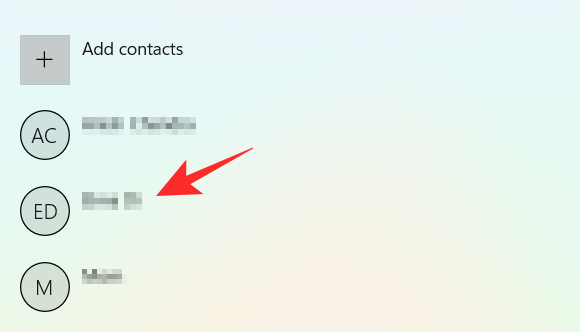
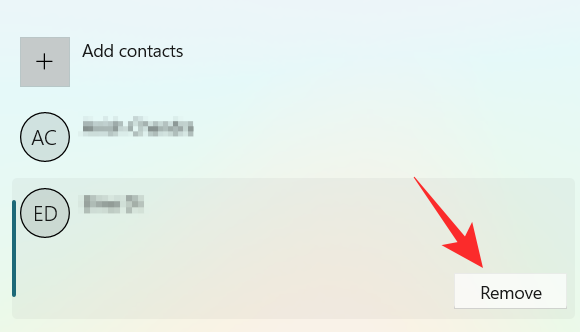
Your priority list has been created. Now, if you want to remove a contact from your priority list, click on the contact under People.
Click on Remove.
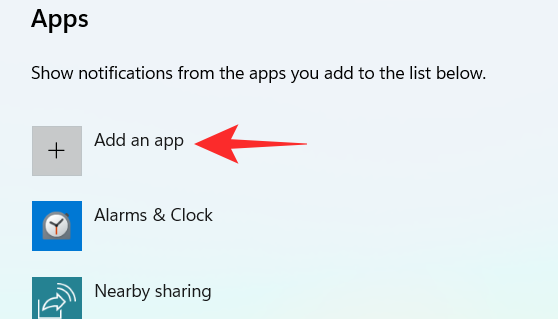
Now, in the Apps section, you can select the apps that can break through your quiet hours. To allow the apps to show notifications, click on the Add an app button.
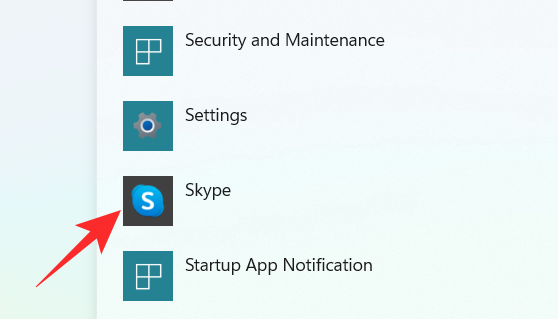
A list of apps appears on your screen. Click on the app you want to add to your priority list.
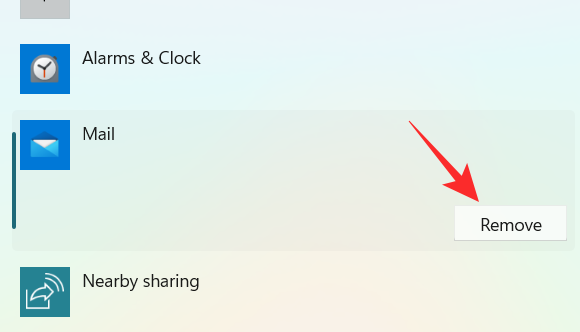
Continue this process until you are done selecting the apps. In case you want to remove an app from your priority list, you can simply click on the app under the App section.
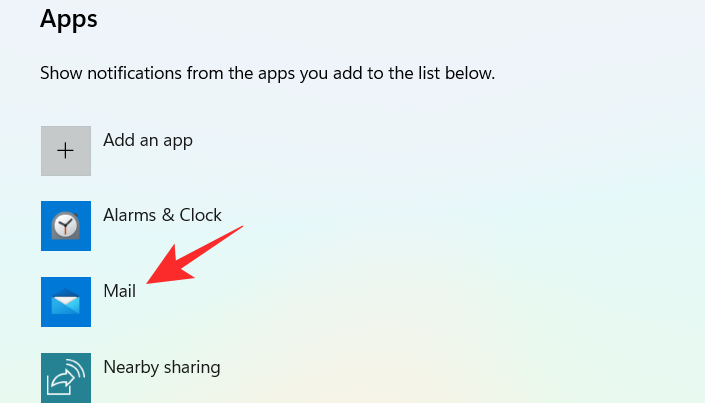
Click on Remove.
And that’s how you can customize the priority list in Focus assist and use it to your advantage to receive notifications only from important contacts.
Method #3: Enable notification summary when Focus assist is disabled
Click on the Search icon on the taskbar.

Type Focus assist

Click on Focus Assist.

Click on your desired option Priority only or Alarms only.
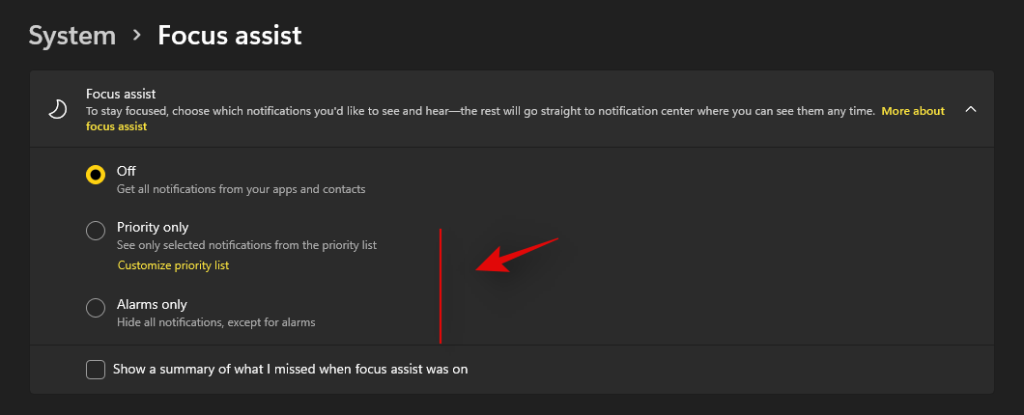
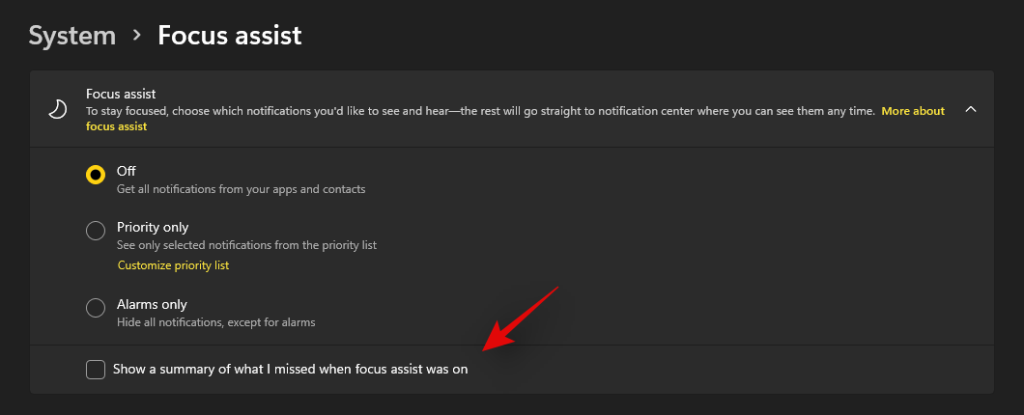
Check the box Show a summary of what I missed when Focus assist was on.
Method #4: Enable or disable automatic Focus assist rules
The Automatic rules in Focus assist allow you to determine the conditions that can activate the Focus assist automatically. There are four different automatic rules in the Focus Assist settings window that can be customized. Check out the steps mentioned below to customize automatic rules in Focus assist.
Click on the Search icon on the taskbar.

Type Focus assist

Click on Focus Assist.

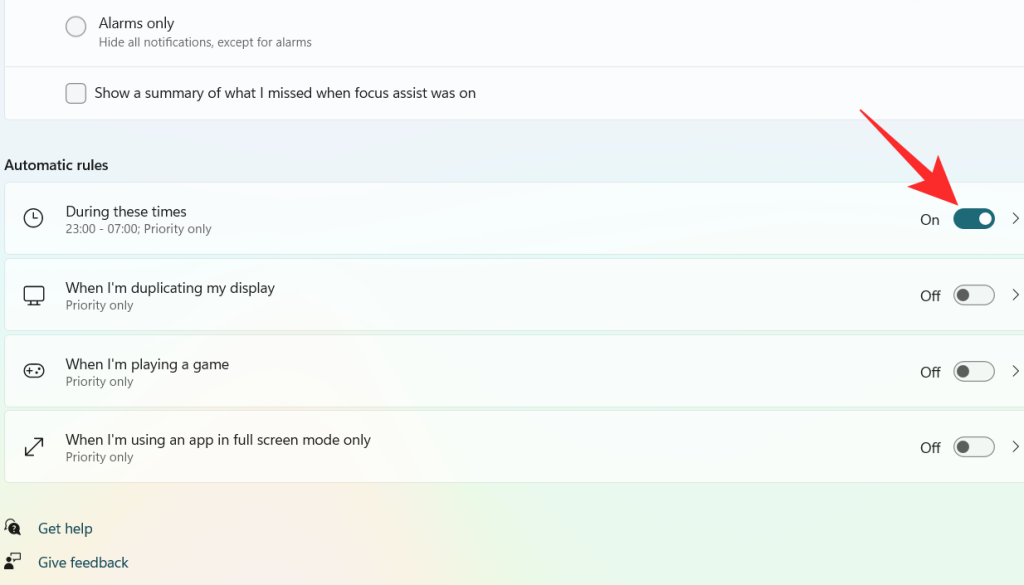
Under the Automatic rules section, there are four sections. Turn on the toggle switch for the option you want to choose.
- During these times – This function allows you to set a specific time range depending on which the Focus Assist feature automatically turns itself on or off.
- When I’m duplicating my display – This function automatically turns on the Focus Assist when it detects that your display is being shared. This function can be used especially to prevent notifications from popping up when you are in the middle of a presentation.
- When I’m playing a game – While you are playing games on a full-screen mode, this function allows the Focus Assist to suppress the notifications from popping up on the screen.
- When I’m using an app in full-screen mode only – This function enables the Focus Assist to turn on automatically when it detects that you’re using an app in full-screen mode. You will not receive any notifications until you have an app opened on a full-screen mode.
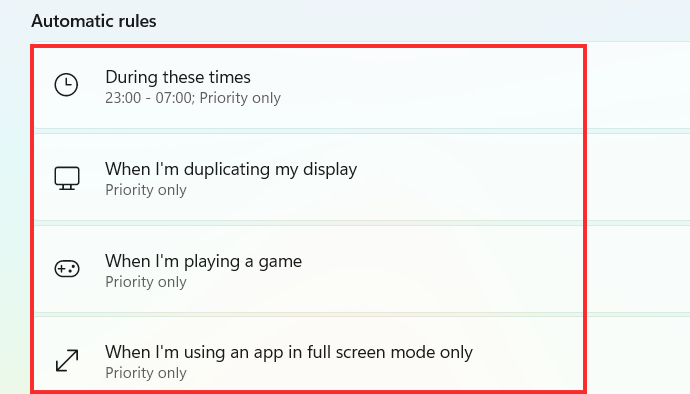
Now, let’s have a look at how to customize the above-mentioned options under Automatic rules.
1. During these times
Turn on the toggle switch, which is extreme right to the During these times tab.
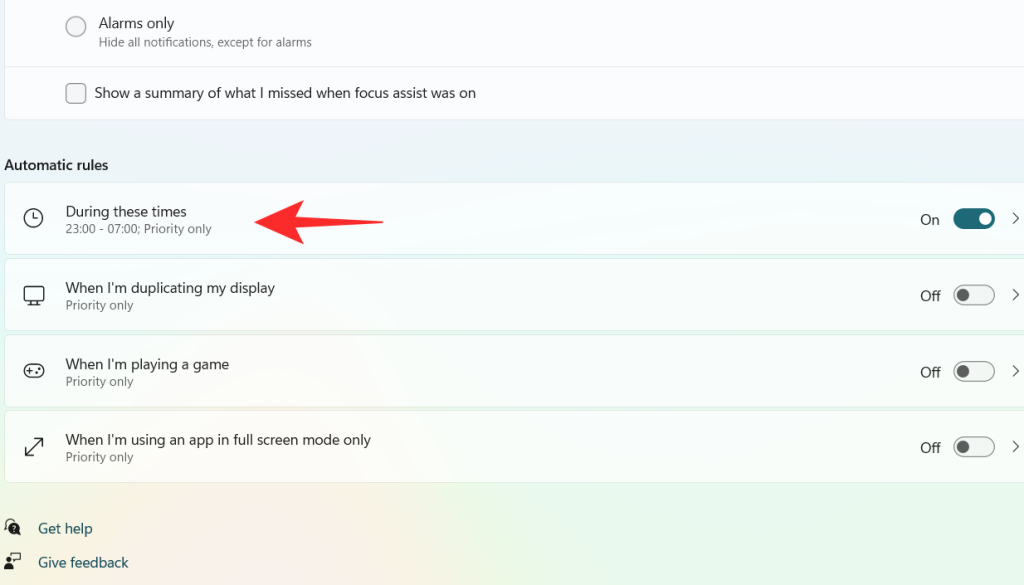
Click on the During these times tab.
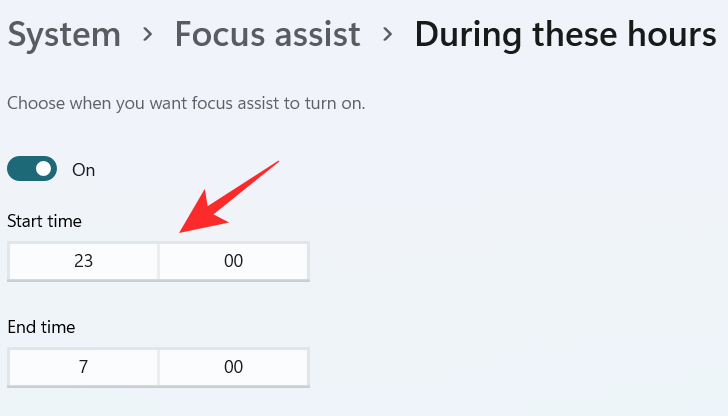
Click on the box under Start time.
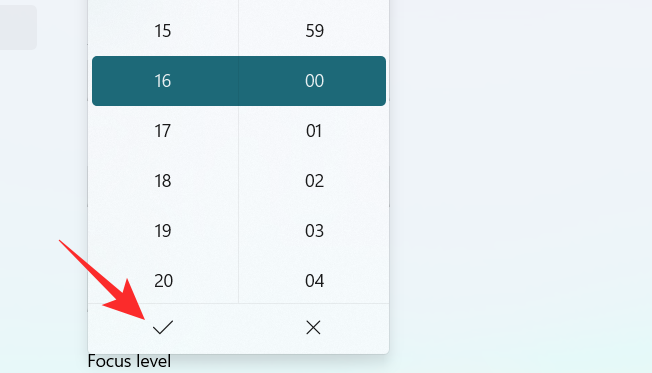
Select the time when you want the Focus Assist to turn on and click on the tick on the bottom of the dropdown menu.
Click on the box under End time.
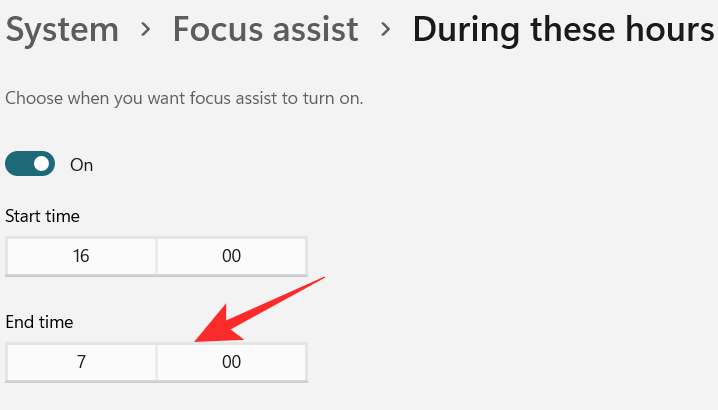
Select the time when you want the Focus Assist to turn off and click on the tick on the bottom of the dropdown menu.
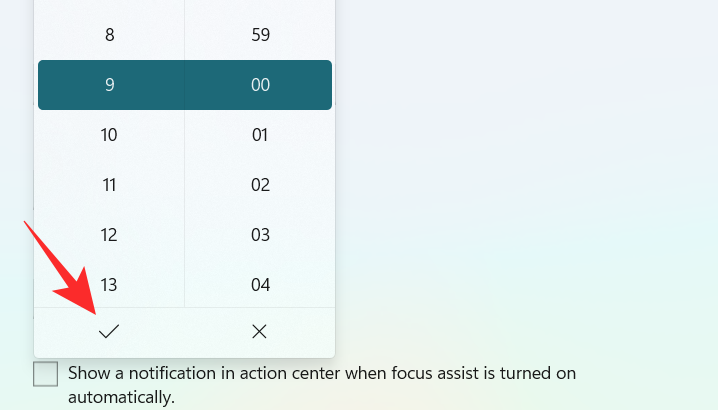
Click on the box under Repeats.
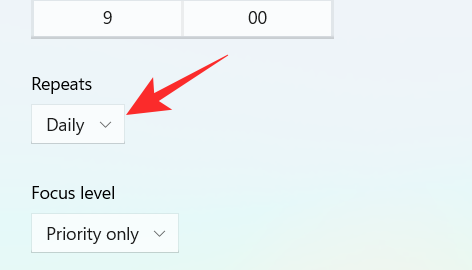
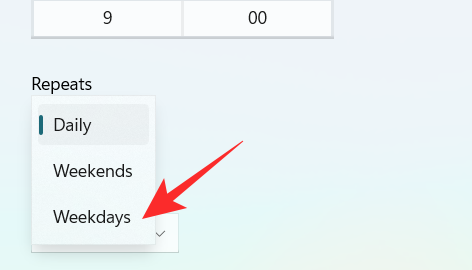
A small dropdown menu appears. Set the schedule to Daily, Weekends, or Weekdays.
Click on the box under Focus level.
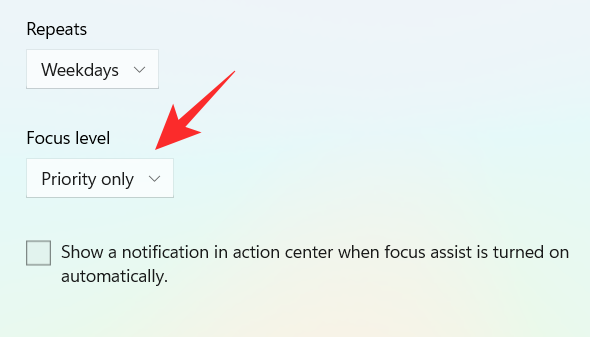
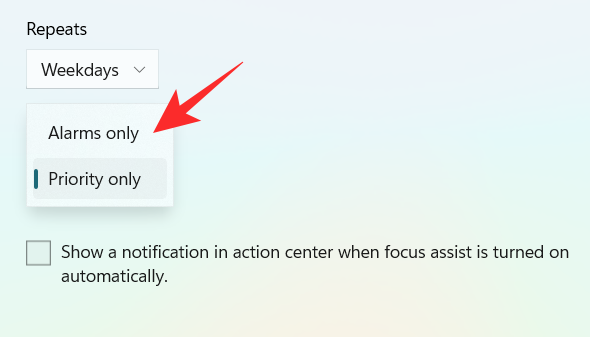
A small dropdown menu appears. Choose between Alarm only or Priority only.
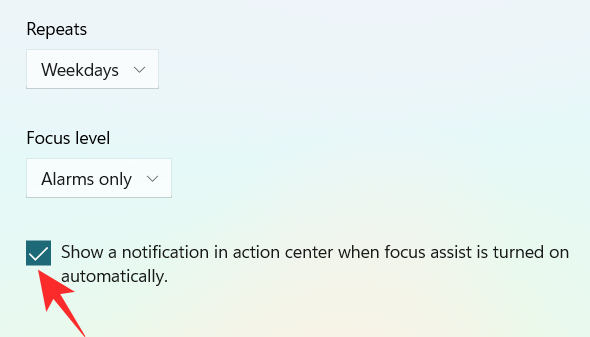
Finally, to get a notification when the Focus assist is turned on, check the box “Show a notification in action center when Focus assist is turned on automatically“.
2. When I’m duplicating my display
Turn on the toggle switch, which is extreme right to the When I’m duplicating my display tab.
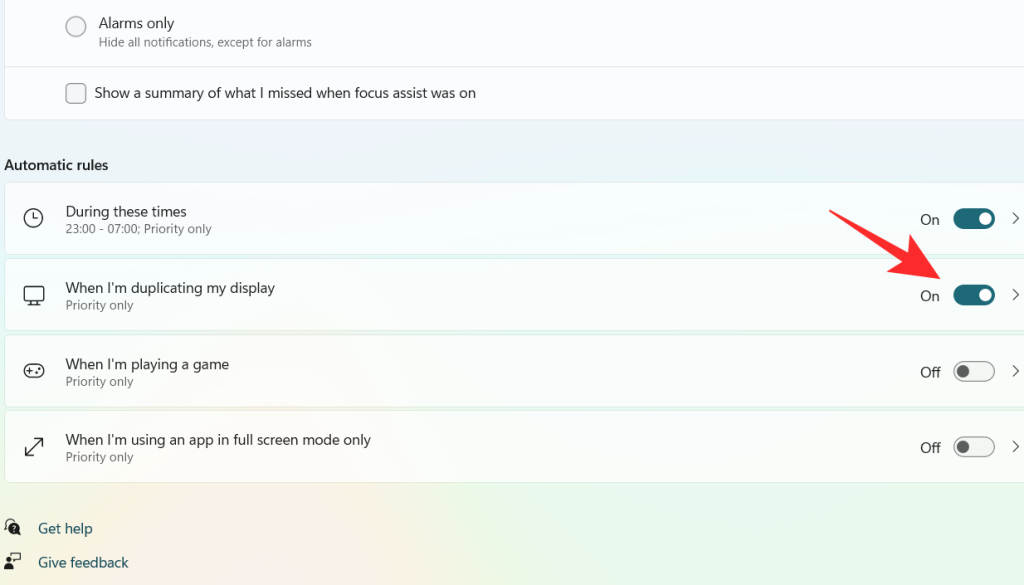
Click on the When I’m duplicating my display tab.
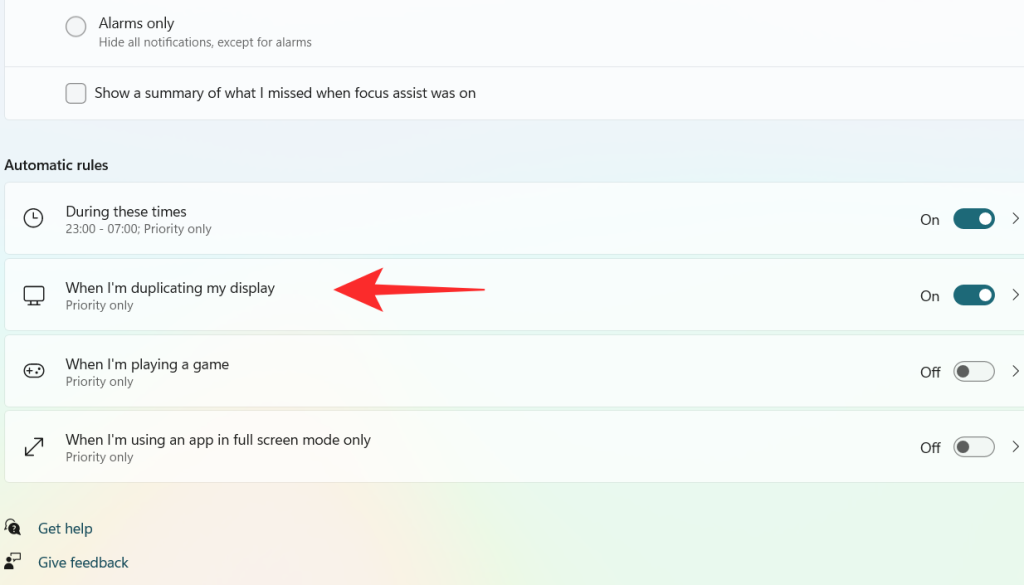
Click on the box under Focus level.
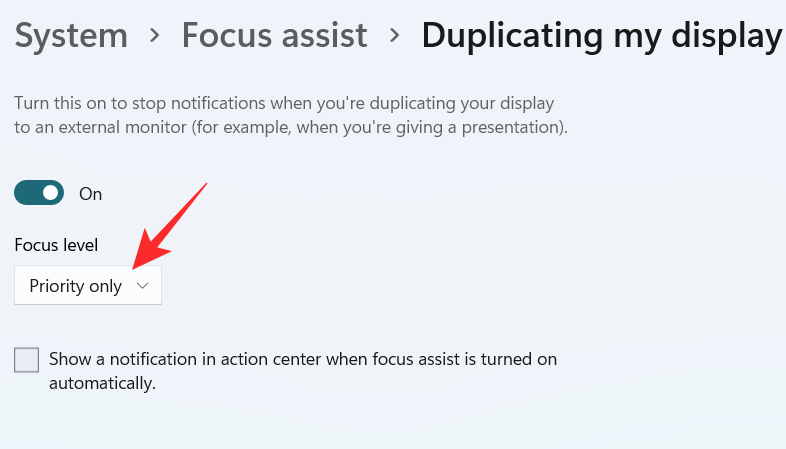
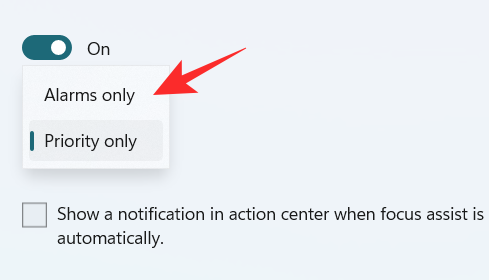
A dropdown menu appears, click on your desired option between Priority only and Alarms only.
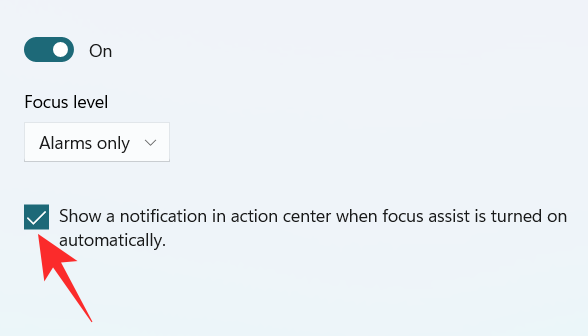
To get a notification when the Focus assist is turned on, check the box “Show a notification in action center when Focus assist is turned on automatically“
3. When I’m playing a game
Turn on the toggle switch, which is extreme right to the When I’m playing a game tab.
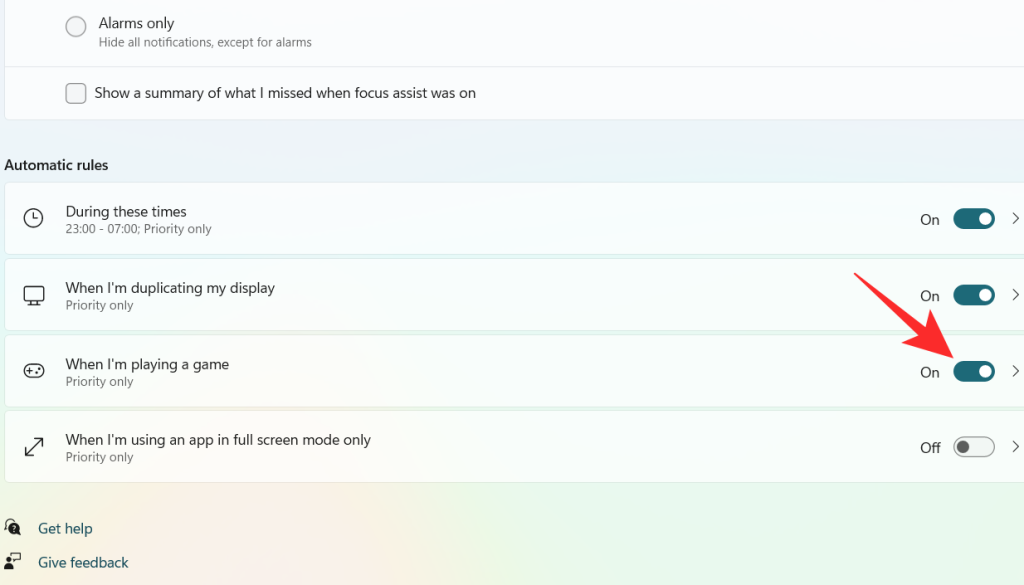
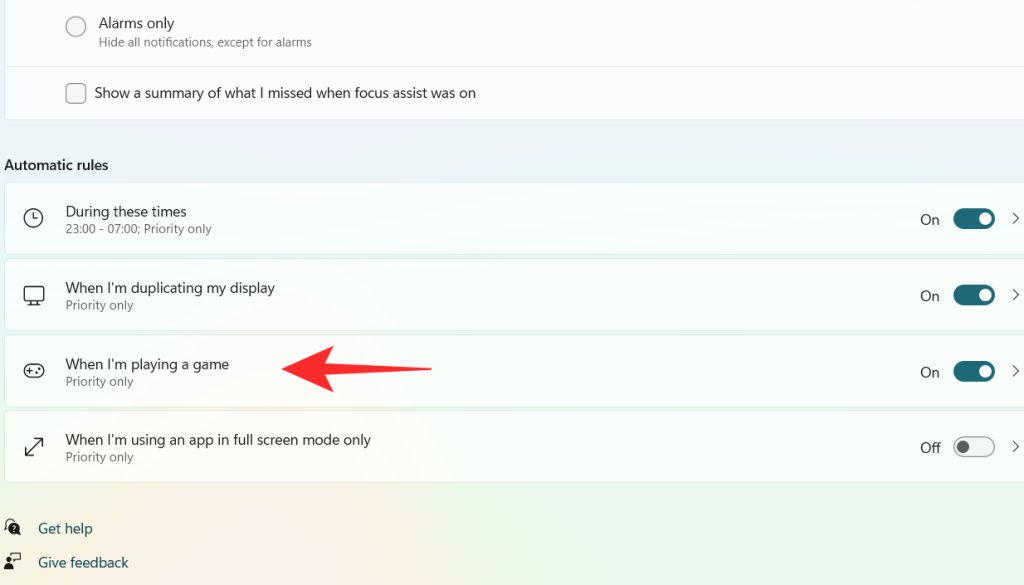
Click on the When I’m playing a game tab
Click on the box under Focus Level.
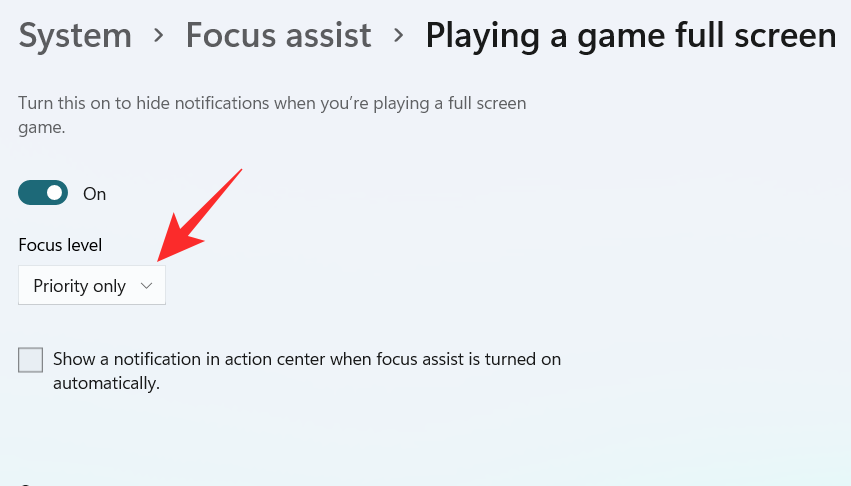
A dropdown menu appears, click on your desired option between Priority only and Alarms only.

To get a notification when the Focus assist is turned on, check the box “Show a notification in action center when Focus assist is turned on automatically“

4. When I’m using an app in full-screen mode only
Turn on the toggle switch, which is extreme right to the When I’m using an app in full-screen mode only tab.
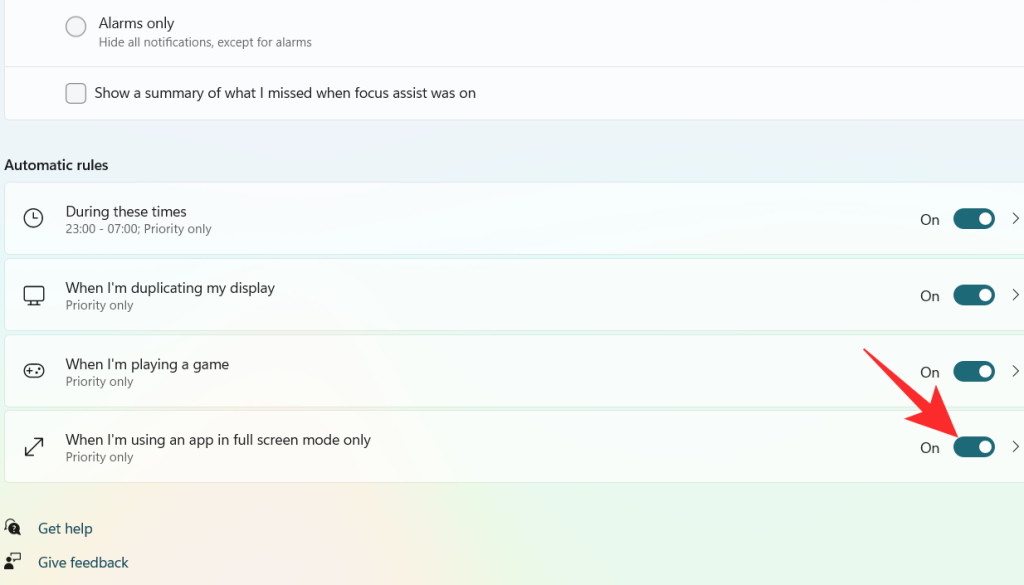
Click on the When I’m using an app in full-screen mode only tab
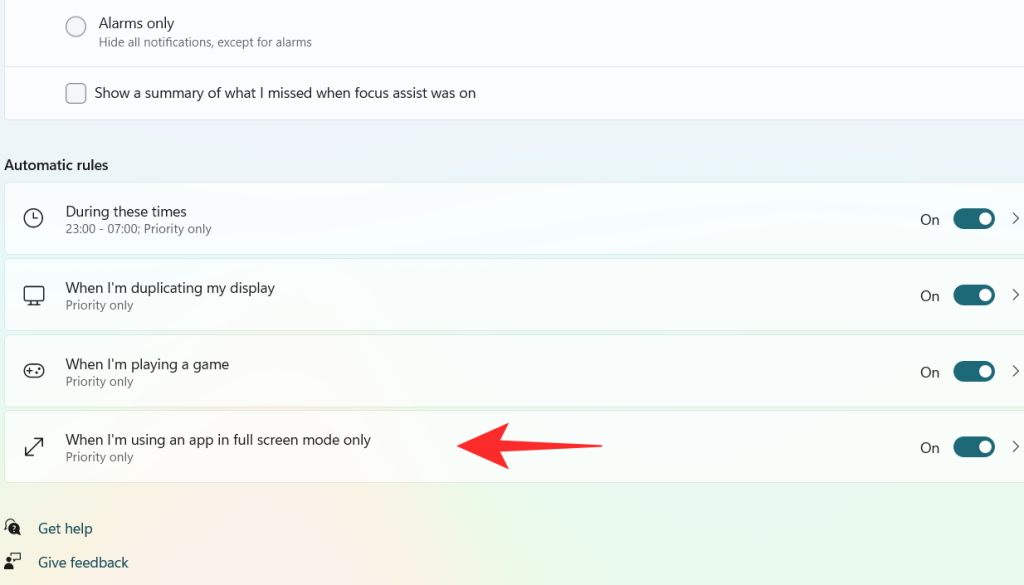
Click on the box under Focus Level.
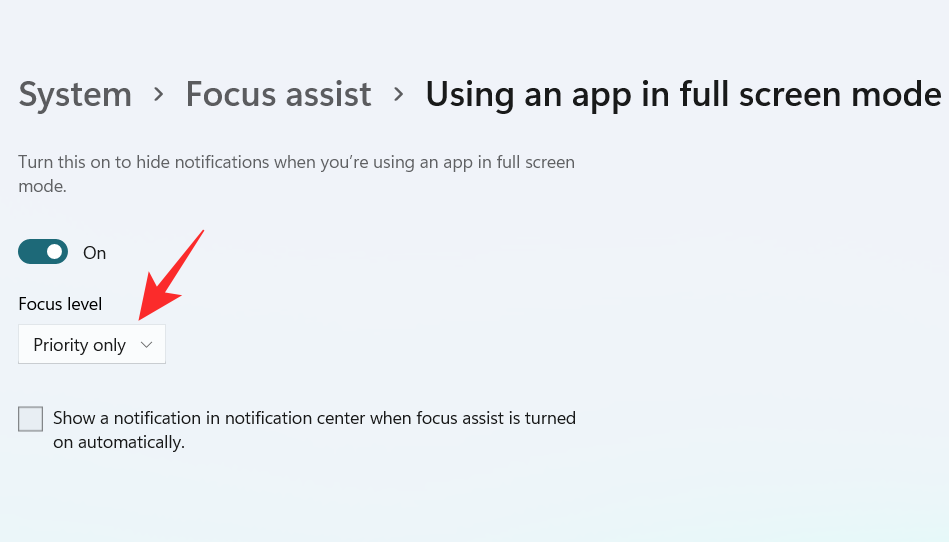
A dropdown menu appears, click on your desired option between Priority only and Alarms only.

To get a notification when the Focus assist is turned on, check the box “Show a notification in action center when Focus assist is turned on automatically“.

Using the above customizations, you can schedule and control Focus assist’s behavior according to your workflow for maximum efficiency no matter the task at hand.
Can you remove the Focus Assist icon from the Action Center?
Yes, you can easily remove the Focus Assist icon from the Action Center. Windows 11 brings a host of new cosmetic and UI changes and one of them has been the ability to customize your action center. You can now add or remove icons from the action center depending on your needs and opt for a more minimal or productive look depending on your workflow.
For now, you can only add and remove certain system modules but in the future, some users expect Microsoft to add the support for third-party apps as well. This would be a much welcome change that would allow you to manage dedicated system settings managed by third-party apps directly from your action center.
Customize your Focus assist icon in the action center
Depending on your current needs you can either remove or add the Focus assist module to the action center. Use one of the guides below depending on your current requirements.
1. Remove it
Click on the Action Center which shows the icon of Wifi, volume, and battery together.

Right-click on an empty place or on any icon and click on Edit quick settings.
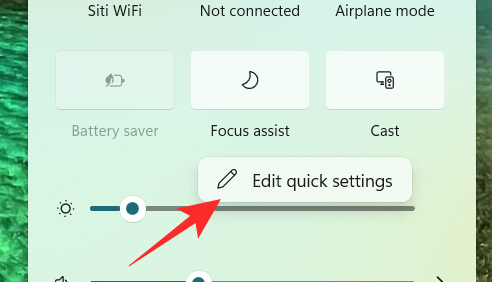
Click on the unpin symbol at the top right corner of the Focus Assist icon to remove the Focus Assist icon from the Action Center.
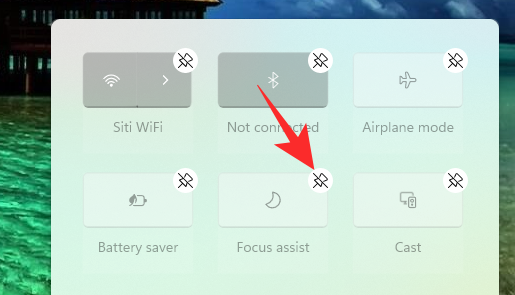
The Focus assist module should now have been removed from your action center. If not, we recommend you restart explorer.exe or your PC for the changes to take effect.
2. Restore it
Click on the Action Center which shows the icon of Wifi, volume, and battery together.

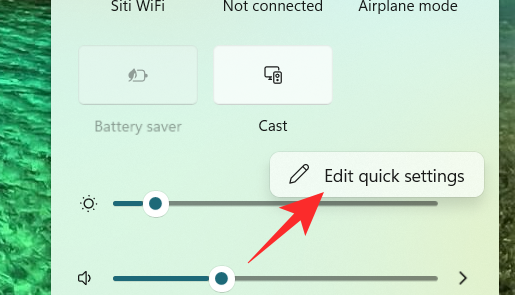
Right-click on an empty place or on any icon and click on Edit quick settings.
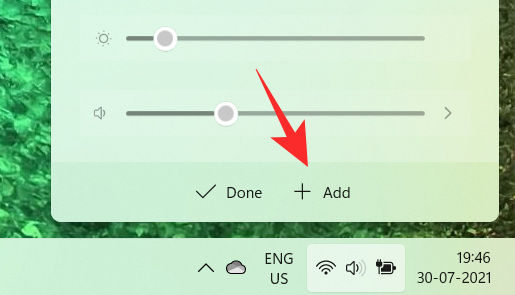
Now, click on the Add button at the bottom of the action center.
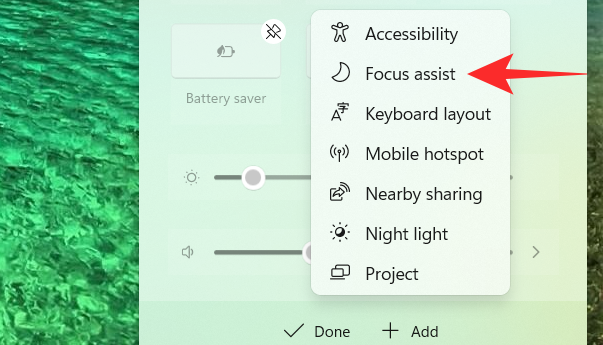
A list of different settings appears. Click on Focus Assist from the list and you will get to see the Focus Assist icon on the Action Center again.
And that’s how you can add the Focus assist module back in the action center.
Focus assist keeps turning on automatically Issue: How to fix
If Focus assist keeps turning on automatically then there could be a couple of reasons for this behavior. Depending on its cause we can either fix it or use a workaround to manage the issue. Let’s find out why Focus assist keeps turning on automatically on your system.
Fix #1: Check Automatic Rules
Are you having this issue when projecting to a secondary display? Or when sharing your screen with a public computer? Then it is likely that focus assist is getting turned on automatically due to the default automatic rules in Windows 11.
By default, focus assist will silence all notifications in such scenarios to help maintain your privacy. But this can be counterproductive in case you are just trying to use a bigger display from a portable system like a laptop or an NUC.
It could also be that scheduled Focus assist was turned on your system by mistake which will enable and disable Focus assist automatically during certain hours. If any of these situations sounds like what you are facing then you can use the guide below to disable all automatic rules that enable Focus assist during certain scenarios and workflows on Windows 11. Let’s get started.
Press Windows + i on your keyboard to open the Settings app. Ensure ‘System’ is selected on your left and then click on ‘Focus Assist’ on your right.
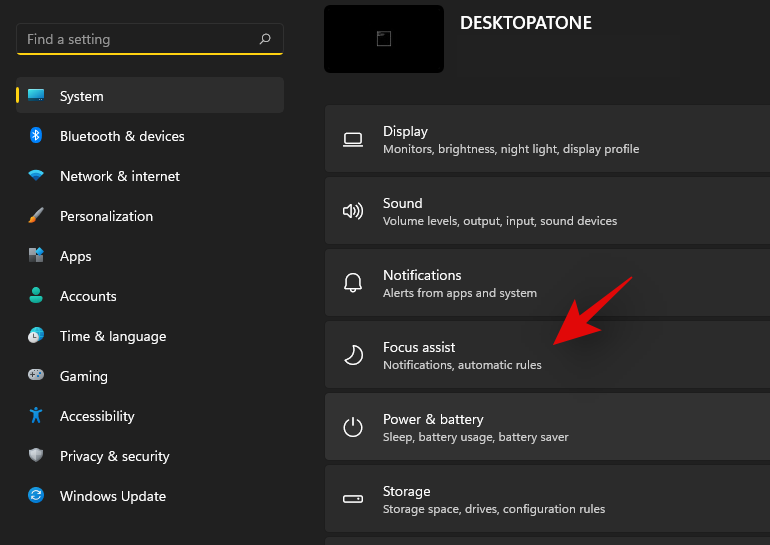
Go down to automatic rules and turn off the following toggles.
- During these times
- When I’m duplicating my display
- When I’m playing a game
- When I’m using an app in full-screen mode only
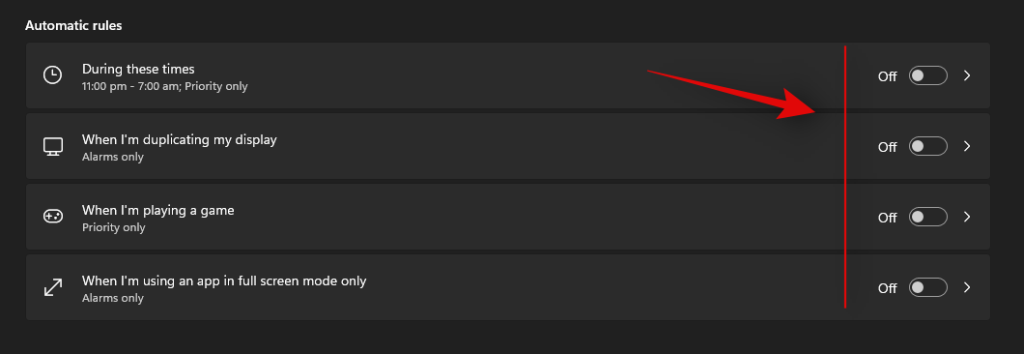
Once these rules are disabled, Windows 11 will not turn on Focus assist automatically on your system.
Fix #2: Turn of GeForce Overlay
This is another way to solve Focus assist misbehaving on your system. If you have a dGPU from Nvidia and are using the GeForce experience app then we recommend disabling its overlay option and restarting your system. With the automatic rule for ‘When I’m using an app in full-screen mode only’ turned on, Windows will mistake the Nvidia overlay detection on your desktop for a full-screen app which will trigger the Focus assist settings in return. You can also disable this automatic rule in case you wish to keep the Geforce Experience overlay enabled on your system.
Focus assist greyed out, option missing or not working; How to fix
Is the focus assist option missing from Windows 11 settings app? Is the module greyed out in the action center? This is a known bug that shows up occasionally with every feature update of Windows. Even certain versions of Windows 10 faced huge issues with this bug until a fix was released.
Fix #1: Enable in Group Policy Editor
If Focus assist seems to be missing from your system then it is likely disabled using the group policy editor. If your PC is managed by your organization or your workplace then it is likely disabled by your administrator. If you have access to the group policy editor then you can use the guide below to enable focus assist on your system. However, in case you have limited access, then you might need to get in touch with your administrator to enable Focus assist on your system.
Press Windows + R on your keyboard to bring up the Run dialog box and type in the following command to launch the Group Policy Editor. Click on ‘Ok’ once you are done.
gpedit.msc
Navigate to the following node.
User configuration > Administrative Templates > Start Menu and Taskbar > Notifications
Double click on ‘Turn off Quiet Hours’ on your right.
Click and select ‘Disabled’ in the top left corner.
Click on ‘Ok’ to save your changes.
And that’s it! Focus assist should now be enabled on your system in case it was disabled using the group policy editor.
Fix #2: Reinstall and repair default Windows UWP apps and system apps
If Focus assist is still missing from your system then let’s check if all the necessary apps and utilities are installed properly on your system. Use the guide below to check and repair Windows 11’s basic apps and functionality on your system.
Press Windows + S and search for PowerShell. Click on ‘Run as administrator’ once it shows up in your search results.
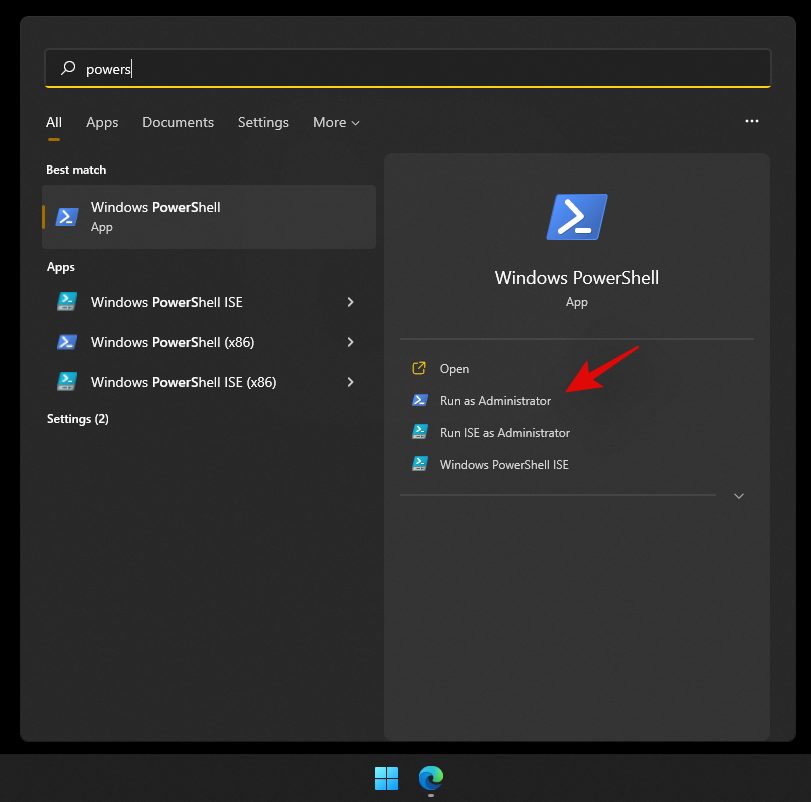
Once PowerShell is launched, execute the following command to reinstall all UWP apps and check and repair other default utilities required by Windows 11 in the background.
Get-AppXPackage -AllUsers | Foreach {Add-AppxPackage -DisableDevelopmentMode -Register "$ ($ _. InstallLocation) \ AppXManifest.xml"}

Wait for the process to finish and restart your PC for good measure. If Focus assist was corrupted or missing from your system, then this fix should help solve all your issues.
Fix #3: Check for a Windows Update
Haven’t updated in a while? We recommend checking for recent Windows Updates. While updates rarely disable major features like Focus assist, a new feature update installation can help refresh your registry, fix mismatched values and more importantly iron out bugs that could be preventing you from accessing Focus assist on your system. Use the guide below to check for recent Windows updates on your system.
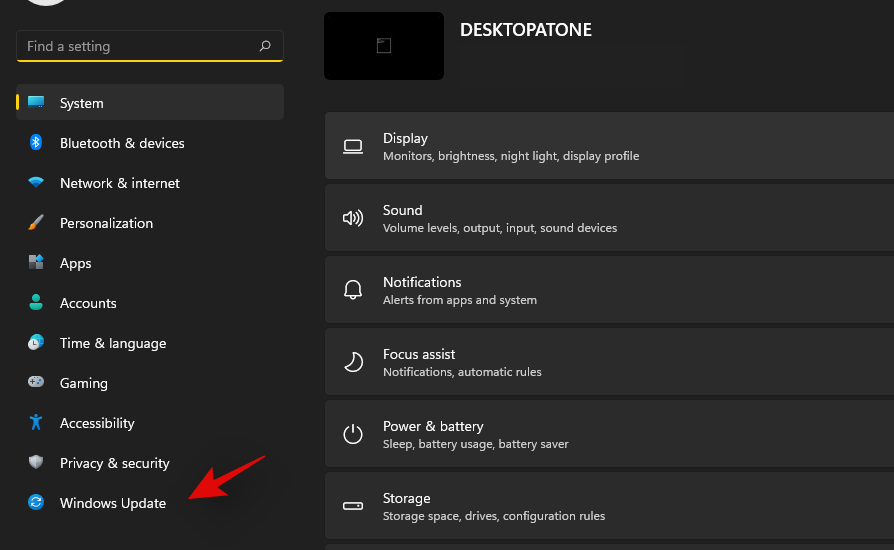
Press Windows + i on your keyboard to open the Settings app and click on ‘Windows Update’ on your left.
Click on ‘Check for updates’.

In case any new updates show up, let them install on your system and restart if prompted. In case you are using a metered connection then you will need to click on ‘Download now’ manually to avoid any unexpected data charges.
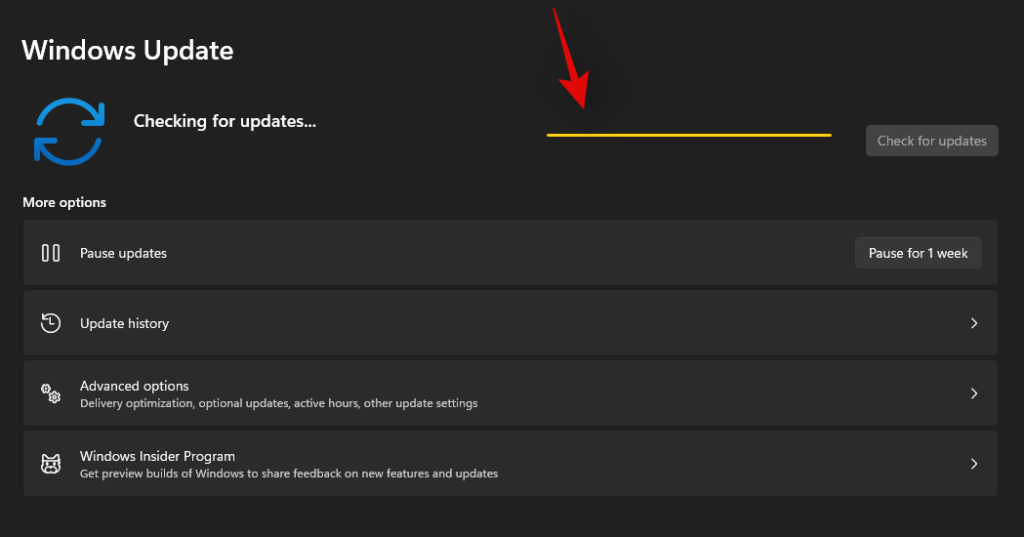
Once the necessary Windows updates are installed on your system, Focus assist should be restored in your action center and the Settings app.
Last Resort: Reset your PC
If Focus assist is still missing from your PC then this indicates a corrupted Windows installation on your system. The best way to fix this without wasting much time on troubleshooting would be to simply reset your PC while keeping all your files intact. This will refresh the entire Windows 11 installation and reinstall all the apps which should help restore functionality for all Windows features including Focus assist. Follow the guide below to reset your PC while keeping your files.
Note: The reset process will remove all installed applications and only retain files stored manually on your local storage. A list of all the removed apps will be available in .txt format on your desktop once your PC has been reset.
Press Windows + i on your keyboard and click on ‘Windows Update’ on your left.
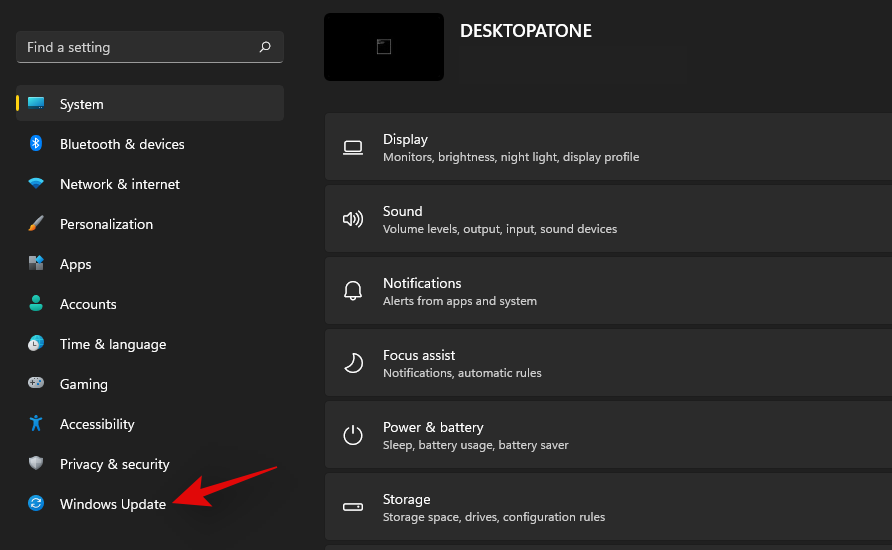
Click on ‘Advanced options’.
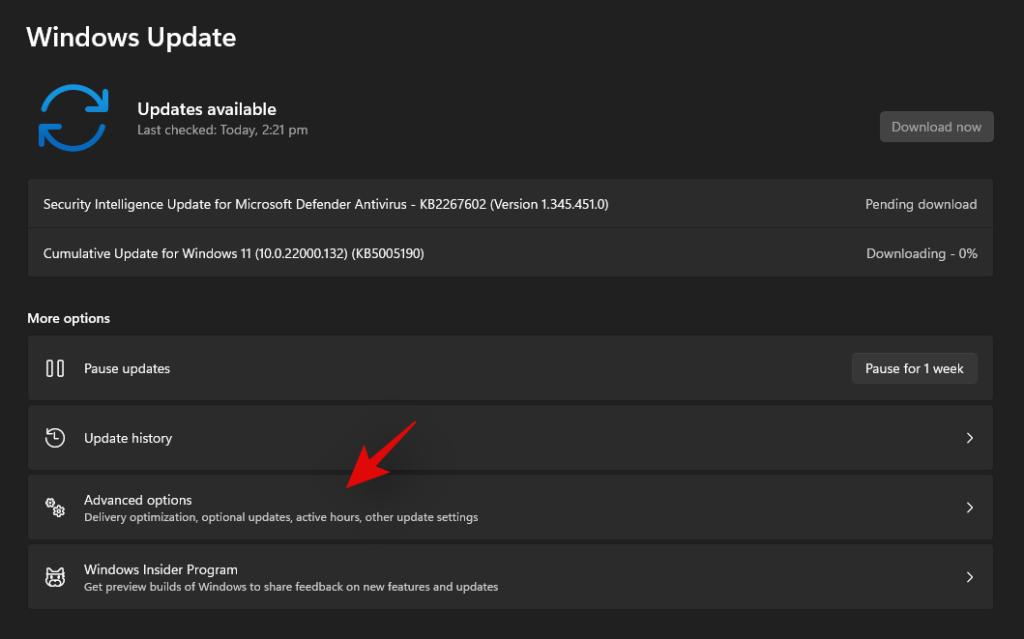
Click and select ‘Recovery’.
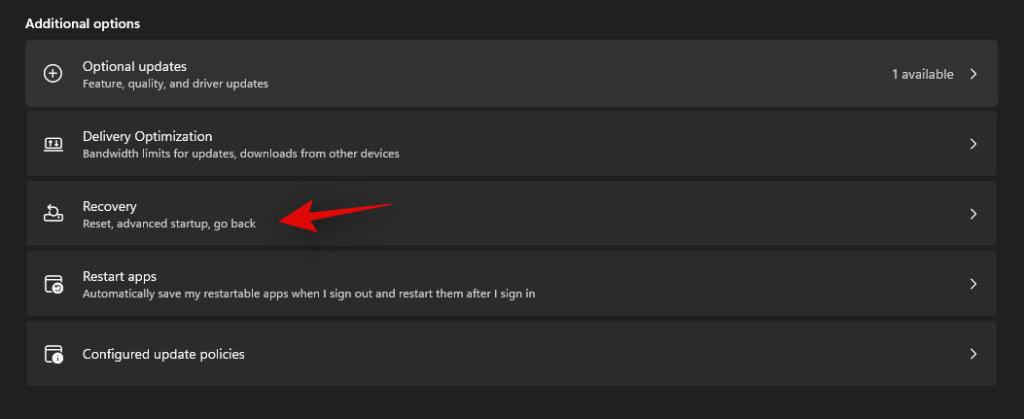
Click on ‘Reset PC’ beside Reset this PC.

Click on ‘Keep my files’.
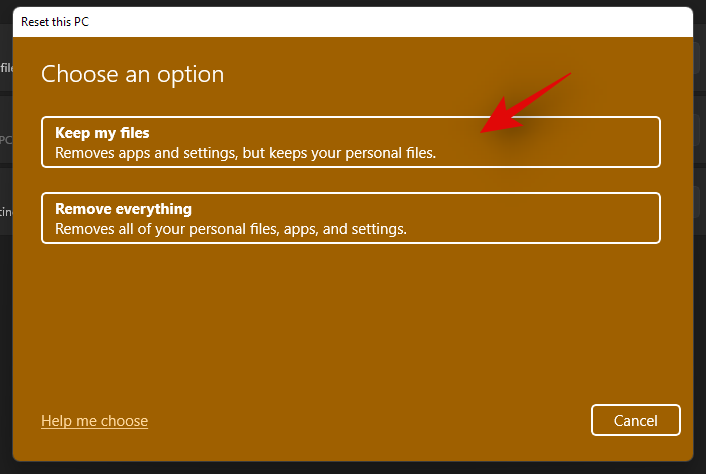
Windows will now process all the files on your local storage. Click on ‘Reset’.
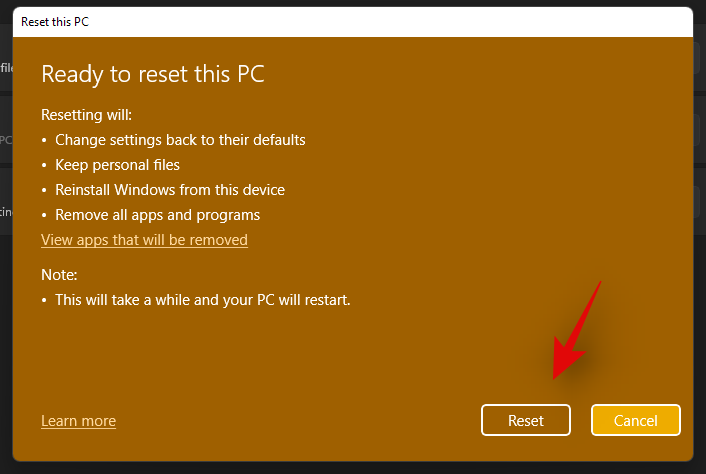
Note: If you are using Windows 11 Pro or higher then you will get the option to use a local installation/recovery media to reinstall Windows 11 as well. However, this option will be missing for Windows 11 Home users.
Windows will now reset your PC while retaining all your files. Your PC will restart several times during this process. This is completely normal and you should let Windows do its thing. If you are using a laptop or a portable NUC, then ensure that your unit is plugged into the power at all times during this process.
How to turn off Focus assist permanently
Do you wish to turn off Focus assist permanently in all scenarios? Then you can use the guide below to do so. The best way to disable Focus assist is by using the group policy editor. But in case you are using Windows 11 Home Edition, then you can use the first method in this guide to disable Focus assist permanently.
Method #1: Disable all settings and rules
Once you disable all the settings and rules for Focus assist, the feature should be turned off automatically on your system. Use the guide below to get you started.
Press Windows + i on your keyboard to open the Settings app and click on ‘Focus assist’ on your right.

Click and select ‘Off’ at the top.
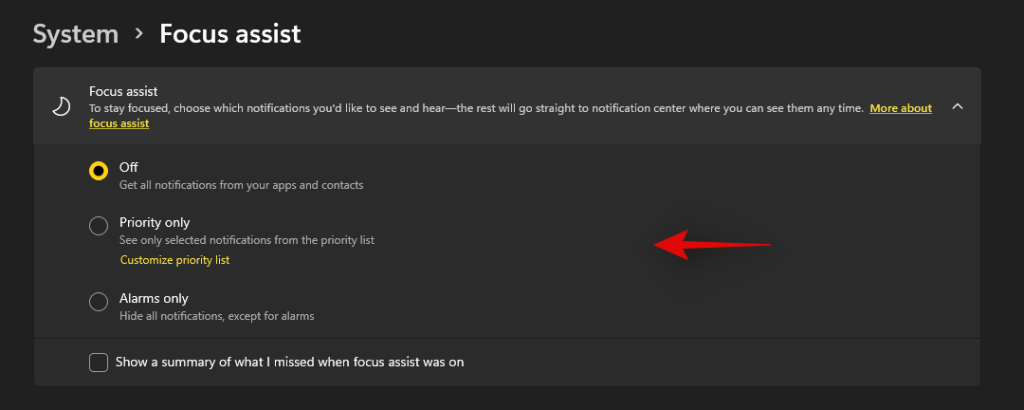
Uncheck the box for ‘Show a summary of what I missed when focus assist was on’.

Subsequently, disable all the toggles under ‘Automatic rules’ as shown below.

We also recommend turning off notifications for unnecessary apps using the guide after this section to avoid unnecessary notifications from interrupting you when focus assist is disabled.
Method #2: Using Group Policy Editor
The group policy editor will permanently disable focus assist on your system and even prevent you from accessing it in your settings. However, this method will only work on Windows 11 Pro or higher versions. In case you have the Windows 11 home edition, you can use the guide above to disable Focus assist instead.
Press Windows + R and type in the following to open Froup Policy EDitor. Click on ‘Ok’ once done.
gpedit.msc
Navigate to the following node.
User configuration > Administrative Templates > Start Menu and Taskbar > Notifications
Find and double-click on ‘Turn on Quiet Hours’ on your right.
Select ‘Enabled’ in the top left and click on ‘Ok’.
Focus assist will now be permanently disabled on the selected system. We recommend you restart your system or explorer.exe in case the changes do not take place immediately.
Is there any other way to disable notifications?
Yes, you can disable notifications individually on a per-app basis in Windows 11 to customize the notifications you receive. This is another way to ensure that you are only notified about the apps and notifications that you intended. Customizing your notifications this way will also allow you to retain the full functionality of the focus assist mode without having to disable certain rules to avoid mismatched scenarios in your workflow.
However, the only downside to managing your notifications this way is that you have to keep enabling and disabling notifications for apps every few months depending on your new installs and uninstalls. You can use the guide below to disable notifications on a per-app basis in Windows 11.
Disable notifications permanently on a per-app basis
Here’s how you can disable notifications on a per-app basis in Windows 11.
Press Windows + i on your keyboard to open the Settings app and then click on ‘Notifications’ on your right.
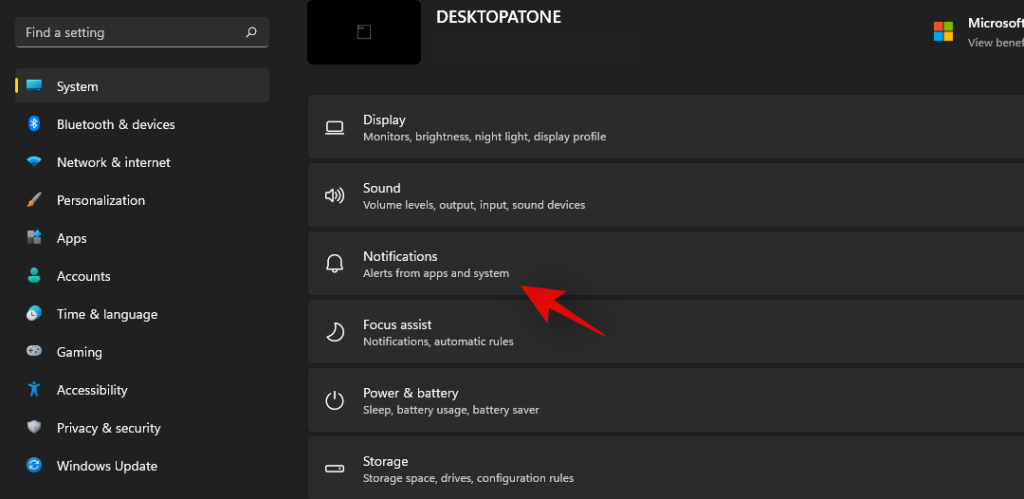
You will now get a list of all the apps that have the permission to deliver notifications on your system. Scroll the list to find the necessary apps and turn off the toggle beside them to disable notifications.
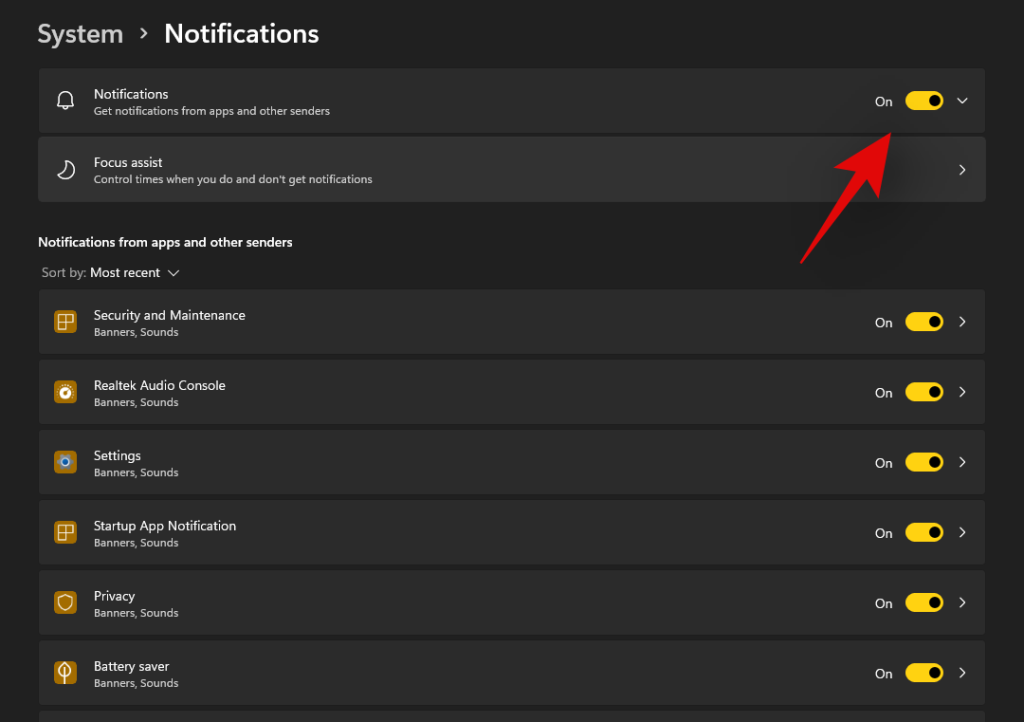
Repeat the steps above for all the intended apps to disable notifications.
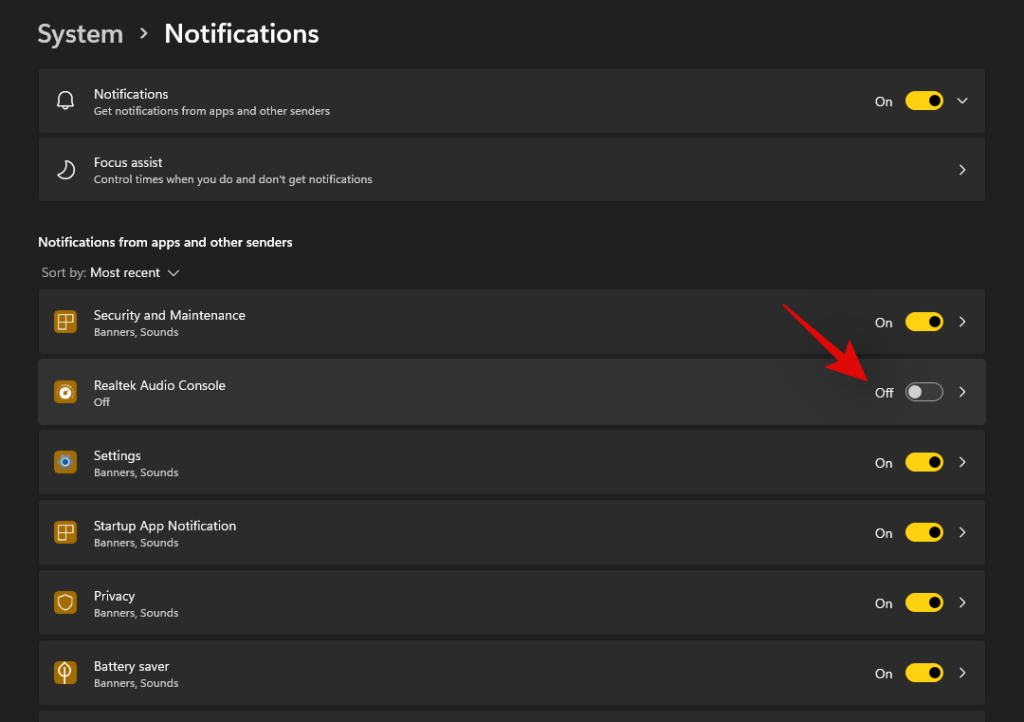
Close the Settings app and notifications for the selected apps should now be permanently disabled on your system.
Can you customize notifications in Windows 11?
Well, not exactly. Windows 11 currently has very limited options when it comes to customizing your notifications. You can not change the look, behavior, or color palette of your notifications without changing the accent color of your overall UI. However, you can customize the way your notifications sound. You can set a nice quiet notification sound that does not interrupt your workflow or opt for a quirky take that makes for a few good laughs each time you get a notification. The choice is completely up to you. Use the guide below to customize your Windows 11 notification sounds.
Required
- A .wav file for the sound you wish to set as your custom notification on Windows 11
Guide
Let’s start by first placing the .wav file in a compatible media folder so that you can set it as your default notification sound in Windows 11. Navigate to the concerned .wav file and copy it to your clipboard.
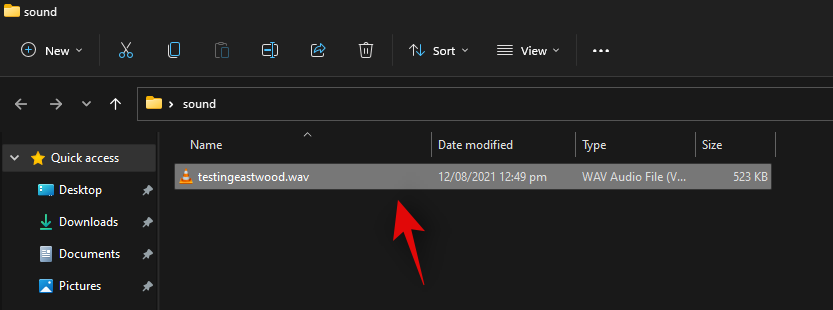
Now navigate to the following path given below. Paste your .wav file in this location. Click on ‘Continue’ when you will be prompted for administrator permission.
C:\Windows\media
We can now use the .wav file as our default notification sound. Press Windows + i on your keyboard to open the Settings app and then click on ‘Sound’ on your right.
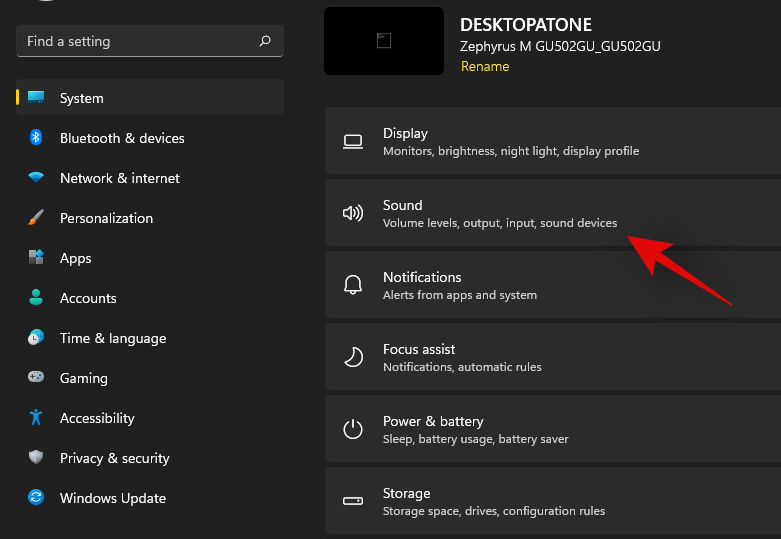
Scroll to the bottom and click on ‘More sound settings’.

Click and switch to the ‘Sounds’ tab at the top.
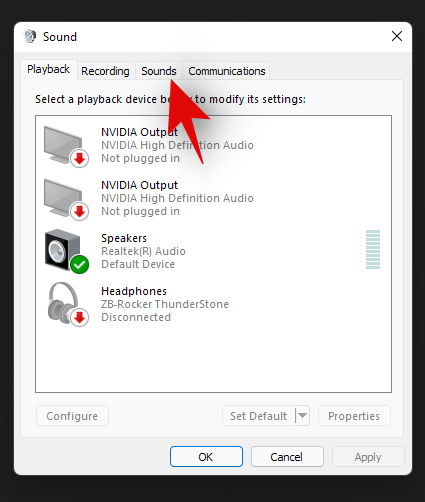
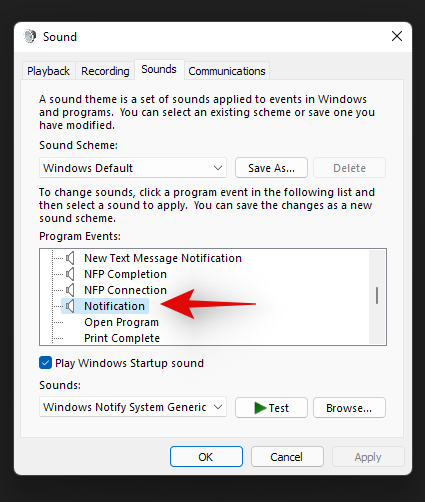
Under ‘Program Events’ scroll the list and find ‘Notifications’. Click on ‘Notifications’ to select it.
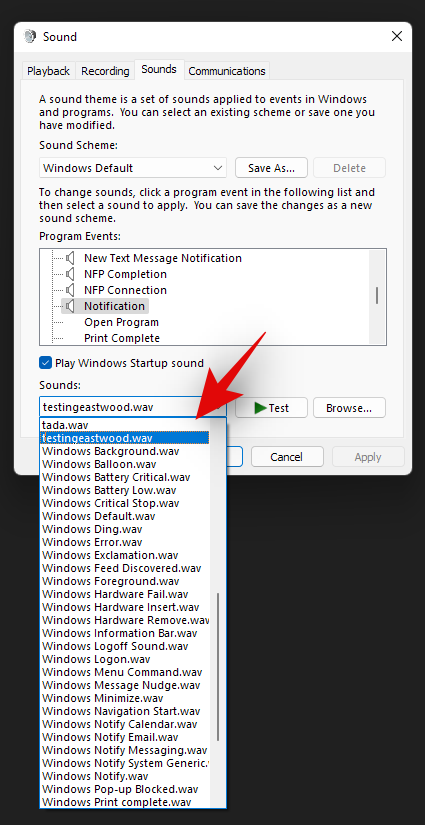
Now click on the drop-down arrow under Sounds and select the .wav file we pasted in the Media folder.
You can click on ‘Test’ to test your custom notification sound.
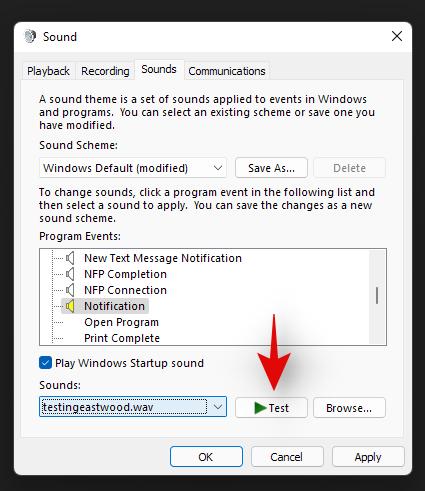
Click on ‘Ok’ to save your changes.
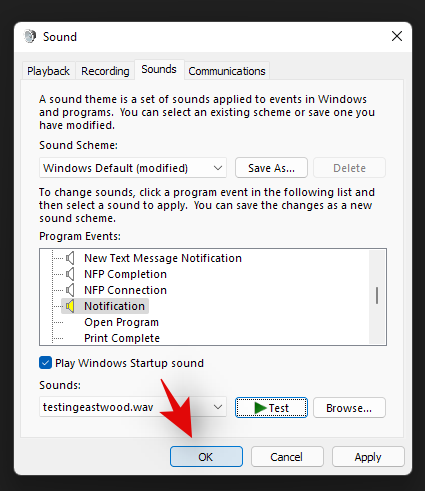
And that’s it! You will now have set a custom sound as your default notification sound in Windows 11.
Distractions from notifications are a huge problem especially when you are into some important work. Using the steps mentioned above, now, you can easily get rid of unnecessary notifications and work peacefully with full concentration.
Related:


