Diskpláss hefur alltaf verið lúxus hvort sem það var í gamla daga DOS þar sem allt var geymt á disklingi eða nútímann okkar þar sem við eigum erfitt með að geyma tónlistarsöfnin okkar á einu drifi. Það fer eftir núverandi kerfi stelling sem þú gætir auðveldlega keyrt út af pláss eins og þú halda áfram að nota kerfið.
Þetta rými gæti verið notað fyrir tímabundnar skrár , boðskrár, gamlar Windows , stór skjalasafn, niðurhalsskrár og fleira. Besta leiðin til að losa um pláss hefur tilhneigingu til að vera að eyða stærstu skrám á vélinni þinni, en það getur reynst erfitt að finna þessar skrár. Í slíkum tilvikum geturðu notað handbókina okkar hér að neðan til að bera kennsl á og eyða stærstu skrám á kerfinu þínu. Byrjum.
Tengt: Hvernig á að laga Windows Search High CPU eða Disk Using á Windows 11
Innihald
Losaðu um pláss á Windows 11
Þú getur auðveldlega leitað að risastórum skrám á kerfinu þínu í Windows 11 (eða 10) með ýmsum aðferðum. Windows 11 kemur einnig með innbyggt tól sem hjálpar þér að bera kennsl á skrár sem taka mikið magn af geymsluplássi á tölvunni þinni. Fylgdu einni af aðferðunum hér að neðan sem hentar best núverandi þörfum þínum og kröfum.
Aðferð #01: Að fjarlægja forrit sem taka mikið pláss
Ýttu á Windows + i á lyklaborðinu þínu til að ræsa stillingarforritið og smelltu á 'Geymsla' hægra megin.
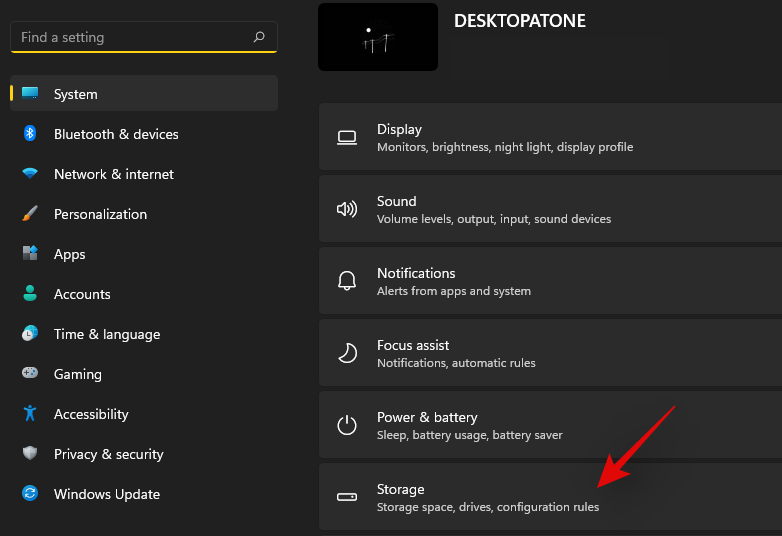
Þú munt nú fá lista yfir alla flokka sem taka upp stóra klumpa af plássi á tölvunni þinni. Smelltu á þann flokk að eigin vali til að byrja. Fylgdu skrefunum hér að neðan, allt eftir vali þínu.
Smelltu á 'Raða eftir' efst.
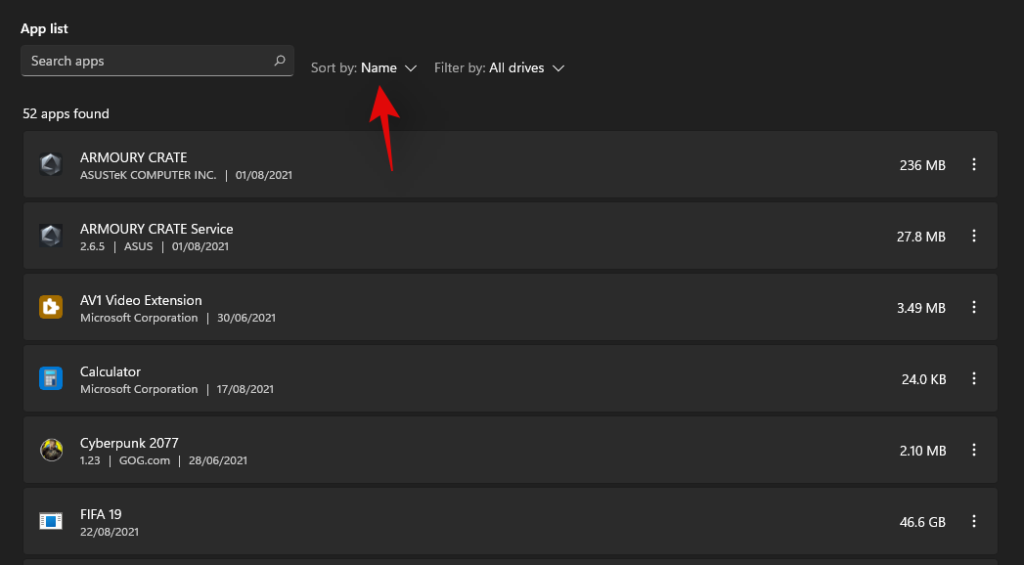
Veldu 'Stærð'.
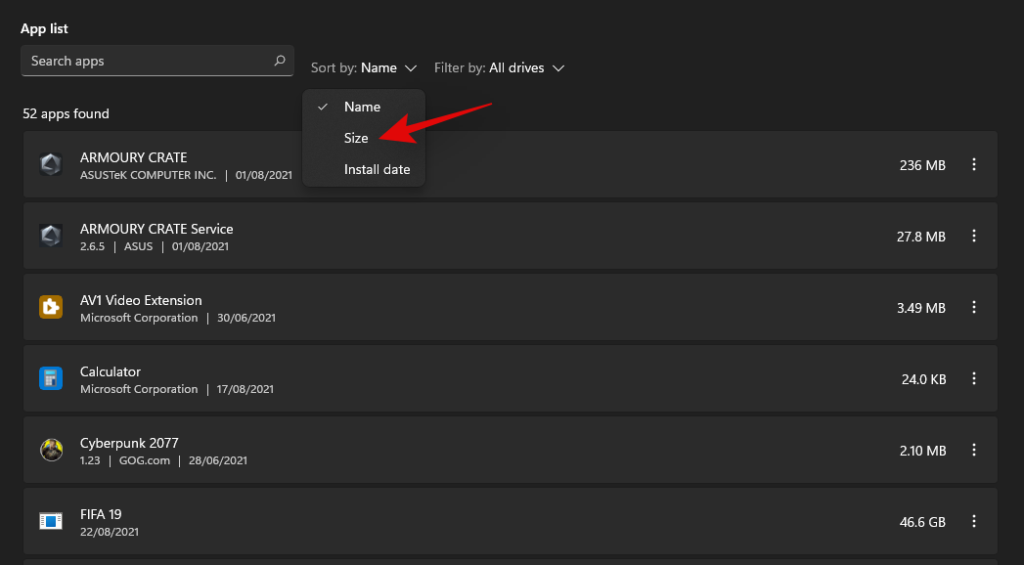
Stærstu forritin og forritin á kerfinu þínu verða nú skráð í lækkandi röð. Smelltu á '3-punkta' valmyndartáknið við hlið forritsins sem þú vilt fjarlægja af tölvunni þinni.
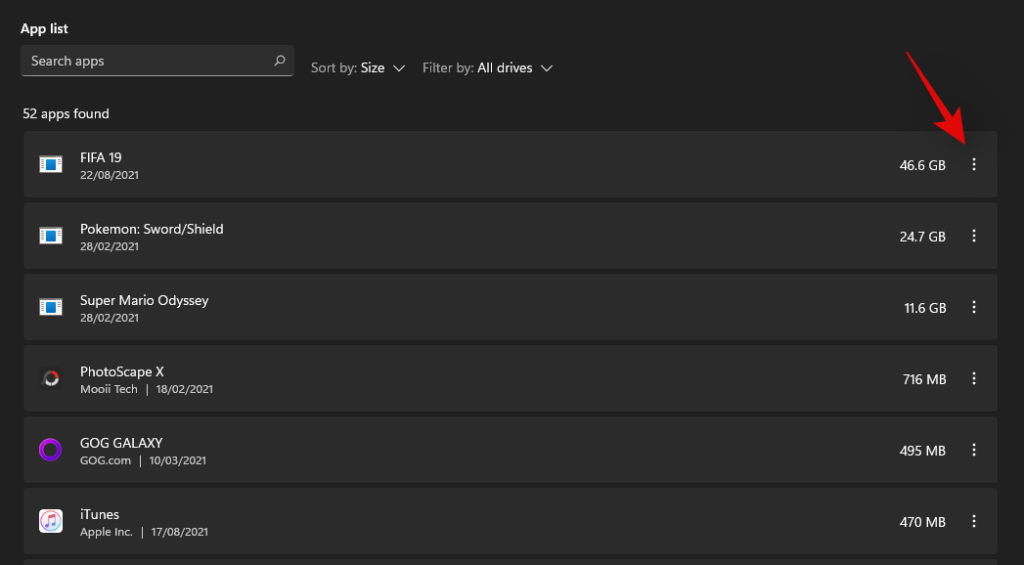
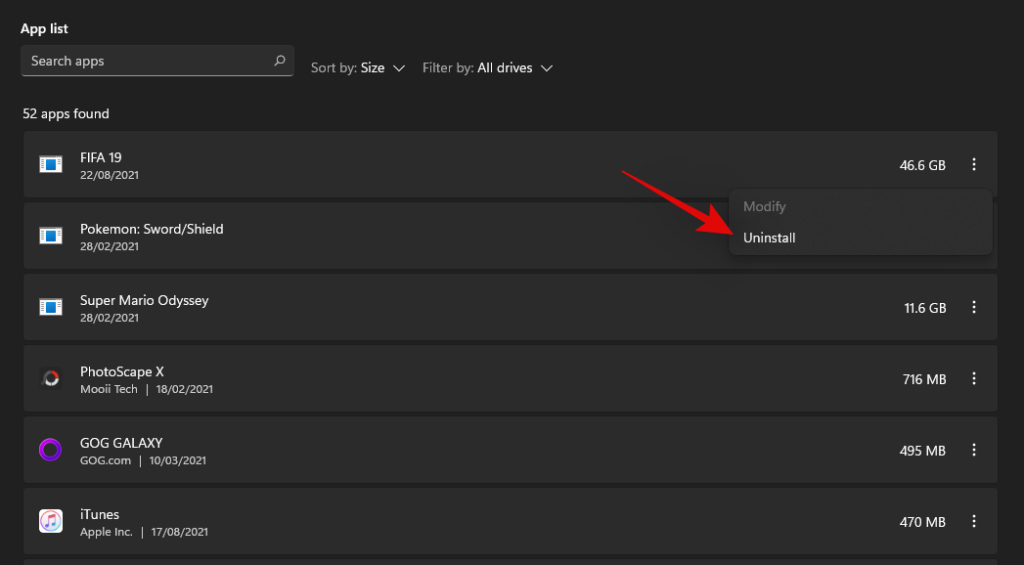
Veldu 'Fjarlægja'.
Smelltu á 'Fjarlægja' aftur til að staðfesta val þitt.
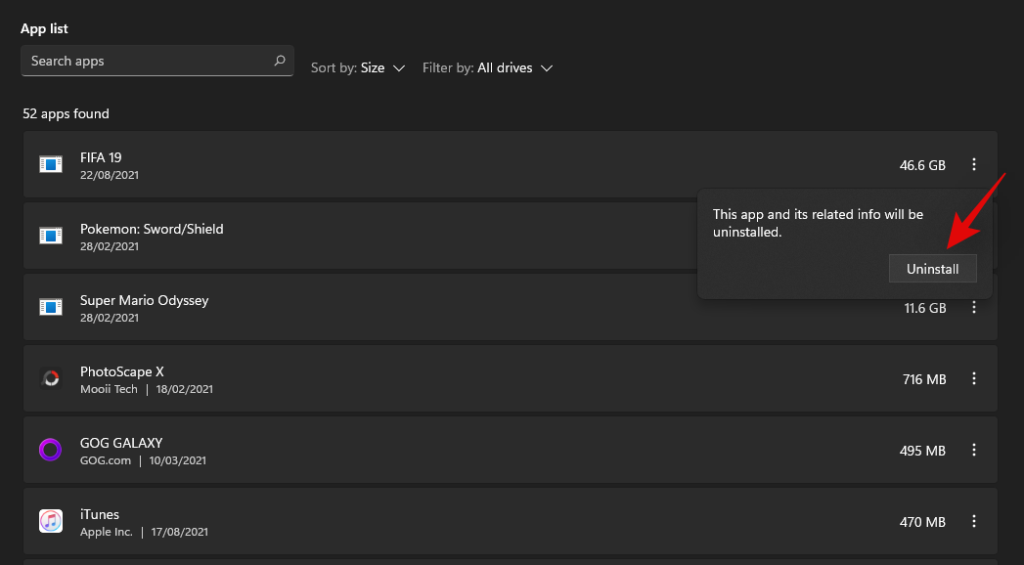
Nú ætti að fjarlægja forritið úr kerfinu þínu.
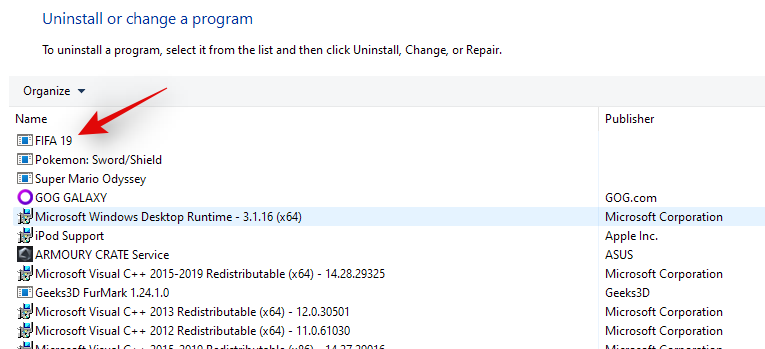
Ef þér var vísað á stjórnborðið
Smelltu og veldu forritið sem þú vilt eyða/fjarlægja.
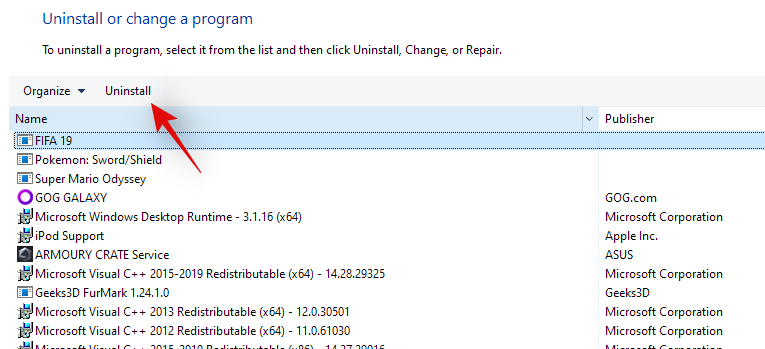
Smelltu á 'Fjarlægja' efst.
Fjarlægingarforritið ætti nú að ræsa á tölvunni þinni. Fylgdu leiðbeiningunum á skjánum til að fjarlægja valið forrit úr kerfinu þínu.
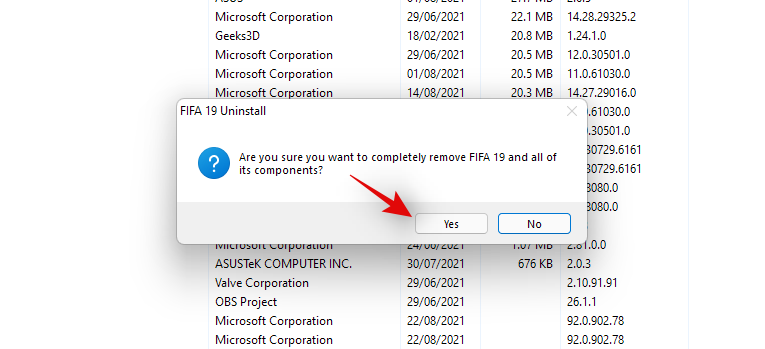
Valið forrit ætti nú að vera fjarlægt úr kerfinu þínu.
Tengt: Hvernig á að gera við Windows 11 [15 leiðir]
Aðferð #02: Losaðu um pláss með því að nota 'tímabundnar skrár' valkostinn undir geymslustillingum
Tímabundnu skrárnar þínar verða þegar skráðar í lækkandi röð eftir stærð þeirra. Hakaðu í reitina fyrir allar tímabundnar skrár sem þú vilt fjarlægja af tölvunni þinni.
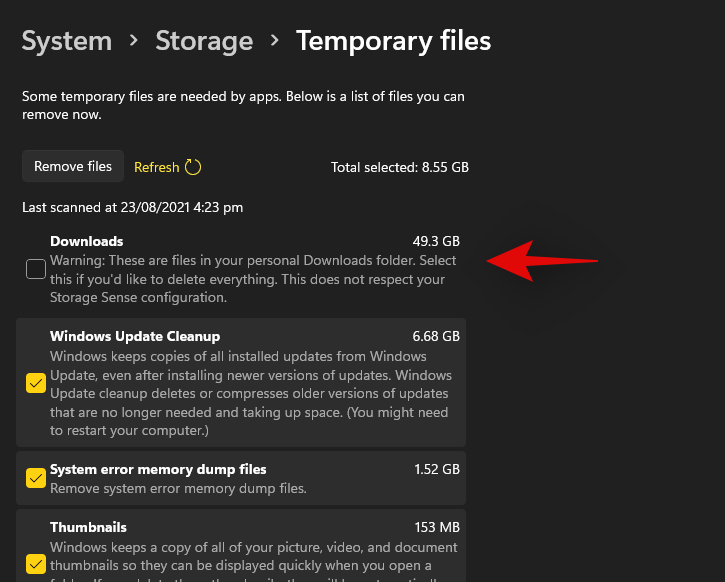
Athugið: Ef þú velur 'Niðurhal' verður persónulegum skrám sem eru vistaðar í 'Niðurhal' möppunni eytt.
Smelltu á 'Fjarlægja skrár' efst til að fjarlægja valdar tímabundnar skrár af tölvunni þinni.
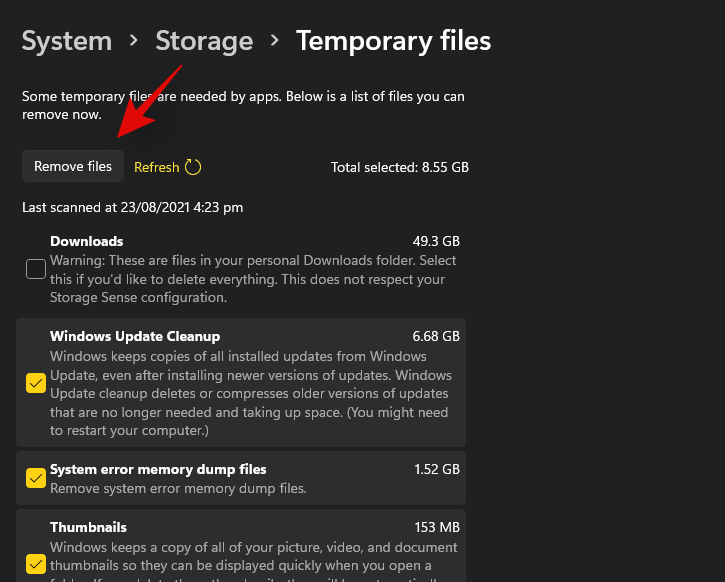
Nú ætti að eyða tímabundnum skrám úr kerfinu þínu.
Tengt: Hvernig á að eyða tímabundnum skrám í Windows 11
Aðferð #03: Losaðu um pláss með því að nota aðra valkosti undir geymslustillingum
Smelltu á 'Skoða skjáborð/tónlist/skjöl/myndbönd' og þér verður vísað á skjáborðið þitt.
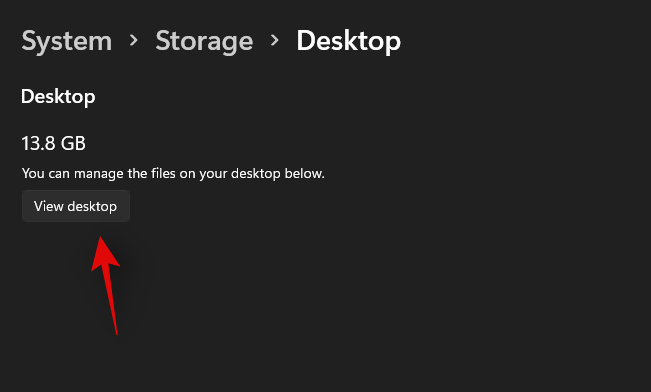
Smelltu á 'Raða' efst.
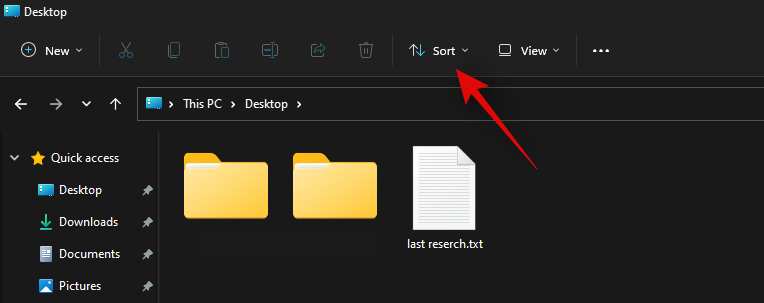
Smelltu á 'Meira'.
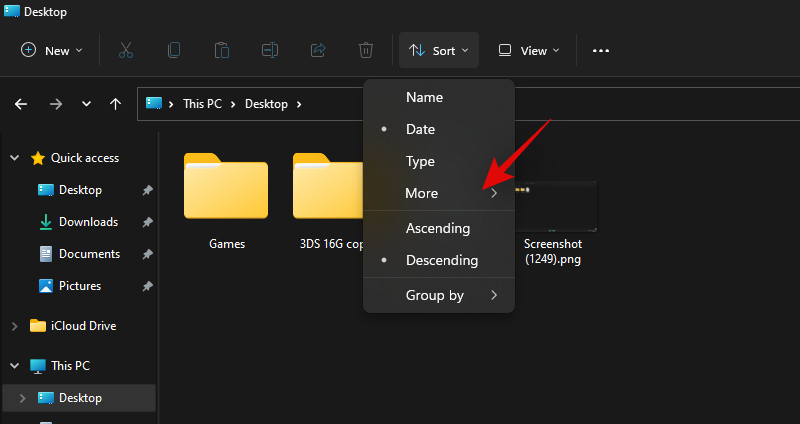
Veldu nú 'Stærð'.
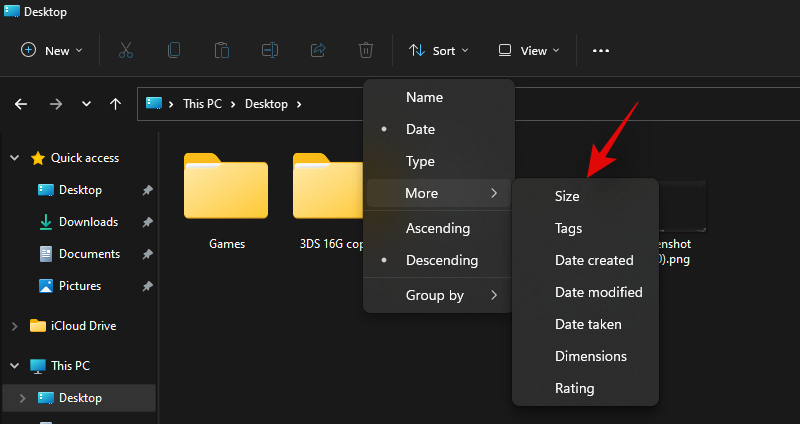
Skrárnar þínar verða nú skráðar í lækkandi röð eftir stærð þeirra. Veldu skrárnar sem þú vilt eyða og ýttu á Del á lyklaborðinu þínu.
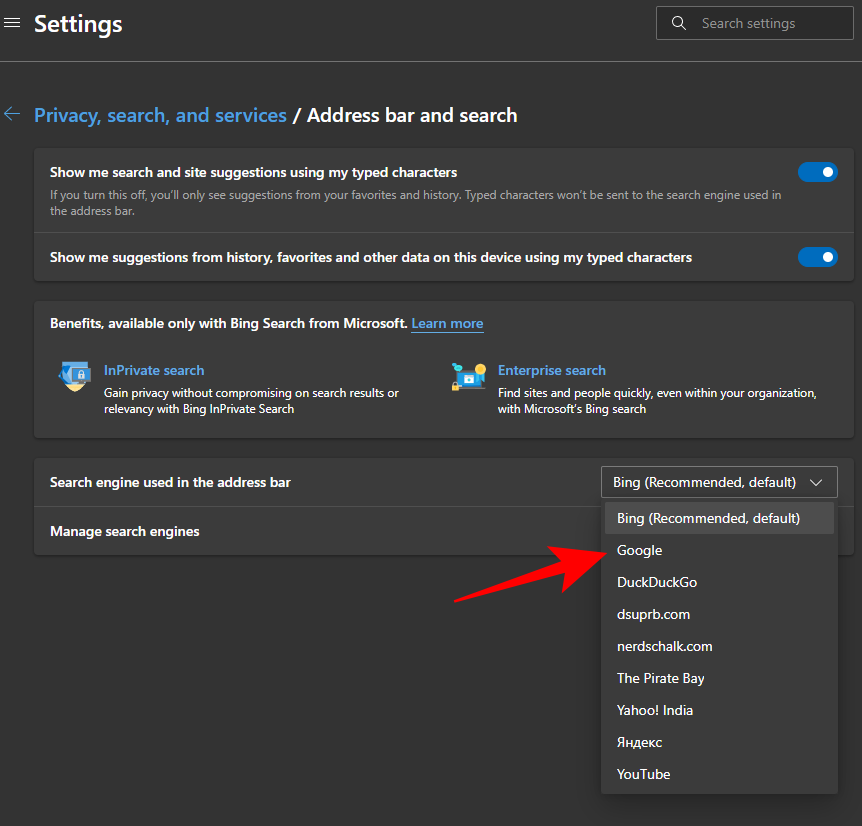
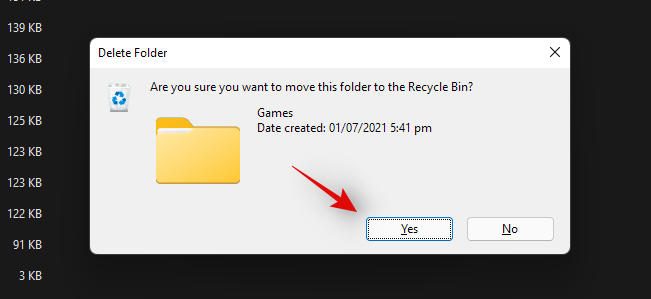
Smelltu nú á 'Já' til að staðfesta val þitt.
Völdum skrám ætti nú að vera eytt úr valinni möppu.
Aðferð #04: Notkun WizDirStat
WizDirStat er vinsælt opið tól sem oft er notað til að búa til myndræna framsetningu á staðbundnu geymslurýminu þínu á notendavænan hátt. Þetta gerir það auðveldara að bera kennsl á stóra klumpa af plássi þínu sem er upptekinn af einni skrá, möppu eða skjalasafni, sem aftur mun auðvelda þér að losa um pláss á tölvunni þinni. Notaðu leiðbeiningarnar hér að neðan til að bera kennsl á hvað er að taka upp pláss á Windows 11 tölvunni þinni.
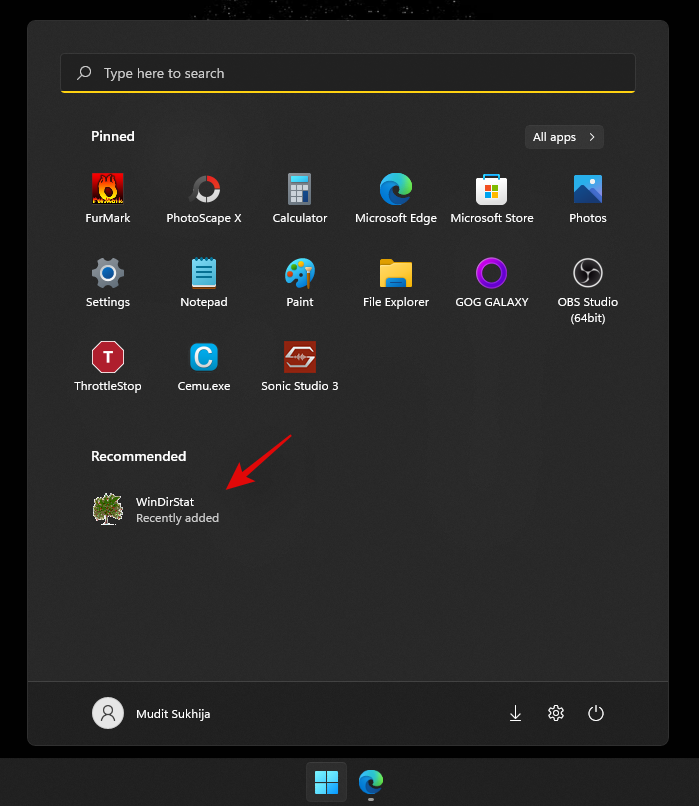
Hladdu niður og settu upp WinDirStat á tölvunni þinni með því að nota tengilinn hér að ofan. Þegar það hefur verið sett upp skaltu ræsa forritið.
Veldu nú einn af valkostunum sem hentar þínum þörfum best. Ef þú hefur aðeins eitt drif uppsett á vélinni þinni með einni skipting, þá geturðu sleppt þessu skrefi. Smelltu á 'Í lagi' þegar þú ert búinn.
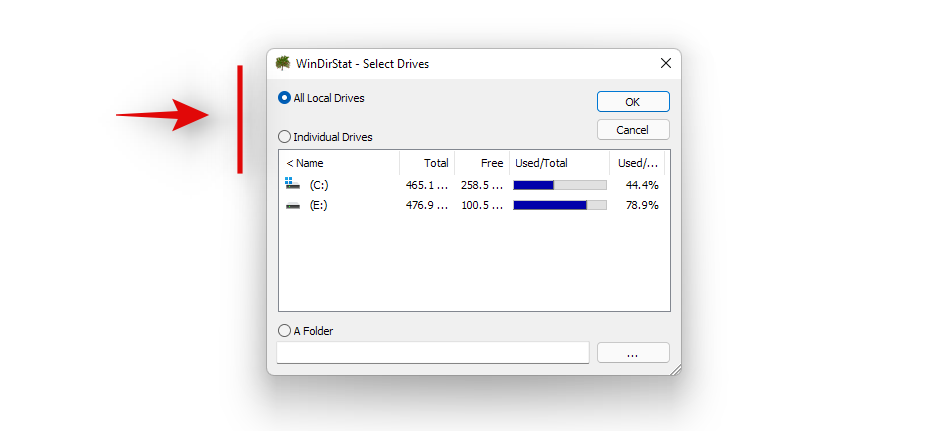
- Öll staðbundin drif: Þetta mun láta WinDirStat greina alla diskana þína og sýna gögn þeirra myndrænt.
- Einstök drif: Veldu eitt af uppsettu drifunum þínum til að greina með tilliti til notkunar á plássi. Þú getur valið þennan möguleika og síðan valið drifið sem þú vilt nota.
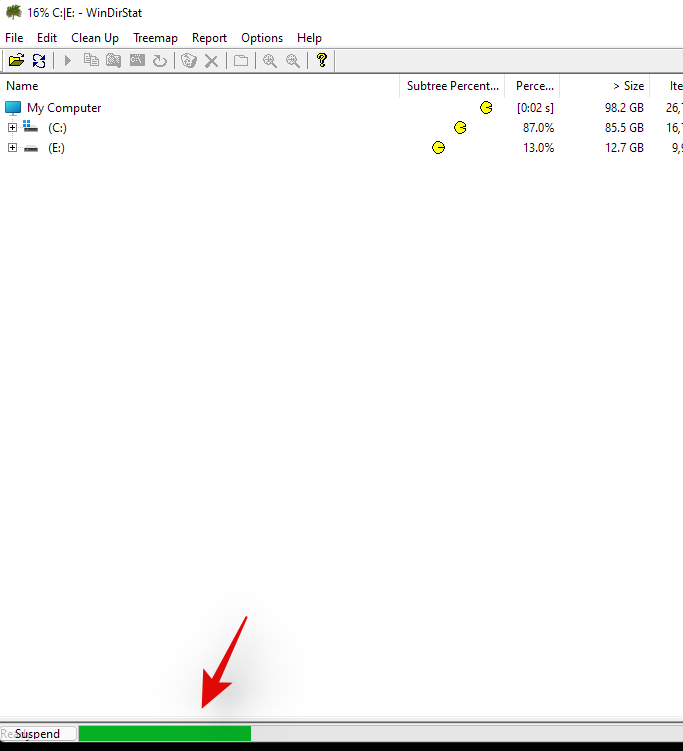
Drifin þín verða nú greind og þú getur fylgst með framvindu þess sama neðst í glugganum.
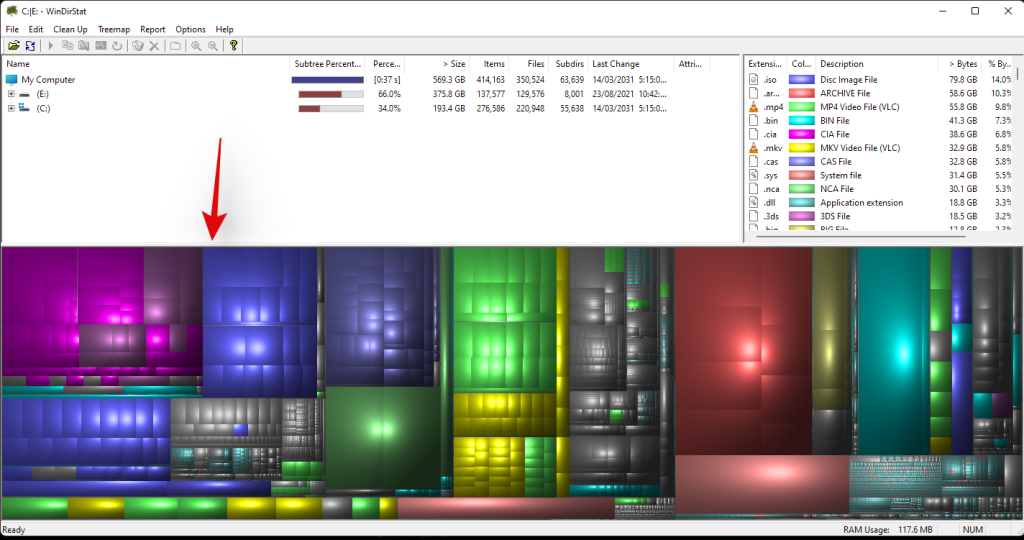
Þegar það hefur verið greint mun litakóða myndræn framsetning á plássnotkun á völdum drifum birtast á skjánum þínum. Smelltu einfaldlega á stærstu bitana til að bera kennsl á stærstu skrárnar.
Ýttu á Del á lyklaborðinu þínu til að eyða skránni. Þetta mun senda það í ruslatunnuna þína og þú getur ákveðið örlög þess þegar þú skoðar hlutina þína í ruslatunnunni. Að öðrum kosti geturðu notað Shift + Del til að eyða hlutnum varanlega úr kerfinu þínu.
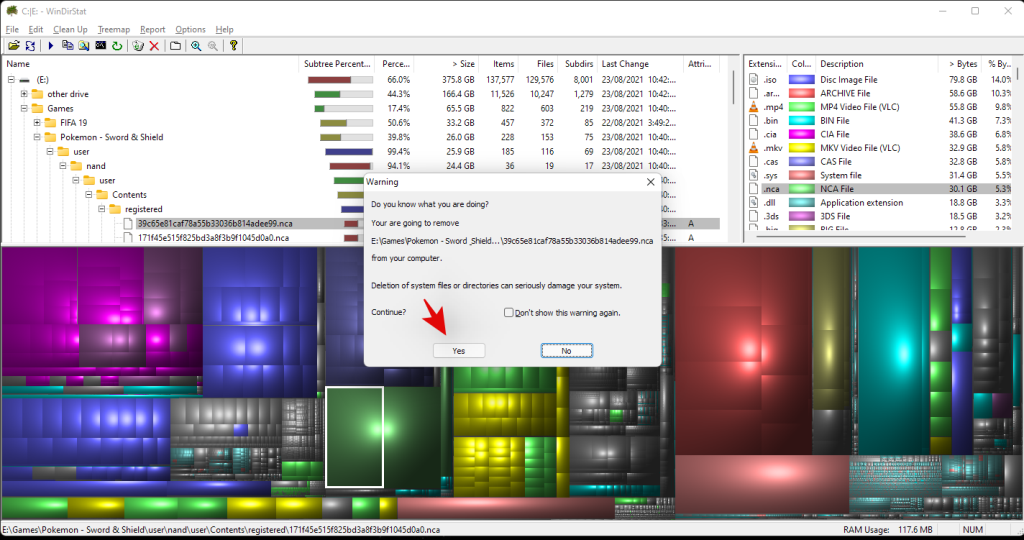
Og þannig er það! Þú getur endurtekið síðustu skrefin til að eyða fleiri af stærstu skrám úr kerfinu þínu.
Aðferð #05: Notaðu Windows leit til að eyða stórum skrám
Windows leit getur einnig hjálpað þér að bera kennsl á stóru skrárnar á kerfinu þínu í Windows 11. Hins vegar er þetta mikill árangur í bili með nýja skráarkönnuðinum, og ef aðferðin virkar ekki fyrir þig, þá þarftu að gera tímabundið skiptu aftur í Windows 10 skráarkönnuður. Ekki hafa áhyggjur, þegar þú hefur fundið og fundið stærstu skrárnar geturðu snúið breytingunum til baka og farið aftur í nýja Windows 11 skráarkönnuðinn. Notaðu leiðbeiningarnar hér að neðan til að byrja.
5.1 Leitaðu að stórum skrám
Við munum nú leita að stórum skrám út frá forsendum þínum.
Ýttu Windows + Eá lyklaborðið þitt til að opna skráarkönnuðinn og smelltu á leitarreitinn efst í hægra horninu. Leitaðu að eftirfarandi hugtaki.
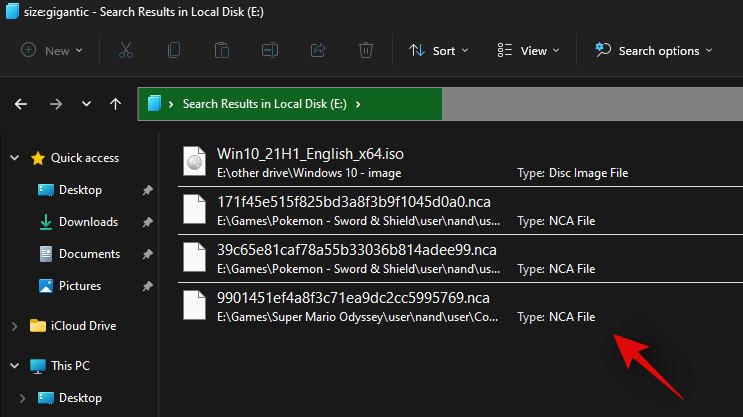
size:gigantic
Niðurstöðurnar verða nú síaðar og skrár stærri en 4GB munu nú birtast á skjánum þínum. Veldu óþarfa skrár sem þú þarft ekki á tölvunni þinni og eyddu þeim einfaldlega til að losa um pláss. Ef þú vilt nota minni lágmarksskráarstærð skaltu skipta út 'gigantic' fyrir eitt af skilmálum hér að neðan, allt eftir stærðinni sem þú kýst.
- Stór: Skrár á milli 128MB og 1GB
- Stórt: Skrár á bilinu 1GB til 4GB
- Miðlungs: Skrár á bilinu 1MB til 128MB
Og þannig er það! Þú getur notað Windows Search á þennan hátt til að sía skrár eftir stærð þeirra og finna þær stærstu sem nú eru á tölvunni þinni.
Athugið: Ef tölvan þín skráir og sýnir kerfisskrár líka, þá mælum við með að þú tékka á skrám áður en þú eyðir þeim til að forðast að eyða mikilvægum kerfisskrám úr kerfinu þínu.
Þú munt nú hafa fundið stórar skrár á tölvunni þinni með því að nota Windows leit.
5.2 If the search term does not work for you
If typing in ‘size:gigantic’ does not work for you, then you will need to switch to the old file explorer from Windows 10. Use the guide below to get you started. Once you switch back to the old file explorer, use the guide above to search for large files. Once found, use the subsequent guide below to get the new Windows 11 file explorer back on your system.
Switch to the old file explorer
Press Windows + S on your keyboard and search for ‘Regedit’. Click and launch the app from your search results.
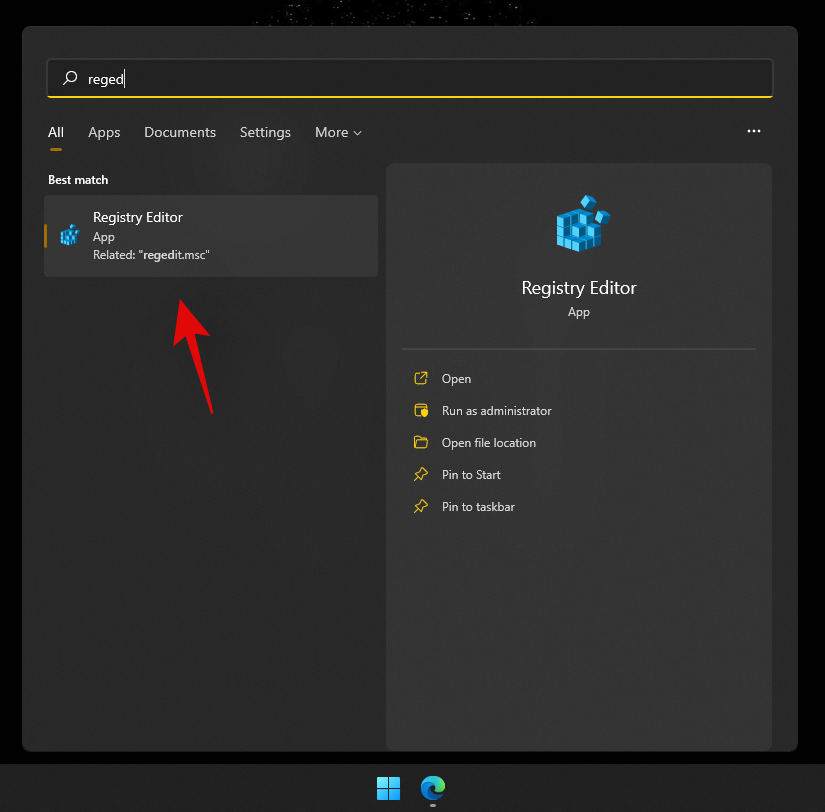
Navigate to the following directory or copy-paste the address below in your address bar.
HKEY_LOCAL_MACHINE\SOFTWARE\Microsoft\Windows\CurrentVersion\Shell Extensions
Click on the folder named ‘Blocked’.
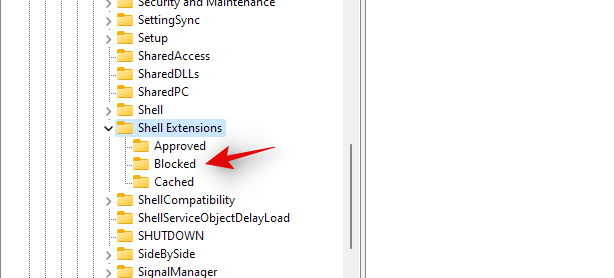
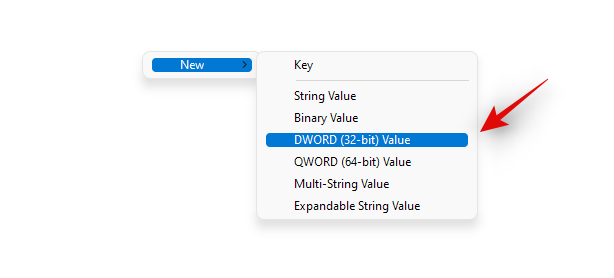
Right-click on an empty area on your right, select ‘New’ and then click on ‘DWORD (32-bit) value’.
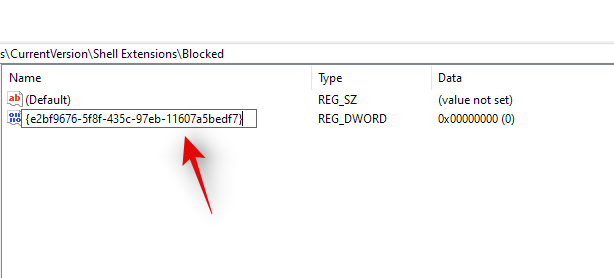
Enter the following name and press Enter on your keyboard. We recommend you copy-paste the same to avoid any naming errors.
{e2bf9676-5f8f-435c-97eb-11607a5bedf7}
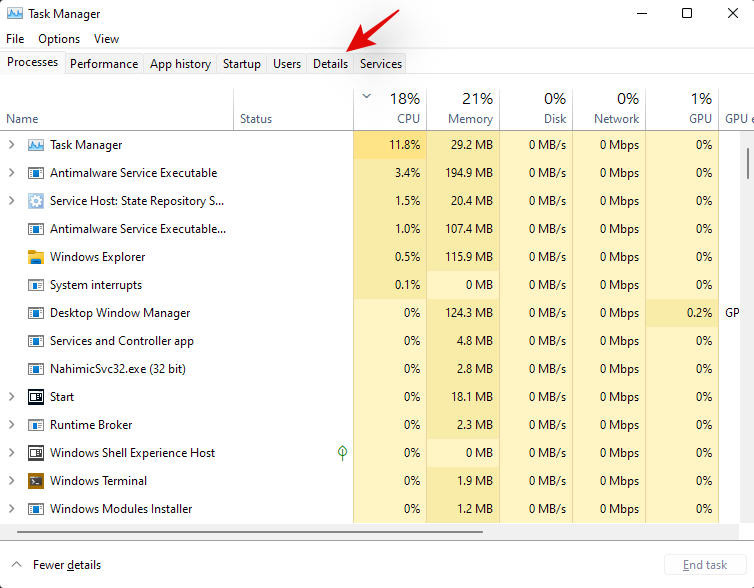
Close the registry editor and press Ctrl + Shift + Esc to open the Task Manager. Switch to the ‘Details’ tab.
Click on ‘Explorer.exe’ and hit Del on your keyboard.
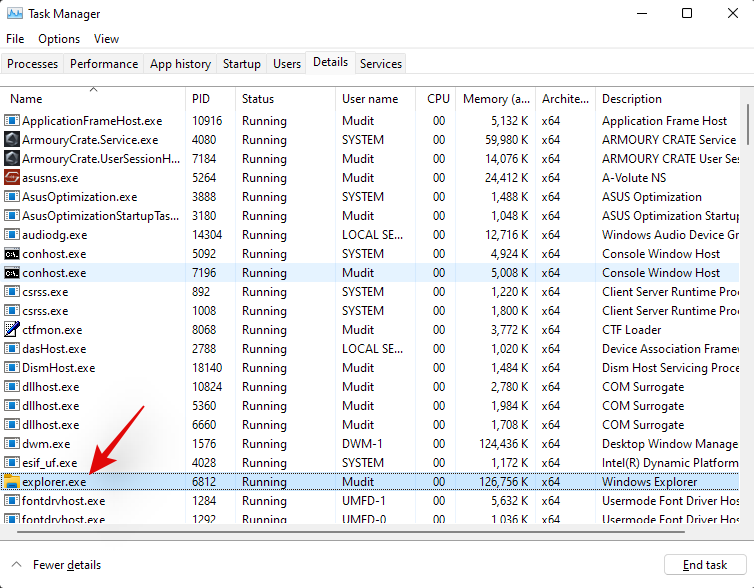
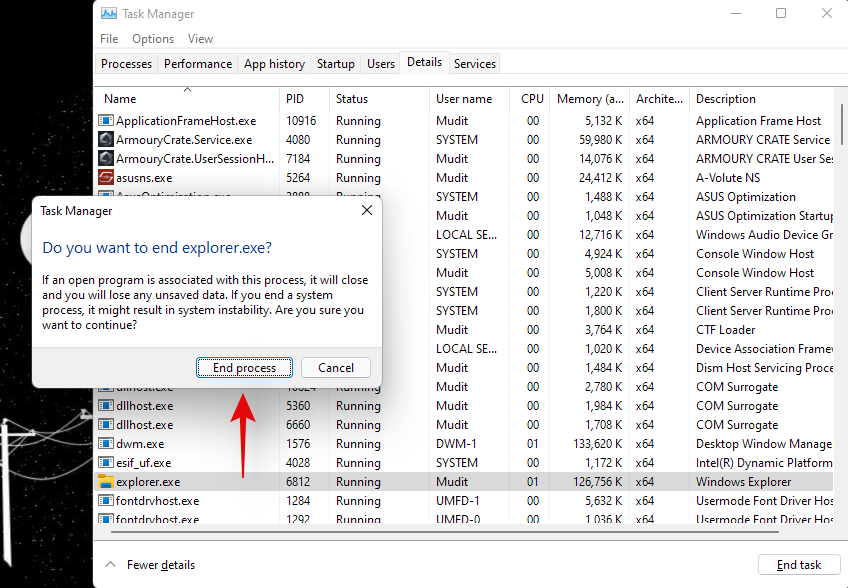
Click on ‘End process’ to confirm your choice.
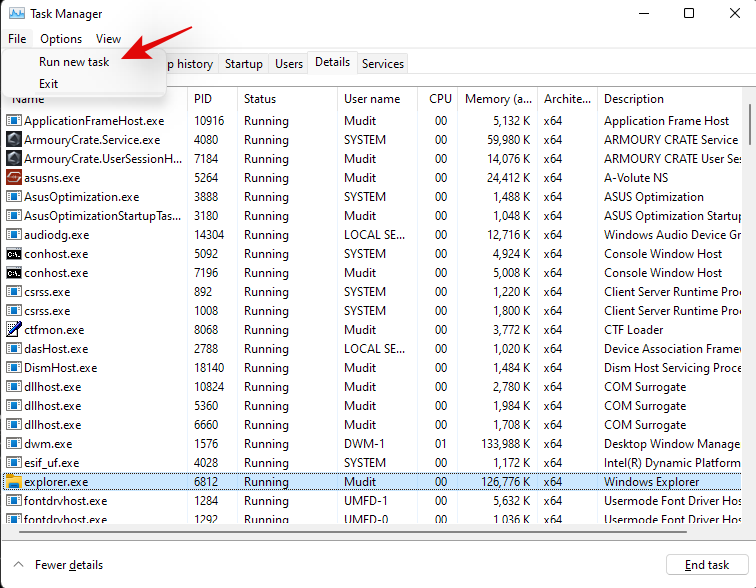
Click on ‘File’ and select ‘Run new task’.
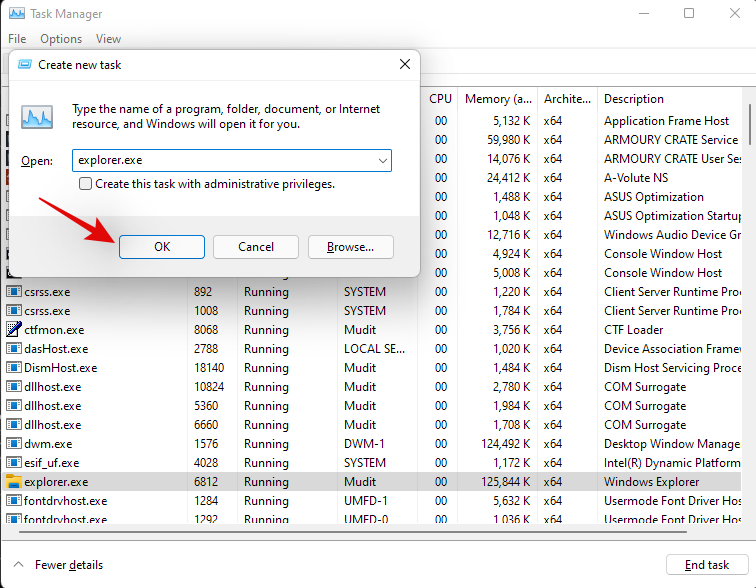
Enter the following in the text box and click on ‘Ok’.
explorer.exe
Windows File Explorer will now restart on your system and it should be reverted to the Windows 10 File Explorer. You can open a random folder to check the same. Confirm that you have gone back to the old file explorer and use the guide below to find large files on your system.
Switch to the new file explorer
We can now revert to the old file explorer. Follow the guide below to get you started.
Press Windows + S on your keyboard and search for Regedit. Click and launch the app once it shows up in your search results.

Navigate to the following path below or copy-paste it in your address bar.
HKEY_LOCAL_MACHINE\SOFTWARE\Microsoft\Windows\CurrentVersion\Shell Extensions

Simply click on the DWORD (32-bit) value we had created earlier and hit Del on your keyboard. Click on ‘Yes’ to confirm your choice.

Press Ctrl + Shift + Esc on your keyboard and switch to the ‘Details’ tab.

Click on ‘explorer.exe’ and hit Del on your keyboard.

Click on ‘End process’.

Click on ‘File’ and select ‘Run new task’.

Type in ‘explorer.exe’ and hit Enter on your keyboard.

You can close the task manager and registry editor on your PC now.
And that’s it! You will now have gone back to the new File Explorer on Windows 11.
Method #06: Using CMD (command prompt)
CMD can also help you find large files on your system. Use the guide below to get you started.
Press Windows + E on your keyboard and navigate to a location where you wish to search for large files and click on the address bar at the top.
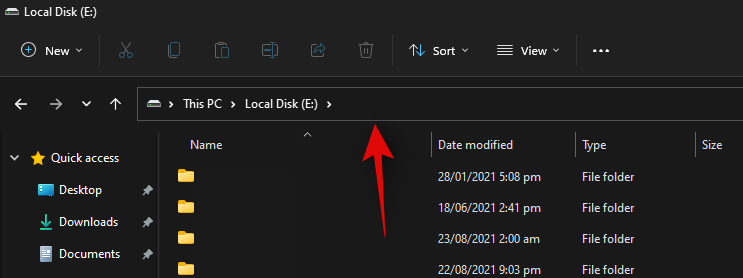
Type in CMD and press Enter on your keyboard.
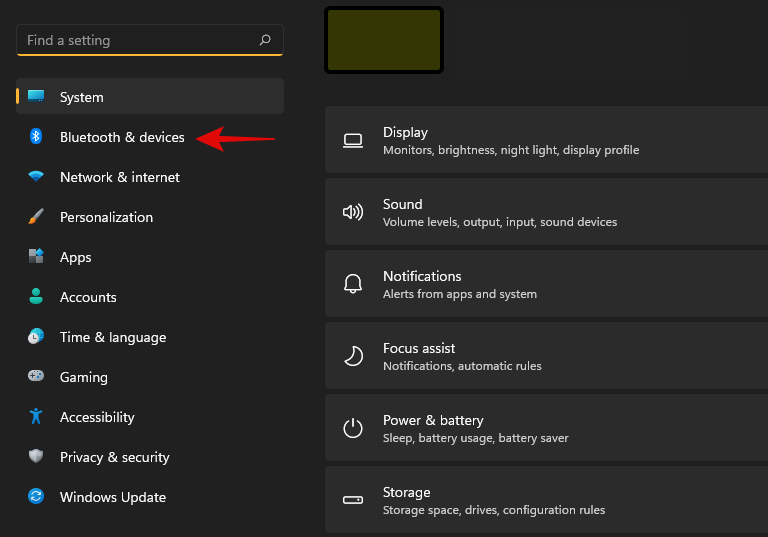
CMD will now be launched in the particular folder. Type in the following command and replace ‘PATH’ with the path we copied to your clipboard.
forfiles /S /M * /C “cmd /c if @fsize GEQ 1073741824 echo @path > largefiles.txt
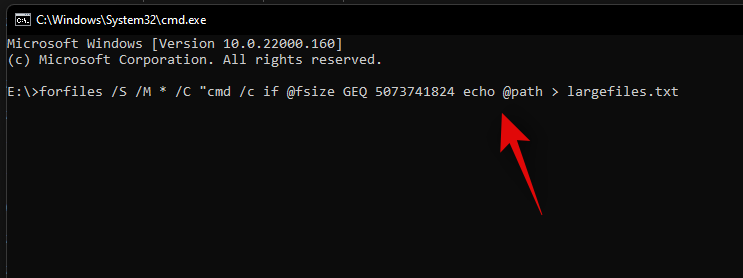
The above command will look for files larger than 1GB on your PC. If you wish to define a larger minimum size, then replace ‘1073741824’ with one of the following options below.
- 2GB: 2147483648
- 5GB: 5368709120
- 10GB: 10737418240
Execute the command with your desired variables and a text file will be created in the same location with a list of all the large files found on your system based on your criteria. You will also find the path for each file on your local storage in the text file.
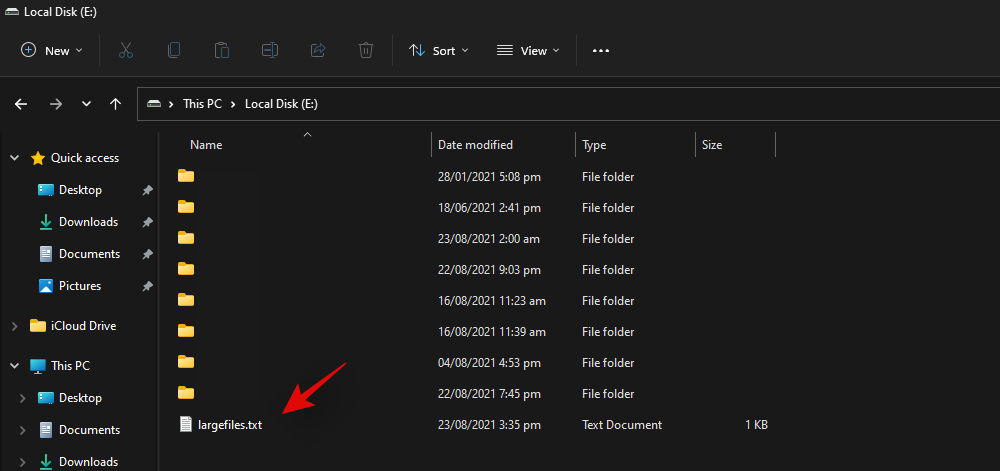
You can use this list to identify the largest files in the current location and then delete them at your discretion to free up some disk space on your system.
Method #07: Using PowerShell
You can also find large files on your system using PowerShell. Just like the command for CMD, PowerShell will scour your local files based on a minimum size and display all the files larger than it. Use the guide below to get you started.
Press Windows + E on your keyboard and navigate to the location where you wish to look for large files. Click on the address bar at the top and type in ‘PowerShell’. Press Enter on your keyboard once you are done.
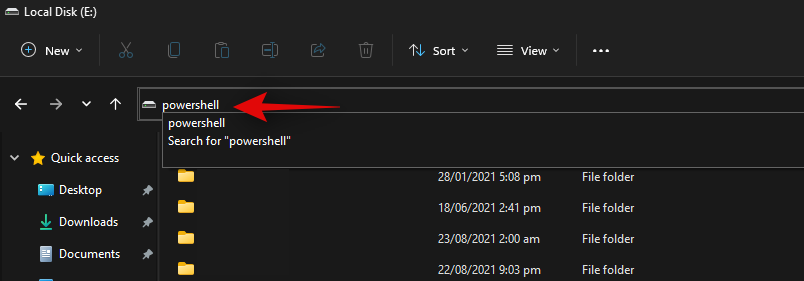
Copy-paste the command below in the PowerShell window and press Enter on your keyboard.
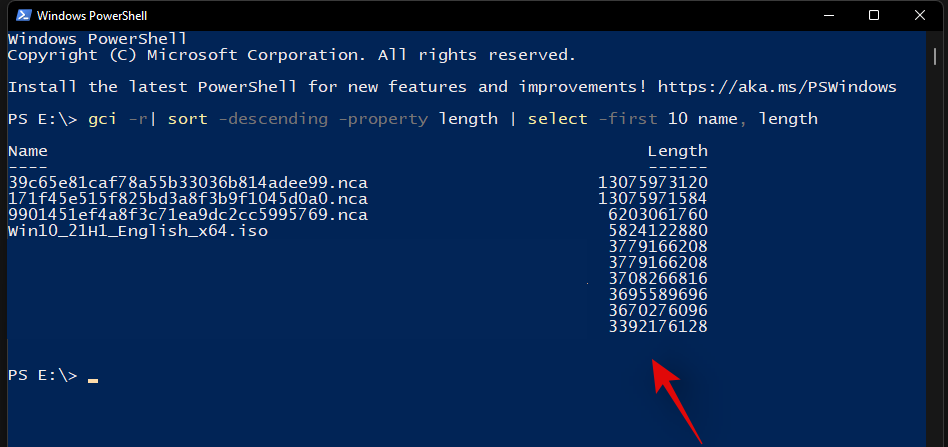
gci -r| sort -descending -property length | select -first 10 name, length
You will now get a list of the top 10 largest files currently taking the most disk space on your system. If you wish to view the top 20 files, then replace ‘select-first 10’ with ‘select-first 20’.
PowerShell will now find and display the 20 largest files on your system along with their size. The file size will be in bytes which can make it a bit difficult to judge the size of files in terms of gigabytes.
And that’s it! You will now have found the largest files on your PC using PowerShell in Windows 11.
Method #08: Using SpaceSniffer
Space Sniffer is another popular third-party utility used to analyze disk space usage on Windows 11. Space sniffer can help you identify large files using huge amounts of space on your system. You can also find hidden files taking huge disk space on your PC using the SpaceSniffer. Use the guide below to get you started.
Download SpaceSniffer to your PC using the link above. A portable .exe will be downloaded to your system. Extract the archive and right-click on the .exe file.
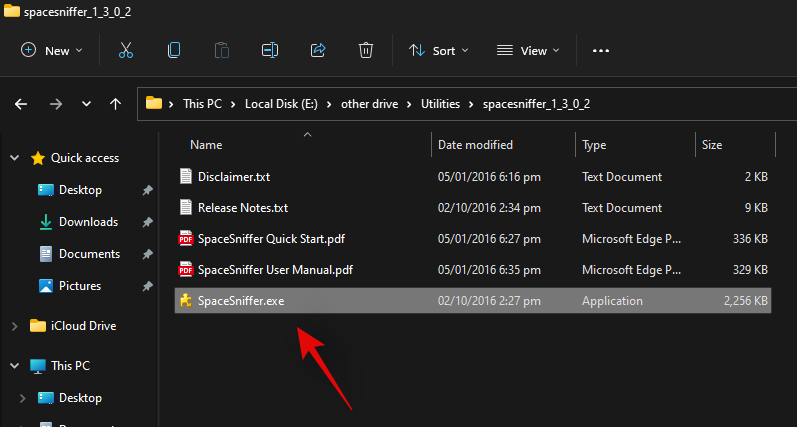
Select ‘Run as administrator’.
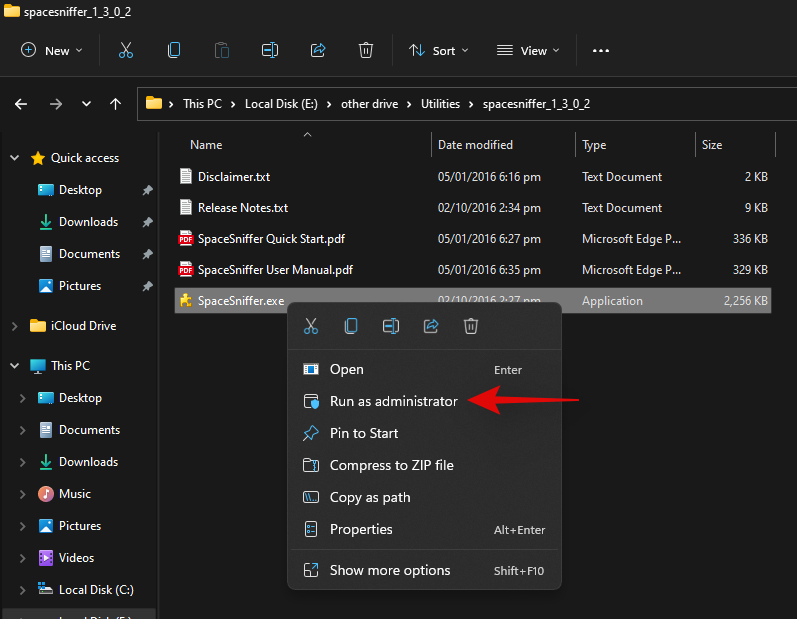
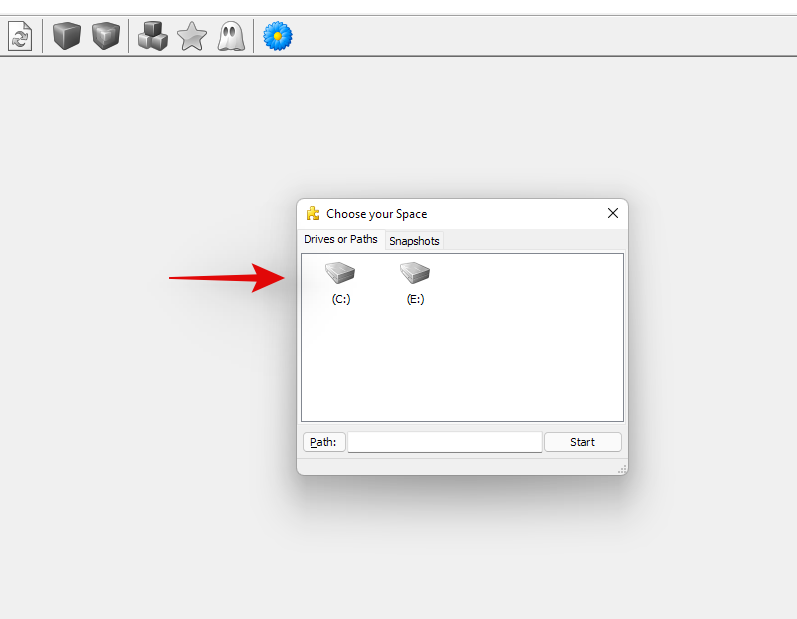
Now select the drive you wish to scan. If you wish to analyze and find large files in a particular directory, then you can enter its path in the text box below.
You will now be shown a graphical representation of your disk space usage on your screen. Simply hover over the largest chunk and you will be shown the name of the folder or file occupying that space.
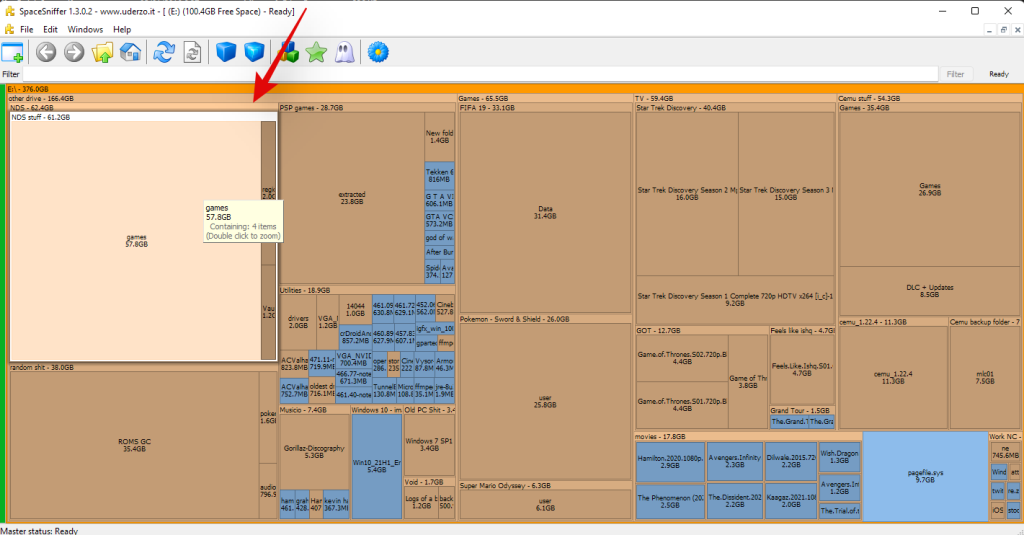
And that’s it! You can use SpaceSniffer this way to identify the largest files on your system by simply looking at the largest chunks on your screen.
Method #09: Other third-party tools you can use to analyze disk usage on Windows 11
The world of third-party tools is a rabbit hole. The more you look, the more programs you will find that claim to help you find and reclaim your disk space on Windows 11. This huge selection of programs can be quite daunting and challenging at first, making it difficult for you to find the perfect tools that fit your current needs and requirements. If you are not a fan of one of the programs used above, then you can opt for one of the alternatives listed below. You can find a few details about each program below their listing.
Tips to free storage space on Windows 11
If you are running low on disk space or have a smaller-sized drive that you are unable to currently upgrade, then you can use the following tips to save as much disk space on your PC as currently possible. Let’s get started.
- Use Disk Cleanup
- Run SFC & DISM commands to fix errors with your drives
- Uninstall unnecessary apps
- Delete or Archive unnecessary or currently unused files
- Use OneDrive or other cloud storage services to save space
- Use an external storage device to store your libraries
- Regularly free up your recycle bin
- Use Storage Sense on Windows 11
- Disable Hibernation to delete the hibernation file
- Rebuild your search index
- Delete additional users created on your system
And more. You can free up space on your PC using tons of ways but each usually comes with a compromise. If you are looking to avoid compromises, then upgrading your storage is the best option. SSDs are cheaper than ever and if you are looking to upgrade your storage, then an M.2 SSD could go a long way for your system.
Note: M.2 SSDs will work at their advertised capacity only if you have a compatible M.2 slot on your system. Not all M.2 slots are the same and not all of them are routed through the PCI lanes on your motherboard.
Free up disk space on Windows 11!
Using the numerous methods above, you can easily find what’s taking up space on your PC and fix it pretty easily. If the Windows-based solutions do not work for you, try using a free-ish software like TreeSize (or others mentioned above).
Ef þú þarft enn hjálp við að hreinsa upp pláss á Windows 11, láttu okkur þá vita í athugasemdareitnum hér að neðan. Útskýrðu mál þitt almennilega.
TENGT




![Hvernig á að fjarlægja McAfee á Windows 11 [5 leiðir] Hvernig á að fjarlægja McAfee á Windows 11 [5 leiðir]](https://blog.webtech360.com/resources8/images31/image-4917-0105182719945.png)
