Os ficheiros DLL que faltan son o peor pesadelo dun usuario de ordenador. Ao parecer, saen da nada e poden deter o teu traballo sen rumbo. Hai unha mensaxe de erro que, por desgraza, é bastante común para os usuarios de Windows, que é a mensaxe de erro "Falta VCRUNTIME140.dll".
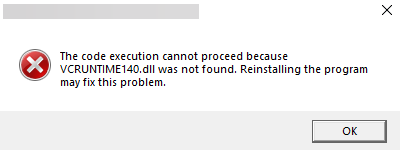
Toda a mensaxe de erro di algo así: A execución do código non pode continuar porque non se atopou VCRUNTlME140.dll. A reinstalación do programa pode solucionar este problema.
Dado que unha variedade de aplicacións depende da biblioteca de tempo de execución de Microsoft Visual Studio, pode resultar problemático obter o erro "Falta Vcruntime140.dll".
Aquí tes algúns métodos que podes usar para corrixir este erro e volver ao teu programa de novo.
Relacionado: Non se pode activar o modo de programador en Windows 11? Como corrixir
Contidos
Que causa o erro "Vcruntime140.dll non atopado"?
Os ficheiros das bibliotecas de ligazóns dinámicas (DLL) conteñen o código que os programas requiren para executarse correctamente. Se se corrompen ou desaparecen, poden causar máis que algúns problemas. As aplicacións desenvolvidas en Visual Studio 2015-2019 necesitan o directorio de execución para acceder a estes códigos.
Recibir unha mensaxe de erro significa que os ficheiros do directorio elimináronse accidentalmente, corrompáronse ou non funcionaron por algún outro motivo. O malware e os virus son causas comúns para isto, pero a actualización de Windows tamén pode introducir erros que provocan que os ficheiros DLL fallen.
Os usuarios tamén informaron de ter un erro similar "Falta Vcruntime140_1.dll". Isto é para aqueles que instalaron a actualización de 2019. Se o teu Visual C++ aínda é de 2015, podes recibir o erro "Vcruntime140.dll".
Relacionado: Como obter Google Play Store e Gapps en Windows 11
Como corrixir o erro "Vcruntime140.dll non atopado" no teu PC con Windows
Aquí tes algunhas formas de corrixir o erro "Vcruntime140.dll non atopado".
Método n.º 01: Repara o redistribuíble de Microsoft Visual C++ 2015-2019
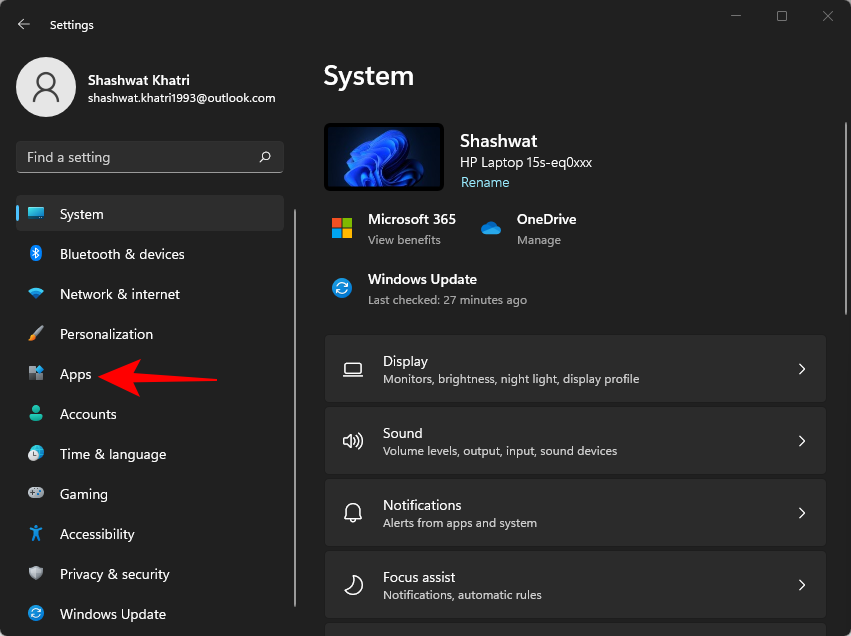
Para reparar o redistribuible de Microsoft Visual C++ 2015-2019, primeiro prema Win + Ipara abrir o menú Configuración. A continuación, fai clic en Aplicacións no panel esquerdo.
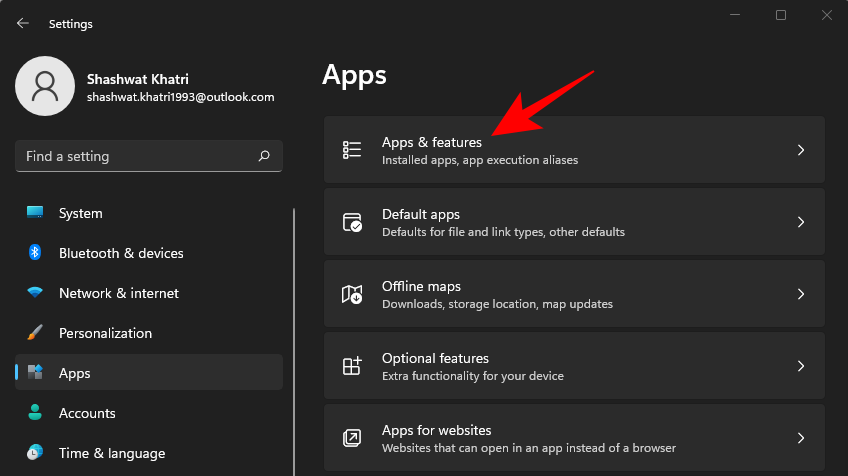
A continuación, fai clic en Aplicacións e funcións .
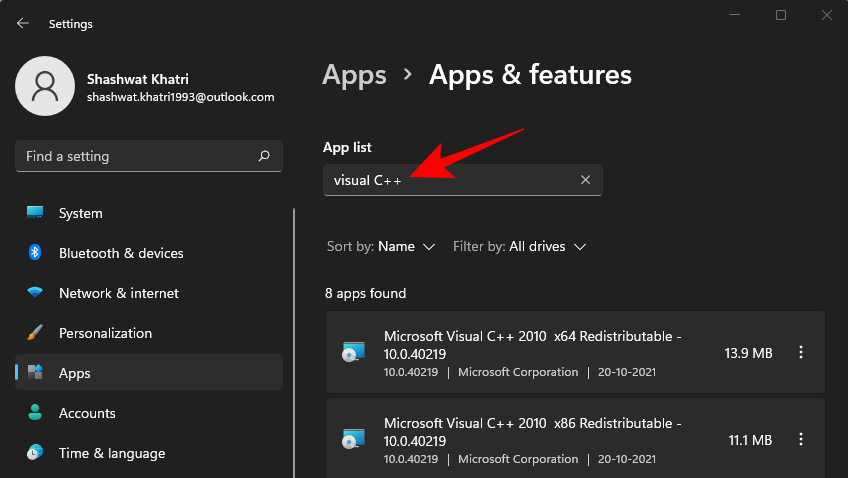
Busca "Visual C++".
Podes obter varias versións de Visual C++. Pero estamos a buscar Microsoft Visual C++ 2015-2019 Redistributable (x64) e (x86).
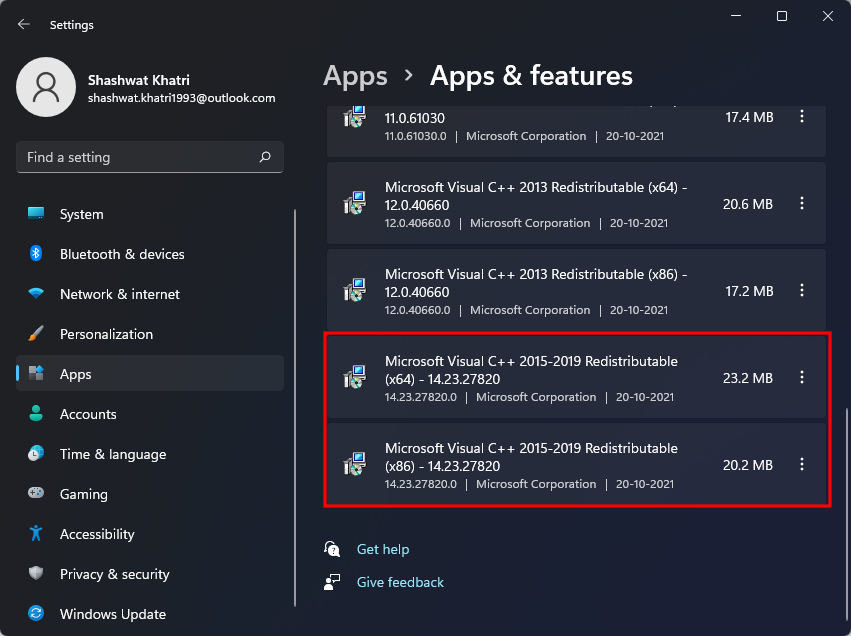
Imos modificar ambos. Primeiro, fai clic nos tres puntos á dereita da versión x64.

Seleccione Modificar .
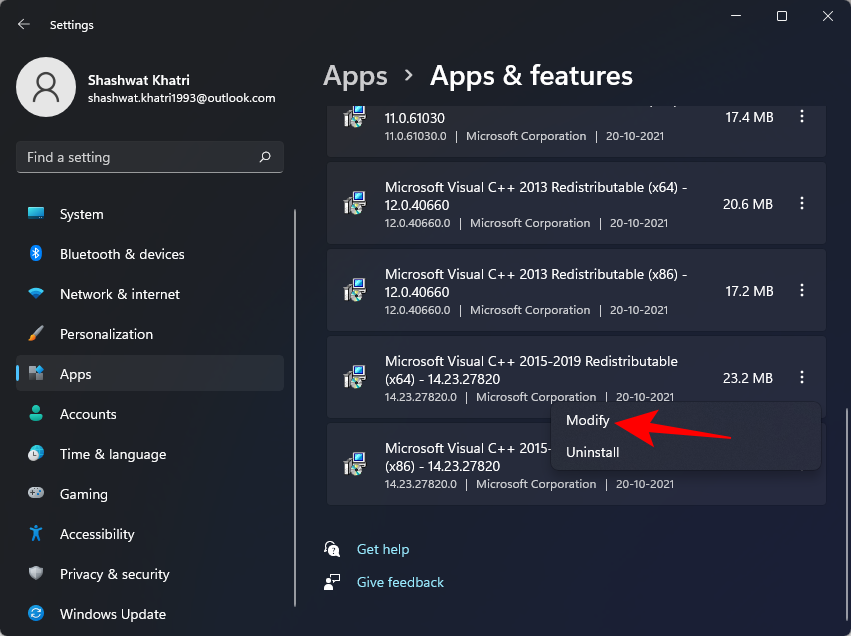
A continuación, fai clic en Reparar .

Unha vez completada a configuración, fai clic en Pechar .
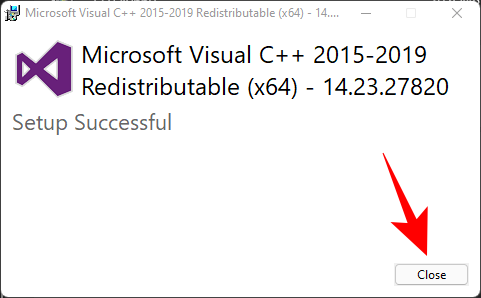
Agora faga o mesmo para a versión x86. Unha vez que remates a configuración, reinicia o teu PC unha vez e intenta executar o programa que estaba xerando a mensaxe de erro.
Método #02: reinstale Visual C++ Redistributable para Visual Studio 2015 (x64 e x86 ambos)
Outra forma de saír da mensaxe de erro é desinstalar e reinstalar o Visual C++ Redistributable para Visual Studio 2015-2019. Aquí tes como facelo:
Vaia á mesma configuración das aplicacións que se mostra antes e busca Visual C++. Aquí tamén buscamos versións redistribuíbles de Visual C++ 2015-2019 (x64) e (x86).
Fai clic primeiro nos tres puntos xunto á versión (x64).
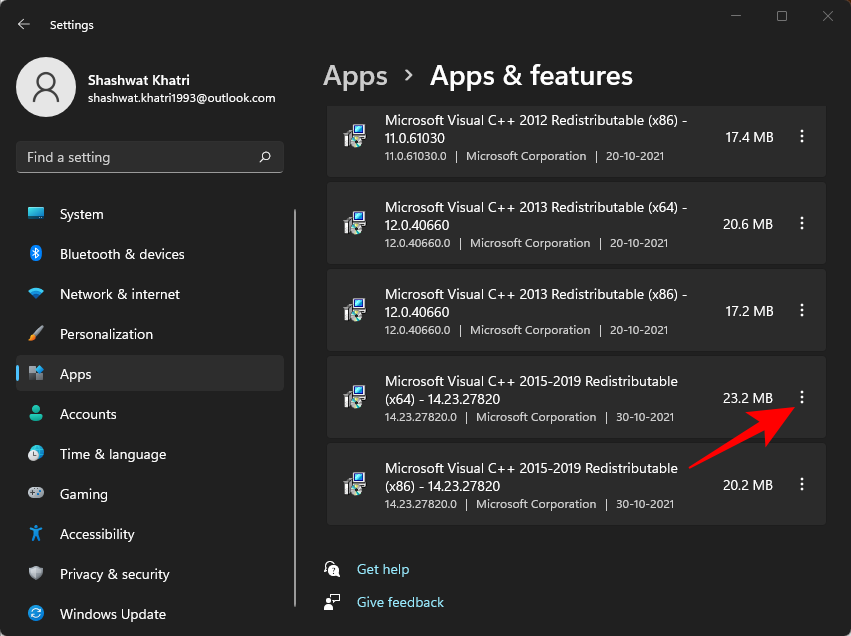
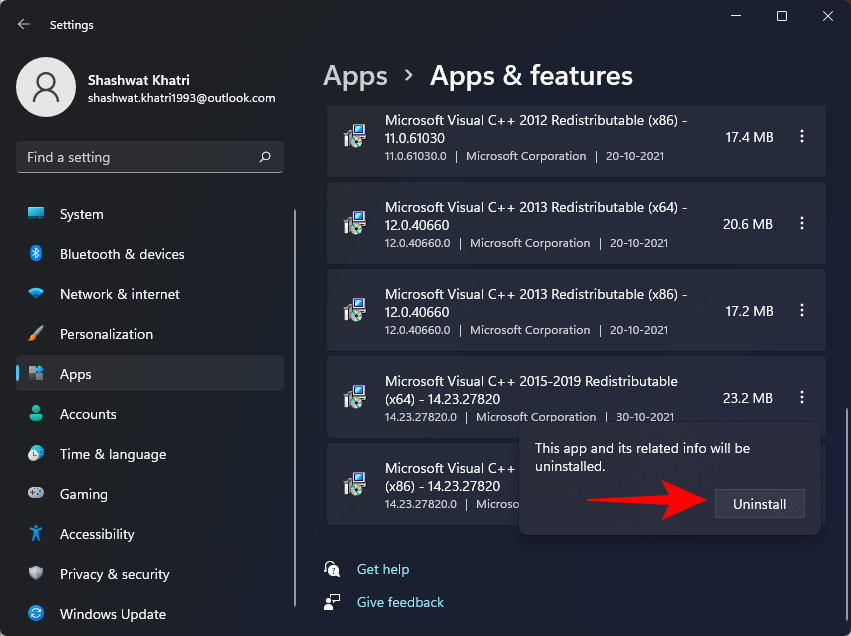
Seleccione Desinstalar .
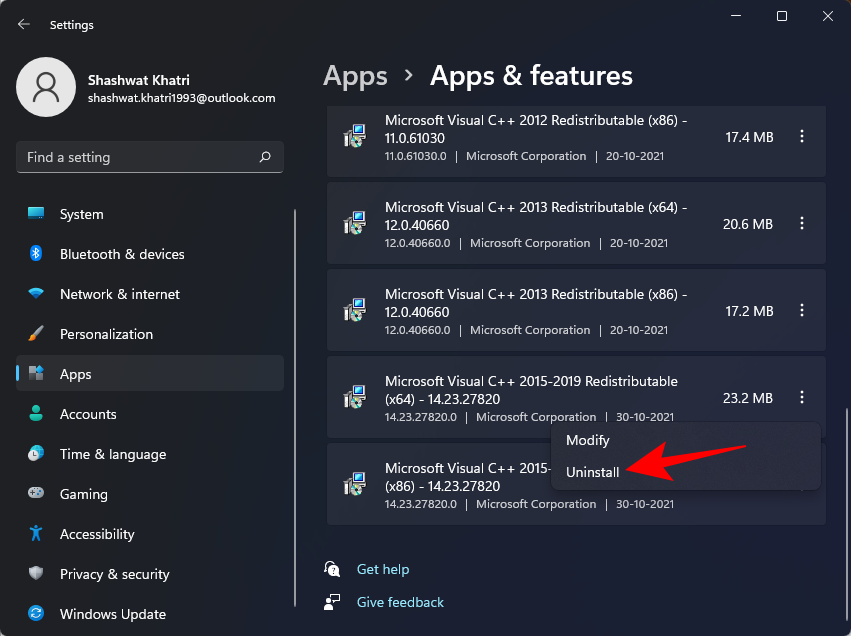
Fai clic de novo en Desinstalar .
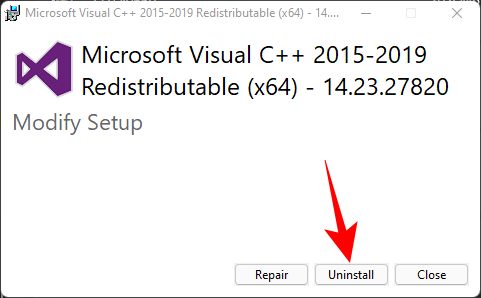
Cando se abra a configuración, fai clic en Desinstalar .
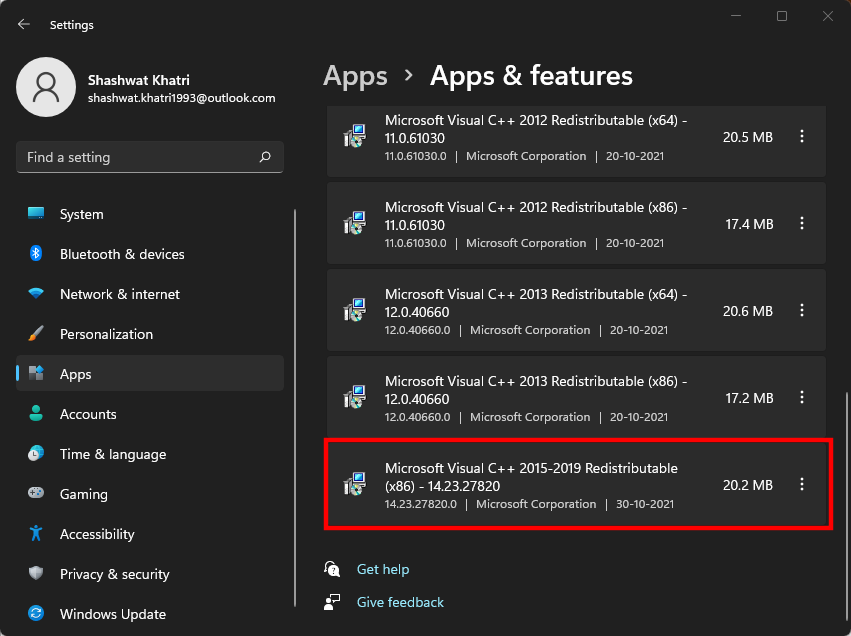
Unha vez que finalice a desinstalación, faga o mesmo para a versión de Visual C++ 2015-2019 (x86).
Agora, é hora de instalar estas dúas versións desde o sitio web de Microsoft. Siga a ligazón de descarga que se indica a continuación para o mesmo.
Descarga : Microsoft Visual C++ 2015 Redistributable Update 3 RC
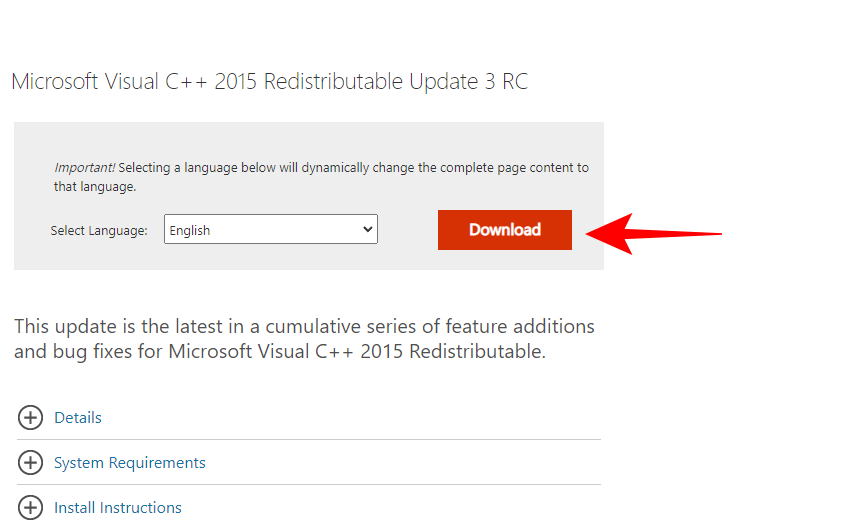
Fai clic no botón Descargar na páxina ligada arriba.
Agora, asegúrate de seleccionar ambas as versións, x64 e x86. A continuación, fai clic en Seguinte .
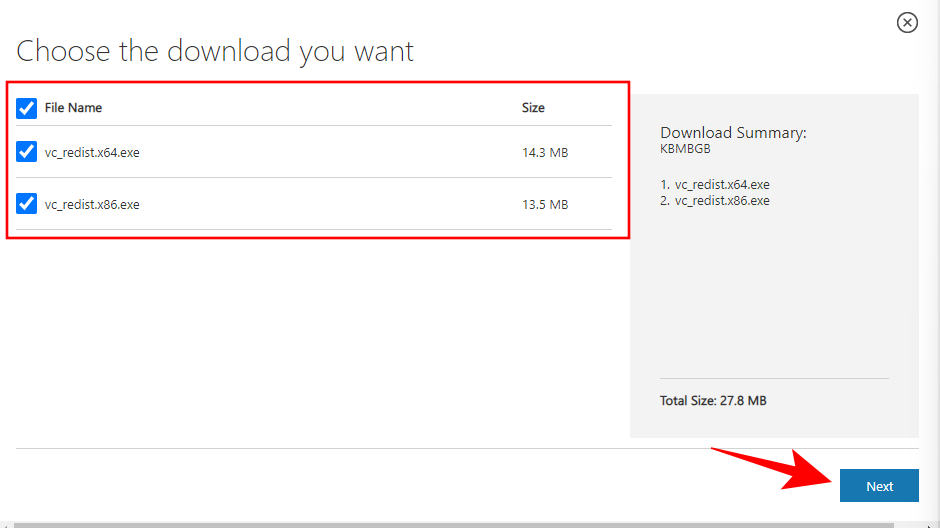
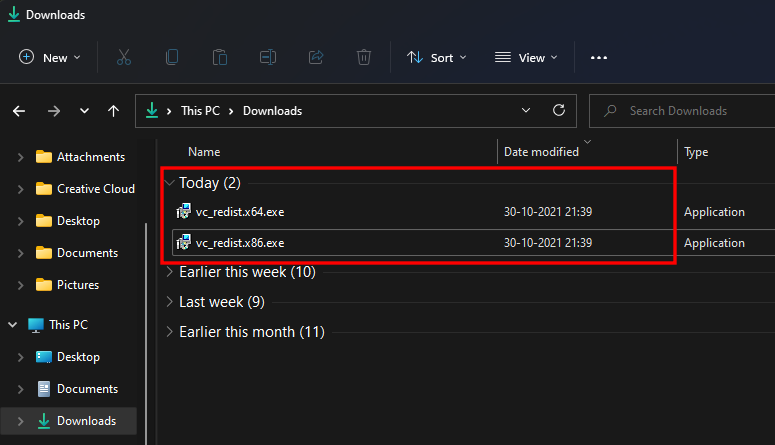
Unha vez descargados os dous ficheiros, execútaos un por un.
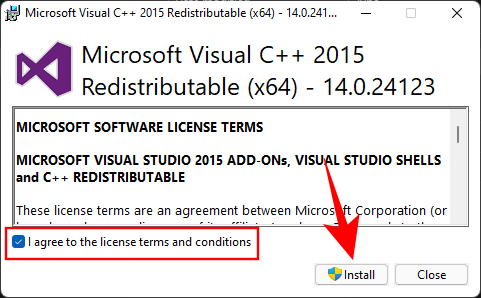
Na configuración, acepta os termos e condicións e fai clic en Instalar .
Unha vez que finalice a configuración, reinicie o sistema e comprobe se a mensaxe de erro desaparece.
Método #03: executa a exploración SFC
Tamén pode usar o comando de verificación de ficheiros do sistema para corrixir o erro. Aquí tes como facelo:
Preme Inicio, escribe cmd e fai clic en Executar como administrador .
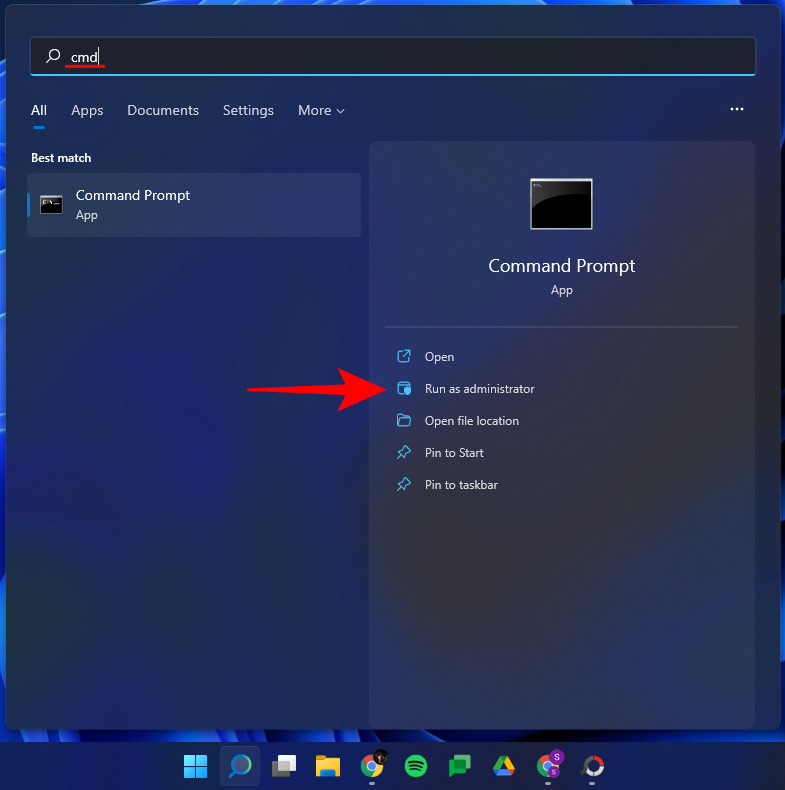
Agora escriba o seguinte comando:
sfc /scannow

Then press Enter. Wait for the system scan to complete.

All corrupt files will now be fixed. If the vcruntime140.dll file was corrupted before, it should now be fixed as well.
Method #04: Reinstall the affected program
Sometimes, you may be required to uninstall and reinstall the affected program. It’s possible that the program wasn’t downloaded or installed properly. Programs tend to have their own copy of the Vcruntime140.dll files that can help solve the problem, as long as they are downloaded and installed properly.
To uninstall, press Win + I to open Settings. Then click on Apps in the left panel.

Click on Apps & features.

Search for the app that was affected, then click on the three-dots next to it and select Uninstall.
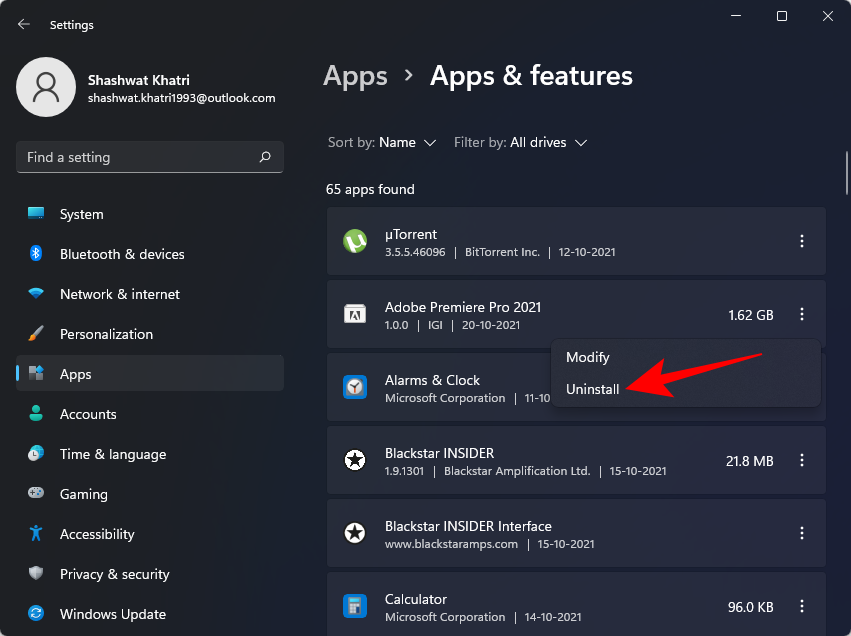
Go through the uninstallation process, then re-download and re-install the program.
Method #05: Download the DLL file manually
For those unaware, you can straight-up download DLL files and fix most application errors. First, go to dll-files.com and look up “VCRUNTIME100.dll.” You can also click on this link to go to the page directly. Now, download the file for your 32-bit or 64-bit system. Click on ‘Download’ to save the file to your computer.
It will download a Zip file. Inside the Zip archive, you will have a DLL file alongside a readme text file.
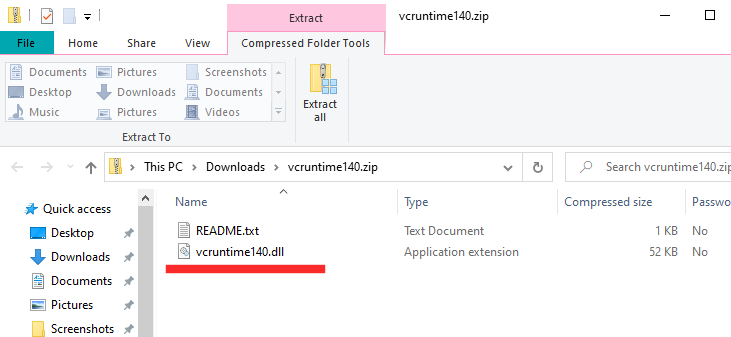
Move the DLL file to the installation directory of the file that is encountering the DLL file error.
Method #06: Update your drivers
Not updating the drivers can throw a lot of curveballs at you, including random DLL file errors. In this case, you have to go to Device Manager and update all drivers manually. First, hit Windows + R and run the devmgmt.msc command.
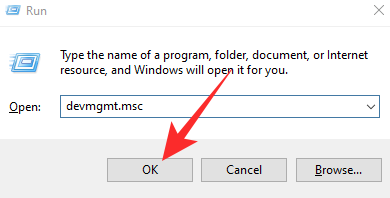
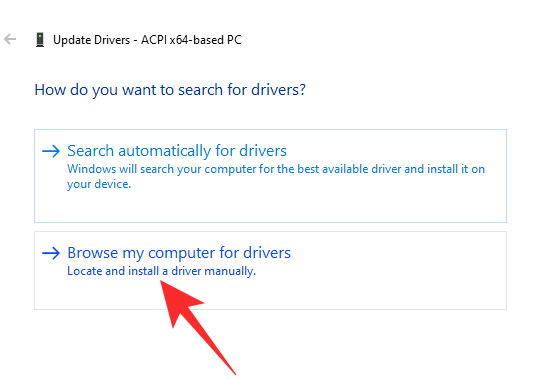
This will take you to Device Manager. Now, expand any branch and right-click on the hardware component you wish to modify. Next, click on ‘Update driver.’
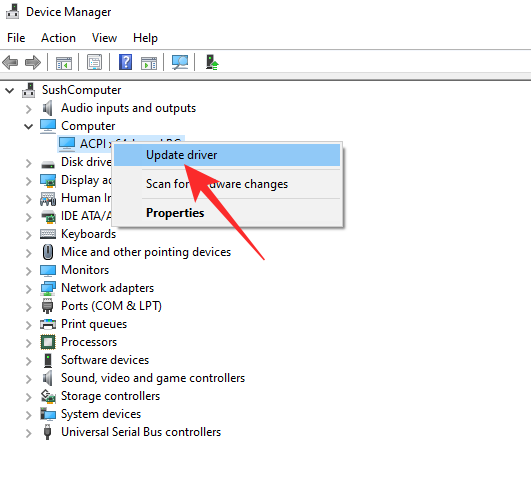
Then, go to ‘Browse my computer for drivers.’
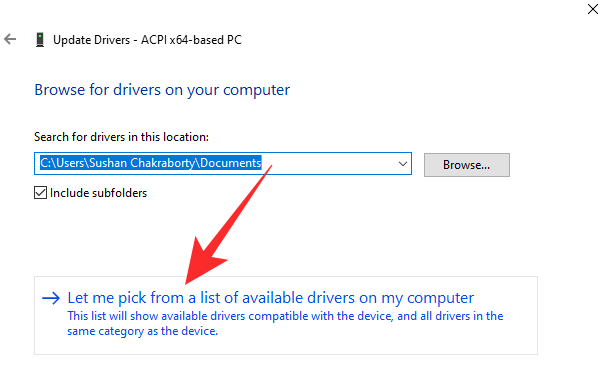
On the next screen, click on ‘Let me pick from a list of available drivers on my computer.’
Windows will look up the driver and give you a list. Click on the driver you want to install and click on ‘Next.’
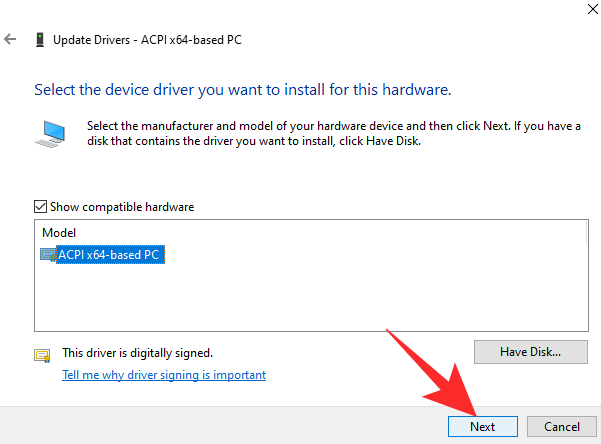
It will be installed right away.
Do this for all suspicious drivers and then try again.
Method #07: Check for quarantined items in Windows Defender
Windows Defender does its own system scanning for potentially harmful files, especially if there isn’t an anti-virus program on your system. It’s possible that windows defender has quarantined the Vcruntime140.dll file.
To check if that’s the case, press Start, type “Windows Security”, then select the app.
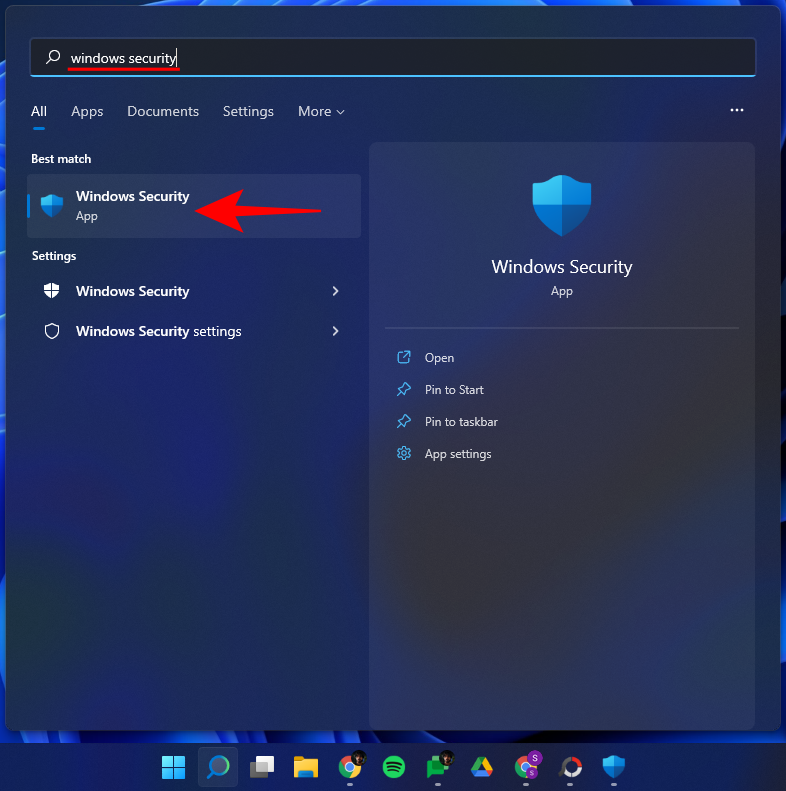
Click on Virus & threat protection.
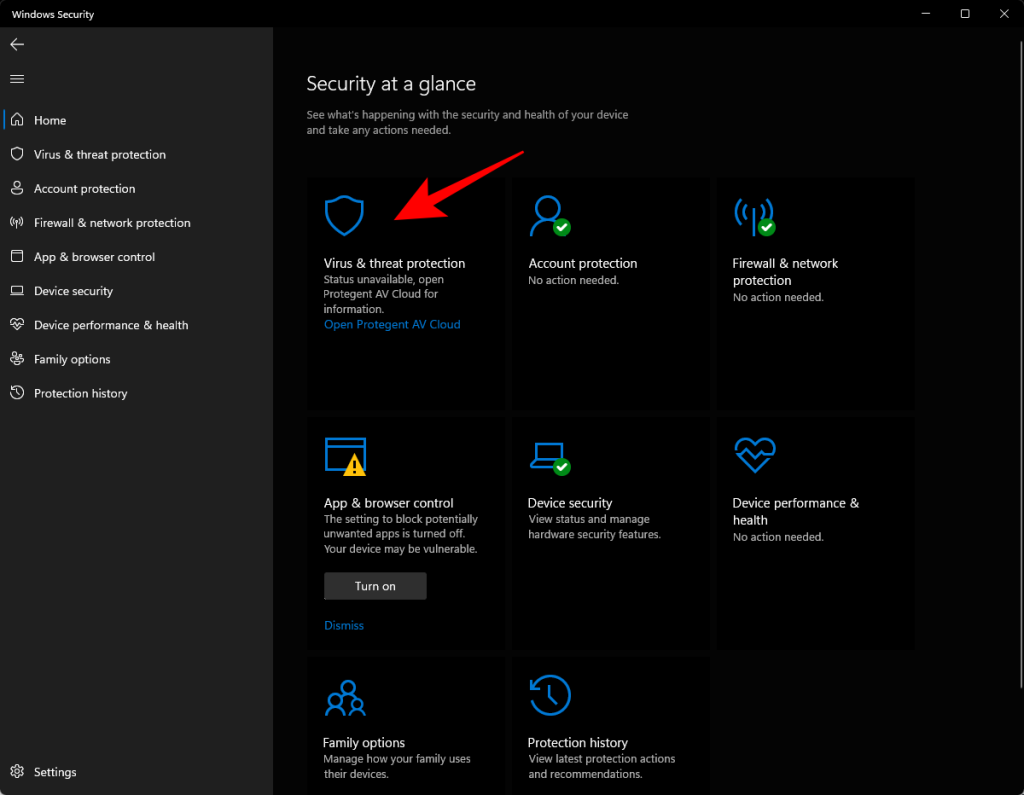
If windows defender has scanned and quarantined files, you should see “Quarantined threats”. If the file is here, select it and then choose Restore.
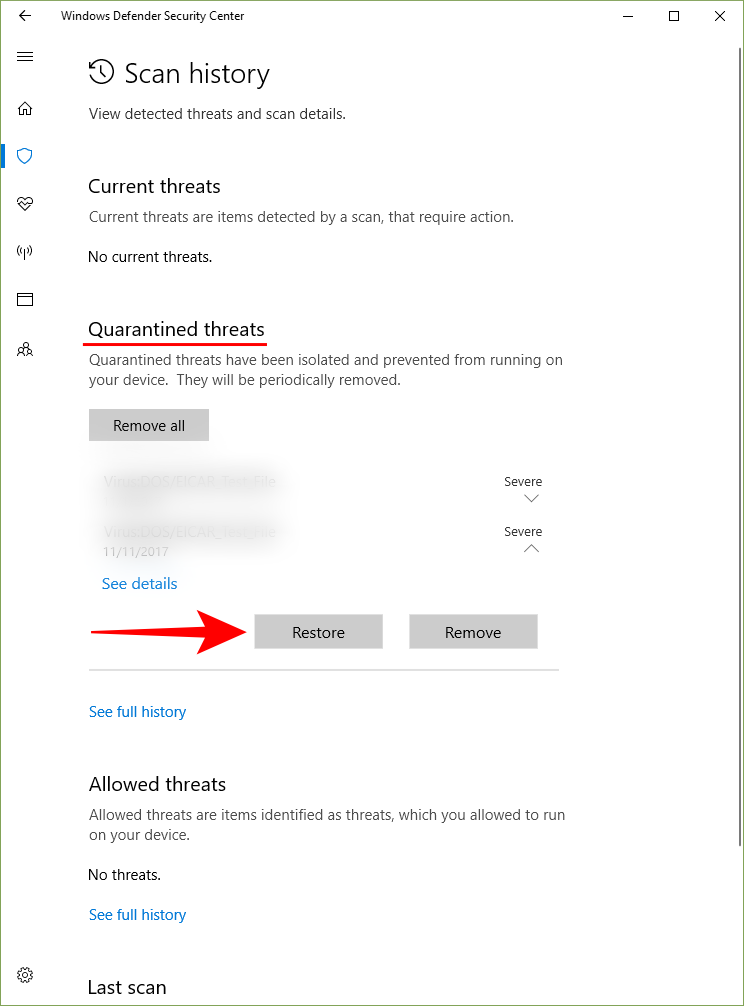
Source: Microsoft Support Community
Method #08: Update Windows
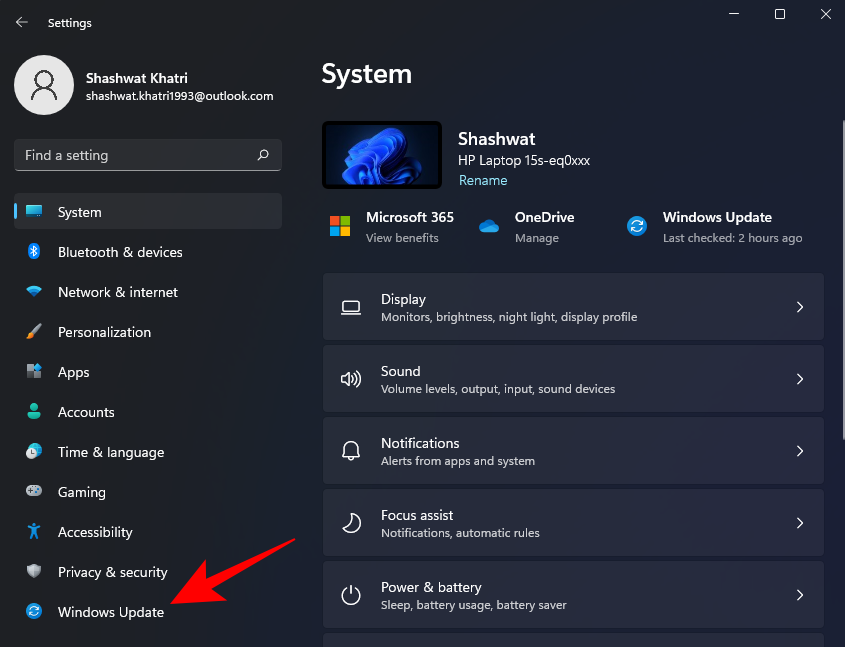
If the source of the problem was a bug, updating your Windows is a potential solution. To check for updates, press Win + I to open Settings and click on Windows Update in the left pane.
Then click on Check for updates.
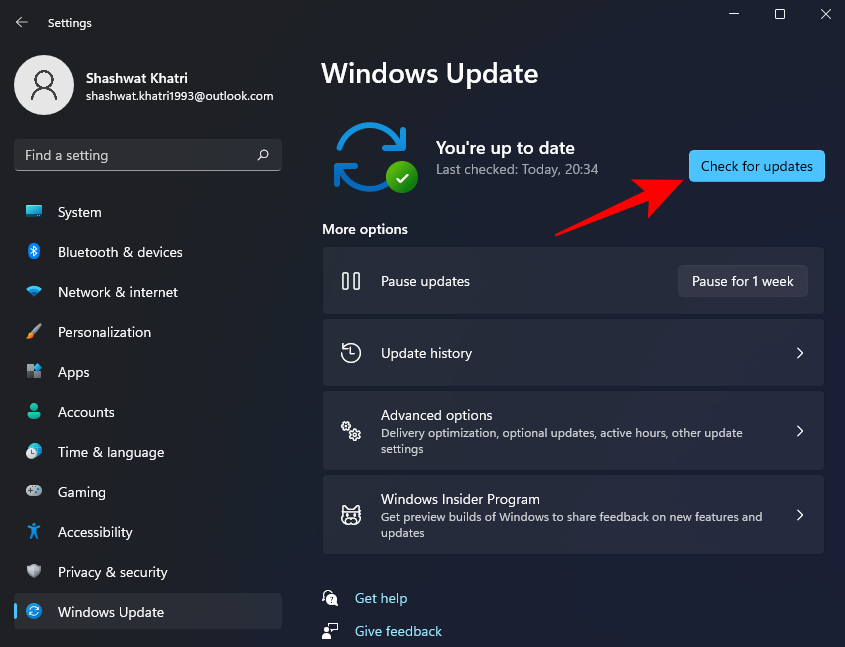
If there are any available updates, install them and restart your PC. Then check to see if the affected program is working again.
Method #09: Perform a System Restore
A System Restore is not easy to perform, especially when time is of the essence. However, if nothing seems to be going according to plan, you should have a go at this hail mary. All you need is a Restore Point and Windows will be able to take itself back to the time before the changes were made. Restore Points can be made automatically or manually. Generally, every sizable Windows Update creates a Restore Point, which means going back to a previous build should not be that difficult.
Click on this link to learn all about System Restore and how you could take your machine to an earlier date.
In all likelihood, one of these nine methods can help you fix the “Vcruntime140.dll is missing” error message. We hope you found this guide useful and were able to run your program again.
RELATED


