As actualizacións son importantes. Reparan problemas de seguridade, melloran o rendemento, introducen novas funcións e moito máis. Por defecto, Windows descargarase e actualizarase tan pronto como estes estean dispoñibles, e iso é unha pequena operación conveniente.
Non obstante, isto convértese nun problema porque estas actualizacións impóñense aos usuarios mesmo cando prefiren non telas. Non é ningún segredo que algunhas actualizacións conteñen erros que poden afectar a túa funcionalidade normal de Windows. Un debería ter o control e a opción de desactivar e deter as actualizacións se é necesario.
Polo tanto, tendo isto en conta, aquí tes todo o que necesitas saber sobre a desactivación das actualizacións en Windows 11.
Relacionado: Como usar Focus Assist en Windows 11
Contidos
Que pasa cando desactivas as actualizacións en Windows 11?
Se sabes para que estás desactivando as actualizacións, utiliza os nosos métodos recomendados anteriormente para facelo. Pero se estás pendente de desactivar as actualizacións de Windows, quizais un pouco máis de información sobre elas debería axudarche a decidir.
Obviamente, non recibirá as actualizacións acumulativas habituais de Windows 11 cando active as actualizacións de Windows, nin recibirá ningún dos parches de seguridade ou correccións de erros que se lanzan con frecuencia.
Durante algún tempo, é posible que non reciba ningunha actualización para os controladores do seu sistema. Se queres instalar controladores e parches mentres as actualizacións de Windows están desactivadas, terás que facelo manualmente.
Relacionado: Como reparar Windows 11 [15 xeitos]
Como deter as actualizacións en Windows 11
Antes de que se diga e faga nada, saiba que as actualizacións de Windows, na súa maioría, son bastante seguras, e recoméndase que as manteñas activadas se queres gozar de todas as actualizacións acumuladas e os aumentos de rendemento que conllevan.
Pero de cando en vez, podes obter un parche defectuoso que introduce erros e funcións de ruptura. Entón, se es alguén que lle gusta revisar as actualizacións antes de descargalas e instalalas, ou queres detelas por completo, aquí tes como podes facelo en Windows 11.
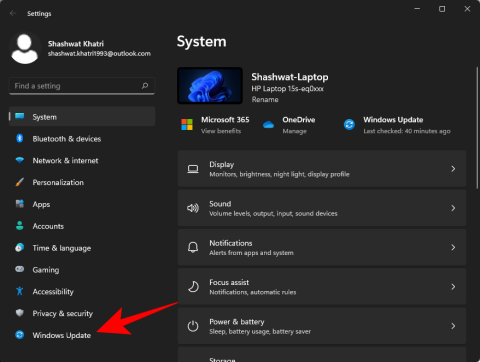
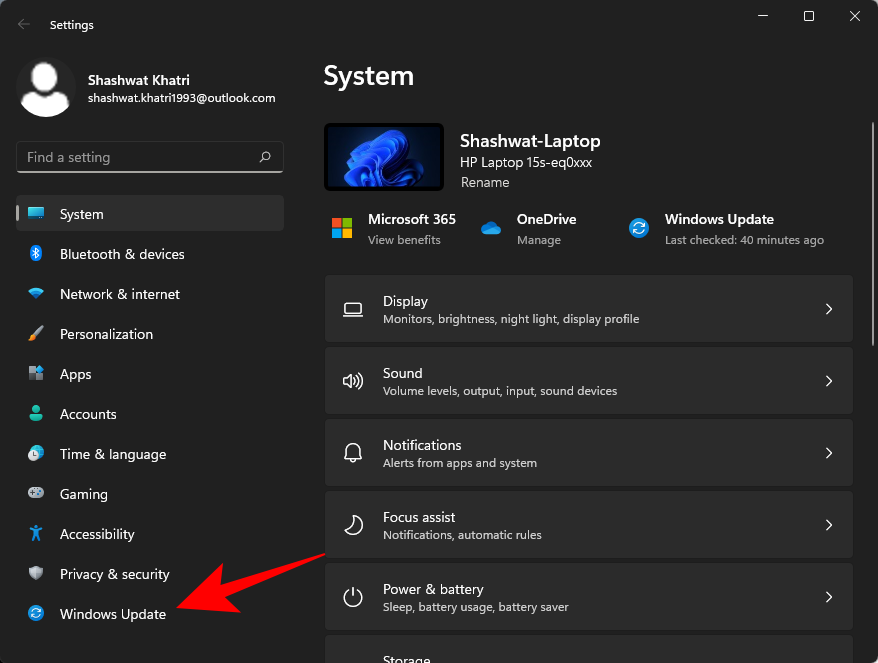
Preme Win + Ipara abrir Configuración e fai clic en Actualización de Windows no panel esquerdo.
Á dereita, xunto a "Pausa as actualizacións", fai clic en Pausa durante 1 semana .
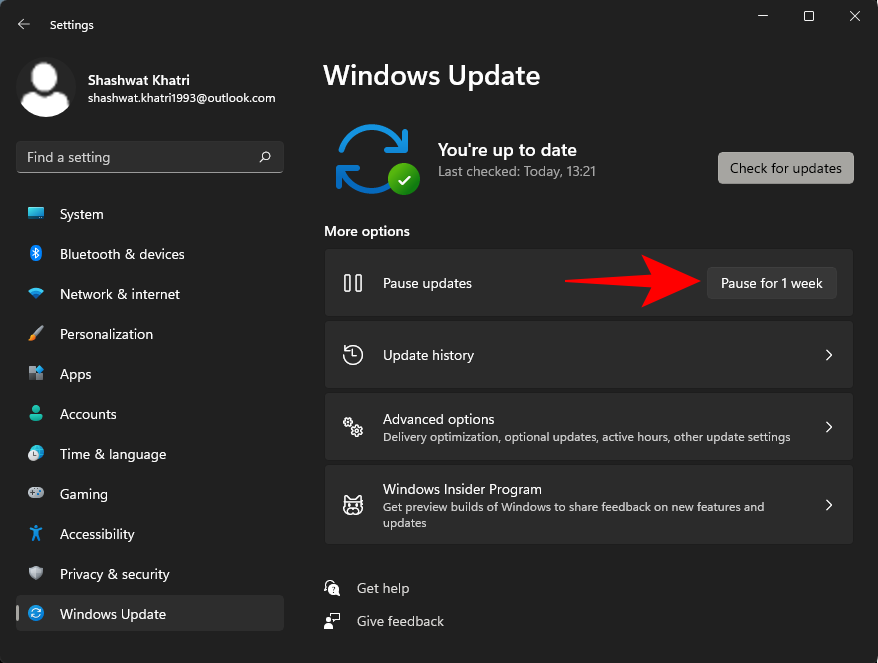
Actualmente, dado que Windows 11 aínda está na súa fase de desenvolvemento, non obterá ningunha outra opción de período de tempo para pausar as actualizacións, nin pode especificar unha. Esperamos obter máis opcións de "Pausa de actualizacións" a medida que saian versións máis recentes de Windows 11 a través das actualizacións de Windows, xa o adiviñaches.
Método #02: desactiva o servizo de actualización de Windows
Para desactivar completamente a actualización de Windows 11, terás que usar a xanela "Servizos". Aquí tes como facelo:
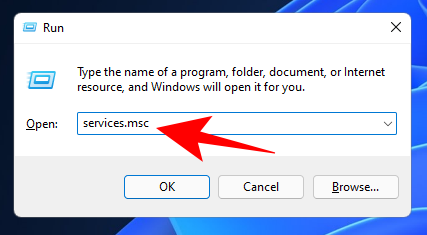
Prema Win + Rpara abrir o cadro de diálogo EXECUTAR, escriba services.msc e prema Intro.
Agora, desprácese cara abaixo e prema dúas veces en Windows Update .
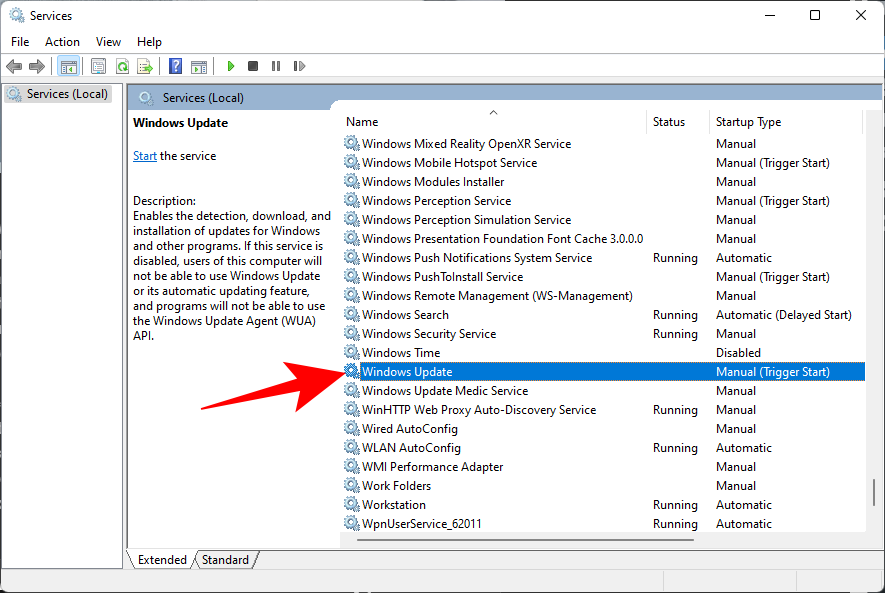
Se se está a executar, fai clic en Deter .
A continuación, fai clic no menú despregable xunto a "Tipo de inicio".
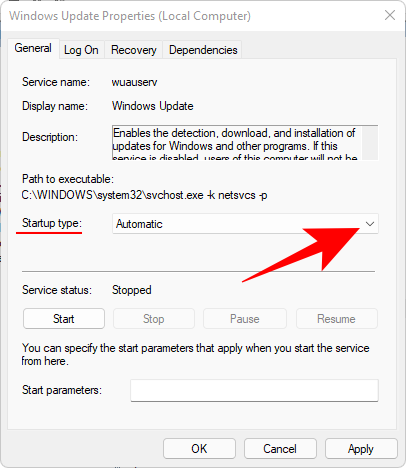
Seleccione Desactivado .
Fai clic en Aceptar .
Relacionado: Como descomprimir ficheiros en Windows 11
Método #03: desactivar ou limitar as actualizacións co Editor de políticas de grupo
O Editor de políticas de grupo é unha ferramenta útil para as edicións Professional, Enterprise e Education de Windows. Vexa como pode limitar as actualizacións de Windows ou desactivalas por completo:
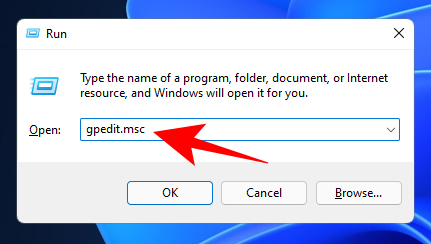
Prema Win + Rpara abrir a caixa RUN, escriba gpedit.msc e prema Intro.
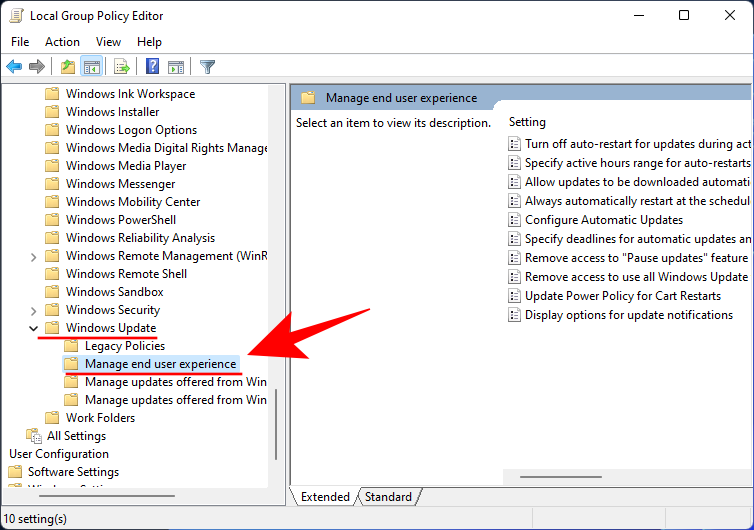
A continuación, navegue ata o seguinte camiño no panel esquerdo:
Computer Configuration > Administrative Templates > Windows Components > Windows Update > Manage end user experience
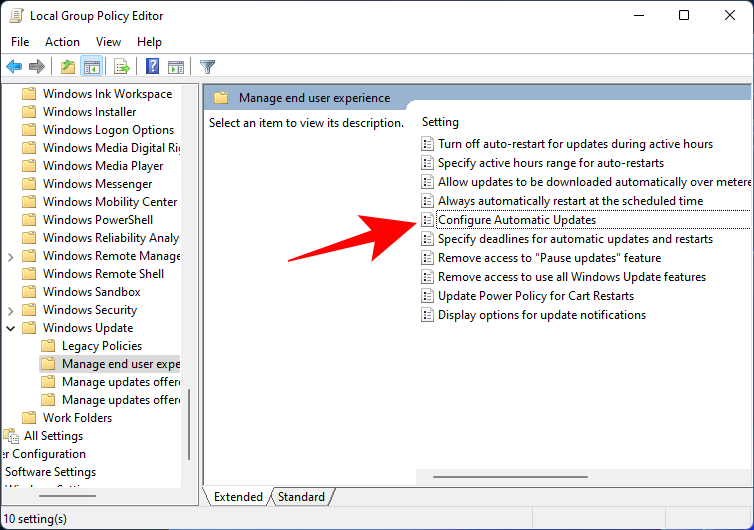
Agora, á dereita, fai dobre clic en Configurar actualizacións automáticas .
Para desactivar completamente as actualizacións de Windows, seleccione Desactivado .
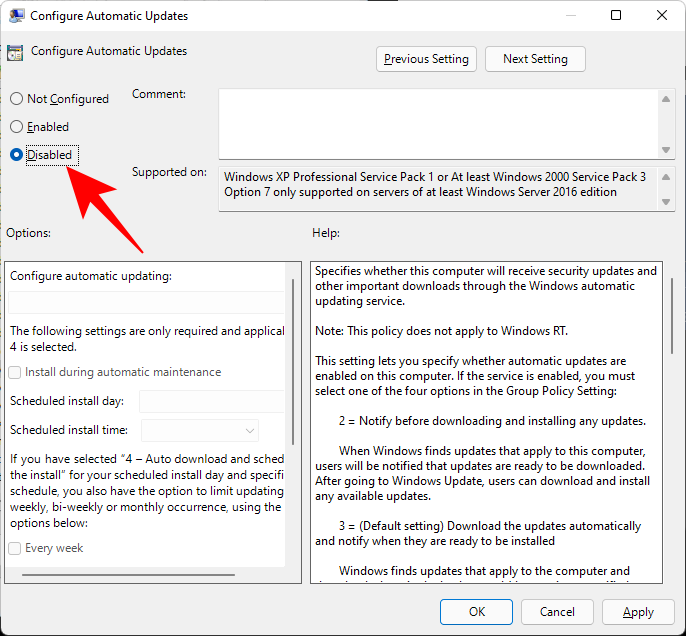
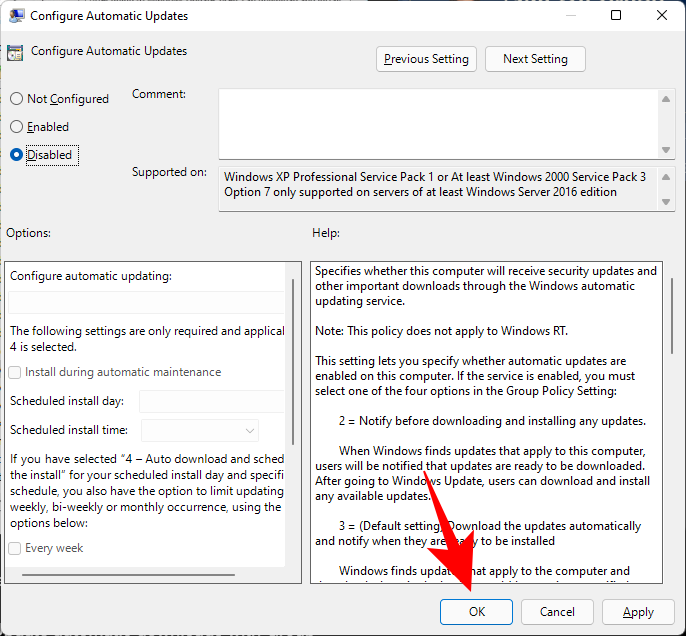
A continuación, fai clic en Aceptar .
Se non queres desactivar as actualizacións de Windows 11 por completo, hai algunhas outras configuracións de actualizacións de Windows que podes analizar. Aquí tes como:
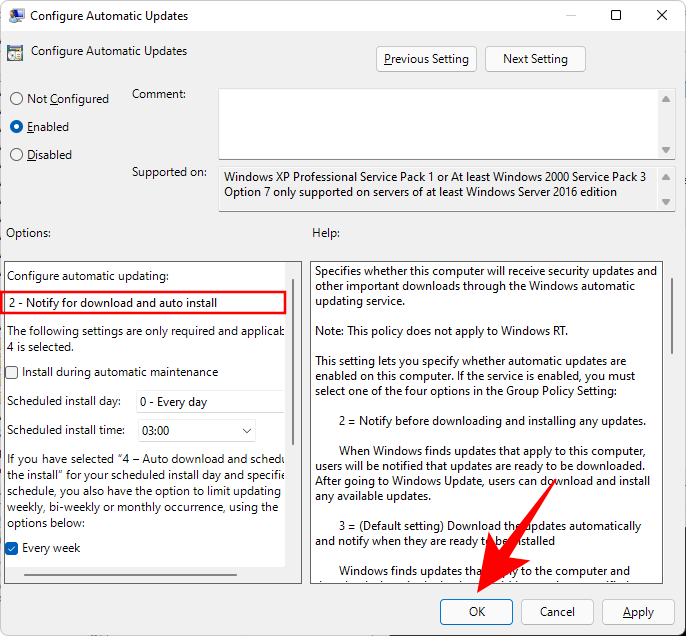
Na mesma xanela da política "Configurar actualizacións automáticas", en primeiro lugar, seleccione Activado .
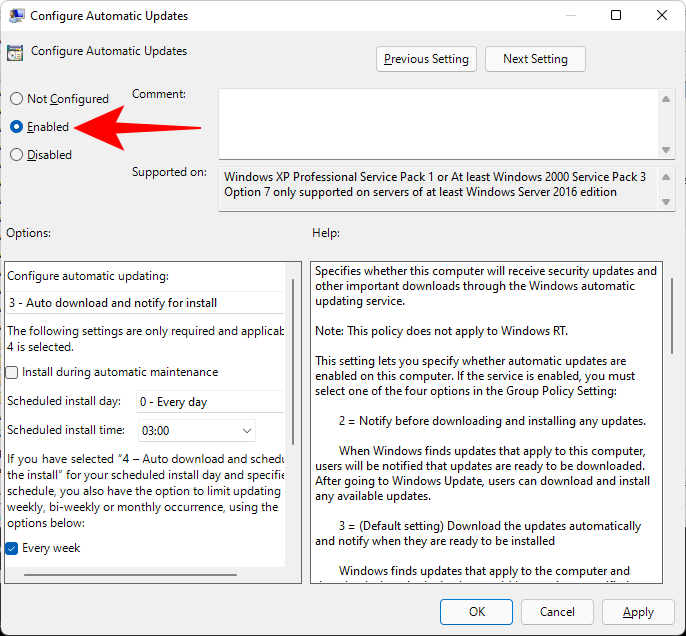
A continuación, en "Configurar actualización automática", faga clic no menú despregable e seleccione unha das seguintes opcións:
- 2 - Notificar a descarga e a instalación automática. (recomendado)
- 3 – Descarga automática e notificación para a instalación.
- 4 – Auto download and schedule the install.
- 5 – Allow local admin to choose settings.
- 7 – Allow download, Notify to install, Notify to restart.
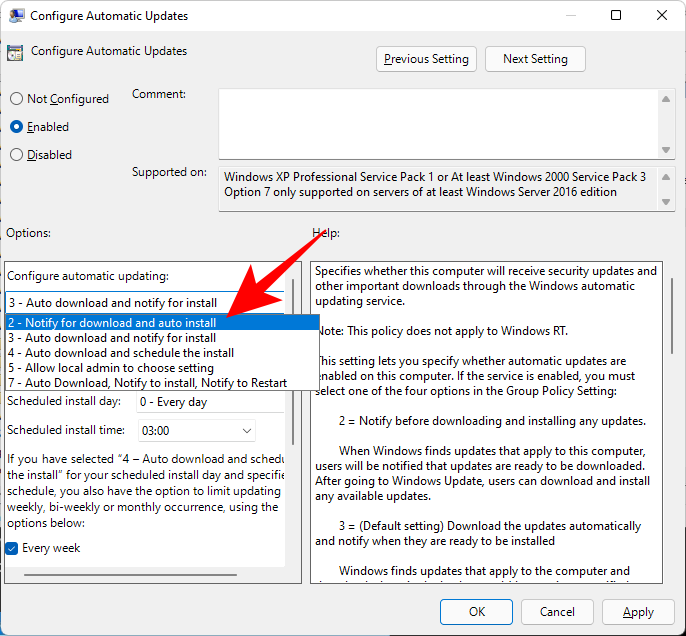
We’re going with the recommended number 2 – ‘Notify for download and auto install’. With this option, updates are not automatically downloaded. Instead, you will have to manually trigger them from the Windows Update settings page.
Once you’ve selected your Windows update configuration, click OK.
Restart your computer for the changes to take effect.
Method #04: Disable or limit updates from the registry
Similar to the previous method, you can also disable WIndows update entirely or tweak Windows update configuration from the Registry. Here’s how:
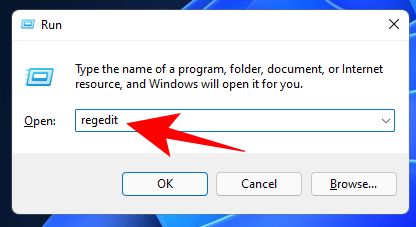
Press Win + R to open the RUN box, type regedit, and hit Enter.
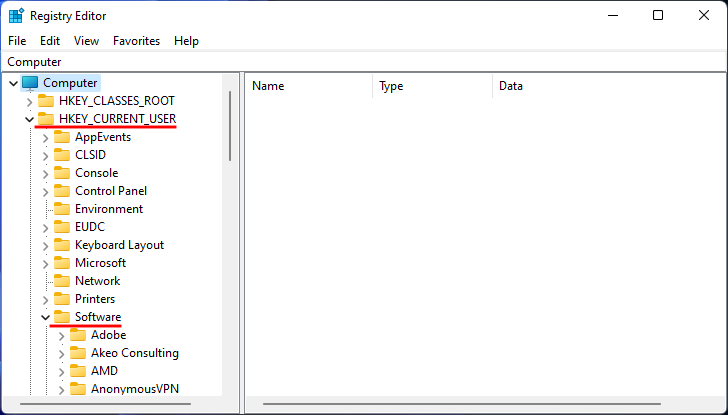
Navigate to the following key:
Computer\HKEY_LOCAL_MACHINE\SOFTWARE\Policies\Microsoft\Windows
Alternatively, you can copy the above and paste it in the Registry Editor’s address bar and press Enter.
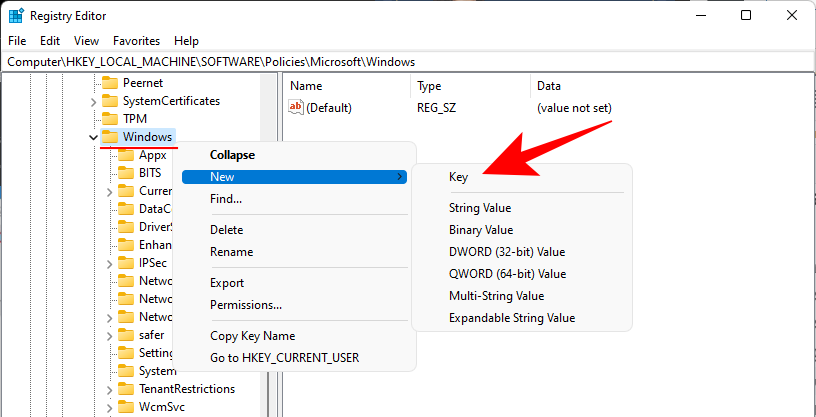
Now, right-click on the selected ‘Windows’ folder and select New > Key.
Name this key WindowsUpdate and hit Enter.
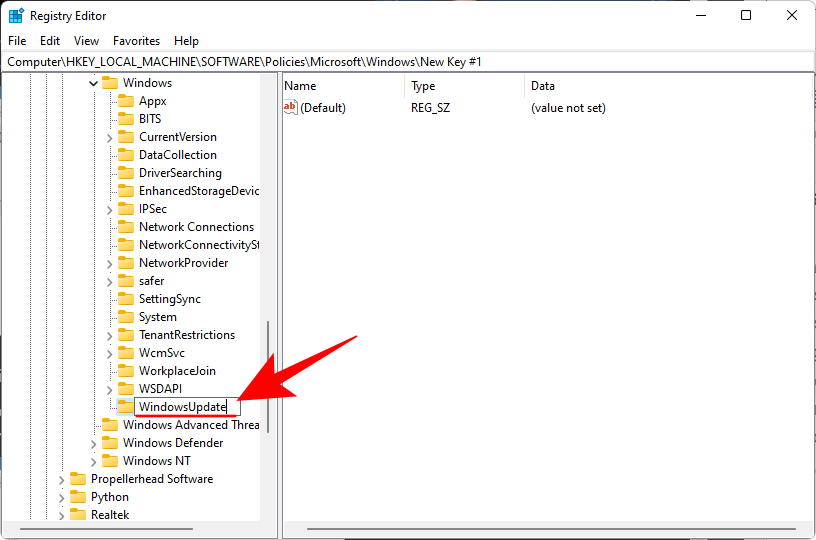
Now, right-click this key and create a sub-key via New > Key.
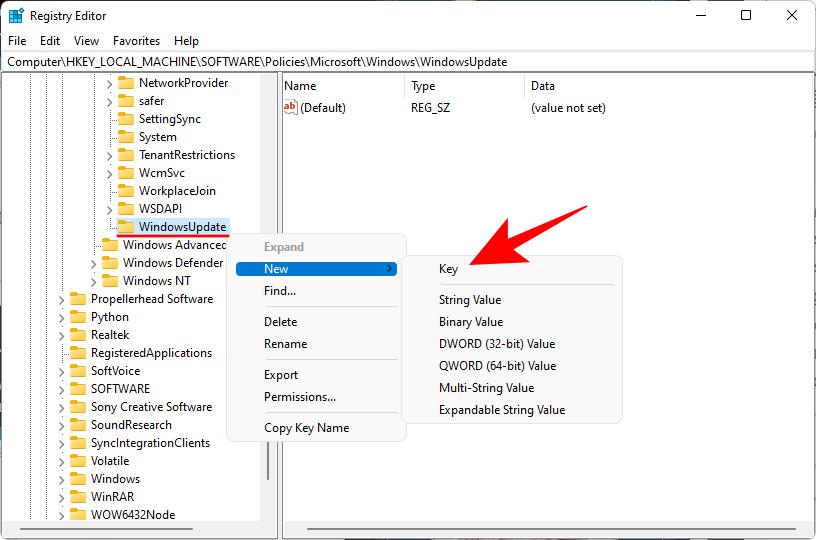
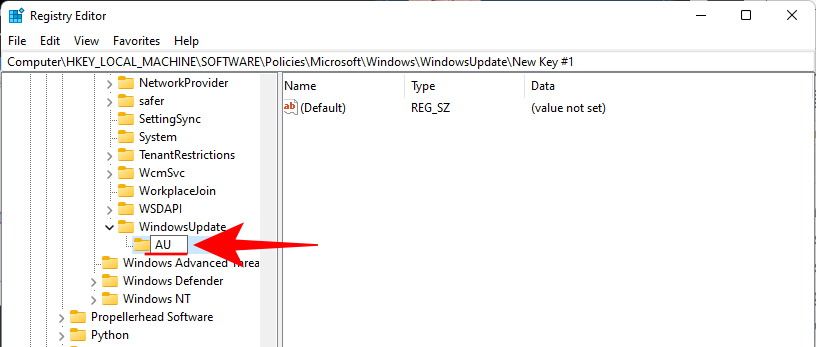
Name this key AU.
With the newly created AU key selected, right-click in the empty space on the right and select New > DWORD (32-bit) Value.
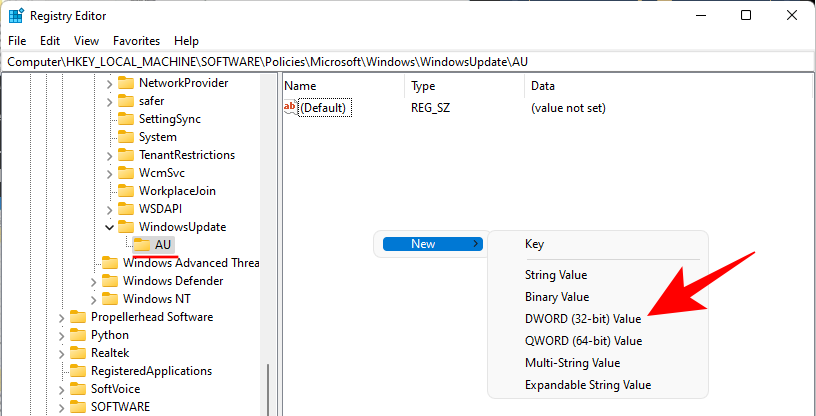
Name this key AUOptions.
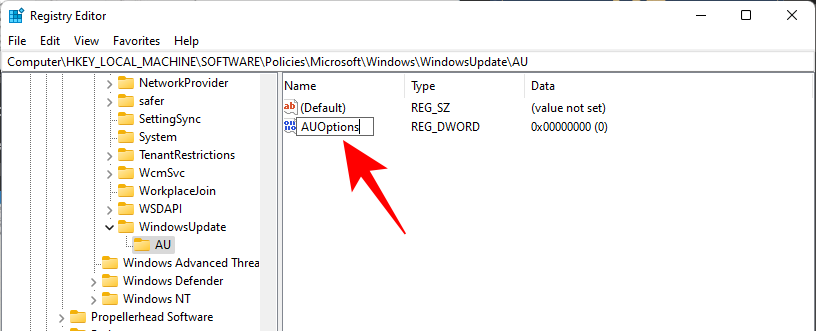
Double-click ‘AUOptions’ and change its value to one of the following numbers (their corresponding change is mentioned below):
- 2 – Notify for download and auto install. (recommended)
- 3 – Auto download and notify for install.
- 4 – Auto download and schedule the install.
- 5 – Allow local admin to choose settings.
- 7 – Allow download, Notify to install, Notify to restart.
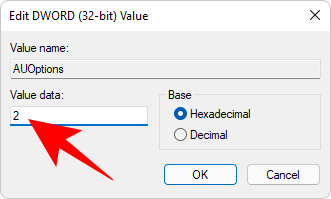
Make sure to only enter the number, depending on how you want the Windows updates to be configured. For instance, we want to be notified for download and auto install so we’re changing the value to ‘2‘. Then click OK.
Note that these options work exactly like the Group Policy method but with the sole exception of not being able to completely disable updates. The only option that comes close to disabling Windows Updates is the recommended option number 2. Restart your computer for the changes to take effect.
Method #05: Set a Metered Connection
Another way to prevent Windows from updating automatically is to set up a metered connection. This will tell Windows that you’re on limited bandwidth and that updates are not your priority. Here’s how you can set it up:
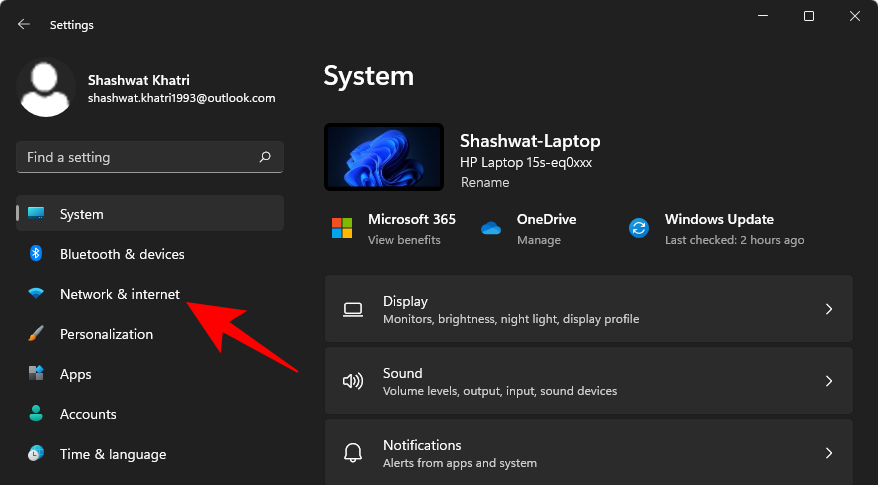
Press Win + I to open Setings, then click on Network & internet in the left panel.
Click on Wi-Fi.
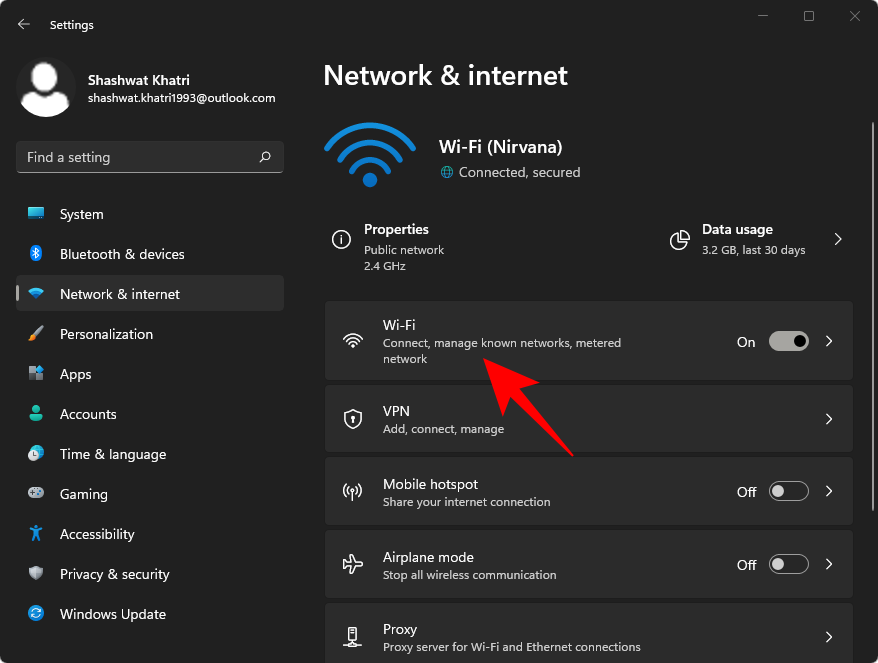
Select your Wi-Fi connection.
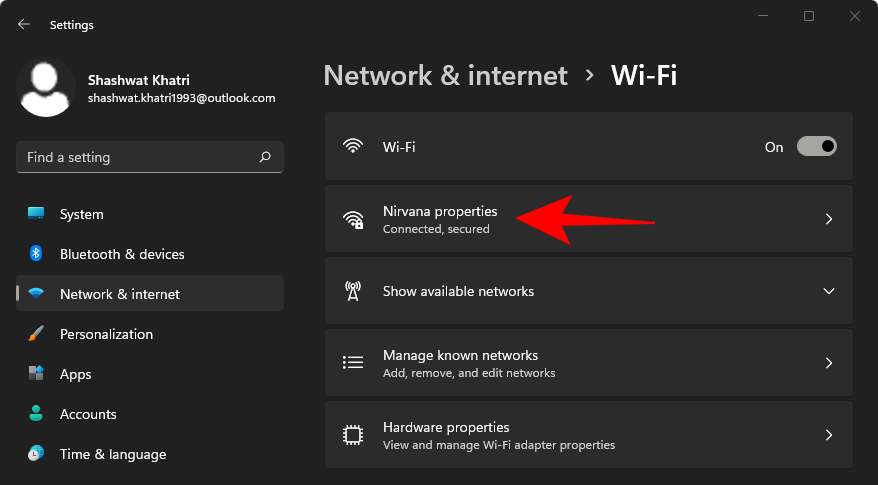
Toggle On Metered connection.
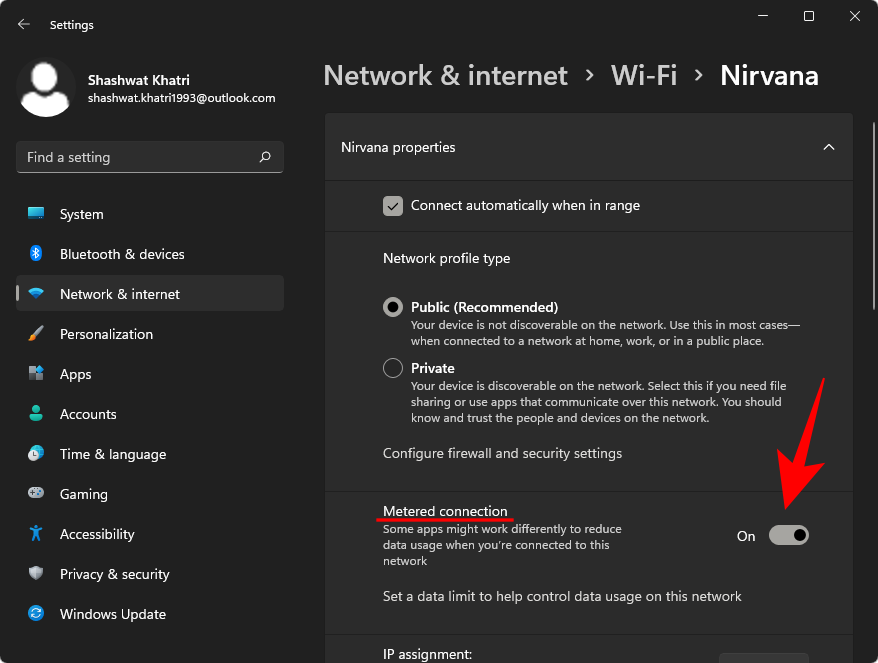
And that’s it! You’ve now set up a metered connection and Windows updates will be temporarily disabled. However, this is not the ideal solution for stopping Windows updates as important security updates can still be downloaded and installed. On top of that, some important apps may not be updated with a metered connection, such as OneDrive or any of the ‘Store apps’.
Method #06: Hide Updates with Microsoft’s Show/Hide troubleshooter
Microsoft has a Windows update troubleshooter tool that lets you hide (or show) specific updates that you don’t want to be installed while keeping everything else up to date.
Download: wushowhide.diagcab
After downloading the show/hide tool from the above link, run the tool and click Next.
The troubleshooter will now begin.
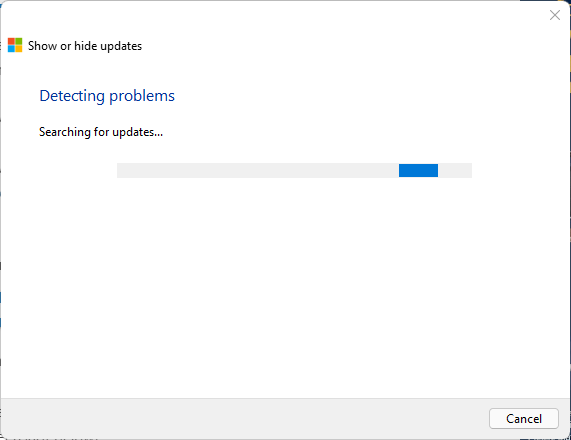
Click on Hide updates.
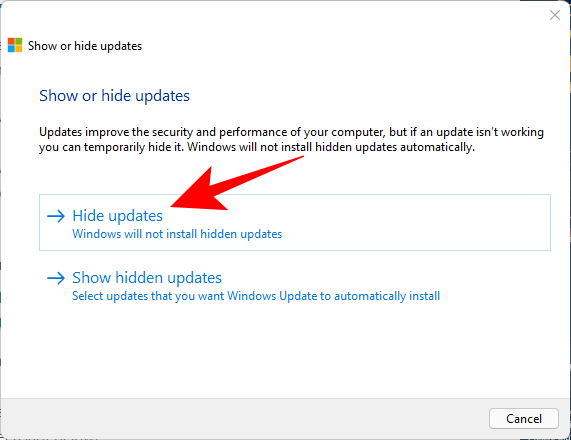
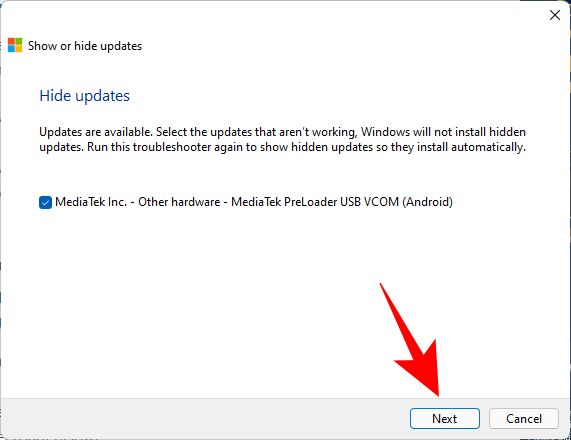
Now select the available update that you want to hide. These will not be installed anymore. Then click Next.
Once the selected updates are hidden, click on Close.
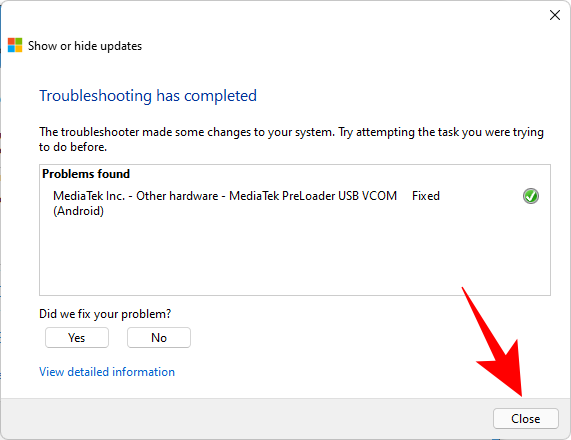
The only caveat with this troubleshooter tool is that the updates have to be downloaded before and waiting to be installed.
If you think you’ve hidden an update by accident, open the troubleshooter tool again but this time select Show updates.
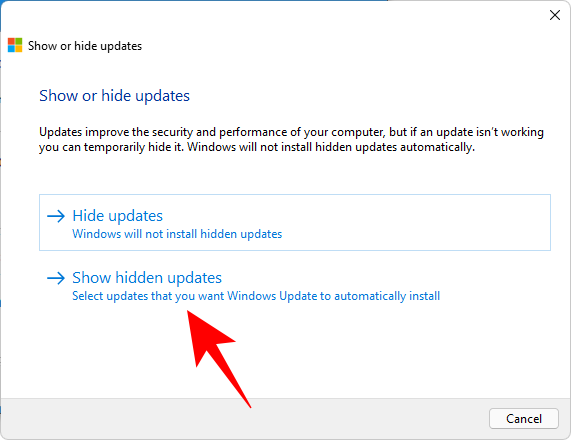
Select your hidden update and click Next.
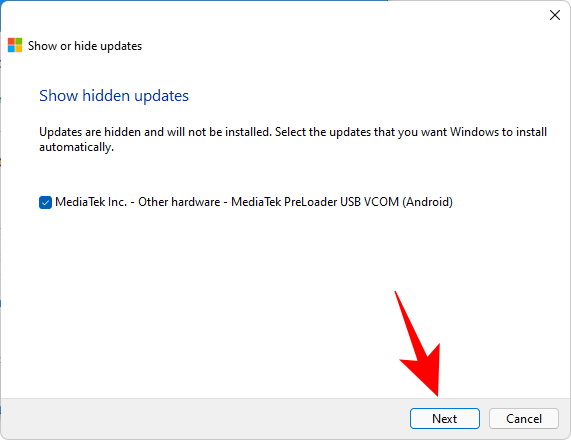
Your hidden update should now become available again.
Method #07: Use a third-party app to disable or stop updates on Windows 11
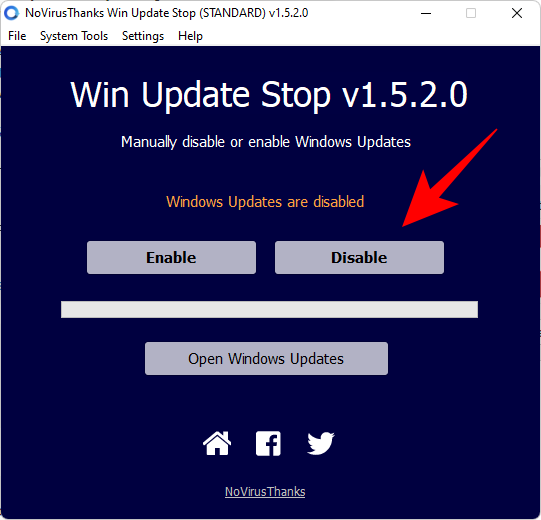
There are various third-party apps that can disable or stop updates entirely on Windows 11. Apart from the Show/Hide troubleshooter that we saw before, the Win Update Stop application is another tool that you can use to disable updates.
All you have to do is run the setup, run the application, and use its one-click interface to quickly enable or disable updates.
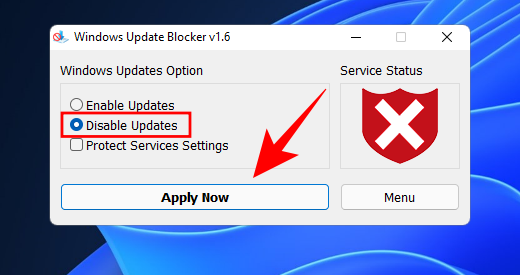
You may also want to give Windows Update Blocker a go – a portable application that lets you disable updates in a flash. Use the link above to download the file, then extract the contents and run the application. Thereafter, all you have to do is ensure that ‘Disable Updates’ is selected and then click ‘Apply Now’.
Why you may want to disable Windows updates
Though turning off Windows updates is not generally recommended, there are cases when it becomes necessary to do so.
It isn’t a rare thing to receive updates that bring their own set of security vulnerabilities and bugs, and many have had to suffer because of it in the past.
Similarly, if you don’t want Windows automatically updating your hardware drivers because, say, the latest version is causing you trouble and you’ve opted for an older one, you may benefit from keeping Windows updates disabled.
Some users also like having more granular control over their updates and configure Windows updates to notify them before downloading and installing any so they can review them and decide which ones to let through.
How to stop updates for other Microsoft products
If you don’t want to receive Windows updates mainly because you don’t want other Microsoft products to get updated, there is a dedicated option to configure that.
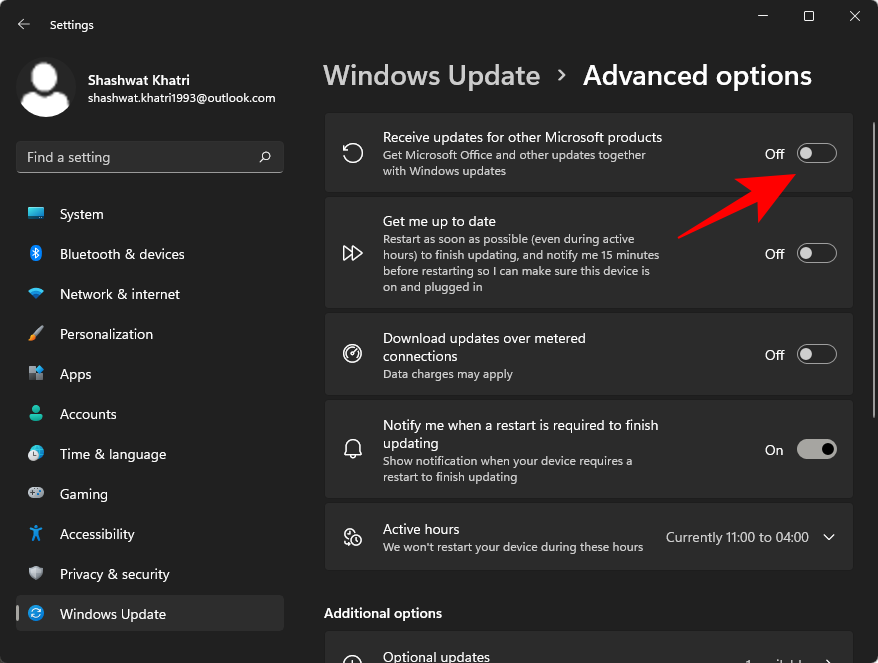
Press Win + I to open Settings and click on Windows Update on the left.
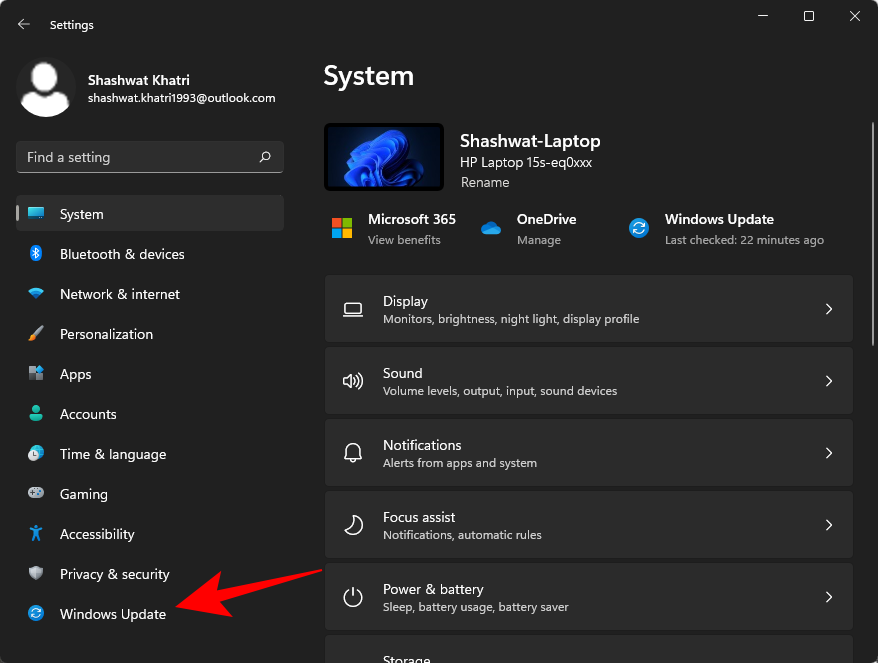
Click on Advanced options.
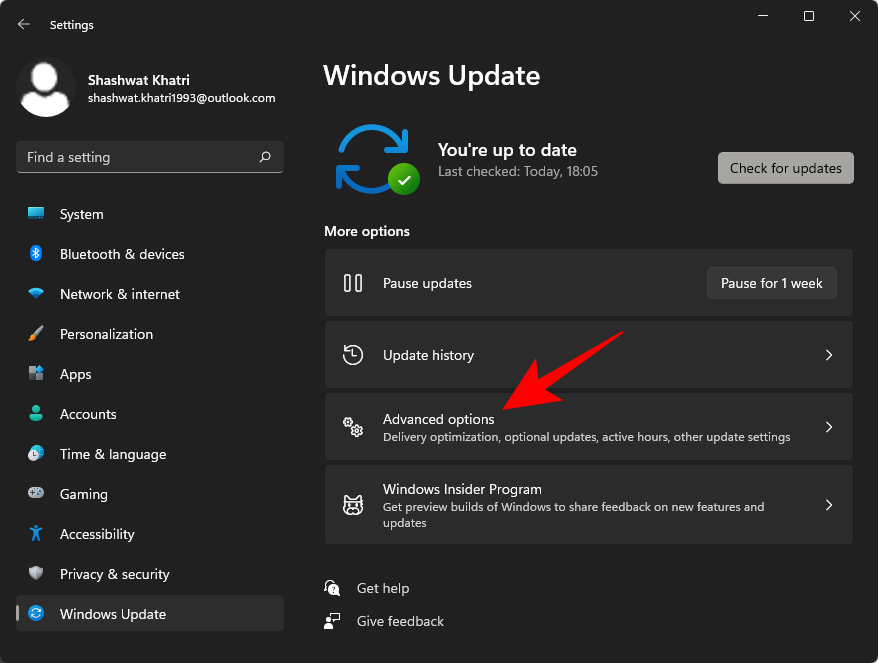
Then toggle Off Receive updates for other Microsoft products.
Exactly which Microsoft products get their updates this way is a hard guess as Microsoft has never made it clear. But from what can be surmised over the years, Office and Silverlight are definitely among them.
How to uninstall Windows 11 updates
Sometimes, disabling Windows updates entirely can seem a bit excessive if you’re doing so only because you’ve received a bad update. There’s a much more practical ‘Uninstall updates’ option that you can use instead. Here’s how:
Press Win + I to open Settings and click on Windows Update on the left.
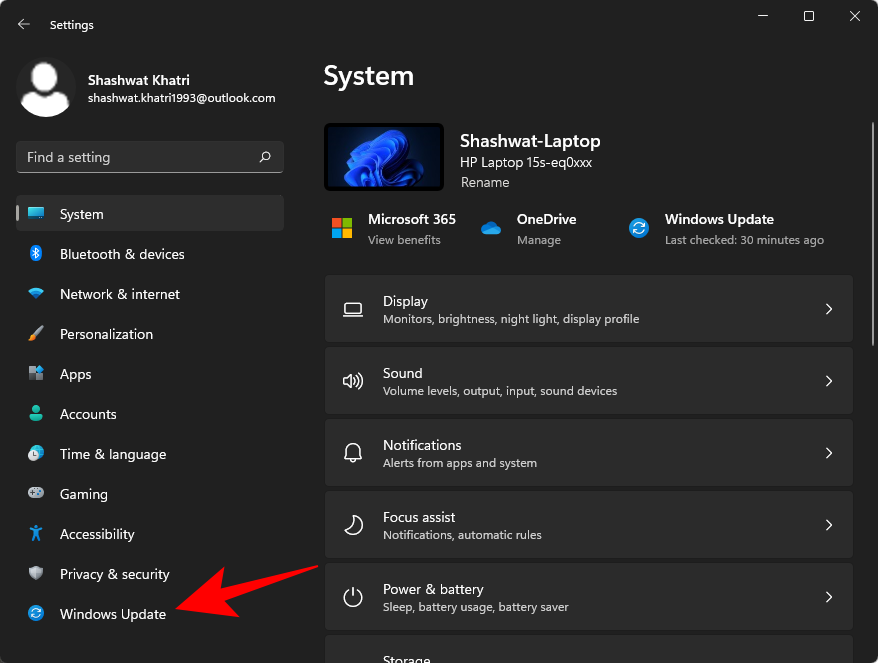
Then click on Update history.
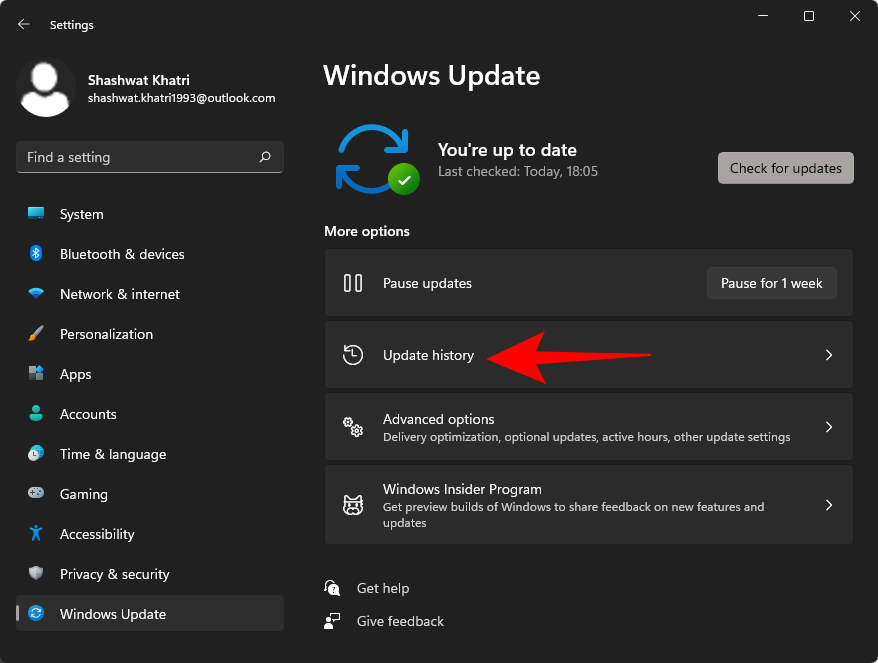
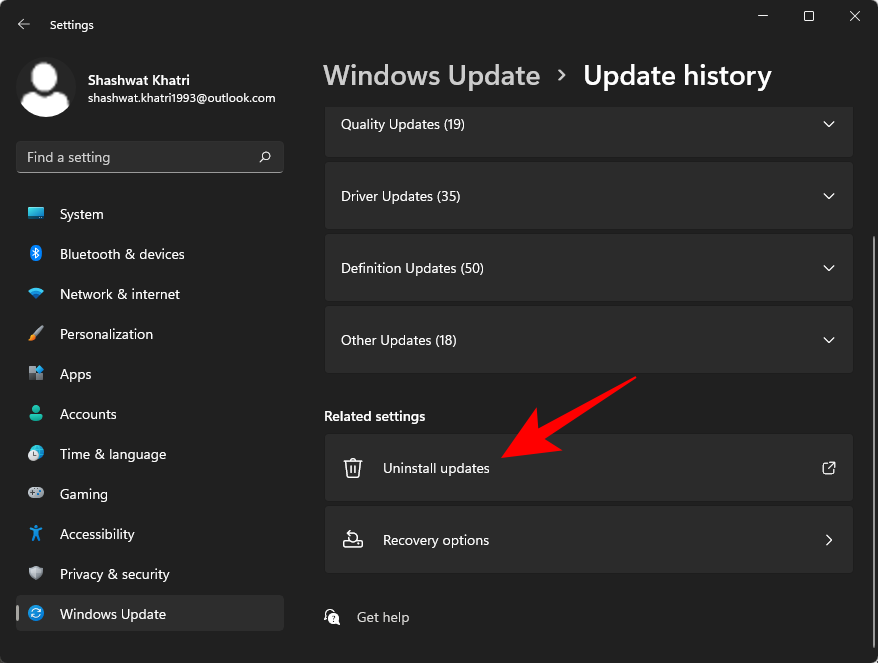
Scroll down and click on Uninstall updates.
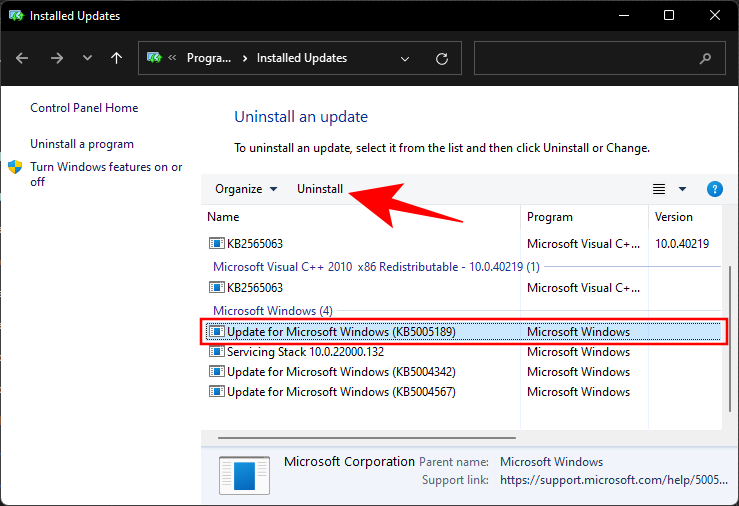
Here, find the update that’s bugging you and select it. Then click on Uninstall.
Confirm with a Yes.
Note: Some minor updates may not have the ‘Uninstall’ button.
Frequently Asked Questions (FAQs):
Let’s take a look at some common queries concerning Windows updates.
Should I disable Windows updates?
Windows Updates should be disabled only if there’s a great need for it. If you’re not suffering from any buggy patches and if all your drivers are functioning without a hitch, keep Windows updates on. Though the updates that you get aren’t always perfect, they are the only source of future security patches and cumulative updates that you’re invariably going to need sooner or later.
Can I permanently disable updates?
Si, podes desactivar as actualizacións permanentemente. Aínda que Microsoft é bastante agresivo ao obrigar aos usuarios a manter Windows actualizado, e tamén por boas razóns, os métodos mencionados nesta guía axudarano a evitalo.
RELACIONADAS
