Todos temos momentos nos que desexamos poder volver a un momento anterior e restaurar como eran as cousas daquela. Aínda que é pouco probable na vida real, é unha realidade sinxela en Windows 11 (do mesmo xeito que nas iteracións anteriores de Windows), xa que nos dá a opción de volver á forma como estaba o sistema nun momento anterior.
Non obstante, para facelo, hai que crear un punto de restauración manualmente, ou polo menos ter Windows configurado para que estes puntos se creen automaticamente. Aquí tes todo o que necesitas saber para crear puntos de restauración en Windows 11 e para que serven.
Contidos
Como crear un punto de restauración en Windows 11 manualmente
Por calquera motivo, se queres crear un punto de restauración por ti mesmo, hai algunhas formas de facelo. Botámoslles unha ollada e creemos a restauración manualmente.
Método #01: Usando as propiedades do sistema
Preme Inicio, escribe "Crear un punto de restauración" e selecciona a opción como se mostra a continuación.
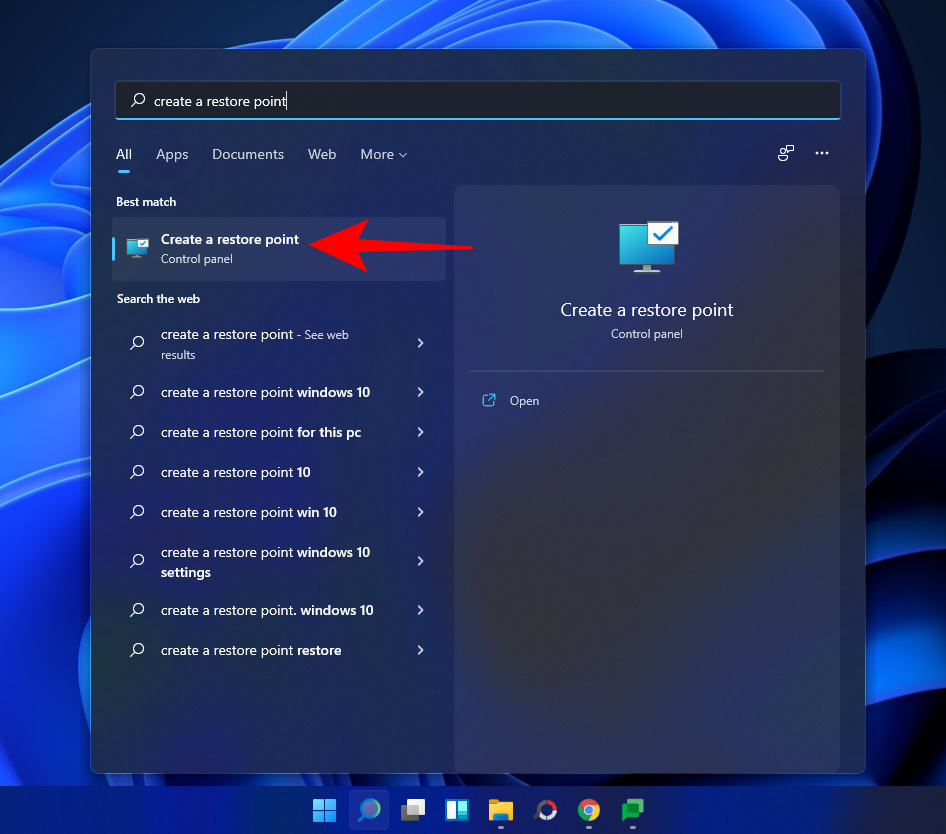
Isto abrirá a xanela Propiedades do sistema. Fai clic no botón Crear na parte inferior.

Se isto está en gris, primeiro terás que activar a protección do sistema (consulta a sección anterior para isto).
Dálle un nome a este punto de restauración e fai clic en Crear .
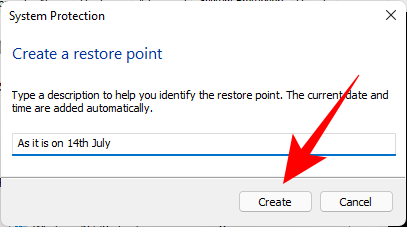
A creación deste punto de restauración pode levar algún tempo, así que ten paciencia.
Método #02: Usando o símbolo do sistema
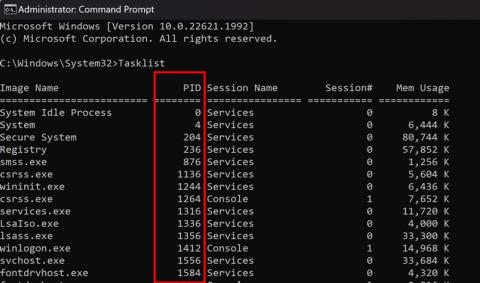
Outra forma de crear un punto de restauración é facelo desde o símbolo do sistema. Aquí tes como facelo:
Preme Inicio, escribe cmd e fai clic en Executar como administrador .

Agora, escriba o seguinte comando e prema Intro:
wmic.exe /Namespace:\\root\default Path SystemRestore Call CreateRestorePoint "Restore Point Name", 100, 7

Substitúe Restore Point Nameo comando anterior polo que desexe chamar ao punto de restauración. O seu punto de restauración do sistema créase correctamente cando recibe as mensaxes "Execución do método exitosa" e "ReturnValue=0".

Método #03: Usando PowerShell
Os usuarios avanzados tamén poden crear puntos de restauración usando PowerShell. Aquí tes como facelo:
Prema Inicio, escriba PowerShell e seleccione Executar como administrador .

Agora escriba o seguinte comando e prema Intro:
powershell.exe -ExecutionPolicy Bypass -NoExit -Command "Checkpoint-Computer -Description 'Restore Point Name' -RestorePointType 'MODIFY_SETTINGS'"

Substitúe Restore Point Nameo comando anterior polo que desexe chamar ao punto de restauración. Deberías ver o informe de progreso da creación do teu punto de restauración.

Se PowerShell mostra unha mensaxe (como se mostra a continuación) que indica que non pode crear máis dun punto de restauración do sistema en 24 horas, terá que editar o rexistro para iso.
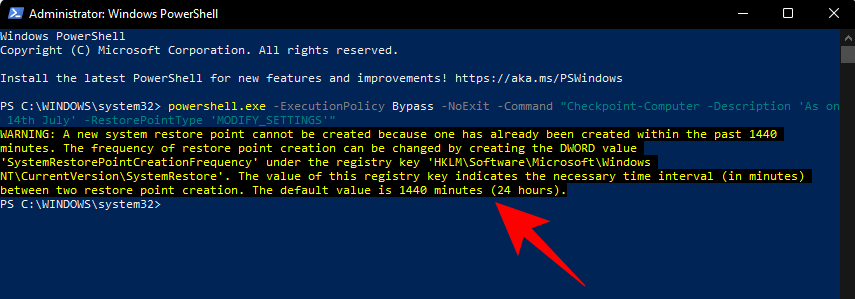
Consulte as correccións dadas máis adiante para evitar el.
Como crear un punto de restauración automaticamente
Windows crea puntos de restauración por si só nalgúns casos, pero tamén pode configuralo para que se cree en cada reinicio. Vexamos primeiro estes dous temas.
Consulta os puntos de restauración xa creados automaticamente polo sistema
Se as configuracións dos puntos de restauración do sistema se configuran correctamente, Windows 11 creará automaticamente puntos de restauración aos que volva. Aquí tes como asegurarte de que Windows coida a cápsula do tempo do teu PC por ti:
Preme Inicio, escribe "Crear un punto de restauración" e escolla a opción como se mostra a continuación.
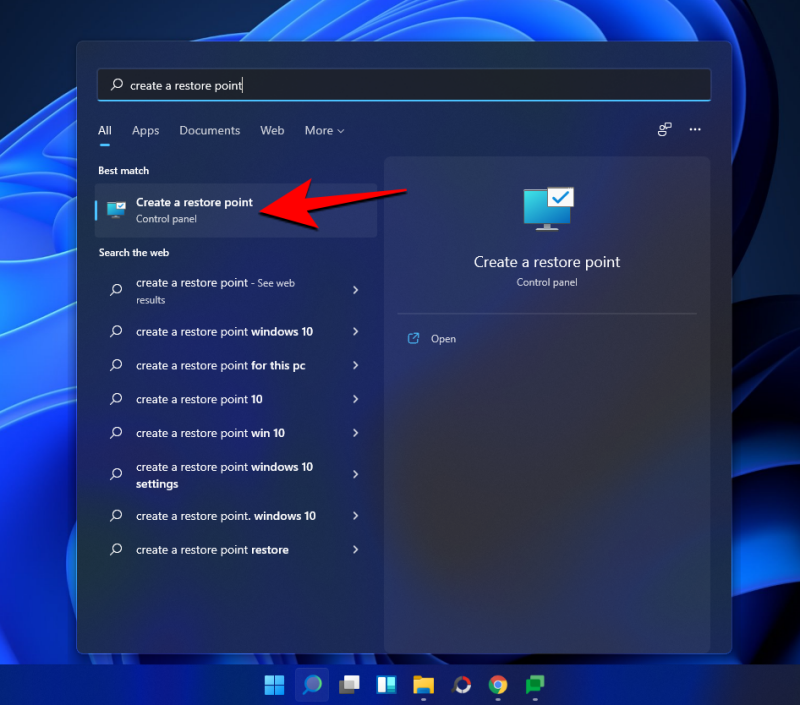
Isto abrirá a xanela Propiedades do sistema. Seleccione a unidade do sistema e prema en Configurar .
Agora selecciona Activar a protección do sistema .

Windows asignará automaticamente espazo no disco para os puntos de restauración do sistema por si mesmo. Pero pode cambiar o espazo de disco que pode usar a protección do sistema. Para facelo, move o control deslizante debaixo de "Uso do espazo en disco" para asignar espazo no disco por ti mesmo.
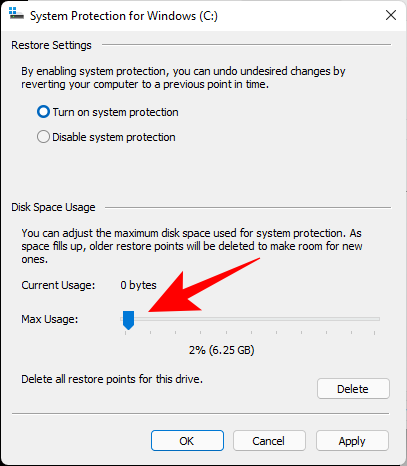
Tamén hai un botón Eliminar para eliminar puntos de restauración anteriores. Unha vez feito, fai clic en 'Aplicar'.
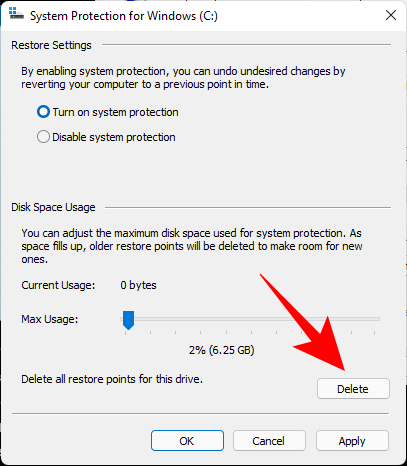
Windows 11 will create system restore points whenever major changes are made such as when new updates are applied.
How to automatically create a system restore point at startup
If you don’t want to go through the trouble of creating system restore points every time you make a change that could potentially disrupt how your system works, you can set up the restore points to be created automatically at startup. Here’s how to do so:
The first thing that you’ll have to do is to change the restore point creation frequency. By default, Windows won’t create a restore point if one has been created in the last 24 hours. To change this, follow the steps below:
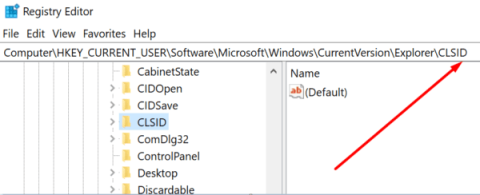
Press Win + R to open the RUN box, type regedit, and hit Enter.

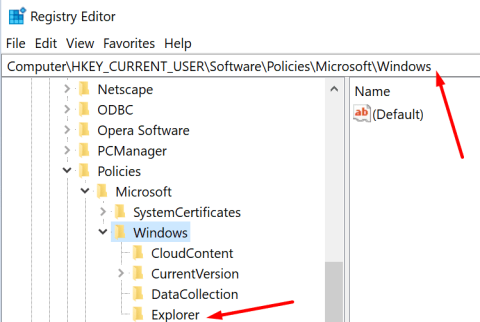
Now, navigate to the following address (or copy and paste it in the registry address bar):
Computer\HKEY_LOCAL_MACHINE\SOFTWARE\Microsoft\Windows NT\CurrentVersion\SystemRestore

Right-click in the empty space to the right and select New, then DWORD (32-bit) Value.
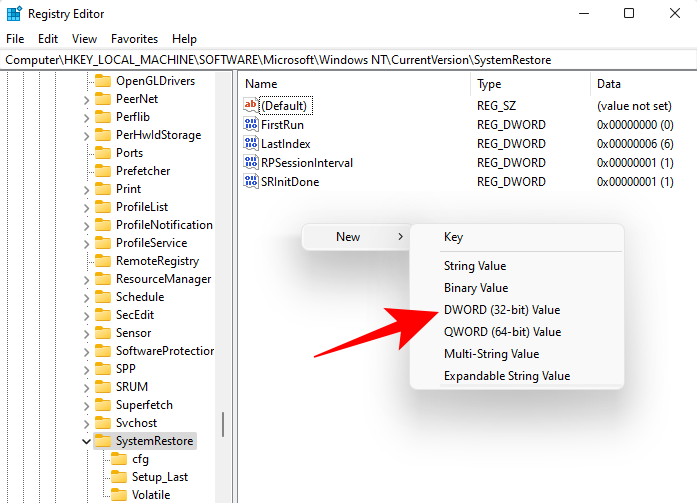
Name it SystemRestorePointCreationFrequency.
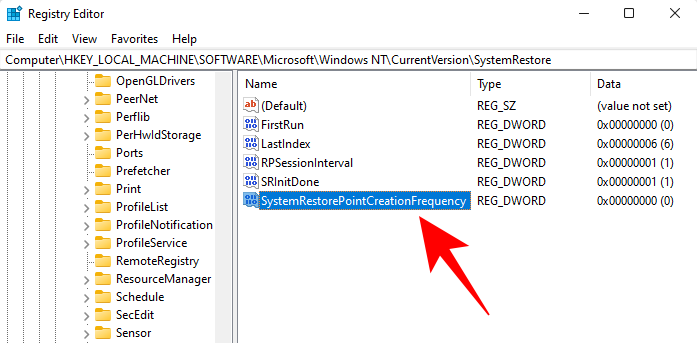
By default, its value is set to 0. Let it be that way and close the registry editor.
Now, the next step is to create a task in Windows Task Scheduler so that a restore point is created whenever Windows starts. To do so, press Start, type Task Scheduler and hit Enter.
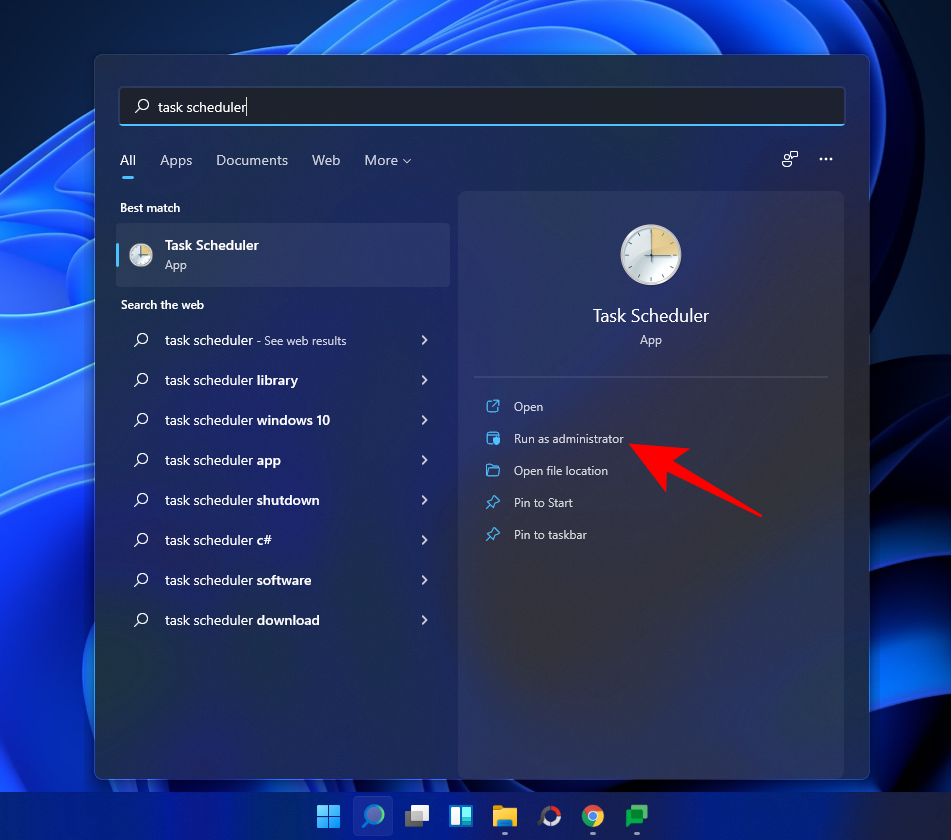
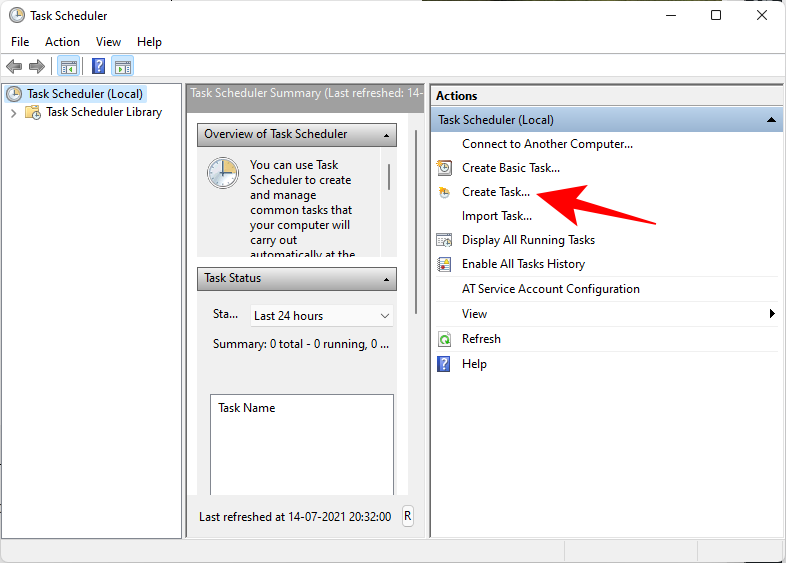
In the right panel, click on Create Task.
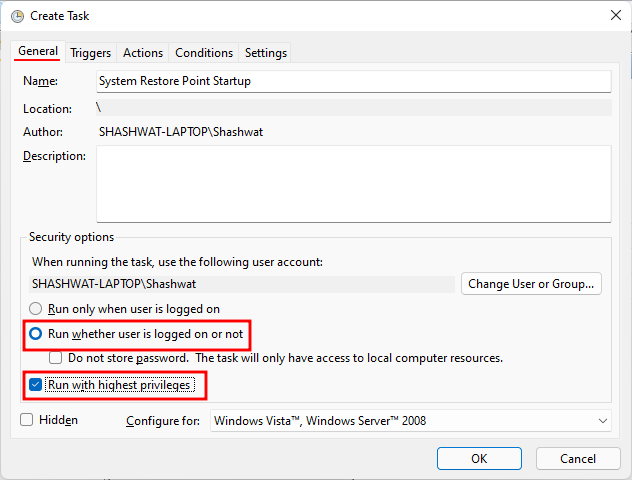
Now, under the ‘General’ tab, give this task a name, and select Run whether user is logged on or not, and Run with highest privileges.
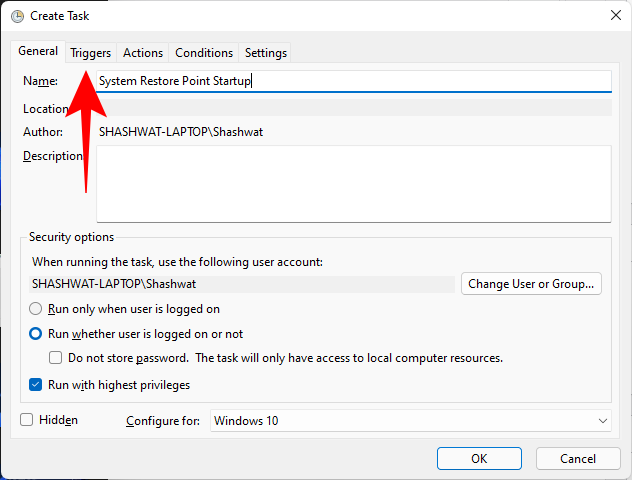
Also, at the bottom, click on the radio button next to “Configure for” and select Windows 10.

Don’t worry if Windows 11 is not among the options. As there’s no stable build for Windows 11 yet, you may not see Windows 11 just yet. But rest assured, the Windows 10 option will still work.
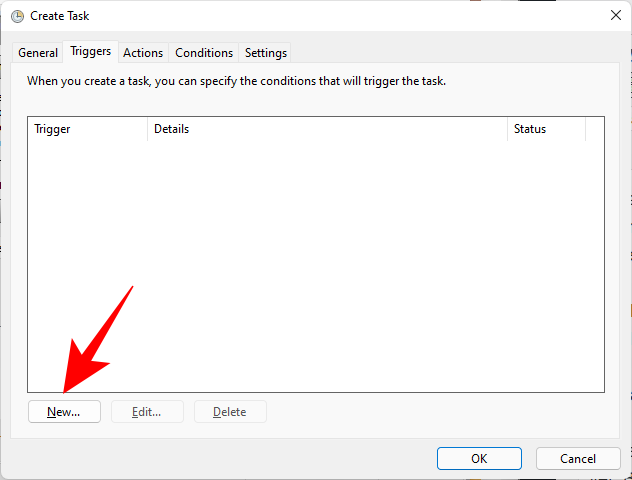
Now click on the “Triggers” tab to switch to it.
Then click on New at the bottom.
Now, click on the drop-down menu next to “Begin this task” and select At startup.
Then click OK

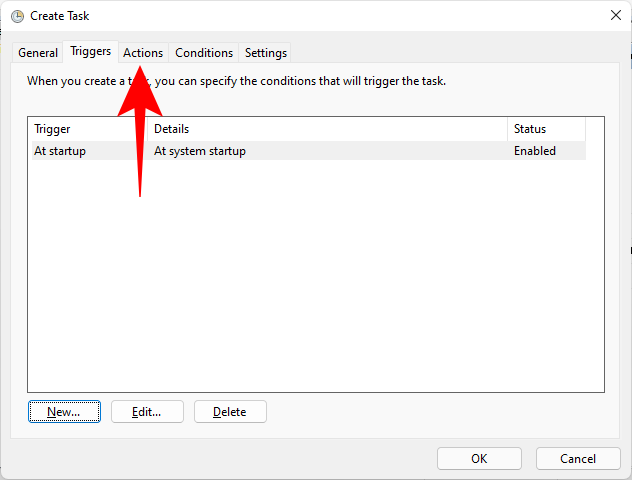
Next, click on the “Actions” tab and switch to it.
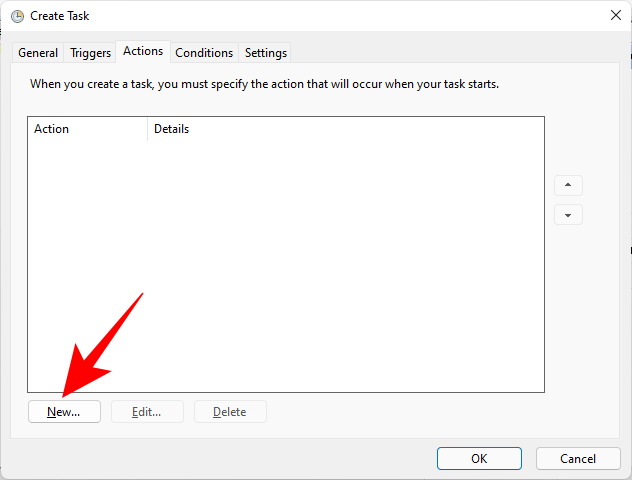
Click on New at the bottom.
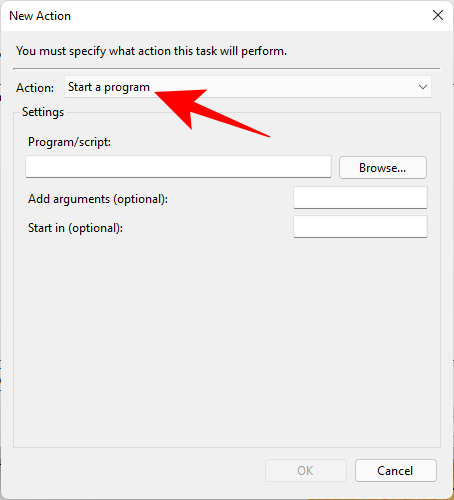
Here, we will use a few arguments to run Windows Management Instrumentation Control Program and to let it know which action needs to be taken. In the “New Action” window, ensure that the Action is to “Start a program” (default).
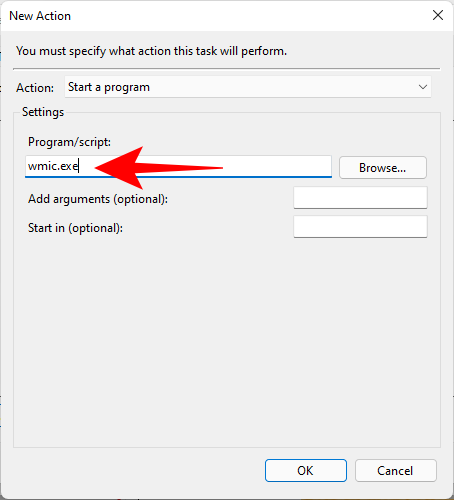
In the Program/script field, type wmic.exe.
Then, next to “Add arguments (optional)”, type the following command:
/Namespace:\\root\default Path SystemRestore Call CreateRestorePoint "Startup Restore Point", 100, 7
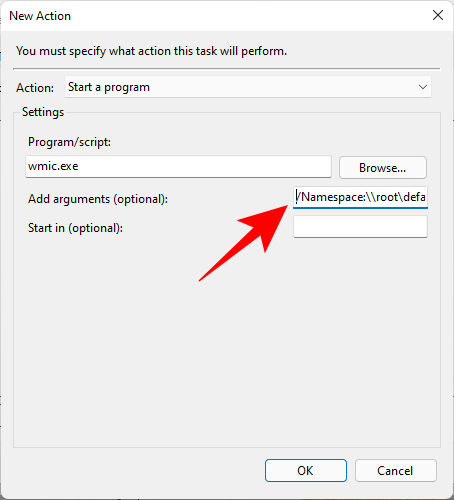
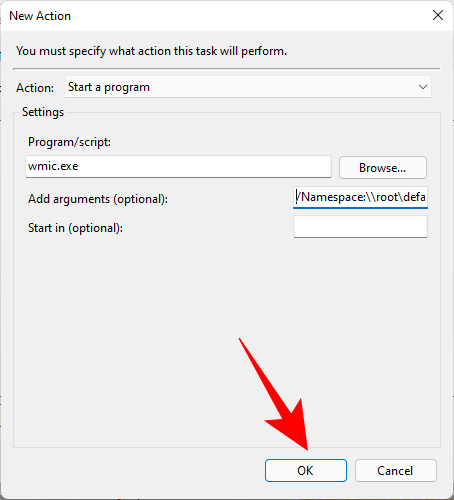
Then click OK.
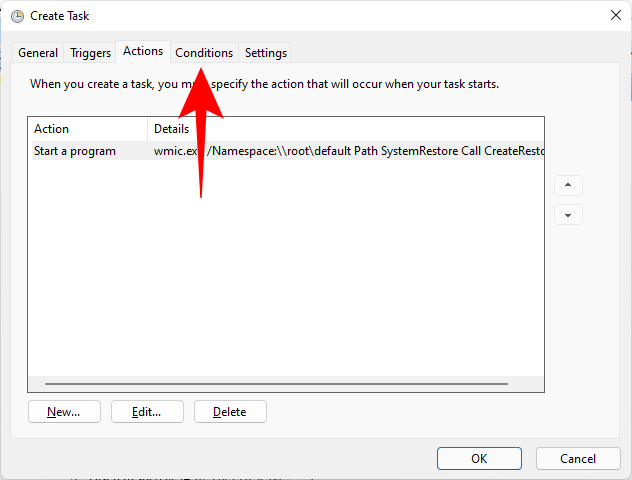
Now, switch to the “Conditions tab”.
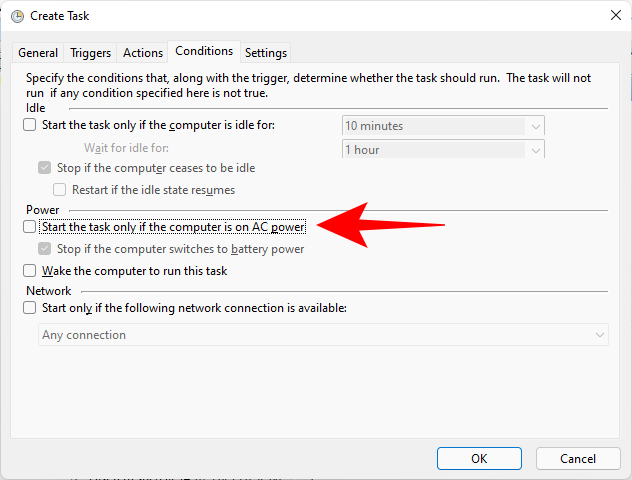
If you’re using a laptop, uncheck the option under “Power” that says Start the task only if the computer is on AC power. Then click OK.
Task Scheduler will prompt you to enter your password to complete setting up the task. Do so and click OK.
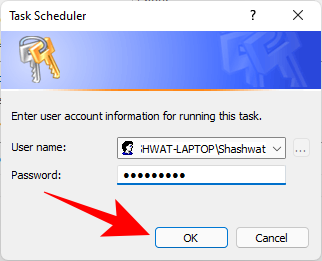
And that’s it. Now, every time you start your computer, a system restore point will be created.
How to restore Windows 11 back to a restore point
If your system runs into any trouble, you can use your restore points, whether they be created automatically or manually, to get your system back to how it was before.
There are a few ways you can restore your system. Depending on how bad a trouble your system has run into, you can use a different way to restore it.
Method #01: Using System Properties
This is the simplest way to restore your system, but it also requires you to be able to at least access the desktop and the start menu.
Press Start, type ‘Create a restore point’, and choose the option as shown below.
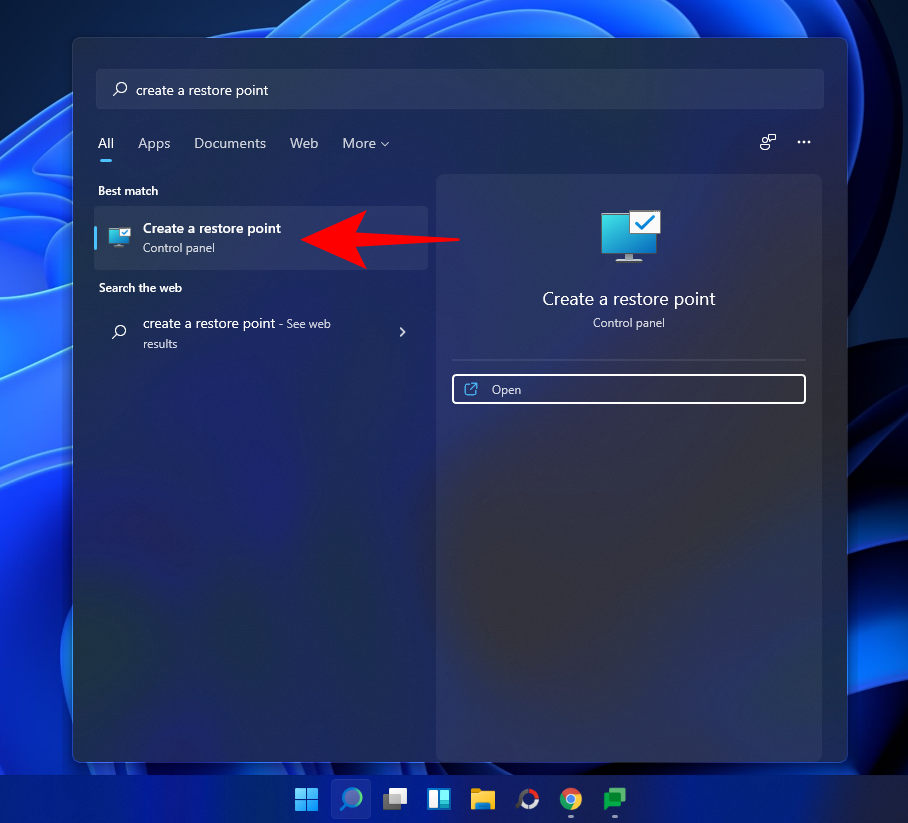
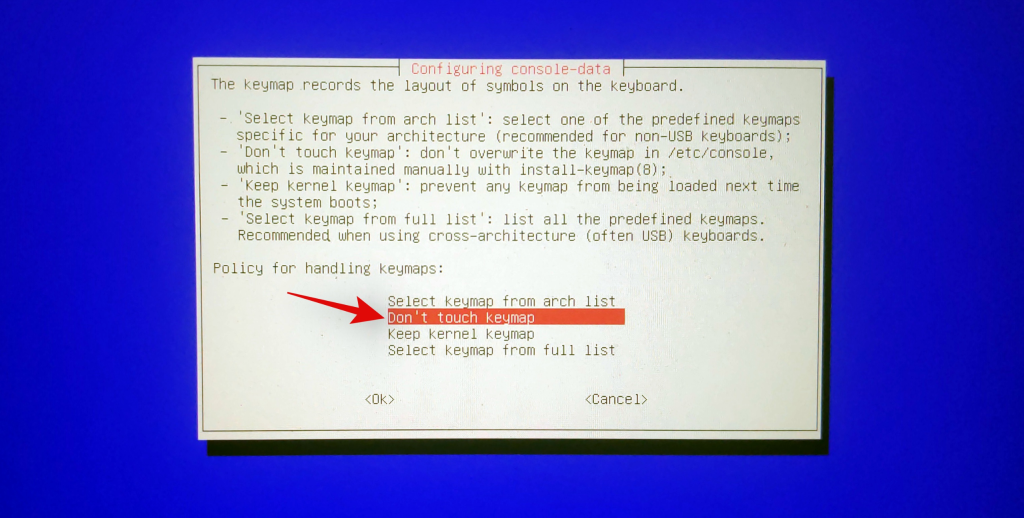
This will open up the System Properties window. Here, click on System Restore.
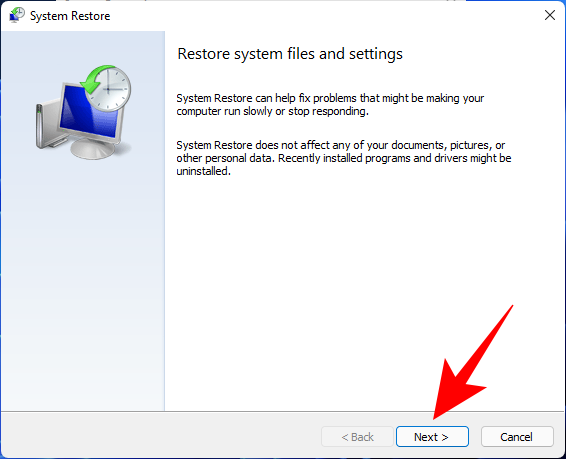
This will lead you to the System Restore window. Click Next.
Select a system restore point and click Next.
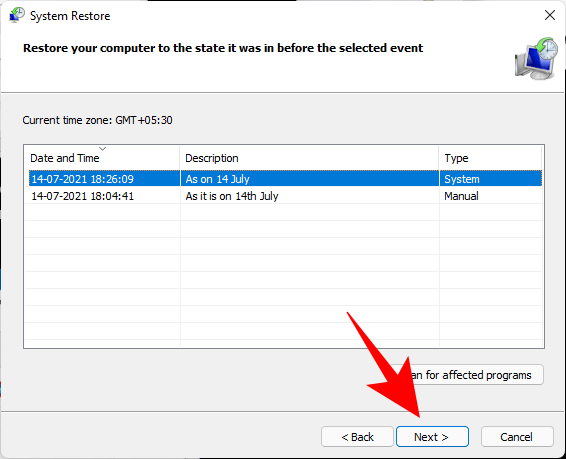
Click Finish.
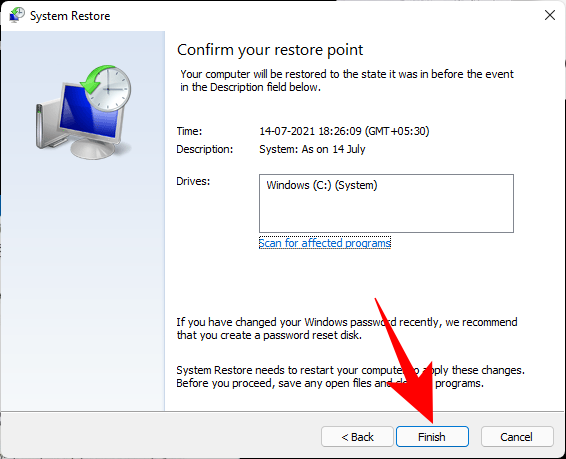
Your system will now be restored.
Method #02: Using Advanced Startup
If you are not able to boot up your system, you may have to access the Advanced Startup settings and restore your system through it. There are a couple of ways you can access the Advanced Startup screen.
The first way is to turn off the device and pressing F8 before you see the Windows logo. This will boot your PC into recovery.
An alternate way is to access recovery using Windows installation media. In the Windows Setup, click Next…
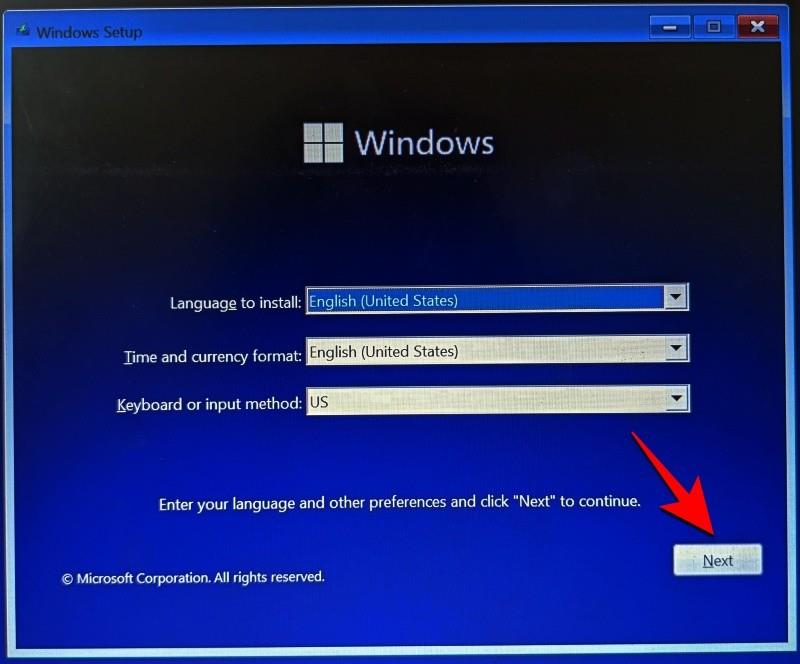
and then click on Repair your computer in the bottom left corner.
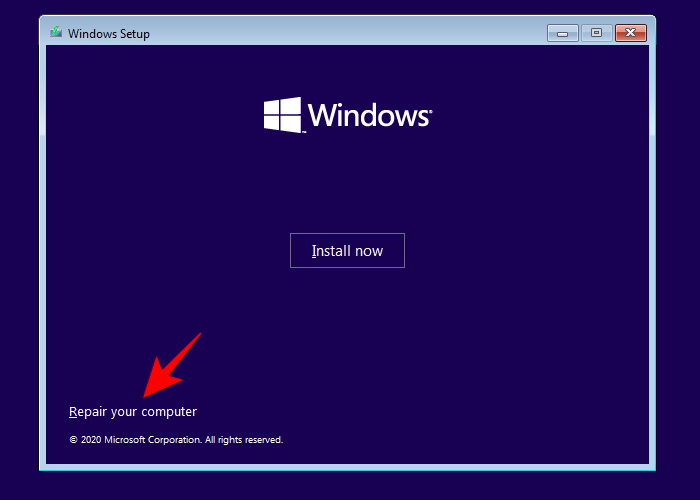
Both these ways will get you to Advanced Startup.
Select Troubleshoot.
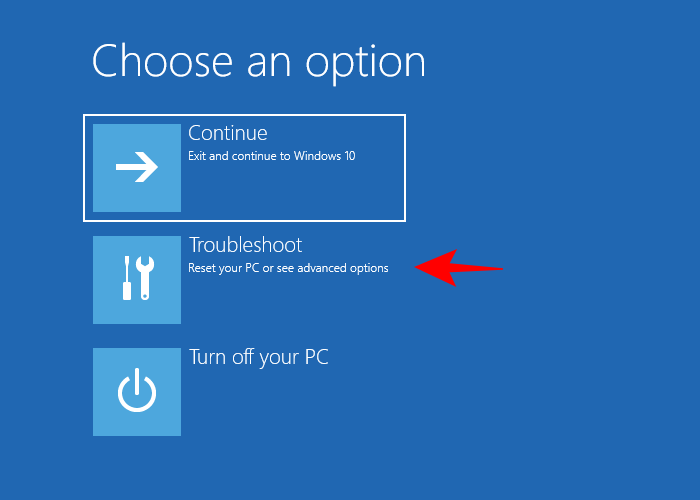
Then Advanced options.
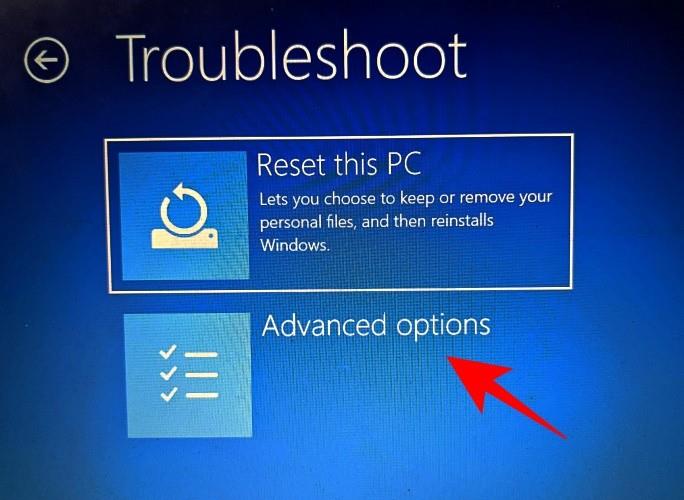
Now click on System Restore.
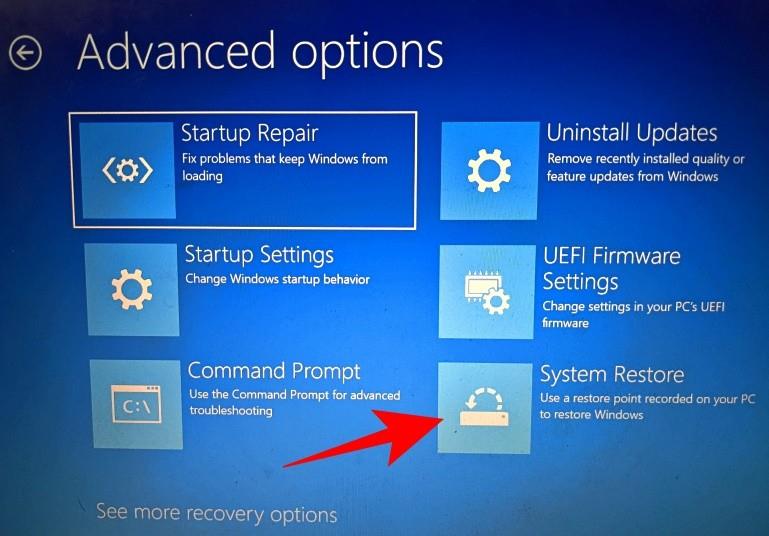
Click Next.
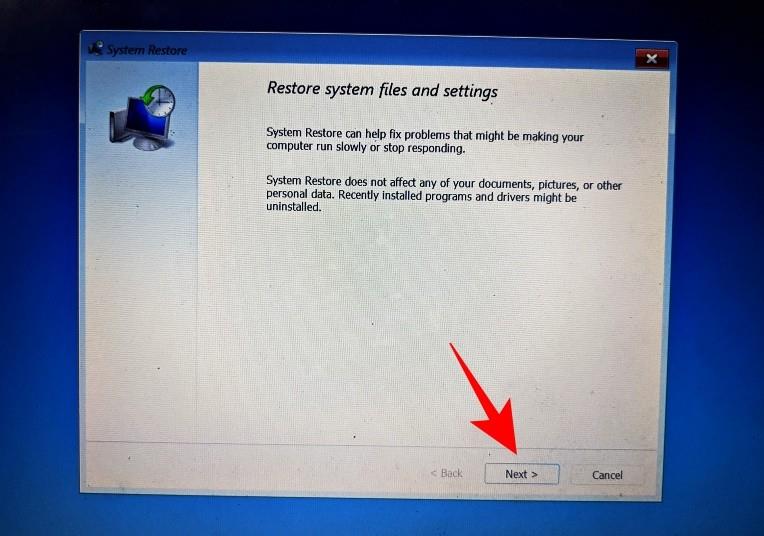
Choose your system restore point and hit Continue.
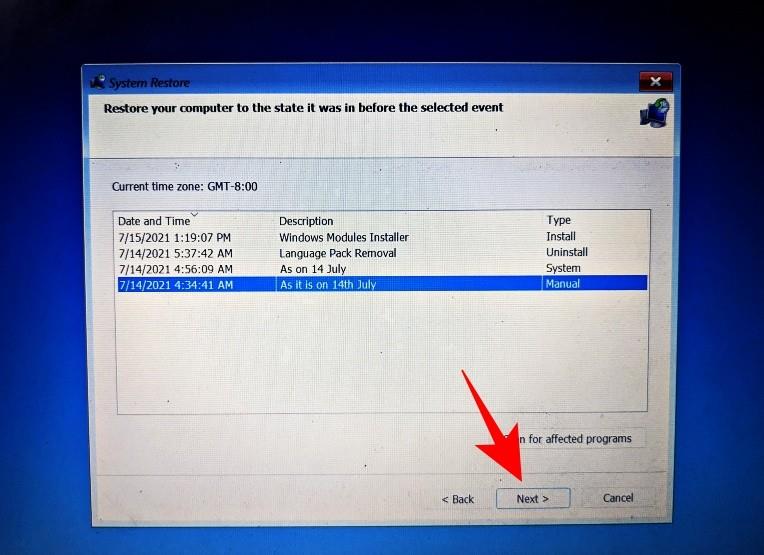
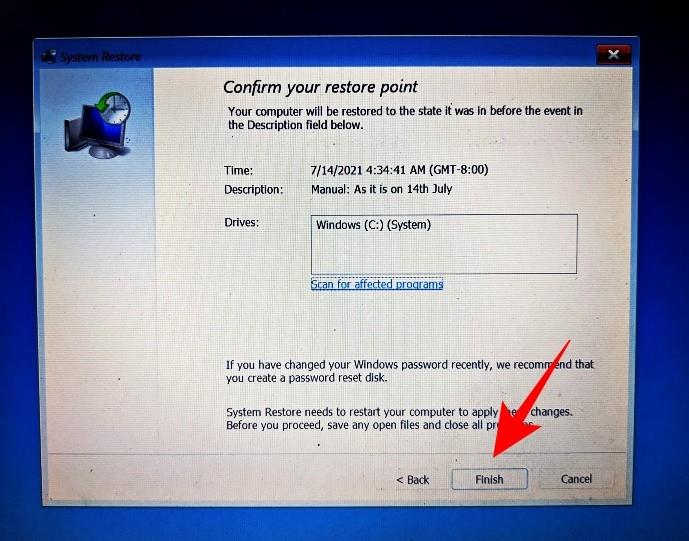
Click Finish to have your system restored.
Can’t create a system restore point? How to fix
There can be times when, for one reason or another, you may not be able to create a system restore point. But there are a few easy fixes that you can implement to get around the issue.
Method #01: Change system restore frequency using Registry Editor
As mentioned before, by default, Windows only lets you create one system restore point if one has already been created in the last 24 hours. This can be problematic, especially if you’re looking to edit the registry or other system settings but want to ensure that there’s a restore point in case things go south. To allow the creation of system restore points at any time, you will have to change the frequency of system restore points.
Press Win + R to open the RUN box, type regedit, and hit Enter.
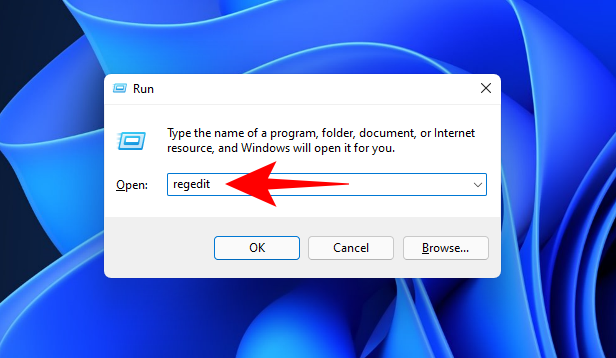
Now, navigate to the following address (or copy and paste it in the registry address bar):
Computer\HKEY_LOCAL_MACHINE\SOFTWARE\Microsoft\Windows NT\CurrentVersion\SystemRestore

Right-click in the empty space to the right and select New, then DWORD (32-bit) Value.

Name it SystemRestorePointCreationFrequency.

By default, its value is set to 0. Let it be that way and close the registry editor. You should now be able to create a system restore point manually without having to worry about any frequency limitations.
Method #02: Enable system restore via Group Policy Editor
Press Win + R to open the RUN box, type gpedit.msc and hit Enter.

This will open up the Group Policy Editor. In the left panel, navigate to Administrative Templated > System > System Restore.

On the right, check the state of the two Settings. They should both be set to Not configured.
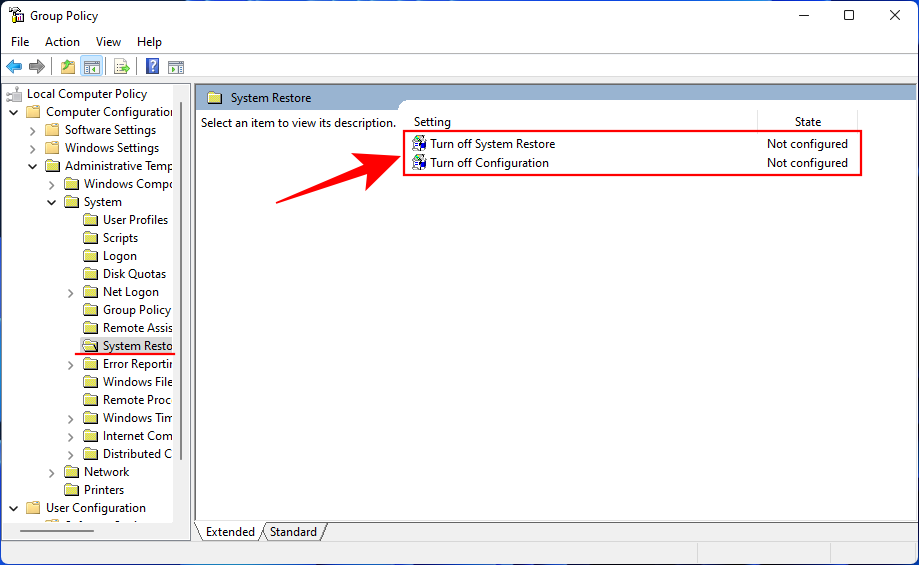
If either of them is enabled, double-click on it and set it to Not configured.
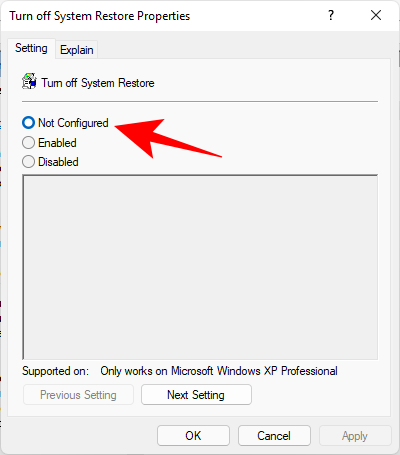
You should be able to create a system restore point as shown before.
Method #03: Turn on Volume Shadow Copy service
When you’re not able to create a system restore point, another fix that you may want to implement is to turn or (or reset) the Volume Shadow Copy service. Here’s how to do so:
Press Win + R to open the RUN box, type services.msc and hit Enter.

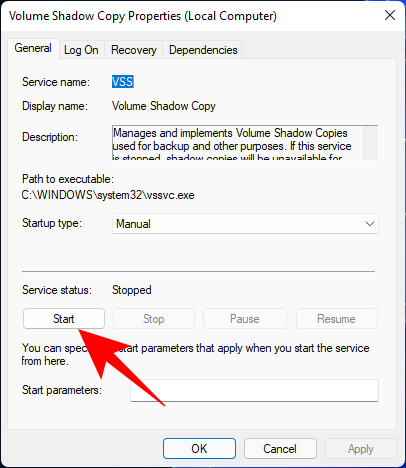
Scroll down and look for Volume Shadow Copy. Double-click on it.
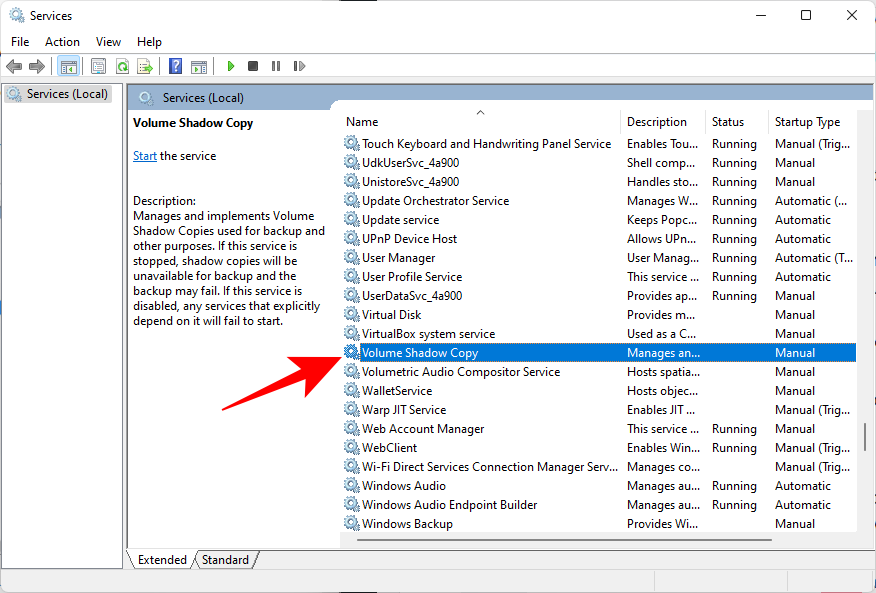
Click on Start if the service isn’t already running.
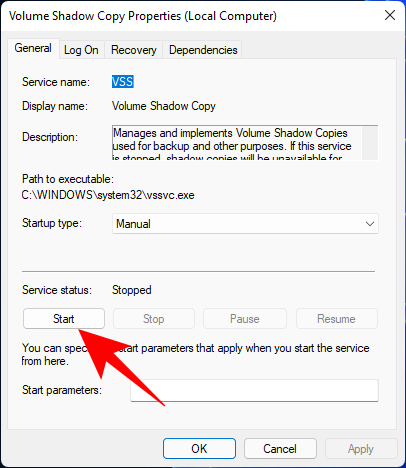
If it running, restart it by clicking on Stop…
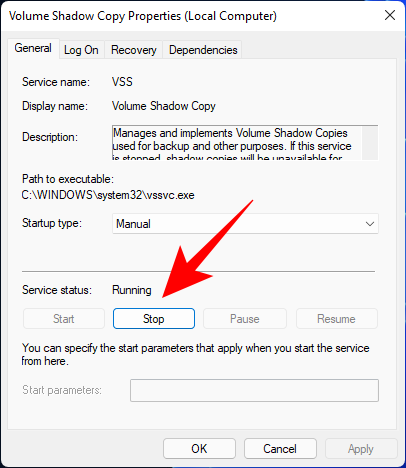
And then on Start again.
Creating a restore point in Windows 11: FAQs
So these were all the ways that you can create a restore point and some fixes if you’re not able to create one. Now, let’s consider the most commonly asked questions about system restore points and why it’s crucial that you create them from time to time, or at least have your system set up to create them automatically.
Are restore points created automatically on Windows 11?
Yes, Windows 11 by default has its System Properties set to create system restore points automatically from time to time, such as when you apply an update or make important changes to your system.
Why should you manually create a restore point?
As mentioned earlier, by default, Windows 11 will create restore points for your system to revert to should it run into a problem. But there can be instances when, for one reason or another, Windows might not be able to do so itself.
Although there are fixes that can resolve this issue (mentioned earlier), you should look to manually create a system restore point in case they don’t work out. It is even more crucial that you do so if you’re messing around with the registry or making other drastic changes to your system. You never know when they might come in to save your system from becoming unusable.
What happens when you create a restore point?
When a system restore point is created, Windows takes a snapshot of your system data as it is at a particular time. The state of the operating system is thus saved so that you can revert back to it in case things go wrong.
How long does it take to create a restore point?
Dependendo da cantidade de datos que hai que gardar, a creación dun punto de restauración pode levar desde uns minutos ata unhas horas. Non obstante, se despois de catro ou cinco horas atopas que aínda se está a crear un punto de restauración, é probable que Windows teña problemas. Neste caso, pode querer cancelar todo o proceso e comezar de novo.
Agardamos que puideses crear puntos de restauración do sistema coa axuda desta guía.


