A maioría das cousas teñen un rango de temperatura particular dentro do cal funcionan de forma óptima. A temperaturas internas máis altas, é tan probable que o teu ordenador falle como o teu corpo. Un dos compoñentes máis cruciais do teu PC é a CPU, que é o cerebro do teu ordenador. Se isto está a ser estrangulado térmico, é probable que se produzan cousas malas.
É importante controlar as temperaturas da CPU, especialmente se podes sentir a calor que se decanta ata ti, e tomar as medidas necesarias para xestionala. Aquí tes todo o que necesitas saber sobre el.
Contidos
Por que precisa controlar a temperatura da CPU?
A CPU é o núcleo do teu ordenador, o mestre de títeres que dirixe todo o espectáculo desde un segundo plano, recibe instrucións e ofrece a potencia de procesamento necesaria para manter todo o shindig. E as súas temperaturas internas deben controlarse periodicamente para garantir que o espectáculo non acabe en chamas. As térmicas superiores á media levan invariablemente a unha redución drástica do rendemento, a unha maior probabilidade de accidentes e, finalmente, a unha desaparición total. Coñecer as temperaturas exactas da CPU garantirá que pode tomar as medidas adecuadas no momento adecuado para controlar o problema.
Relacionado: Como corrixir o uso elevado de CPU ou disco de busca de Windows en Windows 11
Como comprobar a temperatura da CPU en Windows 11
Podes comprobar a saída en bruto proporcionada pola placa base do teu PC a través da BIOS, polo que non dependes dunha aplicación cando realmente che gusta. Pero cando non precisa ser o suficientemente geek, comprobar a temperatura da CPU a través da aplicación funcionará correctamente. Consulte todos os métodos a continuación.
Método #01: Usando BIOS/UEFI
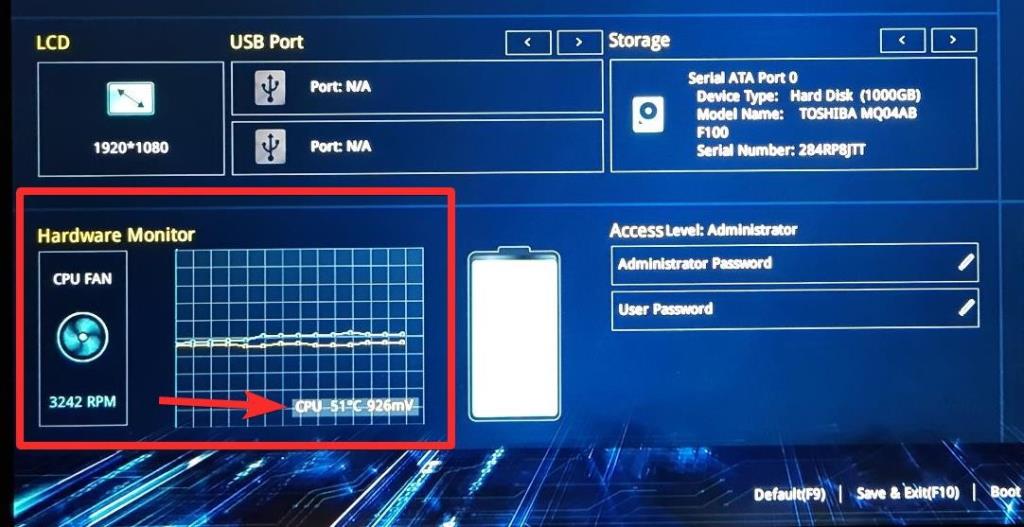
Desafortunadamente, non hai un xeito nativo de comprobar as temperaturas da CPU en Windows 11. Pola contra, terás que comprobar o estado térmico do teu sistema desde a BIOS/UEFI do teu PC. Isto fai que os datos sexan correctos. Aquí tes como facelo:
Como abrir a bios en Windows 11
Aquí tes os dous métodos sinxelos para abrir a BIOS no teu PC con Windows. E si, só tes que abrir a pantalla da BIOS para comprobar a temperatura da CPU que mostra. Non hai que facer nada máis.
Entón, abre a pantalla da BIOS premendo a tecla de acceso rápido dereito cando o teu PC che mostra o logotipo cando se está a iniciar ou, para iso, utiliza o menú Inicio. Ambos os métodos están descritos a continuación. de
Opción 1.1: Abre o BIOS coa tecla de acceso rápido cando o sistema se está a iniciar
Cando se inicia o seu PC ou portátil, hai unha pequena ventá entre a aparición do logotipo e a carga da páxina de inicio de Windows cando precisa premer continuamente a tecla de acceso rápido que é específica do fabricante do seu sistema.
Ao premer a tecla de acceso rápido, o sistema levarao á páxina UEFI/BIOS en lugar da páxina de inicio normal de Windows. As teclas de acceso rápido que cómpre tocar para acceder ao menú de inicio son DEL ou, de xeito máis universal, F2. Os escritorios e Thinkpad Lenovo usan especificamente a tecla F1 para o arranque.
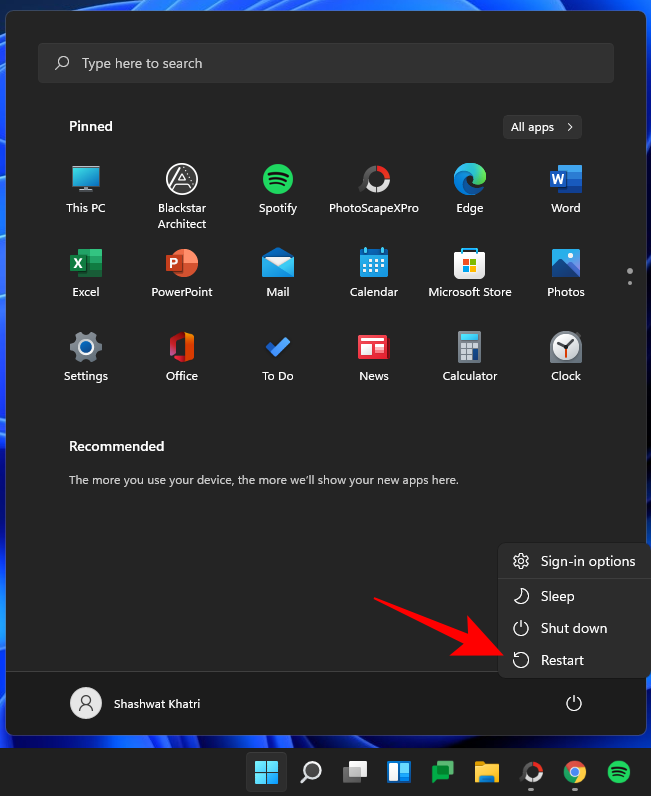
Preme Inicio e fai clic no botón Acendido. A continuación, mentres preme a tecla "Maiús", fai clic en Reiniciar .
Agora o teu ordenador reiniciarase para mostrar a pantalla de inicio avanzado. Fai clic en Solucionar problemas .

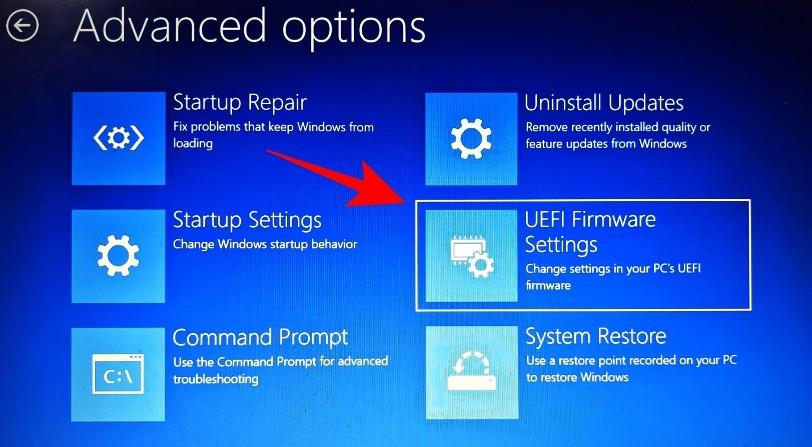
Fai clic en Opcións avanzadas .

Seleccione Configuración do firmware UEFI .
Fai clic en Reiniciar .
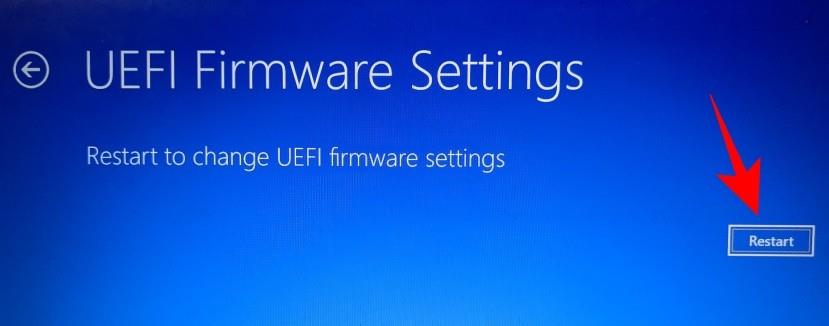
Agora verás unha pantalla que che permitirá comprobar o estado do teu PC e realizar probas de compoñentes e comprobar a información e os diagnósticos do teu sistema. É probable que estes inclúan controles de temperatura tamén.

Comproba a temperatura da CPU cunha aplicación:
O inconveniente de comprobar as temperaturas da CPU usando o BIOS/UEFI é que non pode controlar as térmicas ao longo do tempo. O número que obtén é cal era a temperatura no momento da comprobación. Non obstante, podes contar coa axuda de aplicacións de terceiros que che permiten controlar a temperatura da CPU ao longo do tempo. Aquí tes algúns recomendados.
Método #02: Usando a aplicación "Core Temp".
Core Temp é unha das ferramentas máis populares cuxa única función é darche as lecturas de temperatura da túa CPU.
Descarga : Core Temp
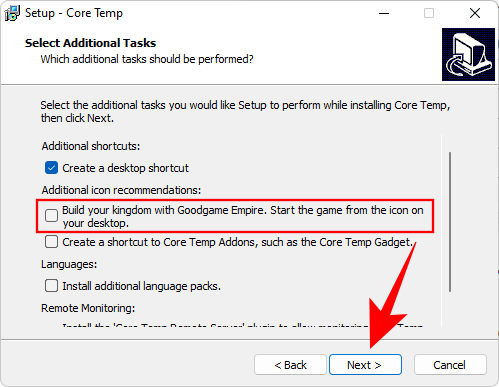
Teña coidado coa instalación que instale xogos innecesarios durante o proceso de instalación. Asegúrate de desmarcar a opción "Constrúe o teu reino con Goodgame Empire. Inicia o xogo desde a icona do teu escritorio” opción como se mostra a continuación:
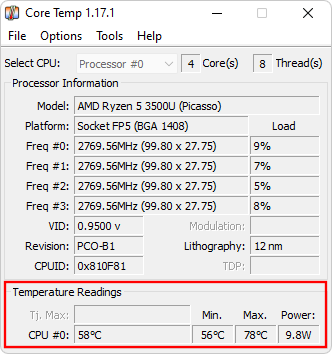
Despois da instalación, executa Core Temp. A aplicación é bastante lixeira e mostra a carga á que se atopan os diferentes núcleos. As lecturas xerais da temperatura da CPU mostraranse na parte inferior. Xunto a el daranse as temperaturas mínimas e máximas do gravador.
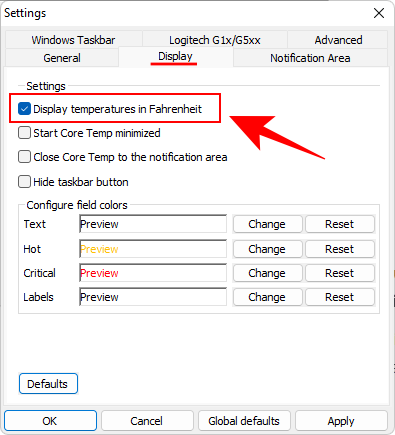
Se queres ver as lecturas de temperatura en Fahrenheit, a opción para facelo está en Opcións > Configuración > Pantalla .
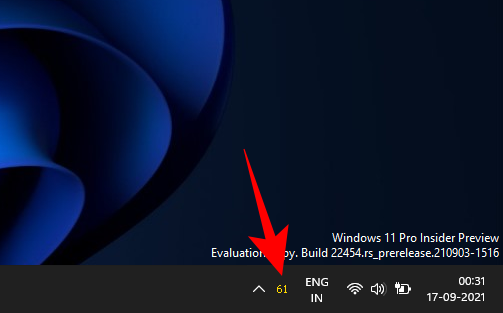
A aplicación tamén proporciona as lecturas térmicas na bandexa do sistema, unha pequena referencia visual cómoda se queres estar atento ás temperaturas mentres executas aplicacións ou realizas axustes.
Método # 03: Usando a aplicación "Open Hardware Monitor".
Este é un programa portátil que che permite controlar o teu hardware, incluídas as temperaturas da CPU, e mostrar moita información nunha única pantalla.
Download: Open Hardware Monitor
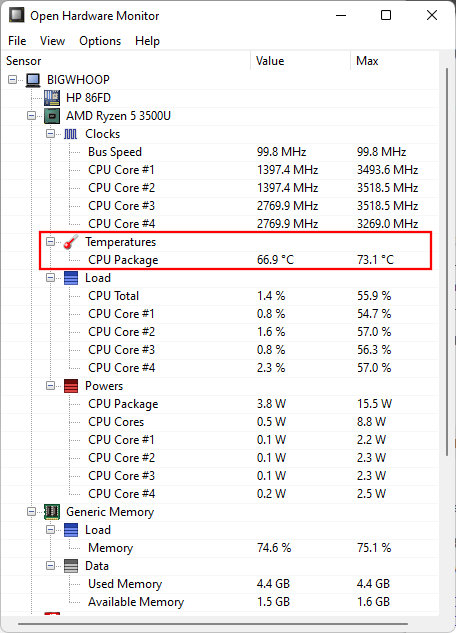
Extract the contents of the zip file and run the executable for ‘Open Hardware Monitor’. The overall temperature of your CPU will be shown under the ‘Temperatures’ branch, including the current temperature as well as the maximum recorded temperature.
Method #04: Using ‘Speccy’ app
In terms of the number of options and an intuitive GUI, Speccy is the ideal tool to monitor your system’s hardware.
Download: Speccy
The initial screen will give you a ‘Summary’ of the main system components. To get a reading for the CPU temperatures, click on CPU.
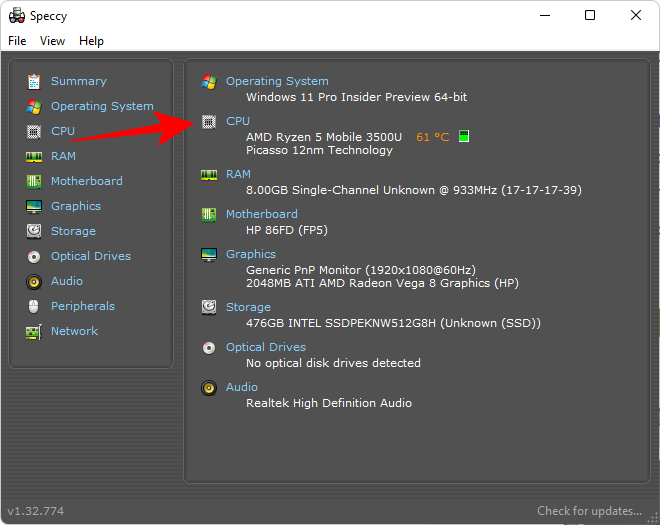
The temperature readings will be at the bottom.
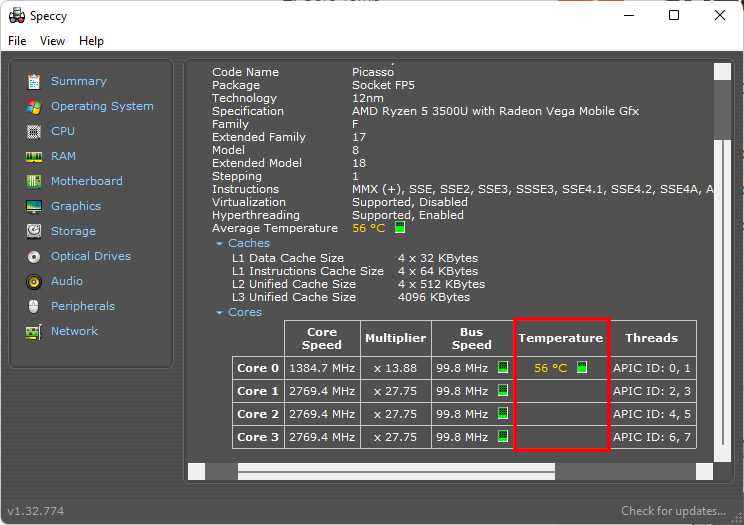
Because Speccy offers so many hardware monitoring options, the additional click to find the CPU thermal readings can seem inconvenient. But if you’re looking for an all-round performer, Speccy is it.
How to display CPU temp on Windows 11
Well, using any of the apps given above, you can easily display the CPU temperature live of your processors. Just run the software to display the CPU temp. You can also keep a watch on the CPU temp with the live temp icon in the taskbar area that shows the icon (in the right).

Common reasons for HIGH CPU temp
There are numerous causes for CPU temperatures reaching the ceiling. Some of them may be right in front of you, while others would be a little more specific to your hardware and the burdens that your computer has to carry.
1. Overclocking
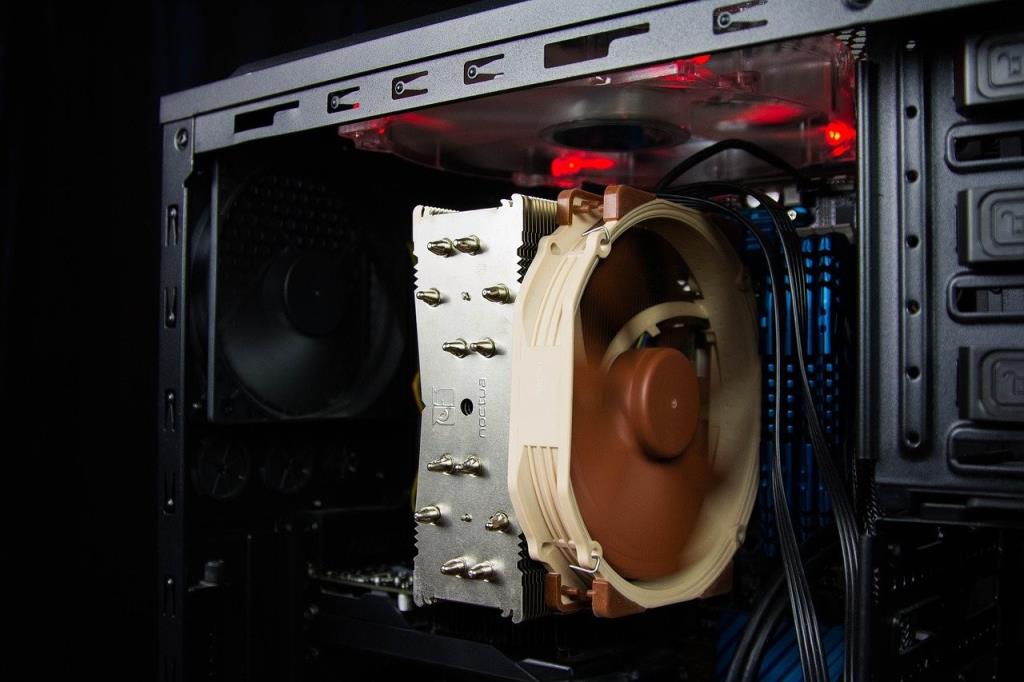
One of the major reasons people don’t overclock their CPUs often is the fear of an overheated CPU, and that has become a truism in the tech world.
Overclocking forces your processor to reach for higher performance than it is designed for. With the right tools and the right guide, you can overclock your CPU easily. But if you don’t know what you’re doing, and doing it often enough, overclocking can become a huge problem.
2. An old computer
Old computers tend to be more at risk of thermal throttling, mainly due to the dust buildup over years of use. This can stop the cooling fans from doing their job well. Old computers also find it hard to keep pace with the applications of the day, forcing the CPU to work harder than usual which invariably leads to higher temperatures.
3. Poor maintenance
Computer maintenance doesn’t just have to do with ensuring that there’s no dust buildup, though it is one of the more important elements of it. The way you handle your computer and look after the hardware (as well as the software) is just as essential. Cleaning the vents and the fans once in a while and ensuring that the drivers and the OS are up to date is a good general practice.
If you don’t like the idea of opening up your computer to clean the hardware, you can use a blower or a hairdryer at lower speeds to do the same.
Related: How to Tell If Your Computer is 32 or 64 Bit on Windows 11
4. Thinner laptops
Thinner laptops, due to their build, tend to have more heat problems than your average laptop. There’s a very practical reason why gaming laptops tend to be on the bulkier side, mainly to accommodate for larger fans and have better air circulation.
If you’re doing CPU-intensive gaming or running heavy applications, thinner laptops will give in much faster because of heat issues, especially if they’re not being taken care of properly.
5. Malware infestation
Malware and virus can derail any good computer. There are various types of malware out there which, if they make it inside your computer, can hamper the normal functionality of your system, putting undue stress on the CPU and lowering its performance. This makes the CPU work harder than usual to achieve the same results, leading to – you guessed it – higher than average thermal readings.
Tips to keeping CPU temperature in check
Keeping CPU temperatures under check won’t just prevent your computer from crashing ever so often, but it will also increase the lifespan of your system. Here are a few tips to ensure that the CPU thermals don’t constantly hit the higher temperature marks and you have a processor that performs the best that it can.
1. Invest in cooling fans
If your cooling fan is on the verge of giving up or isn’t able to keep your CPU thermals under check, perhaps it’s time to get a new one. A more intensive approach would require you to invest in a new CPU cooler or a heat sink. CPU coolers use a condenser to convert the heat from gas to liquid, which is further cooled down and moves through the evaporator for reuse.
2. Get a laptop stand
If you have a laptop, getting a stand for it will ensure that the vents underneath it have enough space and airflow for heat transfer. Setting your laptop on a stand is a very simple way of solving overheating issues without spending too much. Laptop stands come cheap and a decent one won’t cost you more than $20-$25.
3. Keep your workspace clean and well ventilated
This is cliche, and for good reason too. The dirtier your workspace is, the dirtier your PC’s fans will get, and that will stop them from keeping the CPU cool. So, maintain some level of cleanliness to ensure that doesn’t happen.
In addition to that, ensure also that vents are not blocked and there is good airflow in the room. Enclosed spaces, especially in the summer season, can get quite hot. But as long as there is decent airflow in the room, it should work just fine.
4. Keep your PC clean
Just as you should keep your workspace clean, you should also take the time out to clean your PC once in a while. If you find that dust has crept in and accumulated in your PC, clean it out. You can get canned air from a local hardware store for this job. To clean away caked dirt, you can use a cloth or a Q-tip dipped in isopropyl alcohol and rub it off.
5. Re-apply thermal paste
Thermal paste is what allows the heat transfer from the CPU to the cooler. Over time, these can dry up and lead to inefficient heat transfer. Adding a new layer of thermal paste is a surefire way of ensuring that the CPU cooler is working efficiently and the temperatures are kept under check.
Frequently Asked Questions (FAQs):
Maintaining your CPU temperature and preventing it from touching the 90s requires a combination of things to be done right. Here we answer a few commonly asked queries regarding the same.
What’s the ideal temperature range for my CPU?
The ‘ideal’ temperature for a CPU varies from one processor to another. Most third-party applications (such as the ones mentioned in our guide above) will display the maximum temperature for your CPU. This is around the point at which your CPU will shut down to avoid any damage. If your CPU is constantly nearing the maximum temperature mark, bad things are imminent for your PC.
As a general rule, these are the CPU temperature ranges and their corresponding CPU health statuses:
<>: All’s good!
60°C – 70°C: Getting warmer. Things are still okay, but you should consider improving airflow and clean out the dust.
70°C – 80°C: Unless you’re overclocking, you shouldn’t be in this temperature range often. Make sure that the fans are working alright and there aren’t any dust knots clogging up the system.
80°C – 90°C: Your system is definitely under a lot of heat. If this is due to overclocking, consider dialing back a little. If not, some major interventions are in order. Make sure the fans are working, clean your system thoroughly, and maybe install a cooler. If your CPU is constantly hitting this range, the performance is going to get throttled back.
>90°C – This is Inferno!
Is CPU temperature related to performance?
Yes, it definitely is. We aren’t concerned about high temperatures just to satisfy our OCD. It all boils down to performance at the end of the day. Higher temperatures mean that your CPU is trying harder than usual to get the same results. After a certain point, the performance takes a massive hit and you’ll start feeling the difference yourself.
How to lower CPU temperature?
There are many things that you can do to lower CPU temperatures. We’ve mentioned a few tips for the same so do ensure that you go through those above.
We hope you are now able to monitor your CPU’s temperature and have a gauge of where it needs to be.
RELATED


