Windowsi värskendused on olnud paljudele kasutajatele alates Windows XP aegadest kurikuulsaks häirivaks. Õnneks on Windowsi värskenduste tarnimine viimastel aastatel drastiliselt paranenud ja tänapäeval põhjustavad väga vähesed funktsioonivärskendused suuri probleeme .
Saate konfigureerida Windowsi taustal automaatselt alla laadima ja värskendama ning isegi mitteaktiivsetel tundidel taaskäivitama. Kõik see on suurepärane, kuid mis siis, kui installitakse värskendus, mida te ei vajanud? Või mis siis, kui saate värskenduse, mis halvendab teie masina jõudlust ? Sel juhul saate Windows 11-s Windowsi värskendused desinstallida. Siin on aga paar asja, mida peaksite enne Windows 11 arvutist värskenduste desinstallimist meeles pidama.
Seotud: kuidas värskendusi Windows 11-s keelata
Sisu
Miks Windowsi värskendused desinstallida?
Põhjuseid, miks soovite Windowsi värskendusi desinstallida, võib olla mitu, siin on mõned kõige levinumad. Kui otsite tõrkeotsingut pärast hiljutist Windowsi värskendust, saate seda loendit ka läbi vaadata.
Kui teil on oma süsteemis selliseid probleeme, võite proovida probleemi lahendamiseks desinstallida uusima Windowsi värskenduse.
- Halvenenud süsteemi üldine jõudlus
- Vigased draiverivärskendused
- Windowsi funktsioonide funktsionaalsus on rikutud
- Valesti hallatud ressursid taustal
- Kõrge protsessori- või kettakasutus
- Soovimatu draiverivärskendus, mida püüdsite vältida
- Valesti Windowsi turbe või UAC
- Valed piirkonna sätted, mida ei saa muuta
- Windows 11 seaded või suvandid puuduvad
ja veel. Windows 11 uue värskenduse installimisel võib tekkida palju probleeme, eriti kui olete tellinud beeta- või siseringi kanali. Sellistel juhtudel võite proovida vastava värskenduse desinstallida, kasutades selle postituse juhendit.
Seotud: Kuidas tühistada ootel Windows Insider Update
Kas Windowsi värskenduste desinstallimine on ohutu?
Jah, seni, kuni te ei eemalda Windowsi värskendusi sunniviisiliselt käsitsi või ei kasuta aegunud utiliiti, peaksite Windowsi värskendusi oma süsteemist ohutult desinstallima. Siiski peaksite meeles pidama, et Microsoft kasutab Windowsi värskendusi turvapaikade, kiirparanduste ja muu tarnimiseks, et kaitsta teie süsteemi uusimate ohtude ja turvaaukude eest.
Windowsi värskenduste eemaldamine desinstallib ka sellised paigad, mis omakorda muudab teie süsteemi võrguohtude suhtes haavatavaks. See kehtib eriti juhul, kui soovite hiljutised turvavärskendused desinstallida.
Seega, kuigi võite värskendusi desinstallida, on soovitatav muudatused ennistada niipea, kui viga on parandatud. Kui teie viga või tõrge püsib pärast värskenduse uuesti installimist, võite oodata, kuni Microsoft väljastab järgmise värskenduse ja paranduse.
Seotud: Bingi eemaldamine Windows 11-st
Kuidas leida värskendusi, mida soovite eemaldada
Saame värskendusi eemaldada erinevatel viisidel, kuid eemaldatava värskenduse leidmiseks peate selle oma arvutis tuvastama. Igale Microsofti värskendusele on määratud KB number, mis aitab värskendust nii tarbijaarvutites kui ka Microsofti serverites kindlaks teha ja tuvastada. Saame seda numbrit enda huvides kasutada ja vastava värskenduse teie süsteemist eemaldada, kasutades ühte allolevatest juhenditest. Siit saate teada, kuidas oma arvutisse installitud Windowsi värskendusi tuvastada.
Meetod #01: Seadete kasutamine
Vajutage Windows + iklaviatuuril ja valige vasakult "Windowsi värskendus".
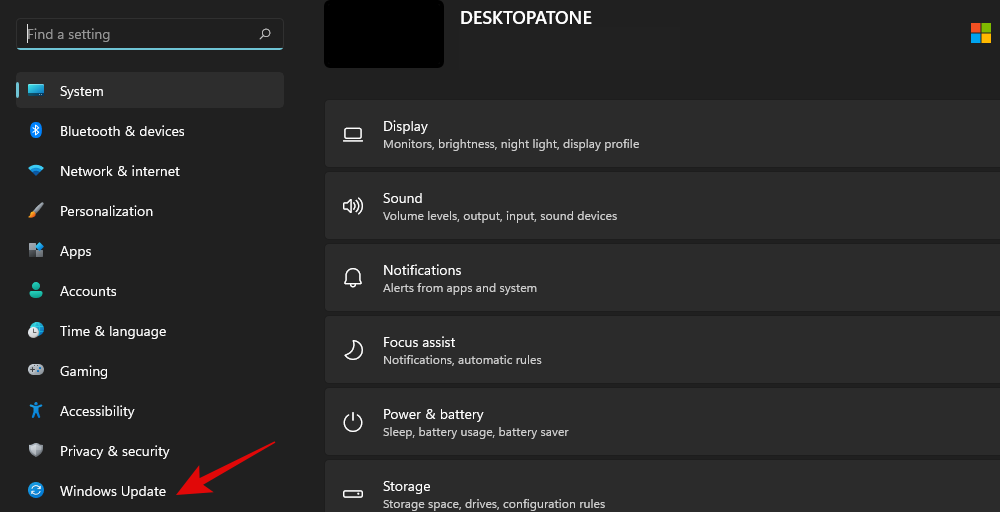
Klõpsake kohe "Värskenda ajalugu".
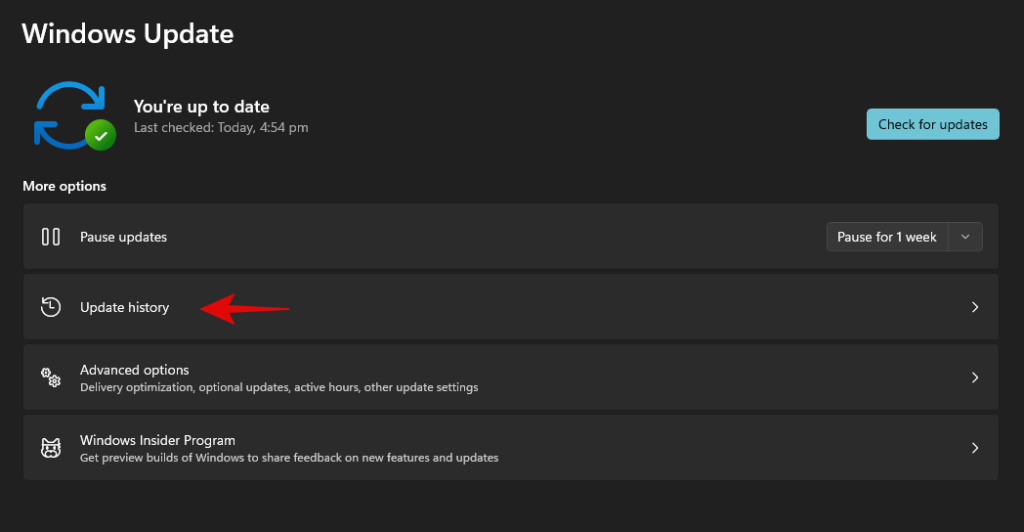
Nüüd saate oma süsteemi hiljuti installitud Windowsi värskenduste loendi.
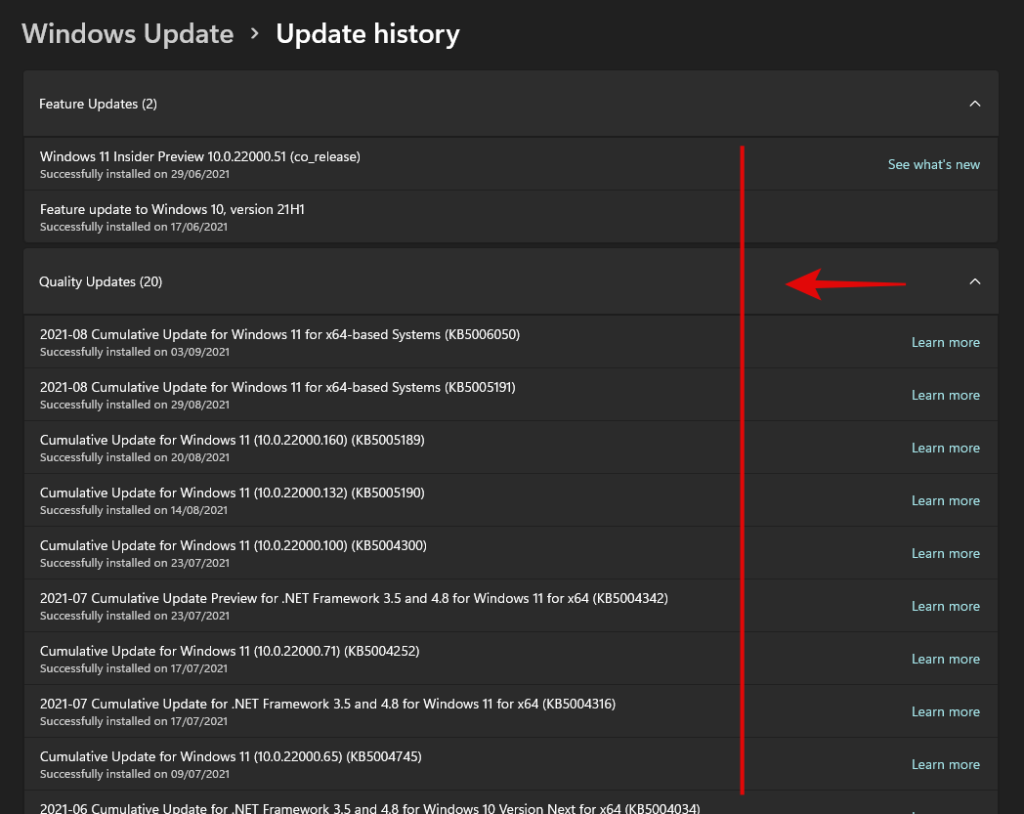
Lihtsalt märkige üles selle värskenduse KB number, mida soovite arvutist eemaldada.
Meetod nr 02: CMD kasutamine
Vajutage Windows + Sklaviatuuril ja otsige CMD. Kui rakendus kuvatakse teie otsingutulemustes, klõpsake käsul Käivita administraatorina.
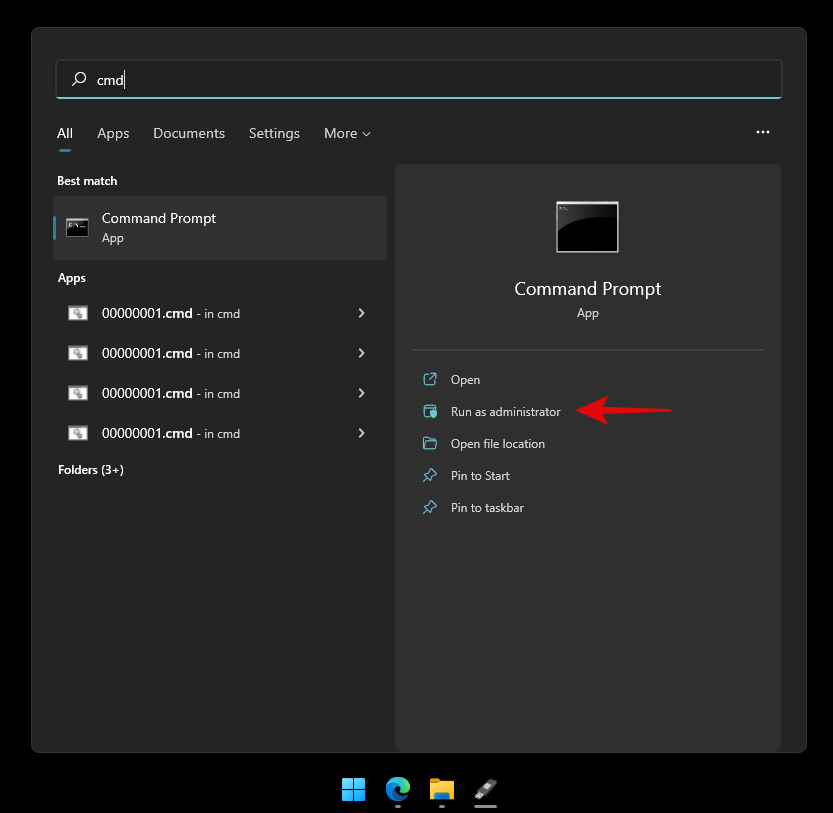
Sisestage järgmine käsk ja vajutage klaviatuuril sisestusklahvi.
wmic qfe list brief /format:table
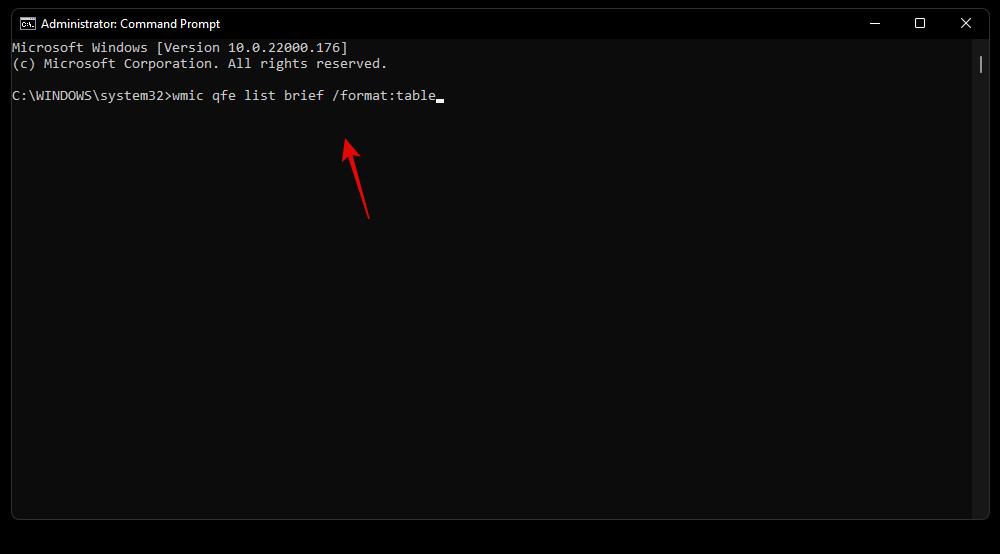
Nüüd näete kõigi teie arvutisse installitud Windowsi värskenduste loendit. Klõpsake allolevas loendis vastavat kategooriat ja laiendage seda.
- Kvaliteedivärskendused: Windows 11 funktsioonivärskendused, mis toovad OS-i sisse olulisi muudatusi.
- Draiveri värskendused: üldised/OEM-draiveri värskendused teie välisseadmetele ja komponentidele, mis tarnitakse Windowsi värskenduse kaudu.
- Määratluse värskendused: turbedefinitsiooni värskendused, mis aitavad Microsoft Defenderil teie süsteemis olevaid ohte tuvastada ja karantiini panna.
- Muud värskendused: Microsofti toodete, funktsioonide ja muude teie seadmele omaste OEM-funktsioonide värskendused. Selles kategoorias värskendatakse ka Windowsi funktsioone ja kogemuspakette.
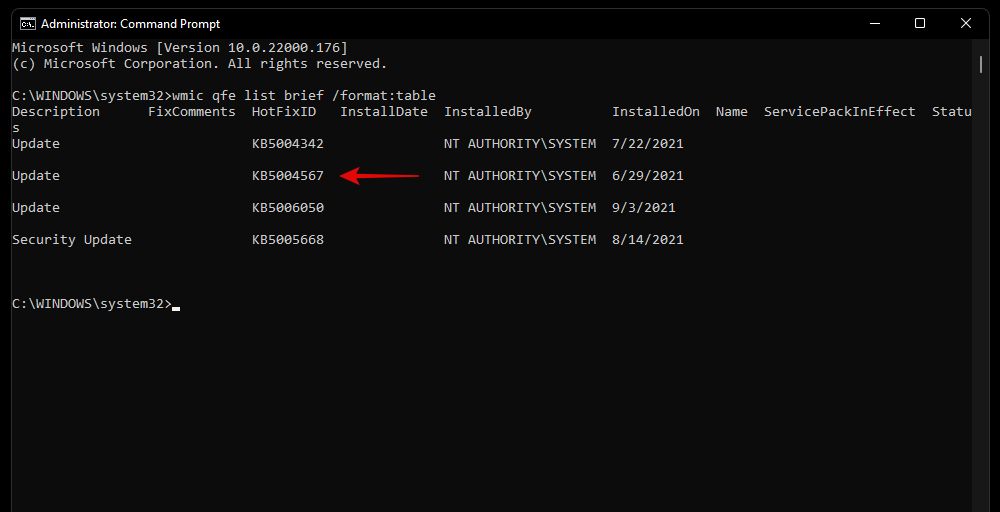
Tuvastage värskendus, mille soovite eemaldada, ja märkige üles selle HotFixID. Kasutame seda ID-d asjaomase värskenduse eemaldamiseks, kasutades allolevat juhendit.
Kuidas arvutist Windowsi värskendusi eemaldada
Saate Windowsi värskendused arvutist eemaldada, kasutades ühte allolevatest meetoditest. Kui olete Windowsist välja lülitatud või te ei saa oma töölaualt käivitada, soovitame kasutada Windows RE meetodit või CMD meetodit. Kui pääsete juurde oma töölauale, saate oma süsteemist värskenduste hõlpsaks eemaldamiseks kasutada rakendust Seaded. Kasutage oma eelistustest olenevalt alustamiseks allolevaid juhendeid.
Meetod #01: Seadete kasutamine
Vajutage Windows + ioma klaviatuuril ja klõpsake vasakpoolsel külgribal "Windowsi värskendus".

Klõpsake "Värskenda ajalugu".

Kerige alla ja klõpsake nuppu "Desinstalli värskendused".
Nüüd suunatakse teid juhtpaneelile, kust leiate loendi viimastest värskendustest, mida saab teie süsteemist eemaldada.

Valige värskendus, mida soovite eemaldada, ja klõpsake ülaosas nuppu "Desinstalli".

Järgige vastava värskenduse arvutist desinstallimiseks ekraanil kuvatavaid juhiseid.
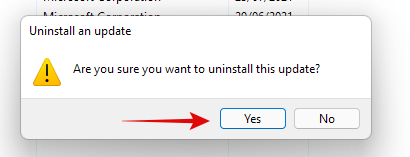
Nüüd saate oma arvuti taaskäivitada ja kõik värskendusega seotud probleemid tuleks nüüd parandada.
Meetod nr 02: Windowsi värskenduse tõrkeotsija kasutamine
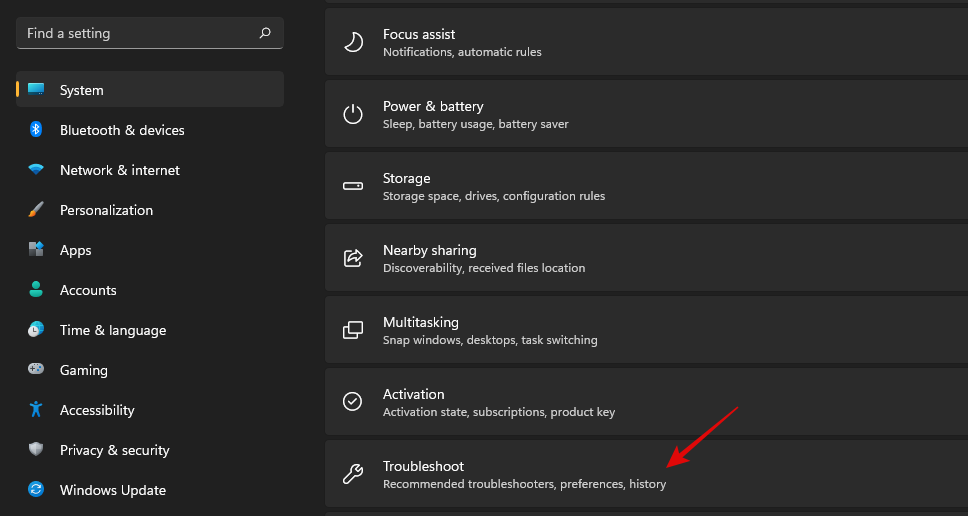
Vajutage Windows + iklaviatuuril ja klõpsake nuppu "Tõrkeotsing".
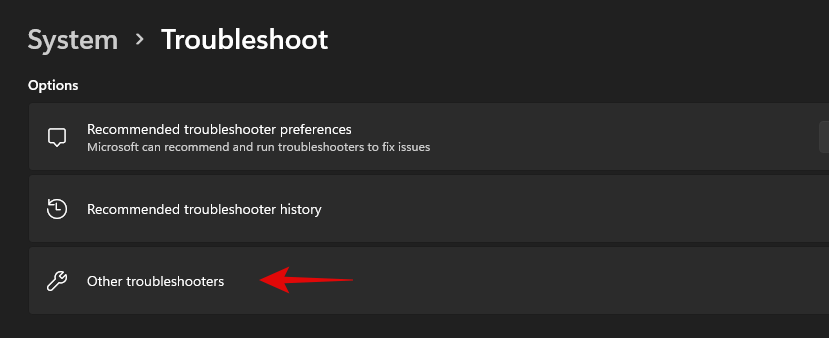
Klõpsake valikul „Muud veaotsingud”.
Klõpsake Windows Update'i kõrval asuvat käsku "Käivita".
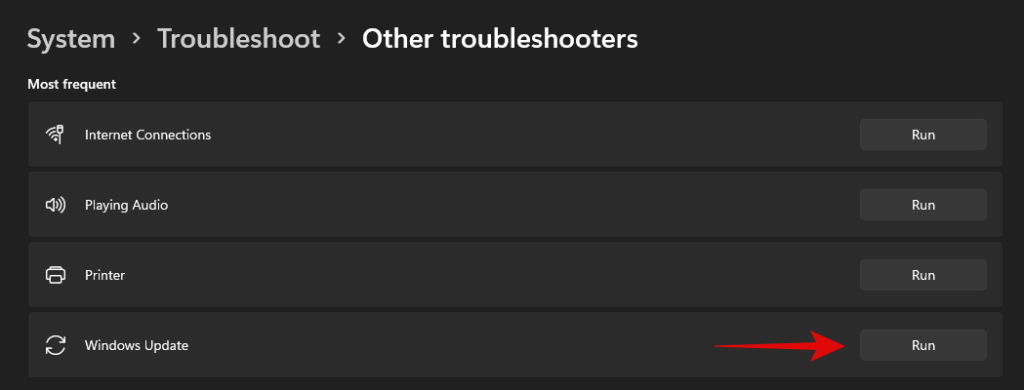
Windowsi tõrkeotsing otsib nüüd teie arvutis Windowsi värskendustega seotud ja nendest põhjustatud probleeme. Kui neid leitakse, lahendab tõrkeotsing probleemi automaatselt. Kui leitakse, et süüdlane on hiljutine värskendus, annab tõrkeotsing teile võimaluse valida ja desinstallida vajalik Windowsi värskendus. Värskenduse täielikuks eemaldamiseks järgige ekraanil kuvatavaid juhiseid.
Kui olete lõpetanud, klõpsake nuppu "Sule".
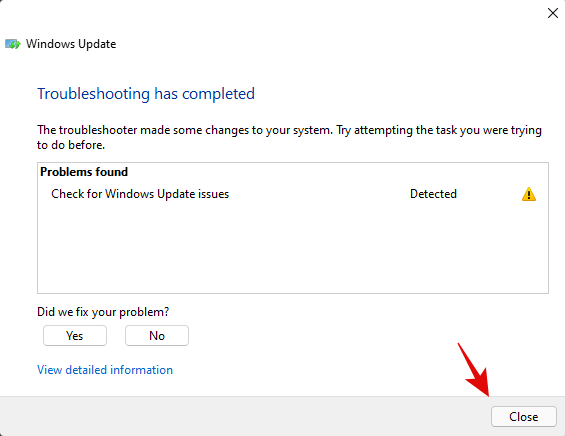
Taaskäivitage arvuti ja probleem peaks nüüd olema lahendatud. Kui ei, saate soovitud Windowsi värskenduse käsitsi oma süsteemist desinstallida alloleva PowerShelli meetodi abil.
Meetod nr 03: PowerShelli või CMD kasutamine
Vajutage Windows + Sklaviatuuril ja otsige PowerShell. Kui rakendus kuvatakse teie otsingutulemustes, klõpsake käsul Käivita administraatorina.
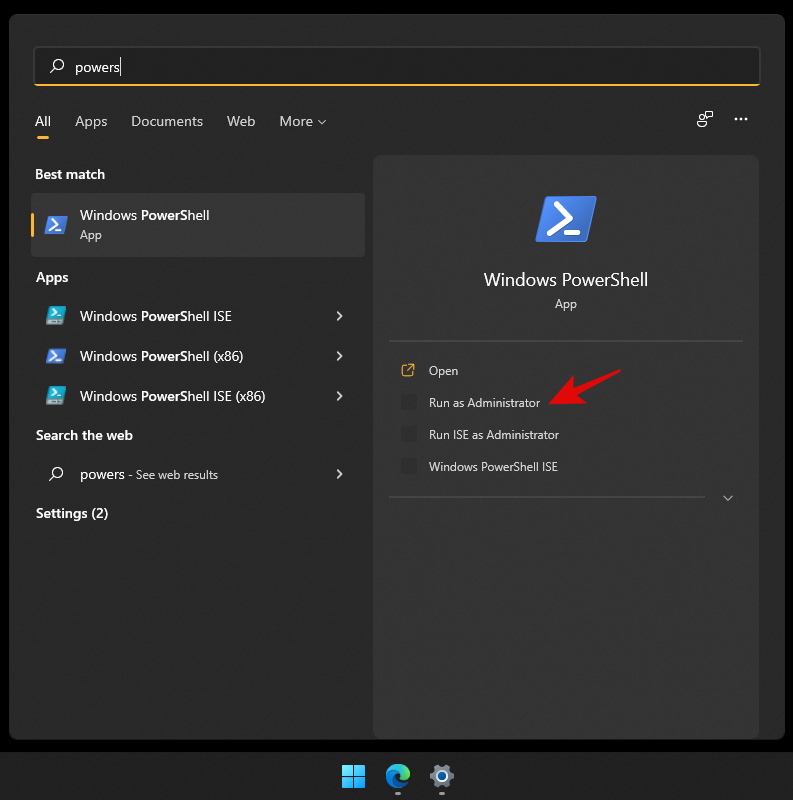
Sisestage järgmine käsk ja vajutage selle käivitamiseks klaviatuuril sisestusklahvi.
wmic qfe list brief /format:table

Nüüd saate tabelivormingus loendi kõigist teie süsteemi hiljuti installitud Windowsi värskendustest. Märkige üles valitud Windows Update'i KB-number.
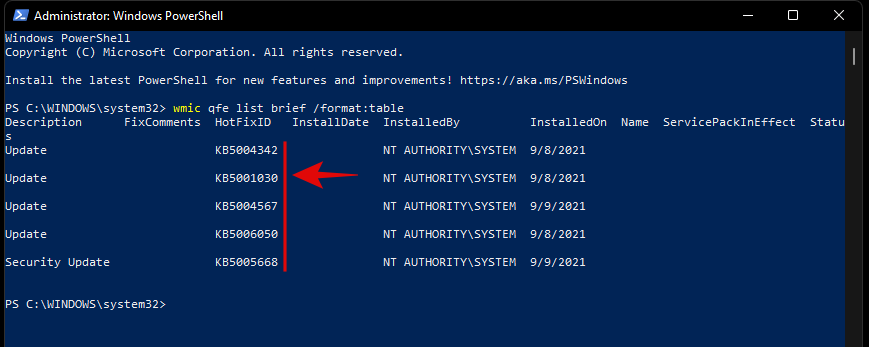
Märkus. Vaja on ainult numbrit, mitte tähti enne seda.
Kui olete valmis, tippige allolev käsk ja käivitage see. Asendage NUMBER KB numbriga, mille olete varem üles märkinud.
wusa /uninstall /kb:NUMBER
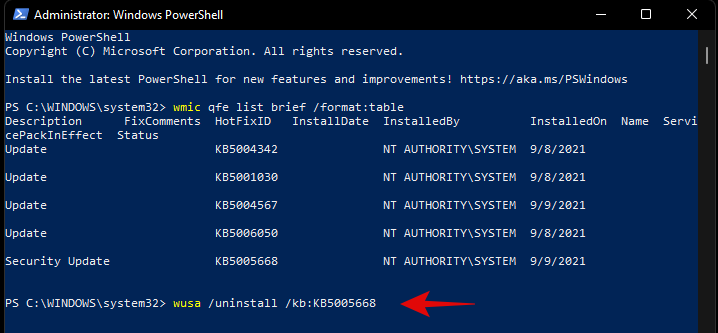
Kui küsitakse, kinnitage oma valik.
Kui teil palutakse taaskäivitada, soovitame teil oma töö taustal salvestamise ajal taaskäivitada.
Kui te aga ei soovi enne desinstallimist ja taaskäivitamist kinnitusi saada, võite kasutada allolevat käsku.
wusa /uninstall /kb:NUMBER /quiet
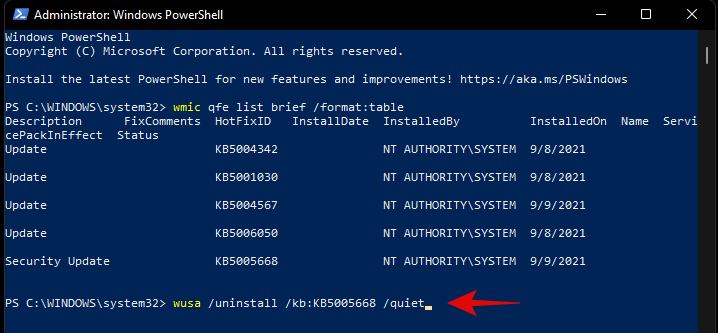
Kuigi ülaltoodud käsk ei küsi kinnitusi, ootab see, kuni teie rakendused taustal tavapäraselt välja lülituvad. Kui soovite oma rakendusi sundida sulgema ja süsteemi viivitamatult taaskäivitada, saate kasutada alltoodud käsku.
wusa /uninstall /kb:NUMBER /quiet /forcerestart
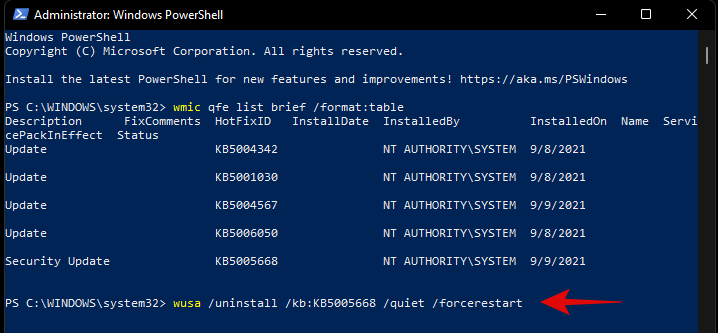
Seejärel, kui soovite ainult taaskäivitamist kinnitada, saate kasutada allolevat käsku.
wusa /uninstall /kb:NUMBER /quiet /promptrestart
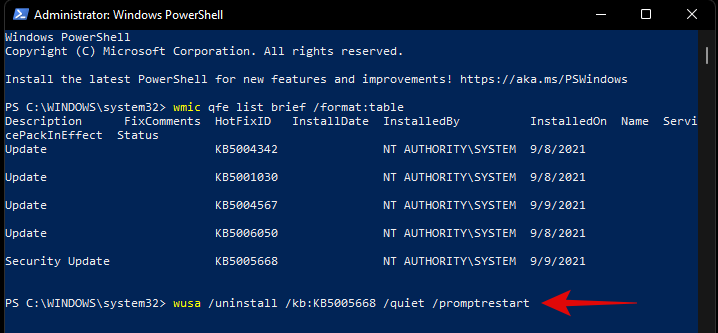
Ja see ongi kõik! Probleemne Windows Update tuleks nüüd teie arvutist desinstallida.
Meetod nr 04: Windows RE-st
Windowsi taastekeskkond võimaldab teil ka vastuolulised värskendused desinstallida. Alustamiseks kasutage allolevat juhendit. Kui seisate silmitsi BSOD-iga ja olete juba taastekeskkonnas, võite selle juhendi paar esimest sammu vahele jätta.
Vajutage Windows + iklaviatuuril ja valige vasakult Windows Update.
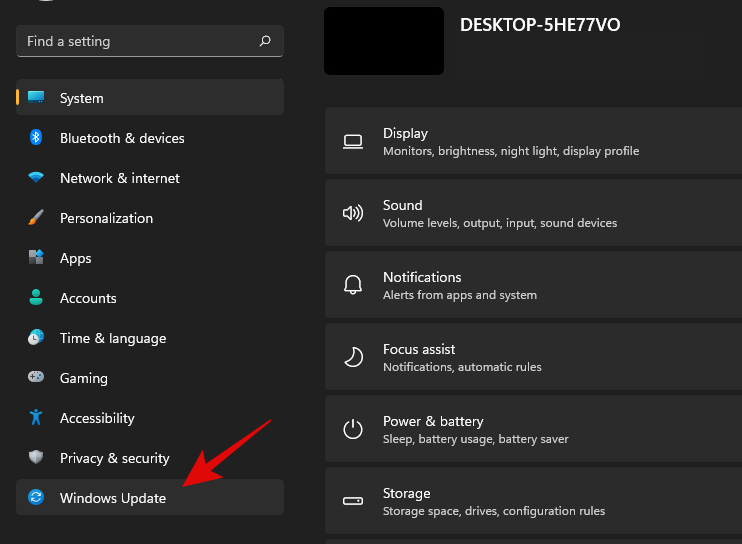
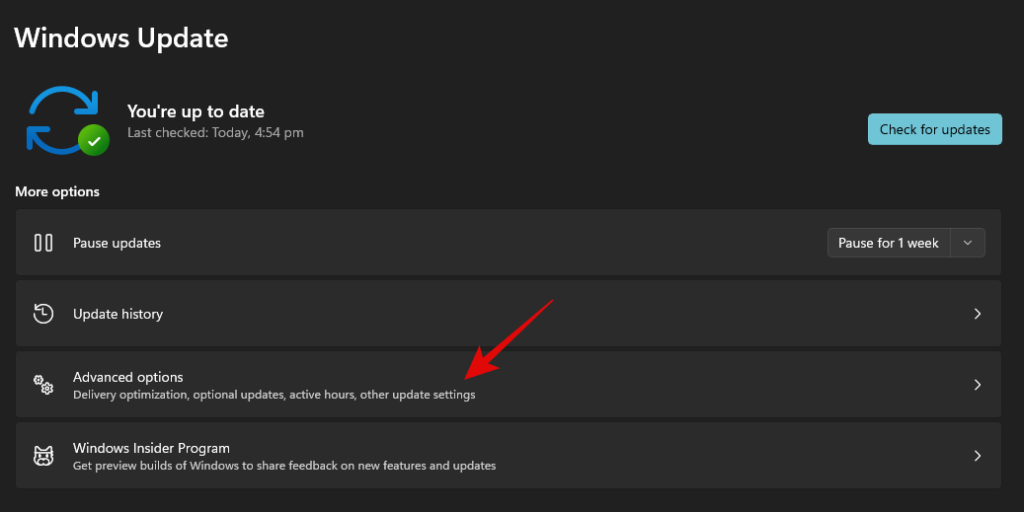
Klõpsake kohe "Täpsemad suvandid".
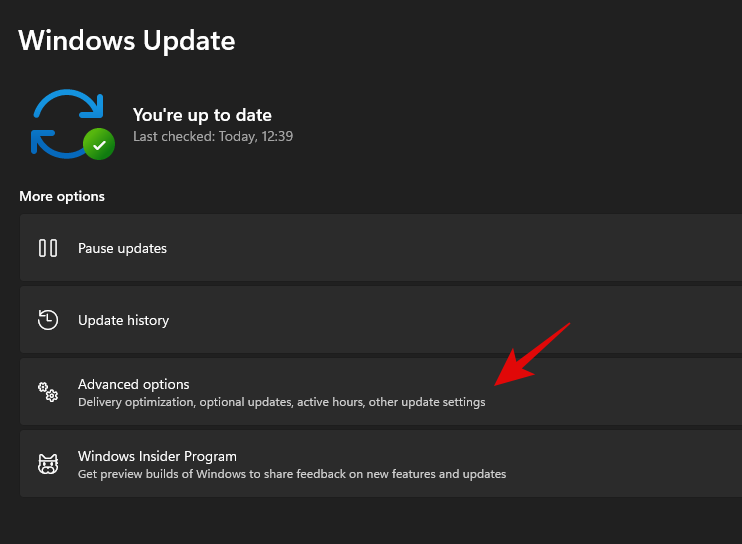
Valige "Taastamine".
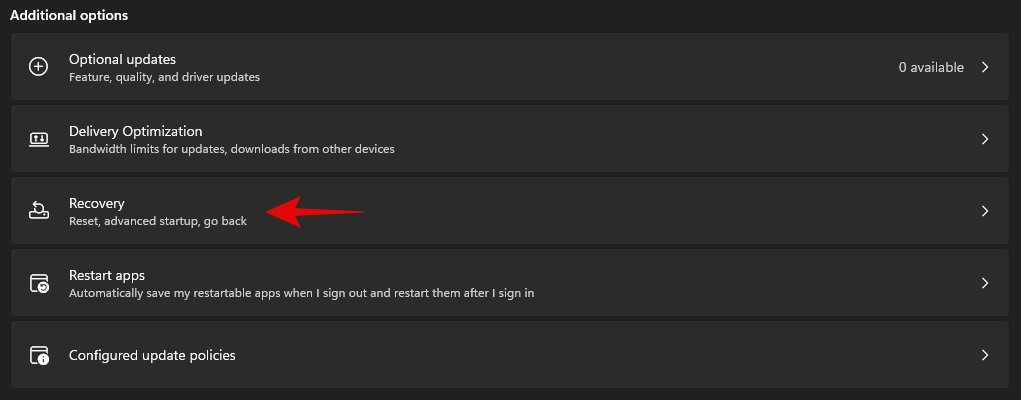
Click on ‘Restart now’ beside Advanced Startup.

You will now boot into the recovery environment. Click on ‘Troubleshoot’.
Now click on ‘Advanced Options’.
Select ‘Uninstall updates’.
Click and select the type of update you wish to install from the options on your screen.
- Uninstall latest quality update
- Uninstall latest feature update
Note: In case you are confused, feature updates refer to major updates to your Windows system that include new features, updated integrations, and sometimes new UI. Quality updates on the other hand encompass everything else including Security updates, Driver updates, Intelligence updates, Telemetry updates, and more.
Click on your administrator account and log in with your password.
Click on ‘Uninstall quality/feature’ update to confirm your choice.
Click on ‘Done’ once the process finishes.
Restart your PC and boot into Windows normally. You shouldn’t face any more issues caused by a problematic Windows update.
Method #05: Using DISM
DISM or Deployment Image Servicing and Management tool is an administrative tool within Windows that helps repair your Windows image and even mount images if needed. DISM supports image formats like .wim, .vhd, and more.
The tool can help you fix issues with your Windows installation and even remove problematic Windows updates. If you are looking to remove windows updates using DISM, then you can follow the steps below to get you started.
Note: DISM can be accessed via CMD and thus, you can use this guide from a recovery environment or an installation media as well. Follow the guide above to get CMD working on your lock screen or within Windows Recovery Environment.
Launch CMD and type in the following command. Press Enter on your keyboard once you are done.
dism /online /get-packages /format:table
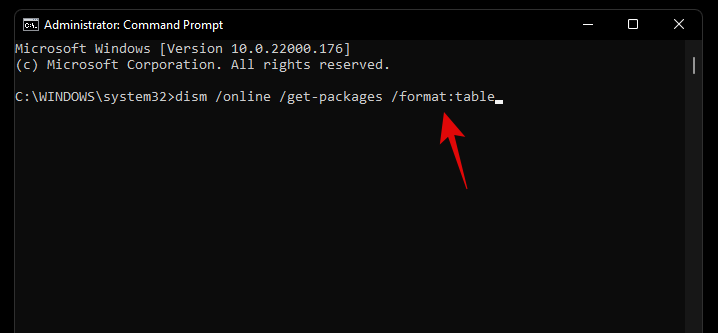
Unlike the WUSA commands we used earlier with PowerShell and CMD, you will need to note down the entire name of the Windows Update package we need to remove. Unfortunately, this includes special characters, spaces, and everything else included in the name. Thankfully you can easily copy the entire name to your clipboard by selecting it with your mouse and then using the keyboard shortcut. Once done, type in the command below and replace NAME with the package name you noted down earlier.
Note: This includes the term ‘Package_for_’ prefixed before some updates.
dism /online /Remove-Package /PackageName:NAME

The selected Windows Update will now be uninstalled from your system. In some cases, you will be prompted to restart your system, type in ‘Y’, and hit Enter on your keyboard to restart your system immediately.
How to stop receiving an update
While removing an update can help you, this does not mean that the broken Windows Update will stop showing up in your Updates section. This can be annoying and if you have automatic updates then you run the risk of automatically installing the problematic update in the background. In all such cases, you can try blocking Windows Updates on your system using the guides below depending on your preferences.
Method #01: Stop OEM driver updates through Windows update
OEM driver updates are delivered through Windows updates as well depending on their importance. Security vulnerabilities and bugs that have been recently found in components like CPU, GPU, or your wireless card, are instantly patched through such updates.
However, if you do not wish to install an OEM driver update provided by Windows update, then you can follow the guide below to block your OEM driver updates.
Press Windows + S on your keyboard and search for ‘Change device installation settings’. Click and launch the app from your search results.
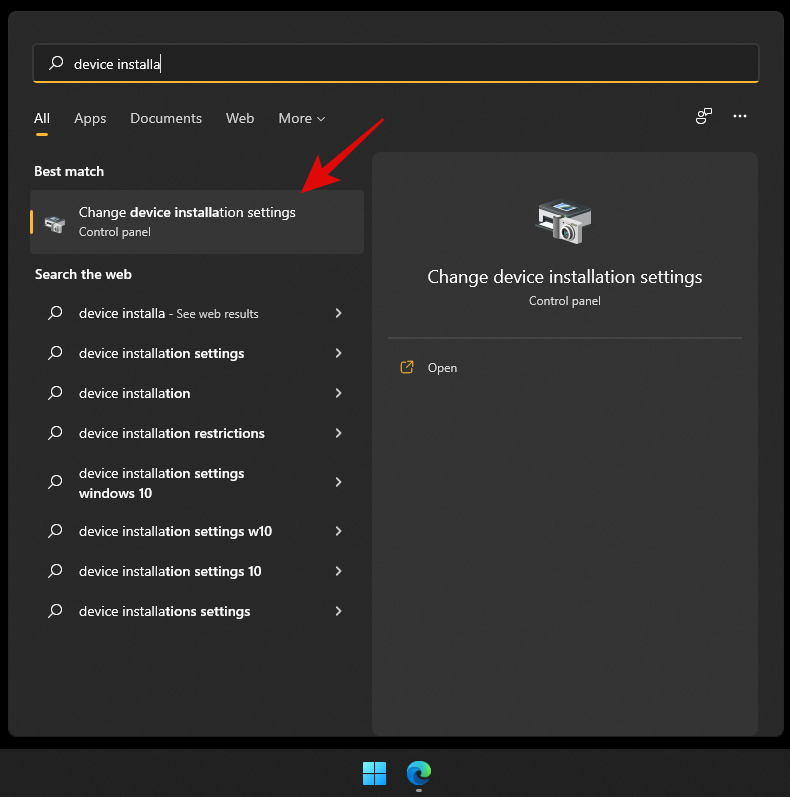
Select ‘No’.
Click on ‘Save changes’.
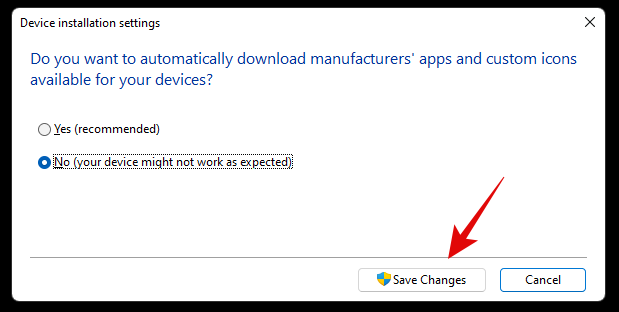
The changes will now be saved and you will no longer receive OEM driver updates through Windows Update.
Related: 6 Ways to Update Drivers on Windows 11
Method #02: Stop updates for Microsoft products
If you have been receiving constant updates for new Microsoft features and old products that keep messing up your system, then you can use the guide below to disable updates for Microsoft products via Windows Update.
Press Windows + i on your keyboard to open the Settings app and select ‘Windows Update’ from the left sidebar.

Click on ‘Advanced options’.

Now turn off the toggle for ‘Receive updates for other Microsoft products’ at the top.
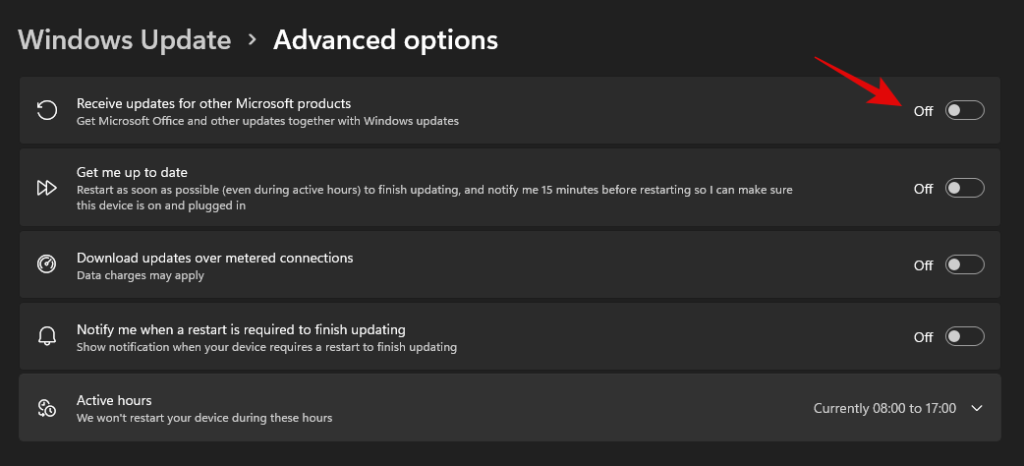
You will no longer receive updates for Microsoft products installed on your system via Windows update.
Method #03: Change active hours for background download and installation for updates
If you’re just looking to dismiss updates so that they don’t interfere with your work hours, then this is the perfect option for you. You can decide when Windows can download and update your PC in the background which will prevent Windows from interfering with your work hours. Follow the guide below to get you started.
Press Windows + i on your keyboard and click on ‘Windows Update’ on your left.

Click on ‘Advanced options’.

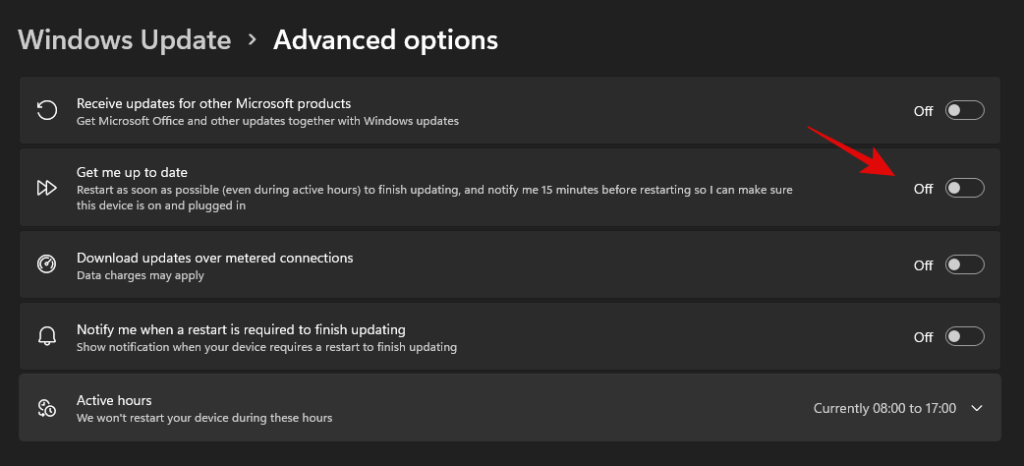
Now turn off the toggle for ‘Get me up to date’.
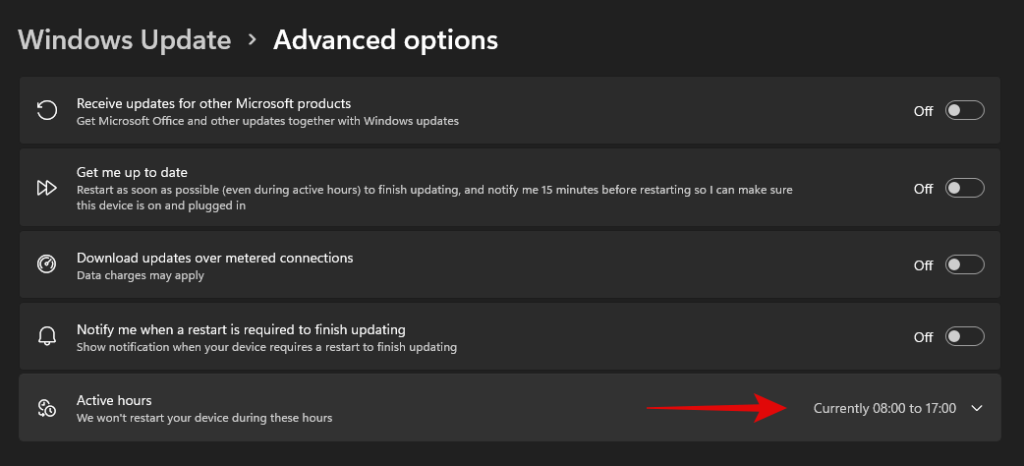
Click on ‘Active hours’.
Click on the drop-down menu and select ‘Manually’.
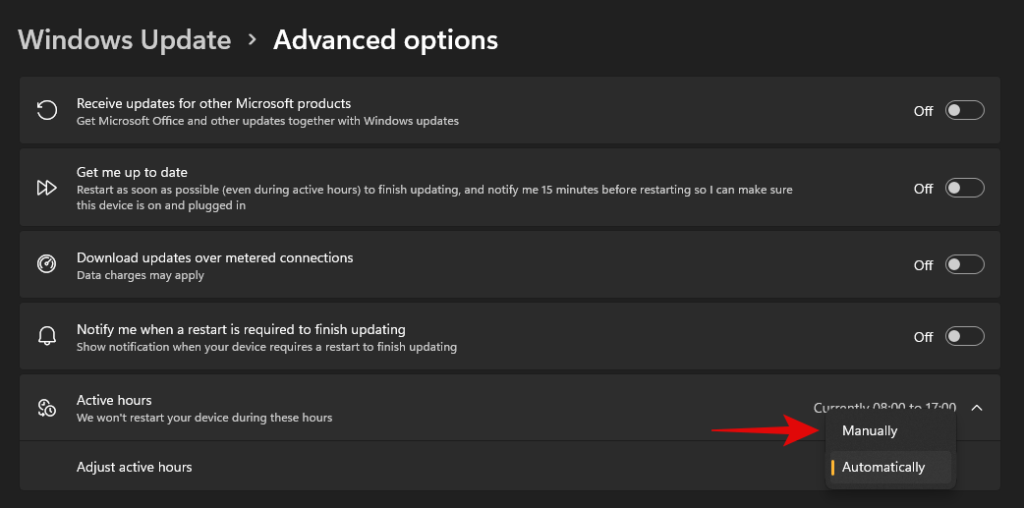
Define your desired start and end time. Windows won’t download updates and restart your PC during these hours.

And that’s it! Active hours should now be enabled for your system.
Method #04: Block Windows updates that you never wish to install
If you are receiving forced Windows updates that you don’t ever wish to install on your system then you can use a dedicated Windows troubleshooter to solve your issue.
This can be helpful in case you are trying to stop an update that disables a certain feature on your system that you don’t want disabled. This could be access to voltage controls, clock speed controls, turbo controls, fan controls, RGB control, and more. Follow the guide below to get you started.
Download the Windows Update Show Hide troubleshooter using the link above and launch it on your PC. Click on ‘Advanced’.
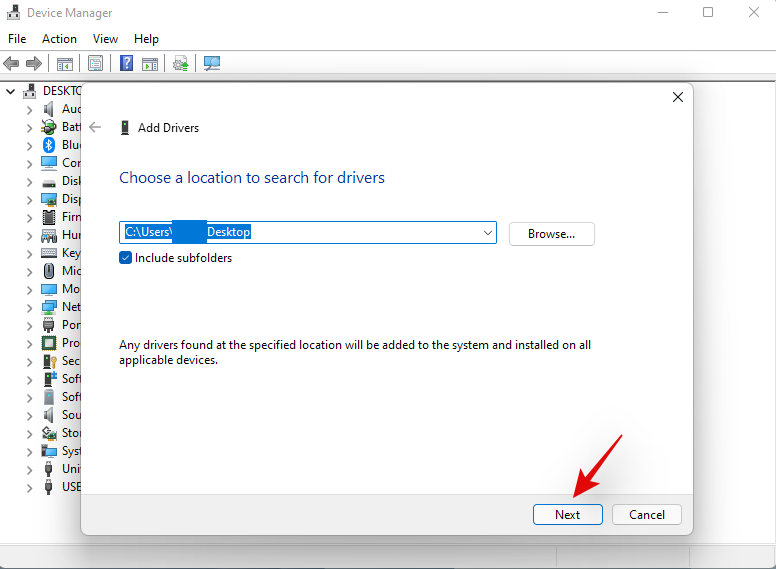
Uncheck the option for ‘Apply repairs automatically’.
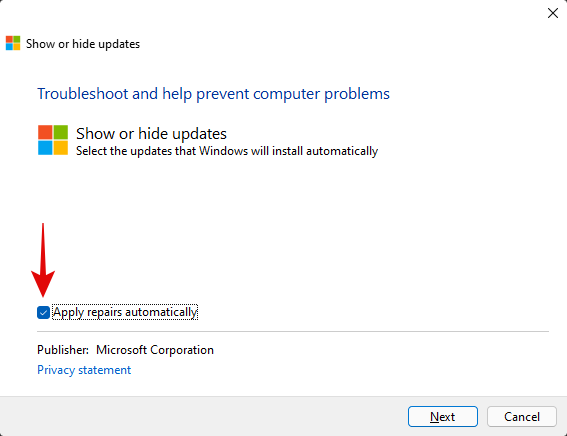
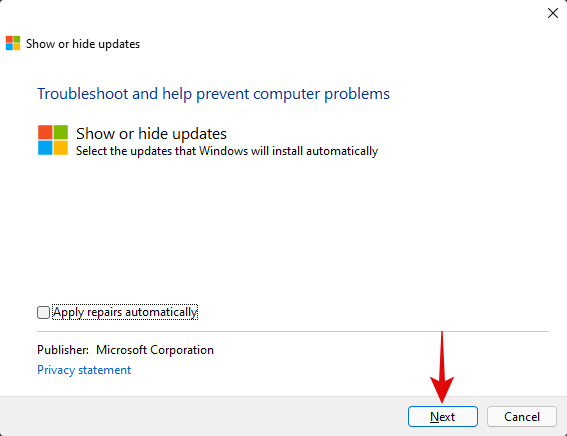
Click on ‘Next’.
The troubleshooter will now look for pending updates and display them on your screen. Click on ‘Hide updates’.
Check the boxes for all the updates you don’t wish to receive on your PC.
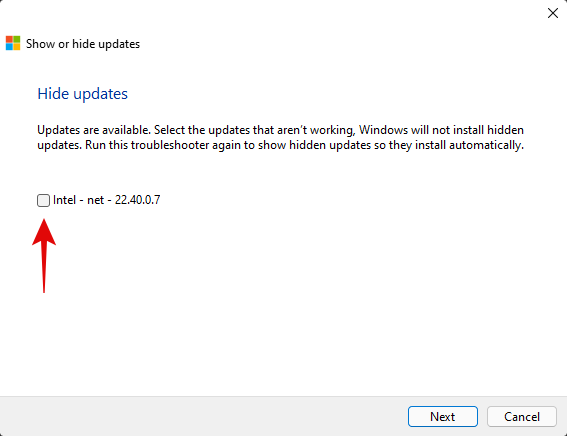
Click on ‘Next’.
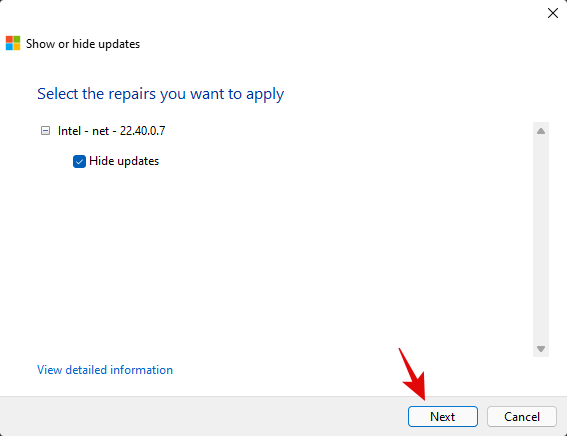
Ensure that ‘Hide updates’ is selected and click on ‘Next’.
The troubleshooter will now hide the necessary Windows updates from your PC which in turn will prevent them from ever being downloaded on your PC. Click on ‘Close’.
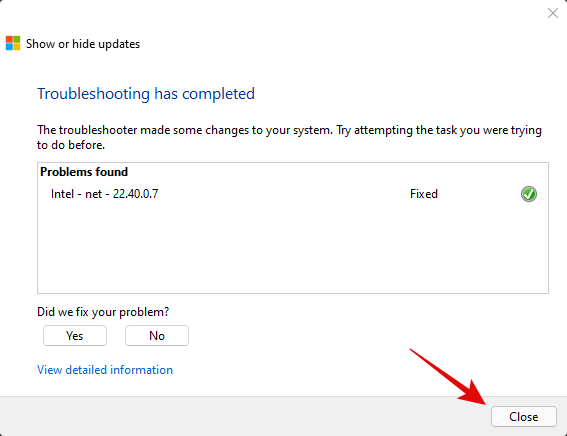
And that’s it! You will now have blocked the necessary updates on Windows 11.
Can you turn off Windows updates?
Yes, you can use certain workarounds and tricks to disable Windows updates on your PC. However, this isn’t recommended as you will lose out on important security patches which would leave you vulnerable to online threats including hackers, malware, adware, and more.
Hence we recommend you keep your PC updated or at least opt to install the latest security updates on your PC. Even if you are losing out on features it’s usually because of a hardware security vulnerability that would compromise your system.
However, if you still wish to disable Windows Updates on your PC, you can use this dedicated guide from us. If you face any issues, feel free to drop a comment.
Can’t uninstall Windows updates? Try these fixes!
If you are unable to install updates on your PC, then you can try the following fixes. However, if you are still unable to uninstall updates then this might indicate an issue with your Windows installation in which case resetting your PC might be the best option.
Follow the guides below to get you started.
Method #01: Reset Windows components and try again
If you have been unable to uninstall updates then you can try resetting your windows components. This will help fix corrupted system files in the background that might be preventing you from uninstalling updates on your system. We will be using a modified script from Mircosoft to help reset all components of Windows 11. The script was originally developed for Windows 10 or higher and hence will need some edits to work properly on Windows 11. This script will perform the following tasks on your system when executed;
- Remove older Windows updates folder
- Re-register Windows update files
- Reset your network connection
Follow the steps below to run the script on your system and reset Windows update components on your PC.
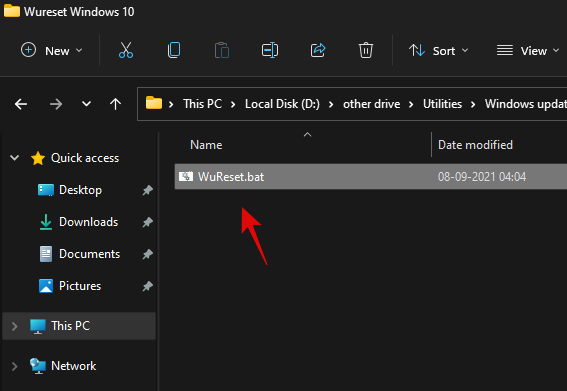
Download the script using the link above to your local storage and extract it to a convenient location. Once extracted right click on the script.
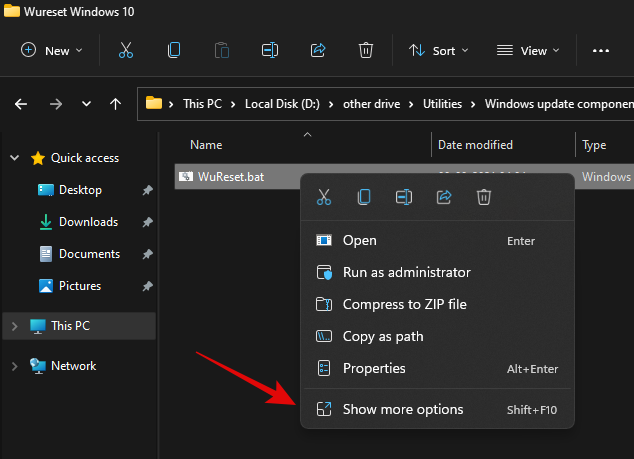
Click on ‘Show more options’.
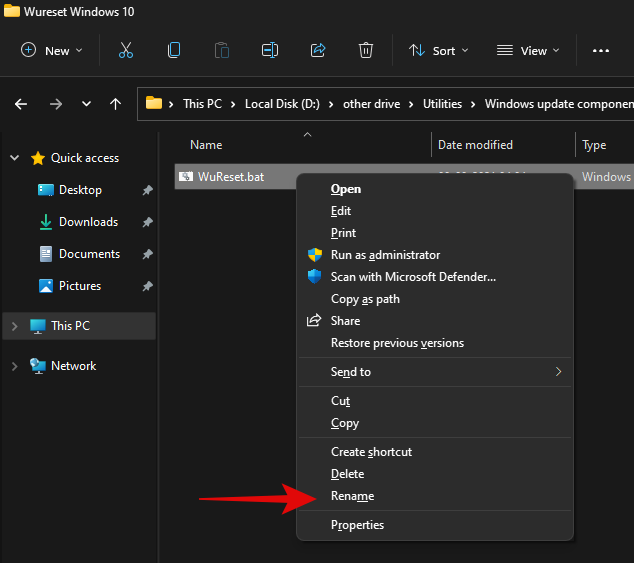
Select ‘Rename’.
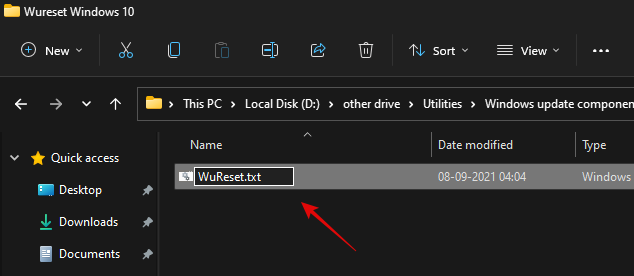
Replace ‘.bat’ with ‘.txt’.
Click on ‘Yes’ to confirm your choice.
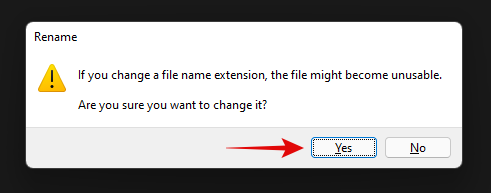
Now double click and open the file and it should open in your notepad. Once opened, scroll to the ‘:Reset’ section for resetting network commands and add the following line after the first delete command as shown below.
del /s /q /f "%SYSTEMROOT%\Logs\WindowsUpdate\*"
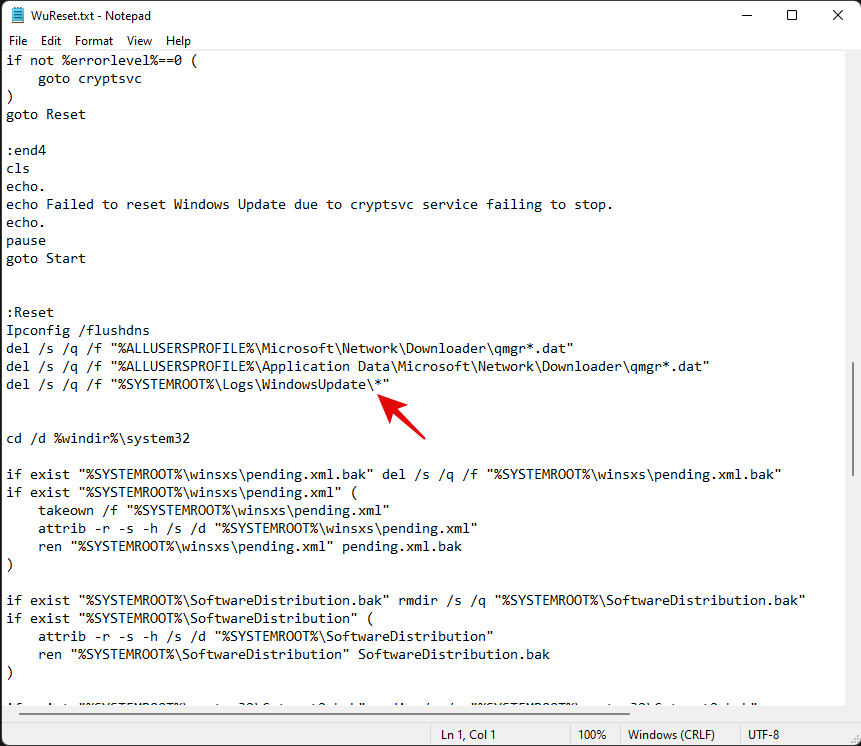
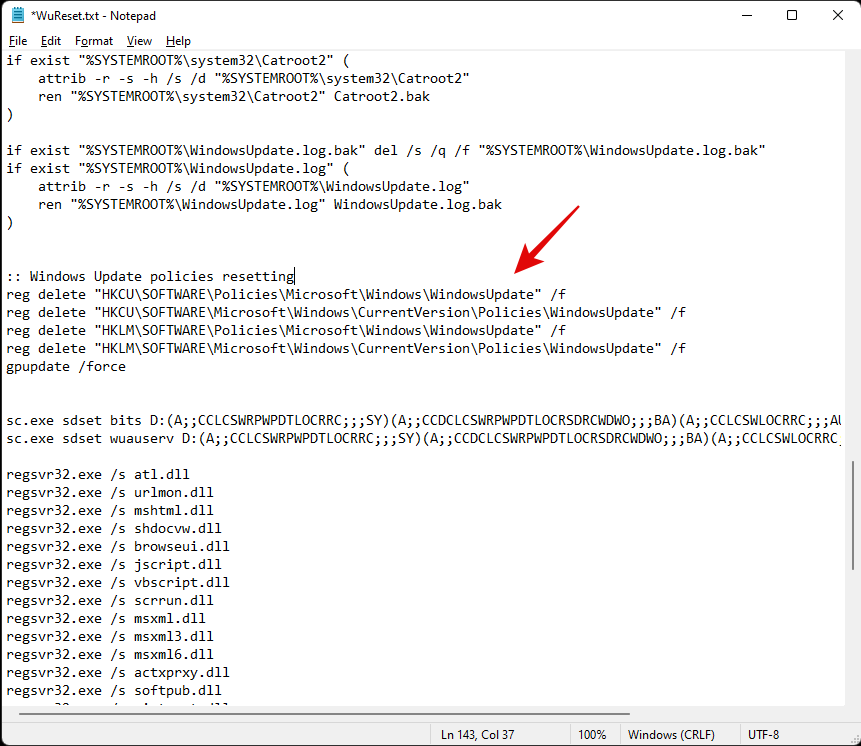
Once added, hit Ctrl + S on your keyboard. Ensure that there are no formatting changes or spaces before or after the line. The file will now be saved on your system along with its recent changes. We will now add some code to Reset Windows’s update policies on your system. Copy the lines below and paste them after your system commands. Ensure that two empty lines are available at either end of the code as shown below.
:: Windows Update policies resetting
reg delete "HKCU\SOFTWARE\Policies\Microsoft\Windows\WindowsUpdate" /f
reg delete "HKCU\SOFTWARE\Microsoft\Windows\CurrentVersion\Policies\WindowsUpdate" /f
reg delete "HKLM\SOFTWARE\Policies\Microsoft\Windows\WindowsUpdate" /f
reg delete "HKLM\SOFTWARE\Microsoft\Windows\CurrentVersion\Policies\WindowsUpdate" /f
gpupdate /force
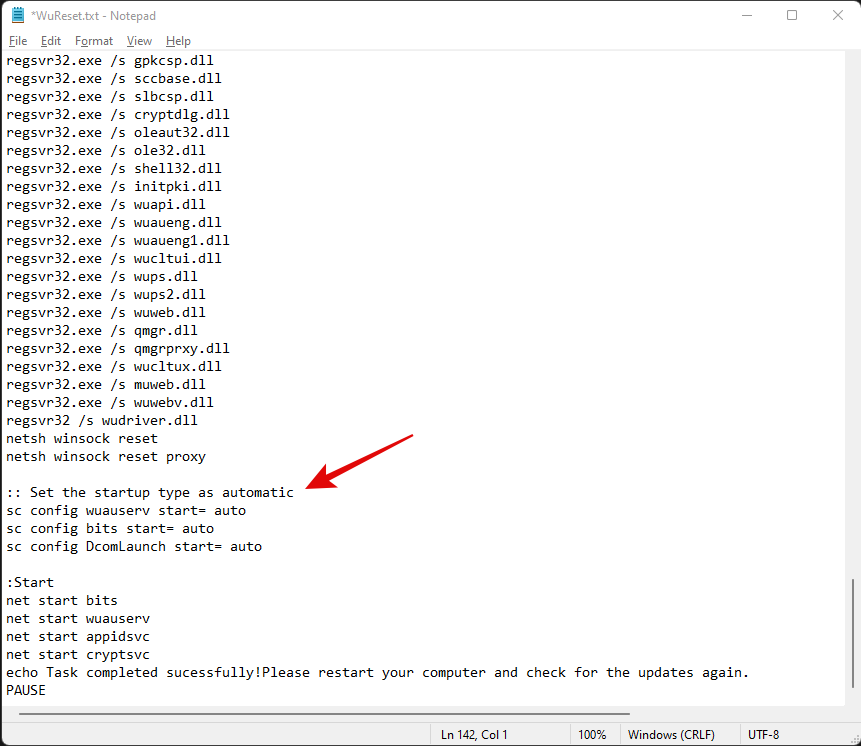
Lastly, let’s add some lines to ensure that the startup type for this service is set to ‘Automatic’. Copy the code below and add the lines after your winsock reset commands but before your service starting commands as shown below. Copy and paste the code in its respective location.
:: Set the startup type as automatic
sc config wuauserv start= auto
sc config bits start= auto
sc config DcomLaunch start= auto
Once you are done, hit Ctrl + S on your keyboard to save your changes. Close the file and right-click on it again and select ‘Show more options’.
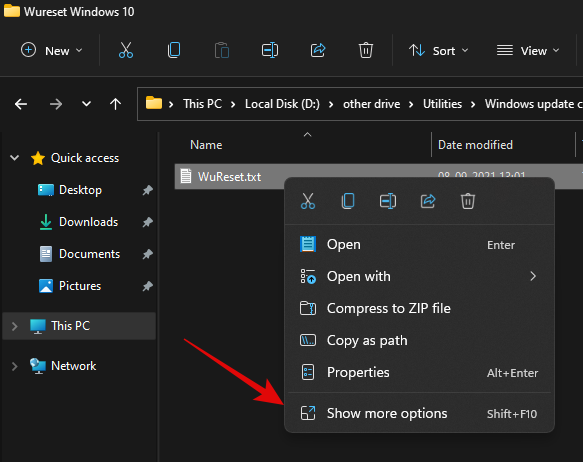
Click on ‘Rename’.
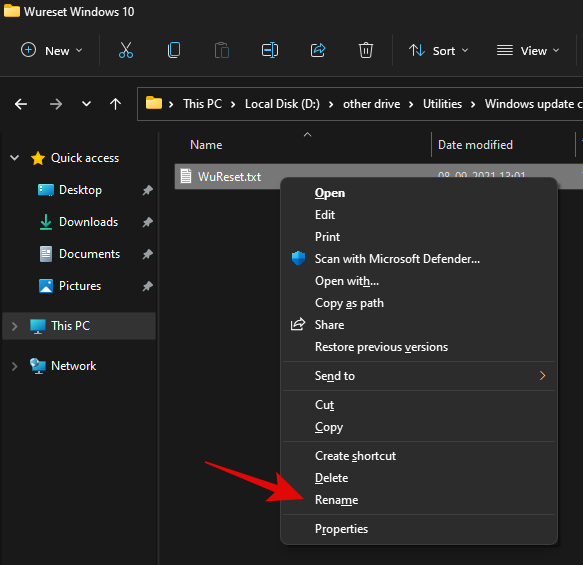
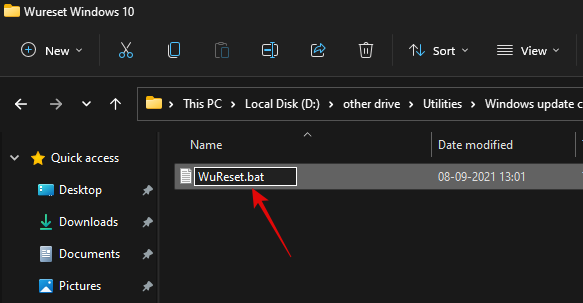
Replace ‘.txt’ with ‘.bat’.
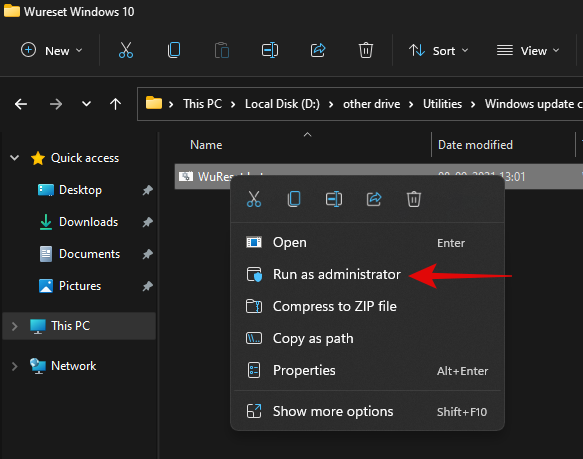
Once done, right-click on the file and select ‘Run as administrator’.
The batch script will now run on your PC and do its thing. Once the process completes, you will be asked to restart your PC. We highly recommend that you restart your PC at the earliest after running this script. Upon a restart, your Windows update should be reset and a fresh start should help you easily install pending Windows updates on your PC.
Method #02: Use DISM to uninstall the concerned packages
If you are still unable to uninstall specific Windows Update packages then simply use the DISM method to remove the concerned updates from your PC. This method force removes any available Windows updates from your PC without any issue. You will get a list of all the available updates in a table format which should make it much easier for you to find the culprit on your PC. Simply follow the guide at the top to get you started.
Method #03: Run SFC & DISM commands
At this point, if Windows still fails to update your system then you are facing a more serious issue than we anticipated earlier. This could indicate system-level corruption of files or missing system files from your system. In such cases, you can run SFC and DISM checks to fix corrupted files as well as restore missing system files. Follow the guide below to get you started.
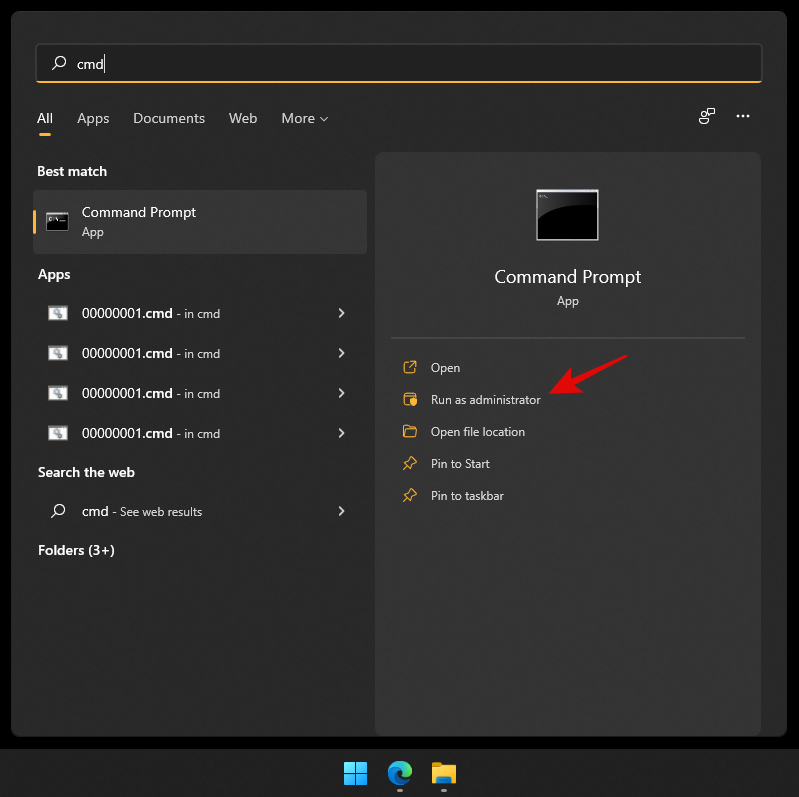
Press Windows + S on your keyboard and search for CMD. Click on ‘Run as administrator’ once it shows up in your search results.
Type in the following command and press Enter on your PC.
sfc /scannow
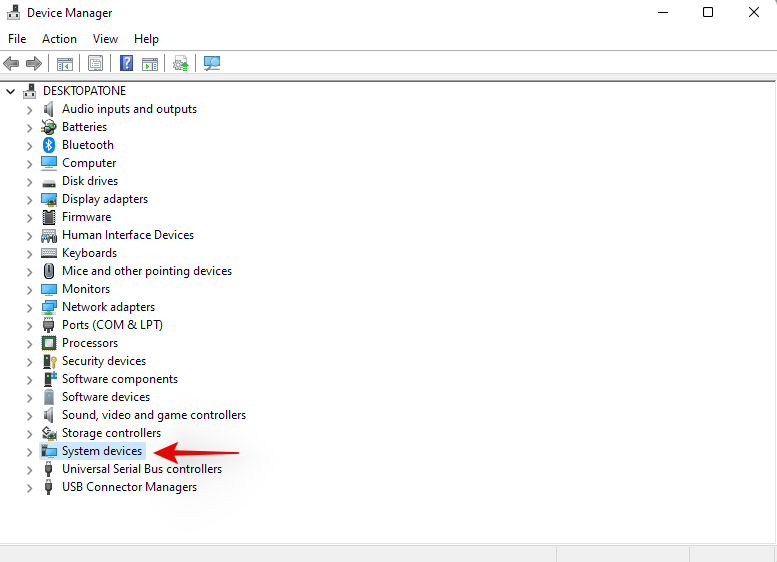
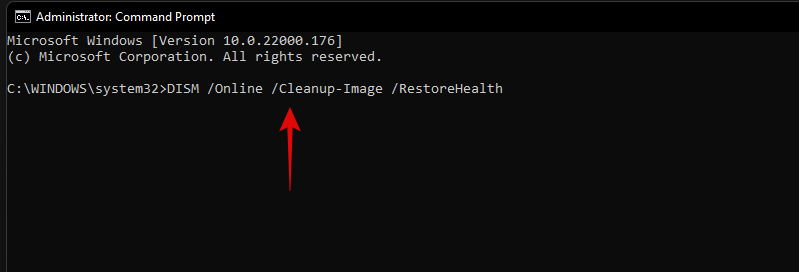
Once the SFC scan completes, type in the following command and execute it.
DISM /Online /Cleanup-Image /RestoreHealth
We recommend you restart your PC once the process completes.
Method #04: Last resort: Reset your PC
If nothing seems to be working for you then it might be time for a fresh installation of Windows 11 on your system. You can try getting in touch with your support team as well but if nothing works then a reset of your PC is the best option. In most cases, a reset while keeping your local files should help get Windows update working on your system.
Windows 11 connects to the update servers and updates your security definitions and drivers during OOBE. Windows will fix all update issues and reinstall necessary services on your system to get Windows update back up and running on your system during this process.
► You can use this dedicated guide from us to reset your Windows 11 PC.
We hope you were able to easily uninstall updates from your Windows 11 PC using the guide above. If you face any issues, feel free to drop a comment below.
Related:



![McAfee desinstallimine opsüsteemis Windows 11 [5 võimalust] McAfee desinstallimine opsüsteemis Windows 11 [5 võimalust]](https://blog.webtech360.com/resources8/images31/image-4917-0105182719945.png)
