Kui lähete üle uuele arvutile, on tõenäoline, et proovite vana arvuti kõvaketast uuesti kasutada. Kui ei, siis võib-olla plaanite selle kinkida mõnele pereliikmele või sõbrale. Kuid enne nende valikute jätkamist peaksite oma vana kõvaketta täielikult pühkima, et järgmine inimene alustaks kõvakettaga.
Selles postituses käsitleme mitmeid viise, kuidas Windows 11 kõvaketast pühkida .
Sisu
Miks peaksite kõvaketast pühkima?
Enne meetodite juurde asumist leidkem minut, et mõista, miks peaksite kõvakettaid pühkima.
Ilmsem põhjus pühkides kõvakettale on masti kõik oma isiklikud failid ja rakendused alates drive, tagades, et nad ei saa tagasi poolt andmete taastamise vahendid - pärast tehaselähtestus või mitte. Veel üks draivi tühjendamise põhjus võib olla lihtsalt uute failide jaoks rohkem salvestusruumi hankimine. Või soovite lihtsalt oma arvuti nullist seadistada Windowsi puhta installi ja kõvaketta värskete partitsioonidega.
Olenemata põhjusest, vaatame üle kõvaketta pühkimise eeldused.
Mida teha enne kõvaketta pühkimist?
Enne draivi kustutamist peate mõne asja eest hoolitsema.
- Veenduge, et oleksite kopeerinud kogu draivi sisu teise asukohta, vältides andmete kadumist.
- Kui kasutate draivi tühjendamiseks sülearvutit, soovitame sülearvuti vooluvõrku ühendada, kuna mõne meetodi rakendamine võib võtta kaua aega.
- Sulgege kõik rakendused või failid, mis võivad töötada kõvakettalt, mida proovite kustutada.
Vaatame Windows 11 kõvaketta tühjendamise meetodeid.
Seotud: draivi kaardistamine opsüsteemis Windows 11
Draivi vormindamine opsüsteemis Windows 11 või 10
Saate draivi vormindada mitmel viisil, olenevalt teie süsteemi juurdepääsu tüübist. Kasutage ühte allolevatest juhenditest, mis teie praeguse olukorra ja vajadustega kõige paremini sobib.
See on kahtlemata üks lihtsamaid ja kiiremaid viise kõvaketta puhastamiseks. Protsess võtab vaid paar sekundit ja sobib suurepäraselt siis, kui soovite kõvakettal uutele failidele ruumi teha.
Märkus. See meetod töötab ainult teie süsteemi teiseste draivide, mitte alglaadimisdraivi puhul.
Siin on sammud.
Vajutage, Win key + ret avada kast Run. Sisestage "explorer" ja vajutage sisestusklahvi.
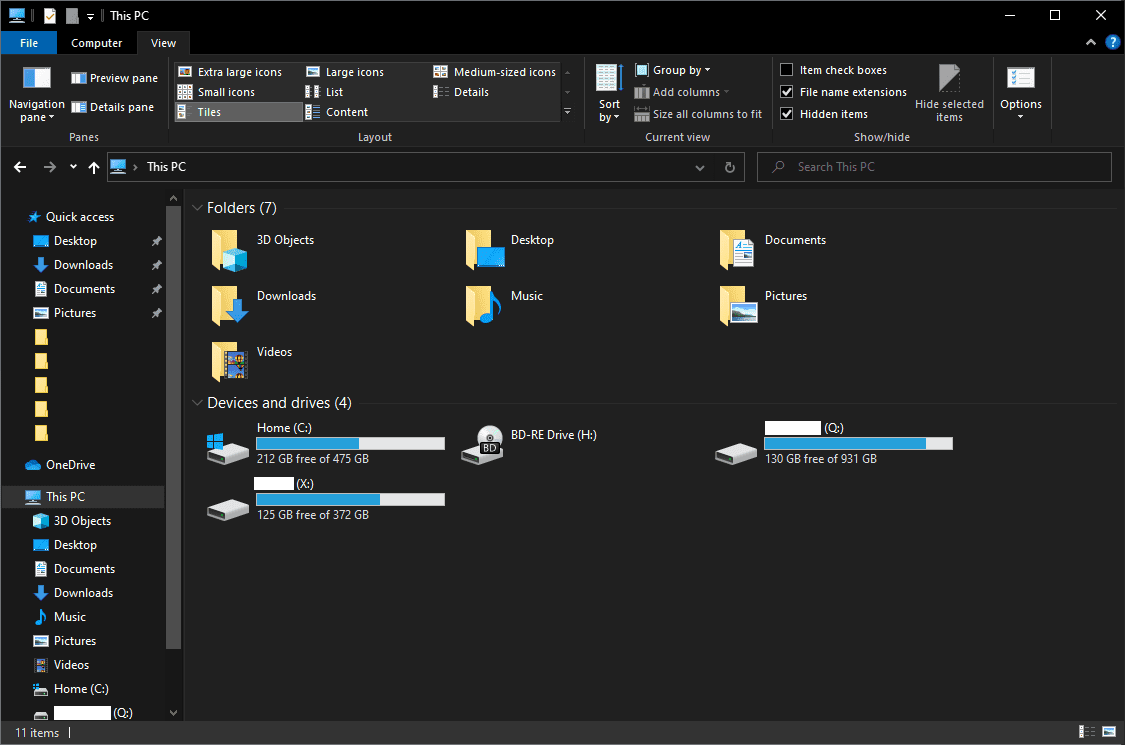
Näete, et avaneb aken pealkirjaga "File Explorer". Klõpsake "See arvuti".
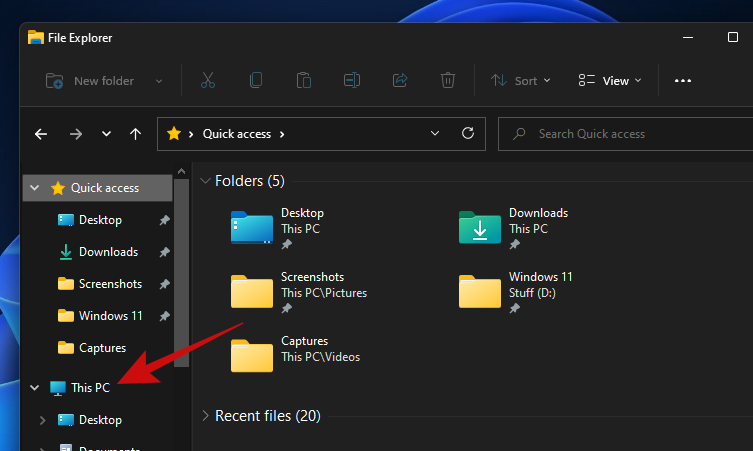
Nüüd peaksite nägema kõiki arvutiga ühendatud draive. Meil on kolm draivi, millest me kasutame selle juhendi jaoks andmedraivi.
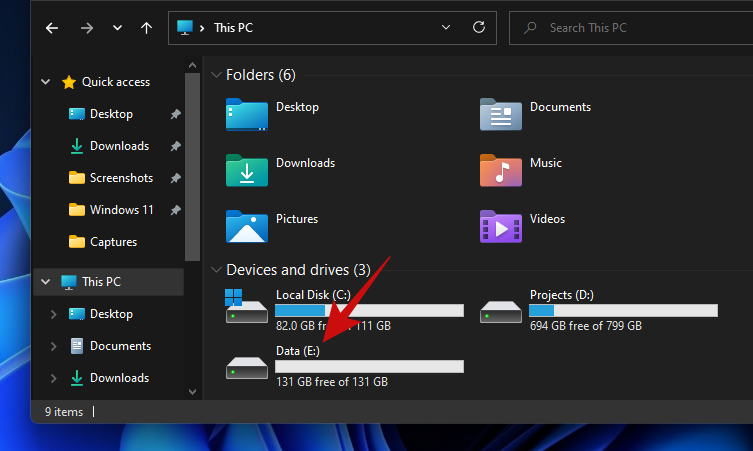
Kõik, mida pead tegema, on paremklõpsake draivi, mida soovite pühkida, ja klõpsake nuppu "Vorminda".
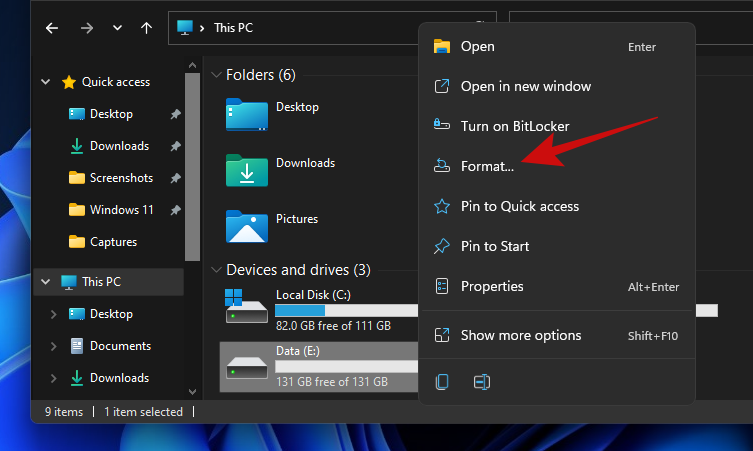
Peaksite nägema väikest "Vorming" hüpikakent koos hulga valikutega. Kui soovite teha kiiret andmete kustutamist ilma muude valikutega segamata, klõpsake nuppu "Start".
Näpunäide. Andmete turvalisemaks kustutamiseks tühjendage ruut "Kiire vormindamine" ja seejärel klõpsake nuppu "Alusta". Pidage meeles, et põhjalik pühkimine võtab palju kauem aega kui kiire vormindamine.
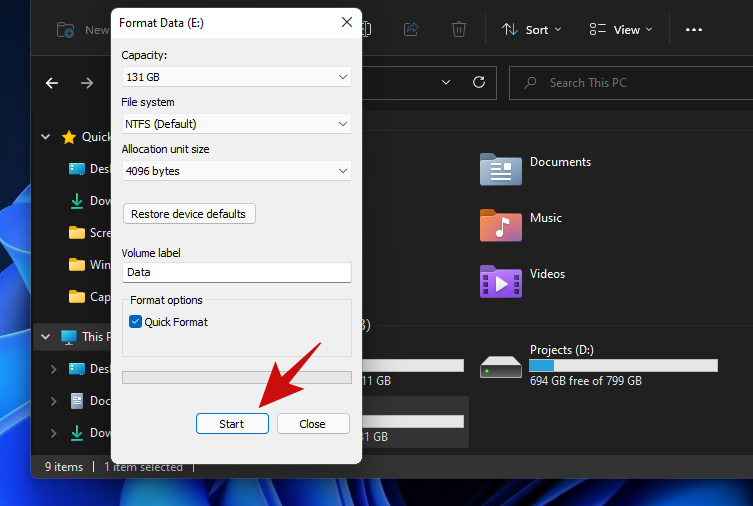
Kui pühkimine on lõpetatud, peaksite nägema sama kinnitavat teadet. Hoiatusest loobumiseks klõpsake nuppu OK.
Teie draiv on nüüd täiesti puhas ja uuesti kasutamiseks valmis.
2. meetod: kettahalduse kasutamine
Avage menüü Start ja tippige "Disk Management". Klõpsake otsingutulemusel või avamisnupul.
Kettahaldustööriist näeb välja järgmiselt.
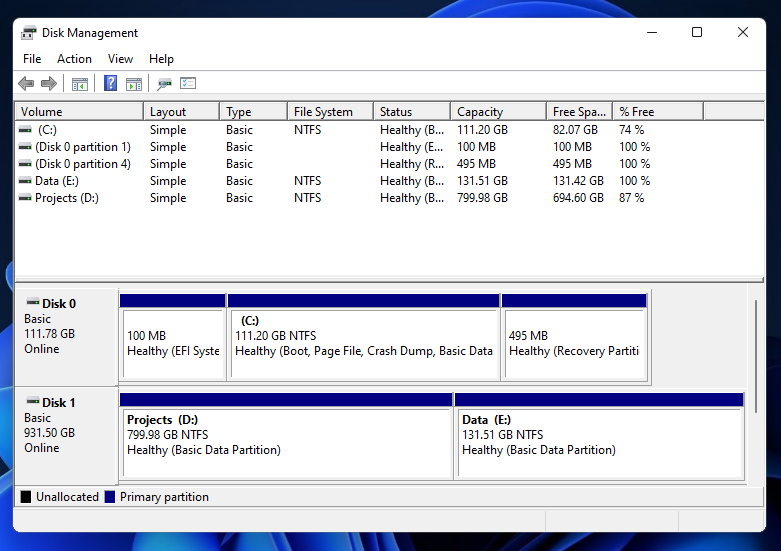
Paremklõpsake helitugevust, mida soovite pühkida, ja klõpsake nuppu Vorminda.
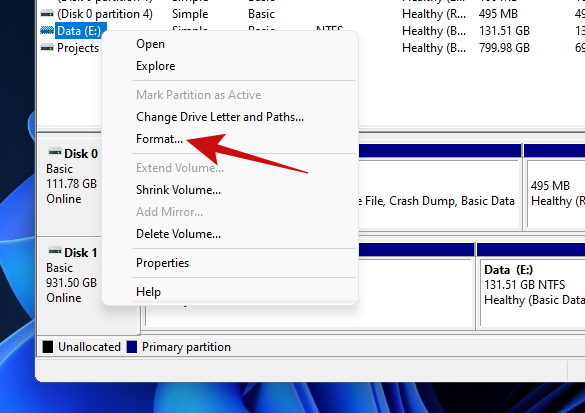
Järgmisel hüpikaknal peaks teil olema käputäis valikuid, näiteks helitugevuse nime, failisüsteemide ja muu muutmine.
Jällegi, nagu ka eelmise meetodi puhul, peaksite jätma linnukese valiku "Kiire vormindamine", kui te ei soovi draivi tühjendamiseks kaua oodata.
Näpunäide . Põhjalikuks tühjendamiseks, mis peaks eemaldama draivilt kõik teie andmete jäljed, tühjendage ruut „Kiire vormindamine”.
Draivi pühkimise alustamiseks klõpsake nuppu "OK".
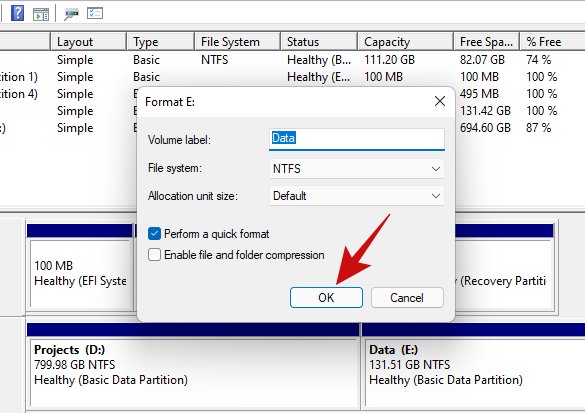
Andmete kustutamise kinnitamiseks klõpsake nuppu OK ja teie draiv peaks mõne minuti jooksul puhas olema.
3. meetod: Diskparti kasutamine CMD-s (käsuviip)
Diskpart on käsurea utiliit, mida saab kasutada kõigi arvutiga ühendatud draivide haldamiseks. Diskparti abil saate teha kõike alates ketaste loetlemisest, partitsioonide loomisest ja kustutamisest ning paljust muust.
Vaatame, kuidas kõvaketast diskpartiga pühkida.
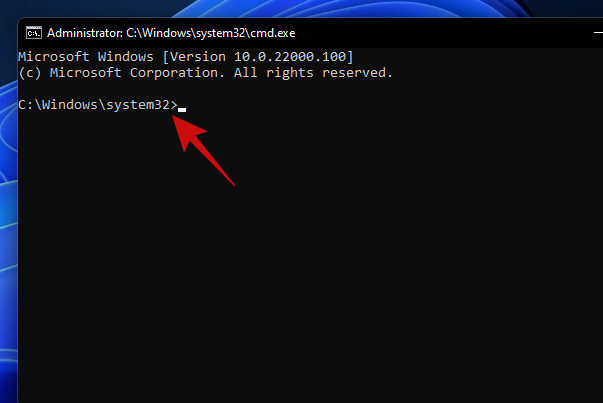
Vajutage, Win key + ret avada kast Run. Tippige "cmd" ja vajutage sisestusklahvi Ctrl + Shift + Enterasemel klahve. See avab kõrgendatud käsurea.
Kõrgendatud käsuviiba vaiketee peaks välja nägema selline.
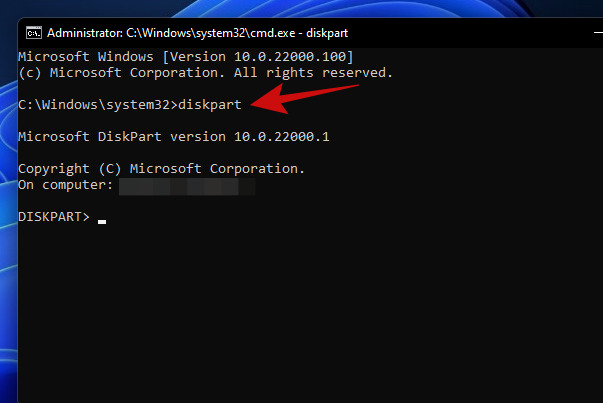
Tippige "diskpart" ja vajutage sisestusklahvi. Nüüd peaksite olema diskparti utiliidis.
Tippige "loendiketas" ja vajutage sisestusklahvi. See peaks loetlema kõik arvutiga ühendatud kettad.
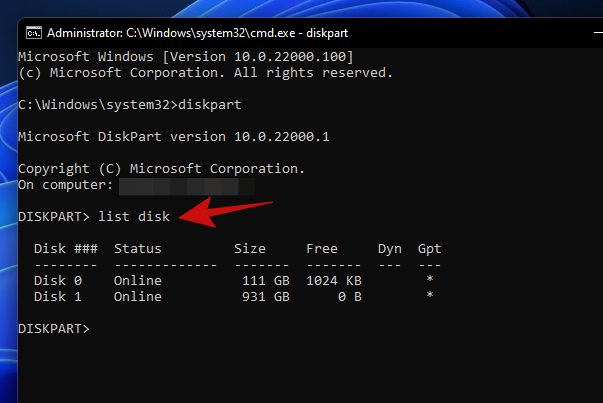
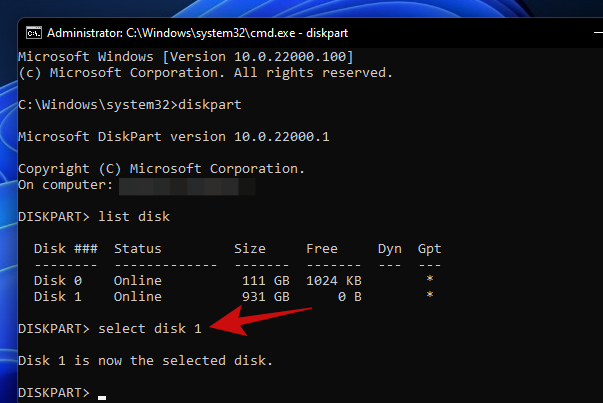
Ketta kustutamise jätkamiseks tippige "vali ketas". Meie sülearvutil on kaks kõvaketast ja selle juhendi puhul jätkame kettaga 1, nii et sisestasime käsu „vali ketas 1” ja vajutame sisestusklahvi.
Sisestage "puhas" ja vajutage sisestusklahvi.
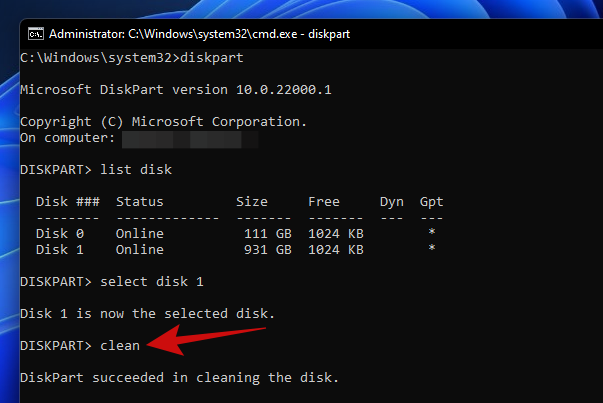
Teie ketas peaks nüüd olema täiesti tühi ja muutunud jaotamata ruumiks. Teie järgmine ülesanne peaks olema partitsioonide loomine varem kasutatud kettahaldustööriista abil. Lihtsalt käivitage tööriist ja lähtestage ketas. Pärast seda peaksite saama luua teile kõige sobivama suurusega vaheseinu.
4. meetod: lähtestamisvaliku kasutamine
Windows 11-ga on kaasas valik „Lähtesta see arvuti”, mis lähtestab Windowsi tehaseseadetele. Ja parim osa selle arvuti lähtestamise juures on see, et see pakub kasutajatele võimalust säilitada kõik failid ja lähtestada Windows või eemaldada kõik Windowsi lähtestamise ajal.
Kui pühite draivi lihtsalt Windowsi uuesti installimiseks, soovitame teil seda meetodit enne puhta installiga jätkamist proovida.
Saate seda teha järgmiselt.
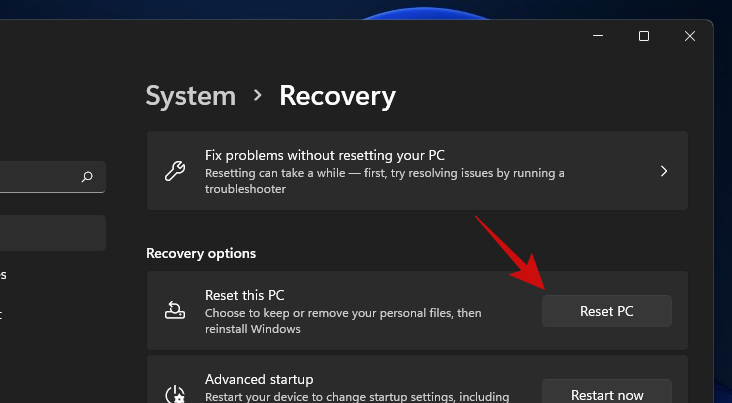
Avage menüü Start ja tippige käsk "Lähtesta see arvuti". Klõpsake ilmuval otsingutulemsel või avamisnupul.
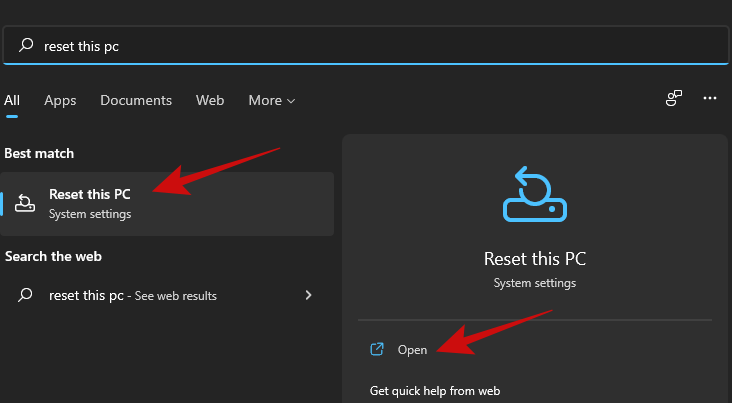
Windowsi lähtestamise protsessi käivitamiseks klõpsake nuppu "Lähtesta arvuti".
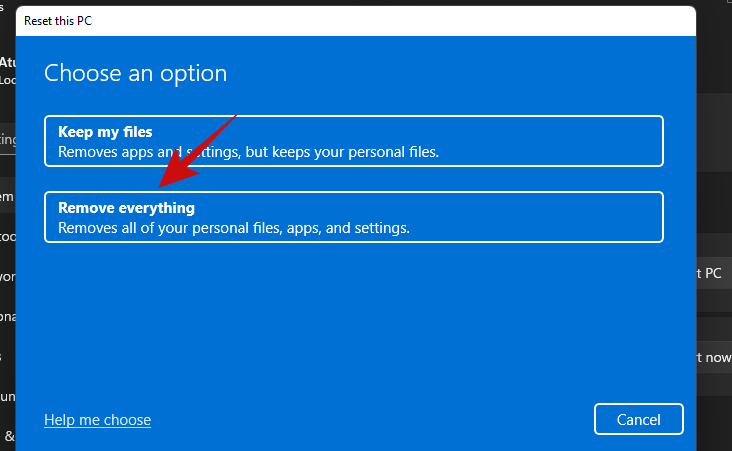
Peaksite nägema sinist ekraani kahe valikuga. Klõpsake Windowsi uuesti installimiseks nuppu „Eemalda kõik”, eemaldades samal ajal kõik oma failid, rakendused ja sätted.
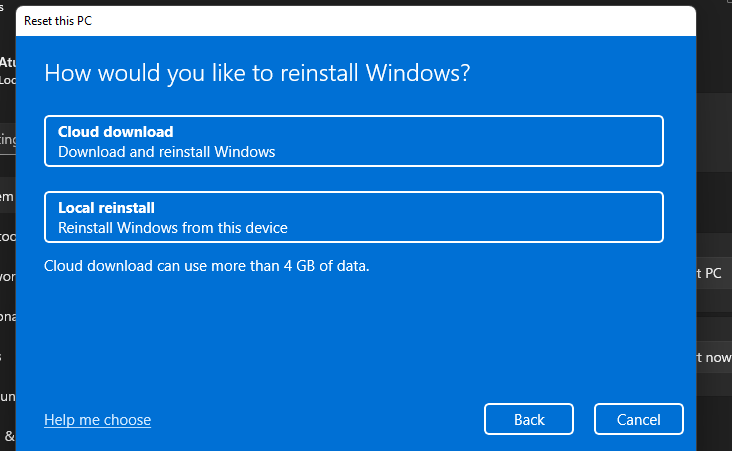
Järgmisel ekraanil peaks küsima, kuidas soovite Windowsi uuesti installida. Kui teie arvutil on Interneti-ühendus, võite jätkata valikuga Pilve allalaadimine, vastasel juhul jätkake valikuga "Kohalik uuesti installimine".
Järgige ülejäänud ekraanil kuvatavaid juhiseid ja teie arvuti on Windows 11 värske installiga kiiresti valmis ning teie kõvakettal pole jälgegi vanadest failidest ja rakendustest.
5. meetod: PowerShelli kasutamine
Samuti saate draive vormindada PowerShelli abil. Järgige allolevaid juhiseid draivi vormindamiseks PowerShelli abil Windows 11-s.
Vajutage Windows + Sklaviatuuril ja otsige PowerShell. Kui see kuvatakse teie otsingutulemustes, klõpsake käsul „Käivita administraatorina”.
Sisestage järgmine käsk, et saada kõigi teie süsteemi installitud ketaste köidete loend. See aitab teil tuvastada ja leida ketta, mida soovite vormindada.
get-volume

Valige köide, mida soovite vormindada, ja seejärel kasutage selle valimiseks allolevat käsku. Asendage X asjaomasele köitele määratud tähega.
select X

Nüüd kasutage valitud köite vormindamiseks allolevat käsku. Asendage NAME teie valitud nimega, mis määratakse köitele pärast selle vormindamist.
format-volume -filesystem NTFS -newfilesystemlabel NAME
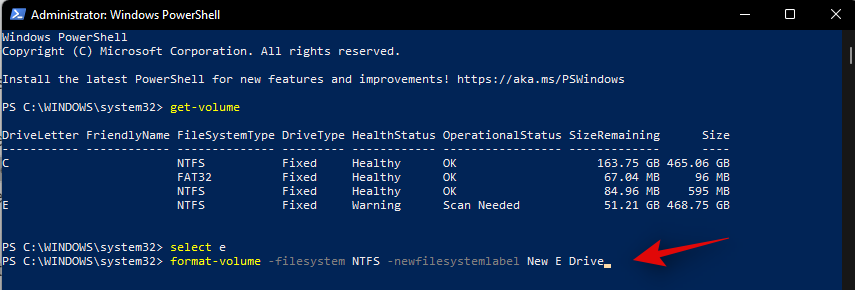
Ja see ongi kõik! Asjaomasel draivil valitud köide vormindatakse nüüd. Oodake, kuni protsess on lõpule viidud, ja sulgege PowerShell, et kasutada ketast nagu tavaliselt.
6. meetod: kolmanda osapoole utiliidi kasutamine
Seal on palju partitsioonihaldureid, mis aitavad teil hõlpsalt hallata ja vormindada kõiki teie süsteemi installitud kettaid. Alustamiseks järgige allolevat juhendit. Selle juhendi jaoks kasutame Gnome Partition Manageri, mis on pikka aega usaldusväärne tööstustööriist, mis on täiesti tasuta. Kasutage allolevat linki, et see oma kohalikku salvestusruumi alla laadida.
Kui GParted on teie süsteemi alla laaditud, saate selle lihtsalt paigaldada nagu mis tahes muu ISO ja alustada. Kui soovite oma alglaadimisdraivi puhastada ja pühkida, soovitame teil ühendada ISO irdkandjale, mis peaks võimaldama teil draivi vormindada väljaspool teie praegust Windows 11 installi. Pärast ühendamist taaskäivitage süsteem ja pääsete alglaadimismenüüst juurde Gnome'i partitsioonihaldurile. Me kasutame Rufust kettapildi ühendamiseks irdkandjale ja seejärel oma praeguse süsteemi taaskäivitamiseks.
Märkus. Veenduge, et turvaline alglaadimine oleks teie süsteemis keelatud, et saaksite USB-liidest käivitada. Lisaks lülitage oma salvestuskonfiguratsiooniks Intel Optane'i mälu asemel AHCI, kui see on saadaval. GParted ei suuda teie draive ära tunda, kui salvestuskonfiguratsiooniks pole määratud AHCI.
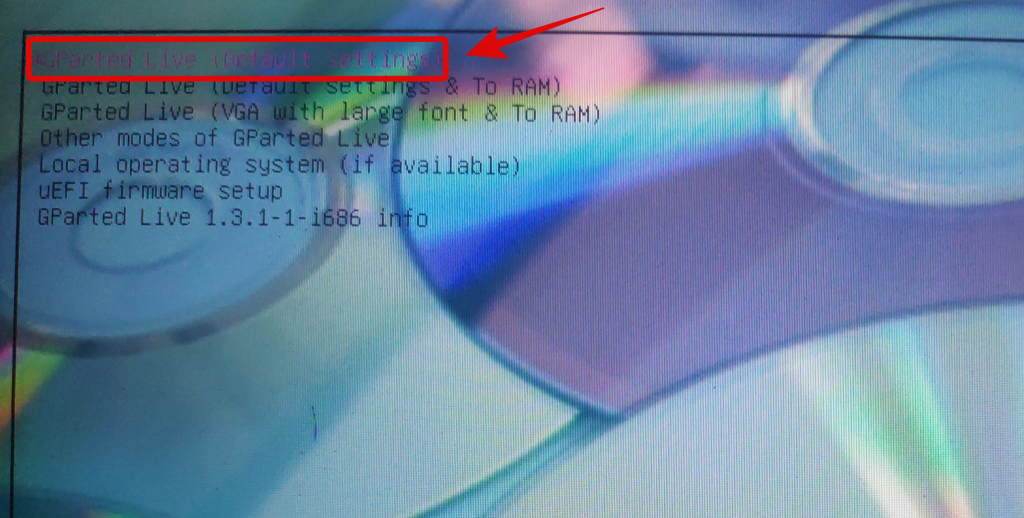
Kui olete oma USB-draivi käivitanud, on teil võimalus käivitada GParted erinevate sätetega. Soovitame valida esimese valiku ja teha valiku „Käivita GParted vaikeseadetega”.
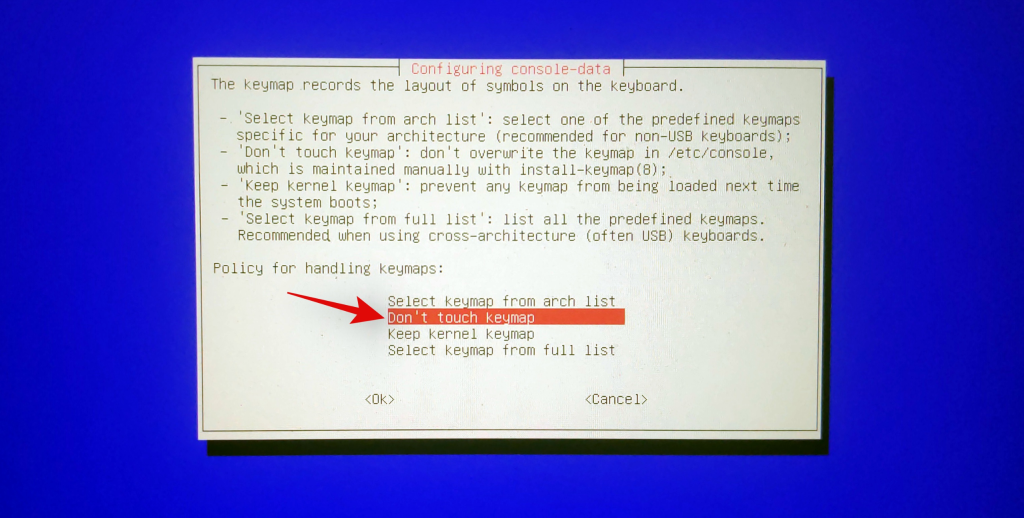
Nüüd palutakse teil valida klahvikaart. See leht on kasulik juhuks, kui Gnome tunneb teie klaviatuuri valesti ära. Kui tundub, et teie klaviatuur reageerib, valige protsessi jätkamiseks käsk „Ära puuduta klahvikaarti”.
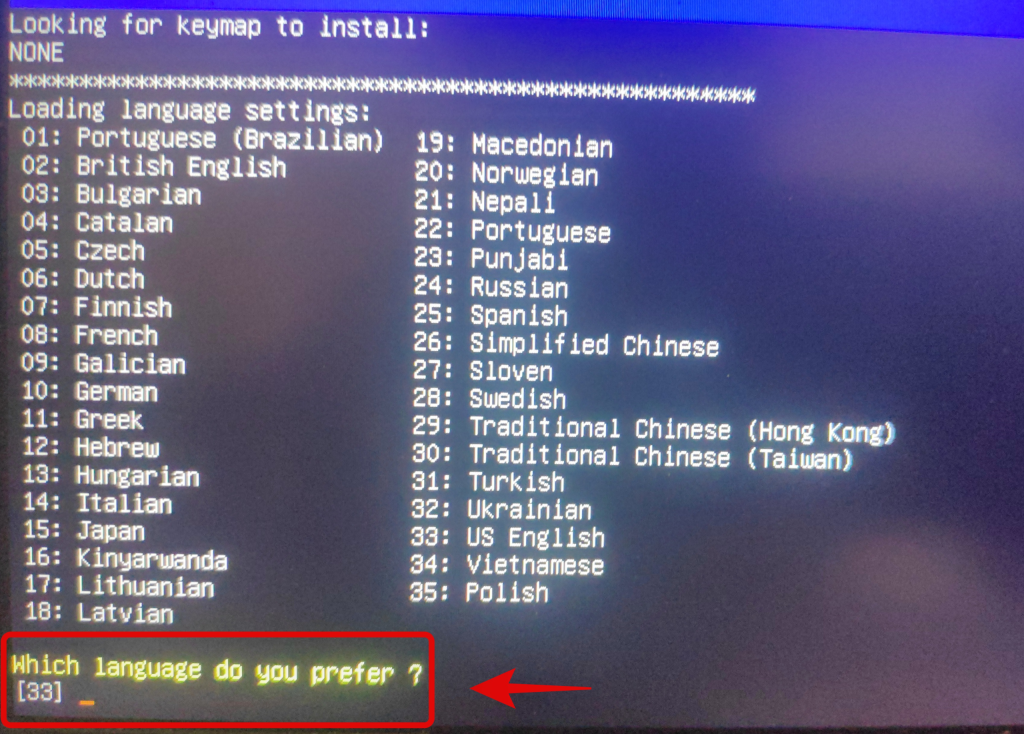
Nüüd jätkake ja valige oma keel, sisestades sellele vastava numbri. Sisestage "33", kui soovite valida USA inglise keele.
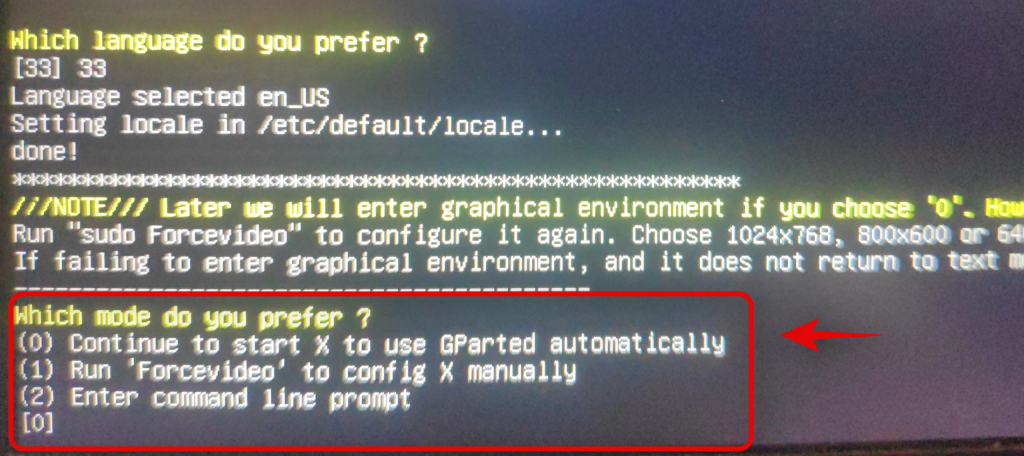
Nüüd küsitakse teilt, kas soovite laadida GParted koos sundvideodraiverite või vaikesätetega. Videodraiveri sundimine on kasulik juhul, kui GParted ei suuda teie ekraani ära tunda või kui teie süsteemis on eraldusvõimega probleeme. Soovitame valida esimese valiku. Valiku valimiseks sisestage '0'.
GParted käivitatakse nüüd ja teid suunatakse selle ajutisele töölauale. Partitsioonihaldur peaks teie süsteemis nüüd automaatselt käivituma. Klõpsake vasakus ülanurgas rippmenüül ja valige soovitud ketas, mida soovite vormindada.
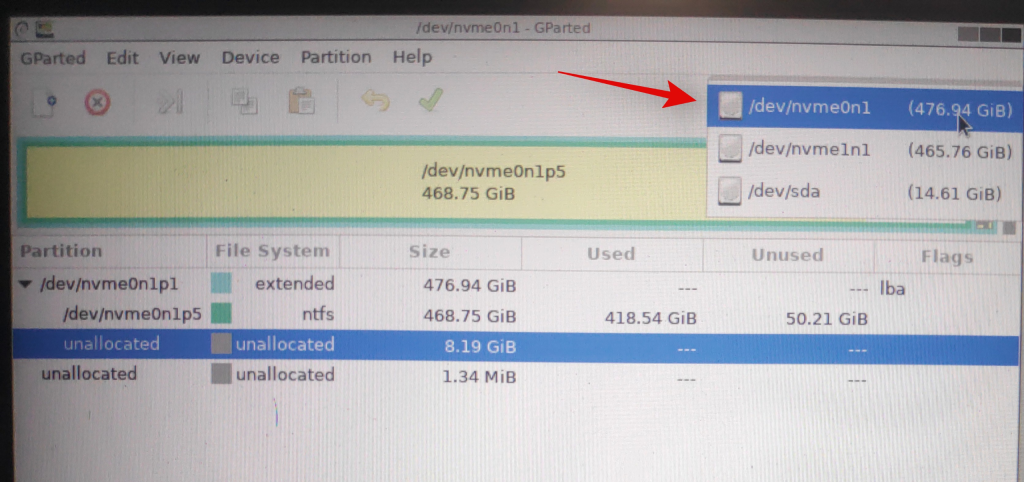
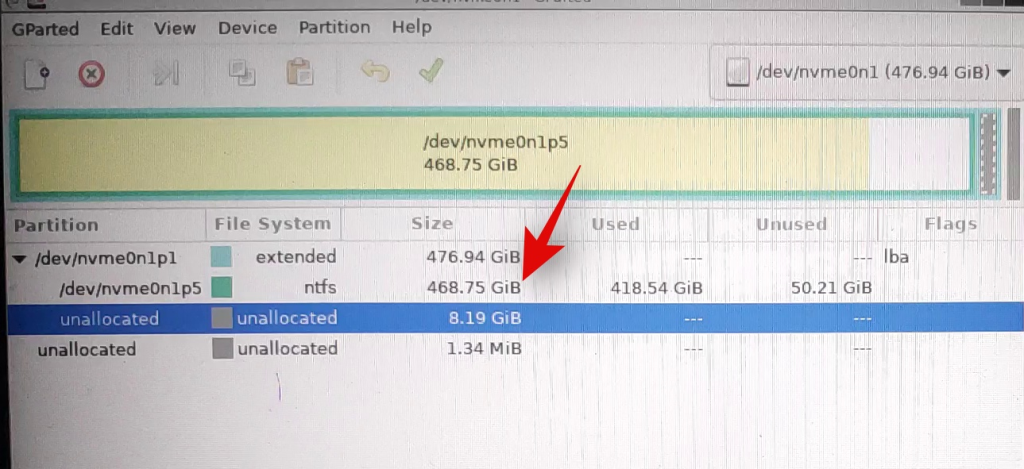
Nüüd kuvatakse valitud kettal olemasolevate köidete loend. Klõpsake ja valige soovitud helitugevus, mida soovite vormindada.
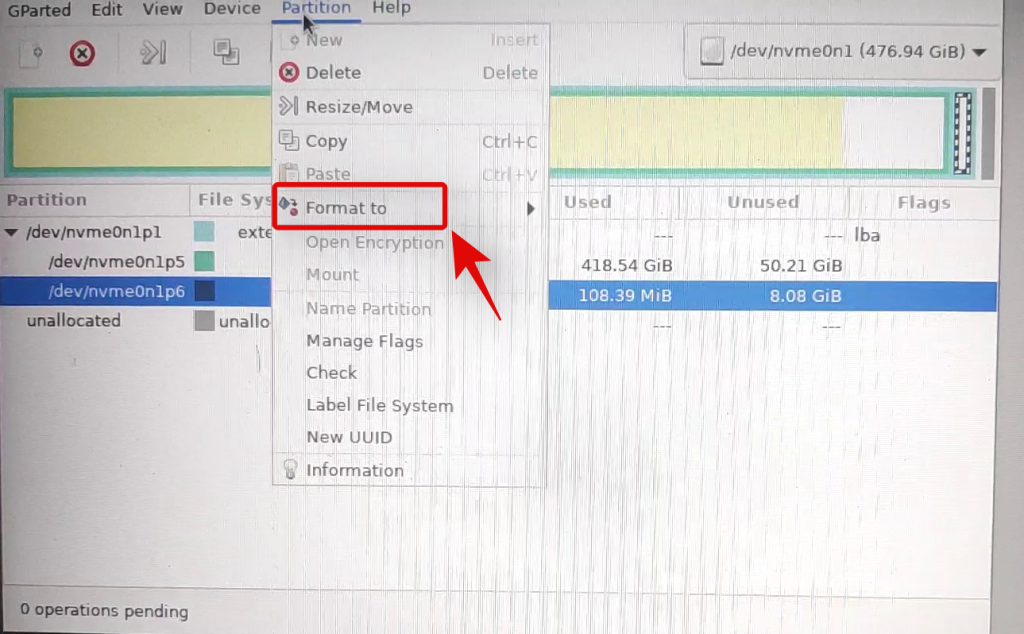
Nüüd klõpsake ülaosas "Partition" ja hõljutage kursorit "Format to" kohal.
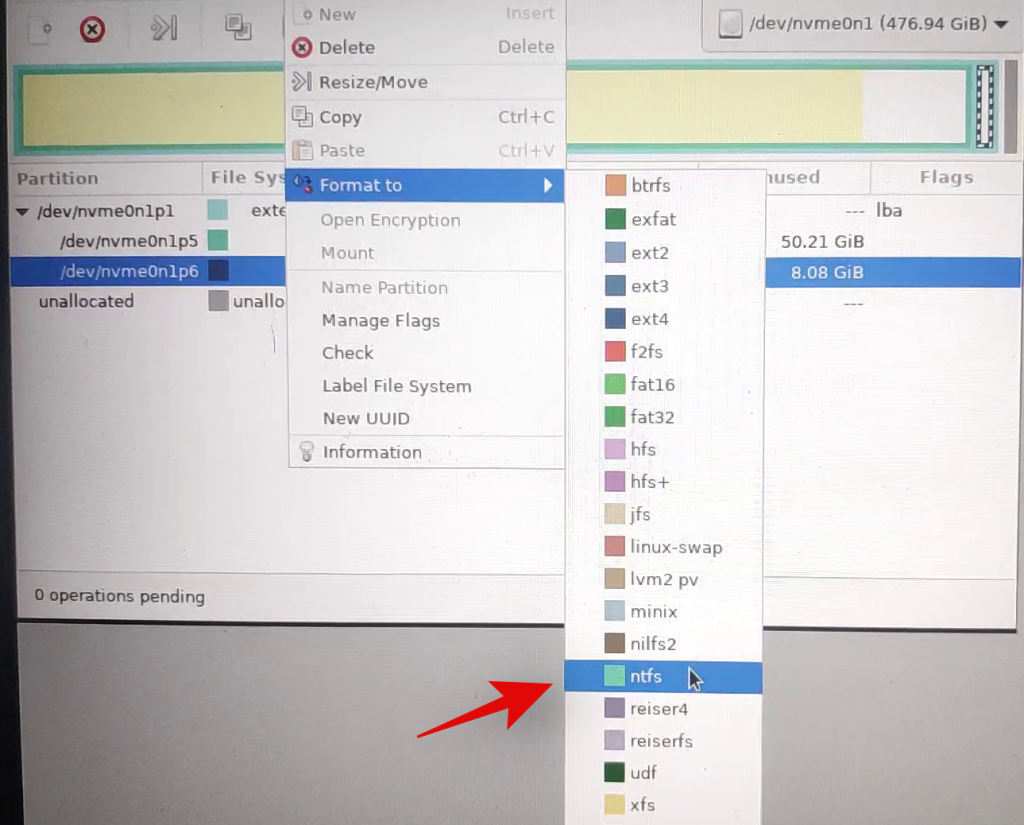
Select your desired drive format but it is recommended that you format your drive in NTFS for all modern systems.
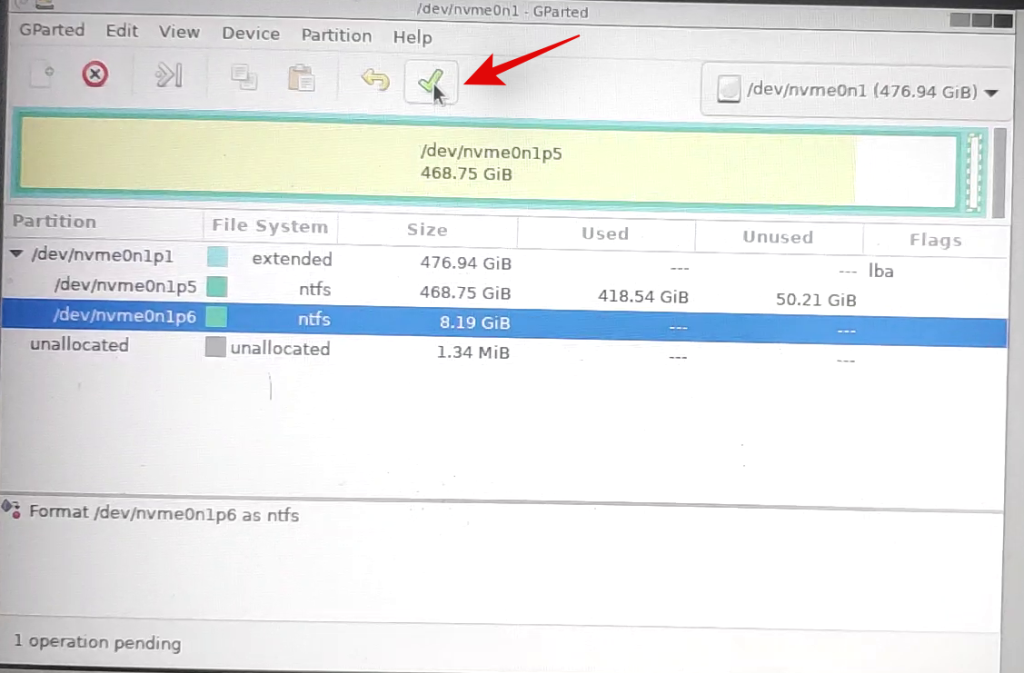
Once you select the desired disk format, GParted will cue the current operation in its task list. Click on the checkmark in the toolbar at the task to execute cued tasks.
Click on ‘Apply’ to confirm your choice.
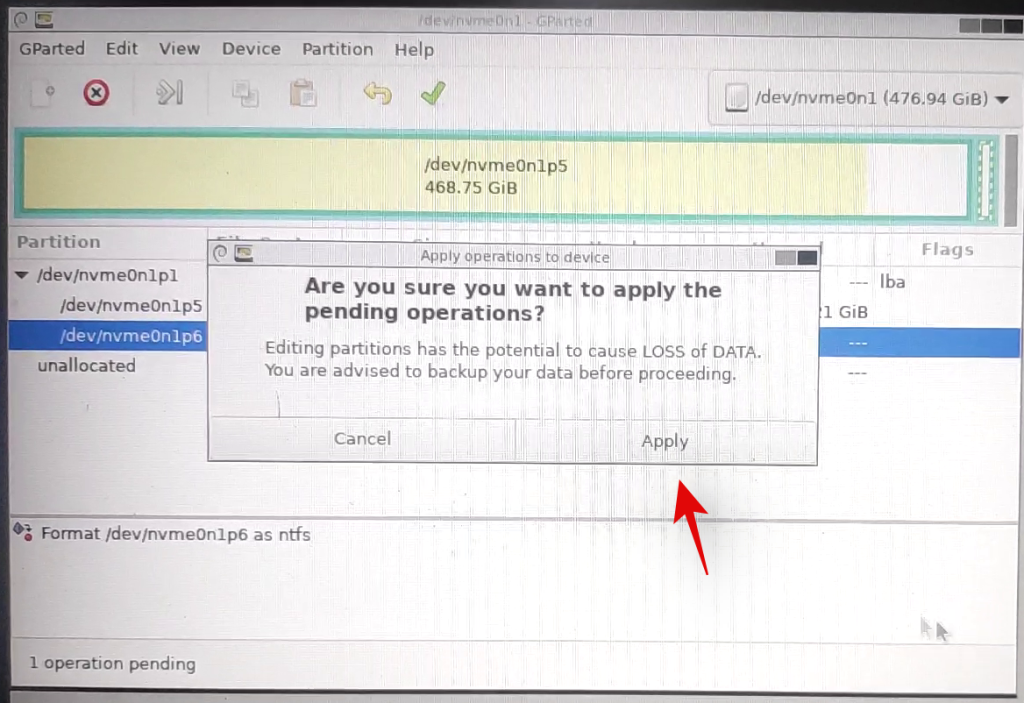
GParted will now perform the necessary operations and the selected volume should be automatically formatted at the end of this process. Close the GParted utility and click on the Power icon on the desktop. Click and select ‘Restart’ and then click on ‘Ok’.
Boot into the BIOS on your system and revert the changes you made earlier. This includes enabling secure boot, changing your storage configuration back to its default settings, and changing your boot device order.
Once you have reverted the changes, unplug your USB and exit the BIOS while saving the changes you made.
You will now be booted into Windows normally and the selected volume should now be formatted and wiped on your system.
Method #7 From Recovery
If you are in Windows Recovery Environment and unable to boot into Windows, then you can use the guide below to format a drive on your system. Please keep in mind that it is not recommended to format your boot drive using the guide below from your recovery environment as this could cause issues with your boot drive and make it unrecognizable. You will then have to completely format the drive and set it up again and install a new version of Windows on it. Hence, use the guide below only to format secondary drives from the Recovery environment or ensure that you have a Windows 11 installation media handy to reinstall the OS that you will remove from your boot drive.
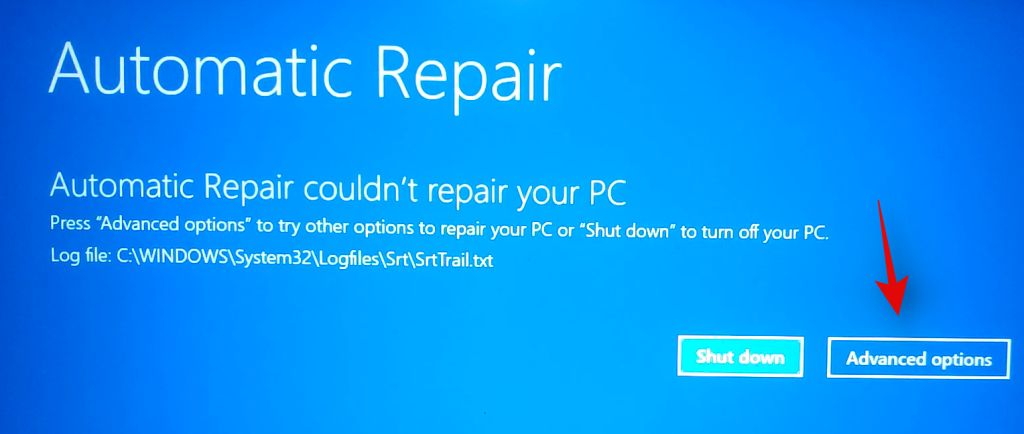
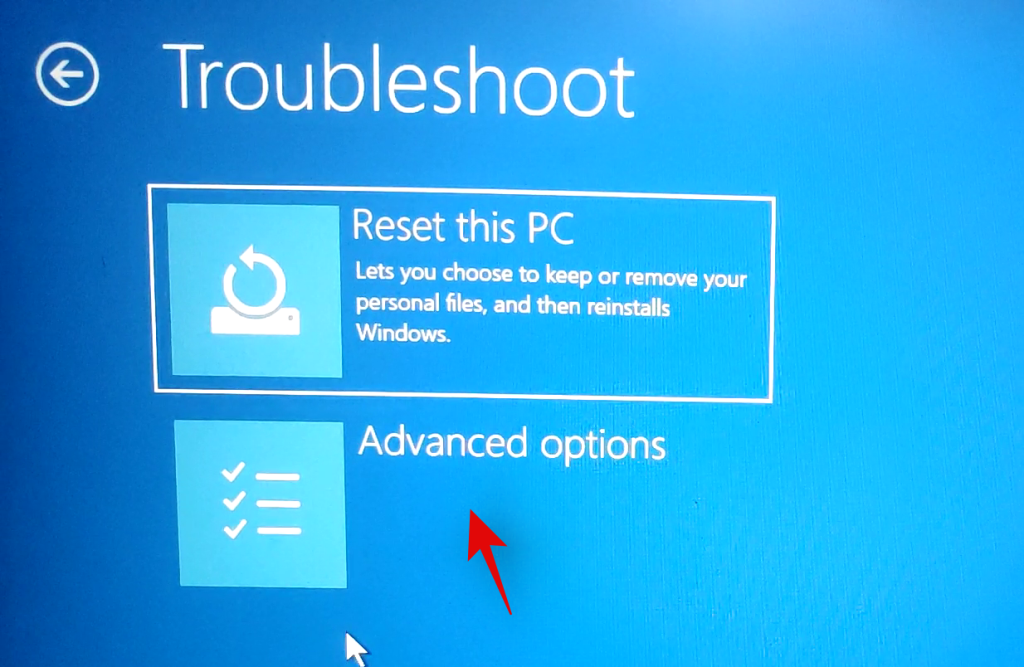
Once you are on the Windows Recovery or troubleshooting screen, click and select ‘Advanced Options’.
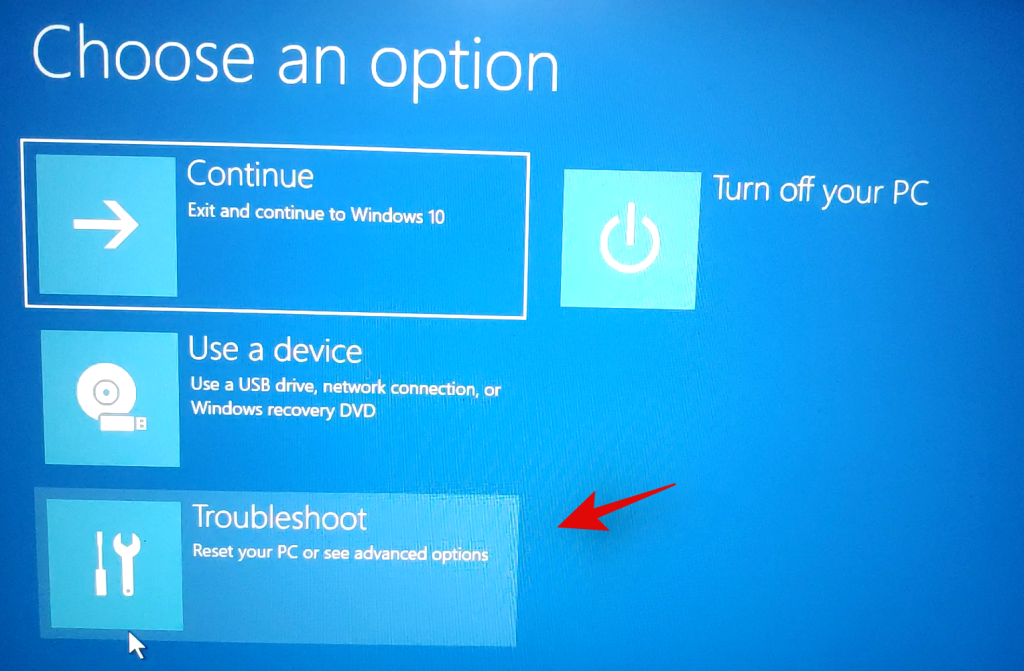
Click on ‘Troubleshoot’.
Select ‘Advanced Options’ again.
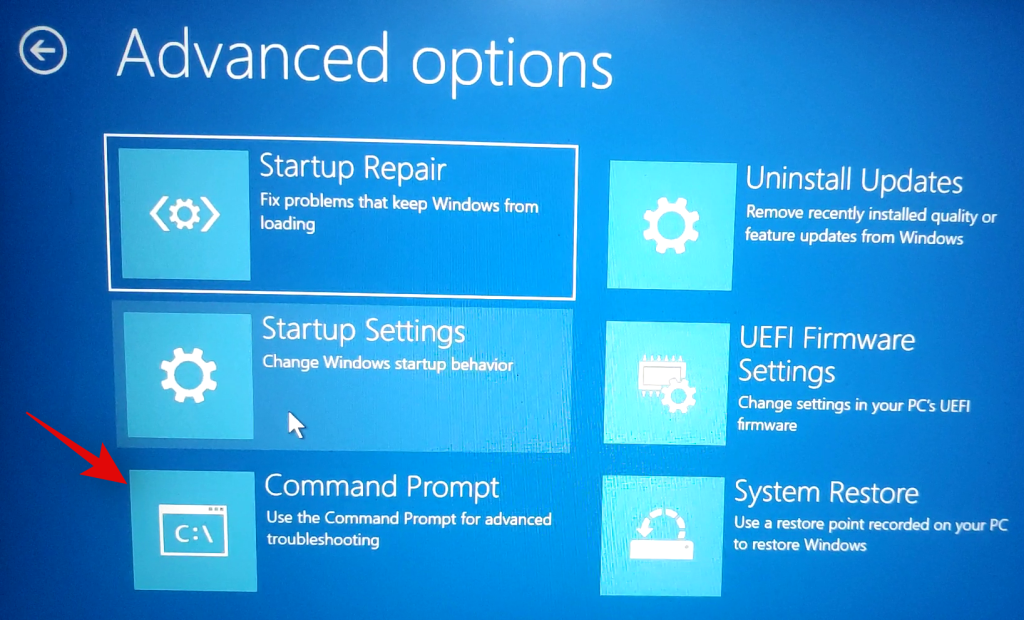
Now click on ‘Command Prompt’ to launch the command prompt.
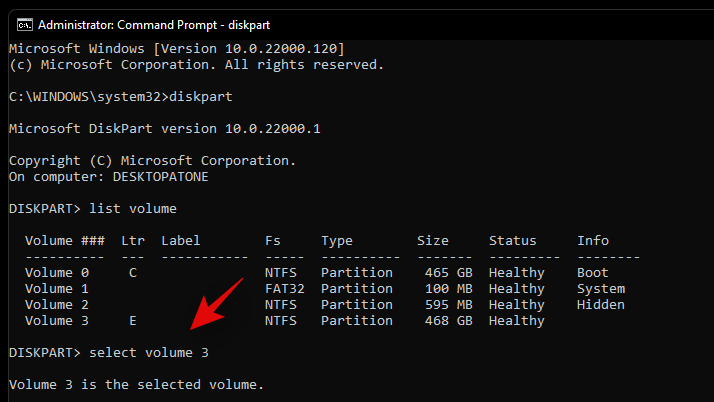
Type in the following command to launch the diskpart utility.
diskpart
Now execute the following command.
list volume

Find the volume you wish to format and use the command below to select it. Replace X with the dedicated number of the volume you selected.
select volume x
Now use the following command to format the selected volume with NTFS as its format. Replace NAME with the name you wish to give your newly formatted volume.
format fs=ntfs quick label=NAME
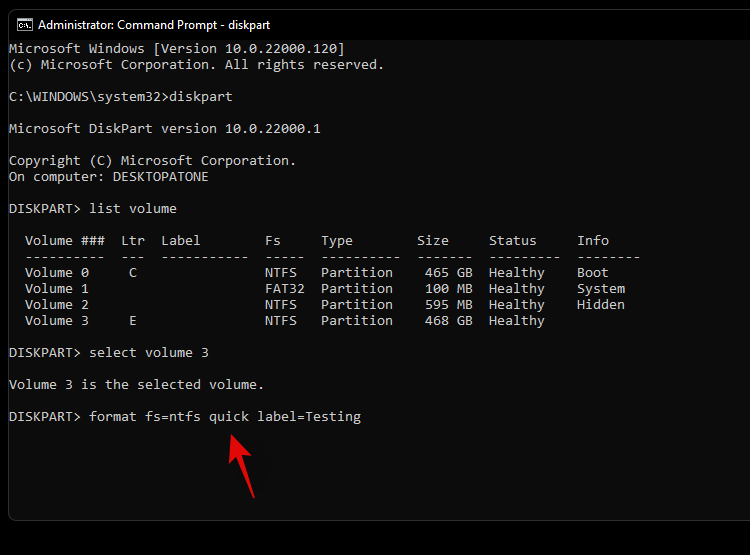
Let diskpart do its thing and the volume should be formatted within a few seconds. Once formatted, type in the following command to exit CMD.
exit
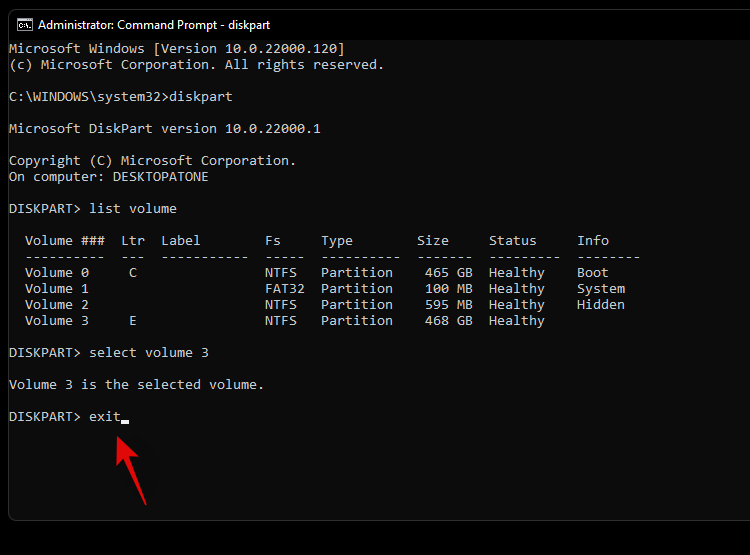
Now restart your PC and the selected volume should be formatted on your system.
Method #8: Using the Windows Setup
You can also format a drive-by directly using the Windows setup as well. Depending on your requirements, you can then exit the setup or continue installing Windows on the freshly formatted drive.
Launch the Windows setup from the installation media when prompted at the time of boot. Once the setup is launched, select your language and click on ‘Next’.
Click on ‘Install Windows’.
Windows Setup will now detect the drives installed on your system. Click and select the drive you wish to format and click on ‘Format drive’ at the bottom.
Confirm your choice and Windows will now proceed to format the selected drive.
And that’s it! Once the drive is formatted, you can continue formatting other drives on your system using the setup or continue with the Windows installation depending on your requirements.
How to completely format a drive on Windows 11 or 10
Completely formatting a drive is a little different from the traditional format methods listed above. While the above-listed methods will delete all your data from the drive, the existing partitions will remain. Additionally, if it is the boot drive that we are talking about then you will also have recovery and EFI partitions on the drive. While this shouldn’t be an issue on your system, they can cause problems when switching systems as the boot order or the recovery media can be recognized incorrectly by the new system.
In such cases, you can wipe all partitions from a drive and completely format it. You can then create new partitions and volumes on the drive depending on the need of the new system that you are switching to. Follow one of the guides below to completely format a drive and remove all partitions and volumes.
Method #1: From a third-party utility
If you wish to completely format your drive using a third-party utility then we recommend using the Gnome Partition Manager. This is an open-source and completely free utility hosted on Sourceforge. You can even compile the binaries on your own in case the privacy is a concern. Follow the guide below to get you started. The Gnome Partition Manager is available in ISO format which allows you to mount it to a removable media and use it individually as well, in case you are looking to completely format your boot drive. Use Rufus to create a USB installation media using the Gnome Partition Manager ISO.
Required
- Gnome Partition Manager | Gnome Partition Manager
- AHCI Storage mode enabled in BIOS
- Secure boot disabled in BIOS
- Boot device order changed (if needed to boot from USB on your system)
Guide
Make the necessary BIOS changes on your system and plug in the GParted USB into your system. Once plugged in, reboot your device and boot from the USB by pressing a key if prompted.
You will now be at the GParted Splash Screen where you will be requested to select the relevant version of GParted that you wish to use. We recommend you select the first one which is GParted Live with default settings.

Once booted, you will be prompted to change your keymap if needed. If your keyboard seems to be working as intended, select ‘Don’t touch keymap’ or use one of the other options to get keyboard working within Gnome.

Select your preferred language by entering its relevant number. Use number 33 for US English.

Now if you wish to manually install or configure your video output then enter 1 on the next screen. Else if the resolution and video response times seem to be fine for now then enter ‘0’.

GParted will now boot with the dictated settings. Once launched, you will be taken to the temporary desktop where the GParted utility will be launched automatically. Click on the drop-down menu in the top right corner and select the desired disk that you wish to completely format.

Now select a volume on the selected disk and click on ‘Partition’ at the top. Select ‘Format to’ and then select ‘NTFS’.

Repeat the steps above for all the partitions on the disk. Once each partition is cued for formatting, click on the checkmark in your toolbar to execute these tasks.

Confirm your choice by clicking on ‘Apply’.
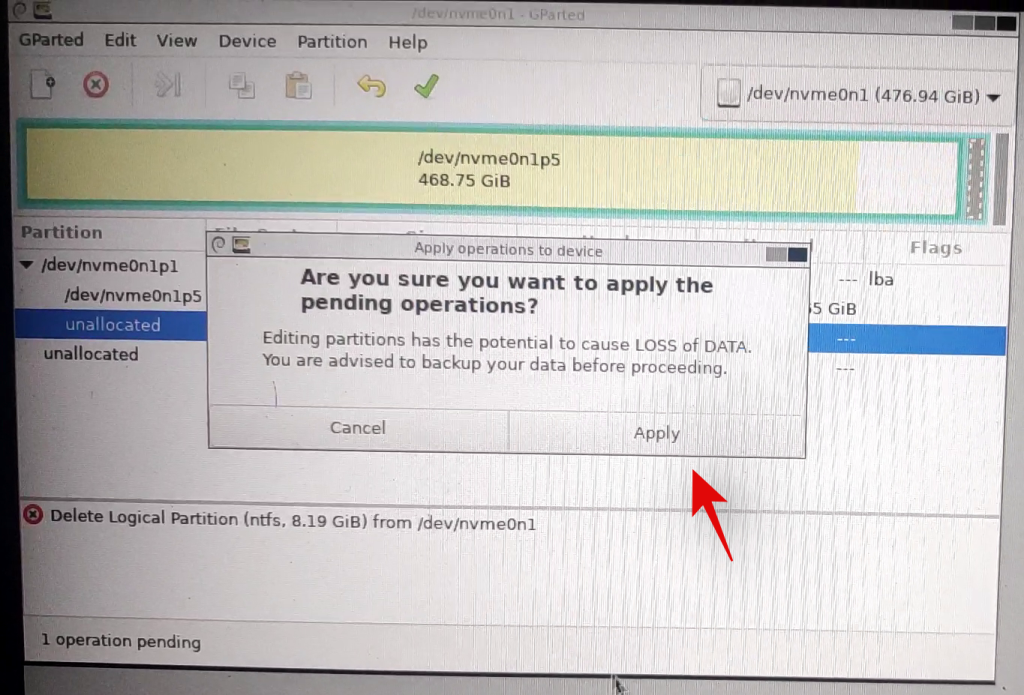
All the selected partitions will now be formatted. We can now delete these partitions. Click and select each partition one by one and then click on the X in your toolbar. This will cue each partition for deletion.
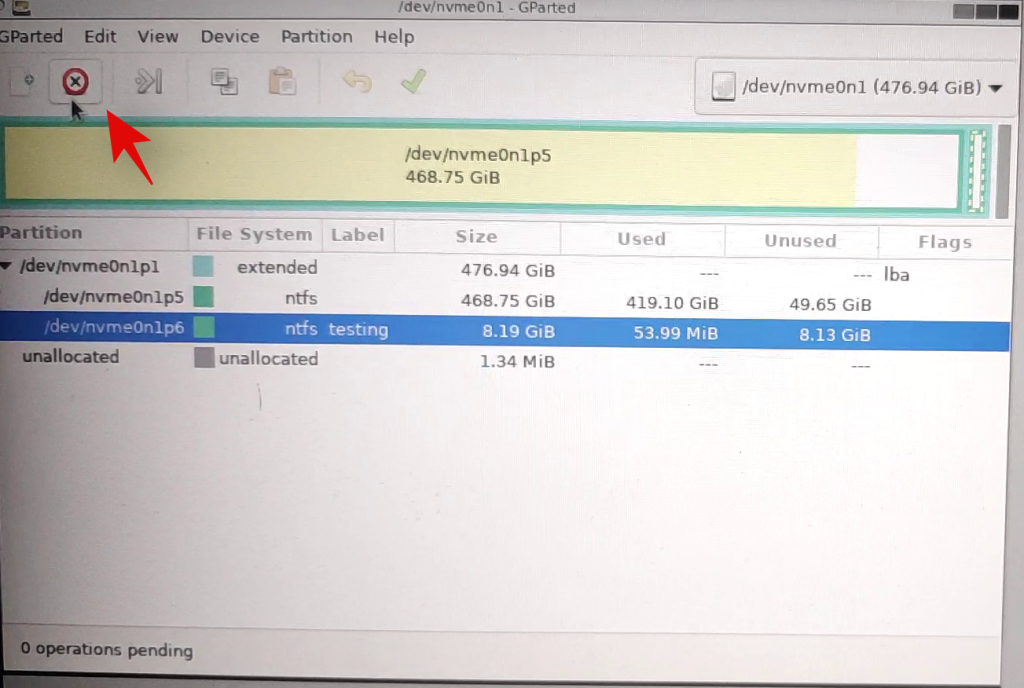
Click on the checkmark again to delete all the selected partitions.
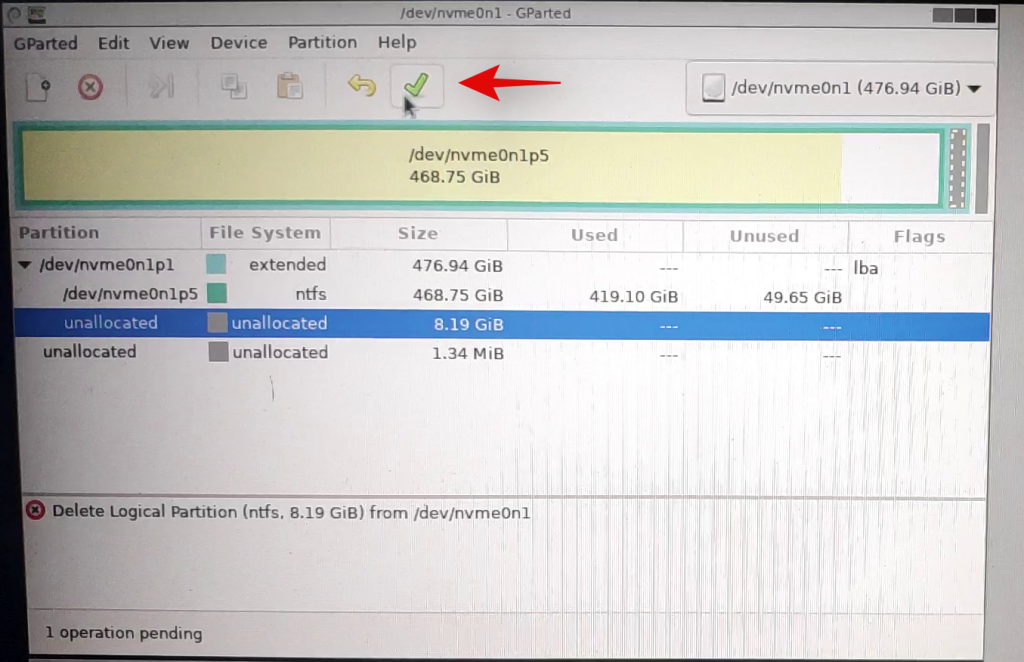
Confirm your choice by clicking on ‘Apply’.

Once all partitions are deleted from the disk, click and select the unallocated volume on the disk and then click on ‘New’ at the top. If you have an existing primary partition on the disk then select that partition and click on the ‘Resize’ icon instead.
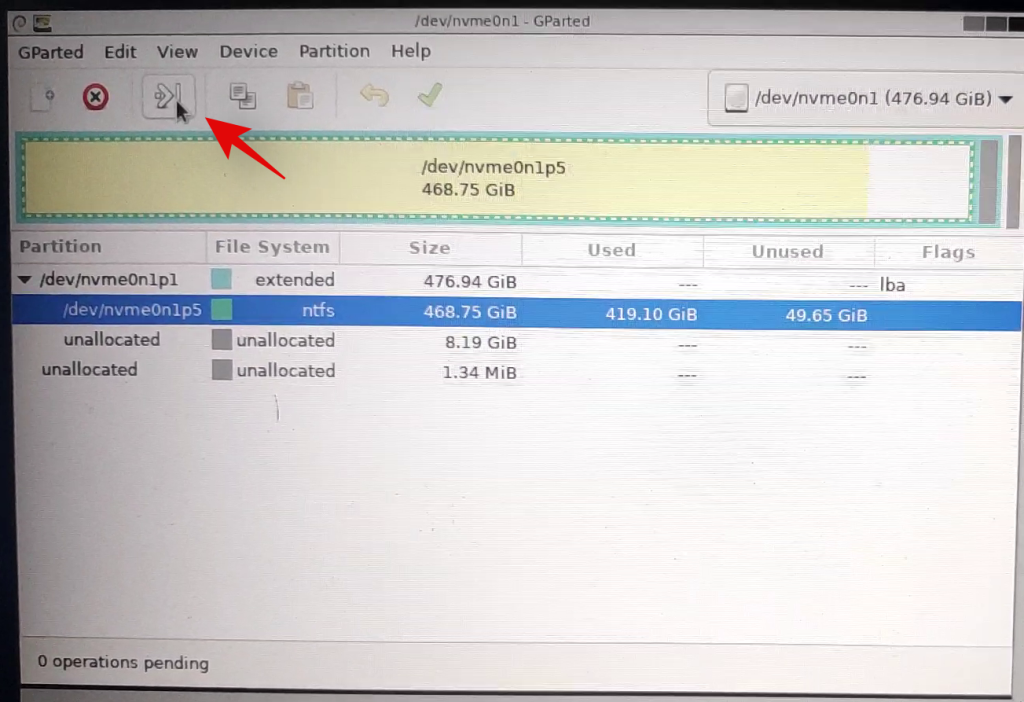
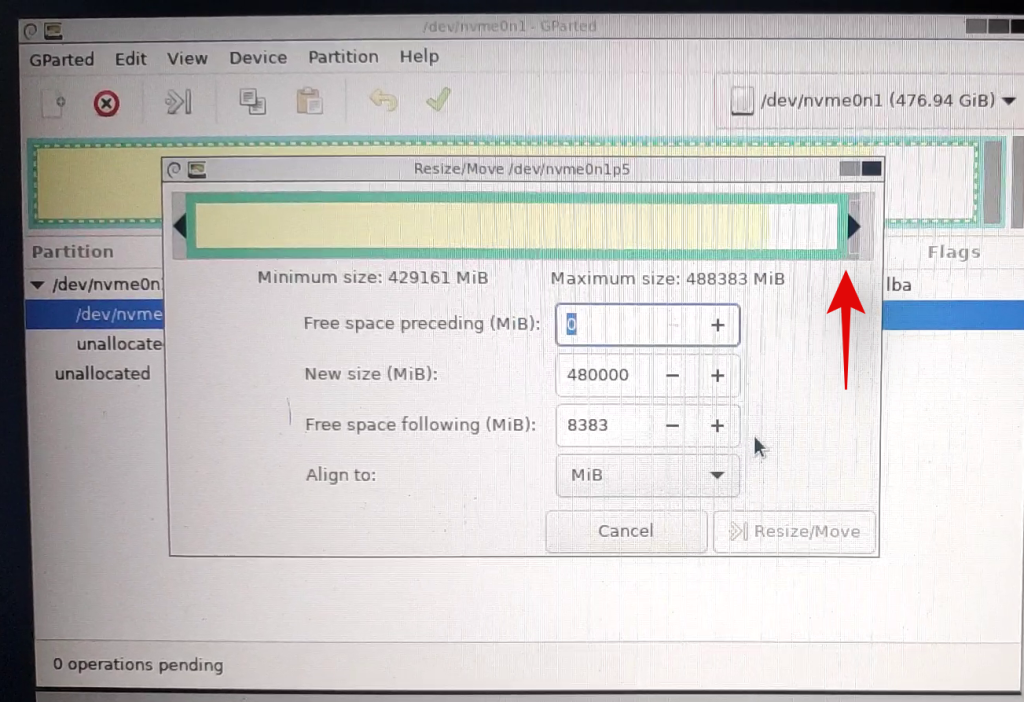
Select the entire size of your disk and enter a name for your disk beside the label text field. If resizing an existing partition, use the slider at the top to drag it to the maximum size.
Click on ‘Ok’ or ‘Resize/Move’ depending on your choice.
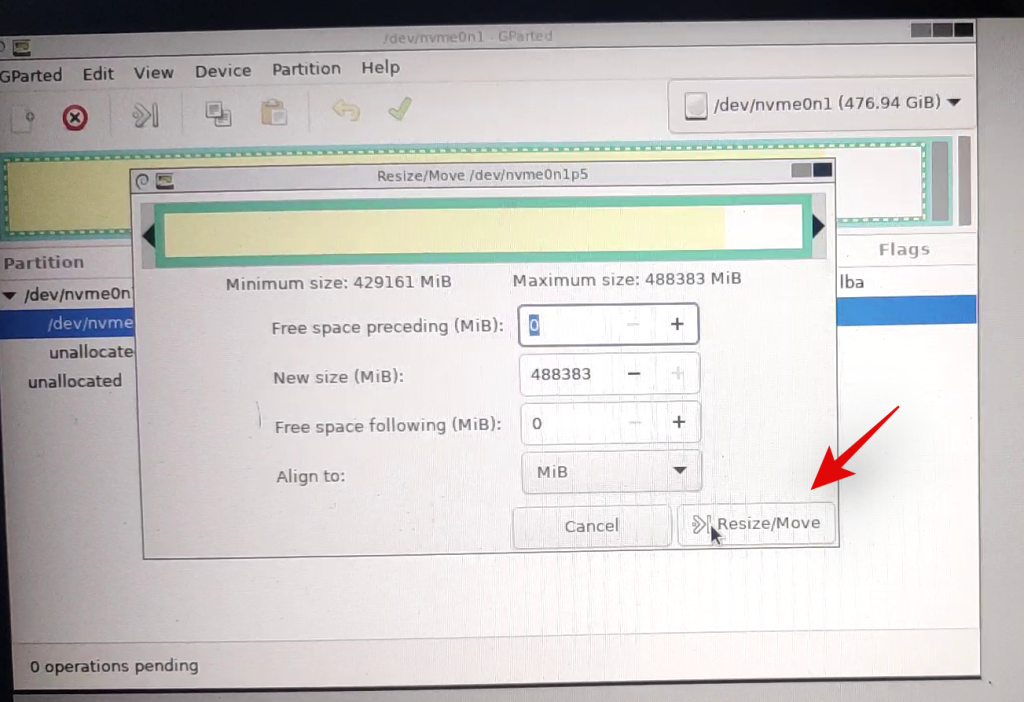
And that’s it! Your entire drive should now be formatted and a single partition equal to the entire size of your drive should now be created which will allow you to use the drive, however, you wish. You can now exit GParted by clicking on the power icon on the desktop. Once rebooting, boot into your BIOS and revert the changes you made earlier. Once reverted, unplug the USB and boot into Windows normally.
Method #2: From CMD
Diskpart is a hugely versatile utility that can be used to completely format a drive as well. Once completely formatted via diskpart, you will need to set your disk as GPT or MBR depending on your platform needs for the drive to be recognized properly.
Launch CMD using one of the guides above depending on the current state of your system. Once CMD is launched, enter the command below to launch diskpart.
diskpart

Now enter the following command and find the disk you wish to completely format.
list disk

Note down the concerned disk’s number and use the command below to select it. Replace N with the disk number you noted down earlier.
select disk N
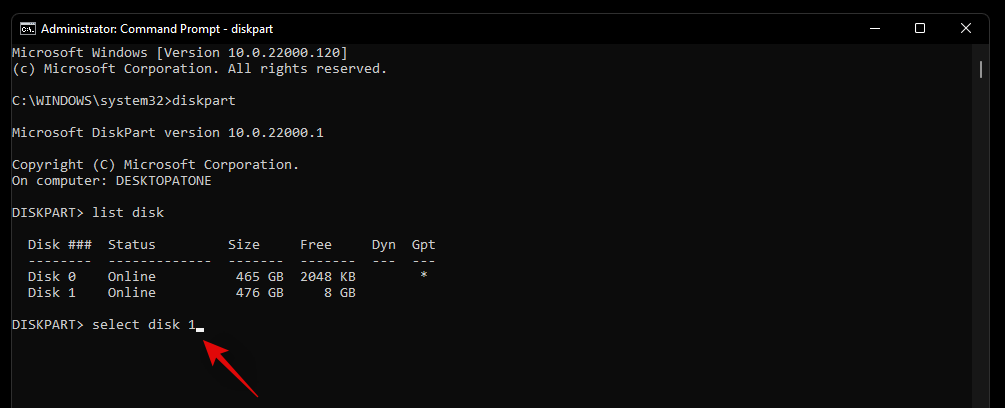
Now enter the command below to clean your disk.
clean
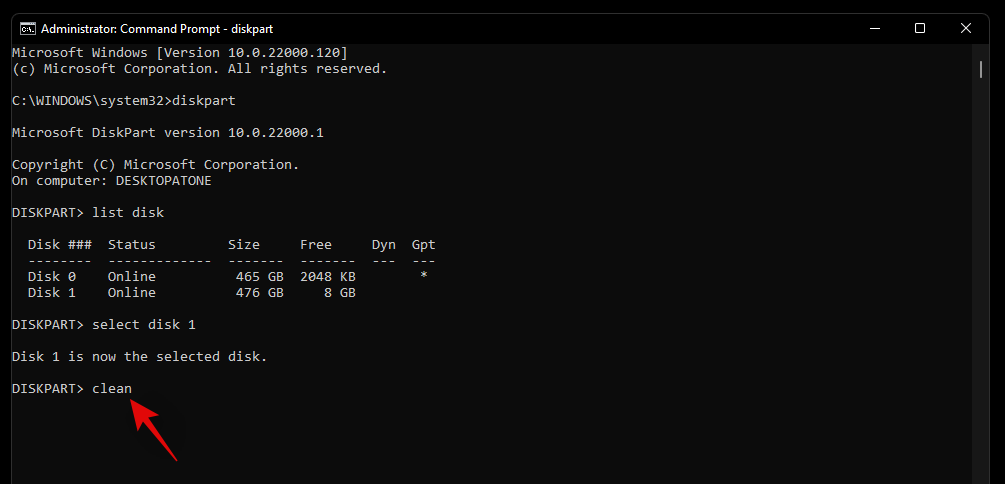
We will now need to create a partition on the selected disk so that it is usable. Enter the command below to get started.
create partition primary
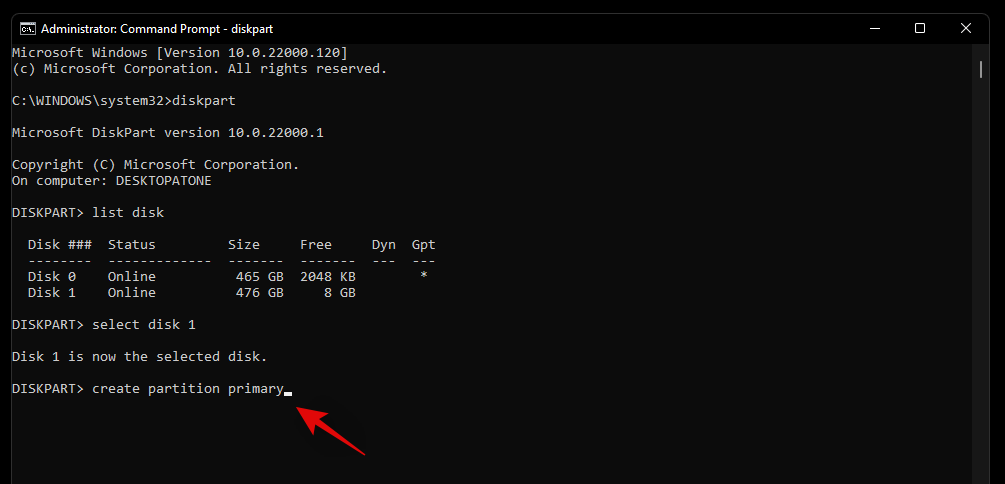
Use the command below to format the newly created volume now.
format fs=ntfs
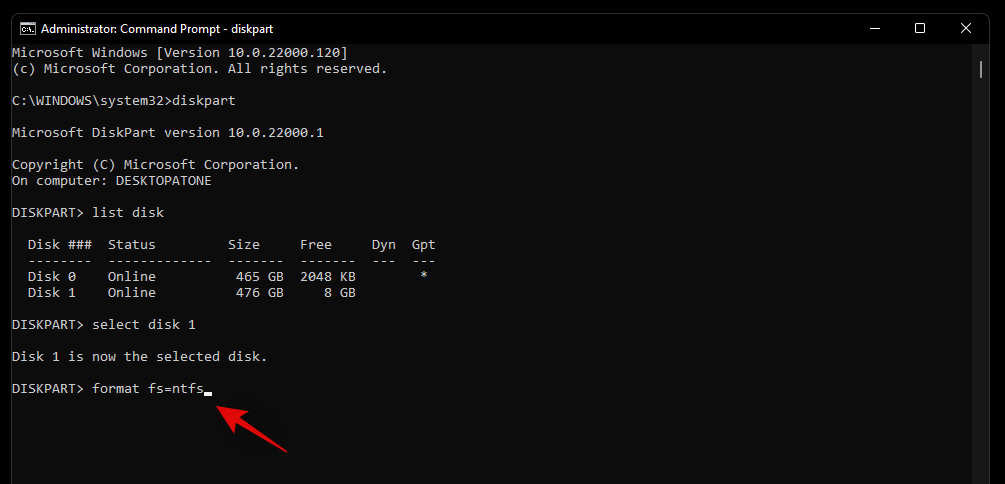
Enter the following command to assign a letter to the drive. Replace X with the letter of your choice.
assign letter=X
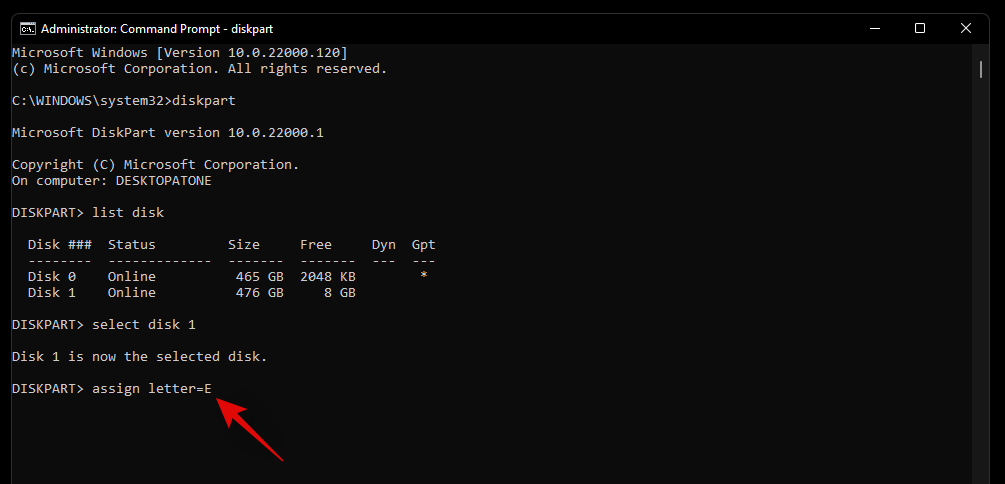
And that’s it! The selected drive should now be completely formatted. Any recovery or EFI partitions on the drive should also now be deleted.
How to switch between MBR and GPT
MBR and GPT are types of disk setups that are used to install new OS on a drive. These types are essential in case you are trying to switch between platforms or use Linux on yoru system. While GPT is a new disk setup with various advantages, MBR is still the most compatible setup format out there. If you are trying to switch your disk setup from MBR to GPT or vice versa then you can use the guide below to change the disk type.
Note: When converting, your disk will be cleaned and all the data will be removed from it. You will need to create new partitions on the drive as well so ensure that you have backed up your data before proceeding with the guide below.
Launch CMD on your system either from the recovery environment or from within Windows depending on the current state of your system. Once launched enter the command below to launch the diskpart utility.
diskpart

Now enter the following command to get a list of all the disks on your system. Note down the number for the concerned list so that you can access it later on.
list disk
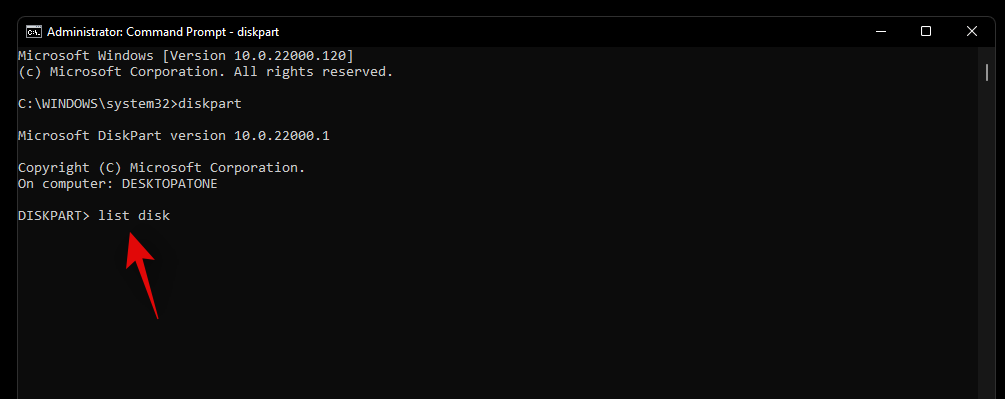
Enter the following command and replace N with the disk number you noted down earlier.
select disk N
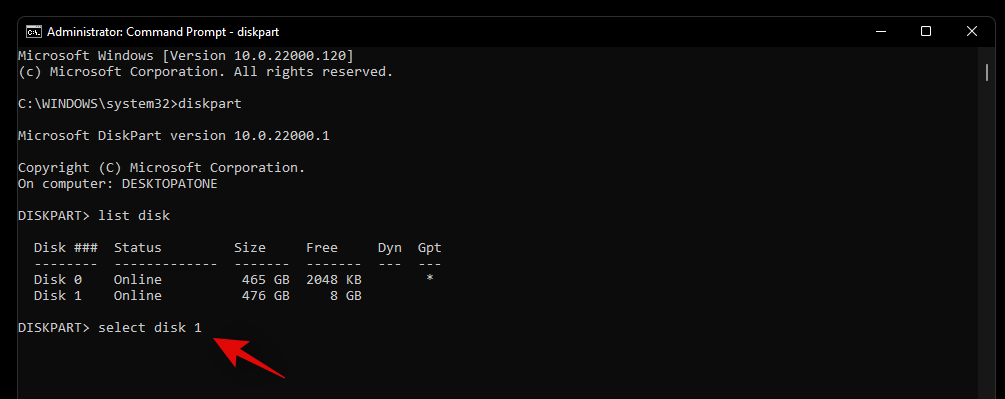
Use the command below to clean the drive.
clean
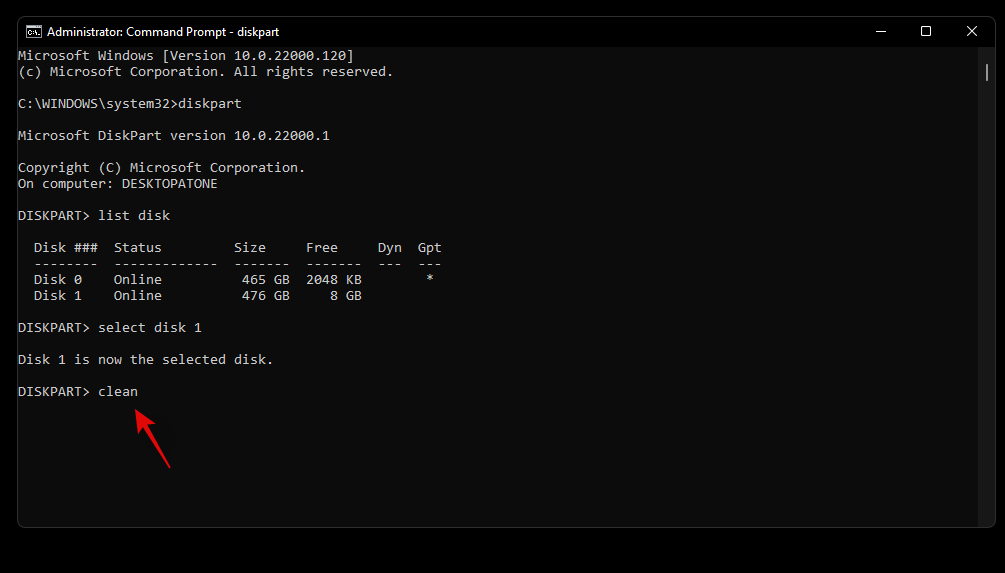
Now let’s convert the drive to your desired disk type. Replace TYPE with MBR or GPT depending on your current requirements.
convert TYPE
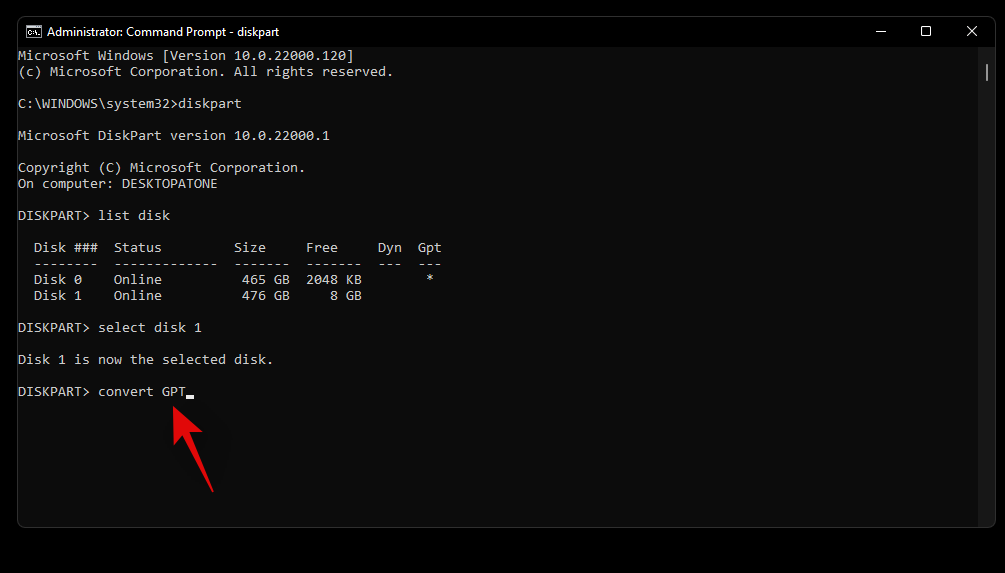
Once the disk has been converted, use the command below to create a primary partition.
create partition primary
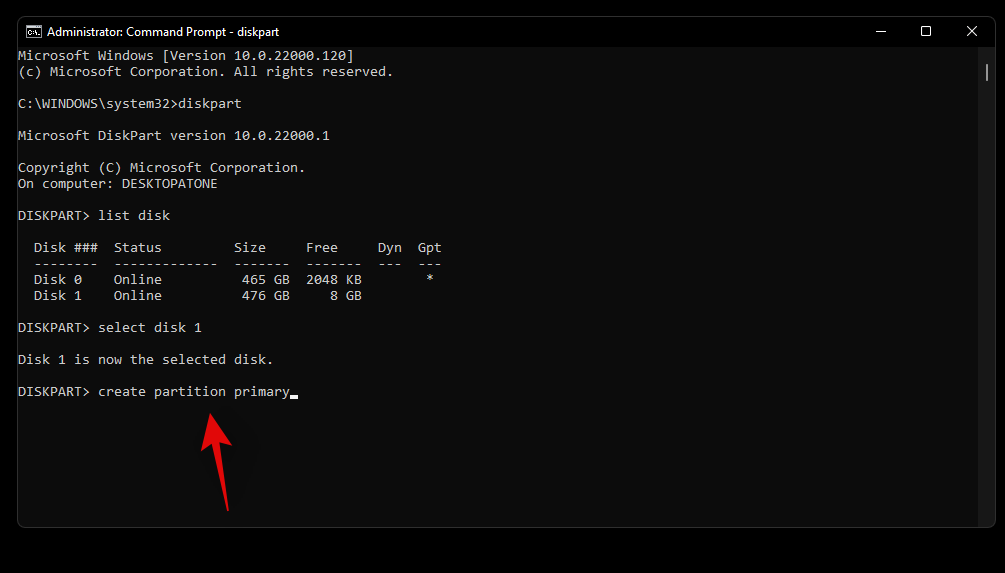
Now use the command below to assign a letter to the drive. Replace X with the drive letter of your choice.
assign letter=X
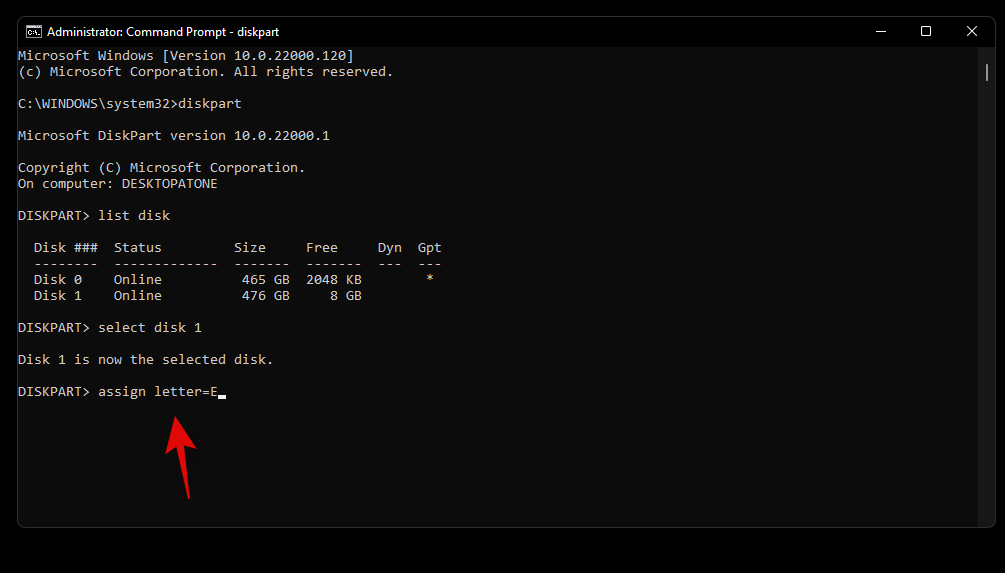
And that’s it! You will now have converted the selected drive to GPT or MBR depending on your current requirements.
How to create new volumes and partitions
Once you have formatted your drives you will find that it is not that easy to use them within Windows. Formatted drives need dedicated partitions which can then be used as storage spaces to store your data or install an OS. Use the guide below to create custom partitions for a selected drive in Windows 11.
Method #1: From CMD
Launch CMD and use the command below to enter diskpart.
diskpart
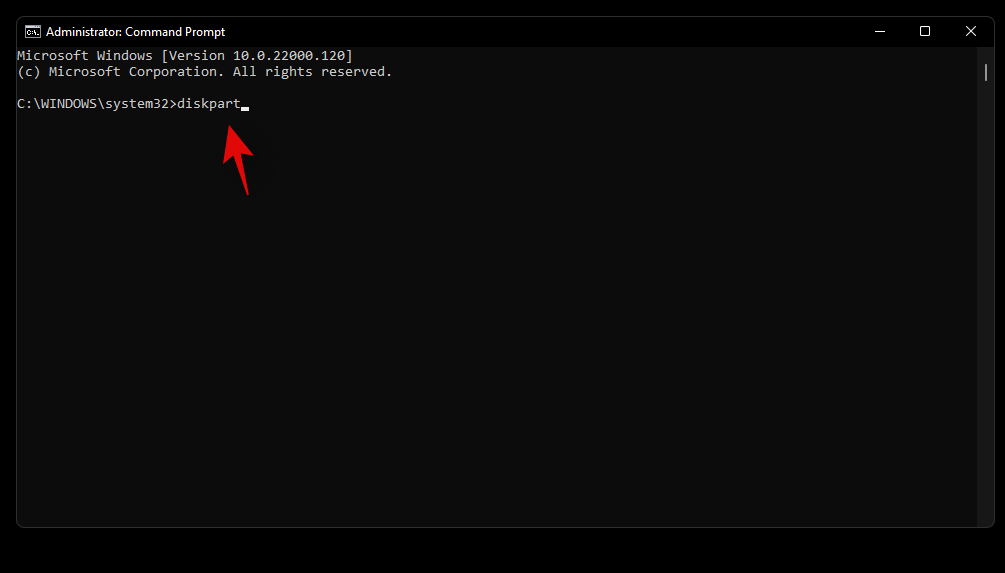
Enter the following command to get a list of all the disks installed on your system. Note down the disk number of the concerned disk.
list disk
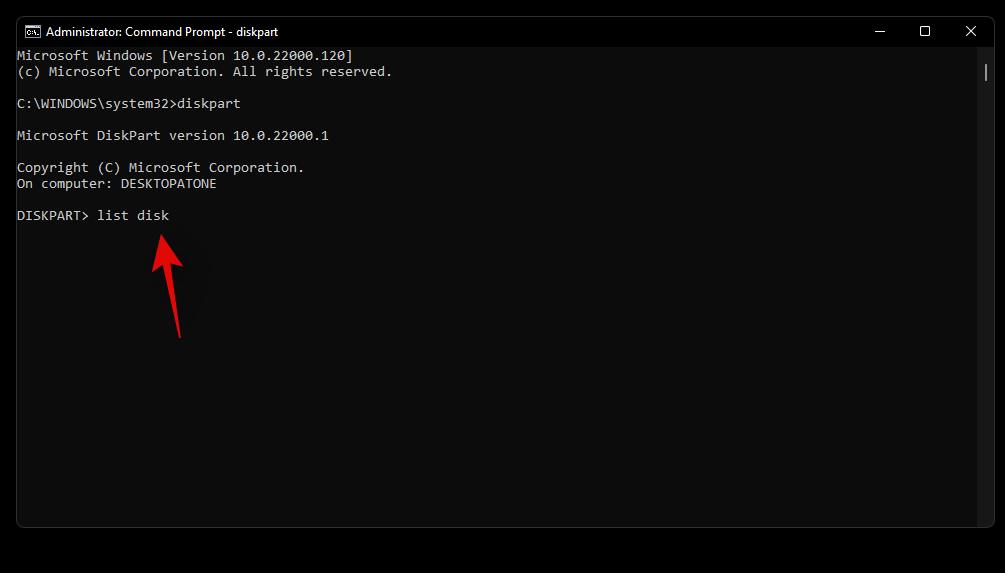
Now enter the command below and replace N with the disk number you noted down earlier.
select disk N
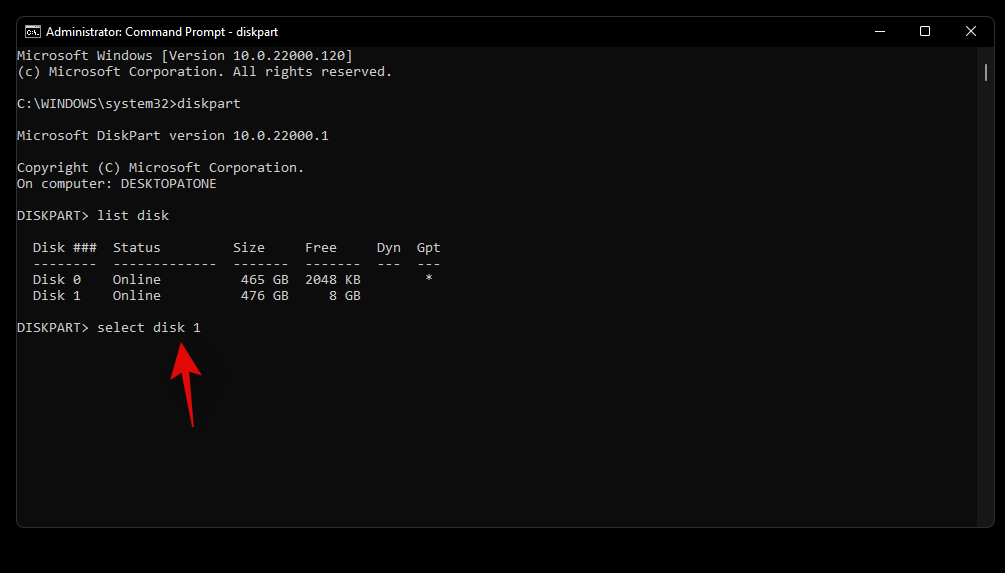
Use the command below to create a custom partition on the selected disk drive. If a partition already exists on the drive then replace ‘primary’ with ‘extended’. Additionally, replace XXXX with the size of your choice for the partition. The size is measured in megabytes where 1000MB = 1GB.
create partition primary size=SIZE
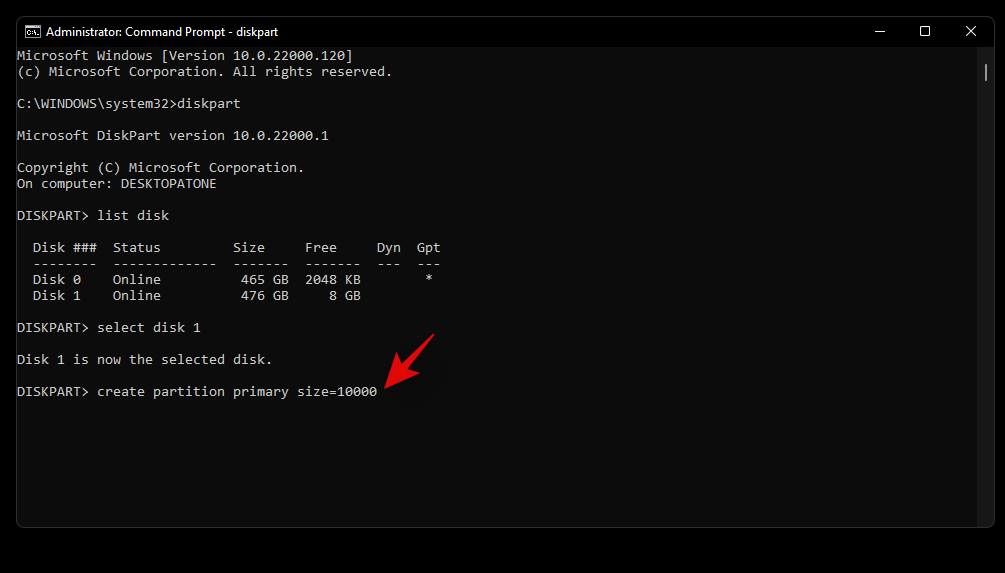
Now enter the following command. Your newly created partition will now show up in this list. Note down its volume number
list volume
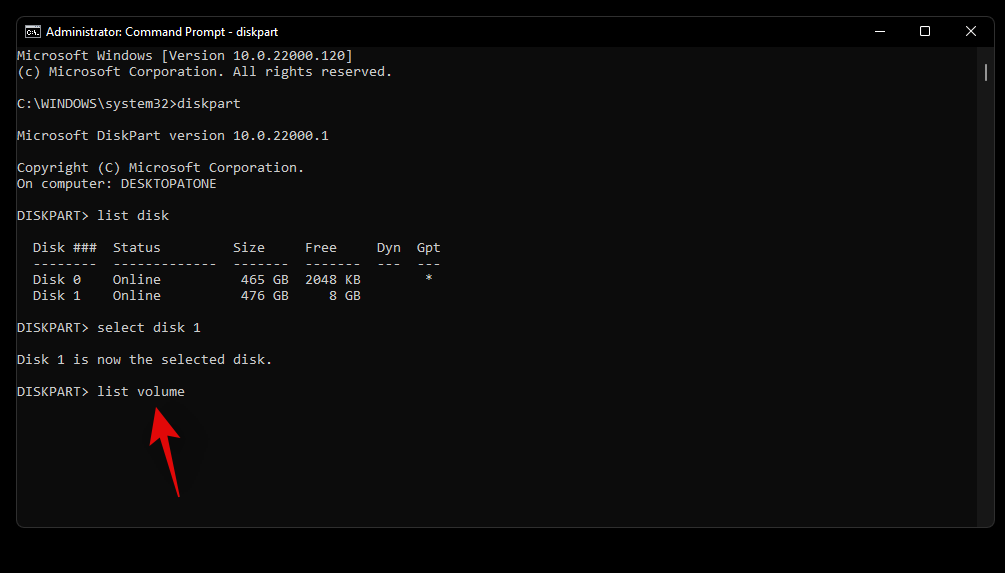
Enter the following command and replace N with the volume number you noted down earlier.
select volume N

Now use the following command to assign a letter to the selected volume. Replace X with the letter of your choice.
assign letter=X
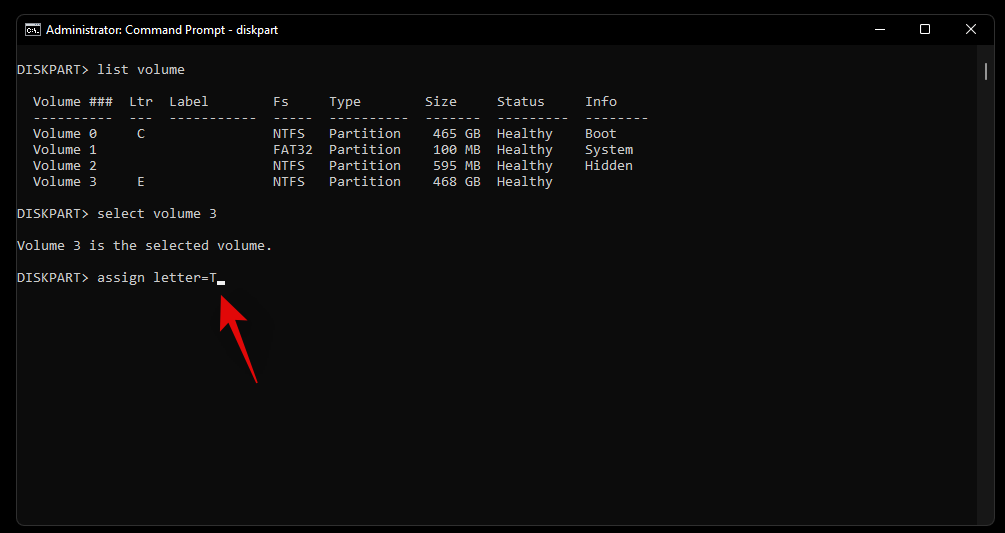
And that’s it! You will now have created a new partition on the selected drive depending on your current needs and requirements.
Method #2: From Disk Management
You can also create a new partition son your system using the Disk Management utility provided within Windows. Use the guide below to get you started.
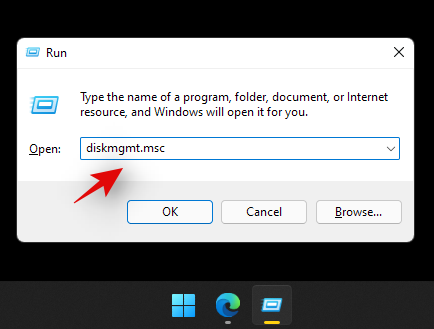
Press Windows + R on your keyboard and type in the following. Press Enter on your keyboard to launch the disk management utility.
diskmgmt.msc
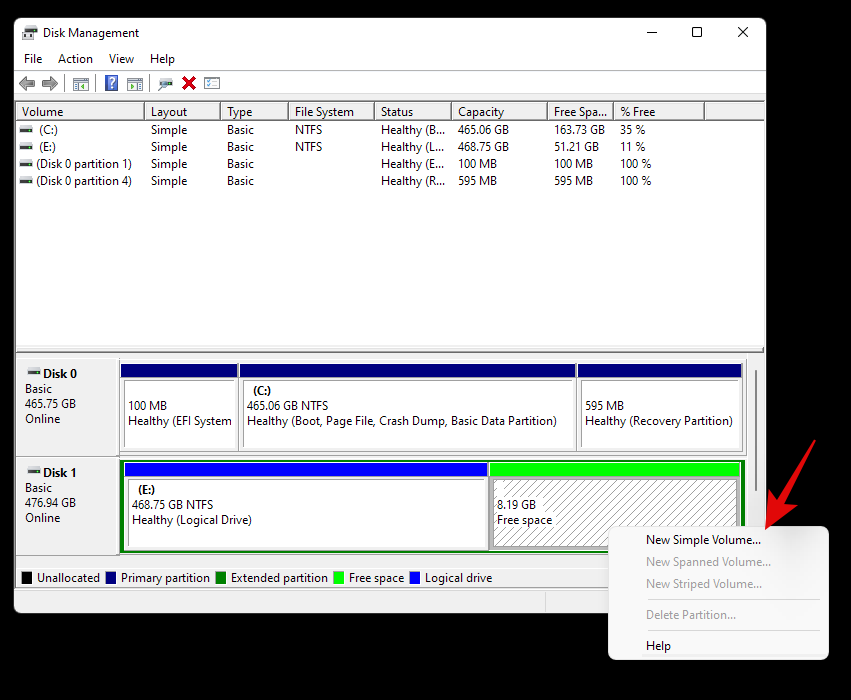
Once the disk management utility is launched, you will get a graphical representation for all your drives. Right-click on the unallocated space at the bottom of your screen and click on ‘New Simple Volume’.
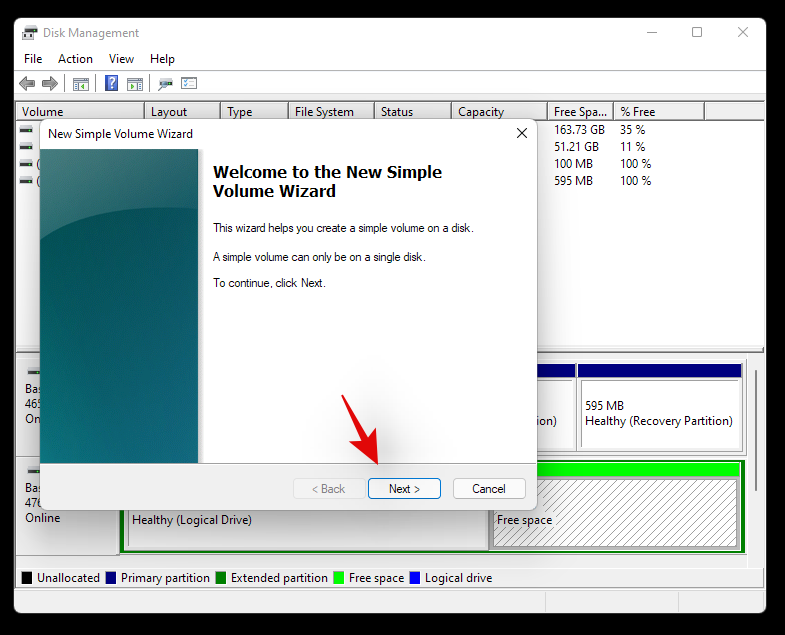
The volume creation wizard will now be launched. Click on ‘Next’ to get started.
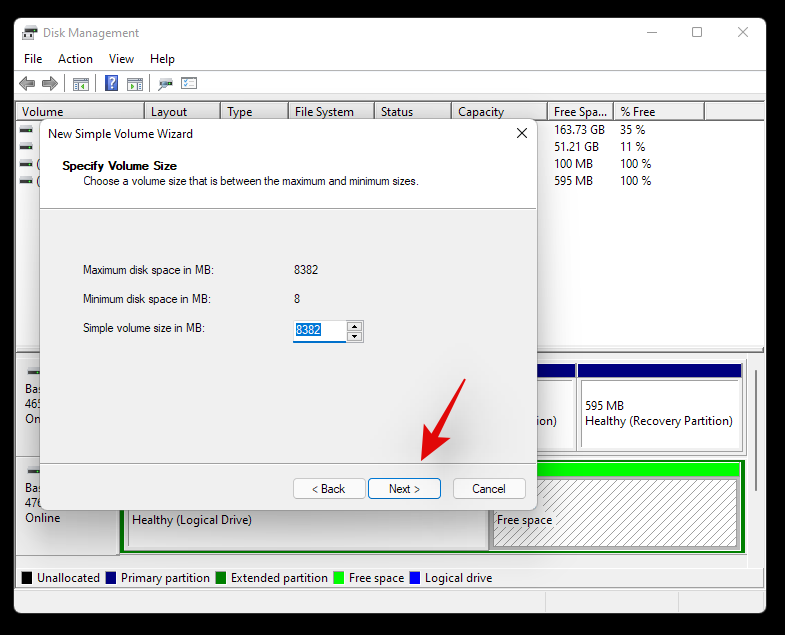
Select a custom size if needed. By default, Windows will use the entire unallocated space to create a new simple volume on your drive. Click on ‘Next’ once you have set the desired size.
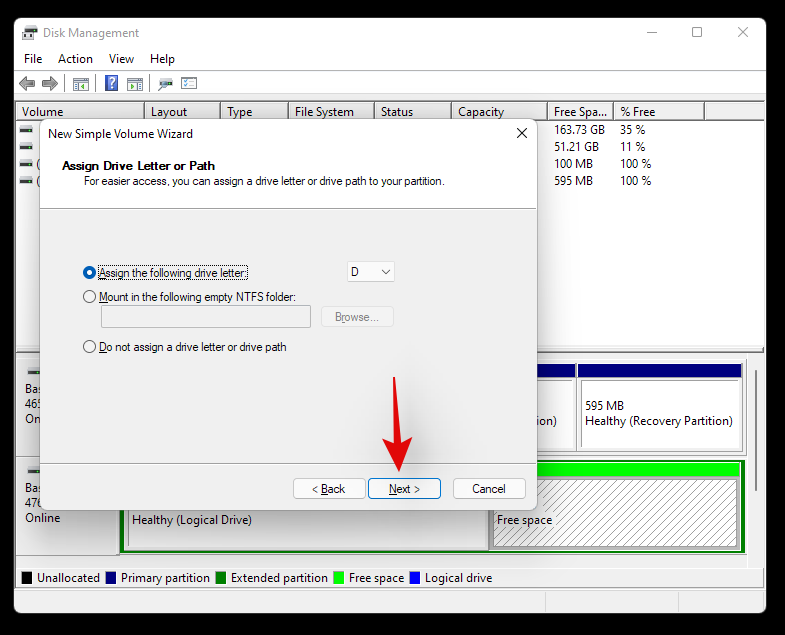
Choose a drive letter for your new volume now. Click on ‘Next’ once you are done.
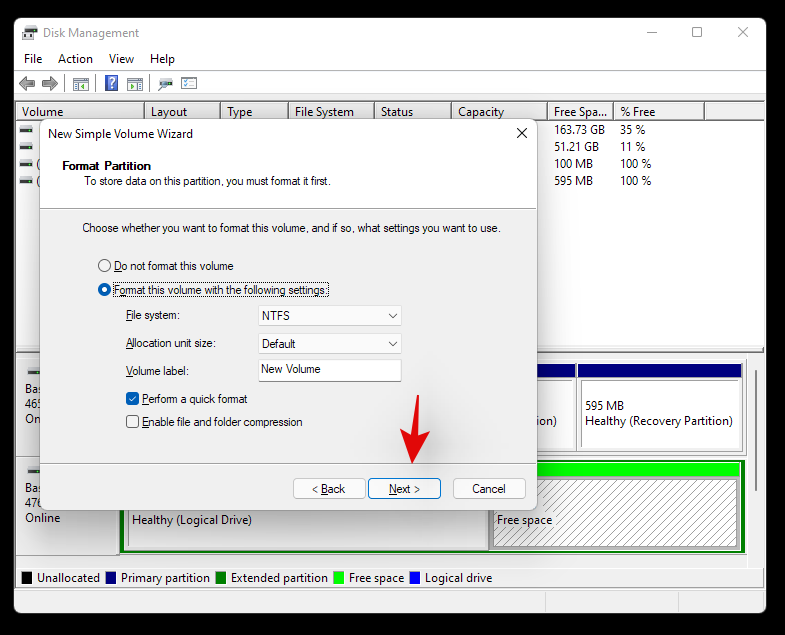
You will now be given the option to format the unallocated space before the volume is created. Choose your disk format by clicking on the drop-down menu and set a name for the new volume beside Volume Label. If you do not wish to format the unallocated space, then click and select ‘Do not format this volume’. Click on ‘Next once you are done.
Finally, click on ‘Finish’ and the new volume will now start being created.
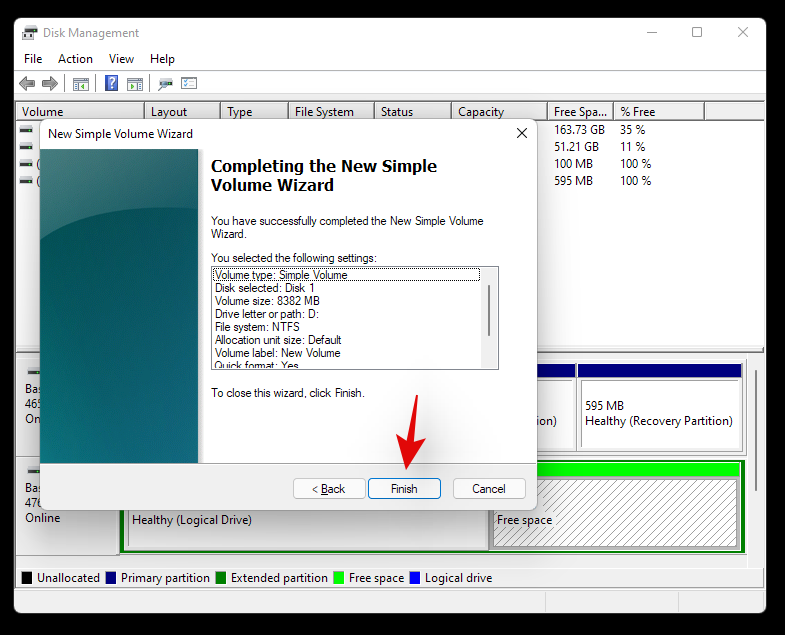
And that’s it! A new volume should now be created on the selected drive.
We hope this guide helped you easily format or wipe your drive in Windows 11 depending on your current needs and requirements. If you face any issues or have any questions for us, feel free to reach out to us using the comments section below.
Related:


