Τα Windows 11 κυκλοφόρησαν στο κοινό και αυτή η νέα ενημέρωση του μακροχρόνιου λειτουργικού συστήματος φαίνεται να λαμβάνει εξαιρετικές κριτικές. Η Microsoft έχει αυξήσει το απόρρητο, την ασφάλεια πρόσθεσε μια νέα διεπαφή χρήστη και τη δυνατότητα εγκατάστασης εφαρμογών Android στα Windows 11. Όμως, ως συνήθως, τα Windows συνοδεύονται από πολλά προεγκατεστημένα πράγματα που είναι άσχετα με σχεδόν κάθε χρήστη.
Και αν αγοράσατε ένα προκατασκευασμένο σύστημα ή φορητό υπολογιστή, τότε το πιθανότερο είναι ότι υπάρχει εγκατεστημένο στο σύστημά σας πρόσθετο διαφημιστικό λογισμικό το οποίο ίσως θέλετε να καταργήσετε. Μπορείτε εύκολα να αφαιρέσετε και να απεγκαταστήσετε τις περισσότερες εφαρμογές στα Windows με ένα απλό κλικ, ωστόσο, τα πράγματα γίνονται λίγο περίπλοκα όταν φτάσετε σε προγράμματα, εφαρμογές Windows Store, ενημερώσεις των Windows και εφαρμογές συστήματος. Μην φοβάστε, μπορείτε να ακολουθήσετε τους παρακάτω οδηγούς μας για να καταργήσετε όλα τα είδη εφαρμογών από το σύστημά σας Windows ανεξάρτητα από τις τρέχουσες ρυθμίσεις σας. Ας αρχίσουμε.
Περιεχόμενα
Πώς να απεγκαταστήσετε εφαρμογές στα Windows 11 [8 Τρόποι]
Ακολουθούν όλοι οι τρόποι με τους οποίους μπορείτε να απεγκαταστήσετε μια εφαρμογή από τον υπολογιστή σας με Windows 11. Για την απεγκατάσταση εφαρμογών συστήματος , δείτε τις ειδικές ενότητες και τις ειδικές μεθόδους παρακάτω μετά από αυτήν την ενότητα.
Μέθοδος #01: Χρήση ρυθμίσεων
Ακολουθήστε τον παρακάτω οδηγό για να απεγκαταστήσετε μια εφαρμογή μέσω των Ρυθμίσεων από το σύστημά σας. Σε περίπτωση που προσπαθείτε να απεγκαταστήσετε μια προεπιλεγμένη εφαρμογή, συνιστούμε να την αλλάξετε εκ των προτέρων, έτσι ώστε η επιλογή απεγκατάστασης να μην είναι γκρίζα για εσάς. Σε περίπτωση που δεν γνωρίζετε την αλλαγή μιας προεπιλεγμένης εφαρμογής στα Windows 11, μπορείτε να ακολουθήσετε τον παρακάτω οδηγό.
Βήμα 1: Αλλάξτε πρώτα την προεπιλεγμένη εφαρμογή; [Προαιρετικός]
Σημείωση: Βεβαιωθείτε ότι έχετε εγκαταστήσει εκ των προτέρων μια εφαρμογή αντικατάστασης στο σύστημά σας για να αντικαταστήσετε την προεπιλεγμένη εφαρμογή σας. Για παράδειγμα, εάν αλλάζετε το πρόγραμμα περιήγησής σας από το Microsoft Edge, τότε πρέπει να έχετε ένα άλλο πρόγραμμα περιήγησης που θέλετε να χρησιμοποιήσετε, ήδη εγκατεστημένο στο σύστημά σας, ώστε να μπορείτε να το επιλέξετε ως το προεπιλεγμένο πρόγραμμα περιήγησής σας.
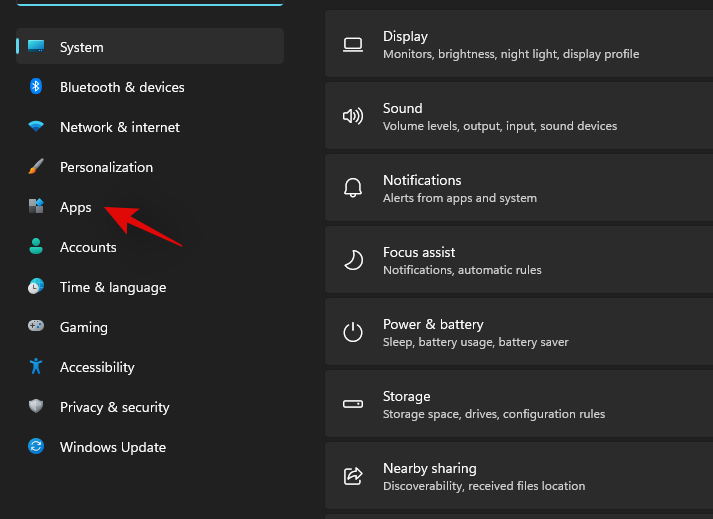
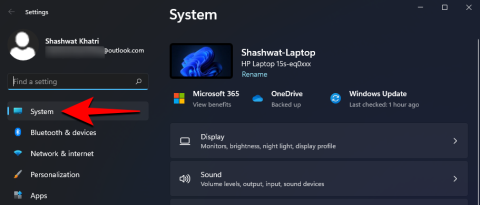
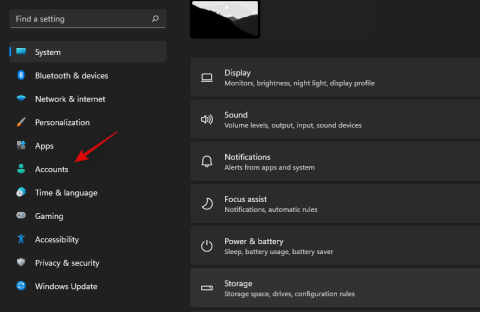
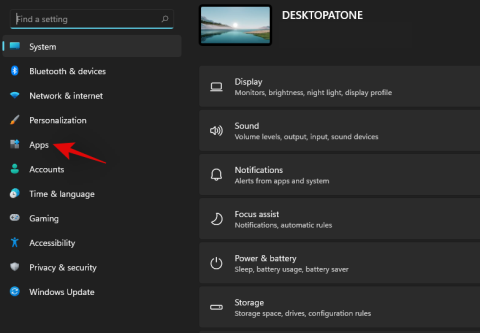
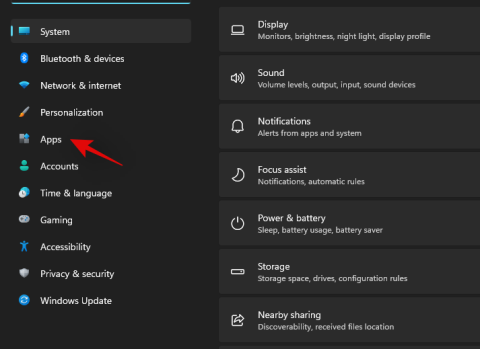
Πατήστε Windows + iστο πληκτρολόγιό σας για να ανοίξετε την εφαρμογή Ρυθμίσεις. Τώρα κάντε κλικ στις «Εφαρμογές» στην αριστερή πλαϊνή γραμμή σας.
Κάντε κλικ και επιλέξτε «Προεπιλεγμένες εφαρμογές» στα δεξιά σας.
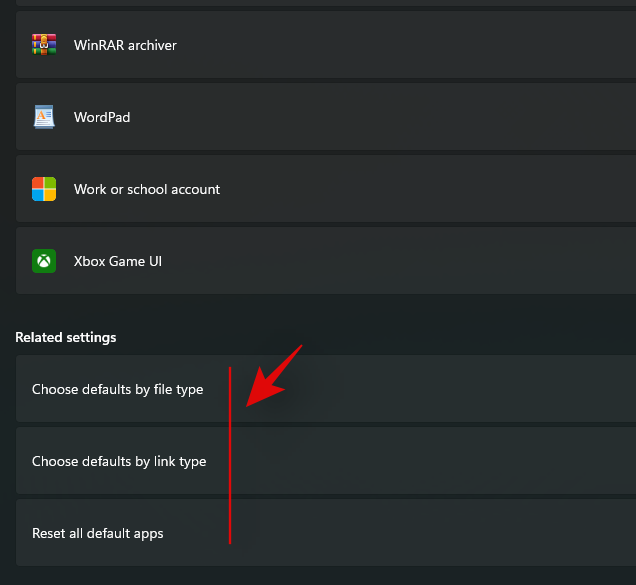
Τώρα επιλέξτε την εφαρμογή που θέλετε να καταργήσετε ως προεπιλεγμένη εφαρμογή και κάντε κλικ σε αυτήν. Σε περίπτωση που θέλετε να αλλάξετε την προεπιλεγμένη εφαρμογή σας ανά τύπο αρχείου, κάντε κλικ στο «Επιλογή προεπιλογών κατά τύπο αρχείου» στο κάτω μέρος, όπως φαίνεται παρακάτω.
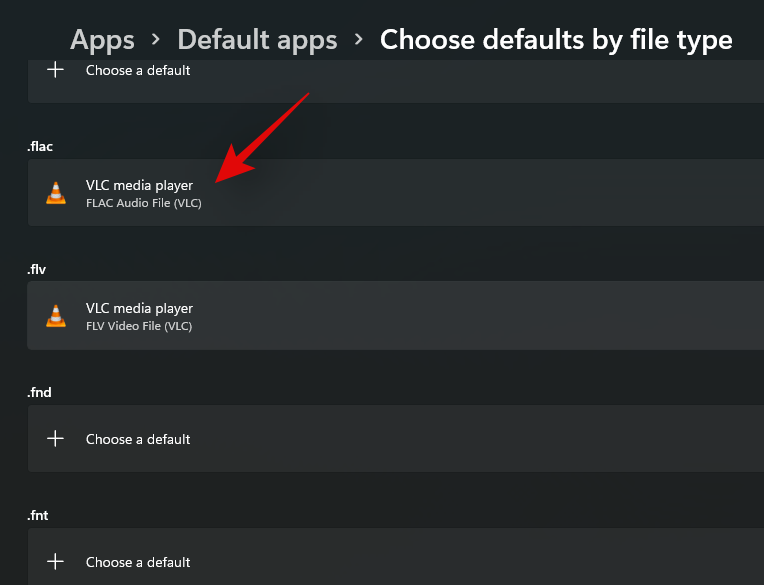
Τώρα κάντε κλικ στον επιθυμητό τύπο αρχείου/επέκταση και επιλέξτε μια εφαρμογή της επιλογής σας.
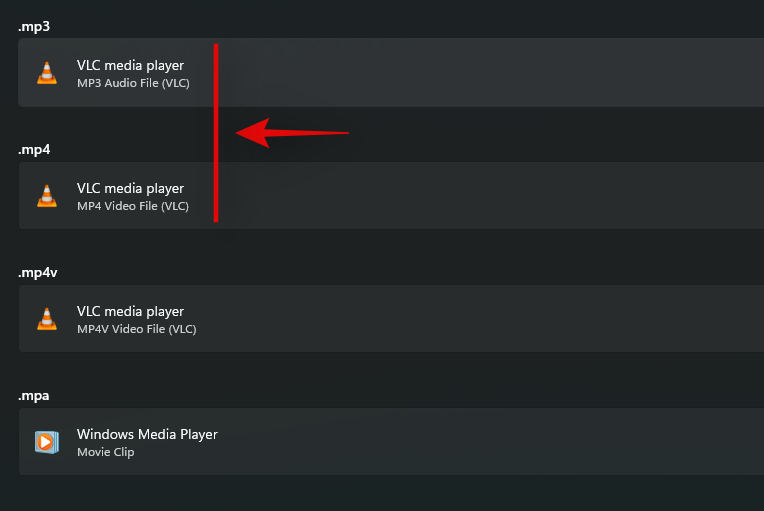
Επαναλάβετε το παραπάνω βήμα για όλους τους απαραίτητους τύπους/επεκτάσεις αρχείων.
Κλείστε την εφαρμογή Ρυθμίσεις και επανεκκινήστε το σύστημά σας για καλή μέτρηση.
Και τέλος! Μόλις γίνει επανεκκίνηση του συστήματός σας, η προεπιλεγμένη εφαρμογή σας θα πρέπει να αλλάξει. Τώρα μπορείτε να χρησιμοποιήσετε τον παρακάτω οδηγό για να απεγκαταστήσετε την απαραίτητη εφαρμογή μέσω των "Ρυθμίσεων" στο σύστημά σας.
Βήμα 2: Απεγκαταστήστε την εφαρμογή από τις Ρυθμίσεις
Πατήστε Windows + iστο πληκτρολόγιό σας και επιλέξτε "Εφαρμογές" από τα αριστερά σας.

Τώρα κάντε κλικ στο «Εφαρμογές και δυνατότητες» στα δεξιά σας.
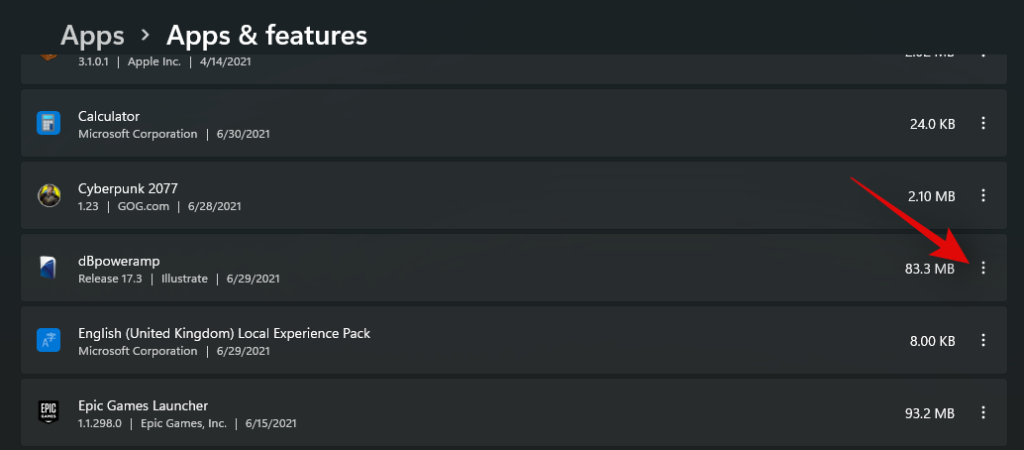
Κάντε κύλιση στη λίστα και βρείτε την εφαρμογή που θέλετε να απεγκαταστήσετε. Μόλις βρεθείτε, κάντε κλικ στο εικονίδιο μενού "3-κουκκίδες" στα δεξιά σας.
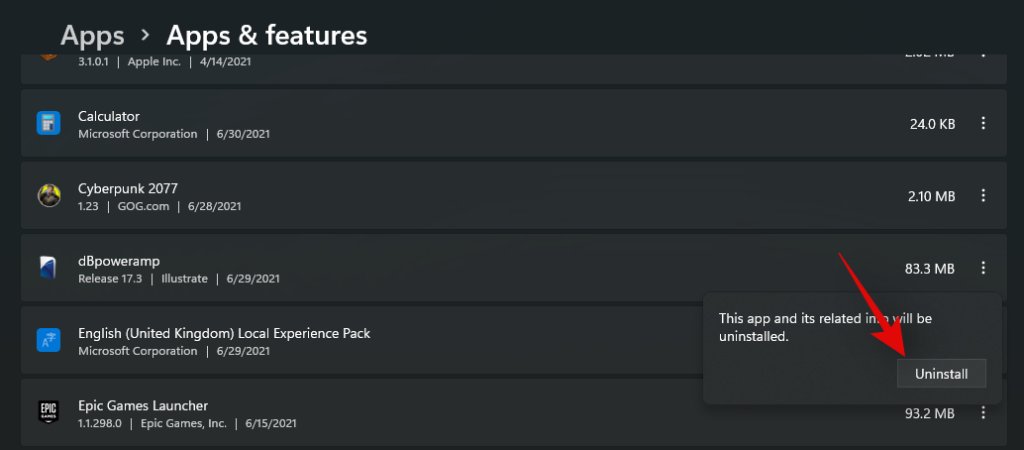
Κάντε κλικ και επιλέξτε "Κατάργηση εγκατάστασης".
Τώρα ακολουθήστε τις οδηγίες που εμφανίζονται στην οθόνη για να απεγκαταστήσετε την εφαρμογή. Εάν καταργείτε την εγκατάσταση μιας προεγκατεστημένης εφαρμογής ή μιας εφαρμογής Windows Store, τότε θα απεγκατασταθεί αυτόματα στο παρασκήνιο. Ωστόσο, εάν πρόκειται για πρόγραμμα που εντοπίζεται από τα Windows, τότε ανάλογα με το πρόγραμμα, τα Windows είτε θα προσπαθήσουν να το απεγκαταστήσουν στο παρασκήνιο είτε θα ξεκινήσουν το 'uninstall.exe' ή το 'setup.msi' ώστε να μπορείτε να το απεγκαταστήσετε μόνοι σας με τις επιθυμητές ρυθμίσεις. Ίσως μπορείτε να διατηρήσετε/αποθηκεύσετε ορισμένα δεδομένα όταν αντιμετωπίζετε τέτοιες ρυθμίσεις, όπως αρχεία καταγραφής, δεδομένα χρήστη, αποθήκευση δεδομένων, εικόνες και άλλα.
Εναλλακτικά, θα έχετε επίσης την επιλογή να αφαιρέσετε εντελώς ό,τι σχετίζεται με το πρόγραμμα από το σύστημά σας.
Και τέλος! Η επιλεγμένη εφαρμογή θα πρέπει τώρα να απεγκατασταθεί από το σύστημά σας. Εάν έχετε απεγκαταστήσει ένα βαρύ πρόγραμμα, συνιστούμε να εκκαθαρίσετε την προσωρινή μνήμη χρησιμοποιώντας αυτόν τον οδηγό, ειδικά εάν το μέγεθος του προγράμματος υπερβαίνει τα 30+ GB.
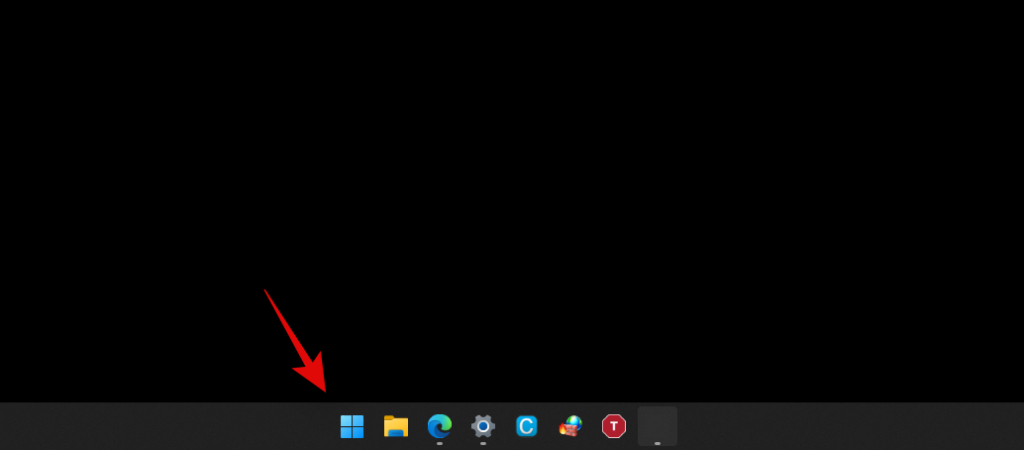
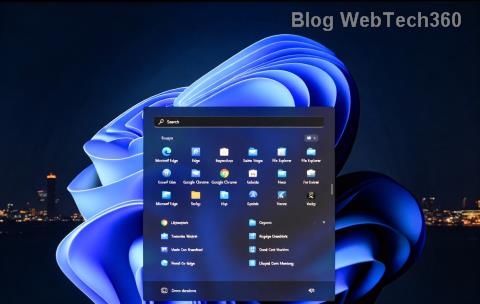
Πατήστε το κουμπί «Windows» στο πληκτρολόγιό σας για να εμφανιστεί το μενού «Έναρξη». Εναλλακτικά, μπορείτε επίσης να κάνετε κλικ στο εικονίδιο στη «Γραμμή εργασιών» σας.
Βρείτε την εφαρμογή που θέλετε να απεγκαταστήσετε και κάντε δεξί κλικ πάνω της.
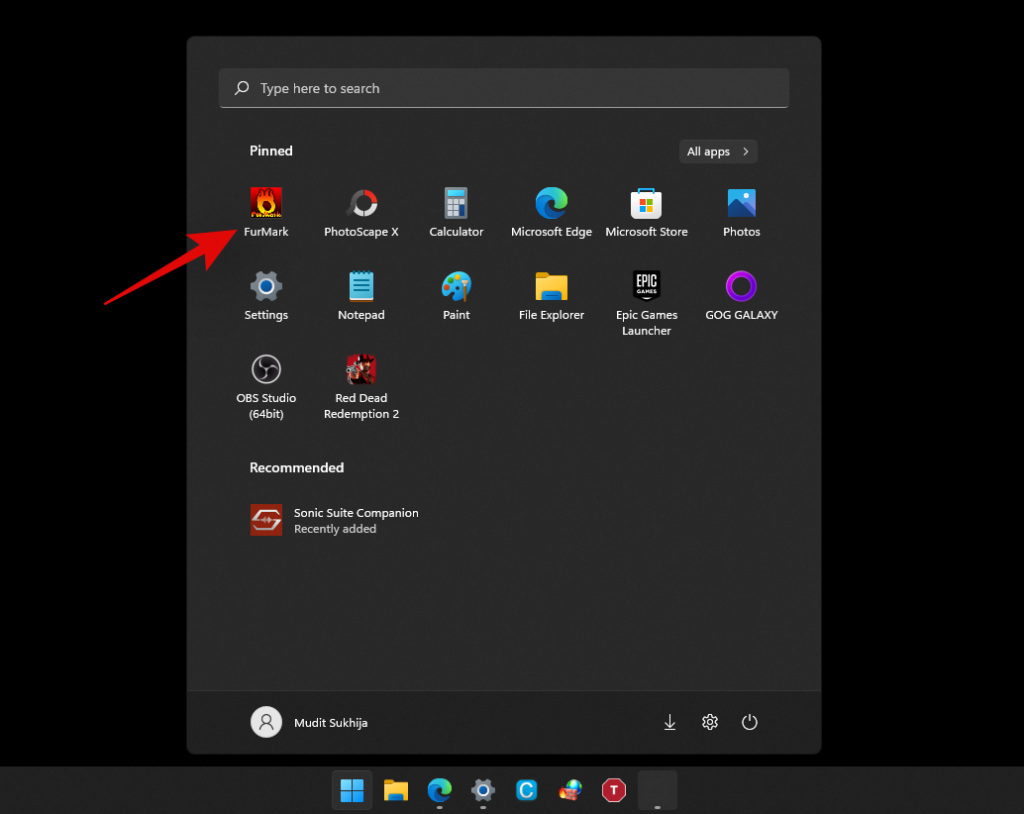
Τώρα κάντε κλικ στο «Κατάργηση εγκατάστασης». Ακολουθήστε τις οδηγίες στην οθόνη, εάν χρειάζεται, για να ολοκληρώσετε τη διαδικασία απεγκατάστασης.
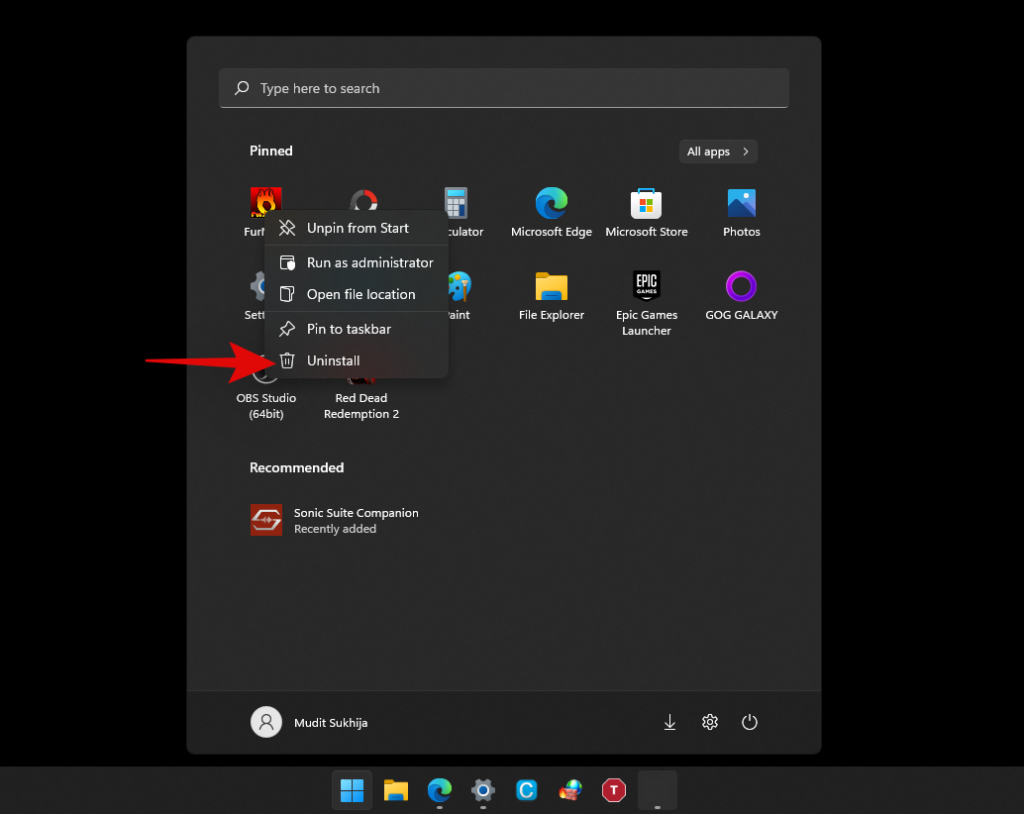
Και τέλος! Τώρα θα έχετε απεγκαταστήσει μια εφαρμογή από το σύστημά σας μέσω του μενού Έναρξη.
Μέθοδος #03: Χρήση του αρχείου απεγκατάστασης '.exe'
Στην ιδανική περίπτωση, δεν χρειάζεται να εκκινήσετε με μη αυτόματο τρόπο το εκτελέσιμο αρχείο απεγκατάστασης για ένα πρόγραμμα, αλλά σε ορισμένες περιπτώσεις, όπως τα παλαιότερα προγράμματα, μπορεί να έχετε ένα πρόγραμμα εγκατεστημένο στο σύστημά σας, του οποίου η επιλογή απεγκατάστασης δεν εμφανίζεται πουθενά στις Ρυθμίσεις σας. Σε τέτοιες περιπτώσεις, μπορείτε να ξεκινήσετε μόνοι σας το αρχείο απεγκατάστασης χρησιμοποιώντας τον παρακάτω οδηγό.
Εντοπίστε το αρχείο .exe του προγράμματος ή τη συντόμευση που χρησιμοποιείτε συνήθως για την εκκίνηση του προγράμματος και κάντε δεξί κλικ πάνω του.
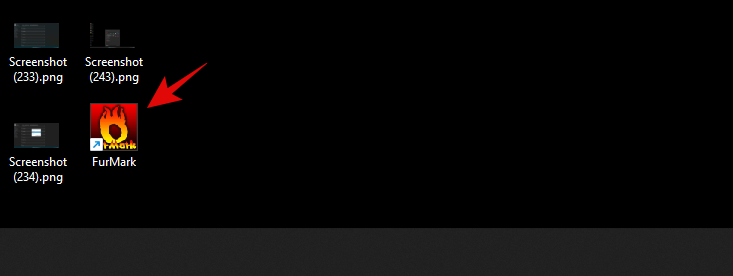
Επιλέξτε «Άνοιγμα τοποθεσίας αρχείου». Εάν δεν βλέπετε αυτήν την επιλογή, επιλέξτε ιδιότητες. Θα βρείτε τώρα την επιλογή «Άνοιγμα τοποθεσίας αρχείου» στην καρτέλα «Γενικά» όπως φαίνεται παρακάτω.
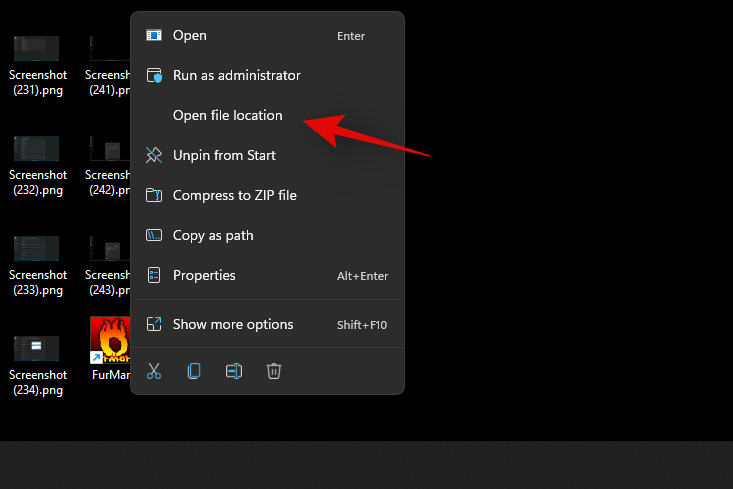
Τώρα θα μεταφερθείτε στον κατάλογο εγκατάστασης του προγράμματος. Αναζητήστε ένα αρχείο .exe με ένα από τα ακόλουθα ονόματα ή παρόμοιο όνομα.
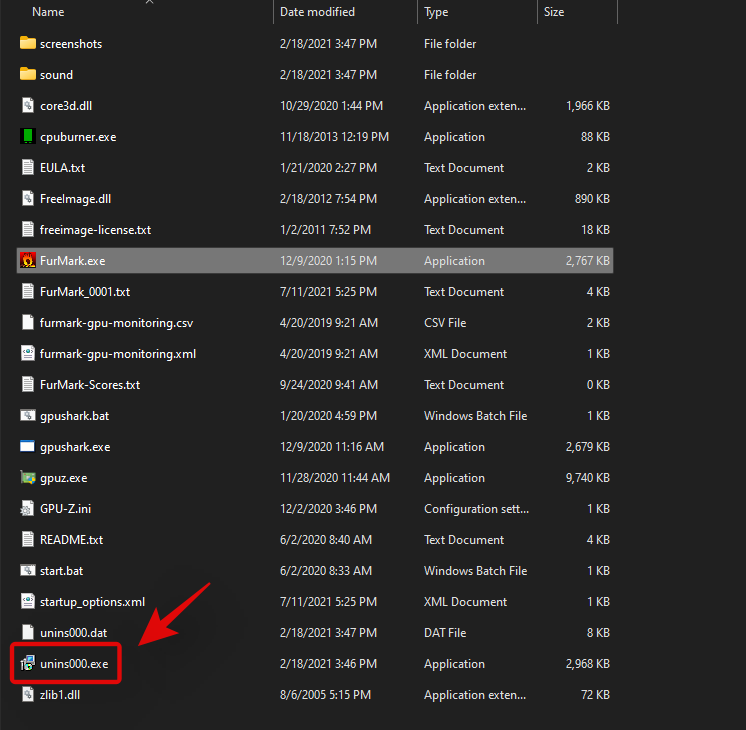
- uninst.exe
- uninstall.exe
- setup.exe
- εγκατάσταση.msi
- (όνομα προγράμματος)setup.exe/.msi
- (όνομα προγράμματος)uninstall.exe/uninst.exe
κι αλλα. Το πρόγραμμα απεγκατάστασης/ρύθμισης θα έχει το ίδιο όνομα. Μόλις το εκκινήσετε, μπορείτε να ακολουθήσετε τις οδηγίες στην οθόνη για να το απεγκαταστήσετε από το σύστημά σας.
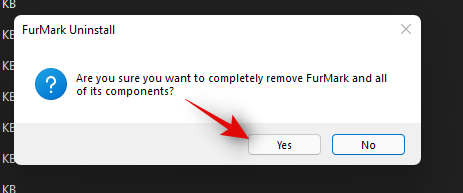
Σε ορισμένες περιπτώσεις, μπορεί επίσης να έχετε την επιλογή να επιδιορθώσετε, να επανεγκαταστήσετε ή να τροποποιήσετε το πρόγραμμα μαζί με την απεγκατάσταση. Μπορείτε να επιλέξετε την επιθυμητή επιλογή και να προχωρήσετε στη ρύθμιση όπως σκοπεύετε.
Μέθοδος #04: Χρήση Πίνακα Ελέγχου
Μπορείτε επίσης να αφαιρέσετε εύκολα προγράμματα και εφαρμογές από τον Πίνακα Ελέγχου. Στην ιδανική περίπτωση, συνιστάται να απεγκαθιστάτε μόνο παλαιού τύπου και σύγχρονα προγράμματα χρησιμοποιώντας τον Πίνακα Ελέγχου, καθώς δεν θα εμφανίζονται εδώ όλες οι εγκατεστημένες εφαρμογές σας. Ακολουθήστε τον παρακάτω οδηγό για να απεγκαταστήσετε προγράμματα μέσω του πίνακα ελέγχου.
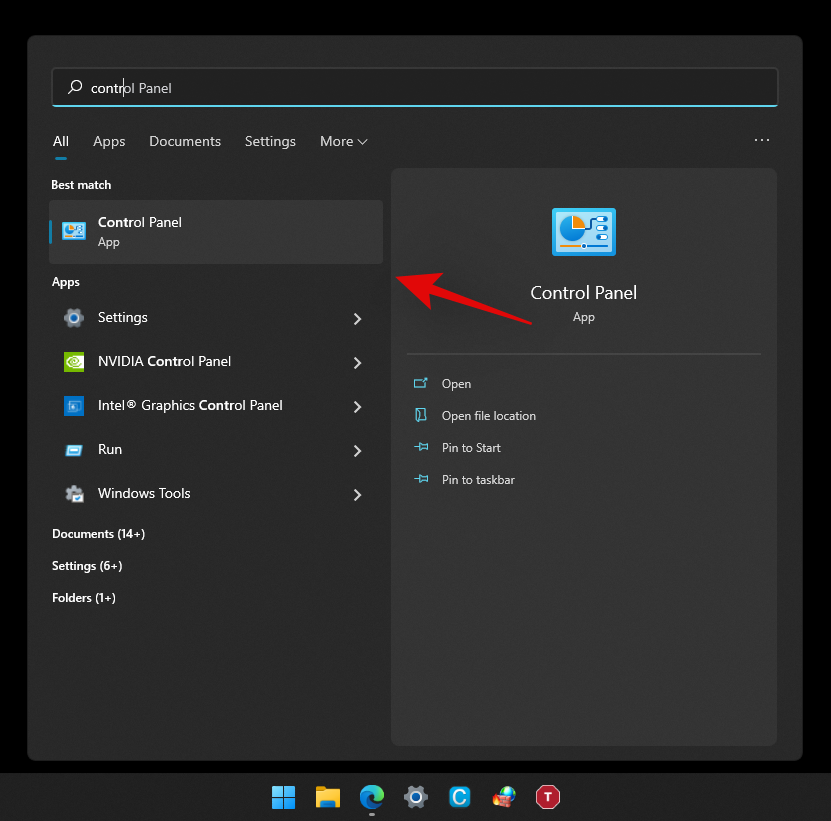
Πατήστε Windows + sστο πληκτρολόγιό σας και πληκτρολογήστε "Πίνακας Ελέγχου". Κάντε κλικ και ξεκινήστε την εφαρμογή μόλις εμφανιστεί στα αποτελέσματα αναζήτησής σας.
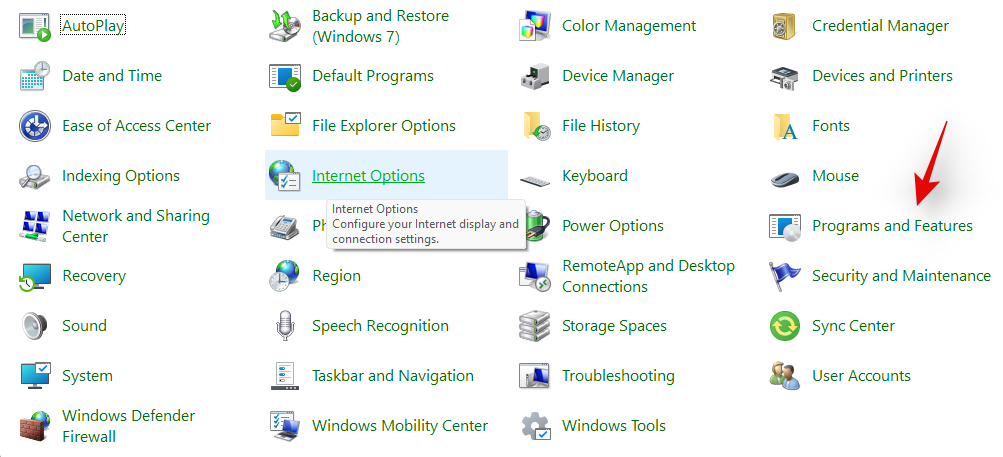
Τώρα κάντε κλικ στο «Προγράμματα και δυνατότητες».
Θα λάβετε τώρα μια λίστα με όλα τα προγράμματα που είναι εγκατεστημένα στο σύστημά σας αυτήν τη στιγμή. Βρείτε το πρόγραμμα που θέλετε να απεγκαταστήσετε και κάντε κλικ σε αυτό.
Τώρα επιλέξτε "Κατάργηση εγκατάστασης" στο επάνω μέρος.

Ακολουθήστε τις οδηγίες που εμφανίζονται στην οθόνη για να ολοκληρώσετε τη διαδικασία εγκατάστασης. Σε ορισμένες περιπτώσεις, αυτή θα είναι μια αυτοματοποιημένη διαδικασία, ενώ σε άλλες, ενδέχεται να έχετε την επιλογή να επιδιορθώσετε την υπάρχουσα εγκατάσταση ή να επιλέξετε ποια δεδομένα θέλετε να διατηρήσετε και ποια δεδομένα θέλετε να διαγράψετε.
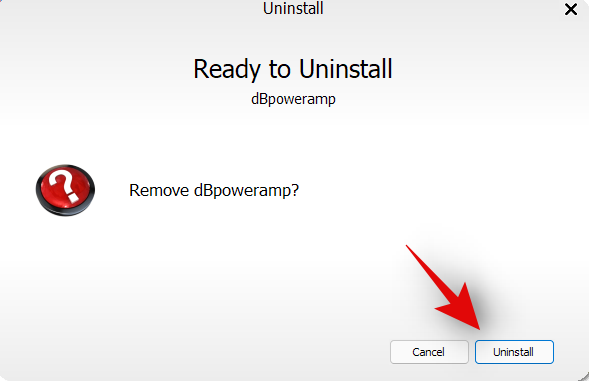
Μόλις κάνετε τις επιλογές σας, θα πραγματοποιηθεί η διαδικασία απεγκατάστασης και το πρόγραμμα θα πρέπει να αφαιρεθεί από το σύστημά σας μόλις ολοκληρωθεί η διαδικασία.
Μέθοδος #05: Χρήση PowerShell
Μπορείτε επίσης να απεγκαταστήσετε εφαρμογές μέσω ενός ανυψωμένου PowerShell στα Windows 11. Αν και η εντολή απεγκατάστασης είναι αρκετά απλή, η λήψη του ονόματος πακέτου για τη σχετική εφαρμογή ή πρόγραμμα δεν είναι. Ως εκ τούτου, στον παρακάτω οδηγό θα βρείτε πώς να απεγκαταστήσετε εφαρμογές μέσω του PowerShell, εάν έχετε το όνομα του πακέτου.
Ωστόσο, εάν δεν ξέρετε πώς να προμηθεύσετε το πλήρες όνομα του πακέτου σας, σας συνιστούμε να ακολουθήσετε τον παρακάτω οδηγό εφαρμογών συστήματος, ο οποίος καλύπτει την ίδια μέθοδο με πολύ περισσότερες λεπτομέρειες. Ας αρχίσουμε.
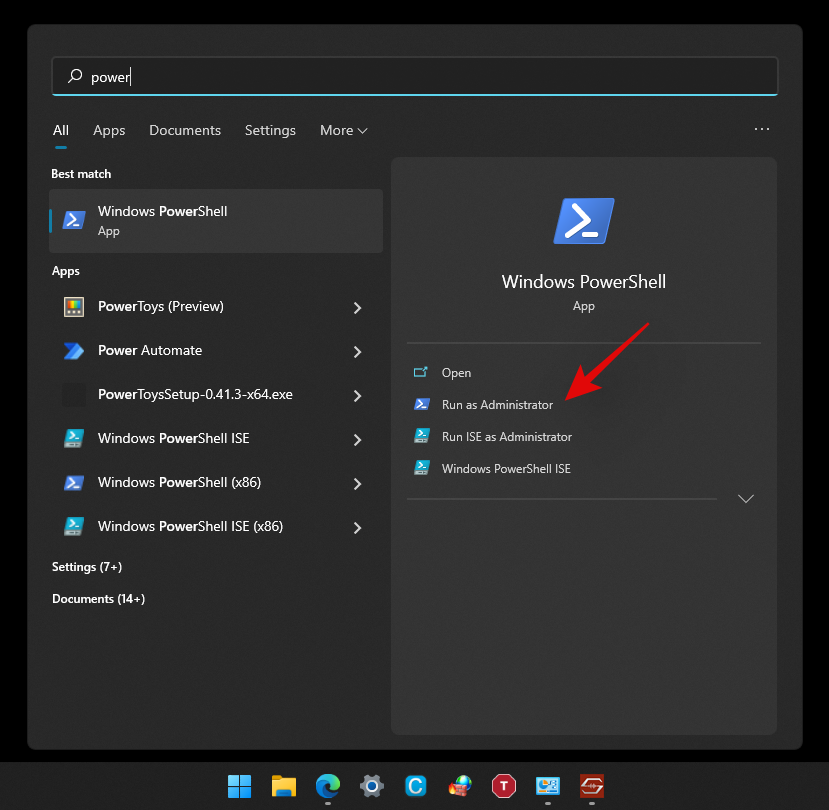
Πατήστε Windows + sστο πληκτρολόγιό σας και πληκτρολογήστε «PowerShell». Τώρα κάντε κλικ στο «Εκτέλεση ως διαχειριστής» μόλις εμφανιστεί στα αποτελέσματα αναζήτησής σας.
Μόλις εμφανιστεί το παράθυρο PowerShell στην επιφάνεια εργασίας σας, πληκτρολογήστε την ακόλουθη εντολή και πατήστε "Enter" στο πληκτρολόγιό σας. Βεβαιωθείτε ότι έχετε αντικαταστήσει το '[Name]' με το πλήρες όνομα πακέτου της σχετικής εφαρμογής.
Remove-AppxPackage [Name]

Και τέλος! Το Powershell θα κάνει τώρα τα μαγικά του και θα απεγκαταστήσει τη σχετική εφαρμογή από το σύστημά σας.
Μέθοδος #06: Χρήση CMD
Μπορείτε επίσης να χρησιμοποιήσετε τη γραμμή εντολών στα Windows 11 για να απεγκαταστήσετε εφαρμογές από το σύστημά σας. Ακολουθήστε τον παρακάτω οδηγό για να ξεκινήσετε.
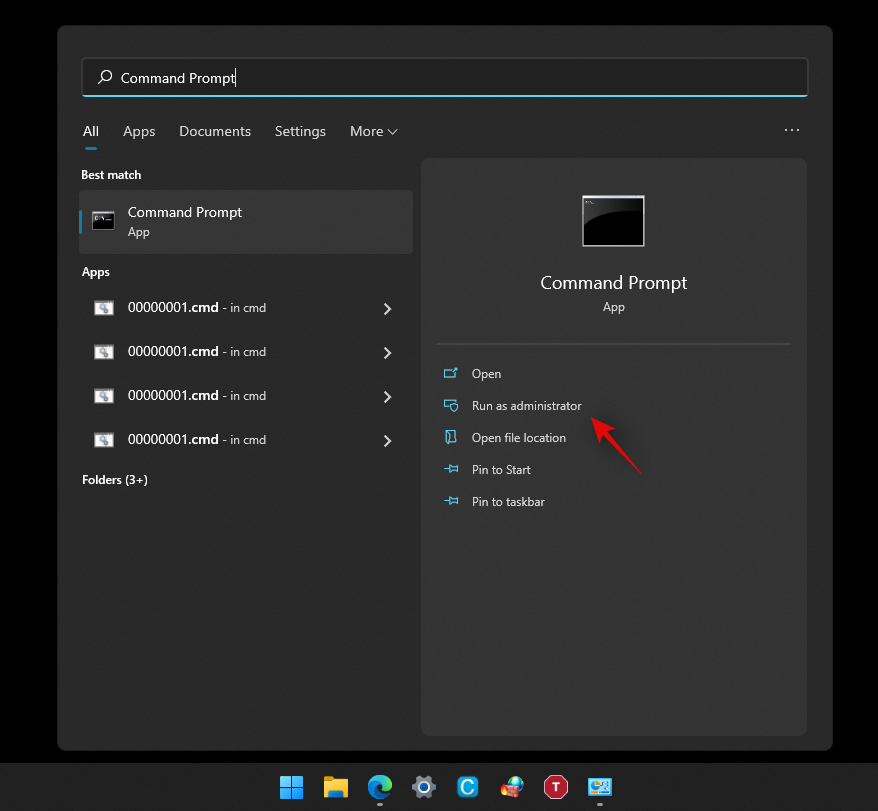
Πατήστε Windows + sστο πληκτρολόγιό σας και αναζητήστε "CMD". Κάντε κλικ στο «Εκτέλεση ως διαχειριστής» μόλις εμφανιστεί στα αποτελέσματα αναζήτησής σας.
Μόλις ξεκινήσει το CMD, πληκτρολογήστε την ακόλουθη εντολή και πατήστε "Enter" στο πληκτρολόγιό σας.
wmic

Τώρα πληκτρολογήστε την ακόλουθη εντολή για να λάβετε μια λίστα με όλες τις εφαρμογές και τα προγράμματα που είναι εγκατεστημένα στο σύστημά σας.
product get name

Μόλις λάβετε μια λίστα με όλα τα προγράμματα, βρείτε αυτό που θέλετε να απεγκαταστήσετε σε αυτήν τη λίστα. Μόλις το βρείτε, σημειώστε ολόκληρο το όνομά του σε μια βολική τοποθεσία.
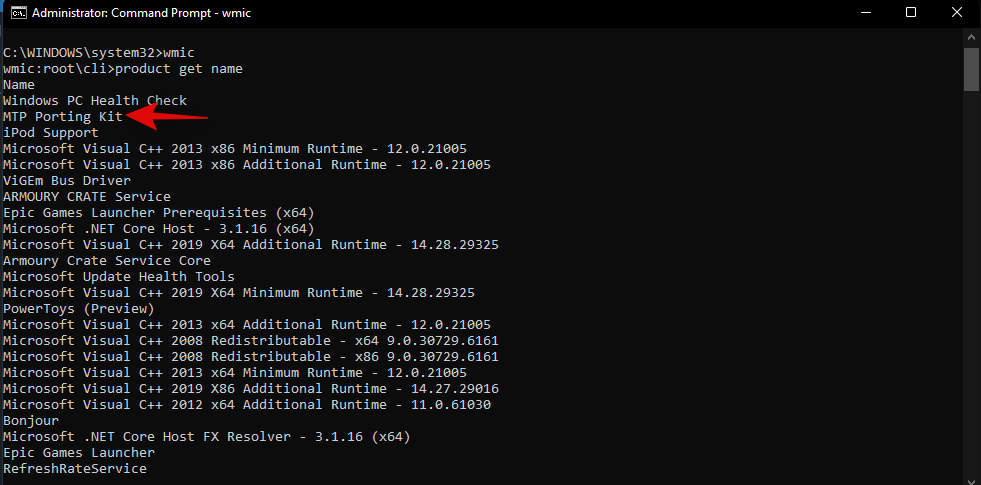
Τώρα πληκτρολογήστε την ακόλουθη εντολή και αντικαταστήστε το AppName με το όνομα της εφαρμογής που σημειώσατε νωρίτερα.
product where name="AppName" call uninstall/nointeractive
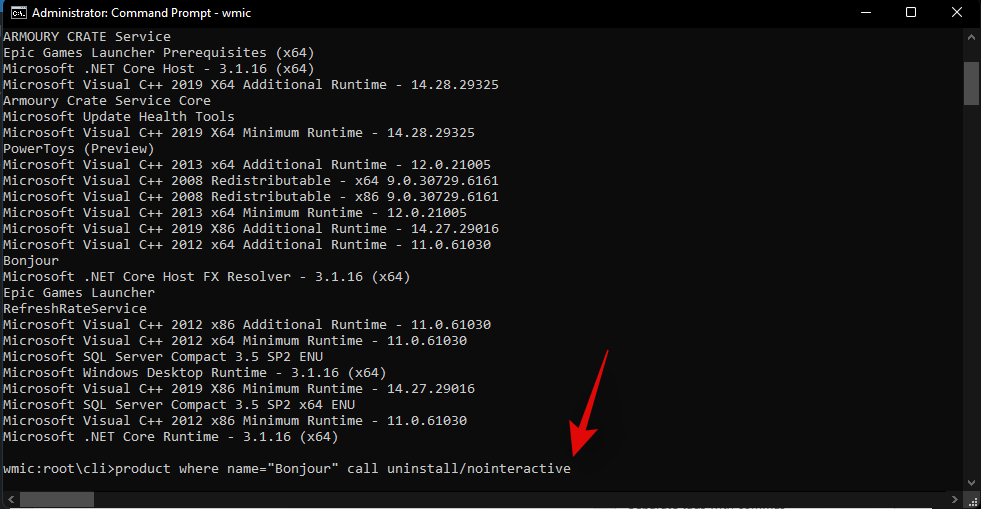
Σημείωση: Μην αφαιρείτε τα εισαγωγικά από την εντολή καθώς είναι απαραίτητα για αυτήν τη σύνταξη.
Πατήστε «Enter» στο πληκτρολόγιό σας για να εκτελέσετε την εντολή.
Η γραμμή εντολών θα πραγματοποιήσει τώρα τις απαραίτητες διεργασίες στο παρασκήνιο και θα πρέπει να λάβετε μια επιβεβαίωση όπως φαίνεται παρακάτω μόλις ολοκληρωθεί η διαδικασία.
Και τέλος! Τώρα θα έχετε απεγκαταστήσει μια εφαρμογή από το σύστημά σας μέσω της Γραμμής εντολών.
Μέθοδος #07: Χρήση setup.msi
Σε περίπτωση που το πρόγραμμά σας είχε ένα αρχείο εγκατάστασης που είχε επέκταση .msi αντί για .exe, τότε μπορείτε να χρησιμοποιήσετε το ίδιο αρχείο για να απεγκαταστήσετε και το πρόγραμμά σας. Ας μάθουμε λίγο περισσότερα για τα αρχεία .msi ώστε να είναι πιο εύκολο να κατανοήσουμε τη λειτουργία τους.
Τι είναι ένα αρχείο .msi;
Traditionally your installers come with a .exe extension. These are programs designed to install programs on your system with the setup files bundled with them. MSI files take this a step further by allowing you to bundle multiple installers together in the same file.
This allows the MSI file to perform various functions thanks to the bundled installers. This includes things like Update installers, software installers, program repairer, program modifier, and uninstaller. Hence, if your program came with a .msi setup file then you can use the guide below to use the same file to uninstall the program from your system.
Note: Older .msi files rarely work with newer installations of the same software. Keep this in mind in case you are trying to downgrade your program to a previous version.
Uninstall via .msi file
Locate the .msi setup file on your local storage and double click and launch the app.
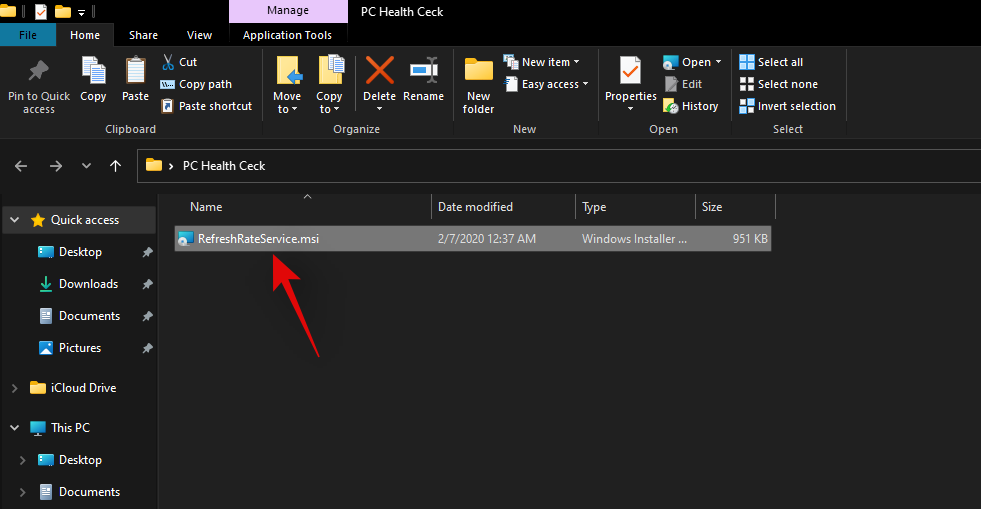
Follow the on-screen instructions until you are prompted to select one of the courses of action.
- Repair
- Modify
- Uninstall
- Install Updates
- Remove Updates
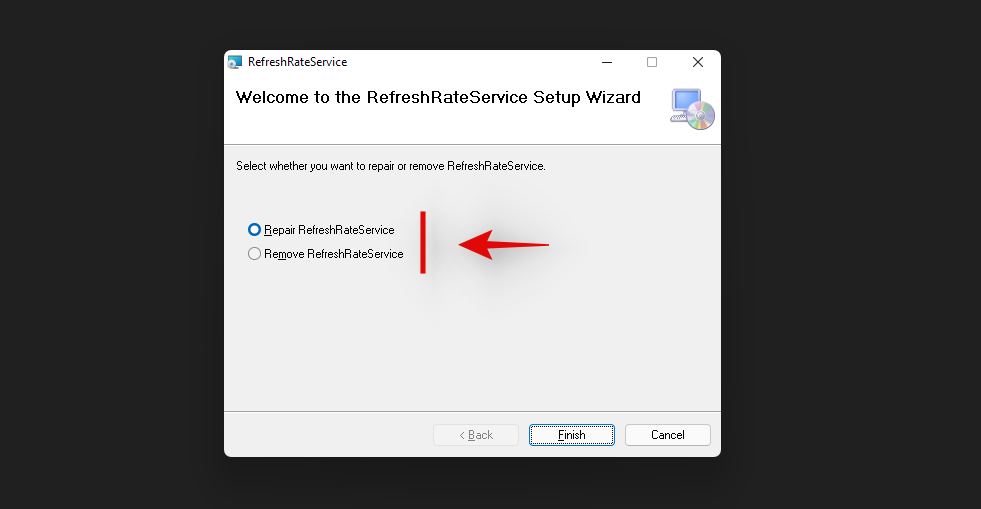
Select the desired option and continue with the on-screen instructions to complete the uninstallation process.
And that’s it! The selected program should now be removed from your system via its .msi setup file.
Method #08: Use a third-party uninstaller
There are various third-party uninstallers available on the market as well. These apps help identify all the system and third-party apps on your system which can then be uninstalled from your PC with a simple click. Most of these programs allow you to remove system apps after opting for the premium model of the software.
In case you decide to use the free version, you will be limited to a certain number of uninstalls in most cases. While this might sound redundant, these utilities are extremely useful for professionals and technicians that need to uninstall multiple programs with a single click. Most of these uninstallers support bulk uninstallations which is quite useful when setting up multiple systems for an office environment. We have linked the two most popular third-party uninstallers below. We hope you find them useful in your quest to uninstall programs from Windows 11.
How to uninstall system apps on Windows 11 [2 Ways]
You can uninstall system apps on Windows 11 either via an elevated PowerShell or by using a third-party PowerShell script. I would recommend that you use the PowerShell method, although it might seem more complicated, you won’t have to run third-party scripts with elevated privileges on your system.
However, if you still decide to use an automated script, ensure that you change your execution policy back to normal once the script has been executed. This will be paramount to your system’s security as leaving the execution policy unchanged might allow malicious users to run PowerShell scripts on your system easily. Use one of the methods below that best suits your current needs and requirements to get started.
Method #01: Using Powershell
The PowerShell uninstallation process for any program has two processes. First, sourcing the full package name of the concerned app and then using PowerShell to uninstall the concerned app. If your app does not show up in the PowerShell list, then you might have to use the third-party script below to remove the concerned app from your system. Let’s get started.
Step 1: Source full package name
Press Windows + s on your keyboard and search for ‘PowerShell’. Click on ‘Run as administrator’ once it shows up in your search results.

Once PowerShell launches, type in the command below and press ‘Enter’ on your screen.
get-appxpackage
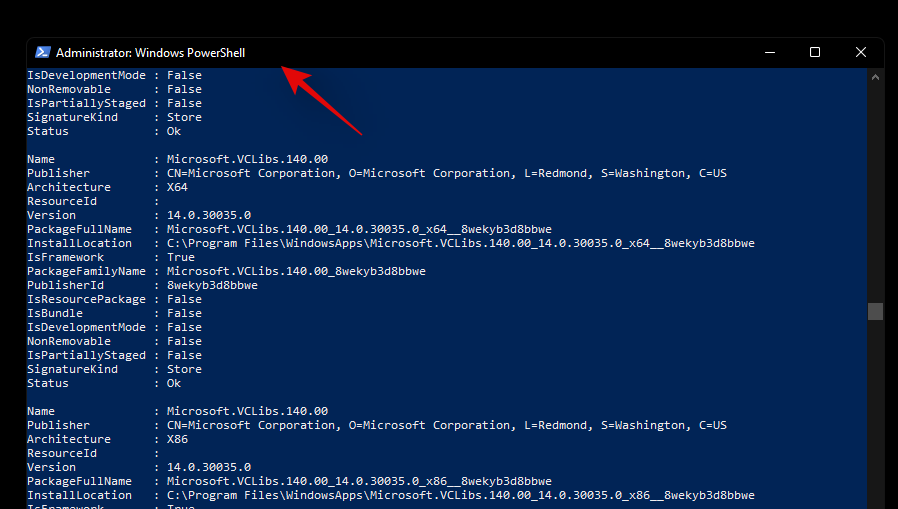
PowerShell will now generate and show a list of all the apps installed on your system including built-in OEM apps and Windows app. Scroll the list to find your app, however, if this seems too tedious, start by right-clicking on the title bar at the top.
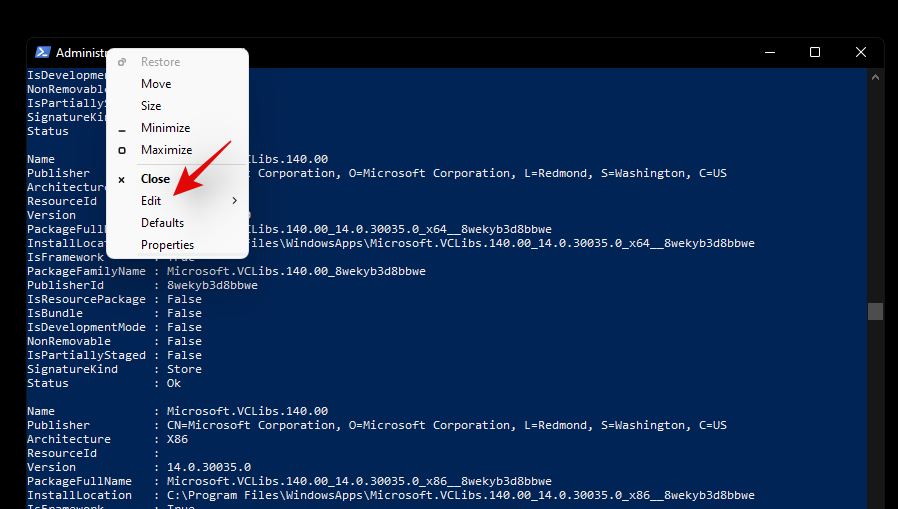
Now select ‘Edit’.
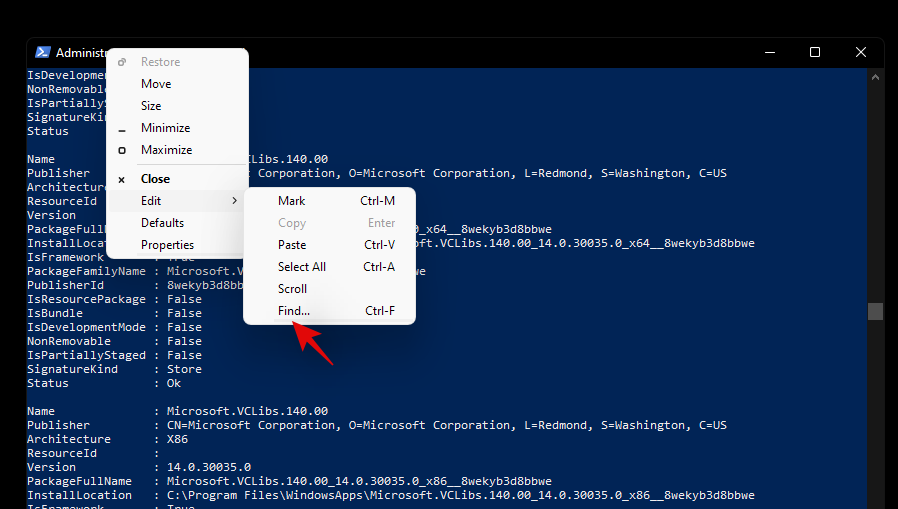
Click on ‘Find’.
Now search for the general name of the app and the ‘Find’ feature should automatically take you to the app in the list.
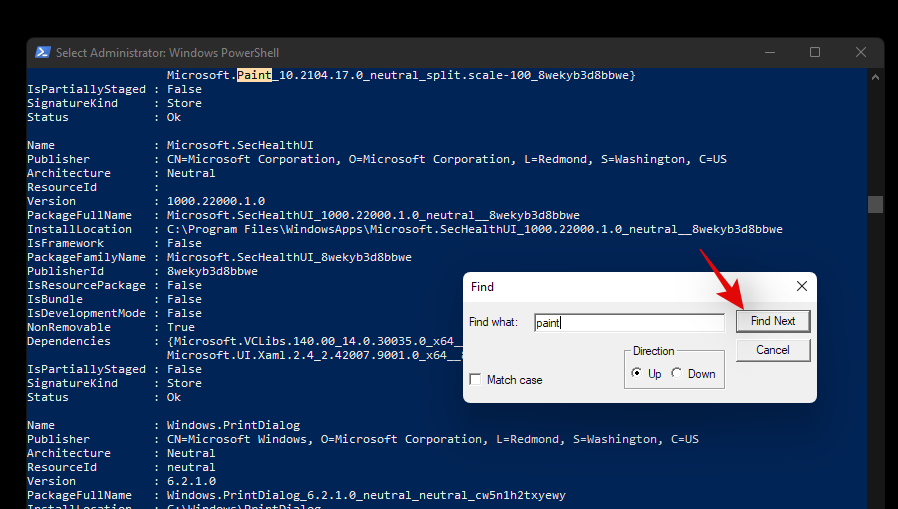
Note down the ‘FullPackageName’ of the concerned app as shown below.
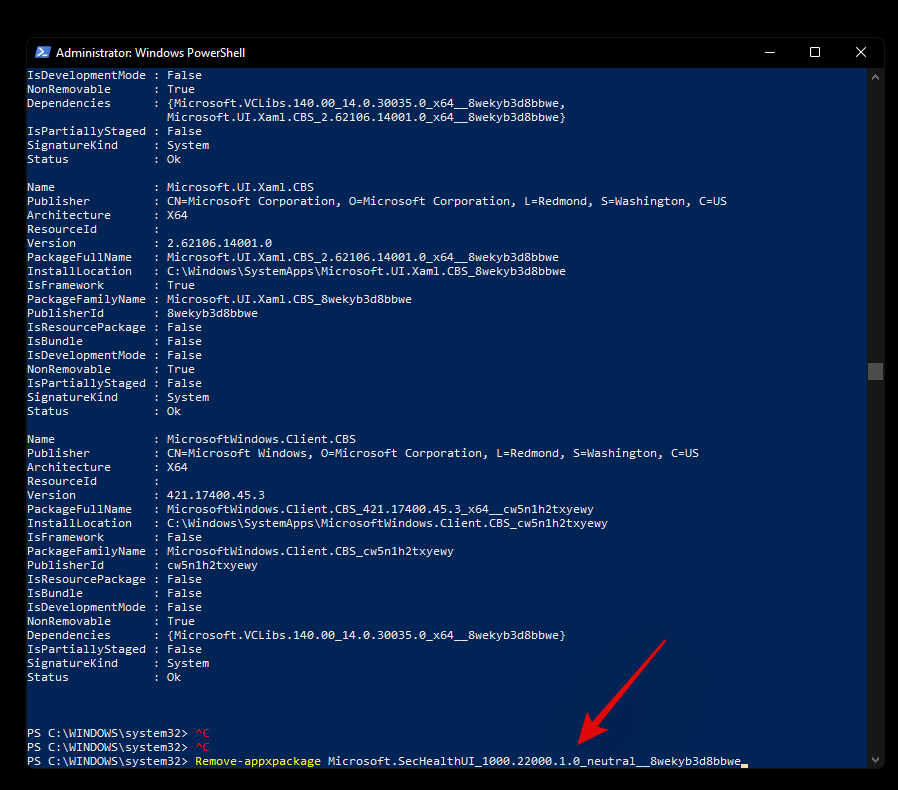
And that’s it! You will now have sourced the full package name for the concerned app on your system. You can now use the guide below to uninstall it from your system.
Step 2: Uninstall app via PowerShell
Open an elevated PowerShell using the guide above. If you already have one open on your screen, then start by typing in the following command. Ensure that you replace ‘[PackageName]’ with the full package name of the app we sourced above.
Remove-Appxpackage [PackageName]

Hit ‘Enter’ on your keyboard once you are done. PowerShell will now do its thing and the app should be installed from your system in no time.
Can’t remove an app using PowerShell? How to fix
If you are unable to remove the app via PowerShell then we recommend you do the following checks to solve the issue.
- Ensure that you are using an elevated PowerShell window.
- Ensure that the Full Package Name has been sourced correctly.
- Verify your ‘uninstall’ codes and try to keep everything lowercase.
- Repeat the same guide in Safe mode.
- Verify if the app hasn’t been already removed from your system and only leftover registry files are showing up in PowerShell.
You should be able to solve your issue by crosschecking the above-stated checks. However, if you are still unable to uninstall the concerned app, then you can use the third-party script below.
Method #02: Using a third party script
You can also use a third-party script to remove system apps from your Windows 11 system. These scripts have been quite popular lately and have been the go-to choice for many users when setting up fresh installations of Windows. Use the guide below to get started.
- Windows10debloater by Sycnex | Download Link
Note: While this is a Windows 10 script, it has been verified to remove system apps on Windows 11 as well. However, we recommend you keep checking the download page for updates that should be better compatible with Windows 11. We recommend using the script to only remove system apps and nothing else offered by the script. Other features could potentially break Windows 11 until a compatible script for the same is released in the future.
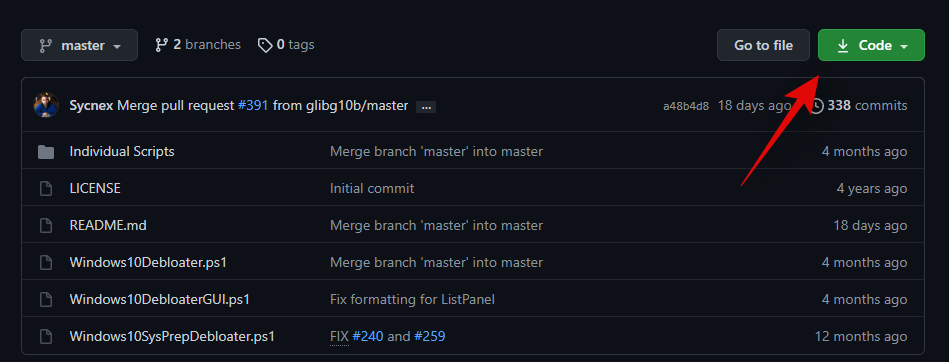
Visit the link above and you will be taken to the GitHub page for the script. Click on ‘Code’ in the top right corner.
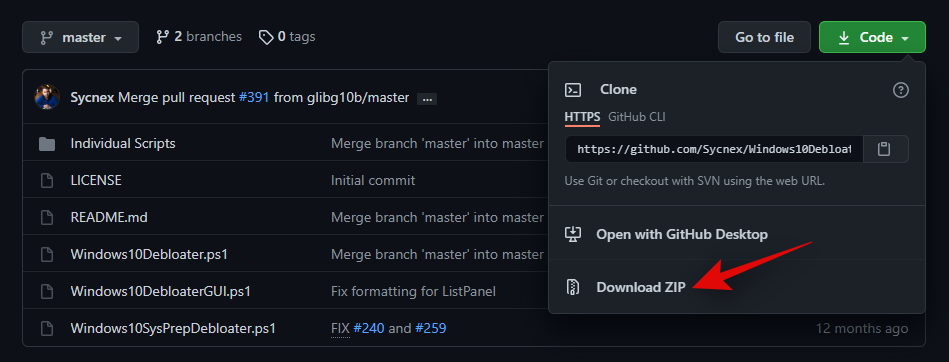
Now click and select ‘Download ZIP’.
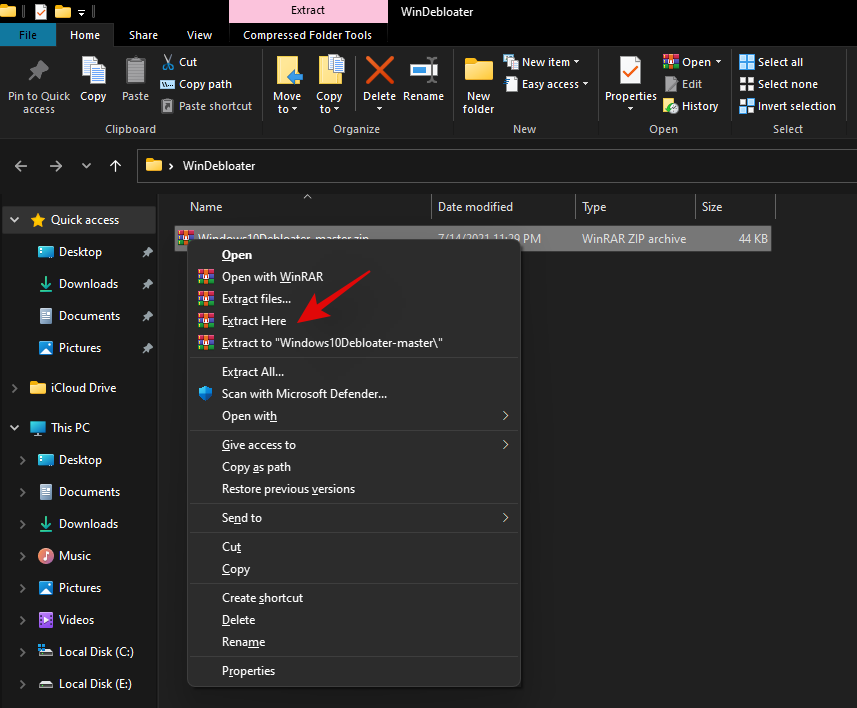
A Zip file will now be downloaded to your local storage. Extract the files to a convenient location.
Once extracted, open the folder and click on ”File’ in the top left corner.
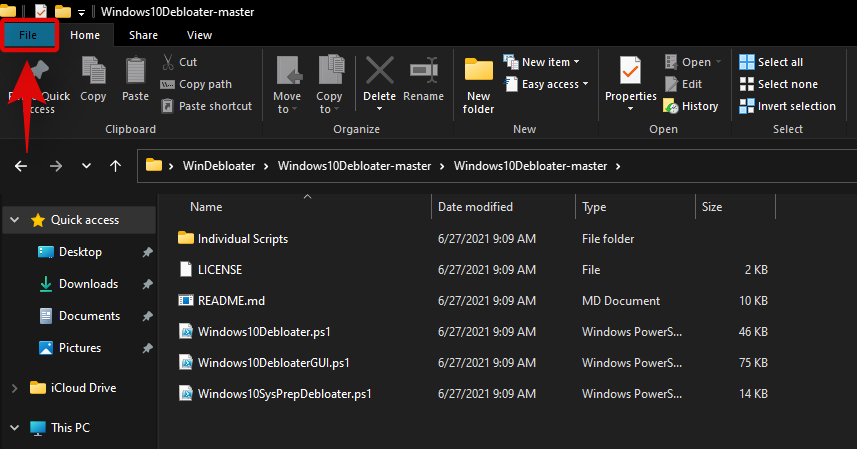
Hover over ‘Open Windows PowerShell’ and select ‘Open Windows PowerShell as administrator’.
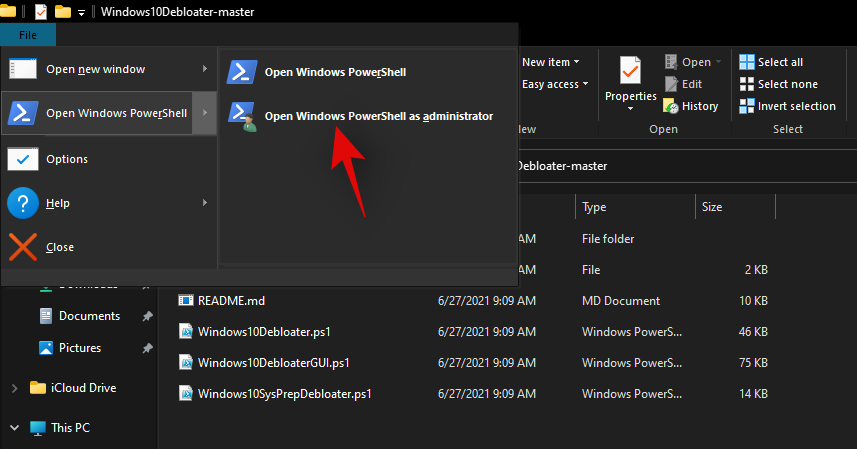
An elevated PowerShell window will now launch on your system. Start by executing the following command given below.
Set-ExecutionPolicy Unrestricted -Force

This will set your script execution policy as unrestricted which will allow us to use the script on your system. Once executed, enter the following command in the window and press ‘Enter’ on your keyboard once you are done.
.\Windows10DebloaterGUI.ps1

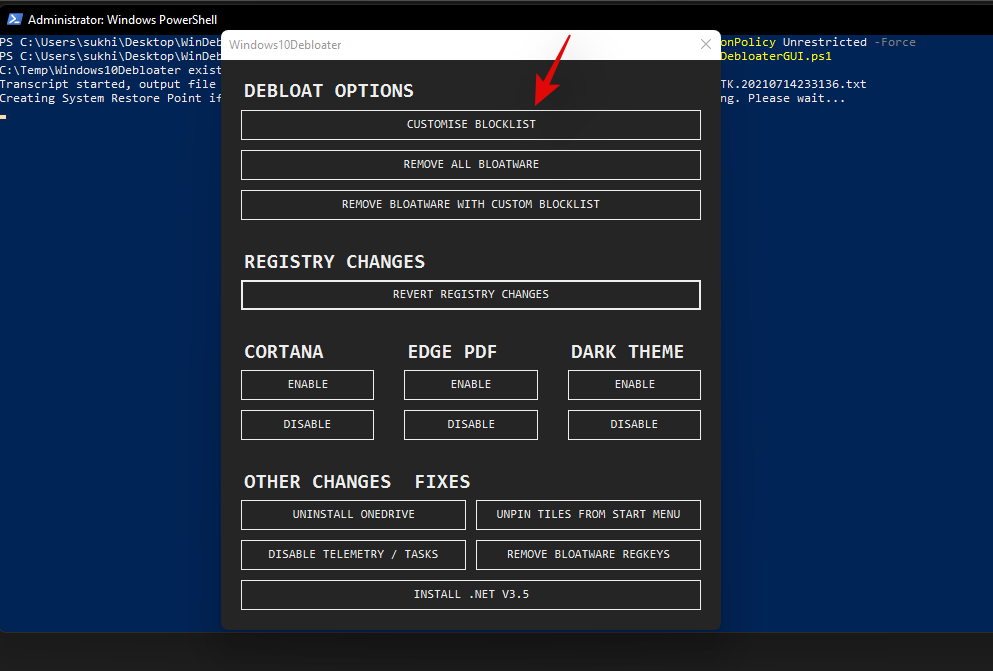
This will execute the debloat script and you should now get a graphical interface for it on your screen. Click on ‘Customize Blacklist’ at the top.
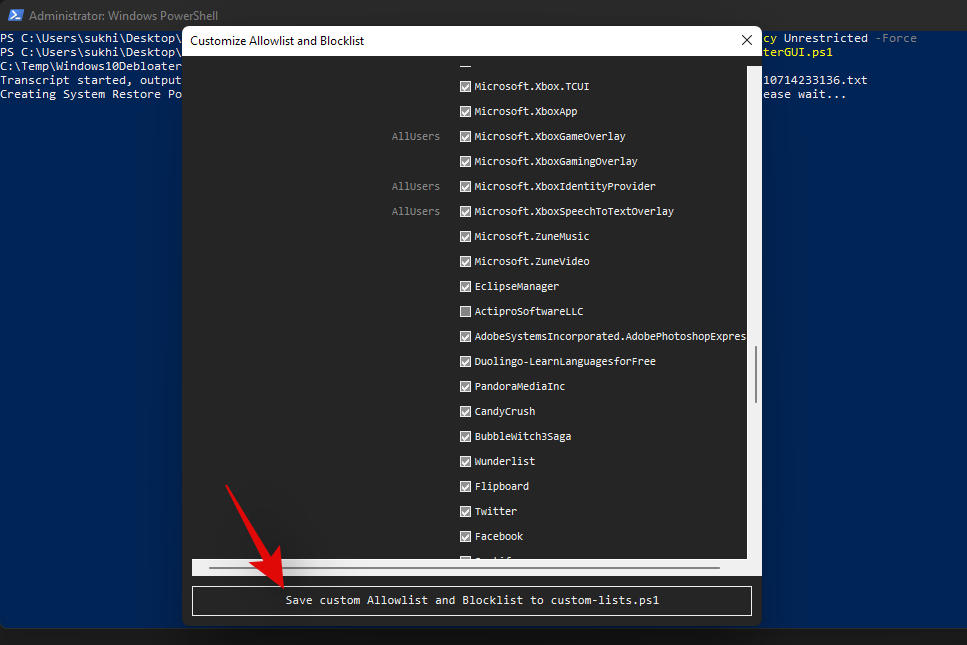
You will now get a list of all the apps installed on your system. Check the box for the apps you wish to uninstall and uncheck the box for the apps you wish to keep on your device. Ensure that you go through the entire list to remove any default selections made by the script for the programs that you wish to keep on your device.
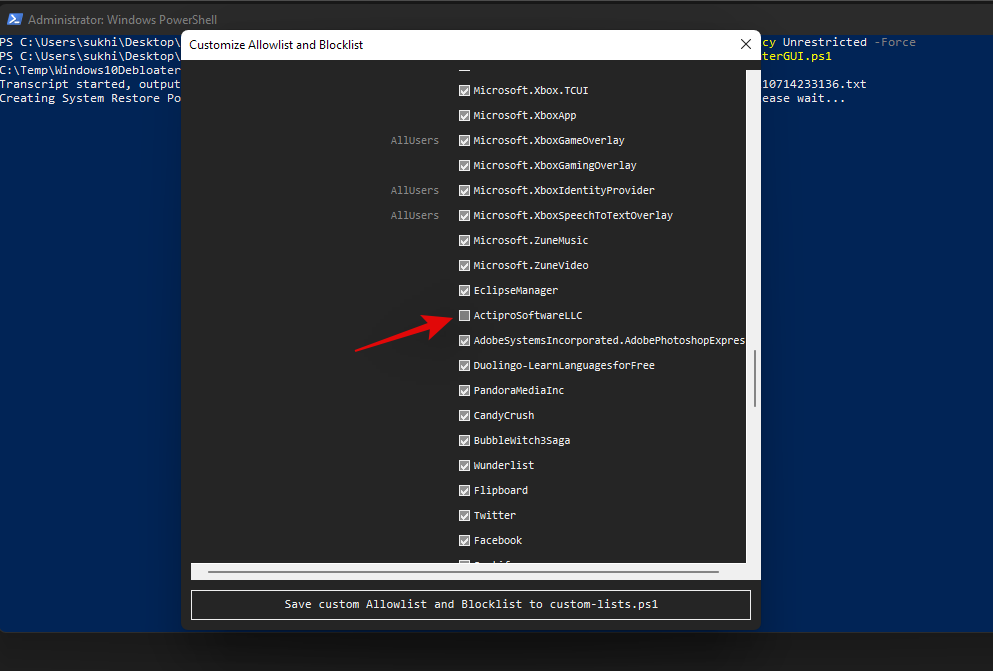
Once you have edited your list, simply click on ���Save custom Whitelist and Blacklist to custom-lists.ps1’ at the top. You can now close this app selection window.
Now click on ‘Remove Bloatware with Customized Blacklist’. Keep an eye on the PowerShell window on the background once the command executes.
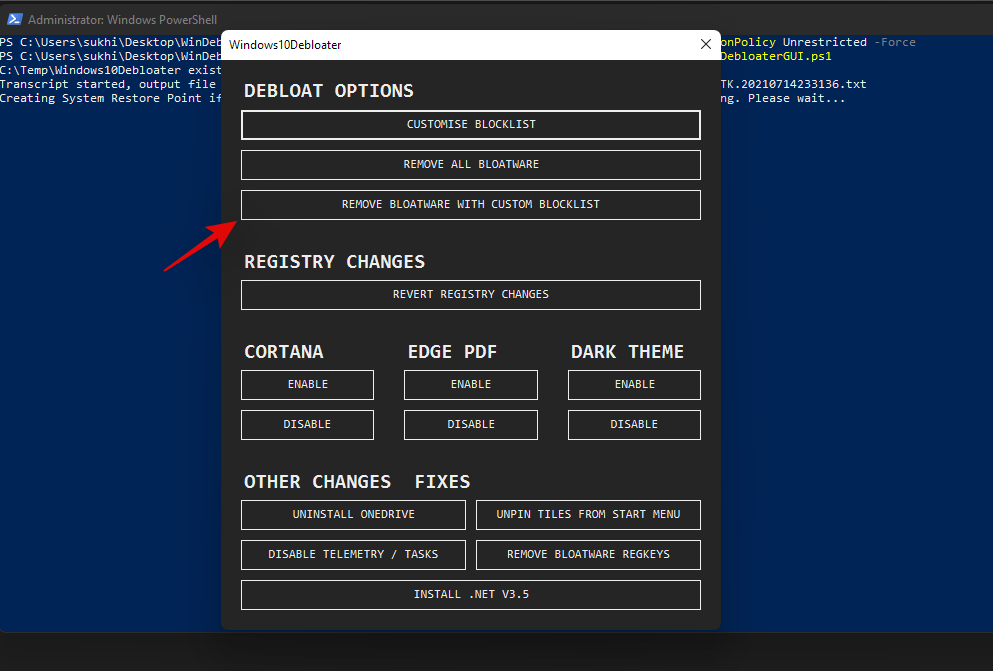
Once all programs have been removed, you will get a confirmation for the same in the PowerShell window in the background. Close the graphical interface by clicking on the ‘X’ in the top right corner.
Now go back to your PowerShell window and execute the following command.
Set-ExecutionPolicy Restricted -Force

This will revert changes to your execution policy and revert the changes we made earlier. Doing this is quite important to maintain proper security on your Windows system.
And that’s it! You will now have uninstalled system apps from your system via a third-party PowerShell script.
Can’t uninstall apps on Windows 11? How to fix
There could be a few reasons why you are unable to uninstall apps on your system. Here are a few workarounds that should help you uninstall persistent apps from your system easily.
Method #01: Close instance in task manager and try again
Chances are that the app has an instance or a process open in the background which is preventing it from being uninstalled. In such cases, you can try finding processes related to the app and kill them on your own. Once the processes have been killed, you can then try to uninstall the app again. Follow the guide below to find and kill the process.
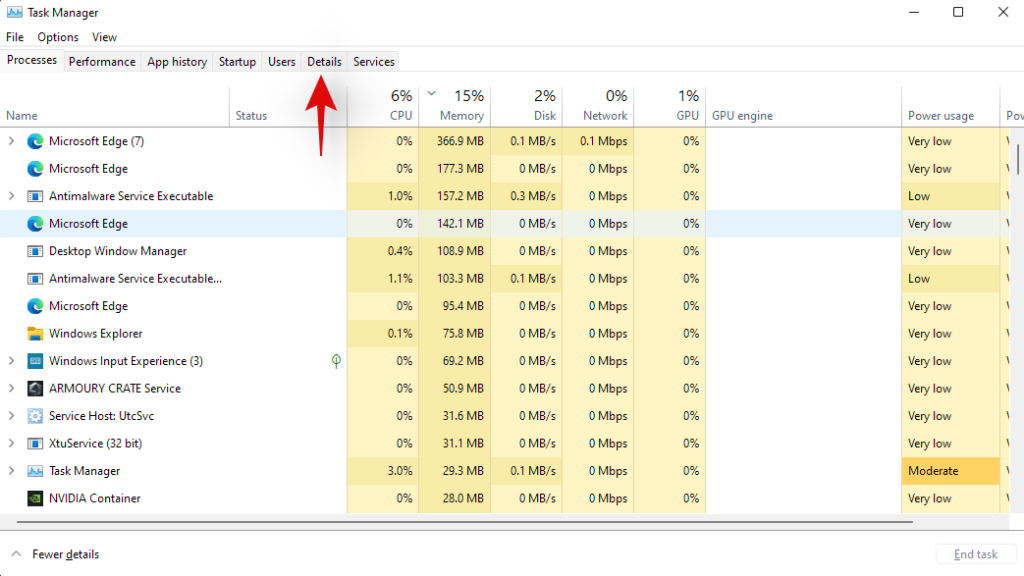
Press Ctrl + Shift + Esc on your keyboard to open the ‘Task Manager’. Switch to the ‘Details’ tab by clicking on it.
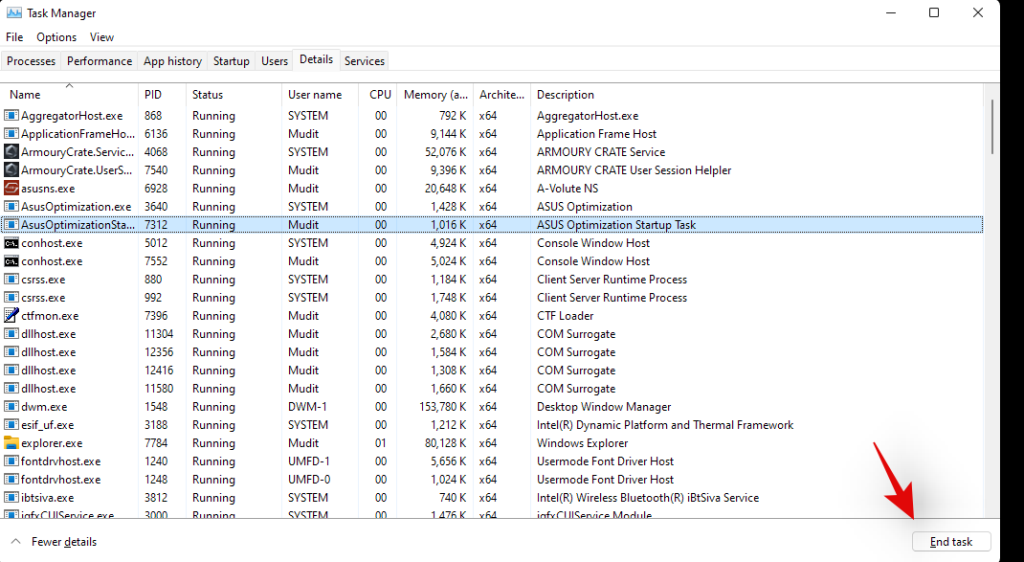
Now look for a process in the list for the concerned app. In our case, we are looking to uninstall ‘AsusOptimization’, hence we will look for a PowerToys process. Once found, click and select the process.
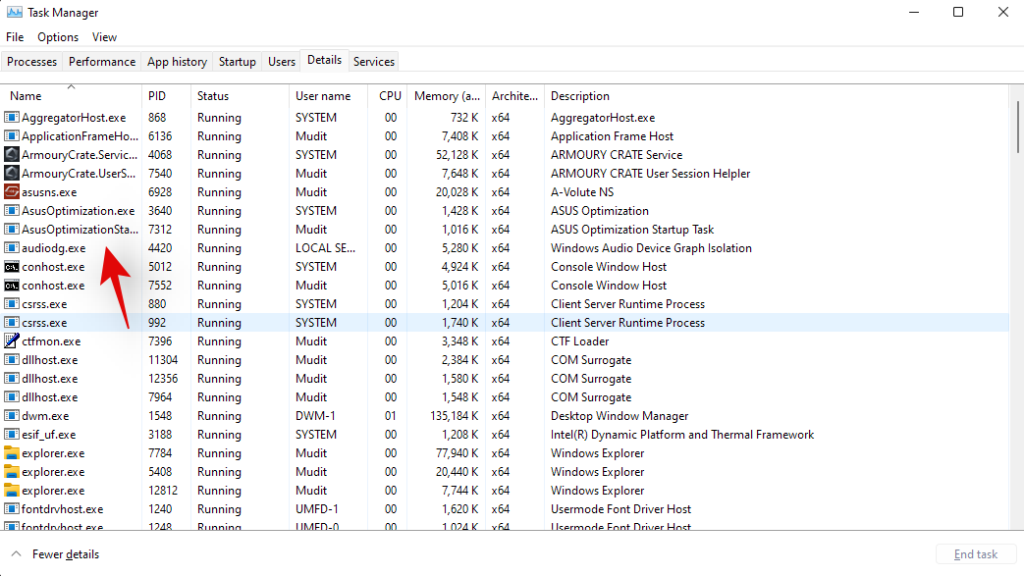
Hit delete on your keyboard or click on ‘End Task’.
Confirm your choice by selecting ‘End Process’.
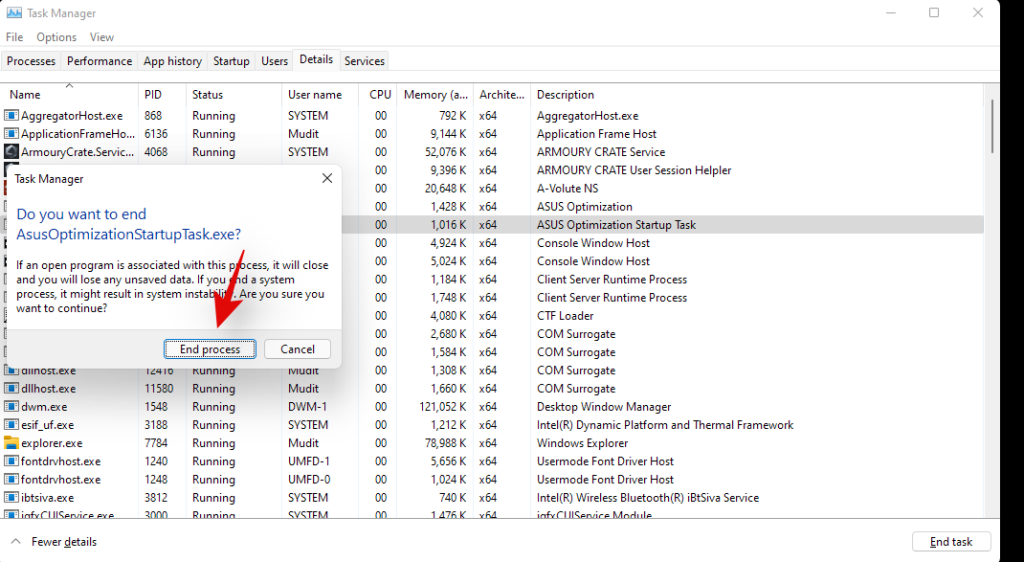
And that’s it! the process should now be killed and you can now try uninstalling the concerned app again.
Method #02: Uninstall in Safe mode
Another way to ensure that no third-party apps are launched or used in the background is to launch your system in safe mode and then try to uninstall your concerned app. You can use this comprehensive guide by us to enter safe mode on Windows 11.
Once in safe mode, follow the guide below to get the installer service back up and running on your system. Once the service is running in the background, you can use either of the methods above to uninstall the concerned app from your system.
Press Windows key + S key to open Windows Search and type in ‘cmd’. Click on ‘Run as administrator’ when the command prompt shows in your search results.
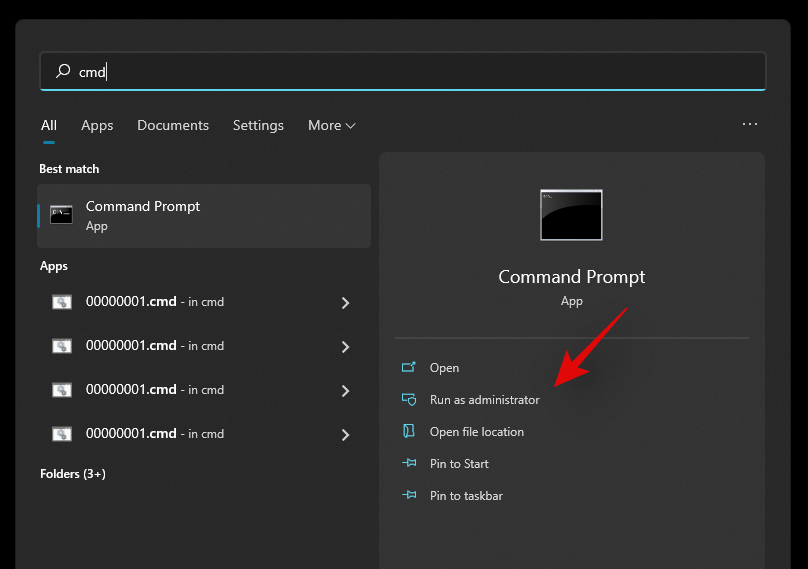
Enter the following commands in the command prompt one by one and hit Enter on your keyboard to execute each one of them.
REG ADD "HKLM\SYSTEM\CurrentControlSet\Control\SafeBoot\Minimal\MSIServer" /VE /T REG_SZ /F /D "Service"
REG ADD "HKLM\SYSTEM\CurrentControlSet\Control\SafeBoot\Network\MSIServer" /VE /T REG_SZ /F /D "Service"
net start msiserver

And that’s it! The installer service should now be running on your system and you should now be able to uninstall the concerned app using either one of the methods above.
Method #03: Run the Microsoft Uninstaller troubleshooter
You can also run a Microsoft Troubleshooter to try and fix uninstaller issues. Microsoft troubleshooters have come a long way since they were first introduced and can now fix most software and driver incompatibility issues without any user intervention.
Microsoft has also made it much easier for you to now launch any troubleshooter to try and solve your current issue. Use the guide below to launch an uninstaller troubleshooter on your Windows 11 system.
Required
Guide
Download the troubleshooter using the link above to your PC. Once downloaded, extract the .zip file to a convenient location. If you have trouble extracting the .zip file or it seems to be blocked, use the guide below to unblock it, else you can skip the guide and jump to the next guide.
Unblock the .zip file
Right-click on the .zip file and select ‘Properties’.
Check the box for ‘Unblock’ at the bottom of the Window.
Click on ‘Ok’.
Provide administrator permission to make the necessary change.
The file should now be unblocked on your system and you should now be able to extract it like any other .zip file on your system.
Run the troubleshooter
Navigate to the extracted files on your local storage. Cut the file named ‘MicrosoftProgram_Install_and_Uninstall.meta.diagcab’ and paste it on your desktop. Double click and run the file from your desktop. Click on ‘Advanced’ at the bottom once the troubleshooter is launched.
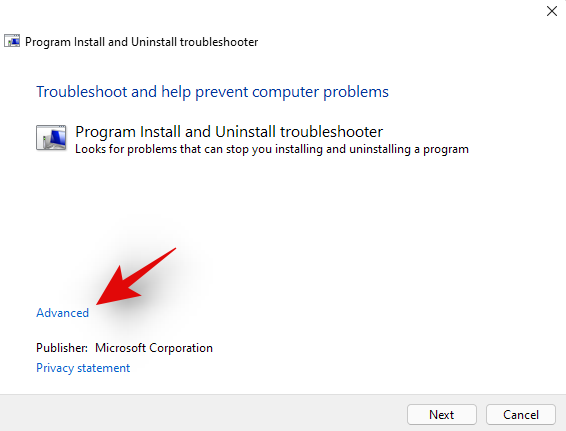
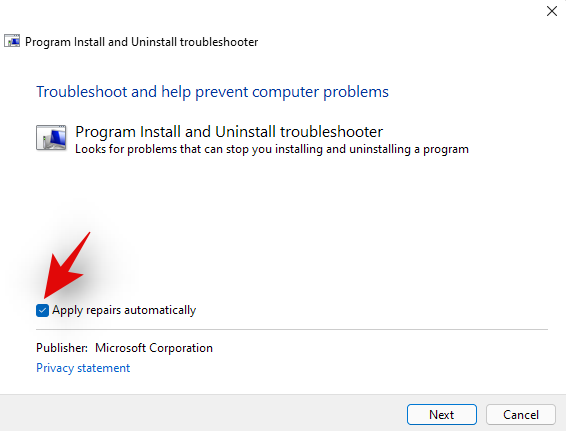
Check the box for ‘Apply repairs automatically’. Click on ‘Next’ once you are done.
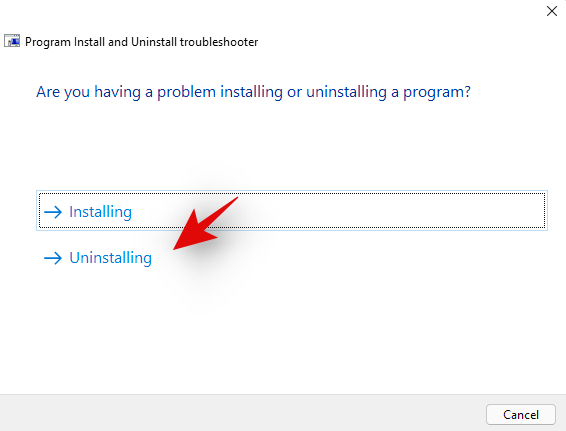
Select ‘Uninstallting’ on the next step.
Select the concerned program from the list provided on your screen. If your program does not appear in the list, click on ‘Not Listed’.
Now follow the on-screen instructions depending on your choice to complete the troubleshooting process.
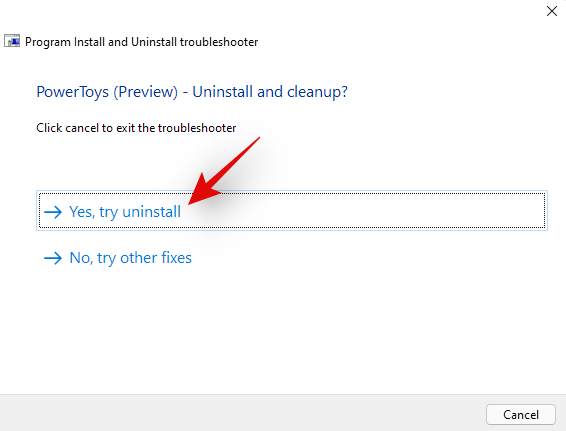
And that’s it! In most cases, the troubleshooter will detect your issue and solve it automatically. A report for the same will be presented to you at the end of the process with all the details.
Method #04: Use a restore point
If you are still having issues uninstalling the software from your system then it is time for some drastic steps as this could be malicious in nature. Let’s restore your PC to a restore point before the concerned app or program was installed on your system.
However, if you do not have a restore point then you can jump to one of the other methods listed below. Here’s how you can use a restore point to restore your PC to its previous state.
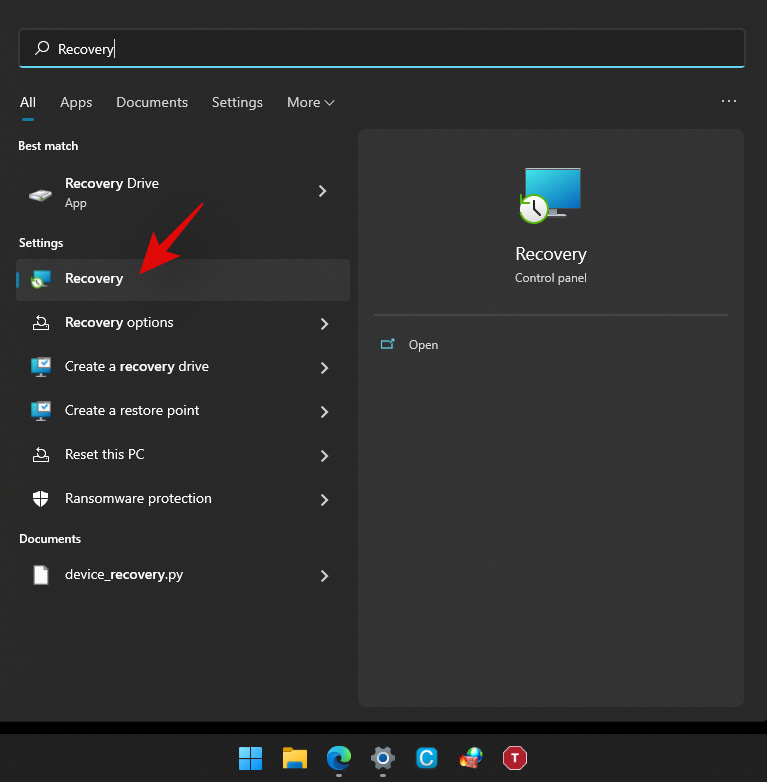
Press Windows + S on your keyboard and search for ‘Recovery’. Click and launch the app link once it shows up in your search results.
Click on ‘Open System Restore’.
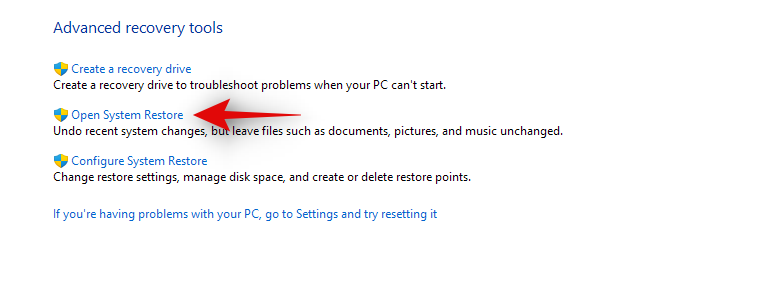
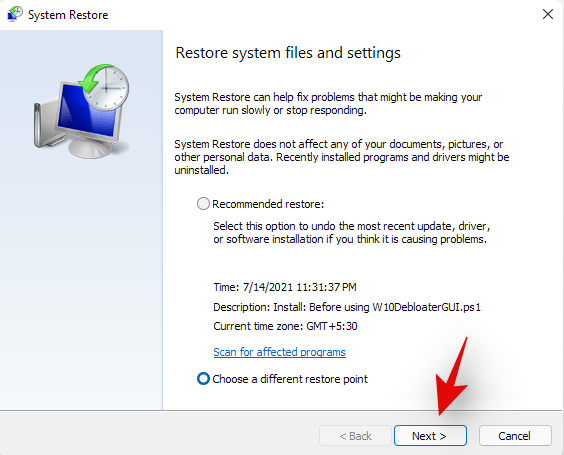
You will now be suggested a recent system restore point if you have one. Select that if needed, or click on ‘Choose a different restore point’ if you wish to choose an older one.
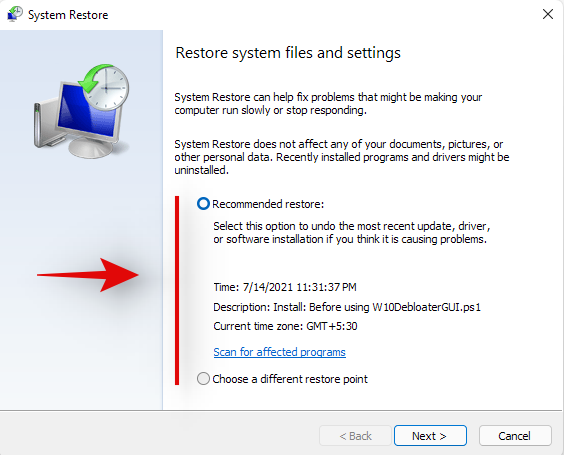
Select ‘Next’ or hit ‘Enter’ on your keyboard.
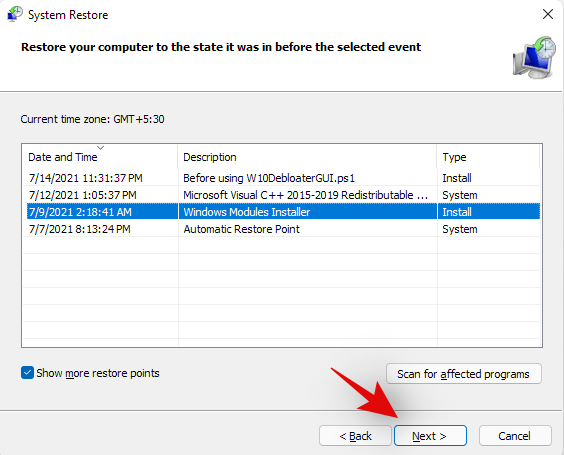
You can now select the desired Restore Point from the list at the top. You can check the box for ‘Show more restore points’ if you wish to look at more restore points.
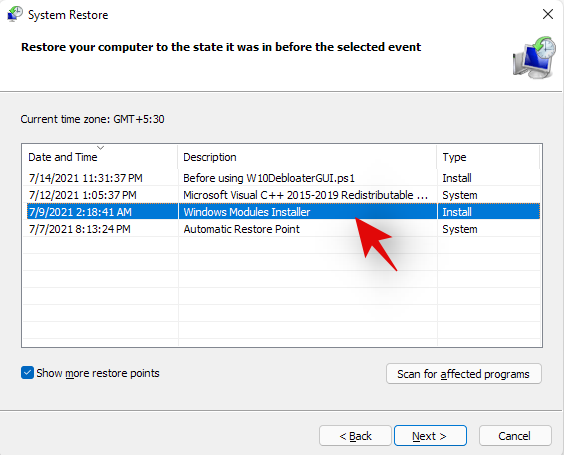
Once selected, click on ‘Next’.
Finally, click on ‘Finish’.
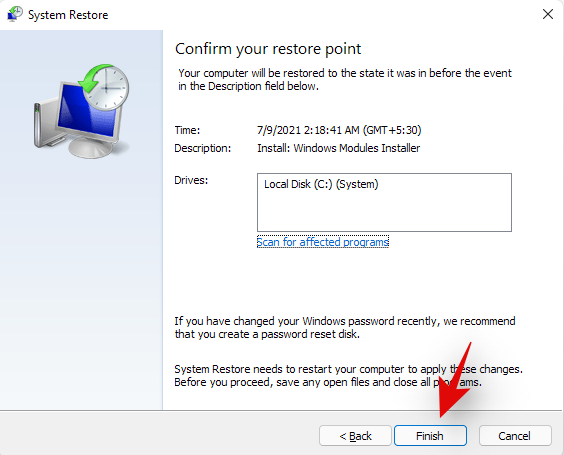
Windows 11 will now restore your system to the selected restore point and the concerned app should no longer be on your system once the process is completed.
Method #05: Contact Windows Support
If you are still unable to get the app uninstalled from your system then it might be time to contact Microsoft Support. Microsoft Support executives are trained to solve such issues with more expertise and can even remotely takeover your system if needed. It might be time to get in touch with the support team to solve your issue. Additionally, if you purchased a pre-built system, you can use your OEM support for some help as well. Use the link below to get in touch with Microsoft Support.
► Microsoft Support
Uninstall programs on Windows 11: FAQs
Can you uninstall pre-installed apps?
Well, officially, you can not and it is not recommended by Microsoft. But still, if you wish to remove preinstalled apps, you can easily do so depending on the type of the app. If you wish to remove a system app then the process is a bit complicated. Else, if you wish to remove third-party pre-installed apps then you can simply do so by uninstalling them like any other app from your Windows 11 Pc using the guide below.
Can you uninstall system apps?
Yes, you can uninstall system apps but not officially. Officially Windows 11 or any Windows for that matter, doesn’t allow you to remove system apps from the OS. However, there are many workarounds to circumvent this restriction and uninstall preinstalled system apps from your system.
This includes using command prompt/PowerShell or a third-party software. Using these methods you should be able to easily uninstall system apps from your system. Follow our guides below for each of the methods depending on your current needs and requirements.
Can you uninstall apps downloaded from the Microsoft Store?
Yes, apps downloaded from the Microsoft Store can be uninstalled easily using either of the methods listed below. This includes Android apps that you may have downloaded on your system but did not find appealing enough. We recommend uninstalling Windows Store apps either via Settings or Start.
Chances are that the Store app will now show up in the Control Panel and if uninstalled via CMD or PowerShell, you could end up with leftover files including empty Start menu folders. Hence, use Powershell or CMD for Windows Store apps only if you are facing an issue uninstalling them via the Settings or the Start menu.
What happens when you uninstall a program?
Uninstallation is the process of removing a program or an app from your system. While apps are installed singularly with all dependencies available to them in a sandbox, programs operate differently. Programs usually have scheduled tasks, customized registry values to execute them, and dependencies for various Windows features and extensions that they need for their own installation process to create and place every file and task correctly.
Hence the removal process for all these things created by a program when it is first installed on your system is called uninstallation. All scheduled tasks, registered services, registry keys, executables, temporary files, log files, and more are removed once you uninstall a program from your system. In some cases, you will be leftover with settings and save files so that you don’t have to set up the program entirely when installing it in the future.
These files can be cleared by clearing your Windows Cache and temporary files in most cases. However, if you still suspect leftover files from a program on your system, then we recommend checking the following places for any leftover files. If found, you can simply delete them like any other file on your system.
- /Documents
- C:\Program Files (x86)\Common Files
- C:\Program Files\Common Files
- C:\ProgramData
- C:\Users\USER\AppData\Local
- C:\Users\USER\AppData\LocalLow
- C:\Users\USER\AppData\Roaming
- C:\Users\USER
How to remove data of uninstalled programs
If you still see the remaining files and folders or context menu options for a removed program or app, then you can try the fixes below to solve your issue.
Method #01: Clear cache and temporary files from Windows
You should first try clearing cache and temporary files from your Windows 11 system. In most cases, this will help the overall File Explorer UI to refresh itself which should automatically remove leftover files and context menu items for removed programs from your system.
You can use this comprehensive guide by us to easily clear your Windows 11 cache and storage. You can also use the same guide to free up storage space on your system as well by deleting other large files and installations that show up in the list.
Method #02: Check for leftover files manually
You can also check and delete all leftover files manually for the removed program or app. You should start by using Windows Search to look for any files or folders associated with the uninstalled program. You can then delete these manually from your local storage.
Once you have deleted all the files and folders that show up in the search, you can proceed to manually check the locations listed below. If they contain any leftover files or folders from the removed program, then you can simply select them and delete them from your system.
- /Documents
- C:\Program Files (x86)\Common Files
- C:\Program Files\Common Files
- C:\ProgramData
- C:\Users\USER\AppData\Local
- C:\Users\USER\AppData\LocalLow
- C:\Users\USER\AppData\Roaming
- C:\Users\USER
Method #03: Run a third-party uninstaller/cleaner
If you are still left with the remaining files and context menus for the program then it is time to use a third-party uninstaller or cleaner. These programs are specifically designed to identify and remove leftover files from previously uninstalled programs on your system. We recommend you give Revo uninstaller a try as even the free model for the app will help you identify the location of leftover files which can then be deleted by you manually. You can also use something like CCleaner that is designed to remove leftover files and free up storage and processing space on your system.
Method #04: Try to remove the app via PowerShell
If nothing works, then chances are that the concerned app was installed on your system using elevated privileges which prevents some files and folders from being removed from your system.
In such cases, we recommend you try to remove the app via PowerShell. You can use our guide above to remove system apps from Windows 11 via PowerShell. You will first need to source the full package name for your app or program, which can then be used to force uninstall it from your system.
Can you uninstall Windows Updates?
Yes you can easily uninstall Windows Update from your system. New updates can often introduce compatibility issues on older hardware and having the option to uninstall updates can always help. You can use the guide below to uninstall recently installed updates from your system.
How to uninstall Windows Updates
Follow the guide below to uninstall recently installed Windows Updates from your Windows 11 system.
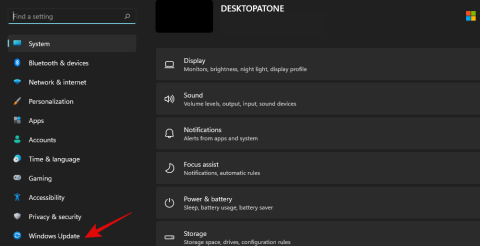
Press Windows + i on your keyboard to open the Settings app. Click on ‘Windows Update’ on your left.
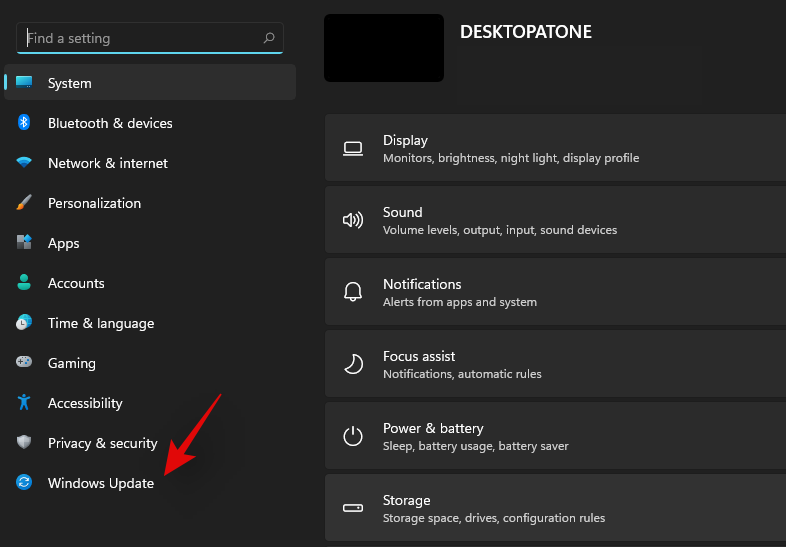
Now click on ‘Update history’.
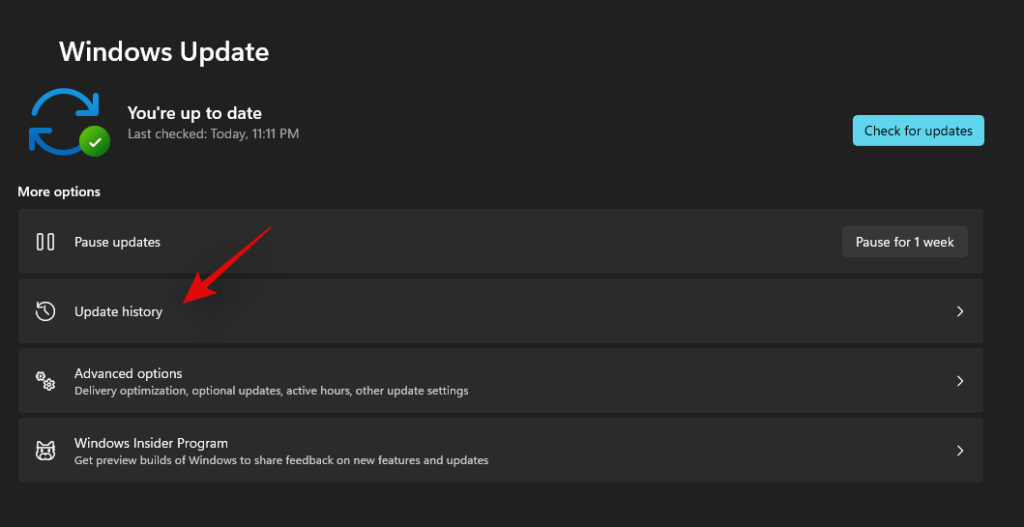
Scroll to the bottom on your right and click on ‘Uninstall Updates’.
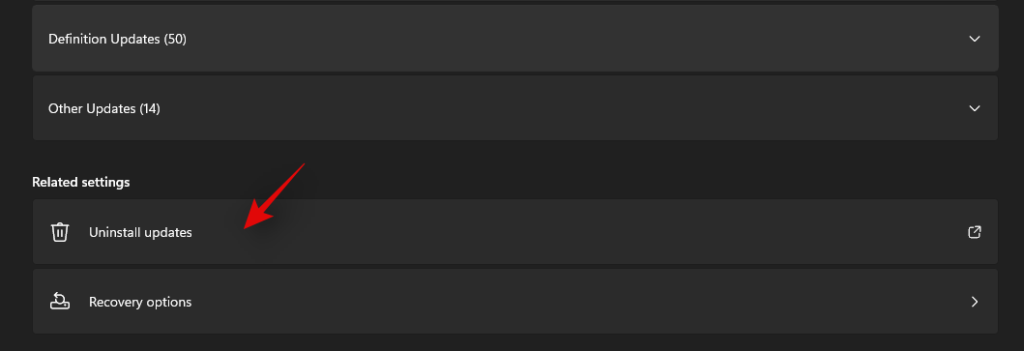
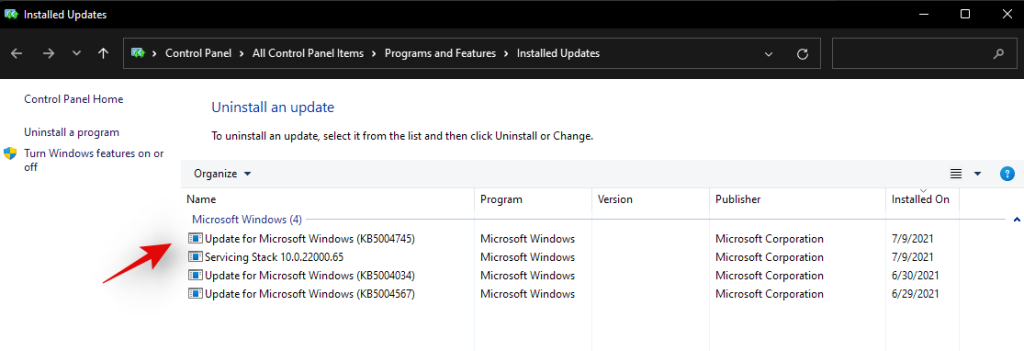
You will now get a list of all the recent updates installed on your system. Click and select the update you wish to uninstall.
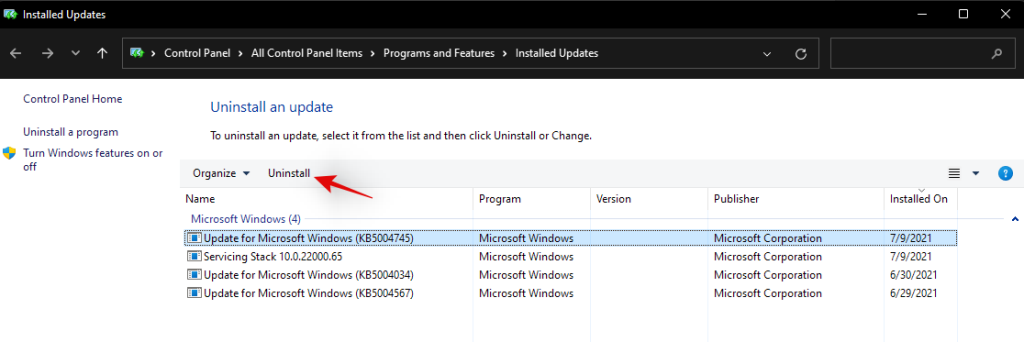
Click on ‘Uninstall’ at the top now.
Follow the on-screen instructions to complete the process.
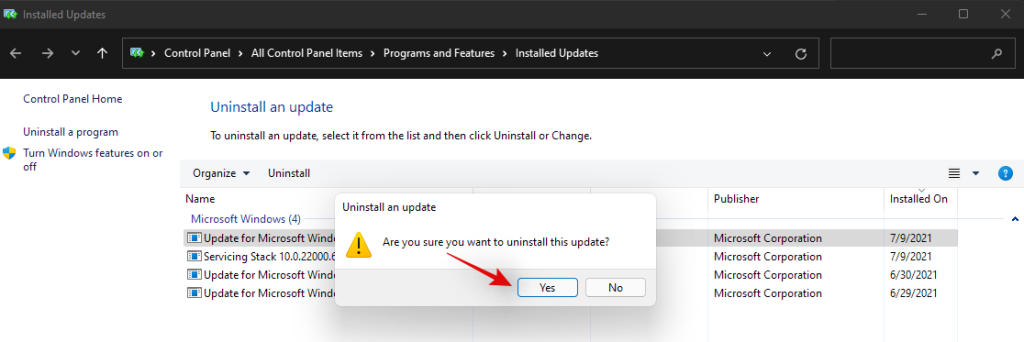
And that’s it! Your selected Windows update should now be uninstalled from your system.
We hope this guide helped you uninstall the concerned apps or programs from your system. If you still face issues, feel free to reach out to us using the comments section below.





![Πώς να απεγκαταστήσετε το McAfee στα Windows 11 [5 τρόποι] Πώς να απεγκαταστήσετε το McAfee στα Windows 11 [5 τρόποι]](https://blog.webtech360.com/resources8/images31/image-4917-0105182719945.png)
Dimitris_Soft -
Αρχικά, ήμουν άσχετος με τα Windows 11, αλλά το άρθρο αυτό με βοήθησε να κατανοήσω πώς να διαγράψω ανεπιθύμητες εφαρμογές.
Μιχάλης -
Συμφωνώ απολύτως! Πρέπει να είμαστε καθαροί από αυτές τις εφαρμογές μετά την απεγκατάσταση. Είναι αναγκαίο να έχουμε ένα γρήγορο σύστημα
Αλέξανδρος -
Ρώτησα τον φίλο μου και μου είπε να χρησιμοποιήσω το CCleaner. Είναι καλό; Μπορεί να βοηθήσει με αυτές τις εφαρμογές;
Αναστασία -
Μπορείτε να προσθέσετε περισσότερες λεπτομέρειες για την απεγκατάσταση εφαρμογών μέσω του PowerShell; Είναι πολύ χρήσιμο εργαλείο για προχωρημένους χρήστες
Κώστας -
Είναι υπέροχο να βλέπεις άρθρα που βοηθούν τους χρήστες. Πραγματικά καλό έργο! Οι εφαρμογές μη χρησιμότητας είναι εντελώς αναγκαίο να φύγουν
Κατερίνα -
Ίσως το επόμενο άρθρο να είναι για το πώς να καθαρίσουμε το σύστημα από υπολείμματα εφαρμογών που έχουν απεγκατασταθεί. Αυτό θα ήταν πολύ χρήσιμο
Θεόδωρος -
Μπράβο! Η διαδικασία είναι πιο εύκολη από ό,τι φανταζόμουν. Ήμουν διστακτικός αλλά τελικά τα κατάφερα
Λίνα -
Το να ξέρεις πώς να απεγκαταστήσεις εφαρμογές είναι πολύ βασικό. Άλλοι ίσως να μην γνωρίζουν ότι μπορούν να χρησιμοποιήσουν και το Control Panel
Πέτρος -
Αχ, ευχαριστώ! Είχα μπερδευτεί με την διαδικασία και τώρα νιώθω πολύ καλύτερα. Στην αρχή σκεφτόμουν να κάνω format τον υπολογιστή!
Δημήτρης -
Εγώ έχω το αντίθετο πρόβλημα! Πρέπει να εγκαταστήσω κάποιες εφαρμογές αλλά δεν ξέρω από πού να αρχίσω. Καλή δουλειά πάντως
Αθηνά -
Θεωρώ ότι πρέπει να γίνει καλύτερη ενημέρωση από την Microsoft για τις αλλαγές στο Windows 11. Υπάρχουν πολλά άγνωστα
Ραφαηλία -
Μου φάνηκε ότι οι περισσότερες εφαρμογές που δεν χρειάζομαι έρχονται προεγκατεστημένες. Χρειάζεται να είμαστε πιο προσεκτικοί
Νίκος το Μικρό -
Ωραία το άρθρο! Τελικά βρήκα την φόρμουλα για να απεγκαταστήσω τα "bloatware" που ήρθαν με τον υπολογιστή
Μάκης -
Μόλις απεγκατέστησα κάποιες εφαρμογές που δεν χρειάζομαι πια! Αν δεν ήταν αυτό το άρθρο, δεν θα το είχα κάνει. Ευχαριστώ
Φώτης -
Ειδικά για όσους δεν είναι τεχνολογικά ειδικοί, η διαδικασία αυτή μπορεί να είναι τρομακτική. Χρειάζονται διευκρινίσεις!
Νίκη -
Ευχαριστώ για την υπενθύμιση! Αν και χρησιμοποιώ Windows πολλά χρόνια, μερικές φορές ξεχνάω πού θα βρω αυτά τα πράγματα
Ηλίας123 -
Πολύ χρήσιμο άρθρο! Η διαδικασία απομάκρυνσης εφαρμογών στα Windows 11 είναι διαφορετική από προηγούμενες εκδόσεις και το άρθρο αυτό διευκολύνει πολύ.
Στέλιος -
Εύχομαι να είχα διαβάσει αυτό το άρθρο νωρίτερα! Μερικές εφαρμογές που δεν χρειάζομαι με ενοχλούσαν πάρα πολύ.
Μαρία -
Ίσως είναι καλό να προσθέσετε και κάποιες συμβουλές για να απεγκαταστήσουμε προγράμματα τρίτων. Έχω κάποιες εφαρμογές που δεν μπορώ να τις βρω
Σοφία -
Μου άρεσε πολύ το άρθρο! Ειδικά η συμβουλή για την απεγκατάσταση μέσω του "Settings". Σημαντικό να το θυμόμαστε!
Κωνσταντίνος -
Θα ήθελα να μάθω περισσότερο για την αφαιρετική διαδικασία μέσω των ρυθμίσεων! Υπάρχουν κρυφές επιλογές;
Γιώργος -
Ευχαριστώ για τις πληροφορίες! Πάντα είχα πρόβλημα με την απεγκατάσταση εφαρμογών στα Windows 11 και δεν ήξερα πώς να το κάνω σωστά
Μαρίνα -
Αχ, πόσο σημαντικό είναι να έχουμε σαφήνεια στις οδηγίες αυτές! Συχνά μπερδεύομαι και γι' αυτό έχω κρατήσει πολλές περιττές εφαρμογές
Ελένη-87 -
Θα ήθελα μια αναθεώρηση για την επαναφορά εργοστασιακών ρυθμίσεων. Βοηθάει πραγματικά στην καθαριότητα του υπολογιστή;