Πώς να επαναφέρετε το Instagram σας μετά την απενεργοποίηση;
Ο οδηγός για την επαναφορά του λογαριασμού σας στο Instagram μετά από απενεργοποίηση.
Οι ενημερώσεις των Windows ήταν πάντα μια διαβόητη ενόχληση για πολλούς χρήστες από την εποχή των Windows XP. Ευτυχώς, η παράδοση των ενημερώσεων των Windows έχει βελτιωθεί δραστικά τα τελευταία χρόνια και πολύ λίγες ενημερώσεις λειτουργιών τείνουν να προκαλούν σημαντικά προβλήματα στις μέρες μας.
Μπορείτε να ρυθμίσετε τις παραμέτρους των Windows ώστε να κατεβαίνουν και να ενημερώνονται αυτόματα στο παρασκήνιο, ακόμη και να τα κάνετε επανεκκίνηση κατά τις ώρες που είναι ανενεργές. Όλα αυτά είναι υπέροχα, αλλά τι γίνεται αν εγκατασταθεί μια ενημέρωση που δεν χρειαζόσασταν; Ή τι γίνεται αν λάβετε μια ενημέρωση που υποβαθμίζει την απόδοση του υπολογιστή σας; Λοιπόν, σε αυτήν την περίπτωση, μπορείτε να απεγκαταστήσετε τις ενημερώσεις των Windows στα Windows 11. Αλλά εδώ είναι μερικά πράγματα που πρέπει να έχετε υπόψη πριν απεγκαταστήσετε τις ενημερώσεις από τον υπολογιστή σας Windows 11.
Σχετικό: Πώς να απενεργοποιήσετε τις ενημερώσεις στα Windows 11
Περιεχόμενα
Γιατί να απεγκαταστήσετε τις ενημερώσεις των Windows;
Μπορεί να υπάρχουν πολλοί λόγοι για τους οποίους θέλετε να απεγκαταστήσετε τις ενημερώσεις των Windows, εδώ είναι μερικοί από τους πιο συνηθισμένους. Εάν αντιμετωπίζετε σφάλματα μετά από μια πρόσφατη ενημέρωση των Windows, τότε μπορείτε επίσης να μεταβείτε σε αυτήν τη λίστα.
Σε περίπτωση που αντιμετωπίζετε τέτοια προβλήματα στο σύστημά σας, μπορείτε να δοκιμάσετε να απεγκαταστήσετε την πιο πρόσφατη ενημέρωση των Windows για να προσπαθήσετε να διορθώσετε το πρόβλημά σας.
κι αλλα. Μπορεί να υπάρχουν πολλά ζητήματα που μπορεί να αντιμετωπίσετε κατά την εγκατάσταση μιας νέας ενημέρωσης για τα Windows 11, ειδικά εάν είστε συνδρομητής στο κανάλι beta ή στο εσωτερικό. Σε τέτοιες περιπτώσεις, μπορείτε να προσπαθήσετε να απεγκαταστήσετε τη σχετική ενημέρωση χρησιμοποιώντας τον οδηγό σε αυτήν την ανάρτηση.
Σχετικό: Πώς να ακυρώσετε μια εκκρεμή ενημέρωση των Windows Insider
Είναι ασφαλές να απεγκαταστήσετε τις ενημερώσεις των Windows;
Ναι, εφόσον δεν καταργείτε αναγκαστικά τις ενημερώσεις των Windows με μη αυτόματο τρόπο ή χρησιμοποιείτε ένα παλιό βοηθητικό πρόγραμμα, θα πρέπει να είστε ασφαλείς κατά την απεγκατάσταση των ενημερώσεων των Windows από το σύστημά σας. Ωστόσο, θα πρέπει να έχετε κατά νου ότι η Microsoft χρησιμοποιεί ενημερώσεις των Windows για να παρέχει ενημερώσεις κώδικα ασφαλείας, επείγουσες επιδιορθώσεις και πολλά άλλα για να προστατεύσει το σύστημά σας από τις πιο πρόσφατες απειλές και ευπάθειες ασφαλείας.
Η κατάργηση των ενημερώσεων των Windows θα απεγκαταστήσει επίσης τέτοιες ενημερώσεις κώδικα, οι οποίες με τη σειρά τους θα καταλήξουν να κάνουν το σύστημά σας ευάλωτο σε διαδικτυακές απειλές. Αυτό ισχύει ιδιαίτερα εάν θέλετε να απεγκαταστήσετε πρόσφατες ενημερώσεις ασφαλείας.
Ως εκ τούτου, ενώ είστε ασφαλείς να απεγκαταστήσετε οποιαδήποτε ενημέρωση, συνιστάται να επαναφέρετε τις αλλαγές σας αμέσως μόλις διορθωθεί το σφάλμα. Εάν το σφάλμα ή το σφάλμα σας είναι επίμονο μετά την επανεγκατάσταση της ενημέρωσης, μπορείτε να περιμένετε μέχρι να κυκλοφορήσει μια επόμενη ενημέρωση και επιδιόρθωση από τη Microsoft.
Σχετικά: Πώς να αφαιρέσετε το Bing από τα Windows 11
Πώς να βρείτε τις ενημερώσεις που θέλετε να καταργήσετε
Μπορούμε να καταργήσουμε ενημερώσεις χρησιμοποιώντας διάφορες μεθόδους, αλλά για να βρείτε ποια ενημέρωση θέλετε να καταργήσετε, πρέπει να την αναγνωρίσετε στον υπολογιστή σας. Σε κάθε ενημέρωση της Microsoft εκχωρείται ένας αριθμός KB που βοηθά στον προσδιορισμό και την αναγνώριση της ενημέρωσης σε υπολογιστές καταναλωτών καθώς και στους διακομιστές της Microsoft. Μπορούμε να χρησιμοποιήσουμε αυτόν τον αριθμό προς όφελός μας και να αφαιρέσουμε τη σχετική ενημέρωση από το σύστημά σας χρησιμοποιώντας έναν από τους παρακάτω οδηγούς. Δείτε πώς μπορείτε να αναγνωρίσετε τις πρόσφατες ενημερώσεις των Windows που είναι εγκατεστημένες στον υπολογιστή σας.
Μέθοδος #01: Χρήση ρυθμίσεων
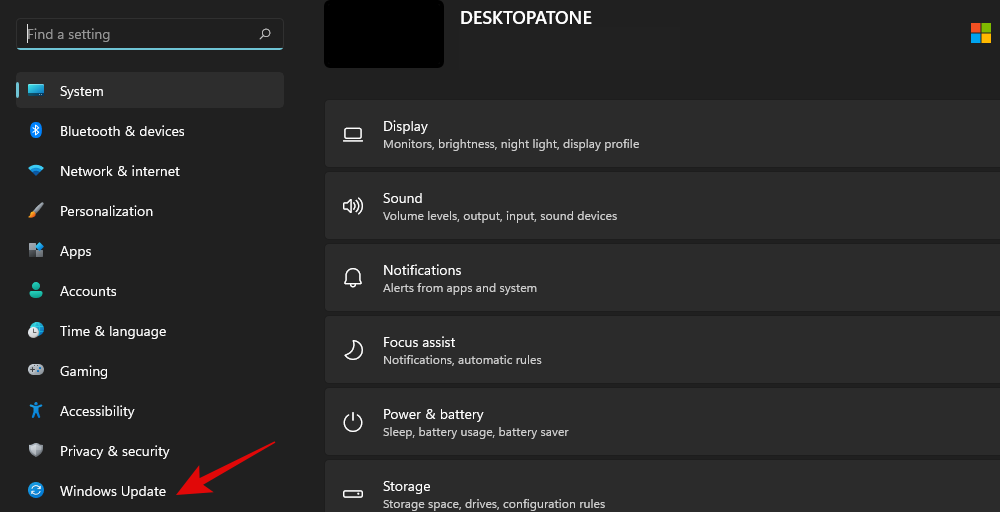
Πατήστε Windows + iστο πληκτρολόγιό σας και επιλέξτε 'Windows update' στα αριστερά σας.
Κάντε κλικ στο «Ενημέρωση ιστορικού» τώρα.
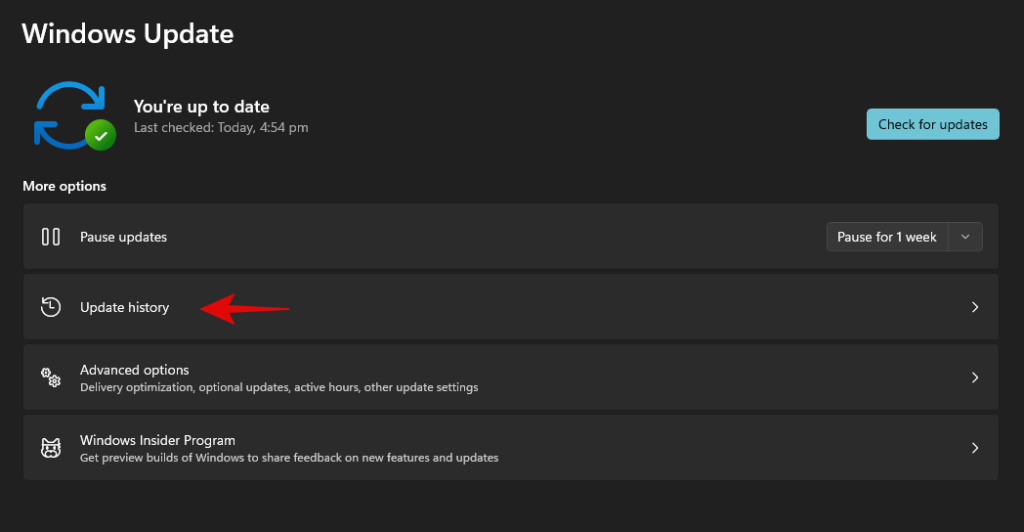
Θα λάβετε τώρα μια λίστα με πρόσφατα εγκατεστημένες ενημερώσεις των Windows στο σύστημά σας.
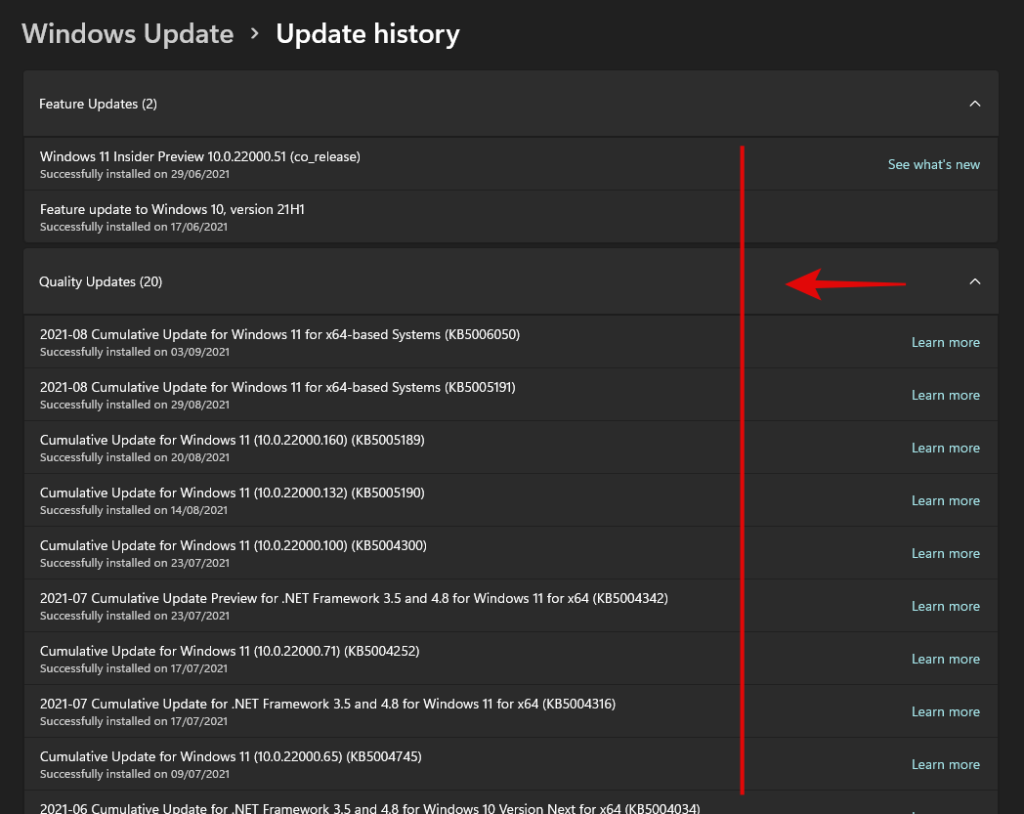
Απλώς σημειώστε τον αριθμό KB της ενημέρωσης που θέλετε να αφαιρέσετε από τον υπολογιστή σας.
Μέθοδος #02: Χρήση CMD
Πατήστε Windows + Sστο πληκτρολόγιό σας και αναζητήστε CMD. Κάντε κλικ στο «Εκτέλεση ως διαχειριστής» μόλις εμφανιστεί η εφαρμογή στα αποτελέσματα αναζήτησής σας.
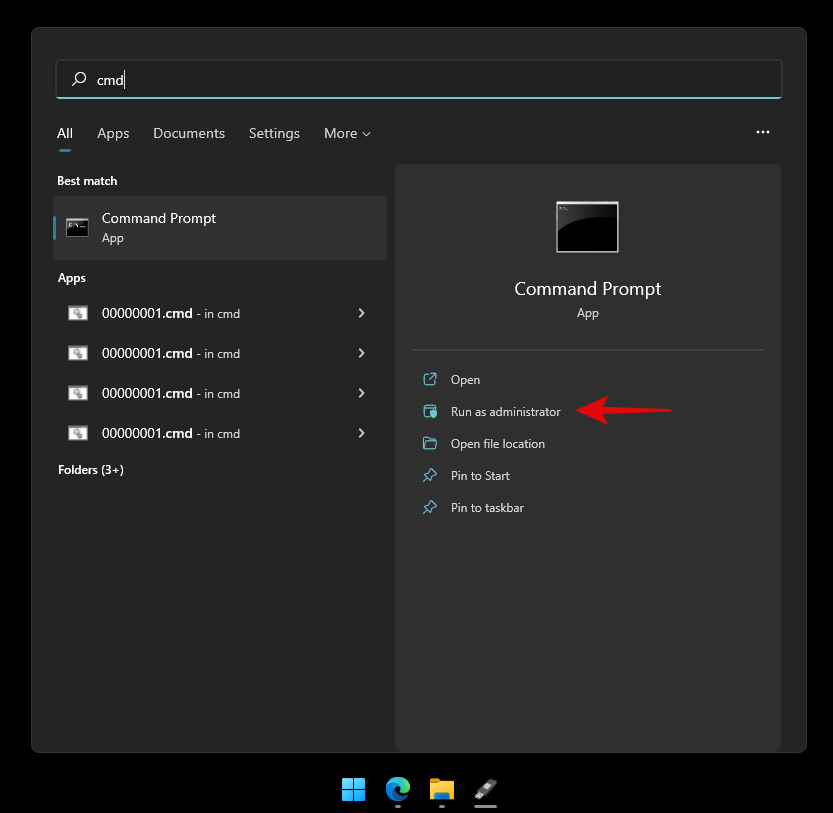
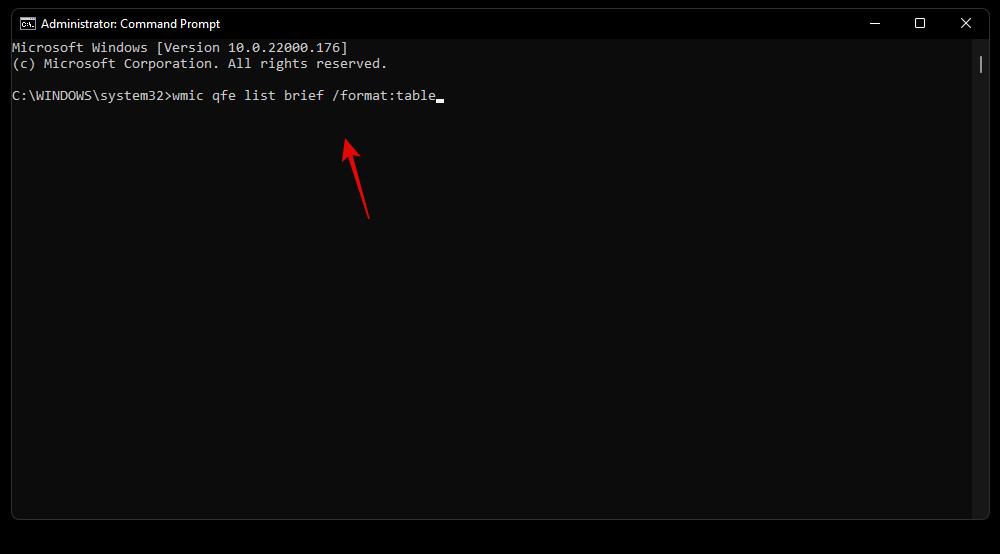
Πληκτρολογήστε την παρακάτω εντολή και πατήστε Enter στο πληκτρολόγιό σας.
wmic qfe list brief /format:table
Θα λάβετε τώρα μια λίστα με όλες τις πρόσφατες ενημερώσεις των Windows που είναι εγκατεστημένες στον υπολογιστή σας. Κάντε κλικ και αναπτύξτε τη σχετική κατηγορία από την παρακάτω λίστα.
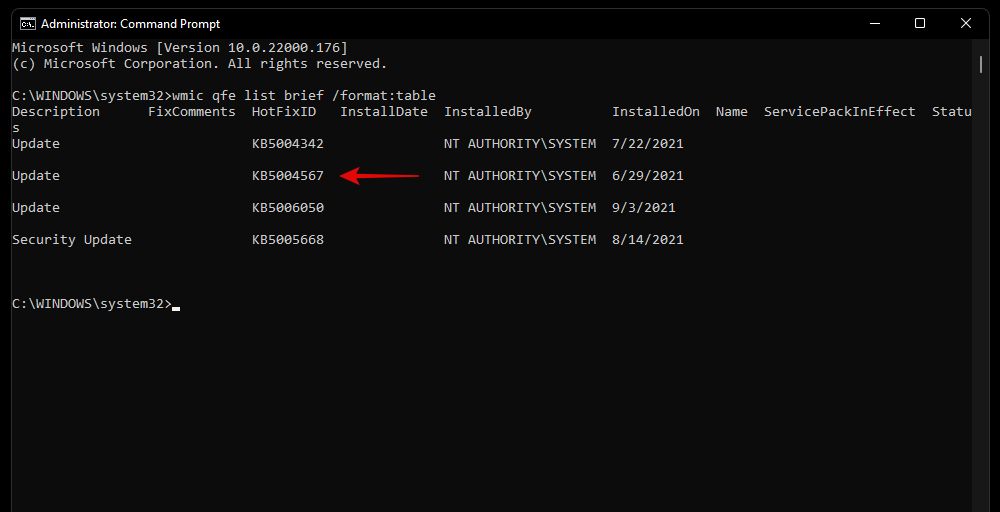
Προσδιορίστε την ενημέρωση που θέλετε να καταργήσετε και σημειώστε το "HotFixID" της. Θα χρησιμοποιήσουμε αυτό το αναγνωριστικό για να καταργήσουμε τη σχετική ενημέρωση χρησιμοποιώντας τον παρακάτω οδηγό.
Πώς να αφαιρέσετε τις ενημερώσεις των Windows από τον υπολογιστή σας
Μπορείτε να αφαιρέσετε τις ενημερώσεις των Windows από τον υπολογιστή σας χρησιμοποιώντας μία από τις παρακάτω μεθόδους. Εάν είστε κλειδωμένοι εκτός των Windows ή δεν μπορείτε να κάνετε εκκίνηση στην επιφάνεια εργασίας σας, συνιστούμε να χρησιμοποιήσετε τη μέθοδο Windows RE ή τη μέθοδο CMD. Εάν έχετε πρόσβαση στην επιφάνεια εργασίας σας, μπορείτε να χρησιμοποιήσετε την εφαρμογή Ρυθμίσεις για να αφαιρέσετε εύκολα ενημερώσεις από το σύστημά σας. Χρησιμοποιήστε τους παρακάτω οδηγούς για να ξεκινήσετε ανάλογα με τις προτιμήσεις σας.
Μέθοδος #01: Χρήση ρυθμίσεων
Πατήστε Windows + iτο πληκτρολόγιό σας και κάντε κλικ στην «Ενημέρωση των Windows» στην αριστερή πλαϊνή γραμμή.

Κάντε κλικ στο «Ενημέρωση ιστορικού».

Κάντε κύλιση προς τα κάτω και κάντε κλικ στο «Κατάργηση εγκατάστασης ενημερώσεων».
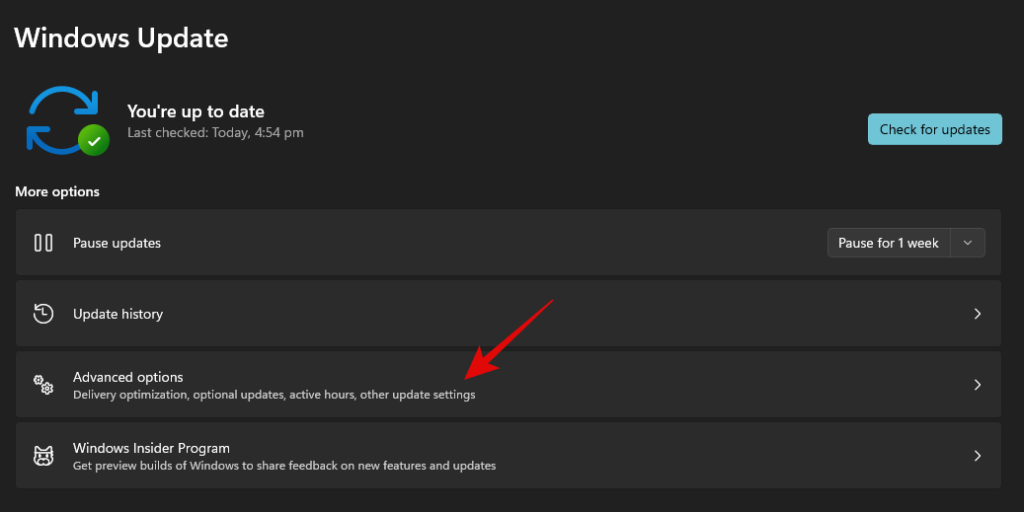
Τώρα θα ανακατευθυνθείτε στον Πίνακα Ελέγχου όπου θα βρείτε μια λίστα με πρόσφατες ενημερώσεις που μπορούν να αφαιρεθούν από το σύστημά σας.

Επιλέξτε την ενημέρωση που θέλετε να καταργήσετε και κάντε κλικ στο «Κατάργηση εγκατάστασης» στο επάνω μέρος.

Ακολουθήστε τις οδηγίες που εμφανίζονται στην οθόνη για να απεγκαταστήσετε τη σχετική ενημέρωση από τον υπολογιστή σας.
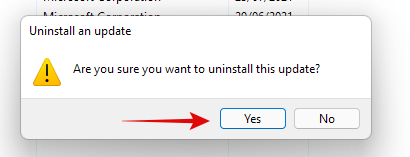
Τώρα μπορείτε να επανεκκινήσετε τον υπολογιστή σας και τυχόν προβλήματα που αντιμετωπίζατε λόγω της ενημέρωσης θα πρέπει τώρα να διορθωθούν.
Μέθοδος #02: Χρήση του προγράμματος αντιμετώπισης προβλημάτων ενημέρωσης των Windows
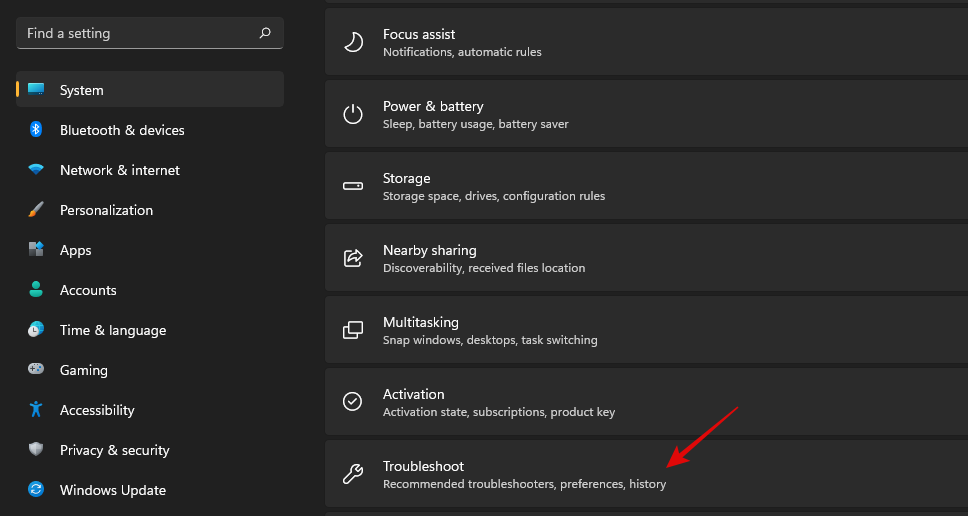
Πατήστε Windows + iστο πληκτρολόγιό σας και κάντε κλικ στο «Αντιμετώπιση προβλημάτων».
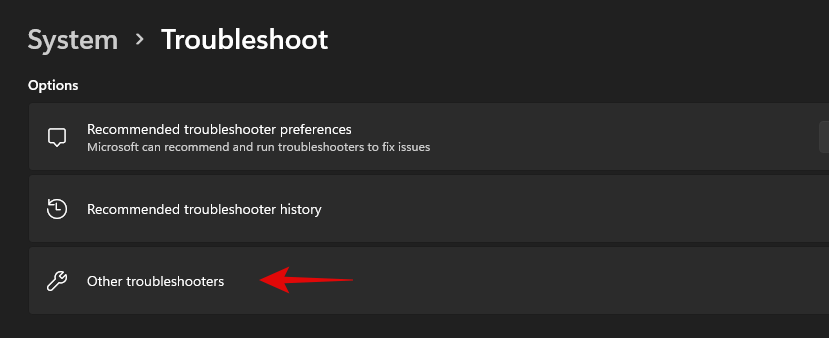
Κάντε κλικ στην επιλογή "Άλλα εργαλεία αντιμετώπισης προβλημάτων".
Κάντε κλικ στο «Εκτέλεση» δίπλα στο Windows Update.
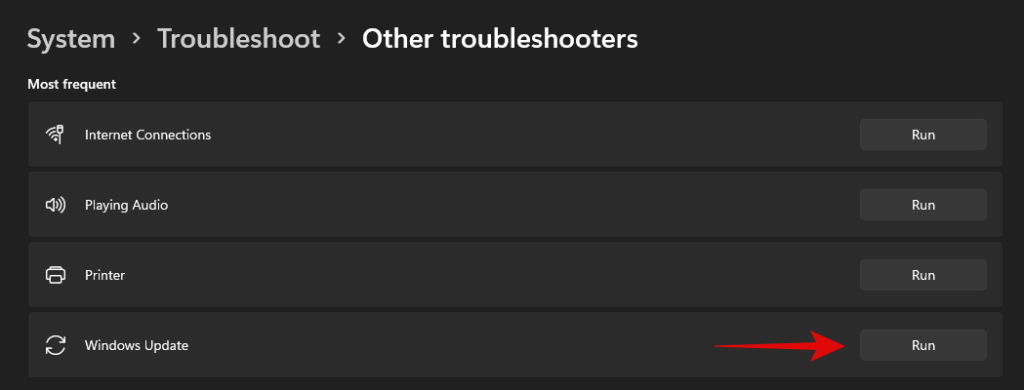
Το εργαλείο αντιμετώπισης προβλημάτων των Windows θα αναζητά πλέον προβλήματα με και που προκαλούνται από τις Ενημερώσεις των Windows στον υπολογιστή σας. Εάν εντοπιστεί κάποιο, το εργαλείο αντιμετώπισης προβλημάτων θα επιλύσει αυτόματα το πρόβλημα. Εάν διαπιστωθεί ότι μια πρόσφατη ενημέρωση είναι ο ένοχος, το εργαλείο αντιμετώπισης προβλημάτων θα σας δώσει την επιλογή να επιλέξετε και να απεγκαταστήσετε το απαραίτητο Windows Update. Ακολουθήστε τις επόμενες οδηγίες στην οθόνη για να καταργήσετε εντελώς την ενημέρωση.
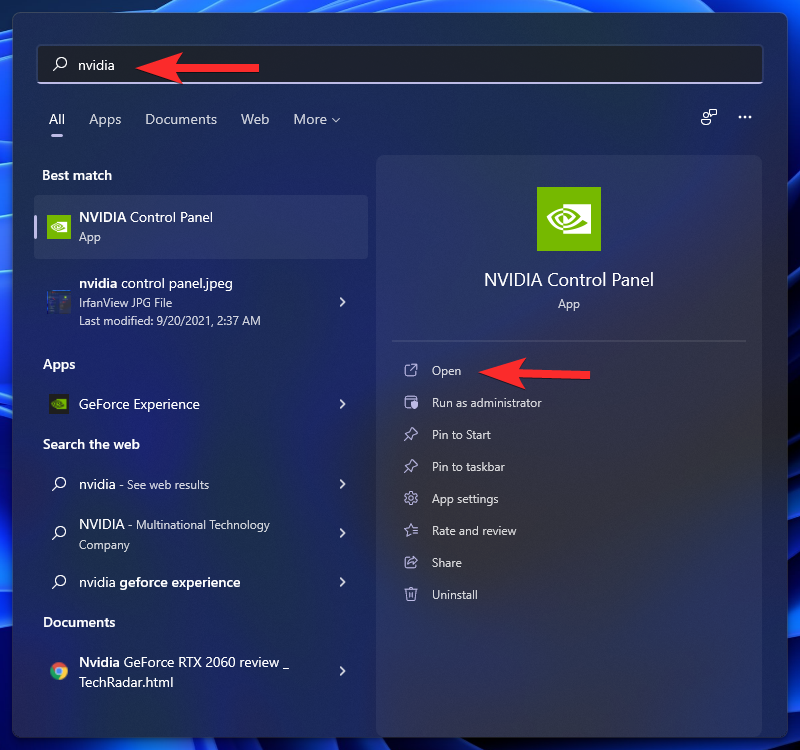
Μόλις τελειώσετε, κάντε κλικ στο «Κλείσιμο».
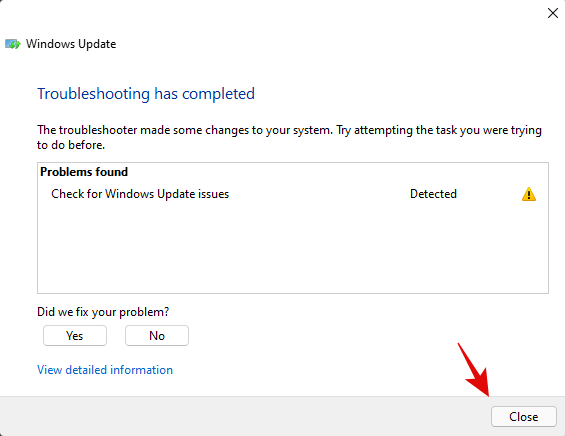
Κάντε επανεκκίνηση του υπολογιστή σας για καλή μέτρηση και το πρόβλημα θα πρέπει τώρα να διορθωθεί σε αυτό το σημείο. Εάν όχι, μπορείτε να χρησιμοποιήσετε την παρακάτω μέθοδο PowerShell για να απεγκαταστήσετε με μη αυτόματο τρόπο το επιθυμητό Windows Update από το σύστημά σας.
Μέθοδος #03: Χρήση PowerShell ή CMD
Πατήστε Windows + Sστο πληκτρολόγιό σας και αναζητήστε το PowerShell. Κάντε κλικ στο «Εκτέλεση ως διαχειριστής» μόλις εμφανιστεί η εφαρμογή στα αποτελέσματα αναζήτησής σας.
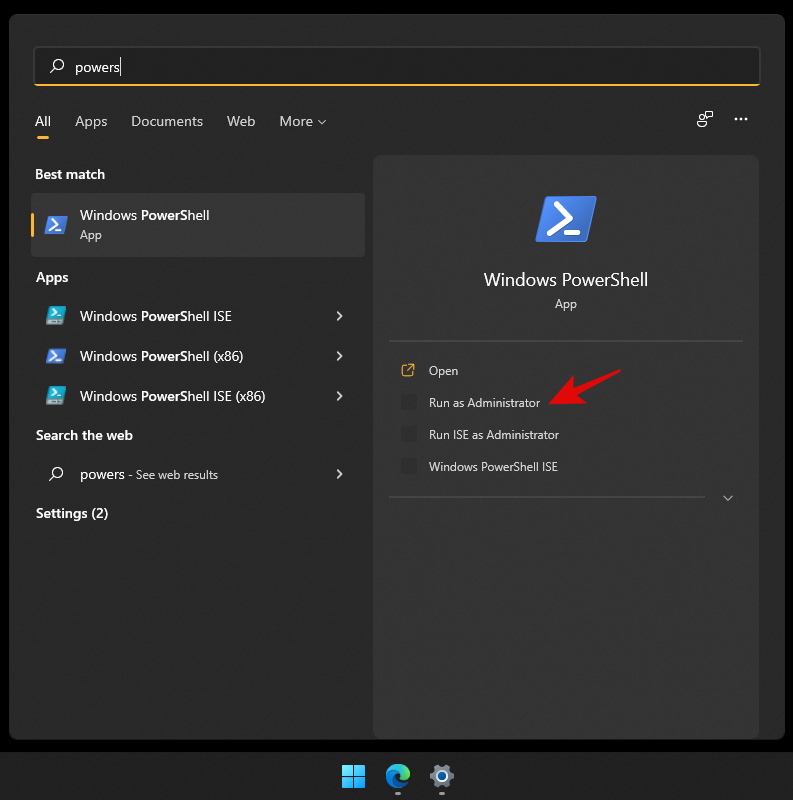
Πληκτρολογήστε την παρακάτω εντολή και πατήστε Enter στο πληκτρολόγιό σας για να την εκτελέσετε.
wmic qfe list brief /format:table

Θα λάβετε τώρα μια λίστα με όλες τις πρόσφατα εγκατεστημένες ενημερώσεις των Windows στο σύστημά σας σε μορφή πίνακα. Σημειώστε τον αριθμό KB για το επιλεγμένο Windows Update.
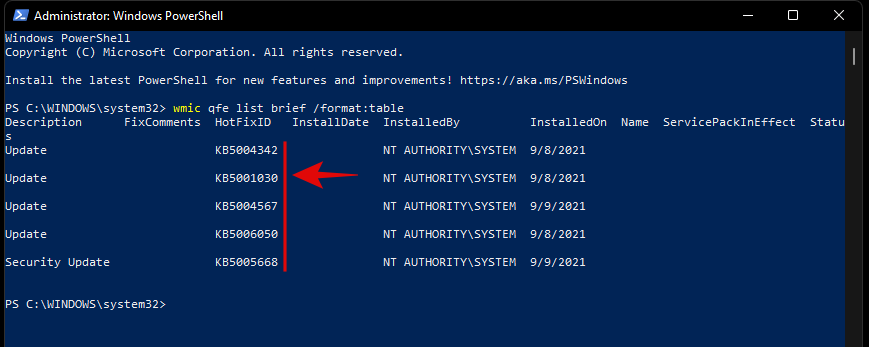
Σημείωση: Χρειάζεστε μόνο τον αριθμό και όχι τα γράμματα πριν από αυτόν.
Μόλις τελειώσετε, πληκτρολογήστε την παρακάτω εντολή και εκτελέστε την. Αντικαταστήστε το "NUMBER" με τον αριθμό KB που σημειώσατε νωρίτερα.
wusa /uninstall /kb:NUMBER
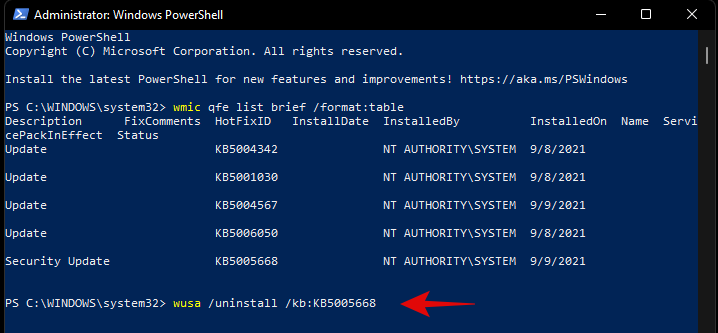
Μόλις σας ζητηθεί, επιβεβαιώστε την επιλογή σας.
Εάν σας ζητηθεί επανεκκίνηση, συνιστούμε να επανεκκινήσετε το σύστημά σας το νωρίτερο, ενώ αποθηκεύετε την εργασία σας στο παρασκήνιο.
Εάν, ωστόσο, δεν επιθυμείτε να λαμβάνετε επιβεβαιώσεις πριν από την απεγκατάσταση και την επανεκκίνηση, τότε μπορείτε να χρησιμοποιήσετε την παρακάτω εντολή.
wusa /uninstall /kb:NUMBER /quiet
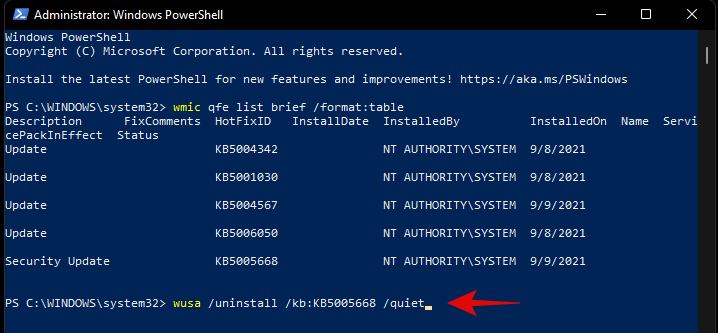
Αν και η παραπάνω εντολή δεν θα σας ζητήσει επιβεβαιώσεις, θα περιμένει να κλείσουν κανονικά οι εφαρμογές σας στο παρασκήνιο. Αν θέλετε να κλείσετε αναγκαστικά τις εφαρμογές σας και να επανεκκινήσετε αμέσως το σύστημά σας, τότε μπορείτε να χρησιμοποιήσετε την εντολή που δίνεται παρακάτω.
wusa /uninstall /kb:NUMBER /quiet /forcerestart
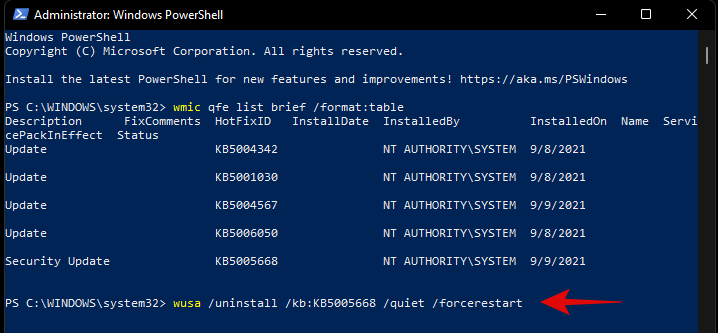
Στη συνέχεια, εάν θέλετε μόνο να επιβεβαιώσετε μια επανεκκίνηση, τότε μπορείτε να χρησιμοποιήσετε την παρακάτω εντολή.
wusa /uninstall /kb:NUMBER /quiet /promptrestart
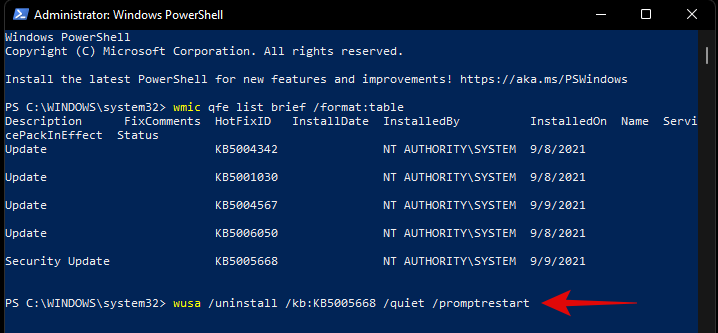
Και τέλος! Το προβληματικό Windows Update θα πρέπει τώρα να απεγκατασταθεί από τον υπολογιστή σας.
Μέθοδος #04: Από τα Windows RE
Το Windows Recovery Environment σάς επιτρέπει επίσης να απεγκαταστήσετε ενημερώσεις σε διένεξη. Χρησιμοποιήστε τον παρακάτω οδηγό για να ξεκινήσετε. Εάν αντιμετωπίζετε ένα BSOD και βρίσκεστε ήδη στο Περιβάλλον Ανάκτησης, τότε μπορείτε να παραλείψετε τα πρώτα βήματα αυτού του οδηγού.
Πατήστε Windows + iστο πληκτρολόγιό σας και επιλέξτε Windows Update από τα αριστερά σας.
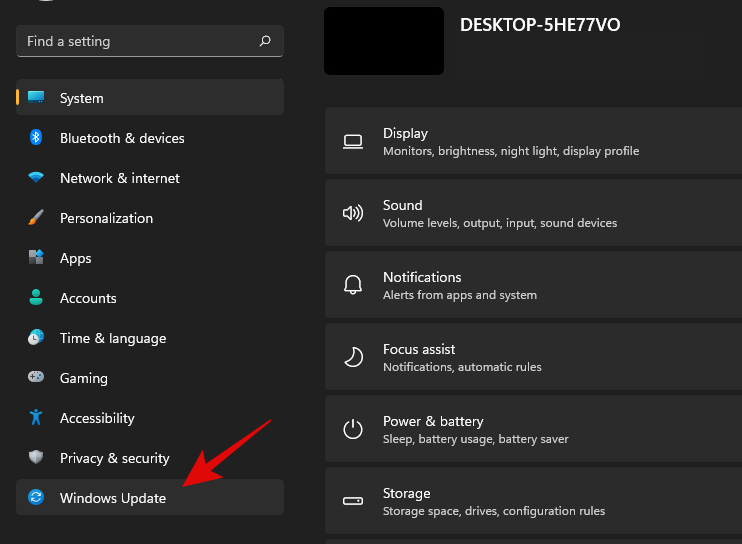
Κάντε κλικ στις «Σύνθετες επιλογές» τώρα.
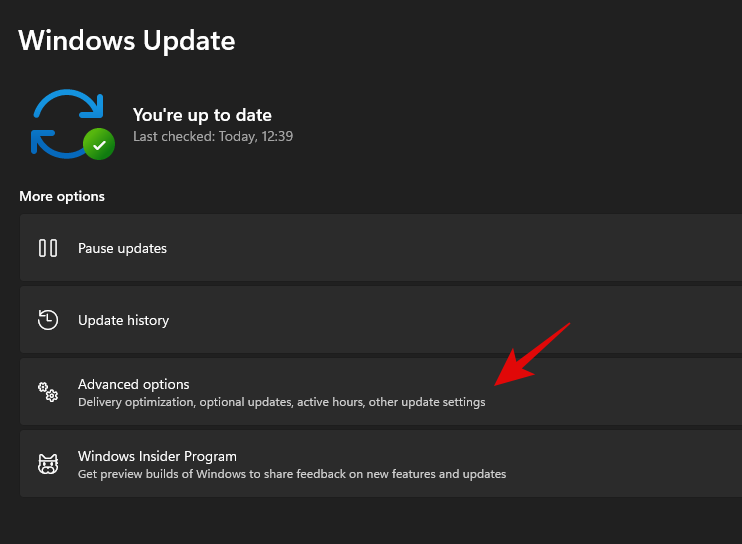
Επιλέξτε «Ανάκτηση».
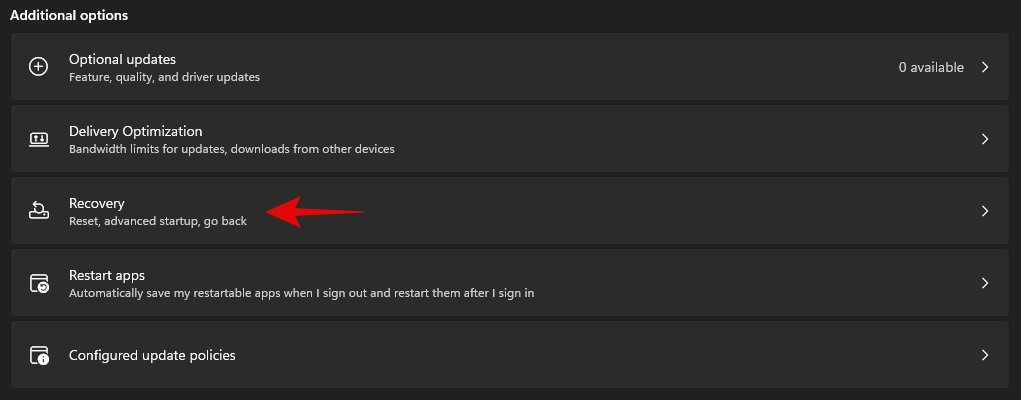
Click on ‘Restart now’ beside Advanced Startup.

You will now boot into the recovery environment. Click on ‘Troubleshoot’.
Now click on ‘Advanced Options’.
Select ‘Uninstall updates’.
Click and select the type of update you wish to install from the options on your screen.
Note: In case you are confused, feature updates refer to major updates to your Windows system that include new features, updated integrations, and sometimes new UI. Quality updates on the other hand encompass everything else including Security updates, Driver updates, Intelligence updates, Telemetry updates, and more.
Click on your administrator account and log in with your password.
Click on ‘Uninstall quality/feature’ update to confirm your choice.
Click on ‘Done’ once the process finishes.
Restart your PC and boot into Windows normally. You shouldn’t face any more issues caused by a problematic Windows update.
Method #05: Using DISM
DISM or Deployment Image Servicing and Management tool is an administrative tool within Windows that helps repair your Windows image and even mount images if needed. DISM supports image formats like .wim, .vhd, and more.
The tool can help you fix issues with your Windows installation and even remove problematic Windows updates. If you are looking to remove windows updates using DISM, then you can follow the steps below to get you started.
Note: DISM can be accessed via CMD and thus, you can use this guide from a recovery environment or an installation media as well. Follow the guide above to get CMD working on your lock screen or within Windows Recovery Environment.
Launch CMD and type in the following command. Press Enter on your keyboard once you are done.
dism /online /get-packages /format:table
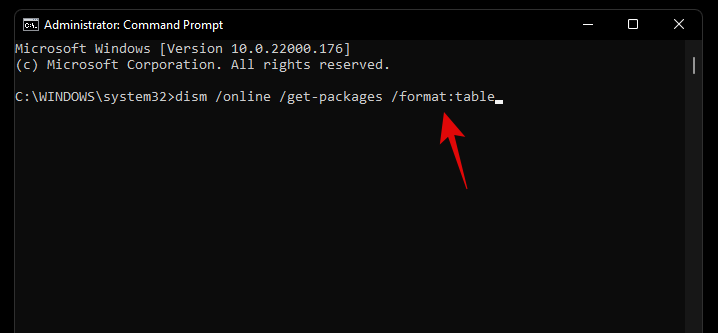
Unlike the WUSA commands we used earlier with PowerShell and CMD, you will need to note down the entire name of the Windows Update package we need to remove. Unfortunately, this includes special characters, spaces, and everything else included in the name. Thankfully you can easily copy the entire name to your clipboard by selecting it with your mouse and then using the keyboard shortcut. Once done, type in the command below and replace NAME with the package name you noted down earlier.
Note: This includes the term ‘Package_for_’ prefixed before some updates.
dism /online /Remove-Package /PackageName:NAME

The selected Windows Update will now be uninstalled from your system. In some cases, you will be prompted to restart your system, type in ‘Y’, and hit Enter on your keyboard to restart your system immediately.
How to stop receiving an update
While removing an update can help you, this does not mean that the broken Windows Update will stop showing up in your Updates section. This can be annoying and if you have automatic updates then you run the risk of automatically installing the problematic update in the background. In all such cases, you can try blocking Windows Updates on your system using the guides below depending on your preferences.
Method #01: Stop OEM driver updates through Windows update
OEM driver updates are delivered through Windows updates as well depending on their importance. Security vulnerabilities and bugs that have been recently found in components like CPU, GPU, or your wireless card, are instantly patched through such updates.
However, if you do not wish to install an OEM driver update provided by Windows update, then you can follow the guide below to block your OEM driver updates.
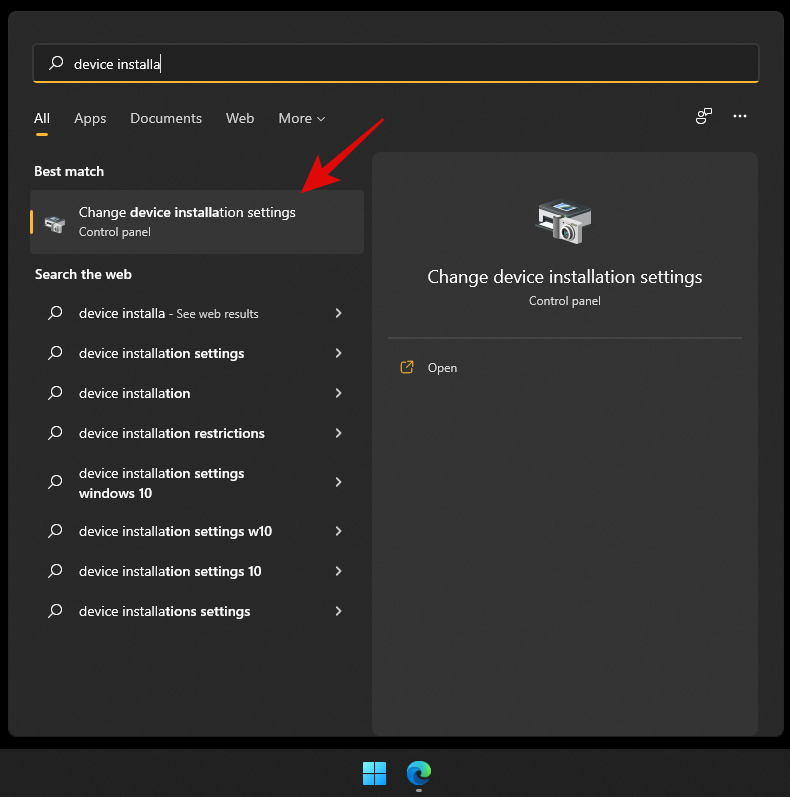
Press Windows + S on your keyboard and search for ‘Change device installation settings’. Click and launch the app from your search results.
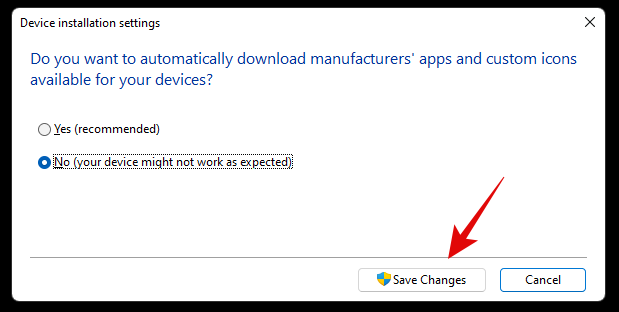
Select ‘No’.
Click on ‘Save changes’.
The changes will now be saved and you will no longer receive OEM driver updates through Windows Update.
Related: 6 Ways to Update Drivers on Windows 11
Method #02: Stop updates for Microsoft products
If you have been receiving constant updates for new Microsoft features and old products that keep messing up your system, then you can use the guide below to disable updates for Microsoft products via Windows Update.
Press Windows + i on your keyboard to open the Settings app and select ‘Windows Update’ from the left sidebar.

Click on ‘Advanced options’.

Now turn off the toggle for ‘Receive updates for other Microsoft products’ at the top.
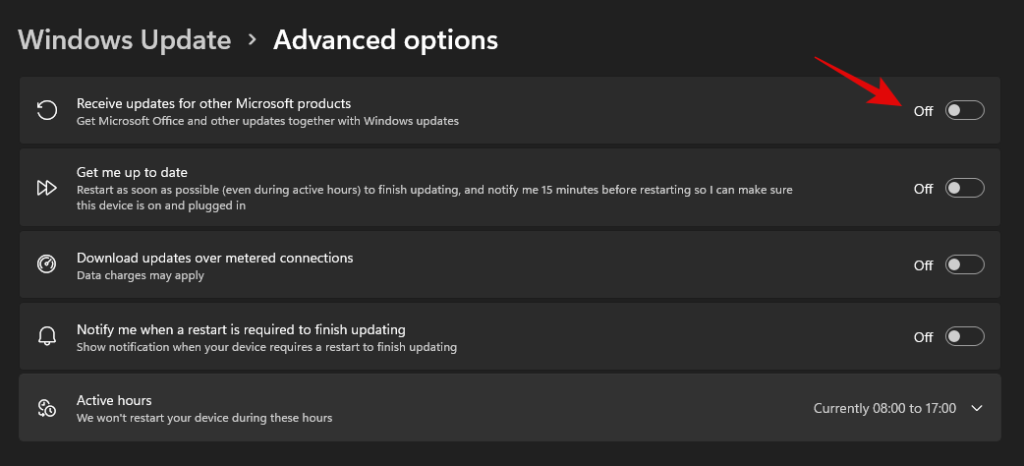
You will no longer receive updates for Microsoft products installed on your system via Windows update.
Method #03: Change active hours for background download and installation for updates
If you’re just looking to dismiss updates so that they don’t interfere with your work hours, then this is the perfect option for you. You can decide when Windows can download and update your PC in the background which will prevent Windows from interfering with your work hours. Follow the guide below to get you started.
Press Windows + i on your keyboard and click on ‘Windows Update’ on your left.

Click on ‘Advanced options’.

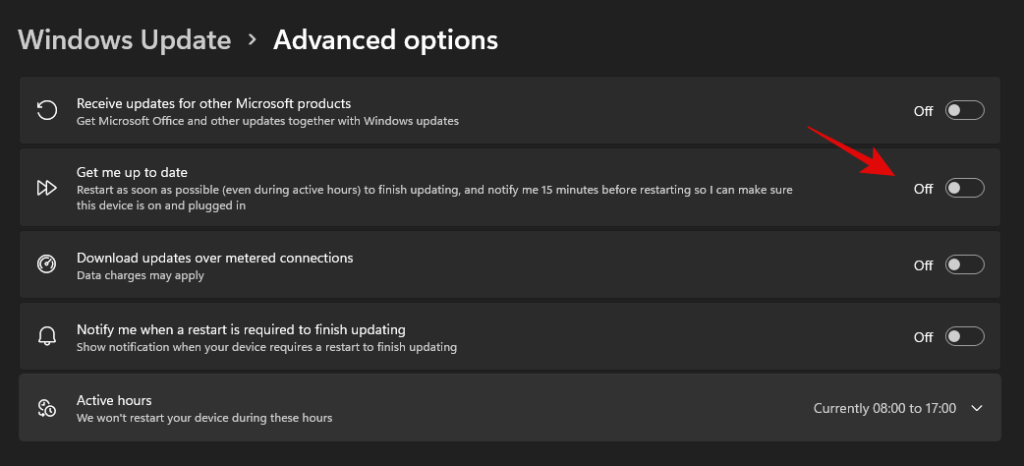
Now turn off the toggle for ‘Get me up to date’.
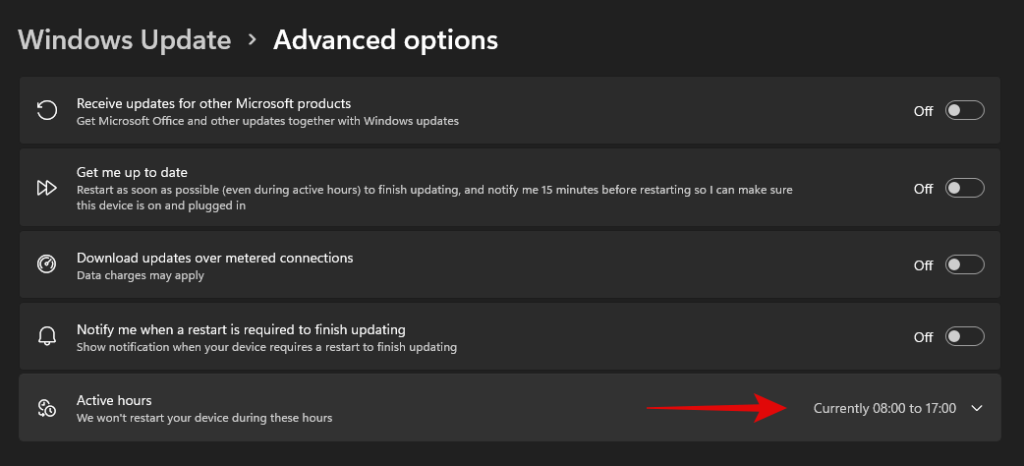
Click on ‘Active hours’.
Click on the drop-down menu and select ‘Manually’.
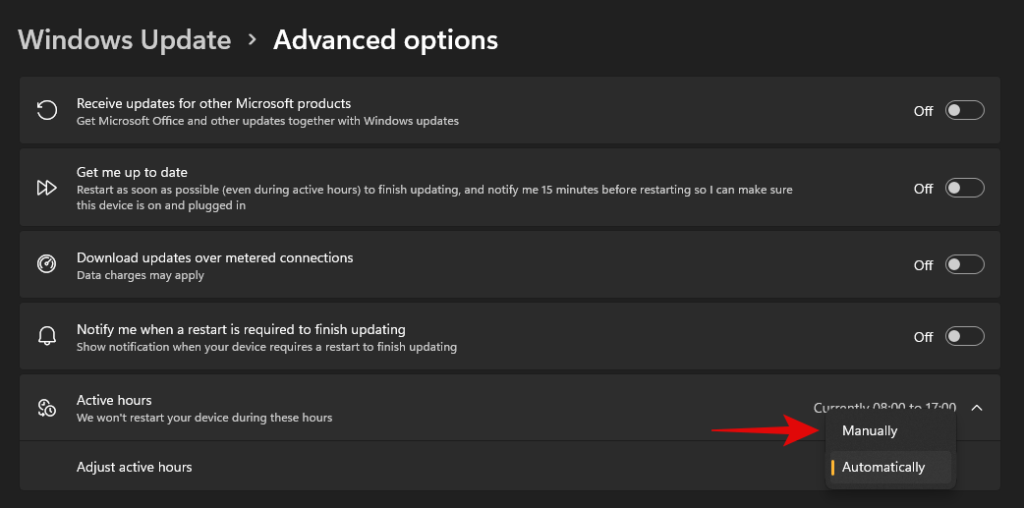
Define your desired start and end time. Windows won’t download updates and restart your PC during these hours.

And that’s it! Active hours should now be enabled for your system.
Method #04: Block Windows updates that you never wish to install
If you are receiving forced Windows updates that you don’t ever wish to install on your system then you can use a dedicated Windows troubleshooter to solve your issue.
This can be helpful in case you are trying to stop an update that disables a certain feature on your system that you don’t want disabled. This could be access to voltage controls, clock speed controls, turbo controls, fan controls, RGB control, and more. Follow the guide below to get you started.
Download the Windows Update Show Hide troubleshooter using the link above and launch it on your PC. Click on ‘Advanced’.
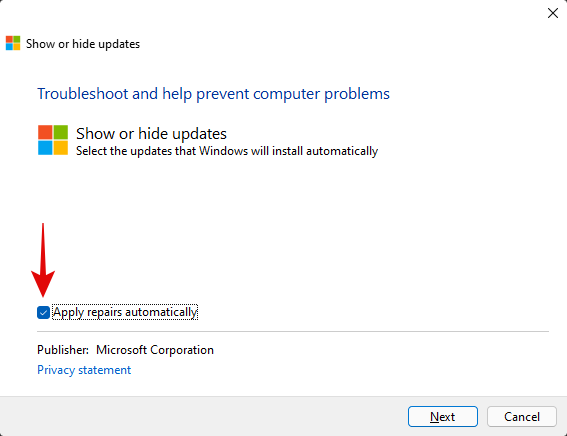
Uncheck the option for ‘Apply repairs automatically’.
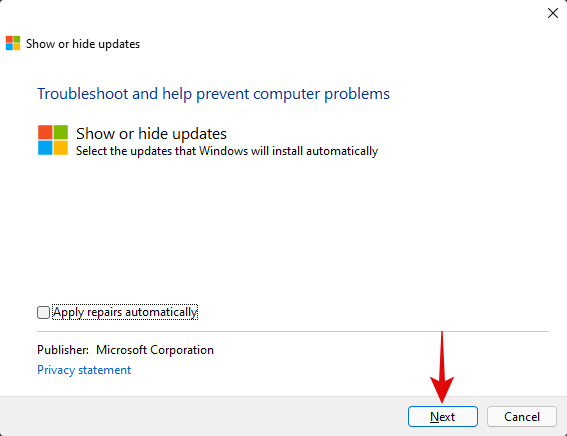
Click on ‘Next’.
The troubleshooter will now look for pending updates and display them on your screen. Click on ‘Hide updates’.
Check the boxes for all the updates you don’t wish to receive on your PC.
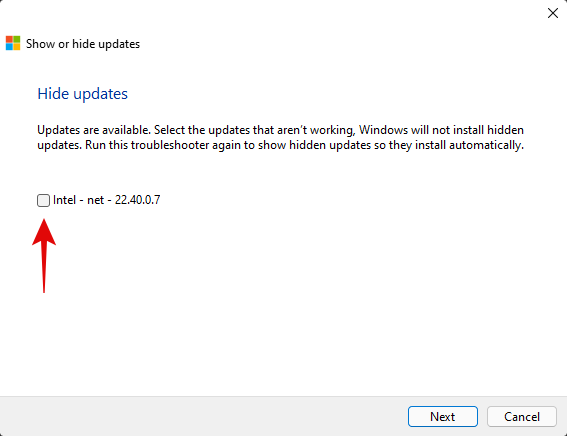
Click on ‘Next’.
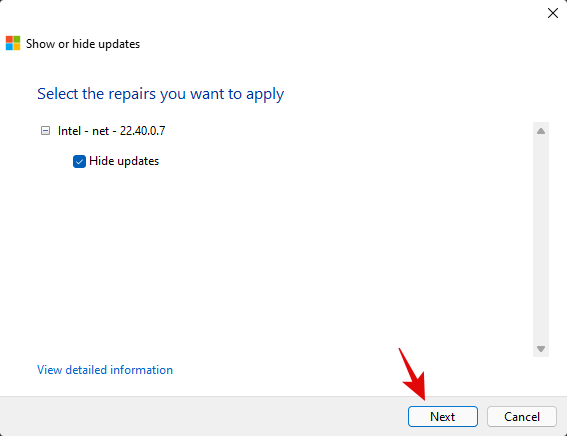
Ensure that ‘Hide updates’ is selected and click on ‘Next’.
The troubleshooter will now hide the necessary Windows updates from your PC which in turn will prevent them from ever being downloaded on your PC. Click on ‘Close’.
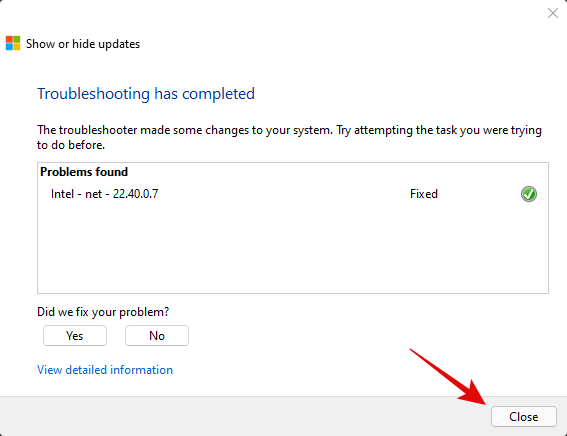
And that’s it! You will now have blocked the necessary updates on Windows 11.
Can you turn off Windows updates?
Yes, you can use certain workarounds and tricks to disable Windows updates on your PC. However, this isn’t recommended as you will lose out on important security patches which would leave you vulnerable to online threats including hackers, malware, adware, and more.
Hence we recommend you keep your PC updated or at least opt to install the latest security updates on your PC. Even if you are losing out on features it’s usually because of a hardware security vulnerability that would compromise your system.
However, if you still wish to disable Windows Updates on your PC, you can use this dedicated guide from us. If you face any issues, feel free to drop a comment.
Can’t uninstall Windows updates? Try these fixes!
If you are unable to install updates on your PC, then you can try the following fixes. However, if you are still unable to uninstall updates then this might indicate an issue with your Windows installation in which case resetting your PC might be the best option.
Follow the guides below to get you started.
Method #01: Reset Windows components and try again
If you have been unable to uninstall updates then you can try resetting your windows components. This will help fix corrupted system files in the background that might be preventing you from uninstalling updates on your system. We will be using a modified script from Mircosoft to help reset all components of Windows 11. The script was originally developed for Windows 10 or higher and hence will need some edits to work properly on Windows 11. This script will perform the following tasks on your system when executed;
Follow the steps below to run the script on your system and reset Windows update components on your PC.
Download the script using the link above to your local storage and extract it to a convenient location. Once extracted right click on the script.
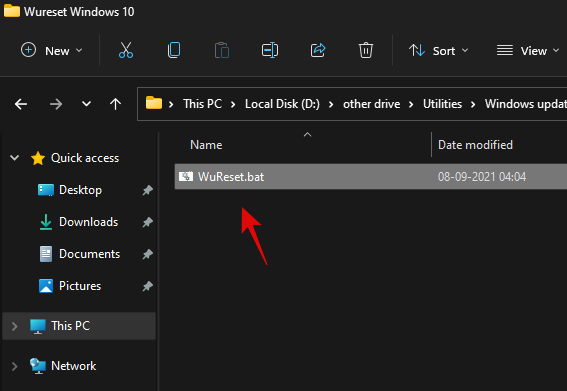
Click on ‘Show more options’.
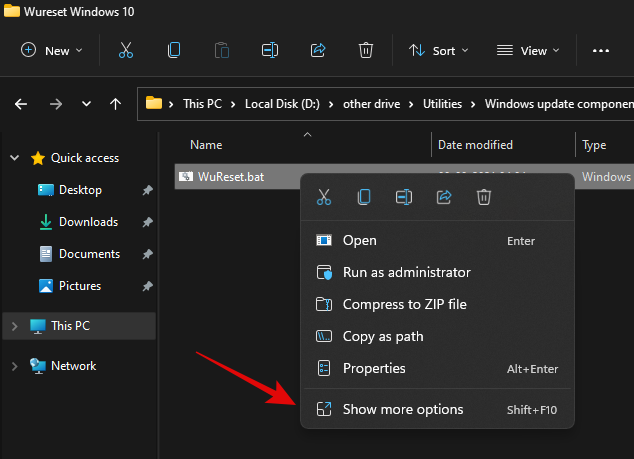
Select ‘Rename’.
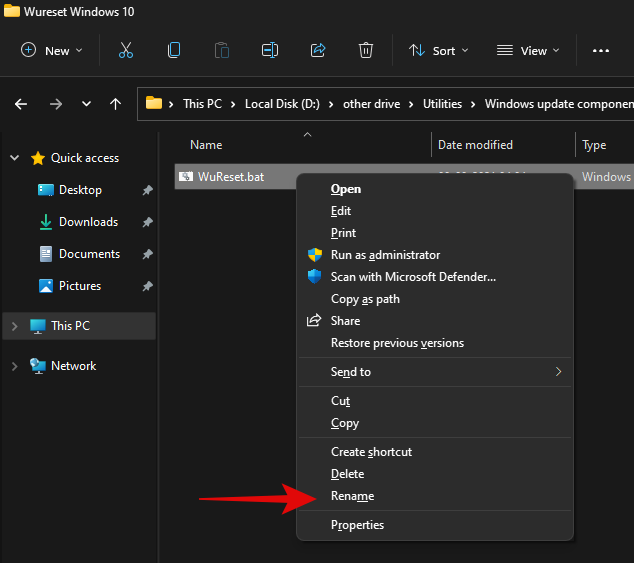
Replace ‘.bat’ with ‘.txt’.
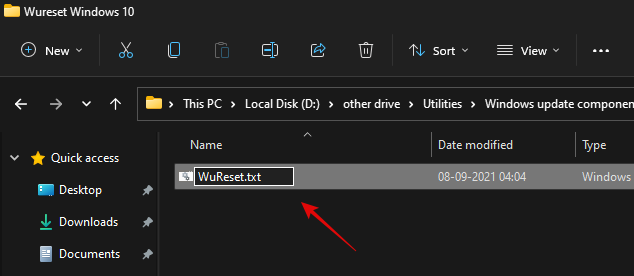
Click on ‘Yes’ to confirm your choice.
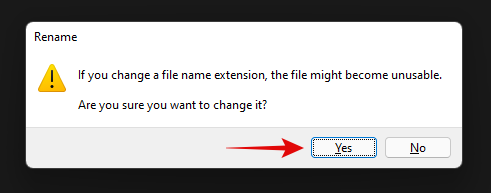
Now double click and open the file and it should open in your notepad. Once opened, scroll to the ‘:Reset’ section for resetting network commands and add the following line after the first delete command as shown below.
del /s /q /f "%SYSTEMROOT%\Logs\WindowsUpdate\*"
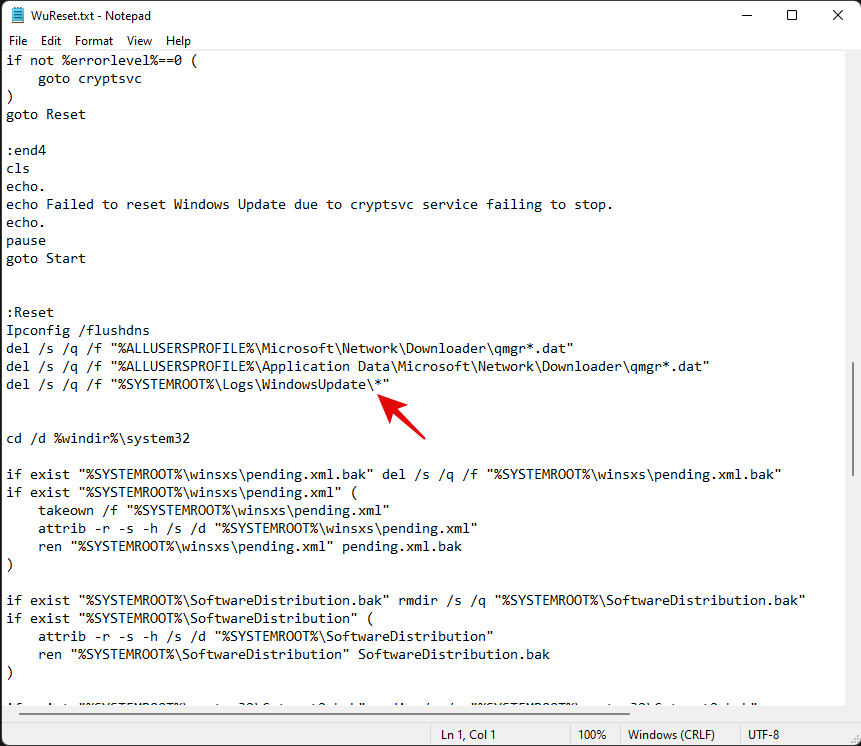
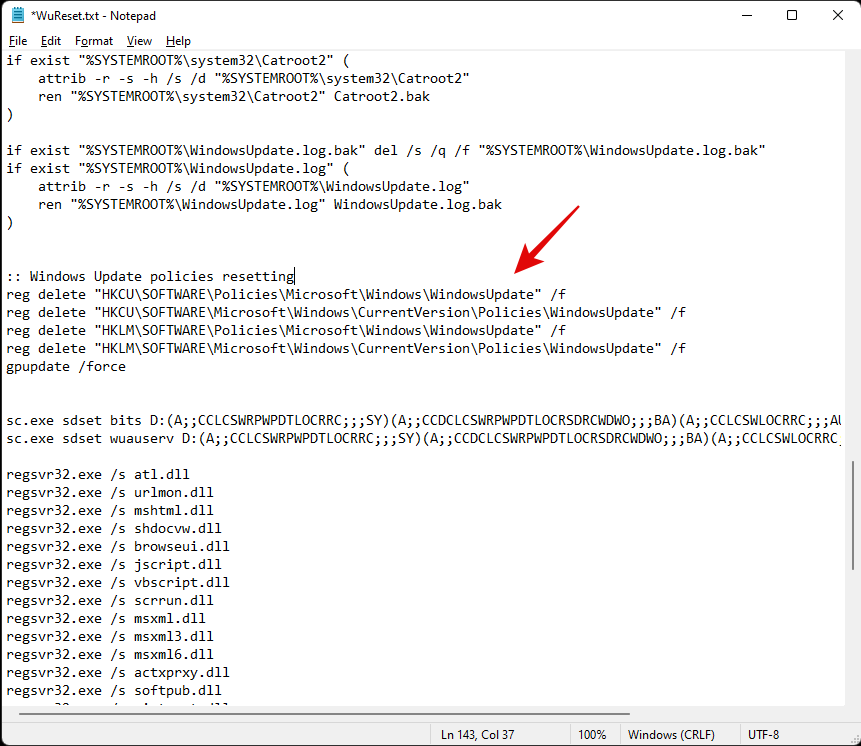
Once added, hit Ctrl + S on your keyboard. Ensure that there are no formatting changes or spaces before or after the line. The file will now be saved on your system along with its recent changes. We will now add some code to Reset Windows’s update policies on your system. Copy the lines below and paste them after your system commands. Ensure that two empty lines are available at either end of the code as shown below.
:: Windows Update policies resetting
reg delete "HKCU\SOFTWARE\Policies\Microsoft\Windows\WindowsUpdate" /f
reg delete "HKCU\SOFTWARE\Microsoft\Windows\CurrentVersion\Policies\WindowsUpdate" /f
reg delete "HKLM\SOFTWARE\Policies\Microsoft\Windows\WindowsUpdate" /f
reg delete "HKLM\SOFTWARE\Microsoft\Windows\CurrentVersion\Policies\WindowsUpdate" /f
gpupdate /force
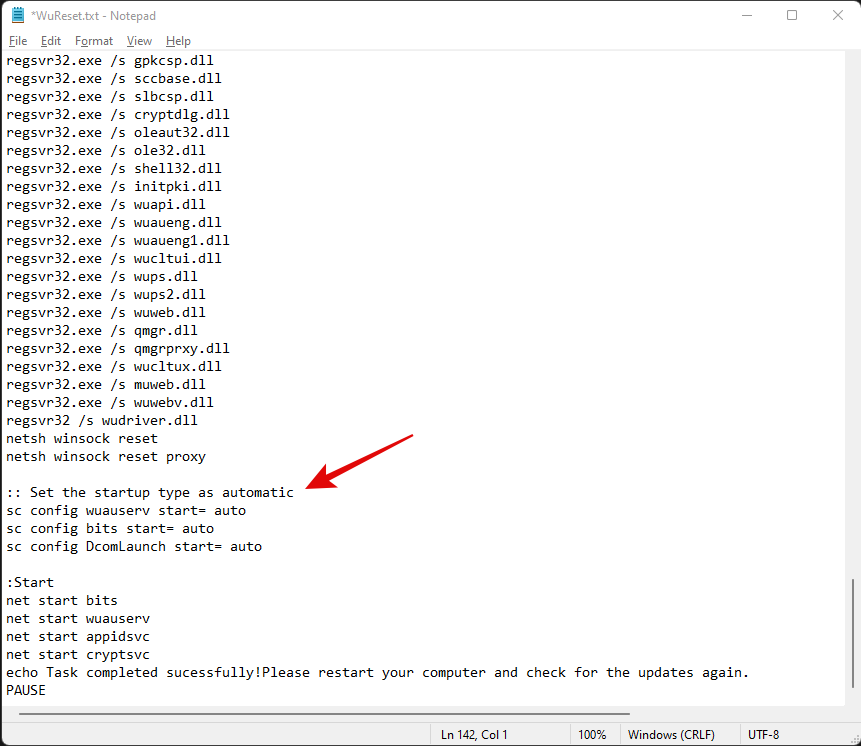
Lastly, let’s add some lines to ensure that the startup type for this service is set to ‘Automatic’. Copy the code below and add the lines after your winsock reset commands but before your service starting commands as shown below. Copy and paste the code in its respective location.
:: Set the startup type as automatic
sc config wuauserv start= auto
sc config bits start= auto
sc config DcomLaunch start= auto
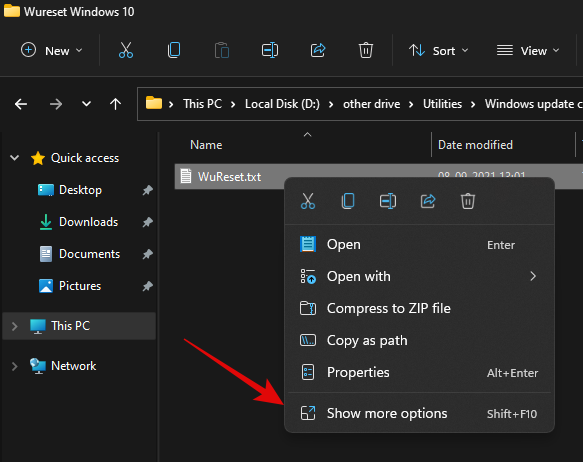
Once you are done, hit Ctrl + S on your keyboard to save your changes. Close the file and right-click on it again and select ‘Show more options’.
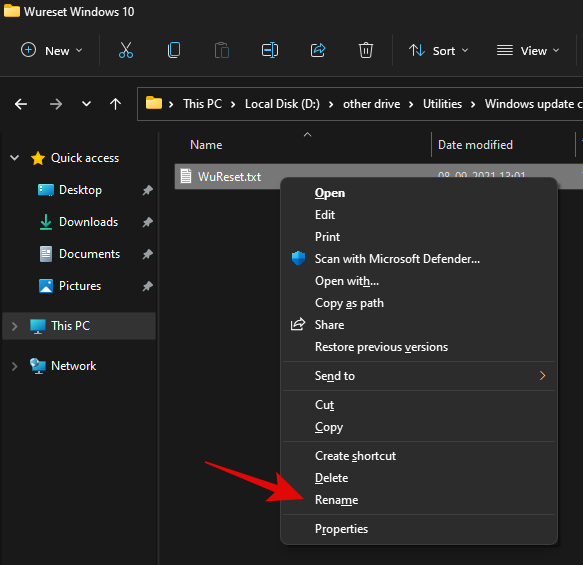
Click on ‘Rename’.
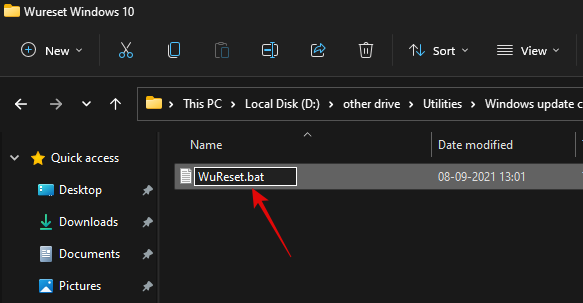
Replace ‘.txt’ with ‘.bat’.
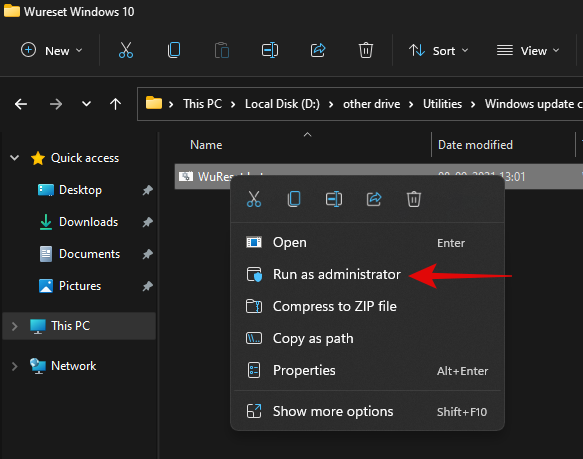
Once done, right-click on the file and select ‘Run as administrator’.
The batch script will now run on your PC and do its thing. Once the process completes, you will be asked to restart your PC. We highly recommend that you restart your PC at the earliest after running this script. Upon a restart, your Windows update should be reset and a fresh start should help you easily install pending Windows updates on your PC.
Method #02: Use DISM to uninstall the concerned packages
If you are still unable to uninstall specific Windows Update packages then simply use the DISM method to remove the concerned updates from your PC. This method force removes any available Windows updates from your PC without any issue. You will get a list of all the available updates in a table format which should make it much easier for you to find the culprit on your PC. Simply follow the guide at the top to get you started.
Method #03: Run SFC & DISM commands
At this point, if Windows still fails to update your system then you are facing a more serious issue than we anticipated earlier. This could indicate system-level corruption of files or missing system files from your system. In such cases, you can run SFC and DISM checks to fix corrupted files as well as restore missing system files. Follow the guide below to get you started.
Press Windows + S on your keyboard and search for CMD. Click on ‘Run as administrator’ once it shows up in your search results.
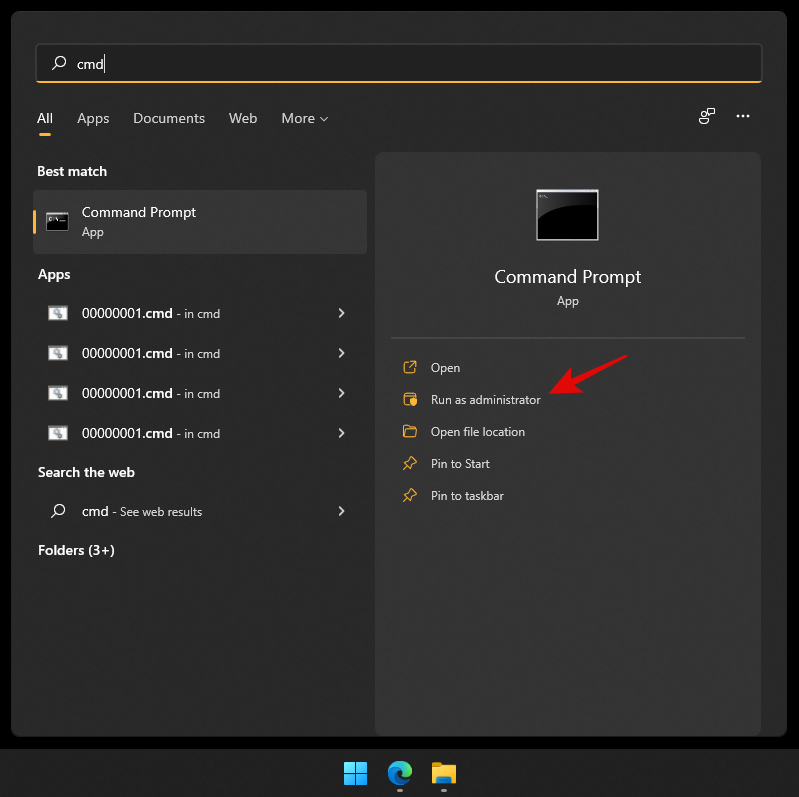
Type in the following command and press Enter on your PC.
sfc /scannow
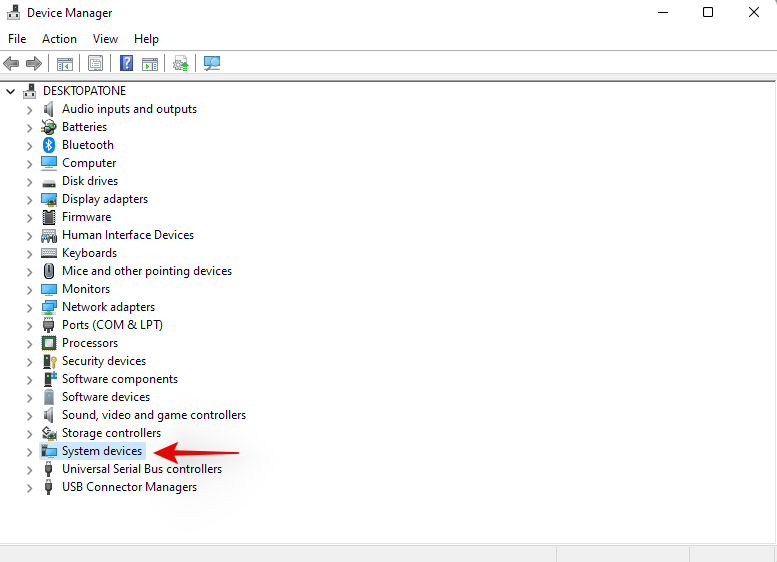
Once the SFC scan completes, type in the following command and execute it.
DISM /Online /Cleanup-Image /RestoreHealth
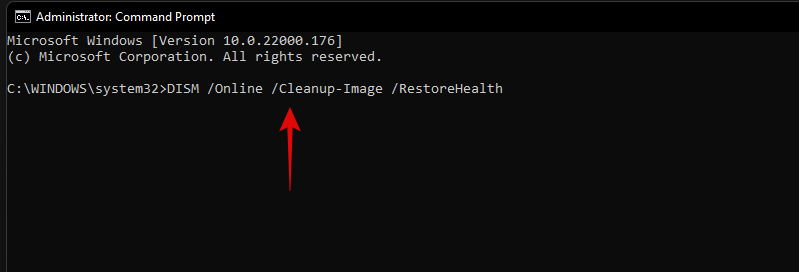
We recommend you restart your PC once the process completes.
Method #04: Last resort: Reset your PC
If nothing seems to be working for you then it might be time for a fresh installation of Windows 11 on your system. You can try getting in touch with your support team as well but if nothing works then a reset of your PC is the best option. In most cases, a reset while keeping your local files should help get Windows update working on your system.
Windows 11 connects to the update servers and updates your security definitions and drivers during OOBE. Windows will fix all update issues and reinstall necessary services on your system to get Windows update back up and running on your system during this process.
► You can use this dedicated guide from us to reset your Windows 11 PC.
We hope you were able to easily uninstall updates from your Windows 11 PC using the guide above. If you face any issues, feel free to drop a comment below.
Related:
Ο οδηγός για την επαναφορά του λογαριασμού σας στο Instagram μετά από απενεργοποίηση.
Οι ενημερώσεις των Windows ήταν πάντα μια διαβόητη ενόχληση για πολλούς χρήστες από την εποχή των Windows XP. Ευτυχώς, η παράδοση των ενημερώσεων των Windows έχει βελτιωθεί δραστικά τα τελευταία χρόνια και…
Το Microsoft Teams είναι ένα από τα πιο δημοφιλή εργαλεία που βοηθούν τις ομάδες να συνεργάζονται από το σπίτι. Μπορείτε να επικοινωνήσετε μέσω απευθείας και ομαδικών μηνυμάτων, τηλεδιάσκεψης με τα μέλη της ομάδας σας και να μοιραστείτε αρχεία με…
Το Microsoft Teams είναι ένα εξαιρετικό εργαλείο συνεργασίας για ομάδες και μέλη που συνεργάζονται εξ αποστάσεως σε ένα έργο. Σας δίνει τη δυνατότητα να επικοινωνείτε απρόσκοπτα μεταξύ σας, να μοιράζεστε αρχεία,…
Ο χώρος στο δίσκο ήταν πάντα πολυτέλεια είτε ήταν οι παλιές μέρες του DOS όπου όλα ήταν αποθηκευμένα σε δισκέτα είτε οι σύγχρονες εποχές όπου δυσκολευόμαστε να αποθηκεύσουμε τις μουσικές μας βιβλιοθήκες σε ένα μόνο dr…
Σχεδόν κάθε άλλος κατασκευαστής υπολογιστών φαίνεται να αρέσει στο λογισμικό προστασίας συστήματος McAfee και αρνείται κατηγορηματικά να στείλει τον υπολογιστή του χωρίς αυτό. Αλλά πολλοί άνθρωποι δεν αγαπούν ιδιαίτερα το McAfee…
Σε αντίθεση με το Zoom και το Google Meet, το Microsoft Teams ακολουθεί μια ορισμένη ευπρέπεια όσον αφορά τη ρύθμιση του χώρου εργασίας σας. Σας επιτρέπει να διαχειρίζεστε πολλούς Οργανισμούς από την εφαρμογή…
Δυσκολεύεστε με αργή απόδοση των Windows 11; Μάθετε αποδεδειγμένες μεθόδους για να διορθώσετε το υπερβολικό φορτίο στο μητρώο και να επιταχύνετε τον υπολογιστή σας. Οδηγός βήμα προς βήμα με ασφαλή εργαλεία και συμβουλές για βέλτιστα αποτελέσματα.
Δυσκολεύεστε με το σφάλμα εγκατάστασης των Windows 11 0x800f081f; Ανακαλύψτε δοκιμασμένες, βήμα προς βήμα λύσεις για να επιλύσετε γρήγορα αυτό το ενοχλητικό πρόβλημα. Επιστρέψτε σε μια ομαλή αναβάθμιση χωρίς την ταλαιπωρία. Ενημερωμένο με τις πιο πρόσφατες λύσεις.
Δυσκολεύεστε με το ενοχλητικό σφάλμα 0x80040154 "Δεν είναι εγγεγραμμένη στην κλάση" στα Windows 11; Ανακαλύψτε δοκιμασμένες, βήμα προς βήμα λύσεις για να το επιλύσετε γρήγορα και να επιστρέψετε στην ομαλή λειτουργία του υπολογιστή. Δεν απαιτούνται τεχνικές γνώσεις!
Ανακαλύψτε πώς να χρησιμοποιείτε το Windows 11 Sandbox για ασφαλή περιήγηση. Μάθετε βήμα προς βήμα την εγκατάσταση, συμβουλές και βέλτιστες πρακτικές για να προστατεύσετε τον υπολογιστή σας από διαδικτυακές απειλές, απολαμβάνοντας παράλληλα ασφαλή περιήγηση στο web.
Δυσκολεύεστε με το σφάλμα ενημέρωσης των Windows 11 0x800f0922; Ανακαλύψτε δοκιμασμένες, βήμα προς βήμα λύσεις για να επιλύσετε αυτό το συνηθισμένο πρόβλημα και να διασφαλίσετε την ομαλή λειτουργία των ενημερώσεών σας. Δεν απαιτούνται τεχνικές γνώσεις!
Δυσκολεύεστε με τον στατικό θόρυβο και το βουητό του μικροφώνου στα Windows 11; Ανακαλύψτε δοκιμασμένες, βήμα προς βήμα λύσεις για να αποκαταστήσετε τον κρυστάλλινο ήχο. Πείτε αντίο στον ενοχλητικό θόρυβο και κάντε το μικρόφωνό σας να λειτουργεί άψογα σήμερα.
Δυσκολεύεστε με τις ρυθμίσεις του Winaero Tweaker στα Windows 11; Ανακαλύψτε αποδεδειγμένα βήματα αντιμετώπισης προβλημάτων για να διορθώσετε σφάλματα, να επαναφέρετε προσαρμογές και να βελτιστοποιήσετε την εμπειρία σας. Επιστρέψτε σε μια απρόσκοπτη εγκατάσταση υπολογιστή σήμερα!
Δυσκολεύεστε με το ενοχλητικό σφάλμα κατεστραμμένου αρχείου 0x80070570 στα Windows 11; Ανακαλύψτε δοκιμασμένες, βήμα προς βήμα λύσεις για να επαναφέρετε τα αρχεία σας και να επιστρέψετε στην ομαλή λειτουργία του υπολογιστή χωρίς την ταλαιπωρία. Ενημερωμένο με τις πιο πρόσφατες λύσεις για τα Windows 11.
Δυσκολεύεστε με το σφάλμα του Διαφράγματος Απορρήτου της Κάμερας Web των Windows 11; Ανακαλύψτε δοκιμασμένες λύσεις για την επίλυση προβλημάτων απορρήτου της κάμερας web, την επαναφορά λειτουργικότητας και τη διασφάλιση της διατήρησης του απορρήτου σας. Οδηγός βήμα προς βήμα για απρόσκοπτες βιντεοκλήσεις.
Δυσκολεύεστε με την ασφάλεια Java; Έχετε μπλοκαρισμένα σφάλματα στα προγράμματα περιήγησης; Ανακαλύψτε λύσεις βήμα προς βήμα για να ξεμπλοκάρετε τα μικροεφαρμογές Java με ασφάλεια, να βελτιστοποιήσετε τις ρυθμίσεις και να αποτρέψετε μελλοντικά προβλήματα. Επιστρέψτε στην απρόσκοπτη περιήγηση σήμερα!

![Πώς να απεγκαταστήσετε το McAfee στα Windows 11 [5 τρόποι] Πώς να απεγκαταστήσετε το McAfee στα Windows 11 [5 τρόποι]](https://blog.webtech360.com/resources8/images31/image-4917-0105182719945.png)
