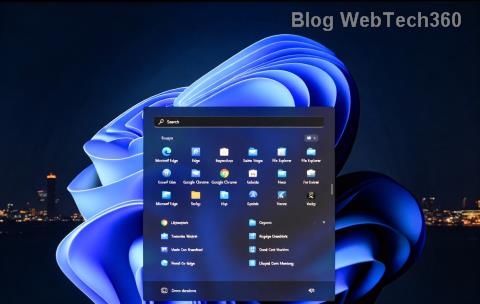
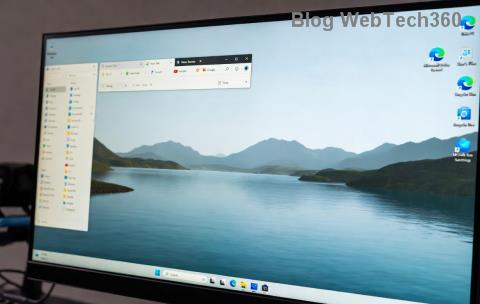
Η γραμμή εργασιών των Windows βρίσκεται στο επίκεντρο όλης της προσοχής από τότε που απέκτησε τη νέα της ανανεωμένη εμφάνιση με την κυκλοφορία των Windows 11. Τώρα μπορείτε να κεντράρετε τη γραμμή εργασιών σας, να απολαύσετε το νέο κέντρο δράσης, να αλλάξετε την ευθυγράμμισή της και να την τοποθετήσετε σε κάθε πλευρά της οθόνης σας. Δυστυχώς, η ανάπτυξη αυτής της δυνατότητας ήταν λιγότερο από επιτυχής με όλο και περισσότερους χρήστες να αγωνίζονται να λειτουργήσουν τη γραμμή εργασιών τους στα Windows 11 για μερικούς μήνες.
Ενώ η Microsoft έχει αναγνωρίσει το πρόβλημα, έχει εκδώσει μια λύση και αυτή τη στιγμή εργάζεται για μια επιδιόρθωση, οι χρήστες εξακολουθούν να φαίνεται να μην μπορούν να κάνουν τη γραμμή εργασιών να λειτουργήσει ξανά. Εάν βρίσκεστε στο ίδιο σκάφος, έχουμε συγκεντρώσει μια λίστα με όλες τις διαθέσιμες επιδιορθώσεις για να επαναφέρετε τη γραμμή εργασιών σας και να λειτουργεί ξανά στα Windows 11. Ακολουθήστε τον παρακάτω οδηγό για να ξεκινήσετε.
Περιεχόμενα
Γιατί δεν εμφανίζεται η γραμμή εργασιών μου;
Η γραμμή εργασιών των Windows 11 έχει μια νέα εμφάνιση που προέρχεται από μια ανανεωμένη άποψη για τη λειτουργία της. Η γραμμή εργασιών βασίζεται πλέον σε πολλές υπηρεσίες και το ίδιο το μενού Έναρξη για να λειτουργεί σωστά. Φαίνεται ότι η διαδικασία αναβάθμισης από τα Windows 10 στα Windows 11 φαίνεται να ανακατεύει τη γραμμή εργασιών ανάλογα με την έκδοση των Windows 10 που έχετε εγκαταστήσει στο σύστημά σας και την έκδοση των Windows 11 στην οποία ενημερώνετε.
Επιπλέον, μια πρόσφατη ενημερωμένη έκδοση των Windows που κυκλοφόρησε τον περασμένο μήνα φαίνεται επίσης να προκαλεί αυτό το πρόβλημα σε ορισμένους χρήστες, ενώ άλλοι αντιμετωπίζουν το ίδιο λόγω της ασυμφωνίας του χρόνου συστήματος, παρά το γεγονός ότι όλα έχουν ρυθμιστεί σωστά. Υπάρχουν πολλοί τρόποι για να διορθώσετε τη γραμμή εργασιών σας και σας συνιστούμε να ξεκινήσετε με τις παρακάτω επιδιορθώσεις μία προς μία.
12 τρόποι για να διορθώσετε προβλήματα στη γραμμή εργασιών στα Windows 11
Χρησιμοποιήστε τις παρακάτω μεθόδους για να ξεκινήσετε τη διόρθωση της γραμμής εργασιών στα Windows 11. Εάν έχετε ήδη δοκιμάσει να κάνετε επανεκκίνηση του συστήματός σας, τότε μπορείτε να παραλείψετε την πρώτη μέθοδο.
Επιδιόρθωση #1: Επανεκκινήστε τον υπολογιστή
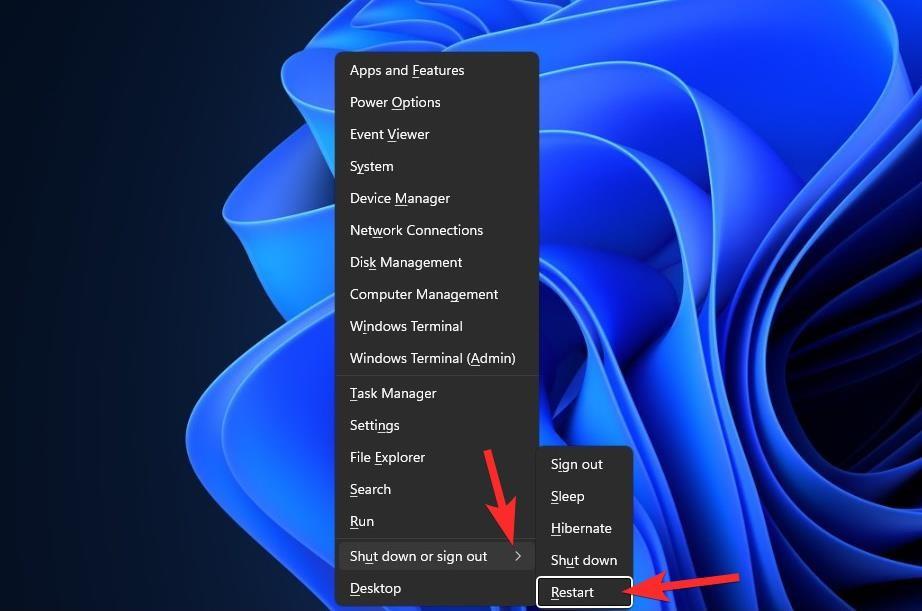
Πριν δοκιμάσετε οτιδήποτε φανταχτερό, καλό είναι να δοκιμάσετε πιο απλά μέτρα, όπως επανεκκίνηση του υπολογιστή ή της Εξερεύνησης των Windows (δείτε παρακάτω). Κάτι τέτοιο θα δώσει στο σύστημά σας μια μαλακή επαναφορά, επιτρέποντας στα δεδομένα να φορτωθούν ξανά και, πιθανώς, να διορθωθούν προβλήματα με τη γραμμή εργασιών και το μενού Έναρξη.
Διόρθωση #2: Βεβαιωθείτε ότι η "Αυτόματη απόκρυψη της γραμμής εργασιών" είναι απενεργοποιημένη
Πατήστε Windows + iστο πληκτρολόγιό σας και κάντε κλικ στο «Εξατομίκευση» στα αριστερά σας.
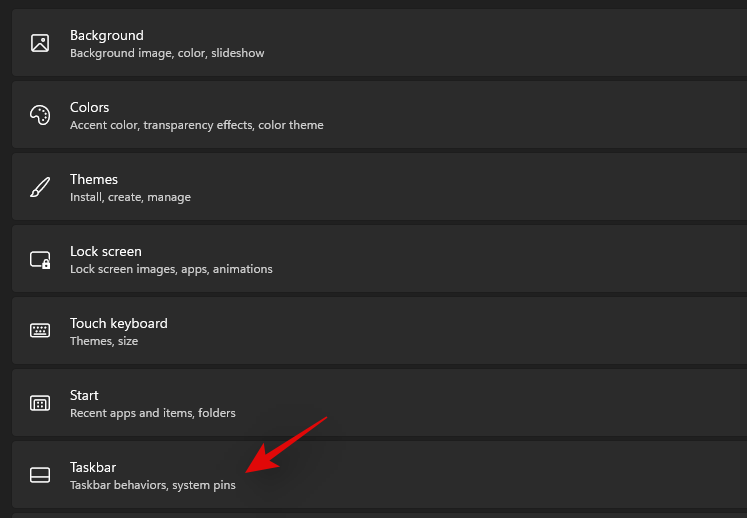
Κάντε κλικ στη «Γραμμή εργασιών».
Τώρα κάντε κλικ στο «Συμπεριφορές της γραμμής εργασιών».
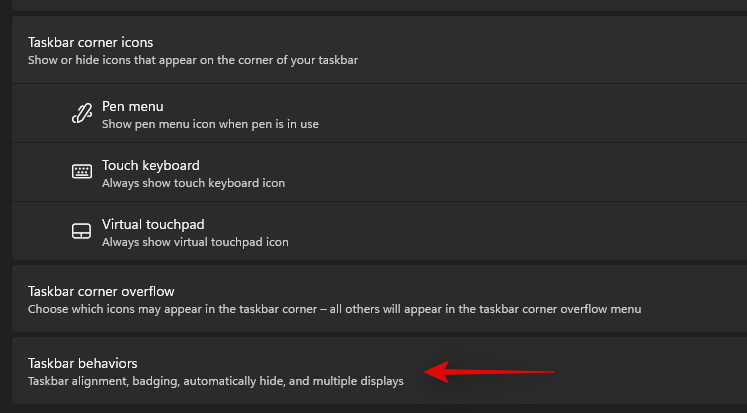
Καταργήστε την επιλογή του πλαισίου για «Αυτόματη απόκρυψη της γραμμής εργασιών».

Τώρα κλείστε την εφαρμογή Ρυθμίσεις και εάν η γραμμή εργασιών σας αποκρύπτονταν αυτόματα, τότε θα πρέπει τώρα να είναι απενεργοποιημένη στο σύστημά σας.
Διόρθωση #3: Επανεκκινήστε τις απαραίτητες υπηρεσίες
Όπως αναφέρθηκε προηγουμένως, τα Windows 11 έχουν ανανεώσει τη γραμμή εργασιών που πλέον σημαίνει ότι βασίζεται σε πολλές υπηρεσίες για να λειτουργεί σωστά σε οποιοδήποτε σύστημα. Ας επανεκκινήσουμε όλες αυτές τις υπηρεσίες για να διασφαλίσουμε ότι μια διένεξη στο παρασκήνιο δεν εμποδίζει τη σωστή λειτουργία της γραμμής εργασιών στο σύστημά σας.
Πατήστε Ctrl + Shift + Escστο σύστημά σας για να εκκινήσετε τη Διαχείριση εργασιών. Μεταβείτε στην καρτέλα "Λεπτομέρειες" στο επάνω μέρος.
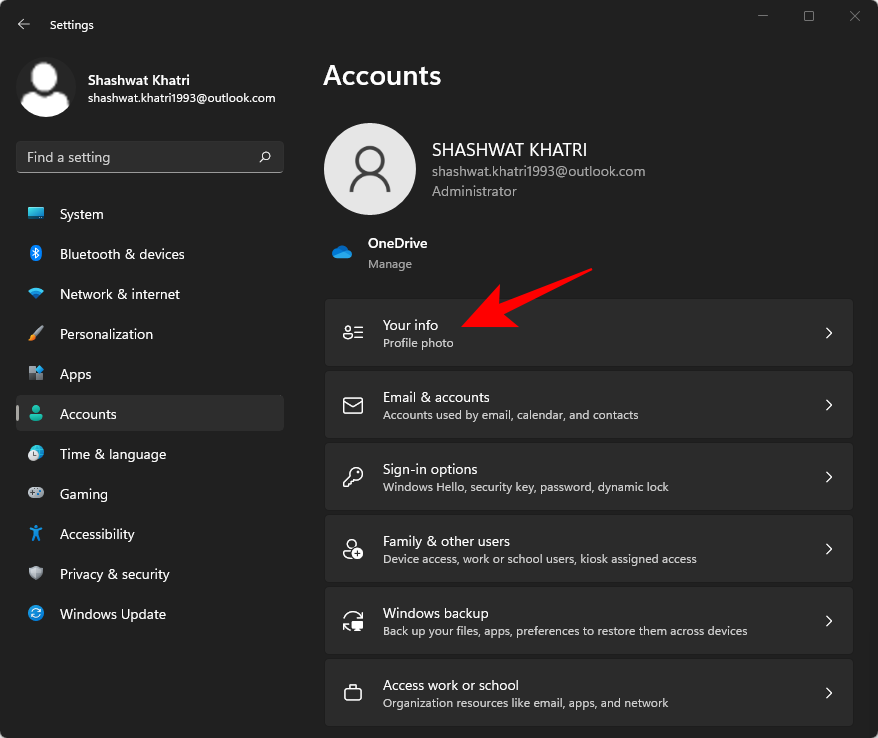
Τώρα βρείτε τις παρακάτω υπηρεσίες που εκτελούνται και επιλέξτε τις κάνοντας κλικ σε αυτές. Πατήστε «Διαγραφή» στο πληκτρολόγιό σας και επιβεβαιώστε την επιλογή σας επιλέγοντας «Τερματισμός διαδικασίας».
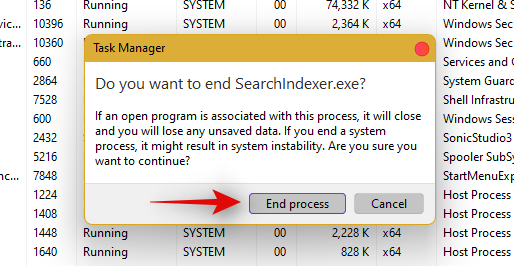
- Explorer.exe
- ShellExperienceHost.exe
- SearchIndexer.exe
- SearchHost.exe
- RuntimeBroker.exe
Ας κάνουμε επανεκκίνηση της Εξερεύνησης των Windows τώρα. Κάντε κλικ στο «Αρχείο» στην επάνω αριστερή γωνία και επιλέξτε «Εκτέλεση νέας εργασίας».
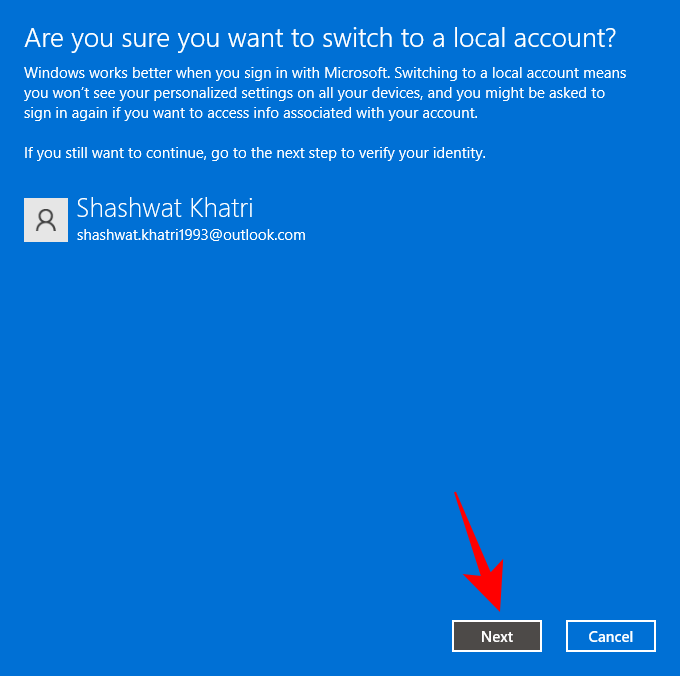
Πληκτρολογήστε 'explorer.exe' και πατήστε Enter στο πληκτρολόγιό σας. Μπορείτε επίσης να κάνετε κλικ στο «Ok» εάν χρειάζεται.
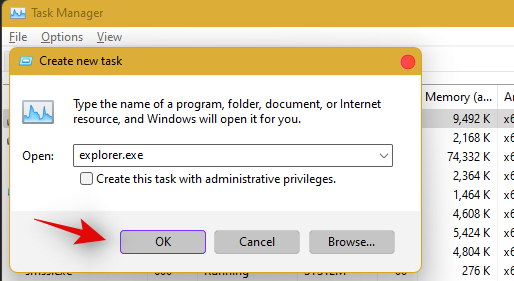
Μόλις επανεκκινηθεί ο εξερευνητής, απλώς επανεκκινήστε τον υπολογιστή σας για να επανεκκινήσετε άλλες υπηρεσίες στο σύστημά σας.
Η γραμμή εργασιών θα πρέπει τώρα να αποκατασταθεί εάν η αιτία του προβλήματός σας ήταν μια διένεξη υπηρεσίας παρασκηνίου.
Διόρθωση #4: Διαγράψτε το IrisService στο Μητρώο και κάντε επανεκκίνηση
Πατήστε Ctrl + Shift + Escγια να ανοίξετε τη Διαχείριση εργασιών. Στη συνέχεια, κάντε κλικ στο Αρχείο στην επάνω αριστερή γωνία.
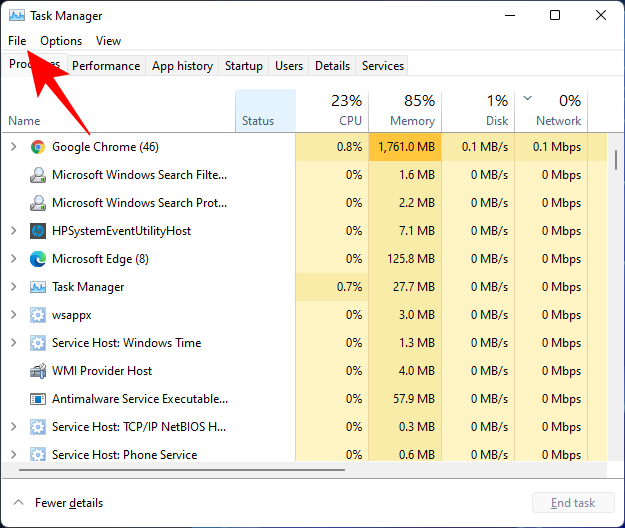
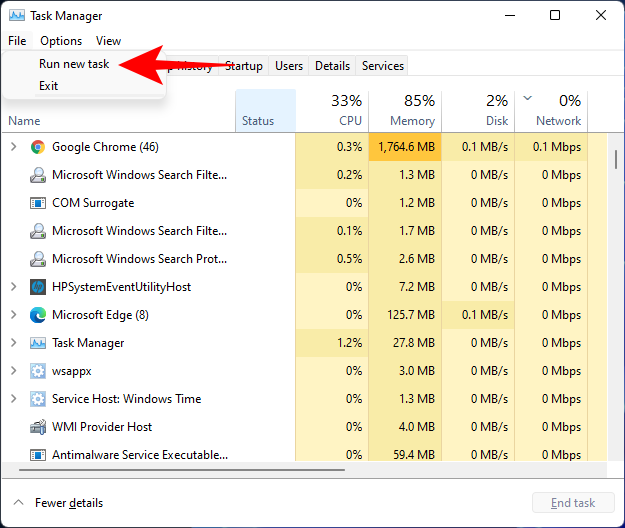
Επιλέξτε Εκτέλεση νέας εργασίας .
Πληκτρολογήστε cmd και πατήστε Enter.
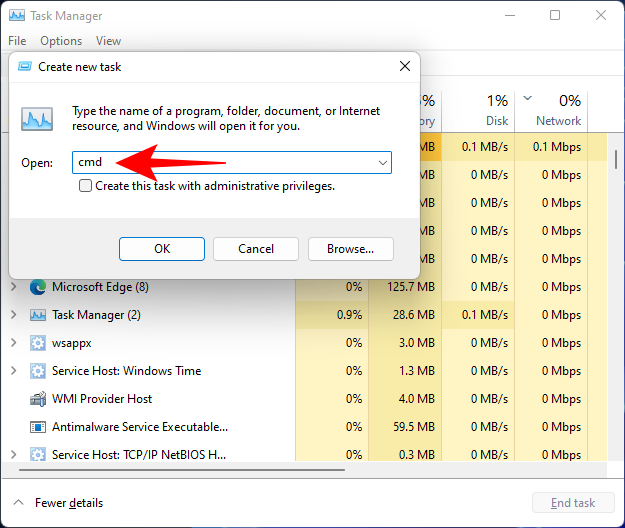
Αυτό θα ανοίξει μια ανυψωμένη εμφάνιση της γραμμής εντολών. Τώρα αντιγράψτε την ακόλουθη εντολή και επικολλήστε την στη γραμμή εντολών:
reg delete HKCU\SOFTWARE\Microsoft\Windows\CurrentVersion\IrisService /f && shutdown -r -t 0

Στη συνέχεια πατήστε Enter. Μόλις το κάνετε αυτό, ο υπολογιστής σας θα επανεκκινήσει. Μόλις ξεκινήσει η δημιουργία αντιγράφων ασφαλείας, τα πράγματα θα πρέπει να επανέλθουν στο κανονικό, συμπεριλαμβανομένης της γραμμής εργασιών.
Διόρθωση #5: Προσθήκη UndockingDisabled στο Μητρώο
Πατήστε Ctrl + Shift + Escγια να ανοίξετε τη Διαχείριση εργασιών. Στη συνέχεια, κάντε κλικ στο Αρχείο (πάνω αριστερή γωνία) και εκτελέστε μια νέα εργασία .
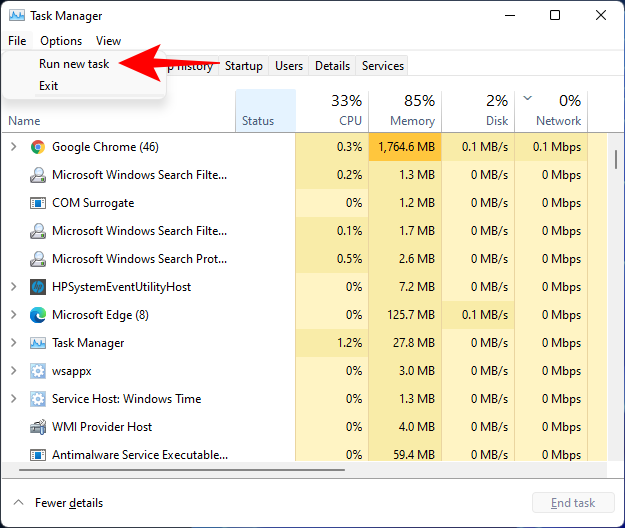
Πληκτρολογήστε regedit και πατήστε Enter.
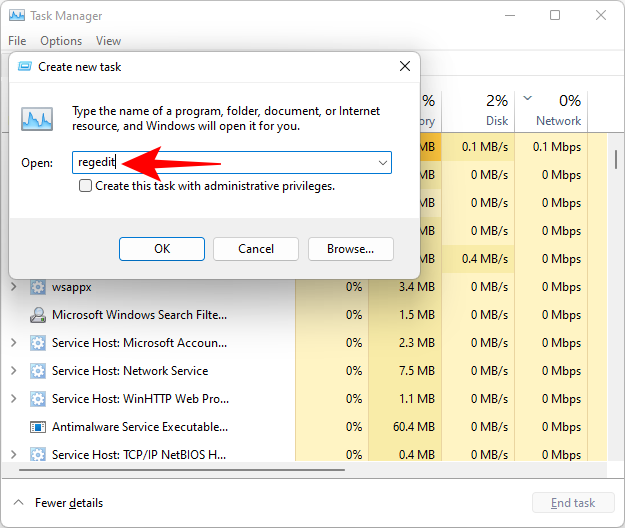
Αυτό θα ανοίξει τον Επεξεργαστή Μητρώου. Τώρα μεταβείτε στην ακόλουθη διεύθυνση:
Computer\HKEY_LOCAL_MACHINE\SOFTWARE\Microsoft\Windows\CurrentVersion\Shell\Update\Packages
Εναλλακτικά, απλώς αντιγράψτε το παραπάνω και επικολλήστε το στη γραμμή διευθύνσεων του Επεξεργαστή Μητρώου, όπως:

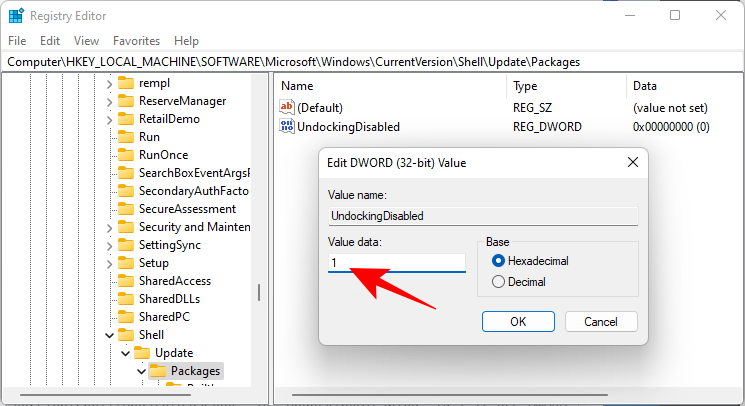
Μόλις πατήσετε Enter, θα κατευθυνθείτε στο καθορισμένο κλειδί. Στα δεξιά, κάντε δεξί κλικ στο διάστημα και επιλέξτε Νέο > Τιμή DWORD (32 bit) .
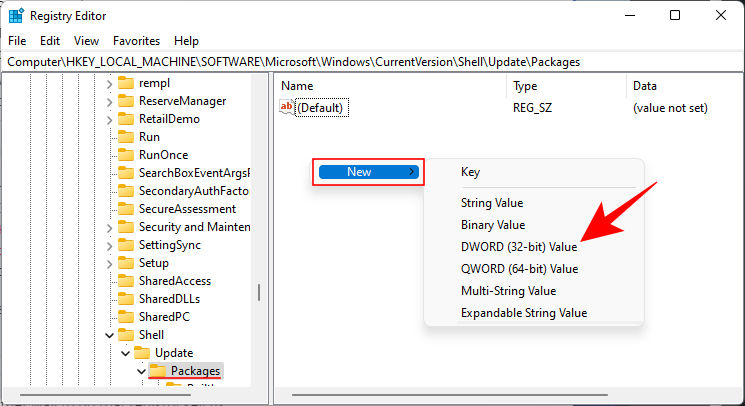
Ονομάστε αυτό το νέο DWORD UndockingDisabled .
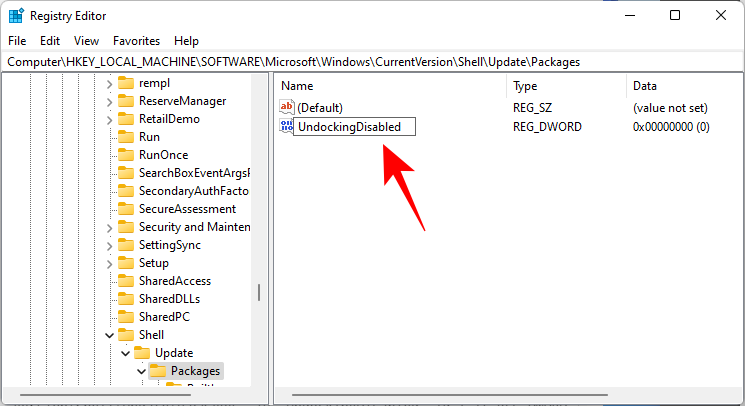
Στη συνέχεια, κάντε διπλό κλικ σε αυτό και αλλάξτε τα "Δεδομένα τιμής" σε 1 . Στη συνέχεια, κάντε κλικ στο OK .
Κάντε επανεκκίνηση του υπολογιστή σας για να τεθούν σε ισχύ οι αλλαγές.
Διόρθωση #6: Εκτελέστε εντολές SFC & DISM
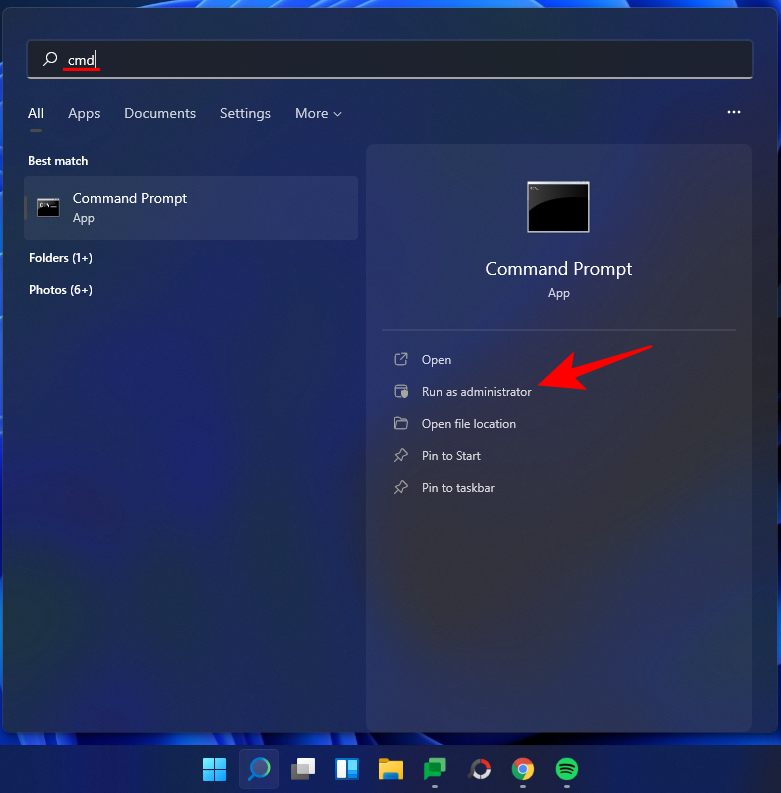
Πατήστε Έναρξη, πληκτρολογήστε cmd και κάντε κλικ στο Εκτέλεση ως διαχειριστής .
Τώρα πληκτρολογήστε την ακόλουθη εντολή:
sfc /scannow
Πατήστε Enter. Περιμένετε μέχρι το SFC να ολοκληρώσει τη σάρωση και να διορθώσετε τυχόν προβλήματα που εντοπίστηκαν.

Στη συνέχεια, εκτελέστε την ακόλουθη εντολή DISM για το εργαλείο Deployment Image Servicing and Management:
dism /online /cleanup-image /scanhealth
Στη συνέχεια πατήστε Enter. Και πάλι, περιμένετε να ολοκληρωθεί η σάρωση.

Τώρα, εκτελέστε την ακόλουθη εντολή DISM:
dism /online /cleanup-image /restorehealth

Πατήστε Enter. Περιμένετε μέχρι το DISM να αποκαταστήσει την υγεία.

Τέλος, εκτελέστε την εντολή chkdsk για να εκτελέσετε το βοηθητικό πρόγραμμα Check Disk:
chkdsk c: /r
Πατήστε Enter. Η γραμμή εντολών θα εμφανίσει ένα μήνυμα που θα σας λέει ότι "δεν μπορεί να κλειδώσει την τρέχουσα μονάδα δίσκου… επειδή ο τόμος χρησιμοποιείται από άλλη διεργασία" και θα ζητήσει την άδειά σας να προγραμματίσετε μια σάρωση πριν από την επόμενη εκκίνηση. Πληκτρολογήστε Yγια συμμόρφωση.

Και πατήστε Enter. Τώρα επανεκκινήστε τον υπολογιστή σας, αφήστε το εργαλείο Έλεγχος δίσκου να κάνει τη δουλειά του και ελέγξτε εάν η γραμμή εργασιών έχει επανέλθει σε κανονική λειτουργία.
Διόρθωση #7: Επανεγκαταστήστε το UWP
Πατήστε Ctrl + Shift + Escστο πληκτρολόγιό σας για να εκκινήσετε τη Διαχείριση εργασιών. Κάντε κλικ στο «Αρχείο» και επιλέξτε «Εκτέλεση νέας εργασίας».
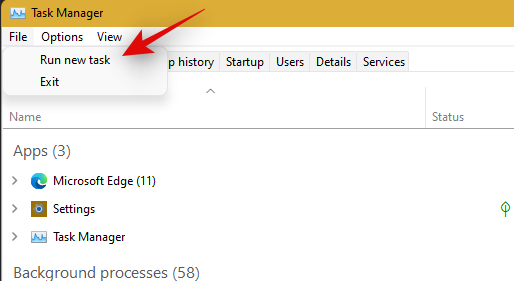
Πληκτρολογήστε «PowerShell» και πατήστε Ctrl + Shift + Enterστο πληκτρολόγιό σας.
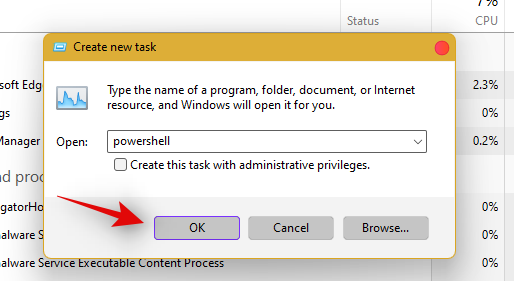
Το PowerShell θα ξεκινήσει τώρα ως διαχειριστής στο σύστημά σας. Πληκτρολογήστε την ακόλουθη εντολή:
Get-AppxPackage -AllUsers | Foreach {Add-AppxPackage -DisableDevelopmentMode -Register “$ ($ _. InstallLocation) \ AppXManifest.xml”}
Πατήστε Enter. Το PowerShell θα εμφανίσει μια τρέχουσα λίστα μηνυμάτων με κόκκινο χρώμα. Αλλά μην ανησυχείτε για αυτό. Απλώς περιμένετε να ολοκληρωθεί η εκτέλεση της εντολής.

Διόρθωση #8: Ελέγξτε το UAC και προσθέστε το μητρώο επεξεργασίας εάν χρειάζεται
Το UAC είναι απαραίτητο για όλες τις σύγχρονες εφαρμογές και δυνατότητες, συμπεριλαμβανομένου του μενού Έναρξη και της γραμμής εργασιών. Θα πρέπει πρώτα να ενεργοποιήσετε το UAC εάν είναι απενεργοποιημένο και να επανεκκινήσετε το σύστημά σας. Εάν η γραμμή εργασιών εξακολουθεί να μην λειτουργεί για εσάς, τότε σας συνιστούμε να δοκιμάσετε να προσθέσετε μια τιμή του μενού Έναρξη Xaml στον Επεξεργαστή Μητρώου σας.
Η προσθήκη αυτής της τιμής φαίνεται να επανεκκινεί και να καταχωρεί εκ νέου τις υπηρεσίες της Γραμμής εργασιών, οι οποίες φαίνεται να κάνουν τη Γραμμή εργασιών να λειτουργεί ξανά στα περισσότερα συστήματα. Ακολουθήστε τον παρακάτω οδηγό για να ξεκινήσετε.
Ελέγξτε και ενεργοποιήστε το UAC εάν είναι απενεργοποιημένο
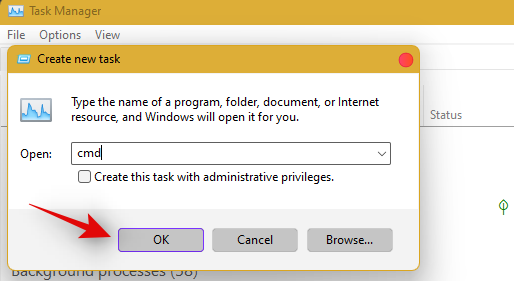
Πατήστε Ctrl + Shift + Escστο πληκτρολόγιό σας για να εκκινήσετε τη διαχείριση εργασιών. Τώρα κάντε κλικ στο «Αρχείο» στην επάνω αριστερή γωνία της οθόνης σας και επιλέξτε «Εκτέλεση νέας εργασίας».

Πληκτρολογήστε 'cmd' και πατήστε Ctrl + Shift + Enterστο πληκτρολόγιό σας.
Τώρα πληκτρολογήστε την παρακάτω εντολή και πατήστε Enter για να εκτελέσετε την εντολή.
C:\Windows\System32\cmd.exe /k %windir%\System32\reg.exe ADD HKLM\SOFTWARE\Microsoft\Windows\CurrentVersion\Policies\System /v EnableLUA /t REG_DWORD /d 0 /f
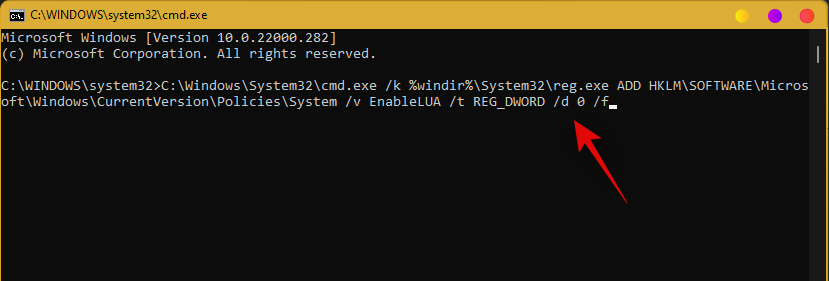
UAC will now be enabled for your system. Restart your PC for the changes to take effect on your system. Once restarted, Taskbar should be up and running on your system if UAC was the issue for you. If not, use the guide below to trigger the taskbar’s functionality on your system.
Add Registry Value
Press Ctrl + Shift + Esc to launch the task manager. Now click on ‘File’ in the top left corner and select ‘Run new task’.

Type in ‘cmd’ and press Ctrl + Shift + Enter on your keyboard.

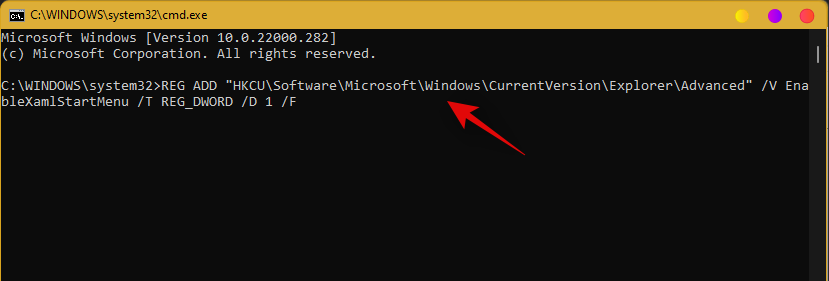
Now type in the following command and press Enter on your keyboard.
REG ADD "HKCU\Software\Microsoft\Windows\CurrentVersion\Explorer\Advanced" /V EnableXamlStartMenu /T REG_DWORD /D 1 /F
Go back to the task manager now, find Windows Explorer in the list, and right-click on it. Select Restart to restart explorer.exe.
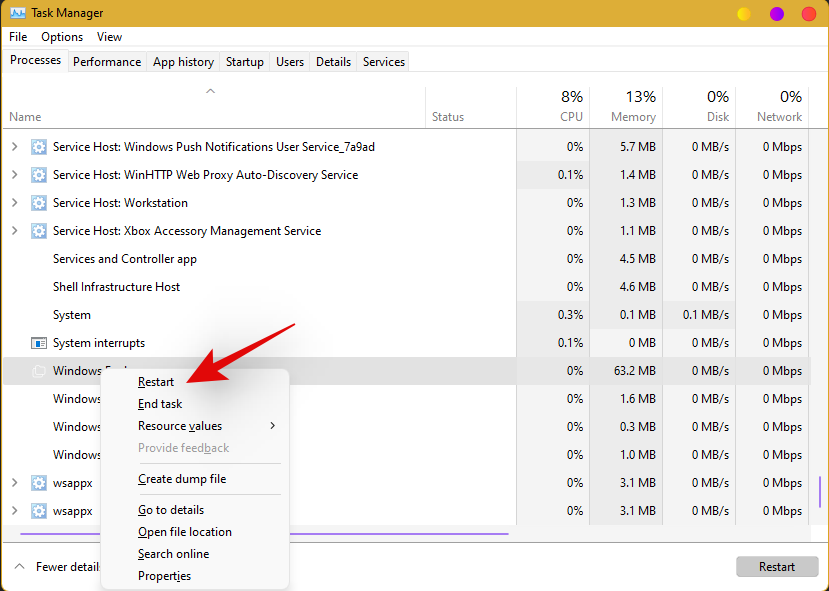
Once restarted, try to access your taskbar. The taskbar should now be available on your system.
Fix #9: Edit date and time to fix Taskbar
Date and Time settings seem to be the major cause of issues with the taskbar in Windows 11. Use the guide below to try out the following time fixes to see which one works the best for you.
Ensure that your time is correctly synchronized with the time server
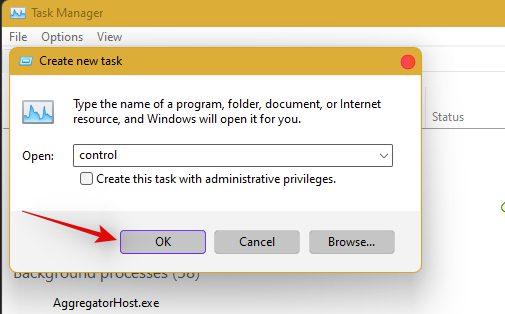
Press Ctrl + Shift + Esc on your keyboard and click on ‘File’. Select ‘Run new task’.

Type in ‘Control’ and hit Enter on your keyboard.
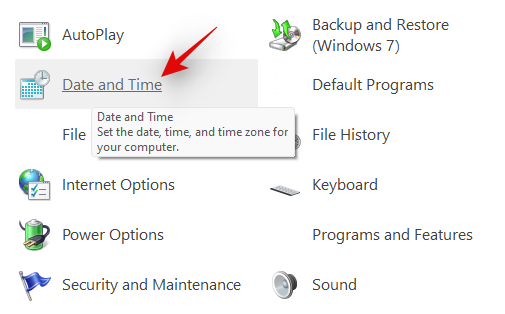
Click on ‘Date and Time’.
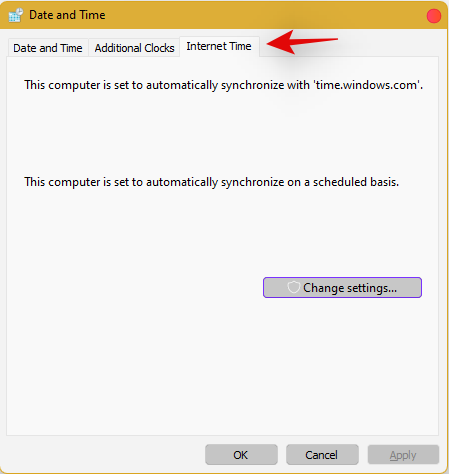
Select ‘Internet Time’ from the top.
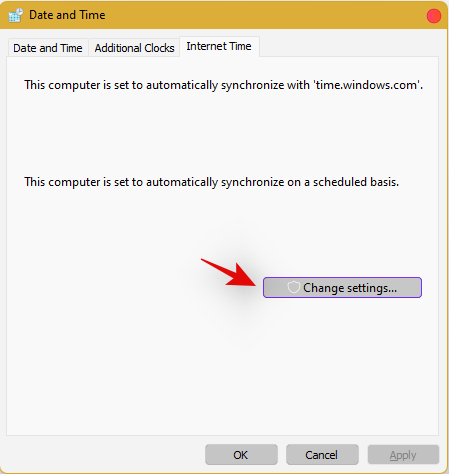
Click on ‘Change Settings’.
Uncheck the box for ‘Synchronize with an Internet time server’.
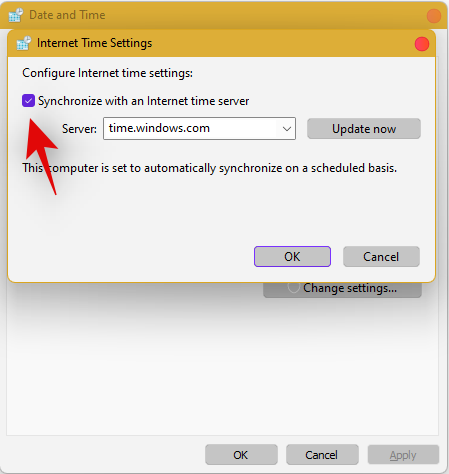
Click on ‘Ok’ once you are done.
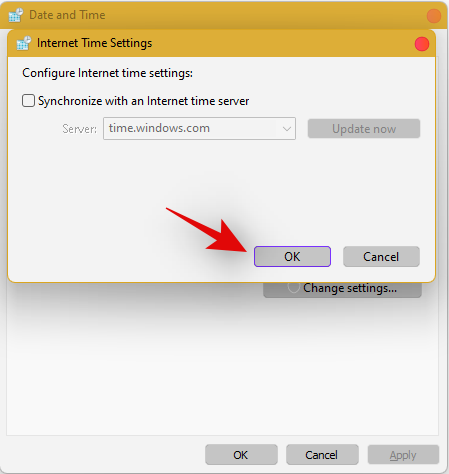
Restart your PC at this point and check your taskbar. If it is still disabled, do not fret, follow the steps above and enable Synchronization with an Internet Time Server again.
Once enabled, press Ctrl + Shift + Esc on your keyboard, and find Windows Explorer in the list on your screen. Right-click the listing and select ‘Restart’.

Once explorer restarts, try using the Taskbar. If synchronization was your issue, then it should now be fixed on your system. If not, continue with the other time fixes mentioned below.
Change date to 1 day ahead
Open the Task Manager by pressing Ctrl + Shift + Esc simultaneously. Then click on File.
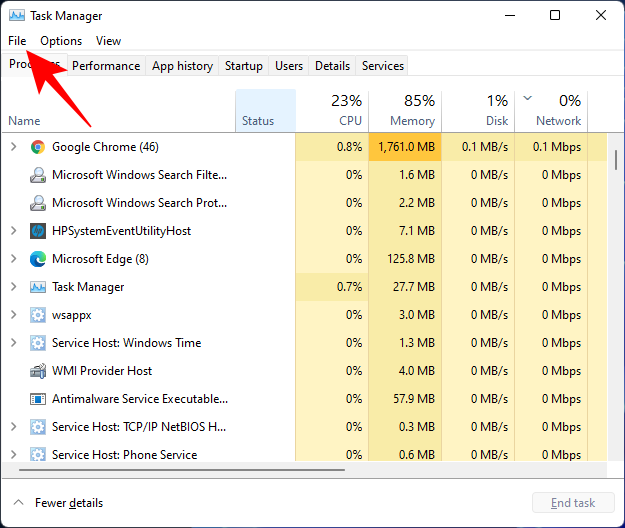
Click on Run new task.
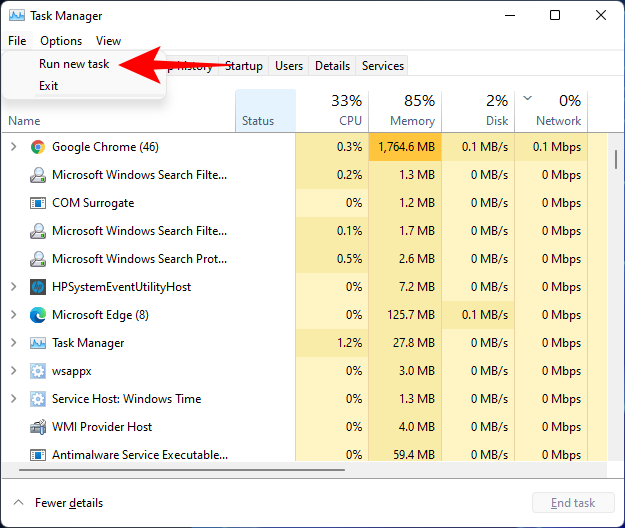
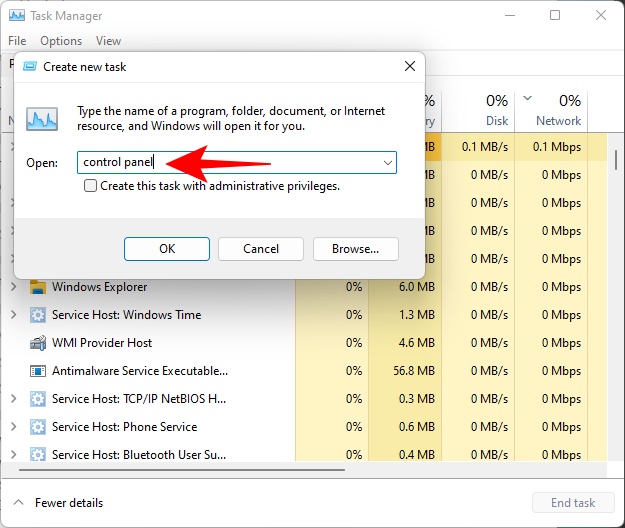
Type control panel and hit Enter.
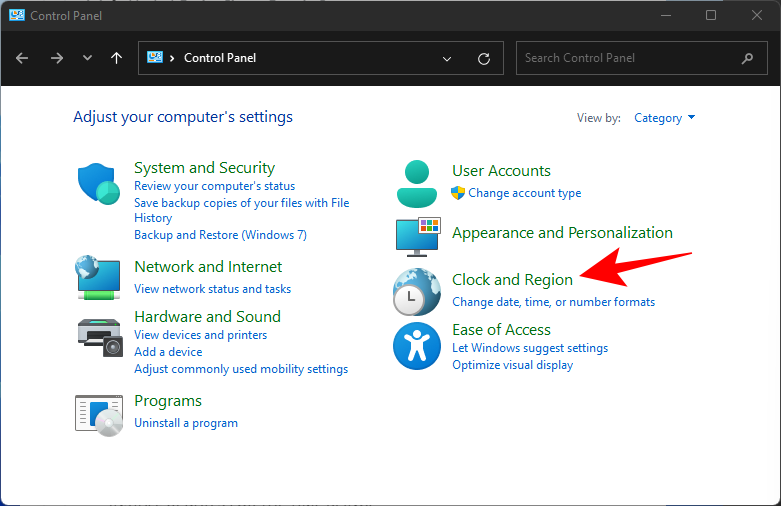
Now click on Clock and Region.
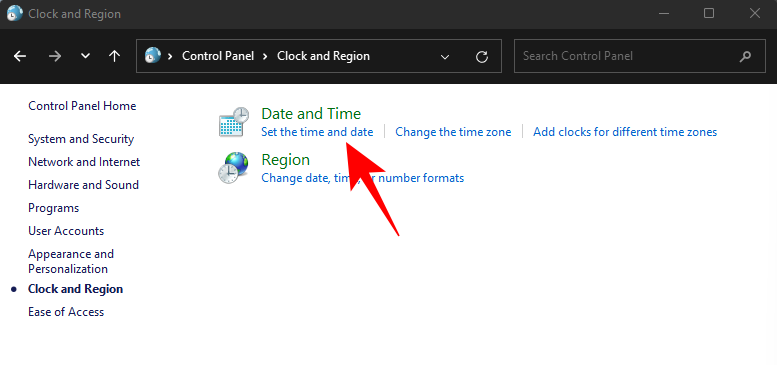
Under “Date and Time”, click on Set the time and date.
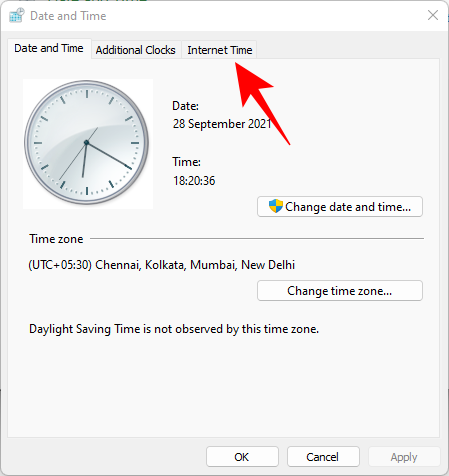
Click on the Internet Time tab to switch to it.
Click on Change settings…
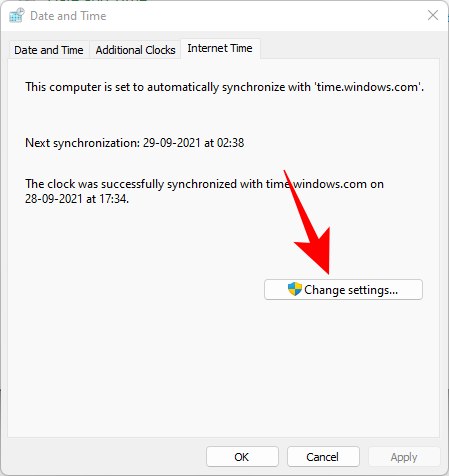
Uncheck Synchronize with an Internet time server, then click OK.
Now click on the Date and Time tab to switch back to it.
Here, click on Change date and time…
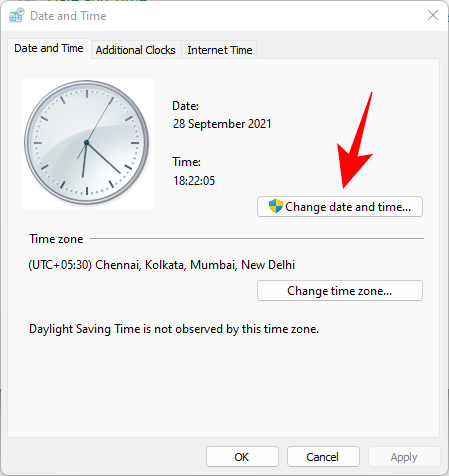
Now change the date and time to reflect tomorrow. As of writing this post, it is the 1st November so we will be changing the date to 2nd November.
Change Dates to last cumulative updates
If you are still unable to get the Taskbar working then you will have to jump through a few hoops to change your date and time multiple times and get the taskbar working on your system. Follow the guide below to get you started.
Press Ctrl + Shift + Esc on your keyboard, click on ‘File’ and select ‘Run new task’.

Type in ‘Control’ and press Enter on your keyboard.

Select ‘Date and Time’.

Switch to ‘Internet time’.

Click on ‘Change Settings’.

Uncheck the box for ‘Synchronize with an Internet Time Server’.

Click on ‘Ok’.

Switch back to ‘Date and Time’. Click on ‘Change Date and Time’ and select your date as 2nd September.
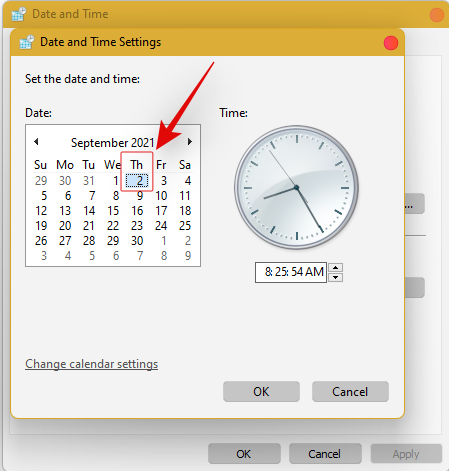
Close all windows and restart your system. Once restarted, open the ‘Date and Time’ dialog box again and change your date to 7th October this time.
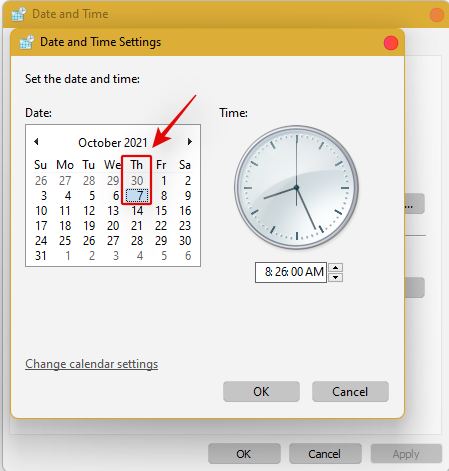
Restart your system again and Taskbar should now be back up and running on your system again. You can now enable synchronization for time again using the steps above on your system.
If synchronizing time does not work, move a month ahead to restore Taskbar
If you are still unable to get Taskbar up and running on your system again you can try the last date change fix. We recommend you use the steps above to change your date and time to a month ahead of your current date. Once changed, restart your system, and the taskbar should be up and running on your system now.
The downside of this fix is that if you revert to your normal date, Taskbar will stop working on your system. Having a mismatched date can cause issues with background syncs for various applications and cause some websites to malfunction. You will also have issues installing and getting the latest Windows Updates, so you will need to check all of these manually when updating in the future.
Fix #10: Uninstall the latest cumulative Windows Update ie: KB5006050
The cumulative update released in September for Windows 11 seems to also cause issues with the taskbar on some desktops and laptops. Use the guide below to uninstall the necessary update from your system.
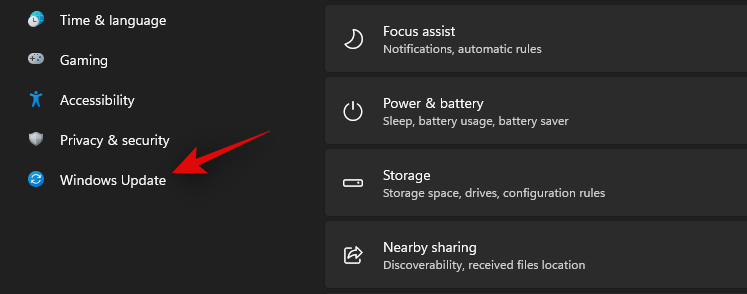
Press Windows + i and select Windows Update from the left.
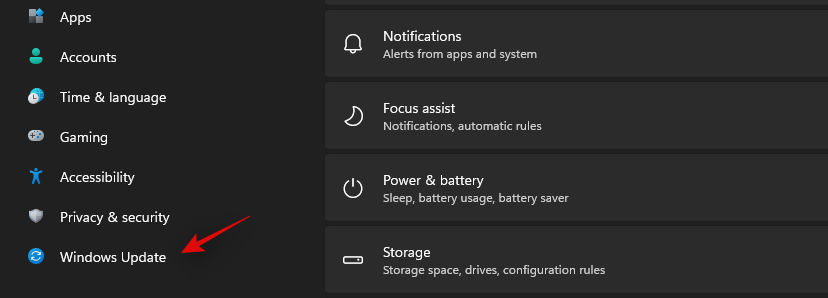
Click on ‘Update history’.
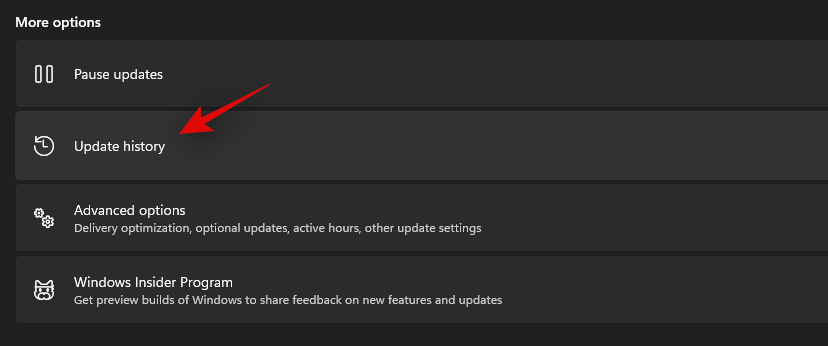
Now select ‘Uninstall updates’.
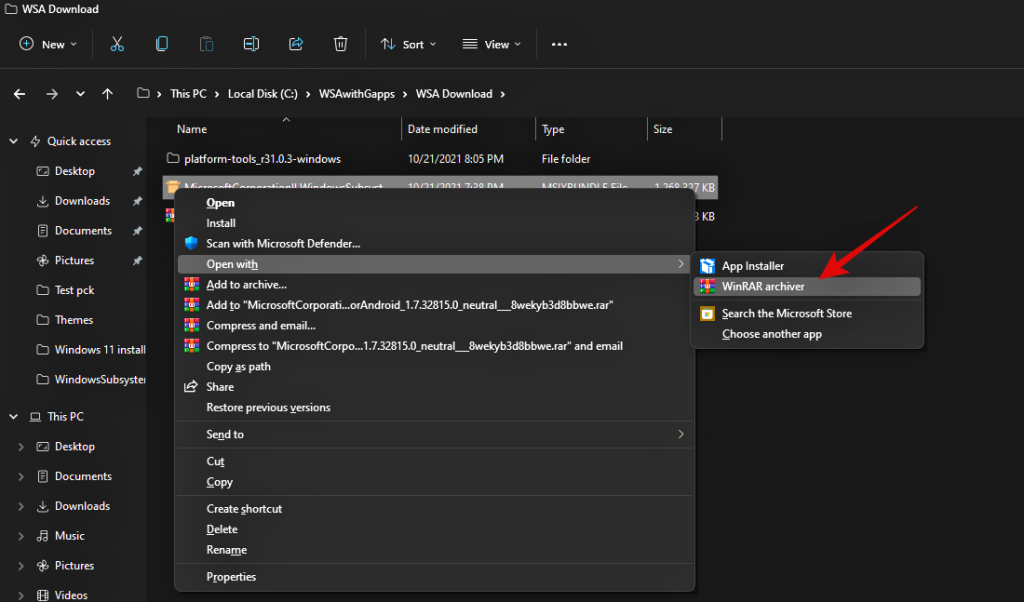
Click and select Windows Cumulative update KB5006050 from the list.
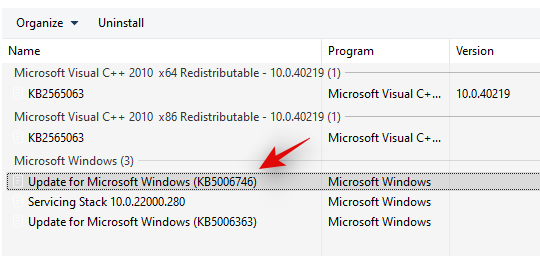
Now click on ‘Uninstall’ at the top and confirm your choice to uninstall the selected update.
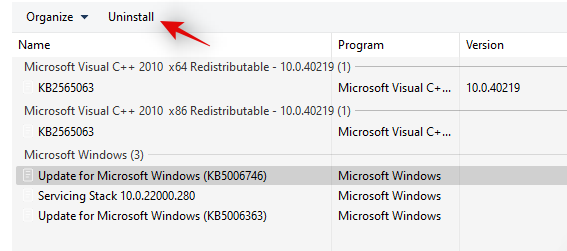
Restart your system and taskbar functionality should now be restored on your system.
Fix #11: Restore PC to a previous restore point
If you had the taskbar working at a previous point in time then we recommend you restore your PC to a previously available restore point on your system. Follow the guide below to get you started.
Press Ctrl + Shift + Esc on your keyboard and click on ‘File’. Select ‘Run new task’ once you are done.

Type in CMD and press Ctrl + Shift + Enter on your keyboard.

Now type in ‘rstrui.exe’ and press Enter on your keyboard.
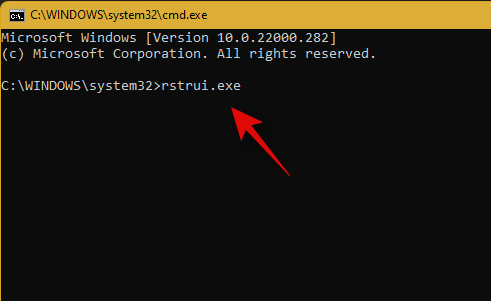
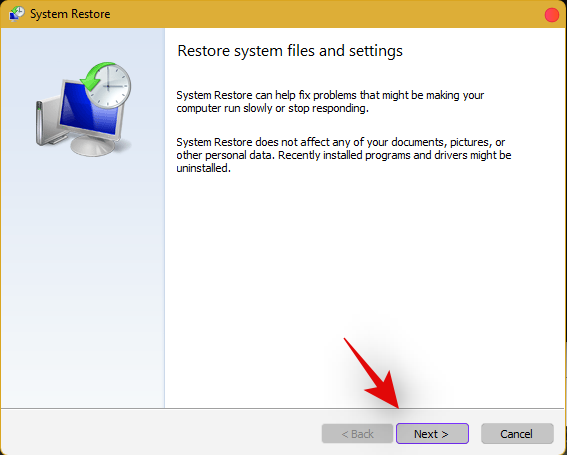
The system restore utility will now launch on your system. Click on ‘Next’.
Select the desired restore point from the list on your screen. Click on ‘Next’ once you are done.
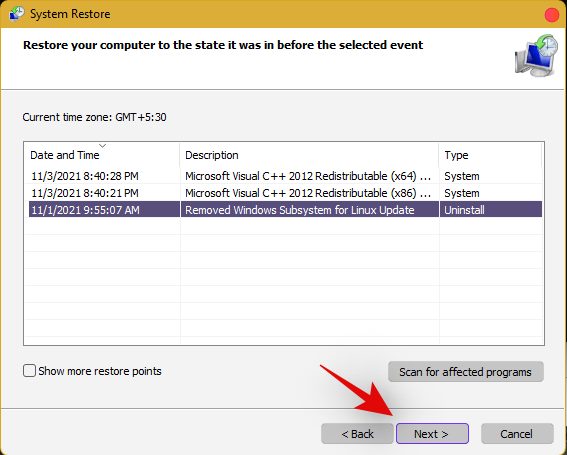
Tip: Click on ‘Scan for affected programs’ to view a list of installed programs that will be removed from your system during the restore process.
Click on ‘Finish’ once the restore finishes and restart your system.
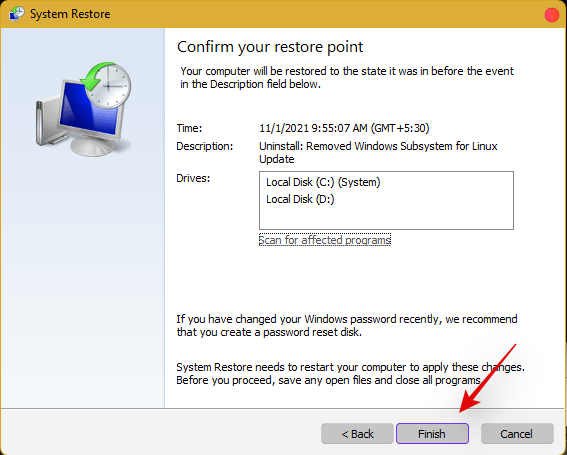
The taskbar should now be back up and running on your system again.
Fix #12: Last Resort: Create a new local admin account and transfer all your data
If by this point Taskbar still fails to work for you then it’s time for some drastic measures. You can create a new local admin account, check if Taskbar is working there, and then transfer all your data to the new account. This will be a tedious process but it is the next best way to get the taskbar working on your system without resetting your PC. Follow the guide below to get you started.
Create a new local admin account
Herre’s how you can create a new local admin account on your system.
Note: Most users facing the taskbar issue are unable to access the Settings app as well. Hence we will be using CMD to add a new local admin account to your PC. However, if the Settings app is available to you then you can use the same to add a new account as well.
Press Ctrl + Shift + Esc on your keyboard, click on ‘File’ and select ‘Run new task’.

Type in ‘cmd’ and press Ctrl + Shift + Enter on your keyboard.

CMD will now be launched as an administrator. Use the command below to add a new local admin account. Replace NAME with the Username of your choice for the new account. You can add a password later once you have confirmed that the taskbar is available in the new account.
net user /add NAME 
Once you have added the new user, use the command below to convert it to an administrator account on your PC. As usual, replace NAME with the Username for the new account you created earlier.
net localgroup Administrators NAME /add

Now type in the following to log out of your current account.
logoff

Once logged out, click on the newly added account to log in to the same. Once logged in, check if the taskbar is available in the new account. If it is, you can use the next section to transfer all your data. However, if the taskbar is still missing then you have no choice but to perform a fresh install of Windows 11 on your PC from a removable USB media drive.
Transfer all your data
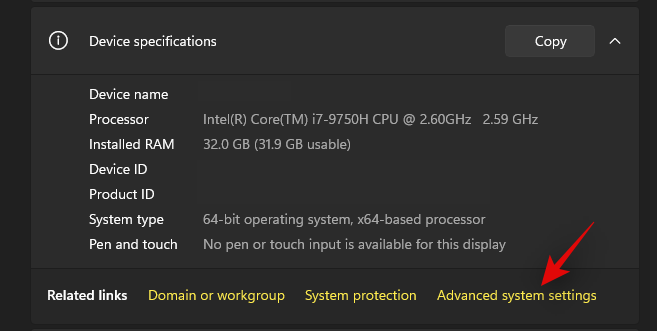
Press Windows + i on your keyboard and click on ‘About’ on your right.
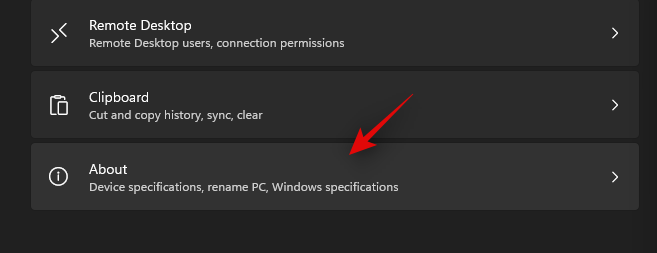
Click on ‘Advanced system settings’.
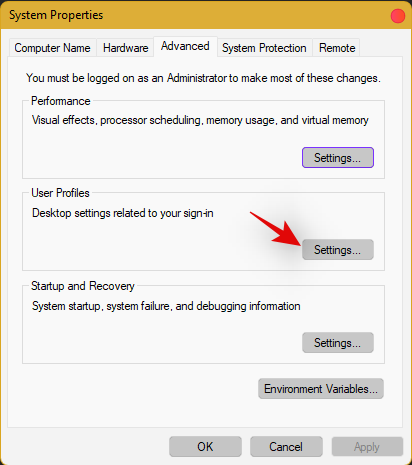
Click on ‘Settings’ under ‘User Profiles’.
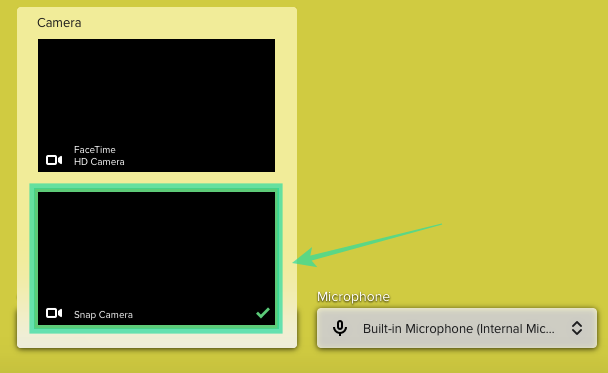
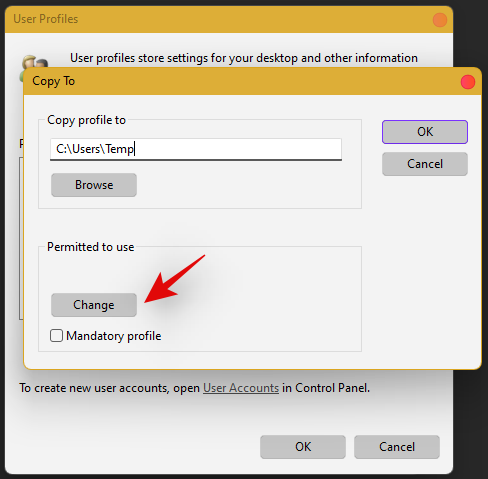
Select your original profile by clicking on it and selecting ‘Copy To’.
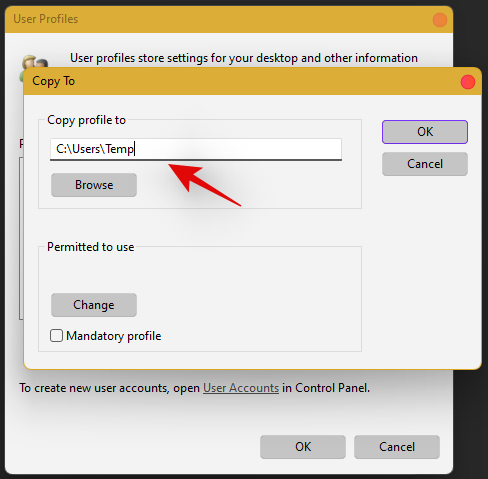
Now enter the following path under ‘Copy profile to’. Rename NAME to the username of your previous profile from where you wish to copy all your data.
C:\Users\NAME
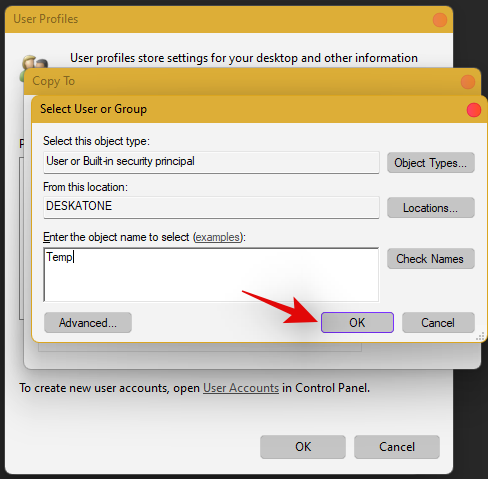
Click on ‘Change’.
Enter the name for your new user profile and press Enter on your keyboard.
Click on ‘Ok’ once you are done.
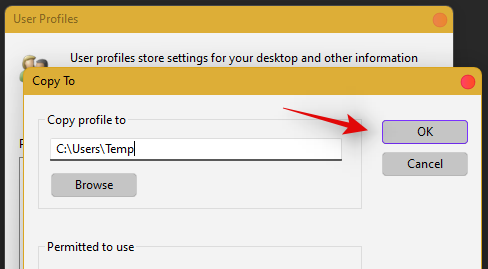
All your data will now be copied over to the new profile where the taskbar is functional on your PC. You can now delete your previous user account and set a password for your new account as well.
Frequently Asked Questions (FAQs):
With so many fixes, you are bound to have a few questions on your mind. Here are some commonly asked ones that should help you get up to speed.
How do I access Windows apps and Settings without a taskbar?
You can use the Task Manager to launch almost any program or Settings page on your system. To launch the desired program, launch the Taskbar > File > Run new task and enter the path to the program you wish to launch. Press Enter if you wish to launch the program normally or press Ctrl + Shift + Enter if you wish to launch the program with administrator privileges.
Is it safe to edit the Registry?
Registry edits are never safe as they have the potential to break your system. Fixes from trusted sources can help you avoid such issues but a good rule of thumb is to always back up your registry before making any edits. This way you can easily restore your Registry values in case some get messed up when editing the Registry.
When will Microsoft fix this issue?
Sadly, Microsoft is yet to release a proper fix for this issue. The company has tried to release a fix in the past cumulative updates to Windows 11 but they have been a hit and miss. We expect Microsoft to completely fix this issue in the upcoming feature update to Windows 11 when the OS gets the ability to run Android apps officially.
Can I update my Windows 11 after fixing the taskbar?
This will depend on the fix that you’re currently using. If you are using a date fix then you won’t be able to install updates until you restore to the current time. This will, however, cause the taskbar to be disabled again and the changes will be carried over after you update your PC. However, if you are using any other fix then you can easily update Windows.
For users with the date fix, you should try updating with the modified time first. If the update gets stuck on ‘Installing 0%’ or ‘Downloading 100%’ then change your date and time to the current date and time and update your PC. Ensure that you do not restart explorer or your PC during this process to keep the current instance of the taskbar alive on your system during the update process. This should help fix the issue for you once Microsoft officially releases an update to fix the issue.
We hope you were able to easily get the taskbar back up and running on your system using the guide above. If you face any more issues, feel free to reach out to us using the comments section below.
Related:
