Как да включите/изключите режим Инкогнито в YouTube
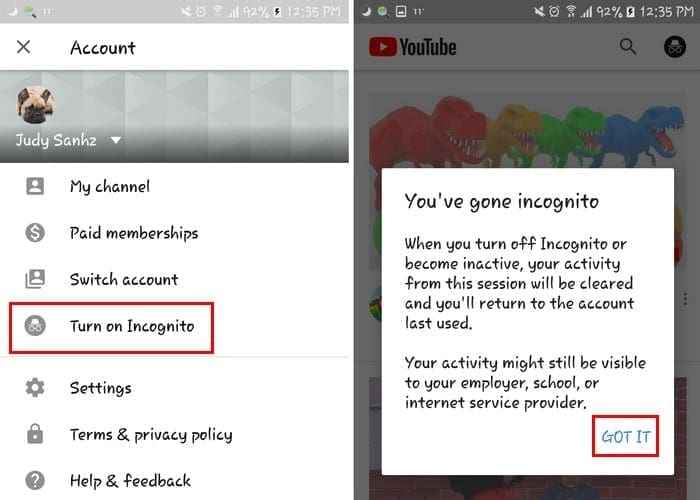
YouTube има режим Инкогнито, който предотвратява записването на вашите гледания или влиянието им върху списъците ви. Този урок ще ви научи как да го използвате.
Въпреки че в някои случаи известията са от съществено значение, понякога се превръщат в елемент на разсейване. Точно като вашия телефон, компютърът също може да ви разсейва с известия. Ето защо Windows 11 включва функцията Focus Assist, която ви позволява да избягвате разсейващи известия. Използвайки тази функция, можете да вършите работата си с пълна концентрация, вместо да се разсейвате от произволни съобщения и известия. Известията също могат да навредят на вашата производителност и затова те трябва да бъдат потиснати в точното време.
Само с няколко щраквания могат да скрият всички известия, сигнали и съобщения на вашия компютър. Ако наскоро сте надстроили системата си до Windows 11 и не можете да разберете новия потребителски интерфейс, тази статия ще ви помогне с изчерпателно ръководство за това как да използвате Focus Assist в Windows 11, за да се отървете от известия.
Свързано: Как да правите екранни снимки на Windows 11
Съдържание
Какво представлява помощ за фокусиране в Windows 11?
Focus Assist е просто режим „Не безпокойте“ за вашия компютър – точно като тези, които имате на телефоните си. Това е удобна функция на Windows 11, която ви позволява да се отървете от ненужни известия, съобщения и сигнали. Функцията за подпомагане на фокуса ви позволява да персонализирате списъка си с приоритети, вместо да блокирате компютъра си от всички известия.
Разсейването може да навреди на вашата производителност. Следователно, с функцията Focus Assist, можете да скриете всички известия, сигнали и съобщения, докато работите върху нещо важно. Вместо да ви предупреждават, те ще отидат направо в центъра за действие. Можете да видите скритите известия в центъра за действие по ваше време.
Как работи Focus Assist на Windows 11?
Focus Assist ви предоставя гъвкавостта да избирате кога да блокирате разсейващите фактори като съобщения, известия и сигнали. Можете да включите Помощ за фокусиране по всяко време или можете също да насрочите времеви диапазон в Настройките, които ще включват автоматично подпомагане на фокуса.
Функцията за подпомагане на фокуса ви позволява да създадете списък с приоритети, за да сте сигурни, че няма да пропуснете никакви известия от най-важните хора във вашия контакт. Хората от вашия списък с приоритети винаги могат да се свържат с вас, дори когато се занимавате с важна работа. В случай, че имате нужда от пълна концентрация по време на работа, можете също да изберете да блокирате всички известия. За да видите всички блокирани известия, които сте получили, докато сте били на работа, отворете центъра за действие на вашата система.
Свързано: Как да спрете изскачащи прозорци в Windows 11
Как да активирате помощ за фокусиране
Помощта за фокусиране е изключена по подразбиране. Но ако искате да го активирате, за да спре да получава известия, следвайте стъпките по-долу.
Метод №1: Използване на настройки
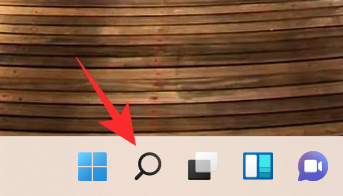
Кликнете върху иконата за търсене , която изглежда като лупа в лентата на задачите.
Въведете помощ за фокусиране в лентата за търсене.
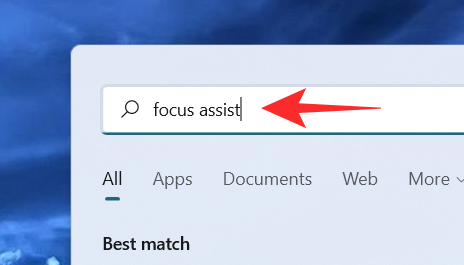
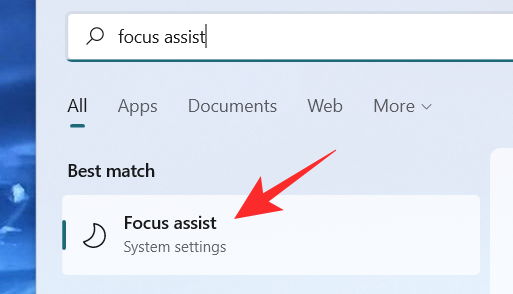
Щракнете върху системните настройки на Focus Assist .
На екрана се появява прозорецът за системни настройки на Focus Assist. Под Помощ за фокусиране изберете една от тези опции:
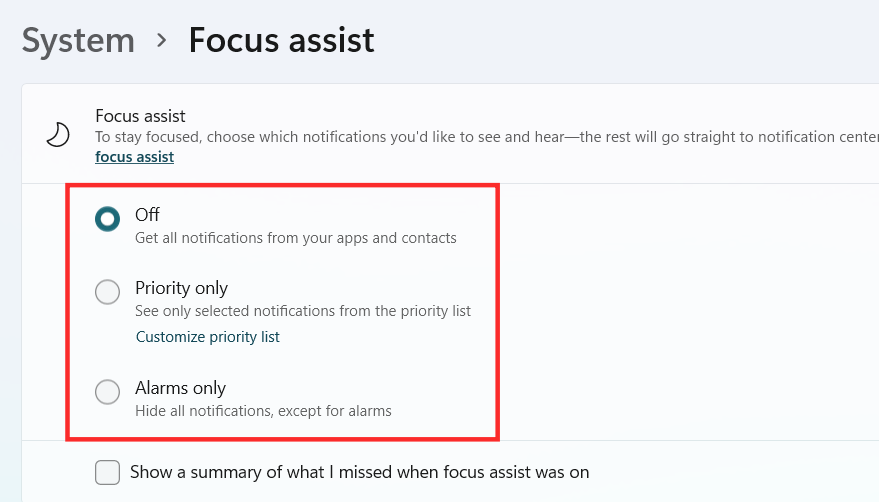
Focus Assist вече трябва да бъде активиран в Windows 11 в зависимост от избора, който сте направили.
Метод №2: Използване на център за действие
Щракнете върху Центъра за действие, който показва иконата на Wifi, силата на звука и батерията заедно.
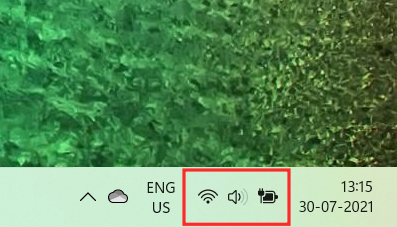
Точно под иконата на Bluetooth можете да видите иконата Focus Assist , която изглежда като полумесец.
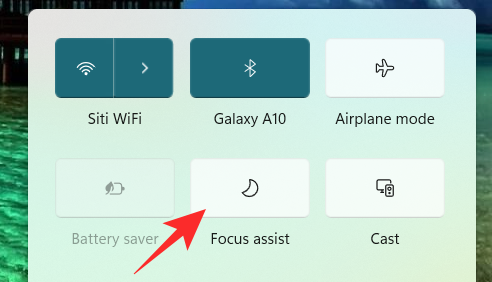
По подразбиране функцията Focus Assist ще бъде деактивирана. Щракнете върху него и функцията директно ще бъде настроена само на приоритет .
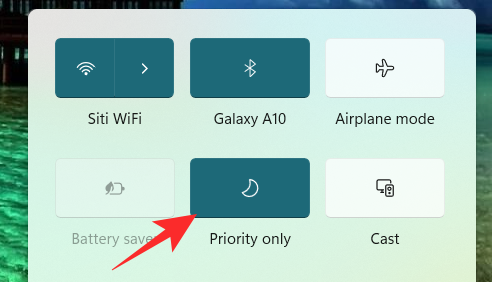
Кликнете върху него отново, за да зададете функцията Focus Assist на само аларми .
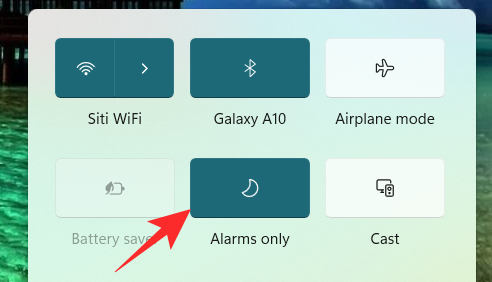
За да деактивирате функцията Focus Assist, щракнете върху нея отново.
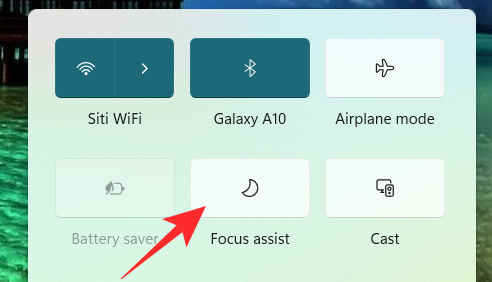
Само като щракнете върху иконата Focus Assist в Центъра за действие, можете да промените функцията му на изключена, само приоритет и само аларми. Въпреки това, за да направите други необходими промени в настройките на Focus Assist от Центъра за действие, щракнете с десния бутон върху иконата Focus Assist в Центъра за действие и щракнете върху Go to Settings .
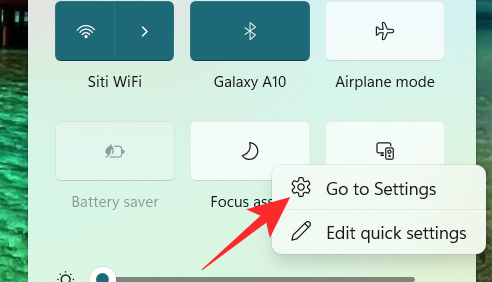
Това ще ви отведе до приложението Настройки, където можете лесно да направите всички планирани промени. И това е! Помощта за фокусиране вече трябва да бъде активирана в Windows 11 директно от центъра за действие.
Метод №3: Използване на редактора на групови правила
Можете също да активирате режима за подпомагане на фокуса с помощта на редактора на групови правила, в случай че сте администратор. Използвайте ръководството по-долу, за да ви помогне с процеса.
Натиснете Windows + Rна клавиатурата си и въведете следното в диалоговия прозорец Изпълнение. Натиснете enter на клавиатурата си, за да отворите редактора на групови правила.
gpedit.msc
Придвижете се до следния възел, посочен по-долу.
User configuration > Administrative Templates > Start Menu and Taskbar > Notifications
Намерете и щракнете двукратно върху стойността „Изключване на тихите часове“ отдясно.
Сега изберете една от следните опции в зависимост от текущите ви нужди в горния ляв ъгъл на прозореца със свойства.
И това е! Помощта за фокусиране вече ще бъде активирана или деактивирана от редактора на групови правила в зависимост от вашите предпочитания. За съжаление, не можете да персонализирате поведението за подпомагане на фокуса като администратор. Тази способност все още принадлежи на потребителя. Можете да активирате или деактивирате възможността за използване на Focus Assist за система само с помощта на редактора на групови правила.
Как да използвате Focus Assist
Focus Assist има различни настройки и опции за персонализиране, които могат да ви помогнат да промените поведението му според текущите си нужди. Използвайте едно от ръководствата по-долу, което най-добре отговаря на текущите ви изисквания.
Метод №1: Активирайте режима само за аларми
Режимът само за аларми в прозореца Focus Assist ви позволява да скриете всички известия с изключение на алармата. Следвайте стъпките, посочени по-долу, за да активирате режима само за аларми.
Щракнете върху Търсене иконата в лентата на задачите.

Тип Помощ за фокусиране

Щракнете върху Помощ за фокусиране .

Под Помощ за фокусиране щракнете върху Само аларми, за да спрете да получавате известия, с изключение на аларми.
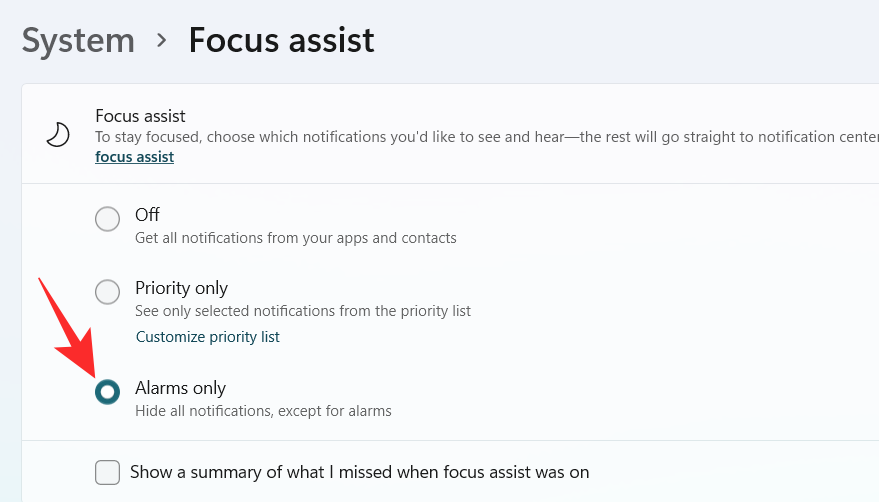
И това е! Сега ще бъдете информирани само за аларми във вашата система. Всички други известия, независимо от техния приоритет, ще бъдат заглушени в Windows 11.
Метод №2: Активирайте приоритет само с персонализиран списък
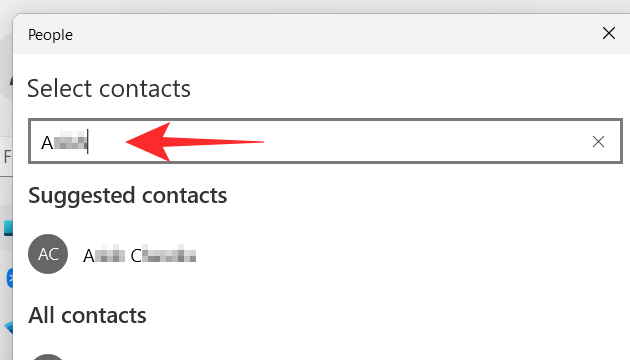
На екрана ще се появи прозорецът Хора . Изберете предпочитаните от вас хора, като напишете имената им в лентата за търсене.
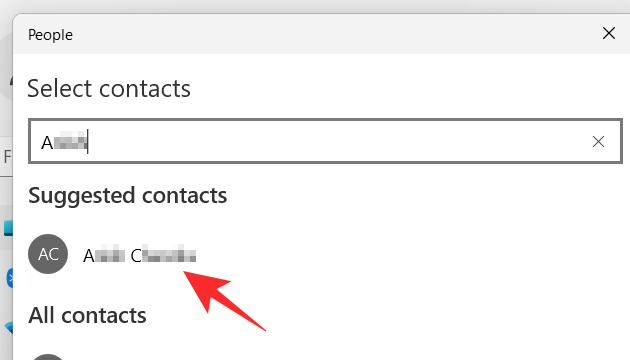
Кликнете върху името на лицето.
Щракнете върху бутона за отметка в долния десен ъгъл на прозореца Хора.
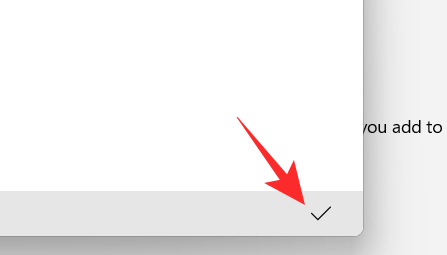
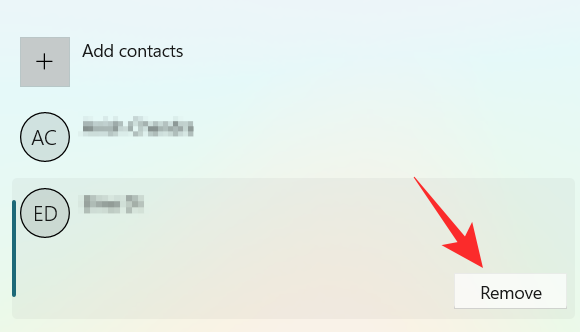
Вашият списък с приоритети е създаден. Сега, ако искате да премахнете контакт от списъка си с приоритети, щракнете върху контакта под Хора .

Щракнете върху Премахване .
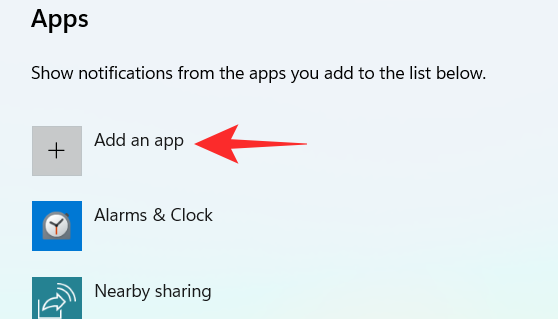
Сега в секцията Приложения можете да изберете приложенията, които могат да пробият вашите тихи часове. За да позволите на приложенията да показват известия, щракнете върху бутона Добавяне на приложение .
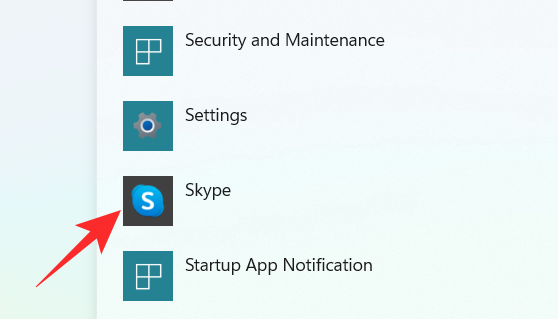
На екрана ви се появява списък с приложения. Щракнете върху приложението, което искате да добавите към списъка си с приоритети.
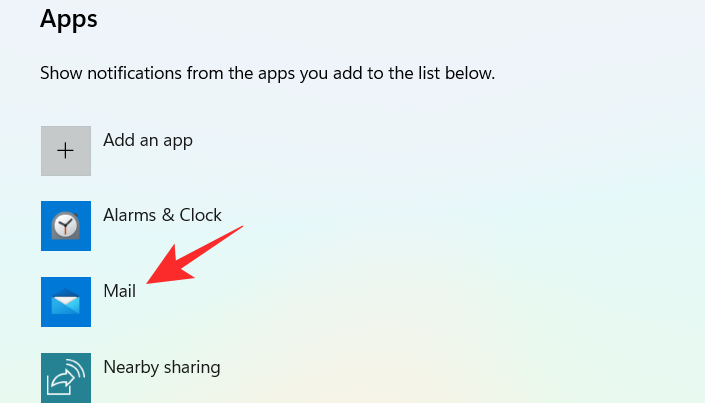
Продължете този процес, докато не приключите с избора на приложенията. В случай, че искате да премахнете приложение от списъка си с приоритети, можете просто да щракнете върху приложението в секцията за приложения .
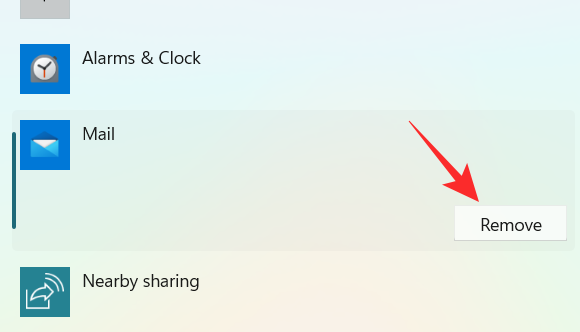
Щракнете върху Премахване .
И по този начин можете да персонализирате списъка с приоритети в Focus Assist и да го използвате в своя полза, за да получавате известия само от важни контакти.
Метод №3: Активирайте обобщението на известията, когато подпомагането за фокусиране е деактивирано
Щракнете върху Търсене иконата в лентата на задачите.

Тип Помощ за фокусиране

Щракнете върху Помощ за фокусиране .

Щракнете върху желаната от вас опция Само приоритет или Само аларми .
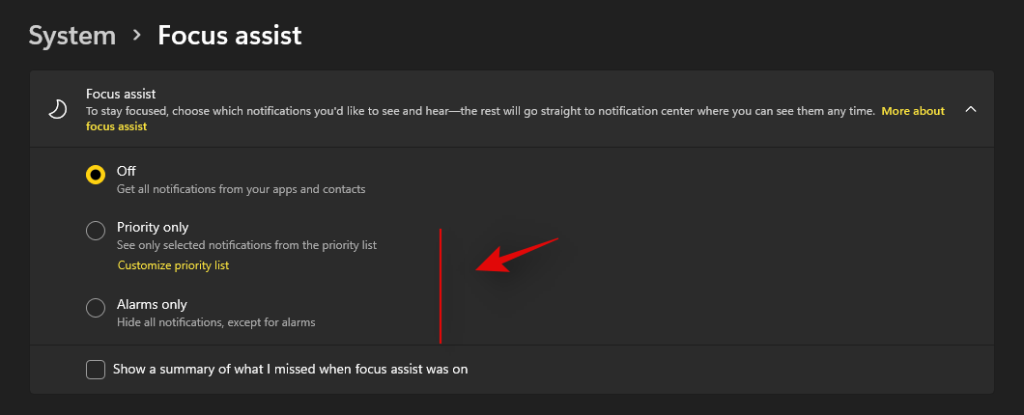
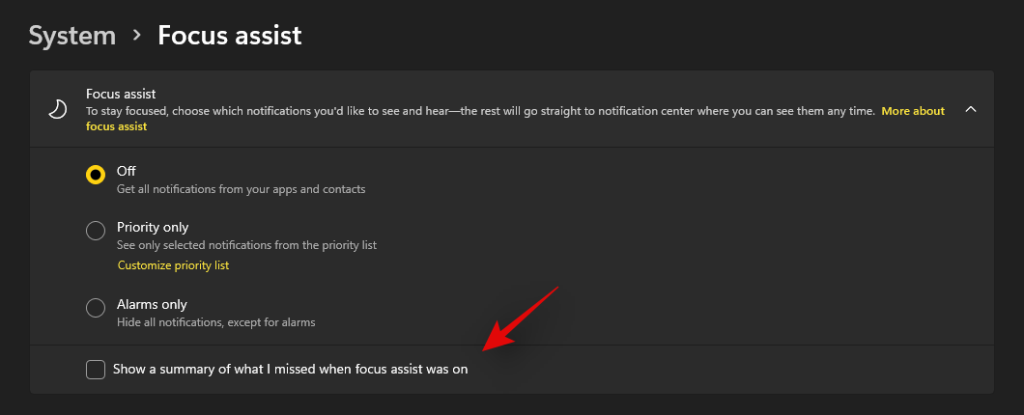
Поставете отметка в квадратчето Показване на обобщение на това, което съм пропуснал, когато е включена помощ за фокусиране .
Метод №4: Активирайте или деактивирайте автоматичните правила за подпомагане на фокуса
The Automatic rules in Focus assist allow you to determine the conditions that can activate the Focus assist automatically. There are four different automatic rules in the Focus Assist settings window that can be customized. Check out the steps mentioned below to customize automatic rules in Focus assist.
Click on the Search icon on the taskbar.

Type Focus assist

Click on Focus Assist.

Under the Automatic rules section, there are four sections. Turn on the toggle switch for the option you want to choose.
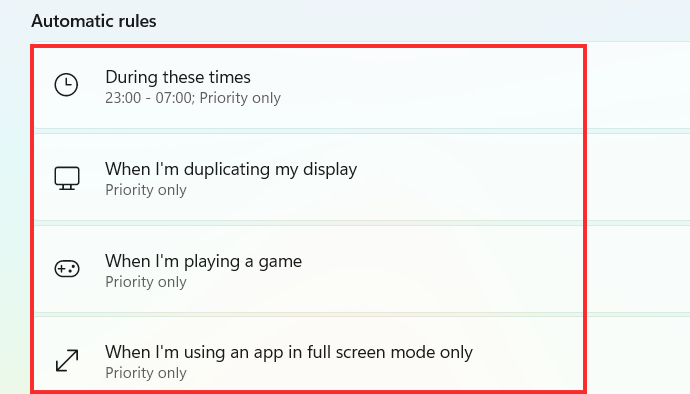
Now, let’s have a look at how to customize the above-mentioned options under Automatic rules.
1. During these times
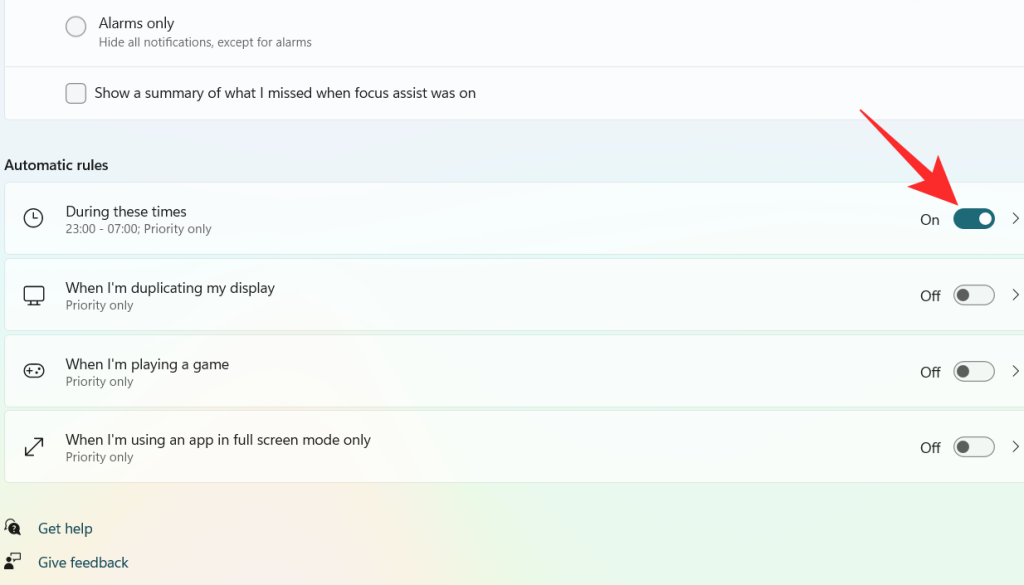
Turn on the toggle switch, which is extreme right to the During these times tab.
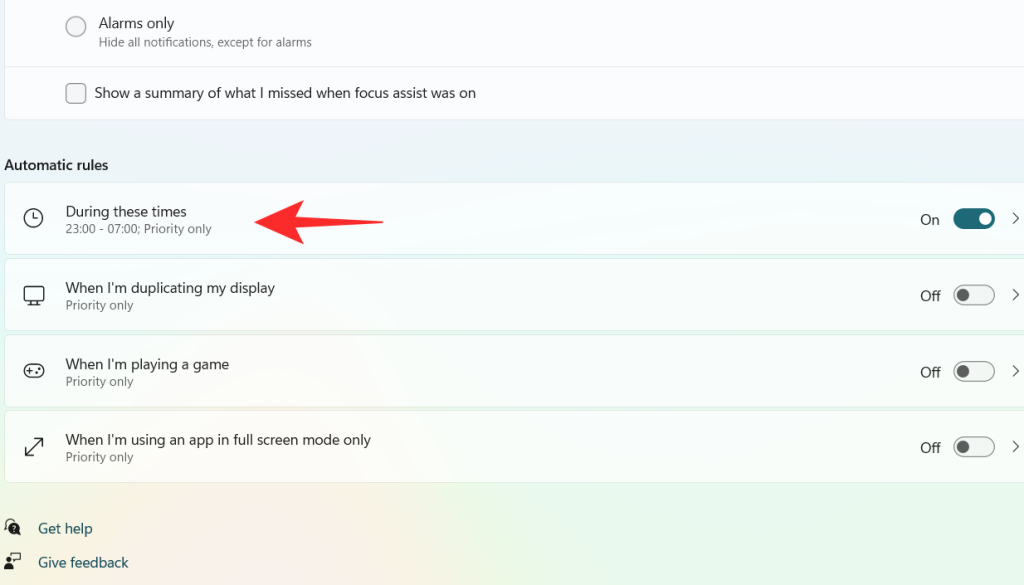
Click on the During these times tab.
Click on the box under Start time.
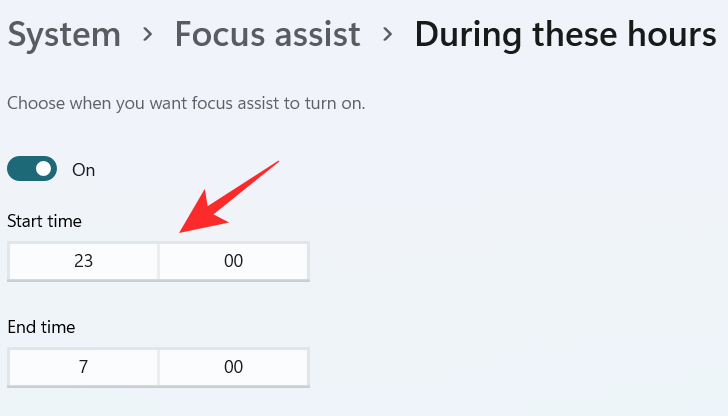
Select the time when you want the Focus Assist to turn on and click on the tick on the bottom of the dropdown menu.
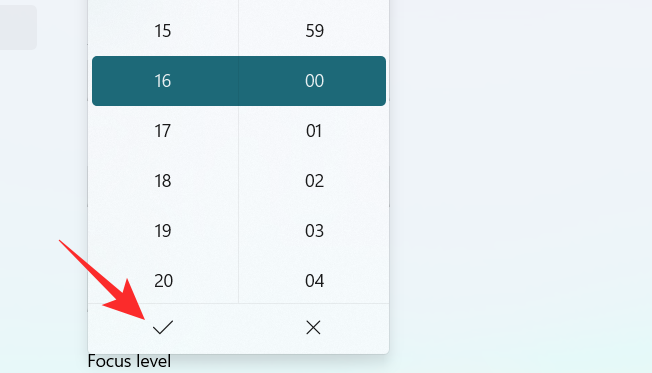
Click on the box under End time.
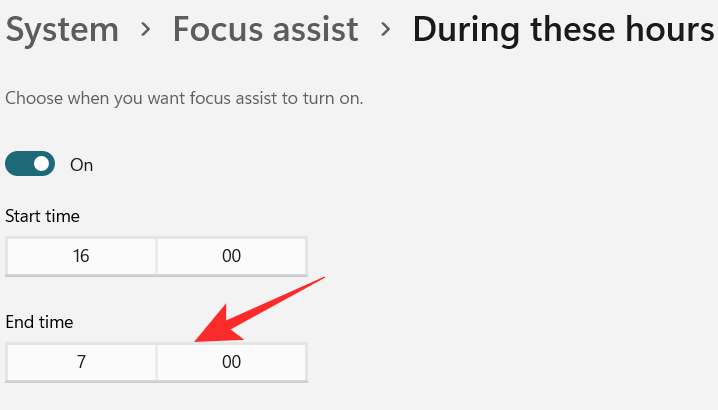
Select the time when you want the Focus Assist to turn off and click on the tick on the bottom of the dropdown menu.
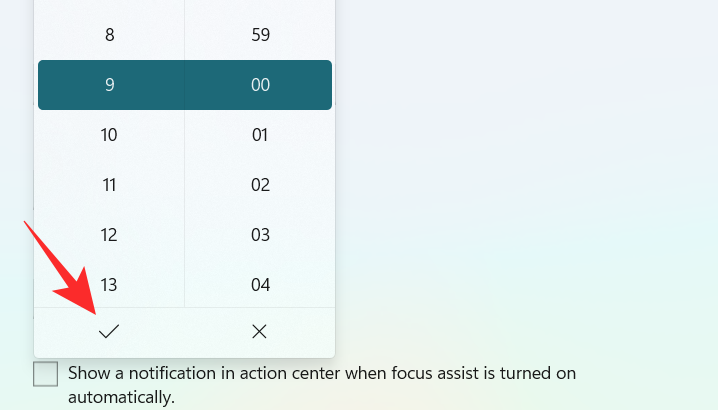
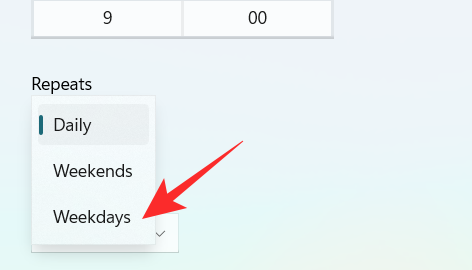
Click on the box under Repeats.
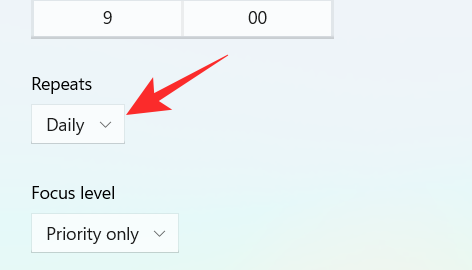
A small dropdown menu appears. Set the schedule to Daily, Weekends, or Weekdays.
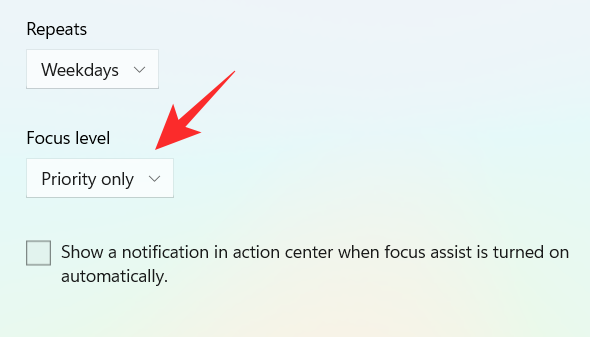
Click on the box under Focus level.
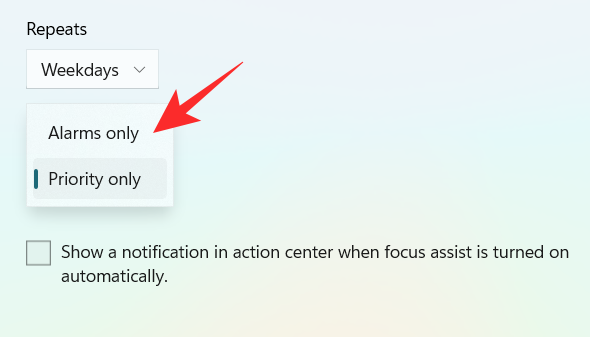
A small dropdown menu appears. Choose between Alarm only or Priority only.
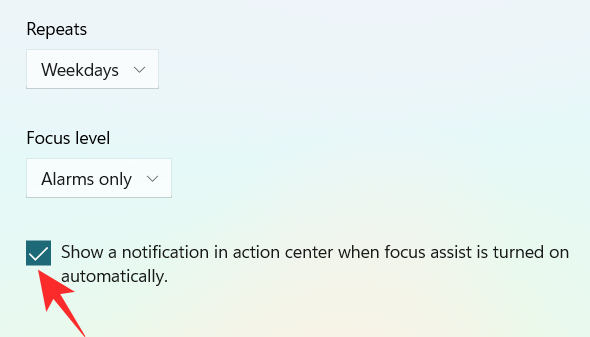
Finally, to get a notification when the Focus assist is turned on, check the box “Show a notification in action center when Focus assist is turned on automatically“.
2. When I’m duplicating my display
Turn on the toggle switch, which is extreme right to the When I’m duplicating my display tab.
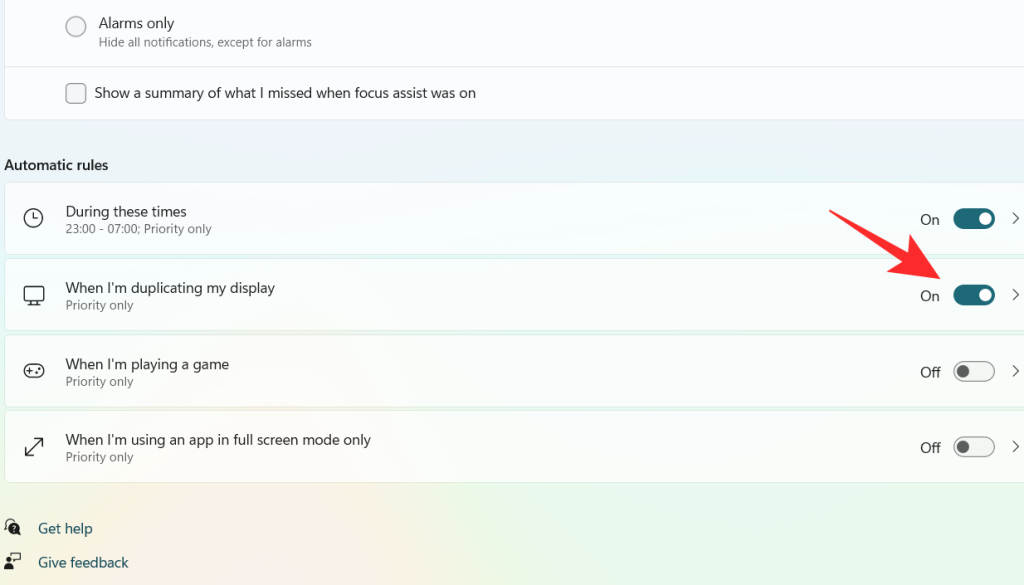
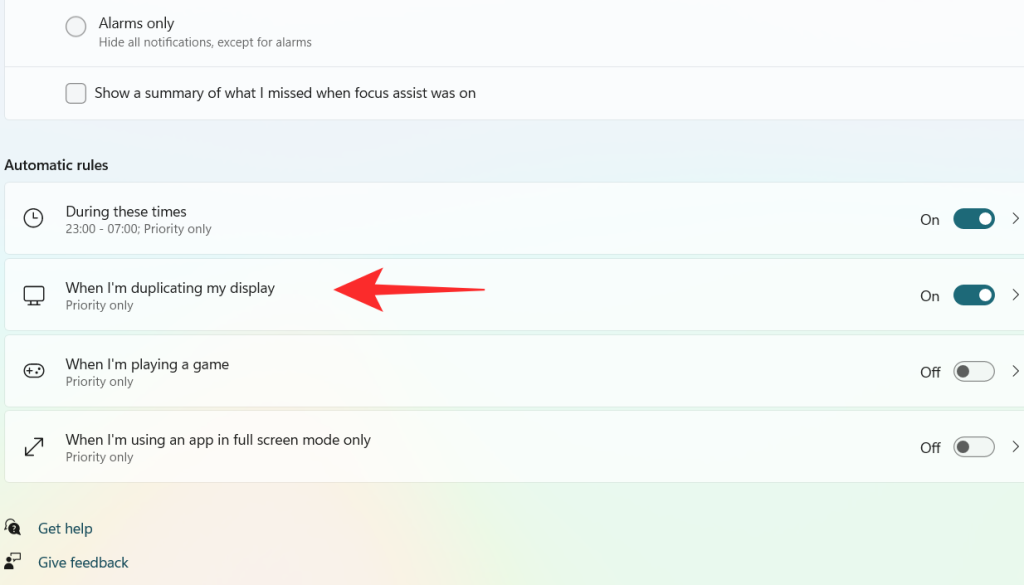
Click on the When I’m duplicating my display tab.
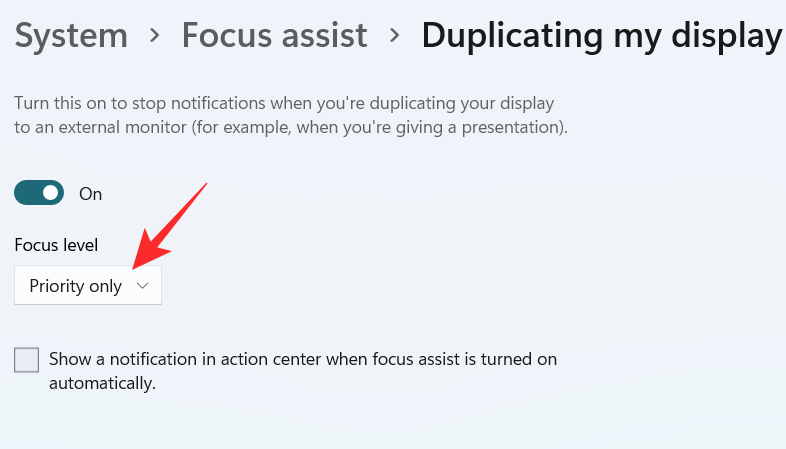
Click on the box under Focus level.
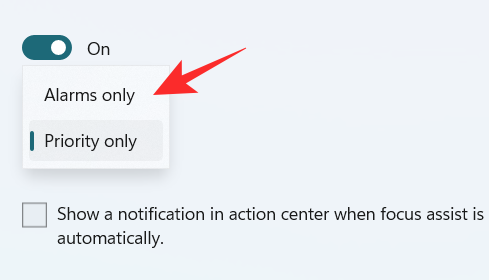
A dropdown menu appears, click on your desired option between Priority only and Alarms only.
To get a notification when the Focus assist is turned on, check the box “Show a notification in action center when Focus assist is turned on automatically“
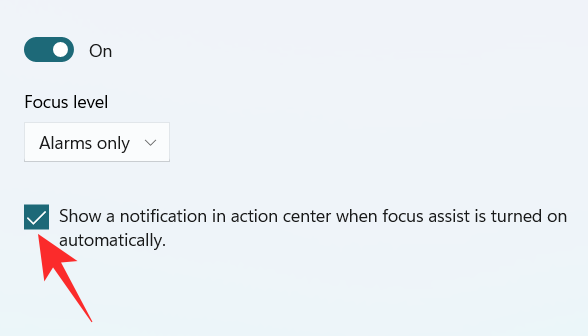
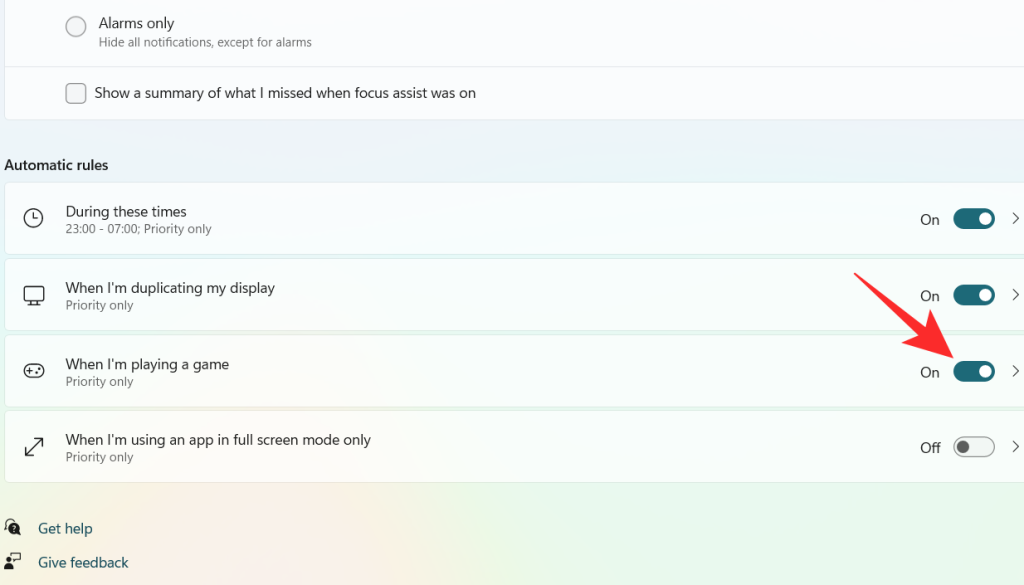
3. When I’m playing a game
Turn on the toggle switch, which is extreme right to the When I’m playing a game tab.
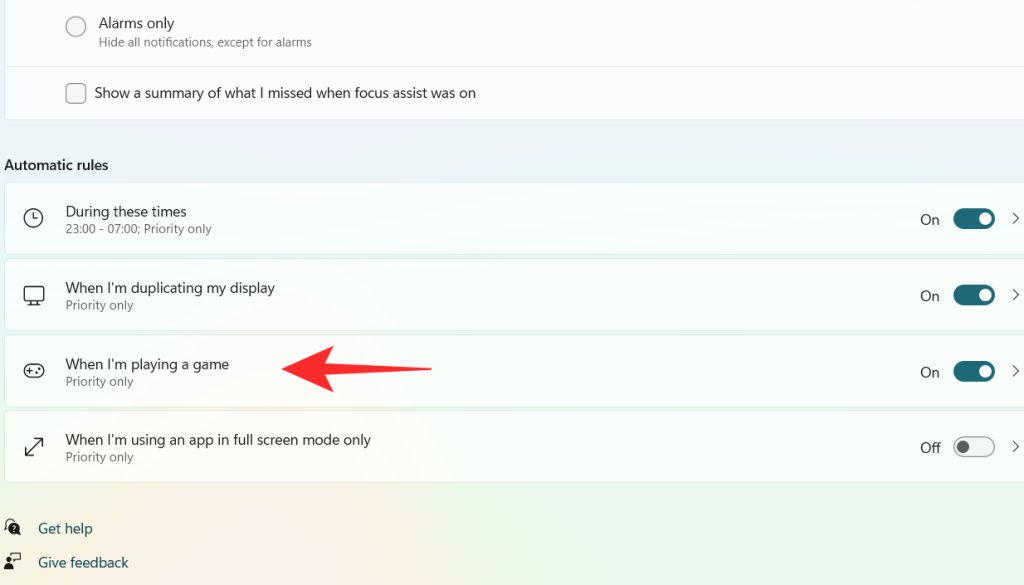
Click on the When I’m playing a game tab
Click on the box under Focus Level.
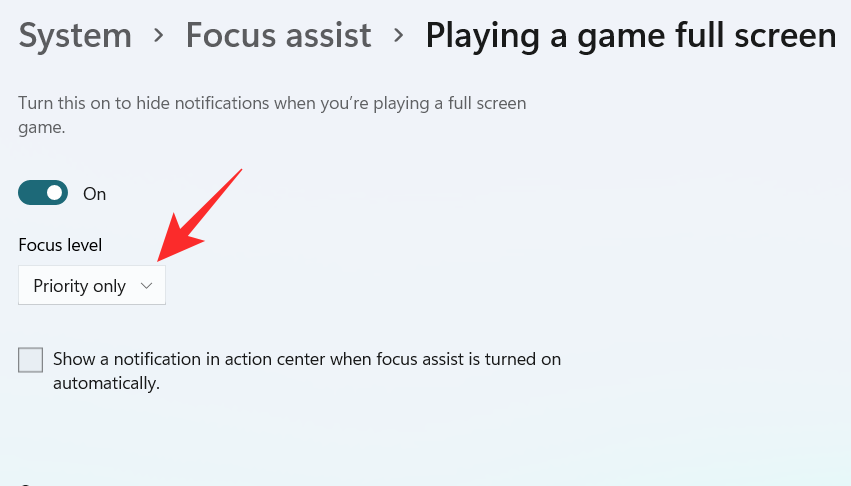
A dropdown menu appears, click on your desired option between Priority only and Alarms only.

To get a notification when the Focus assist is turned on, check the box “Show a notification in action center when Focus assist is turned on automatically“

4. When I’m using an app in full-screen mode only
Turn on the toggle switch, which is extreme right to the When I’m using an app in full-screen mode only tab.
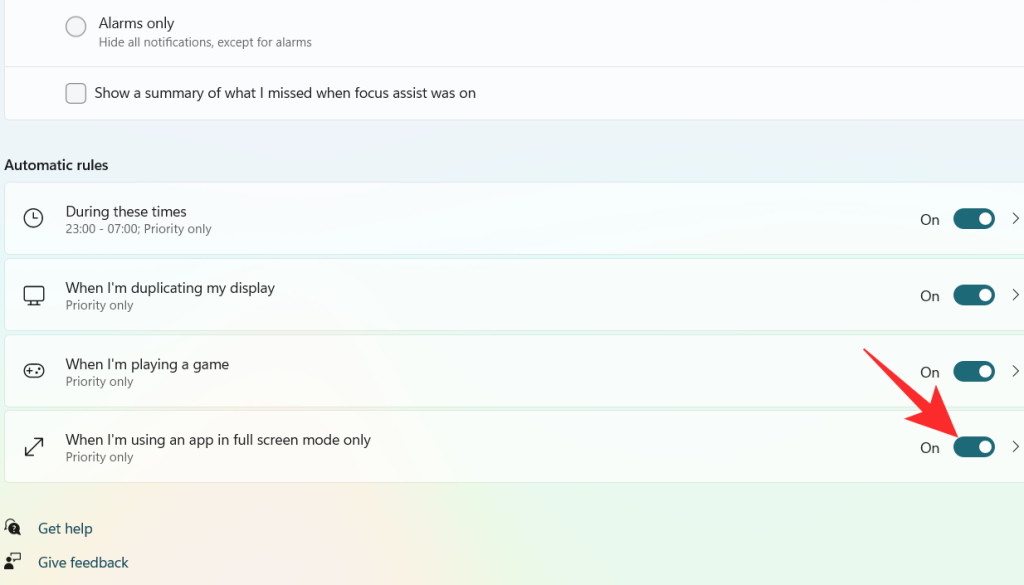
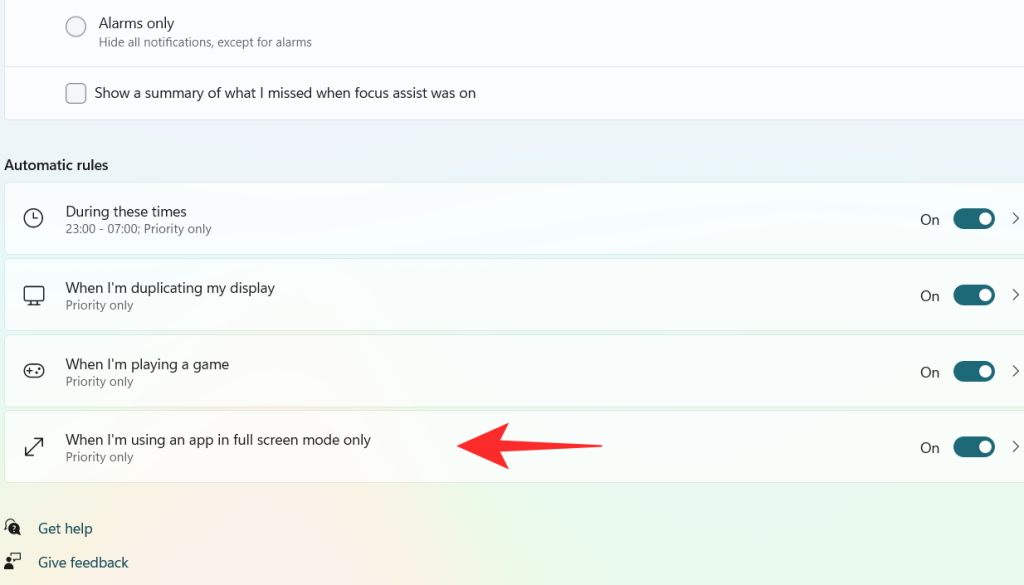
Click on the When I’m using an app in full-screen mode only tab
Click on the box under Focus Level.
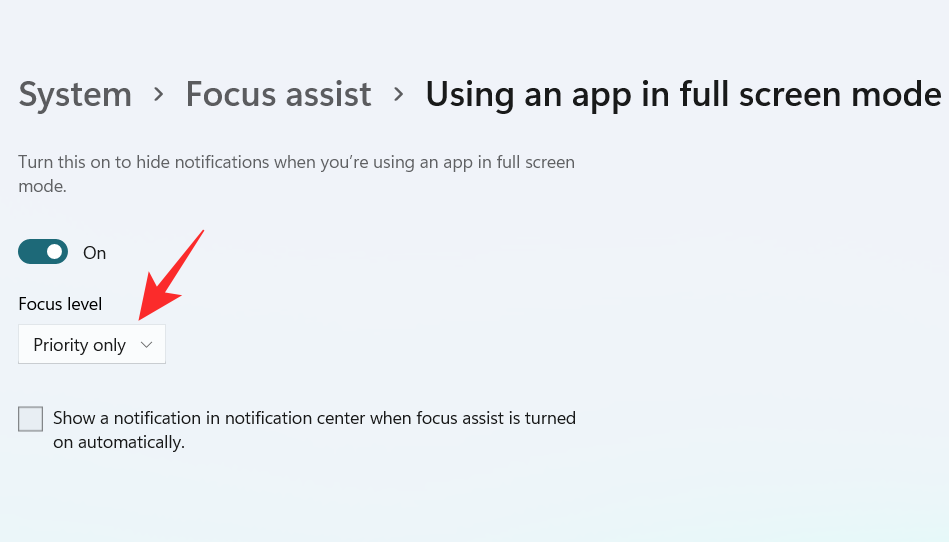
A dropdown menu appears, click on your desired option between Priority only and Alarms only.

To get a notification when the Focus assist is turned on, check the box “Show a notification in action center when Focus assist is turned on automatically“.

Using the above customizations, you can schedule and control Focus assist’s behavior according to your workflow for maximum efficiency no matter the task at hand.
Can you remove the Focus Assist icon from the Action Center?
Yes, you can easily remove the Focus Assist icon from the Action Center. Windows 11 brings a host of new cosmetic and UI changes and one of them has been the ability to customize your action center. You can now add or remove icons from the action center depending on your needs and opt for a more minimal or productive look depending on your workflow.
For now, you can only add and remove certain system modules but in the future, some users expect Microsoft to add the support for third-party apps as well. This would be a much welcome change that would allow you to manage dedicated system settings managed by third-party apps directly from your action center.
Customize your Focus assist icon in the action center
Depending on your current needs you can either remove or add the Focus assist module to the action center. Use one of the guides below depending on your current requirements.
1. Remove it
Click on the Action Center which shows the icon of Wifi, volume, and battery together.

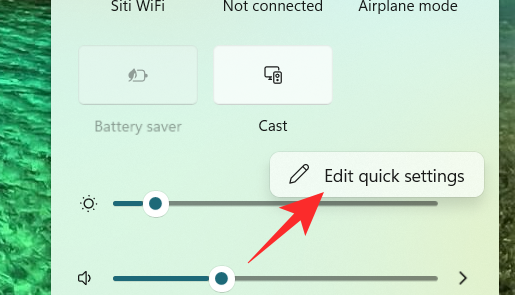
Right-click on an empty place or on any icon and click on Edit quick settings.
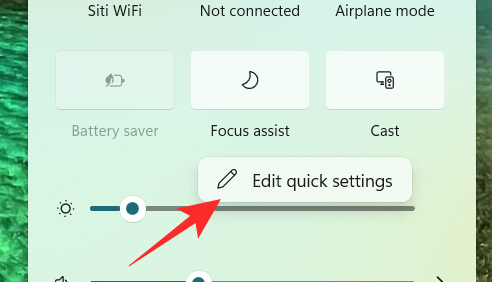
Click on the unpin symbol at the top right corner of the Focus Assist icon to remove the Focus Assist icon from the Action Center.
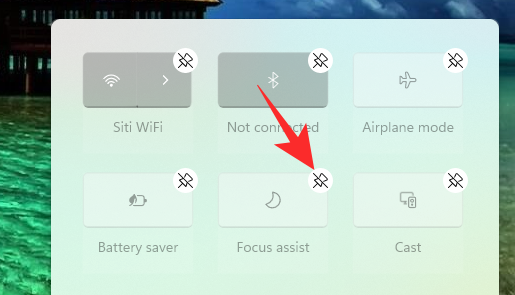
The Focus assist module should now have been removed from your action center. If not, we recommend you restart explorer.exe or your PC for the changes to take effect.
2. Restore it
Click on the Action Center which shows the icon of Wifi, volume, and battery together.

Right-click on an empty place or on any icon and click on Edit quick settings.
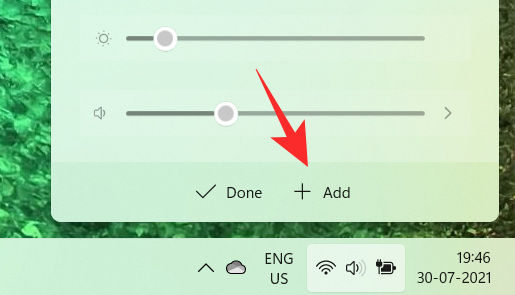
Now, click on the Add button at the bottom of the action center.
A list of different settings appears. Click on Focus Assist from the list and you will get to see the Focus Assist icon on the Action Center again.
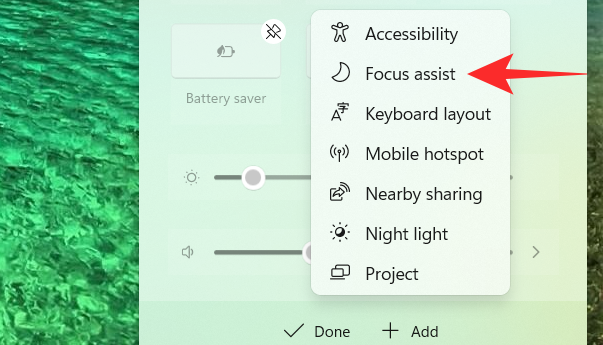
And that’s how you can add the Focus assist module back in the action center.
Focus assist keeps turning on automatically Issue: How to fix
If Focus assist keeps turning on automatically then there could be a couple of reasons for this behavior. Depending on its cause we can either fix it or use a workaround to manage the issue. Let’s find out why Focus assist keeps turning on automatically on your system.
Fix #1: Check Automatic Rules
Are you having this issue when projecting to a secondary display? Or when sharing your screen with a public computer? Then it is likely that focus assist is getting turned on automatically due to the default automatic rules in Windows 11.
By default, focus assist will silence all notifications in such scenarios to help maintain your privacy. But this can be counterproductive in case you are just trying to use a bigger display from a portable system like a laptop or an NUC.
It could also be that scheduled Focus assist was turned on your system by mistake which will enable and disable Focus assist automatically during certain hours. If any of these situations sounds like what you are facing then you can use the guide below to disable all automatic rules that enable Focus assist during certain scenarios and workflows on Windows 11. Let’s get started.
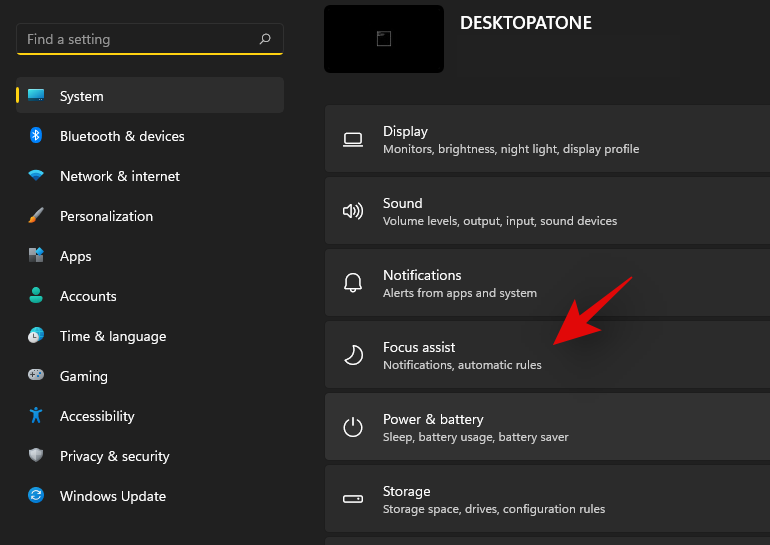
Press Windows + i on your keyboard to open the Settings app. Ensure ‘System’ is selected on your left and then click on ‘Focus Assist’ on your right.
Go down to automatic rules and turn off the following toggles.
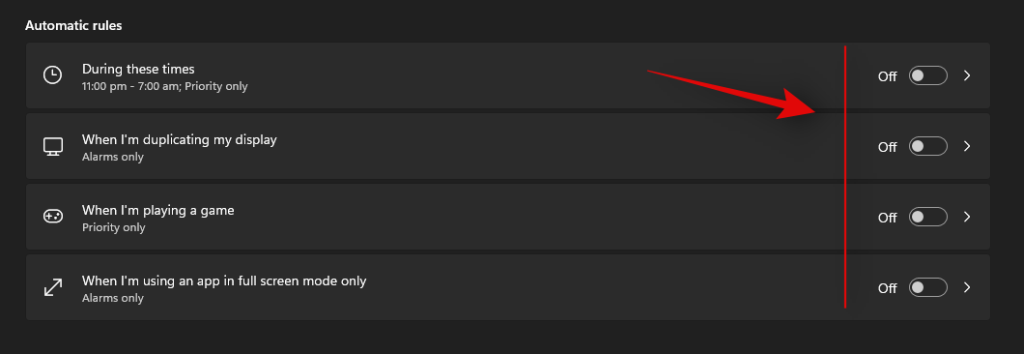
Once these rules are disabled, Windows 11 will not turn on Focus assist automatically on your system.
Fix #2: Turn of GeForce Overlay
This is another way to solve Focus assist misbehaving on your system. If you have a dGPU from Nvidia and are using the GeForce experience app then we recommend disabling its overlay option and restarting your system. With the automatic rule for ‘When I’m using an app in full-screen mode only’ turned on, Windows will mistake the Nvidia overlay detection on your desktop for a full-screen app which will trigger the Focus assist settings in return. You can also disable this automatic rule in case you wish to keep the Geforce Experience overlay enabled on your system.
Focus assist greyed out, option missing or not working; How to fix
Is the focus assist option missing from Windows 11 settings app? Is the module greyed out in the action center? This is a known bug that shows up occasionally with every feature update of Windows. Even certain versions of Windows 10 faced huge issues with this bug until a fix was released.
Fix #1: Enable in Group Policy Editor
If Focus assist seems to be missing from your system then it is likely disabled using the group policy editor. If your PC is managed by your organization or your workplace then it is likely disabled by your administrator. If you have access to the group policy editor then you can use the guide below to enable focus assist on your system. However, in case you have limited access, then you might need to get in touch with your administrator to enable Focus assist on your system.
Press Windows + R on your keyboard to bring up the Run dialog box and type in the following command to launch the Group Policy Editor. Click on ‘Ok’ once you are done.
gpedit.msc
Navigate to the following node.
User configuration > Administrative Templates > Start Menu and Taskbar > Notifications
Double click on ‘Turn off Quiet Hours’ on your right.
Click and select ‘Disabled’ in the top left corner.
Click on ‘Ok’ to save your changes.
And that’s it! Focus assist should now be enabled on your system in case it was disabled using the group policy editor.
Fix #2: Reinstall and repair default Windows UWP apps and system apps
If Focus assist is still missing from your system then let’s check if all the necessary apps and utilities are installed properly on your system. Use the guide below to check and repair Windows 11’s basic apps and functionality on your system.
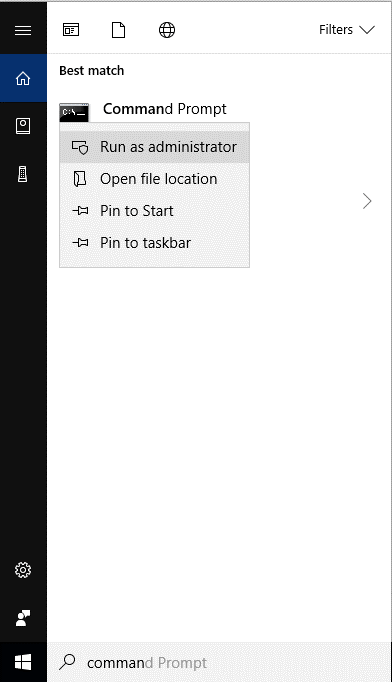
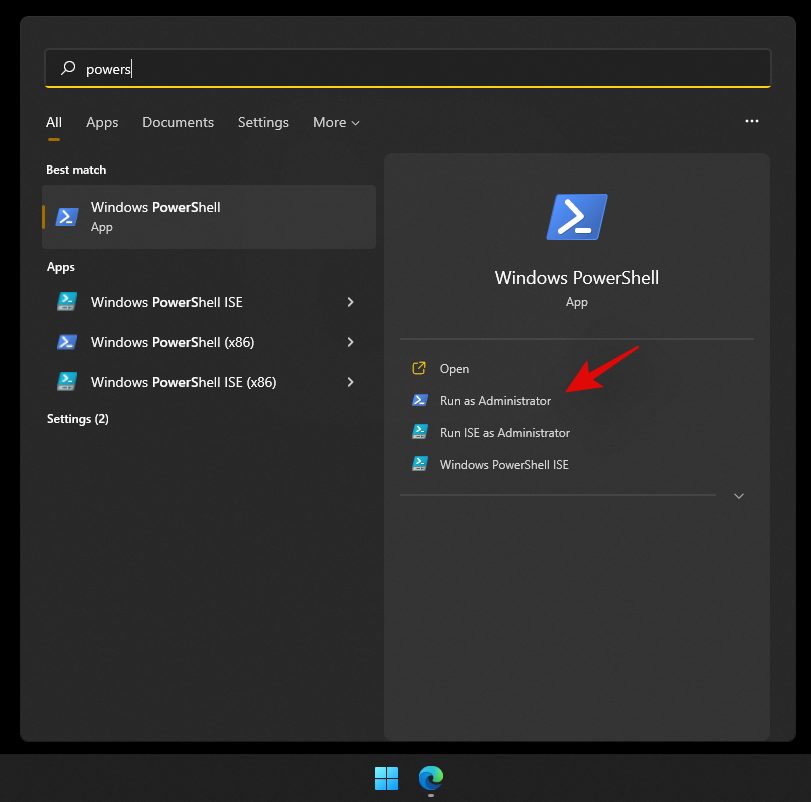
Press Windows + S and search for PowerShell. Click on ‘Run as administrator’ once it shows up in your search results.
Once PowerShell is launched, execute the following command to reinstall all UWP apps and check and repair other default utilities required by Windows 11 in the background.
Get-AppXPackage -AllUsers | Foreach {Add-AppxPackage -DisableDevelopmentMode -Register "$ ($ _. InstallLocation) \ AppXManifest.xml"}

Wait for the process to finish and restart your PC for good measure. If Focus assist was corrupted or missing from your system, then this fix should help solve all your issues.
Fix #3: Check for a Windows Update
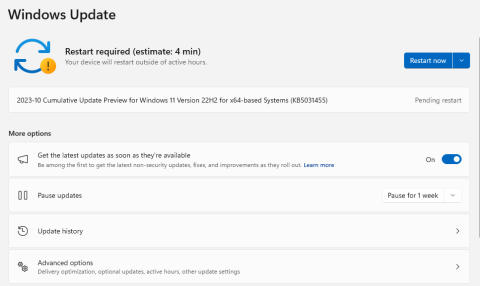
Haven’t updated in a while? We recommend checking for recent Windows Updates. While updates rarely disable major features like Focus assist, a new feature update installation can help refresh your registry, fix mismatched values and more importantly iron out bugs that could be preventing you from accessing Focus assist on your system. Use the guide below to check for recent Windows updates on your system.
Press Windows + i on your keyboard to open the Settings app and click on ‘Windows Update’ on your left.
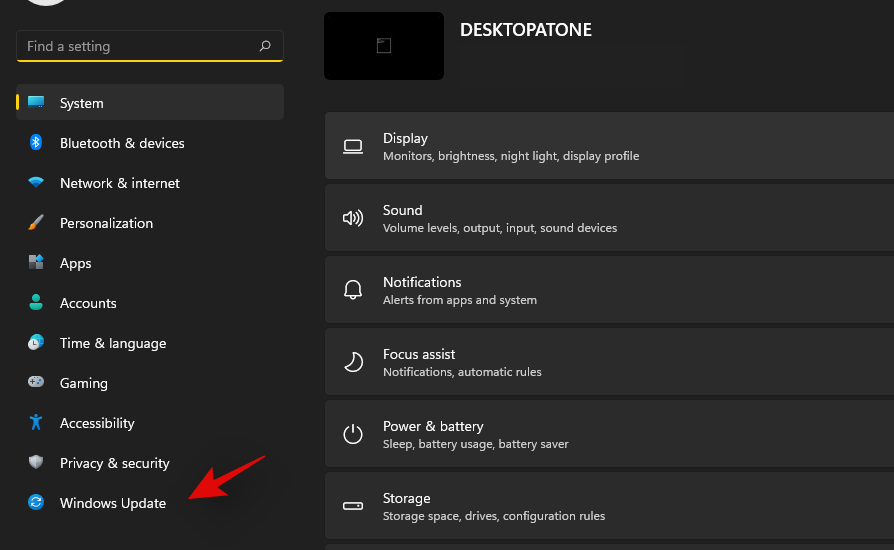
Click on ‘Check for updates’.

In case any new updates show up, let them install on your system and restart if prompted. In case you are using a metered connection then you will need to click on ‘Download now’ manually to avoid any unexpected data charges.
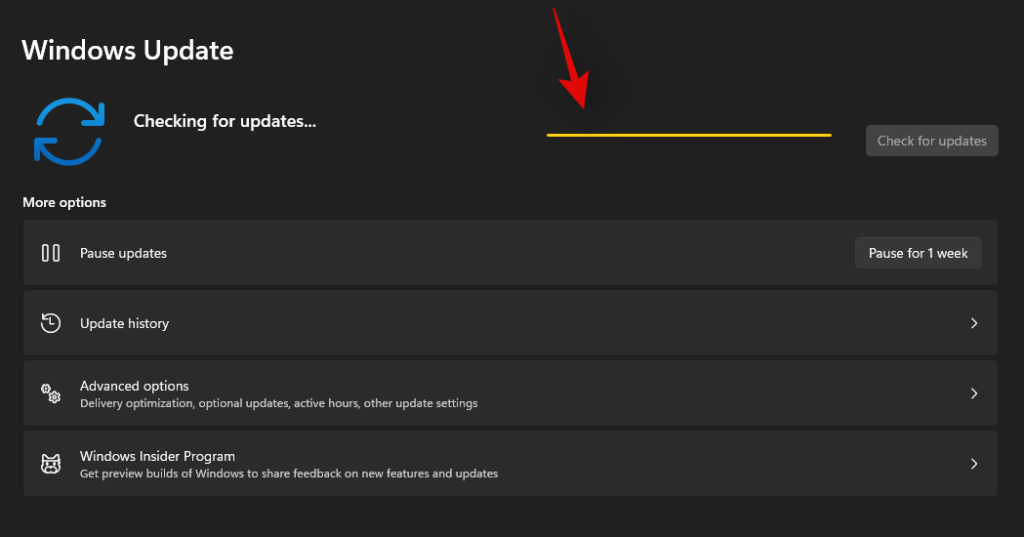
Once the necessary Windows updates are installed on your system, Focus assist should be restored in your action center and the Settings app.
Last Resort: Reset your PC
If Focus assist is still missing from your PC then this indicates a corrupted Windows installation on your system. The best way to fix this without wasting much time on troubleshooting would be to simply reset your PC while keeping all your files intact. This will refresh the entire Windows 11 installation and reinstall all the apps which should help restore functionality for all Windows features including Focus assist. Follow the guide below to reset your PC while keeping your files.
Note: The reset process will remove all installed applications and only retain files stored manually on your local storage. A list of all the removed apps will be available in .txt format on your desktop once your PC has been reset.
Press Windows + i on your keyboard and click on ‘Windows Update’ on your left.
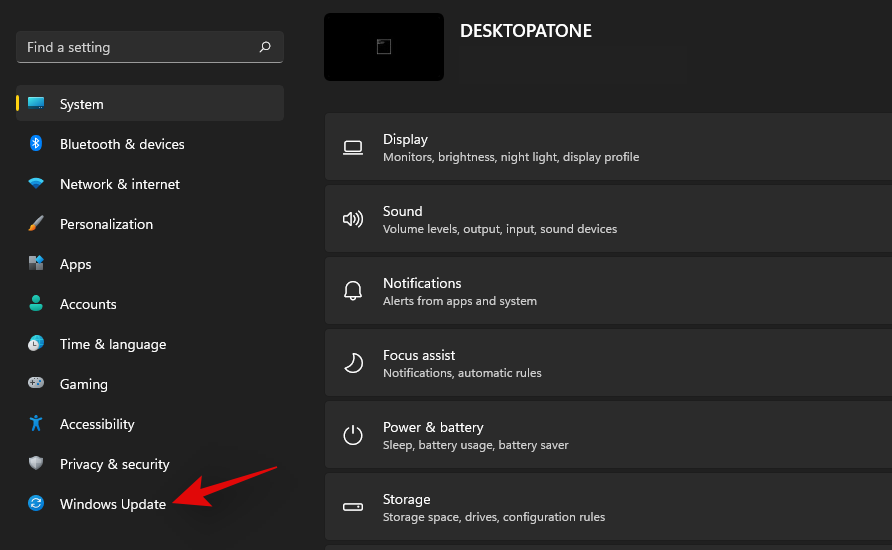
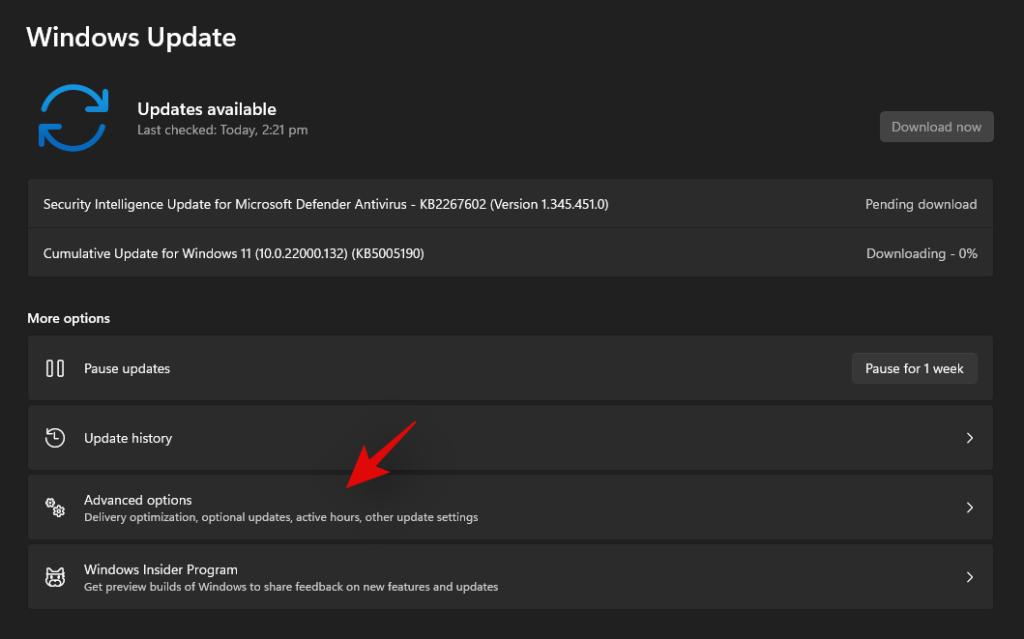
Click on ‘Advanced options’.
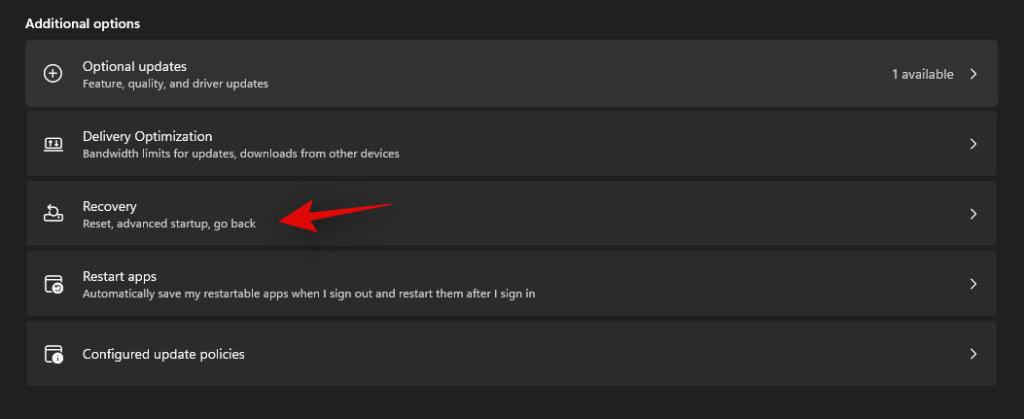
Click and select ���Recovery’.
Click on ‘Reset PC’ beside Reset this PC.

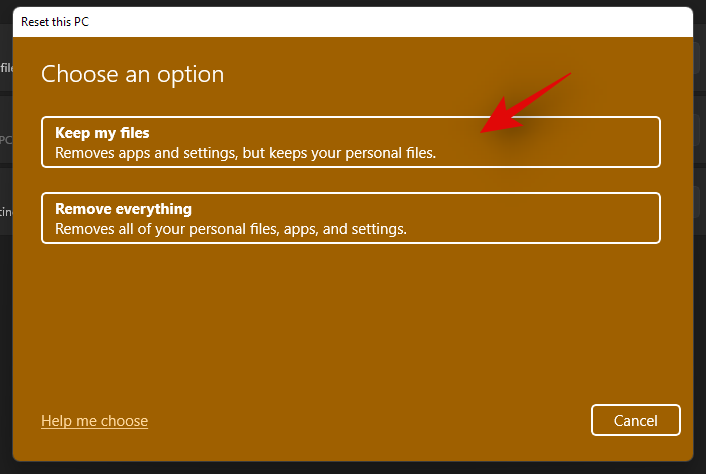
Click on ‘Keep my files’.
Windows will now process all the files on your local storage. Click on ‘Reset’.
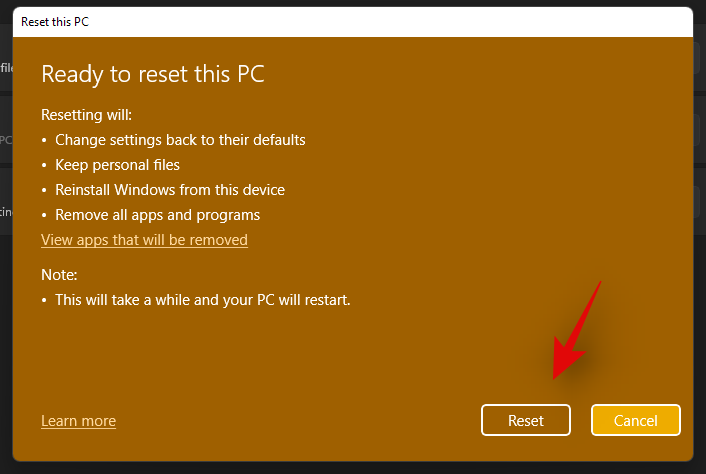
Note: If you are using Windows 11 Pro or higher then you will get the option to use a local installation/recovery media to reinstall Windows 11 as well. However, this option will be missing for Windows 11 Home users.
Windows will now reset your PC while retaining all your files. Your PC will restart several times during this process. This is completely normal and you should let Windows do its thing. If you are using a laptop or a portable NUC, then ensure that your unit is plugged into the power at all times during this process.
How to turn off Focus assist permanently
Do you wish to turn off Focus assist permanently in all scenarios? Then you can use the guide below to do so. The best way to disable Focus assist is by using the group policy editor. But in case you are using Windows 11 Home Edition, then you can use the first method in this guide to disable Focus assist permanently.
Method #1: Disable all settings and rules
Once you disable all the settings and rules for Focus assist, the feature should be turned off automatically on your system. Use the guide below to get you started.
Press Windows + i on your keyboard to open the Settings app and click on ‘Focus assist’ on your right.

Click and select ‘Off’ at the top.
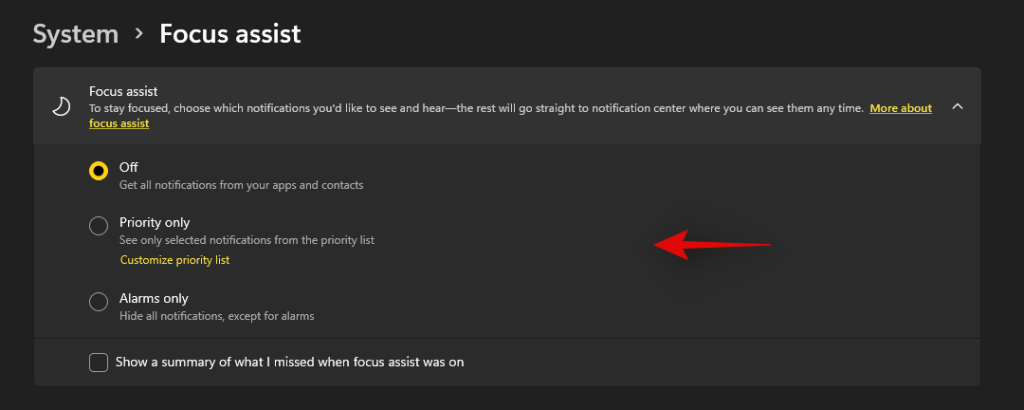
Uncheck the box for ‘Show a summary of what I missed when focus assist was on’.

Subsequently, disable all the toggles under ‘Automatic rules’ as shown below.

We also recommend turning off notifications for unnecessary apps using the guide after this section to avoid unnecessary notifications from interrupting you when focus assist is disabled.
Method #2: Using Group Policy Editor
The group policy editor will permanently disable focus assist on your system and even prevent you from accessing it in your settings. However, this method will only work on Windows 11 Pro or higher versions. In case you have the Windows 11 home edition, you can use the guide above to disable Focus assist instead.
Press Windows + R and type in the following to open Froup Policy EDitor. Click on ‘Ok’ once done.
gpedit.msc
Navigate to the following node.
User configuration > Administrative Templates > Start Menu and Taskbar > Notifications
Find and double-click on ‘Turn on Quiet Hours’ on your right.
Select ‘Enabled’ in the top left and click on ‘Ok’.
Focus assist will now be permanently disabled on the selected system. We recommend you restart your system or explorer.exe in case the changes do not take place immediately.
Is there any other way to disable notifications?
Yes, you can disable notifications individually on a per-app basis in Windows 11 to customize the notifications you receive. This is another way to ensure that you are only notified about the apps and notifications that you intended. Customizing your notifications this way will also allow you to retain the full functionality of the focus assist mode without having to disable certain rules to avoid mismatched scenarios in your workflow.
However, the only downside to managing your notifications this way is that you have to keep enabling and disabling notifications for apps every few months depending on your new installs and uninstalls. You can use the guide below to disable notifications on a per-app basis in Windows 11.
Disable notifications permanently on a per-app basis
Here’s how you can disable notifications on a per-app basis in Windows 11.
Press Windows + i on your keyboard to open the Settings app and then click on ‘Notifications’ on your right.
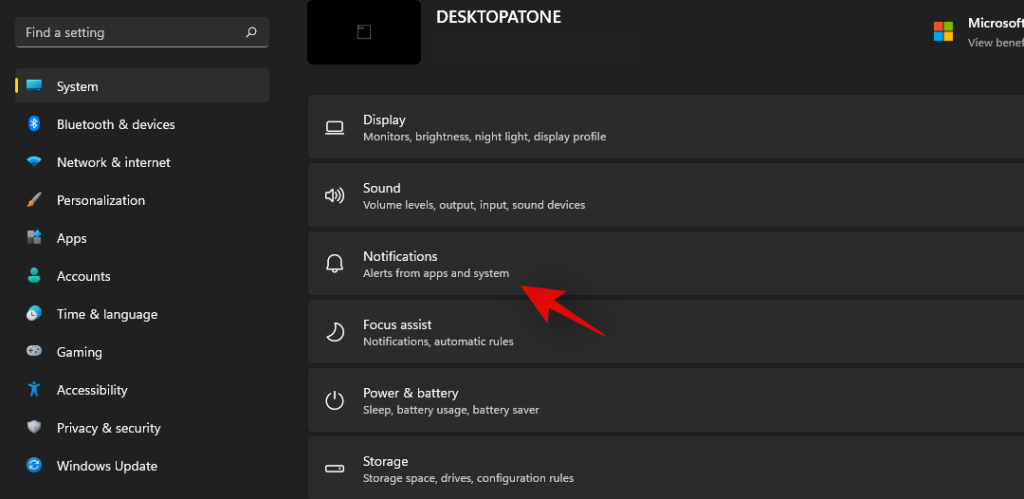
You will now get a list of all the apps that have the permission to deliver notifications on your system. Scroll the list to find the necessary apps and turn off the toggle beside them to disable notifications.
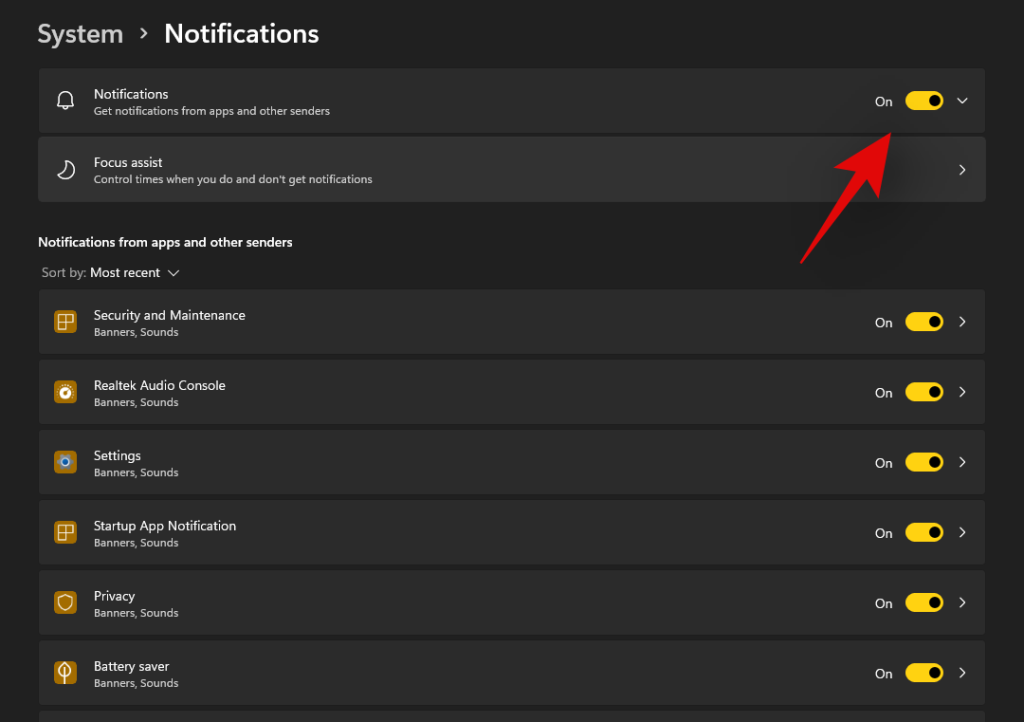
Repeat the steps above for all the intended apps to disable notifications.
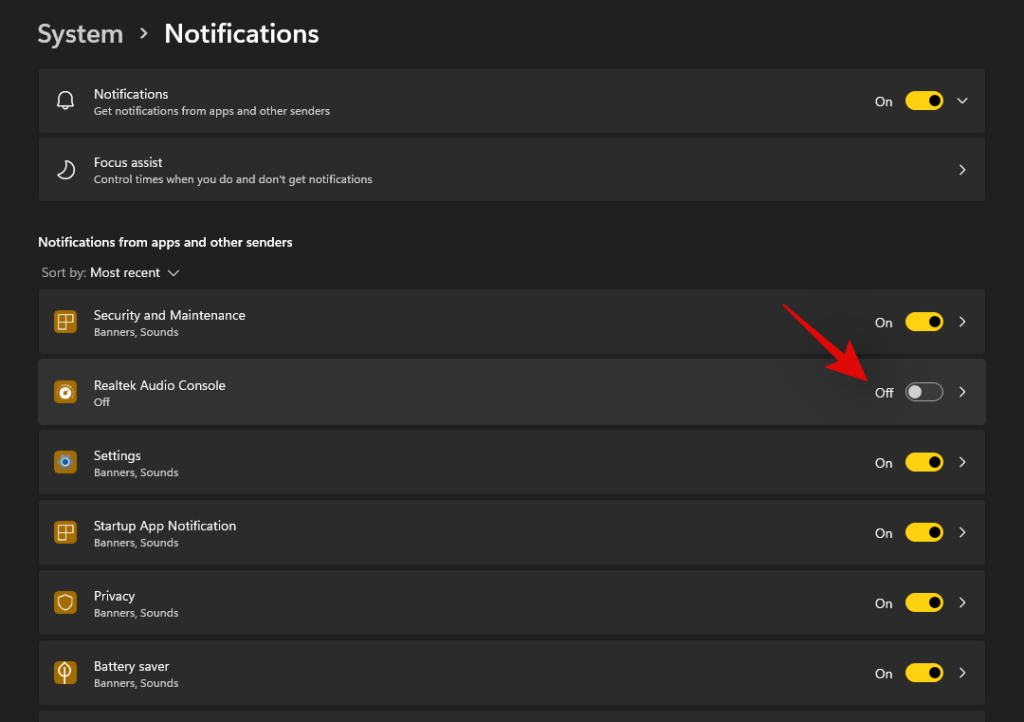
Close the Settings app and notifications for the selected apps should now be permanently disabled on your system.
Can you customize notifications in Windows 11?
Well, not exactly. Windows 11 currently has very limited options when it comes to customizing your notifications. You can not change the look, behavior, or color palette of your notifications without changing the accent color of your overall UI. However, you can customize the way your notifications sound. You can set a nice quiet notification sound that does not interrupt your workflow or opt for a quirky take that makes for a few good laughs each time you get a notification. The choice is completely up to you. Use the guide below to customize your Windows 11 notification sounds.
Required
Guide
Let’s start by first placing the .wav file in a compatible media folder so that you can set it as your default notification sound in Windows 11. Navigate to the concerned .wav file and copy it to your clipboard.
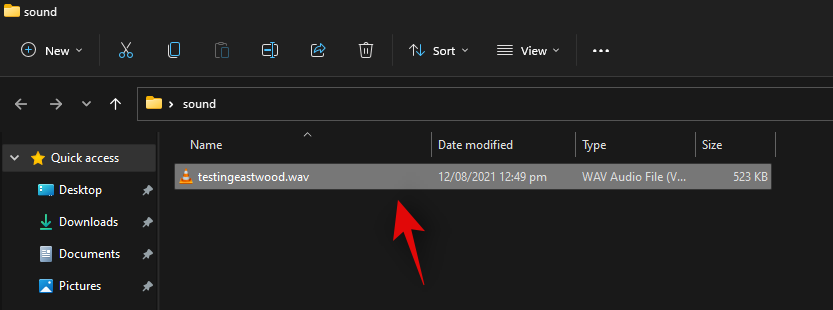
Now navigate to the following path given below. Paste your .wav file in this location. Click on ‘Continue’ when you will be prompted for administrator permission.
C:\Windows\media
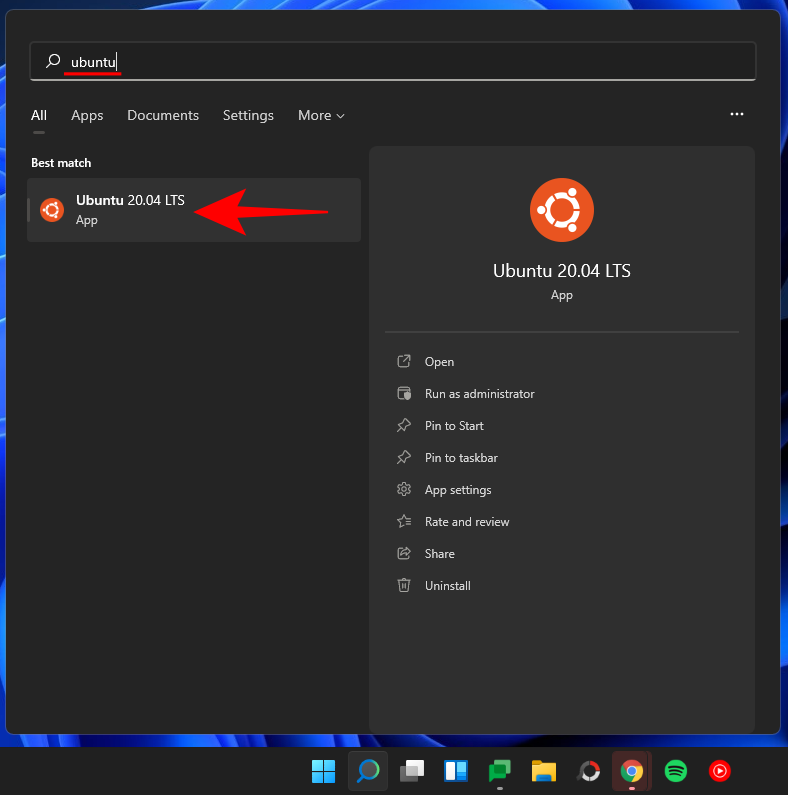
We can now use the .wav file as our default notification sound. Press Windows + i on your keyboard to open the Settings app and then click on ‘Sound’ on your right.
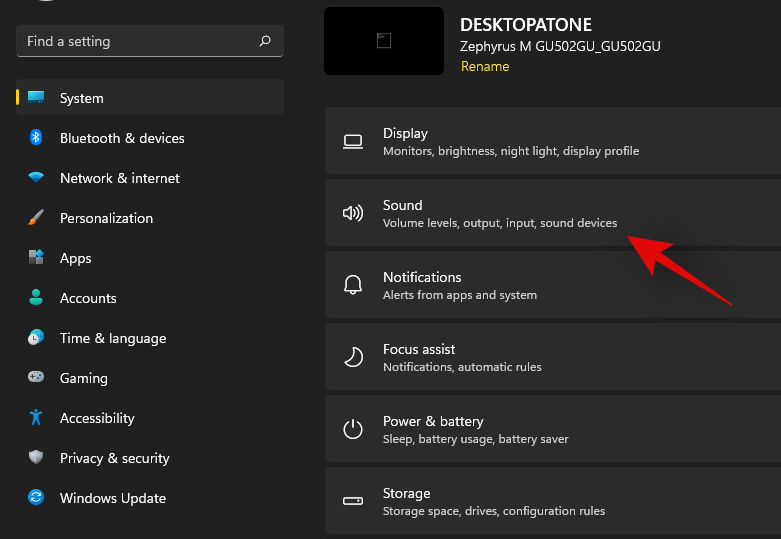
Scroll to the bottom and click on ‘More sound settings’.

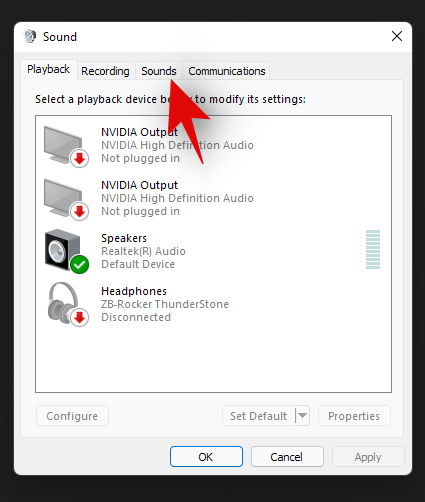
Click and switch to the ‘Sounds’ tab at the top.
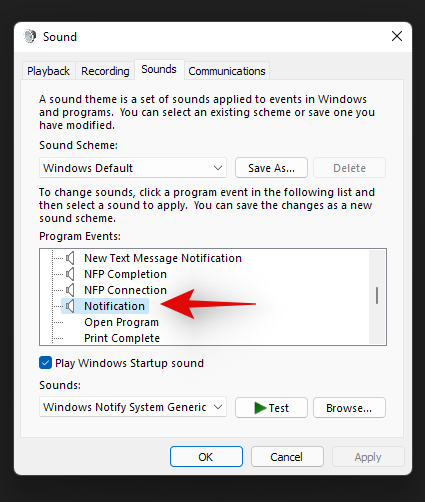
Under ‘Program Events’ scroll the list and find ‘Notifications’. Click on ‘Notifications’ to select it.
Now click on the drop-down arrow under Sounds and select the .wav file we pasted in the Media folder.
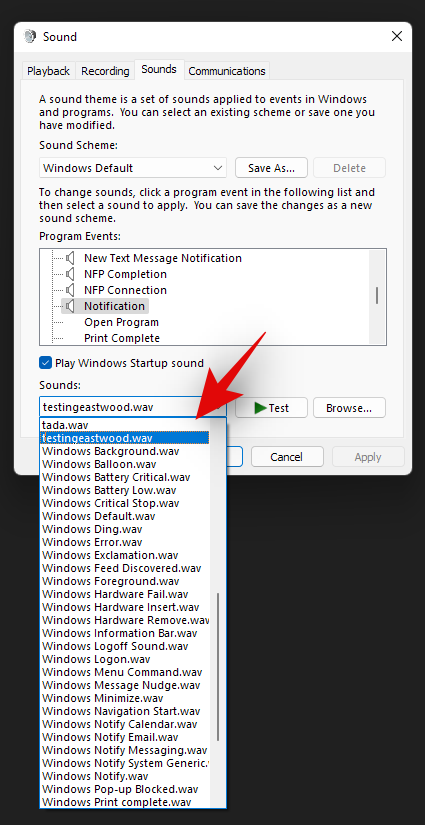
You can click on ‘Test’ to test your custom notification sound.
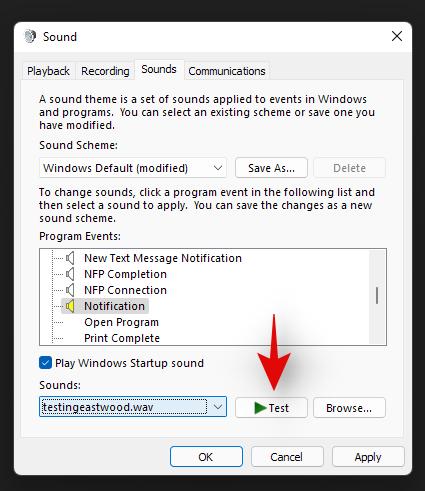
Click on ‘Ok’ to save your changes.
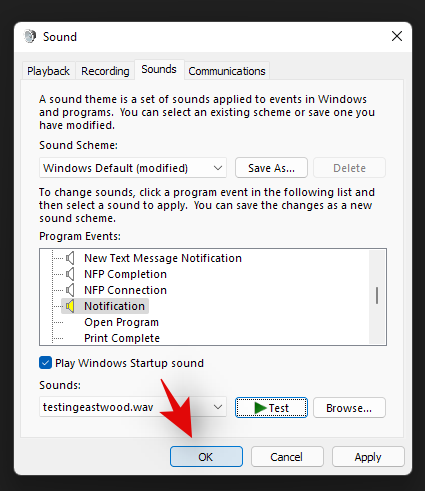
And that’s it! You will now have set a custom sound as your default notification sound in Windows 11.
Distractions from notifications are a huge problem especially when you are into some important work. Using the steps mentioned above, now, you can easily get rid of unnecessary notifications and work peacefully with full concentration.
Related:
YouTube има режим Инкогнито, който предотвратява записването на вашите гледания или влиянието им върху списъците ви. Този урок ще ви научи как да го използвате.
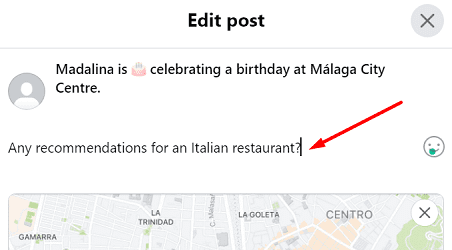
Ако искате просто да поискате от приятели препоръки за конкретна дейност, отидете на Какво мислите и напишете въпроса си.
Научете как да получите достъп до SIM картата на Apple iPad с този урок.
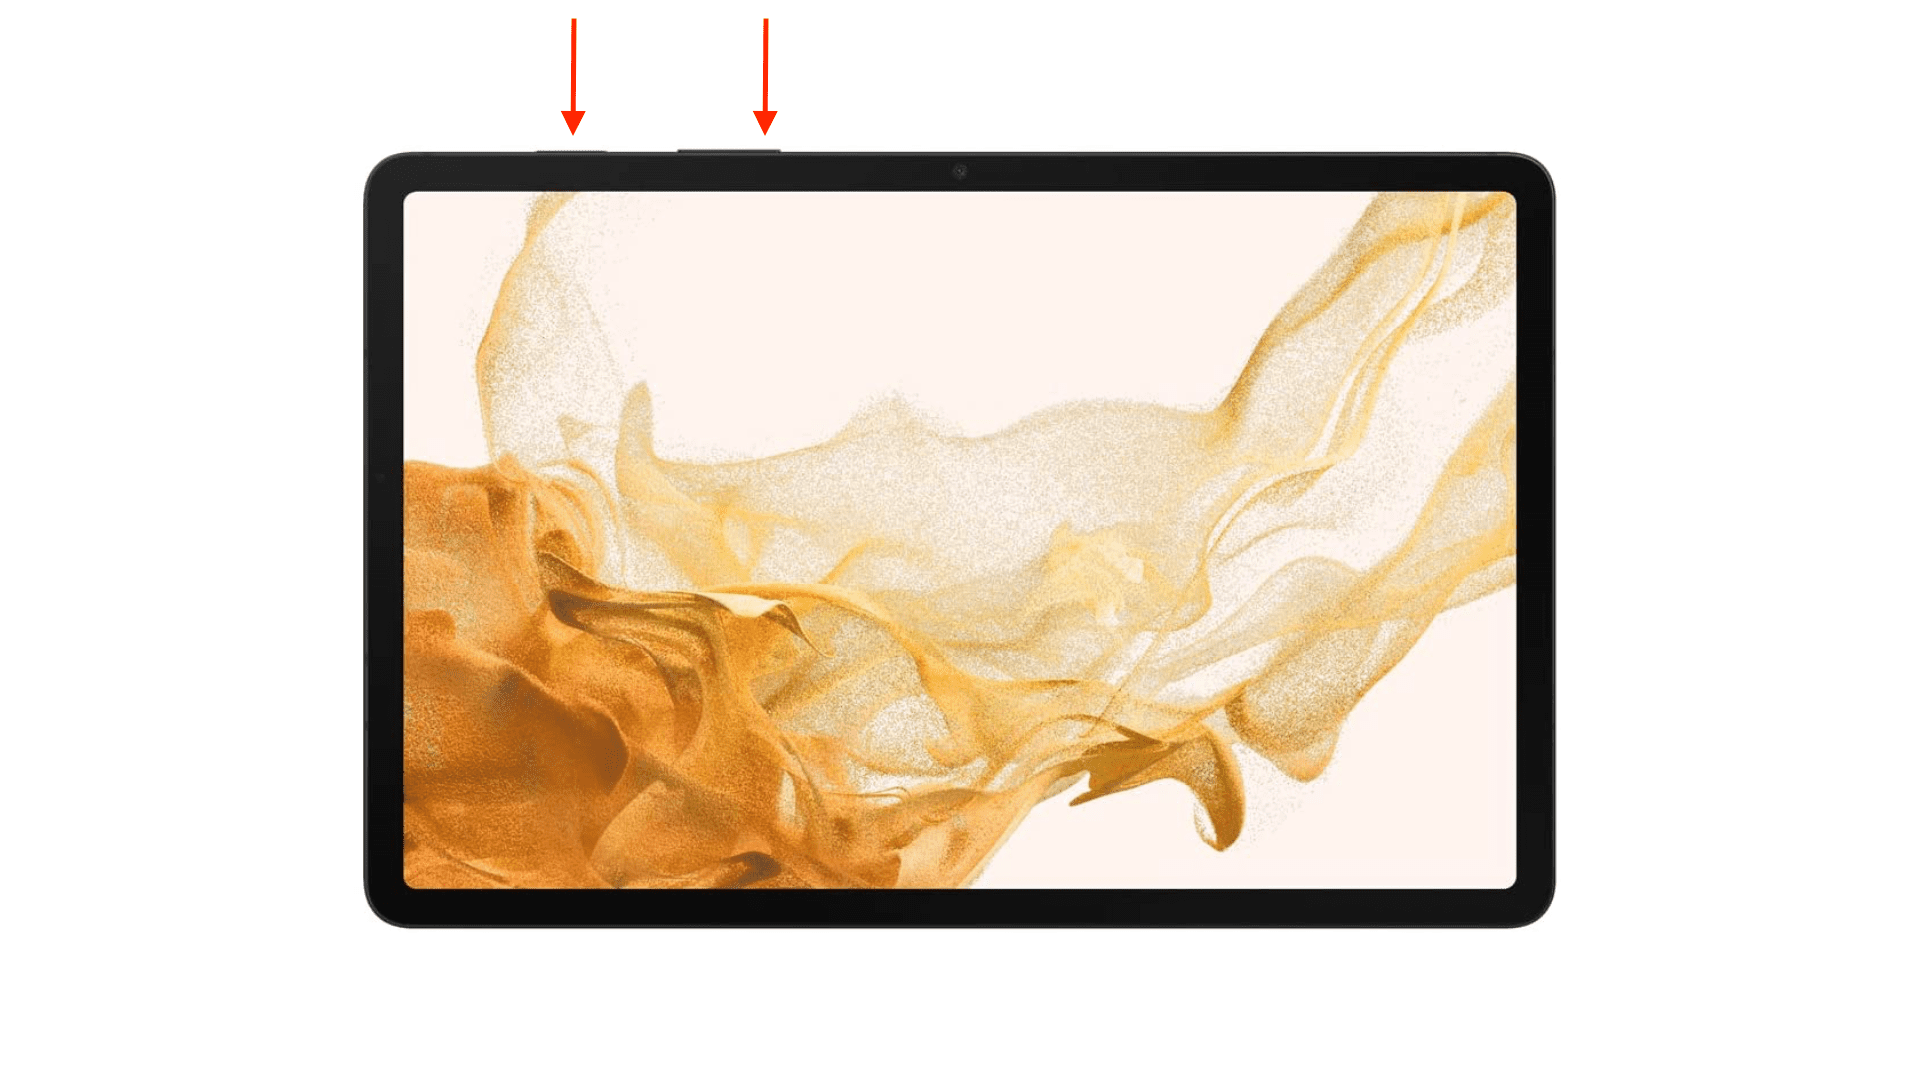
Урок за това как да включите или изключите безопасния режим на таблета Samsung Galaxy Tab S3
Открийте топ 10 важни стъпки за настройка и оптимизация на Windows 11, за да подобрите производителността и опита на потребителя.
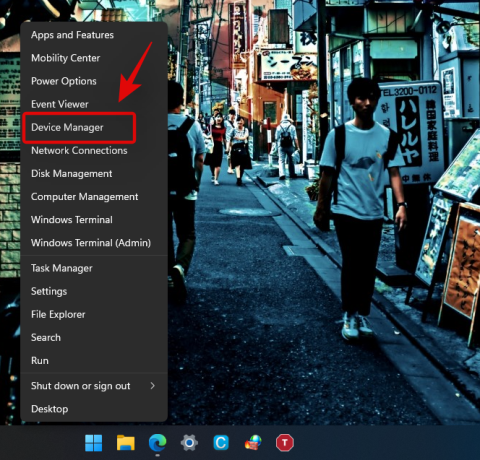
Актуализирането на драйвери на Windows 11 е необходимо за подобряване на съвместимостта и отстраняване на грешки. Научете как да актуализирате драйверите правилно.
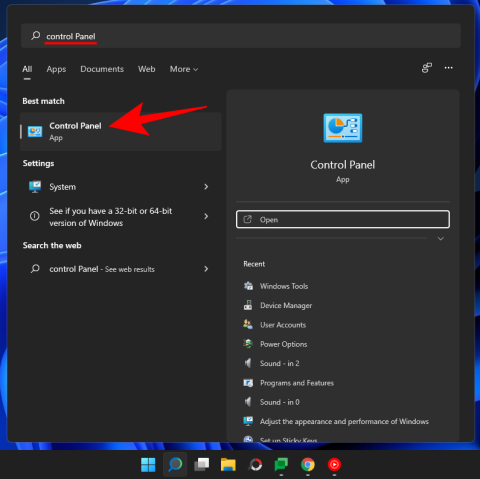
Научете сериозни и ефективни методи как да отворите <strong>контролния панел</strong> в Windows 11. Оптимизирайте настройките на операционната система с тези 9 начина.
Научете как да показвате разширенията на файловете в Windows 11 лесно и бързо по 6 метода. Подобрете сигурността и управлението на файловете си.
Научете как да върнете „Моят компютър“ в Windows 11. Лесни стъпки за достъп и управление на файлове с „Този компютър“.
Не публикувайте снимките си безплатно в Instagram, когато можете да получите пари за тях. Прочетете и научете как да печелите пари в Instagram и се възползвайте максимално от тази платформа за социални мрежи.
Научете как да редактирате и премахвате PDF метаданни с лекота. Това ръководство ще ви помогне лесно да редактирате или премахвате PDF метаданни по няколко лесни начина.
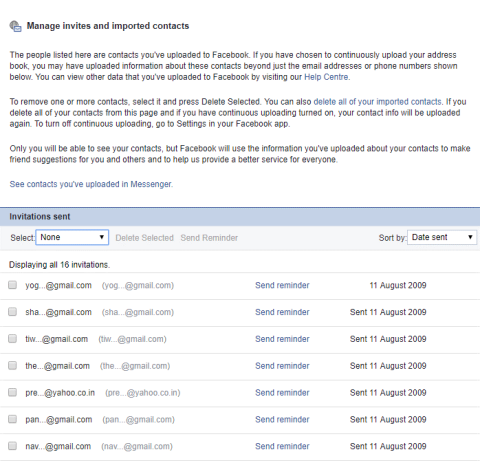
Знаете ли, че Facebook има пълен списък с контактите ви в телефонния указател заедно с техните имена, номер и имейл адрес.
Проблемът може да попречи на компютъра ви да функционира правилно и може да се наложи да промените настройките за защита или да актуализирате драйвери, за да ги коригирате.
Този блог ще помогне на читателите да конвертират стартиращ USB в ISO файл с помощта на софтуер на трета страна, който е безплатен за използване и защитен от зловреден софтуер.
Срещнахте код за грешка на Windows Defender 0x8007139F и ви е трудно да изпълнявате сканирания? Ето начини, по които можете да коригирате проблема.
Това изчерпателно ръководство ще ви помогне да коригирате „Грешка на планировчика на задачи 0xe0434352“ на вашия компютър с Windows 11/10. Вижте поправките сега.
Грешка в Windows LiveKernelEvent 117 кара компютъра ви да замръзне или да се срине неочаквано. Научете как да го диагностицирате и коригирате с препоръчани от експерти стъпки.
Този блог ще помогне на читателите да поправят проблемите, които PowerPoint не ми позволява да записвам аудио на компютър с Windows и дори ще препоръча други заместители на запис на екрана.
Чудите се как да пишете върху PDF документ, тъй като от вас се изисква да попълвате формуляри, да добавяте пояснения и да поставяте подписите си. Попаднахте на правилния пост, прочетете!
Този блог ще помогне на потребителите да премахнат водния знак System Requirements Not Met, за да се насладят на по-гладко и безопасно изживяване с Windows 11, както и на по-чист работен плот.
Имате проблеми с чувствителността на стилуса към натиск в Windows 11? Открийте доказани решения, за да възстановите плавното и бързо рисуване и водене на бележки. Накарайте цифровата си писалка да работи перфектно без разочарование.
Имате проблеми с отказан FTP достъп в Windows 11 Explorer? Открийте доказани решения за възстановяване на безпроблемния трансфер на файлове и повишаване на производителността ви. Ръководство стъпка по стъпка за бързо решение.
Имате проблеми с грешката „Missing Boot Manager“ на Windows 11? Открийте подробни решения, за да стартирате компютъра си отново безпроблемно. Лесни и надеждни решения за всички потребители.
Открийте как да настроите Game Bar за професионално стриймване през 2026 г. с инструкции стъпка по стъпка. Отключете разширени функции за безпроблемно излъчване на геймплей в Windows. Идеално за стриймъри, които целят да подобрят съдържанието си.
Липсва ли ви контролният панел на Nvidia в Windows 11? Открийте лесни, стъпка по стъпка решения, за да го възстановите бързо и да се върнете към оптимизирането на графиката си. Не са необходими технически познания!
Имате проблеми с грешки при отхвърляне на дланта на тъчпада в Windows 11? Открийте доказани, стъпка по стъпка решения, за да възстановите плавното управление на курсора и да елиминирате случайното въвеждане. Върнете лаптопа си в правилната посока още днес!
Затруднявате се с новото контекстно меню на Windows 11? Открийте доказани решения, за да се върнете към класическия стил без усилие. Ръководство стъпка по стъпка с настройки на системния регистър и инструменти за безпроблемно преживяване.
Открийте как без усилие да използвате AI Search в приложението за снимки на Windows 11, за да намирате снимки мигновено с заявки на естествен език. Ръководство стъпка по стъпка за организиране и търсене на снимки, задвижвани от изкуствен интелект, за безпроблемно изживяване.
Имате проблеми с грешката „DHCP сървърът не е намерен“ в Windows 11? Открийте доказани решения за бързо възстановяване на интернет връзката. Поетапни решения за безпроблемна работа в мрежа.
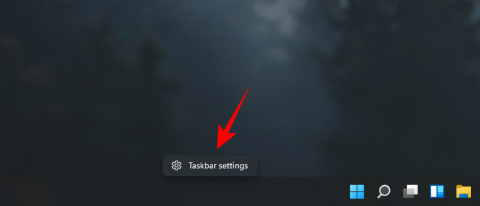
Открийте стъпка по стъпка начини за персонализиране на икони в лентата на задачите в Windows 11. Персонализирайте работния си плот с лекота, повишете производителността и направете компютъра си наистина ваш. Актуализирани съвети за най-новите функции.
