How to manage updates for Office 365
If youre not a fan of having the automatic updates, it is very easy to turn off. In this guide, well show you how you can do just that.
If you don't like receiving automatic updates in Office 365, there is an easy way to disable and manage it. Here's how.
One of the benefits of having an Office 365 subscription is always getting the updated versions of the core Office 365 apps. However, if you're not a fan of having the automatic updates, it is very easy to turn off or manage your settings for it. In this guide, we'll show you how you can do just that.
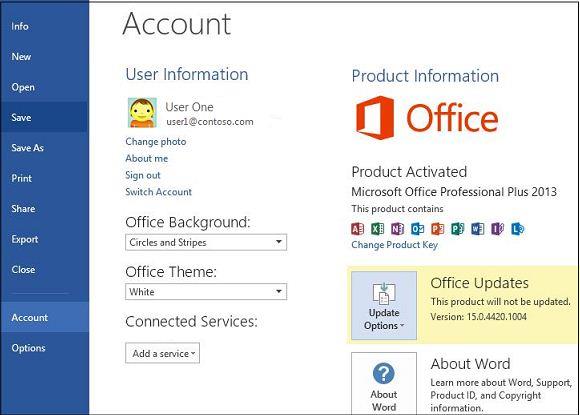
If your PC didn't come with Office 365 preinstalled as a Microsoft Store app, or if you had to manually download Office through your web browser, disabling Office 365 Auto Updates is a lengthy task. You'll need to first open up any Office 365 app and the File menu and then choose Account. In the bottom right-hand corner, you'll then notice an option for Update Options. You'll want to click that and then choose the down arrow. You'll have a couple of options to choose from here. We'll describe them for you below, but you'll want to choose the Disable Updates option and then click the Yes button.
It's important to note that by going this route, you're only disabling the automatic security performance, and reliability updates. You're not disabling the major updates to new Office versions, say from Office 2016 to Office 2019, as covered under your subscription. To do this, you'll need to visit your Windows Update settings, click on Advanced Options, and uncheck the option for Recieve updates for other Microsoft products when you update Windows.
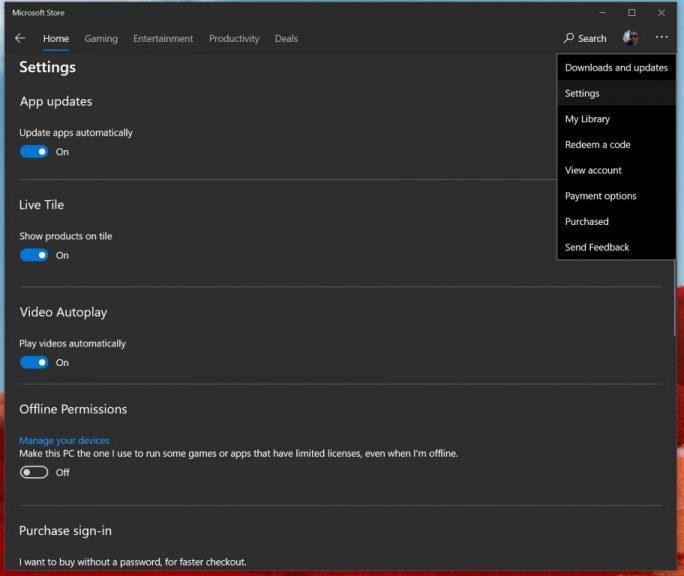
Now, if you're using any of the pre-installed Office 365 apps on your PC, which are usually found from the Microsoft Store, the process will be a bit different. You'll need to first close all your Office apps, and then visit the Microsoft Store. From there, you'll then need to click the ... icon that appears next to your profile photo. Next, choose Settings and then make sure the toggle switch for Update apps automatically is turned off.
Please be aware that by going this route, you'll now have to manage all your app updates manually by going to Downloads and Updates and choosing all the apps you want to update. Turning off automatic app updates from the Microsoft Store not only impacts not only Office 365 apps but also the stock apps on your system, like the Game Bar, Calendar, Weather apps, and more.
In the event that you're not seeing these options, there is a reason why. Your Office 365 version could be covered by volume licensing, and your company is using a group policy to update the office. If this is the case, then usually, you're set with the rules put forth by your IT department. This means that you've likely already been opted out of Auto Updates, as your IT department typically will test updates first, before deciding if to roll it out to everyone. That's usually the safest way to go, assuring a quality experience for everyone covered under your company's Office 365 plans.
Pronađite detaljne korake kako da vratite svoj Instagram nalog nakon što je onemogućen.
Желите да избришете истекле пропуснице и средите Аппле новчаник? Пратите док објашњавам у овом чланку како да уклоните ставке из Аппле новчаника.
Било да сте одрасла или млада особа, можете испробати ове апликације за бојење да бисте ослободили своју креативност и смирили свој ум.
Овај водич вам показује како да решите проблем са вашим Аппле иПхоне или иПад уређајем који приказује погрешну локацију.
Погледајте како можете да омогућите и управљате Не узнемиравај на иПад-у како бисте се могли фокусирати на оно што треба да урадите. Ево корака које треба пратити.
Погледајте различите начине на које можете повећати своју тастатуру на иПад-у без апликације треће стране. Такође погледајте како се тастатура мења са апликацијом.
Да ли се суочавате са грешком иТунес не открива иПхоне или иПад на вашем Виндовс 11 рачунару? Испробајте ове проверене методе да одмах решите проблем!
Осећате да ваш иПад не ради брзо? Не можете да надоградите на најновији иПадОС? Пронађите овде знакове који говоре да морате да надоградите иПад!
Тражите кораке како да укључите аутоматско чување у програму Екцел? Прочитајте овај водич о укључивању аутоматског чувања у Екцел-у на Мац-у, Виндовс 11 и иПад-у.
Погледајте како можете да држите своје лозинке у Мицрософт Едге-у под контролом и спречите прегледач да сачува све будуће лозинке.
