Ako odstrániť hudbu a videá z Amazon Fire
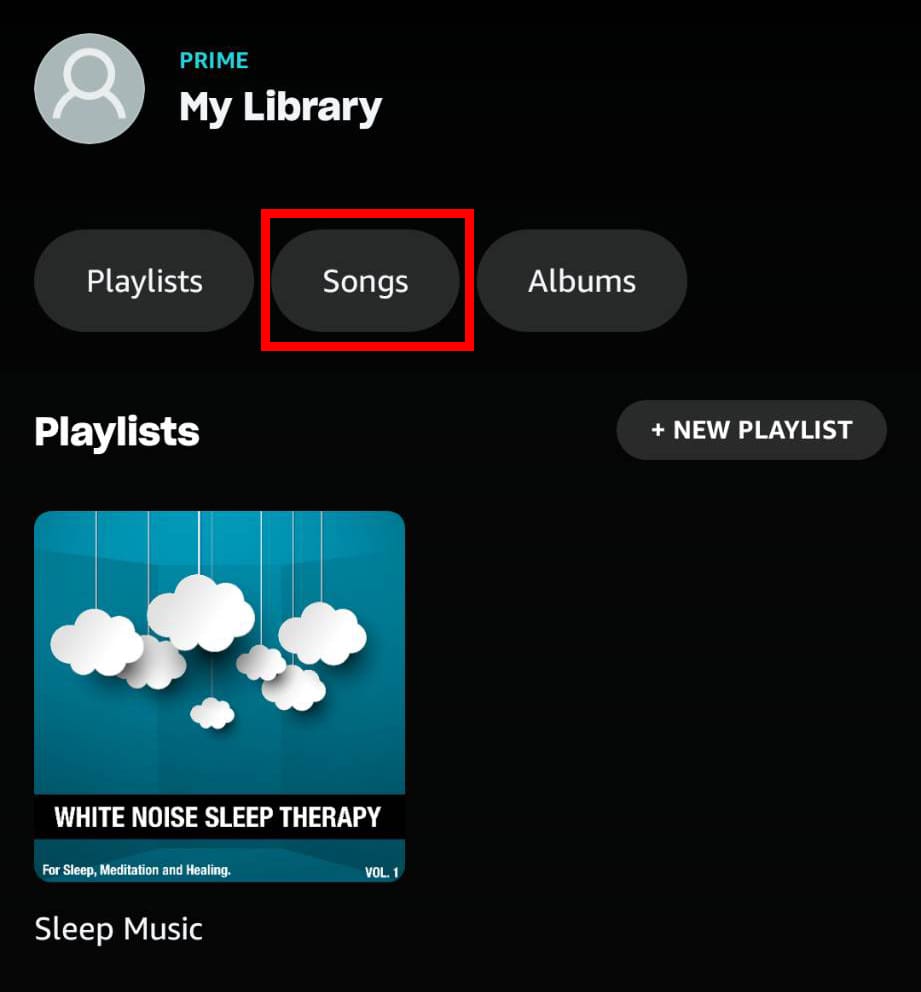
Prečítajte si, ako odstrániť hudbu a videá z tabletov Amazon Fire a Fire HD, aby ste získali viac miesta, upratali a zvýšili výkon.
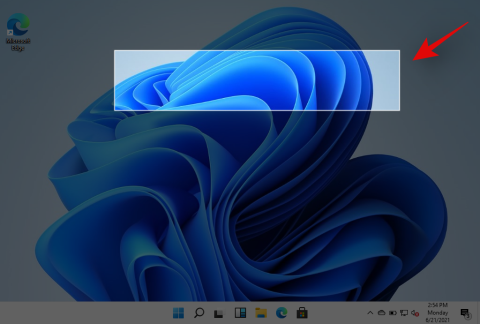
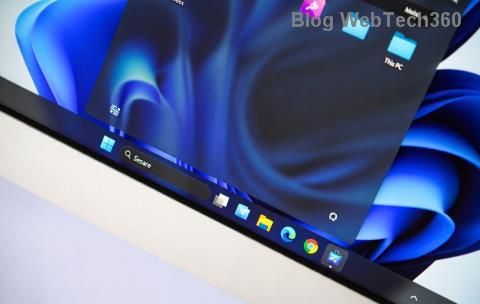
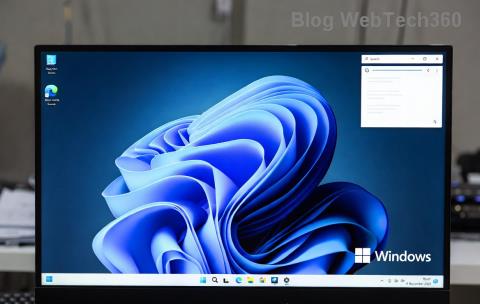
Windows 11 priniesol niekoľko vítaných zmien UX vďaka novému vzhľadu matného skla a centrovanému panelu úloh . Ak ste niekto, kto rád vyťaží maximum zo svojho priestoru na obrazovke, potom môže byť prázdna ľavá strana obrazovky väčšinu času dosť frustrujúca.
Čo teda môžete urobiť s nevyužitým prázdnym priestorom na paneli úloh, najmä s tým na ľavej strane? Môžete to získať späť? Poďme zistiť 2 najúžasnejšie spôsoby, ako dobre využiť tento priestor!
Obsah
Čo môžete robiť s priestorom na paneli úloh?
S priestorom na paneli úloh môžete robiť viacero vecí, ale najjednoduchšie je zobraziť štatistiky výkonnosti na rovnakom mieste. Môžete použiť šikovný trik, ktorý ponúkajú miniaplikácie Xbox Game Bar, aby to fungovalo vo vašom systéme.
Ak sa cítite dobrodružnejšie, môžete použiť nástroj tretej strany na skrytie panela úloh a následne použiť vzhľady Rainmeter na zobrazenie požadovaných údajov v pravom dolnom rohu obrazovky. To isté môžete urobiť aj so zapnutým panelom úloh a Rainmeter ponúka obrovský výber vzhľadov, z ktorých si môžete vybrať. Najlepšie na tom je, že môžete kódovať a upravovať svoje vzhľady, aby ste dosiahli správne umiestnenie a estetiku na základe vašich preferencií. Pomocou nižšie uvedeného sprievodcu získajte späť miesto na paneli úloh.
Súvisiace: Ako zmenšiť alebo zväčšiť panel úloh v systéme Windows 11
Ako využiť prázdne miesto na paneli úloh v systéme Windows 11
Použite niektorú z dvoch nižšie uvedených metód na získanie priestoru na paneli úloh v závislosti od vašich preferencií a množstva majstrovania, ktoré chcete urobiť, aby všetko vo vašom systéme fungovalo.
Metóda č. 01: Použite herný panel Xbox na získanie štatistík výkonu na paneli úloh
Uistite sa, že máte v počítači nainštalovaný Game Bar. Ak nie, môžete si ho stiahnuť pomocou odkazu nižšie.
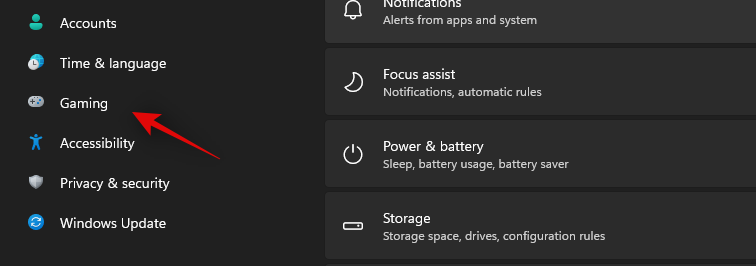
Po nainštalovaní stlačte Windows + iklávesnicu a kliknite na 'Hry' na ľavej strane.
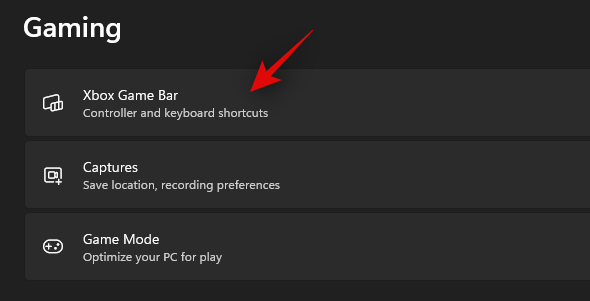
Vyberte položku Xbox Game Bar.
Teraz povoľte prepínač pre „Herný panel“ na pravej strane.
Po dokončení stlačte Windows + Gklávesnicu, aby ste aktivovali hernú lištu. Po aktivácii by ste mali mať miniaplikáciu výkonu na ľavej strane spolu s ostatnými miniaplikáciami predvolene otvorenú.
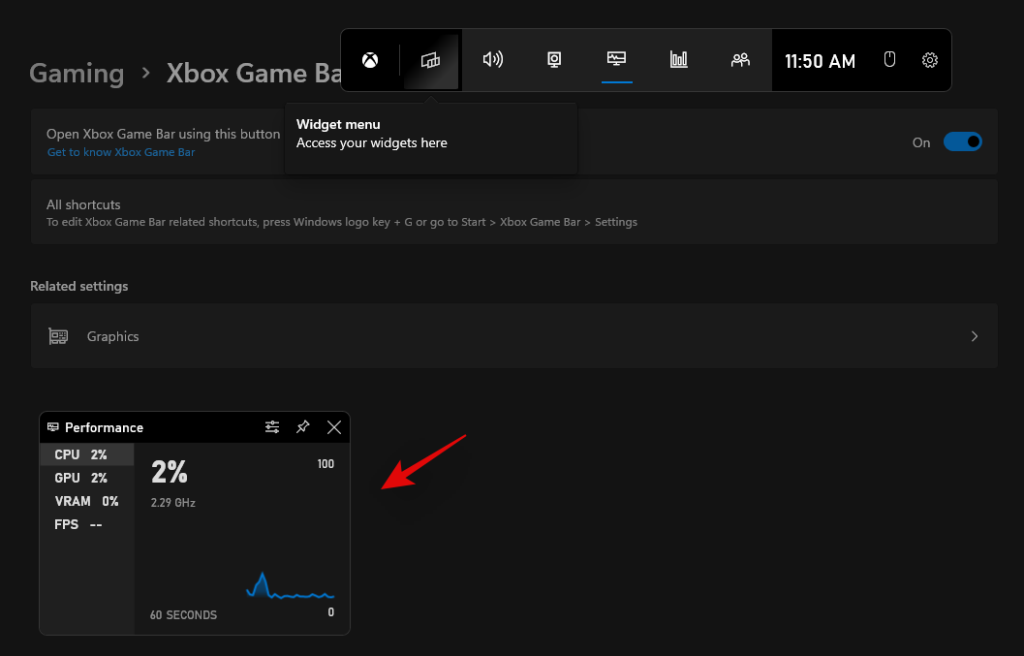
Ak však miniaplikácia nie je k dispozícii, kliknutím na ikonu „Výkon“ v hornej časti ju aktivujte.
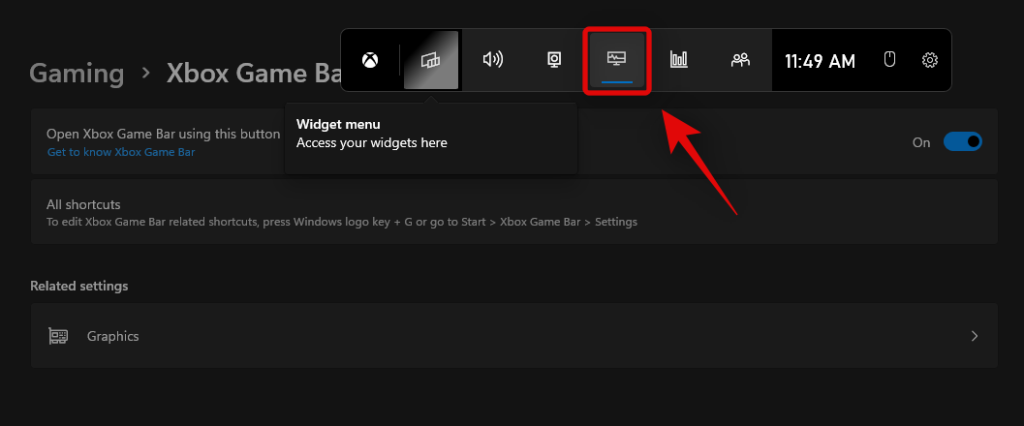
Teraz kliknite na „Možnosti výkonu“ v hornej časti.
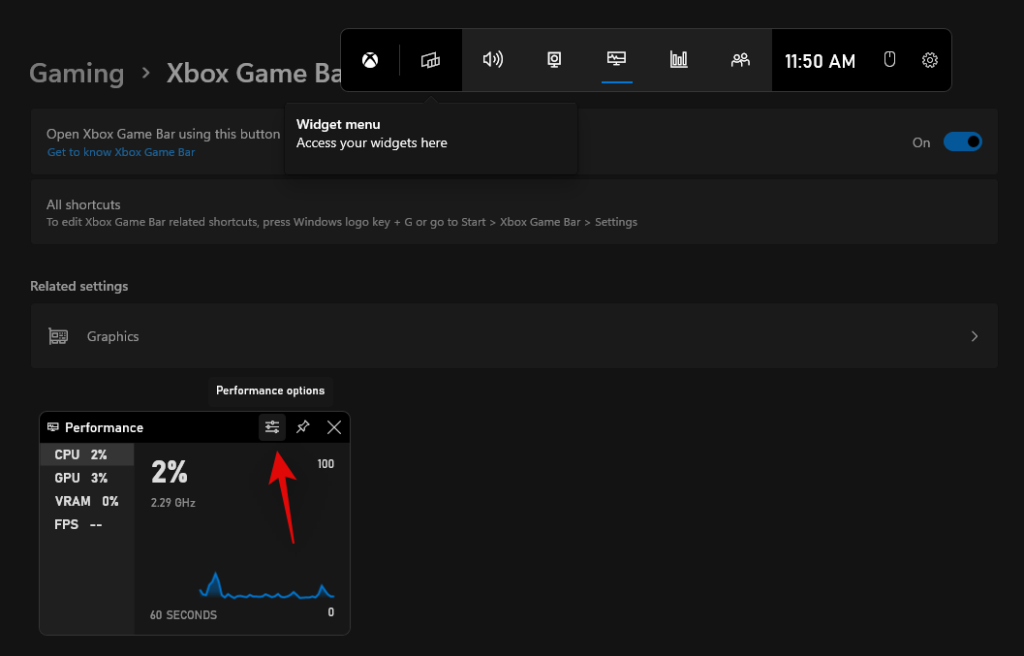
Kliknite na šípku rozbaľovacej ponuky v hornej časti a vyberte možnosť „Dol“.
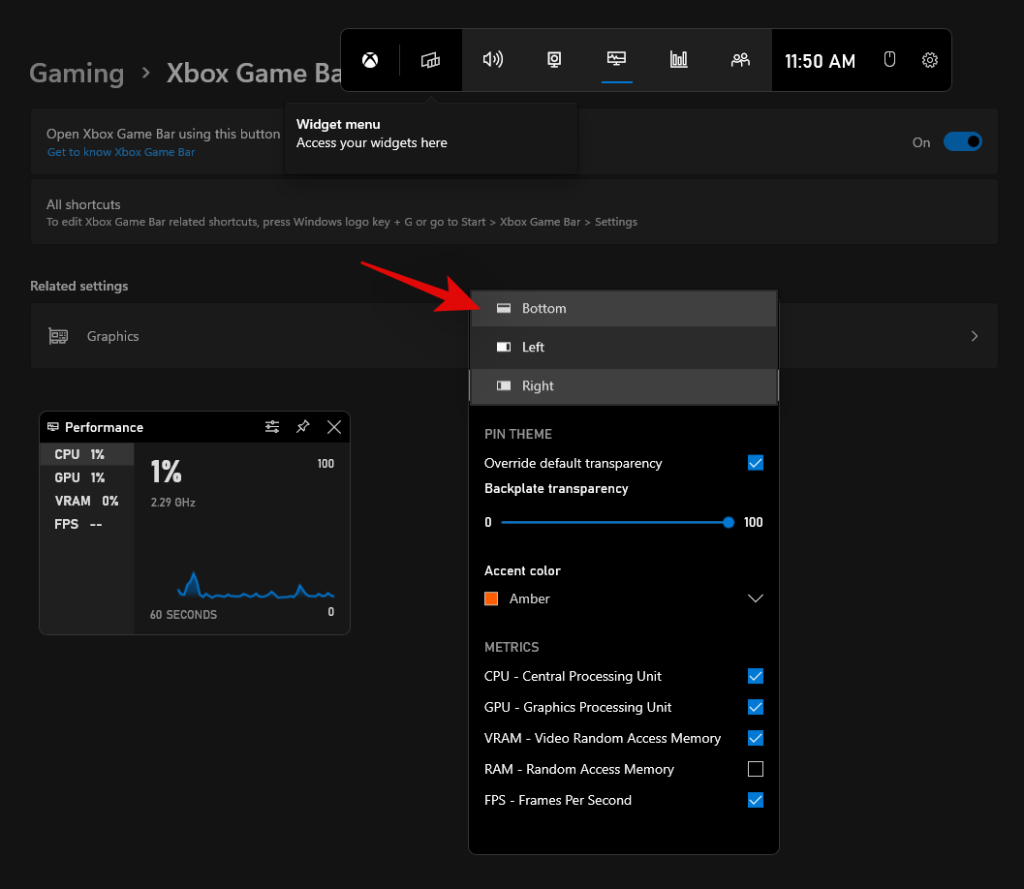
Začiarknite políčko „Prepísať priehľadnosť“ pri potiahnutí posúvača na 100 %.
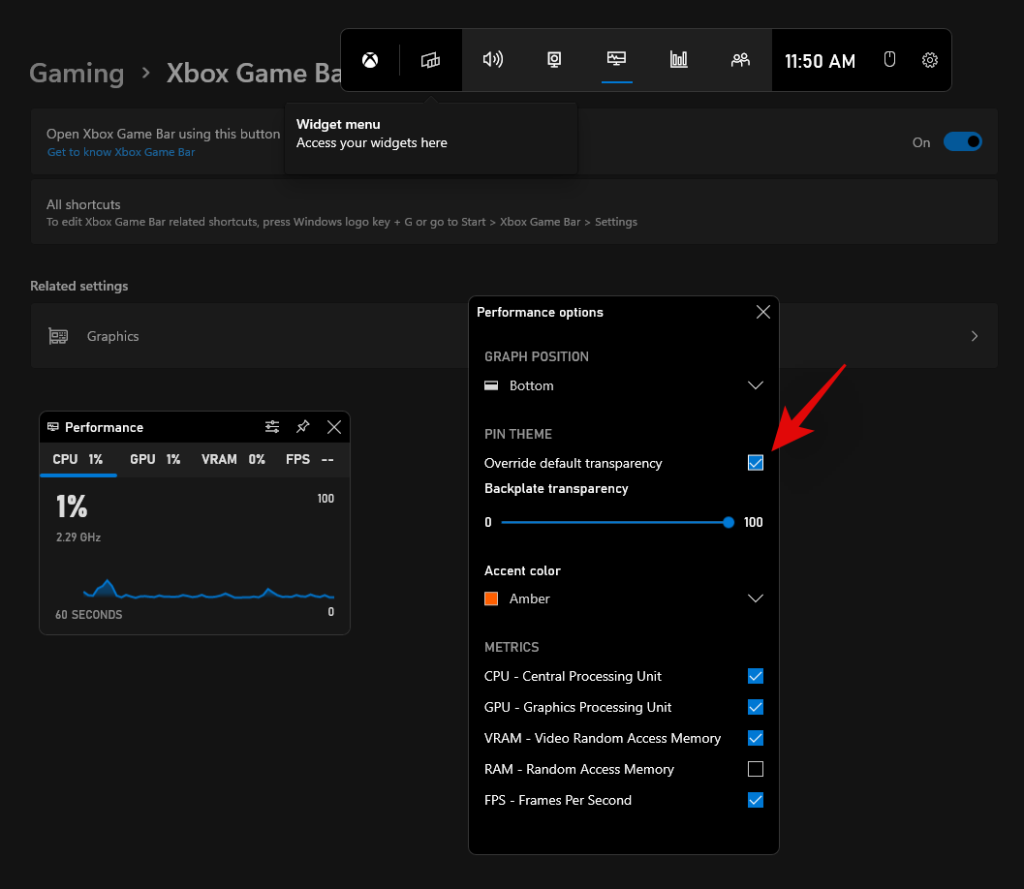
Teraz si vyberte akcentovú farbu podľa vlastného výberu.
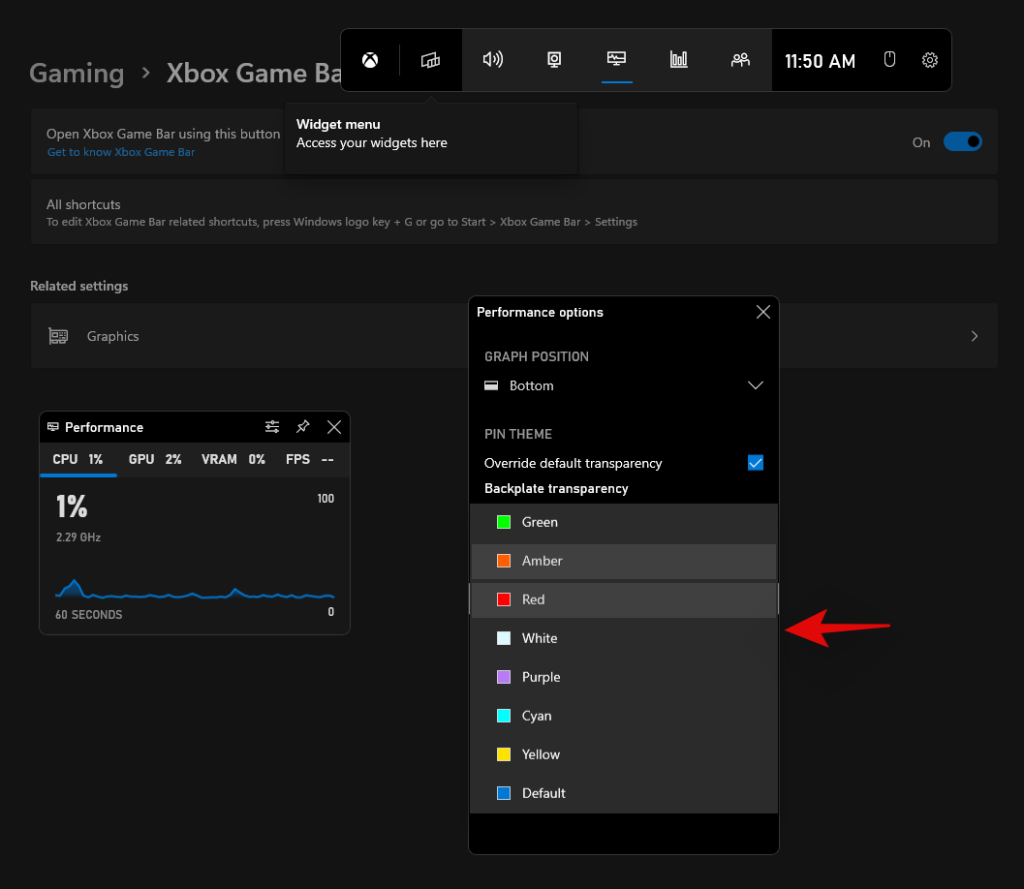
Nakoniec zrušte začiarknutie políčok pre štatistiky, ktoré nechcete zobrazovať na paneli úloh.
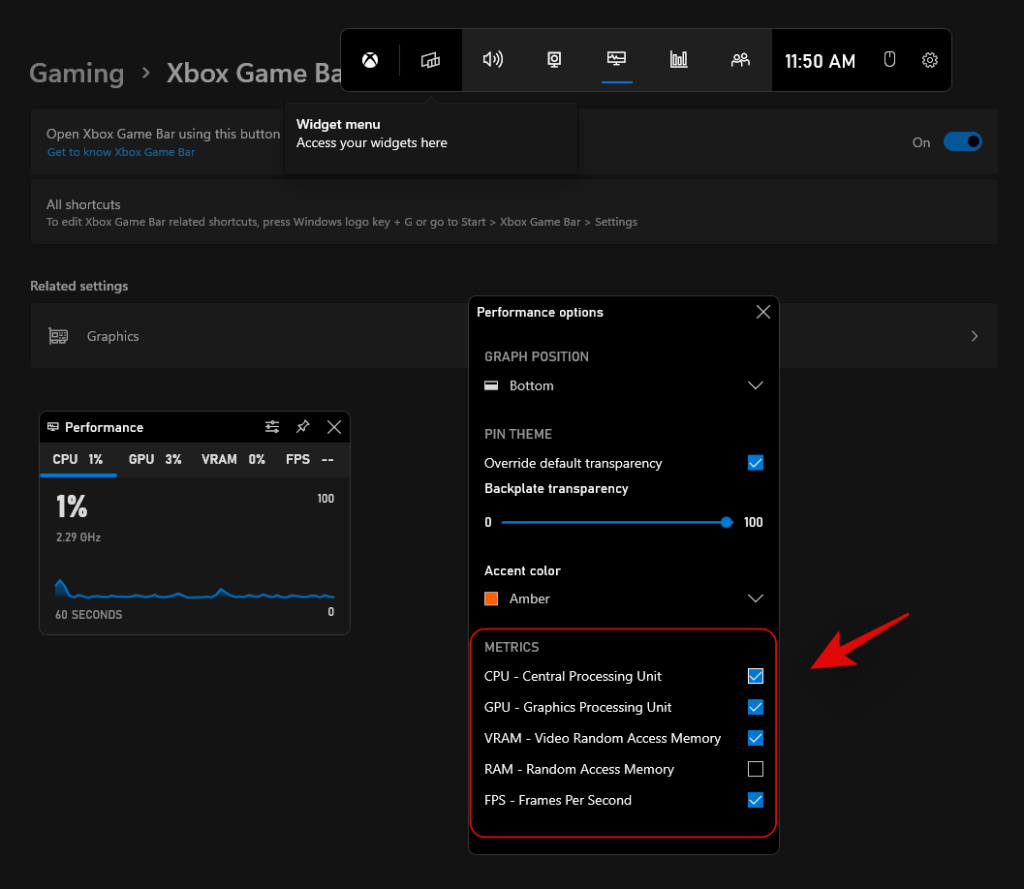
Teraz ste nakonfigurovali widget. Ukážte myšou v pravom dolnom rohu grafu a kliknite na rozbaľovaciu šípku, ktorá sa zobrazí. Toto skryje graf z vášho widgetu.
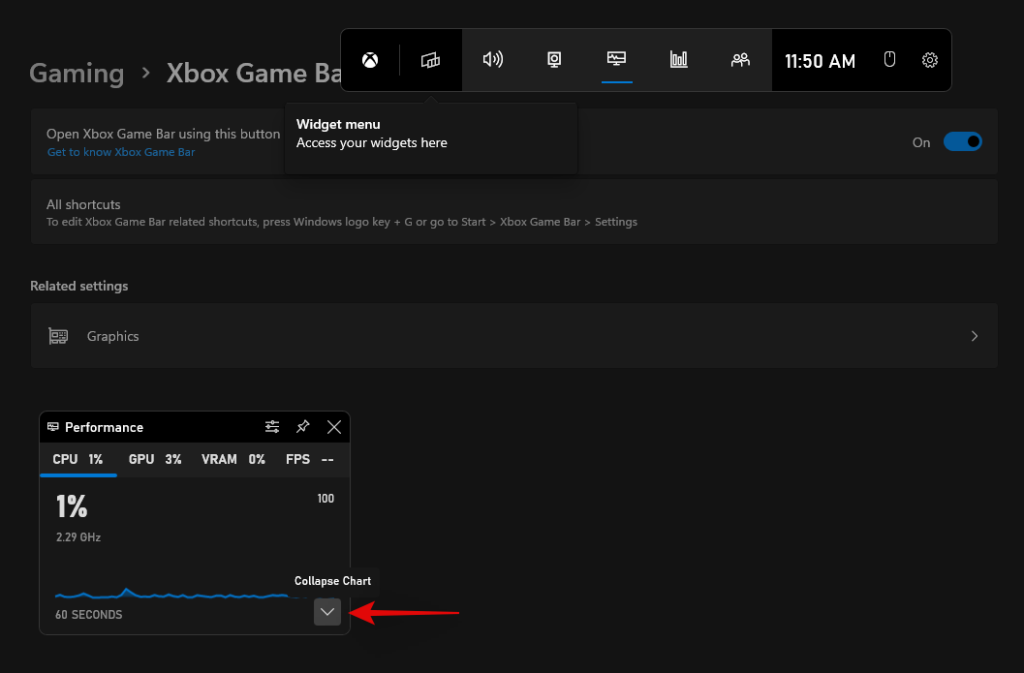
Teraz potiahnite a presuňte miniaplikáciu na panel úloh a podľa toho ju umiestnite. V závislosti od môjho aktuálneho rozlíšenia sa zdalo, že mierne čalúnenie na ľavej a spodnej strane robí trik.

Po premiestnení kliknite na ikonu „Pripnúť“ v hornej časti.

Teraz kliknite kamkoľvek, aby ste zatvorili herný panel Xbox.

Štatistiky výkonu teraz zostanú na paneli úloh a zvyšok bude skrytý na displeji.
Súvisiace články: Ako presunúť panel úloh na začiatok v systéme Windows 11
Metóda #02: Použite Rainmeter
Rainmeter je dlhotrvajúci nástroj, ktorý je predvoleným nástrojom na prispôsobenie miniaplikácií v systéme Windows, pretože boli natívnou funkciou. Aj keď od aktualizácie Rainmeter uplynul nejaký čas, tento nástroj stále funguje dobre v systéme Windows 11. Využitie zdrojov je však minimálne, problém s ekvalizérom zvuku pretrváva. Používanie vzhľadov Rainmeter, ktoré používajú nové EQ API, môže spôsobiť vysoké využitie procesora na starších systémoch so 4 jadrami alebo menej, a preto odporúčame držať sa ďalej od takýchto vzhľadov, ak čelíte problémom s vysokým využívaním procesora. Pomocou nižšie uvedeného sprievodcu môžete nastaviť Rainmeter a začať ho používať vo svojom systéme.
2.1 Získajte kožu
Najprv musíme získať vzhľad Rainmeter, ktorý chcete používať s počítačom. Odporúčame vám získať zdroj z DeviantArt, ale môžete použiť aj akúkoľvek inú dôveryhodnú webovú stránku. Majte na pamäti, že zatiaľ čo väčšina nastavení vzhľadu bude mať viacero prvkov, ako sú hodiny, počasie, kalendár, dátum a ďalšie, môžete si vybrať každý z nich a prispôsobiť si ich podľa svojich potrieb. Môžete teda kombinovať stiahnuté súbory, aby ste našli estetiku, ktorá dokonale vyhovuje vašim potrebám. V tomto návode budeme používať skin s názvom Urban, ale môžete použiť akýkoľvek iný skin, ktorý považujete za najlepší pre vaše estetické potreby.
2.2 Nastavenie merača dažďa
Teraz je čas nastaviť Rainmeter vo vašom systéme. Na začiatok použite kroky uvedené nižšie.
Navštívte tento odkaz a kliknite na 'Stiahnuť', aby ste si stiahli najnovšiu verziu Rainmeter do svojho počítača.
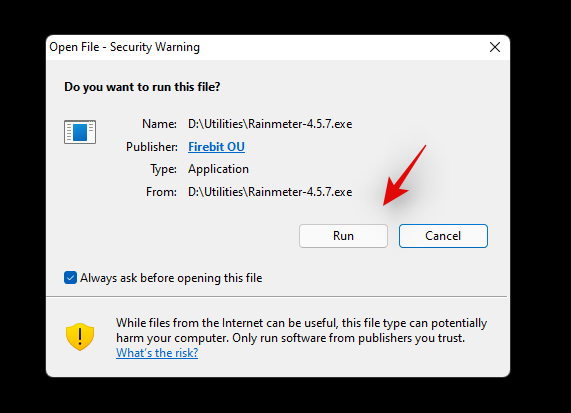
Po stiahnutí nastavenia do miestneho úložiska dvakrát kliknite a spustite ho v počítači. Po zobrazení výzvy kliknite na 'Spustiť'.
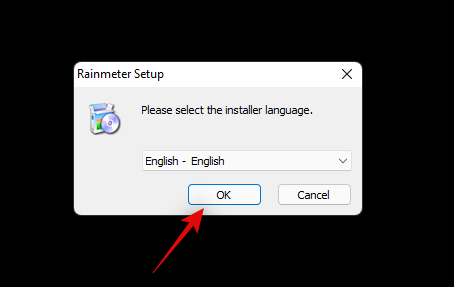
Vyberte požadovaný jazyk a kliknite na „OK“.
Teraz kliknite a vyberte 'Prenosná inštalácia'.
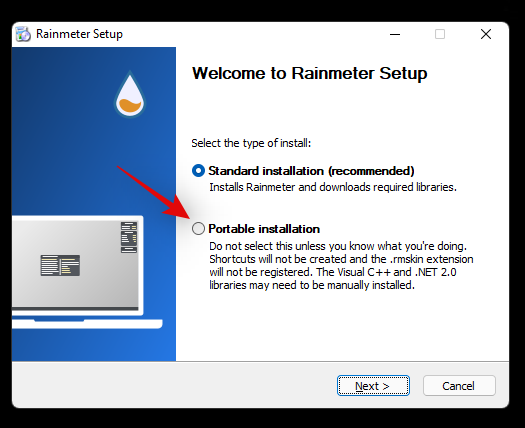
Poznámka: Inštalácia prenosnej verzie minimalizuje zdroje využívané Rainmeterom, ale môžete si zvoliť aj „Klasickú inštaláciu“ vo svojom systéme.
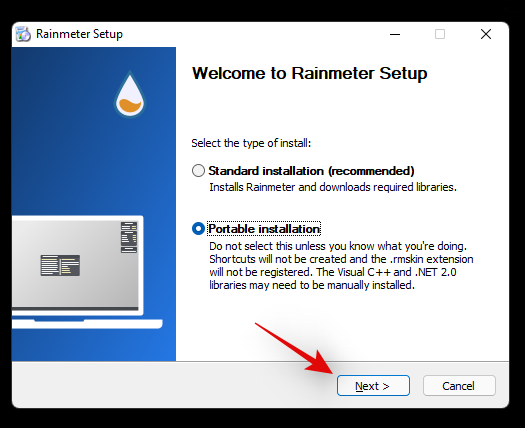
Kliknite na 'Ďalej'.
Vyberte inštalačný adresár pre Rainmeter. Odporúčame, aby ste ho uložili na inú jednotku alebo partíciu, než je vaša zavádzacia jednotka.
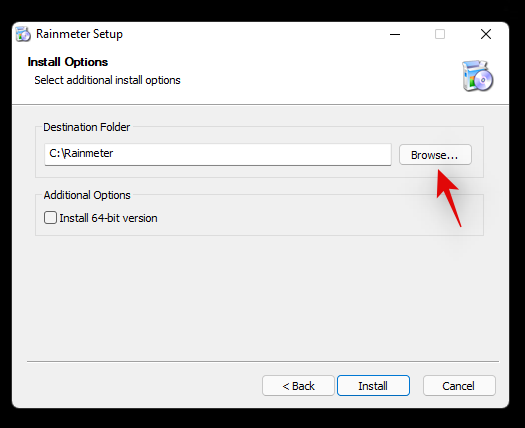
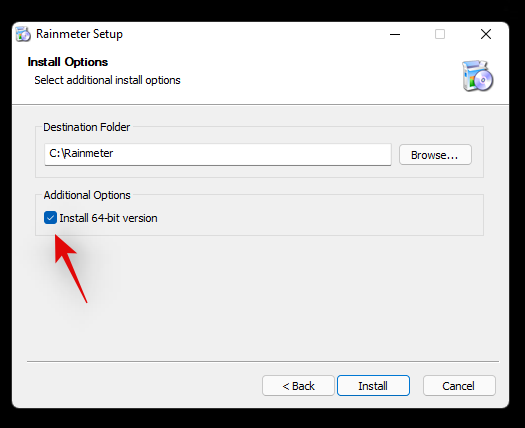
Po výbere začiarknite políčko „Inštalovať 64-bitovú verziu“.
Teraz kliknite na 'Inštalovať'.
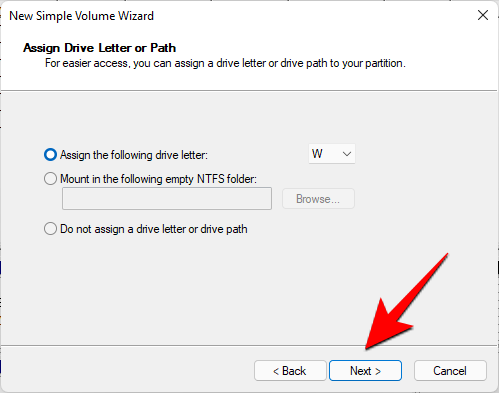
Po dokončení procesu zatvorte okno.
Teraz ste pripravení používať Rainmeter vo svojom systéme. Ak si prajete, aby sa Rainmeter automaticky spustil pri každom zapnutí vášho systému, potom použite sprievodcu nižšie na vytvorenie úlohy automatického spustenia pre Rainmeter.
2.3 Autostart Rainmeter
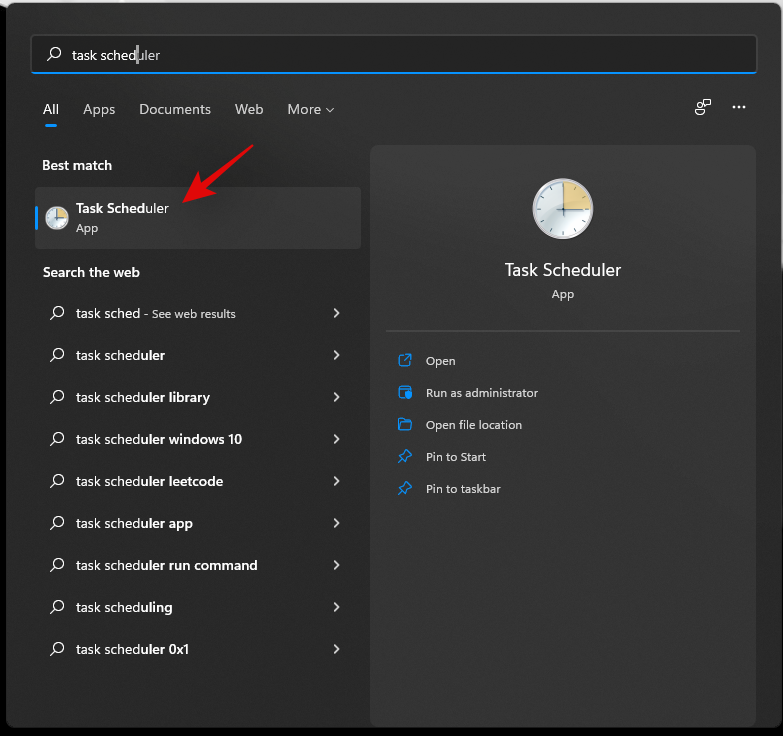
Spustite ponuku Štart, vyhľadajte „Plánovač úloh“ a spustite to isté z výsledkov vyhľadávania.
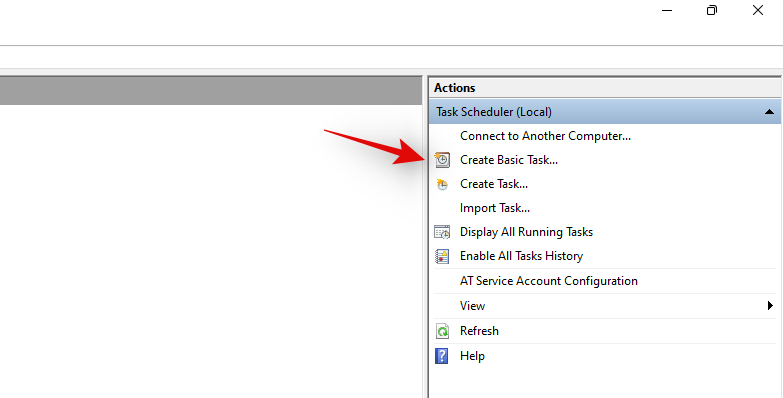
Kliknite na „Vytvoriť základnú úlohu“ vpravo.
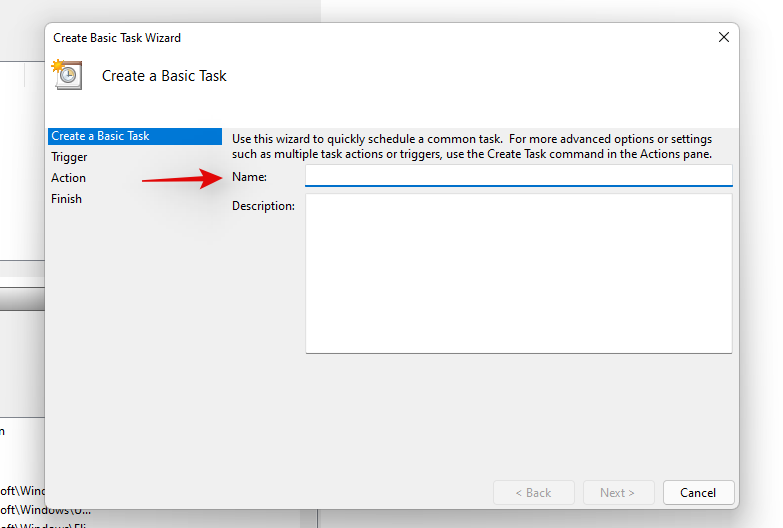
Zadajte názov a popis svojej úlohy, ako je uvedené nižšie.
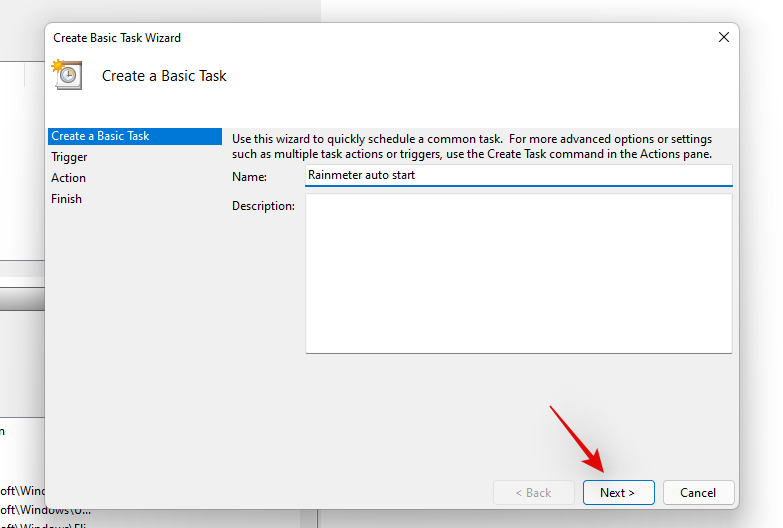
Po dokončení kliknite na „Ďalej“.
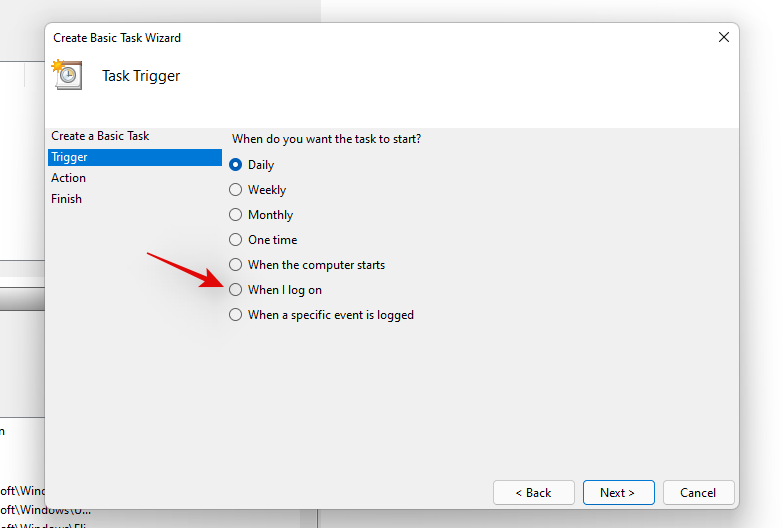
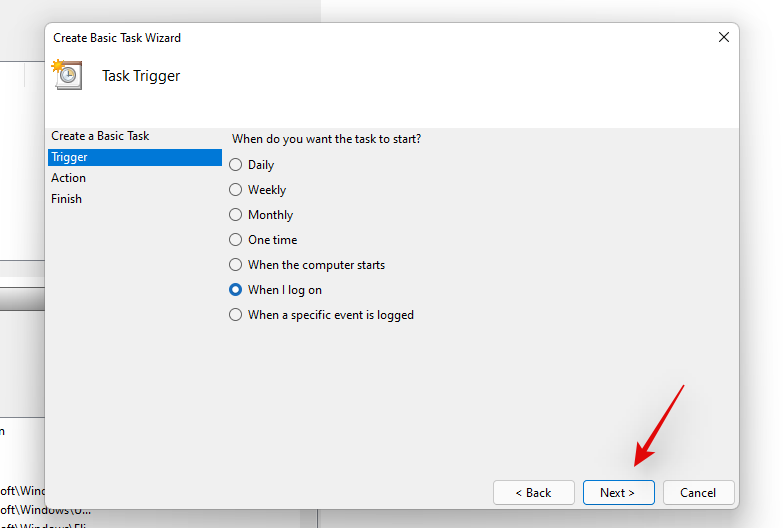
Kliknite na „Keď sa prihlásim“.
Kliknite na 'Ďalej'.
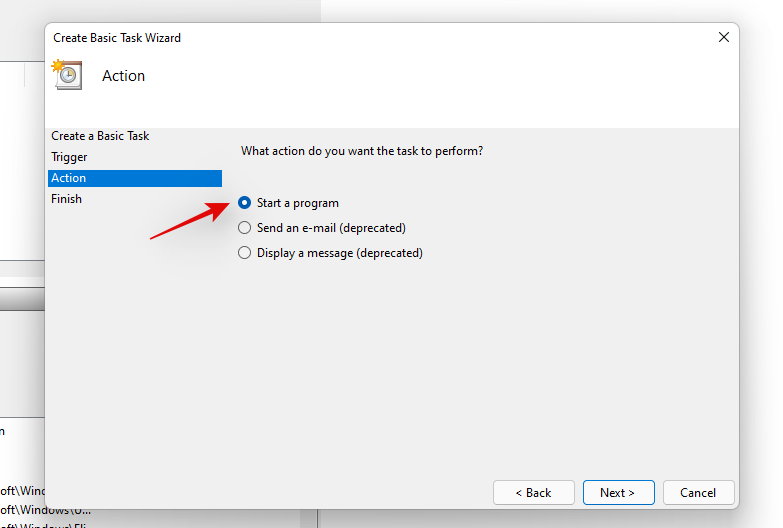
Vyberte 'Spustiť program'.
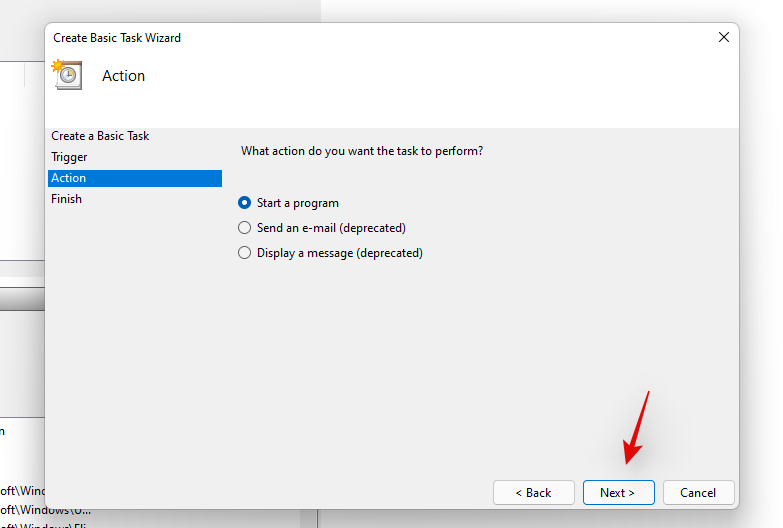
Kliknite na 'Ďalej'.
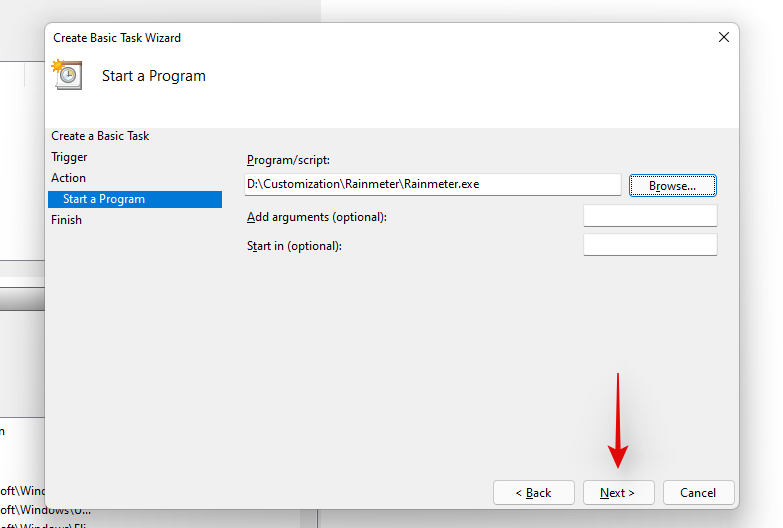
Teraz kliknite na „Prehľadávať“ a vyberte „Rainmeter.exe“ z vášho lokálneho úložiska.
Kliknite na 'Ďalej'.
Nakoniec kliknite na 'Dokončiť'.
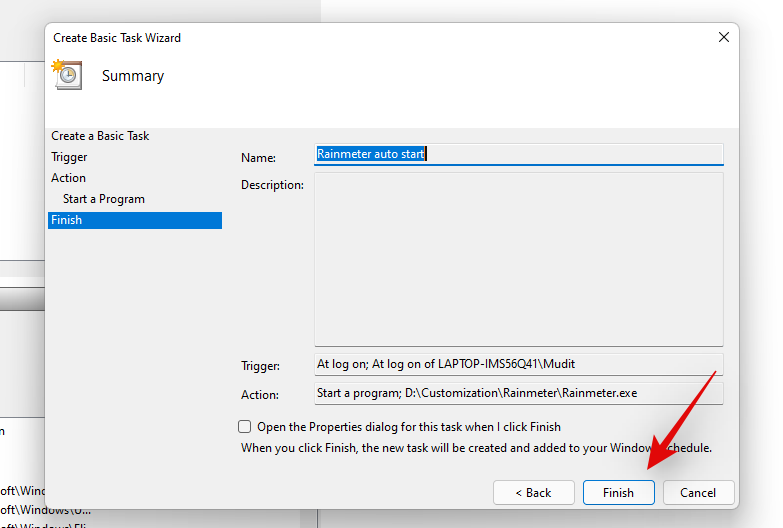
Úloha sa teraz vytvorí a Rainmeter sa teraz automaticky spustí vždy, keď sa prihlásite do svojho používateľského účtu na aktuálnom počítači.
2.4 Pridajte a nastavte svoj vzhľad
We will now add and set up your skin in Rainmeter. Use the guide below to get you started.
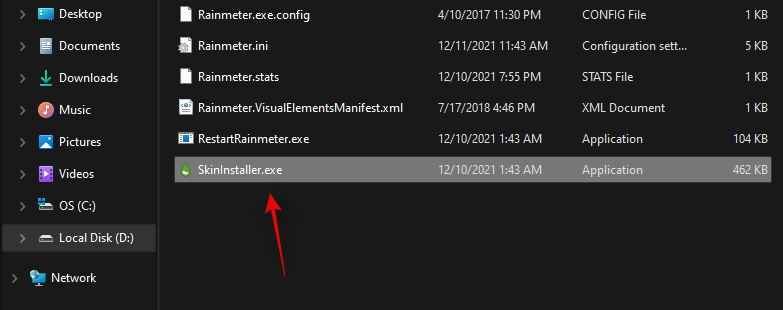
Download the desired Rainmeter skin you wish to use from this link. Once downloaded, navigate to the Rainmeter installation on your local storage and launch Skininstaller.exe.
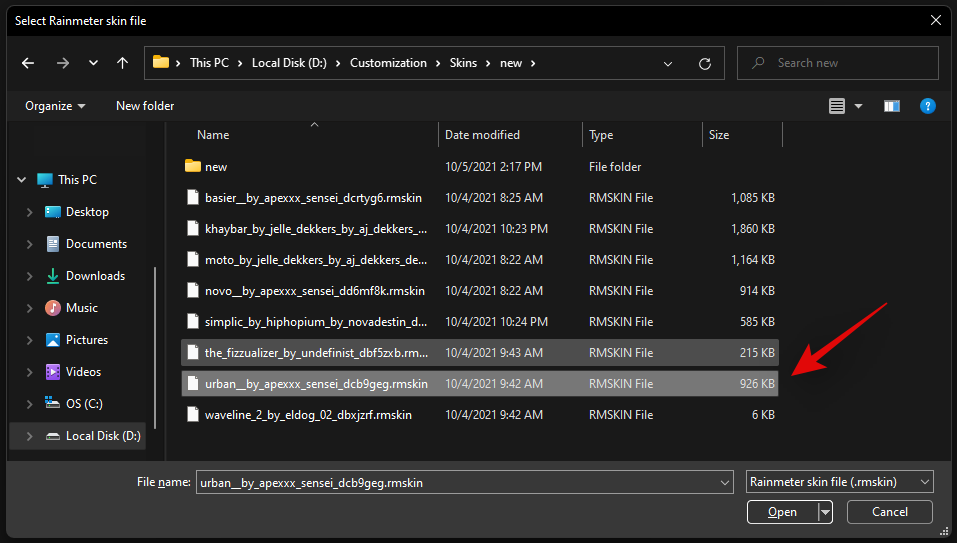
Select the skin you downloaded to your local storage earlier. Select the file with ‘.rmskin’ extension. If you downloaded an archive, then you will need to extract it first to find this file for your screen.
Once selected, leave everything at default and simply uncheck the box for ‘Apply included layout’.
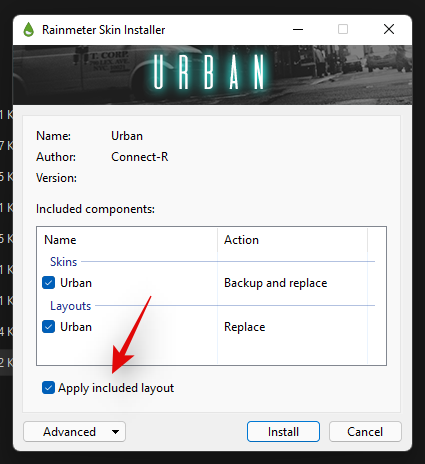
Click on ‘Install’ once you are done.
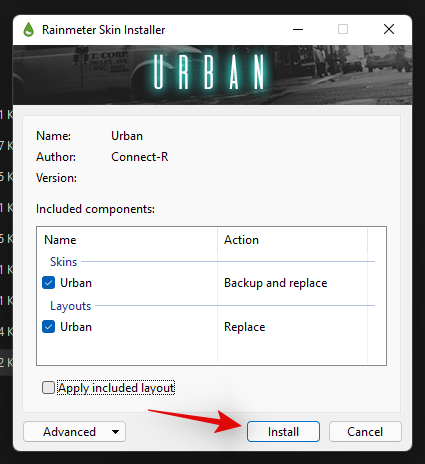
The selected skin will now be installed on your PC, we can now configure it and place it in your taskbar. Use the guide below to get you started.
2.5 Finally, customize your taskbar with Rainmeter
At this point, I recommend that you find and install any other skins that you wish to use to mix and match for the perfect setup. Once installed, follow the guide below to customize your skins and place the necessary elements in your taskbar.
Launch Rainmeter.exe on your local storage if it isn’t already running. Once launched, click on the tray icon for the same in your taskbar.
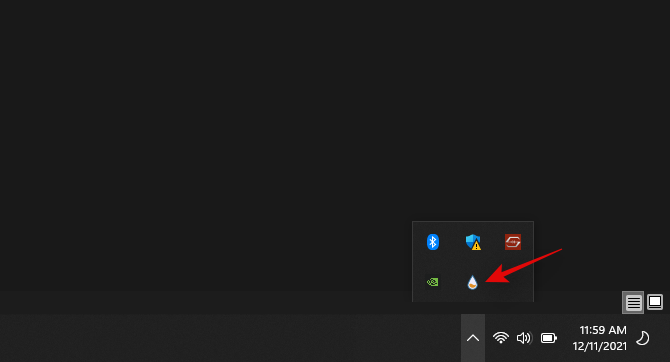
You will now have the Rainmeter window open on your screen. Click and select the theme you wish to use from your left and subsequently the .ini file for the configuration. For example, as we are using the stats from the Urban theme, we have navigated to Urban > CPU. The names can vary and be anything depending on the developer of your screen so feel free to try each one to find the one that you are looking for. Once found, double click on the concerned .ini file. This will automatically load the skin and it should now be visible on your desktop.
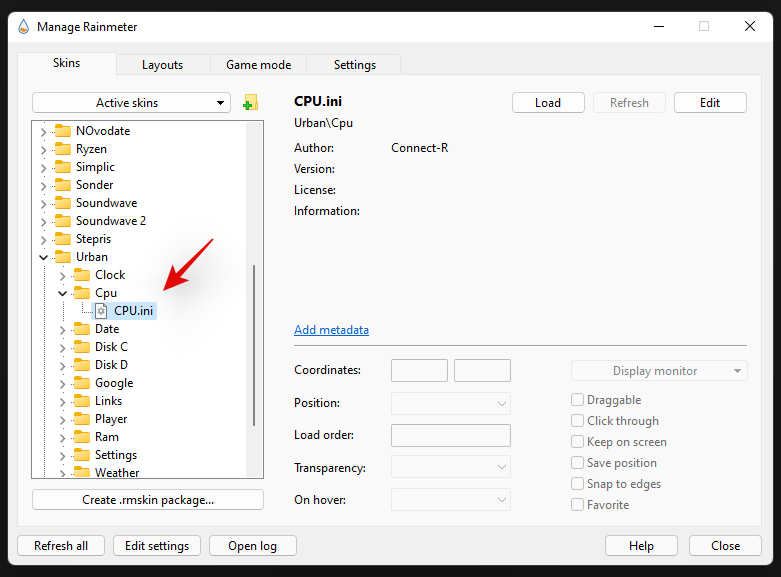
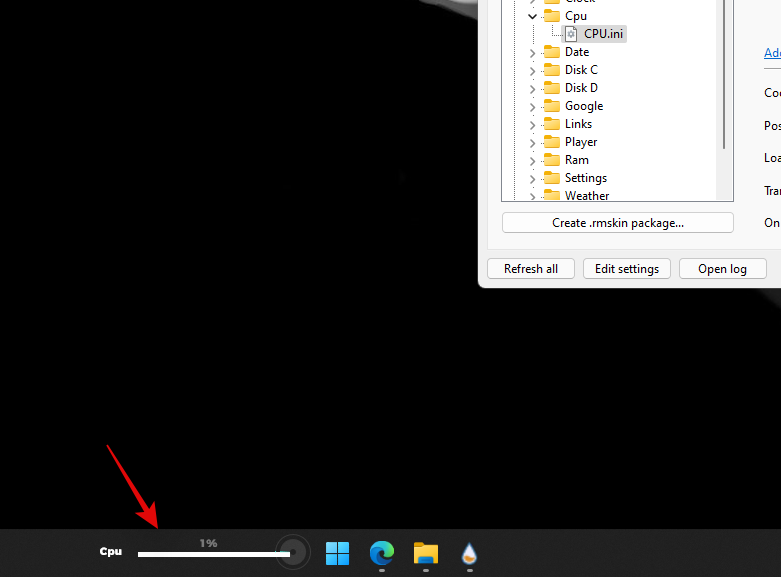
Click on the drop-down menu for Position and select ‘Stay topmost’. Now simply click and drag the skin to the desired position in your taskbar.
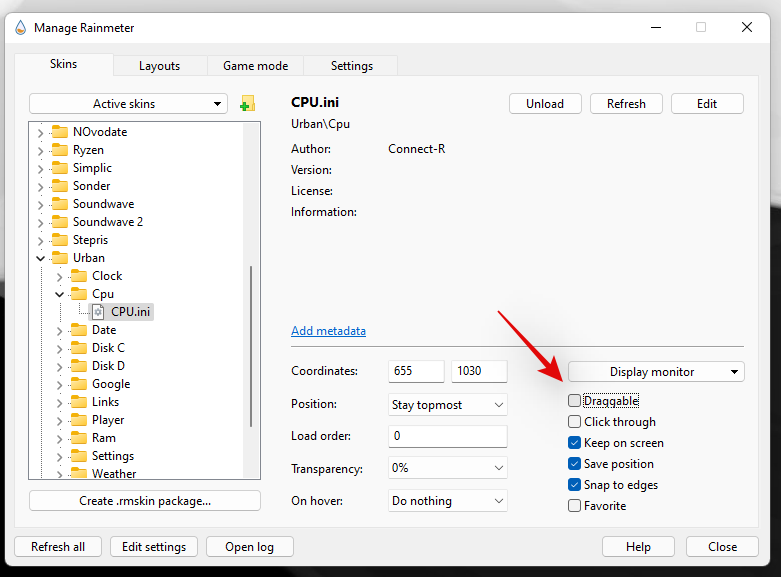
Once you are happy with the position, uncheck ‘Draggable’ for the selected skin.
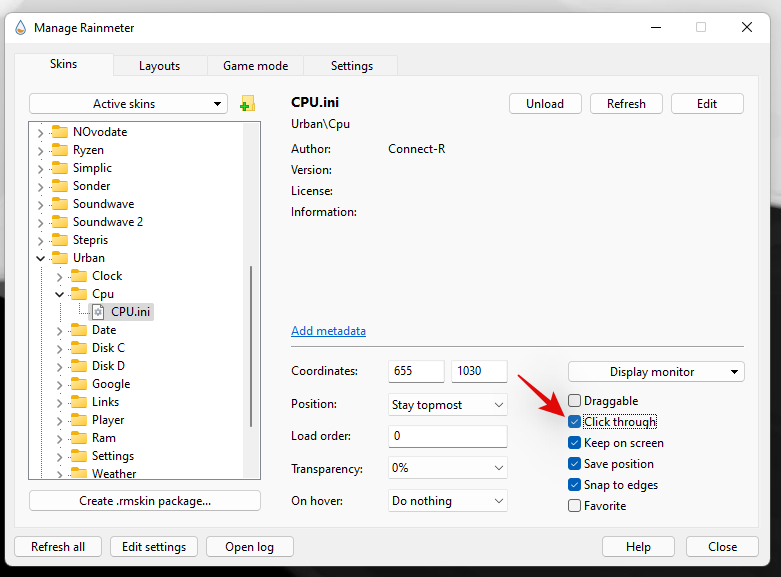
Click and enable ‘Click through’.
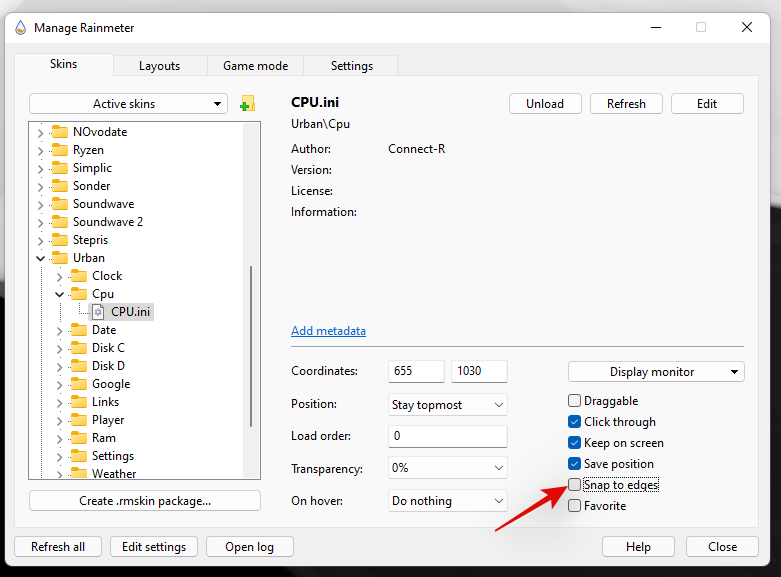
You can also uncheck ‘Snap to edges’ to manually position the skin on your skin.
Note: If you are using a skin that uses clickable buttons like Settings links, Wi-Fi, and more, then we recommend you do not enable ‘Click through’.
Once done, click on ‘Refresh all’ just to be safe. This will refresh all your skins in the background ensuring that everything is working as intended. And that’s it! You should now have reclaimed the space in your taskbar.
2.6 Resize Skins
Re-sizing skins has come a long way in Rainmeter as most modern skins allow you to use the right-click and drag gesture to resize them. We recommend you give this a shot, right-click on your screen, keep holding down the right mouse click, and drag your mouse up and down. If your skin supports this feature then it should now be resized on your PC. If however, your skin does not respond to this gesture then you can manually edit the .ini file to resize it instead. Use the steps below to get you started.
Click on the ‘Rainmeter’ icon in your system tray to launch the Settings for the same.

Now click and select the concerned skin from your left.

Once selected, click on ‘Edit’ in the top right corner.
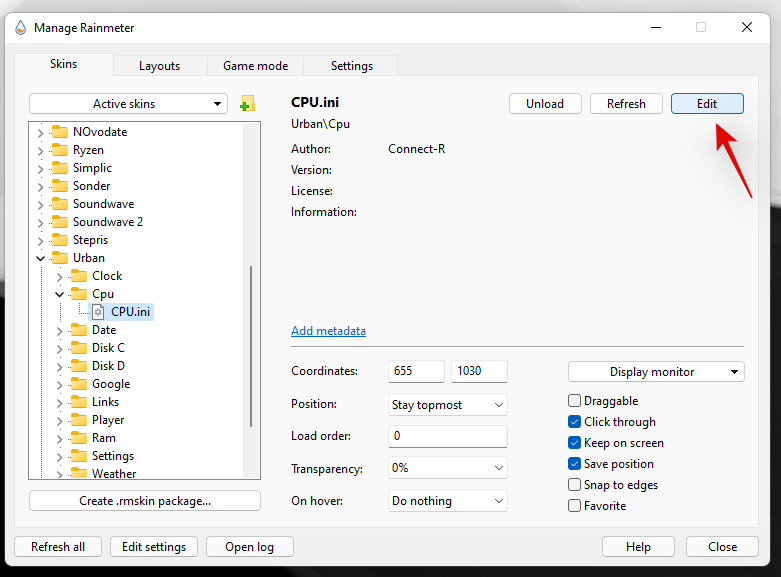
Now look for values related to size in this file. Ideally, you’re looking for a size variable in the code at the top as it controls the entire screen and not the individual elements of your screen. Once found, simply modify this value to change the size of your skin.
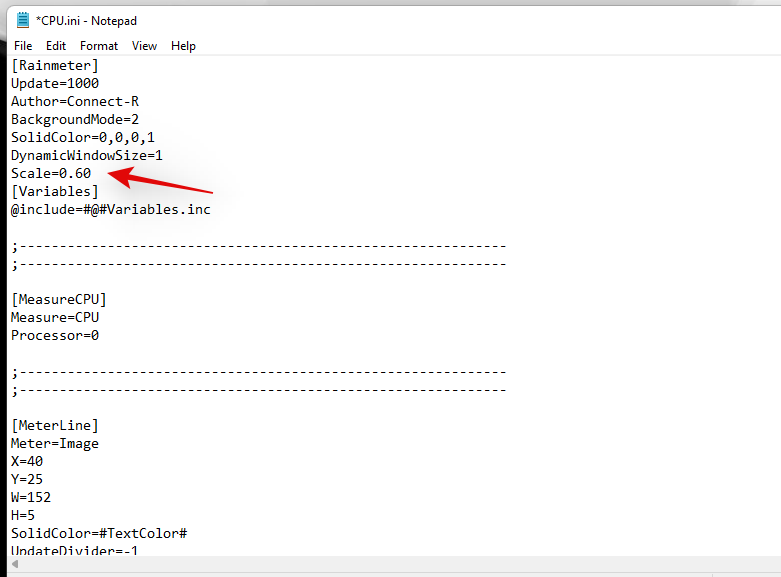
Hit Ctrl + S to save your changes without closing the text file. Now switch back to Rainmeter settings and hit ‘Refresh’ at the top.
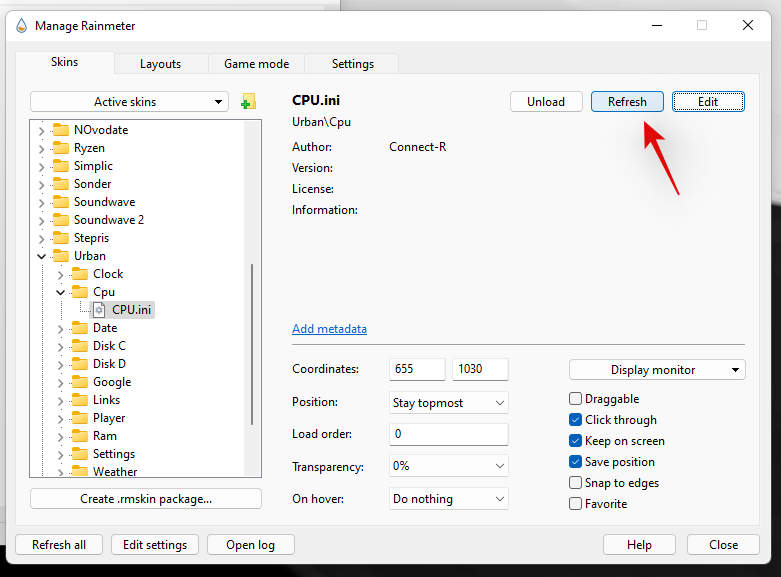
The changes will now be reflected in the skin on your screen. If however, you do not have a size value at the top or the changes do not reflect, then you will have to edit each meter size manually in the subsequent code below. This can be quite tedious depending on the elements contained in the skin. However, in our case, this was a simple modification which could also be the case for you.
However, if you are having to sift through tons of code, then we recommend you simply opt for a different skin instead. Rainmeter has been supported for a long time and thus has a huge library of skins. You should be able to find easily adjustable skin for your system. Use the Rainmeter skin options at the end of this guide to help you find a new one based on your aesthetic needs.
FAQs
With so many ways to customize your taskbar and so many options at your disposal, you are bound to have a few questions. Here are some commonly asked ones that should help you get up to speed on your system.
How much resources does Xbox Game Bar use?
Unlike Microsoft’s reputation, Xbox Game Bar is quite efficient with resources. It uses the Windows Kernal to directly tie into the Task Manager service and source all hardware info reading for your systems. This makes it highly efficient and you shouldn’t notice any difference in your system’s performance as the Game Bar is usually always running in the background.
How much resources does Rainmeter use?
Rainmeter does use CPU and RAM and can increase your resource usage if you use tons of skins. However, each skin is supposed to be a hit of around 0.4% to 0.6% on your CPU in the task manager at maximum. If you notice Rainmeter using large amounts of CPU resources on your system then you likely have a bugged or incompatible skin that is trying to use a service or API that is currently unsupported by Rainmeter. This usually happens with Visualizers, Calendars, and Weather widgets that tend to regularly sync with online servers to provide the necessary updated data. In the case of visualizers, the service used to measure your Audio frequencies conflicts with newer drivers and APIs in the background which is why most visualizers are known to cause high CPU usage on most systems.
This doesn’t mean you should give up on Visualizers, you should simply opt for one that was recently released for the latest version of Rainmeter.
My Xbox game bar stats don’t update in the taskbar: Fix
This is an issue that occurs when the Xbox Game Bar is facing a conflict in the background. You can use the following fixes to get this sorted on your system.
A restart in the worst cases will help fix the Performance widget on your system.
Rainmeter skins won’t update: Fix
If skins won’t update or display the correct data then you simply need to refresh them all. If that does not work, you can load and unload the concerned skin which should get everything back up and running on your system again. Use the guide below to get you started.
Click on the Rainmeter icon in your system tray to launch the Rainmeter Settings.

Once launched, click on the drop-down menu in the top left and select all your Active skins one by one.
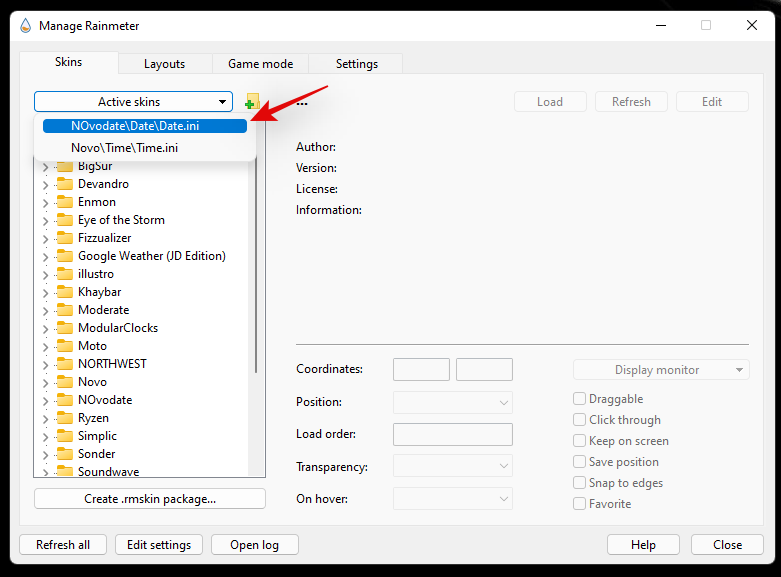
Click on ‘Unload’ and ‘Load’ subsequently, for each active skin.
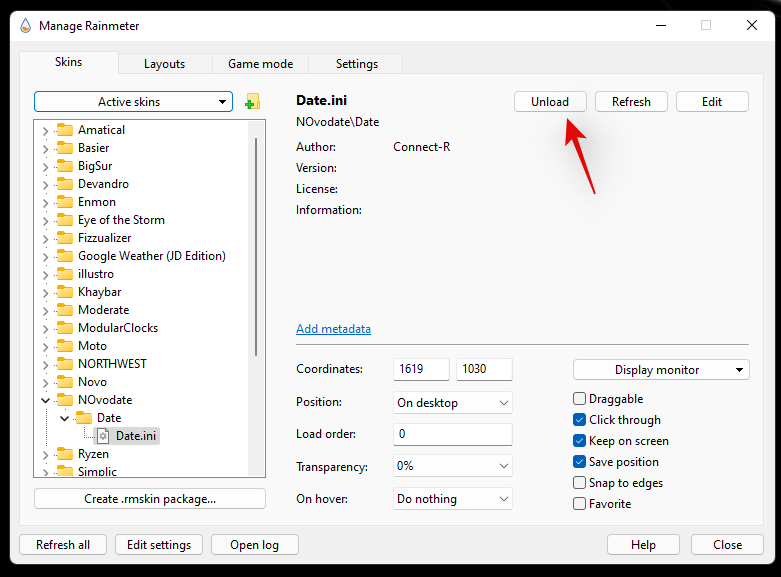
This should help the stats correctly display in all skins on most systems. If however, you still face issues, then we recommend you restart your system and check for any new updates available for Rainmeter.
Can I hide my taskbar?
Unfortunately hiding the taskbar seems to be a pipedream for now in Windows 11. However, you can use RoundedTB and its Dynamic Taskbar feature to have a virtually non-existent taskbar on your system. You will then be able to place the necessary skins natively in the taskbar space without having to worry about the color or aesthetic of your taskbar. You can download RoundedTB on your system using the guide below.
We hope this post helped you easily reclaim the space in your taskbar. If you face any issues or have any more questions for us, feel free to reach out using the comments section below.
RELATED:
Prečítajte si, ako odstrániť hudbu a videá z tabletov Amazon Fire a Fire HD, aby ste získali viac miesta, upratali a zvýšili výkon.
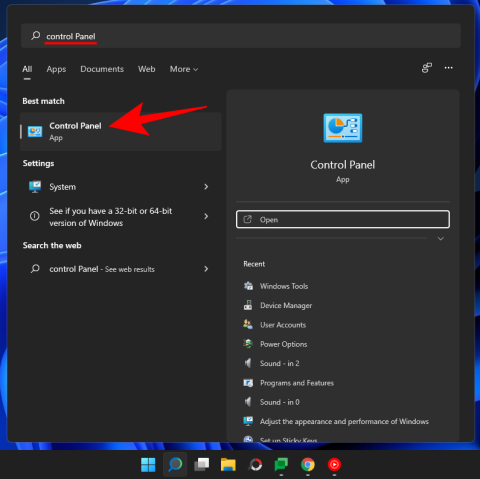
Tí, ktorí pracujú so systémom Windows, vedia, že Ovládací panel je spoľahlivým nástrojom. Objavte 9 spôsobov, ako ho otvoriť v systéme Windows 11.
Objavte, ako zdieľať súbory v systéme Windows 11 pomocou jednoduchého sprievodcu, ktorý pokrýva zdieľanie cez Windows Explorer, e-mail a ďalšie metódy.
Ovládače zariadení pomáhajú opraviť chyby, vytvárať a zlepšovať kompatibilitu periférnych zariadení. Zistite, ako **aktualizovať ovládače** v systéme Windows 11 a prečo je to dôležité.
Vytvorte a pridajte nový používateľský účet v systéme Windows 11, či už lokálne či online. Naučte sa, ako spravovať používateľské kontá s naším kompletným sprievodcom.
Zbavte sa zbytočného odpadu a organizujte svoje súbory pomocou najlepších aplikácií na vyhľadávanie duplicitných súborov pre Windows 11.
Naučte sa, ako prispôsobiť farbu panela úloh v systéme Windows 11 a vytvorte si unikátny vzhľad pomocou našich detailných návodov a tipov.
Register Windows je pamäťová banka vášho počítača, kde sú uložené kľúčové informácie o systéme. Naučte sa, ako bezpečne vyčistiť register a zrýchliť výkon systému.
Odkazy Zoom na stretnutie sa používajú na pozvanie účastníkov. Zistite, ako vytvoriť a zdieľať tieto odkazy efektívne.
Snímky obrazovky v systéme Windows 11: Naučte sa, ako používať kláves PrtSc, aplikáciu Snip & Sketch, a ďalšie metódy pre efektívne zachytenie obrazovky.
Windows 11 má veľa kontroverzií okolo podpory pre určité procesory, pretože operačný systém unikol v júli. Oficiálna verzia OS bola teraz uvoľnená pre verejnosť s mnohými zmenami ...
Zistite, ako povoliť modul TPM 2.0 a bezpečné spustenie v systéme BIOS pre Windows 11, aby ste zabezpečili svoj počítač a splnili systémové požiadavky.
Zistite, ako efektívne zmeniť veľkosť panela úloh v systéme Windows 11 pomocou jednoduchých metód, skúste prispôsobenie podľa vašich potrieb.
Kompletný sprievodca prihlásením sa ako správca v systéme Windows 11 a Windows 10. Naučte sa, ako spravovať prístupové povolenia a vytvárať nové účty správcu.
Ako spustiť staré hry v systéme Windows 11 pomocou rôznych metód.
Windows 11 bol uvoľnený pre verejnosť a spoločnosť Microsoft vydala nového prispôsobeného asistenta, ktorý vám pomôže dostať sa na palubu. Windows 11 prináša množstvo zmien vrátane možnosti inštalovať...
Microsoft Teams vám ponúka možnosť spravovať a spolupracovať s viacerými tímami súčasne z pohodlia vašej pohovky. To vám umožní ľahko zvládnuť veľké projekty na diaľku, pričom…
Microsoft Teams je jedným zo široko používaných nástrojov na spoluprácu s viac ako 20 miliónmi aktívnych používateľov denne. Služba ponúka funkcie ako okamžité správy, video a audio konferencie, file-sh…
V prípade, že služba Windows Search využíva mimoriadne vysoké zdroje procesora alebo disku, môžete v systéme Windows 11 použiť nasledujúce metódy riešenia problémov. Metódy na vyriešenie problému zahŕňajú jednoduchšie metódy ...
Nová aplikácia Fotky pre Windows 11 bola z väčšej časti veľmi vítaným doplnkom. Dodáva sa s prepracovaným používateľským rozhraním, novým editorom videa s obrovskou knižnicou efektov, novým používateľským rozhraním na import a integráciou…
Máte problémy s novým kontextovým menu systému Windows 11? Objavte overené opravy, ktoré vám pomôžu prepnúť späť na klasický štýl. Podrobný návod s úpravami registra a nástrojmi pre bezproblémový zážitok.
Objavte, ako bez námahy používať vyhľadávanie s umelou inteligenciou v aplikácii Fotografie vo Windowse 11 na okamžité vyhľadávanie fotografií pomocou dopytov v prirodzenom jazyku. Podrobný návod na organizáciu a vyhľadávanie fotografií s využitím umelej inteligencie pre bezproblémový zážitok.
Máte problémy s chybou „DHCP server sa nenašiel“ v systéme Windows 11? Objavte overené riešenia na rýchle obnovenie internetového pripojenia. Podrobné riešenia pre bezproblémové sieťové pripojenie.
Objavte podrobné návody na prispôsobenie ikon na paneli úloh v systéme Windows 11. Prispôsobte si pracovnú plochu s ľahkosťou, zvýšte produktivitu a prispôsobte si počítač skutočne podľa seba. Aktualizované tipy na najnovšie funkcie.
Objavte podrobný návod, ako odstrániť oddiel GPT na pevnom disku. Naučte sa bezpečné metódy používania nástrojov Správa diskov, DiskPart a nástrojov tretích strán na bezpečnú konverziu alebo vymazanie disku.
Zistite, ako nastaviť dynamickú obnovovaciu frekvenciu v systéme Windows 11 pre plynulý obraz a úsporu batérie. Podrobný návod s tipmi na bezproblémovú optimalizáciu zobrazenia.
Máte problémy s chybou tlačiarne 709? Objavte podrobný trik v registri, ktorý ju natrvalo opraví. Zvýšte svoju produktivitu pomocou tohto spoľahlivého sprievodcu riešením problémov so systémom Windows. Koniec s frustráciou z tlače!
Objavte jednoduché a podrobné metódy na kontrolu verzie a čísla zostavy systému Windows 11. Zostaňte informovaní o najnovších funkciách a zaistite, aby bol váš systém optimalizovaný pre maximálny výkon.
Máte problémy s tučným písmom a kurzívou, ktoré nefunguje? Objavte overené podrobné riešenia pre Word, Dokumenty Google, CSS a ďalšie. Dostaňte formátovanie textu do správnych koľají ešte dnes!
Máte problémy s chybou 709 o stave tlačiarne offline v systéme Windows 11? Objavte overené a podrobné riešenia na vyriešenie tohto frustrujúceho problému a obnovenie bezproblémovej tlače. Nie sú potrebné žiadne technické znalosti!



![Ako vyčistiť register v systéme Windows 11 [4 spôsoby] Ako vyčistiť register v systéme Windows 11 [4 spôsoby]](https://blog.webtech360.com/resources8/images31/image-9744-0105182733836.png)
