Ako sa prihlásiť ako správca v systéme Windows 11 alebo Windows 10
Windows je komplexný operačný systém, ktorý vám umožňuje diktovať a spravovať prístupové povolenia na základe aktuálne aktívneho účtu. Správcom to značne uľahčuje správu P…
Windows je komplexný operačný systém, ktorý vám umožňuje diktovať a spravovať prístupové povolenia na základe aktuálne aktívneho účtu. Správcom to značne zjednodušuje správu počítačov v ich organizácii, pretože im umožňuje poskytovať zvýšené povolenia vybraným jednotlivcom.
Ale čo ak vlastníte svoj počítač? Ako spravujete lokálne účty? Čo ak nemáte účet správcu? Si navždy zamknutý? Ak máte tieto otázky alebo ste nedávno čelili chybe, pri ktorej ste vyžadovali povolenie správcu, máme pre vás dokonalého sprievodcu.
Tu je všetko, čo potrebujete vedieť o správcovských účtoch v systéme Windows 11.
Poznámka o kompatibilite so systémom Windows 10: Sprievodcovia na tejto stránke boli zostavené pomocou systému Windows 11, takže používateľské rozhranie použité na snímkach obrazovky je zo systému Windows 11. Tieto príručky však úplne fungujú aj v systéme Windows 10. Takže neváhajte použiť príručky na Windows 11, ako aj Windows 10 PC.
Súvisiace: Ako vyhľadávať v systéme Windows 11
Obsah
Čo je účet správcu v systéme Windows 11?
Konto správcu je najvyšším účtom v systéme Microsoft Windows s najvyššími oprávneniami. To vám ako správcovi umožňuje spravovať váš počítač tak, ako chcete. Môžete vykonávať zmeny v systémových súboroch, inštalovať vylepšené programy, upravovať inštaláciu systému Windows, nastaviť vlastnú automatizáciu a oveľa viac. Povolenie na vykonávanie takýchto úloh nie je k dispozícii pre štandardných alebo hosťujúcich používateľov. Okrem toho môžete ako správca spravovať funkcie systému Windows a diktovať, ktoré z nich sú dostupné a dostupné pre vašich používateľov.
Prečo potrebujete účet správcu?
Účet správcu je účet s najvyššími oprávneniami v systéme Windows. To znamená, že zmeny operačného systému na úrovni systému môžete vykonávať pomocou účtu správcu bez akýchkoľvek obmedzení. Tu sú niektoré z bežných dôvodov, prečo by ste mohli potrebovať konto správcu v počítači.
a oveľa viac. Môže existovať veľa dôvodov, prečo potrebujete účet správcu v systéme Windows 11, ale vedeli ste, že v systéme Windows existujú dva druhy účtov správcu. Teda nie presne, ale tu je všetko, čo o nich potrebujete vedieť.
Súvisiace články: Ako zakázať zvuky výstrah systému Windows 11
Prihláste sa ako správca: Veci, ktoré potrebujete vedieť
Systém Windows sa štandardne dodáva so vstavaným účtom správcu, aj keď ho nemáte na uzamknutej obrazovke. Tento predvolený účet je vytvorený v čase inštalácie systému Windows na schválenie všetkých systémových zmien vykonaných v počítači pri nastavovaní systému Windows.
Okrem toho vám systém Windows umožňuje nastaviť ďalšie konto správcu z vášho lokálneho účtu, ak máte potrebné povolenia. Svoj aktuálny účet môžete tiež previesť na účet správcu, ak v súčasnosti používate štandardný účet v systéme Windows 11.
Nastavenie každého z týchto účtov má odlišné požiadavky a v závislosti od aktuálneho nastavenia sa môžete rozhodnúť pre ktorékoľvek z týchto nastavení. Ale v prípade, že sa pokúšate obnoviť heslo miestneho účtu, potom je vašou najlepšou voľbou použitie predvoleného účtu správcu, pretože v tomto prípade by ste sa nemohli dostať cez uzamknutú obrazovku.
Okrem toho je tu niekoľko bežných vecí, ktoré by ste mali mať na pamäti skôr, ako budete pokračovať podľa pokynov nižšie.
Rozdiel medzi predvoleným účtom správcu a poskytnutím prístupu správcu k používateľskému účtu
Predvolený účet správcu je samostatný účet, ktorý je súčasťou každej inštalácie systému Windows bez ohľadu na vaše zariadenie alebo verziu systému Windows. Na druhej strane prevedený účet je štandardný účet alebo účet hosťa na vašom počítači, ktorý bol povýšený na oprávnenia správcu.
Po zvýšení bude váš účet patriť do skupiny správcov a budete mať všetky potrebné povolenia správcu na vykonávanie zmien na úrovni systému vo vašom počítači. Predvolený správca sa väčšinou používa pri pokuse o obnovenie stratených hesiel k miestnym používateľským účtom na vašom počítači.
Konverzia účtu je na druhej strane jednoduchý proces zvýšenia povolení vášho aktuálneho účtu, ktorý vám umožní fungovať ako správca aktuálneho zariadenia. Predvoleného správcu možno vo vašom systéme zakázať jednoduchým príkazom, zatiaľ čo váš lokálny účet bude potrebné znova skonvertovať, ak chcete zmeny vrátiť späť. Použite jednu z nižšie uvedených metód, ktorá najlepšie vyhovuje vašim aktuálnym potrebám.
Súvisiace: Ako zakázať klávesnicu v systéme Windows 11
Ako sa prihlásiť ako správca v systéme Windows 11
V systéme Windows 11 sa môžete prihlásiť ako správca pomocou rôznych metód, ktoré sme riešili vyššie. Ak chcete vykonať dočasné zmeny vo svojom počítači alebo obnoviť stratené heslo, môžete povoliť predvolený účet správcu. Môžete tiež nastaviť nový účet správcu pre nového používateľa v prípade, že chcete s niekým zdieľať svoje zariadenie. Nakoniec môžete previesť svoj aktuálny lokálny účet na účet správcu, ak sami hľadáte oprávnenia správcu na aktuálnom zariadení. Postupujte podľa jednej z nižšie uvedených metód, ktorá najlepšie vyhovuje vašim aktuálnym potrebám a požiadavkám.
Metóda #01: Použite predvolený účet správcu
Na vykonanie potrebných zmien pomocou nižšie uvedenej príručky môžete použiť predvolený účet správcu na počítači so systémom Windows 11. Po vykonaní zmien môžete účet deaktivovať pomocou nasledujúceho sprievodcu. Začnime.
1.1 Povoľte predvolený účet správcu
Najprv budeme musieť povoliť/odkryť administrátorský účet na vašom PC. Dá sa to urobiť rôznymi metódami. Ak sa môžete dostať cez uzamknutú obrazovku, môžete použiť jednu z týchto metód. Ak sa však nemôžete dostať cez uzamknutú obrazovku, budete musieť získať prístup k CMD z uzamknutej obrazovky a použiť sprievodcu nižšie. V takýchto prípadoch môžete použiť sprievodcu v spodnej časti na aktiváciu CMD priamo z domovskej obrazovky. Začnime.
1.1.1 Používanie CMD
Spustite CMD vo svojom systéme a zadajte príkaz nižšie. Po dokončení ho spustite stlačením klávesu Enter na klávesnici.
net user administrator /active:yes
Príkaz by mal byť teraz úspešne dokončený.
Stlačte kláves Windows na klávesnici a kliknite na svoje používateľské meno v ľavom dolnom rohu. Účet správcu by teraz mal byť viditeľný v tejto časti.
To znamená, že proces bol úspešný. Teraz sa môžete odhlásiť zo svojho účtu a prihlásiť sa do účtu správcu. Predvolený účet správcu nemá heslo a po prihlásení do účtu vás privíta OOBE. Teraz môžete v prípade potreby použiť nasledujúce príručky na obnovenie hesla systému Windows.
1.1.2 Používanie nástrojov správcu
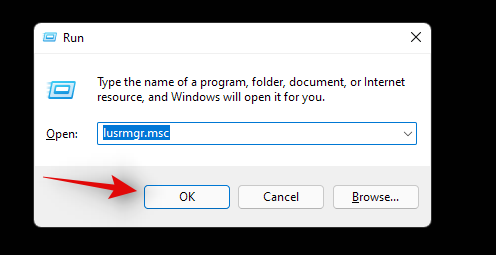
Stlačením Windows + R
na klávesnici spustíte dialógové okno spustenia. Po spustení zadajte nasledujúci výraz a stlačte kláves Enter na klávesnici.
lusrmgr.msc
Na vašom počítači sa teraz spustí správca miestnych skupín. Začnite výberom položky „Používatelia“ na ľavej strane.
Kliknite na Správca na pravej strane. Teraz kliknite na položku Ďalšie akcie a potom na položku Vlastnosti .
Na obrazovke sa teraz otvorí nové okno. Zrušte začiarknutie možnosti „Účet je zakázaný“.
Kliknite na „Použiť“ a potom na „OK“.
Zatvorte správcu miestnych skupín a aktivujte ponuku Štart. Teraz kliknite na svoje používateľské meno v ľavom dolnom rohu a v tejto sekcii by mal byť teraz k dispozícii nový účet „Správca“. Teraz sa môžete odhlásiť zo svojho aktuálneho účtu a prihlásiť sa do nového účtu správcu. Účet nebude mať heslo a mali by ste byť schopní sa doň jednoducho prihlásiť jednoduchým kliknutím na „Prihlásiť sa“.
1.1.3 Používanie Editora databázy Registry
Metóda editora registra je použiteľná iba pre používateľov s nainštalovaným systémom Windows 11 Pro alebo vyšším v ich systémoch. Je to preto, že cesta k registrom, ku ktorej potrebujeme prístup pre túto metódu, je k dispozícii iba pre používateľov systému Windows 11 Pro alebo vyššieho. Ak ste používateľom systému Windows 11 Home, môžete namiesto toho použiť metódu CMD uvedenú vyššie.
Stlačte Windows + R
na klávesnici a zadajte nasledujúci výraz. Po dokončení stlačte kláves Enter na klávesnici.
regedit
Teraz prejdite na nasledujúcu cestu. Môžete to tiež skopírovať a prilepiť do panela s adresou v hornej časti.
Computer\HKEY_LOCAL_MACHINE\SOFTWARE\Microsoft\Windows NT\CurrentVersion\Winlogon\SpecialAccounts\UserList
Keď je na ľavej strane vybratý zoznam používateľov, kliknite pravým tlačidlom myši na prázdnu oblasť napravo a vyberte možnosť „Nový“.
Kliknite na „Hodnota DWORD (32-bitová)“.
Pomenujte hodnotu ako „Správca“ a na klávesnici stlačte kláves Enter.
Once the value is added, close the Registry Editor and restart your PC for good measure. An administrator account should now be available in the bottom left corner of your screen when at the lock screen.
1.1.4 Using GPO
If you are using an enterprise machine then you can also use the Group Policy Editor to enable the default administrator account on your PC. However, this option will be unavailable to users with Windows 11 Home edition. Follow the guide below to get you started.
Press Windows + R
, enter the following term and press Enter on your keyboard to open the Group Policy Editor on your PC.
gpedit.msc
Navigate to the following directory using the left sidebar.
Computer Configuration\Windows Settings\Security Settings\Local Policies\Security Options\
Now double click on the following value on your right: Accounts: Administrator account status
Select ‘Enabled’.
Click on ‘Apply’ and then on ‘OK’.
Close the GPO window now and press the Windows key on your keyboard to open the Start menu. Now click on your username in the bottom left corner of your screen and a new Administrator account should now be available to you.
1.2 Disable the default administrator account
Now that you are done with your administrative tasks, it is recommended that you disable your administrator account to prevent unauthorized access to your system. Use one of the methods below that best suits your current needs and requirements. Let’s get started.
1.2.1 Using CMD
Activate CMD on your PC depending on your current setup and type in the following command. Press Enter on your keyboard to execute it.
net user administrator /active:no
And that’s it! The default administrator account should now be disabled on your PC.
1.2.2 Using Admin Tools
Press Windows + R
and enter the following term in the Run dialog box. Press Enter on your keyboard once you are done.
lusrmgr.msc
Select ‘Users’ from the left sidebar and click on ‘Administrator’ on your right.
Select the checkbox for ‘Account is disabled’ option.
Click Apply and then OK.
Close the admin tools window and the default administrator account should now be disabled on your PC.
1.2.3 Using Registry Editor
Press Windows + R
, type in the following, and press Enter on your keyboard to open the Registry Editor on your PC.
regedit
Once the registry editor opens, navigate to the path given below.
Computer\HKEY_LOCAL_MACHINE\SOFTWARE\Microsoft\Windows NT\CurrentVersion\Winlogon\SpecialAccounts\UserList
Click on ‘Administrator’ on your right and hit Del on your keyboard.
Confirm your choice by clicking on ‘Yes’.
Restart your PC and the default admin account should no longer be available on your lock screen.
1.2.4 Using GPO
Press Windows + R
and type in the following. Press Enter on your keyboard once you are done.
gpedit.msc
Now navigate to the following path.
Computer Configuration\Windows Settings\Security Settings\Local Policies\Security Options\
Now double click on the following value on your right: Accounts: Administrator account status
Select ‘Disabled’.
Click on ‘Apply’ and then on ‘OK’.
Close the GPO window.
The default administrator account will now be disabled on your PC via the Group Policy Editor in Windows 11.
1.3 Login as admin using command prompt (can’t get past the lock screen issue)
If you are locked out of Windows and would like to access the administrator account to reset your password then you will need to launch CMD from your lock screen first. You will need a recovery environment to proceed with this guide.
You will need to first access CMD using Windows installation media (a Windows bootable USB) for this guide and then follow the steps below. If using an installation media press Shift + F10
during the setup to launch CMD anywhere.
Follow the guide below to get you started once you have launched CMD as given above.
Once the command prompt launches, enter the following command and press Enter on your keyboard.
cd windows
You will now be taken to your default boot drive in CMD. Enter the following command and execute it by press Enter on your keyboard.
cd system32
You will now be in the System32 directory. Execute the command below to create a backup of utilman.exe.
copy utilman.exe utilman.exe.back
Execute the command below within CMD now.
copy cmd.exe cmd1.exe
Now let’s delete the default utilman.exe.
del utilman.exe
We will now rename CMD so that it can be accessed as utilman.exe.
rename cmd.exe utilman.exe
Once all the commands are executed successfully, close the command prompt by typing in the following command.
exit
Restart your PC and proceed to the Windows lock screen as you normally would. Click on the accessibility icon in the bottom right corner and you should now be able to access CMD on your lock screen. Follow the guide above to enable administrator account on your system. Once enabled, you can use the guide below to reset a local account’s password. Once you have reset your password it is highly recommended that you revert the changes we made to cmd.exe and utilman.exe earlier. Use the steps below to revert your changes.
Press Windows + S
on your keyboard and search for CMD. Click on ‘Run as administrator’ once it shows up in your search results.
Now enter the following commands one by one and execute them to revert your changes. Make sure to execute each command one after the other without changing their order.
del utilman.exe
rename cmd1.exe cmd.exe
rename utilman.exe.back utilman.exe
CMD functionality should now be restored within Windows 11. You can check for the same by pressing Windows + R
on your keyboard, typing in CMD, and hitting Enter on your keyboard. If CMD launches on your system then all the necessary changes have been reverted successfully.
However, if CMD does not launch, make sure that you executed each command successfully on your system by re-verifying each one in the list above.
And that’s it! You should now be able to access CMD from your lock screen.
1.4 Reset password for a local account
You can now reset your local account’s password with the default administrator account we just enabled. Follow the steps below to get you started.
Log in to the Windows administrator account and then press Windows + S
on your keyboard. Search for Control Panel and click and launch the app once it shows up in your search results.
Click on ‘User Accounts’.
Click on ‘User Accounts’ again.
Click on ‘Manage another account’.
Click and select the account for which you wish to change the password.
Now click on ‘Change the password’.
Type in your new password and confirm the same in the respective text boxes
Set a password hint if needed.
Click on ‘Change password’ once you are done.
And that’s it! The password for the selected account should now be changed. You can now visit the lock screen and log into your local account using your new password. We recommend you revert any changes made at this point to maintain your security and privacy. You should revert any CMD changes made as well as disable the default administrator account on your system using the guides above.
Method #02: Create a new administrator account in Windows 11
If you wish to create a new administrator account in Windows 11, then you can follow the steps below. Please keep in mind that you will need administrator privileges to create a new administrator user account on your device. Follow the guide below to get you started.
Press Windows + i
on your keyboard and select ‘Accounts’ from the left sidebar.
Click on ‘Family & other users’.
Click on ‘Add account’.
At this point, you can enter the Microsoft Account details of the new user and follow the on-screen steps to set up a new account. However, if you are looking to create a new local account then you can continue with the steps below.
Click on ‘I don’t have this person’s sign-in information’.
Click on ‘Add a user without a Microsoft account’.
Enter the name of the new user.
Now set a password and confirm the same.
Click on ‘Next’ once you are done.
\
A new account will now be added to your PC. However, the newly added account is a standard account. Let’s convert it into an administrator account. Press Windows + S
on your keyboard and search for Control Panel. Click and launch the app from your search results.
Click on ‘User Accounts’.
Click on ‘User Accounts’ again.
Click on ‘Manage another account’.
Now click and select the new account you just created.
Click on ‘Change the account type’.
Click and select ‘Administrator’.
Finally, click on ‘Change account type’.
And that’s it! You will now have created a new local administrator account on your device.
Method #03: Change a standard account to an administrator account
If you have a standard account then you can simply switch to an administrator account. If using the Windows Home edition then you can either use the Control Panel method or the ‘netplwiz’ method. On the other hand, Windows Pro and higher users can use either of the methods listed below. Let’s get started.
Note: If you are logged in as a standard user and would like to convert the same account to an administrator account then we recommend you use the netplwiz guide in the methods below.
3.1 Using Control Panel (Windows home)
Press Windows + S
on your keyboard, search for Control Panel and launch the app once it shows up in your search results.
Click on ‘User Accounts’.
Click on ‘User Accounts’ again.
If you wish to change your own account’s type then click on ‘Change your account type’. If you wish to convert another local account then select ‘Manage another account’ and select the concerned account. Once selected, click on ‘Change account type’.
Select ‘Administrator’.
Click on ‘Change account type’.
And that’s it, the concerned account should now be an administrator account on your system.
3.2 Using netplwiz
You can also use netplwiz to your advantage and convert user accounts on your PC. Follow the guide below to get you started.
Press Windows + R
on your keyboard to launch the run dialog box. Once launched, type in the following and press Enter on your keyboard.
netplwiz
Check the box for ‘Users must enter a user name and password to use this computer’ at the top.
Now click and select the user account you wish to convert from the list below.
Click on ‘Properties’.
Switch to the ‘Group Membership’ tab at the top.
Click and select ‘Administrator’.
Click on ‘Ok’ twice, once you are done.
If you converted the current local account that you are signed in with then you will be prompted to re-login to the account for the changes to take effect. Click on ‘Yes’ to confirm your choice.
You will now be taken to the lock screen. Login to the concerned account and you should now have administrator privileges within it.
3.3 Using Local groups manager (Windows Pro and higher)
Press Windows + R
on your keyboard, type in the following, and press Enter on your keyboard.
lusrmgr.msc
The local groups manager should now launch on your PC. Click and open ‘Users’ on your left.
Now select the desired User account that you wish to convert from your right and double click on it.
Switch to the ‘Member of’ tab and select the ‘Administrator’ group.
Click on ‘Ok’ once you are done.
And that’s it! The selected account will now have elevated administrator privileges within Windows.
Can you set or reset a password when logged in as an administrator?
Yes, you can easily reset your password as an administrator in Windows 11. This can be done in multiple ways and you can reset the password for a standard account or an administrator account using this method. This can be quite useful if you have forgotten your password and would like to get back into your system without losing your data.
However, you should keep in mind that this can be used by anyone to change your password and get access to your system. Hence, it is recommended that you set a secure password for your default account whenever possible.
For now, you can use the guide below to reset a password in Windows 11 when logged in as an administrator.
How to reset the password once logged in as an administrator
Resetting your password is quite easy when you are logged in to Windows 11 as an administrator. The best way to do this is by using either the Control Panel or CMD. Use one of the guides below that best fits your current needs and requirements. Follow any one of the guides below to get you started.
1. Using Control Panel
Press Windows + S
and search for Control Panel. Click and launch the app from your search results.
Click on ‘User Accounts’.
Now click on ‘User Accounts’ again.
Click on ‘Manage another account’.
Now click and select your local account for which you wish to reset your password.
Click on ‘Change the password’.
Add a new password for your local account and confirm the same in their respective text boxes.
Now add a password hint if required.
Click on ‘Change password’ once done.
And that’s it! The password for the selected account should now be changed based on your preferences.
2. Using CMD
You can also reset a local account’s password using CMD. Follow the guide below to get you started.
Press Windows + S
on your keyboard and search for CMD. Click on ‘Run as administrator’ once the app shows up in your search result.
Type in the following and press Enter on your keyboard.
net user
You will get a list of all the accounts currently available on your PC. Make a note of the desired account’s username and then type in the command below. Replace ‘NAME’ with the name you noted down earlier and replace ‘PASSWORD’ with your new password. Once done, press Enter on your keyboard.
net user NAME PASSWORD
And that’s it! Once the command is executed, the password for the desired account should be automatically changed on your PC.
How to add a password for the administrator account
If you are looking to secure your PC further then it is recommended that you add a password for the default administrator account. This will ensure that no one aware of this trick can access your Windows account without your authorization. We can add a password for your default admin account in several ways but we recommend you do so either via the advanced menu or via the CMD method. Follow any one of the guides below to get you started.
1. Using Ctrl + Alt + Del
Log in to the default administrator account and press Ctrl + Alt + Del
on your keyboard.
Now click and select ‘Change password’.
Enter a new password and confirm the same in their respective fields.
Add a password hint or security question depending on your preferences.
Click on ‘Ok’ once you are done.
And that’s it! Your default administrator account’s password should now be changed on your PC.
2. Using CMD
Log in to the default administrator account and press Windows + S
on your keyboard. Search for CMD and click on ‘Run as administrator’ once the app shows up in your search results.
Now enter the following command. Replace ‘PASSWORD’ with a password of your desired choice.
net user Administrator PASSWORD
And that’s it! The new password should now be set for your default administrator account.
Should you keep the administrator account enabled?
No, it is not recommended to keep your default/super administrator account enabled. This account has higher and more elevated privileges when compared to a normal administrator account in Windows. This account is used by Windows to perform system-level tasks in the background as well hence it could cause several privacy issues on your system.
In case somebody can access this account, they would have access to your entire data and hardware. The user could then proceed to take control of your entire system or simply infect it with malware, adware, and in the worst cases, ransomware.
We hope you were able to easily log in as an administrator in Windows 11 using the guide above. If you face any issues or have any more questions for us, feel free to reach out to us using the comments section below.
Related:
Pre mnohých ľudí sa YouTube stal primárnym zdrojom zábavy. Platforma zvyčajne funguje bez problémov, ale slabé internetové pripojenie áno
Android O bol oficiálne predstavený ako Android Oreo – alebo Android 8 – v auguste. Niektoré zo sľúbených telefónov majú softvér novej generácie, iné áno
Môže sa to zdať zvláštne zvažovať výhody a nevýhody stiahnutia bezplatnej aktualizácie operačného systému, ale cesta aktualizácie systému Windows 10 z októbra 2018
Ak často používate Bluetooth prenosného počítača na pripojenie k iným zariadeniam, možno ste sa stretli s problémami s chýbajúcim tlačidlom Bluetooth
Režim spánku je jednoduchý spôsob, ako šetriť energiu počítača. Keď operačný systém prejde do režimu spánku, vypne počítač a zároveň uloží súčasnosť
Kontextové reklamy sú bežným problémom väčšiny mobilných zariadení bez ohľadu na operačný systém. Častejšie problém spočíva v aplikáciách nainštalovaných na
Aj keď nevlastníte telefón s Androidom, pravdepodobne denne používate tri alebo štyri služby Google, takže spoločnosť o vás veľa vie. Vaša úroda
Ako každá iná aplikácia na vašom Androide alebo iPhone, aj Instagram dostáva pravidelné aktualizácie, pridáva nové funkcie, opravuje chyby a zlepšuje výkon. teda
Získanie chyby Iba tiesňové volania na vašom telefóne s Androidom môže byť frustrujúce. Chyba znamená, že váš telefón sa nemôže pripojiť k mobilnej sieti,
Ste pripravení vytvoriť príbeh z hromady fotografií na telefóne? Kombinácia obrázkov je spôsob, ako to urobiť. Koláže a mriežky sú cestou