Slå Global Logging På eller Av i Microsoft Outlook 365
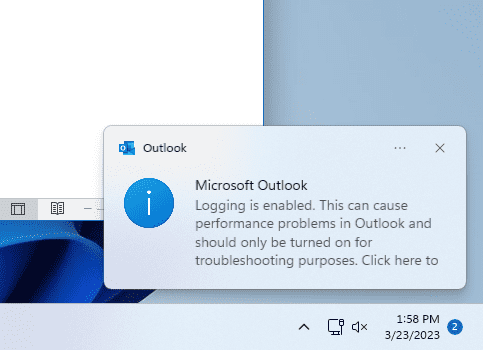
Microsoft Support spurte om å dele feilloggen fra Outlook-app, men vet ikke hvordan? Finn her trinnene for Outlook Global Logging og Advanced Logging.
Mens varslinger er avgjørende i noen tilfeller, blir det noen ganger et element av distraksjon. Akkurat som telefonen din, kan også en PC distrahere deg med varsler. Dette er grunnen til at Windows 11 inkluderer Focus Assist-funksjonen, som lar deg unngå distraherende varsler. Ved å bruke denne funksjonen kan du gjøre arbeidet ditt med full konsentrasjon i stedet for å bli distrahert av tilfeldige meldinger og varsler. Varsler kan også skade produktiviteten din, og derfor må de undertrykkes til rett tid.
Bare noen få klikk kan skjule alle varsler, varsler og meldinger på PC-en. Hvis du nylig har oppgradert systemet til Windows 11 og ikke klarer å finne ut av det nye brukergrensesnittet, vil denne artikkelen hjelpe deg med en omfattende veiledning for hvordan du bruker Focus Assist på Windows 11 for å bli kvitt varsler.
Relatert: Slik tar du skjermbilder på Windows 11
Innhold
Hva er Focus assist på Windows 11?
Focus Assist er ganske enkelt en Ikke forstyrr-modus for PC-en din – akkurat som de du har på telefonene dine. Det er en hendig funksjon på Windows 11 som lar deg bli kvitt unødvendige varsler, meldinger og varsler. Focus assist-funksjonen lar deg tilpasse prioriteringslisten din i stedet for å sperre PC-en fra alle varslene.
Distraksjon kan skade produktiviteten din. Derfor, med Focus Assist-funksjonen, kan du skjule alle varsler, varsler og meldinger mens du jobber med noe viktig. I stedet for å varsle deg, går de rett til handlingssenteret. Du kan se de skjulte varslene i handlingssenteret på din egen tid.
Hvordan fungerer Focus assist på Windows 11?
Focus Assist gir deg fleksibiliteten til å velge når du skal blokkere distraksjoner som meldinger, varsler og varsler. Du kan slå på Focus Assist når som helst, eller du kan også planlegge et tidsrom i innstillingene som vil slå på Focus assist automatisk.
Focus assist-funksjonen lar deg lage en prioriteringsliste for å sikre at du ikke går glipp av noen varsler fra de viktigste personene i kontakten din. Personene på prioriteringslisten din kan alltid nå deg, selv når du er inne på noe viktig arbeid. I tilfelle du trenger full konsentrasjon mens du jobber, kan du også velge å blokkere alle varsler. For å se alle blokkerte varslinger du mottok mens du var på jobb, åpne handlingssenteret på systemet ditt.
Relatert: Slik stopper du popup-vinduer på Windows 11
Slik aktiverer du Focus assist
Focus Assist er slått av som standard. Men hvis du vil aktivere den til å slutte å motta varsler, følger du trinnene nedenfor.
Metode #1: Bruke innstillinger
Klikk på Søk -ikonet, som ser ut som et forstørrelsesglass på oppgavelinjen.
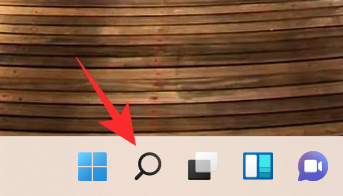
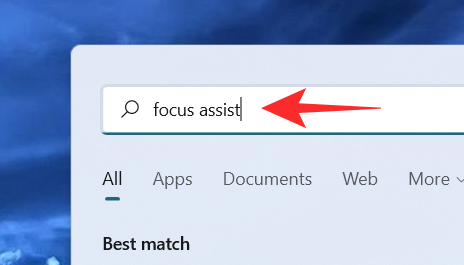
Skriv fokushjelp i søkefeltet.
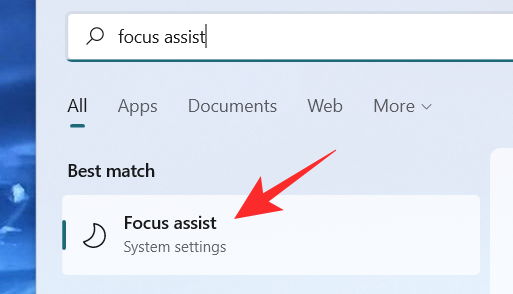
Klikk på Focus Assist- systeminnstillingene.
Innstillingsvinduet for Focus Assist-system vises på skjermen. Under Focus Assist velger du ett av disse alternativene:
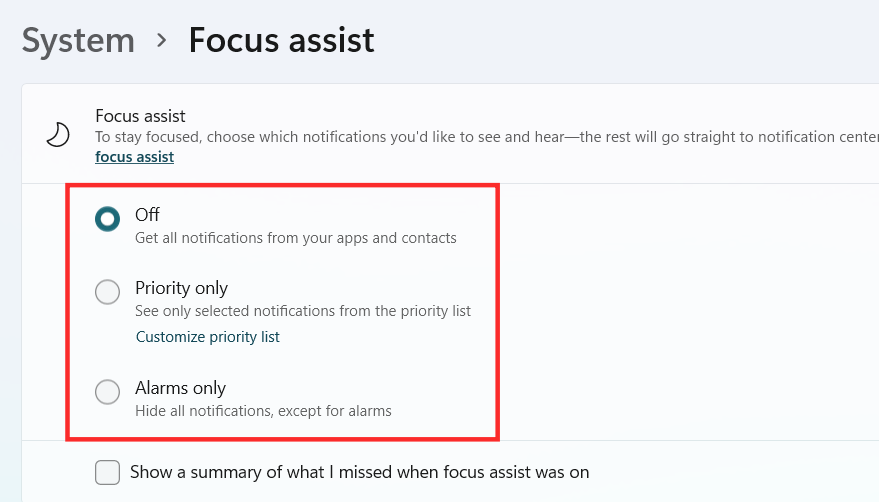
Focus Assist skal nå være aktivert i Windows 11 avhengig av valget du har gjort.
Metode #2: Bruk av handlingssenter
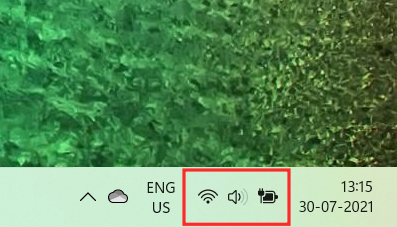
Klikk på handlingssenteret som viser ikonet for Wifi, volum og batteri sammen.
Rett under Bluetooth-ikonet kan du se Focus Assist- ikonet som ser ut som en halvmåne.
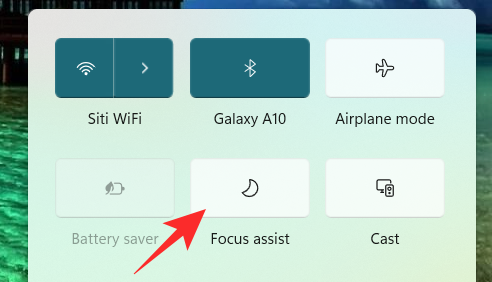
Som standard vil Focus Assist-funksjonen være deaktivert. Klikk på den og funksjonen settes direkte til kun prioritet .
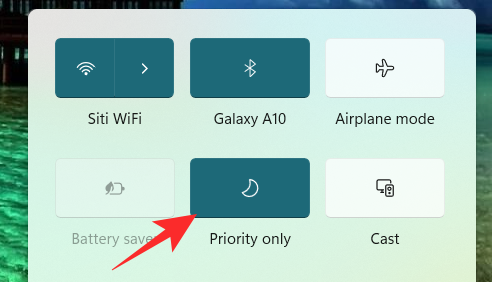
Klikk på den igjen for å sette Focus Assist-funksjonen til bare alarmer .
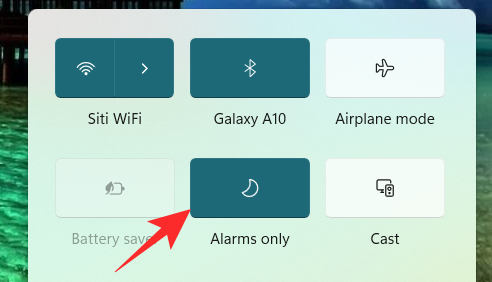
For å deaktivere Focus Assist-funksjonen, klikk på den igjen.
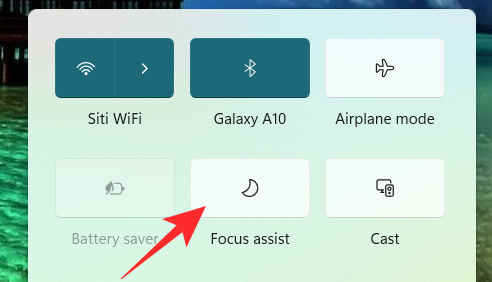
Bare ved å klikke på Focus Assist-ikonet på handlingssenteret, kan du endre funksjonen til av, kun prioritet og kun alarmer. For å gjøre andre nødvendige endringer i Focus Assist-innstillingene fra Action Center, høyreklikker du på Focus Assist- ikonet på Action Center og klikker på Gå til Innstillinger .
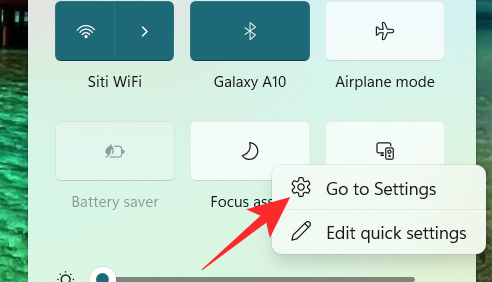
Dette tar deg til Innstillinger-appen hvor du enkelt kan gjøre alle de tiltenkte endringene. Og det er det! Fokushjelp skal nå være aktivert i Windows 11 direkte fra handlingssenteret.
Metode #3: Bruke Group Policy Editor
Du kan også aktivere Focus assist-modus ved å bruke Group Policy Editor i tilfelle du er administrator. Bruk veiledningen nedenfor for å hjelpe deg med prosessen.
Trykk Windows + Rpå tastaturet og skriv inn følgende i Kjør-dialogboksen. Trykk enter på tastaturet for å åpne gruppepolicyredigering.
gpedit.msc
Naviger til følgende node nevnt nedenfor.
User configuration > Administrative Templates > Start Menu and Taskbar > Notifications
Finn og dobbeltklikk på 'Slå av stille timer'-verdien på høyre side.
Velg nå ett av følgende alternativer avhengig av dine nåværende behov i øverste venstre hjørne av egenskapsvinduet.
Og det er det! Fokushjelp vil nå bli aktivert eller deaktivert fra Group Policy Editor avhengig av dine preferanser. Dessverre kan du ikke tilpasse Focus assist-atferden som administrator. Den evnen ligger fortsatt hos brukeren. Du kan bare aktivere eller deaktivere muligheten til å bruke Focus Assist for et system ved å bruke Group Policy Editor.
Slik bruker du Focus assist
Focus assist har ulike innstillinger og tilpasningsalternativer som kan hjelpe deg med å endre oppførselen i henhold til dine nåværende behov. Bruk en av veiledningene nedenfor som passer best til dine nåværende krav.
Metode #1: Aktiver bare alarmer-modus
Bare alarmer-modus i Focus Assist-vinduet lar deg skjule alle varslene bortsett fra alarmen. Følg trinnene nevnt nedenfor for å aktivere bare alarmer-modus.
Klikk på Søk -ikonet på oppgavelinjen.

Type Focus assist

Klikk på Focus Assist .

Under Focus Assist klikker du på Bare alarmer for å slutte å motta varsler, bortsett fra alarmer.
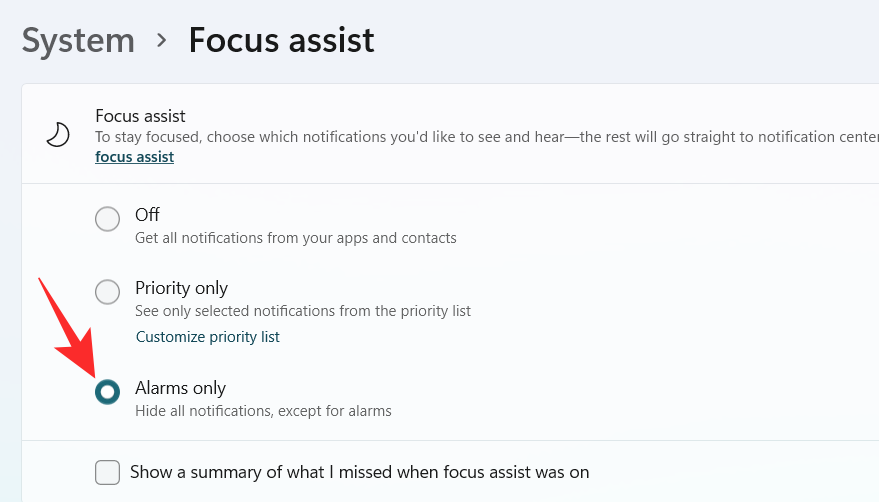
Og det er det! Du vil nå kun bli informert om alarmer på systemet ditt. Alle andre varsler, uansett prioritet, vil bli dempet i Windows 11.
Metode #2: Aktiver Prioritet bare med en tilpasset liste
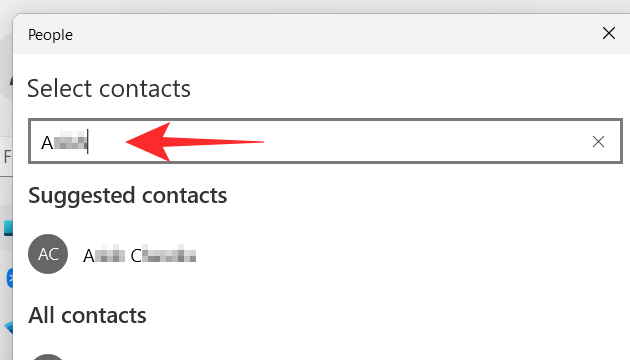
The People vinduet vises på skjermen. Velg dine foretrukne personer ved å skrive inn navnene deres i søkefeltet.
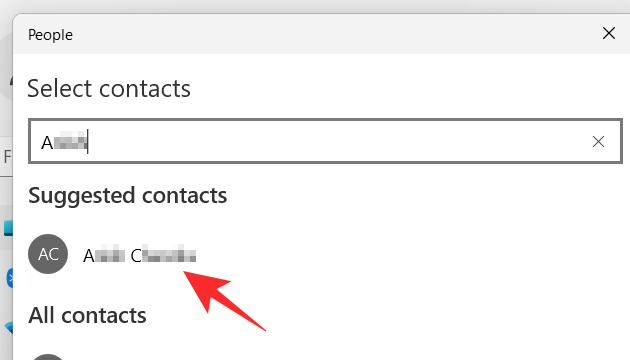
Klikk på navnet til personen.
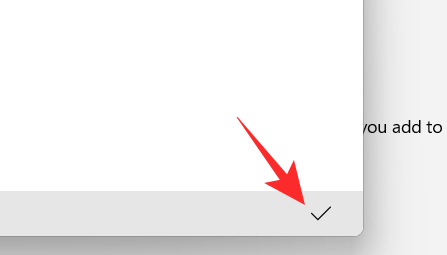
Klikk på hakeknappen nederst i høyre hjørne av People-vinduet.
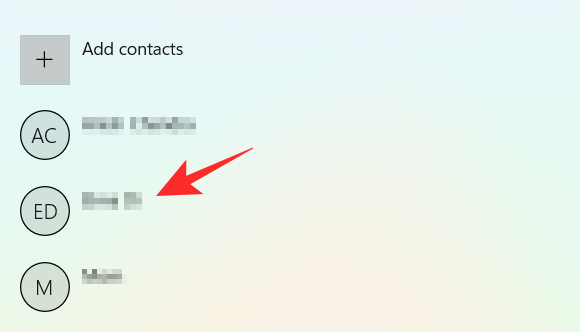
Prioriteringslisten din er opprettet. Nå, hvis du vil fjerne en kontakt fra prioriteringslisten din, klikker du på kontakten under Personer .
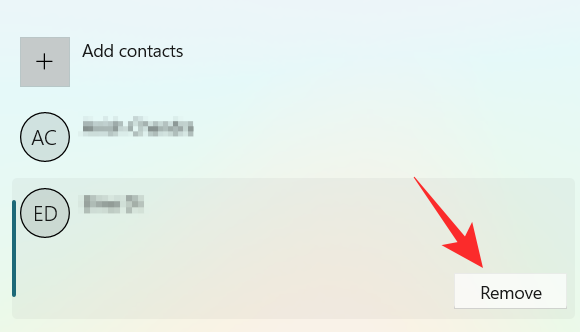
Klikk på Fjern .
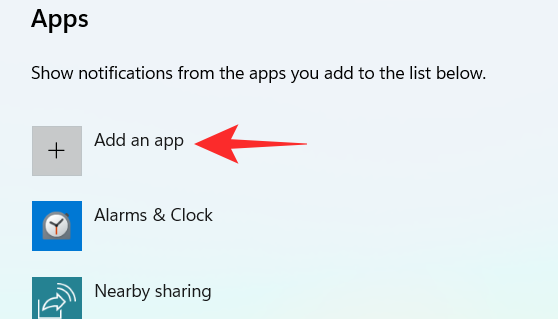
Nå, i Apps- delen, kan du velge appene som kan bryte gjennom dine stille timer. For å la appene vise varsler, klikk på Legg til en app- knappen.
En liste over apper vises på skjermen. Klikk på appen du vil legge til prioriteringslisten din.
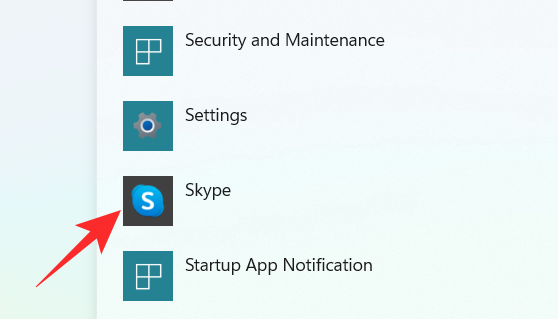
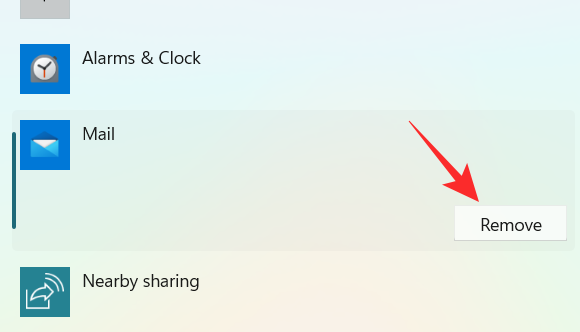
Fortsett denne prosessen til du er ferdig med å velge appene. I tilfelle du vil fjerne en app fra prioriteringslisten din, kan du ganske enkelt klikke på appen under App- delen.
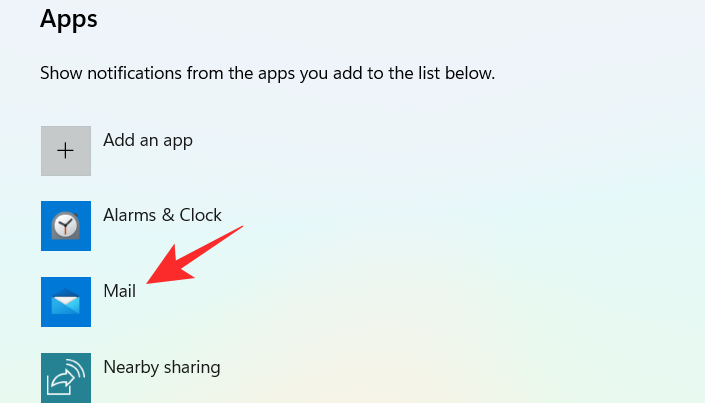
Klikk på Fjern .
Og det er slik du kan tilpasse prioriteringslisten i Focus assist og bruke den til din fordel for å motta varsler kun fra viktige kontakter.
Metode #3: Aktiver varslingssammendrag når fokushjelp er deaktivert
Klikk på Søk -ikonet på oppgavelinjen.

Type Focus assist

Klikk på Focus Assist .

Klikk på ønsket alternativ Kun prioritet eller Kun alarmer .
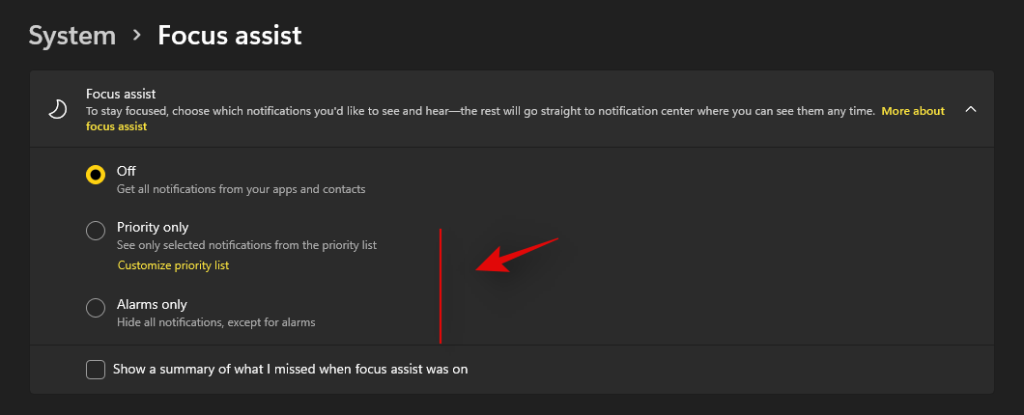
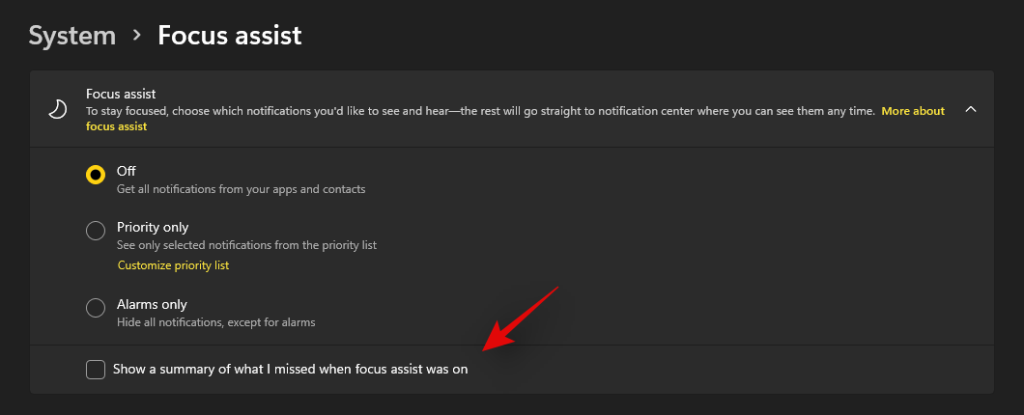
Kryss av i boksen Vis et sammendrag av hva jeg gikk glipp av da Focus assist var på .
Metode #4: Aktiver eller deaktiver automatiske fokushjelpsregler
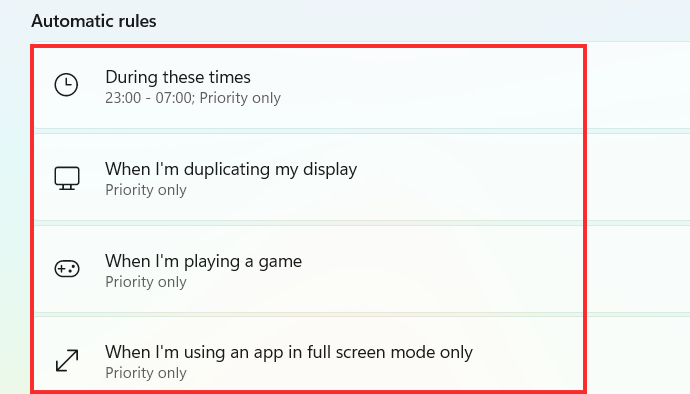
De automatiske reglene i Focus assist lar deg bestemme forholdene som kan aktivere Focus assist automatisk. Det er fire forskjellige automatiske regler i Focus Assist-innstillingsvinduet som kan tilpasses. Sjekk ut trinnene som er nevnt nedenfor for å tilpasse automatiske regler i Focus assist.
Klikk på Søk -ikonet på oppgavelinjen.

Type Focus assist

Klikk på Focus Assist .

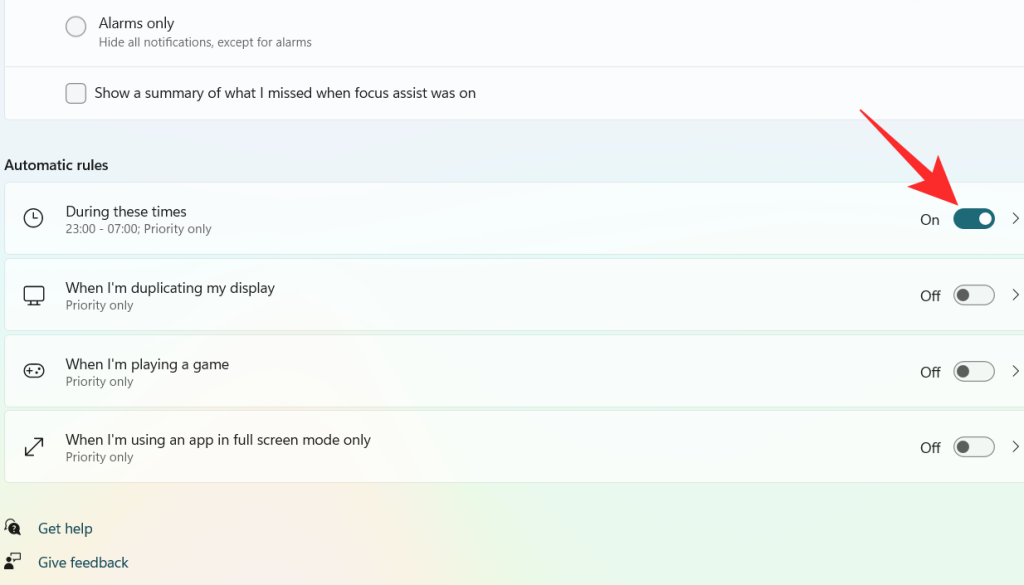
Under delen Automatiske regler er det fire seksjoner. Slå på vippebryteren for alternativet du vil velge.
La oss nå se på hvordan du tilpasser de ovennevnte alternativene under Automatiske regler.
1. I disse tider
Slå på vippebryteren, som er ekstremt til høyre for kategorien I løpet av disse tidene .
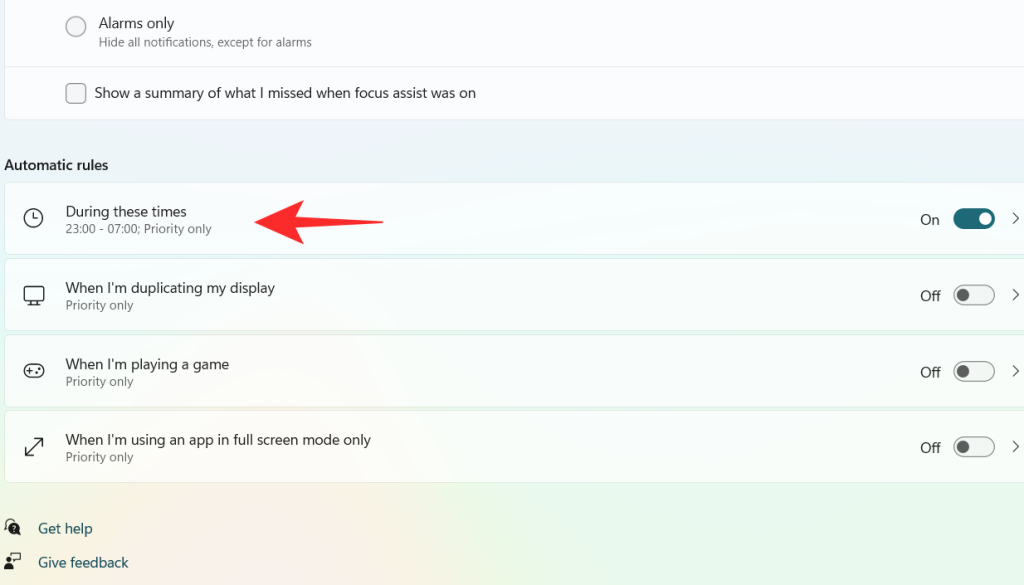
Klikk på fanen I løpet av disse tidene .
Klikk på boksen under Starttid .
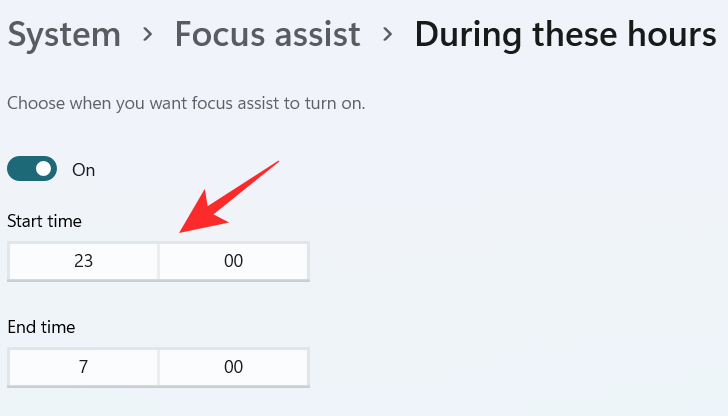
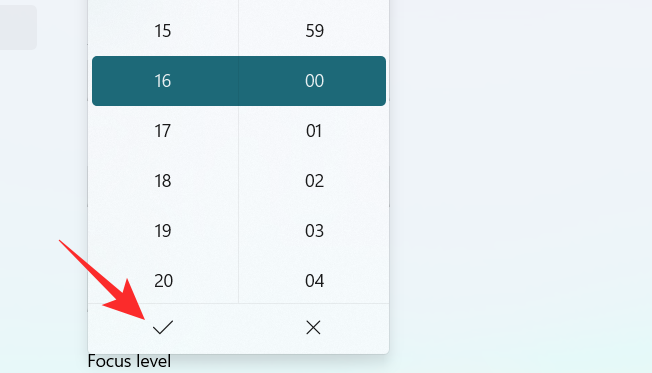
Velg tidspunktet når du vil at Focus Assist skal slås på, og klikk på haken nederst på rullegardinmenyen.
Klikk på boksen under Sluttid .
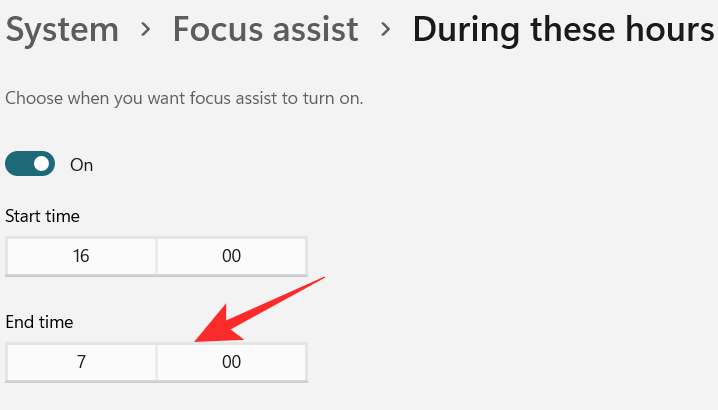
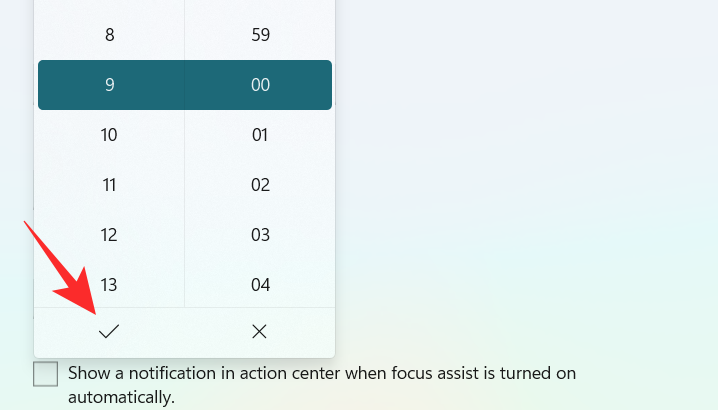
Velg tidspunktet når du vil at Focus Assist skal slås av, og klikk på haken nederst på rullegardinmenyen.
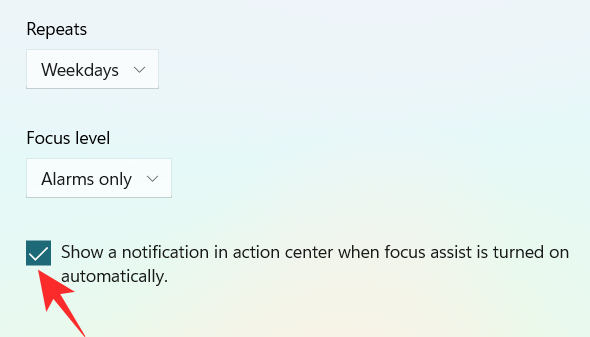
Klikk på boksen under Gjentakelser .
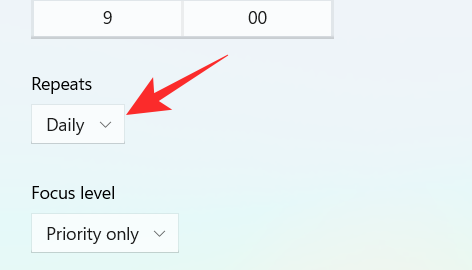
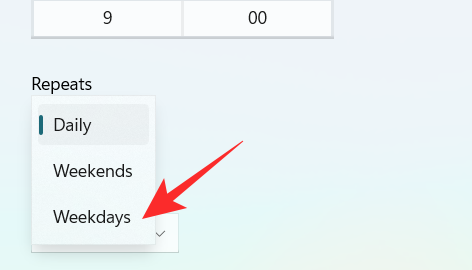
En liten rullegardinmeny vises. Sett tidsplanen til Daglig, Helger eller Ukedager .
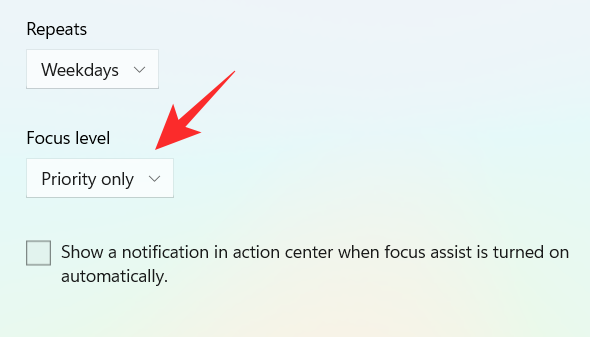
Klikk på boksen under Fokusnivå .
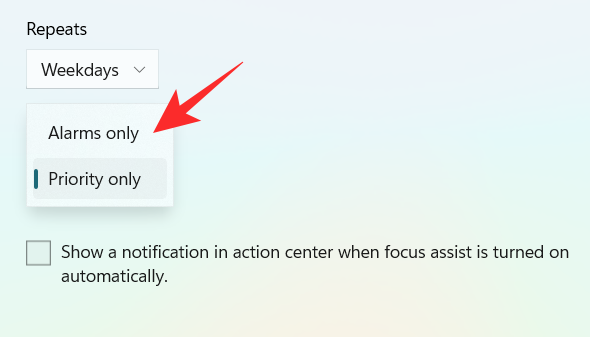
En liten rullegardinmeny vises. Velg mellom Kun alarm eller Kun prioritet .
Til slutt, for å få et varsel når fokushjelpen er slått på, merk av i boksen " Vis et varsel i handlingssenteret når fokushjelpen slås på automatisk ".
2. Når jeg dupliserer skjermen min
Slå på vippebryteren, som er ekstremt til høyre for fanen When I'm duplating my display .
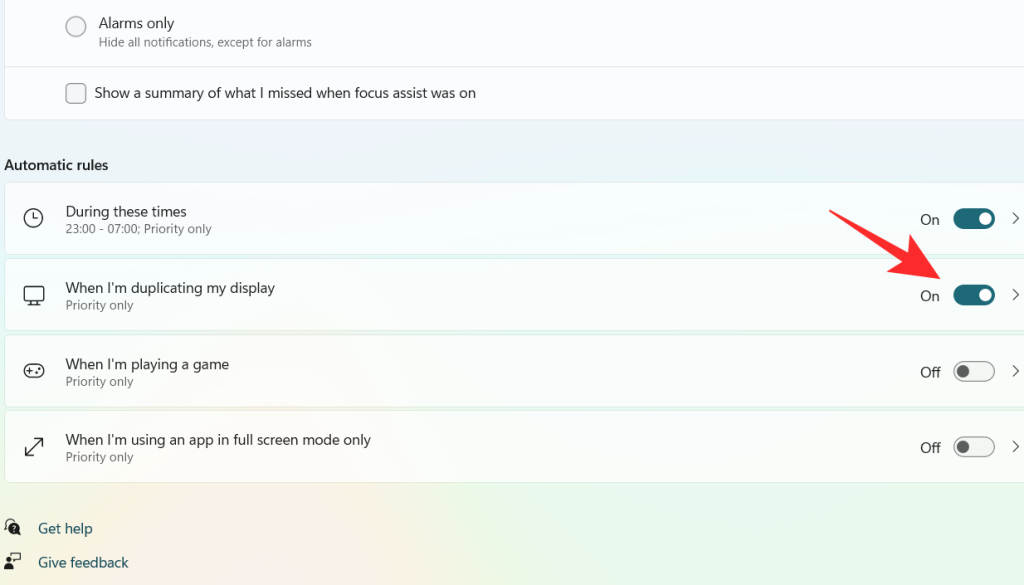
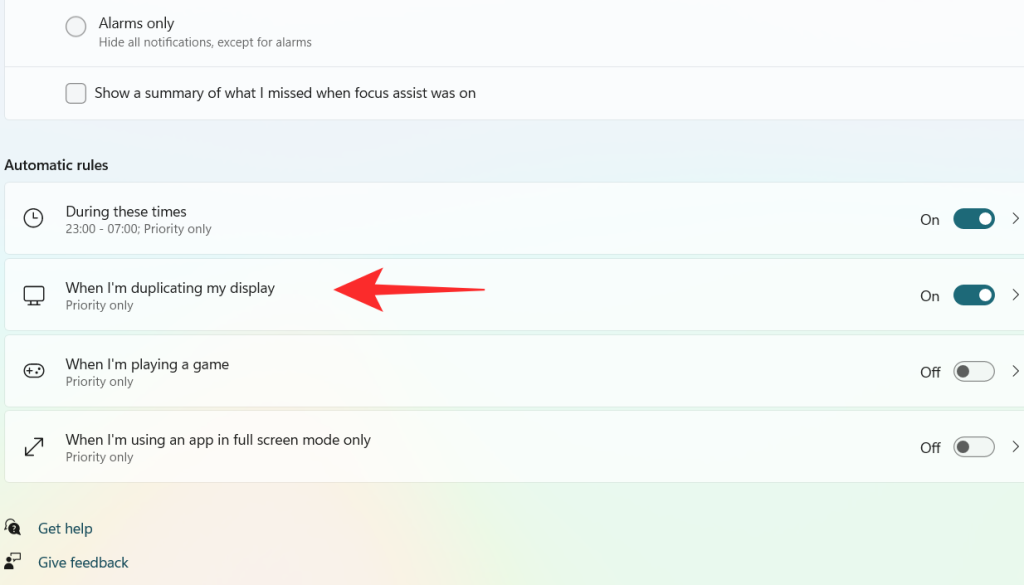
Klikk på fanen Når jeg dupliserer visningen min .
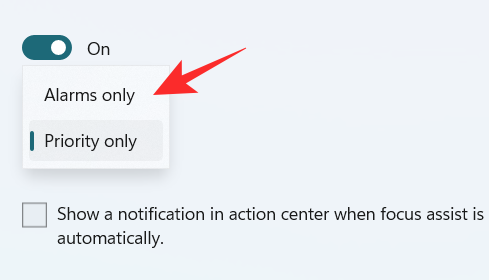
Klikk på boksen under Fokusnivå .
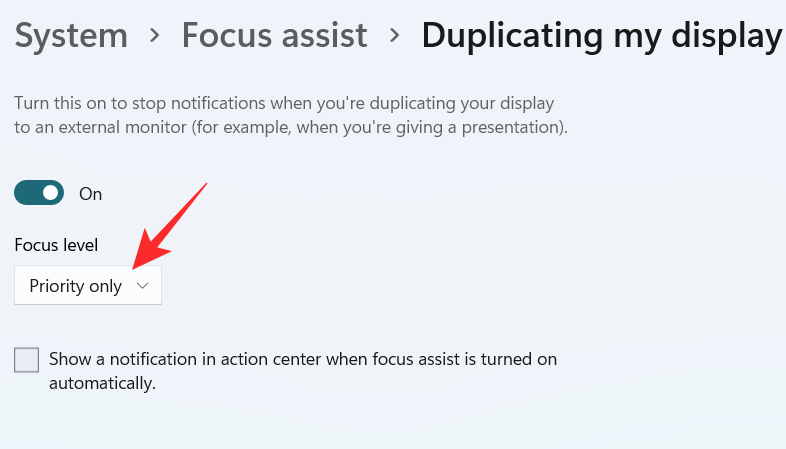
A dropdown menu appears, click on your desired option between Priority only and Alarms only.
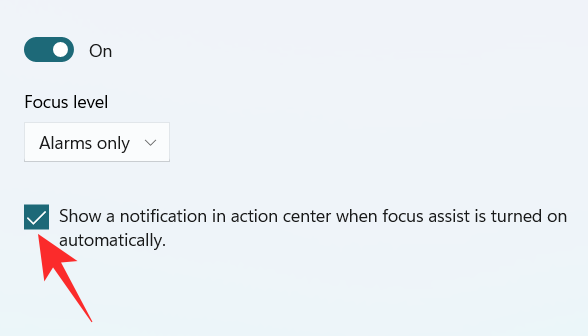
To get a notification when the Focus assist is turned on, check the box “Show a notification in action center when Focus assist is turned on automatically“
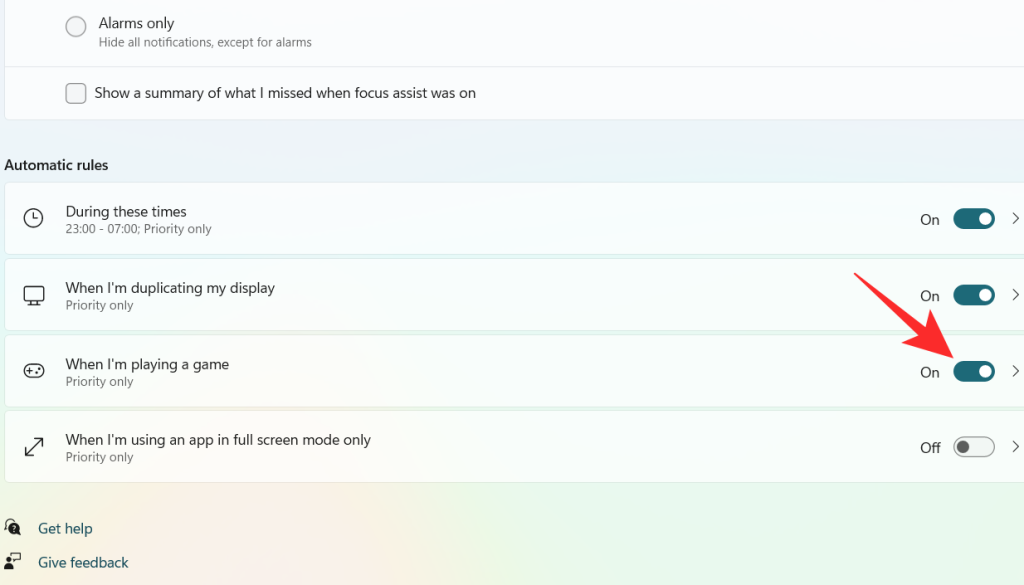
3. When I’m playing a game
Turn on the toggle switch, which is extreme right to the When I’m playing a game tab.
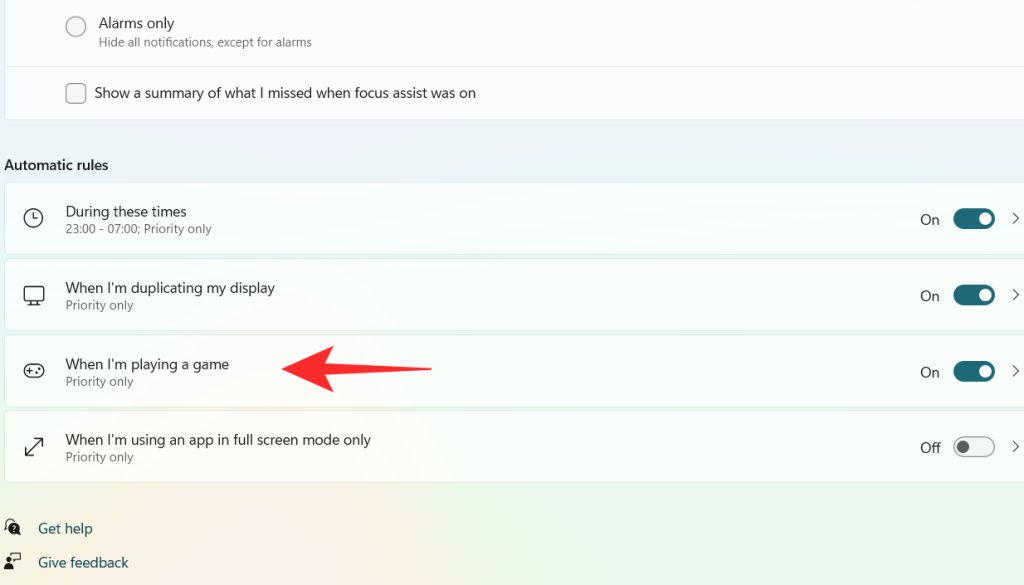
Click on the When I’m playing a game tab
Click on the box under Focus Level.
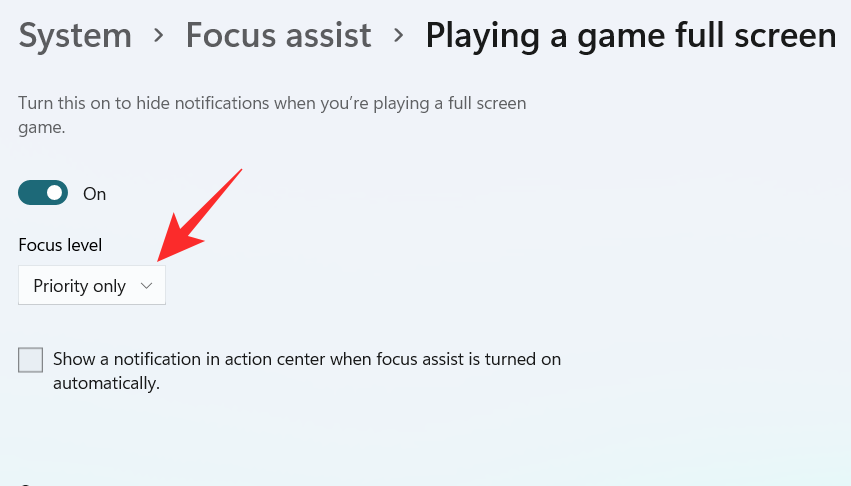
A dropdown menu appears, click on your desired option between Priority only and Alarms only.

To get a notification when the Focus assist is turned on, check the box “Show a notification in action center when Focus assist is turned on automatically“

4. When I’m using an app in full-screen mode only
Turn on the toggle switch, which is extreme right to the When I’m using an app in full-screen mode only tab.
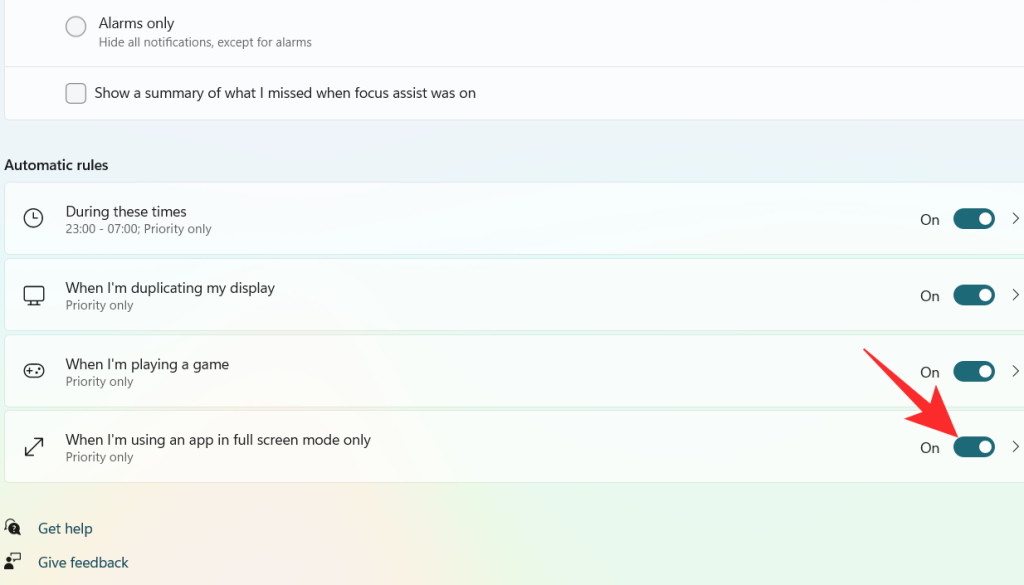
Click on the When I’m using an app in full-screen mode only tab
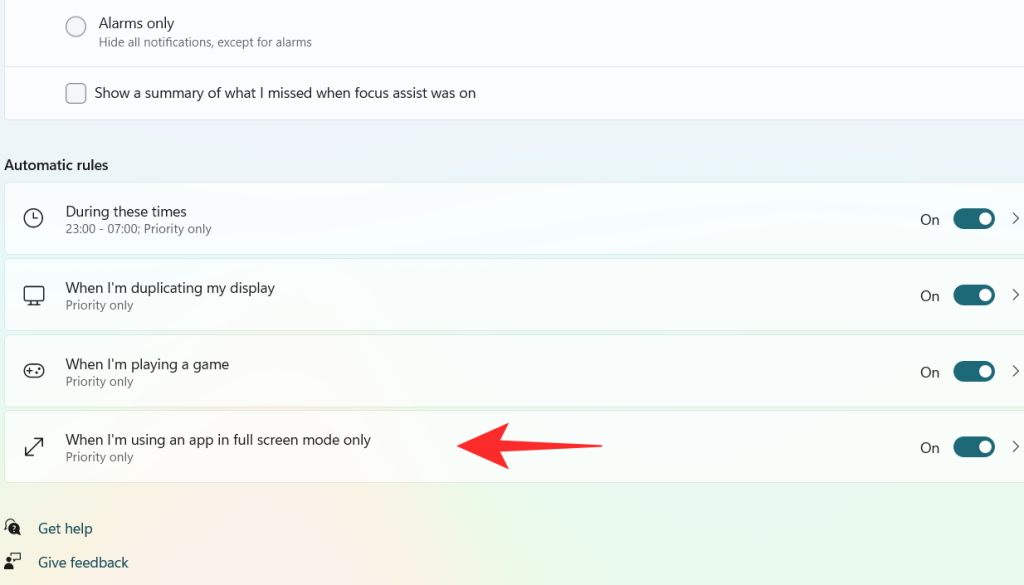
Click on the box under Focus Level.
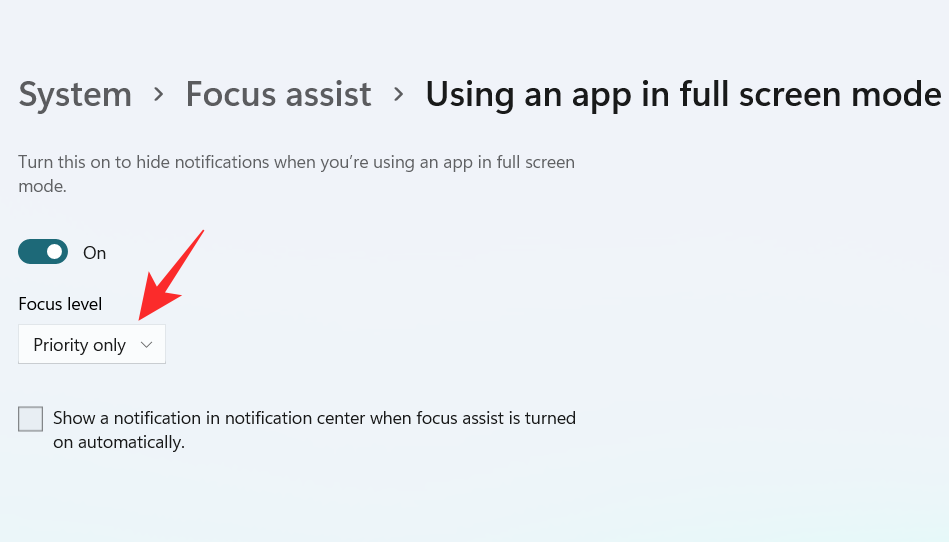
A dropdown menu appears, click on your desired option between Priority only and Alarms only.

To get a notification when the Focus assist is turned on, check the box “Show a notification in action center when Focus assist is turned on automatically“.

Using the above customizations, you can schedule and control Focus assist’s behavior according to your workflow for maximum efficiency no matter the task at hand.
Can you remove the Focus Assist icon from the Action Center?
Yes, you can easily remove the Focus Assist icon from the Action Center. Windows 11 brings a host of new cosmetic and UI changes and one of them has been the ability to customize your action center. You can now add or remove icons from the action center depending on your needs and opt for a more minimal or productive look depending on your workflow.
For now, you can only add and remove certain system modules but in the future, some users expect Microsoft to add the support for third-party apps as well. This would be a much welcome change that would allow you to manage dedicated system settings managed by third-party apps directly from your action center.
Customize your Focus assist icon in the action center
Depending on your current needs you can either remove or add the Focus assist module to the action center. Use one of the guides below depending on your current requirements.
1. Remove it
Click on the Action Center which shows the icon of Wifi, volume, and battery together.

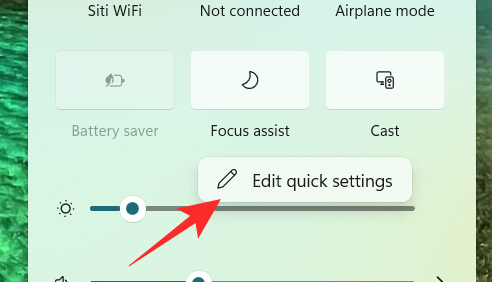
Right-click on an empty place or on any icon and click on Edit quick settings.
Click on the unpin symbol at the top right corner of the Focus Assist icon to remove the Focus Assist icon from the Action Center.
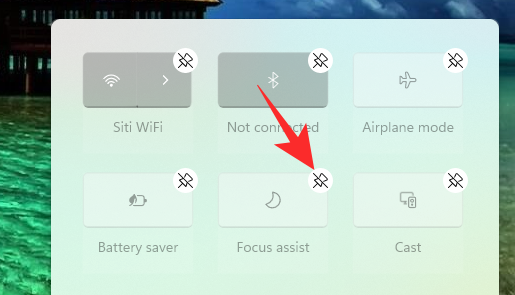
The Focus assist module should now have been removed from your action center. If not, we recommend you restart explorer.exe or your PC for the changes to take effect.
2. Restore it
Click on the Action Center which shows the icon of Wifi, volume, and battery together.

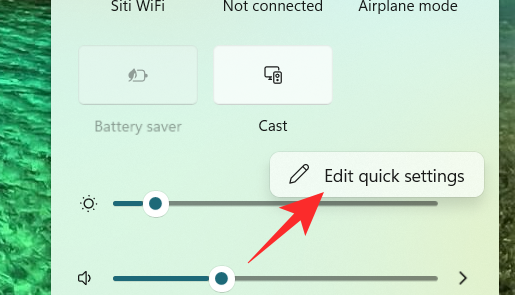
Right-click on an empty place or on any icon and click on Edit quick settings.
Now, click on the Add button at the bottom of the action center.
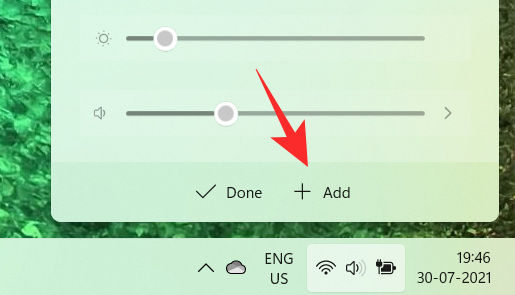
A list of different settings appears. Click on Focus Assist from the list and you will get to see the Focus Assist icon on the Action Center again.
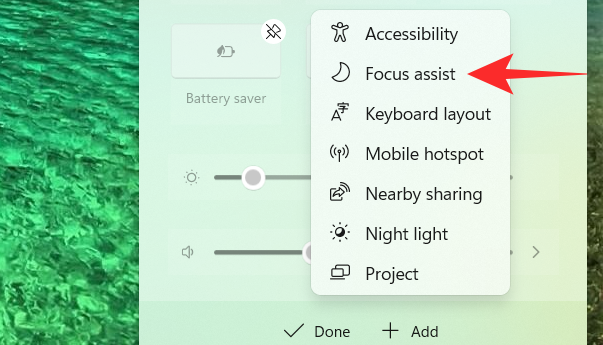
And that’s how you can add the Focus assist module back in the action center.
Focus assist keeps turning on automatically Issue: How to fix
If Focus assist keeps turning on automatically then there could be a couple of reasons for this behavior. Depending on its cause we can either fix it or use a workaround to manage the issue. Let’s find out why Focus assist keeps turning on automatically on your system.
Fix #1: Check Automatic Rules
Are you having this issue when projecting to a secondary display? Or when sharing your screen with a public computer? Then it is likely that focus assist is getting turned on automatically due to the default automatic rules in Windows 11.
By default, focus assist will silence all notifications in such scenarios to help maintain your privacy. But this can be counterproductive in case you are just trying to use a bigger display from a portable system like a laptop or an NUC.
It could also be that scheduled Focus assist was turned on your system by mistake which will enable and disable Focus assist automatically during certain hours. If any of these situations sounds like what you are facing then you can use the guide below to disable all automatic rules that enable Focus assist during certain scenarios and workflows on Windows 11. Let’s get started.
Press Windows + i on your keyboard to open the Settings app. Ensure ‘System’ is selected on your left and then click on ‘Focus Assist’ on your right.
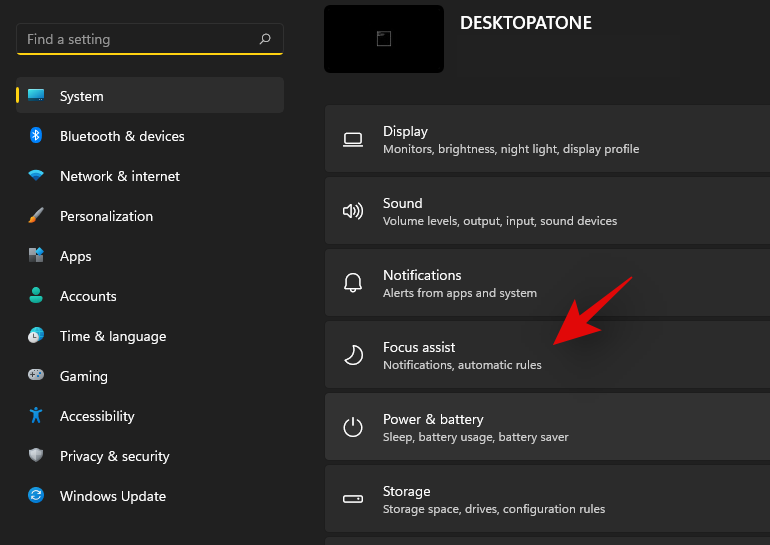
Go down to automatic rules and turn off the following toggles.
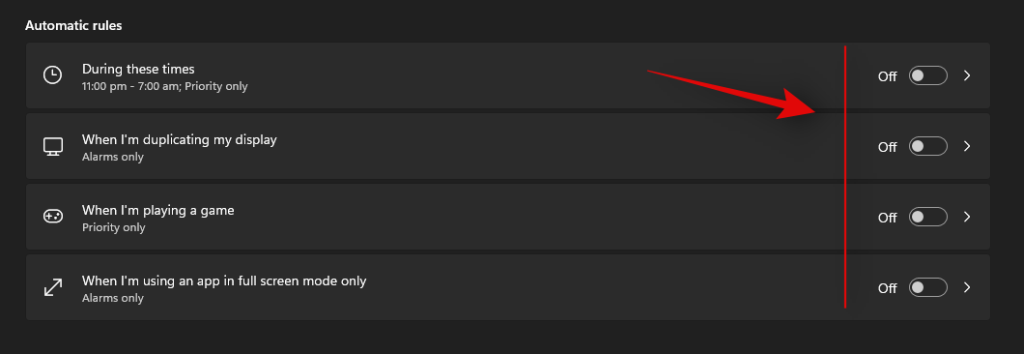
Once these rules are disabled, Windows 11 will not turn on Focus assist automatically on your system.
Fix #2: Turn of GeForce Overlay
This is another way to solve Focus assist misbehaving on your system. If you have a dGPU from Nvidia and are using the GeForce experience app then we recommend disabling its overlay option and restarting your system. With the automatic rule for ‘When I’m using an app in full-screen mode only’ turned on, Windows will mistake the Nvidia overlay detection on your desktop for a full-screen app which will trigger the Focus assist settings in return. You can also disable this automatic rule in case you wish to keep the Geforce Experience overlay enabled on your system.
Focus assist greyed out, option missing or not working; How to fix
Is the focus assist option missing from Windows 11 settings app? Is the module greyed out in the action center? This is a known bug that shows up occasionally with every feature update of Windows. Even certain versions of Windows 10 faced huge issues with this bug until a fix was released.
Fix #1: Enable in Group Policy Editor
If Focus assist seems to be missing from your system then it is likely disabled using the group policy editor. If your PC is managed by your organization or your workplace then it is likely disabled by your administrator. If you have access to the group policy editor then you can use the guide below to enable focus assist on your system. However, in case you have limited access, then you might need to get in touch with your administrator to enable Focus assist on your system.
Press Windows + R on your keyboard to bring up the Run dialog box and type in the following command to launch the Group Policy Editor. Click on ‘Ok’ once you are done.
gpedit.msc
Navigate to the following node.
User configuration > Administrative Templates > Start Menu and Taskbar > Notifications
Double click on ‘Turn off Quiet Hours’ on your right.
Click and select ‘Disabled’ in the top left corner.
Click on ‘Ok’ to save your changes.
And that’s it! Focus assist should now be enabled on your system in case it was disabled using the group policy editor.
Fix #2: Reinstall and repair default Windows UWP apps and system apps
If Focus assist is still missing from your system then let’s check if all the necessary apps and utilities are installed properly on your system. Use the guide below to check and repair Windows 11’s basic apps and functionality on your system.
Press Windows + S and search for PowerShell. Click on ‘Run as administrator’ once it shows up in your search results.
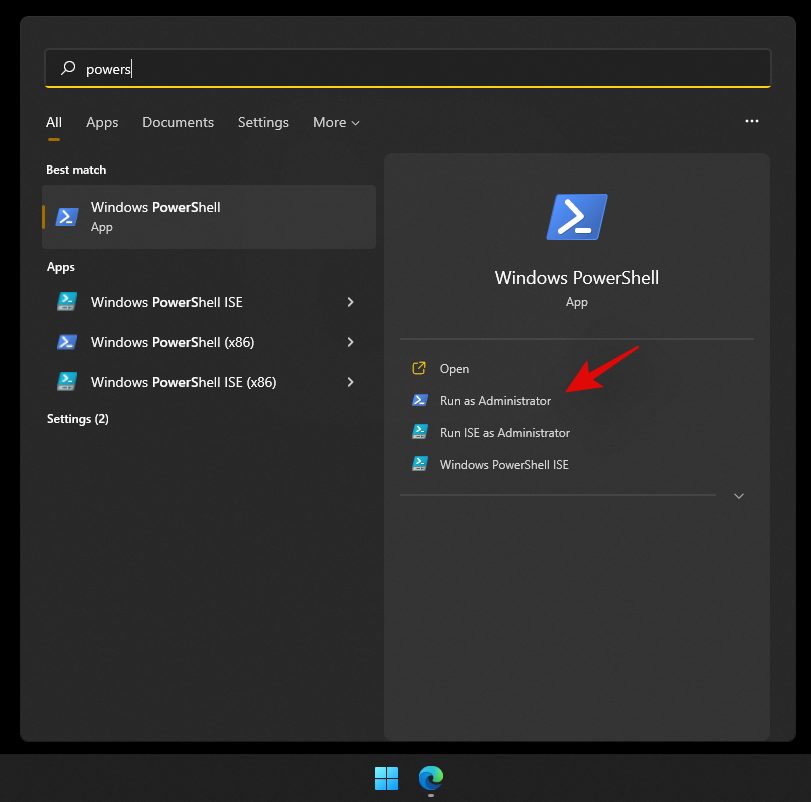
Once PowerShell is launched, execute the following command to reinstall all UWP apps and check and repair other default utilities required by Windows 11 in the background.
Get-AppXPackage -AllUsers | Foreach {Add-AppxPackage -DisableDevelopmentMode -Register "$ ($ _. InstallLocation) \ AppXManifest.xml"}

Wait for the process to finish and restart your PC for good measure. If Focus assist was corrupted or missing from your system, then this fix should help solve all your issues.
Fix #3: Check for a Windows Update
Haven’t updated in a while? We recommend checking for recent Windows Updates. While updates rarely disable major features like Focus assist, a new feature update installation can help refresh your registry, fix mismatched values and more importantly iron out bugs that could be preventing you from accessing Focus assist on your system. Use the guide below to check for recent Windows updates on your system.
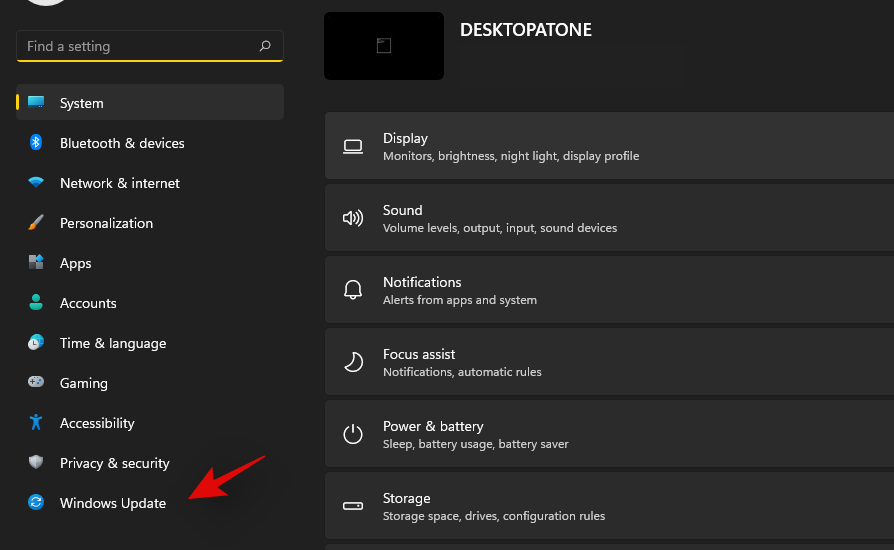
Press Windows + i on your keyboard to open the Settings app and click on ‘Windows Update’ on your left.
Click on ‘Check for updates’.

In case any new updates show up, let them install on your system and restart if prompted. In case you are using a metered connection then you will need to click on ‘Download now’ manually to avoid any unexpected data charges.
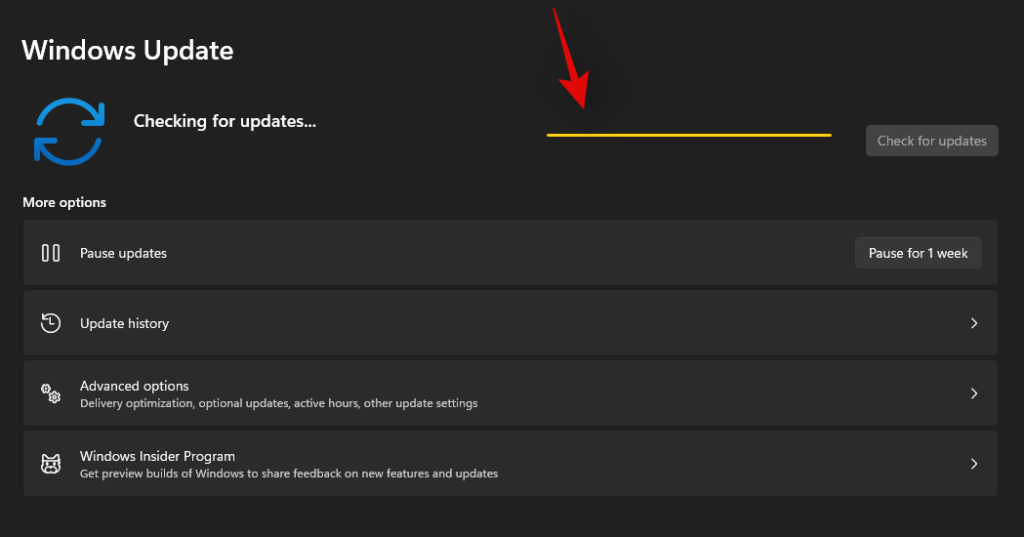
Once the necessary Windows updates are installed on your system, Focus assist should be restored in your action center and the Settings app.
Last Resort: Reset your PC
If Focus assist is still missing from your PC then this indicates a corrupted Windows installation on your system. The best way to fix this without wasting much time on troubleshooting would be to simply reset your PC while keeping all your files intact. This will refresh the entire Windows 11 installation and reinstall all the apps which should help restore functionality for all Windows features including Focus assist. Follow the guide below to reset your PC while keeping your files.
Note: The reset process will remove all installed applications and only retain files stored manually on your local storage. A list of all the removed apps will be available in .txt format on your desktop once your PC has been reset.
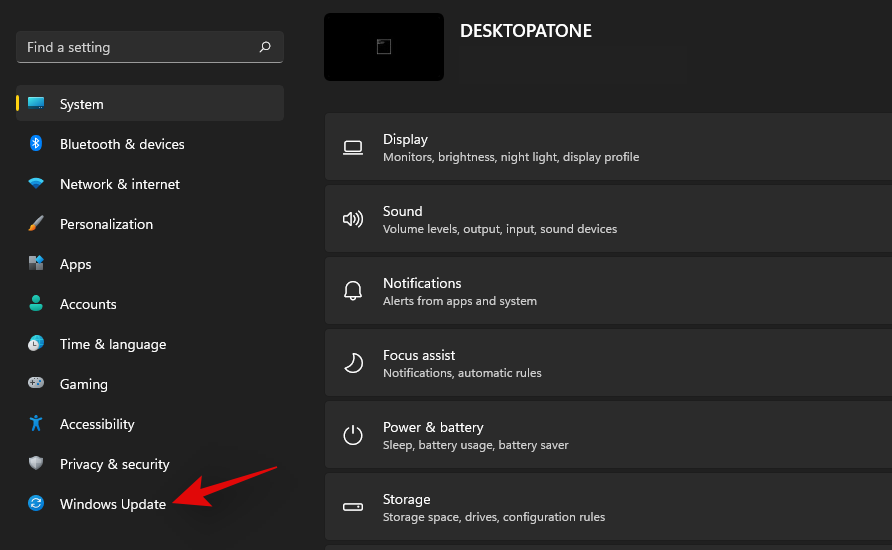
Press Windows + i on your keyboard and click on ‘Windows Update’ on your left.
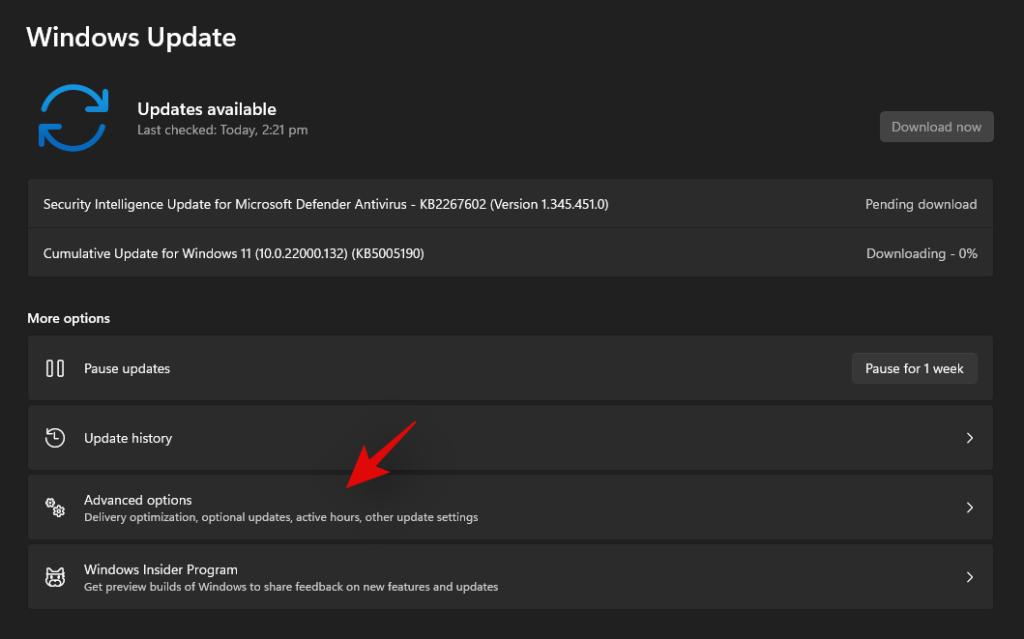
Click on ‘Advanced options’.
Click and select ‘Recovery’.
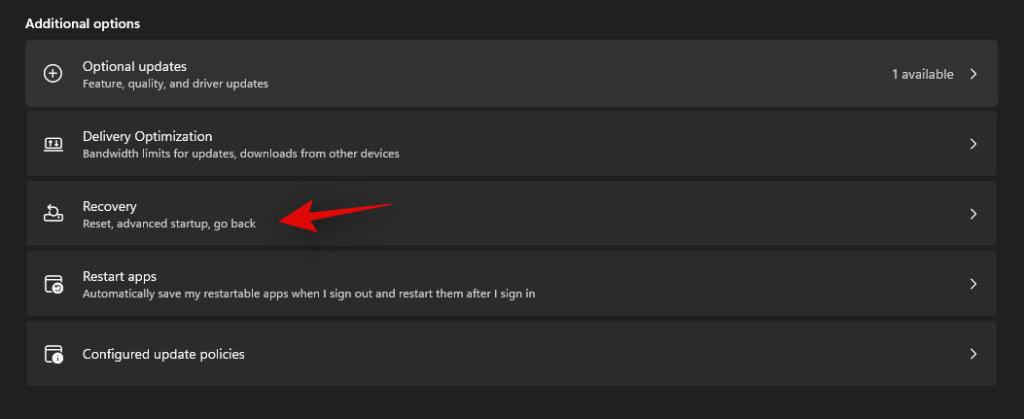
Click on ‘Reset PC’ beside Reset this PC.

Click on ‘Keep my files’.
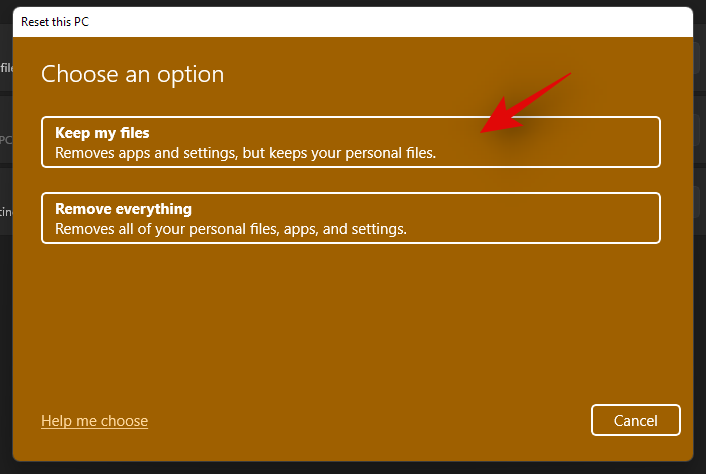
Windows will now process all the files on your local storage. Click on ‘Reset’.
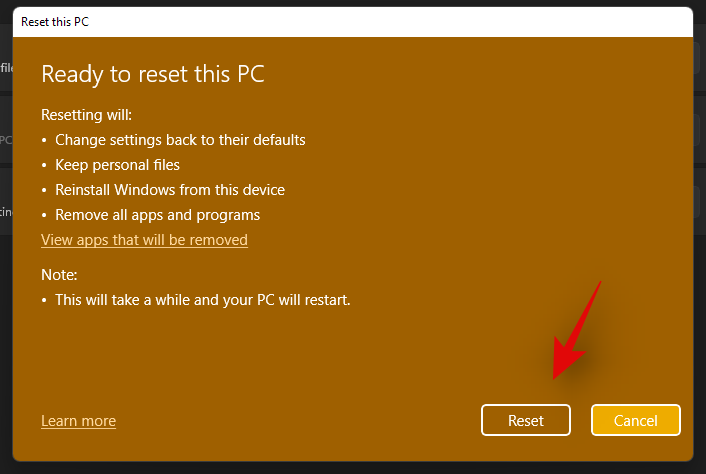
Note: If you are using Windows 11 Pro or higher then you will get the option to use a local installation/recovery media to reinstall Windows 11 as well. However, this option will be missing for Windows 11 Home users.
Windows will now reset your PC while retaining all your files. Your PC will restart several times during this process. This is completely normal and you should let Windows do its thing. If you are using a laptop or a portable NUC, then ensure that your unit is plugged into the power at all times during this process.
How to turn off Focus assist permanently
Do you wish to turn off Focus assist permanently in all scenarios? Then you can use the guide below to do so. The best way to disable Focus assist is by using the group policy editor. But in case you are using Windows 11 Home Edition, then you can use the first method in this guide to disable Focus assist permanently.
Method #1: Disable all settings and rules
Once you disable all the settings and rules for Focus assist, the feature should be turned off automatically on your system. Use the guide below to get you started.
Press Windows + i on your keyboard to open the Settings app and click on ‘Focus assist’ on your right.

Click and select ‘Off’ at the top.
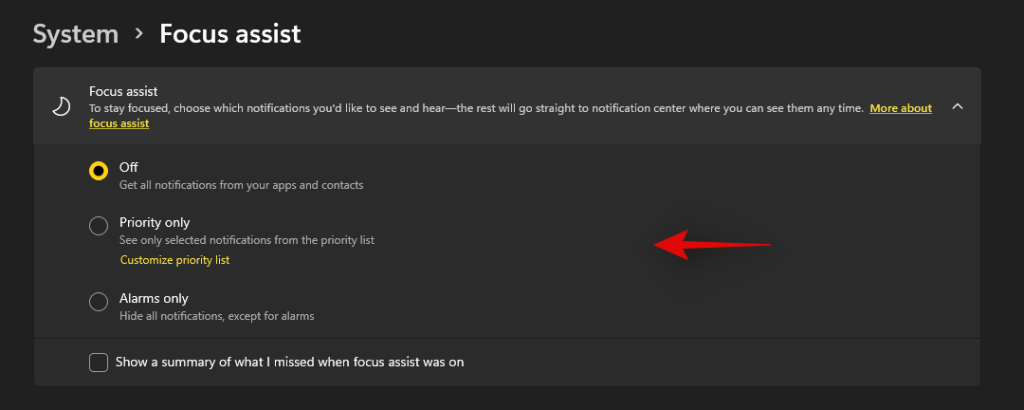
Uncheck the box for ‘Show a summary of what I missed when focus assist was on’.

Subsequently, disable all the toggles under ‘Automatic rules’ as shown below.

We also recommend turning off notifications for unnecessary apps using the guide after this section to avoid unnecessary notifications from interrupting you when focus assist is disabled.
Method #2: Using Group Policy Editor
The group policy editor will permanently disable focus assist on your system and even prevent you from accessing it in your settings. However, this method will only work on Windows 11 Pro or higher versions. In case you have the Windows 11 home edition, you can use the guide above to disable Focus assist instead.
Press Windows + R and type in the following to open Froup Policy EDitor. Click on ‘Ok’ once done.
gpedit.msc
Navigate to the following node.
User configuration > Administrative Templates > Start Menu and Taskbar > Notifications
Find and double-click on ‘Turn on Quiet Hours’ on your right.
Select ‘Enabled’ in the top left and click on ‘Ok’.
Focus assist will now be permanently disabled on the selected system. We recommend you restart your system or explorer.exe in case the changes do not take place immediately.
Is there any other way to disable notifications?
Yes, you can disable notifications individually on a per-app basis in Windows 11 to customize the notifications you receive. This is another way to ensure that you are only notified about the apps and notifications that you intended. Customizing your notifications this way will also allow you to retain the full functionality of the focus assist mode without having to disable certain rules to avoid mismatched scenarios in your workflow.
However, the only downside to managing your notifications this way is that you have to keep enabling and disabling notifications for apps every few months depending on your new installs and uninstalls. You can use the guide below to disable notifications on a per-app basis in Windows 11.
Disable notifications permanently on a per-app basis
Here’s how you can disable notifications on a per-app basis in Windows 11.
Press Windows + i on your keyboard to open the Settings app and then click on ‘Notifications’ on your right.
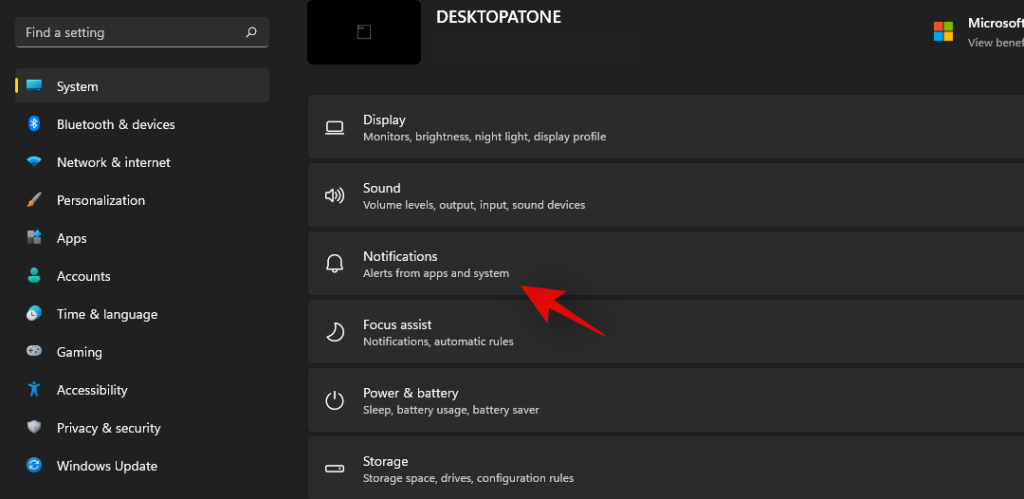
You will now get a list of all the apps that have the permission to deliver notifications on your system. Scroll the list to find the necessary apps and turn off the toggle beside them to disable notifications.
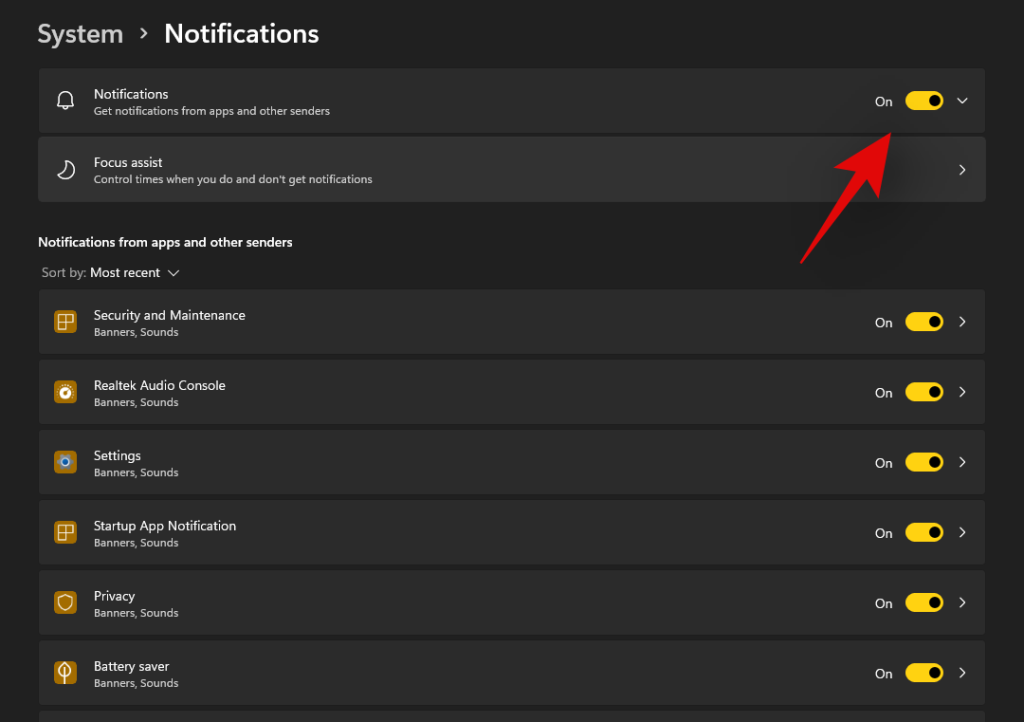
Repeat the steps above for all the intended apps to disable notifications.
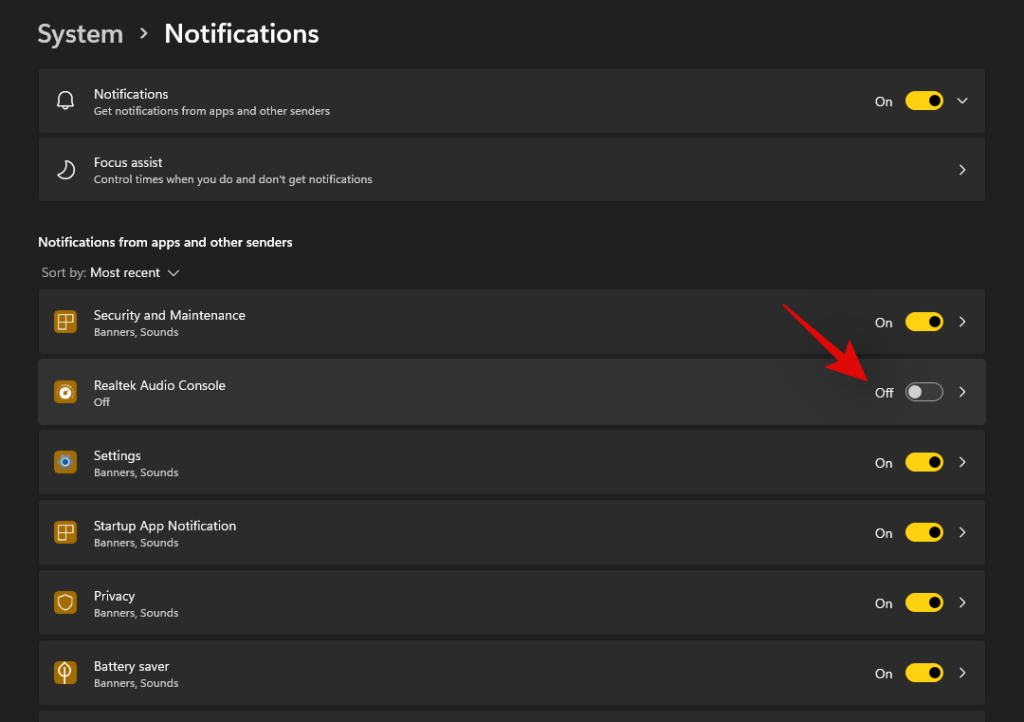
Close the Settings app and notifications for the selected apps should now be permanently disabled on your system.
Can you customize notifications in Windows 11?
Well, not exactly. Windows 11 currently has very limited options when it comes to customizing your notifications. You can not change the look, behavior, or color palette of your notifications without changing the accent color of your overall UI. However, you can customize the way your notifications sound. You can set a nice quiet notification sound that does not interrupt your workflow or opt for a quirky take that makes for a few good laughs each time you get a notification. The choice is completely up to you. Use the guide below to customize your Windows 11 notification sounds.
Required
Guide
Let’s start by first placing the .wav file in a compatible media folder so that you can set it as your default notification sound in Windows 11. Navigate to the concerned .wav file and copy it to your clipboard.
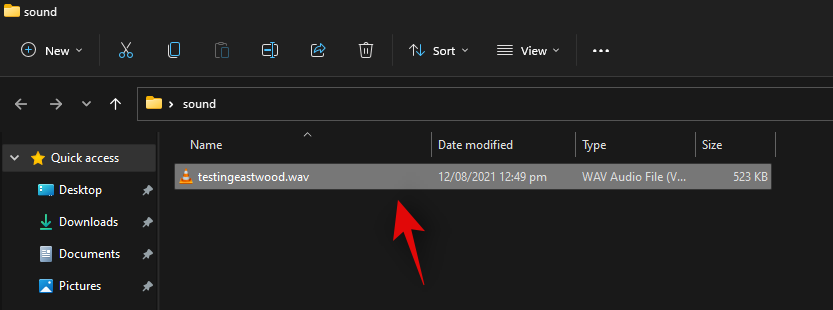
Now navigate to the following path given below. Paste your .wav file in this location. Click on ‘Continue’ when you will be prompted for administrator permission.
C:\Windows\media
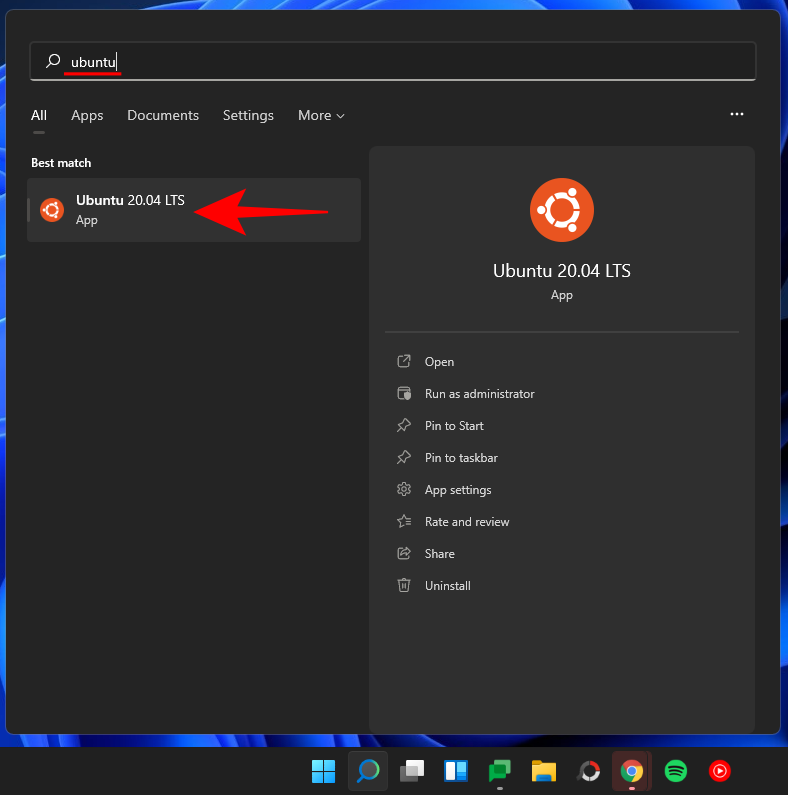
We can now use the .wav file as our default notification sound. Press Windows + i on your keyboard to open the Settings app and then click on ‘Sound’ on your right.
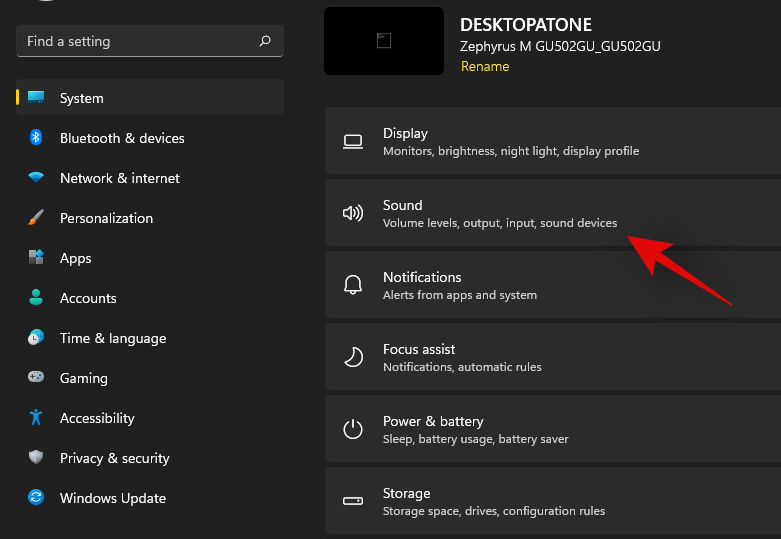
Scroll to the bottom and click on ‘More sound settings’.

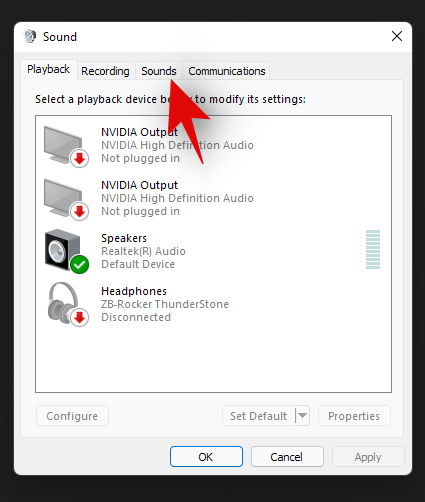
Click and switch to the ‘Sounds’ tab at the top.
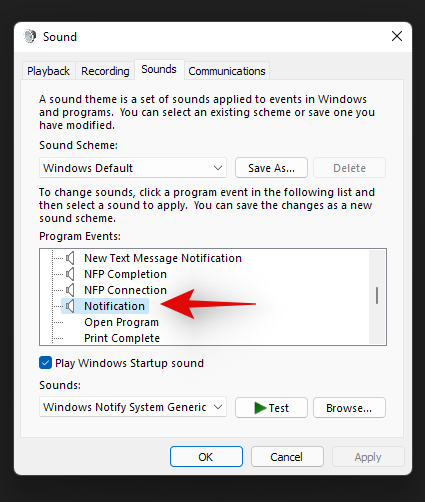
Under ‘Program Events’ scroll the list and find ‘Notifications’. Click on ‘Notifications’ to select it.
Now click on the drop-down arrow under Sounds and select the .wav file we pasted in the Media folder.
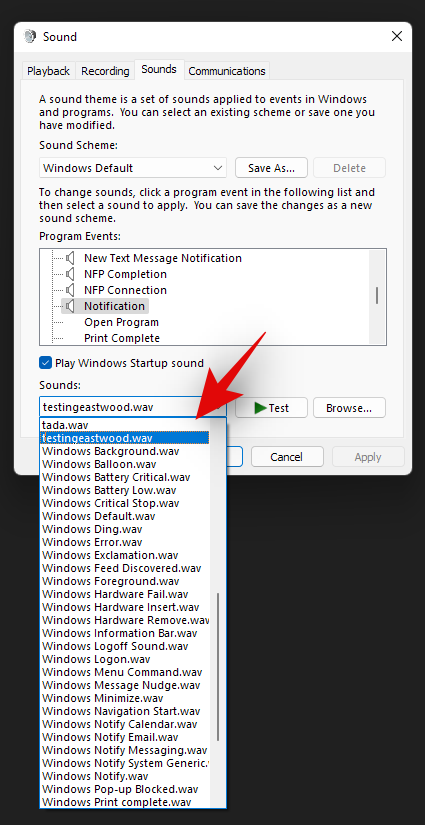
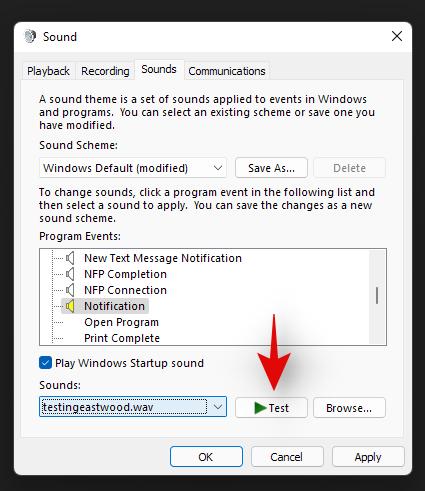
You can click on ‘Test’ to test your custom notification sound.
Click on ‘Ok’ to save your changes.
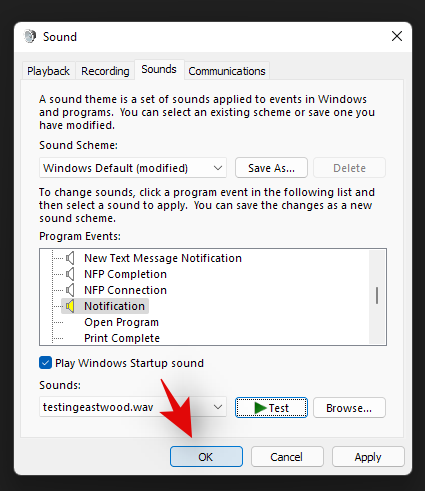
And that’s it! You will now have set a custom sound as your default notification sound in Windows 11.
Distractions from notifications are a huge problem especially when you are into some important work. Using the steps mentioned above, now, you can easily get rid of unnecessary notifications and work peacefully with full concentration.
Related:
Microsoft Support spurte om å dele feilloggen fra Outlook-app, men vet ikke hvordan? Finn her trinnene for Outlook Global Logging og Advanced Logging.
Vil du fjerne Windows-tjenester som du ikke ønsker på PC-en din med Windows 11? Finn her noen enkle metoder du kan stole på!
Se hvor enkelt det er å legge til et ord eller et annet språk i stavekontrollen i Firefox. Se også hvordan du kan slå av stavekontrollen for nettleseren.
Ønsker du å aktivere eller deaktivere AutoRecover eller AutoSave alternativet? Lær hvordan du kan aktivere eller deaktivere AutoRecover-funksjonen i Word 2019 eller Microsoft 365.
Denne veiledningen beskriver hvordan du legger til sidetall i dokumenter i Microsoft Word 365.
Lær hvordan du logger på som administrator i Windows 10 og Windows 11. Få tips og triks for å administrere brukerkontoer og systeminnstillinger effektivt.
For å liste alle Windows 11-kontoer, åpne Innstillinger > Kontoer > Andre brukere og familiesider. Du kan også bruke kommandoprompt og PowerShell.
Oppdag raskeste måter å åpne Innstillinger-appen på Windows 11 med nyttige trinn og tips.
Lær hvordan du enkelt kan endre bakgrunnsbilde på Windows 11 ved hjelp av forskjellige enkle metoder.
Lær hvordan du effektivt tar skjermbilder i Windows 11 med Print Screen, Snip & Sketch og mer. Få tips og triks for å lagre og dele skjermbilder.
Oppdatering av enhetsdrivere er viktig for å fikse feil og forbedre kompatibiliteten i Windows 11. Lær hvordan du effektivt kan oppdatere driverne dine.
Lær hvordan du fjerner McAfee programvare fra Windows 11-PC-en din. Følg våre 5 trinn for avinstallering og sikkerhetstips.
Finn ut hvor "Min datamaskin" er på Windows 11 og hvordan du enkelt kan få tilgang til denne viktige funksjonen. Følg våre enkle trinn for å gjenopprette PC-ikonet.
Denne bloggen hjelper lesere med å deaktivere Copilot-funksjonen på Windows 11, hvis de ikke ønsker å bruke AI-modellen.
Lær hvordan du kan tilpasse Start-menyen i Windows 11 for en bedre brukeropplevelse. Oppdag tips for tilpasning som passer dine behov.
Lær hvordan du enkelt åpner Kontrollpanel i Windows 11 med flere metoder som gir deg frihet til å tilpasse innstillinger. Perfekt for de som ønsker å navigere effektivt i systemet.
Lær hvordan du oppretter en ny brukerkonto på Windows 11, både lokalt og online. Få nyttige tips og trinnvise instruksjoner her.
Ikke legg ut bildene dine gratis på Instagram når du kan få betalt for dem. Les og vet hvordan du tjener penger på Instagram og får mest mulig ut av denne sosiale nettverksplattformen.
Lær hvordan du enkelt redigerer og fjerner PDF-metadata. Denne veiledningen hjelper deg med å enkelt redigere eller fjerne PDF-metadata på et par enkle måter.
Vet du at Facebook har en komplett liste over telefonbokkontakter sammen med navn, nummer og e-postadresse.
Sliter du med at Game Bar tar opp plass i Windows 11? Oppdag en trinnvis veiledning om hvordan du avinstallerer Game Bar fullstendig, får tilbake systemressursene dine og får en smidigere opplevelse. Enkle og trygge metoder inkludert.
Sliter du med den frustrerende feilen «Page Fault in Nonpaged Area» i Windows 11? Oppdag velprøvde trinnvise løsninger for å løse BSOD-krasj raskt og få PC-en til å fungere problemfritt igjen. Ingen teknisk ekspertise nødvendig!
Sliter du med at Windows 11-kameraet ikke fungerer? Oppdag trinnvise løsninger for uskarp video, appkrasj og mer. Få webkameraet ditt raskt tilbake på nett med våre eksperttips.
Sliter du med at viftehastighetskontrollen i Windows 11 ikke fungerer? Oppdag dokumenterte løsninger for å få tilbake kontrollen over PC-en din.
Sliter du med feil i Genshin Impact-startprogrammet på Windows 11? Oppdag velprøvde, trinnvise løsninger for å fikse krasj, frysing og kompatibilitetsproblemer. Kom tilbake til Teyvat uten frustrasjon!
Oppdag trinnvis hvordan du konfigurerer snarveier på skrivebordet i Windows 11 Pro for optimal effektivitet. Øk arbeidsflyten din med tilpassede snarveier, tips og beste praksis.
Oppdag hvordan du deaktiverer dvalemodus i Windows 11 for å frigjøre verdifull SSD-plass. Følg vår enkle trinnvise veiledning og gjenvinn GB-er uten problemer, og boost PC-en din.
Sliter du med den frustrerende passordforespørselsløkken i Windows 11 og Outlook? Oppdag velprøvde, trinnvise løsninger for å få tilbake kontrollen over e-posten din uten endeløse popup-vinduer. Oppdatert med de nyeste løsningene for sømløs produktivitet.
Oppdag pålitelige kilder for å kjøpe en lovlig Windows 11 Pro-nøkkel i 2026. Få eksperttips om hvordan du unngår forfalskninger, sikrer deg ekte lisenser og nyter problemfri aktivering for optimal produktivitet.
Sliter du med den fryktede feilen «System Thread Exception Not Handled» i Windows 11? Denne omfattende veiledningen tar deg gjennom velprøvde løsninger, fra enkle omstarter til avanserte driveroppdateringer, for å få PC-en til å fungere problemfritt igjen. Si farvel til frustrerende blåskjermer!

![Slik avinstallerer du McAfee på Windows 11 [5 måter] Slik avinstallerer du McAfee på Windows 11 [5 måter]](https://blog.webtech360.com/resources8/images31/image-4917-0105182719945.png)

