Kā atvērt vadības paneli sistēmā Windows 11
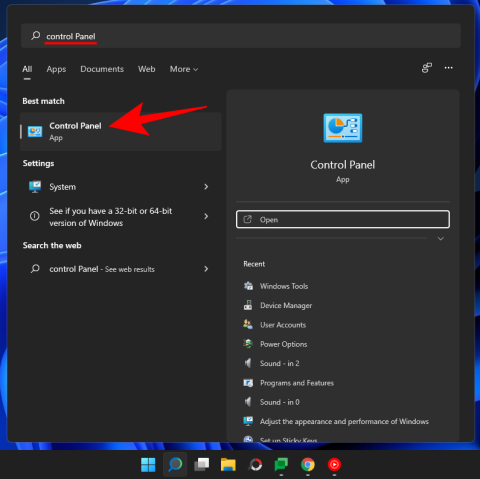
Uzziniet, kā atvērt vadības paneli Windows 11. Izpētiet 9 veidus, kā piekļūt svarīgākajām iestatījumu opcijām, un optimizējiet savu Windows pieredzi.
Klēpjdatora karstie taustiņi ir būtiski rīki, mēģinot piekļūt ierīces pamatfunkcijām. Tie ļauj jums kontrolēt skaļumu, pielāgot spilgtumu , tastatūras fona apgaismojumu, skārienpaliktņa darbību un daudz ko citu. Atkarībā no ierīces, jums var būt papildu karstie taustiņi īpašām funkcijām, piemēram, n taustiņu apgāšanās iespējošana, skārienpaliktņa atspējošana, tastatūras atspējošana , lidmašīnas režīma aktivizēšana, barošanas režīmu maiņa un daudz kas cits.
Tomēr jūsu klēpjdators var zaudēt savu funkcionalitāti un efektivitāti, ja karstie taustiņi pārstāj darboties. Tas liktu jums mainīt/rediģēt katru iestatījumu, izmantojot to īpašās opcijas lietotnē Windows iestatījumi, kas var būt diezgan apgrūtinoši. Ja klēpjdatora karstie taustiņi nedarbojas jūsu klēpjdatorā, varat izmantot tālāk norādītās metodes, lai labotu savus karstos taustiņus.
Saistīts: Kā pārvietot uzdevumjoslu uz augšu operētājsistēmā Windows 11
Saturs
Kāpēc karstie taustiņi nedarbojas?

Klēpjdatora karstie taustiņi var pārstāt darboties vairāku iemeslu dēļ, taču, tā kā sistēma Windows 11 ir diezgan jauna, šķiet, ka visizplatītākais iemesls ir draiveru konflikti un OEM utilītu konflikti fonā. Tas ir tāpēc, ka lielākā daļa draiveru, ko pašlaik izlaiž oriģinālā aprīkojuma ražotāji, ir paredzēti operētājsistēmai Windows 10. Operētājsistēmā Windows 11 ir ieviestas vairākas atšķirīgas izmaiņas fonā un veidā, kā tiek apstrādāti draiveri, kas, šķiet, traucē karsto taustiņu funkcionalitāti daudzās dažādās ierīcēs.
Šķiet, ka visvairāk skartās ierīces ir no Asus un Lenovo, jo tām ir īpaši utilīti, piemēram, Armory Crate Service, kas ir jāatjaunina operētājsistēmai Windows 11. Tas nenozīmē, ka citi ražotāji ir atbrīvoti no šīs problēmas, šķiet, ka arī daudzas Dell un Acer ierīces zaudē savu karsto taustiņu funkcionalitāti operētājsistēmā Windows 11.
Ja jums pieder kāda no šīm ierīcēm vai jūsu klēpjdatora karstie taustiņi kopumā nedarbojas operētājsistēmā Windows 11, varat izmantot tālāk norādītās metodes, lai mēģinātu novērst problēmu. Sāksim.
Saistīts: Kā izveidot atjaunošanas punktu sistēmā Windows 11
Kā labot karstos taustiņus Windows 11 klēpjdatoros
Varat izmantot tālāk norādītās metodes, lai mēģinātu atkal aktivizēt karstos taustiņus savā klēpjdatorā. Metodes ir uzskaitītas to prioritātes secībā, un visbiežāk sastopamie labojumi ir uzskaitīti augšpusē. Varat sākt ar pirmo labojumu un izskatīt sarakstu, lai mēģinātu atrast jūsu sistēmai piemērotu labojumu. Sāksim.
1. metode: pārbaudiet, vai nav OEM atjauninājumu
Ja jums ir īpaša tastatūras utilīta, kas pārvalda karstos taustiņus fonā, piemēram, Armory Crate Service vai Synaptics utilīta, varat mēģināt atjaunināt draiverus no sava OEM vietnes. Šīs utilītas atšķiras no konkrētiem tastatūras draiveriem, un tās palaiž pakalpojumus un uzdevumus fonā, kas palīdz iespējot karstos taustiņus jūsu klēpjdatorā.
Ja kāda no šīm utilītprogrammām ir bojāta vai nedarbojas, iesakām pārbaudīt jaunākos atjauninājumus vai atkārtoti instalēt pašreizējo versiju klēpjdatorā. Izmantojiet tālāk esošās saites, lai apmeklētu sava OEM atbalsta vietni un pārbaudītu jaunākos utilītu atjauninājumus. Kad tie ir atrasti, noklikšķiniet un lejupielādējiet tos savā vietējā krātuvē un pēc iespējas ātrāk instalējiet tos savā klēpjdatorā.
Pēc instalēšanas karstajiem taustiņiem atkal jāsāk darboties jūsu klēpjdatorā. Mēs iesakām restartēt klēpjdatoru, lai izvairītos no konfliktiem ar iepriekš instalētajām versijām fonā. Ja karstie taustiņi joprojām nedarbojas, varat izmantot tālāk sniegto ceļvedi, lai atiestatītu un atsvaidzinātu OEM utilītas savā klēpjdatorā.
Saistīts: Kā salabot sistēmu Windows 11
2. metode: pārliecinieties, vai OEM utilītas darbojas pareizi
Ja šķiet, ka jūsu OEM utilītas nedarbojas fonā, šeit ir dažas problēmu novēršanas metodes, lai atjaunotu to funkcionalitāti. Sāksim.
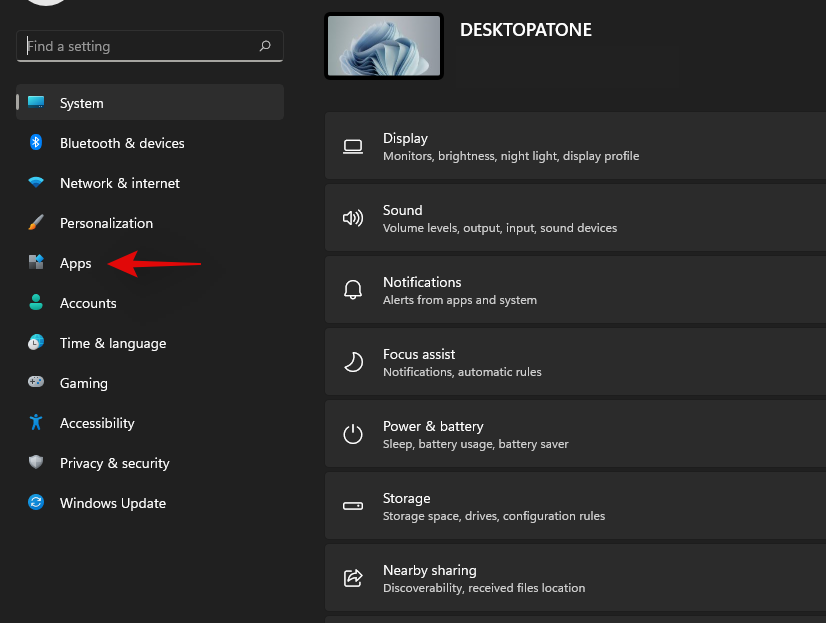
Nospiediet Windows + iuz tastatūras un kreisajā pusē noklikšķiniet uz "Programmas".
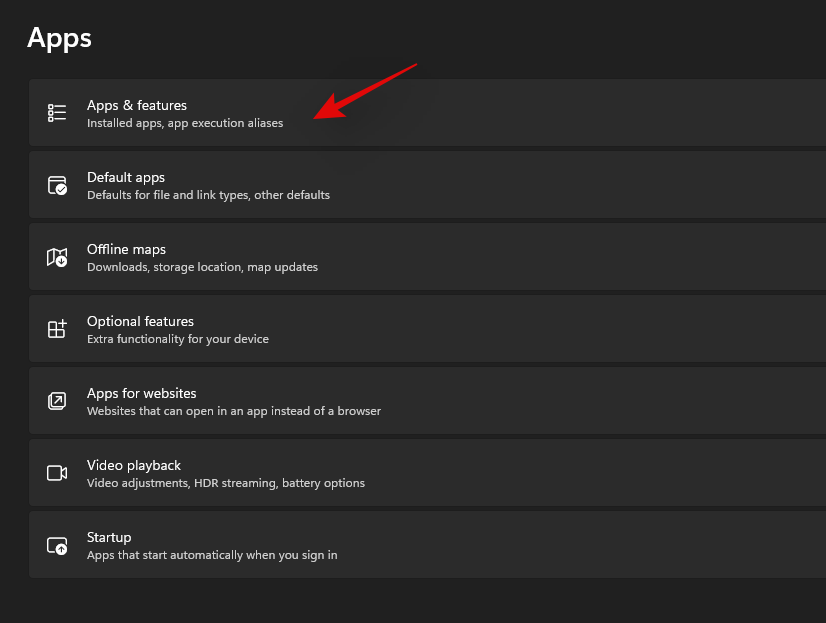
Noklikšķiniet uz "Programmas un funkcijas".
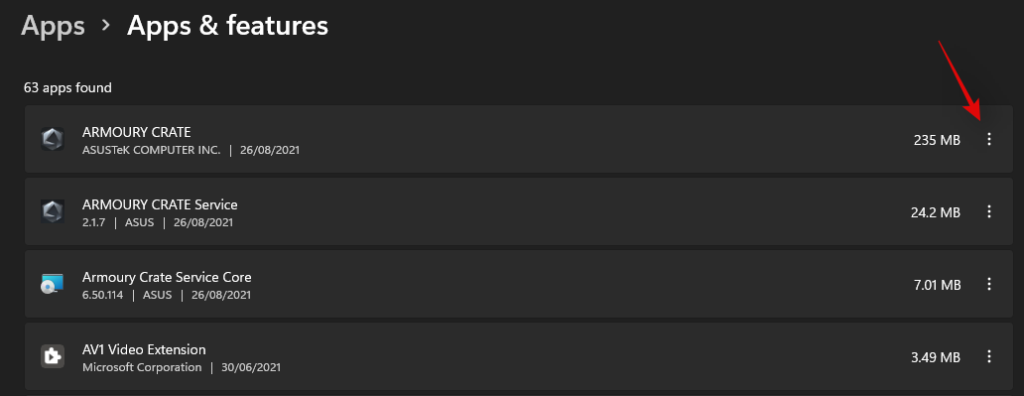
Šajā sarakstā atrodiet attiecīgo lietotni un noklikšķiniet uz '3 punktu' izvēlnes ikonas blakus tai.
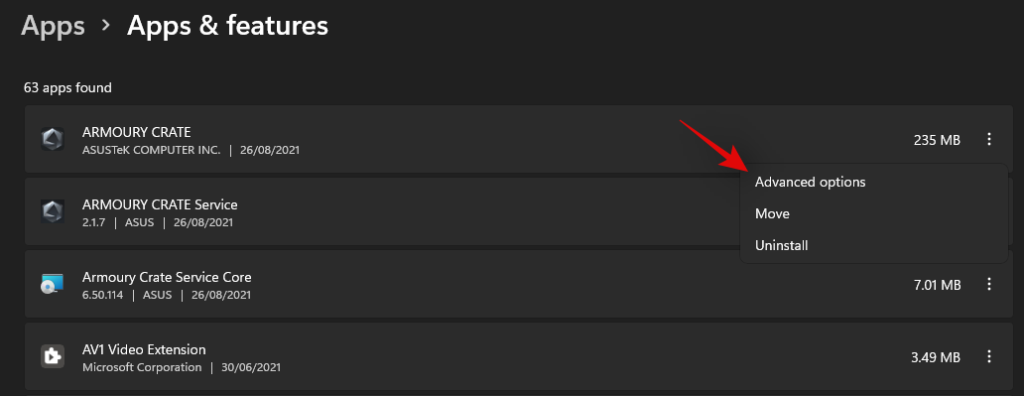
Izvēlieties "Papildu opcijas".
Tagad izpildiet kādu no tālāk norādītajām sadaļām atkarībā no tā, ko vēlaties darīt ar atlasīto lietotni.
2.1. Iespējot fona funkcionalitāti
Noklikšķiniet uz nolaižamās izvēlnes sadaļā “Fona lietotņu atļaujas” un atlasiet “Optimizēta jauda” vai “Vienmēr”.
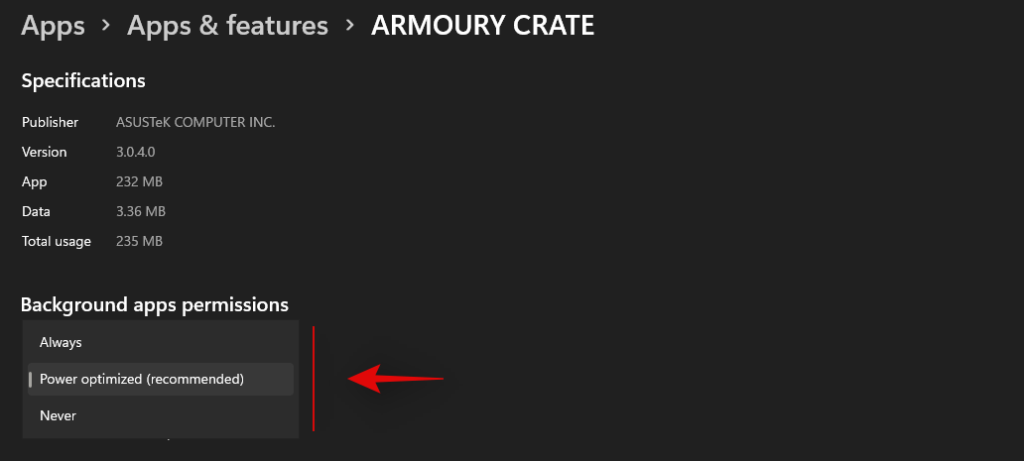
“Jauda optimizēta” ļaus lietotnei darboties fonā atkarībā no jūsu pašreizējā enerģijas plāna. No otras puses, “Vienmēr” dos lietotnei atļauju palikt aktīvai un darboties fonā neatkarīgi no jūsu pašlaik atlasītā enerģijas plāna.
2.2. Labojiet lietotni
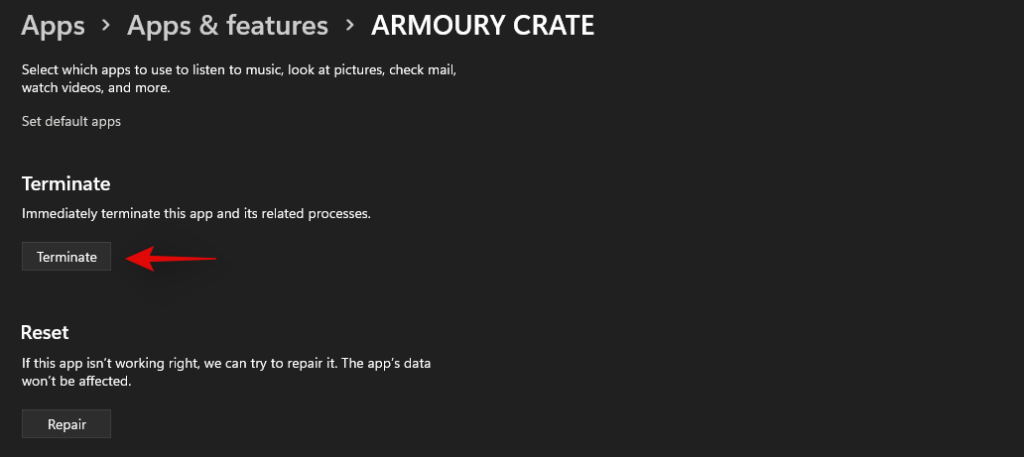
Operētājsistēmā Windows 11 varat arī labot savu lietotni. Vienkārši ritiniet līdz apakšai un vispirms noklikšķiniet uz "Pārtraukt".
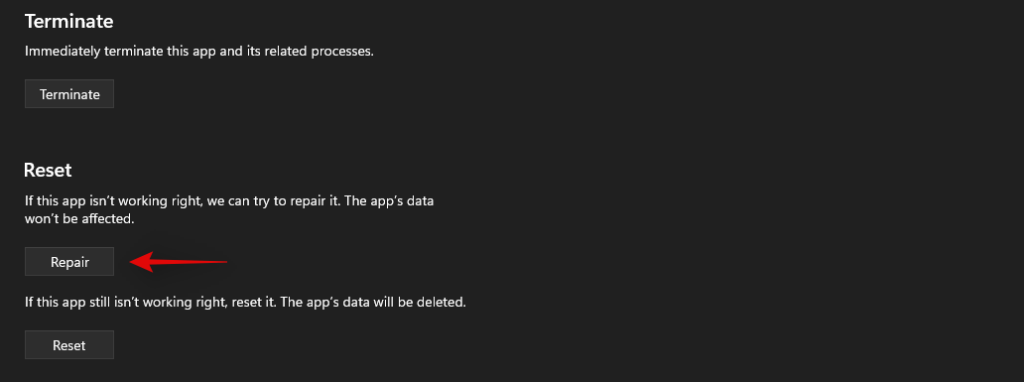
Tagad noklikšķiniet uz "Remonts".
Pagaidiet, līdz sistēma Windows darīs savu darbu, kad blakus opcijai tiek parādīta atzīme, mēģiniet palaist attiecīgo lietotni savā klēpjdatorā.
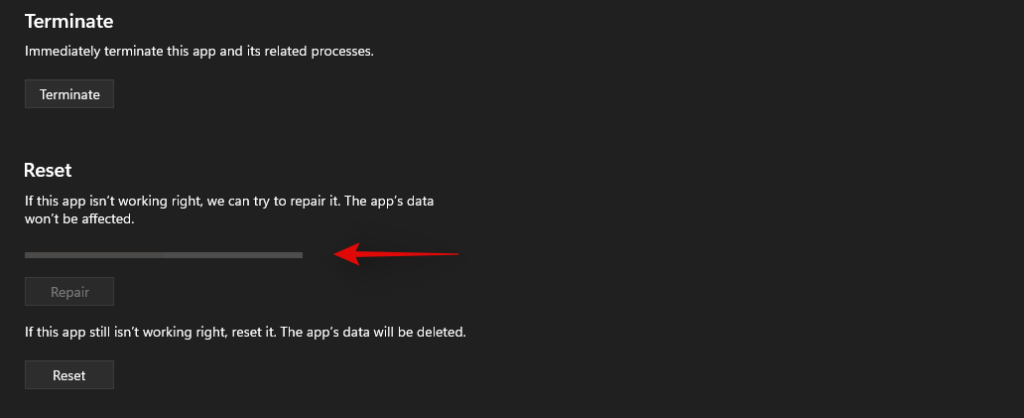
Pārbaudiet savus karstos taustiņus tūlīt, ja neliela problēma vai konflikts izraisīja lietotnes nedarbošanos fonā, tagad jūsu klēpjdatorā ir jāatjauno karsto taustiņu funkcionalitāte.
2.3. Atiestatiet lietotni
Ja iepriekš minētās metodes jums nederēja, varat atiestatīt OEM lietotni. Tas atiestatīs tās datus un dos jums jaunu sākumu tā, it kā lietotne tikko būtu instalēta jūsu klēpjdatorā. Tam vairumā gadījumu vajadzētu palīdzēt atjaunot karstā taustiņa funkcionalitāti. Tomēr ņemiet vērā, ka jūsu lietotnes dati tiks atiestatīti, kas liks jums atkārtoti pieteikties lietotnē, ja nepieciešams. Turklāt tiks atiestatītas arī visas lietotnē veiktās izmaiņas vai pielāgojumi. Lai sāktu darbu, veiciet tālāk norādītās darbības.
Noklikšķiniet uz “Pārtraukt”, lai aizvērtu lietotni.

Tagad noklikšķiniet uz "Atiestatīt".

Vēlreiz noklikšķiniet uz Atiestatīt, lai apstiprinātu savu izvēli.

Programma tagad tiks atiestatīta jūsu klēpjdatorā. Ieteicams restartēt klēpjdatoru un vēlreiz mēģināt izmantot karstos taustiņus. Ja lietotne nedarbojās pareizi operētājsistēmā Windows 11, jūsu karstā taustiņa funkcionalitāte tagad ir jāatjauno jūsu klēpjdatorā.
3. metode: atjauniniet draiverus
Vēl viens tastatūras nepareizas darbības iemesls ir novecojuši draiveri. Ja iepriekš neesat atjauninājis tastatūras draiverus, iespējams, tas ir iemesls, kāpēc tastatūras karstie taustiņi nedarbojas operētājsistēmā Windows 11. Windows 11 pārvalda un instalē jūsu draiverus atšķirīgi, turklāt dažos gadījumos ir zināms, ka Windows 11 nomainiet savu OEM tastatūras draiveri par labu vispārējam draiverim, ja tas ir jaunākais.
Ja karstie taustiņi joprojām nedarbojas, iesakām atjaunināt draiverus un instalēt jaunākos tastatūras draiverus, kas pieejami no jūsu oriģinālā aprīkojuma ražotāja. Vienkārši apmeklējiet savu OEM vietni, izmantojot kādu no tālāk norādītajām saitēm, un lejupielādējiet attiecīgo draiveri savā vietējā krātuvē.
Pēc lejupielādes instalējiet draiveri un restartējiet klēpjdatoru. Aizliedziet visus Windows 11 piedāvātos tastatūras draiveru atjauninājumus, un jūsu karstajiem taustiņiem vajadzētu atsākt darboties. Izmantojiet tālāk esošās saites, lai sāktu darbu.
Ja tastatūras draiveri joprojām ir novecojuši un karstie taustiņi nedarbojas, iespējams, ir pienācis laiks pārbaudīt draivera atjauninājumus, izmantojot Windows. Iespējams, ka jūsu oriģinālā aprīkojuma ražotājs jums piegādās jaunākos draivera atjauninājumus, izmantojot Windows atjauninājumus. Pārbaudiet, vai klēpjdatora Windows atjauninājumos nav pieejami tastatūras draiveru atjauninājumi, izmantojot tālāk sniegto rokasgrāmatu. Vispirms mēs pārliecināsimies, vai jūsu klēpjdators saņem draivera atjauninājumus, izmantojot Windows Update. Izpildiet tālāk sniegtos norādījumus, lai sāktu darbu.
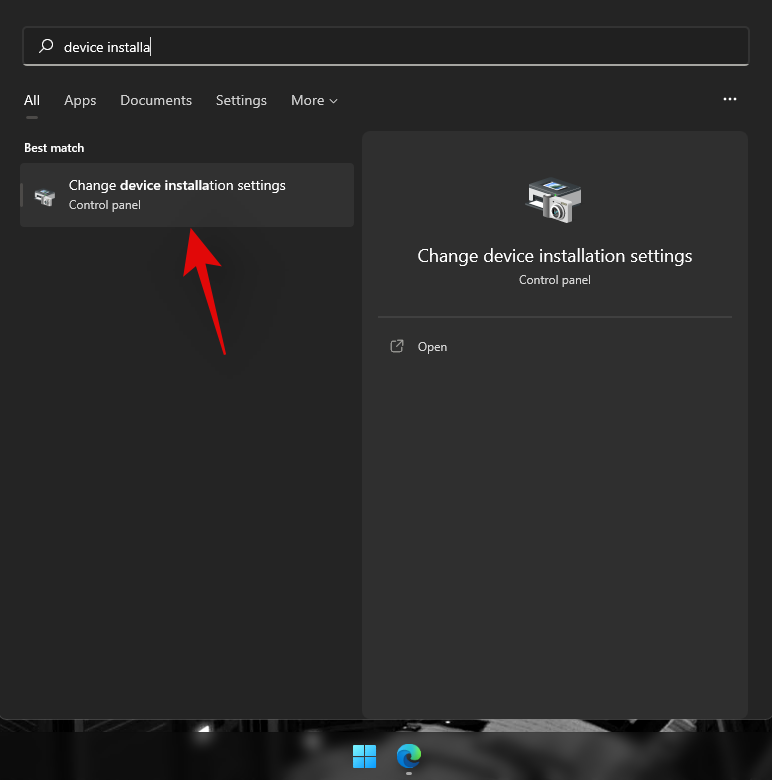
Nospiediet Windows + Suz tastatūras un meklējiet “Mainīt ierīces instalēšanas iestatījumus”. Noklikšķiniet un palaidiet lietotni, kad tā tiek parādīta jūsu meklēšanas rezultātos.
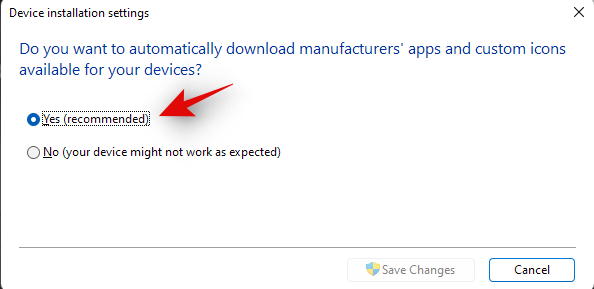
Atlasiet “Jā (ieteicams)”.
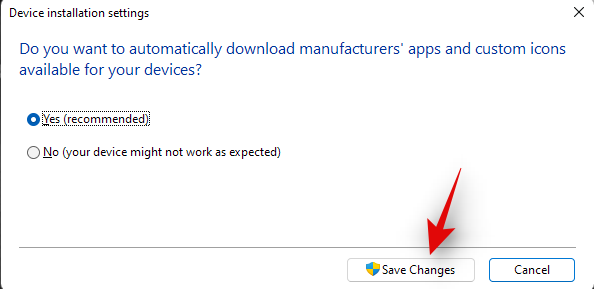
Noklikšķiniet uz "Saglabāt izmaiņas".
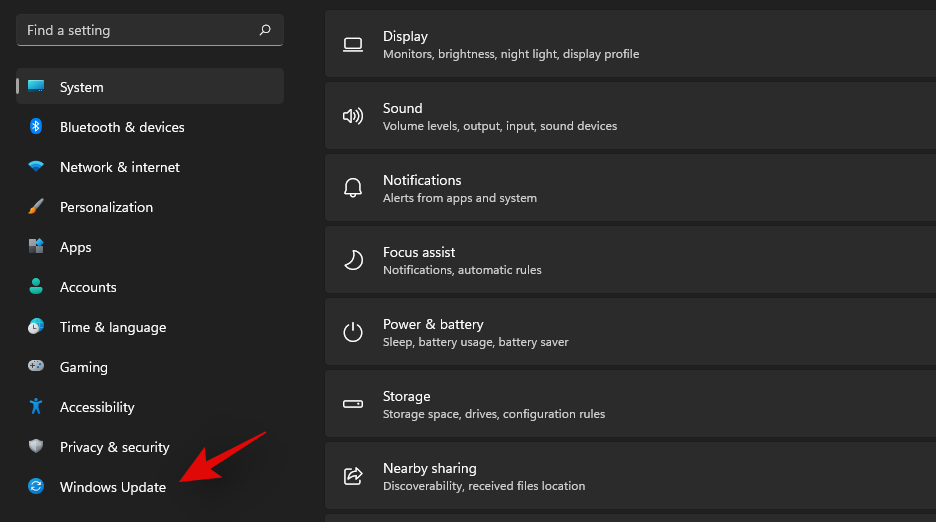
Pagaidiet, līdz sistēma Windows iespējo jūsu klēpjdatora draivera atjauninājumus. Kad tas ir iespējots, aizveriet ierīces instalēšanas iestatījumu logu un nospiediet Windows + itastatūru. Kreisajā pusē atlasiet Windows atjaunināšana.
Augšpusē noklikšķiniet uz Pārbaudīt atjauninājumus un instalējiet visus parādītos atjauninājumus.
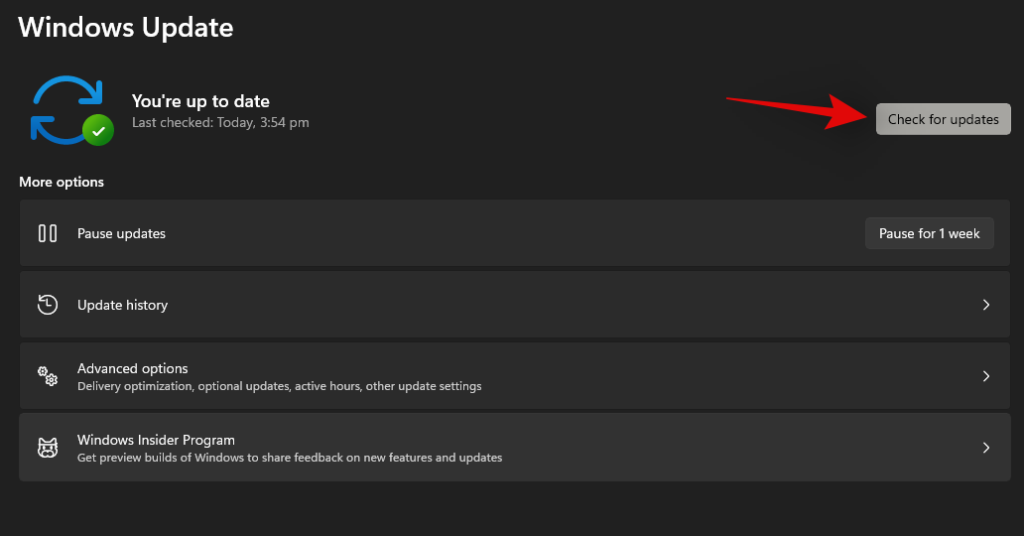
Pēc instalēšanas noklikšķiniet uz "Papildu opcijas" apakšā.
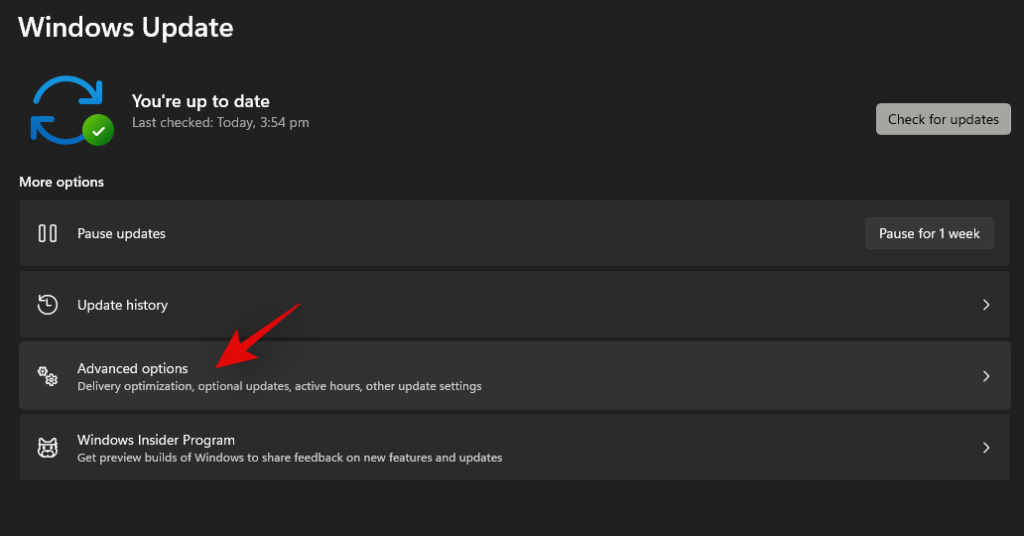
Tagad noklikšķiniet uz 'Neobligātie atjauninājumi'.
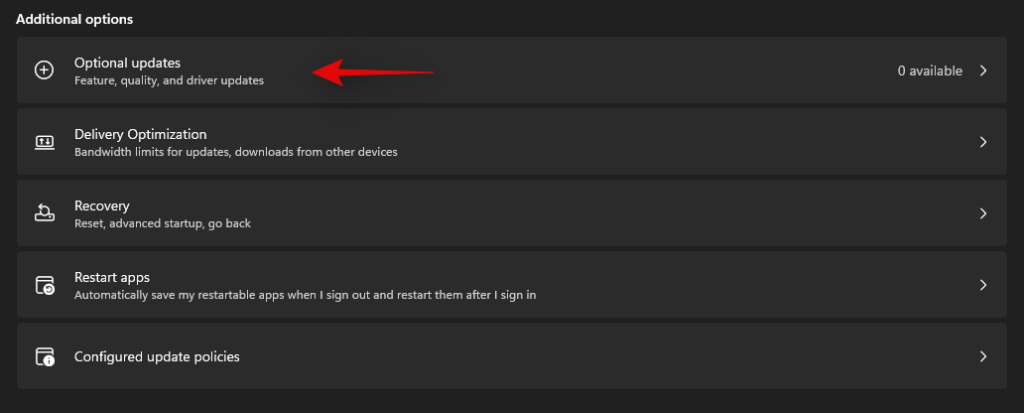
Noklikšķiniet un izvērsiet “Draivera atjauninājumi (n)”, kur n apzīmē pašreizējo jūsu klēpjdatoram pieejamo draivera atjauninājumu skaitu. Atzīmējiet izvēles rūtiņu visiem tastatūras draiveriem, kas tiek rādīti šajā sarakstā. Ekrāna apakšā noklikšķiniet uz "Lejupielādēt un instalēt". Restartējiet klēpjdatoru pat tad, ja to neprasa Windows atjauninājums.
Un tas arī viss! Jūsu klēpjdatorā tagad ir jāinstalē jaunākie tastatūras draiveri, kas palīdzēs atjaunot karsto taustiņu funkcionalitāti. Ja nē, varat turpināt ar tālāk norādītajiem labojumiem, lai mēģinātu labot karstos taustiņus.
4. metode: atkārtoti instalējiet tastatūras draiverus
Ja neviena no iepriekš minētajām metodēm jums nelīdz, ir pienācis laiks pārinstalēt tastatūras draiverus. Lai gan draiveri reti saskaras ar konfliktiem fonā, kļūdainas instalācijas, nesaderīgi komponenti un nepareizi atjauninājumi var sabojāt tastatūras draiverus, īpaši, ja jums ir pielāgots RGB fona apgaismojums, ko pārvalda OEM utilīta.
Katra no šīm lietotnēm izmanto atšķirīgu veidu, kā pievienot tastatūras fona apgaismojumu, lai palīdzētu pielāgot to atbilstoši jūsu vajadzībām. Šie veidi, kā pievienoties sistēmai, nedarbojas labi ar citām trešo pušu programmām, kas pārvalda tastatūras kartēšanu, izkārtojumu un daudz ko citu. Tastatūras draivera atkārtota instalēšana var palīdzēt novērst lielāko daļu šādu problēmu, un to var izdarīt, vai nu instalējot īpašu draiveri no sava OEM, vai izmantojot vispārīgu draiveri, ko nodrošina sistēma Windows. Sāksim.
4.1. Pārinstalējiet vispārējo tastatūras draiveri
Press Windows + X on your keyboard and click on ‘Device Manager’.
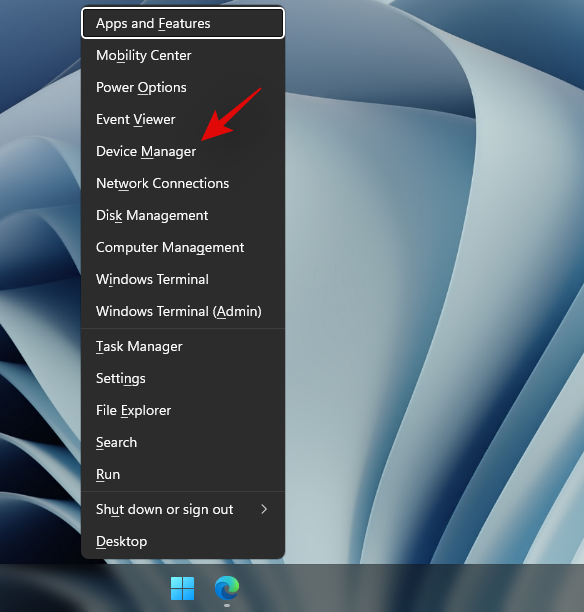
Once opened, find your concerned keyboard in the list and right-click on it. If you can’t find your keyboard or have multiple listings, then you can select and uninstall all of them. Once uninstalled, leftover drivers will be removed while the necessary ones will be automatically re-downloaded.
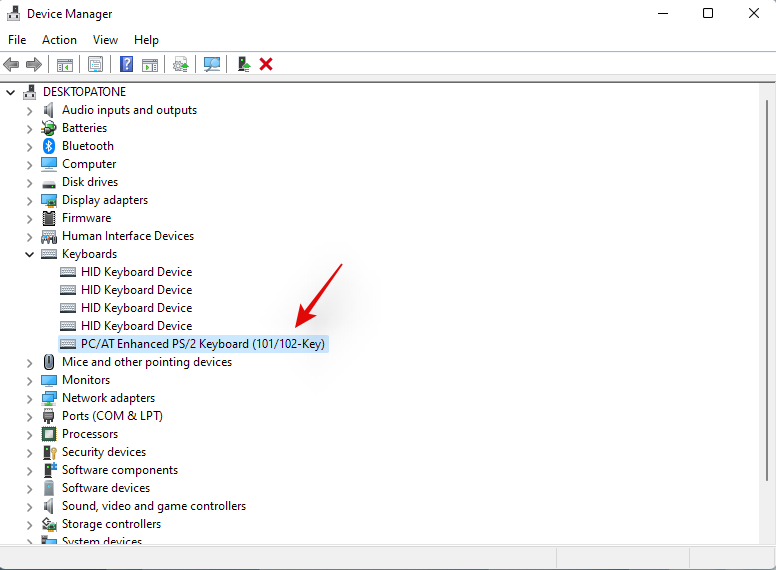
Click on ‘Uninstall device’.
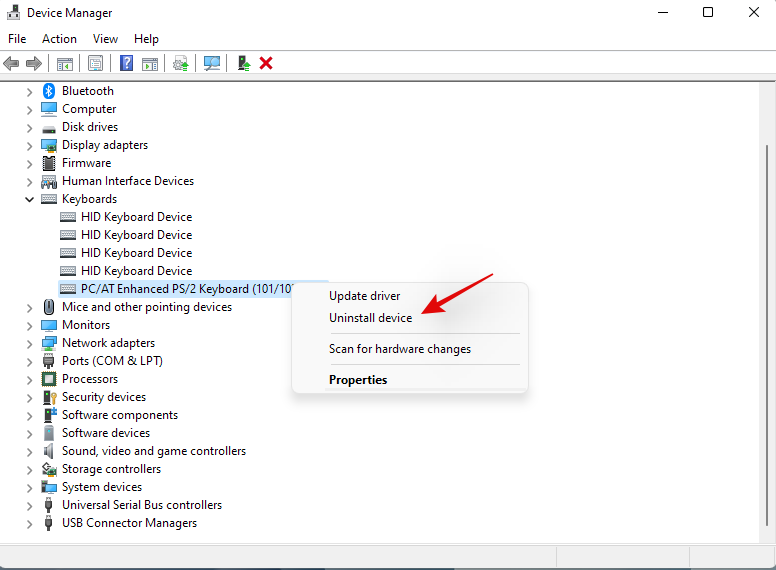
Click on ‘Uninstall’ again to confirm your choice.
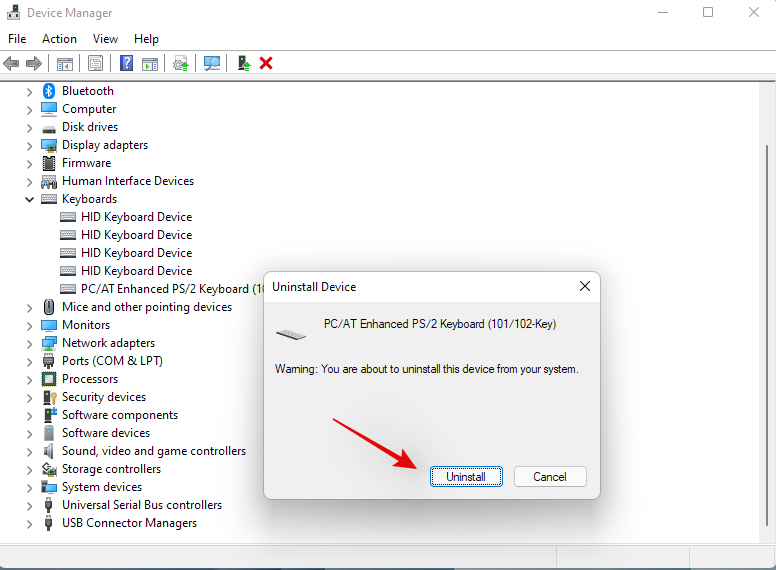
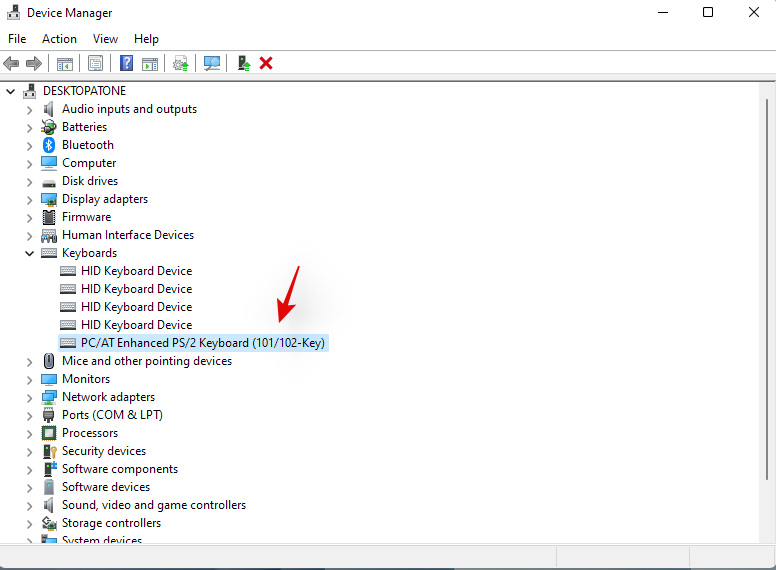
Restart your laptop if prompted, and repeat the steps above to remove all necessary keyboard drivers installed on your system. Once uninstalled, right-click on an empty area and select ‘Scan for hardware changes’. You can also click on the dedicated icon for the same in your toolbar.

Windows will now look for generic missing drivers for your native keyboard and reinstall them automatically on your laptop.
If however, your drivers aren’t found by Windows, then you can use the guide below to manually install the dedicated keyboard drivers from your OEM.
4.2 Reinstall keyboard drivers manually
Download and install the necessary keyboard drivers to your local storage. Ensure that you extract the file beforehand in case you downloaded an archive. You should find a .inf file inside which is the driver we will be installed manually on your system. Follow the steps below to get you started.
Press Windows + X on your keyboard and select ‘Device Manager’.

Now expand the ‘Keyboards’ section and right-click on your concerned keyboard. If you have multiple HID devices under ‘Keyboards’ then we recommend you uninstall all unnecessary drivers to avoid conflicts.
Select ‘Uninstall device’.

Check the box for ‘Attempt to remove the driver for this device’ if the option is available. Click on ‘Uninstall’ to confirm your choice.

The selected keyboard will now be uninstalled from your system. Your keyboard will stop working after the concerned driver has been uninstalled. This is normal behavior and your keyboard’s functionality should be restored once we reinstall the necessary drivers. Repeat the steps above for all HID devices you wish to remove. Once the necessary devices have been removed, click on the ‘Add drivers’ icon in your toolbar.

Click on ‘Browse’.
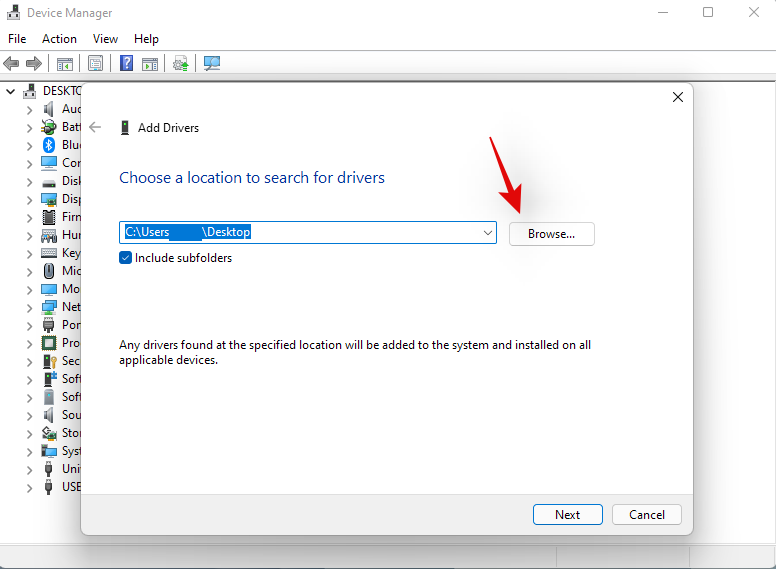
Navigate to the folder where you have stored your OEM drivers and click on ‘OK’.
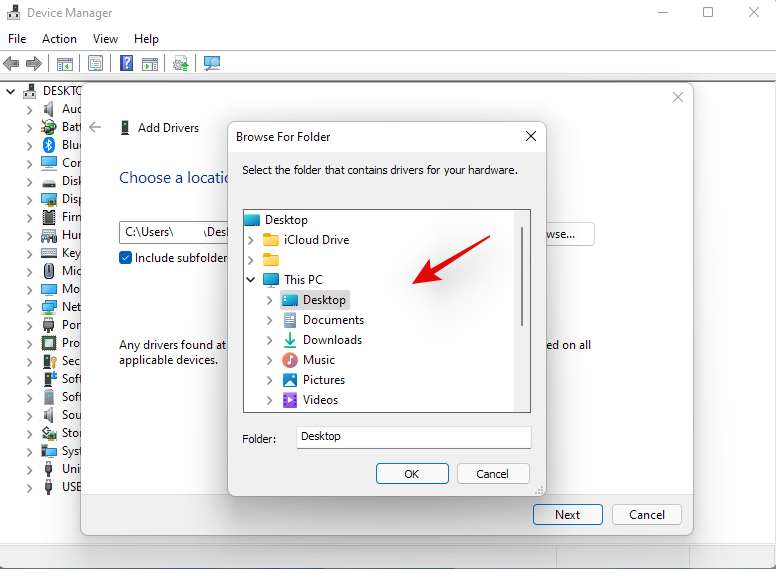
Check the box for ‘Include subfolders’ just to be safe. Click on ‘Next’ once you are done.
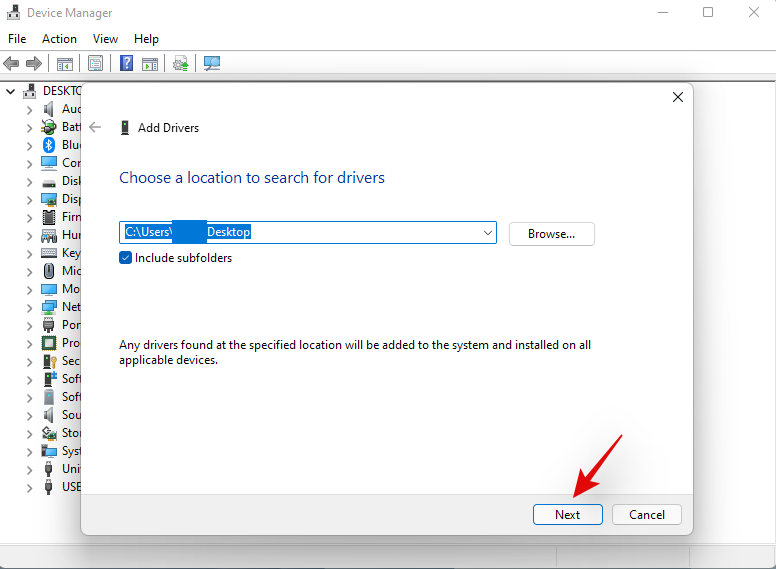
Windows will now scan the location for compatible drivers and automatically install them on your system.
Once installed, we recommend you restart your laptop for good measure.
And that’s it! Your hotkey functionality should now be restored on your system if a background driver conflict was causing issues on your system.
Note: Do not install any keyboard drivers via Windows Update in the future to avoid losing hotkey functionality again.
Method #5: Disable gaming mode
Gaming mode within Windows is known to cause issues on certain laptops. Microsoft’s gaming mode has gotten smarter and the mode automatically tries to apply the best peripheral settings for your gaming experience. This includes tweaking your audio, mouse settings, enabling n key rollover on your keyboard, windows key lock, and a lot more.
However, automatically enabling these settings requires hooking into dedicated drivers and tools which are often managed by your OEM. This could create conflicts in the background which might be preventing you from using your hotkeys on Windows 11. Use the guide below to disable gaming mode on your laptop.
Press Windows + i on your keyboard and click on ‘Personalization’ on your left.
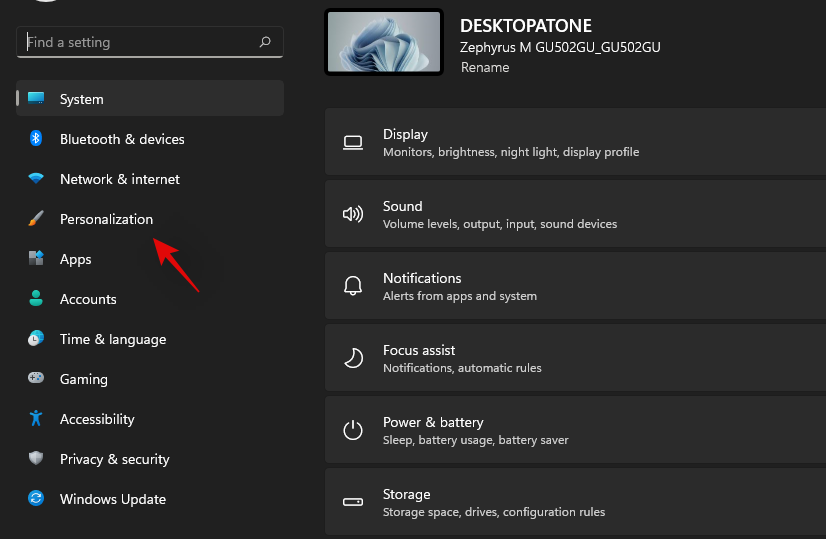
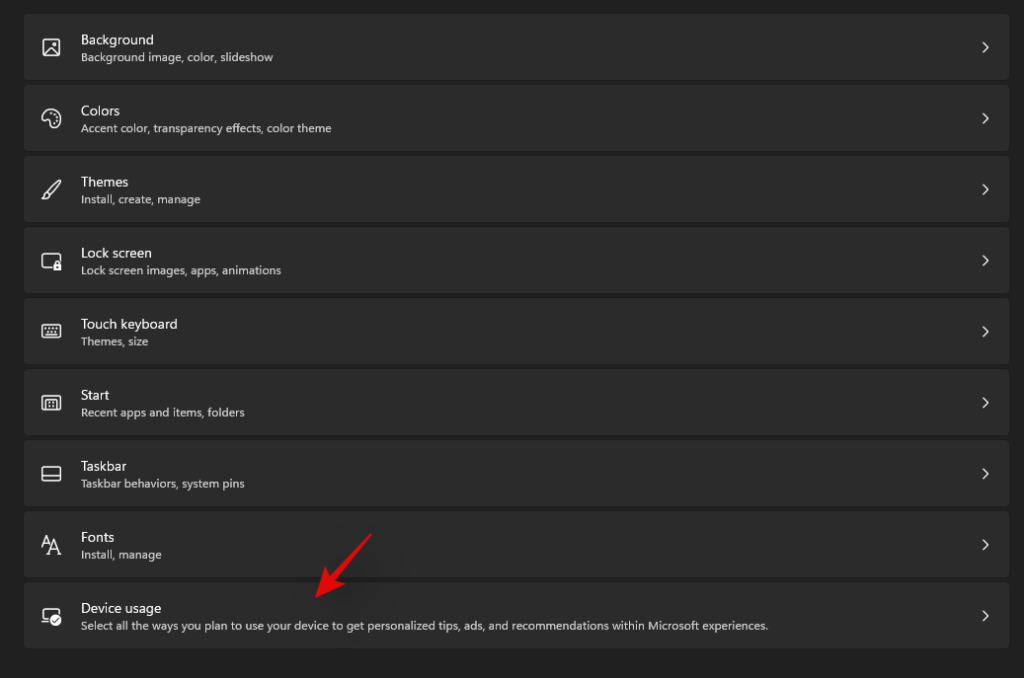
Click on ‘Device usage’.
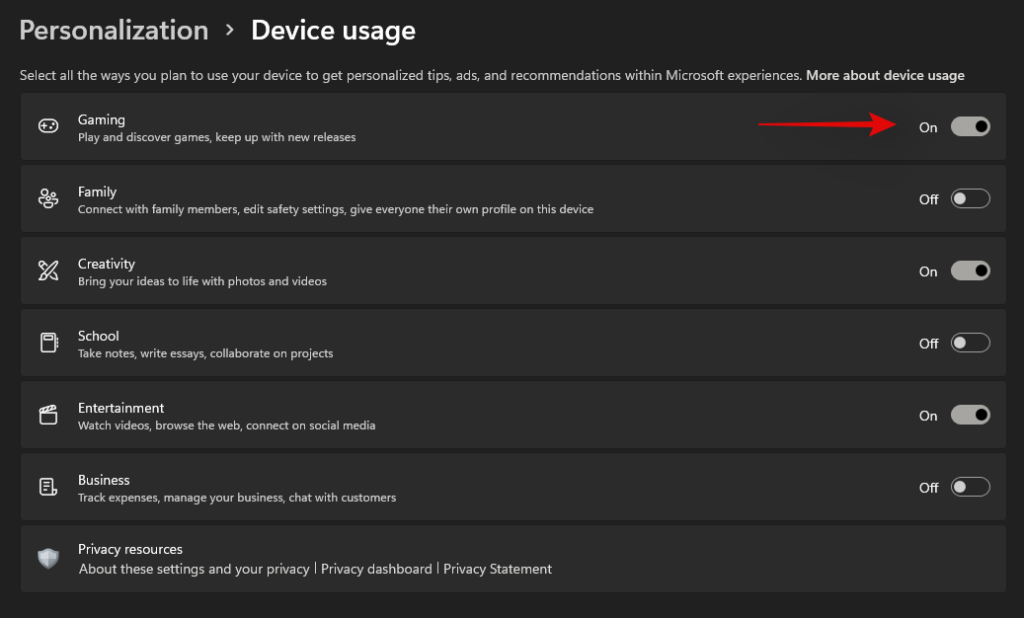
Disable the toggle for ‘Gaming’.
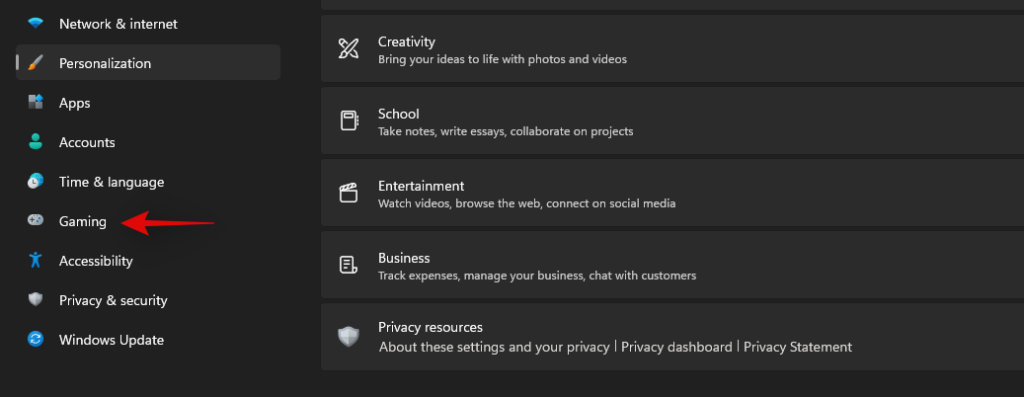
Click on ‘Gaming’ on your left now.
Click on ‘Game Mode’ on your right.

Disable the toggle for ‘Game mode’ at the top of your screen.

Close the Settings app and restart your laptop.
If your hotkeys start working upon a restart then game mode was likely interfering with your hotkeys in the background.
Method #6: Restart HID service
You can also restart your HID service which should help restart all your HID or Human Interface Devices. This includes your keyboard and restarting the HID service should help fix your hotkeys if your custom software or mapper was unable to hook into the HID service. Use the guide below to get you started.
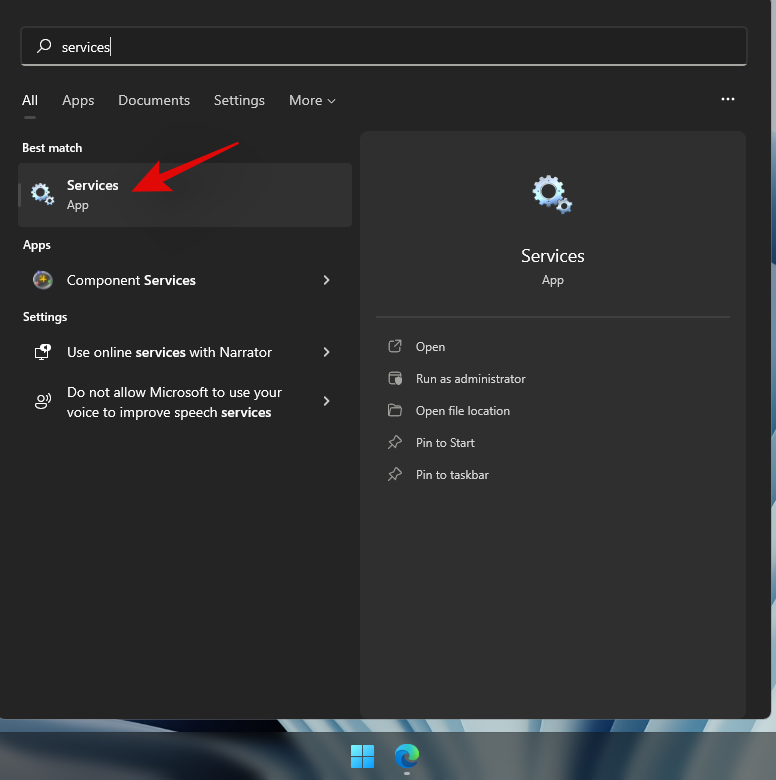
Press Windows + S and search for ‘Services’. Click and launch the app once it shows up in your search results.
Look for ‘Human Interface Device Service’ and right-click on it.
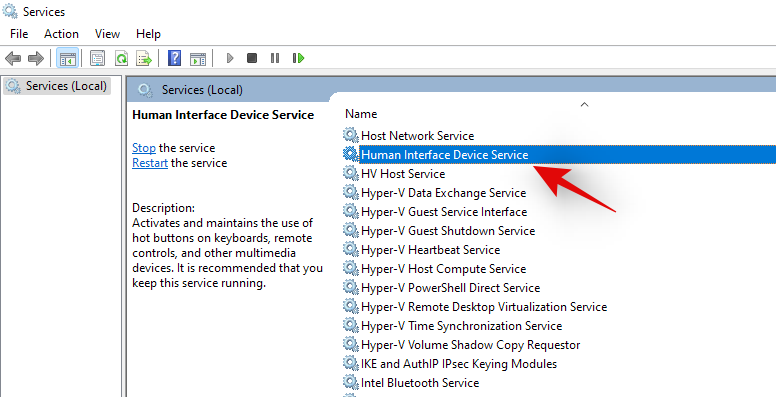
Select ‘Restart’.
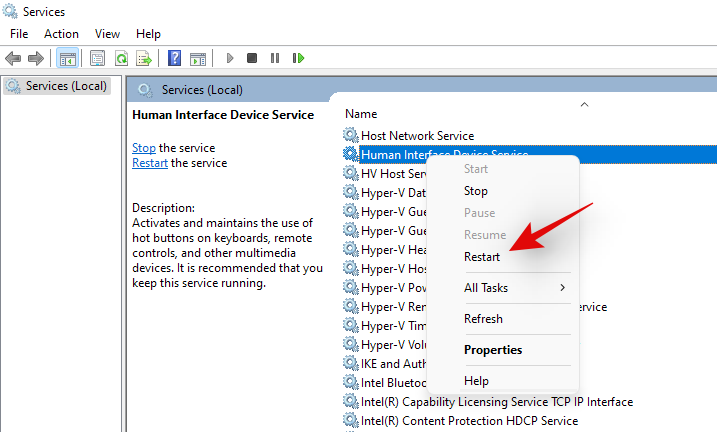
Windows will now restart your HID service.
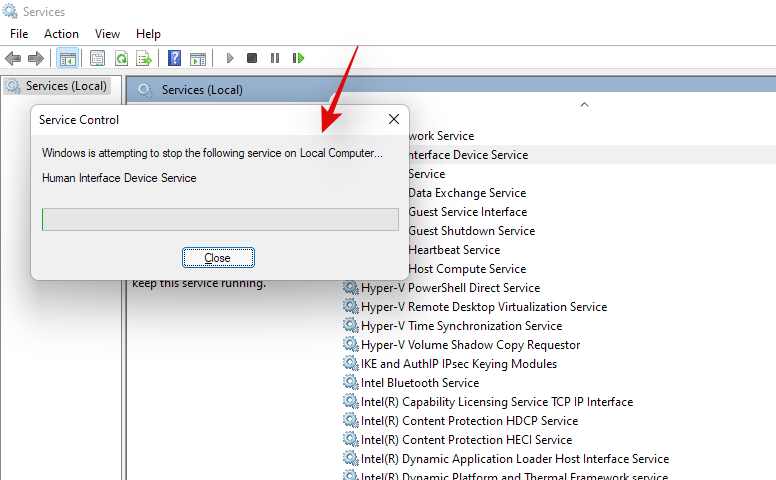
You can try testing out your hotkeys now. If a conflict in the background was preventing your custom software from hooking into the HID service, then this issue should now be fixed and your hotkey functionality should now be restored.
Method #7: Disable filter keys
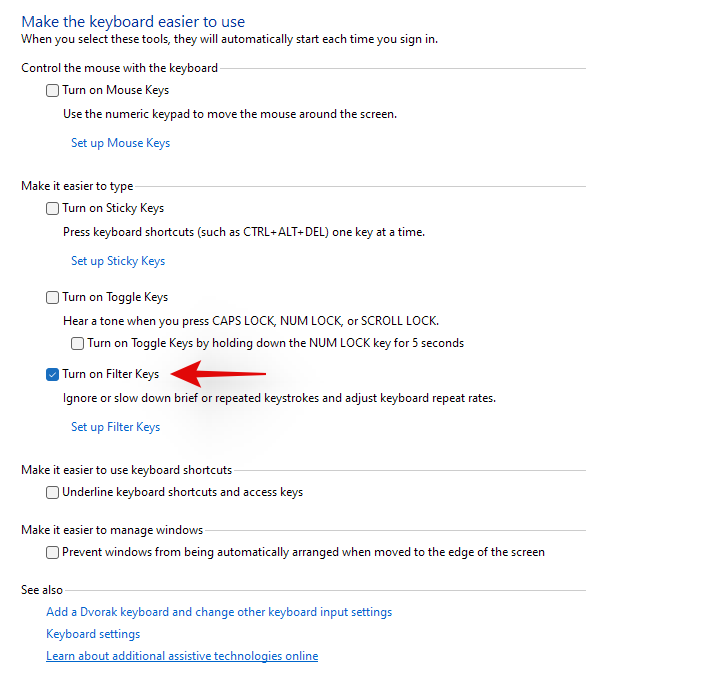
Filter keys are another culprit within Windows that is known to cause issues on many devices. Ideally, Filter keys is an accessibility feature meant to be used so that you can avoid brief repeated key inputs which is quite useful for users with anxiety, hyperactivity, hand tremors, and other similar conditions.
However, if this feature has been enabled by mistake, then it could prevent Windows from detecting your hotkey inputs and combinations. You can check if Filter keys are enabled on your system and disable them using the guide below.
Press Windows + S and search for Control Panel. Click and launch the app once it shows up in your search results.
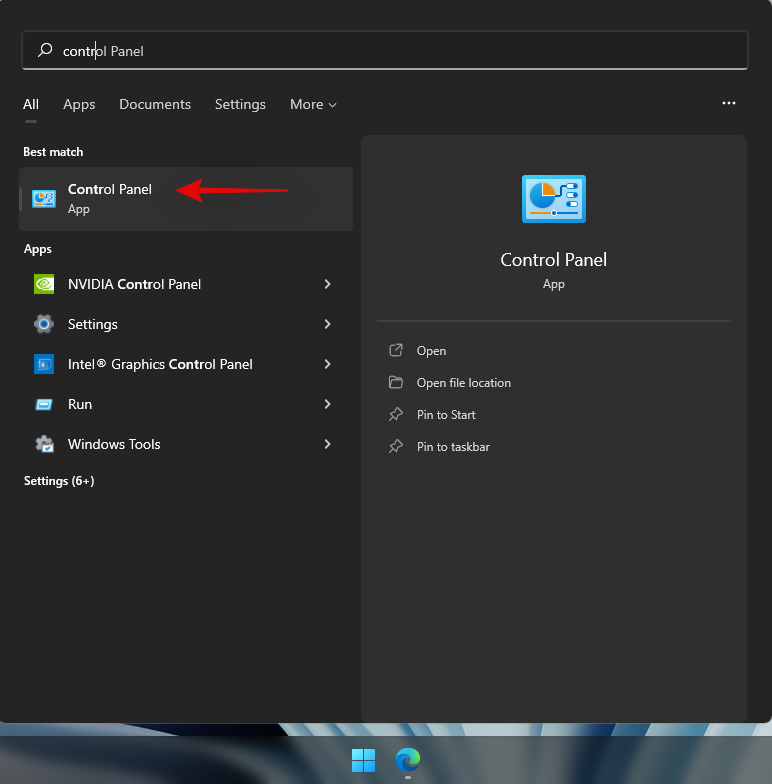
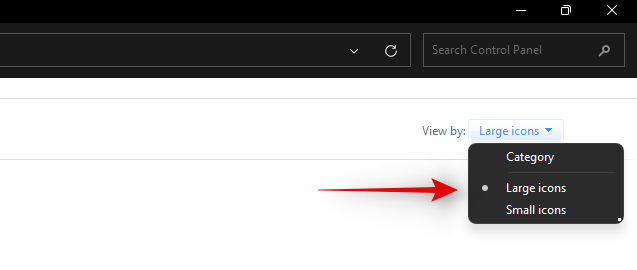
Switch to ‘Large icons’ by clicking on the drop-down menu in the top right corner.
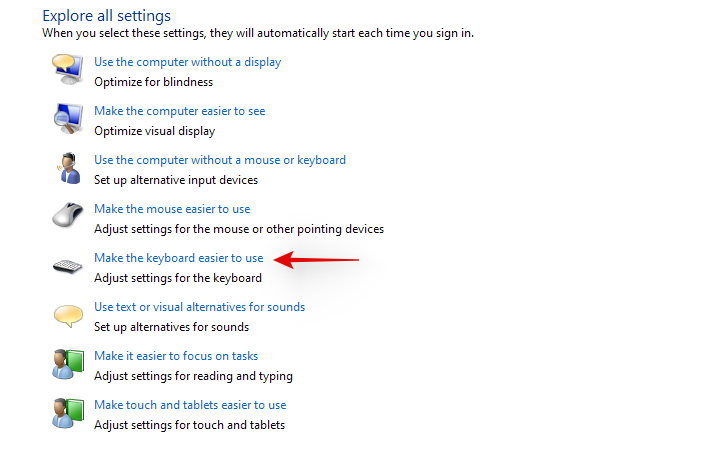
Click on ‘Ease of Access Center’.

Click on ‘Make the keyboard easier to use’.
Now uncheck the box for ‘Turn on filter keys’.
Click on ‘Ok’ at the bottom.
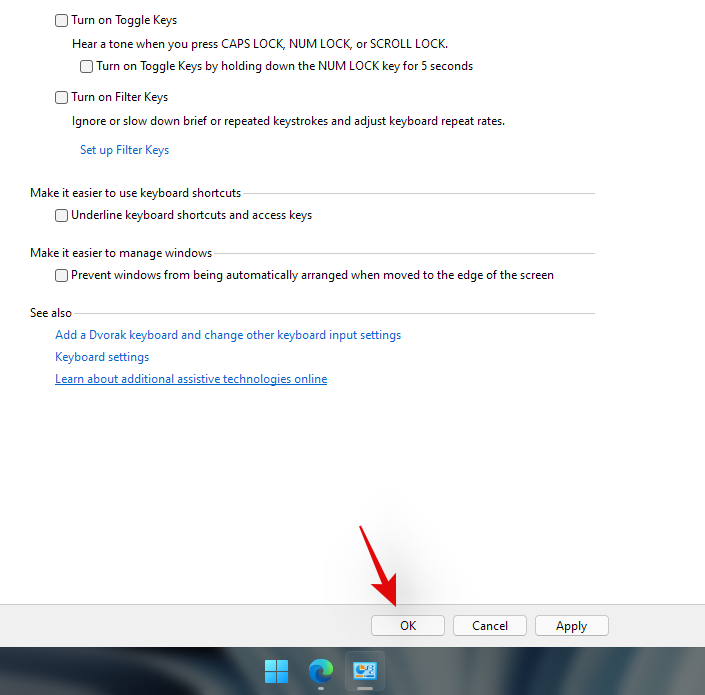
And that’s it! Filter keys should now be disabled on your system. Check your hotkey combinations and their functionality should now be restored on your system.
Method #8: Disable Function (Fn) lock if available
Fn lock is a feature in most laptops that allows you to lock and use the Fn keys and their functionality. Most systems use Fn keys as alternate keys mapped to functions and utilities that will be needed to manage your system. For example, F7 could be used to increase brightness and F8 could be used to decrease brightness. If directly pressing these keys helps you manage your brightness then the Fn lock is disabled on your laptop.
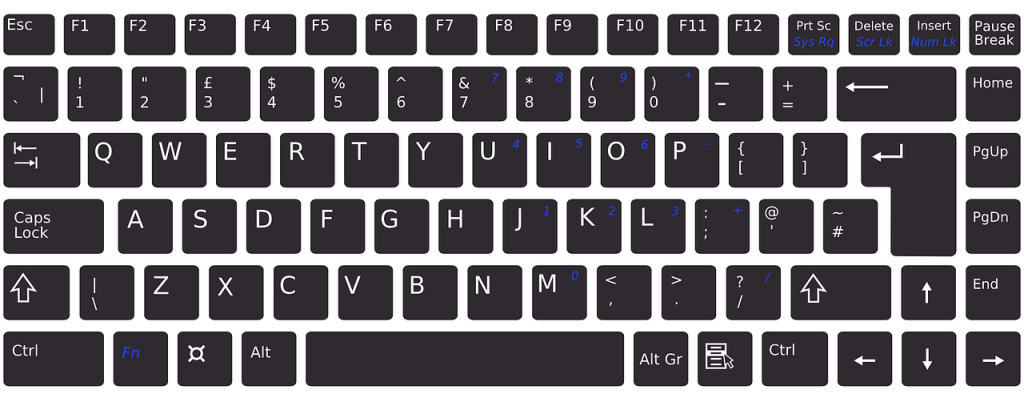
However, if hitting F7 and F8 registers as the respective key then the Fn lock is enabled on your device. In such cases, your Fn keys will behave normally and you will need to use Fn + F7 or F8 combination to adjust your brightness. You can disable or toggle this lock using keyboard shortcuts on most laptops. Look for an ‘Fn Lock’ icon on one of your keys and pres Fn + the respective key, on your keyboard. This should help disable Fn lock on your keyboard if enabled, and restore your hotkeys functionality.
In case a key combination is not available on your device, then you will most likely need to access your BIOS. Most manufacturers allow you to disable and enable Fn lock from the BIOS for easy access. Simply press F2 on your splash screen once your laptop is booting to enter the BIOS menu. Once in the BIOS menu, find the relevant option and toggle the Fn lock for your laptop.
In case a BIOS menu option is also not available to you then your laptop most likely uses the default Fn lock combination which is ‘Fn + Esc’ on your keyboard. This will help toggle the Fn lock on your system which should help restore your hotkeys.
Method #9: Check the on-screen keyboard
On-Screen keyboard within Windows can help you determine if your hotkeys have actually stopped working or you are facing a software issue. Start by launching the on-screen keyboard on your laptop using the taskbar icon. If the icon is hidden, press Windows + S on your keyboard and search for ‘On-Screen Keyboard’. Click and launch the app from your search results.
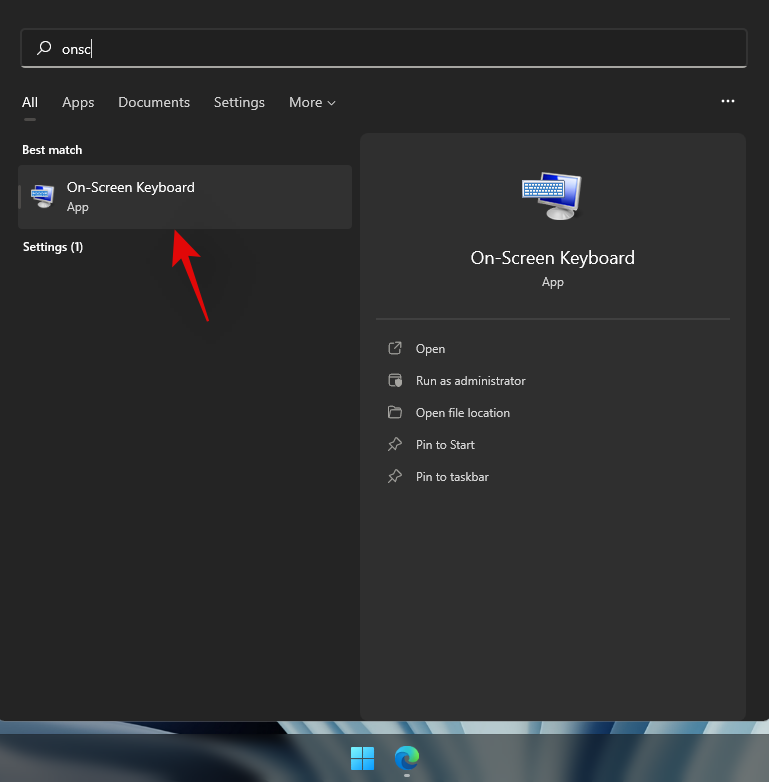
Now try using a hotkey that does not use Fn keys on your keyboard as they would be unavailable on your on-screen keyboard. If not try testing out each key and see if it still works on your laptop.
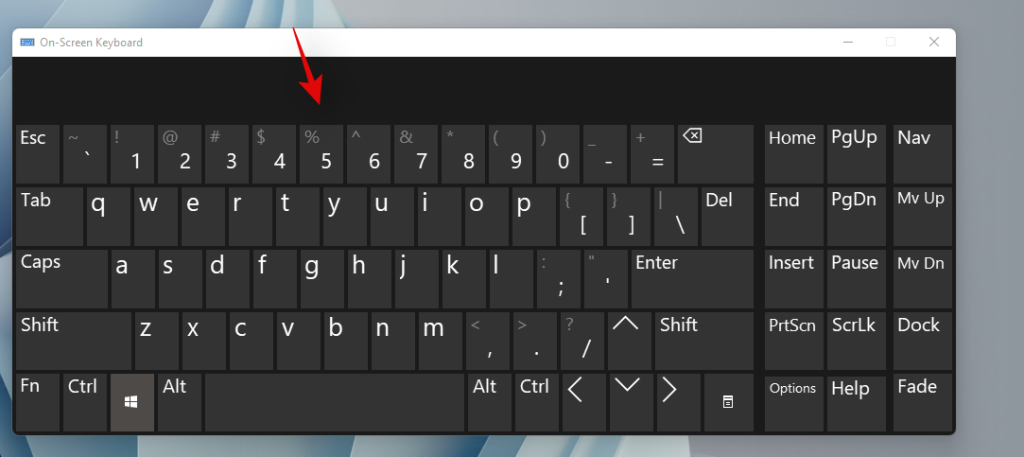
If all your keys seem to be registering with hotkeys working via the on-screen keyboard, then this indicates a hardware issue with your keyboard. In such cases, we recommend you get in touch with your OEM support team and try to solve your issue. If however, you are unable to activate your hotkeys via the on-screen keyboard as well, then you can use the fixes below to try and solve your issue.
Method #10: Use Windows troubleshooter
If hotkeys still fail to work on your system then it’s time to run a dedicated Windows troubleshooter. Windows troubleshooters have become highly advanced in the past few years and they can help fix most issues with your system nowadays. Use the guide below to run a keyboard troubleshooter on Windows 11.
Press Windows + i on your keyboard and click on ‘Troubleshoot’ on your right.
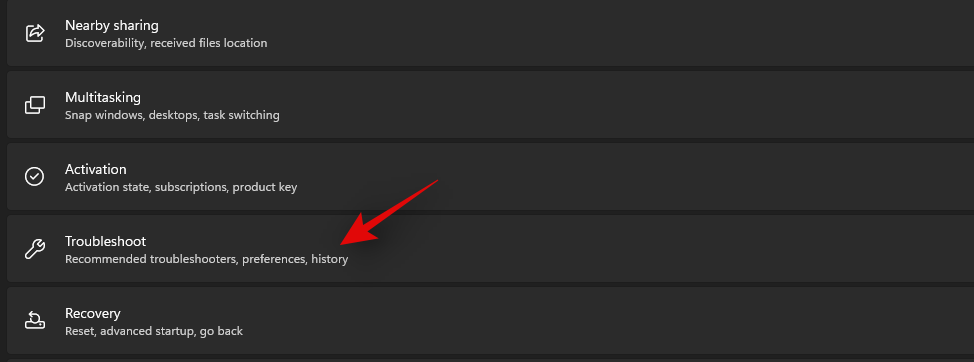
Now click on ‘Other troubleshooters’.
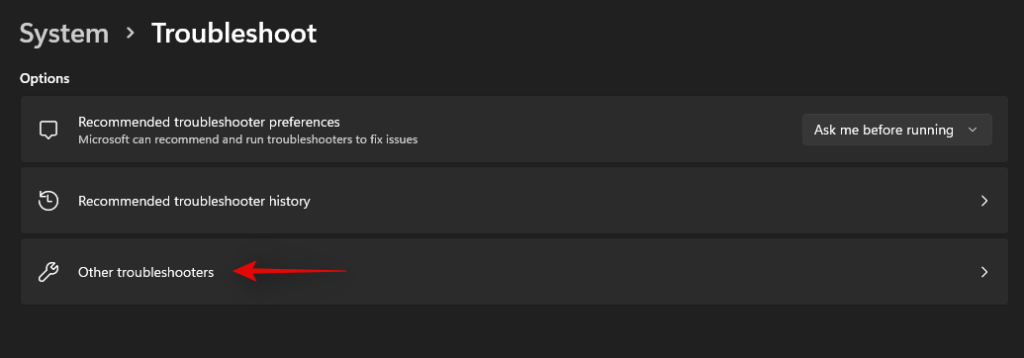
Scroll down and click on ‘Run’ beside ‘Keyboard’.

Windows troubleshooter will now do its thing and try to find issues with your keyboard.
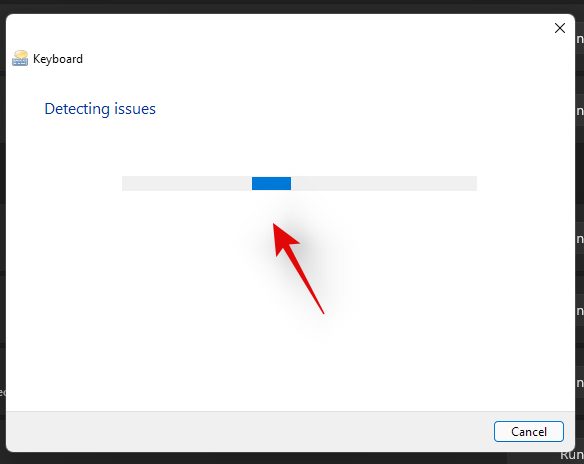
If any are found, follow the on-screen instructions to apply the relevant fixes. However, if the troubleshooter does not find anything then you can use the methods below to try and get your hotkeys working again.
Method #11: Run SFC scan
If hotkeys still aren’t working on your laptop then this might indicate an issue with your Windows installation. Let’s try to fix Windows system files and Windows 11 image on your laptop to try and fix hotkeys on your system. Use the guide below to get you started.
Press Windows + S on your keyboard and search for ‘CMD’. Click on ‘Run as administrator’ once it shows up in your search results.
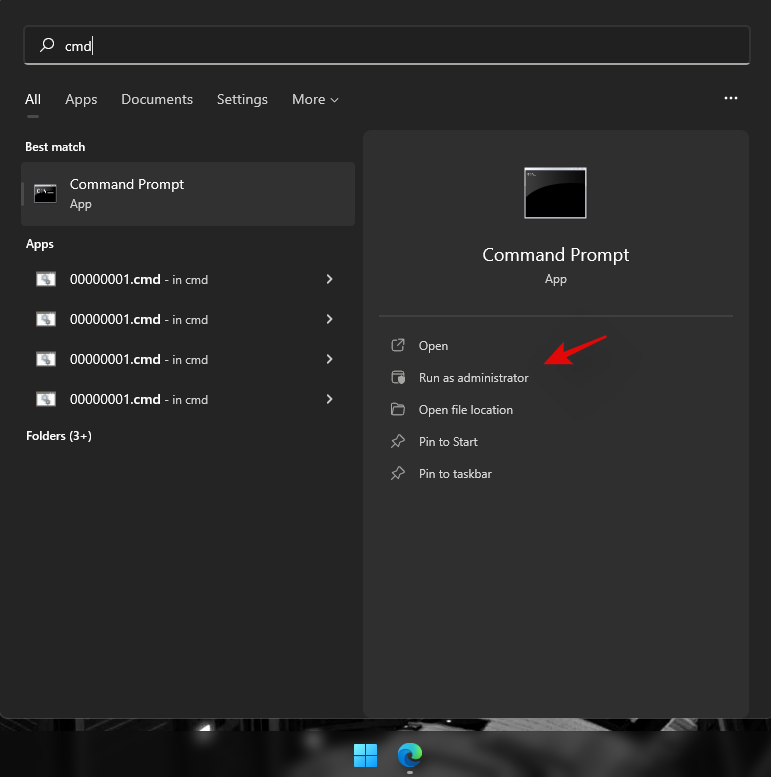
Now type in the following command and press Enter on your keyboard to execute it.
sfc /scannow

Windows will now scan and verify all of your system files and replace corrupted ones with fresh system files. If a corrupted Windows 11 installation broke your hotkeys functionality, then this should help fix it on your laptop.
Method #12: Run DISM fixes to restore Windows image
If you got the following message after running the SFC scan above, then it is highly important to run the DISM commands to fix your Windows 11 image.
“Windows Resource Protection found corrupt files but was unable to fix some (or all) of them”
Additionally, if the SFC scan is completed successfully but your hotkeys still do not work, then you can use the DISM commands to try and fix your Windows image as well. This will restore system files and solve background conflicts that might be preventing you from using your hotkeys. Follow the steps below to get you started.
Press Windows + S on your keyboard, search for CMD and click on ‘Run as administrator’ once it shows up in your search results.

Type in the following command and press Enter on your keyboard to execute it.
DISM /Online /Cleanup-Image /RestoreHealth

Wait for the process to complete and restart your laptop for good measure.
If a corrupted Windows image was the cause of your issue, then hotkey functionality should now be restored on your laptop.
Method #13: Uninstall any third-party tools
If you have any third-party tools customizing your keyboard then we recommend you disable or uninstall them at once. This includes the likes of key mappers, macro customizers, keyboard backlighting customizers, keyboard layout changes, and more. Such apps use different ways to hook into your keyboard drivers via Windows and any one of these could be outdated and not compatible with Windows 11 on your system.
We recommend you uninstall any such tools from your system at the earliest and remove any additional leftover configuration files if available. You should also check for driver updates to your keyboard and roll back to a previously known driver to revert any major changes applicable to your system. Use the guide below to roll back your keyboard driver.
13.1 How to rollback your keyboard driver
Press Windows + X on your keyboard and click on ‘Device manager’.

Find the desired keyboard in your list of devices and right-click on it once found.

Select ‘Properties’.
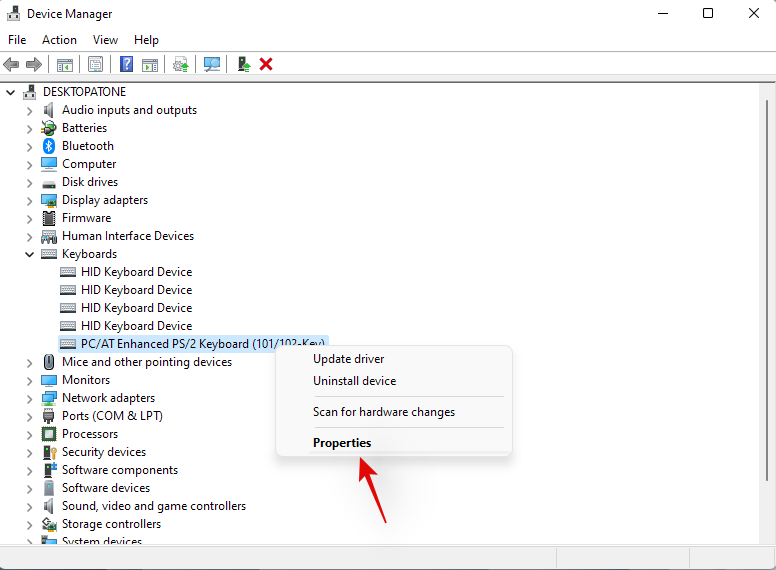
Click and switch to the Driver tab.
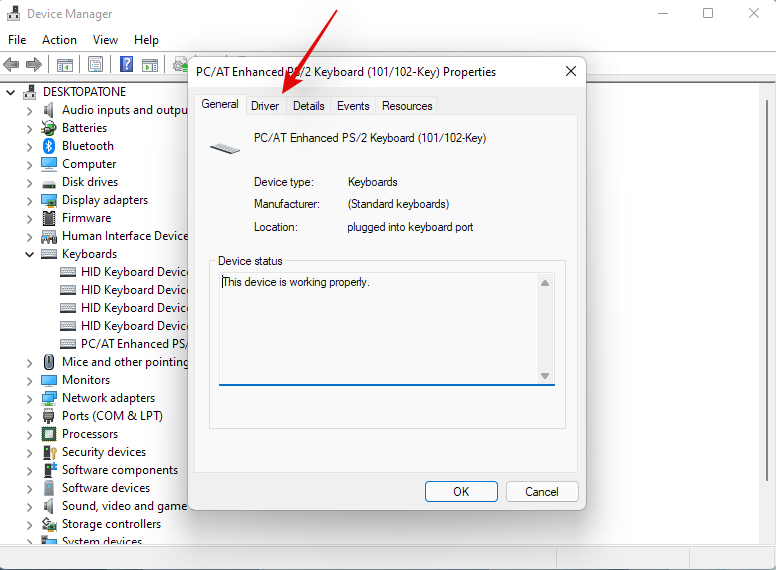
Click on ‘Rollback driver’ if available.
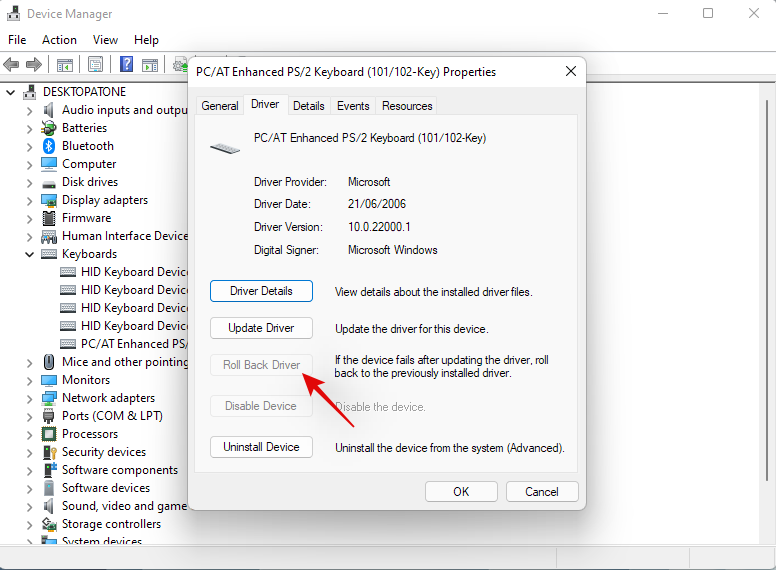
Follow the on-screen instructions to finish rolling back your driver.
Restart your system if prompted.
Once the driver is reverted to its previous iteration hotkeys should start working on your system again.
However, if you don’t have the option to roll back your driver then you will need to uninstall the installed drivers for your keyboard and hope that Windows sources the correct drivers when it scans for new hardware on your system. If you have dedicated drivers available for your keyboard on your OEM support site, then you can install them manually. Follow Method #10 below to reinstall your keyboard drivers manually or through Windows in this case.
Method #14: Connect to a different USB port (external keyboards only)
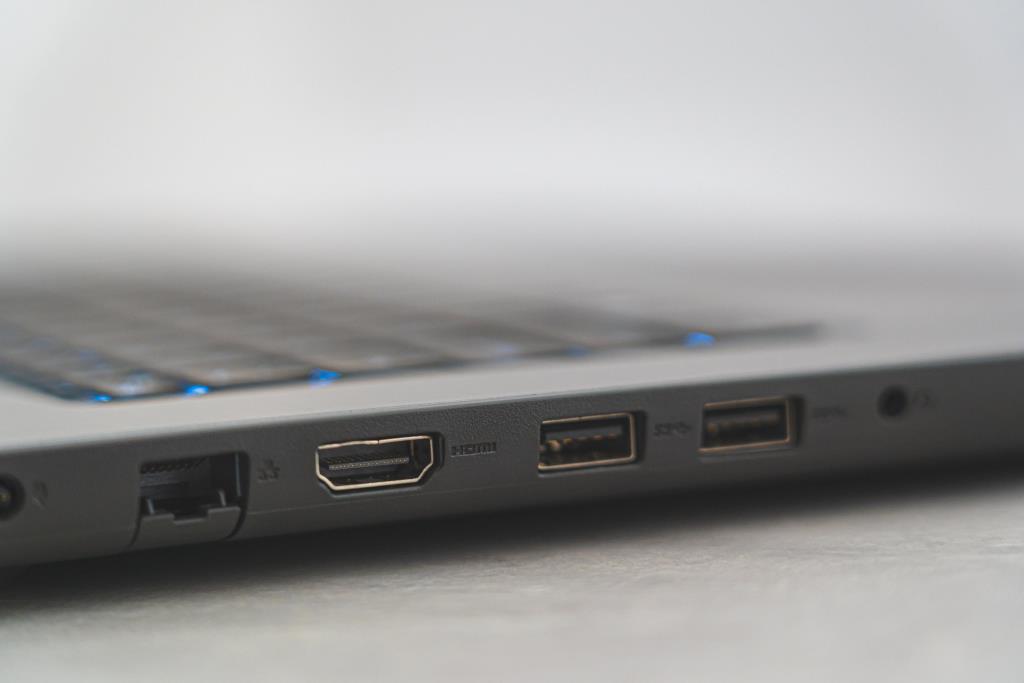
If you are using an external keyboard then we recommend using a different USB port. Depending on your keyboard you might need a USB 2.0 or USB 3.0 port for compatibility and keyboard layout reasons. Additionally, if your keyboard uses fancy backlighting and other custom features then it likely requires a USB 3.0 port on your system to power all of its features.
In contrast, if you are trying to use a legacy keyboard via adapters then you will likely need to test USB 2.0 and USB 1.2 for best performance depending on your unit. Moreover, we recommend you ensure that your laptop is plugged into power so that it can power your USB ports properly.
If however, your external keyboard still fails to work then you can try reinstalling its drivers on your system using the guide in this post.
Method #15: Check GPO and re-enable hotkeys if disabled
If you are using Windows Pro or higher that has been issued by your organization or your educational institute then it is likely that hotkeys have been disabled on your system by your administrator. This could be a side effect due to a recent change, or it could be your new company policy.
Administrators tend to disable third-party apps on company-issued and education systems which also, in turn, disables hotkey functionality for most laptops. You can fix this issue by contacting your administrator and whitelisting your hotkey app in case you don’t have access to the Group Policy Editor. However,
If you are an administrator, with access to GPO, then you can use the guide below to re-enable hotkeys on your system.
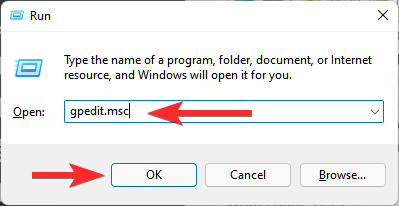
Press Windows + R on your keyboard, type in the following term, and press Enter on your keyboard.
gpedit.msc
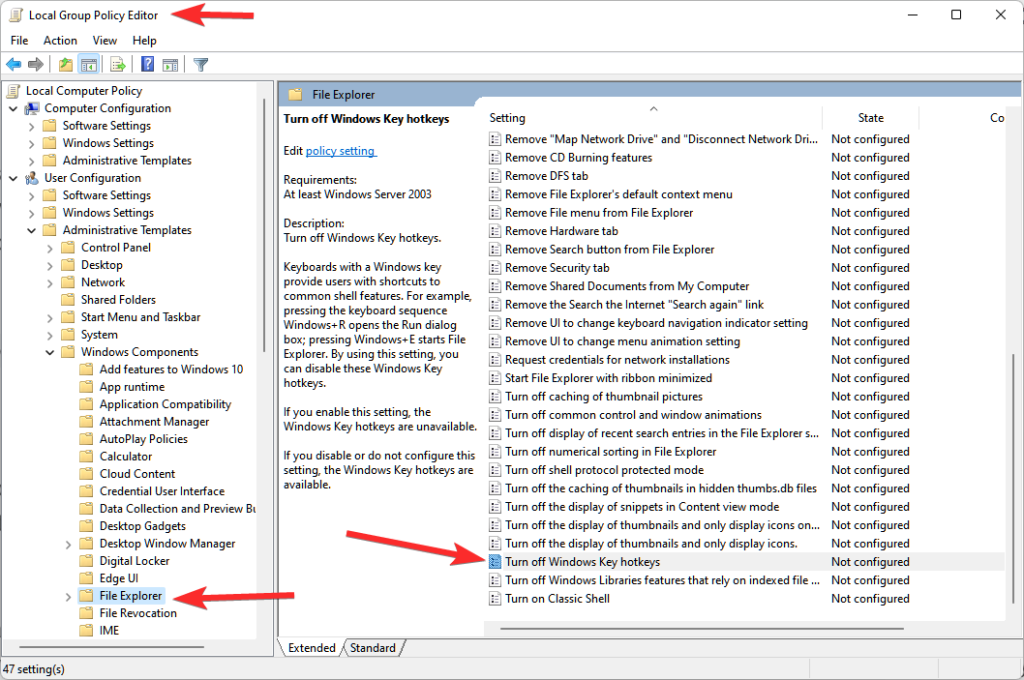
Navigate to the following path.
User Configuration > Administrative Templates > Windows Components > File Explorer
Double click on ‘Turn off Windows Key hotkeys’.
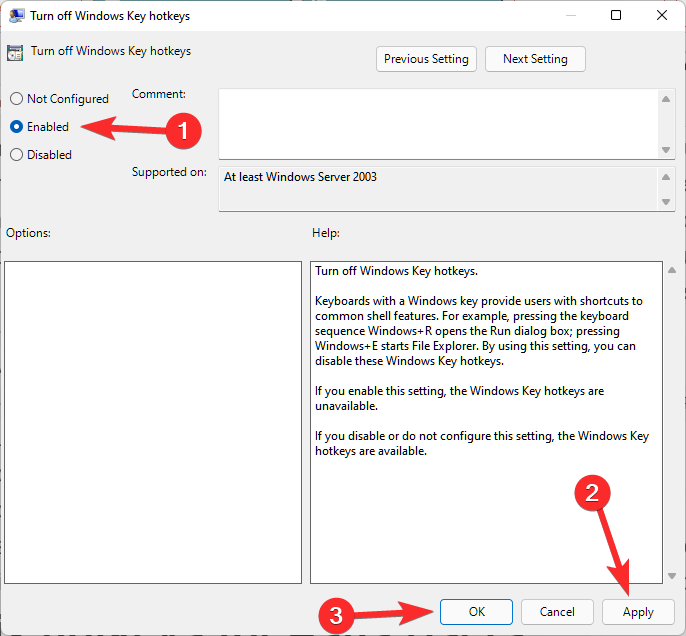
Click and select ‘Enabled’ in the top left. Then click ‘Apply’ in the bottom right and then click ‘OK’.
Restart your laptop for good measure and hotkey functionality will now be restored on your system. Please keep in mind that this will only work for OEMs that hook into Windows shortcuts natively to get hotkeys working again. For manufacturers that have dedicated utilities, you can use one of the guides below.
Fix hotkeys for Asus Users
If you are an Asus user with a ROG or a TUF unit, then it is likely that you are dealing with Armoury Crate. Armoury Crate is Asus’s utility that helps you manage your power plan, performance plan, overclocking, keyboard backlighting, and more depending on your laptop. Over the years Armoury Crate has grown to be quite finicky and has been riddled with telemetry and adware.
Moreover, the Aura Sync utility seems to be a hit or miss when syncing your peripherals’ backlighting with each other. If you have an Asus unit and hotkeys don’t seem to be working for you then it is likely that the Asus hotkeys app hasn’t been launching in the background. In this case, you can either try to manually start the app or reinstall AC service and the Asus System interface reconfigure your hotkeys and restore their functionality. Use one of the guides below that best fits your current needs and requirements.
Method #1: Try to manually start AsusHotkeyExec.exe
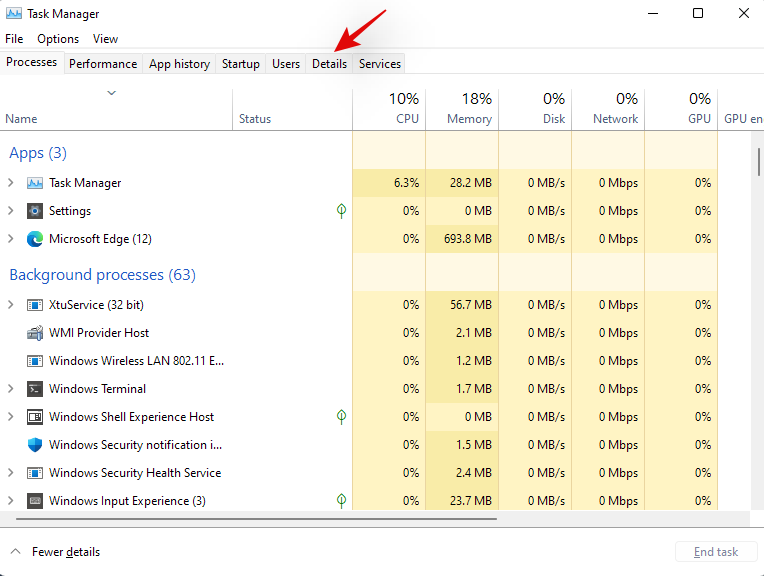
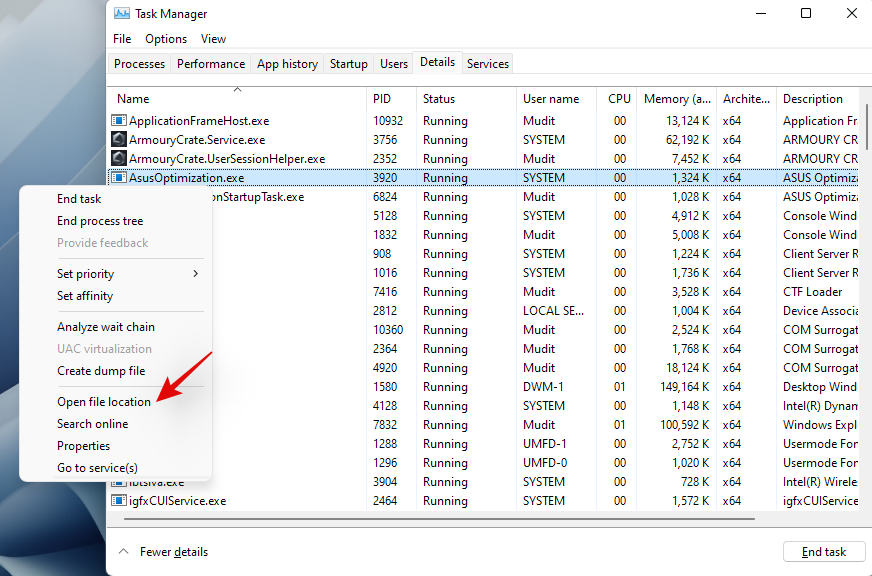
Press Ctrl + Shift + Esc on your system to open the Task Manager and switch to the ‘Details’ tab.
Depending on your preferences, the install location of AsusHotKeyExec.exe could vary. Hence we will use an already running process to find its install location. Start by right-clicking on either of the following ongoing tasks.
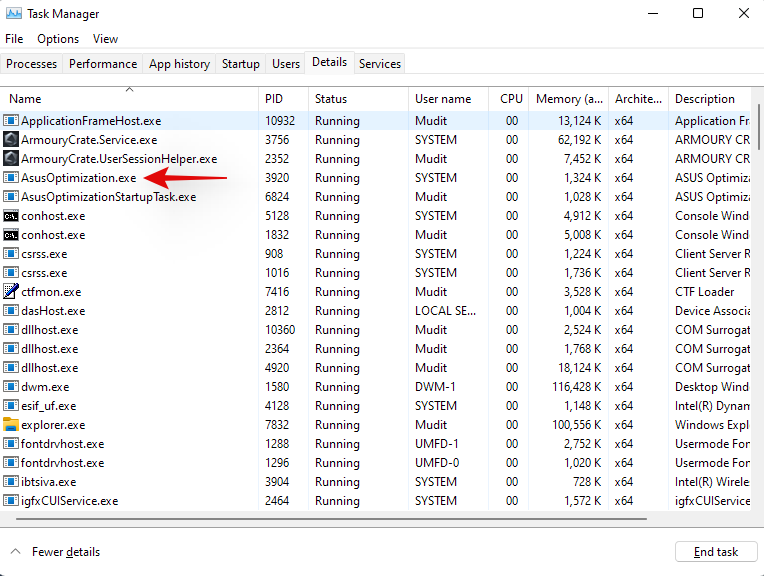
Select ‘Open file location’.
You should now be taken to the ‘C:\Windows\System32’ ideally, where you should find the ‘AsusHotkeyExec.exe’. Right-click on the app and select ‘Run as administrator’.
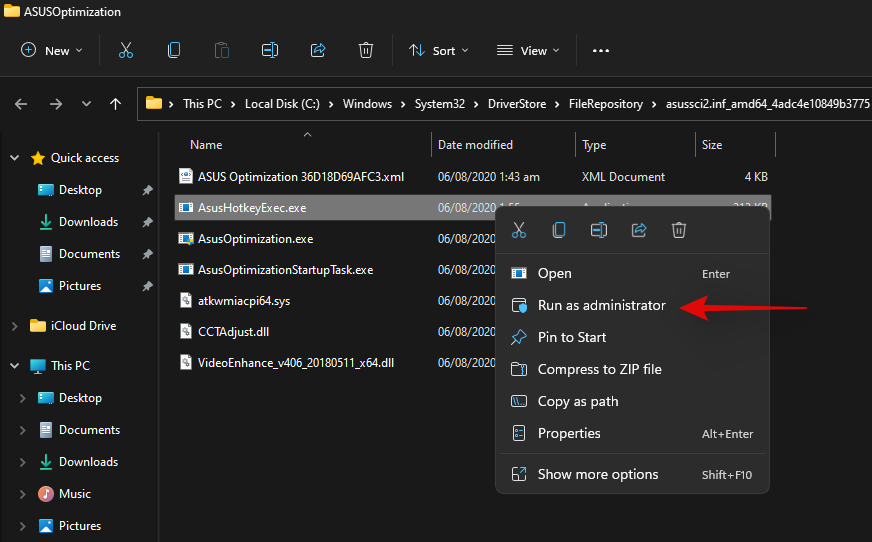
The app will now launch in the background and restore hotkey functionality on your system.
Try using one of your hotkeys now, if it seems to be working then, likely, AsusHotkeyExec.exe did not automatically launch in the background. This could be an isolated incident but if the app fails to launch even after a restart, then you will need to re-enable its auto start functionality.
You can do this by reinstalling Asus System Interface and Armoury Crate Service on your laptop using the guide below.
Method #2: Re-install Asus System Interface and Armoury Crate service
Asus System Control Interface is a prominent utility regularly updated by Asus that helps most tools like Armoury Crate, Armoury Crate Service, MyAsus System Diagnosis, and more to run properly on your system. Armoury Crate service on the other hand is your overclocking utility bundled with specific overclocking and power management configurations for your specific device. Depending on your ROG or TUF unit, AsusHotkeyExec.exe could be bundled with either of these services. Let’s re-install both of them on your system.
Visit the link above and click on ‘Laptops’.
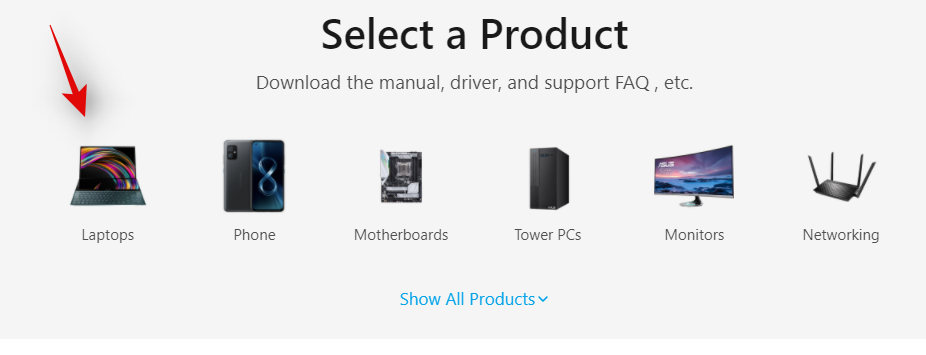
Click on ‘Product Series’ and select your Series from the drop-down menu.
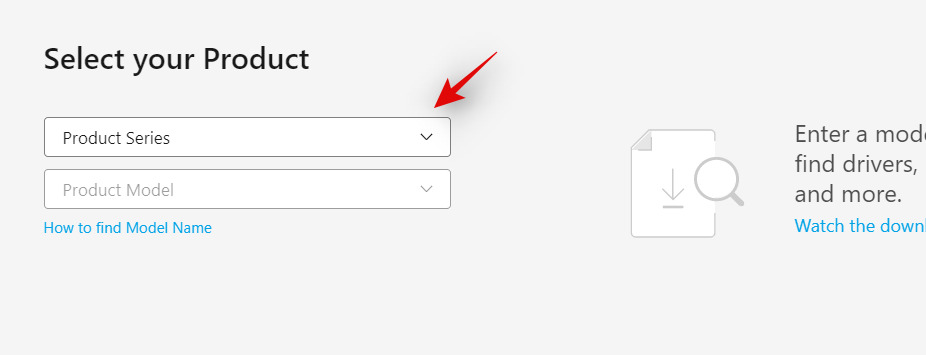
Click on the next drop-down menu and select your laptop from the list.
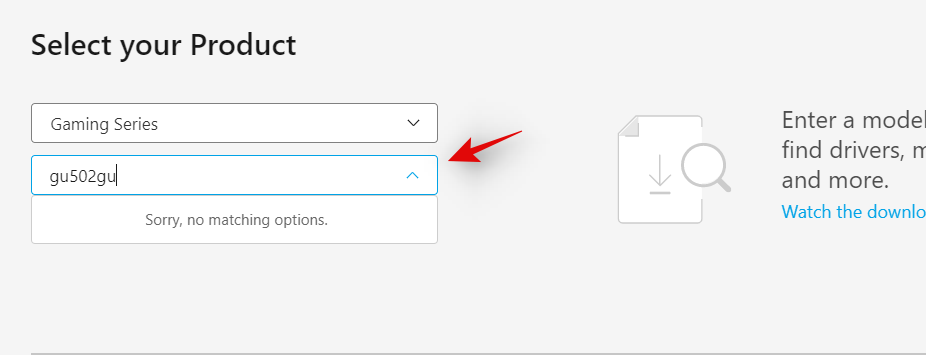
If your unit is not listed in this list, then you can search for it using the search bar at the top. Click on your laptop model once it shows up in your search results under ‘Products’.
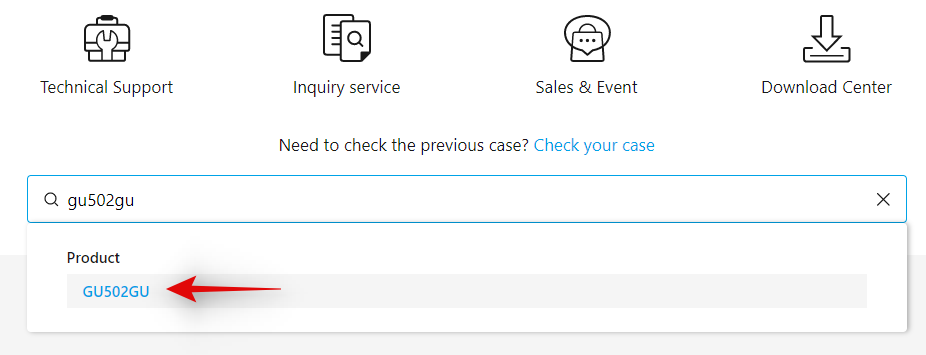
Click on ‘Driver & Utility’.
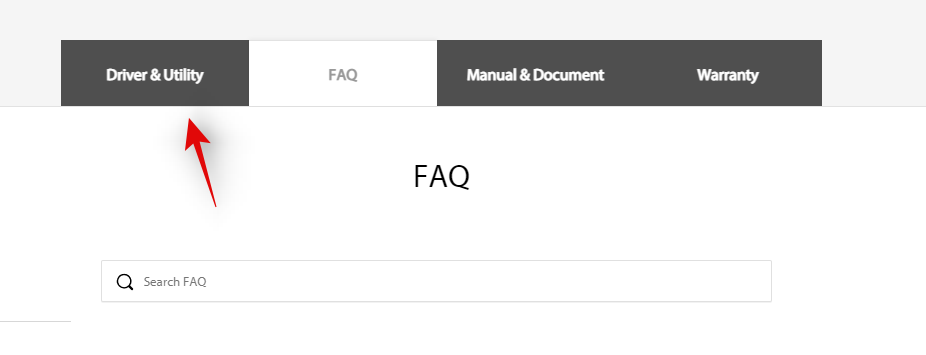
Choose ‘Windows 10 64-bit’ as your OS.
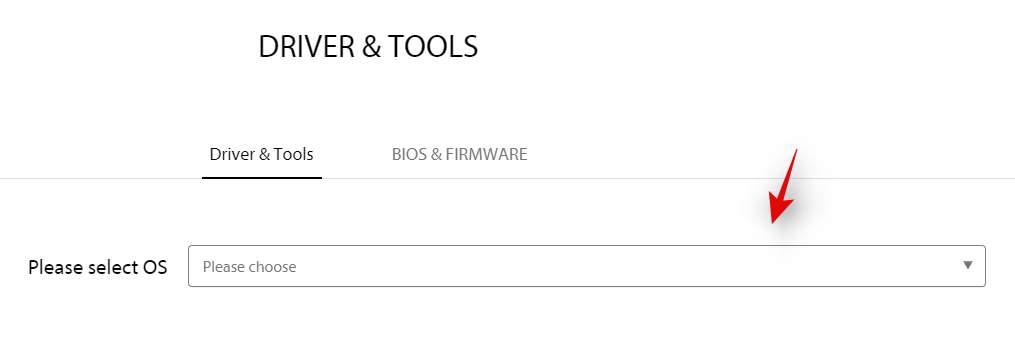
Now scroll down to the ‘Software and Utility’ section and click on ‘Show all’.
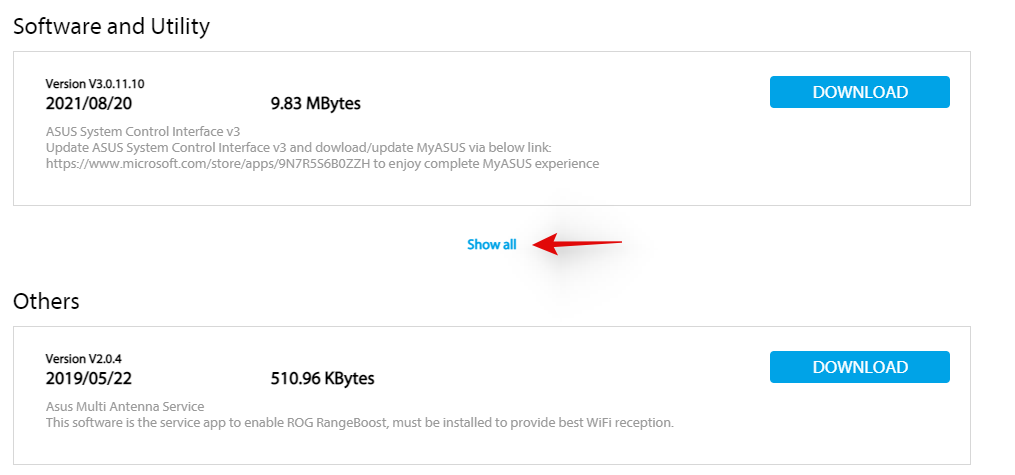
Click on ‘Download’ beside the latest version of ASUS System Control Interface.
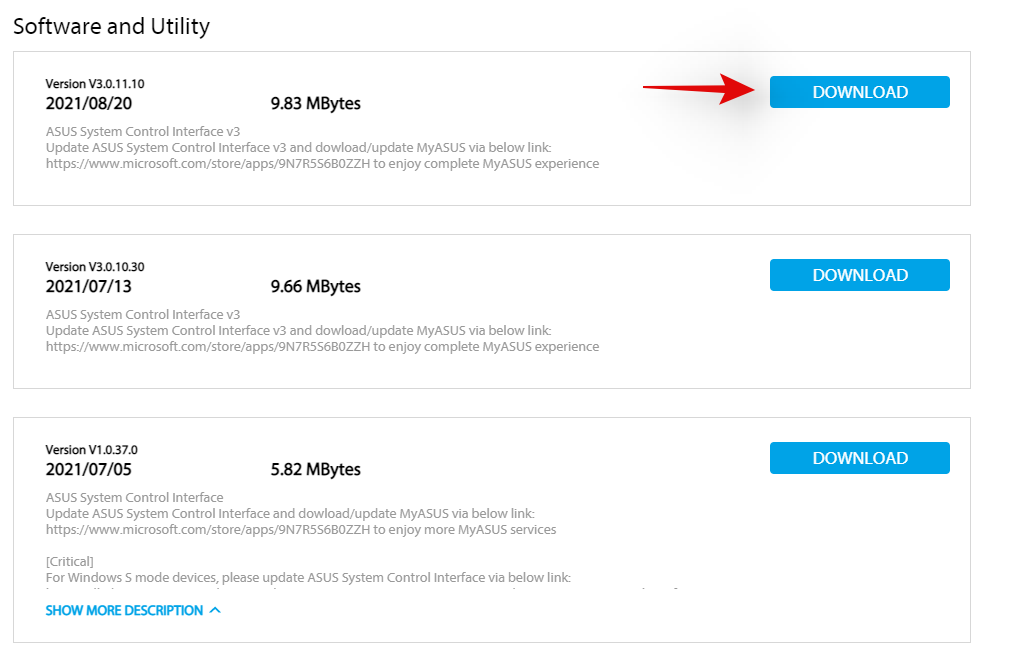
Similarly, click on ‘Download’ beside Armoury Crate Service.
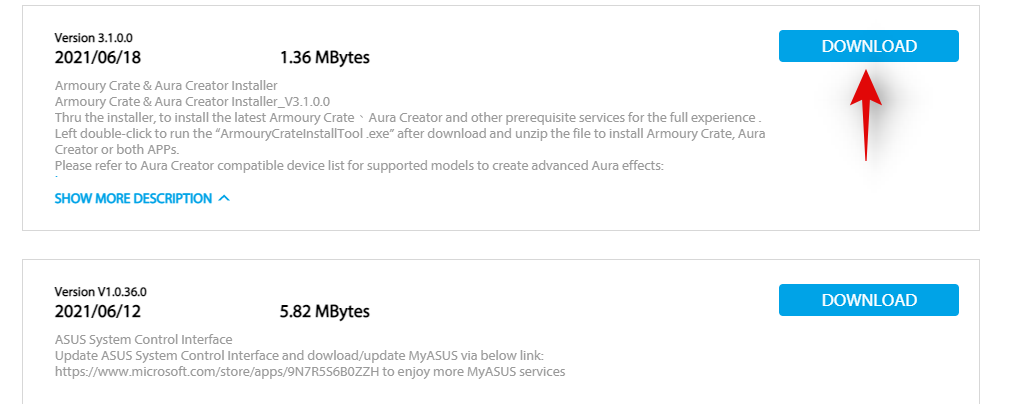
Note: Asus has now started bundling the Armoury Crate app, Armoury Crate Service, Aura Sync app, and Aura Sync service in a single package for many laptops. If this is the case for your unit as well, then you can download this package.
Now let’s remove all installed services and packages that we are going to reinstall. Press Windows + i on your keyboard and click on ‘Apps’ on your left.

Click on ‘Apps and features’.

Now uninstall the following applications if you managed to source the Armoury Crate Service package from the download page.

However, if you got a single package to install Armoury Crate, Armoury Crate Service, Aura Sync app, and Aura Sync service, then uninstall the following applications from your laptop.
To uninstall an app, click on the 3-dot menu beside it and select ‘Uninstall’. Click on ‘Uninstall’ again to confirm your choice. Repeat the steps above to uninstall all the necessary apps from your system.
Note: Do not remove services like Refresh Rate service, Pointing device service, and more from your laptop during this process. Even though they hook into the Armoury crate, there is no need to uninstall them as the existing installation will work with your reinstalled Armoury Crate and its services.
We will now uninstall Asus System Control Interface from your system. The best way to do this is by using the Device Manager. Follow the guide below to get you started.
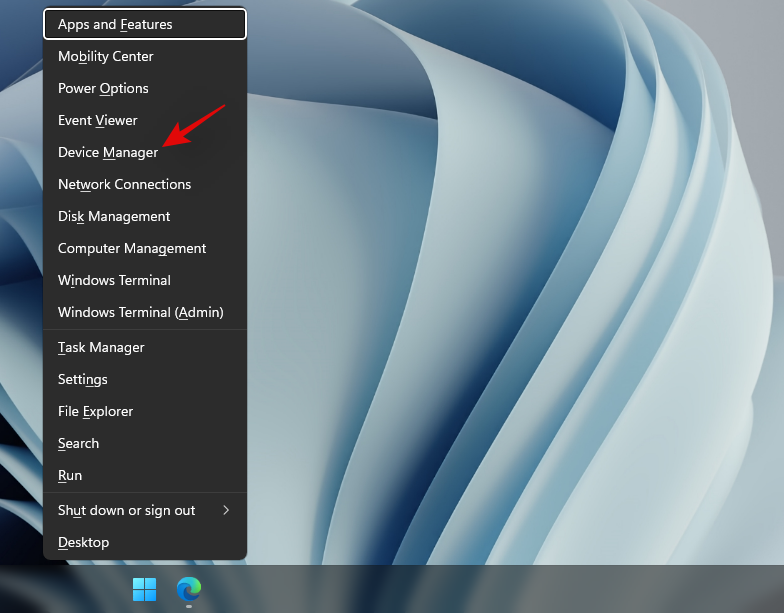
Press Windows + X on your keyboard instead and select ‘Device Manager’.
Click and expand ‘System devices’ in Device Manager.
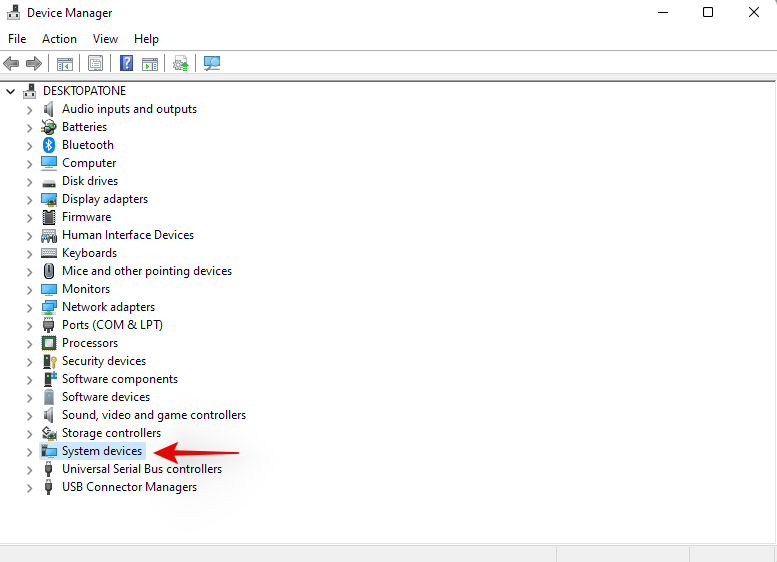
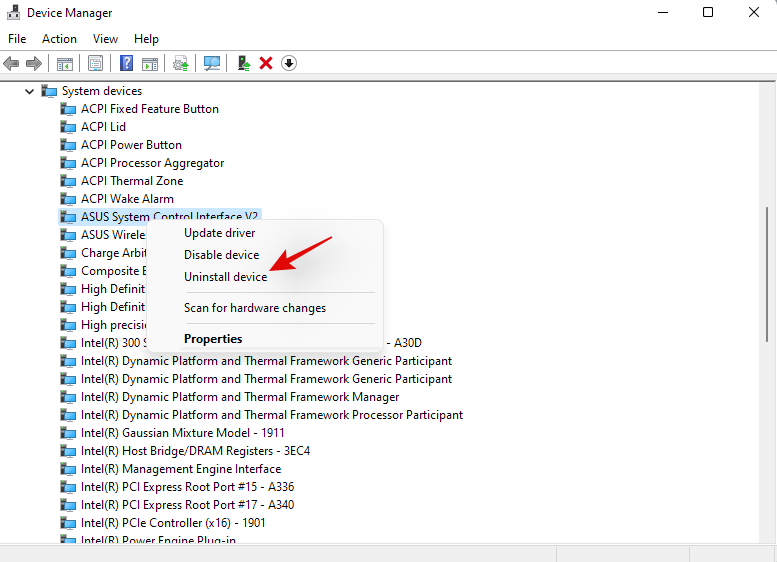
Right-click on ‘Asus System Control Interface’ and select ‘Uninstall device’.
Click on ‘Uninstall’ to confirm your choice. Additionally, check the box for ‘Attempt to remove the driver for this device’ if available.
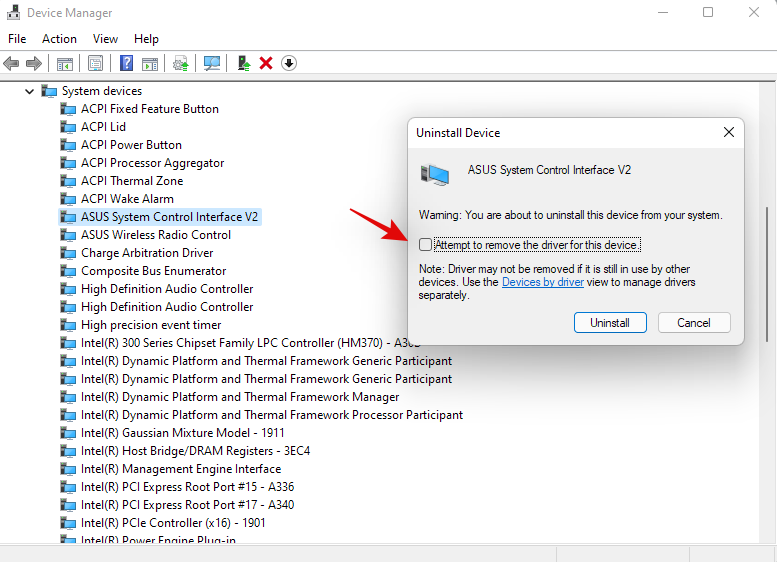
If Asus System Control Interface is unavailable in your device manager then you can restart your laptop at this point. Once restarted, follow the subsequent steps to re-install Armoury Crate and Asus System Control Interface on your system. The concerned drivers will now be uninstalled from your system. You can now restart your laptop for the changes to take effect.
Once your laptop restarts, navigate to the packages we downloaded from Asus’s website on your local storage and start by installing Asus System Control Interface first. Double-click and launch the .exe file and follow the on-screen instructions to install Asus System Control Interface on your laptop. You will be prompted to restart your system once the process completes. We recommend you restart your system at this point before proceeding with the installation of Armoury Crate on your system.
Once your system restarts, double click and launch the Armoury Crate package.
Select the utilities you wish to install on your system. Unless you have other Asus peripherals that support RGB backlighting through Aura Sync, there is no point in installing Aura Sync. Once you have selected the desired utilities, click on ‘Next’.
Click on ‘Install’ to start the installation process.
The package will now connect to Asus’s servers, identify your laptop and install the necessary compatible utilities. Once installed, we recommend you restart your system for good measure.
And that’s it! Once your system restarts, hotkeys should be back up and running again on your system.
Fix hotkeys for Lenovo users
If you own a Lenovo unit especially from the ThinkPad or IdeaPad series, then you will need to try out the following fixes. Lenovo’s professional lineup of laptops is bundled with tons of hotkeys and there are mainly 3 fixes you can try to fix your issue. Let’s first verify if your hotkeys have actually stopped working. Follow the steps below to get you started.
Method #1: Disable all shortcuts and enhancements
Let’s start by disabling all keyboard shortcuts and keyboard enhancements within Windows for your laptop’s keyboard. Follow the guide below to get you started.
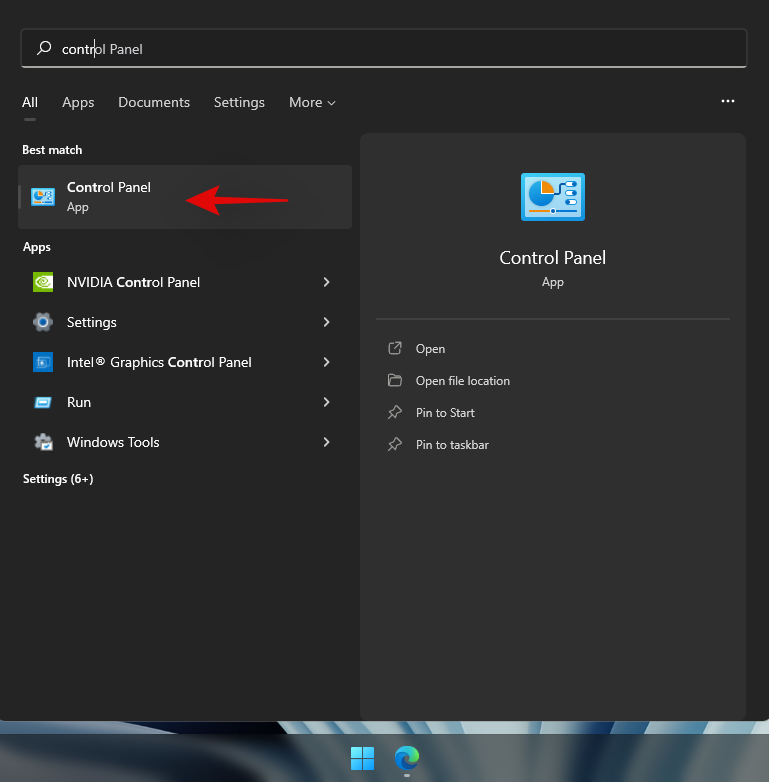
Press Windows + S on your keyboard and search for ‘Control Panel’. Click and launch the app from your search results.
Click on the drop-down menu in the top right corner and select ‘Large icons’.

Click on ‘Ease of access center’.

Click on ‘Make the keyboard easier to use’.
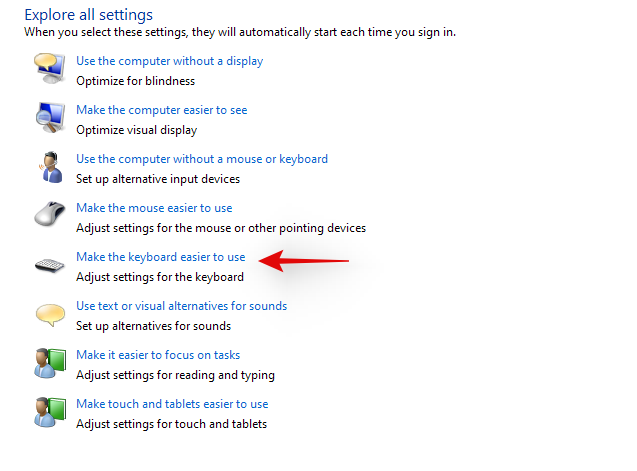
Uncheck all the options available on your screen.
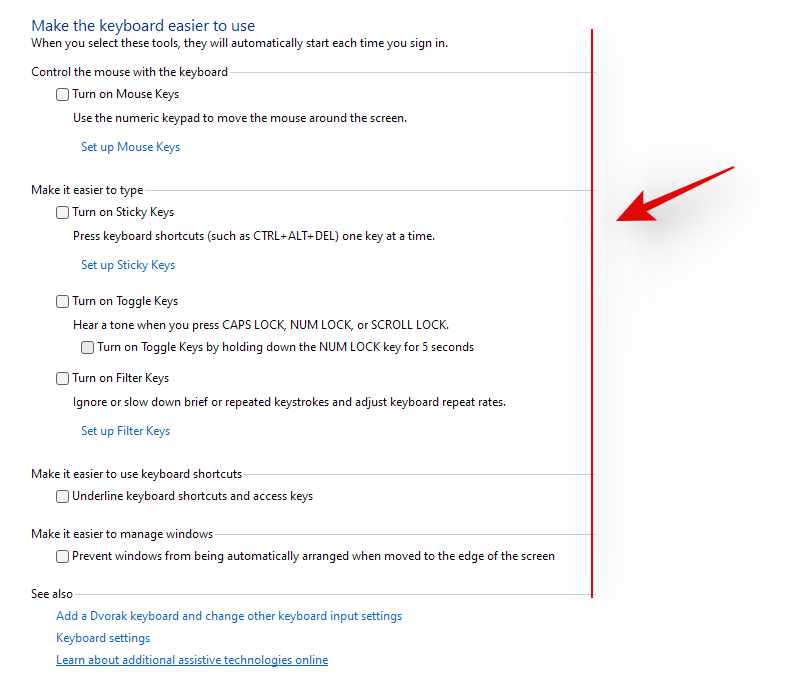
Save your changes and restart your laptop for good measure.

If keyboard enhancements enabled by Windows were causing conflicts with your hotkeys, then your hotkey functionality should be restored on your laptop by now.
Method #2: Update your drivers using Lenovo support
You might have manually updated your drivers, you might have reinstalled and rolled back your drivers, but this isn’t similar to downloading and installing drivers through the support app. Most OEM support apps are designed to automatically scan for known issues with your hardware in the background and fix them automatically. These support app also come with hotfixes and patches that aren’t readily available to the end consumer. These hotfixes and patches are applied when downloading and installing the concerned driver or utility,
Hence we recommend that you download and reinstall the following drivers on your system through the Lenovo support app. Depending on your unit’s make and model, you could be using a different Lenovo app like Lenovo Vantage and more. The process is similar for all these apps and you simply need to manually uninstall your keyboard drivers first and then reinstall the corresponding ones from your support app.
Note: We won’t be removing your power management drivers and instead we will be simply reinstalling them. Removing power management drivers can end up harming your vital components especially if your laptop is doing some resource-heavy work in the background.
Press Windows + X and select ‘Device Manager’.

Find your keyboard under ‘Keyboards’ and right-click on it.
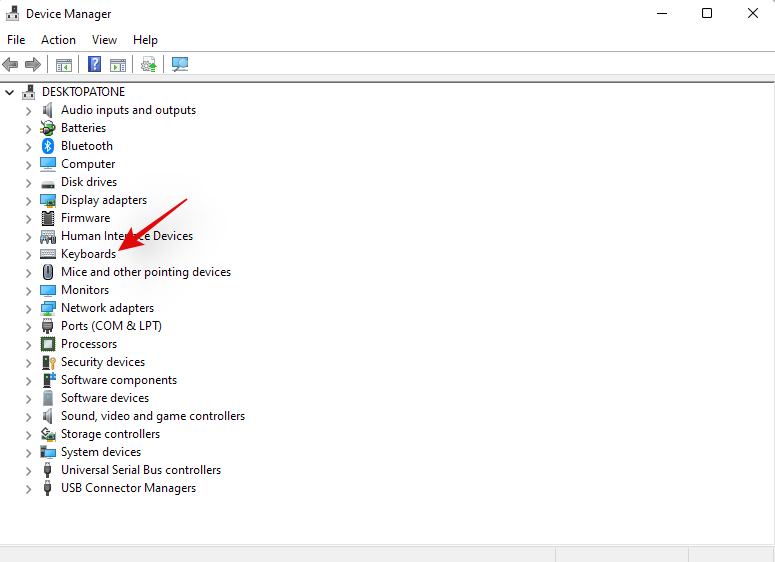
Select ‘Uninstall device’.
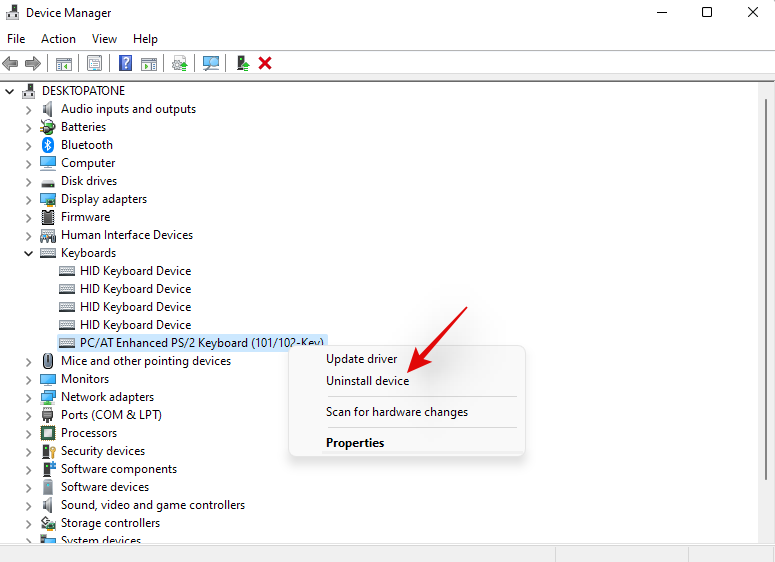
Check the box for ‘Attempt to remove the driver for this device’ if available. Click on ‘Uninstall’.
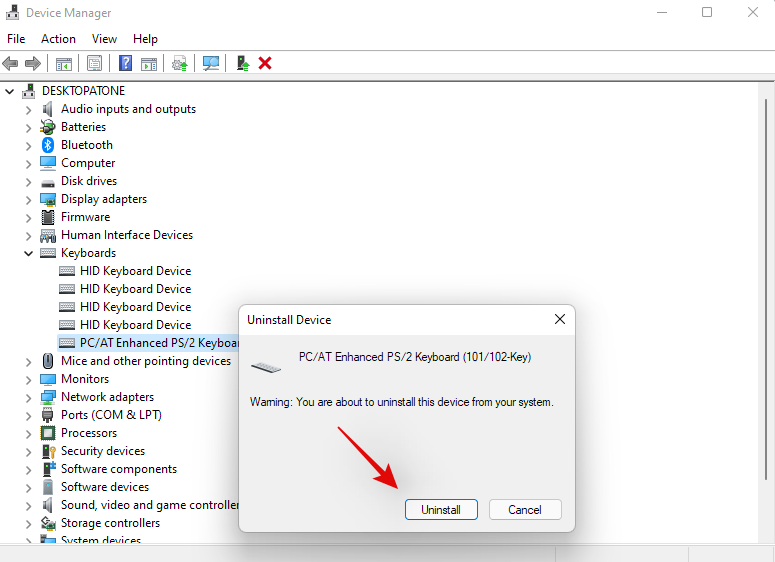
Your keyboard driver will now be uninstalled. Open the Lenovo System Update, Lenovo Vantage, or the corresponding Lenovo support app depending on your current laptop. We will be using the Lenovo System update app for this guide as that will be used by most modern systems currently and in the future. If you do not have the app installed on your unit, then you can use the link below to download it to your laptop.
Download and install the app on your system using the link above. Once installed, launch the app and log in with your device and account details if prompted.
Click on ‘Get new updates’ on your left.
Lenovo System update app will now detect your configuration and look for compatible upgrades accordingly. Once the process completes, all available updates will be shown on your screen according to their priority. Check each of the following sections and check the boxes for the updates you wish to install on your laptop. Your keyboard driver will also show up in this list as it is currently missing from your system. Ensure that you check the box for your keyboard driver before moving to the next step.
Note: Do not check the boxes for your bios updates. We recommend you download and install bios updates, individually and separately so that your laptop does not face installation conflicts in the background during this process.
Click on ‘Download’ in the bottom right corner.
Lenovo system update will now download and install all the selected drivers on your system. Your laptop could automatically restart a few times during this process which is normal. Simply log back into your account and wait until the installation process has been completed.
Once all the drivers are installed on your system, try using your keyboard hotkeys again. In most cases for Lenovo devices, your hotkeys should be back up and running on your system again. Lenovo is known to apply certain patches in the background when installing hotkey drivers and create certain tasks to maintain the functionality of your hotkeys. A reinstallation should have reinitiated this process again which should have fixed your hotkeys.
Fix hotkeys for Acer users
If you are using an Acer system then there isn’t much you can do at this point. Acer is known to keep its hotkeys simple with minimal customization available to the end-user. This in turn means that if the above-stated general fixes did not work for you then it is unlikely that resetting the CMOS will. However, if you have overclocked your unit or have been messing around with voltage values, then you can try resetting your CMOS to get hotkeys back up and running on your system again.
Resetting the CMOS does a lot of things but it mainly helps reset changes to core system values like your voltage, frequency speed, and more. Resetting the CMOS also helps discharge capacitors on some laptops which can give you a sudo-fresh start which is known to solve many persistent errors and issues with systems in the past. Use this comprehensive guide by us to reset your CMOS on your Acer unit.
Check out: How to Reset BIOS in Windows 11
Facing error codes when restarting HID services? Try these fixes!

If you decided to restart your HID service using the guide at the top, then you could end up facing two common errors depending on how your system has been configured. These are known errors and can be fixed on your system using the guides below. Follow the steps to get you started.
Method #1: For error code 126
Error code 126 can be fixed by replacing the Hidserv.dll to your system 32 folder. Follow the guide below to get you started.
Note: You will need a Windows 11 installation media or ISO in case the .dll file is unavailable on your system. Make sure you have either of these handy before proceeding with the guide below. In case you do not have an installation media handy, then you can use the link below to download Hidserv.dll to your local storage.
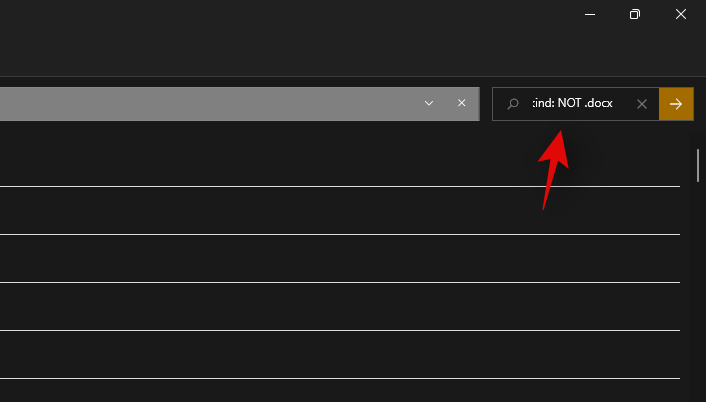
Open the Windows installation media you have handy and search for Hidserv.dll using the search box in your top right corner.
Once found, copy the file to a convenient location on your local storage. If however, you downloaded the file to your local storage using the link above, then extract the archive to a convenient location and follow the steps below to edit its security permissions.
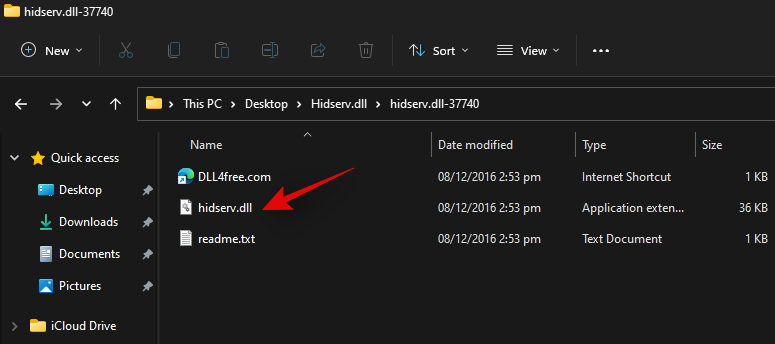
Right-click on the downloaded Hidserv.dll and select ‘Properties’.
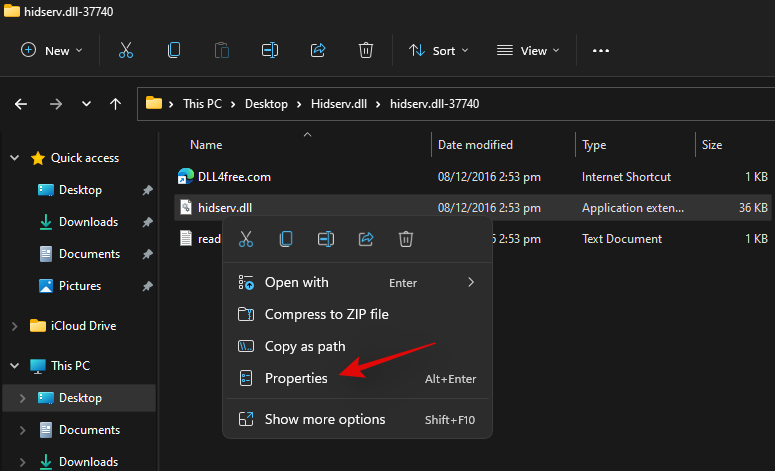
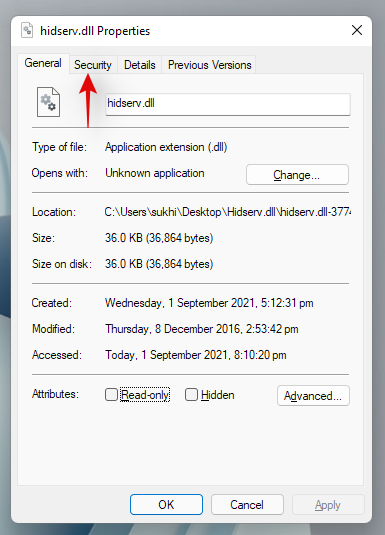
We will now need to manually grant permissions to the necessary users and applications so that Hidserv.dll can work properly on your system. Switch to the Security tab at the top.
Click on ‘Edit’ at the top.
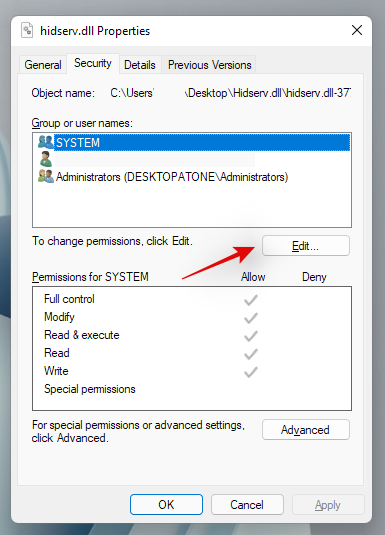
Click on ‘System’ at the top and check the box for ‘Write’
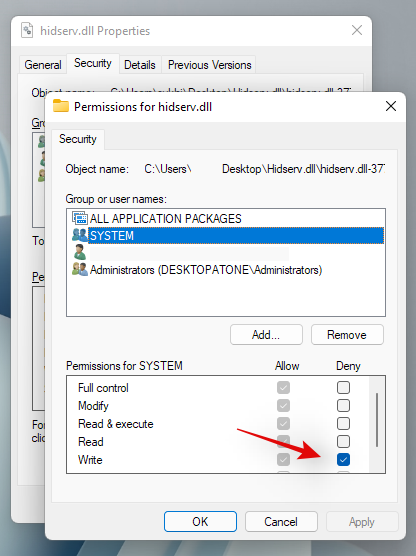
Click on ‘Apply’ once done. Select ‘Yes’ to confirm your choice. Repeat the steps above and restrict permissions for Administrators and other users in the list above. Once you are done, click on ‘Add’.
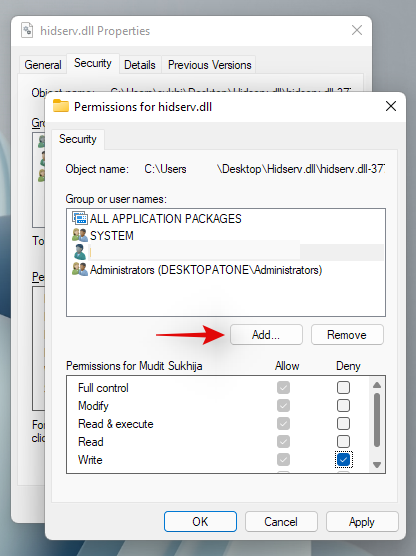
Now enter the following term and press Enter on your keyboard.
All Application Packages
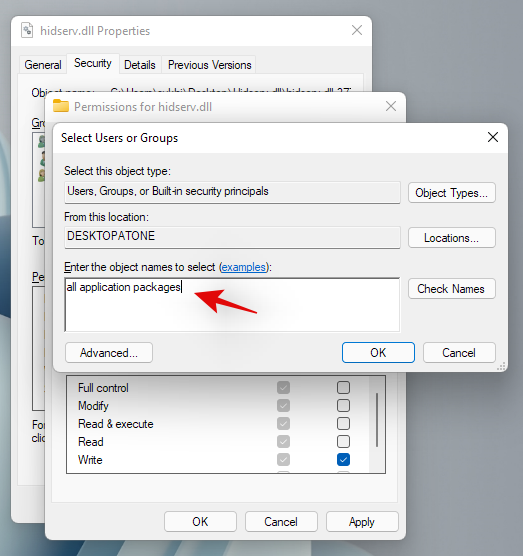
Select the following permissions for ‘ALL APPLICATION PACKAGES’.
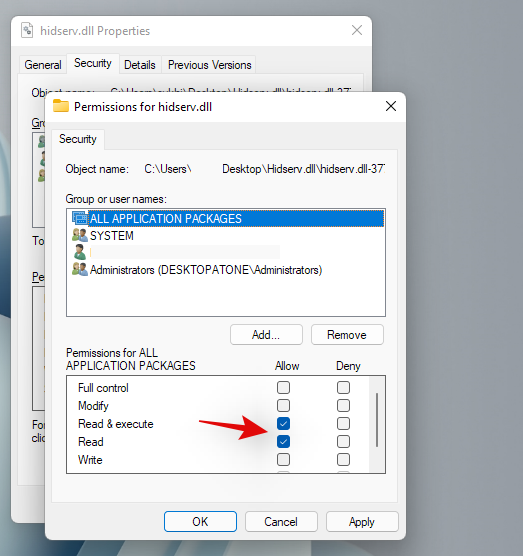
Similarly, click on ‘Add’ again.

Now enter the following term and click on ‘Ok’.
NT Service\TrustedInstaller
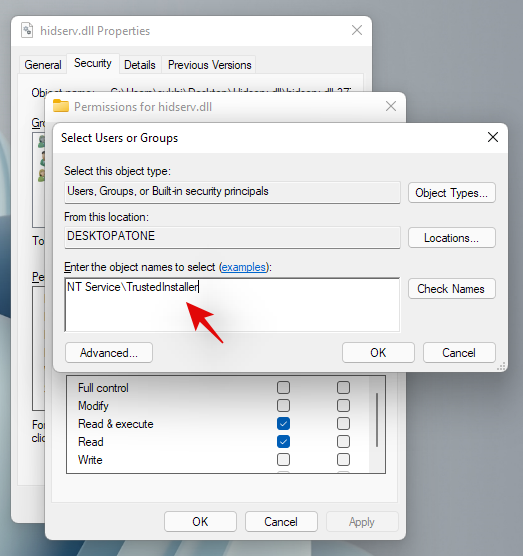
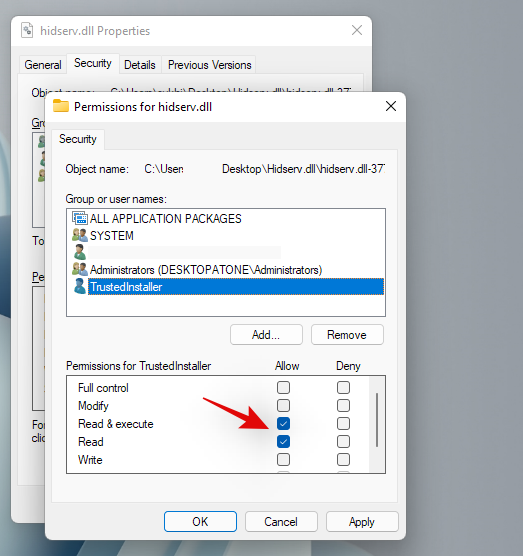
Check the boxes for the same permissions as we did for the application packages above.
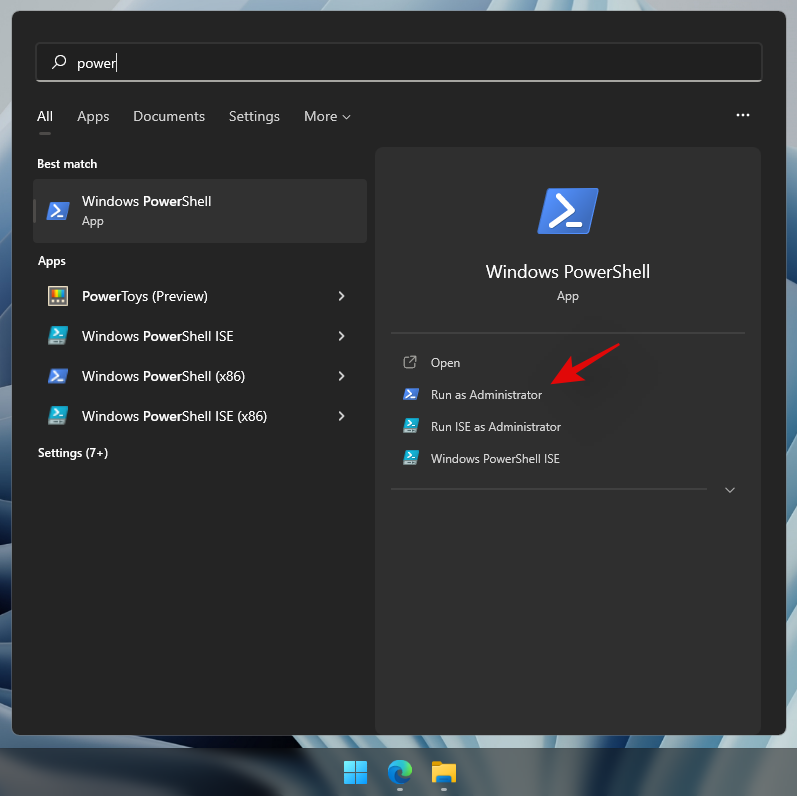
We now need to add permissions for restricted UMP packages on your system. There is no way to do this using the Windows File Explorer, so we will be using a PowerShell script instead. Press Windows + S on your keyboard and search for PowerShell. Click on ‘Run as administrator’ once it shows up in your search results.
Once PowerShell launches, copy and paste the code below in your PowerShell window. Do not execute the commands just yet.
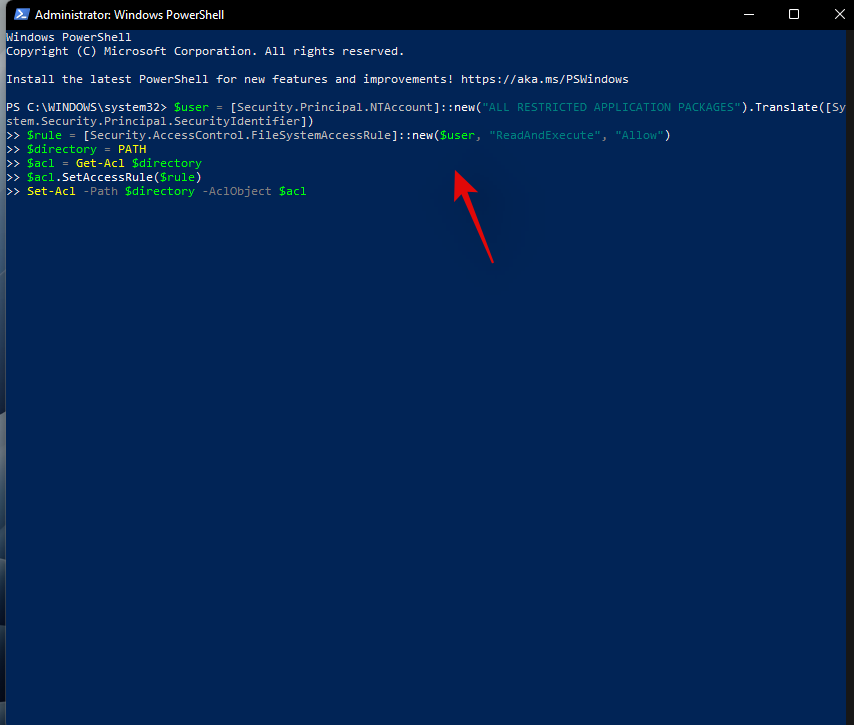
$user = [Security.Principal.NTAccount]::new("ALL RESTRICTED APPLICATION PACKAGES").Translate([System.Security.Principal.SecurityIdentifier])
$rule = [Security.AccessControl.FileSystemAccessRule]::new($user, "ReadAndExecute", "Allow")
$directory = PATH
$acl = Get-Acl $directory
$acl.SetAccessRule($rule)
Set-Acl -Path $directory -AclObject $acl
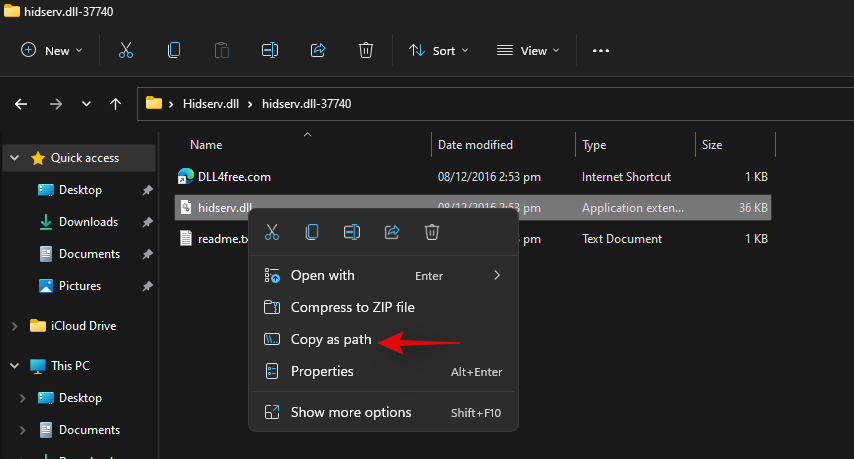
Now navigate to the Hidserv.dll file that we just edited the permissions for and right-click on it. Select ‘Copy as path’.
Go back to your PowerShell window and replace “PATH” with the path we just copied.
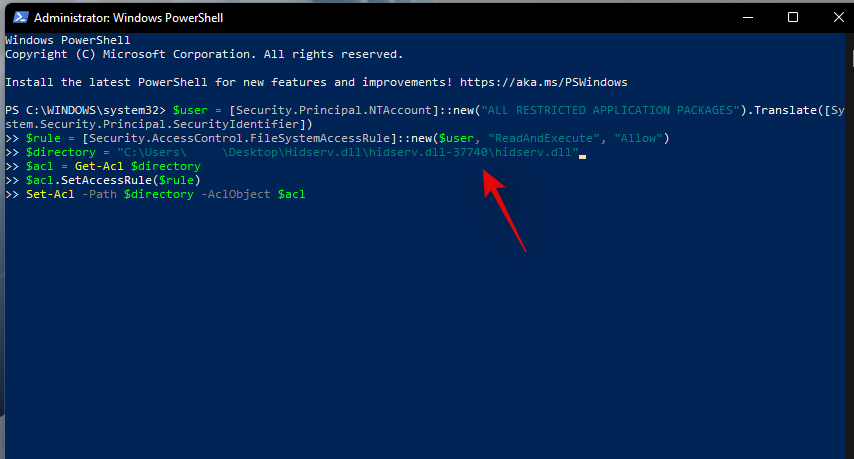
Once replaced, hit Enter on your keyboard to execute the command. Once completed, the new permissions for restricted application packages should now be added to your new Hidserv.dll file.
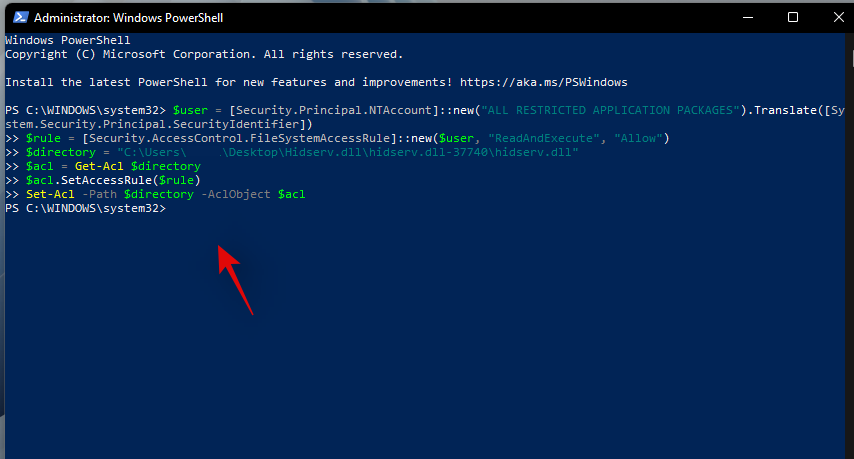
Note: If you are typing in the path manually then you will need to include in double-quotes as shown in the final screenshot. Pasting a copied path using the method above will automatically add double quotes to it.
It’s now time to replace or add the file to your boot directory. Navigate to the Hidserv.dll file we just created and copy it to your clipboard.
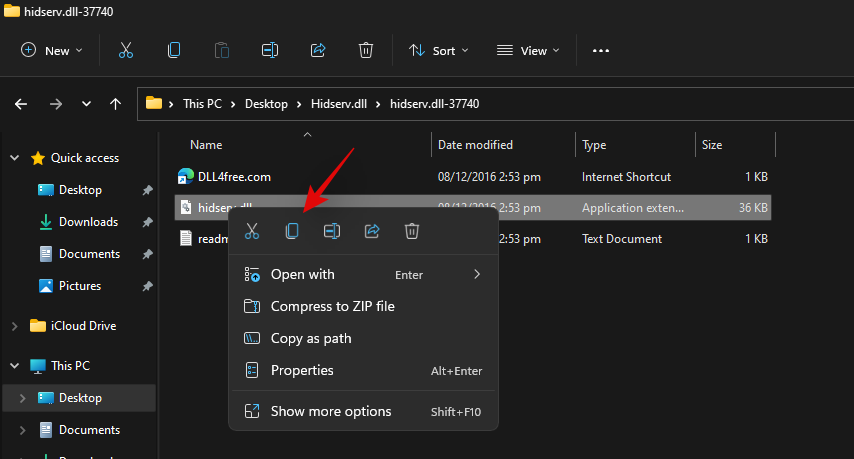
Press Windows + E on your keyboard and navigate to the following path.
C:\Windows\System32
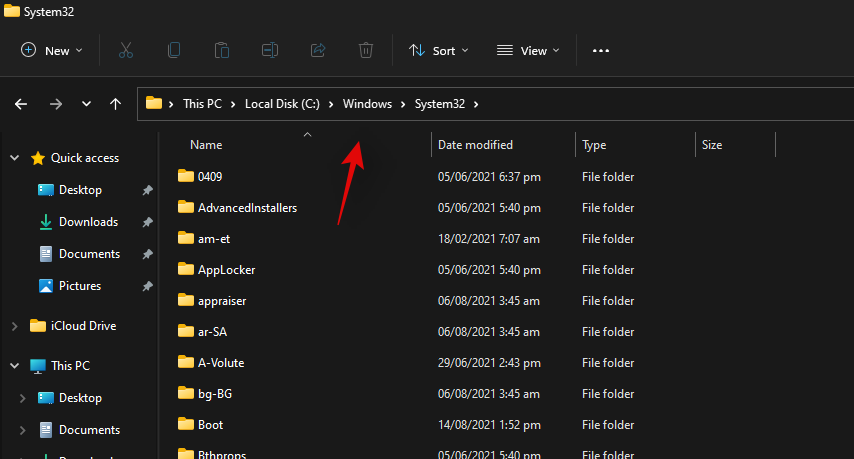
Paste your file in this location. Click on ‘Replace the file in the destination’.
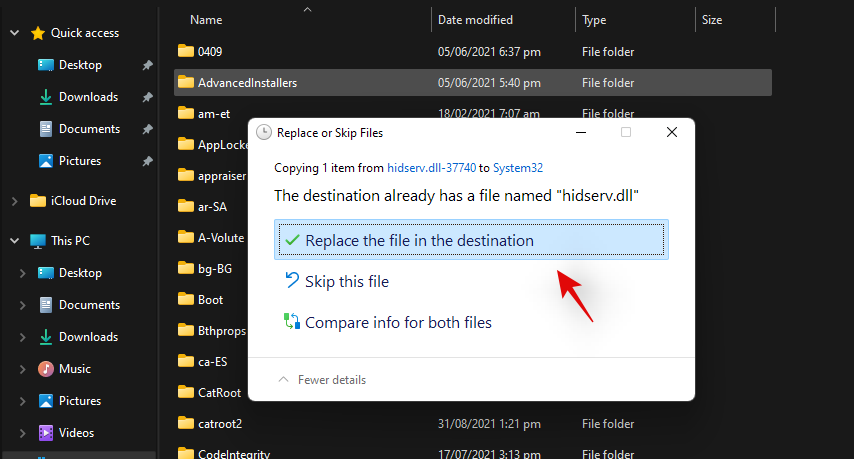
Click on ‘Yes’ to grant the necessary administrator permissions. Once the file is replaced, restart your system for good measure. You can now check your HID services in the Services app to see if it is back up and running again. If not, you can try starting it manually, and you should no longer be facing Error code 126 on your system.
Method #2: For Error code 2
If you are getting Error code 2 after trying to restart the HID service then there could be a couple of reasons why you are facing this error. The main reason is due to unwanted registry changes for the HID service. This could have happened due to recently applied manual hacks or registry cleaners used by you. We will need to check for these changes and revert them if any have been made on your system. Follow the guide below to get you started.
Press Windows + R on your keyboard, type in the following term, and hit Enter on your keyboard.
regedit
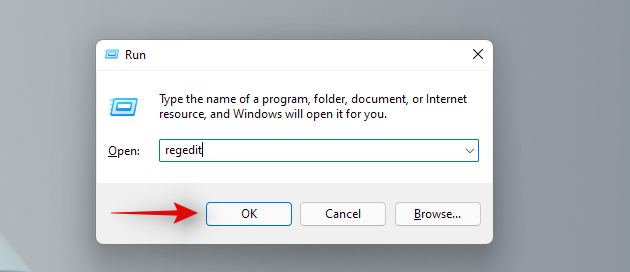
Navigate to the following registry key. You can also copy-paste the same in the address bar at the top of your screen.
Computer\HKEY_LOCAL_MACHINE\SYSTEM\ControlSet001\Services\hidserv
Double click on the ‘Type’ value on your right.
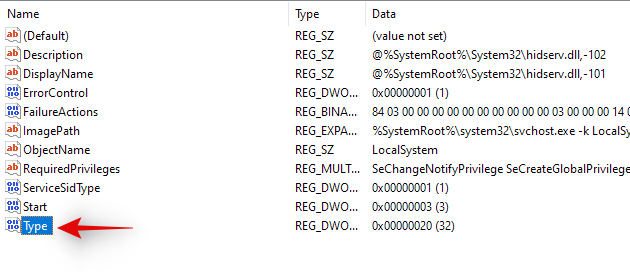
Set the value to ’20’ if it is something different and click on ‘Ok’.
Now click on ‘Parameters’ under Hidserv on your left.
Double click on ServiceDll on your right.
Enter the following path in its Value data field. Even if the same path exists, copy-paste the one below just to be sure. Ensure that there are no spaces at the starting or end of the path below.
%SystemRoot%\System32\hidserv.dll
Once done, repeat the steps above for the following registry locations given below.
Additionally, if folders named ControlSet002 or more exist in the location below, then we recommend repeating the steps above for the Hidserv folder in those locations as well.
Once you have made these changes, restart your system, and HID service should be automatically working on your laptop again. If not, launch the service manually and you should no longer face Error code 2 on your laptop.
Laptop hotkeys can be quite finicky and we hope you were able to get the back up and running again on your system using the guides above. If you face any issues or have any questions for us, feel free to reach out using the comments section below.
Related:
Uzziniet, kā atvērt vadības paneli Windows 11. Izpētiet 9 veidus, kā piekļūt svarīgākajām iestatījumu opcijām, un optimizējiet savu Windows pieredzi.
Operētājsistēma Windows 11 ir izlaista sabiedrībai, un korporācija Microsoft ir izlaidusi jaunu personalizētu palīgu, kas palīdzēs jums iekļūt. Operētājsistēmā Windows 11 ir iekļautas daudzas izmaiņas, tostarp iespēja instalēt…
Windows 11 Insider Build ir atbrīvots savvaļā un piesaista lielu uzmanību gan no cienītājiem, gan kritiķiem. Jaunais dizains kopumā ir patīkams acīm, taču ir daži elementi, kas…
Windows 11 noplūde un Insider Dev Build ir izraisījuši miljoniem OS virtuālo un vietējo instalāciju nedaudz vairāk nekā nedēļas laikā. Ja arī jūs esat pārgājis uz Windows 11, iespējams,…
Lai gan dažos gadījumos paziņojumi ir būtiski, dažreiz tie kļūst par traucēkli. Tāpat kā tālrunis, arī dators var novērst jūsu uzmanību ar paziņojumiem. Tāpēc operētājsistēmā Windows 11 ir iekļauta…
Windows 11 ir paredzēts jau ļoti ilgu laiku, un šī operētājsistēma nav bez milzīgām izmaiņām. Ir dabiski justies aizvainotiem par izmaiņām, tomēr būtībā OS joprojām ir uzticīga savai…
Kopš paziņošanas sistēma Windows 11 ir nogājusi garu ceļu, un šķiet, ka beta versijas katru dienu saņem arvien vairāk testētāju. Windows pārcēlās uz UWP lietotnēm savai sistēmai un Windows Store atpakaļ…
Ja rodas savienojamības problēmas, iespējams, vēlēsities iztīrīt DNS kešatmiņu. Neuztraucieties, lai to izdarītu, jums nav vajadzīgas nekādas tehniskas zināšanas, un tas ir diezgan vienkārši…
Pēc gandrīz 6 gadus ilgas pielāgošanas uzturēšanas OS, ar kuru mēs bijām tik pazīstami, tagad tiek būtiski jaunināti. Ir veiktas izmaiņas dizaina pamatos, kas tagad ietver centu…
Windows ir populārākā patērētāju OS mūsdienu laikmetā. Taču dažkārt var būt nepieciešams pārslēgties starp operētājsistēmām, lai izmantotu noteiktu funkciju vai vienkārši izmēģinātu citas alternatīvas. Wipi…
Gaidīšana beidzot ir beigusies, ļaudis! Operētājsistēma Windows 11 beidzot ir izlaista sabiedrībai, un tagad varat bez maksas jaunināt datoru no operētājsistēmas Windows 10, izmantojot derīgu licenci. Jaunā OS piedāvā daudzas ch…
Nezinātājiem angļu valoda ir ģermāņu valoda, savukārt tādas valodas kā spāņu, franču, portugāļu, itāļu un rumāņu ir romāņu valodas (tāpat kā tajās, kas atvasinātas no Vulgar L…
Ikreiz, kad izveidojat savienojumu ar tīklu, sistēma Windows automātiski saglabās paroles un citus savienojuma datus, lai jūs varētu vēlreiz tajā pieteikties, kad tas būs darbības zonā. Bet ko darīt, ja vēlaties aizmirst Wi-…
Viena no galvenajām jomām, kas ir saņēmusi lielu Windows 11 remontu, ir darbību centrs. Šis ir stratēģiski svarīgs apgabals, kas atrodas pa labi no uzdevumjoslas un ir apkalpojis Windows lietotājus…
Operētājsistēmā Windows 11 dažādiem notikumiem tiek atskaņotas dažāda veida skaņas, lai jūs, lietotājs, zinātu, kas notiek, un saņemtu skaņas apstiprinājumu par to. Viņi arī informē jūs par jebkādām grūtībām…
Operētājsistēmā Windows 11 ir bijušas zināmas problēmas ar mūsdienu spēlēm, taču šķiet, ka nesenā Valorant kļūda ir satriekusi visus. Vai jūs saskaraties ar kļūdu VAN 1067? Tad šī ir problēma ar Wi…
Windows atjauninājumi vienmēr ir bijuši bēdīgi slaveni ar to, ka palēnina datoru darbību, kad tie darbojas fonā. Tie ir arī bēdīgi slaveni ar to, ka tiek instalēti nejaušā restartēšanas režīmā, kas viss izriet no spējas automatizēt…
Operētājsistēmas Windows 11 izstrādātāja versija tagad ir izlaista, un viss ir labi, ja vēlaties to iegūt pēc iespējas ātrāk. Bet, ņemot vērā, ka šī ir tikai izstrādātāja versija, tas nav viss p…
Kad Microsoft 24. jūnijā atklāja Windows 11 kopā ar tās sistēmas prasībām, viņi arī izlaida lietotni PC Health Check, kas bija paredzēta, lai ļautu miljoniem datoru lietotāju pārbaudīt, vai viņu...
Klēpjdatora karstie taustiņi ir būtiski rīki, mēģinot piekļūt ierīces pamatfunkcijām. Tie ļauj jums kontrolēt skaļumu, pielāgot spilgtumu, tastatūras fona apgaismojumu, skārienpaliktņa darbību un m…
Vai operētājsistēmā Windows rodas problēmas ar kļūdu “Nevar izveidot savienojumu ar printeri” 0x00000709? Atklājiet pārbaudītas problēmu novēršanas darbības, sākot no reģistra korekcijām līdz tīkla atiestatīšanai, lai ātri atjaunotu printera darbību. Atjaunināts ar jaunākajiem labojumiem ērtai drukāšanai.
Vai, mainot fonus operētājsistēmā Windows 11, rodas problēmas ar attēla kļūdu? Atklājiet pārbaudītus risinājumus, lai novērstu šo kaitinošo problēmu un atjaunotu darbvirsmas perfektu izskatu. Soli pa solim sniegta rokasgrāmata nemanāmai pielāgošanai.
Vai rodas problēmas ar tīmekļa kameras aizkavi lietotnēs Zoom un Teams operētājsistēmā Windows 11? Atklājiet pārbaudītus risinājumus, lai atvieglotu videozvanus, uzlabotu veiktspēju un novērstu kaitinošas aizkaves, nodrošinot netraucētu attālinātu darbu. Atjaunināts ar jaunākajiem padomiem.
Vai operētājsistēmā Windows 11 rodas problēmas ar trūkstošām OneDrive sinhronizācijas ikonām? Atklājiet ātrus un efektīvus problēmu novēršanas padomus, lai atjaunotu mākoņa sinhronizācijas statusu un atgrieztos pie netraucētas failu pārvaldības. Nav nepieciešamas tehniskās zināšanas!
Vai operētājsistēmā Windows 11 rodas problēmas ar audio sprakšķēšanu? Atklājiet pārbaudītus risinājumus, lai atjaunotu kristāldzidru skaņu. Soli pa solim sniegta pamācība ar padomiem, kā novērst sprakšķēšanu, statisku troksni un pārtraukumus, lai nodrošinātu nevainojamu klausīšanos.
Vai Windows 11 uzdevumjoslā rodas problēmas ar izplūdušiem vai pārāk lieliem fontiem? Atklājiet pārbaudītus fontu lieluma kļūdu risinājumus, sākot no DPI pielāgojumiem līdz reģistra izmaiņām, nodrošinot nevainojamu darbvirsmas pieredzi.
Uzziniet, kā izmantot Windows 11 diska tīrīšanas utilītu, lai atbrīvotu vietu, uzlabotu veiktspēju un nodrošinātu datora nevainojamu darbību. Soli pa solim sniegta pamācība ar padomiem maksimālai efektivitātei.
Iepazīstieties ar soli pa solim sniegtiem norādījumiem, kā pielāgot Windows 11 bloķēšanas ekrāna pulksteni ar personīgiem attēliem, fontiem un stiliem. Paaugstiniet savu darbvirsmas pieredzi bez piepūles.
Vai rodas problēmas ar GPT aizsardzības nodalījuma piekļuves liegšanas kļūdu? Atklājiet pārbaudītus soļus, lai atrisinātu šo kaitinošo problēmu un ātri un droši atgūtu piekļuvi saviem datiem. Ekspertu padomi Windows lietotājiem.
Vai rodas problēma ar kļūdu “Spēļu josla ieraksta pēdējās 30 sekundes”? Atklājiet pārbaudītus risinājumus, lai ātri un vienkārši atjaunotu tūlītējās atkārtošanas ierakstu. Vairs nekādu pazaudētu episku mirkļu!


![Kā rakstīt akcentus operētājsistēmā Windows 11 [6 veidi] Kā rakstīt akcentus operētājsistēmā Windows 11 [6 veidi]](https://blog.webtech360.com/resources8/images31/image-285-0105182715408.png)


