Kā atvērt vadības paneli sistēmā Windows 11
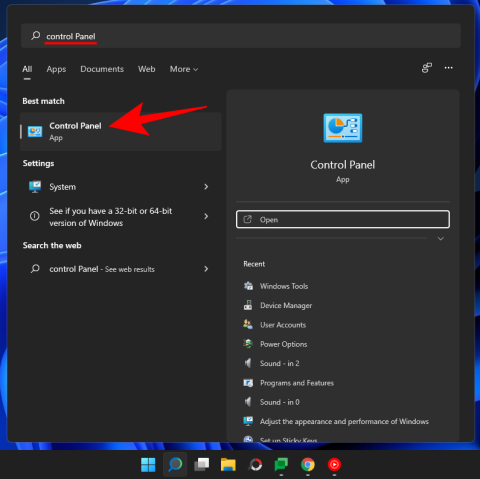
Uzziniet, kā atvērt vadības paneli Windows 11. Izpētiet 9 veidus, kā piekļūt svarīgākajām iestatījumu opcijām, un optimizējiet savu Windows pieredzi.
Lai gan dažos gadījumos paziņojumi ir būtiski, dažreiz tie kļūst par traucēkli. Tāpat kā tālrunis, arī dators var novērst jūsu uzmanību ar paziņojumiem. Tāpēc operētājsistēmā Windows 11 ir iekļauta funkcija Focus Assist, kas ļauj izvairīties no traucējošiem paziņojumiem. Izmantojot šo funkciju, varat veikt savu darbu ar pilnu koncentrēšanos, nevis novērst uzmanību no nejaušiem ziņojumiem un paziņojumiem. Paziņojumi var arī kaitēt jūsu produktivitātei, tāpēc tie ir jāizslēdz īstajā laikā.
Tikai ar dažiem klikšķiem var paslēpt visus paziņojumus, brīdinājumus un ziņojumus jūsu datorā. Ja nesen esat jauninājis savu sistēmu uz Windows 11 un nevarat izdomāt jauno lietotāja interfeisu, šis raksts palīdzēs jums sniegt visaptverošu ceļvedi par to, kā izmantot Focus Assist operētājsistēmā Windows 11, lai atbrīvotos no paziņojumiem.
Saistīts: Kā uzņemt ekrānuzņēmumus operētājsistēmā Windows 11
Saturs
Kas ir fokusa palīdzība operētājsistēmā Windows 11?
Focus Assist ir vienkārši režīms Netraucēt jūsu datoram — tāpat kā tiem, kas ir jūsu tālruņos. Tā ir ērta funkcija operētājsistēmā Windows 11, kas ļauj atbrīvoties no nevajadzīgiem paziņojumiem, ziņojumiem un brīdinājumiem. Fokusa palīgfunkcija ļauj pielāgot savu prioritāšu sarakstu, nevis bloķēt datoru no visiem paziņojumiem.
Uzmanības novēršana var kaitēt jūsu produktivitātei. Tādējādi, izmantojot funkciju Focus Assist, varat paslēpt visus paziņojumus, brīdinājumus un ziņojumus, kamēr strādājat pie kāda svarīga. Tā vietā, lai jūs brīdinātu, viņi dosies tieši uz darbības centru. Jūs varat skatīt slēptos paziņojumus darbību centrā savā laikā.
Kā Focus Assist darbojas operētājsistēmā Windows 11?
Focus Assist nodrošina elastību, lai izvēlētos, kad bloķēt traucējošos faktorus, piemēram, ziņojumus, paziņojumus un brīdinājumus. Focus Assist varat ieslēgt jebkurā laikā vai arī iestatījumos varat ieplānot laika diapazonu, kas automātiski ieslēgs fokusa palīgierīci.
Fokusa palīgfunkcija ļauj izveidot prioritāšu sarakstu, lai pārliecinātos, ka nepalaižat garām nevienu paziņojumu no svarīgākajām personām jūsu kontaktpersonā. Personas jūsu prioritāšu sarakstā vienmēr var ar jums sazināties, pat ja jums ir kāds svarīgs darbs. Ja darba laikā nepieciešama pilnīga koncentrēšanās, varat arī izvēlēties bloķēt visus paziņojumus. Lai skatītu visus bloķētos paziņojumus, ko saņēmāt, strādājot, atveriet savas sistēmas darbību centru.
Saistīts: Kā apturēt uznirstošos logus operētājsistēmā Windows 11
Kā iespējot fokusa palīdzību
Focus Assist pēc noklusējuma ir izslēgts. Bet, ja vēlaties to iespējot, lai pārtrauktu paziņojumu saņemšanu, veiciet tālāk norādītās darbības.
1. metode: iestatījumu izmantošana
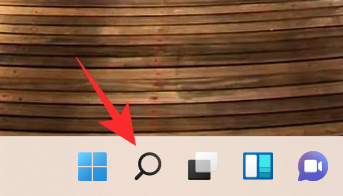
Noklikšķiniet uz ikonas Meklēt , kas uzdevumjoslā izskatās kā palielināms stikls.
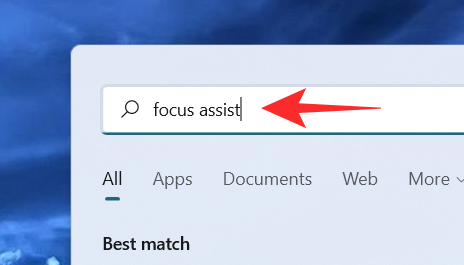
Meklēšanas joslā ierakstiet fokusa palīgsistēmu .
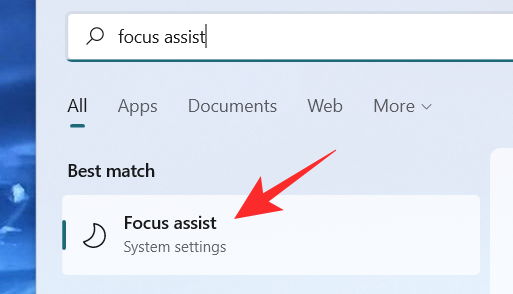
Noklikšķiniet uz Focus Assist sistēmas iestatījumiem.
Ekrānā tiek parādīts Focus Assist sistēmas iestatījumu logs. Sadaļā Focus Assist atlasiet vienu no šīm opcijām:
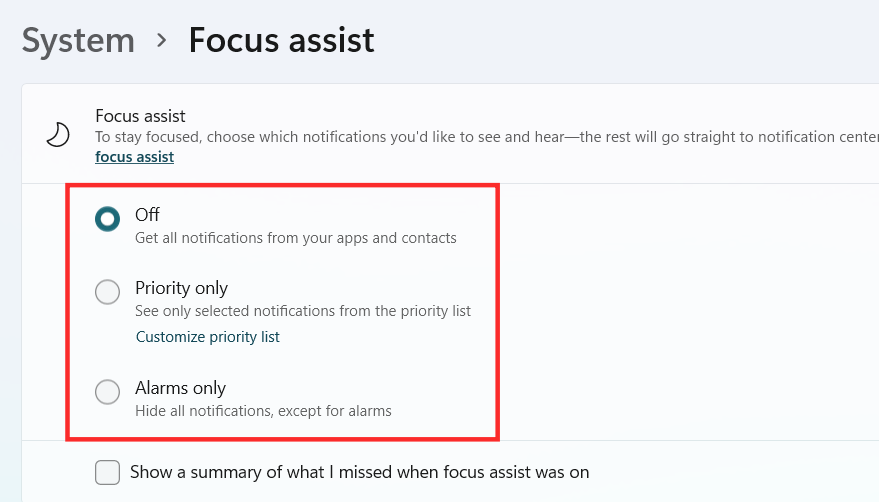
Focus Assist tagad ir jāiespējo operētājsistēmā Windows 11 atkarībā no jūsu izvēles.
2. metode: darbību centra izmantošana
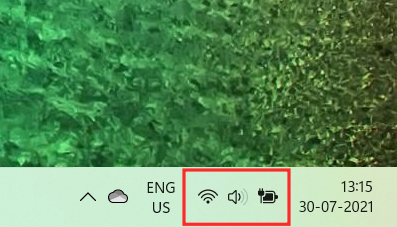
Noklikšķiniet uz darbību centra, kurā tiek parādīta Wi-Fi, skaļuma un akumulatora ikona kopā.
Tieši zem Bluetooth ikonas ir redzama Focus Assist ikona, kas izskatās kā mēness sirpis.
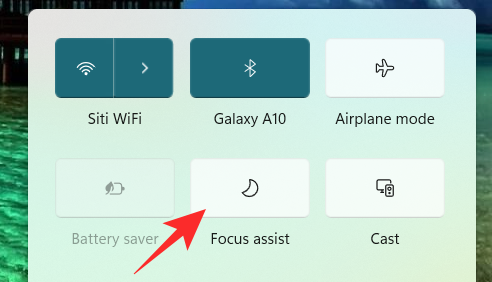
Pēc noklusējuma funkcija Focus Assist tiks atspējota. Noklikšķiniet uz tā, un funkcija tiks iestatīta uz Tikai prioritāte .
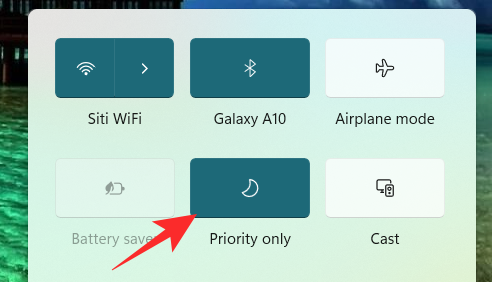
Noklikšķiniet uz tā vēlreiz, lai iestatītu funkciju Focus Assist uz Tikai trauksmes .
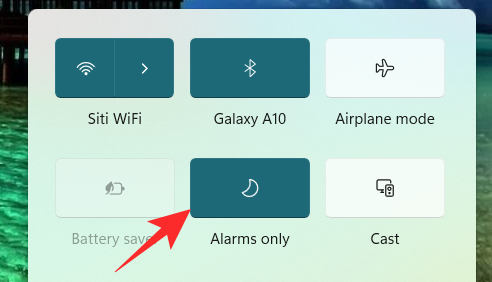
Lai atspējotu funkciju Focus Assist, noklikšķiniet uz tās vēlreiz.
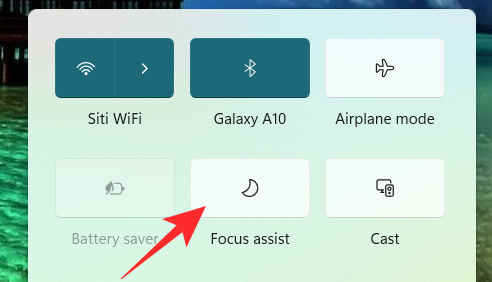
Vienkārši noklikšķinot uz Focus Assist ikonas darbību centrā, varat mainīt tās funkciju uz izslēgtu, tikai prioritāti un tikai trauksmes signālus. Tomēr, lai veiktu citas nepieciešamās izmaiņas Focus Assist iestatījumos no darbību centra, ar peles labo pogu noklikšķiniet uz Focus Assist ikonas darbību centrā un noklikšķiniet uz Iet uz iestatījumiem .
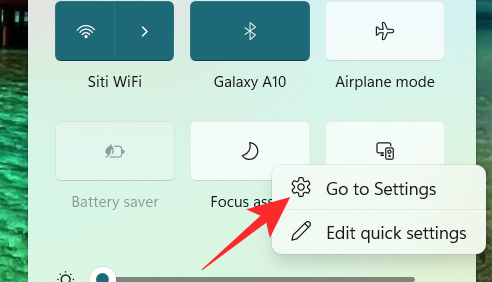
Tiks atvērta lietotne Iestatījumi, kurā varēsit viegli veikt visas paredzētās izmaiņas. Un tas arī viss! Fokusa palīgs tagad ir jāiespējo operētājsistēmā Windows 11 tieši no darbību centra.
3. metode: grupas politikas redaktora izmantošana
Varat arī iespējot fokusa palīdzības režīmu, izmantojot grupas politikas redaktoru, ja esat administrators. Izmantojiet tālāk sniegto ceļvedi, lai palīdzētu procesam.
Nospiediet Windows + Ruz tastatūras un dialoglodziņā Palaist ierakstiet tālāk norādīto. Nospiediet tastatūras ievadīšanas taustiņu, lai atvērtu grupas politikas redaktoru.
gpedit.msc
Pārejiet uz tālāk minēto mezglu.
User configuration > Administrative Templates > Start Menu and Taskbar > Notifications
Labajā pusē atrodiet vērtību “Izslēgt klusās stundas” un veiciet dubultklikšķi uz tās.
Tagad rekvizītu loga augšējā kreisajā stūrī atlasiet kādu no šīm opcijām atkarībā no pašreizējām vajadzībām.
Un tas arī viss! Fokusa palīgs tagad tiks iespējots vai atspējots grupas politikas redaktorā atkarībā no jūsu vēlmēm. Diemžēl jūs nevarat pielāgot fokusa palīdzības darbību kā administrators. Šī spēja joprojām ir lietotāja ziņā. Varat iespējot vai atspējot iespēju izmantot Focus Assist sistēmai, tikai izmantojot grupas politikas redaktoru.
Kā izmantot fokusa palīgu
Fokusa palīgam ir dažādi iestatījumi un pielāgošanas opcijas, kas var palīdzēt mainīt tā darbību atbilstoši jūsu pašreizējām vajadzībām. Izmantojiet kādu no tālāk sniegtajām rokasgrāmatām, kas vislabāk atbilst jūsu pašreizējām prasībām.
1. metode: iespējojiet režīmu Tikai trauksmes
Focus Assist loga režīms Tikai trauksmes ļauj paslēpt visus paziņojumus, izņemot trauksmi. Veiciet tālāk minētās darbības, lai iespējotu režīmu Tikai trauksmes.
Uzdevumjoslā noklikšķiniet uz ikonas Meklēt .

Tips Fokusa palīgs

Noklikšķiniet uz Focus Assist .

Sadaļā Focus Assist noklikšķiniet uz Tikai trauksmes, lai pārtrauktu paziņojumu saņemšanu, izņemot trauksmes signālus.
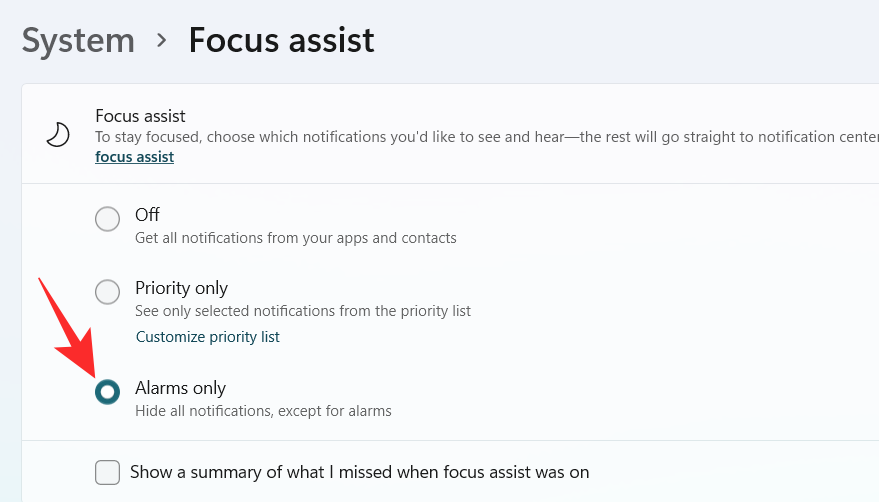
Un tas arī viss! Tagad jūs tiksit informēts tikai par trauksmes signāliem jūsu sistēmā. Visi pārējie paziņojumi neatkarīgi no to prioritātes operētājsistēmā Windows 11 tiks izslēgti.
2. metode: iespējojiet prioritāti tikai ar pielāgotu sarakstu
Cilvēki logs parādīsies uz ekrāna. Izvēlieties sev vēlamās personas, ierakstot viņu vārdus meklēšanas joslā.
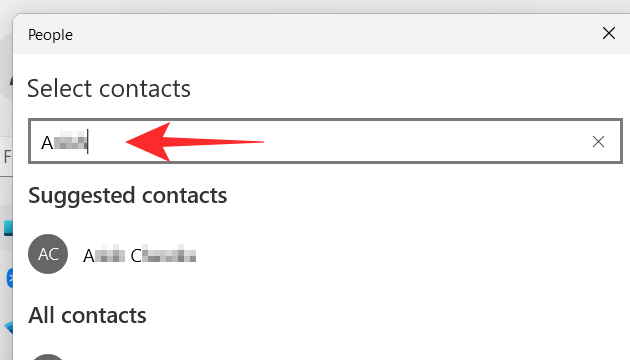
Noklikšķiniet uz personas vārda.
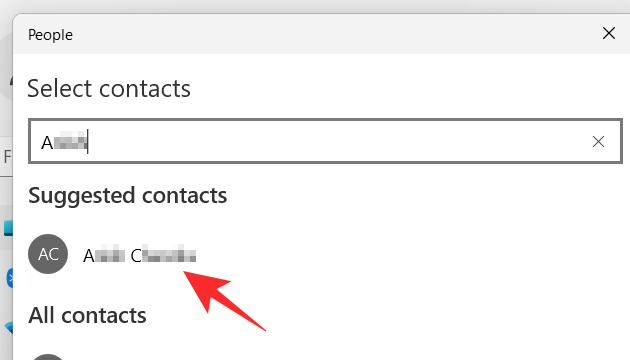
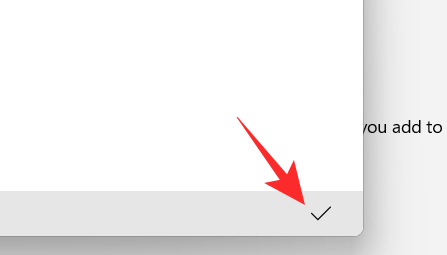
Noklikšķiniet uz atzīmes pogas Personu loga apakšējā labajā stūrī.
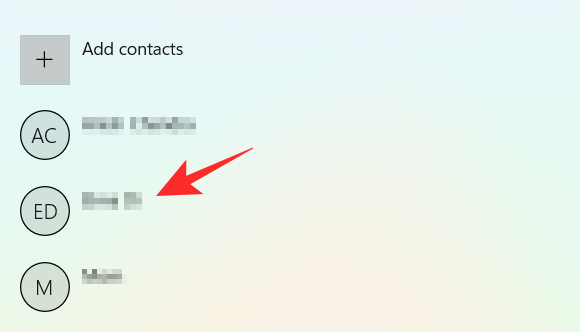
Jūsu prioritāšu saraksts ir izveidots. Tagad, ja vēlaties noņemt kontaktpersonu no sava prioritāšu saraksta, noklikšķiniet uz kontaktpersonas sadaļā Cilvēki .
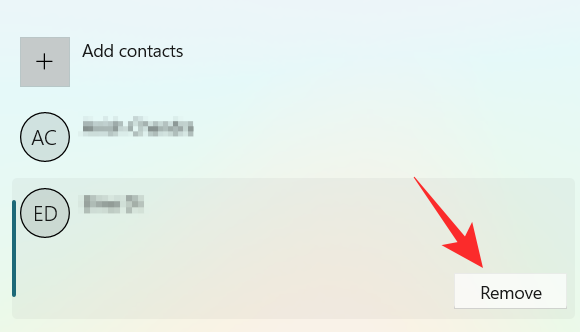
Noklikšķiniet uz Noņemt .
Tagad sadaļā Lietojumprogrammas varat atlasīt programmas, kas var pārtraukt jūsu kluso laiku. Lai ļautu lietotnēm rādīt paziņojumus, noklikšķiniet uz pogas Pievienot lietotni .
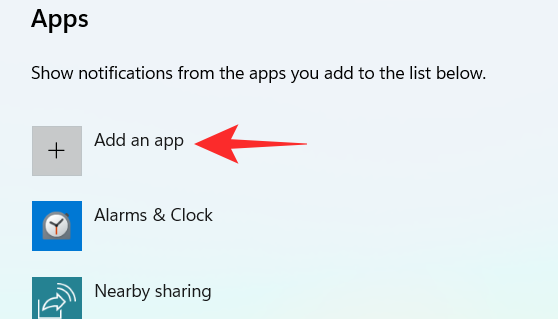
Ekrānā tiek parādīts lietotņu saraksts. Noklikšķiniet uz lietotnes, kuru vēlaties pievienot savam prioritāšu sarakstam.
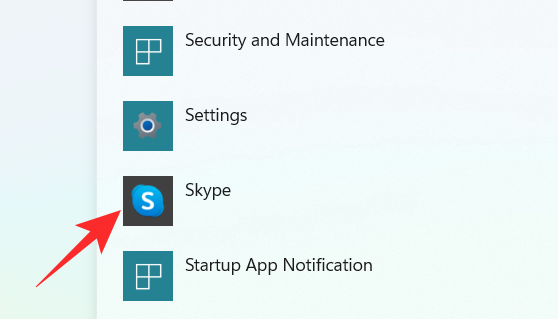
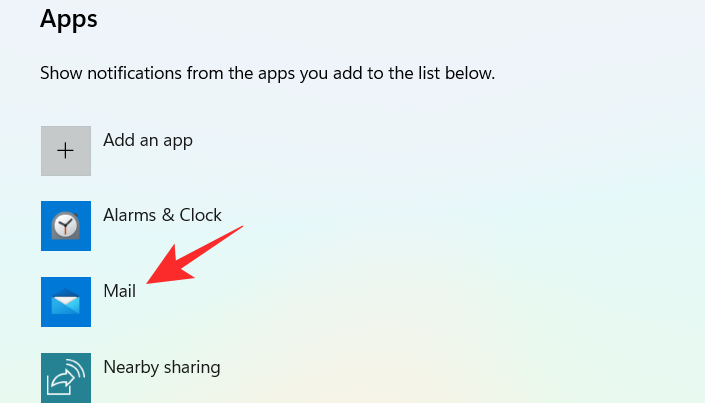
Turpiniet šo procesu, līdz esat pabeidzis lietotņu atlasi. Ja vēlaties noņemt lietotni no prioritāšu saraksta, varat vienkārši noklikšķināt uz lietotnes sadaļā Lietotne .
Noklikšķiniet uz Noņemt .
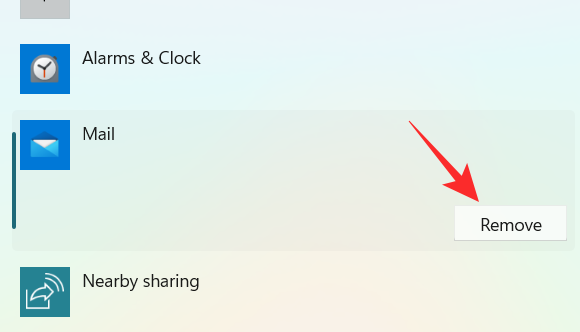
Un tādā veidā jūs varat pielāgot Focus assist prioritāšu sarakstu un izmantot to savā labā, lai saņemtu paziņojumus tikai no svarīgām kontaktpersonām.
3. metode: iespējojiet paziņojumu kopsavilkumu, kad fokusa palīgs ir atspējots
Uzdevumjoslā noklikšķiniet uz ikonas Meklēt .

Tips Fokusa palīgs

Noklikšķiniet uz Focus Assist .

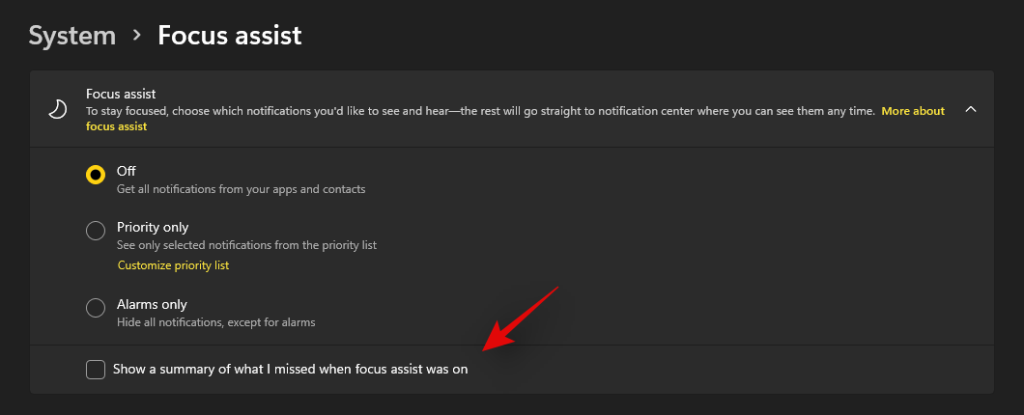
Noklikšķiniet uz vajadzīgās opcijas Tikai prioritātes vai Tikai trauksmes .
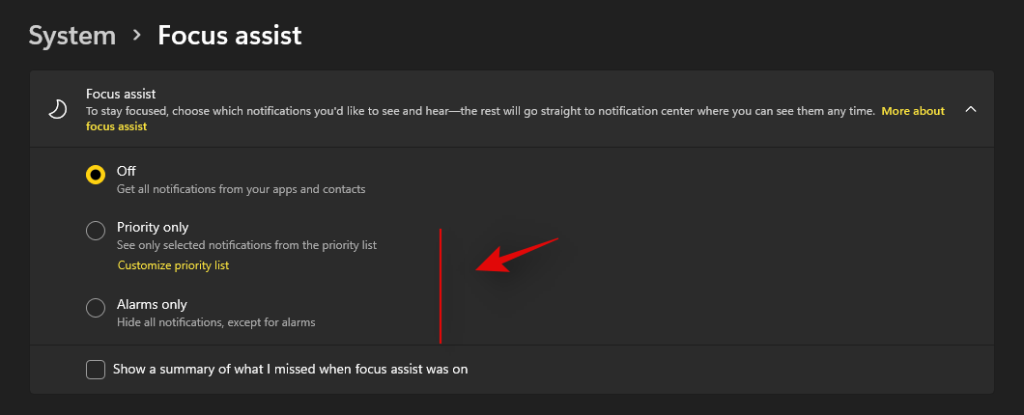
Atzīmējiet izvēles rūtiņu Rādīt kopsavilkumu par to, ko es palaidu garām, kad bija ieslēgts fokusa palīgs .
4. metode: iespējojiet vai atspējojiet automātiskos fokusēšanas palīga noteikumus
The Automatic rules in Focus assist allow you to determine the conditions that can activate the Focus assist automatically. There are four different automatic rules in the Focus Assist settings window that can be customized. Check out the steps mentioned below to customize automatic rules in Focus assist.
Click on the Search icon on the taskbar.

Type Focus assist

Click on Focus Assist.

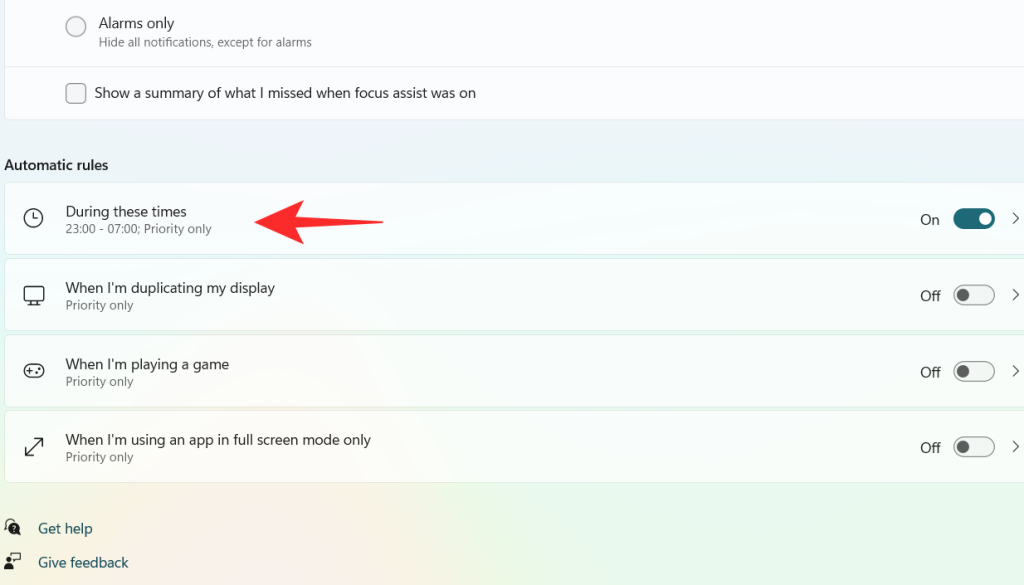
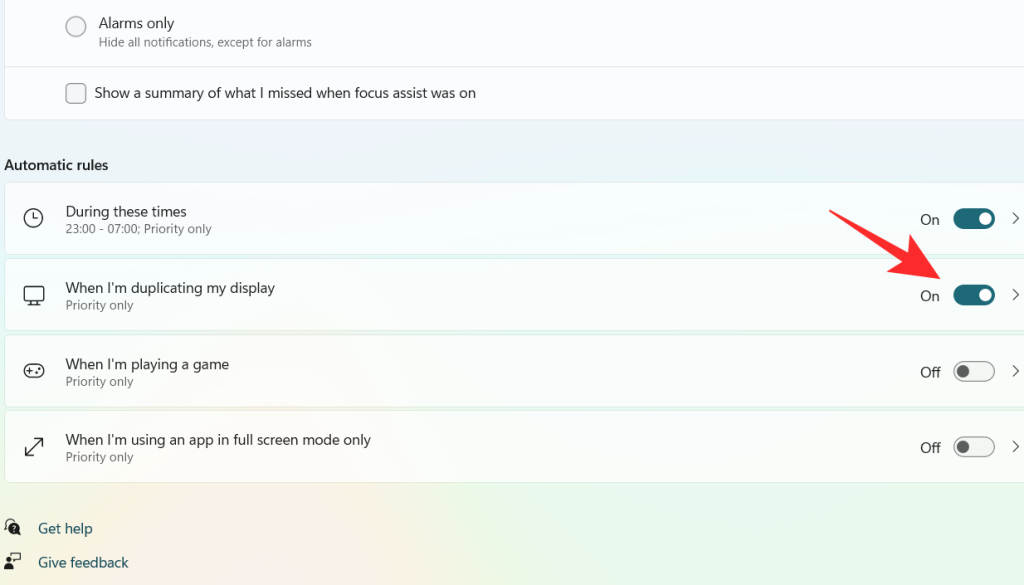
Under the Automatic rules section, there are four sections. Turn on the toggle switch for the option you want to choose.
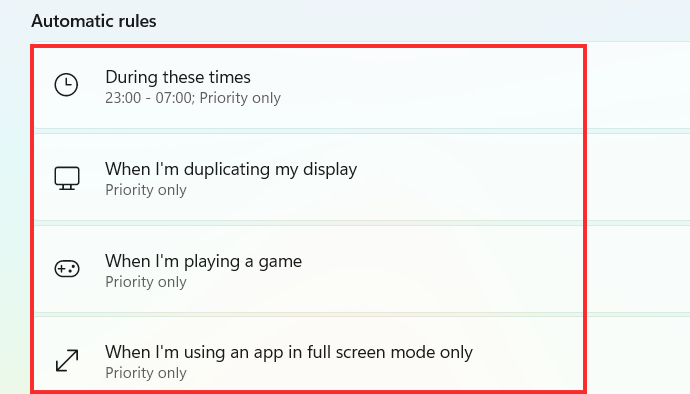
Now, let’s have a look at how to customize the above-mentioned options under Automatic rules.
1. During these times
Turn on the toggle switch, which is extreme right to the During these times tab.
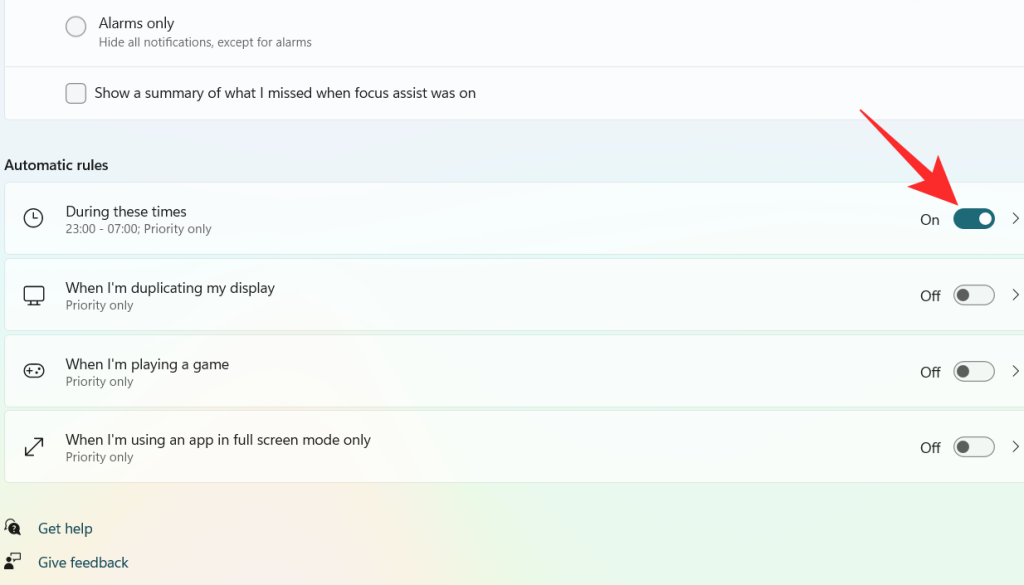
Click on the During these times tab.
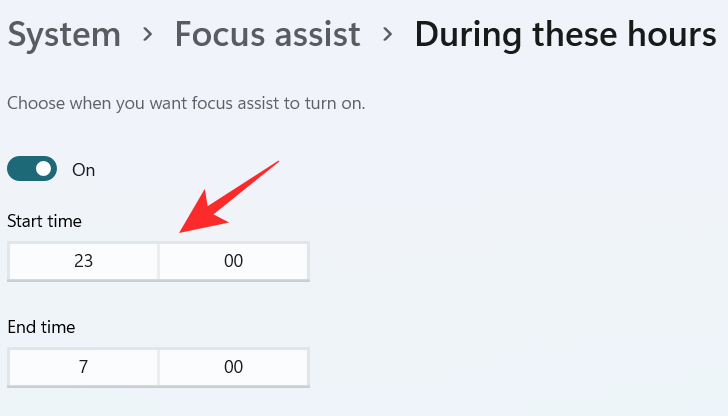
Click on the box under Start time.
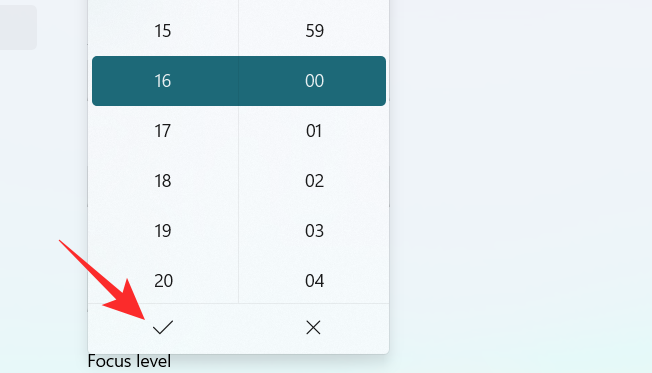
Select the time when you want the Focus Assist to turn on and click on the tick on the bottom of the dropdown menu.
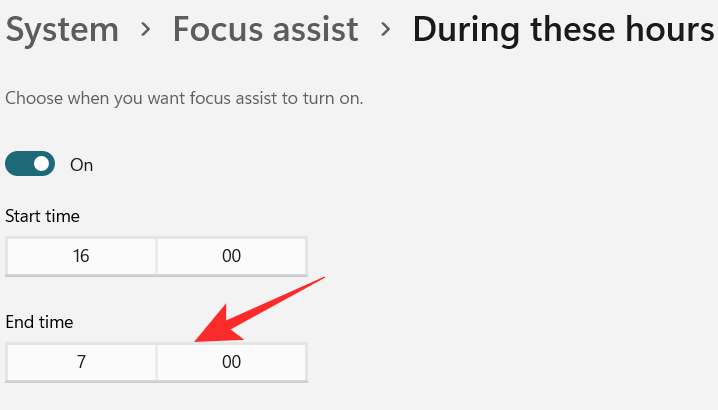
Click on the box under End time.
Select the time when you want the Focus Assist to turn off and click on the tick on the bottom of the dropdown menu.
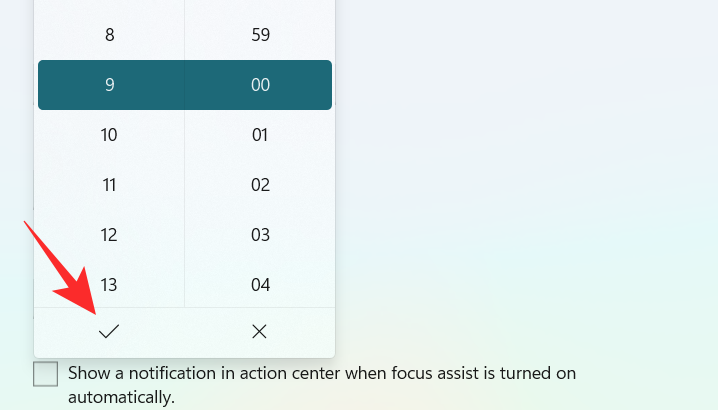
Click on the box under Repeats.
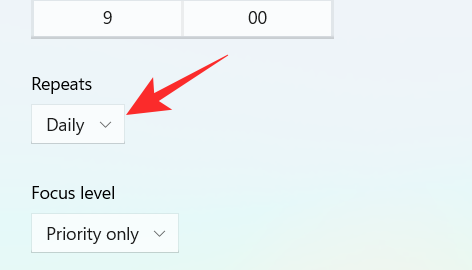
A small dropdown menu appears. Set the schedule to Daily, Weekends, or Weekdays.
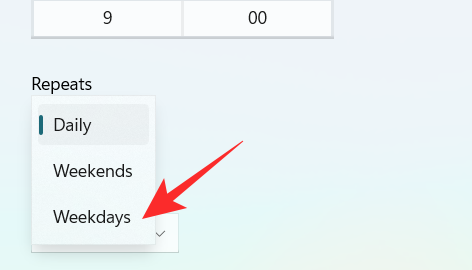
Click on the box under Focus level.
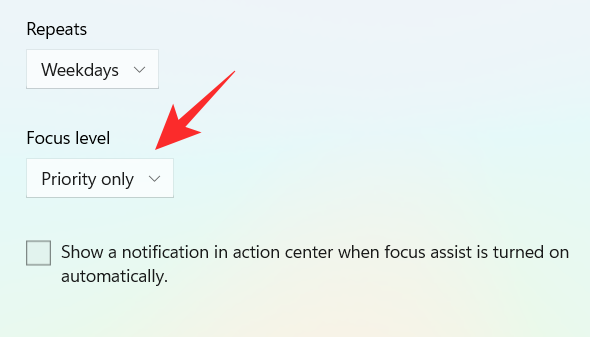
A small dropdown menu appears. Choose between Alarm only or Priority only.
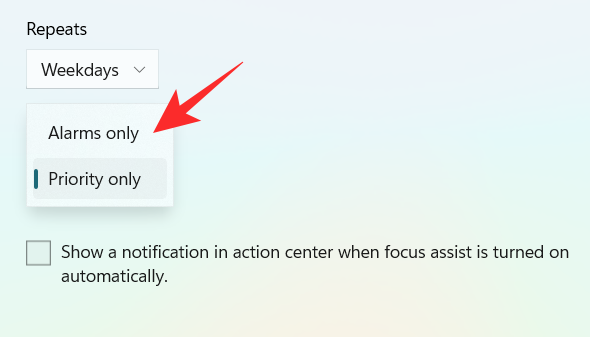
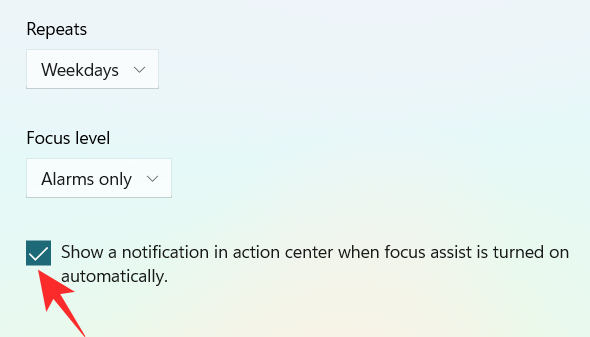
Finally, to get a notification when the Focus assist is turned on, check the box “Show a notification in action center when Focus assist is turned on automatically“.
2. When I’m duplicating my display
Turn on the toggle switch, which is extreme right to the When I’m duplicating my display tab.
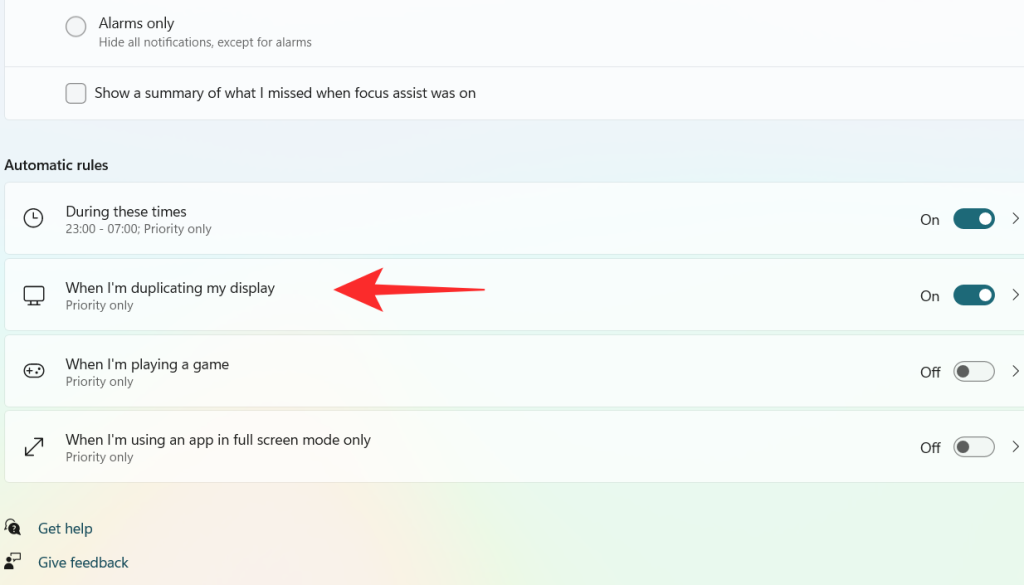
Click on the When I’m duplicating my display tab.
Click on the box under Focus level.
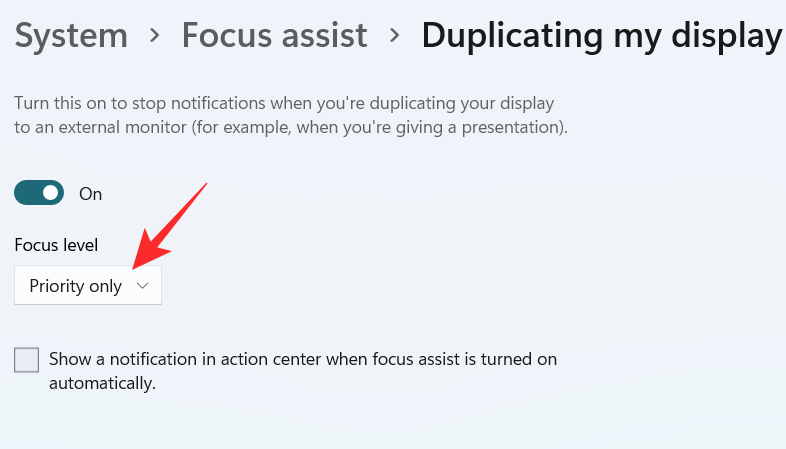
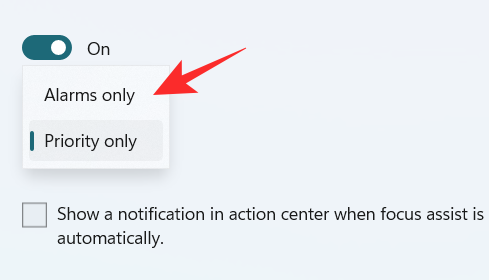
A dropdown menu appears, click on your desired option between Priority only and Alarms only.
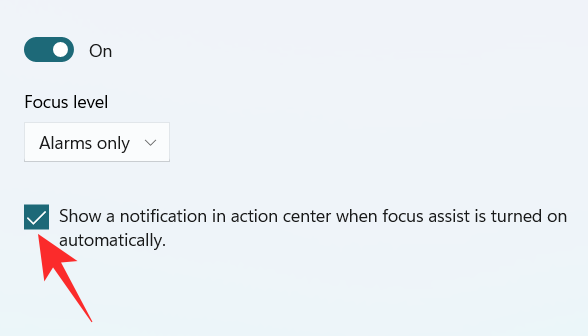
To get a notification when the Focus assist is turned on, check the box “Show a notification in action center when Focus assist is turned on automatically“
3. When I’m playing a game
Turn on the toggle switch, which is extreme right to the When I’m playing a game tab.
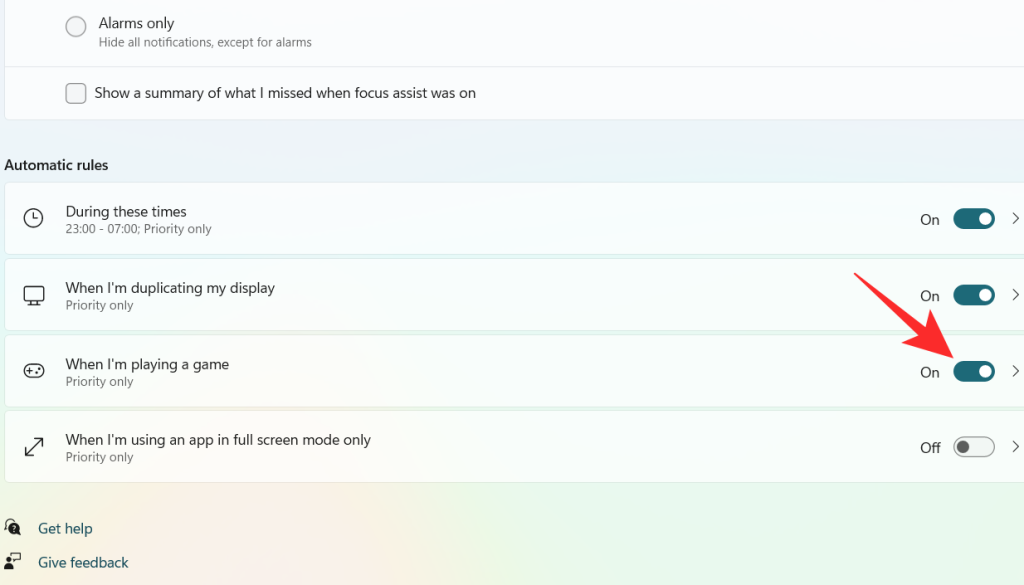
Click on the When I’m playing a game tab
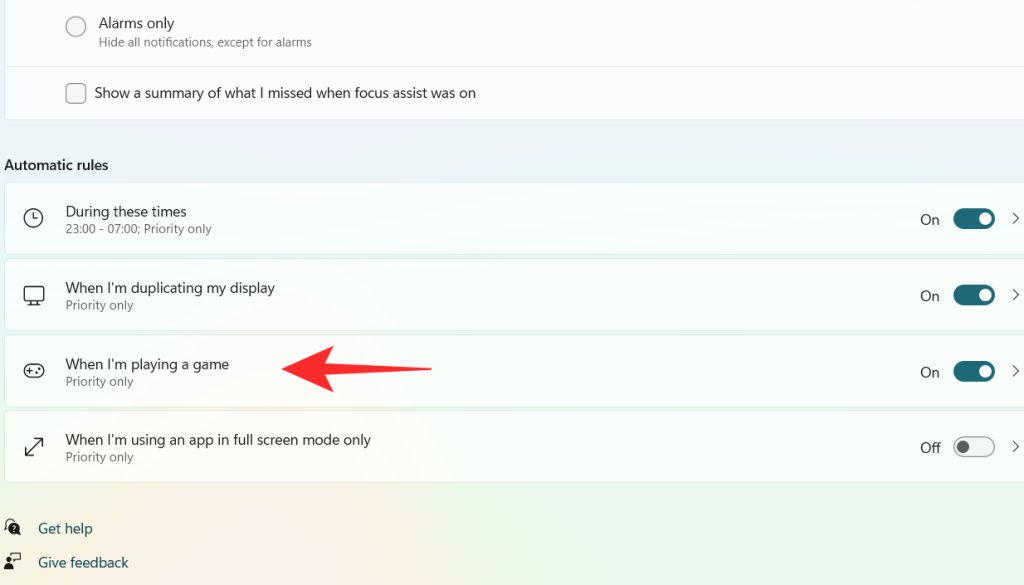
Click on the box under Focus Level.
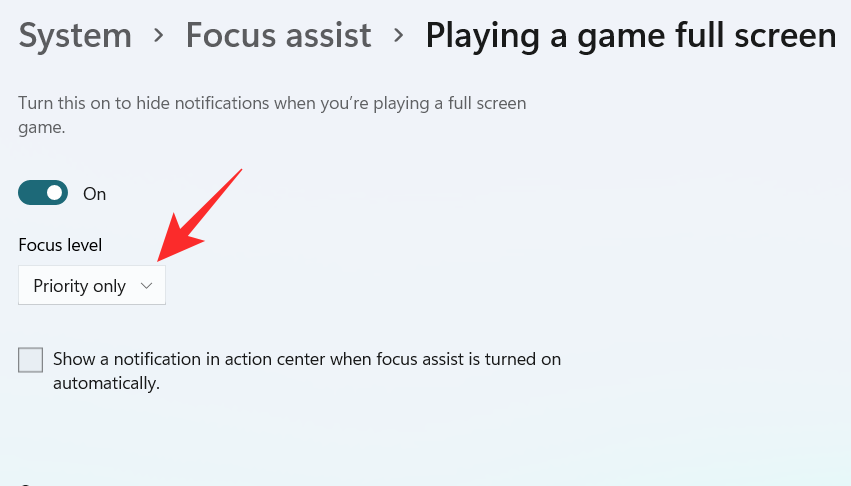
A dropdown menu appears, click on your desired option between Priority only and Alarms only.

To get a notification when the Focus assist is turned on, check the box “Show a notification in action center when Focus assist is turned on automatically“

4. When I’m using an app in full-screen mode only
Turn on the toggle switch, which is extreme right to the When I’m using an app in full-screen mode only tab.
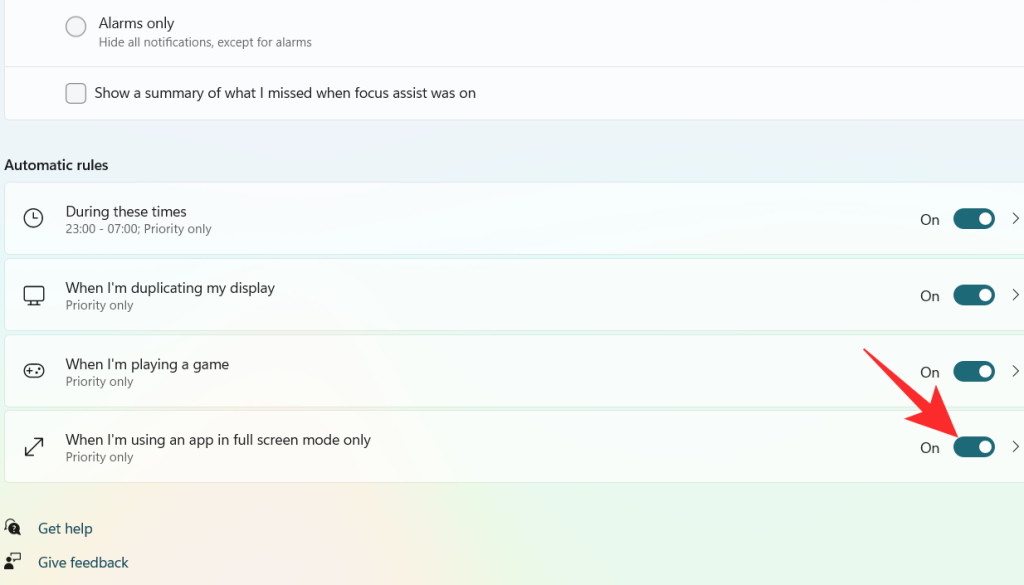
Click on the When I’m using an app in full-screen mode only tab
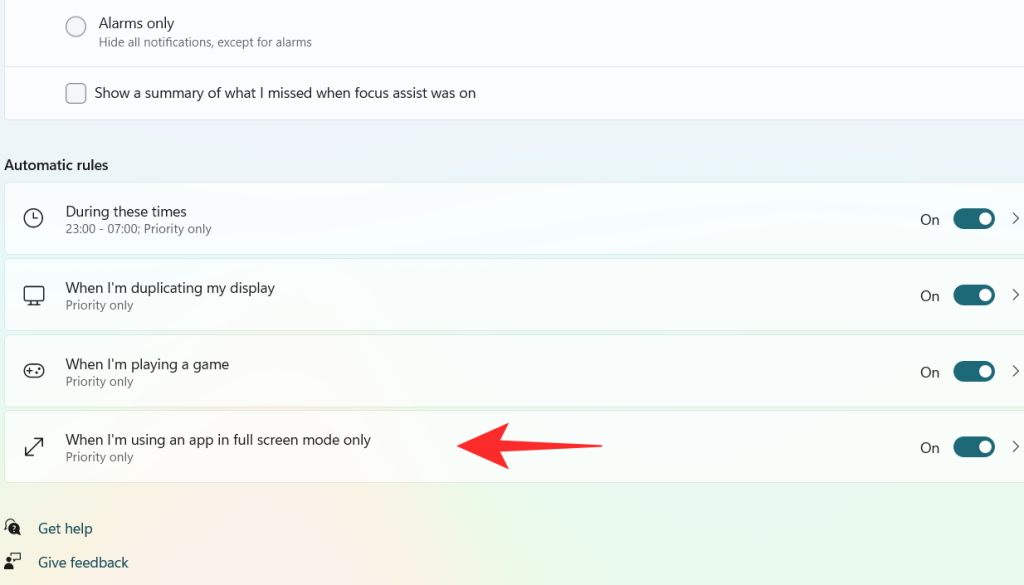
Click on the box under Focus Level.
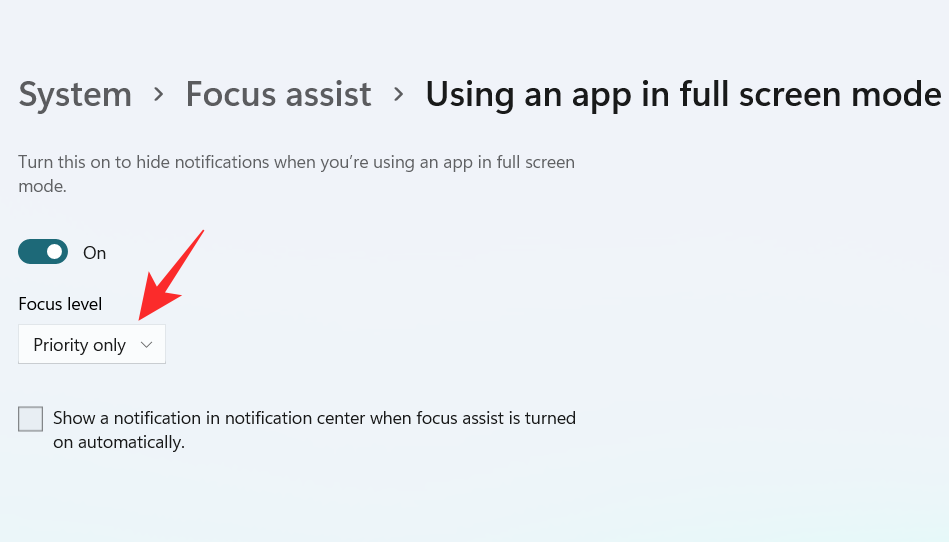
A dropdown menu appears, click on your desired option between Priority only and Alarms only.

To get a notification when the Focus assist is turned on, check the box “Show a notification in action center when Focus assist is turned on automatically“.

Using the above customizations, you can schedule and control Focus assist’s behavior according to your workflow for maximum efficiency no matter the task at hand.
Can you remove the Focus Assist icon from the Action Center?
Yes, you can easily remove the Focus Assist icon from the Action Center. Windows 11 brings a host of new cosmetic and UI changes and one of them has been the ability to customize your action center. You can now add or remove icons from the action center depending on your needs and opt for a more minimal or productive look depending on your workflow.
For now, you can only add and remove certain system modules but in the future, some users expect Microsoft to add the support for third-party apps as well. This would be a much welcome change that would allow you to manage dedicated system settings managed by third-party apps directly from your action center.
Customize your Focus assist icon in the action center
Depending on your current needs you can either remove or add the Focus assist module to the action center. Use one of the guides below depending on your current requirements.
1. Remove it
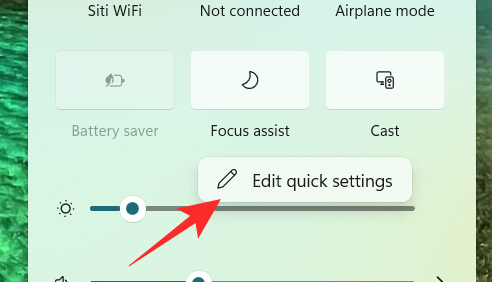
Click on the Action Center which shows the icon of Wifi, volume, and battery together.

Right-click on an empty place or on any icon and click on Edit quick settings.
Click on the unpin symbol at the top right corner of the Focus Assist icon to remove the Focus Assist icon from the Action Center.
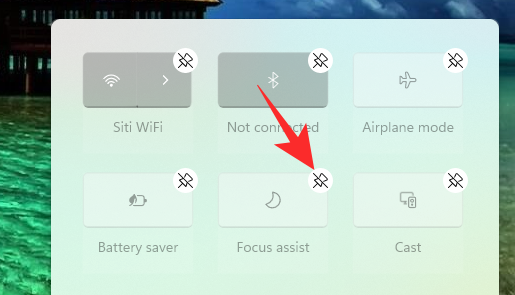
The Focus assist module should now have been removed from your action center. If not, we recommend you restart explorer.exe or your PC for the changes to take effect.
2. Restore it
Click on the Action Center which shows the icon of Wifi, volume, and battery together.

Right-click on an empty place or on any icon and click on Edit quick settings.
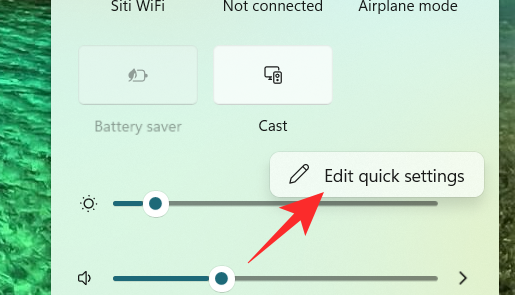
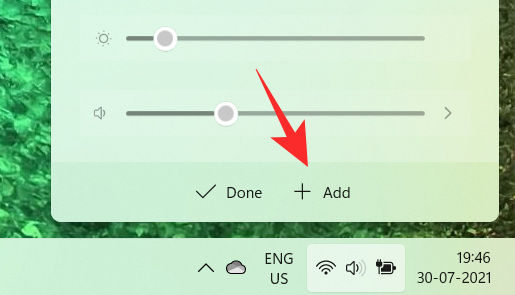
Now, click on the Add button at the bottom of the action center.
A list of different settings appears. Click on Focus Assist from the list and you will get to see the Focus Assist icon on the Action Center again.
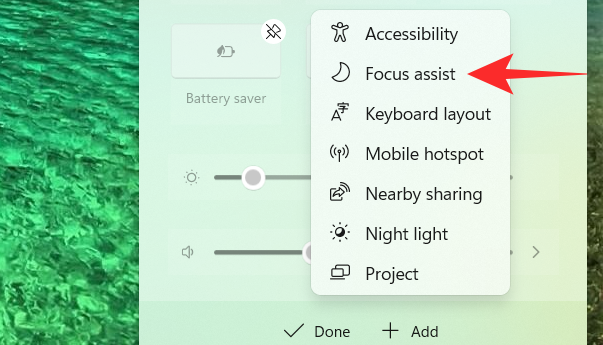
And that’s how you can add the Focus assist module back in the action center.
Focus assist keeps turning on automatically Issue: How to fix
If Focus assist keeps turning on automatically then there could be a couple of reasons for this behavior. Depending on its cause we can either fix it or use a workaround to manage the issue. Let’s find out why Focus assist keeps turning on automatically on your system.
Fix #1: Check Automatic Rules
Are you having this issue when projecting to a secondary display? Or when sharing your screen with a public computer? Then it is likely that focus assist is getting turned on automatically due to the default automatic rules in Windows 11.
By default, focus assist will silence all notifications in such scenarios to help maintain your privacy. But this can be counterproductive in case you are just trying to use a bigger display from a portable system like a laptop or an NUC.
It could also be that scheduled Focus assist was turned on your system by mistake which will enable and disable Focus assist automatically during certain hours. If any of these situations sounds like what you are facing then you can use the guide below to disable all automatic rules that enable Focus assist during certain scenarios and workflows on Windows 11. Let’s get started.
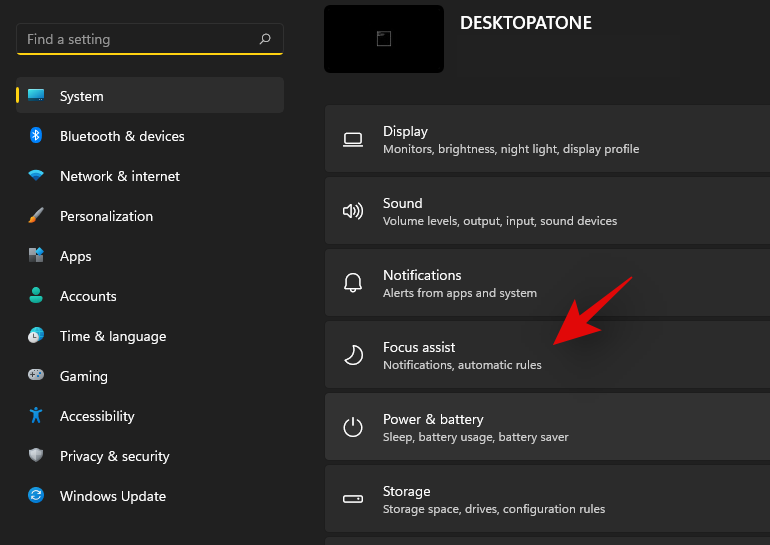
Press Windows + i on your keyboard to open the Settings app. Ensure ‘System’ is selected on your left and then click on ‘Focus Assist’ on your right.
Go down to automatic rules and turn off the following toggles.
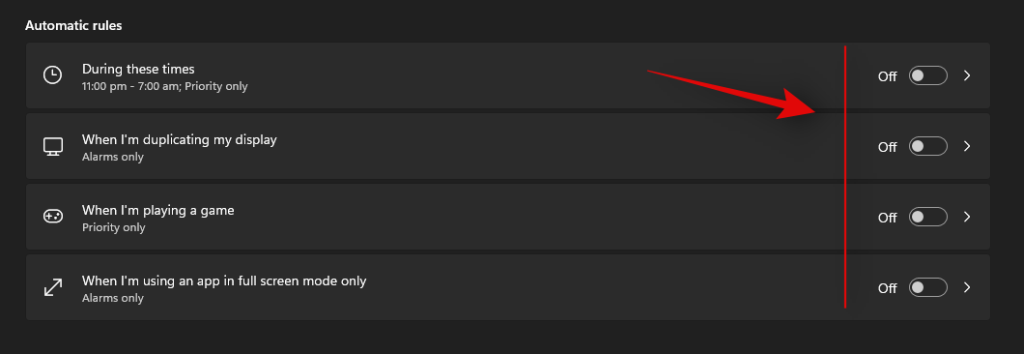
Once these rules are disabled, Windows 11 will not turn on Focus assist automatically on your system.
Fix #2: Turn of GeForce Overlay
This is another way to solve Focus assist misbehaving on your system. If you have a dGPU from Nvidia and are using the GeForce experience app then we recommend disabling its overlay option and restarting your system. With the automatic rule for ‘When I’m using an app in full-screen mode only’ turned on, Windows will mistake the Nvidia overlay detection on your desktop for a full-screen app which will trigger the Focus assist settings in return. You can also disable this automatic rule in case you wish to keep the Geforce Experience overlay enabled on your system.
Focus assist greyed out, option missing or not working; How to fix
Is the focus assist option missing from Windows 11 settings app? Is the module greyed out in the action center? This is a known bug that shows up occasionally with every feature update of Windows. Even certain versions of Windows 10 faced huge issues with this bug until a fix was released.
Fix #1: Enable in Group Policy Editor
If Focus assist seems to be missing from your system then it is likely disabled using the group policy editor. If your PC is managed by your organization or your workplace then it is likely disabled by your administrator. If you have access to the group policy editor then you can use the guide below to enable focus assist on your system. However, in case you have limited access, then you might need to get in touch with your administrator to enable Focus assist on your system.
Press Windows + R on your keyboard to bring up the Run dialog box and type in the following command to launch the Group Policy Editor. Click on ‘Ok’ once you are done.
gpedit.msc
Navigate to the following node.
User configuration > Administrative Templates > Start Menu and Taskbar > Notifications
Double click on ‘Turn off Quiet Hours’ on your right.
Click and select ‘Disabled’ in the top left corner.
Click on ‘Ok’ to save your changes.
And that’s it! Focus assist should now be enabled on your system in case it was disabled using the group policy editor.
Fix #2: Reinstall and repair default Windows UWP apps and system apps
If Focus assist is still missing from your system then let’s check if all the necessary apps and utilities are installed properly on your system. Use the guide below to check and repair Windows 11’s basic apps and functionality on your system.
Press Windows + S and search for PowerShell. Click on ‘Run as administrator’ once it shows up in your search results.
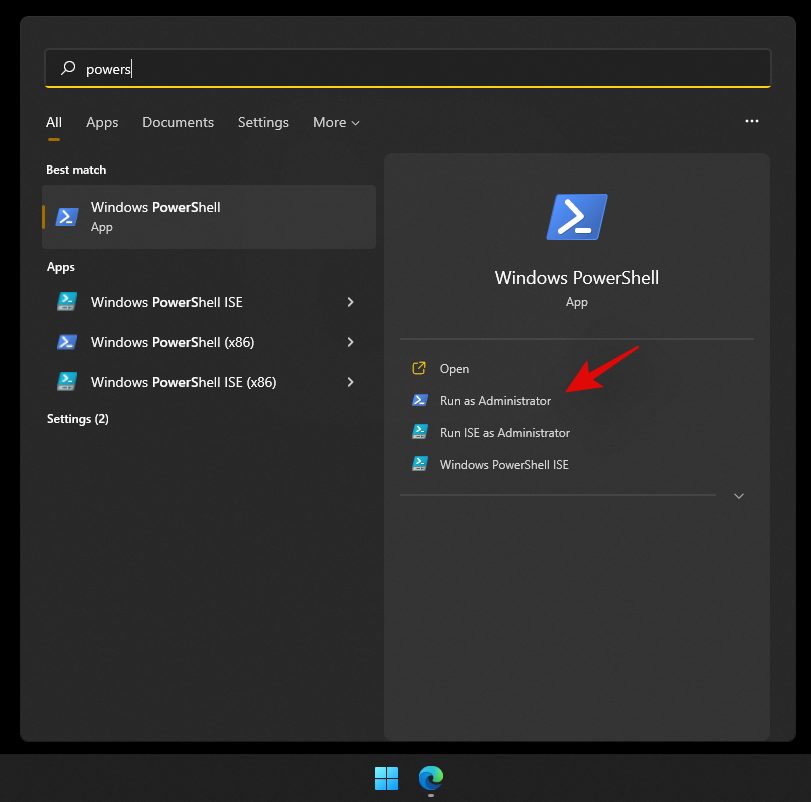
Once PowerShell is launched, execute the following command to reinstall all UWP apps and check and repair other default utilities required by Windows 11 in the background.
Get-AppXPackage -AllUsers | Foreach {Add-AppxPackage -DisableDevelopmentMode -Register "$ ($ _. InstallLocation) \ AppXManifest.xml"}

Wait for the process to finish and restart your PC for good measure. If Focus assist was corrupted or missing from your system, then this fix should help solve all your issues.
Fix #3: Check for a Windows Update
Haven’t updated in a while? We recommend checking for recent Windows Updates. While updates rarely disable major features like Focus assist, a new feature update installation can help refresh your registry, fix mismatched values and more importantly iron out bugs that could be preventing you from accessing Focus assist on your system. Use the guide below to check for recent Windows updates on your system.
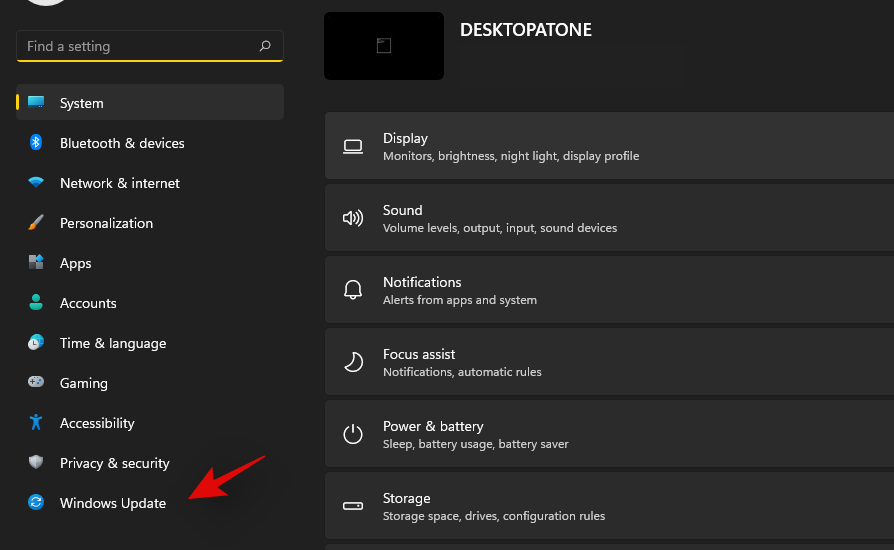
Press Windows + i on your keyboard to open the Settings app and click on ‘Windows Update’ on your left.
Click on ‘Check for updates’.

In case any new updates show up, let them install on your system and restart if prompted. In case you are using a metered connection then you will need to click on ‘Download now’ manually to avoid any unexpected data charges.
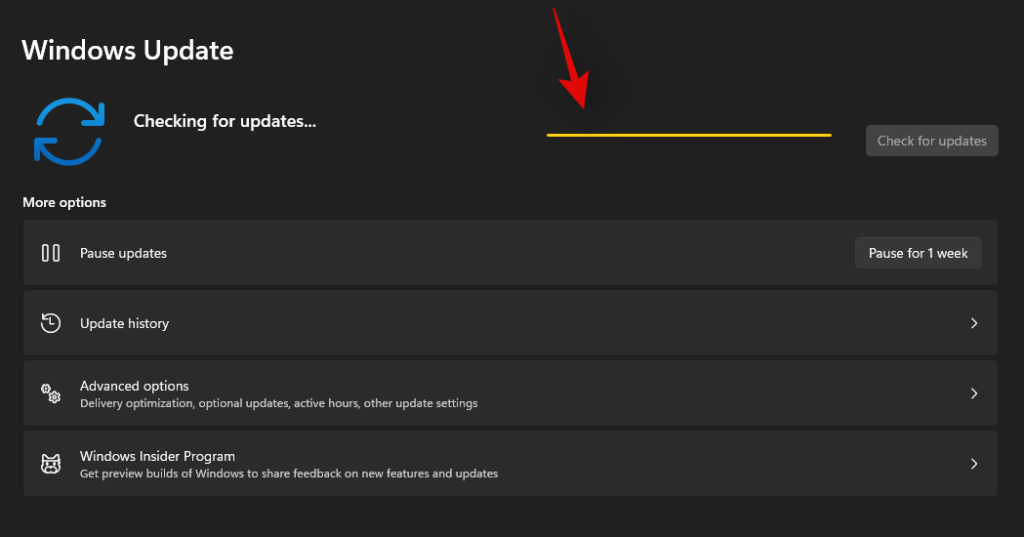
Once the necessary Windows updates are installed on your system, Focus assist should be restored in your action center and the Settings app.
Last Resort: Reset your PC
If Focus assist is still missing from your PC then this indicates a corrupted Windows installation on your system. The best way to fix this without wasting much time on troubleshooting would be to simply reset your PC while keeping all your files intact. This will refresh the entire Windows 11 installation and reinstall all the apps which should help restore functionality for all Windows features including Focus assist. Follow the guide below to reset your PC while keeping your files.
Note: The reset process will remove all installed applications and only retain files stored manually on your local storage. A list of all the removed apps will be available in .txt format on your desktop once your PC has been reset.
Press Windows + i on your keyboard and click on ‘Windows Update’ on your left.
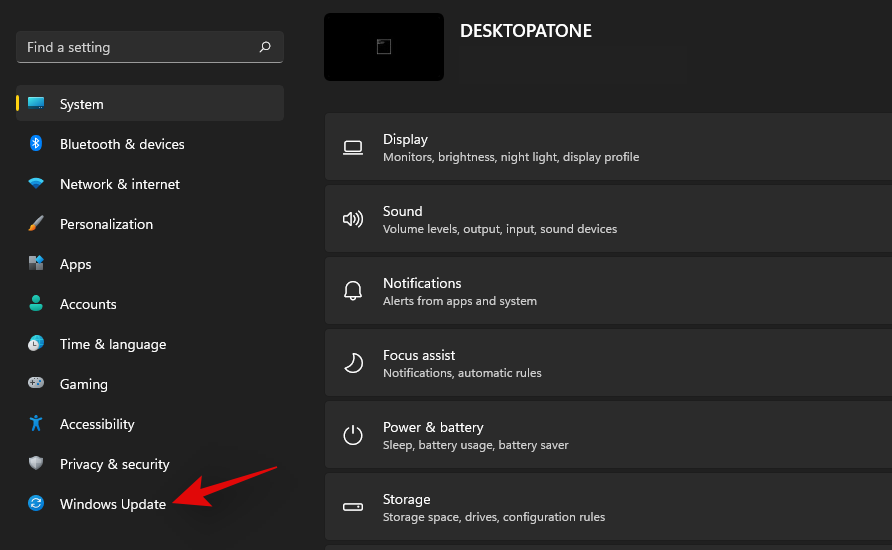
Click on ‘Advanced options’.
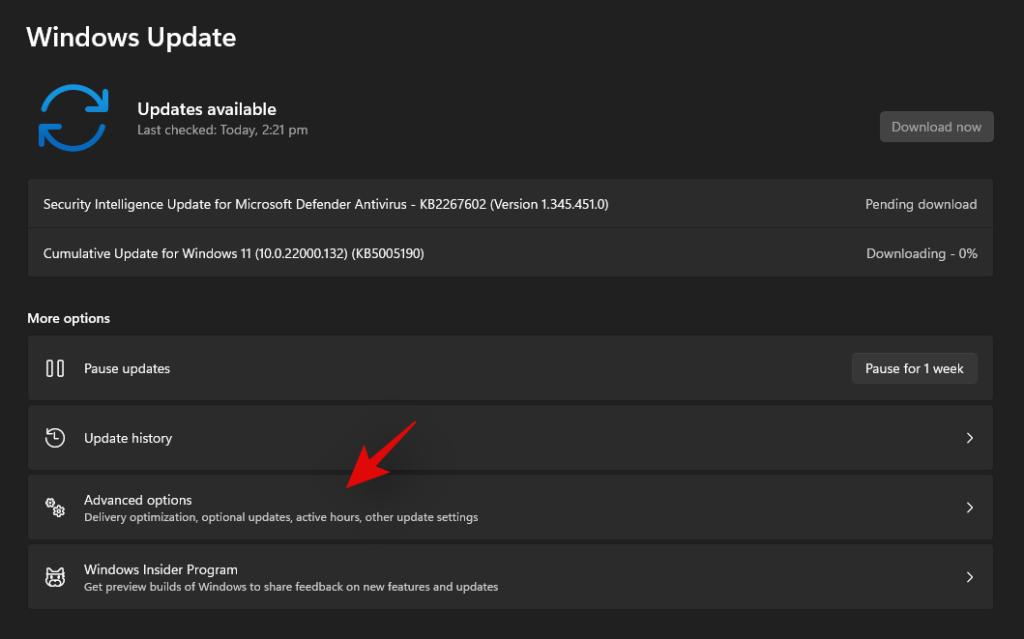
Click and select ‘Recovery’.
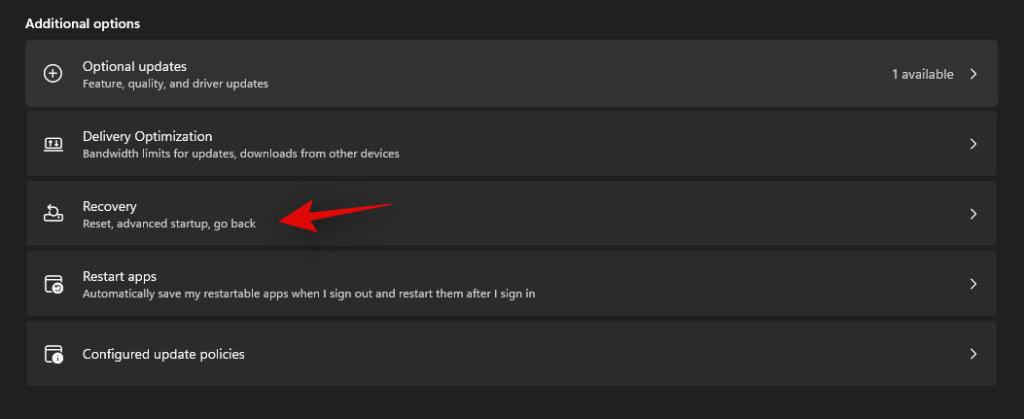
Click on ‘Reset PC’ beside Reset this PC.

Click on ‘Keep my files’.
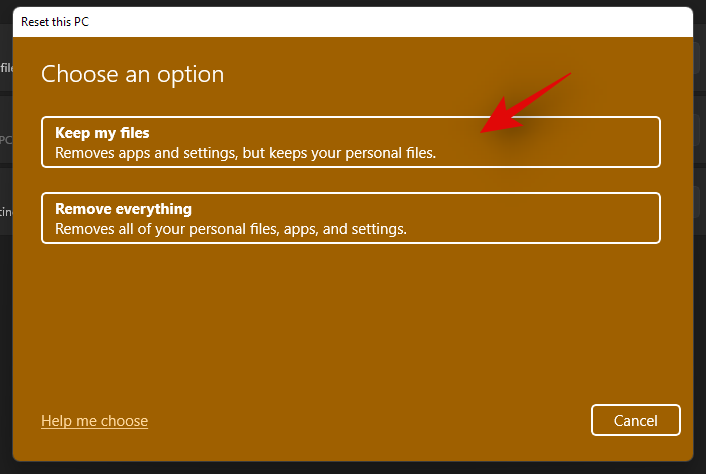
Windows will now process all the files on your local storage. Click on ‘Reset’.
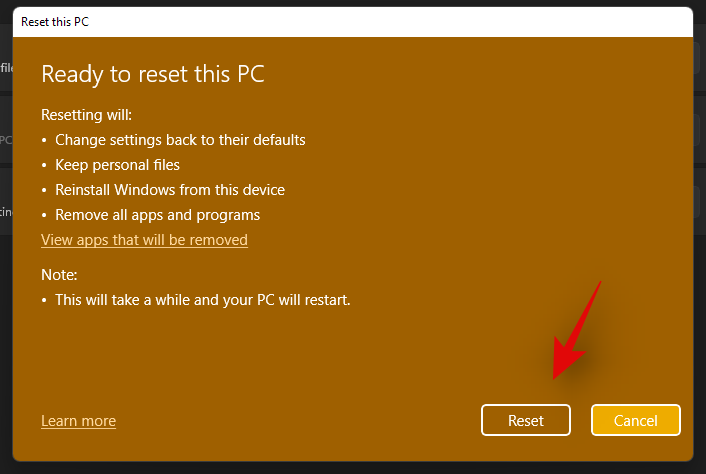
Note: If you are using Windows 11 Pro or higher then you will get the option to use a local installation/recovery media to reinstall Windows 11 as well. However, this option will be missing for Windows 11 Home users.
Windows will now reset your PC while retaining all your files. Your PC will restart several times during this process. This is completely normal and you should let Windows do its thing. If you are using a laptop or a portable NUC, then ensure that your unit is plugged into the power at all times during this process.
How to turn off Focus assist permanently
Do you wish to turn off Focus assist permanently in all scenarios? Then you can use the guide below to do so. The best way to disable Focus assist is by using the group policy editor. But in case you are using Windows 11 Home Edition, then you can use the first method in this guide to disable Focus assist permanently.
Method #1: Disable all settings and rules
Once you disable all the settings and rules for Focus assist, the feature should be turned off automatically on your system. Use the guide below to get you started.
Press Windows + i on your keyboard to open the Settings app and click on ‘Focus assist’ on your right.

Click and select ‘Off’ at the top.
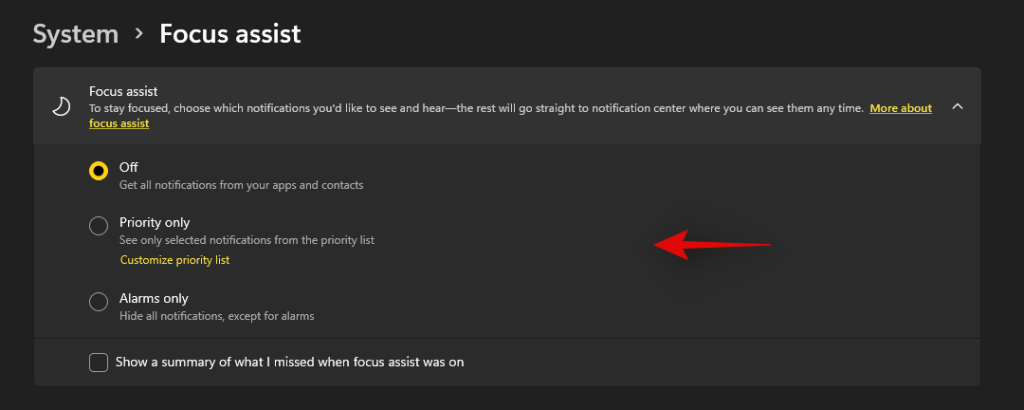
Uncheck the box for ‘Show a summary of what I missed when focus assist was on’.

Subsequently, disable all the toggles under ‘Automatic rules’ as shown below.

We also recommend turning off notifications for unnecessary apps using the guide after this section to avoid unnecessary notifications from interrupting you when focus assist is disabled.
Method #2: Using Group Policy Editor
The group policy editor will permanently disable focus assist on your system and even prevent you from accessing it in your settings. However, this method will only work on Windows 11 Pro or higher versions. In case you have the Windows 11 home edition, you can use the guide above to disable Focus assist instead.
Press Windows + R and type in the following to open Froup Policy EDitor. Click on ‘Ok’ once done.
gpedit.msc
Navigate to the following node.
User configuration > Administrative Templates > Start Menu and Taskbar > Notifications
Find and double-click on ‘Turn on Quiet Hours’ on your right.
Select ‘Enabled’ in the top left and click on ‘Ok’.
Focus assist will now be permanently disabled on the selected system. We recommend you restart your system or explorer.exe in case the changes do not take place immediately.
Is there any other way to disable notifications?
Yes, you can disable notifications individually on a per-app basis in Windows 11 to customize the notifications you receive. This is another way to ensure that you are only notified about the apps and notifications that you intended. Customizing your notifications this way will also allow you to retain the full functionality of the focus assist mode without having to disable certain rules to avoid mismatched scenarios in your workflow.
However, the only downside to managing your notifications this way is that you have to keep enabling and disabling notifications for apps every few months depending on your new installs and uninstalls. You can use the guide below to disable notifications on a per-app basis in Windows 11.
Disable notifications permanently on a per-app basis
Here’s how you can disable notifications on a per-app basis in Windows 11.
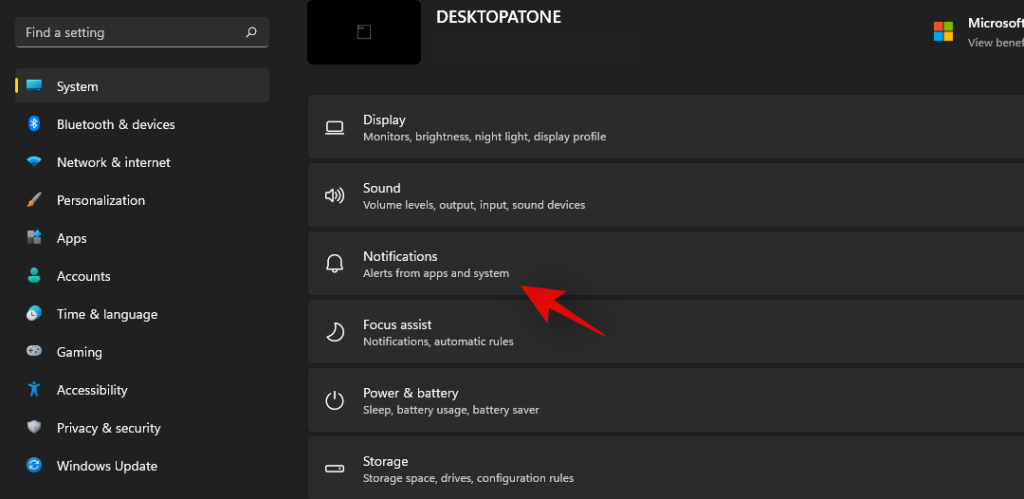
Press Windows + i on your keyboard to open the Settings app and then click on ‘Notifications’ on your right.
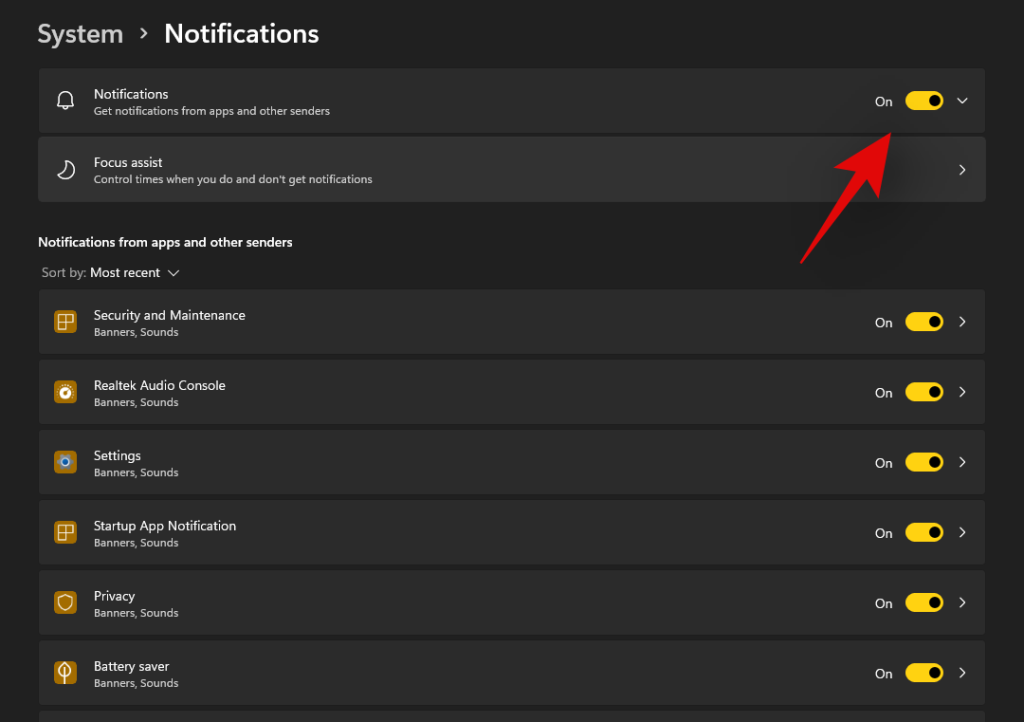
You will now get a list of all the apps that have the permission to deliver notifications on your system. Scroll the list to find the necessary apps and turn off the toggle beside them to disable notifications.
Repeat the steps above for all the intended apps to disable notifications.
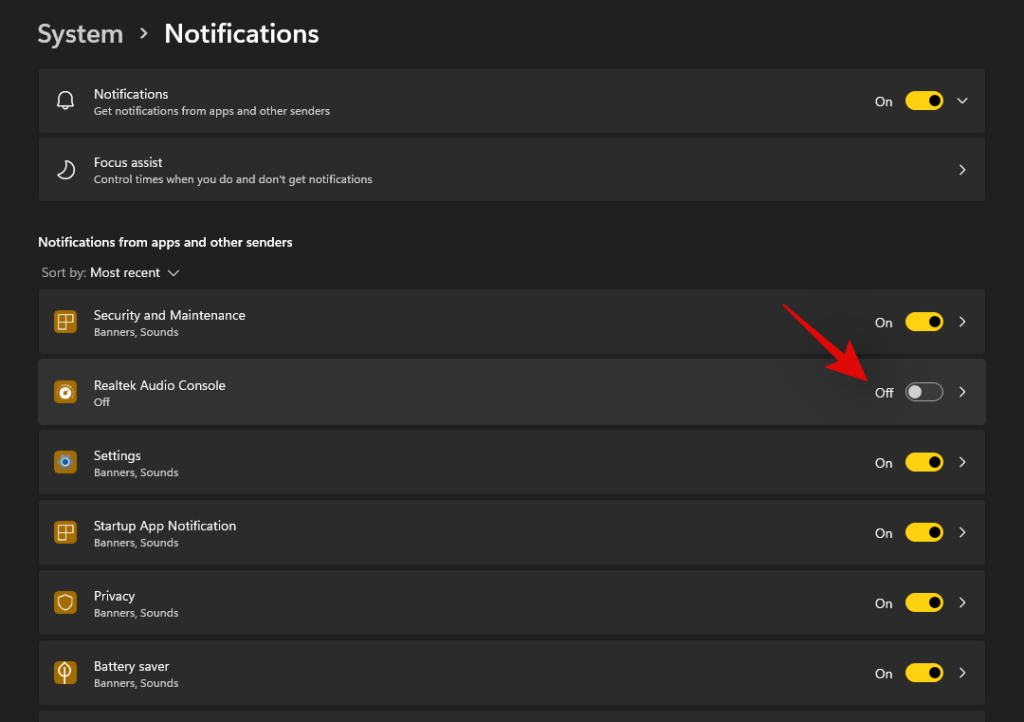
Close the Settings app and notifications for the selected apps should now be permanently disabled on your system.
Can you customize notifications in Windows 11?
Well, not exactly. Windows 11 currently has very limited options when it comes to customizing your notifications. You can not change the look, behavior, or color palette of your notifications without changing the accent color of your overall UI. However, you can customize the way your notifications sound. You can set a nice quiet notification sound that does not interrupt your workflow or opt for a quirky take that makes for a few good laughs each time you get a notification. The choice is completely up to you. Use the guide below to customize your Windows 11 notification sounds.
Required
Guide
Let’s start by first placing the .wav file in a compatible media folder so that you can set it as your default notification sound in Windows 11. Navigate to the concerned .wav file and copy it to your clipboard.
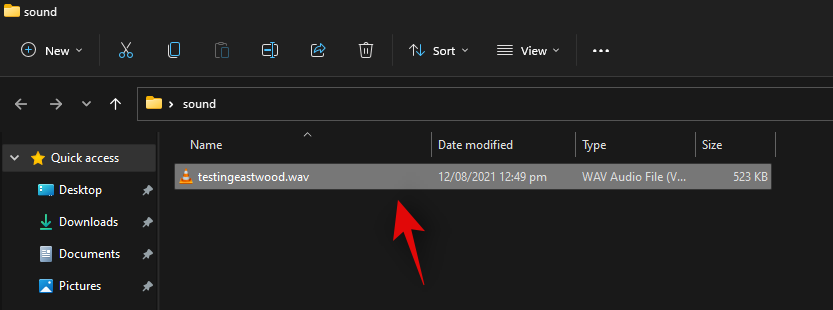
Now navigate to the following path given below. Paste your .wav file in this location. Click on ‘Continue’ when you will be prompted for administrator permission.
C:\Windows\media
We can now use the .wav file as our default notification sound. Press Windows + i on your keyboard to open the Settings app and then click on ‘Sound’ on your right.
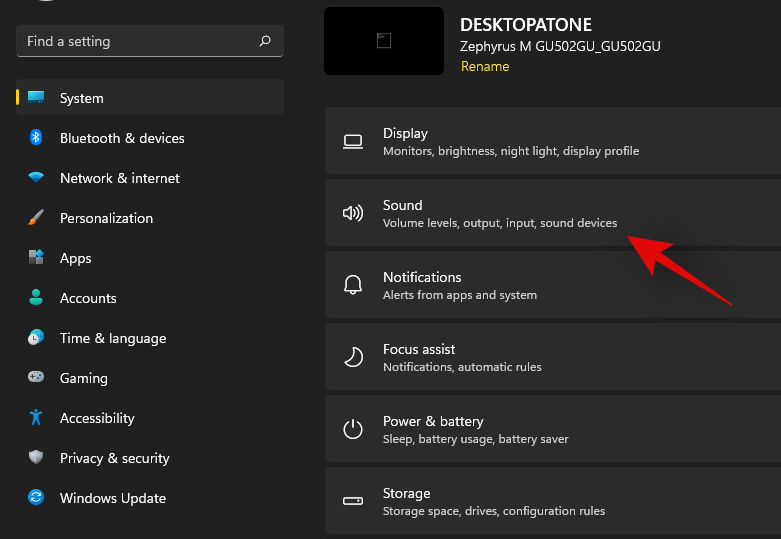
Scroll to the bottom and click on ‘More sound settings’.

Click and switch to the ‘Sounds’ tab at the top.
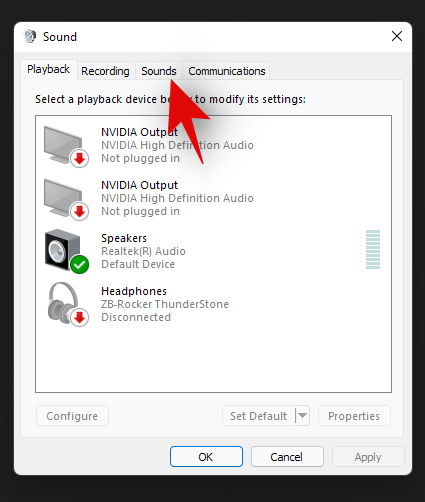
Under ‘Program Events’ scroll the list and find ‘Notifications’. Click on ‘Notifications’ to select it.
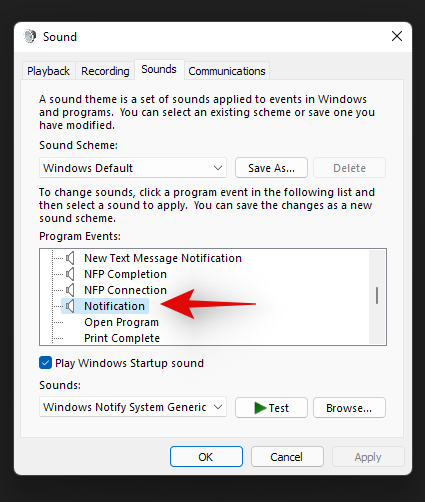
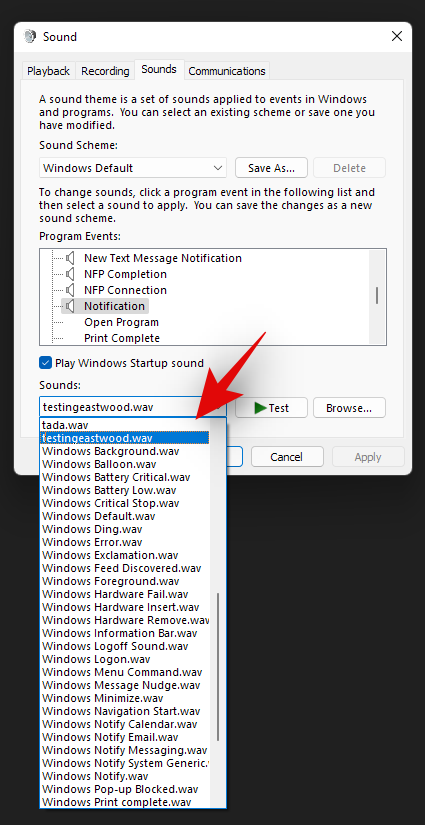
Now click on the drop-down arrow under Sounds and select the .wav file we pasted in the Media folder.
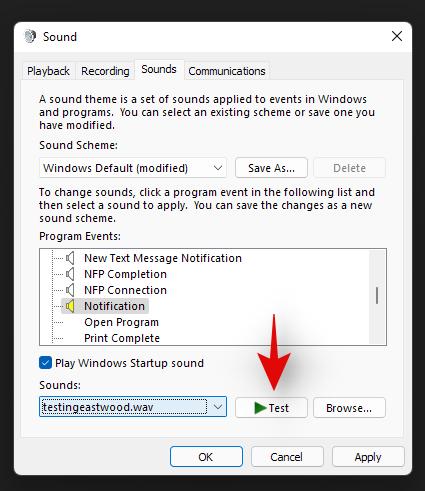
You can click on ‘Test’ to test your custom notification sound.
Click on ‘Ok’ to save your changes.
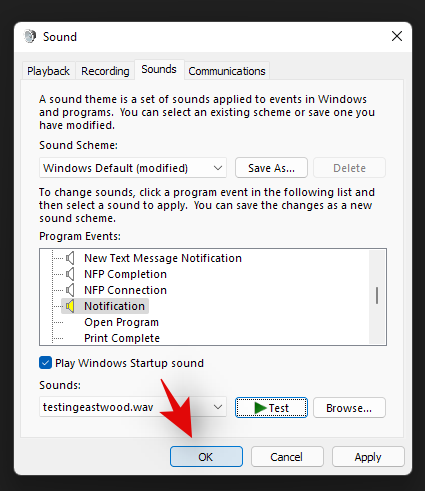
And that’s it! You will now have set a custom sound as your default notification sound in Windows 11.
Distractions from notifications are a huge problem especially when you are into some important work. Using the steps mentioned above, now, you can easily get rid of unnecessary notifications and work peacefully with full concentration.
Related:
Uzziniet, kā atvērt vadības paneli Windows 11. Izpētiet 9 veidus, kā piekļūt svarīgākajām iestatījumu opcijām, un optimizējiet savu Windows pieredzi.
Operētājsistēma Windows 11 ir izlaista sabiedrībai, un korporācija Microsoft ir izlaidusi jaunu personalizētu palīgu, kas palīdzēs jums iekļūt. Operētājsistēmā Windows 11 ir iekļautas daudzas izmaiņas, tostarp iespēja instalēt…
Windows 11 Insider Build ir atbrīvots savvaļā un piesaista lielu uzmanību gan no cienītājiem, gan kritiķiem. Jaunais dizains kopumā ir patīkams acīm, taču ir daži elementi, kas…
Windows 11 noplūde un Insider Dev Build ir izraisījuši miljoniem OS virtuālo un vietējo instalāciju nedaudz vairāk nekā nedēļas laikā. Ja arī jūs esat pārgājis uz Windows 11, iespējams,…
Lai gan dažos gadījumos paziņojumi ir būtiski, dažreiz tie kļūst par traucēkli. Tāpat kā tālrunis, arī dators var novērst jūsu uzmanību ar paziņojumiem. Tāpēc operētājsistēmā Windows 11 ir iekļauta…
Windows 11 ir paredzēts jau ļoti ilgu laiku, un šī operētājsistēma nav bez milzīgām izmaiņām. Ir dabiski justies aizvainotiem par izmaiņām, tomēr būtībā OS joprojām ir uzticīga savai…
Kopš paziņošanas sistēma Windows 11 ir nogājusi garu ceļu, un šķiet, ka beta versijas katru dienu saņem arvien vairāk testētāju. Windows pārcēlās uz UWP lietotnēm savai sistēmai un Windows Store atpakaļ…
Ja rodas savienojamības problēmas, iespējams, vēlēsities iztīrīt DNS kešatmiņu. Neuztraucieties, lai to izdarītu, jums nav vajadzīgas nekādas tehniskas zināšanas, un tas ir diezgan vienkārši…
Pēc gandrīz 6 gadus ilgas pielāgošanas uzturēšanas OS, ar kuru mēs bijām tik pazīstami, tagad tiek būtiski jaunināti. Ir veiktas izmaiņas dizaina pamatos, kas tagad ietver centu…
Windows ir populārākā patērētāju OS mūsdienu laikmetā. Taču dažkārt var būt nepieciešams pārslēgties starp operētājsistēmām, lai izmantotu noteiktu funkciju vai vienkārši izmēģinātu citas alternatīvas. Wipi…
Gaidīšana beidzot ir beigusies, ļaudis! Operētājsistēma Windows 11 beidzot ir izlaista sabiedrībai, un tagad varat bez maksas jaunināt datoru no operētājsistēmas Windows 10, izmantojot derīgu licenci. Jaunā OS piedāvā daudzas ch…
Nezinātājiem angļu valoda ir ģermāņu valoda, savukārt tādas valodas kā spāņu, franču, portugāļu, itāļu un rumāņu ir romāņu valodas (tāpat kā tajās, kas atvasinātas no Vulgar L…
Ikreiz, kad izveidojat savienojumu ar tīklu, sistēma Windows automātiski saglabās paroles un citus savienojuma datus, lai jūs varētu vēlreiz tajā pieteikties, kad tas būs darbības zonā. Bet ko darīt, ja vēlaties aizmirst Wi-…
Viena no galvenajām jomām, kas ir saņēmusi lielu Windows 11 remontu, ir darbību centrs. Šis ir stratēģiski svarīgs apgabals, kas atrodas pa labi no uzdevumjoslas un ir apkalpojis Windows lietotājus…
Operētājsistēmā Windows 11 dažādiem notikumiem tiek atskaņotas dažāda veida skaņas, lai jūs, lietotājs, zinātu, kas notiek, un saņemtu skaņas apstiprinājumu par to. Viņi arī informē jūs par jebkādām grūtībām…
Operētājsistēmā Windows 11 ir bijušas zināmas problēmas ar mūsdienu spēlēm, taču šķiet, ka nesenā Valorant kļūda ir satriekusi visus. Vai jūs saskaraties ar kļūdu VAN 1067? Tad šī ir problēma ar Wi…
Windows atjauninājumi vienmēr ir bijuši bēdīgi slaveni ar to, ka palēnina datoru darbību, kad tie darbojas fonā. Tie ir arī bēdīgi slaveni ar to, ka tiek instalēti nejaušā restartēšanas režīmā, kas viss izriet no spējas automatizēt…
Operētājsistēmas Windows 11 izstrādātāja versija tagad ir izlaista, un viss ir labi, ja vēlaties to iegūt pēc iespējas ātrāk. Bet, ņemot vērā, ka šī ir tikai izstrādātāja versija, tas nav viss p…
Kad Microsoft 24. jūnijā atklāja Windows 11 kopā ar tās sistēmas prasībām, viņi arī izlaida lietotni PC Health Check, kas bija paredzēta, lai ļautu miljoniem datoru lietotāju pārbaudīt, vai viņu...
Klēpjdatora karstie taustiņi ir būtiski rīki, mēģinot piekļūt ierīces pamatfunkcijām. Tie ļauj jums kontrolēt skaļumu, pielāgot spilgtumu, tastatūras fona apgaismojumu, skārienpaliktņa darbību un m…
Vai operētājsistēmā Windows rodas problēmas ar kļūdu “Nevar izveidot savienojumu ar printeri” 0x00000709? Atklājiet pārbaudītas problēmu novēršanas darbības, sākot no reģistra korekcijām līdz tīkla atiestatīšanai, lai ātri atjaunotu printera darbību. Atjaunināts ar jaunākajiem labojumiem ērtai drukāšanai.
Vai, mainot fonus operētājsistēmā Windows 11, rodas problēmas ar attēla kļūdu? Atklājiet pārbaudītus risinājumus, lai novērstu šo kaitinošo problēmu un atjaunotu darbvirsmas perfektu izskatu. Soli pa solim sniegta rokasgrāmata nemanāmai pielāgošanai.
Vai rodas problēmas ar tīmekļa kameras aizkavi lietotnēs Zoom un Teams operētājsistēmā Windows 11? Atklājiet pārbaudītus risinājumus, lai atvieglotu videozvanus, uzlabotu veiktspēju un novērstu kaitinošas aizkaves, nodrošinot netraucētu attālinātu darbu. Atjaunināts ar jaunākajiem padomiem.
Vai operētājsistēmā Windows 11 rodas problēmas ar trūkstošām OneDrive sinhronizācijas ikonām? Atklājiet ātrus un efektīvus problēmu novēršanas padomus, lai atjaunotu mākoņa sinhronizācijas statusu un atgrieztos pie netraucētas failu pārvaldības. Nav nepieciešamas tehniskās zināšanas!
Vai operētājsistēmā Windows 11 rodas problēmas ar audio sprakšķēšanu? Atklājiet pārbaudītus risinājumus, lai atjaunotu kristāldzidru skaņu. Soli pa solim sniegta pamācība ar padomiem, kā novērst sprakšķēšanu, statisku troksni un pārtraukumus, lai nodrošinātu nevainojamu klausīšanos.
Vai Windows 11 uzdevumjoslā rodas problēmas ar izplūdušiem vai pārāk lieliem fontiem? Atklājiet pārbaudītus fontu lieluma kļūdu risinājumus, sākot no DPI pielāgojumiem līdz reģistra izmaiņām, nodrošinot nevainojamu darbvirsmas pieredzi.
Uzziniet, kā izmantot Windows 11 diska tīrīšanas utilītu, lai atbrīvotu vietu, uzlabotu veiktspēju un nodrošinātu datora nevainojamu darbību. Soli pa solim sniegta pamācība ar padomiem maksimālai efektivitātei.
Iepazīstieties ar soli pa solim sniegtiem norādījumiem, kā pielāgot Windows 11 bloķēšanas ekrāna pulksteni ar personīgiem attēliem, fontiem un stiliem. Paaugstiniet savu darbvirsmas pieredzi bez piepūles.
Vai rodas problēmas ar GPT aizsardzības nodalījuma piekļuves liegšanas kļūdu? Atklājiet pārbaudītus soļus, lai atrisinātu šo kaitinošo problēmu un ātri un droši atgūtu piekļuvi saviem datiem. Ekspertu padomi Windows lietotājiem.
Vai rodas problēma ar kļūdu “Spēļu josla ieraksta pēdējās 30 sekundes”? Atklājiet pārbaudītus risinājumus, lai ātri un vienkārši atjaunotu tūlītējās atkārtošanas ierakstu. Vairs nekādu pazaudētu episku mirkļu!


![Kā rakstīt akcentus operētājsistēmā Windows 11 [6 veidi] Kā rakstīt akcentus operētājsistēmā Windows 11 [6 veidi]](https://blog.webtech360.com/resources8/images31/image-285-0105182715408.png)


