„Windows 11“ buvo išleista visuomenei ir atrodo, kad šis naujas ilgai veikiančios OS naujinimas sulaukia puikių atsiliepimų. „Microsoft“ padidino privatumą, saugumas pridėjo naują vartotojo sąsają ir galimybę įdiegti „Android“ programas į „Windows 11“. Tačiau, kaip įprasta, sistemoje „Windows“ yra daug iš anksto įdiegtų dalykų, kurie nėra svarbūs beveik kiekvienam vartotojui.
Ir jei įsigijote iš anksto sukurtą sistemą arba nešiojamąjį kompiuterį, tikėtina, kad jūsų sistemoje yra įdiegta papildoma reklamos programinė įranga, kurią galbūt norėsite pašalinti. Galite lengvai pašalinti ir pašalinti daugumą „Windows“ programų vienu spustelėjimu, tačiau viskas tampa šiek tiek sudėtingesnė, kai patenkate į programas, „Windows Store“ programas, „Windows“ naujinius ir sistemos programas. Nebijokite, galite vadovautis toliau pateiktais vadovais, kad pašalintumėte visų rūšių programas iš „Windows“ sistemos, neatsižvelgiant į dabartinius nustatymus. Pradėkime.
Turinys
Kaip pašalinti programas „Windows 11“ [8 būdai]
Štai visi būdai, kuriais galite pašalinti programą iš „Windows 11“ kompiuterio. Norėdami pašalinti sistemos programas , žr. tam skirtus skyrius ir specialius metodus, esančius toliau po šio skyriaus.
01 metodas: nustatymų naudojimas
Vykdykite toliau pateiktą vadovą, kad pašalintumėte programą naudodami sistemos nustatymus. Jei bandote pašalinti numatytąją programą, rekomenduojame ją pakeisti iš anksto, kad pašalinimo parinktis nebūtų pilka. Jei nežinote, kaip pakeisti numatytąją programą „Windows 11“, galite vadovautis toliau pateiktu vadovu.
1 veiksmas: pirmiausia pakeiskite numatytąją programą? [Neprivaloma]
Pastaba: iš anksto įsitikinkite, kad sistemoje esate įdiegę pakaitinę programą, kad pakeistumėte numatytąją programą. Pavyzdžiui, jei keičiate naršyklę iš „Microsoft Edge“, jūsų sistemoje turi būti jau įdiegta kita naršyklė, kurią norite naudoti, kad galėtumėte pasirinkti ją kaip numatytąją naršyklę.
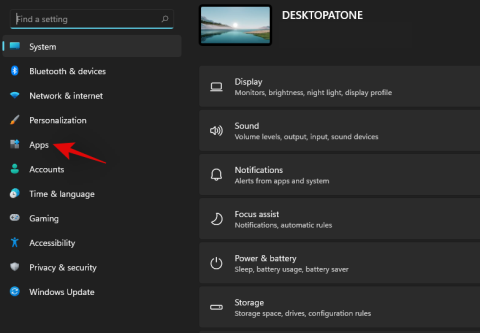
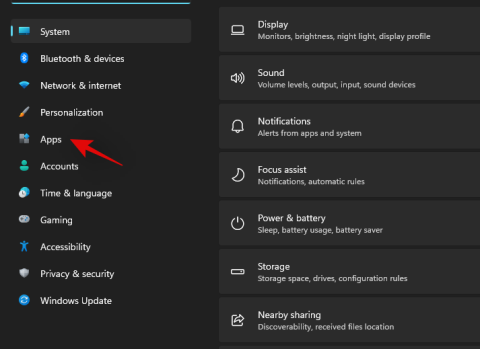
Paspauskite Windows + iklaviatūrą, kad atidarytumėte nustatymų programą. Dabar kairėje šoninėje juostoje spustelėkite „Programos“.
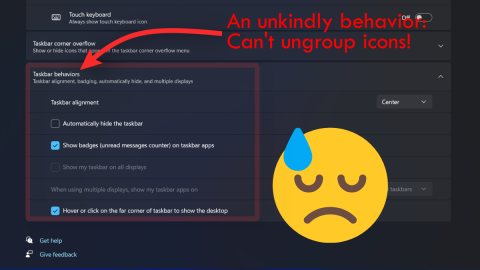
Spustelėkite ir dešinėje pasirinkite „Numatytosios programos“.
Dabar pasirinkite programą, kurią norite pašalinti kaip numatytąją programą, ir spustelėkite ją. Jei norite pakeisti numatytąją programą pagal failo tipą, apačioje spustelėkite „Pasirinkti numatytuosius nustatymus pagal failo tipą“, kaip parodyta toliau.
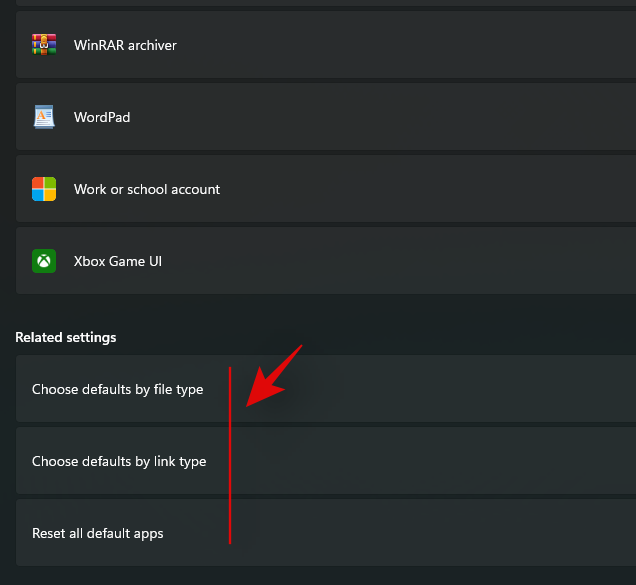
Dabar spustelėkite norimą failo tipą / plėtinį ir pasirinkite norimą programą.
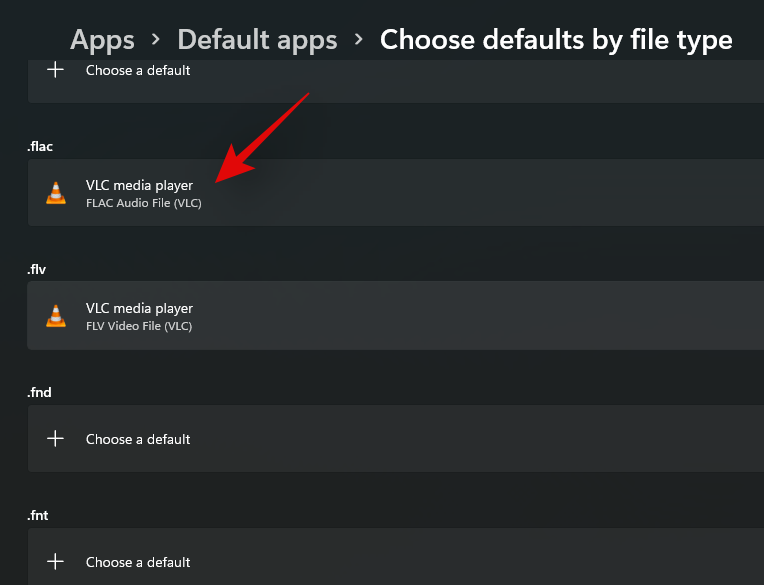
Pakartokite aukščiau aprašytą veiksmą su visais reikalingais failų tipais / plėtiniais.
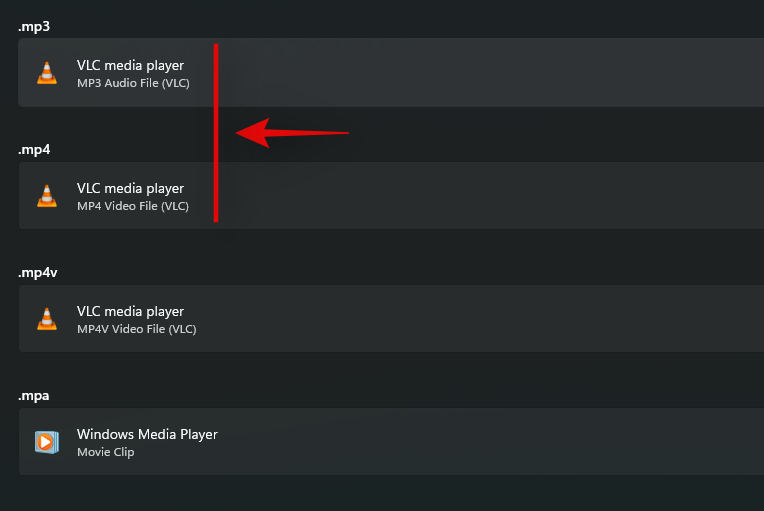
Uždarykite programą „Nustatymai“ ir iš naujo paleiskite sistemą.
Štai ir viskas! Kai sistema paleidžiama iš naujo, numatytoji programa turėtų būti pakeista. Dabar galite naudoti toliau pateiktą vadovą, kad pašalintumėte reikiamą programą naudodami sistemos „Nustatymai“.
2 veiksmas: pašalinkite programą iš nustatymų
Paspauskite Windows + iklaviatūrą ir kairėje pasirinkite „Programos“.

Dabar dešinėje spustelėkite „Programos ir funkcijos“.
Slinkite sąrašu ir raskite programą, kurią norite pašalinti. Suradę spustelėkite „3 taškų“ meniu piktogramą dešinėje.
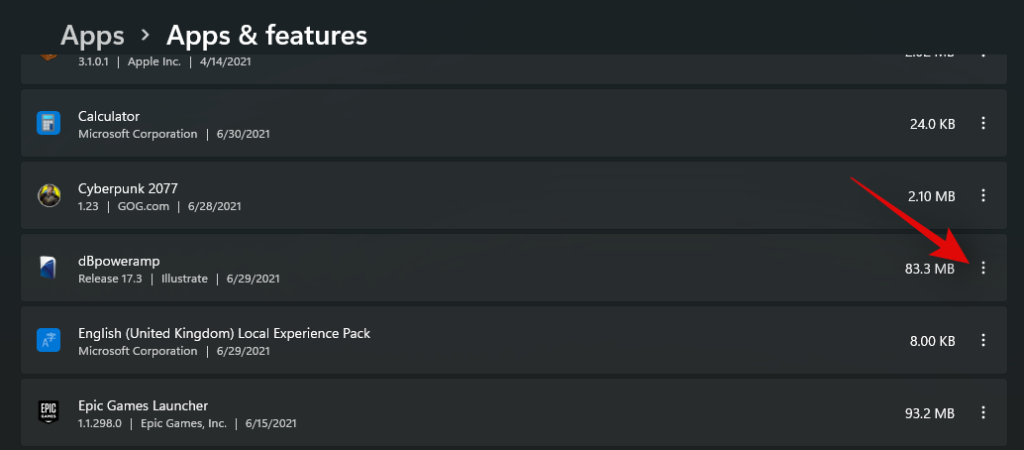
Spustelėkite ir pasirinkite „Pašalinti“.
Dabar vykdykite ekrane pateikiamas instrukcijas, kad pašalintumėte programą. Jei pašalinate iš anksto įdiegtą arba „Windows Store“ programą, ji bus automatiškai pašalinta fone. Tačiau jei tai programa, kurią aptiko „Windows“, priklausomai nuo programos, „Windows“ bandys ją pašalinti fone arba paleis „uninstall.exe“ arba „setup.msi“, kad galėtumėte ją pašalinti patys. su norimais nustatymais. Susidūrę su tokiomis sąrankomis galite išsaugoti / išsaugoti kai kuriuos duomenis, įskaitant žurnalo failus, vartotojo duomenis, išsaugoti duomenis, paveikslėlius ir kt.
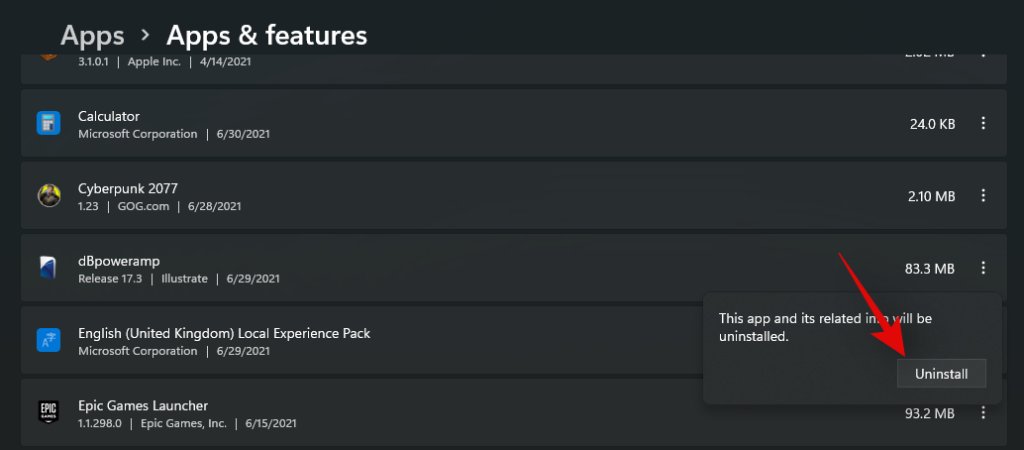
Arba taip pat turėsite galimybę iš sistemos visiškai pašalinti viską, kas susiję su programa.
Štai ir viskas! Pasirinkta programa dabar turėtų būti pašalinta iš jūsų sistemos. Jei pašalinote sunkią programą, rekomenduojame išvalyti talpyklą pagal šį vadovą, ypač jei programos dydis viršijo 30 GB.
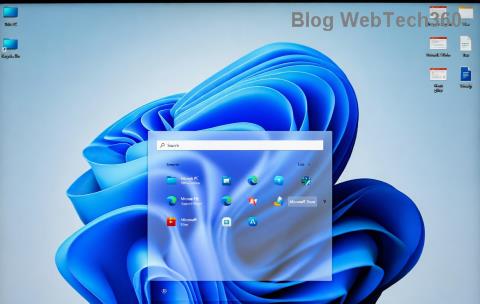
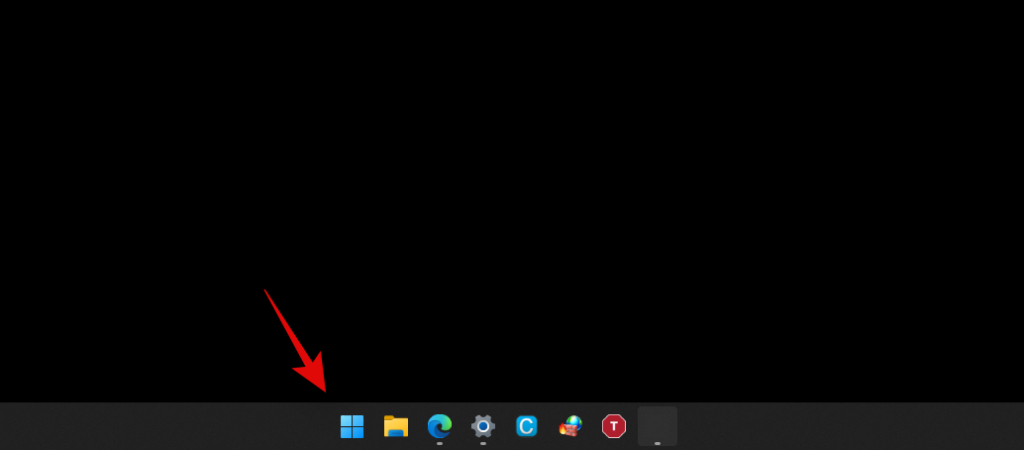
Paspauskite klaviatūros mygtuką „Windows“, kad būtų parodytas meniu „Pradėti“. Arba taip pat galite spustelėti piktogramą „Užduočių juostoje“.
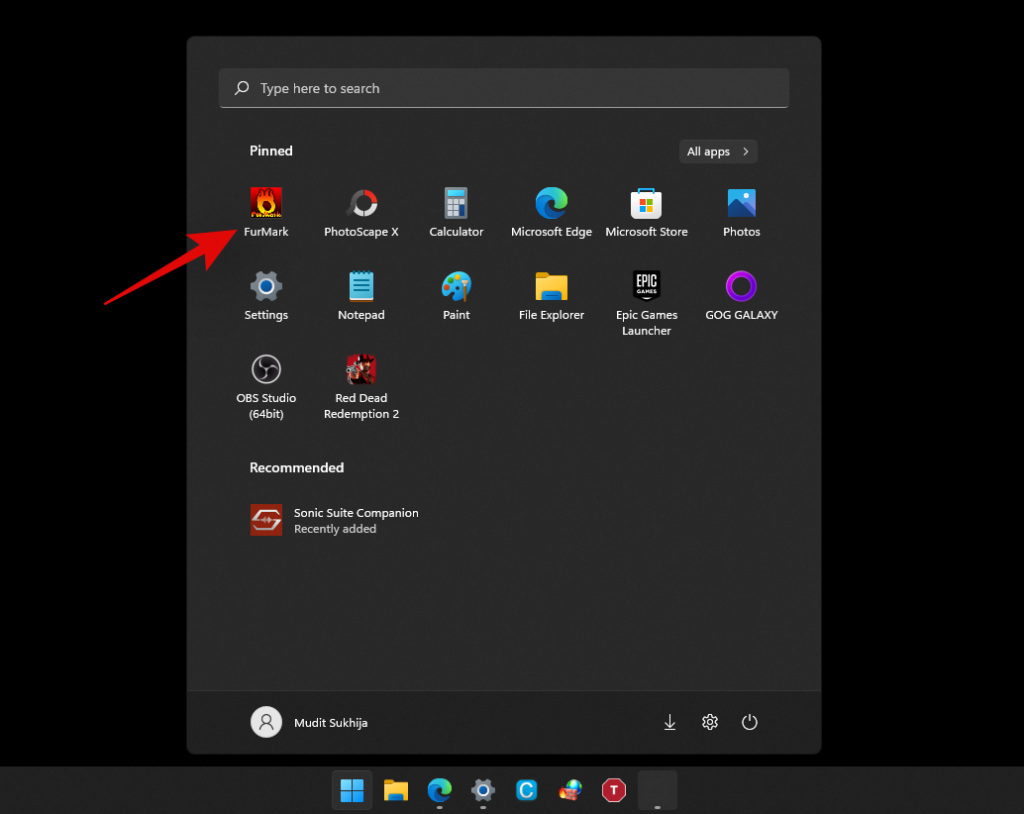
Raskite programą, kurią norite pašalinti, ir spustelėkite ją dešiniuoju pelės mygtuku.
Dabar spustelėkite „Pašalinti“. Jei reikia, vykdykite ekrane pateikiamas instrukcijas, kad užbaigtumėte pašalinimo procesą.
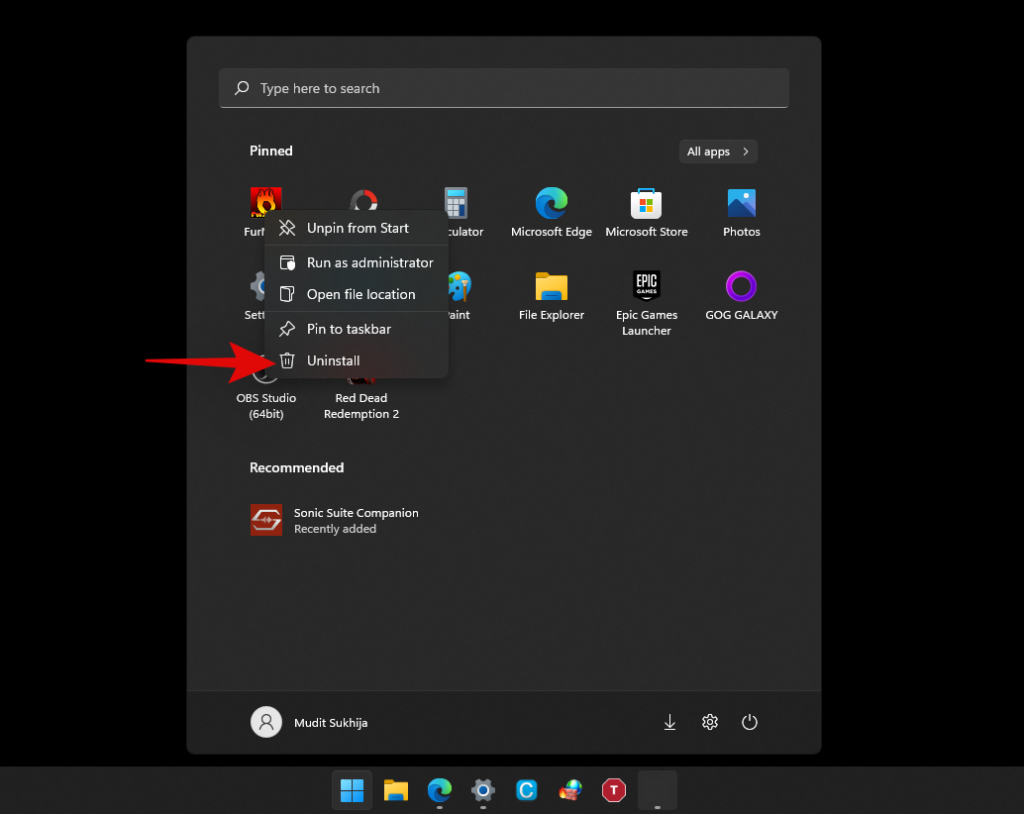
Štai ir viskas! Dabar turėsite pašalinti programą iš savo sistemos naudodami meniu Pradėti.
03 būdas: naudokite pašalinimo failą „.exe“.
Idealiu atveju jums nereikėtų rankiniu būdu paleisti programos pašalinimo vykdomojo failo, tačiau kai kuriais atvejais, pavyzdžiui, senesnėse programose, jūsų sistemoje gali būti įdiegta programa, kurios pašalinimo parinktis niekur nerodoma nustatymuose. Tokiais atvejais galite patys paleisti pašalinimo failą naudodami toliau pateiktą vadovą.
Raskite programos .exe failą arba nuorodą, kurią paprastai naudojate programai paleisti, ir spustelėkite jį dešiniuoju pelės mygtuku.
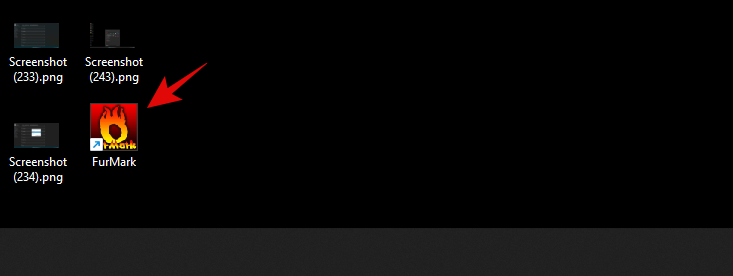
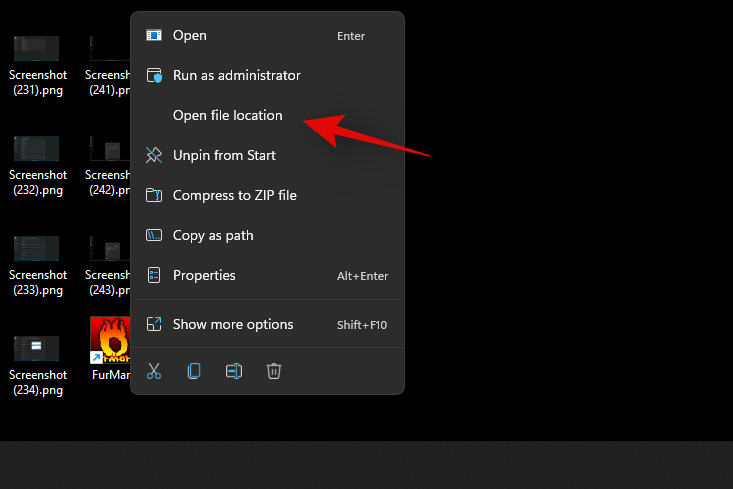
Pasirinkite „Atidaryti failo vietą“. Jei nematote šios parinkties, pasirinkite ypatybes. Dabar skirtuke „Bendra“ rasite parinktį „Atidaryti failo vietą“, kaip parodyta toliau.
Dabar būsite nukreipti į programos diegimo katalogą. Ieškokite .exe failo vienu iš šių pavadinimų arba panašiu pavadinimu.
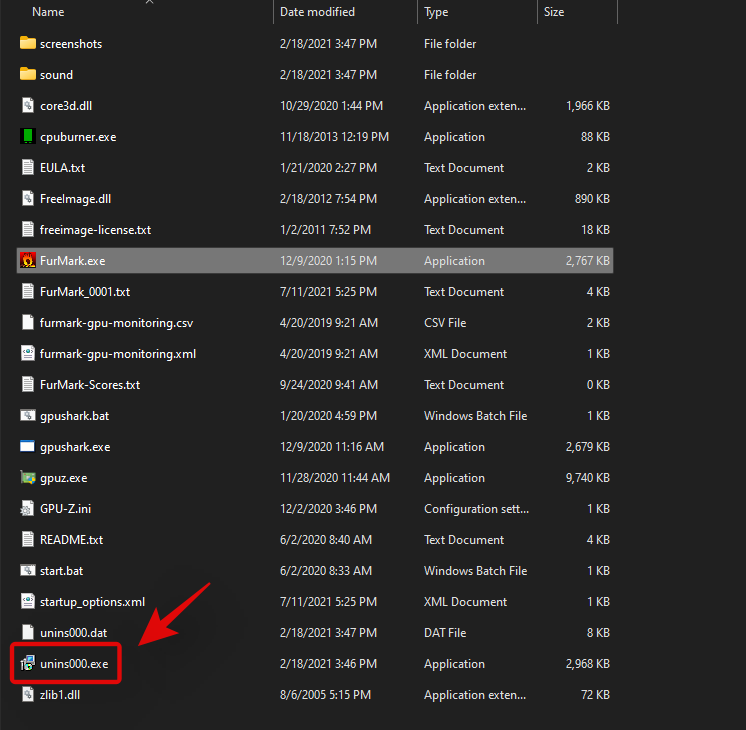
- uninst.exe
- uninstall.exe
- setup.exe
- setup.msi
- (programos pavadinimas)setup.exe/.msi
- (programos pavadinimas)uninstall.exe/uninst.exe
ir dar. Pašalinimo programa / sąranka bus pavadinta panašiai. Kai jį paleisite, galite vadovautis ekrane pateikiamomis instrukcijomis, kad pašalintumėte ją iš savo sistemos.
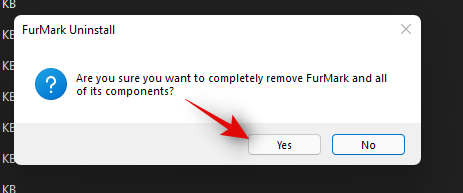
Kai kuriais atvejais taip pat galite gauti galimybę taisyti, iš naujo įdiegti arba modifikuoti programą kartu su pašalinimu. Galite pasirinkti norimą parinktį ir tęsti sąranką taip, kaip norite.
04 metodas: Valdymo skydo naudojimas
Taip pat galite lengvai pašalinti programas ir programas iš valdymo skydelio. Idealiu atveju, naudojant valdymo skydelį, rekomenduojama pašalinti tik pasenusias ir modernias programas, nes čia bus rodomos ne visos įdiegtos programos. Vykdykite toliau pateiktą vadovą, kad pašalintumėte programas per valdymo skydelį.
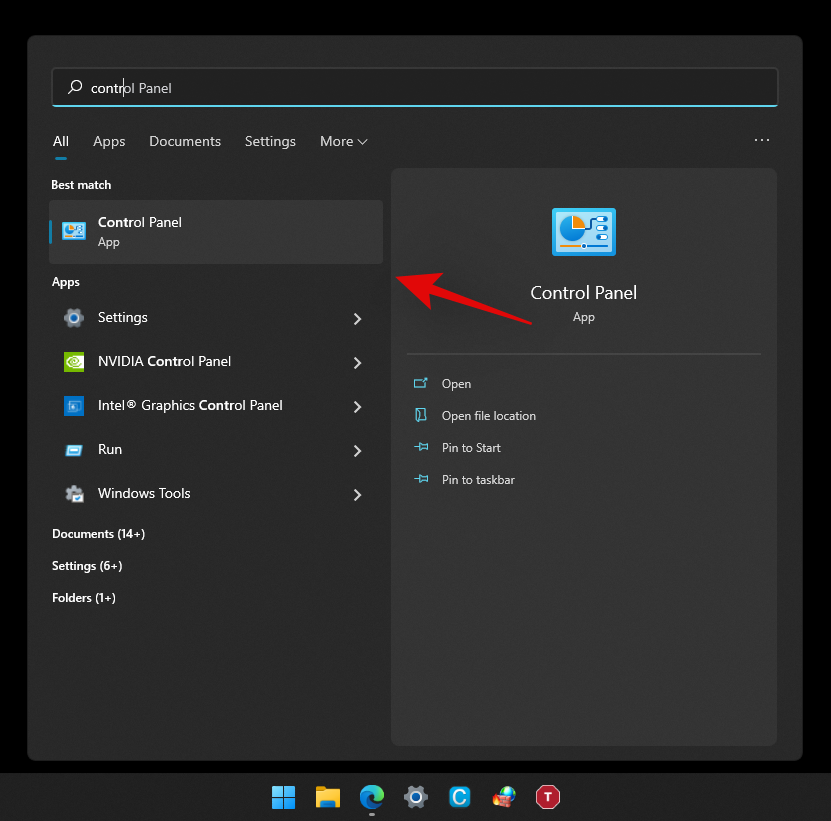
Paspauskite Windows + sklaviatūrą ir įveskite „Valdymo skydas“. Spustelėkite ir paleiskite programą, kai ji pasirodys paieškos rezultatuose.
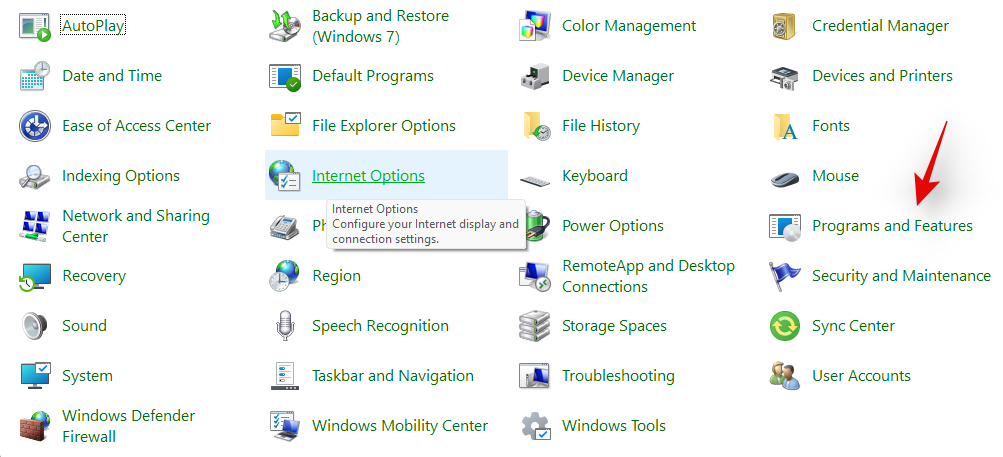
Dabar spustelėkite „Programos ir funkcijos“.
Dabar gausite visų šiuo metu jūsų sistemoje įdiegtų programų sąrašą. Raskite programą, kurią norite pašalinti, ir spustelėkite ją.
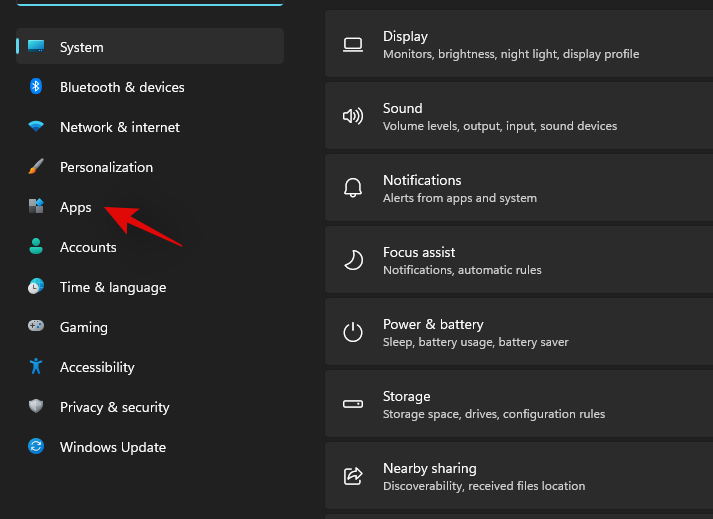
Dabar viršuje pasirinkite „Pašalinti“.

Vykdykite ekrane pateikiamus nurodymus, kad užbaigtumėte diegimo procesą. Kai kuriais atvejais tai bus automatizuotas procesas, o kitais atvejais galite gauti galimybę pataisyti esamą diegimą arba pasirinkti, kuriuos duomenis norite išsaugoti ir kuriuos norite ištrinti.
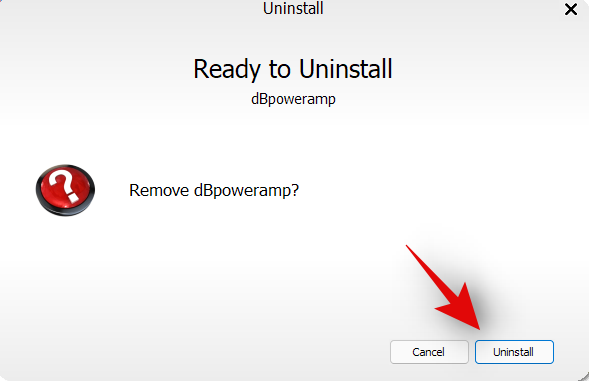
Pasirinkus, įvyks pašalinimo procesas, o programa turi būti pašalinta iš sistemos, kai tik procesas bus baigtas.
05 metodas: „PowerShell“ naudojimas
Taip pat galite pašalinti programas naudodami padidintą „PowerShell“ funkciją sistemoje „Windows 11“. Nors pašalinimo komanda yra gana paprasta, atitinkamos programos ar programos paketo pavadinimo gauti nėra. Taigi, toliau pateiktame vadove rasite, kaip pašalinti programas naudojant „PowerShell“, jei turite paketo pavadinimą.
Tačiau jei nežinote, kaip gauti viso paketo pavadinimo, rekomenduojame vadovautis toliau pateiktu sistemos programų vadovu, kuriame tas pats metodas aprašytas daug išsamiau. Pradėkime.
Paspauskite Windows + sklaviatūrą ir įveskite „PowerShell“. Dabar spustelėkite „Vykdyti kaip administratoriui“, kai jis pasirodys paieškos rezultatuose.
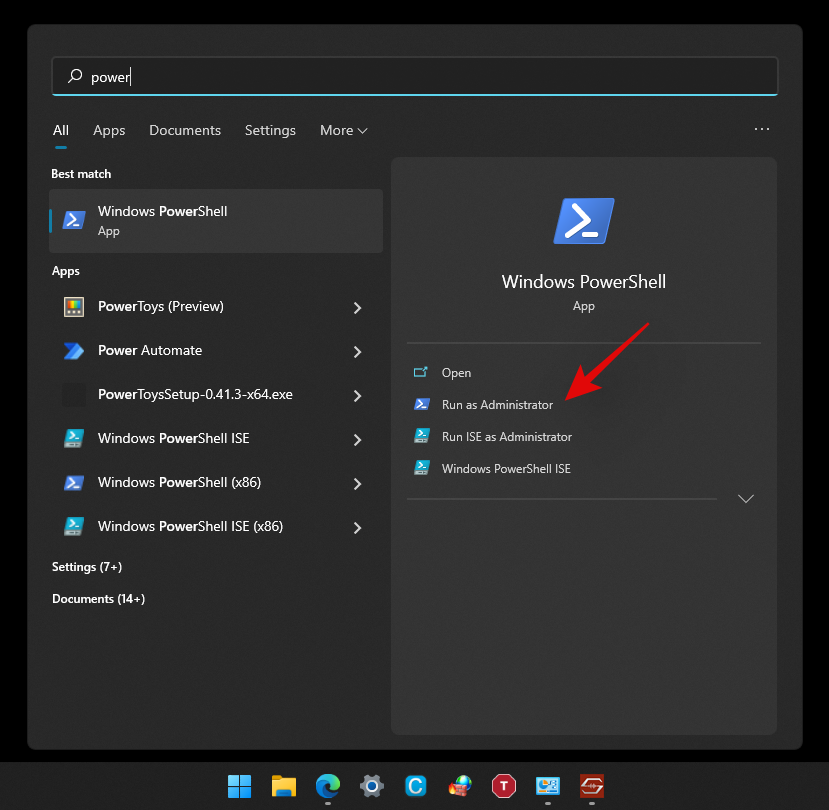
Kai darbalaukyje gausite „PowerShell“ langą, įveskite šią komandą ir klaviatūroje paspauskite „Enter“. Įsitikinkite, kad „[Vardas]“ pakeitėte visu atitinkamos programos paketo pavadinimu.
Remove-AppxPackage [Name]

Štai ir viskas! Dabar „Powershell“ atliks savo magiją ir pašalins atitinkamą programą iš jūsų sistemos.
06 metodas: CMD naudojimas
Taip pat galite naudoti komandų eilutę sistemoje „Windows 11“, kad pašalintumėte programas iš savo sistemos. Norėdami pradėti, vadovaukitės toliau pateiktu vadovu.
Paspauskite Windows + sklaviatūrą ir ieškokite „CMD“. Spustelėkite „Vykdyti kaip administratoriui“, kai jis pasirodys paieškos rezultatuose.
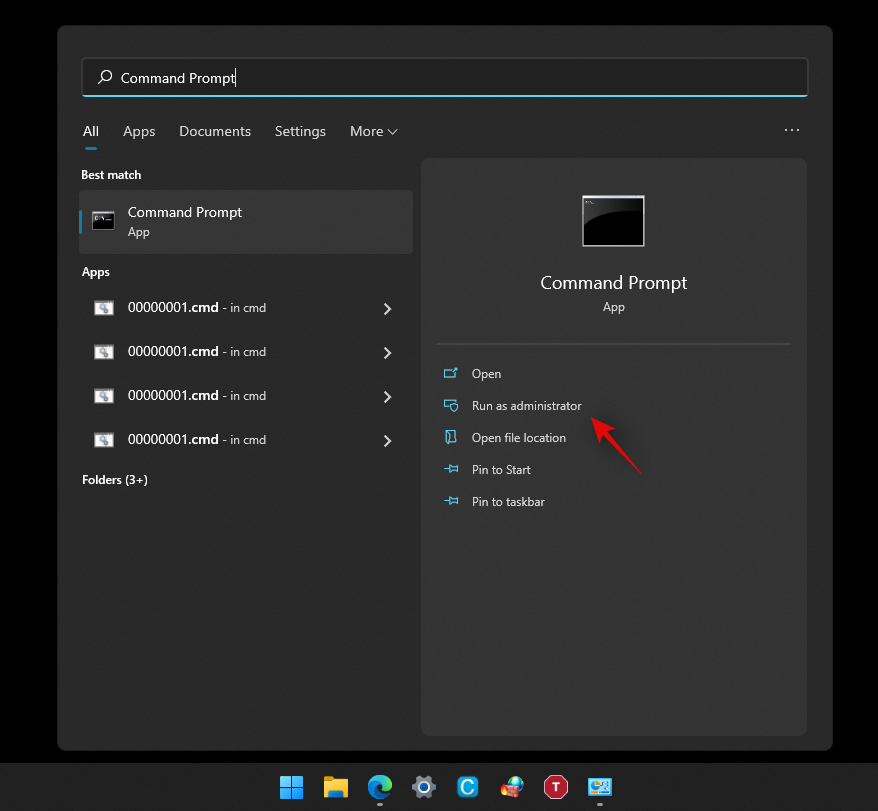
Paleidę CMD, įveskite šią komandą ir klaviatūroje paspauskite „Enter“.
wmic

Dabar įveskite šią komandą, kad gautumėte visų jūsų sistemoje įdiegtų programų ir programų sąrašą.
product get name

Kai gausite visų programų sąrašą, šiame sąraše raskite tą, kurią norite pašalinti. Suradę užsirašykite visą jo pavadinimą patogioje vietoje.
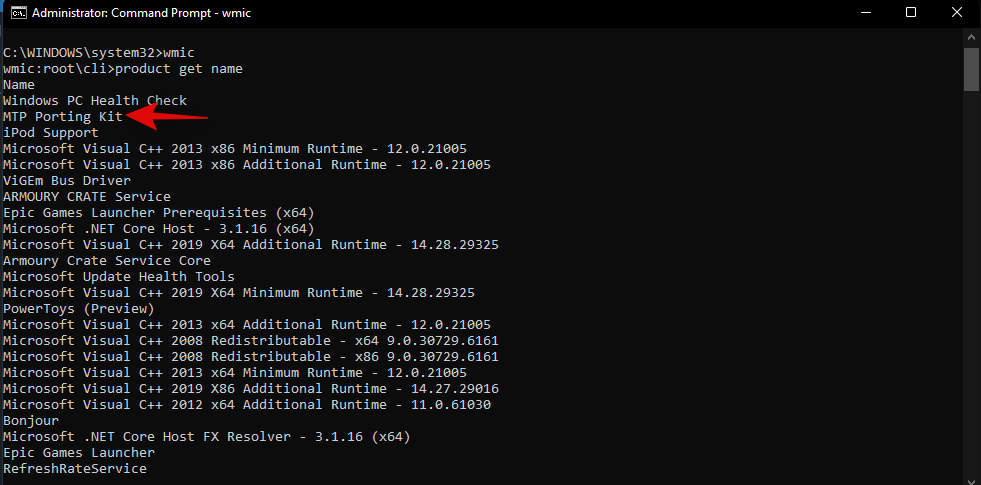
Dabar įveskite šią komandą ir pakeiskite „ AppName “ programos pavadinimu, kurį pažymėjote anksčiau.
product where name="AppName" call uninstall/nointeractive
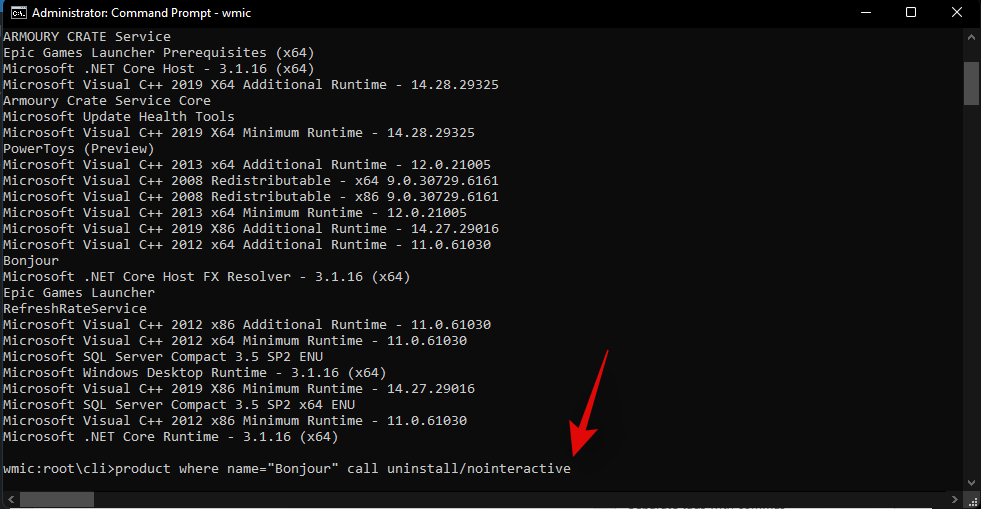
Pastaba: nepašalinkite kabučių iš komandos, nes jos būtinos šiai sintaksei.
Norėdami įvykdyti komandą, klaviatūroje paspauskite „Enter“.
Komandinė eilutė dabar atliks reikiamus procesus fone, o baigę procesą turėtumėte gauti patvirtinimą, kaip parodyta toliau.
Štai ir viskas! Dabar turėsite pašalinę programą iš savo sistemos naudodami komandų eilutę.
07 metodas: Setup.msi naudojimas
Jei jūsų programoje buvo įdiegtas sąrankos failas, kurio plėtinys buvo .msi, o ne .exe, galite naudoti tą patį failą programai pašalinti. Sužinokime šiek tiek daugiau apie .msi failus, kad būtų lengviau suprasti jų funkciją.
Kas yra .msi failas?
Tradiciškai jūsų montuotojai turi .exe plėtinį. Tai yra programos, skirtos programoms įdiegti jūsų sistemoje kartu su sąrankos failais. MSI failai žengia dar vieną žingsnį, leisdami į vieną failą sujungti kelis diegimo programas.
Dėl to MSI failas gali atlikti įvairias funkcijas dėl įdiegtų programų. Tai apima tokius dalykus kaip naujinimo diegimo programos, programinės įrangos diegimo programos, programų taisytojas, programos modifikatorius ir pašalinimo programa. Taigi, jei jūsų programoje yra .msi sąrankos failas, galite naudoti toliau pateiktą vadovą, kad pašalintumėte programą iš sistemos naudodami tą patį failą.
Pastaba: senesni .msi failai retai veikia su naujesniais tos pačios programinės įrangos diegimais. Turėkite tai omenyje, jei bandote grąžinti ankstesnę programos versiją.
Pašalinkite naudodami .msi failą
Vietinėje saugykloje suraskite .msi sąrankos failą ir dukart spustelėkite ir paleiskite programą.
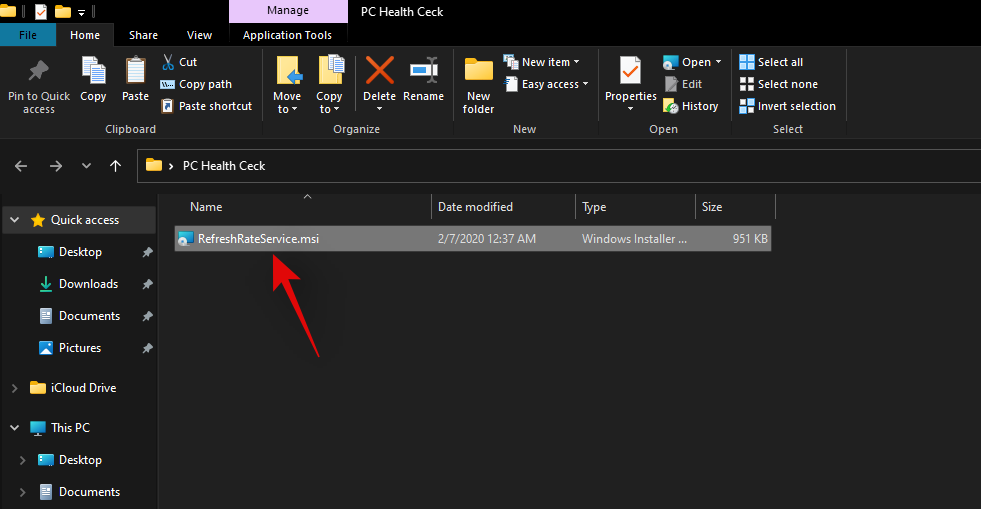
Vykdykite ekrane pateikiamas instrukcijas, kol būsite paraginti pasirinkti vieną iš veiksmų krypčių.
- Remontas
- Modifikuoti
- Pašalinkite
- Įdiekite naujinimus
- Pašalinti naujinimus
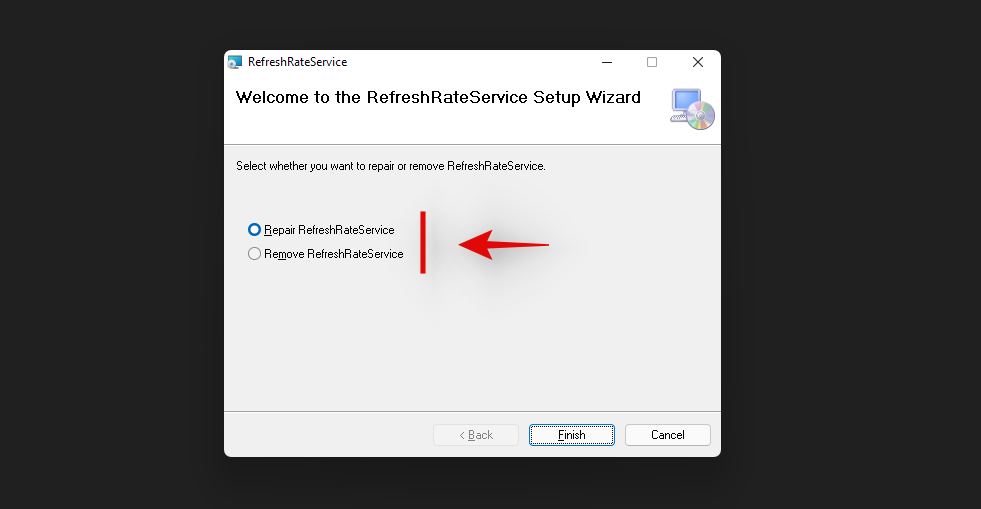
Pasirinkite norimą parinktį ir tęskite ekrane pateikiamus nurodymus, kad užbaigtumėte pašalinimo procesą.
Štai ir viskas! Pasirinkta programa dabar turėtų būti pašalinta iš sistemos naudojant .msi sąrankos failą.
08 būdas: naudokite trečiosios šalies pašalinimo programą
Rinkoje taip pat yra įvairių trečiųjų šalių pašalinimo programų. Šios programos padeda identifikuoti visas jūsų sistemoje esančias sistemas ir trečiųjų šalių programas, kurias galima pašalinti iš kompiuterio vienu paspaudimu. Dauguma šių programų leidžia pašalinti sistemos programas pasirinkus aukščiausios kokybės programinės įrangos modelį.
Jei nuspręsite naudoti nemokamą versiją, daugeliu atvejų turėsite tik tam tikrą pašalinimų skaičių. Nors tai gali atrodyti perteklinė, šios priemonės yra labai naudingos profesionalams ir technikai, kuriems reikia pašalinti kelias programas vienu spustelėjimu. Dauguma šių pašalinimo programų palaiko masinį pašalinimą, o tai yra gana naudinga nustatant kelias biuro aplinkai skirtas sistemas. Toliau susiejome du populiariausius trečiųjų šalių pašalinimo programas. Tikimės, kad jie bus naudingi siekiant pašalinti programas iš „Windows 11“.
Kaip pašalinti sistemos programas „Windows 11“ [2 būdai]
Galite pašalinti sistemos programas sistemoje „Windows 11“ naudodami padidintą „PowerShell“ arba trečiosios šalies „PowerShell“ scenarijų. Rekomenduočiau naudoti PowerShell metodą, nors jis gali atrodyti sudėtingesnis, jums nereikės savo sistemoje paleisti trečiųjų šalių scenarijų su padidintomis privilegijomis.
Tačiau, jei vis tiek nuspręsite naudoti automatinį scenarijų, įsitikinkite, kad scenarijui įvykdę vėl pakeisite vykdymo politiką į įprastą. Tai bus svarbiausia jūsų sistemos saugumui, nes nepakeitus vykdymo politikos, kenkėjiški vartotojai gali lengvai paleisti „PowerShell“ scenarijus jūsų sistemoje. Norėdami pradėti, naudokite vieną iš toliau pateiktų metodų, kurie geriausiai atitinka dabartinius poreikius ir reikalavimus.
01 metodas: „Powershell“ naudojimas
Bet kurios programos „PowerShell“ pašalinimo procesas turi du procesus. Pirma, gaukite visą atitinkamos programos paketo pavadinimą ir naudokite „PowerShell“, kad pašalintumėte atitinkamą programą. Jei jūsų programa nerodoma PowerShell sąraše, gali tekti naudoti toliau pateiktą trečiosios šalies scenarijų, kad pašalintumėte atitinkamą programą iš savo sistemos. Pradėkime.
1 veiksmas: šaltinio visas paketo pavadinimas
Paspauskite Windows + sklaviatūrą ir ieškokite „PowerShell“. Spustelėkite „Vykdyti kaip administratoriui“, kai jis pasirodys paieškos rezultatuose.

Paleidę „PowerShell“, įveskite toliau esančią komandą ir ekrane paspauskite „Enter“.
get-appxpackage
Dabar „PowerShell“ sugeneruos ir parodys visų jūsų sistemoje įdiegtų programų sąrašą, įskaitant įtaisytąsias OEM programas ir „Windows“ programas. Slinkite sąrašu, kad surastumėte programą, tačiau, jei tai atrodo pernelyg varginanti, pradėkite dešiniuoju pelės mygtuku spustelėdami pavadinimo juostą viršuje.
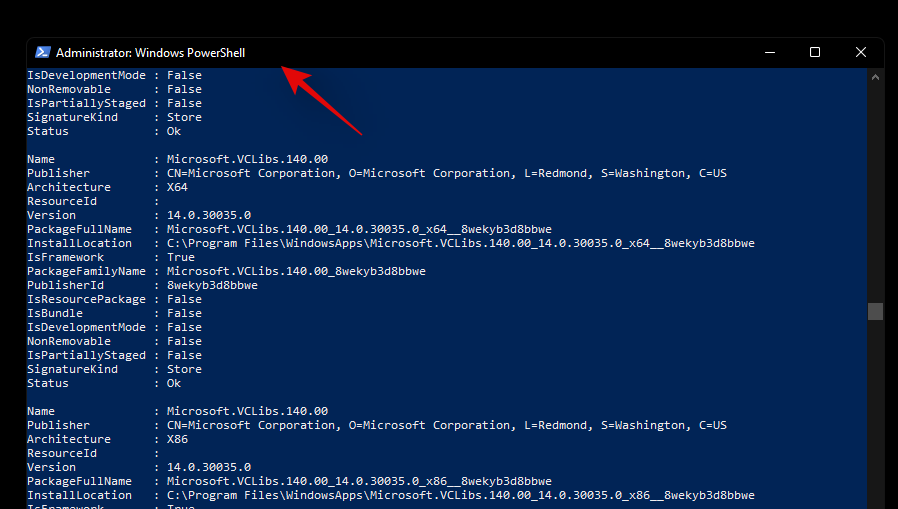
Dabar pasirinkite „Redaguoti“.
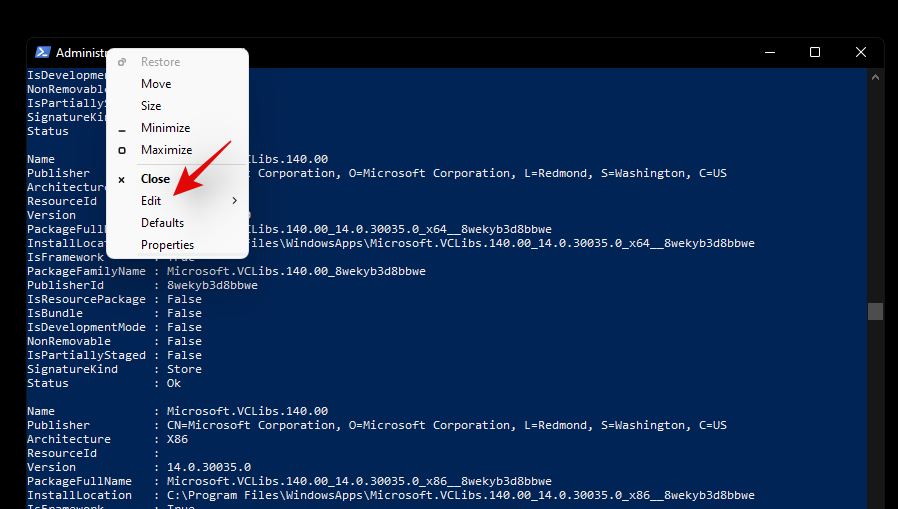
Spustelėkite „Rasti“.
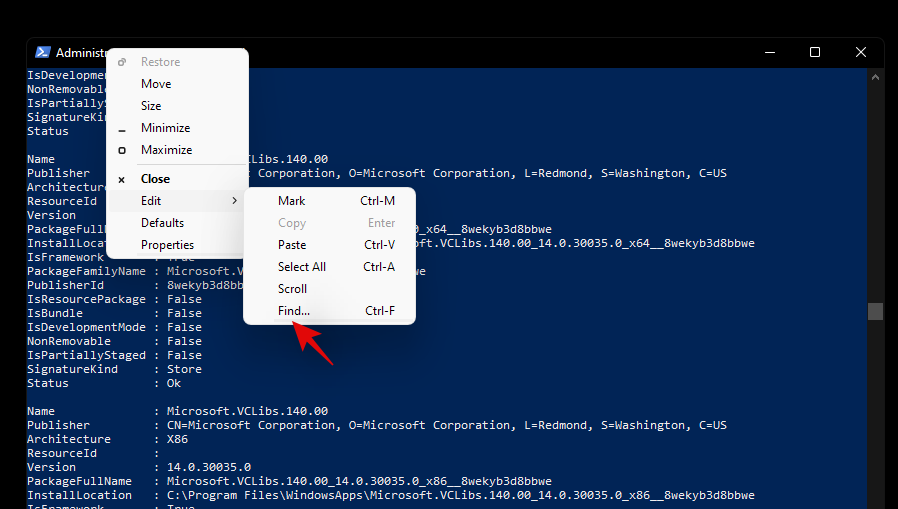
Dabar ieškokite bendrojo programos pavadinimo ir funkcija „Rasti“ turėtų automatiškai nukreipti jus į sąraše esančią programą.
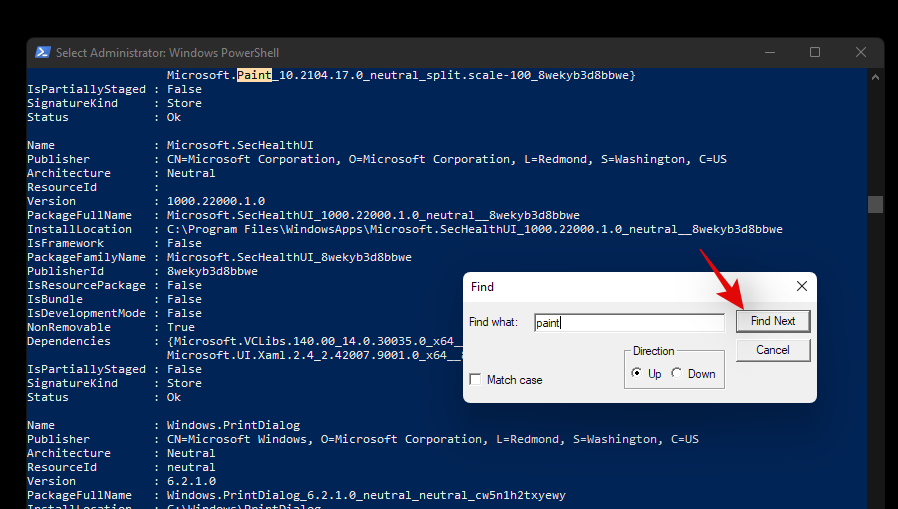
Užsirašykite atitinkamos programos „FullPackageName“, kaip parodyta toliau.
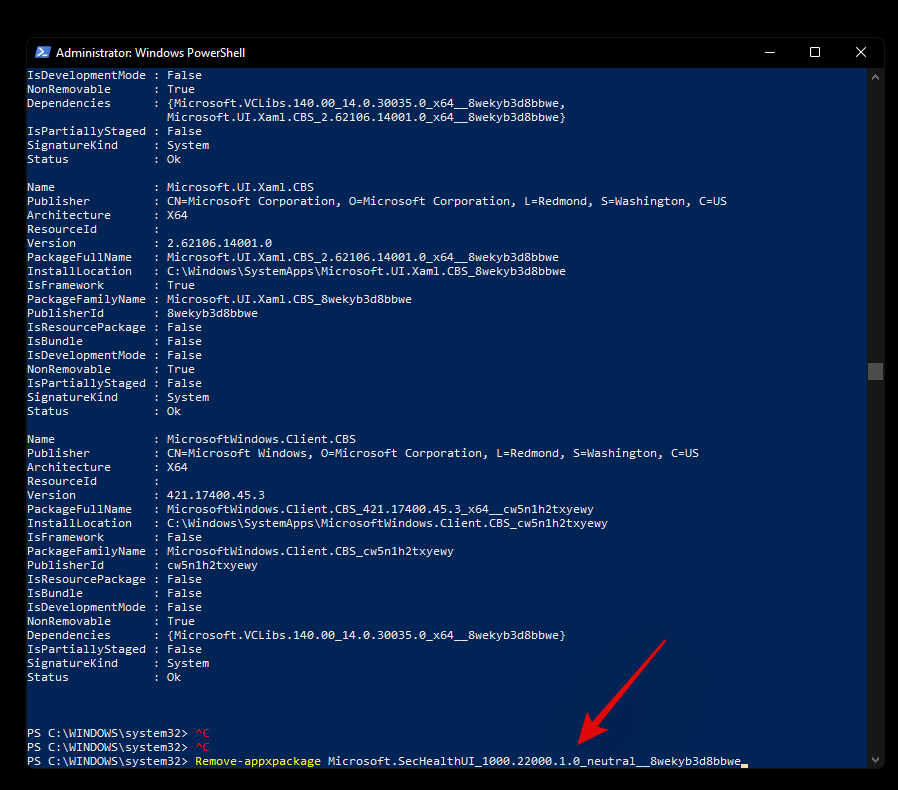
Štai ir viskas! Dabar turėsite visą atitinkamos programos paketo pavadinimą savo sistemoje. Dabar galite naudoti toliau pateiktą vadovą, kad pašalintumėte jį iš savo sistemos.
2 veiksmas: pašalinkite programą naudodami „PowerShell“.
Open an elevated PowerShell using the guide above. If you already have one open on your screen, then start by typing in the following command. Ensure that you replace ‘[PackageName]’ with the full package name of the app we sourced above.
Remove-Appxpackage [PackageName]

Hit ‘Enter’ on your keyboard once you are done. PowerShell will now do its thing and the app should be installed from your system in no time.
Can’t remove an app using PowerShell? How to fix
If you are unable to remove the app via PowerShell then we recommend you do the following checks to solve the issue.
- Ensure that you are using an elevated PowerShell window.
- Ensure that the Full Package Name has been sourced correctly.
- Verify your ‘uninstall’ codes and try to keep everything lowercase.
- Repeat the same guide in Safe mode.
- Verify if the app hasn’t been already removed from your system and only leftover registry files are showing up in PowerShell.
You should be able to solve your issue by crosschecking the above-stated checks. However, if you are still unable to uninstall the concerned app, then you can use the third-party script below.
Method #02: Using a third party script
You can also use a third-party script to remove system apps from your Windows 11 system. These scripts have been quite popular lately and have been the go-to choice for many users when setting up fresh installations of Windows. Use the guide below to get started.
- Windows10debloater by Sycnex | Download Link
Note: While this is a Windows 10 script, it has been verified to remove system apps on Windows 11 as well. However, we recommend you keep checking the download page for updates that should be better compatible with Windows 11. We recommend using the script to only remove system apps and nothing else offered by the script. Other features could potentially break Windows 11 until a compatible script for the same is released in the future.
Visit the link above and you will be taken to the GitHub page for the script. Click on ‘Code’ in the top right corner.
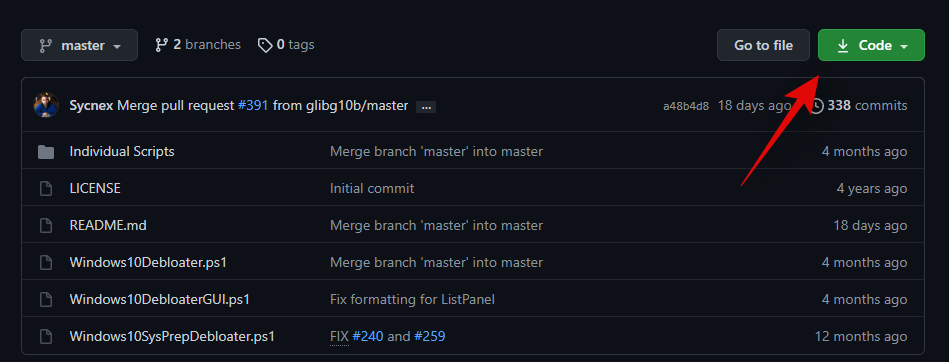
Now click and select ‘Download ZIP’.
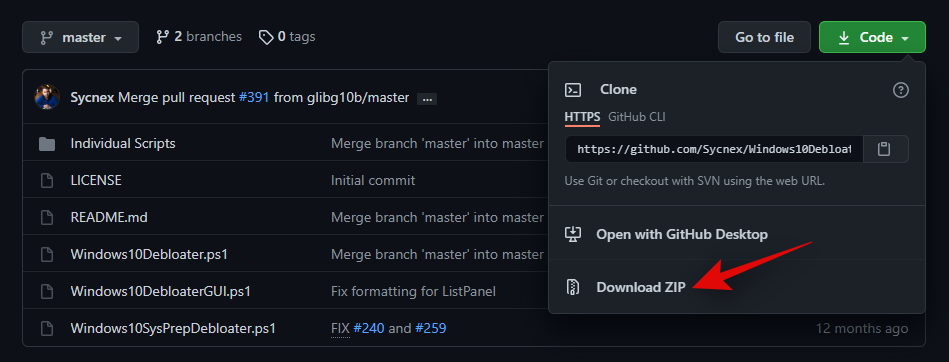
A Zip file will now be downloaded to your local storage. Extract the files to a convenient location.
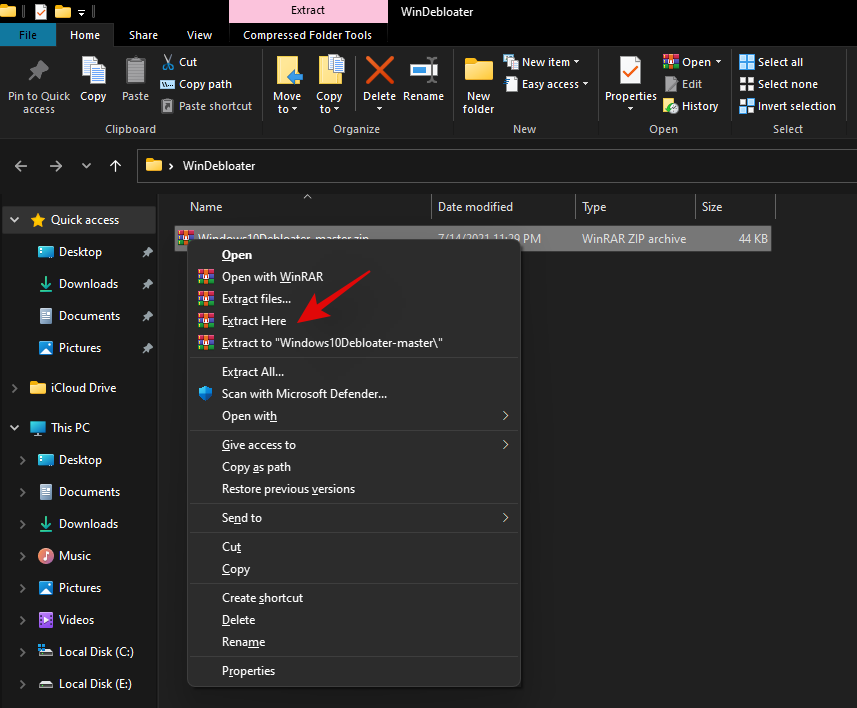
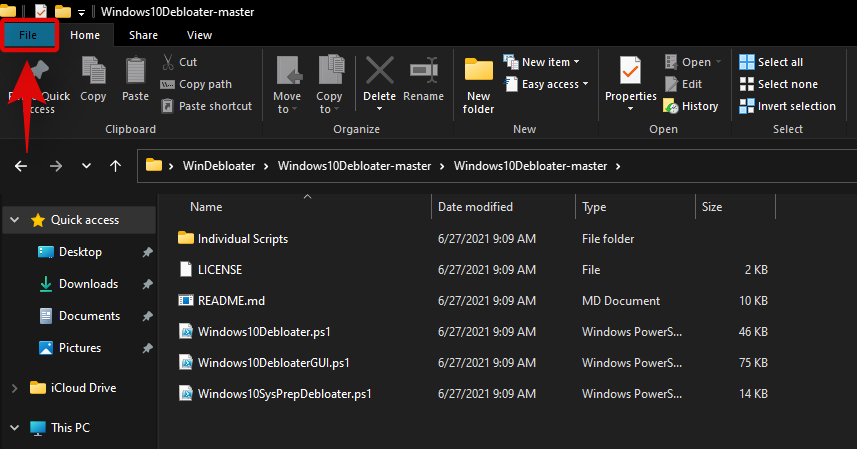
Once extracted, open the folder and click on ”File’ in the top left corner.
Hover over ‘Open Windows PowerShell’ and select ‘Open Windows PowerShell as administrator’.
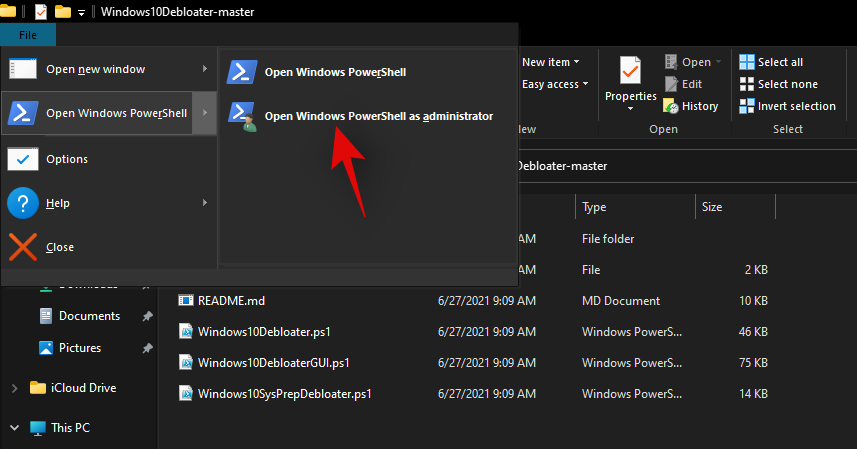
An elevated PowerShell window will now launch on your system. Start by executing the following command given below.
Set-ExecutionPolicy Unrestricted -Force

This will set your script execution policy as unrestricted which will allow us to use the script on your system. Once executed, enter the following command in the window and press ‘Enter’ on your keyboard once you are done.
.\Windows10DebloaterGUI.ps1

This will execute the debloat script and you should now get a graphical interface for it on your screen. Click on ‘Customize Blacklist’ at the top.
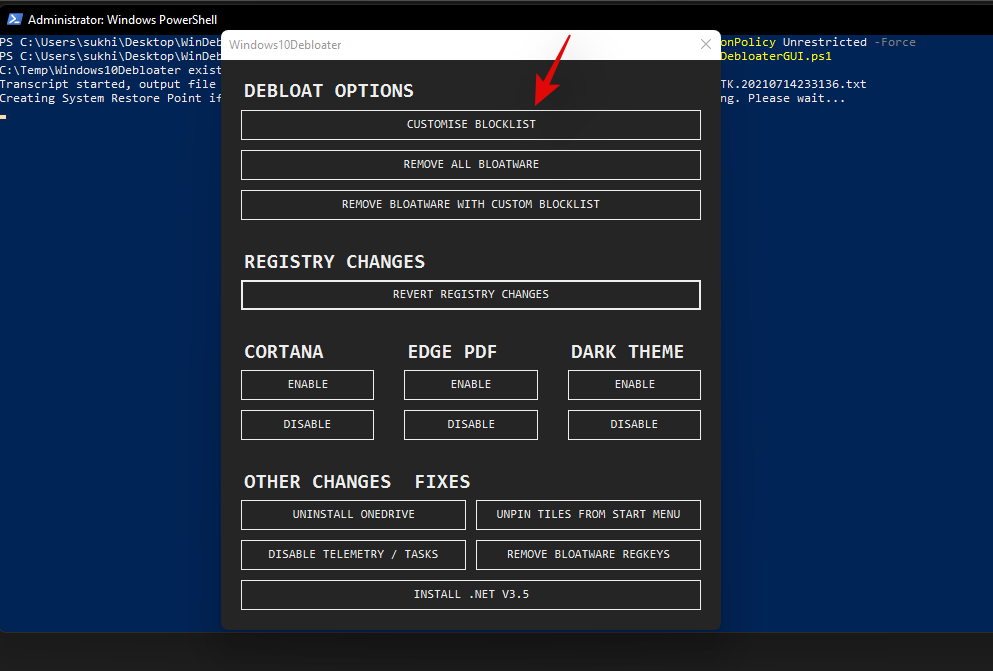
You will now get a list of all the apps installed on your system. Check the box for the apps you wish to uninstall and uncheck the box for the apps you wish to keep on your device. Ensure that you go through the entire list to remove any default selections made by the script for the programs that you wish to keep on your device.
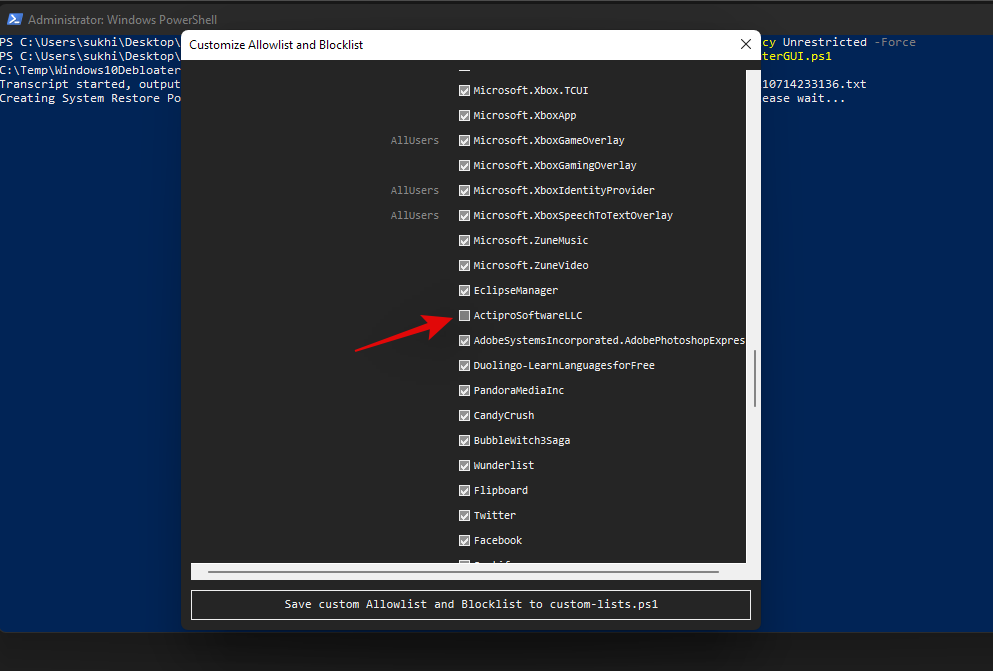
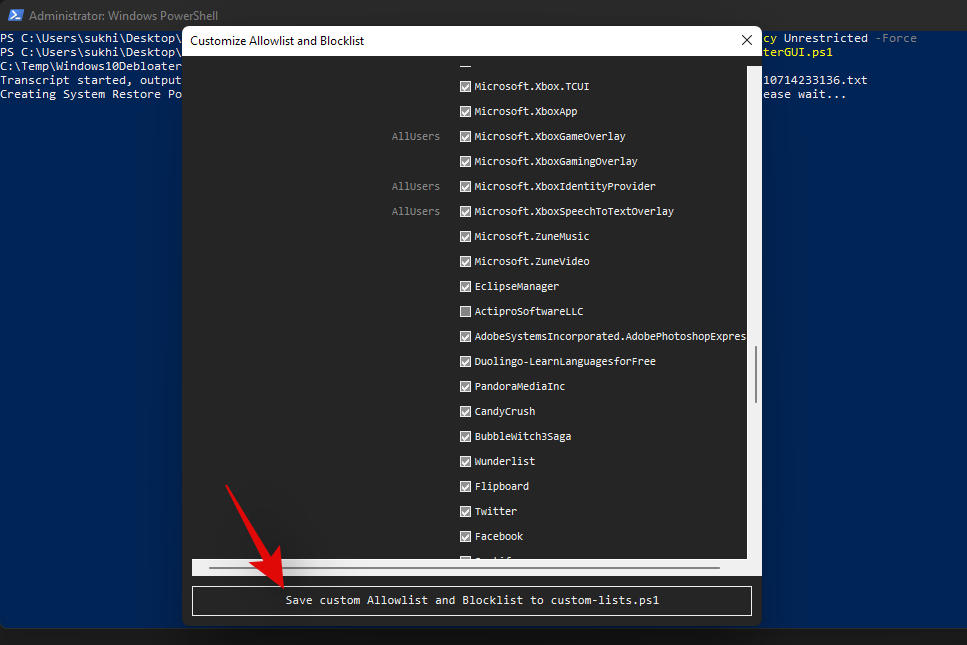
Once you have edited your list, simply click on ‘Save custom Whitelist and Blacklist to custom-lists.ps1’ at the top. You can now close this app selection window.
Now click on ‘Remove Bloatware with Customized Blacklist’. Keep an eye on the PowerShell window on the background once the command executes.
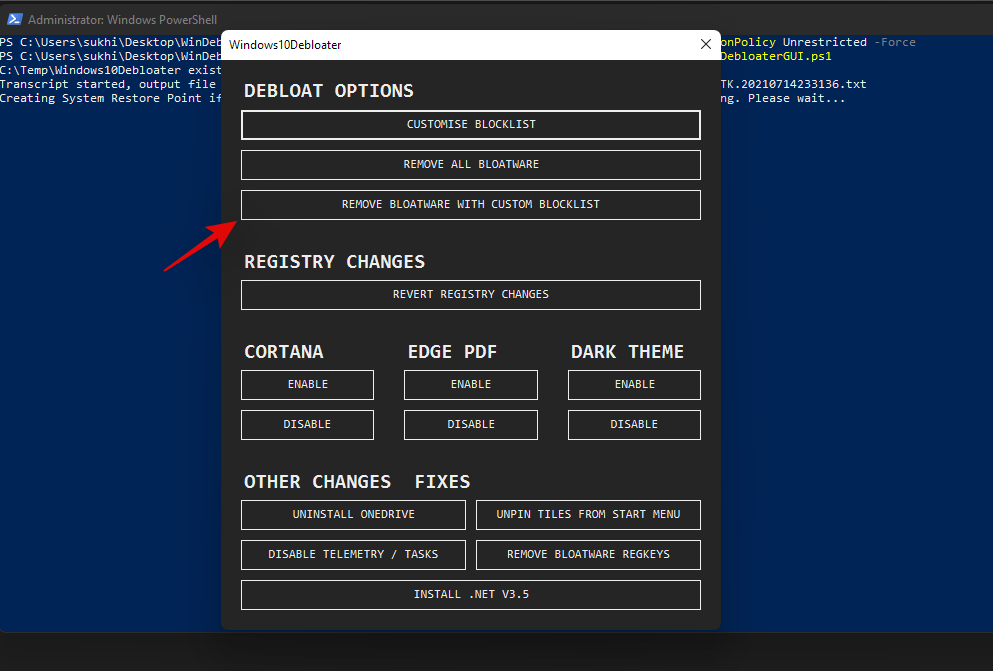
Once all programs have been removed, you will get a confirmation for the same in the PowerShell window in the background. Close the graphical interface by clicking on the ‘X’ in the top right corner.
Now go back to your PowerShell window and execute the following command.
Set-ExecutionPolicy Restricted -Force

This will revert changes to your execution policy and revert the changes we made earlier. Doing this is quite important to maintain proper security on your Windows system.
And that’s it! You will now have uninstalled system apps from your system via a third-party PowerShell script.
Can’t uninstall apps on Windows 11? How to fix
There could be a few reasons why you are unable to uninstall apps on your system. Here are a few workarounds that should help you uninstall persistent apps from your system easily.
Method #01: Close instance in task manager and try again
Chances are that the app has an instance or a process open in the background which is preventing it from being uninstalled. In such cases, you can try finding processes related to the app and kill them on your own. Once the processes have been killed, you can then try to uninstall the app again. Follow the guide below to find and kill the process.
Press Ctrl + Shift + Esc on your keyboard to open the ‘Task Manager’. Switch to the ‘Details’ tab by clicking on it.
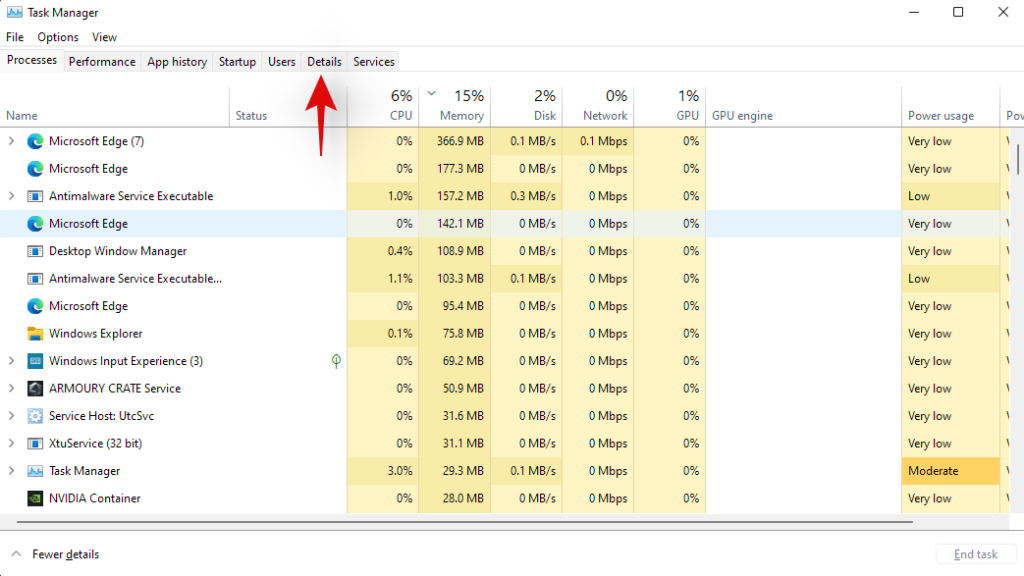
Now look for a process in the list for the concerned app. In our case, we are looking to uninstall ‘AsusOptimization’, hence we will look for a PowerToys process. Once found, click and select the process.
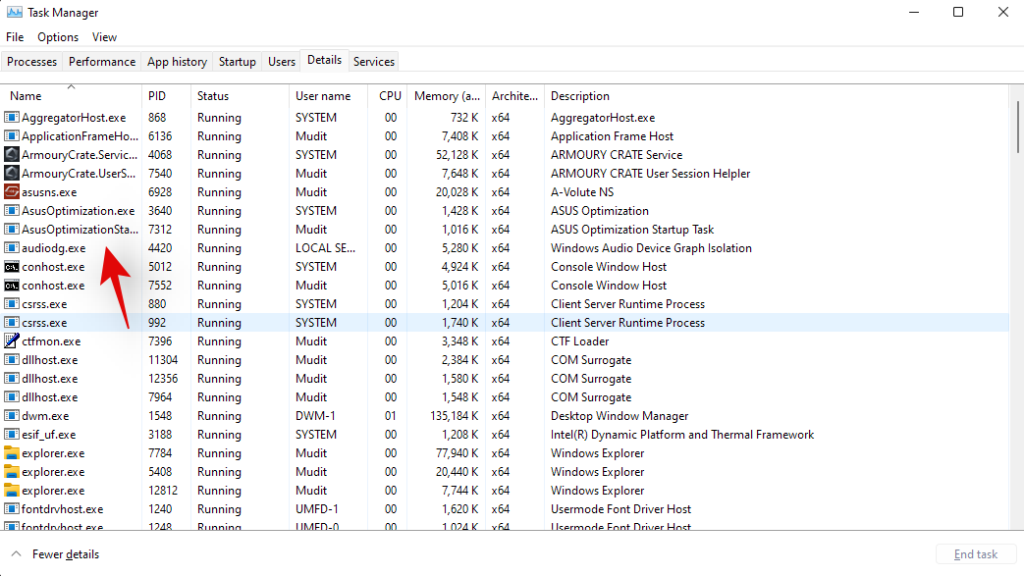
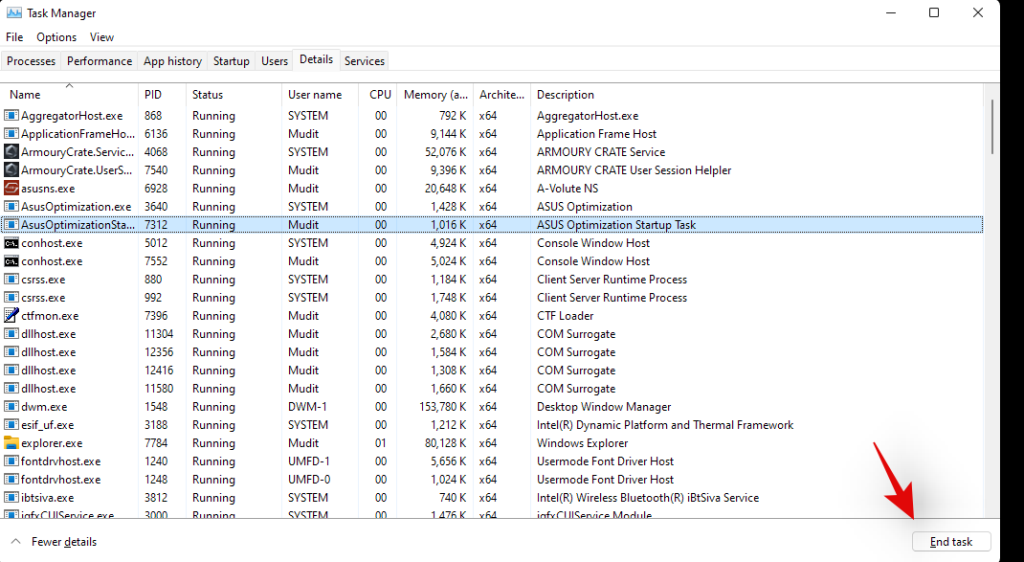
Hit delete on your keyboard or click on ‘End Task’.
Confirm your choice by selecting ‘End Process’.
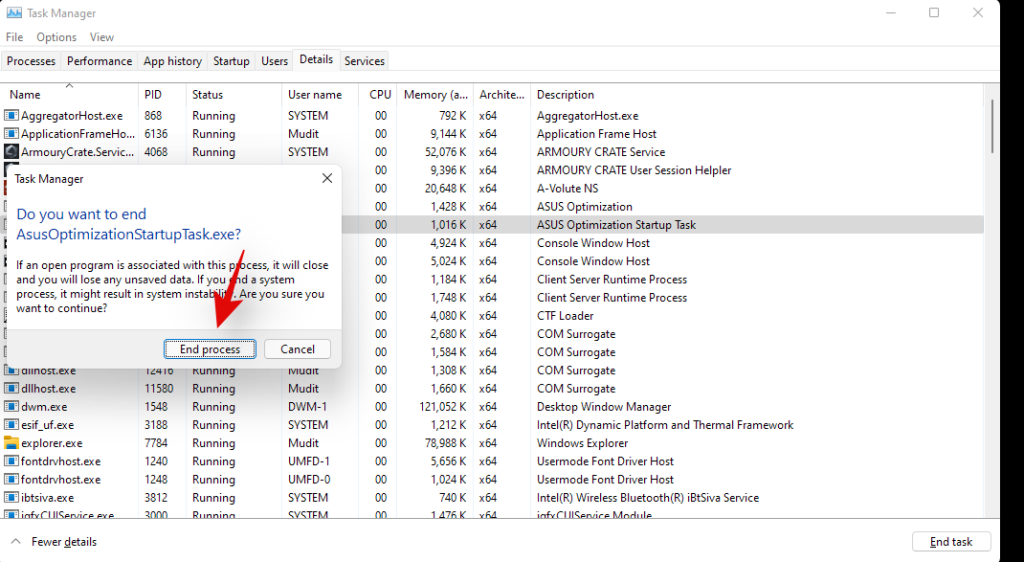
And that’s it! the process should now be killed and you can now try uninstalling the concerned app again.
Method #02: Uninstall in Safe mode
Another way to ensure that no third-party apps are launched or used in the background is to launch your system in safe mode and then try to uninstall your concerned app. You can use this comprehensive guide by us to enter safe mode on Windows 11.
Once in safe mode, follow the guide below to get the installer service back up and running on your system. Once the service is running in the background, you can use either of the methods above to uninstall the concerned app from your system.
Press Windows key + S key to open Windows Search and type in ‘cmd’. Click on ‘Run as administrator’ when the command prompt shows in your search results.
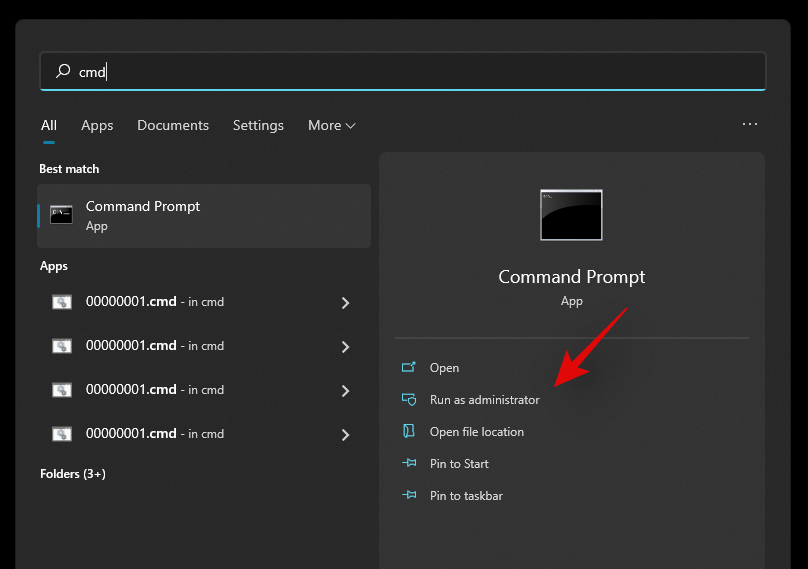
Enter the following commands in the command prompt one by one and hit Enter on your keyboard to execute each one of them.
REG ADD "HKLM\SYSTEM\CurrentControlSet\Control\SafeBoot\Minimal\MSIServer" /VE /T REG_SZ /F /D "Service"
REG ADD "HKLM\SYSTEM\CurrentControlSet\Control\SafeBoot\Network\MSIServer" /VE /T REG_SZ /F /D "Service"
net start msiserver

And that’s it! The installer service should now be running on your system and you should now be able to uninstall the concerned app using either one of the methods above.
Method #03: Run the Microsoft Uninstaller troubleshooter
You can also run a Microsoft Troubleshooter to try and fix uninstaller issues. Microsoft troubleshooters have come a long way since they were first introduced and can now fix most software and driver incompatibility issues without any user intervention.
Microsoft has also made it much easier for you to now launch any troubleshooter to try and solve your current issue. Use the guide below to launch an uninstaller troubleshooter on your Windows 11 system.
Required
Guide
Download the troubleshooter using the link above to your PC. Once downloaded, extract the .zip file to a convenient location. If you have trouble extracting the .zip file or it seems to be blocked, use the guide below to unblock it, else you can skip the guide and jump to the next guide.
Unblock the .zip file
Right-click on the .zip file and select ‘Properties’.
Check the box for ‘Unblock’ at the bottom of the Window.
Click on ‘Ok’.
Provide administrator permission to make the necessary change.
The file should now be unblocked on your system and you should now be able to extract it like any other .zip file on your system.
Run the troubleshooter
Navigate to the extracted files on your local storage. Cut the file named ‘MicrosoftProgram_Install_and_Uninstall.meta.diagcab’ and paste it on your desktop. Double click and run the file from your desktop. Click on ‘Advanced’ at the bottom once the troubleshooter is launched.
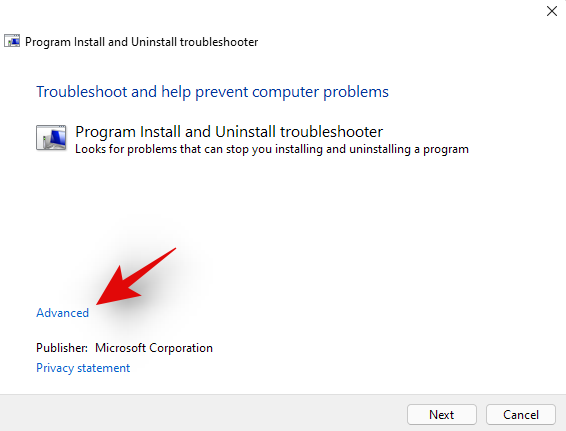
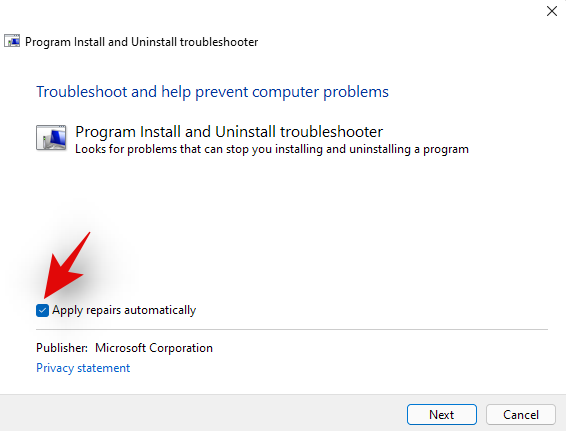
Check the box for ‘Apply repairs automatically’. Click on ‘Next’ once you are done.
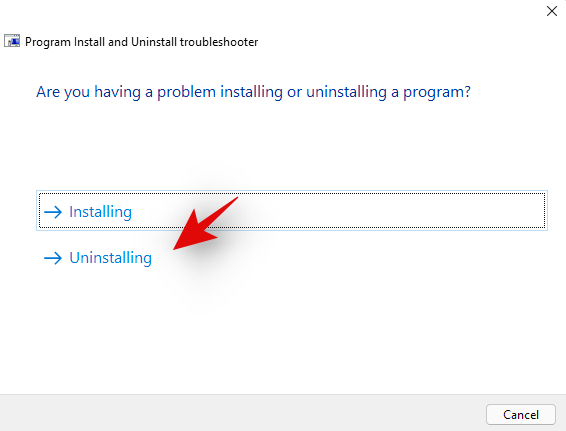
Select ‘Uninstallting’ on the next step.
Select the concerned program from the list provided on your screen. If your program does not appear in the list, click on ‘Not Listed’.
Now follow the on-screen instructions depending on your choice to complete the troubleshooting process.
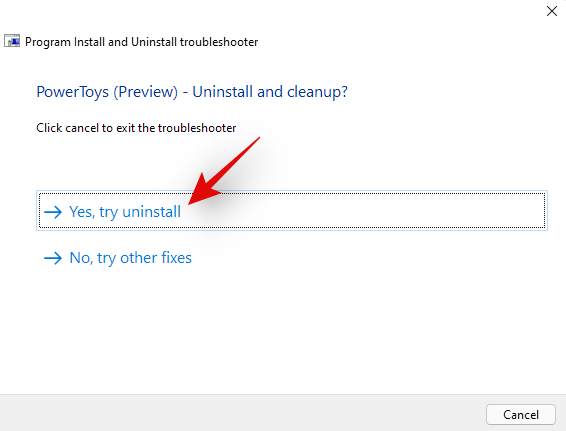
And that’s it! In most cases, the troubleshooter will detect your issue and solve it automatically. A report for the same will be presented to you at the end of the process with all the details.
Method #04: Use a restore point
If you are still having issues uninstalling the software from your system then it is time for some drastic steps as this could be malicious in nature. Let’s restore your PC to a restore point before the concerned app or program was installed on your system.
However, if you do not have a restore point then you can jump to one of the other methods listed below. Here’s how you can use a restore point to restore your PC to its previous state.
Press Windows + S on your keyboard and search for ‘Recovery’. Click and launch the app link once it shows up in your search results.
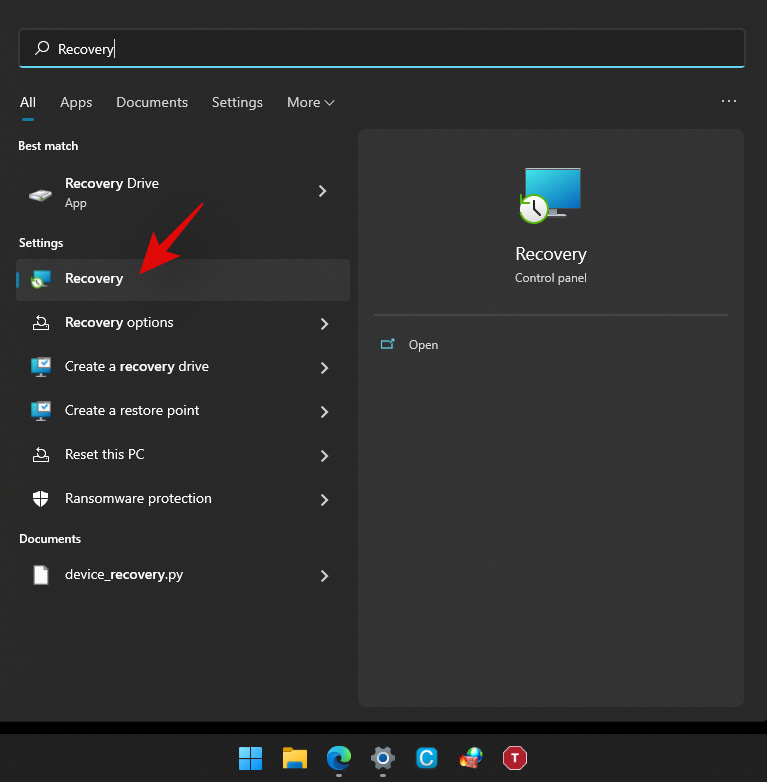
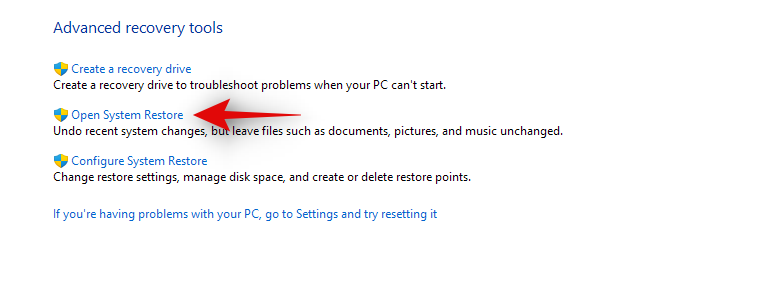
Click on ‘Open System Restore’.
You will now be suggested a recent system restore point if you have one. Select that if needed, or click on ‘Choose a different restore point’ if you wish to choose an older one.
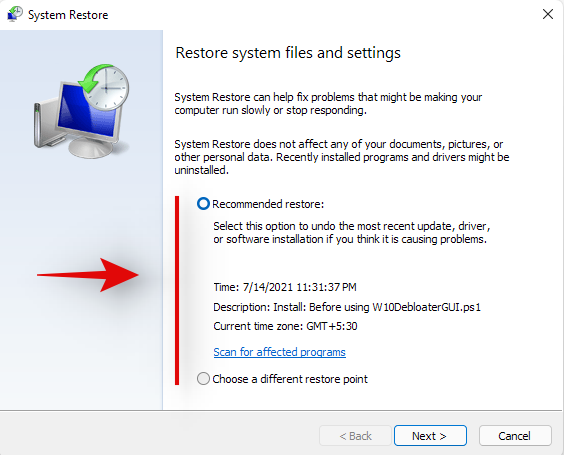
Select ‘Next’ or hit ‘Enter’ on your keyboard.
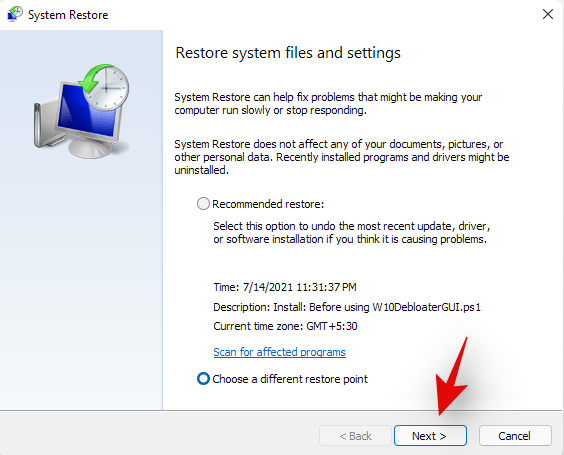
You can now select the desired Restore Point from the list at the top. You can check the box for ‘Show more restore points’ if you wish to look at more restore points.
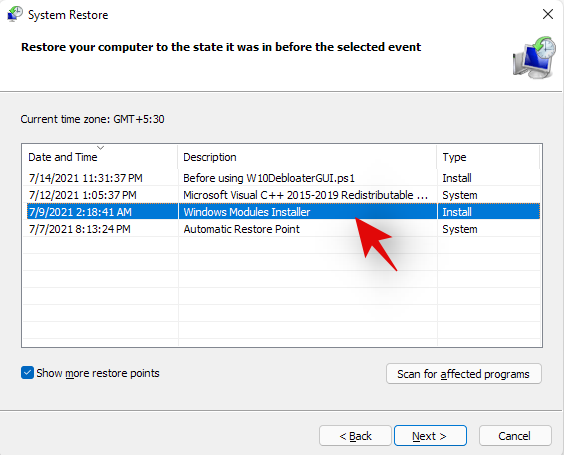
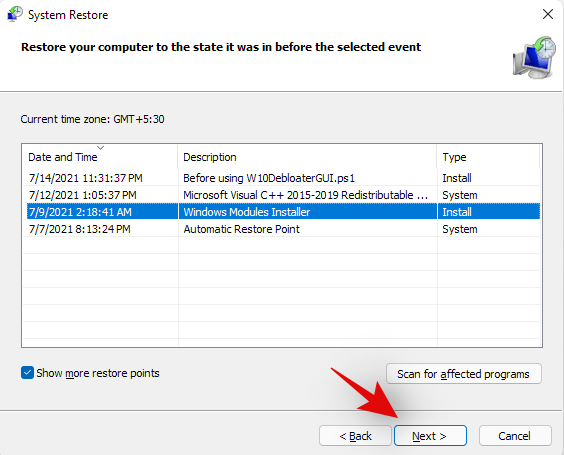
Once selected, click on ‘Next’.
Finally, click on ‘Finish’.
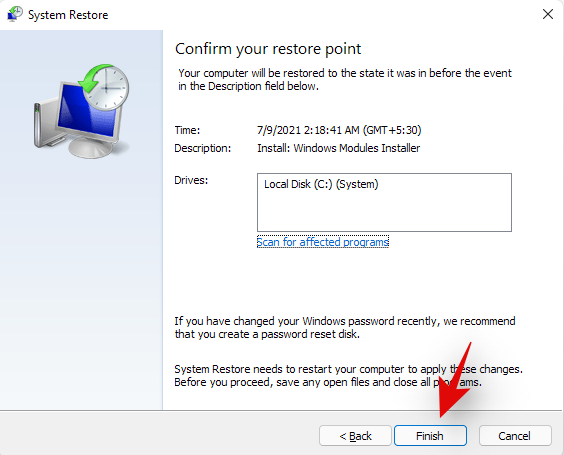
Windows 11 will now restore your system to the selected restore point and the concerned app should no longer be on your system once the process is completed.
Method #05: Contact Windows Support
If you are still unable to get the app uninstalled from your system then it might be time to contact Microsoft Support. Microsoft Support executives are trained to solve such issues with more expertise and can even remotely takeover your system if needed. It might be time to get in touch with the support team to solve your issue. Additionally, if you purchased a pre-built system, you can use your OEM support for some help as well. Use the link below to get in touch with Microsoft Support.
► Microsoft Support
Uninstall programs on Windows 11: FAQs
Can you uninstall pre-installed apps?
Well, officially, you can not and it is not recommended by Microsoft. But still, if you wish to remove preinstalled apps, you can easily do so depending on the type of the app. If you wish to remove a system app then the process is a bit complicated. Else, if you wish to remove third-party pre-installed apps then you can simply do so by uninstalling them like any other app from your Windows 11 Pc using the guide below.
Can you uninstall system apps?
Yes, you can uninstall system apps but not officially. Officially Windows 11 or any Windows for that matter, doesn’t allow you to remove system apps from the OS. However, there are many workarounds to circumvent this restriction and uninstall preinstalled system apps from your system.
This includes using command prompt/PowerShell or a third-party software. Using these methods you should be able to easily uninstall system apps from your system. Follow our guides below for each of the methods depending on your current needs and requirements.
Can you uninstall apps downloaded from the Microsoft Store?
Yes, apps downloaded from the Microsoft Store can be uninstalled easily using either of the methods listed below. This includes Android apps that you may have downloaded on your system but did not find appealing enough. We recommend uninstalling Windows Store apps either via Settings or Start.
Chances are that the Store app will now show up in the Control Panel and if uninstalled via CMD or PowerShell, you could end up with leftover files including empty Start menu folders. Hence, use Powershell or CMD for Windows Store apps only if you are facing an issue uninstalling them via the Settings or the Start menu.
What happens when you uninstall a program?
Uninstallation is the process of removing a program or an app from your system. While apps are installed singularly with all dependencies available to them in a sandbox, programs operate differently. Programs usually have scheduled tasks, customized registry values to execute them, and dependencies for various Windows features and extensions that they need for their own installation process to create and place every file and task correctly.
Hence the removal process for all these things created by a program when it is first installed on your system is called uninstallation. All scheduled tasks, registered services, registry keys, executables, temporary files, log files, and more are removed once you uninstall a program from your system. In some cases, you will be leftover with settings and save files so that you don’t have to set up the program entirely when installing it in the future.
These files can be cleared by clearing your Windows Cache and temporary files in most cases. However, if you still suspect leftover files from a program on your system, then we recommend checking the following places for any leftover files. If found, you can simply delete them like any other file on your system.
- /Documents
- C:\Program Files (x86)\Common Files
- C:\Program Files\Common Files
- C:\ProgramData
- C:\Users\USER\AppData\Local
- C:\Users\USER\AppData\LocalLow
- C:\Users\USER\AppData\Roaming
- C:\Users\USER
How to remove data of uninstalled programs
If you still see the remaining files and folders or context menu options for a removed program or app, then you can try the fixes below to solve your issue.
Method #01: Clear cache and temporary files from Windows
You should first try clearing cache and temporary files from your Windows 11 system. In most cases, this will help the overall File Explorer UI to refresh itself which should automatically remove leftover files and context menu items for removed programs from your system.
You can use this comprehensive guide by us to easily clear your Windows 11 cache and storage. You can also use the same guide to free up storage space on your system as well by deleting other large files and installations that show up in the list.
Method #02: Check for leftover files manually
You can also check and delete all leftover files manually for the removed program or app. You should start by using Windows Search to look for any files or folders associated with the uninstalled program. You can then delete these manually from your local storage.
Once you have deleted all the files and folders that show up in the search, you can proceed to manually check the locations listed below. If they contain any leftover files or folders from the removed program, then you can simply select them and delete them from your system.
- /Documents
- C:\Program Files (x86)\Common Files
- C:\Program Files\Common Files
- C:\ProgramData
- C:\Users\USER\AppData\Local
- C:\Users\USER\AppData\LocalLow
- C:\Users\USER\AppData\Roaming
- C:\Users\USER
Method #03: Run a third-party uninstaller/cleaner
If you are still left with the remaining files and context menus for the program then it is time to use a third-party uninstaller or cleaner. These programs are specifically designed to identify and remove leftover files from previously uninstalled programs on your system. We recommend you give Revo uninstaller a try as even the free model for the app will help you identify the location of leftover files which can then be deleted by you manually. You can also use something like CCleaner that is designed to remove leftover files and free up storage and processing space on your system.
Method #04: Try to remove the app via PowerShell
If nothing works, then chances are that the concerned app was installed on your system using elevated privileges which prevents some files and folders from being removed from your system.
In such cases, we recommend you try to remove the app via PowerShell. You can use our guide above to remove system apps from Windows 11 via PowerShell. You will first need to source the full package name for your app or program, which can then be used to force uninstall it from your system.
Can you uninstall Windows Updates?
Yes you can easily uninstall Windows Update from your system. New updates can often introduce compatibility issues on older hardware and having the option to uninstall updates can always help. You can use the guide below to uninstall recently installed updates from your system.
How to uninstall Windows Updates
Follow the guide below to uninstall recently installed Windows Updates from your Windows 11 system.
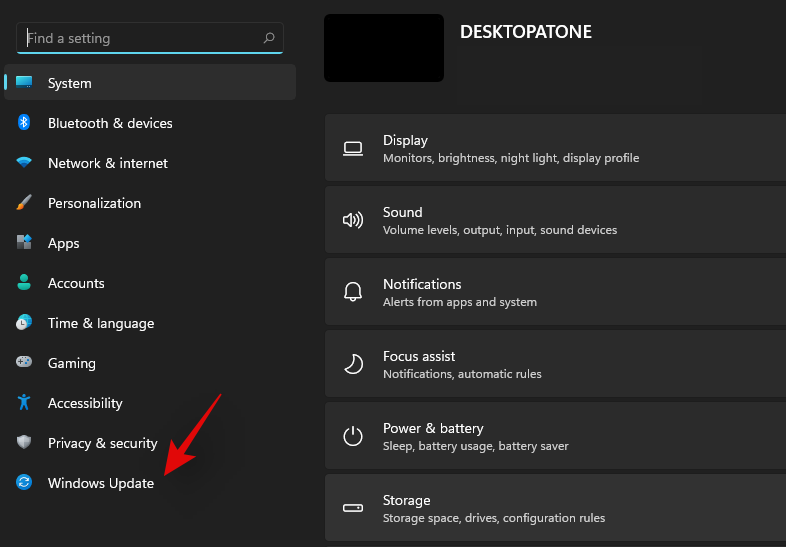
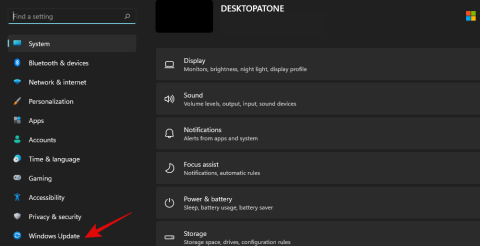
Press Windows + i on your keyboard to open the Settings app. Click on ‘Windows Update’ on your left.
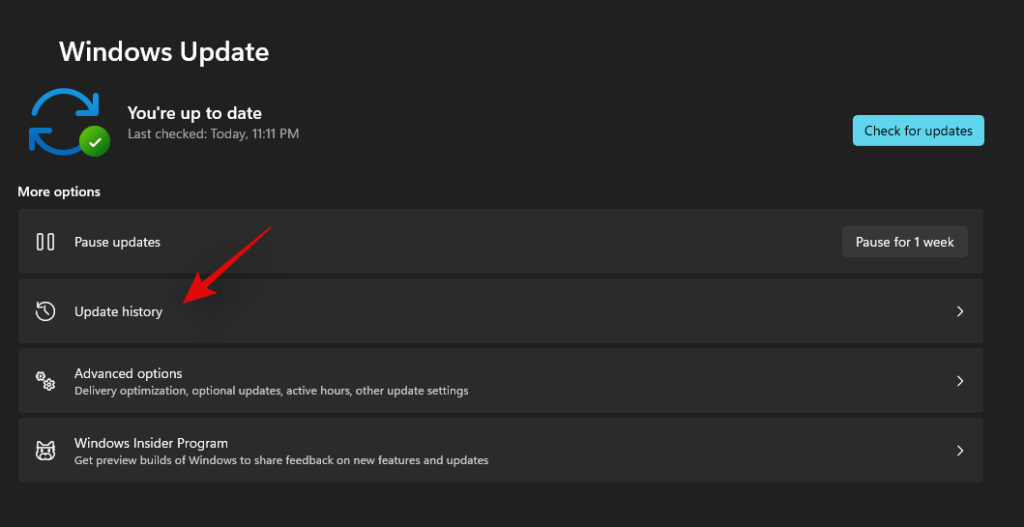
Now click on ‘Update history’.
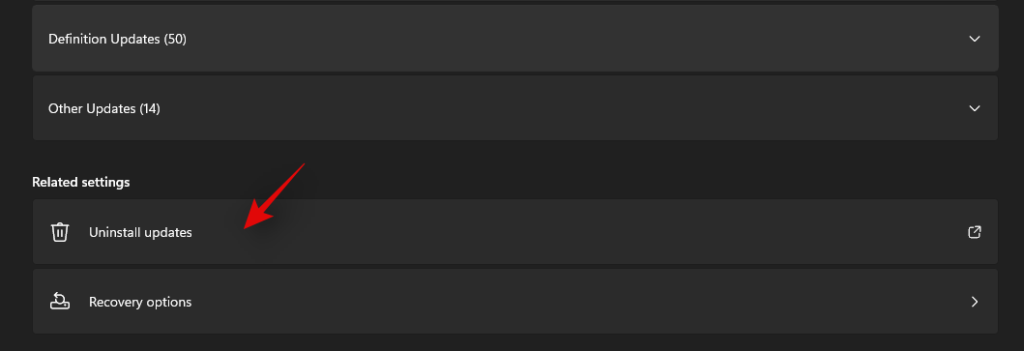
Scroll to the bottom on your right and click on ‘Uninstall Updates’.
You will now get a list of all the recent updates installed on your system. Click and select the update you wish to uninstall.
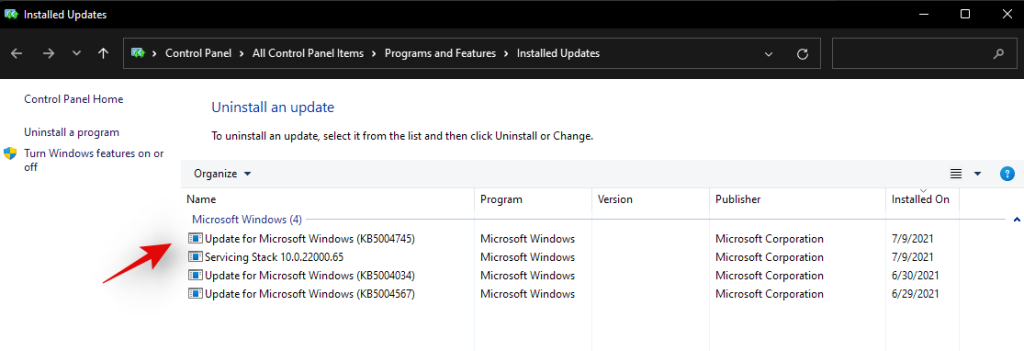
Click on ‘Uninstall’ at the top now.
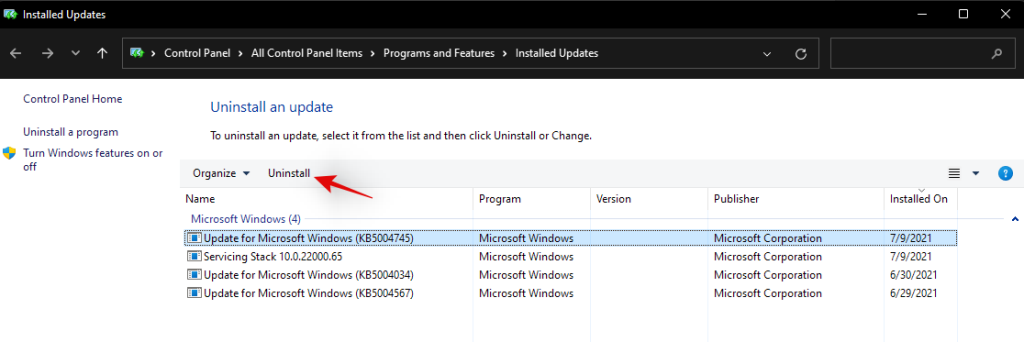
Follow the on-screen instructions to complete the process.
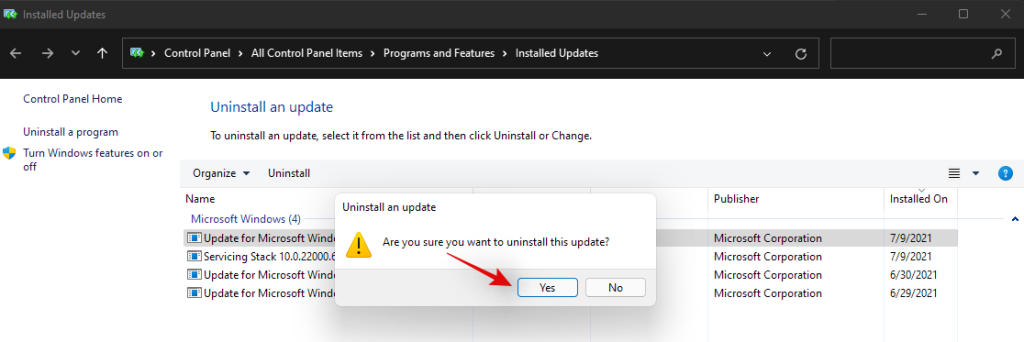
And that’s it! Your selected Windows update should now be uninstalled from your system.
We hope this guide helped you uninstall the concerned apps or programs from your system. If you still face issues, feel free to reach out to us using the comments section below.




![Kaip pašalinti McAfee iš Windows 11 [5 būdai] Kaip pašalinti McAfee iš Windows 11 [5 būdai]](https://blog.webtech360.com/resources8/images31/image-4917-0105182719945.png)
