Fartölvu flýtilyklar eru nauðsynleg verkfæri þegar reynt er að fá aðgang að grunnaðgerðum tækisins. Þeir gera þér kleift að stjórna hljóðstyrknum þínum, stilla birtustig , baklýsingu lyklaborðs, hegðun snertiborðs og margt fleira. Það fer eftir tækinu þínu, þú gætir haft fleiri flýtilykla fyrir sérstakar aðgerðir eins og að virkja n takkaveltingu, slökkva á snertiborðinu þínu, slökkva á lyklaborðinu , virkja flugstillingu, breyta aflstillingu og margt fleira.
Hins vegar getur fartölvan þín endað með því að missa virkni sína og skilvirkni ef skyndilyklarnir hætta að virka. Þetta myndi neyða þig til að breyta/breyta hverri stillingu með því að nota sérstaka valkosti þeirra í Windows Stillingar appinu sem getur verið ansi fyrirferðarmikið. Ef flýtilyklar fyrir fartölvu virka ekki á fartölvunni þinni, þá geturðu notað aðferðirnar hér að neðan til að laga flýtilyklana þína.
Tengt: Hvernig á að færa verkstikuna efst í Windows 11
Innihald
Af hverju virka flýtilyklar ekki?
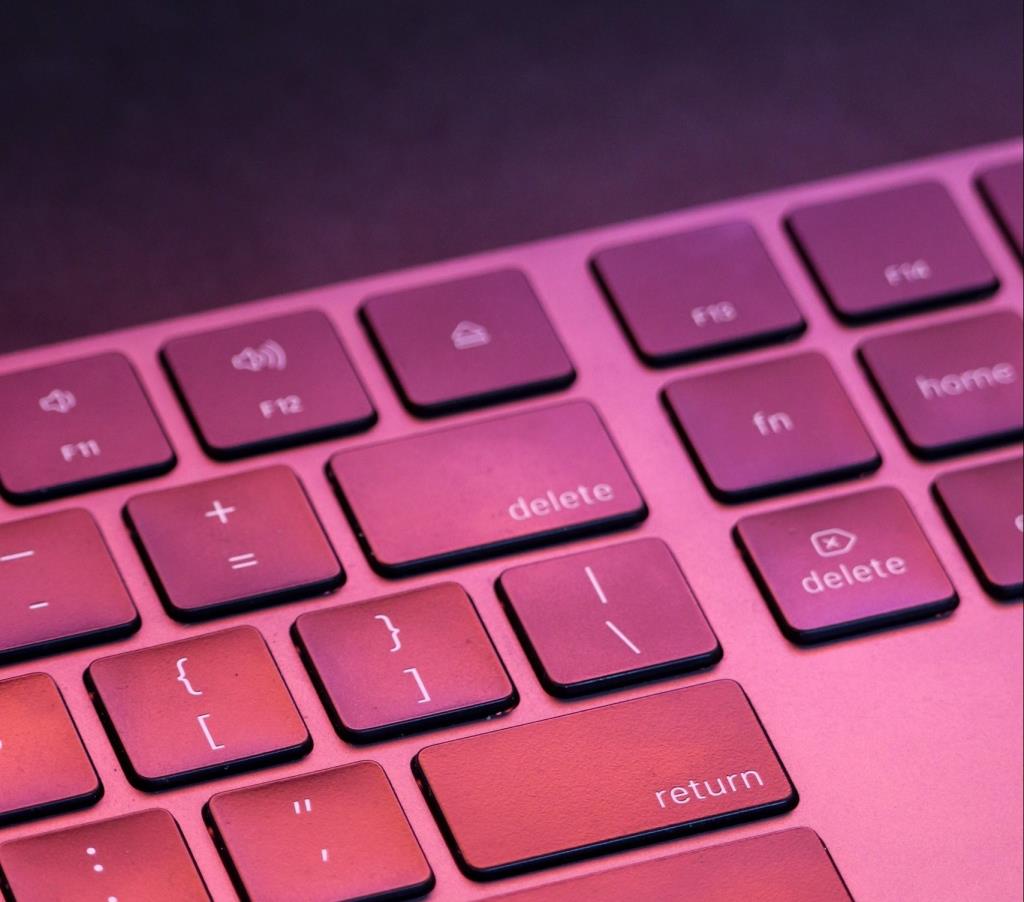
Hraðlyklar á fartölvunni geta hætt að virka af ýmsum ástæðum, en þar sem Windows 11 er frekar nýtt virðist algengasta ástæðan vera árekstrar ökumanna og árekstrar OEM gagnsemi í bakgrunni. Þetta er vegna þess að flestir reklar sem gefnir eru út af OEM eru hannaðir fyrir Windows 10. Windows 11 kynnir nokkrar mismunandi breytingar á bakgrunni og hvernig ökumenn eru meðhöndlaðir sem virðist brjóta niður virkni flýtilykla á mörgum mismunandi tækjum.
Einingarnar sem hafa mest áhrif virðast vera frá Asus og Lenovo vegna sérstakra tóla þeirra eins og Armory Crate Service sem þarf að uppfæra fyrir Windows 11. Þetta þýðir ekki að aðrir framleiðendur séu undanþegnir þessu máli, margar Dell og Acer einingar virðast líka missa flýtilyklavirkni sína með Windows 11.
Ef þú átt eitthvað af þessum tækjum eða ef flýtilyklar fartölvunnar virka almennt ekki á Windows 11, þá geturðu notað aðferðirnar hér að neðan til að reyna að laga vandamálið. Byrjum.
Tengt: Hvernig á að búa til endurheimtarpunkt í Windows 11
Hvernig á að laga flýtilykla á Windows 11 fartölvum
Þú getur notað eftirfarandi aðferðir til að reyna að fá flýtilykla til að virka á fartölvunni þinni aftur. Aðferðirnar hafa verið taldar upp í forgangsröð og algengustu lagfæringarnar hafa verið taldar upp efst. Þú getur byrjað á fyrstu lagfæringunni og unnið þig í gegnum listann til að reyna að finna lagfæringuna sem virkar fyrir kerfið þitt. Byrjum.
Aðferð #1: Leitaðu að OEM uppfærslum
Ef þú ert með sérstakt lyklaborðsforrit sem sér um flýtilyklana þína í bakgrunni eins og Armory Crate Service eða Synaptics tólið, þá geturðu reynt að uppfæra reklana þína af vefsíðu OEM þíns. Þessi tól eru frábrugðin sérstökum lyklaborðsrekla og þau keyra þjónustu og verkefni í bakgrunni sem hjálpa til við að virkja flýtilykla á fartölvunni þinni.
Ef annaðhvort þessara tóla er bilað eða virkar ekki, þá mælum við með að leita að nýjustu uppfærslunum eða setja upp nýjustu útgáfuna á fartölvuna þína. Notaðu hlekkina hér að neðan til að heimsækja stuðningssíðuna fyrir OEM þinn og athuga með nýjustu uppfærslur á tólum. Þegar þau hafa fundist skaltu smella á og hlaða þeim niður á staðbundna geymsluna þína og setja þau upp á fartölvuna þína í fyrsta lagi.
Þegar þeir hafa verið settir upp ættu flýtilyklar að byrja að virka á fartölvunni þinni aftur. Við mælum með að þú endurræsir fartölvuna þína til að forðast árekstra við áður uppsettar útgáfur í bakgrunni. Ef flýtilyklarnir þínir virka enn ekki, þá geturðu notað leiðbeiningarnar hér að neðan til að endurstilla og endurnýja OEM tólin þín á fartölvunni þinni.
Tengt: Hvernig á að gera við Windows 11
Aðferð #2: Gakktu úr skugga um að OEM veitur virki rétt
Ef OEM tólin þín virðast ekki virka í bakgrunni þá eru hér nokkrar bilanaleitaraðferðir til að endurheimta virkni þeirra. Byrjum.
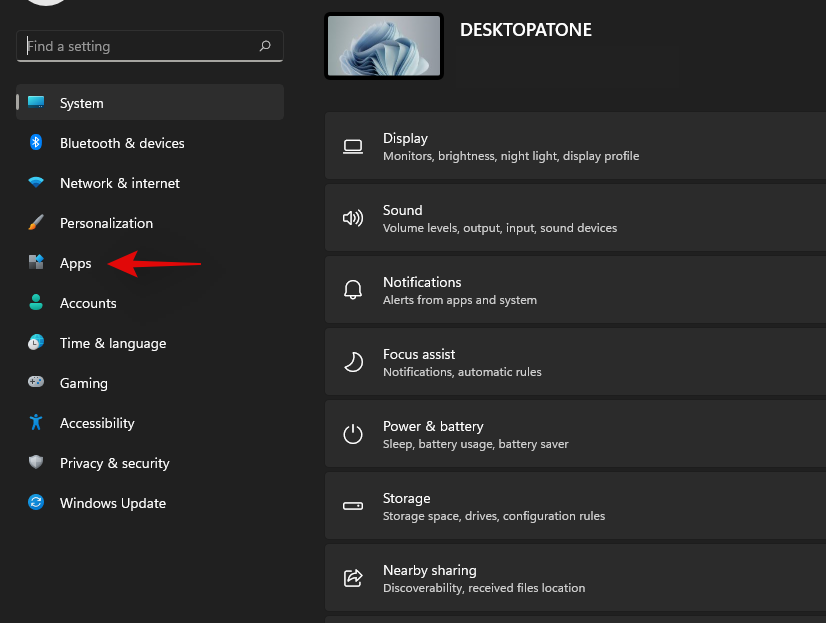
Ýttu Windows + iá lyklaborðið þitt og smelltu á 'Apps' vinstra megin.
Smelltu á 'Forrit og eiginleikar'.
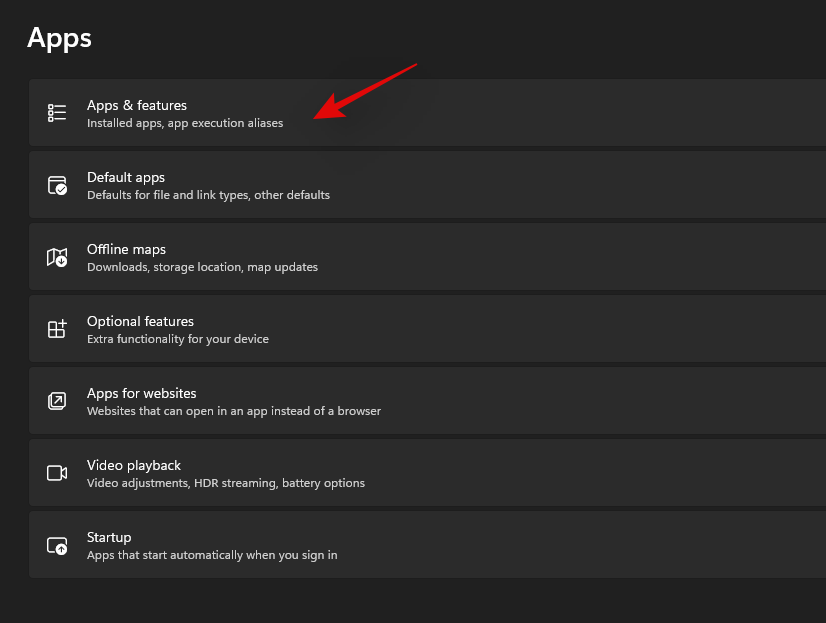
Finndu viðkomandi forrit á þessum lista og smelltu á '3-punkta' valmyndartáknið við hliðina á því.
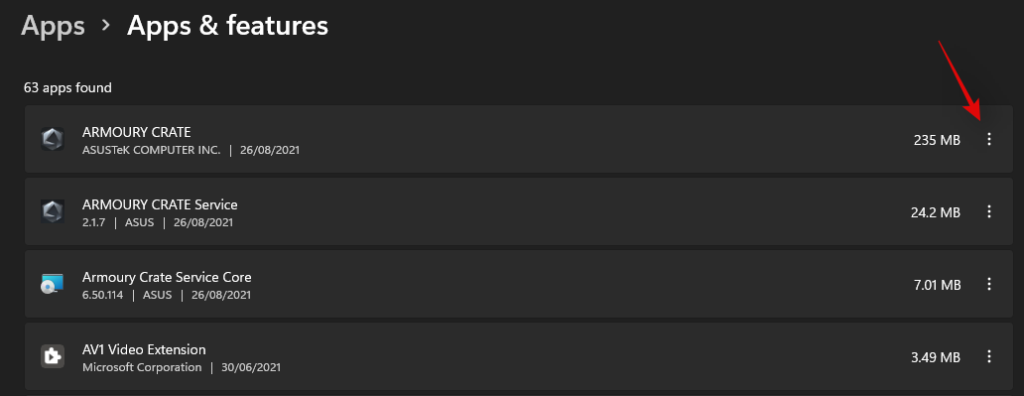
Veldu 'Ítarlegar valkostir'.
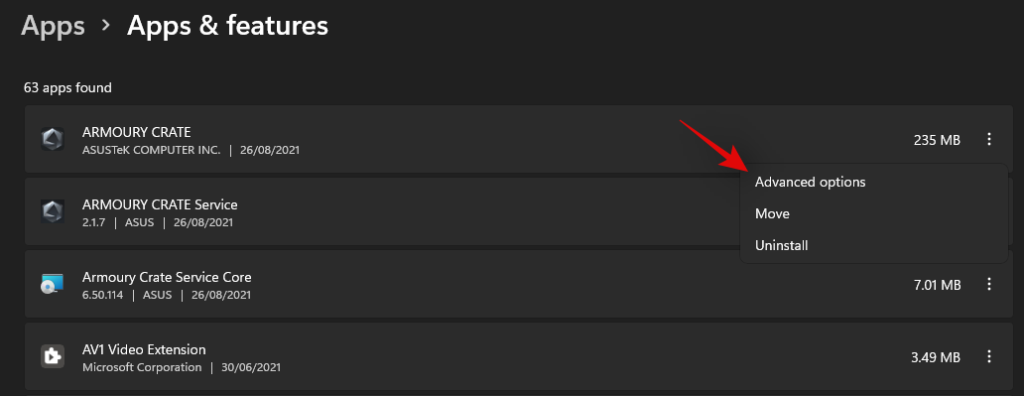
Fylgdu nú einum af hlutunum hér að neðan eftir því hvað þú vilt gera við valið forrit.
2.1 Virkja bakgrunnsvirkni
Smelltu á fellivalmyndina undir 'Heimildir bakgrunnsforrita' og veldu 'Aflbjartsýni' eða 'Alltaf'.
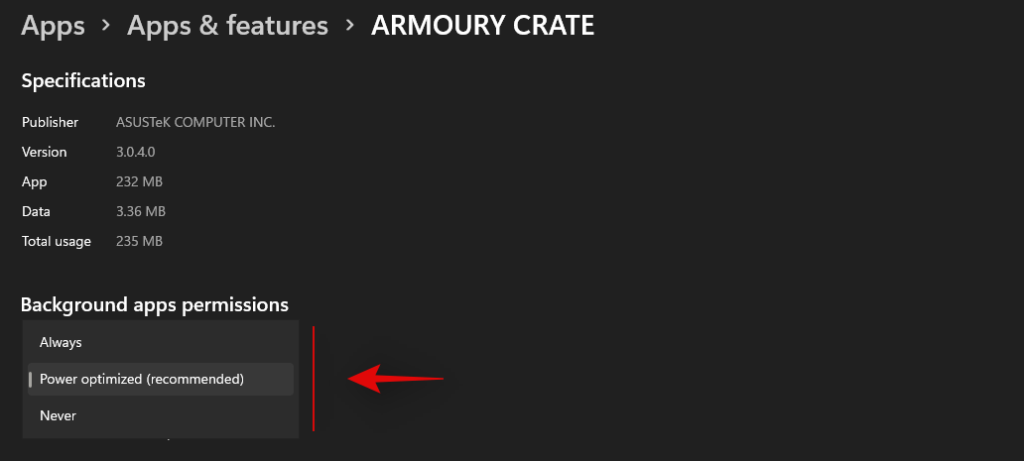
'Power optimized' mun leyfa appinu að vinna í bakgrunni eftir núverandi orkuáætlun þinni. 'Alltaf' mun aftur á móti gefa appinu leyfi til að vera virkt og vinna í bakgrunni, óháð því hvaða orkuáætlun þú hefur valið.
2.2 Gerðu við appið
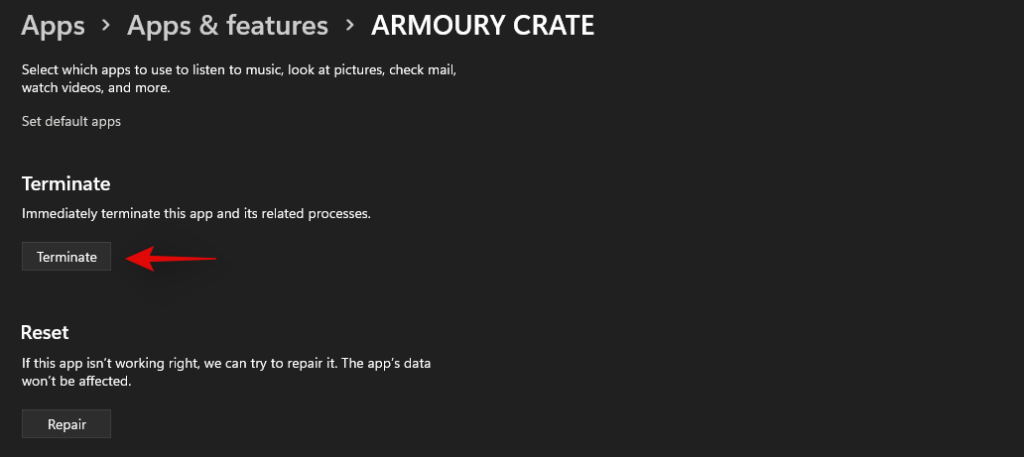
Windows 11 gerir þér einnig kleift að gera við appið þitt. Skrunaðu einfaldlega til botns og smelltu fyrst á 'Ljúka'.
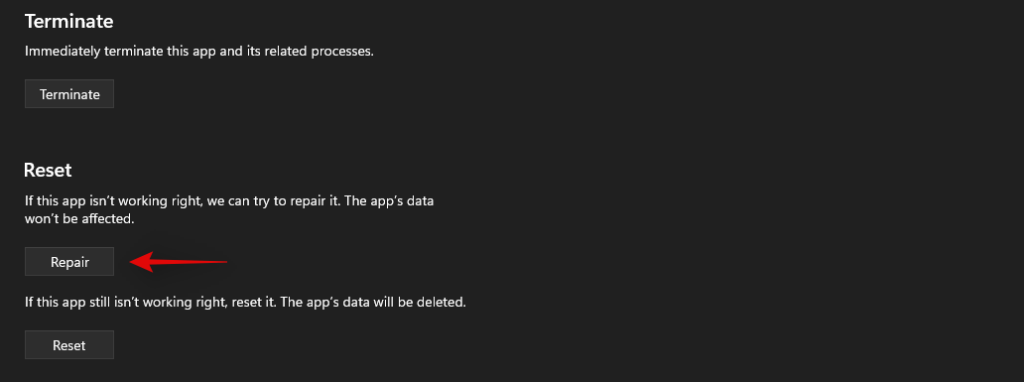
Smelltu nú á 'Viðgerð'.
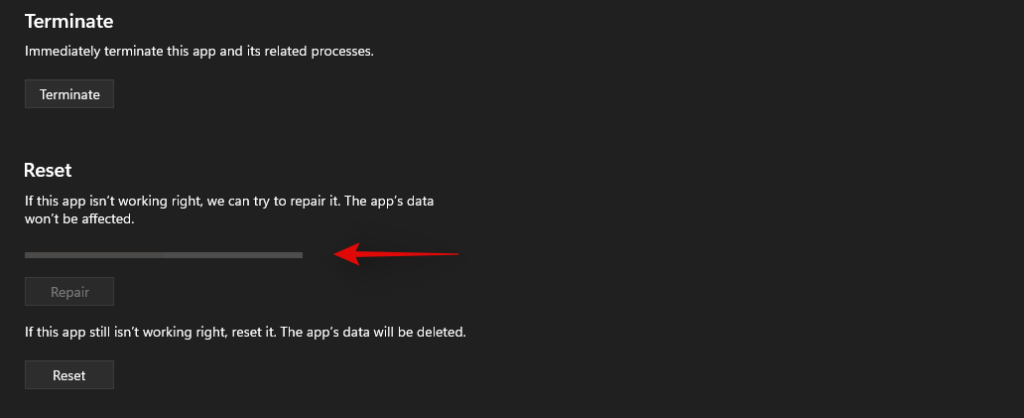
Bíddu eftir að Windows geri sitt, þegar gátmerki birtist við hliðina á valkostinum reyndu að ræsa viðkomandi app á fartölvunni þinni.
Prófaðu flýtilyklana þína núna, ef minniháttar vandamál eða átök olli því að appið virkaði ekki í bakgrunni, þá ætti að endurheimta virkni flýtilykla á fartölvunni þinni.
2.3 Núllstilla appið
Ef ofangreindar aðferðir virkuðu ekki fyrir þig geturðu endurstillt OEM appið. Þetta mun endurstilla gögnin og gefa þér nýja byrjun eins og appið hafi verið sett upp á fartölvuna þína. Þetta ætti að hjálpa til við að endurheimta virkni flýtilykla þíns í flestum tilfellum. Hins vegar hafðu í huga að forritsgögnin þín verða endurstillt sem mun neyða þig til að skrá þig aftur inn í appið ef við á. Að auki verða allar breytingar eða sérstillingar sem þú gerðir í appinu einnig endurstilltar. Fylgdu skrefunum hér að neðan til að koma þér af stað.
Smelltu á 'Ljúka' til að loka appinu.

Smelltu nú á 'Endurstilla'.

Smelltu á 'Endurstilla' aftur til að staðfesta val þitt.

Forritið verður nú endurstillt á fartölvunni þinni. Við mælum með að þú endurræsir fartölvuna þína til góðs og reynir að nota flýtilyklana aftur. Ef forritið virkaði ekki almennilega á Windows 11, þá ætti flýtilykillinn þinn nú að vera endurheimtur á fartölvunni þinni.
Aðferð #3: Uppfærðu rekla
Önnur ástæða fyrir bilun á lyklaborðinu þínu væri gamaldags rekla. Ef þú hefur ekki uppfært lyklaborðsreklana þína áður þá er það líklega ástæðan fyrir því að flýtilyklarnir þínir virka ekki í Windows 11. Windows 11 stjórnar og setur upp reklana þína á annan hátt, auk þess sem í sumum tilfellum er vitað að Windows 11 skiptu út OEM lyklaborðsreklanum þínum í þágu almenns rekla ef það er nýjasta.
Ef flýtilyklar eru enn ekki að virka fyrir þig þá mælum við með að þú uppfærir reklana þína og settir upp nýjustu lyklaborðsrekla sem til eru frá OEM þínum. Farðu einfaldlega á OEM síðuna þína með því að nota einn af krækjunum hér að neðan og halaðu niður viðkomandi rekla í staðbundna geymsluna þína.
Þegar það hefur verið hlaðið niður skaltu setja upp bílstjórinn og endurræsa fartölvuna þína. Neitaðu öllum uppfærslum fyrir lyklaborðsrekla sem Windows 11 býður upp á og flýtilyklar ættu að byrja að virka aftur. Notaðu hlekkina hér að neðan til að koma þér af stað.
Ef lyklaborðsreklarnir þínir eru enn gamlir og flýtilyklar virka ekki þá gæti verið kominn tími til að athuga hvort reklauppfærslur séu uppfærðar í gegnum Windows. OEM þinn er líklega að afhenda þér nýjustu reklauppfærslurnar í gegnum Windows uppfærslur. Leitaðu að uppfærslum fyrir lyklaborðsrekla í Windows uppfærslum á fartölvunni þinni með því að nota handbókina hér að neðan. Við munum fyrst ganga úr skugga um að fartölvan þín fái reklauppfærslur í gegnum Windows Update. Fylgdu leiðbeiningunum hér að neðan til að koma þér af stað.
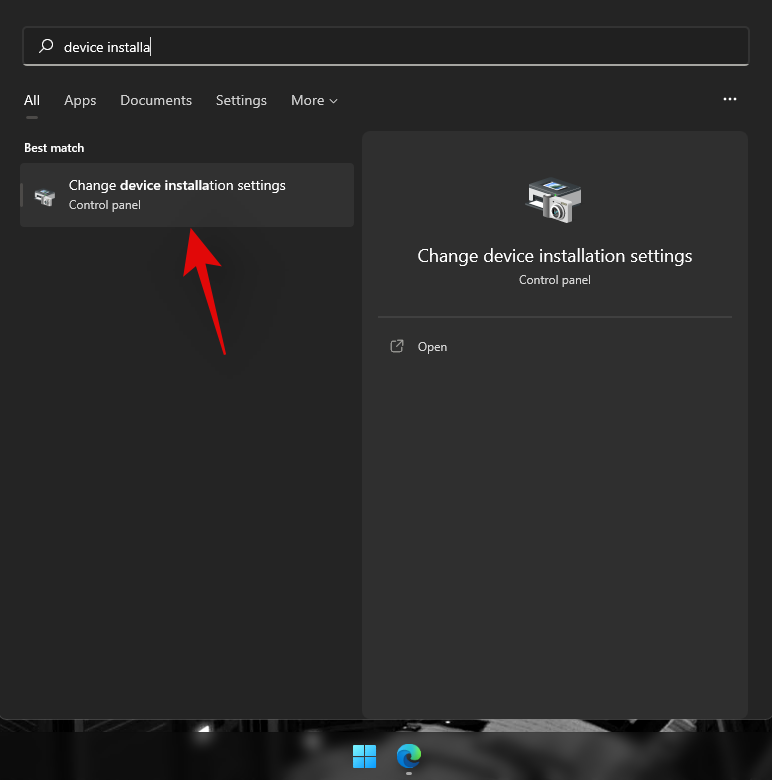
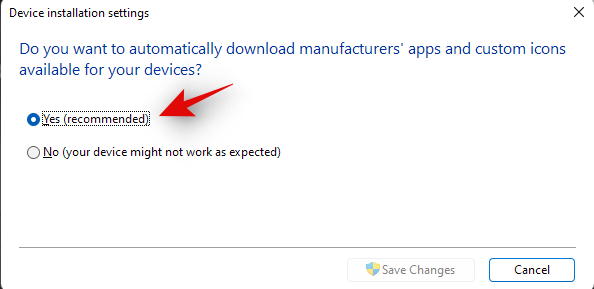
Press Windows + S on your keyboard and search for ‘Change device installation settings’. Click and launch the app once it shows up in your search results.
Select ‘Yes (recommended)’.
Click on ‘Save changes’.
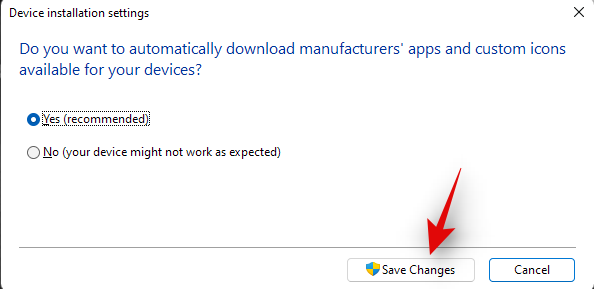
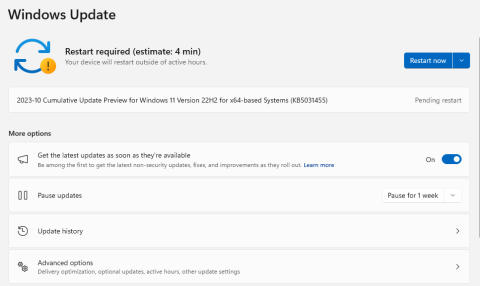
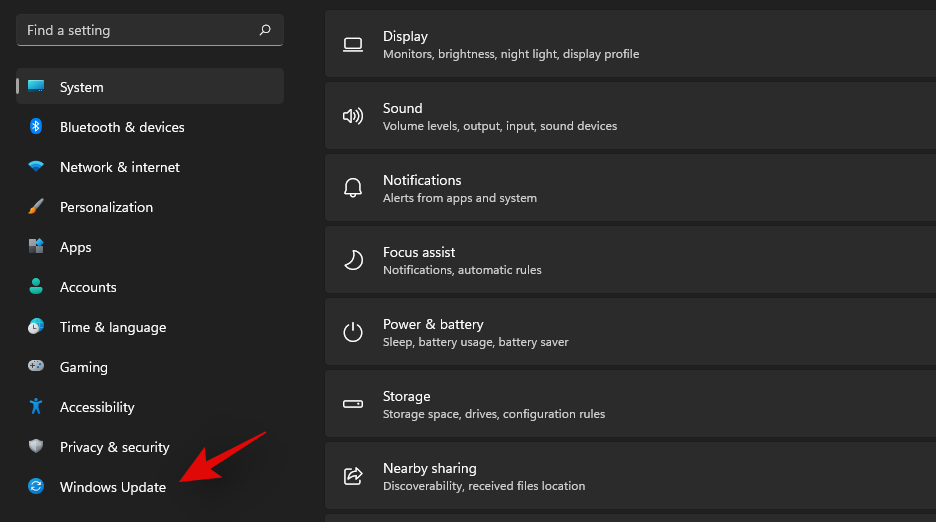
Wait for Windows to enable driver updates for your laptop. Once enabled close the device installation settings window and press Windows + i on your keyboard. Select ‘Windows Update’ from your left.
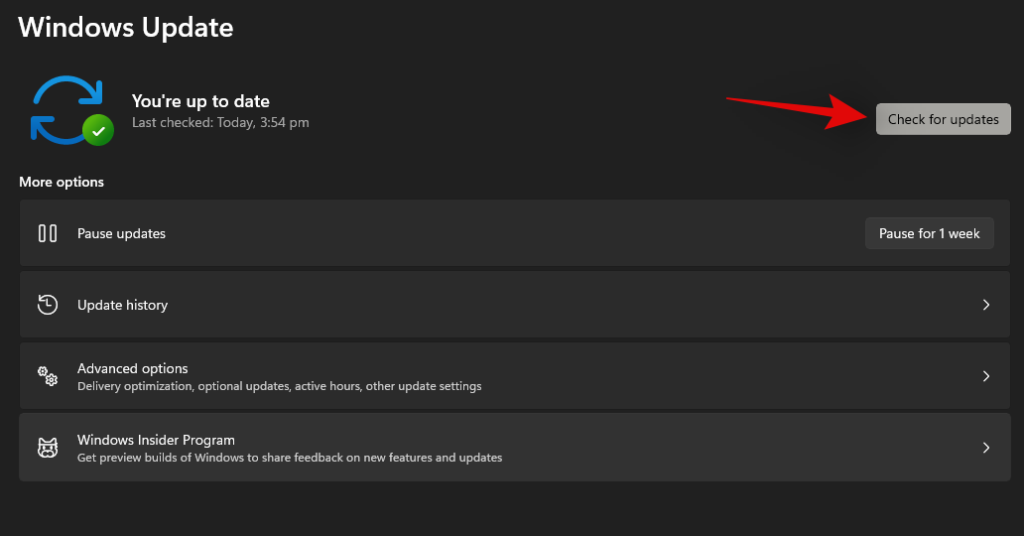
Click on ‘Check updates’ at the top and install any updates that show up.
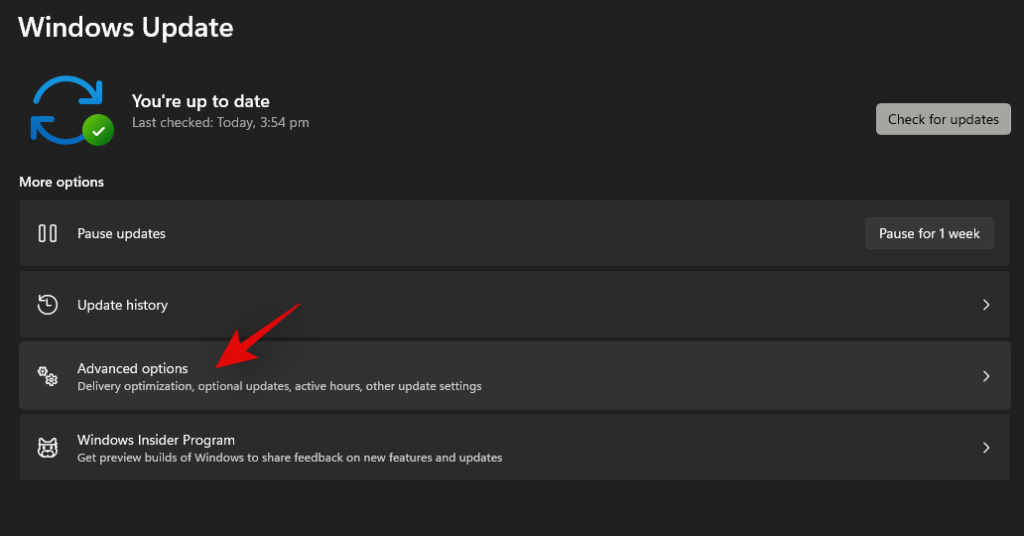
Once installed, click on ‘Advanced options’ at the bottom.
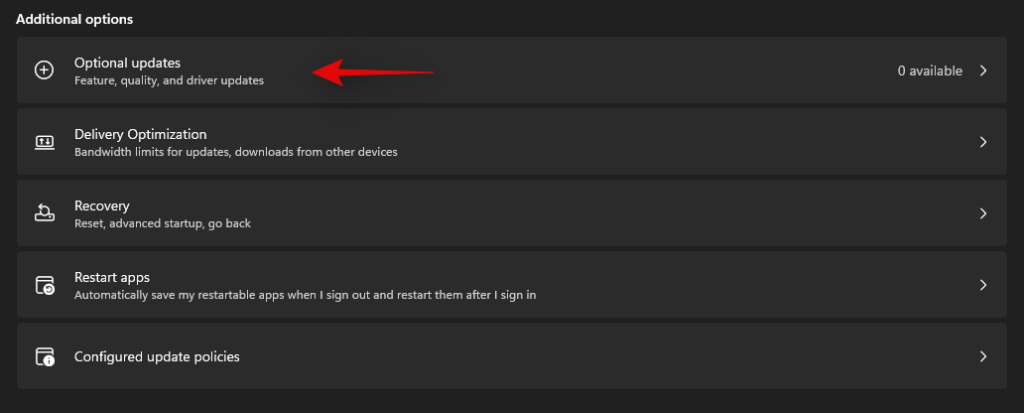
Now click on ‘Optional updates’.
Click and expand ‘Driver updates (n)’ where n represents the current number of driver updates available for your laptop. Check the box for any keyboard drivers that show up in this list. Click on ‘Download & install’ at the bottom of your screen. Restart your laptop for good measure even if not prompted by a Windows update.
And that’s it! Your latest keyboard drivers should now be installed on your laptop which should help restore hotkeys functionality for you. If not, you can continue with the fixes below to try and fix your hotkeys.
Method #4: Reinstall keyboard drivers
If none of the methods above work for you, then it’s time to reinstall your keyboard drivers. While drivers rarely face conflicts in the background, botched installations, incompatible components, and wrong updates can mess up your keyboard drivers, especially if you have custom RGB backlighting managed by an OEM utility.
Each of these apps uses a different way of hooking into your keyboard backlighting to help customize it according to your needs. These ways to hook into the system don’t play well with other third-party apps managing your keyboard mapping, layout, and more. Reinstalling your keyboard driver can help fix most such issues, and you can do so by either installing a dedicated driver from your OEM or by using a generic driver sourced by Windows. Let’s get started.
4.1 Reinstall generic keyboard driver
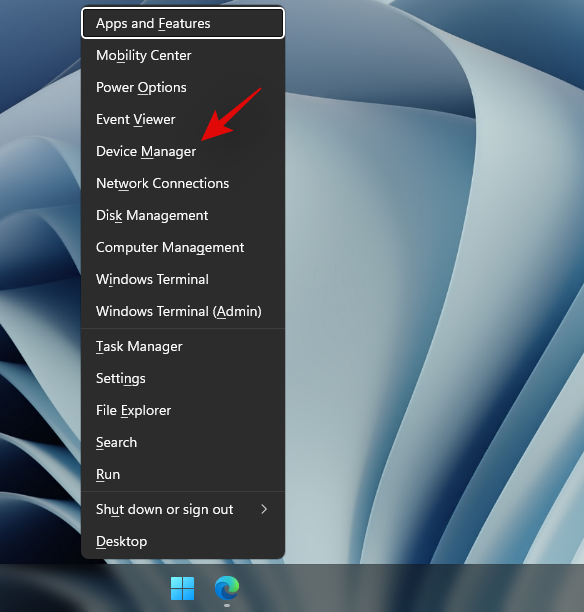
Press Windows + X on your keyboard and click on ‘Device Manager’.
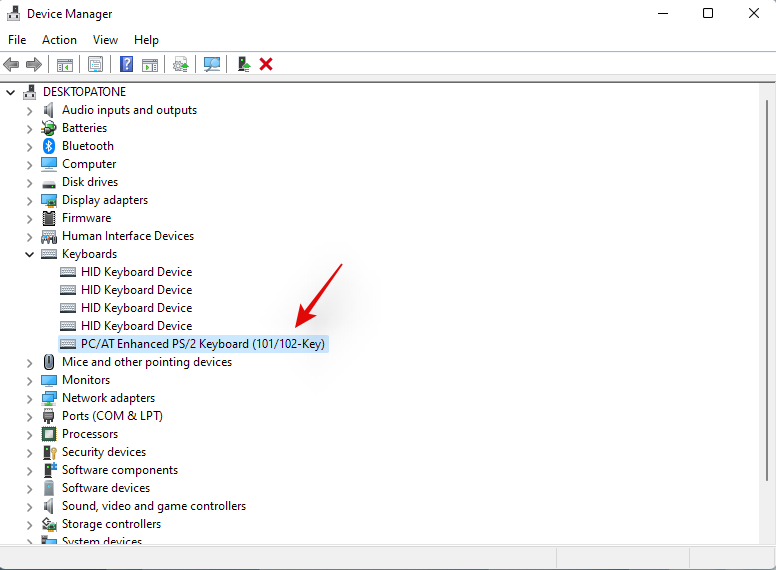
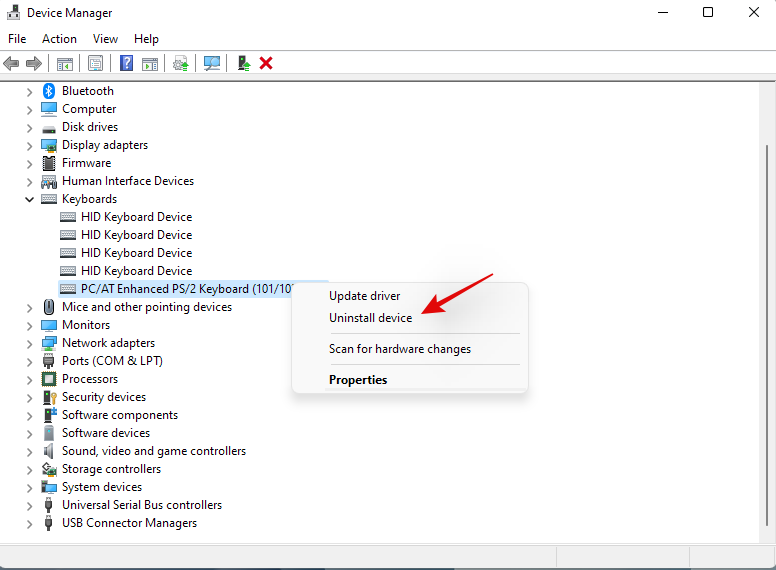
Once opened, find your concerned keyboard in the list and right-click on it. If you can’t find your keyboard or have multiple listings, then you can select and uninstall all of them. Once uninstalled, leftover drivers will be removed while the necessary ones will be automatically re-downloaded.
Click on ‘Uninstall device’.
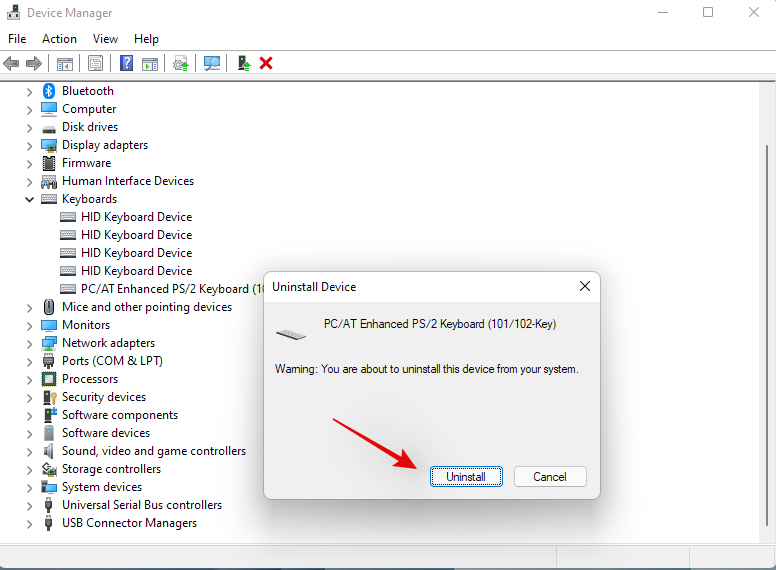
Click on ‘Uninstall’ again to confirm your choice.
Restart your laptop if prompted, and repeat the steps above to remove all necessary keyboard drivers installed on your system. Once uninstalled, right-click on an empty area and select ‘Scan for hardware changes’. You can also click on the dedicated icon for the same in your toolbar.

Windows will now look for generic missing drivers for your native keyboard and reinstall them automatically on your laptop.
If however, your drivers aren’t found by Windows, then you can use the guide below to manually install the dedicated keyboard drivers from your OEM.
4.2 Reinstall keyboard drivers manually
Download and install the necessary keyboard drivers to your local storage. Ensure that you extract the file beforehand in case you downloaded an archive. You should find a .inf file inside which is the driver we will be installed manually on your system. Follow the steps below to get you started.
Press Windows + X on your keyboard and select ‘Device Manager’.

Now expand the ‘Keyboards’ section and right-click on your concerned keyboard. If you have multiple HID devices under ‘Keyboards’ then we recommend you uninstall all unnecessary drivers to avoid conflicts.
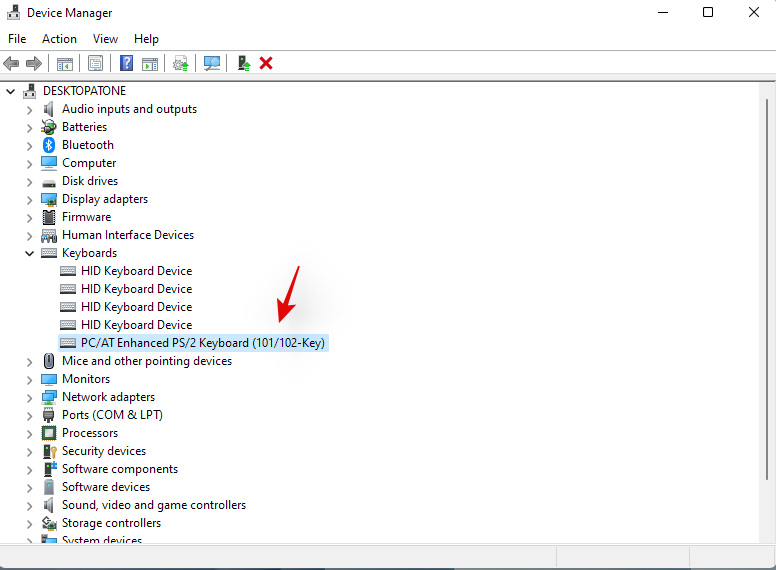
Select ‘Uninstall device’.

Check the box for ‘Attempt to remove the driver for this device’ if the option is available. Click on ‘Uninstall’ to confirm your choice.

The selected keyboard will now be uninstalled from your system. Your keyboard will stop working after the concerned driver has been uninstalled. This is normal behavior and your keyboard’s functionality should be restored once we reinstall the necessary drivers. Repeat the steps above for all HID devices you wish to remove. Once the necessary devices have been removed, click on the ‘Add drivers’ icon in your toolbar.

Click on ‘Browse’.
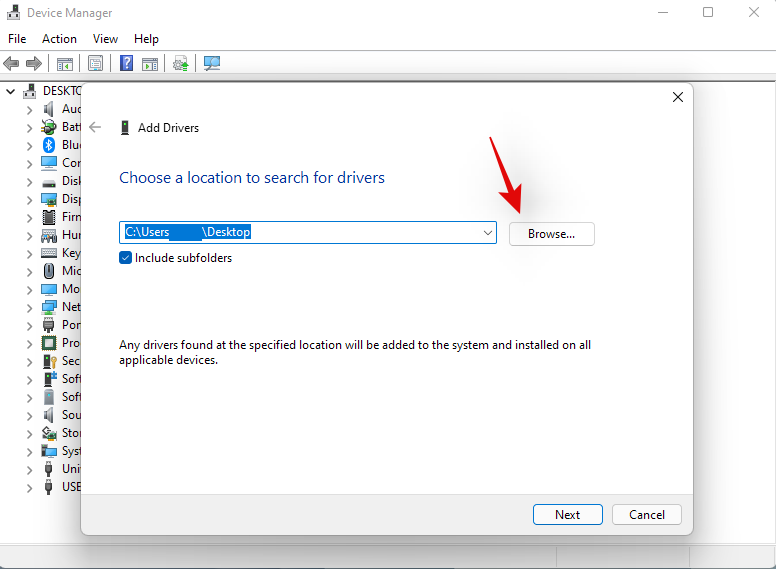
Navigate to the folder where you have stored your OEM drivers and click on ‘OK’.
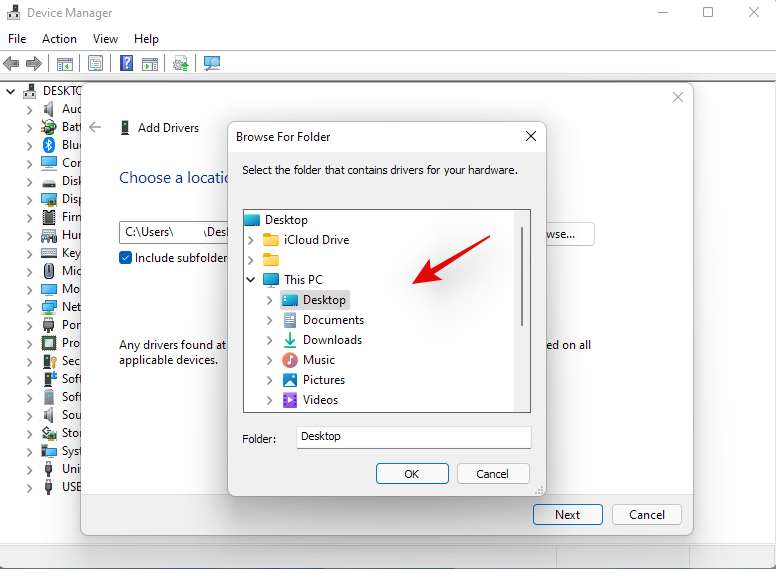
Check the box for ‘Include subfolders’ just to be safe. Click on ‘Next’ once you are done.
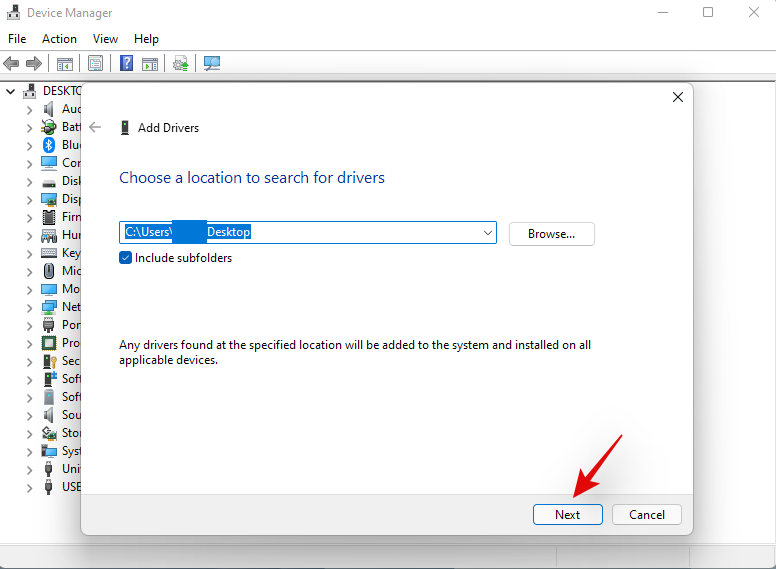
Windows will now scan the location for compatible drivers and automatically install them on your system.
Once installed, we recommend you restart your laptop for good measure.
And that’s it! Your hotkey functionality should now be restored on your system if a background driver conflict was causing issues on your system.
Note: Do not install any keyboard drivers via Windows Update in the future to avoid losing hotkey functionality again.
Method #5: Disable gaming mode
Gaming mode within Windows is known to cause issues on certain laptops. Microsoft’s gaming mode has gotten smarter and the mode automatically tries to apply the best peripheral settings for your gaming experience. This includes tweaking your audio, mouse settings, enabling n key rollover on your keyboard, windows key lock, and a lot more.
However, automatically enabling these settings requires hooking into dedicated drivers and tools which are often managed by your OEM. This could create conflicts in the background which might be preventing you from using your hotkeys on Windows 11. Use the guide below to disable gaming mode on your laptop.
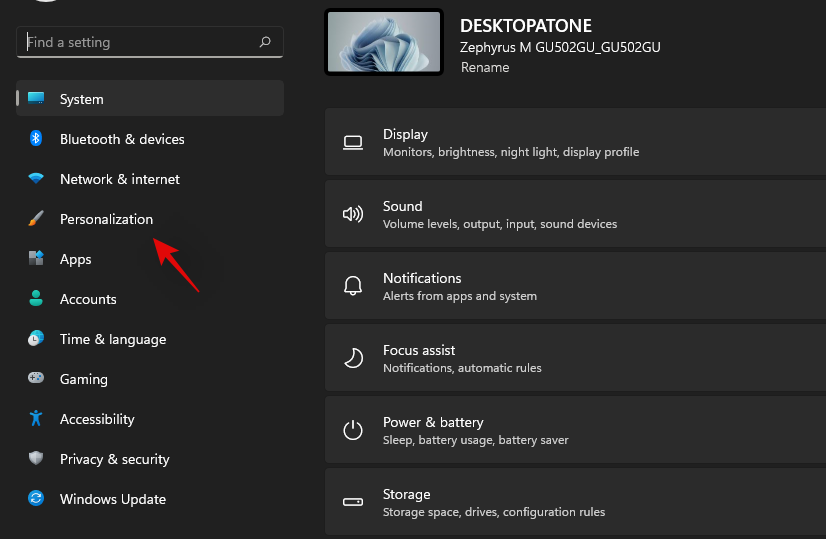
Press Windows + i on your keyboard and click on ‘Personalization’ on your left.
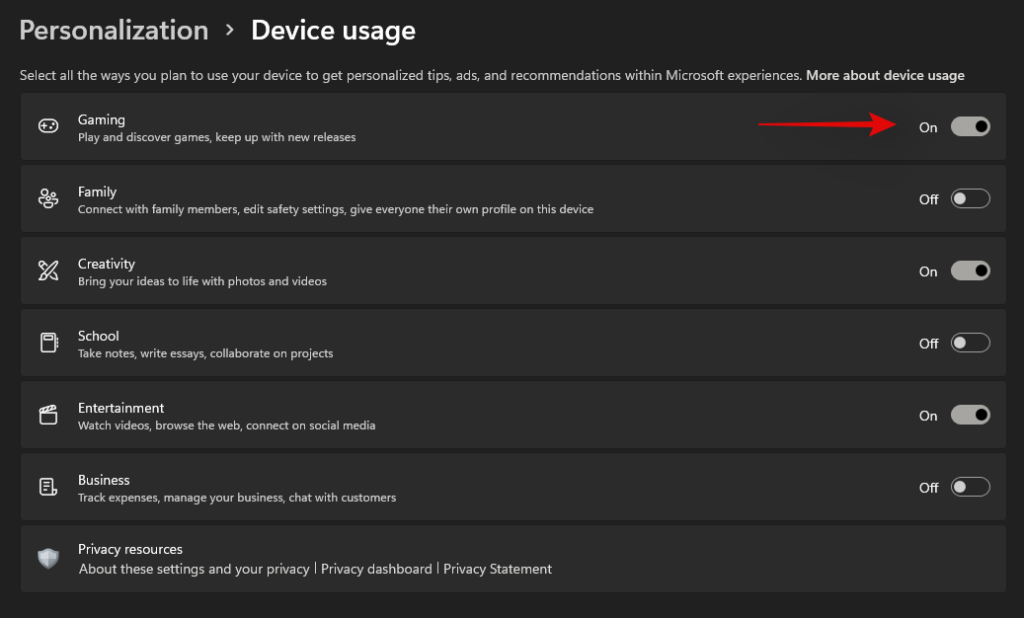
Click on ‘Device usage’.
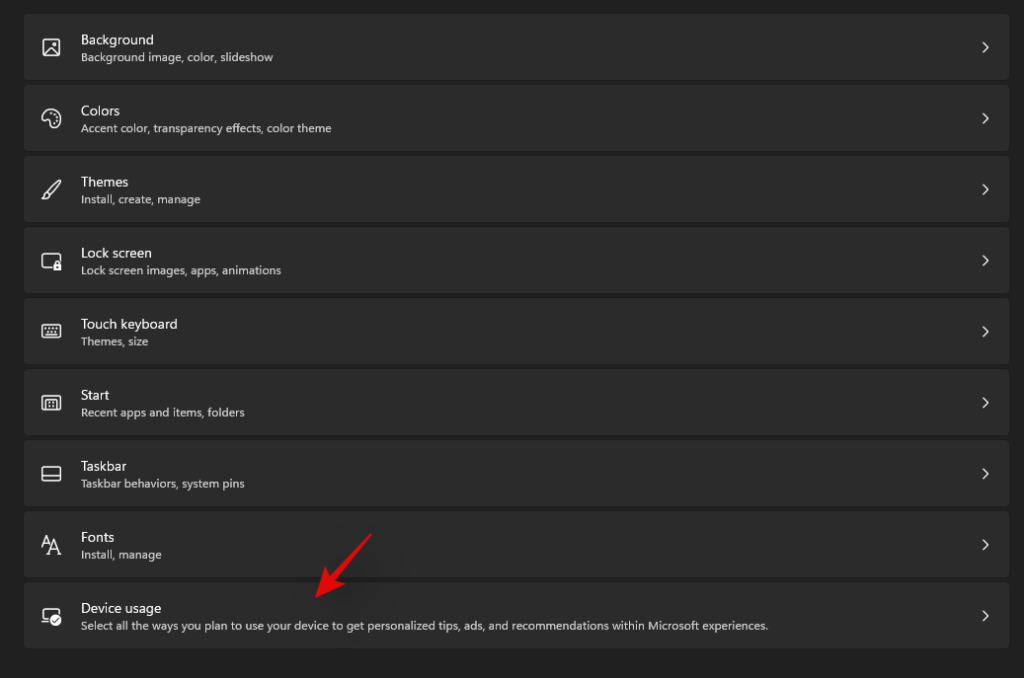
Disable the toggle for ‘Gaming’.
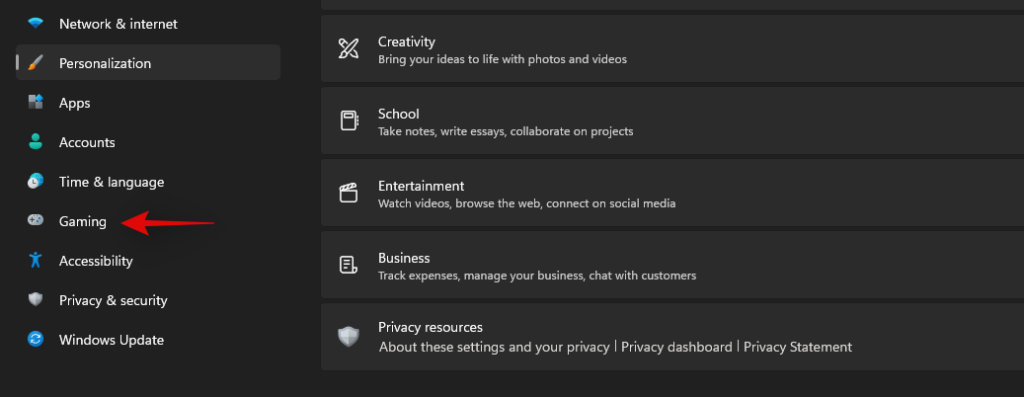
Click on ‘Gaming’ on your left now.
Click on ‘Game Mode’ on your right.

Disable the toggle for ‘Game mode’ at the top of your screen.

Close the Settings app and restart your laptop.
If your hotkeys start working upon a restart then game mode was likely interfering with your hotkeys in the background.
Method #6: Restart HID service
You can also restart your HID service which should help restart all your HID or Human Interface Devices. This includes your keyboard and restarting the HID service should help fix your hotkeys if your custom software or mapper was unable to hook into the HID service. Use the guide below to get you started.
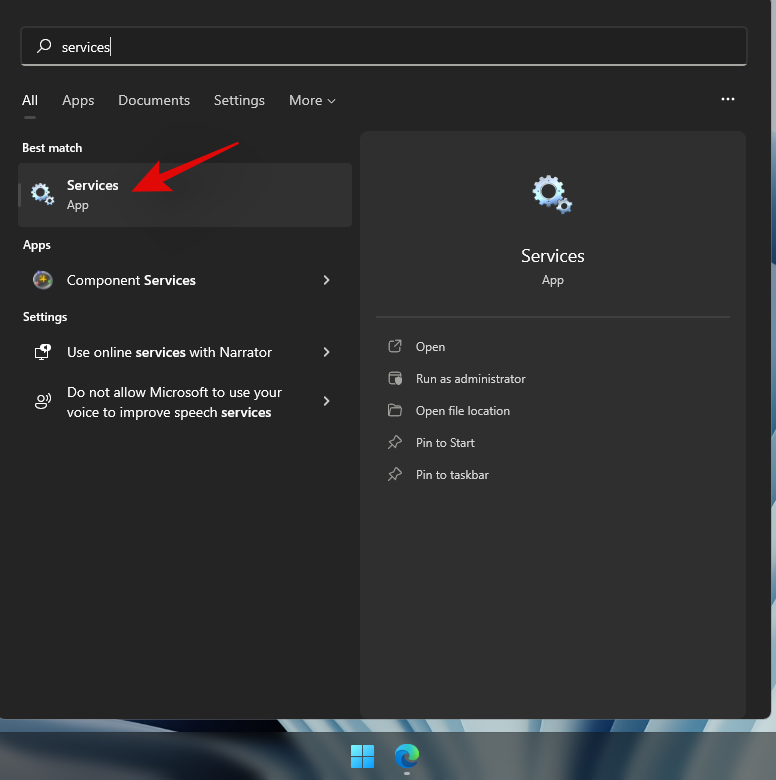
Press Windows + S and search for ‘Services’. Click and launch the app once it shows up in your search results.
Look for ‘Human Interface Device Service’ and right-click on it.
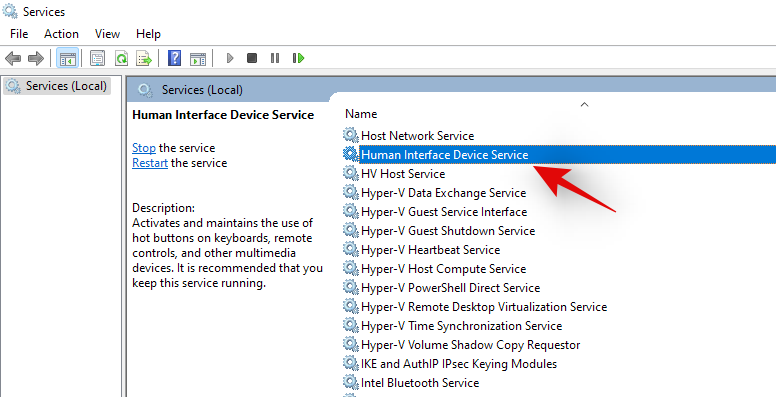
Select ‘Restart’.
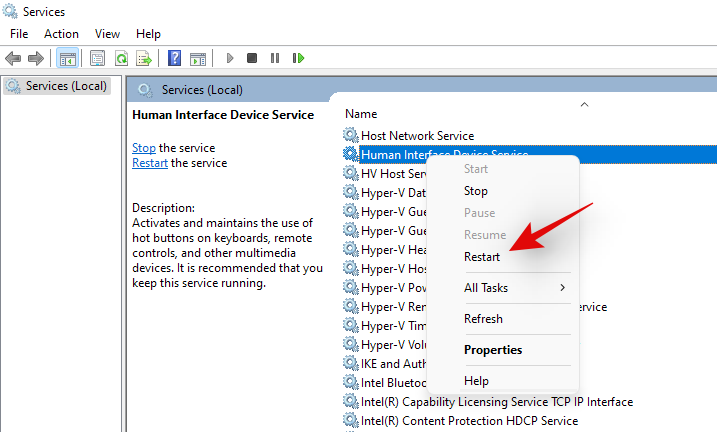
Windows will now restart your HID service.
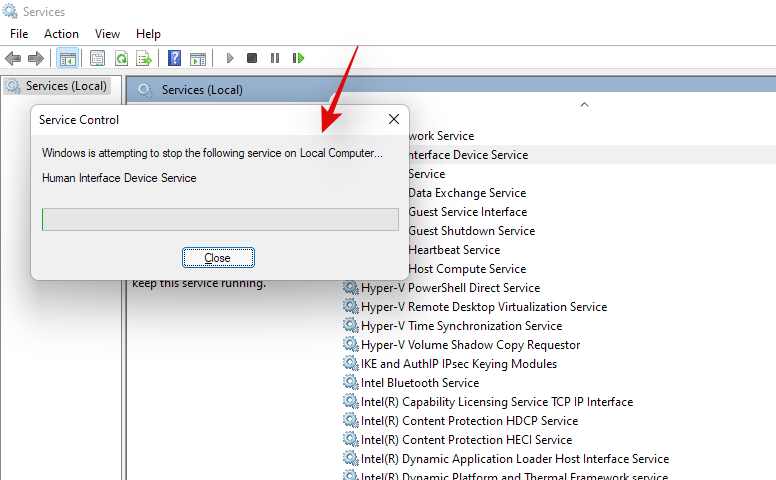
You can try testing out your hotkeys now. If a conflict in the background was preventing your custom software from hooking into the HID service, then this issue should now be fixed and your hotkey functionality should now be restored.
Method #7: Disable filter keys
Filter keys are another culprit within Windows that is known to cause issues on many devices. Ideally, Filter keys is an accessibility feature meant to be used so that you can avoid brief repeated key inputs which is quite useful for users with anxiety, hyperactivity, hand tremors, and other similar conditions.
However, if this feature has been enabled by mistake, then it could prevent Windows from detecting your hotkey inputs and combinations. You can check if Filter keys are enabled on your system and disable them using the guide below.
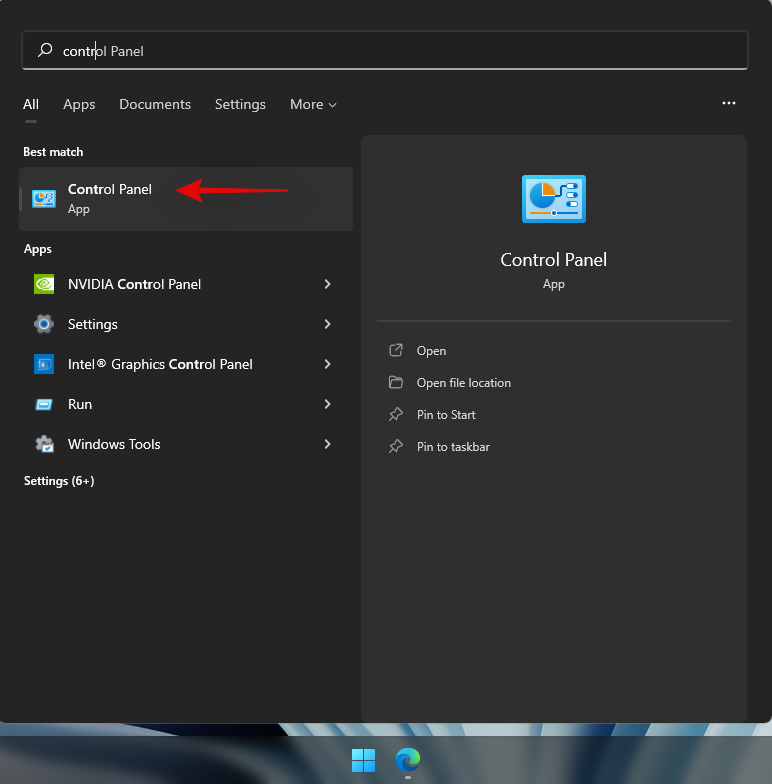
Press Windows + S and search for Control Panel. Click and launch the app once it shows up in your search results.
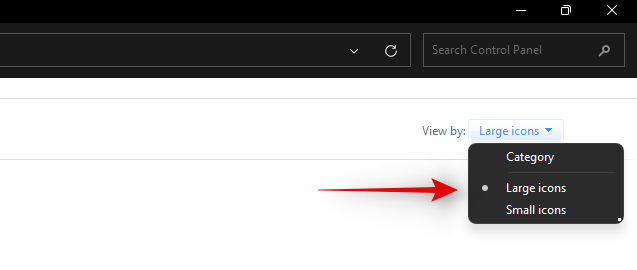
Switch to ‘Large icons’ by clicking on the drop-down menu in the top right corner.
Click on ‘Ease of Access Center’.

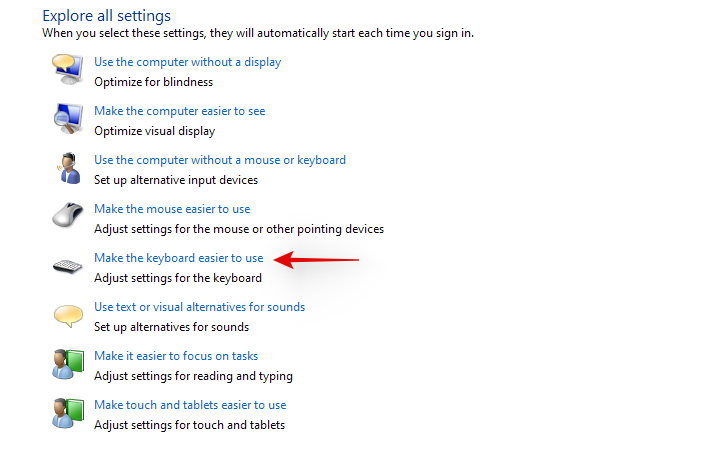
Click on ‘Make the keyboard easier to use’.
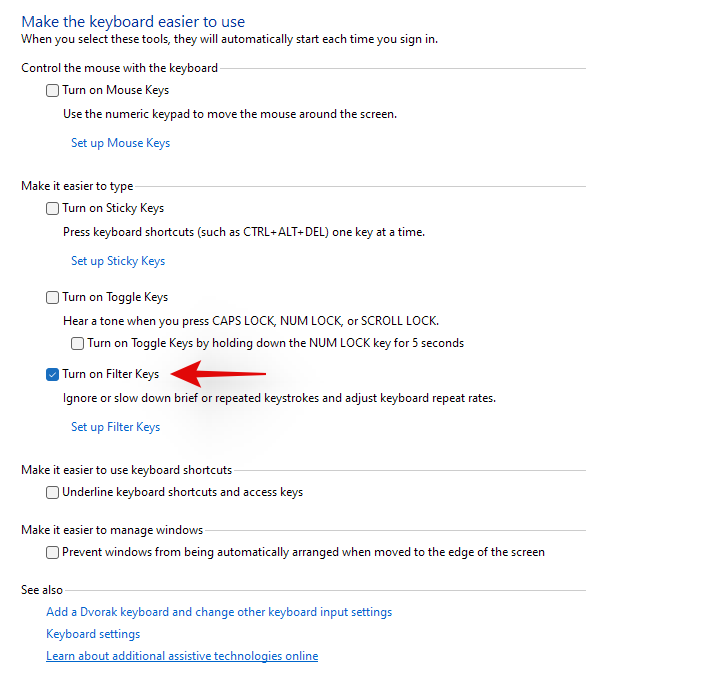
Now uncheck the box for ‘Turn on filter keys’.
Click on ‘Ok’ at the bottom.
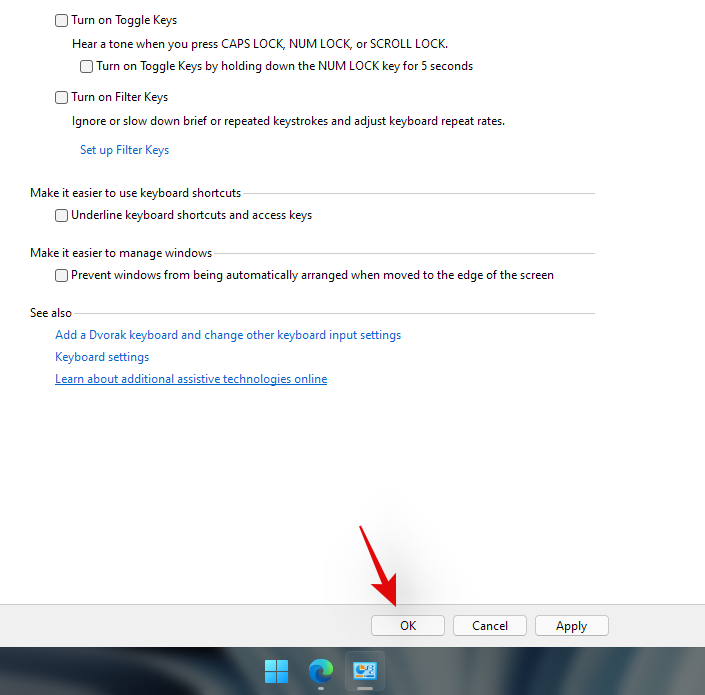
And that’s it! Filter keys should now be disabled on your system. Check your hotkey combinations and their functionality should now be restored on your system.
Method #8: Disable Function (Fn) lock if available
Fn lock is a feature in most laptops that allows you to lock and use the Fn keys and their functionality. Most systems use Fn keys as alternate keys mapped to functions and utilities that will be needed to manage your system. For example, F7 could be used to increase brightness and F8 could be used to decrease brightness. If directly pressing these keys helps you manage your brightness then the Fn lock is disabled on your laptop.
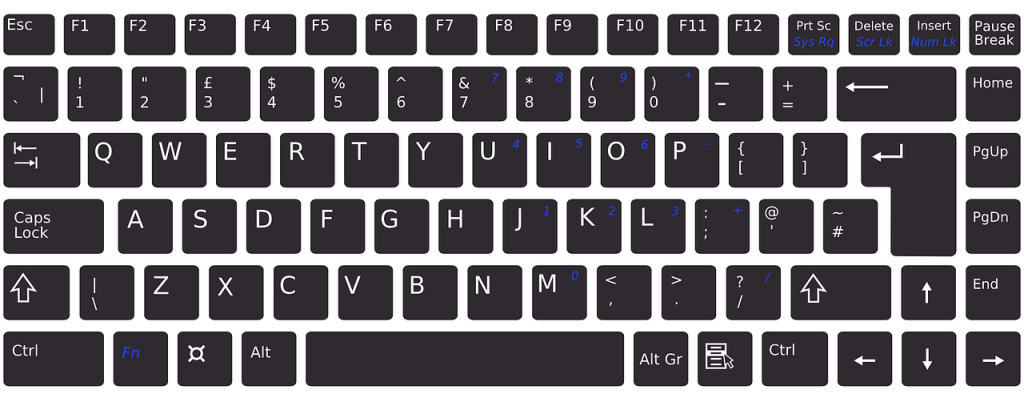
However, if hitting F7 and F8 registers as the respective key then the Fn lock is enabled on your device. In such cases, your Fn keys will behave normally and you will need to use Fn + F7 or F8 combination to adjust your brightness. You can disable or toggle this lock using keyboard shortcuts on most laptops. Look for an ‘Fn Lock’ icon on one of your keys and pres Fn + the respective key, on your keyboard. This should help disable Fn lock on your keyboard if enabled, and restore your hotkeys functionality.
In case a key combination is not available on your device, then you will most likely need to access your BIOS. Most manufacturers allow you to disable and enable Fn lock from the BIOS for easy access. Simply press F2 on your splash screen once your laptop is booting to enter the BIOS menu. Once in the BIOS menu, find the relevant option and toggle the Fn lock for your laptop.
In case a BIOS menu option is also not available to you then your laptop most likely uses the default Fn lock combination which is ‘Fn + Esc’ on your keyboard. This will help toggle the Fn lock on your system which should help restore your hotkeys.
Method #9: Check the on-screen keyboard
On-Screen keyboard within Windows can help you determine if your hotkeys have actually stopped working or you are facing a software issue. Start by launching the on-screen keyboard on your laptop using the taskbar icon. If the icon is hidden, press Windows + S on your keyboard and search for ‘On-Screen Keyboard’. Click and launch the app from your search results.
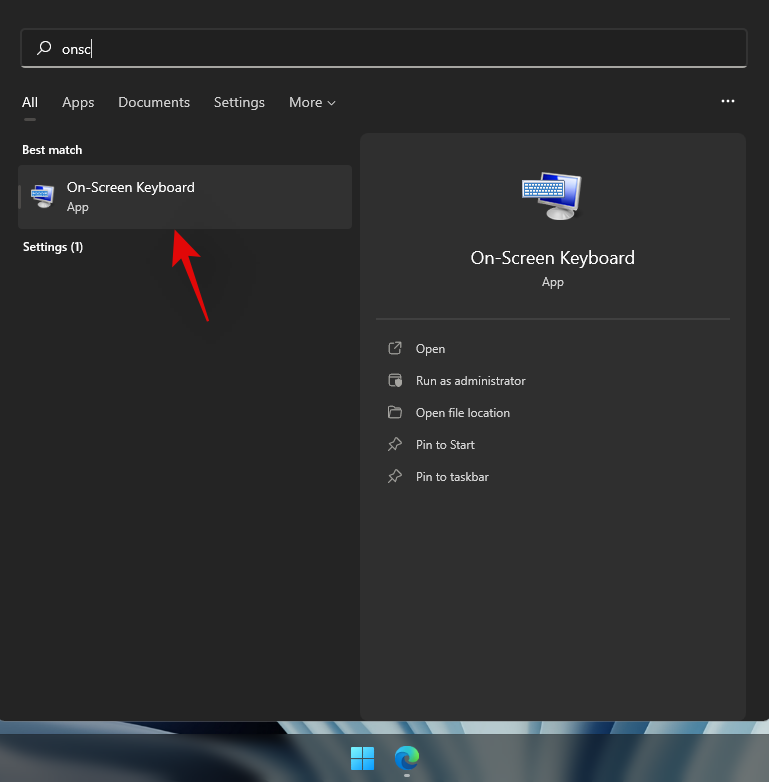
Now try using a hotkey that does not use Fn keys on your keyboard as they would be unavailable on your on-screen keyboard. If not try testing out each key and see if it still works on your laptop.
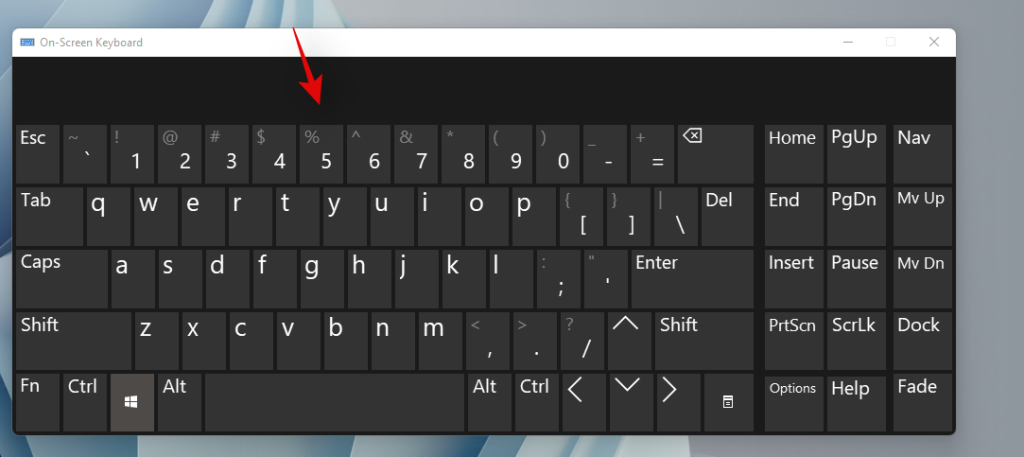
If all your keys seem to be registering with hotkeys working via the on-screen keyboard, then this indicates a hardware issue with your keyboard. In such cases, we recommend you get in touch with your OEM support team and try to solve your issue. If however, you are unable to activate your hotkeys via the on-screen keyboard as well, then you can use the fixes below to try and solve your issue.
Method #10: Use Windows troubleshooter
If hotkeys still fail to work on your system then it’s time to run a dedicated Windows troubleshooter. Windows troubleshooters have become highly advanced in the past few years and they can help fix most issues with your system nowadays. Use the guide below to run a keyboard troubleshooter on Windows 11.
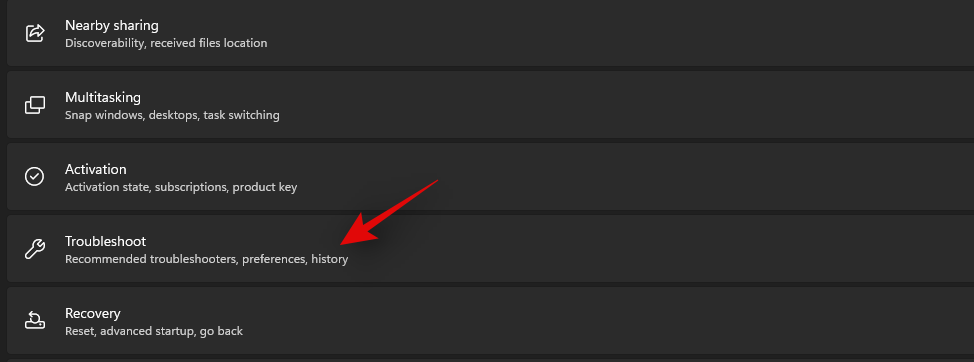
Press Windows + i on your keyboard and click on ‘Troubleshoot’ on your right.
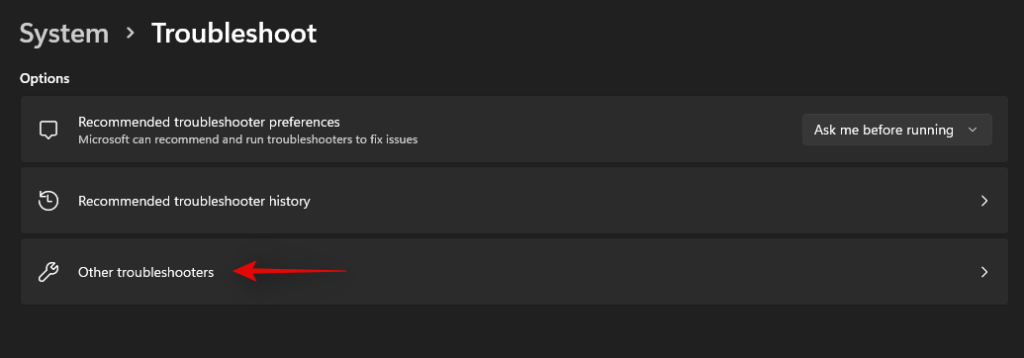
Now click on ‘Other troubleshooters’.
Scroll down and click on ‘Run’ beside ‘Keyboard’.

Windows troubleshooter will now do its thing and try to find issues with your keyboard.
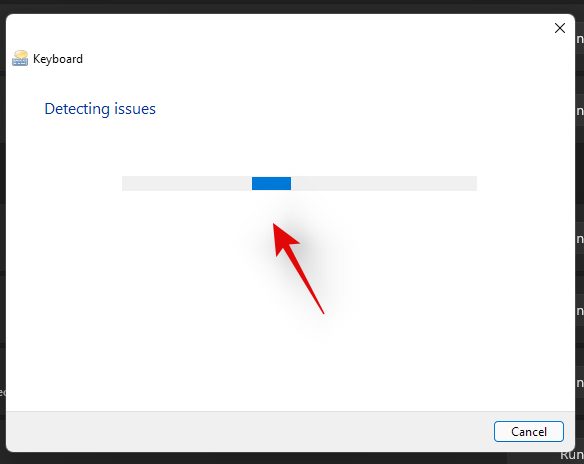
If any are found, follow the on-screen instructions to apply the relevant fixes. However, if the troubleshooter does not find anything then you can use the methods below to try and get your hotkeys working again.
Method #11: Run SFC scan
If hotkeys still aren’t working on your laptop then this might indicate an issue with your Windows installation. Let’s try to fix Windows system files and Windows 11 image on your laptop to try and fix hotkeys on your system. Use the guide below to get you started.
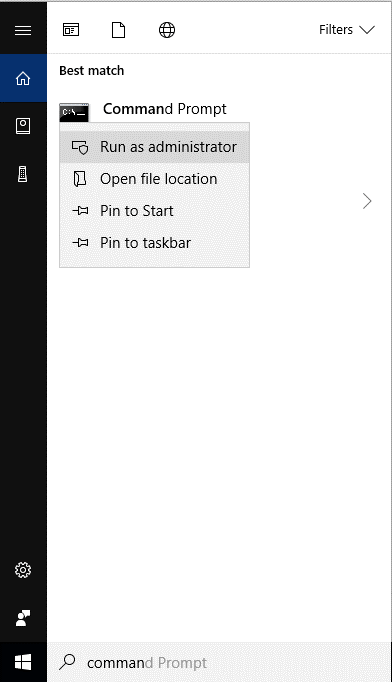
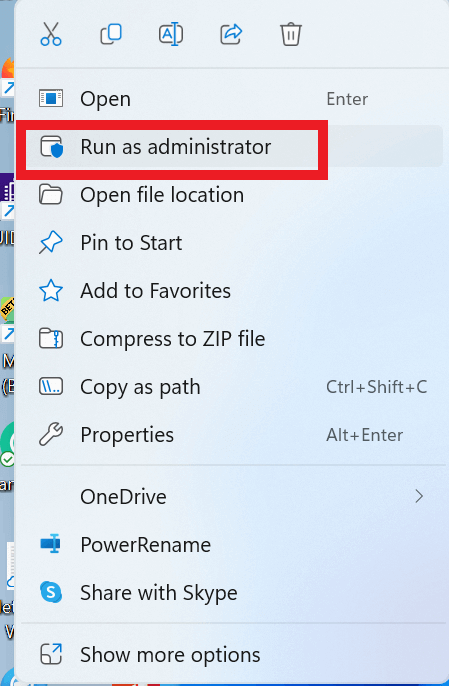
Press Windows + S on your keyboard and search for ‘CMD’. Click on ‘Run as administrator’ once it shows up in your search results.
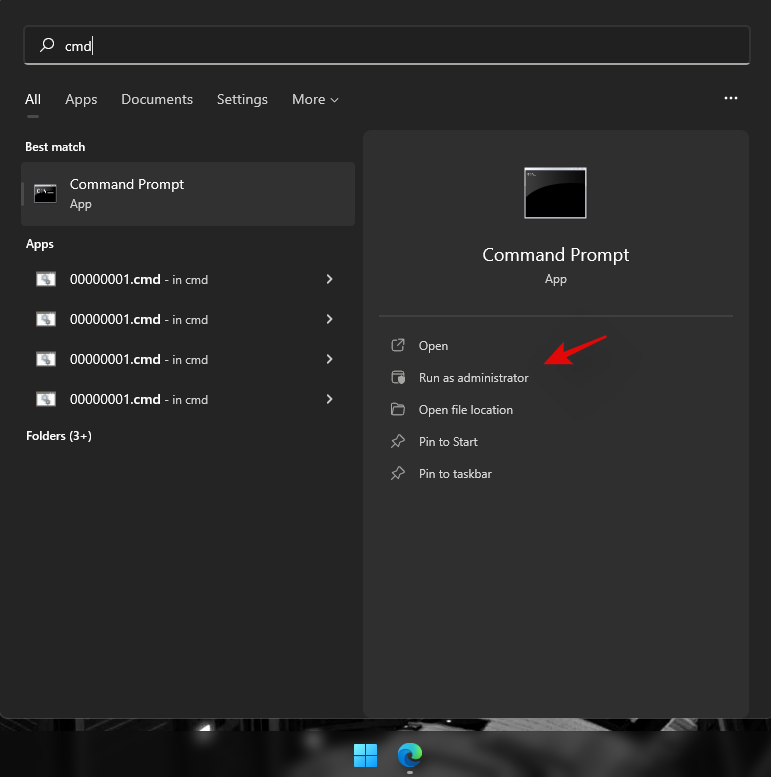
Now type in the following command and press Enter on your keyboard to execute it.
sfc /scannow

Windows will now scan and verify all of your system files and replace corrupted ones with fresh system files. If a corrupted Windows 11 installation broke your hotkeys functionality, then this should help fix it on your laptop.
Method #12: Run DISM fixes to restore Windows image
If you got the following message after running the SFC scan above, then it is highly important to run the DISM commands to fix your Windows 11 image.
“Windows Resource Protection found corrupt files but was unable to fix some (or all) of them”
Additionally, if the SFC scan is completed successfully but your hotkeys still do not work, then you can use the DISM commands to try and fix your Windows image as well. This will restore system files and solve background conflicts that might be preventing you from using your hotkeys. Follow the steps below to get you started.
Press Windows + S on your keyboard, search for CMD and click on ‘Run as administrator’ once it shows up in your search results.

Type in the following command and press Enter on your keyboard to execute it.
DISM /Online /Cleanup-Image /RestoreHealth

Wait for the process to complete and restart your laptop for good measure.
If a corrupted Windows image was the cause of your issue, then hotkey functionality should now be restored on your laptop.
Method #13: Uninstall any third-party tools
If you have any third-party tools customizing your keyboard then we recommend you disable or uninstall them at once. This includes the likes of key mappers, macro customizers, keyboard backlighting customizers, keyboard layout changes, and more. Such apps use different ways to hook into your keyboard drivers via Windows and any one of these could be outdated and not compatible with Windows 11 on your system.
We recommend you uninstall any such tools from your system at the earliest and remove any additional leftover configuration files if available. You should also check for driver updates to your keyboard and roll back to a previously known driver to revert any major changes applicable to your system. Use the guide below to roll back your keyboard driver.
13.1 How to rollback your keyboard driver
Press Windows + X on your keyboard and click on ‘Device manager’.

Find the desired keyboard in your list of devices and right-click on it once found.

Select ‘Properties’.
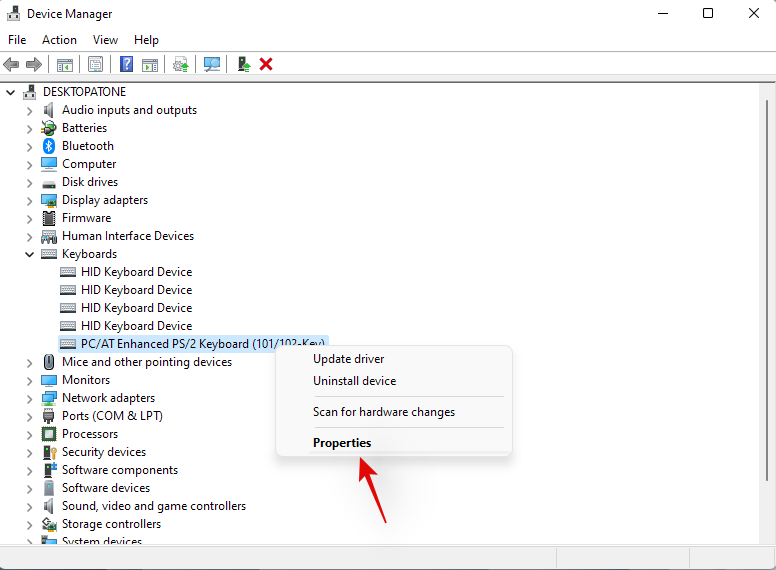
Click and switch to the Driver tab.
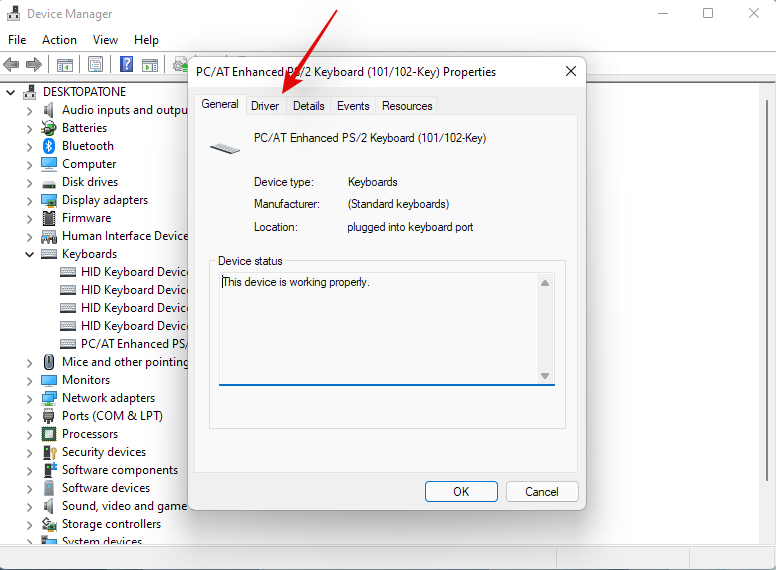
Click on ‘Rollback driver’ if available.
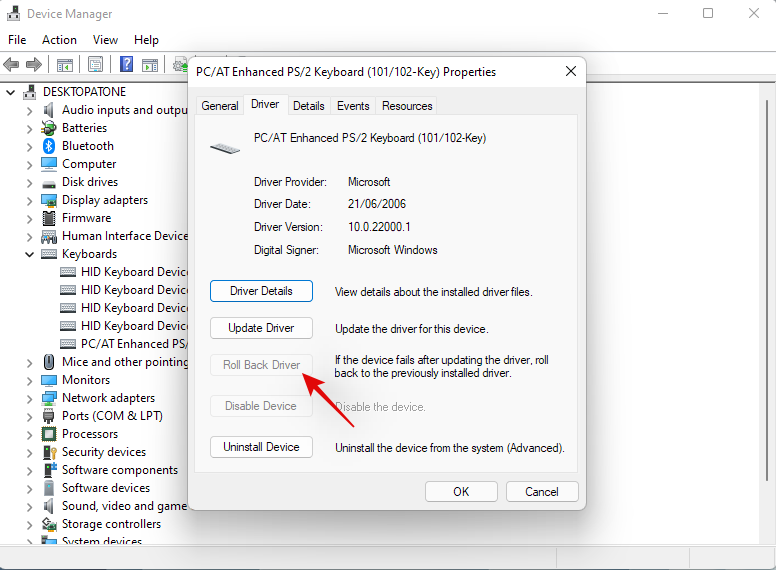
Follow the on-screen instructions to finish rolling back your driver.
Restart your system if prompted.
Once the driver is reverted to its previous iteration hotkeys should start working on your system again.
However, if you don’t have the option to roll back your driver then you will need to uninstall the installed drivers for your keyboard and hope that Windows sources the correct drivers when it scans for new hardware on your system. If you have dedicated drivers available for your keyboard on your OEM support site, then you can install them manually. Follow Method #10 below to reinstall your keyboard drivers manually or through Windows in this case.
Method #14: Connect to a different USB port (external keyboards only)
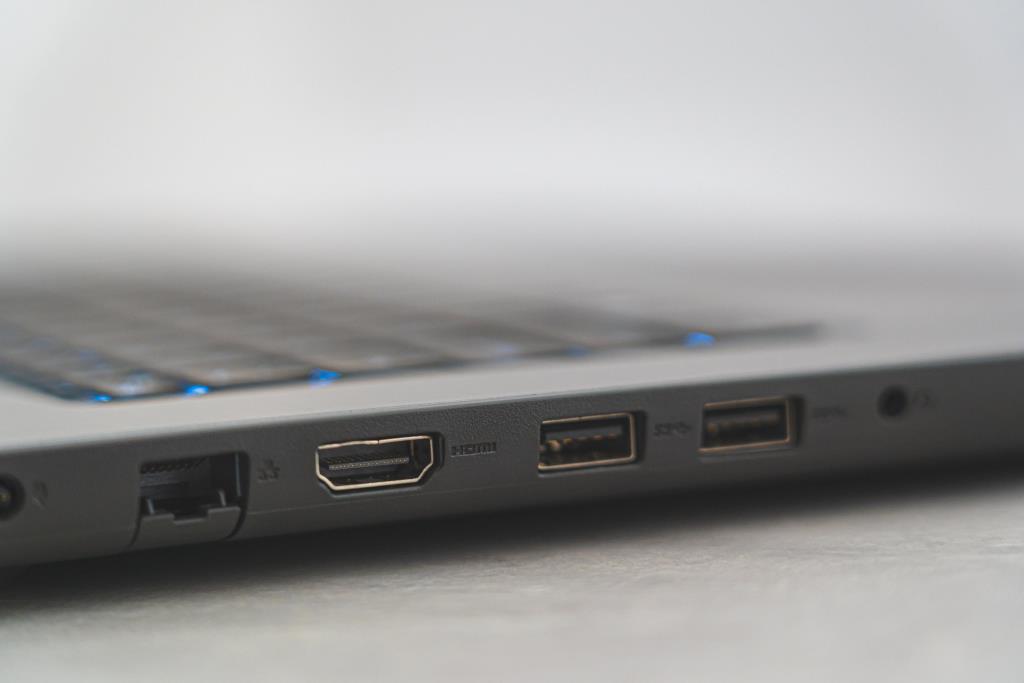
If you are using an external keyboard then we recommend using a different USB port. Depending on your keyboard you might need a USB 2.0 or USB 3.0 port for compatibility and keyboard layout reasons. Additionally, if your keyboard uses fancy backlighting and other custom features then it likely requires a USB 3.0 port on your system to power all of its features.
In contrast, if you are trying to use a legacy keyboard via adapters then you will likely need to test USB 2.0 and USB 1.2 for best performance depending on your unit. Moreover, we recommend you ensure that your laptop is plugged into power so that it can power your USB ports properly.
If however, your external keyboard still fails to work then you can try reinstalling its drivers on your system using the guide in this post.
Method #15: Check GPO and re-enable hotkeys if disabled
If you are using Windows Pro or higher that has been issued by your organization or your educational institute then it is likely that hotkeys have been disabled on your system by your administrator. This could be a side effect due to a recent change, or it could be your new company policy.
Administrators tend to disable third-party apps on company-issued and education systems which also, in turn, disables hotkey functionality for most laptops. You can fix this issue by contacting your administrator and whitelisting your hotkey app in case you don’t have access to the Group Policy Editor. However,
If you are an administrator, with access to GPO, then you can use the guide below to re-enable hotkeys on your system.
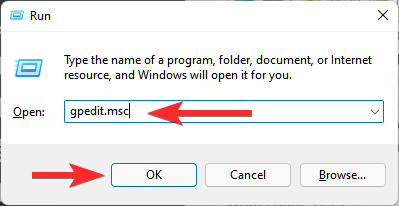
Press Windows + R on your keyboard, type in the following term, and press Enter on your keyboard.
gpedit.msc
Navigate to the following path.
User Configuration > Administrative Templates > Windows Components > File Explorer
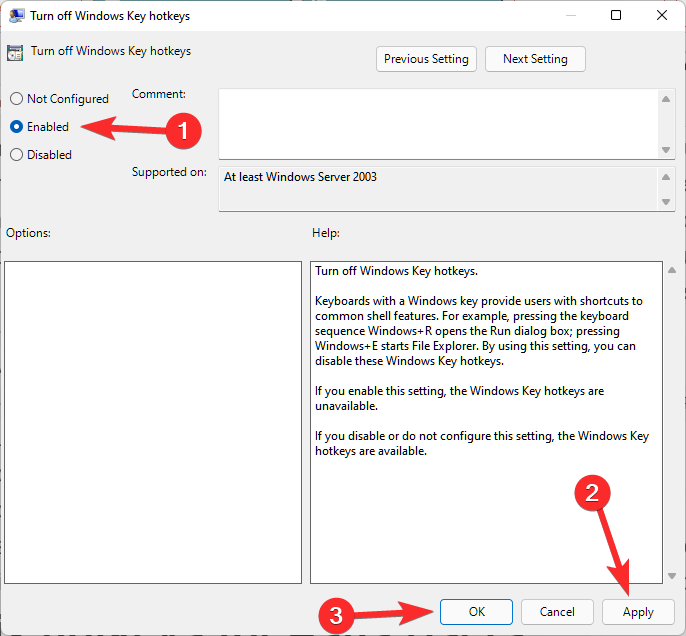
Double click on ‘Turn off Windows Key hotkeys’.
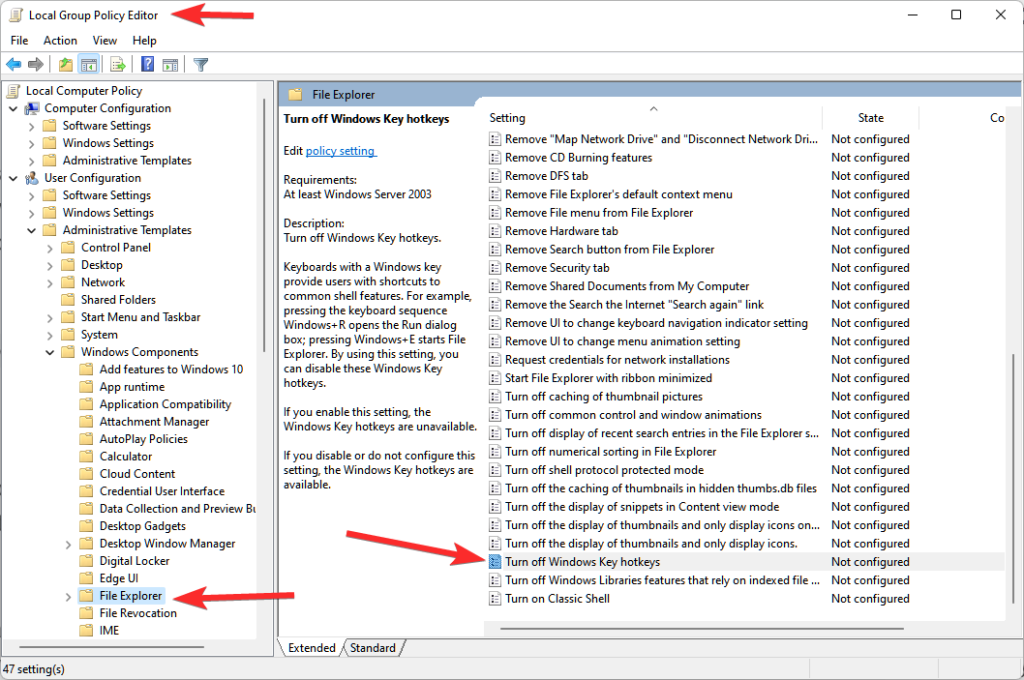
Click and select ‘Enabled’ in the top left. Then click ‘Apply’ in the bottom right and then click ‘OK’.
Restart your laptop for good measure and hotkey functionality will now be restored on your system. Please keep in mind that this will only work for OEMs that hook into Windows shortcuts natively to get hotkeys working again. For manufacturers that have dedicated utilities, you can use one of the guides below.
Fix hotkeys for Asus Users
If you are an Asus user with a ROG or a TUF unit, then it is likely that you are dealing with Armoury Crate. Armoury Crate is Asus’s utility that helps you manage your power plan, performance plan, overclocking, keyboard backlighting, and more depending on your laptop. Over the years Armoury Crate has grown to be quite finicky and has been riddled with telemetry and adware.
Moreover, the Aura Sync utility seems to be a hit or miss when syncing your peripherals’ backlighting with each other. If you have an Asus unit and hotkeys don’t seem to be working for you then it is likely that the Asus hotkeys app hasn’t been launching in the background. In this case, you can either try to manually start the app or reinstall AC service and the Asus System interface reconfigure your hotkeys and restore their functionality. Use one of the guides below that best fits your current needs and requirements.
Method #1: Try to manually start AsusHotkeyExec.exe
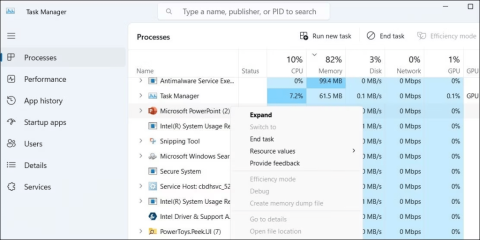
Press Ctrl + Shift + Esc on your system to open the Task Manager and switch to the ‘Details’ tab.
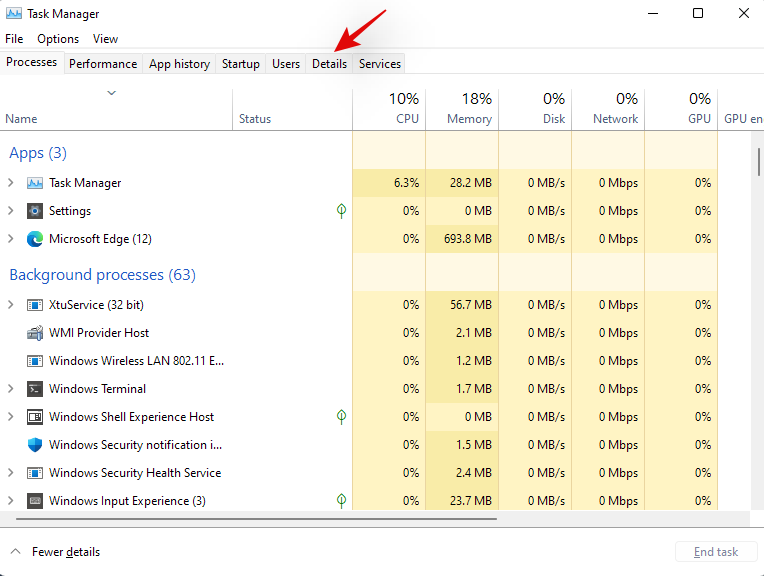
Depending on your preferences, the install location of AsusHotKeyExec.exe could vary. Hence we will use an already running process to find its install location. Start by right-clicking on either of the following ongoing tasks.
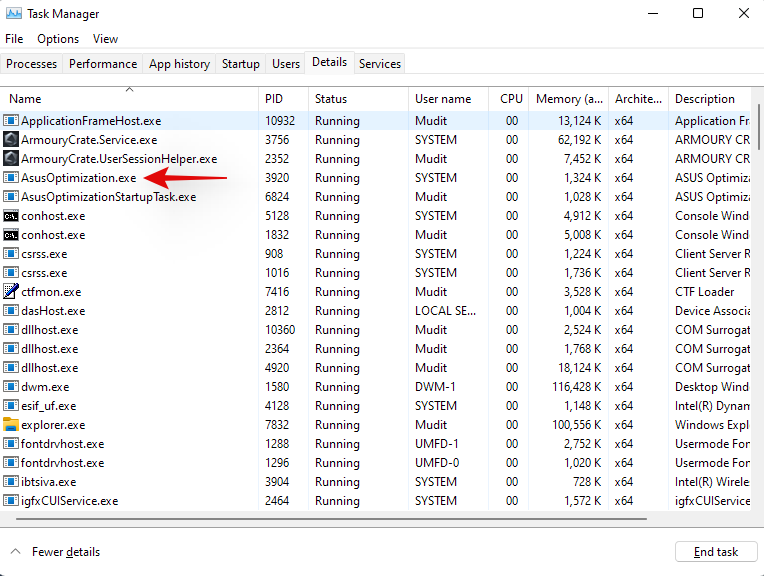
- AsusOptimization.exe
- AsusOptimizationStartupTask.exe
Select ‘Open file location’.
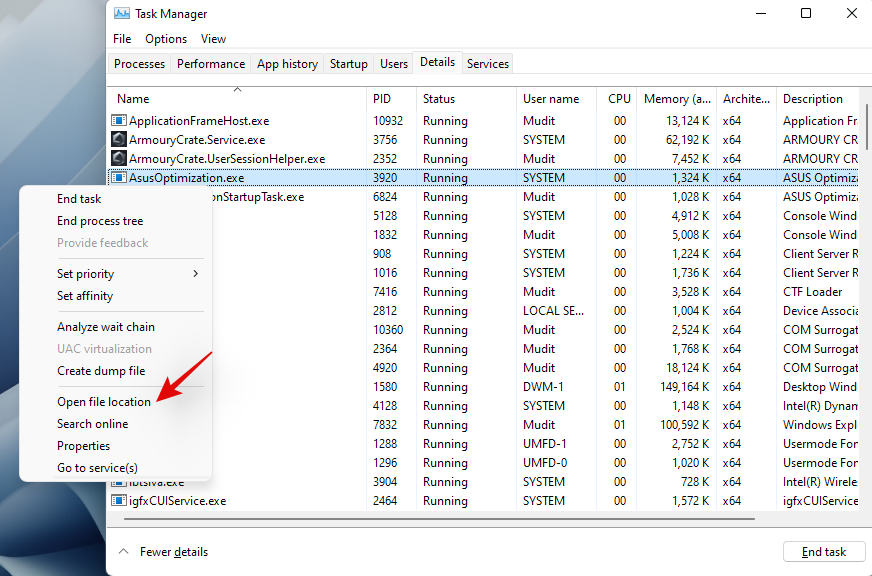
You should now be taken to the ‘C:\Windows\System32’ ideally, where you should find the ‘AsusHotkeyExec.exe’. Right-click on the app and select ‘Run as administrator’.
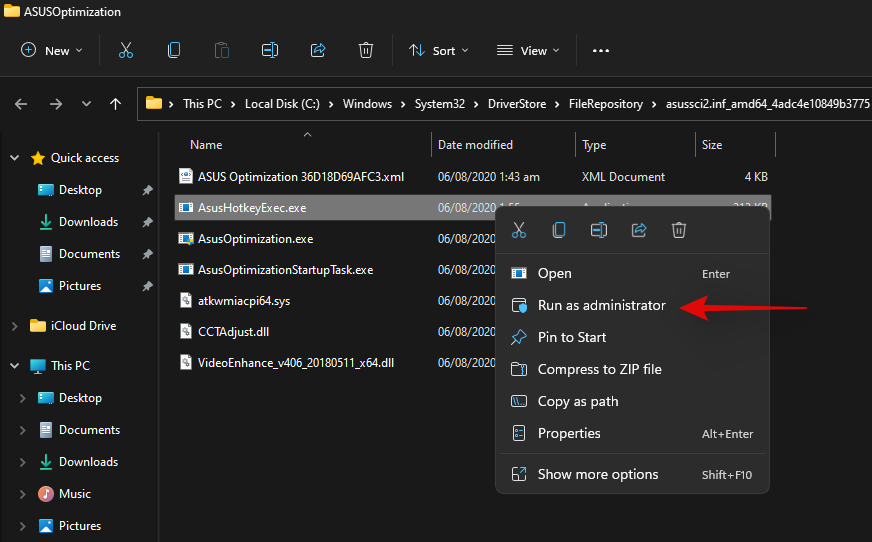
The app will now launch in the background and restore hotkey functionality on your system.
Try using one of your hotkeys now, if it seems to be working then, likely, AsusHotkeyExec.exe did not automatically launch in the background. This could be an isolated incident but if the app fails to launch even after a restart, then you will need to re-enable its auto start functionality.
You can do this by reinstalling Asus System Interface and Armoury Crate Service on your laptop using the guide below.
Method #2: Re-install Asus System Interface and Armoury Crate service
Asus System Control Interface is a prominent utility regularly updated by Asus that helps most tools like Armoury Crate, Armoury Crate Service, MyAsus System Diagnosis, and more to run properly on your system. Armoury Crate service on the other hand is your overclocking utility bundled with specific overclocking and power management configurations for your specific device. Depending on your ROG or TUF unit, AsusHotkeyExec.exe could be bundled with either of these services. Let’s re-install both of them on your system.
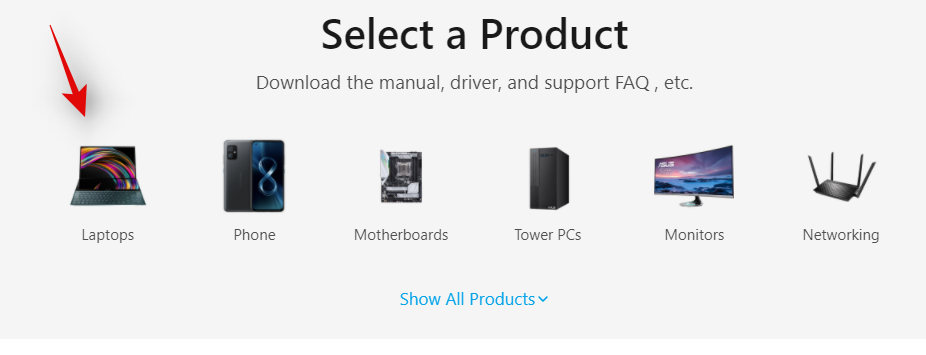
Visit the link above and click on ‘Laptops’.
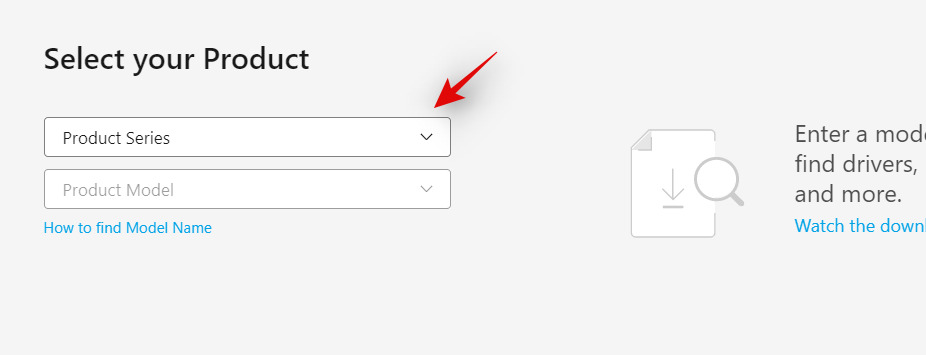
Click on ‘Product Series’ and select your Series from the drop-down menu.
Click on the next drop-down menu and select your laptop from the list.
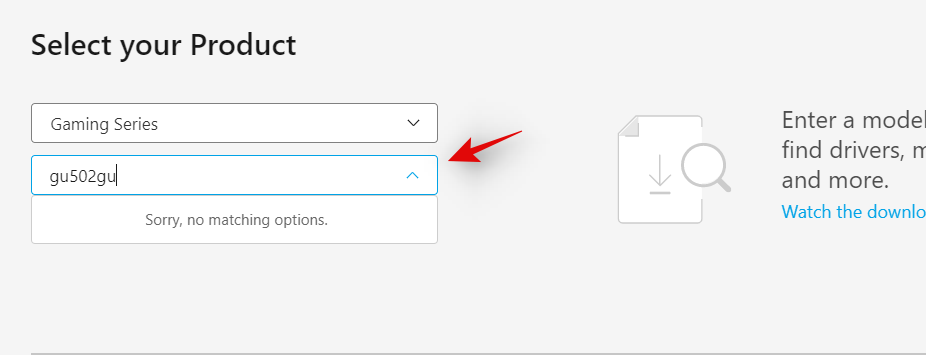
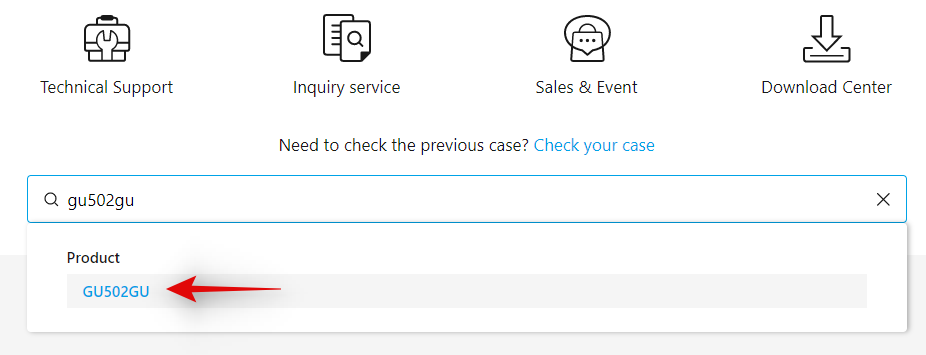
If your unit is not listed in this list, then you can search for it using the search bar at the top. Click on your laptop model once it shows up in your search results under ‘Products’.
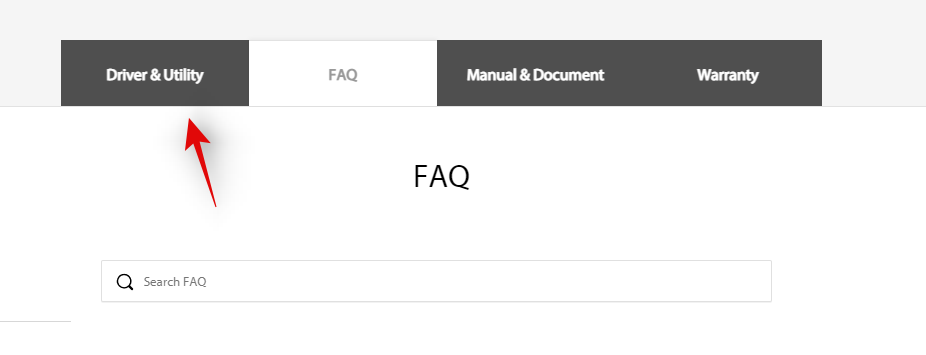
Click on ‘Driver & Utility’.
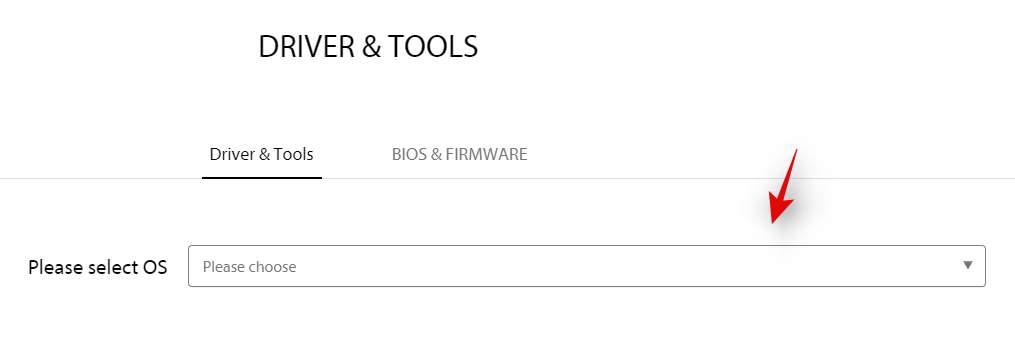
Choose ‘Windows 10 64-bit’ as your OS.
Now scroll down to the ‘Software and Utility’ section and click on ‘Show all’.
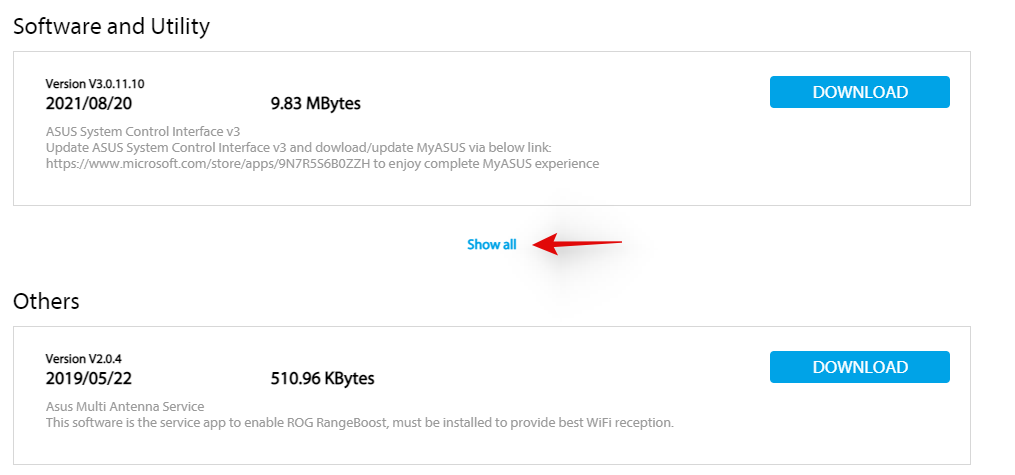
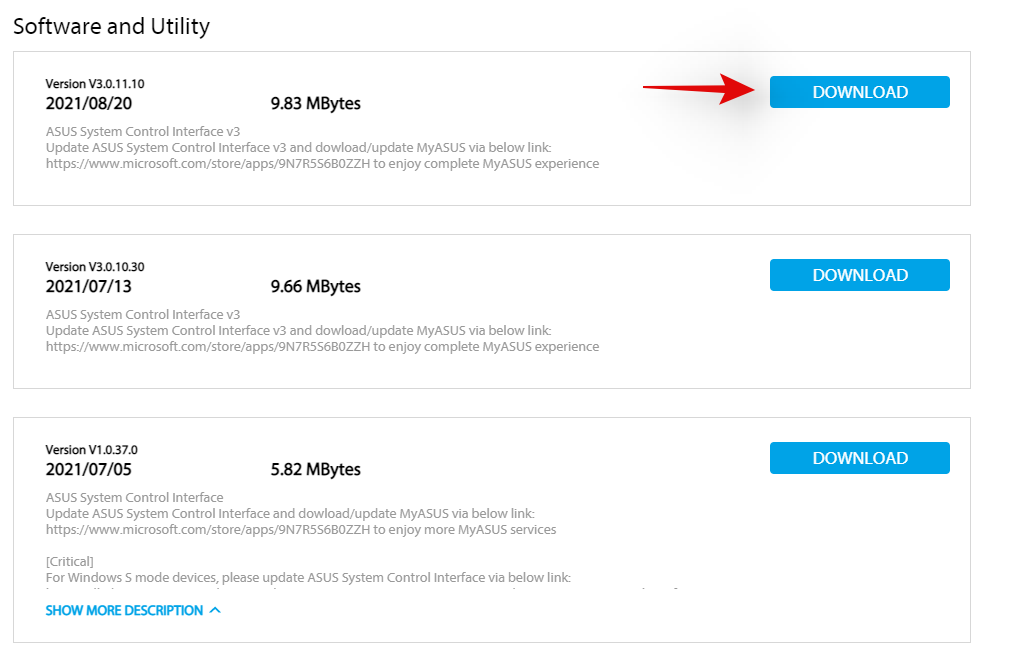
Click on ‘Download’ beside the latest version of ASUS System Control Interface.
Similarly, click on ‘Download’ beside Armoury Crate Service.
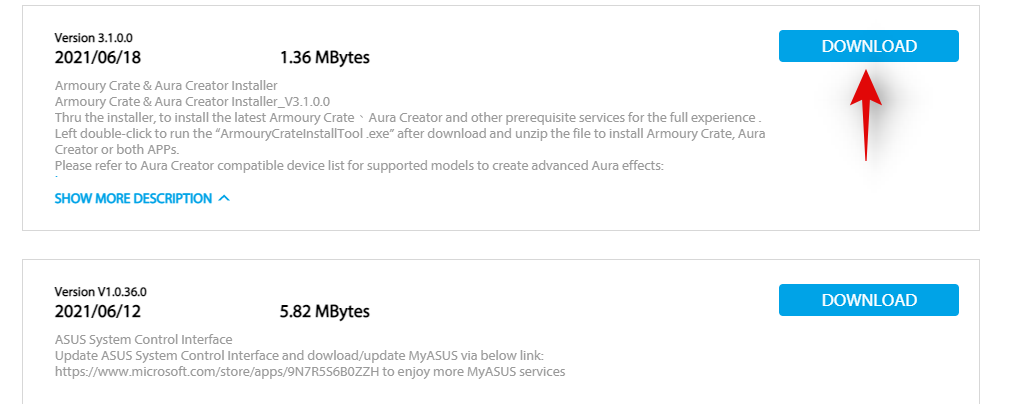
Note: Asus has now started bundling the Armoury Crate app, Armoury Crate Service, Aura Sync app, and Aura Sync service in a single package for many laptops. If this is the case for your unit as well, then you can download this package.
Now let’s remove all installed services and packages that we are going to reinstall. Press Windows + i on your keyboard and click on ‘Apps’ on your left.

Click on ‘Apps and features’.

Now uninstall the following applications if you managed to source the Armoury Crate Service package from the download page.

- Armoury Crate Service
- Armoury Crate Service core
However, if you got a single package to install Armoury Crate, Armoury Crate Service, Aura Sync app, and Aura Sync service, then uninstall the following applications from your laptop.
- Armoury Crate
- Armoury Crate Service
- Armoury Crate Service core
- Aura Sync add-on x32
- Aura Sync add-on x64
- Game Visual or Asus Splendid
- Aura Sync
To uninstall an app, click on the 3-dot menu beside it and select ‘Uninstall’. Click on ‘Uninstall’ again to confirm your choice. Repeat the steps above to uninstall all the necessary apps from your system.
Note: Do not remove services like Refresh Rate service, Pointing device service, and more from your laptop during this process. Even though they hook into the Armoury crate, there is no need to uninstall them as the existing installation will work with your reinstalled Armoury Crate and its services.
We will now uninstall Asus System Control Interface from your system. The best way to do this is by using the Device Manager. Follow the guide below to get you started.
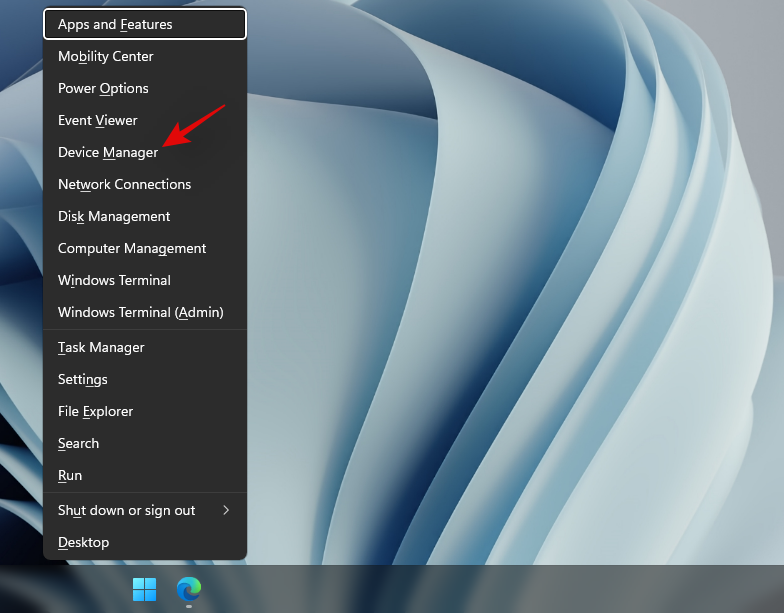
Press Windows + X on your keyboard instead and select ‘Device Manager’.
Click and expand ‘System devices’ in Device Manager.
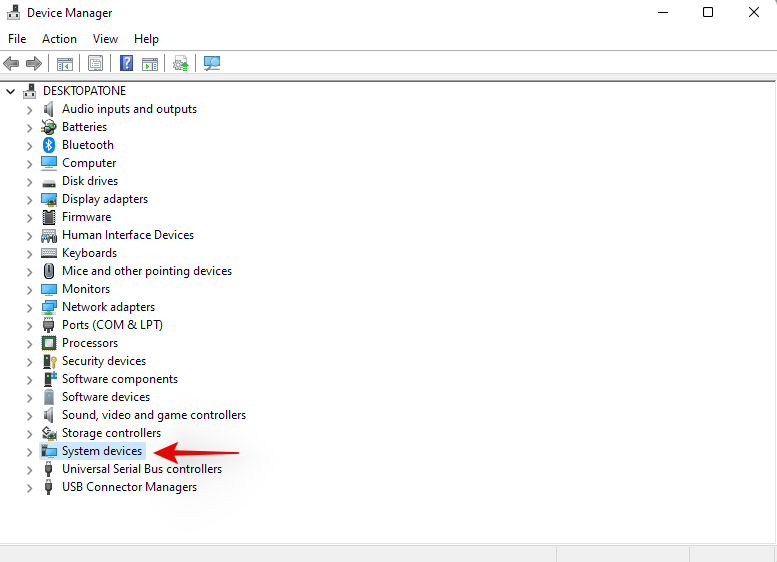
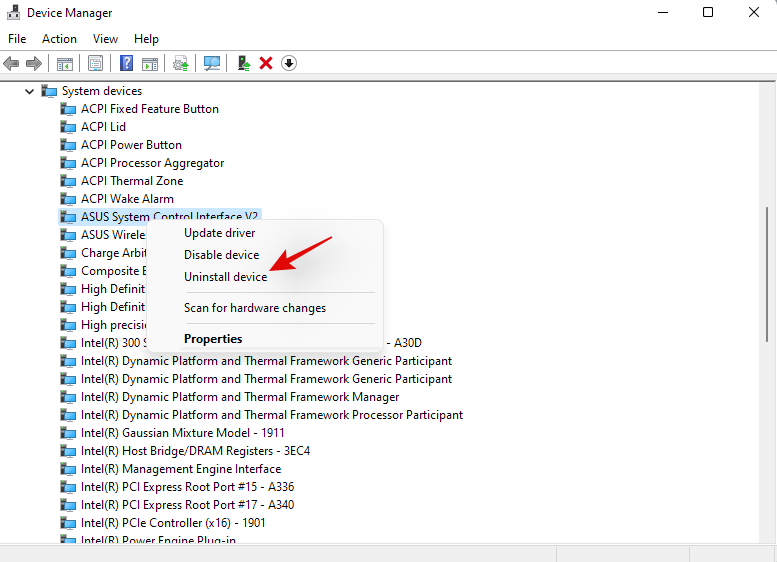
Right-click on ‘Asus System Control Interface’ and select ‘Uninstall device’.
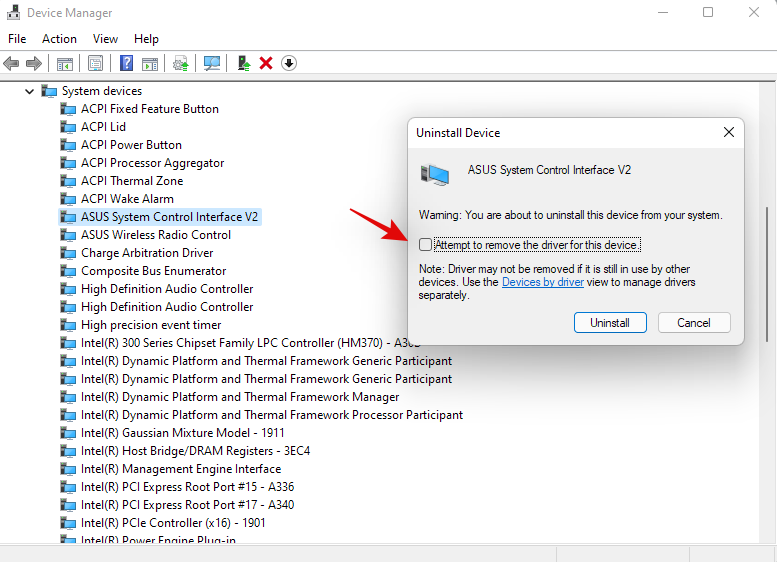
Click on ‘Uninstall’ to confirm your choice. Additionally, check the box for ‘Attempt to remove the driver for this device’ if available.
If Asus System Control Interface is unavailable in your device manager then you can restart your laptop at this point. Once restarted, follow the subsequent steps to re-install Armoury Crate and Asus System Control Interface on your system. The concerned drivers will now be uninstalled from your system. You can now restart your laptop for the changes to take effect.
Once your laptop restarts, navigate to the packages we downloaded from Asus’s website on your local storage and start by installing Asus System Control Interface first. Double-click and launch the .exe file and follow the on-screen instructions to install Asus System Control Interface on your laptop. You will be prompted to restart your system once the process completes. We recommend you restart your system at this point before proceeding with the installation of Armoury Crate on your system.
Once your system restarts, double click and launch the Armoury Crate package.
Select the utilities you wish to install on your system. Unless you have other Asus peripherals that support RGB backlighting through Aura Sync, there is no point in installing Aura Sync. Once you have selected the desired utilities, click on ‘Next’.
Click on ‘Install’ to start the installation process.
The package will now connect to Asus’s servers, identify your laptop and install the necessary compatible utilities. Once installed, we recommend you restart your system for good measure.
And that’s it! Once your system restarts, hotkeys should be back up and running again on your system.
Fix hotkeys for Lenovo users
If you own a Lenovo unit especially from the ThinkPad or IdeaPad series, then you will need to try out the following fixes. Lenovo’s professional lineup of laptops is bundled with tons of hotkeys and there are mainly 3 fixes you can try to fix your issue. Let’s first verify if your hotkeys have actually stopped working. Follow the steps below to get you started.
Method #1: Disable all shortcuts and enhancements
Let’s start by disabling all keyboard shortcuts and keyboard enhancements within Windows for your laptop’s keyboard. Follow the guide below to get you started.
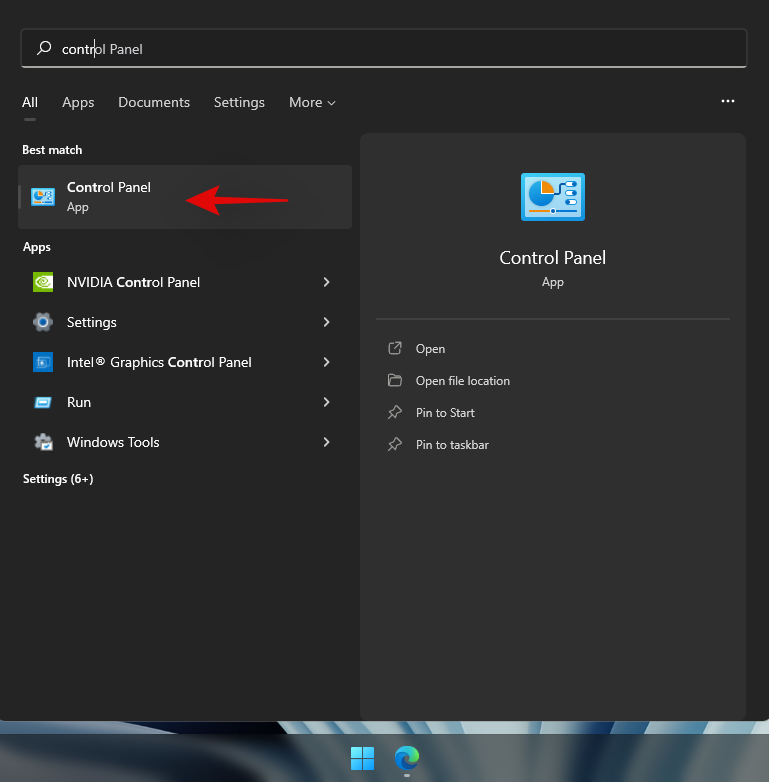
Press Windows + S on your keyboard and search for ‘Control Panel’. Click and launch the app from your search results.
Click on the drop-down menu in the top right corner and select ‘Large icons’.

Click on ‘Ease of access center’.

Click on ‘Make the keyboard easier to use’.
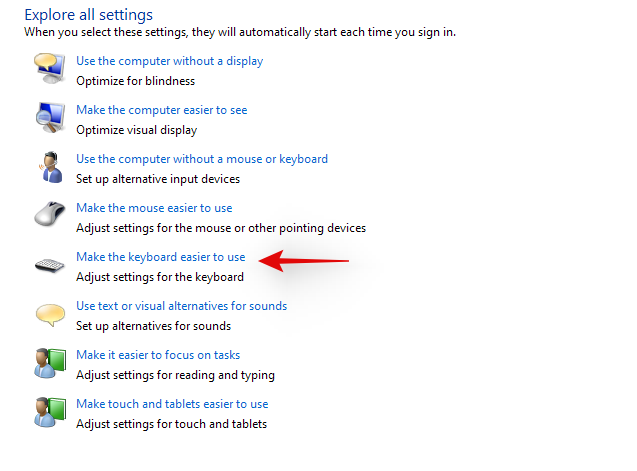
Uncheck all the options available on your screen.
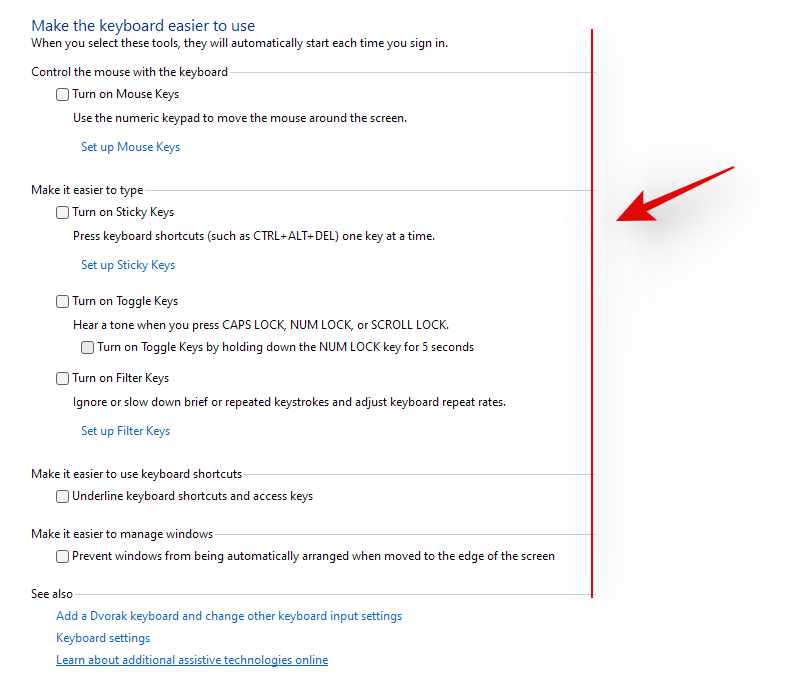
Save your changes and restart your laptop for good measure.

If keyboard enhancements enabled by Windows were causing conflicts with your hotkeys, then your hotkey functionality should be restored on your laptop by now.
Method #2: Update your drivers using Lenovo support
You might have manually updated your drivers, you might have reinstalled and rolled back your drivers, but this isn’t similar to downloading and installing drivers through the support app. Most OEM support apps are designed to automatically scan for known issues with your hardware in the background and fix them automatically. These support app also come with hotfixes and patches that aren’t readily available to the end consumer. These hotfixes and patches are applied when downloading and installing the concerned driver or utility,
Hence we recommend that you download and reinstall the following drivers on your system through the Lenovo support app. Depending on your unit’s make and model, you could be using a different Lenovo app like Lenovo Vantage and more. The process is similar for all these apps and you simply need to manually uninstall your keyboard drivers first and then reinstall the corresponding ones from your support app.
Note: We won’t be removing your power management drivers and instead we will be simply reinstalling them. Removing power management drivers can end up harming your vital components especially if your laptop is doing some resource-heavy work in the background.
Press Windows + X and select ‘Device Manager’.

Find your keyboard under ‘Keyboards’ and right-click on it.
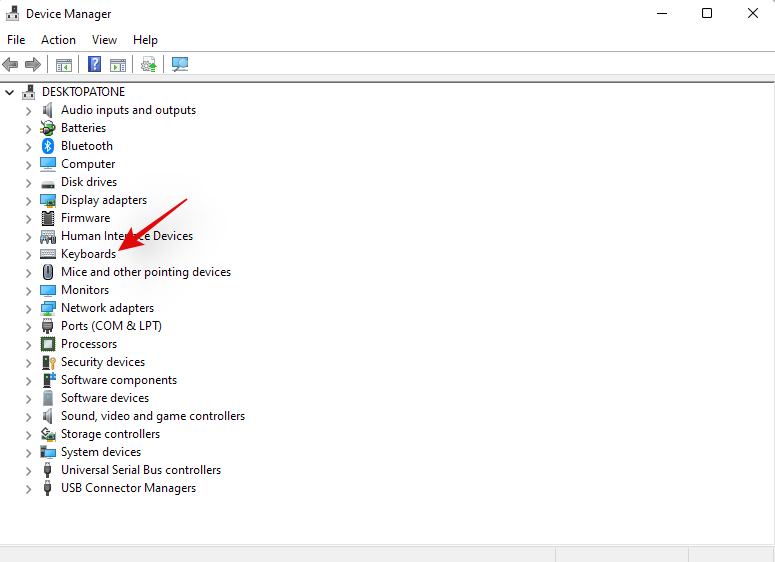
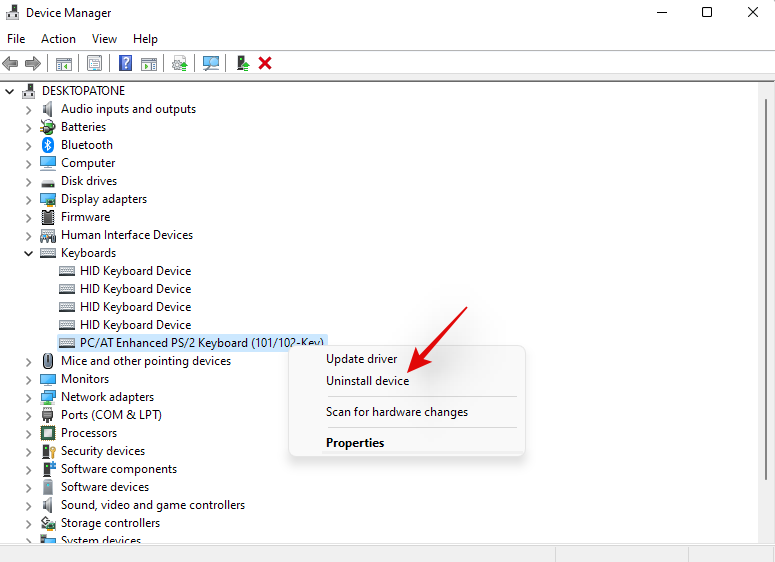
Select ‘Uninstall device’.
Check the box for ‘Attempt to remove the driver for this device’ if available. Click on ‘Uninstall’.
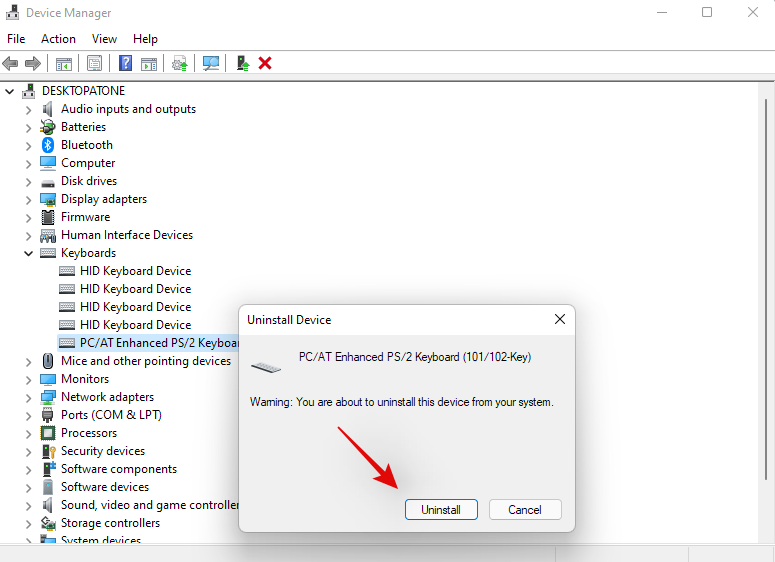
Your keyboard driver will now be uninstalled. Open the Lenovo System Update, Lenovo Vantage, or the corresponding Lenovo support app depending on your current laptop. We will be using the Lenovo System update app for this guide as that will be used by most modern systems currently and in the future. If you do not have the app installed on your unit, then you can use the link below to download it to your laptop.
Download and install the app on your system using the link above. Once installed, launch the app and log in with your device and account details if prompted.
Click on ‘Get new updates’ on your left.
Lenovo System update app will now detect your configuration and look for compatible upgrades accordingly. Once the process completes, all available updates will be shown on your screen according to their priority. Check each of the following sections and check the boxes for the updates you wish to install on your laptop. Your keyboard driver will also show up in this list as it is currently missing from your system. Ensure that you check the box for your keyboard driver before moving to the next step.
- Critical Updates
- Recommended Updates
- Optional Updates
Note: Do not check the boxes for your bios updates. We recommend you download and install bios updates, individually and separately so that your laptop does not face installation conflicts in the background during this process.
Click on ‘Download’ in the bottom right corner.
Lenovo system update will now download and install all the selected drivers on your system. Your laptop could automatically restart a few times during this process which is normal. Simply log back into your account and wait until the installation process has been completed.
Once all the drivers are installed on your system, try using your keyboard hotkeys again. In most cases for Lenovo devices, your hotkeys should be back up and running on your system again. Lenovo is known to apply certain patches in the background when installing hotkey drivers and create certain tasks to maintain the functionality of your hotkeys. A reinstallation should have reinitiated this process again which should have fixed your hotkeys.
Fix hotkeys for Acer users
If you are using an Acer system then there isn’t much you can do at this point. Acer is known to keep its hotkeys simple with minimal customization available to the end-user. This in turn means that if the above-stated general fixes did not work for you then it is unlikely that resetting the CMOS will. However, if you have overclocked your unit or have been messing around with voltage values, then you can try resetting your CMOS to get hotkeys back up and running on your system again.
Resetting the CMOS does a lot of things but it mainly helps reset changes to core system values like your voltage, frequency speed, and more. Resetting the CMOS also helps discharge capacitors on some laptops which can give you a sudo-fresh start which is known to solve many persistent errors and issues with systems in the past. Use this comprehensive guide by us to reset your CMOS on your Acer unit.
Check out: How to Reset BIOS in Windows 11
Facing error codes when restarting HID services? Try these fixes!

If you decided to restart your HID service using the guide at the top, then you could end up facing two common errors depending on how your system has been configured. These are known errors and can be fixed on your system using the guides below. Follow the steps to get you started.
Method #1: For error code 126
Error code 126 can be fixed by replacing the Hidserv.dll to your system 32 folder. Follow the guide below to get you started.
Note: You will need a Windows 11 installation media or ISO in case the .dll file is unavailable on your system. Make sure you have either of these handy before proceeding with the guide below. In case you do not have an installation media handy, then you can use the link below to download Hidserv.dll to your local storage.
Open the Windows installation media you have handy and search for Hidserv.dll using the search box in your top right corner.
Þegar hún hefur fundist skaltu afrita skrána á hentugan stað á staðbundinni geymslu. Hins vegar, ef þú hleður niður skránni á staðbundna geymsluna þína með því að nota hlekkinn hér að ofan, dragðu þá skjalasafnið út á hentugan stað og fylgdu skrefunum hér að neðan til að breyta öryggisheimildum hennar.
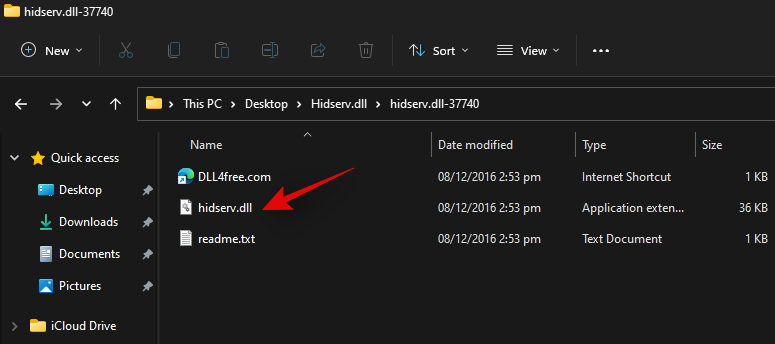
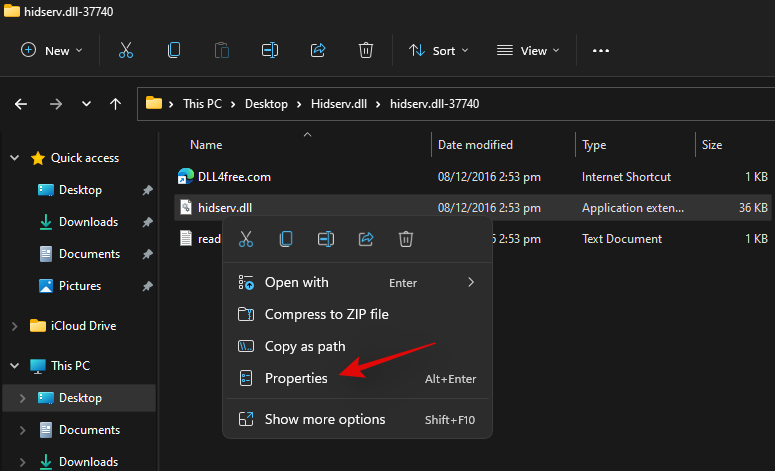
Hægrismelltu á niðurhalaða Hidserv.dll og veldu 'Eiginleikar'.
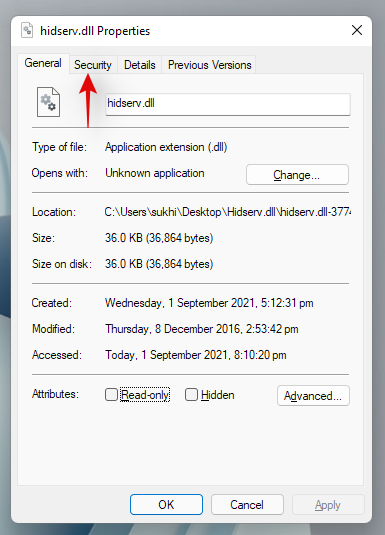
Við munum nú þurfa að veita nauðsynlegum notendum og forritum heimildir handvirkt svo að Hidserv.dll geti virkað rétt á kerfinu þínu. Skiptu yfir í Öryggisflipann efst.
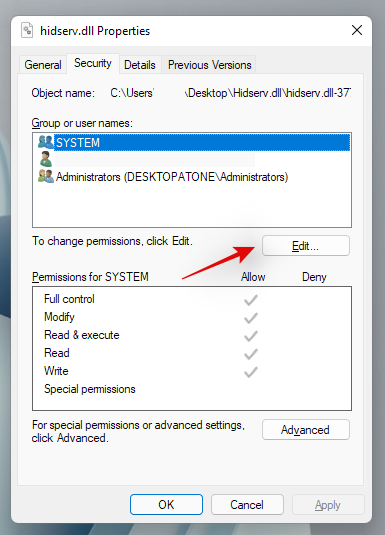
Smelltu á 'Breyta' efst.
Smelltu á 'System' efst og hakaðu í reitinn fyrir 'Skrifa'
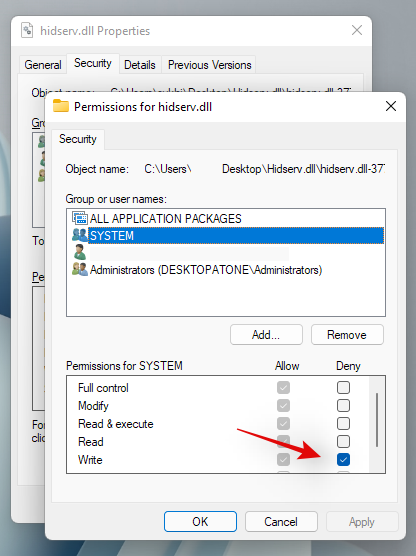
Smelltu á 'Sækja um' þegar því er lokið. Veldu 'Já' til að staðfesta val þitt. Endurtaktu skrefin hér að ofan og takmarkaðu heimildir fyrir stjórnendur og aðra notendur á listanum hér að ofan. Þegar þú ert búinn skaltu smella á 'Bæta við'.
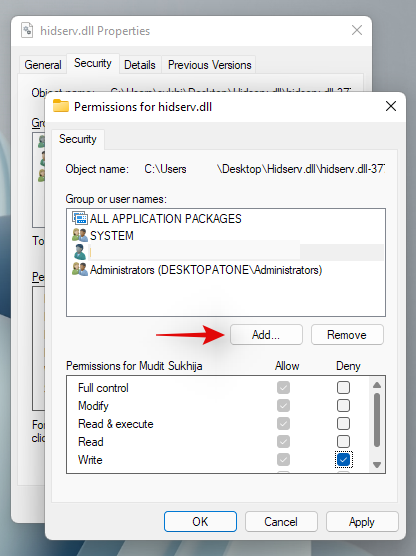
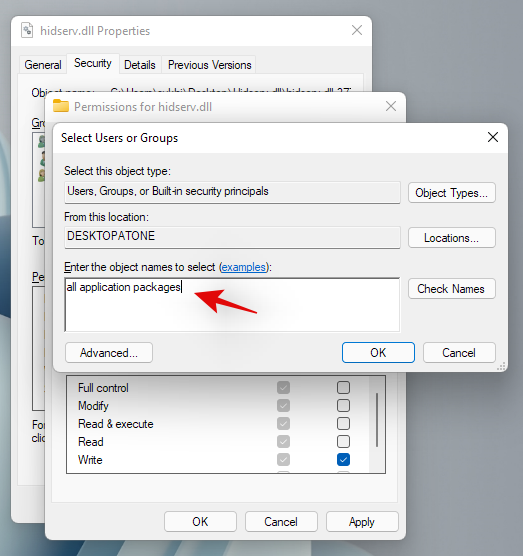
Sláðu nú inn eftirfarandi hugtak og ýttu á Enter á lyklaborðinu þínu.
All Application Packages
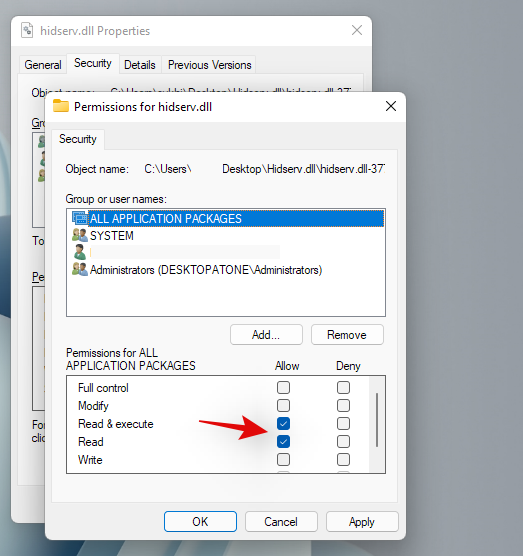
Veldu eftirfarandi heimildir fyrir 'ALLIR UMSÓKNAPAKKAR'.
Á sama hátt skaltu smella á 'Bæta við' aftur.

Sláðu nú inn eftirfarandi hugtak og smelltu á 'Í lagi'.
NT Service\TrustedInstaller
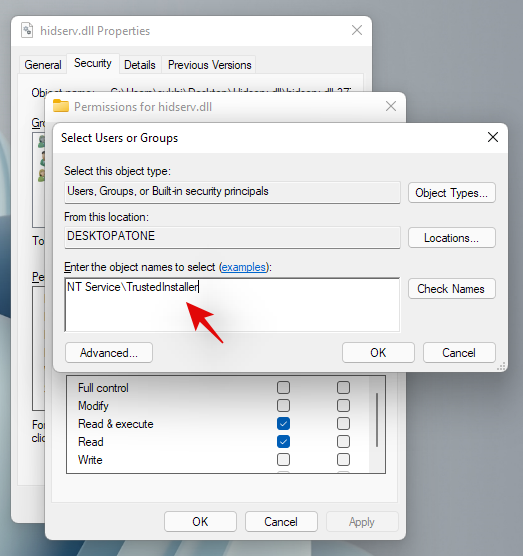
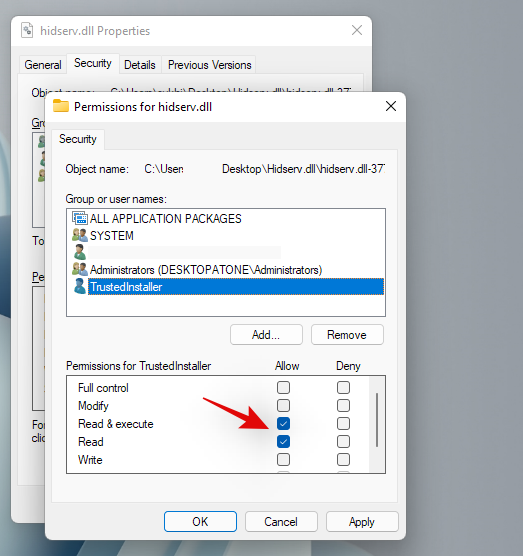
Hakaðu í reitina fyrir sömu heimildir og við gerðum fyrir forritapakkana hér að ofan.
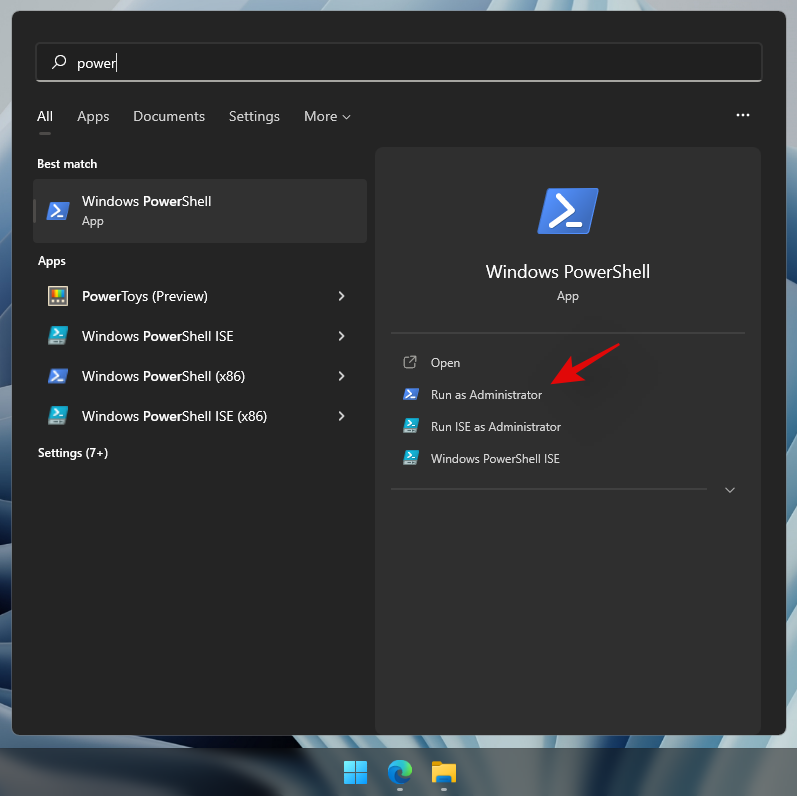
Við þurfum nú að bæta við heimildum fyrir takmarkaða UMP pakka á kerfinu þínu. Það er engin leið til að gera þetta með Windows File Explorer, svo við munum nota PowerShell skriftu í staðinn. Ýttu Windows + Sá lyklaborðið og leitaðu að PowerShell. Smelltu á 'Hlaupa sem stjórnandi' þegar það birtist í leitarniðurstöðum þínum.
Þegar PowerShell er ræst skaltu afrita og líma kóðann hér að neðan í PowerShell glugganum þínum. Ekki framkvæma skipanirnar ennþá.
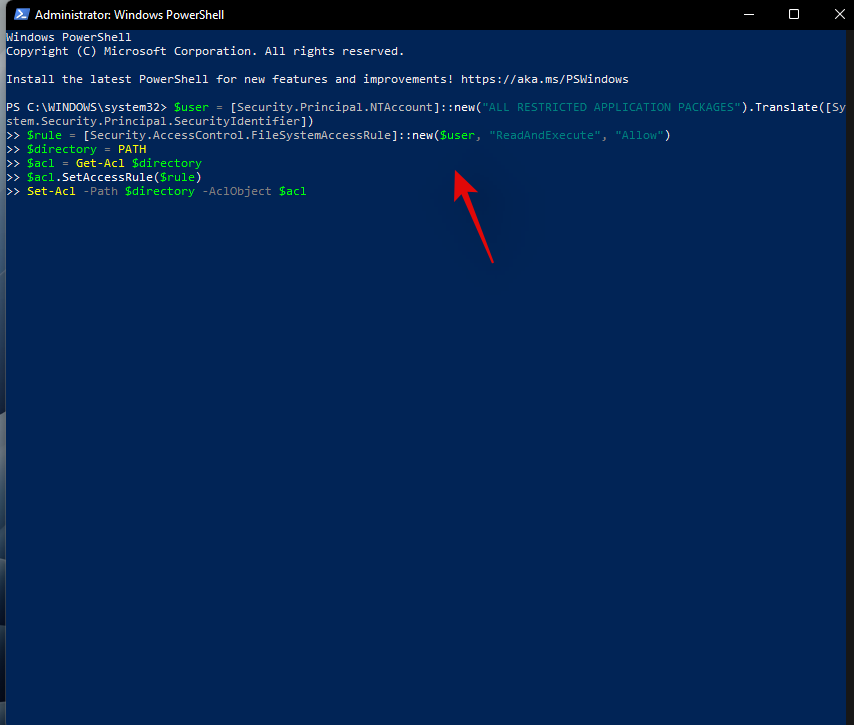
$user = [Security.Principal.NTAccount]::new("ALL RESTRICTED APPLICATION PACKAGES").Translate([System.Security.Principal.SecurityIdentifier])
$rule = [Security.AccessControl.FileSystemAccessRule]::new($user, "ReadAndExecute", "Allow")
$directory = PATH
$acl = Get-Acl $directory
$acl.SetAccessRule($rule)
Set-Acl -Path $directory -AclObject $acl
Farðu nú að Hidserv.dll skránni sem við breyttum bara heimildunum fyrir og hægrismelltu á hana. Veldu 'Afrita sem slóð'.
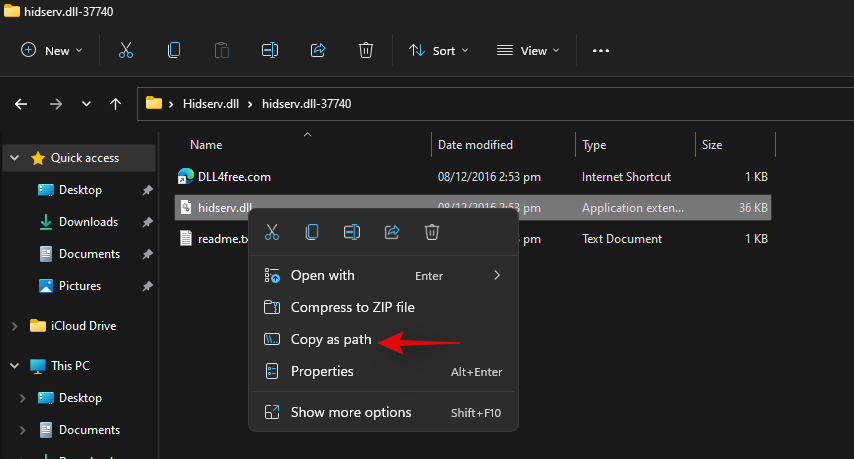
Farðu aftur í PowerShell gluggann þinn og skiptu "PATH" út fyrir slóðina sem við afrituðum.
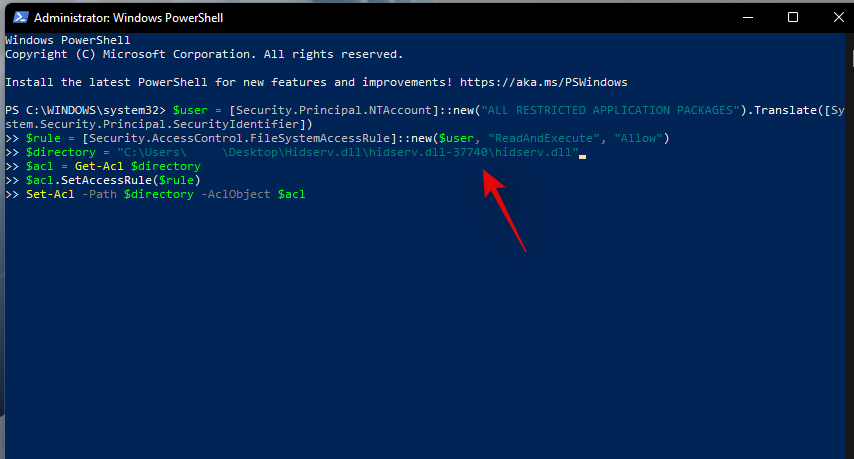
Þegar skipt er út skaltu ýta á Enter á lyklaborðinu þínu til að framkvæma skipunina. Þegar því er lokið ætti nú að bæta nýjum heimildum fyrir takmarkaða forritapakka við nýju Hidserv.dll skrána þína.
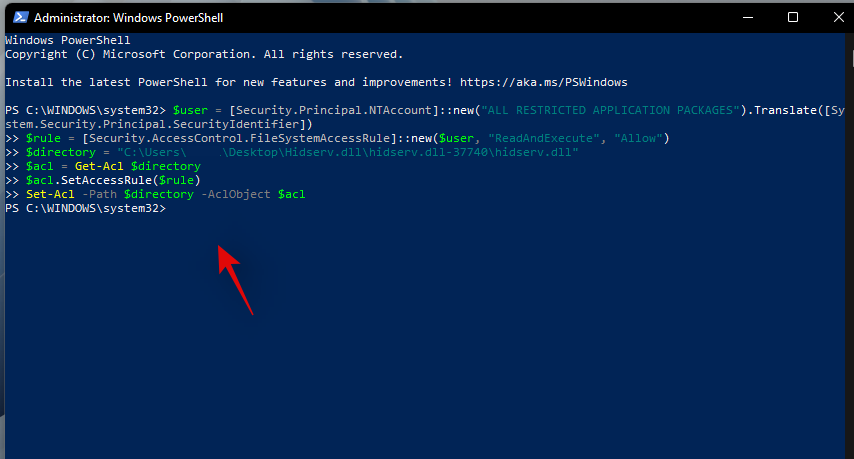
Athugið: Ef þú ert að slá inn slóðina handvirkt þá þarftu að setja inn í tvöfaldar gæsalappir eins og sýnt er á lokaskjámyndinni. Með því að líma afritaða slóð með aðferðinni hér að ofan bætast tvöfaldar gæsalappir sjálfkrafa við hana.
Nú er kominn tími til að skipta um eða bæta skránni við ræsiskrána þína. Farðu í Hidserv.dll skrána sem við bjuggum til og afritaðu hana á klemmuspjaldið þitt.
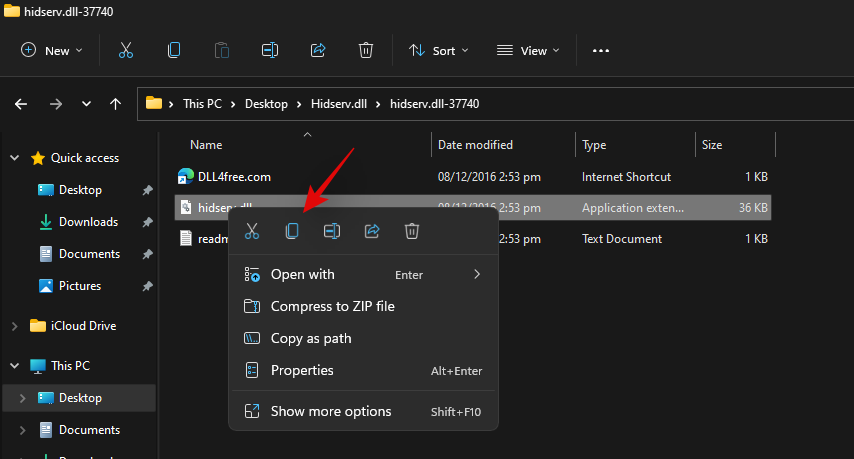
Ýttu Windows + Eá lyklaborðið þitt og farðu á eftirfarandi slóð.
C:\Windows\System32
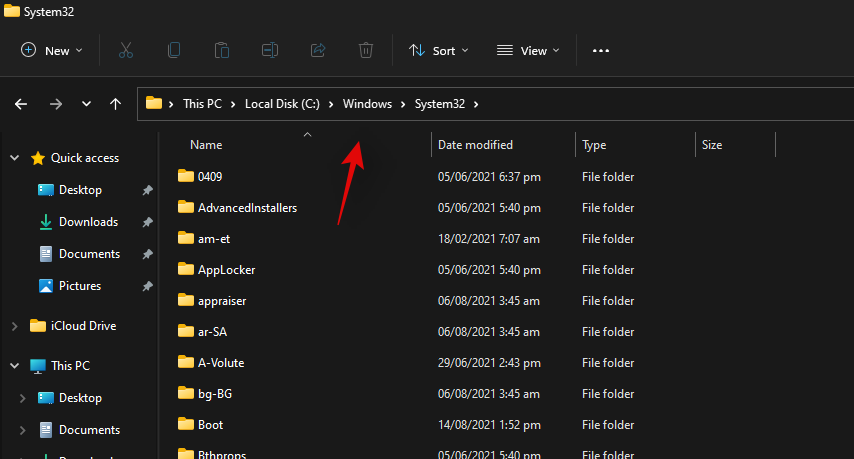
Límdu skrána þína á þessum stað. Smelltu á 'Skiptu út skránni á áfangastað'.
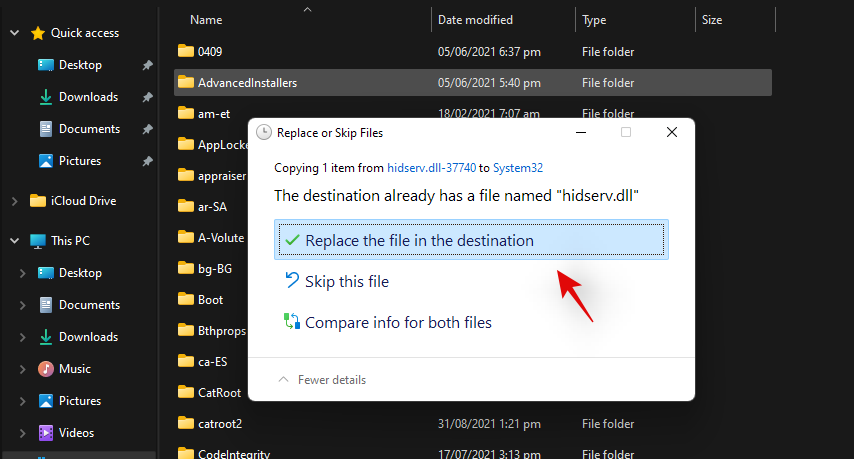
Smelltu á „Já“ til að veita nauðsynlegar stjórnandaheimildir. Þegar búið er að skipta út skránni skaltu endurræsa kerfið þitt til góðs. Þú getur nú athugað HID þjónustuna þína í Services appinu til að sjá hvort hún sé aftur komin í gang. Ef ekki, geturðu reynt að ræsa það handvirkt og þú ættir ekki lengur að standa frammi fyrir villukóða 126 á vélinni þinni.
Aðferð #2: Fyrir villukóða 2
Ef þú færð villukóða 2 eftir að hafa reynt að endurræsa HID þjónustuna þá gætu verið nokkrar ástæður fyrir því að þú stendur frammi fyrir þessari villu. Aðalástæðan er vegna óæskilegra breytinga á skrásetningu fyrir HID þjónustuna. Þetta gæti hafa gerst vegna nýlega beittra handvirkra innbrota eða skrásetningarhreinsiefna sem þú notar. Við þurfum að athuga hvort þessar breytingar séu til staðar og afturkalla þær ef einhverjar hafa verið gerðar á kerfinu þínu. Fylgdu leiðbeiningunum hér að neðan til að koma þér af stað.
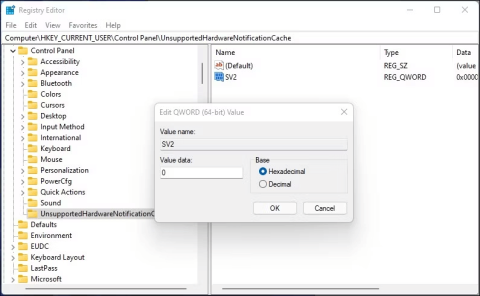
Ýttu Windows + Rá lyklaborðið þitt, sláðu inn eftirfarandi hugtak og ýttu á Enter á lyklaborðinu þínu.
regedit
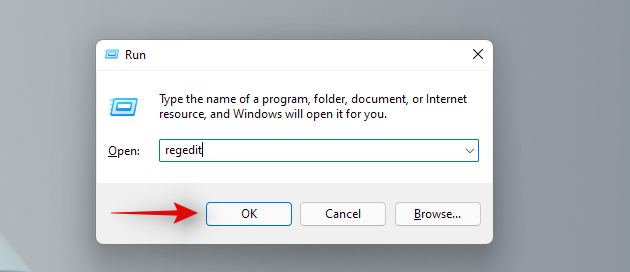
Farðu í eftirfarandi skrásetningarlykil. Þú getur líka copy-paste það sama í veffangastikunni efst á skjánum þínum.
Computer\HKEY_LOCAL_MACHINE\SYSTEM\ControlSet001\Services\hidserv
Tvísmelltu á 'Type' gildið hægra megin.
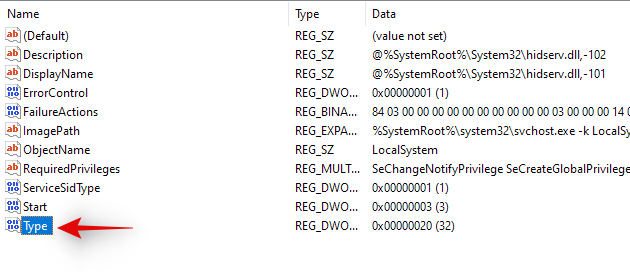
Stilltu gildið á '20' ef það er eitthvað annað og smelltu á 'Ok'.
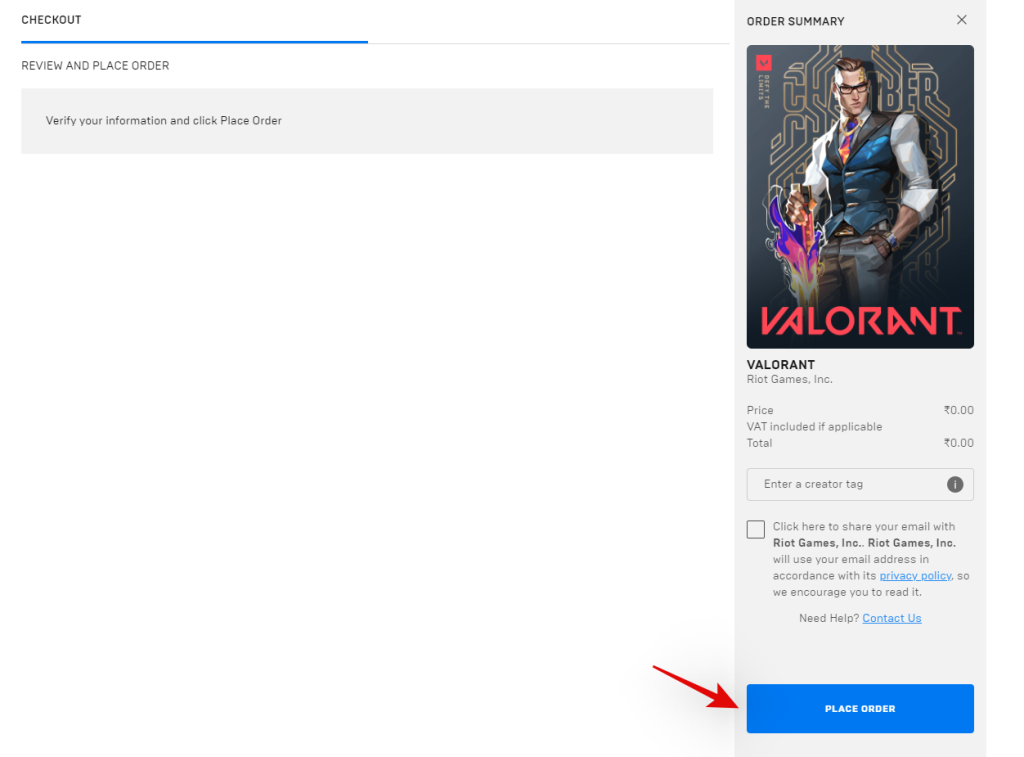
Smelltu nú á 'Parameters' undir Hidserv vinstra megin.
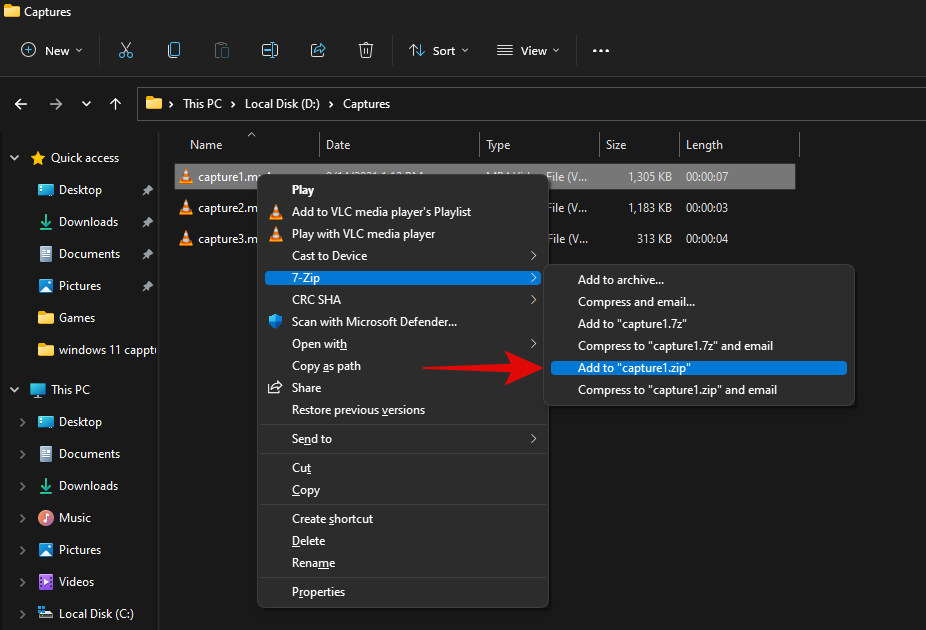
Tvísmelltu á ServiceDll hægra megin.
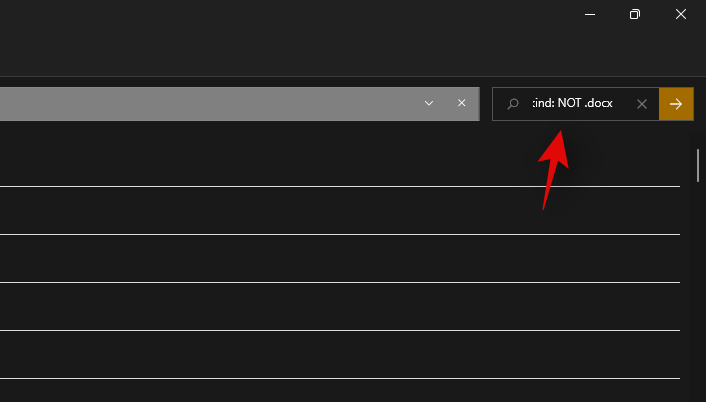
Sláðu inn eftirfarandi slóð í gildisgagnareitinn. Jafnvel þó að sama leiðin sé til, copy-pasteðu þá fyrir neðan bara til að vera viss. Gakktu úr skugga um að engin bil séu við upphaf eða enda leiðarinnar fyrir neðan.
%SystemRoot%\System32\hidserv.dll
Þegar þessu er lokið skaltu endurtaka skrefin hér að ofan fyrir eftirfarandi skrásetningarstaðsetningar sem gefnar eru upp hér að neðan.
- Tölva\HKEY_LOCAL_MACHINE\SYSTEM\CurrentControlSet\Services\hidserv
Að auki, ef möppur sem heita ControlSet002 eða fleiri eru til á staðsetningunni fyrir neðan, þá mælum við með því að endurtaka skrefin hér að ofan fyrir Hidserv möppuna á þeim stöðum líka.
- Tölva\HKEY_LOCAL_MACHINE\SYSTEM\
Þegar þú hefur gert þessar breytingar skaltu endurræsa kerfið þitt og HID þjónusta ætti að virka sjálfkrafa á fartölvunni þinni aftur. Ef ekki, ræstu þjónustuna handvirkt og þú ættir ekki lengur að standa frammi fyrir villukóða 2 á fartölvunni þinni.
Hraðlyklar fyrir fartölvur geta verið ansi sniðugir og við vonum að þú hafir getað komið aftur í gang aftur á vélinni þinni með því að nota leiðbeiningarnar hér að ofan. Ef þú stendur frammi fyrir einhverjum vandamálum eða hefur einhverjar spurningar fyrir okkur skaltu ekki hika við að hafa samband með því að nota athugasemdahlutann hér að neðan.
Tengt:


