Stýrikerfi eru líflína hvers tölvu þar sem án þeirra væri ómögulegt að senda tölvupóst, horfa á kattamyndbönd eða spjalla við vini okkar. En öðru hvoru rekst hvert stýrikerfi á vandamálum eins og hægum ræsingum, hrun forrita, gallalausum skjá, óþægilegu hljóði og hvaðeina.
Ef þér finnst eintakið þitt af Windows 11 líka hafa hegðað sér undarlega undanfarið, teljum við að það sé kominn tími til að taka málin í sínar hendur og gera við Windows 11.
Núna áður en þú flýtir þér til næsta tölvuviðgerðartækni, skulum við kíkja á þær fjölmörgu aðferðir sem tiltækar eru til ráðstöfunar sem geta hjálpað þér að gera við skemmda uppsetningu á Windows 11.
Innihald
Aðferð #1: Notaðu Windows úrræðaleit
Windows bilanaleitir hafa náð langt og þeir geta nú lagað flest vandamál þín með einföldum smelli. Flestar bilanaleitarskipanir og athuganir sem venjulega voru gerðar í gegnum CMD og PowerShell eru nú settar saman í Úrræðaleit sem gerir þær mun nothæfari þegar upp koma vandamál. Ef þú ert enn ófær um að laga og gera við Windows 11 uppsetninguna þína, þá gæti bilanaleitið verið þess virði að reyna. Notaðu leiðbeiningarnar hér að neðan til að koma þér af stað.
Ýttu Windows + iá lyklaborðið þitt til að opna Stillingar appið. Gakktu úr skugga um að „Kerfi“ sé valið til vinstri og smelltu síðan á „Úrræðaleit“ hægra megin.
![Hvernig á að gera við Windows 11 [15 leiðir] Hvernig á að gera við Windows 11 [15 leiðir]](https://img2.webtech360.com/resources8/images31/image-6439-0105182722076.png)
Smelltu á 'Aðrar úrræðaleitir'.
![Hvernig á að gera við Windows 11 [15 leiðir] Hvernig á að gera við Windows 11 [15 leiðir]](https://img2.webtech360.com/resources8/images31/image-405-0105182722143.png)
Finndu nú viðkomandi úrræðaleit fyrir núverandi vandamál þitt eftir því vandamáli sem þú ert með með uppsetninguna þína. Smelltu á 'Hlaupa' við hliðina á bilanaleitinni.
![Hvernig á að gera við Windows 11 [15 leiðir] Hvernig á að gera við Windows 11 [15 leiðir]](https://img2.webtech360.com/resources8/images31/image-9440-0105182722204.png)
Úrræðaleitarmaðurinn mun nú gera sitt og laga öll vandamál sem hann finnur með viðkomandi íhlut eða eiginleika.
![Hvernig á að gera við Windows 11 [15 leiðir] Hvernig á að gera við Windows 11 [15 leiðir]](https://img2.webtech360.com/resources8/images31/image-9235-0105182955896.png)
Aðferð #2: Fjarlægðu og settu aftur upp allar nýlegar Windows uppfærslur
Ef þú stendur frammi fyrir tilviljunarkenndum hruni, hægum afköstum, titringi eða villum út í bláinn eftir nýlega Windows uppfærslu geturðu prófað að fjarlægja nýlegar uppfærslur til að leysa vandamálið þitt. Þessum uppfærslum ætti að snúa til baka með kerfisendurheimt með því að nota handbókina efst en ef þú ert ekki með endurheimtarpunkt þá geturðu notað handbókina hér að neðan til að fjarlægja Windows uppfærslur handvirkt af Windows 11 kerfinu þínu.
Ýttu Windows + iá lyklaborðið þitt til að opna Stillingar appið. Smelltu nú á Windows Update vinstra megin.
![Hvernig á að gera við Windows 11 [15 leiðir] Hvernig á að gera við Windows 11 [15 leiðir]](https://img2.webtech360.com/resources8/images31/image-6752-0105182955965.png)
Smelltu á 'Uppfæra sögu'.
![Hvernig á að gera við Windows 11 [15 leiðir] Hvernig á að gera við Windows 11 [15 leiðir]](https://img2.webtech360.com/resources8/images31/image-9408-0105182722517.png)
Skrunaðu til botns og smelltu á 'Fjarlægja uppfærslur'.
![Hvernig á að gera við Windows 11 [15 leiðir] Hvernig á að gera við Windows 11 [15 leiðir]](https://img2.webtech360.com/resources8/images31/image-1959-0105182722745.png)
Þú verður nú tekinn á stjórnborðið þar sem þú færð lista yfir allar nýlegar helstu uppfærslur sem settar hafa verið upp á vélinni þinni. Þú munt ekki fá öryggisuppfærslur skráðar á þessum lista þar sem ekki er hægt að fjarlægja þær af öryggisástæðum. Smelltu og veldu uppfærsluna sem þú vilt fjarlægja.
![Hvernig á að gera við Windows 11 [15 leiðir] Hvernig á að gera við Windows 11 [15 leiðir]](https://img2.webtech360.com/resources8/images31/image-3028-0105182722836.png)
Smelltu nú á 'Fjarlægja' efst.
![Hvernig á að gera við Windows 11 [15 leiðir] Hvernig á að gera við Windows 11 [15 leiðir]](https://img2.webtech360.com/resources8/images31/image-2165-0105182722899.png)
Athugið: Ef þú færð ekki Uninstall valmöguleikann er það líklega vegna þess að þú ert að reyna að fjarlægja mikilvægan Windows íhlut sem myndi brjóta virkni núverandi uppsetningar þinnar.
Smelltu á 'Já' til að staðfesta val þitt.
![Hvernig á að gera við Windows 11 [15 leiðir] Hvernig á að gera við Windows 11 [15 leiðir]](https://img2.webtech360.com/resources8/images31/image-9581-0105182722985.png)
Valin uppfærsla verður nú fjarlægð af kerfinu þínu. Við mælum með að þú endurræsir kerfið þitt og athugar hvort vandamálið sem þú stóðst frammi fyrir hafi verið lagað. Ef ekki, haltu áfram að fjarlægja Windows Updates þar til þú finnur sökudólginn.
Aðferð #3: Endurheimt á eldri kerfisendurheimtunarstað
Athugið: Þessi aðferð gerir ráð fyrir að þú sért með virkt eintak af Windows 11 sem þú getur ræst inn í.
Þú getur hugsað um kerfisendurheimtunarpunkta sem leiðir til að endurheimta kerfið þitt í fyrra ástand Windows (þegar endurheimtarpunkturinn var búinn til) ásamt forritunum og stillingunum sem tölvan þín hafði þá.
Windows 11 býr sjálfkrafa til kerfisendurheimtunarstaði með reglulegu millibili. Ef þú vilt geturðu líka búið til endurheimtarpunkta.
Þau eru líka búin til þegar nýtt forrit eða Windows uppfærsla er sett upp.
Hér er hvernig þú getur reynt að gera við Windows 11 með því að nota endurheimtarpunkta.
Opnaðu 'Byrja' valmyndina og sláðu inn "Búa til endurheimtarpunkt". Smelltu síðan á valkostinn sem sýndur er hér að neðan.
![Hvernig á að gera við Windows 11 [15 leiðir] Hvernig á að gera við Windows 11 [15 leiðir]](https://img2.webtech360.com/resources8/images31/image-7098-0105182723056.png)
Sprettiglugga ætti nú að vera opin með titlinum 'System Properties' og þú ættir að geta séð System Restore tengda valkosti eins og sýnt er hér að neðan.
![Hvernig á að gera við Windows 11 [15 leiðir] Hvernig á að gera við Windows 11 [15 leiðir]](https://img2.webtech360.com/resources8/images31/image-1063-0105182723121.png)
Ef sprettigluggavalmyndin þín lítur út eins og okkar þar sem slökkt er á 'Vörn' fyrir alla diskana þína, höfum við slæmar fréttir fyrir þig. Vegna skorts á fyrri kerfisendurheimtunarpunktum þýðir ekkert að halda áfram með þessa aðferð þar sem það er enginn endurheimtarpunktur til að snúa aftur til.
Á þessum tímapunkti mælum við með að prófa næstu aðferð.
Ábending: Ef þú ert að lesa þetta bara til að sjá hvernig hlutirnir virka, mælum við með að þú kveikir á vörn fyrir kerfisdrifið þitt (auðkennt hér að neðan), það sem inniheldur Windows 11, og búðu til endurheimtarstað núna.
![Hvernig á að gera við Windows 11 [15 leiðir] Hvernig á að gera við Windows 11 [15 leiðir]](https://img2.webtech360.com/resources8/images31/image-2132-0105182723214.png)
Hér er hvernig þú getur gert það.
Veldu drifið merkt 'System' og smelltu á 'Configure'.
![Hvernig á að gera við Windows 11 [15 leiðir] Hvernig á að gera við Windows 11 [15 leiðir]](https://img2.webtech360.com/resources8/images31/image-6753-0105182723323.png)
Smelltu síðan á 'Kveikja á kerfisvörn' hnappinn og úthlutaðu plássi fyrir kerfisendurheimtunarpunkta með því að færa sleðann að neðan. Við höfum úthlutað aðeins 4% af kerfisdrifinu okkar, sem er nálægt 4,5GB.
Ef endurheimtarpunktunum fjölgar eða fjölgar, þá yrði eldri sjálfkrafa eytt til að gera pláss fyrir nýja.
Smelltu á 'Apply' og síðan 'OK'.
![Hvernig á að gera við Windows 11 [15 leiðir] Hvernig á að gera við Windows 11 [15 leiðir]](https://img2.webtech360.com/resources8/images31/image-2650-0105182723417.png)
Á drifinu sem þú valdir áðan ætti nú að vera kveikt á 'Vörn' og þú ættir nú að geta búið til kerfisendurheimtarpunkta.
![Hvernig á að gera við Windows 11 [15 leiðir] Hvernig á að gera við Windows 11 [15 leiðir]](https://img2.webtech360.com/resources8/images31/image-3719-0105182723520.png)
Á meðan þú ert á sama sprettiglugga, smelltu á 'Búa til' hnappinn til að búa til fyrsta kerfisendurheimtunarpunkt tölvunnar þinnar.
![Hvernig á að gera við Windows 11 [15 leiðir] Hvernig á að gera við Windows 11 [15 leiðir]](https://img2.webtech360.com/resources8/images31/image-7789-0105182723725.png)
Það ætti nú að vera sprettigluggi sem biður um nafn endurheimtarpunktsins þíns, ekki hika við að slá inn hvað sem þú vilt. Til hægðarauka er núverandi kerfistími og gögnum tölvunnar þinnar sjálfkrafa bætt við til að gera þennan endurheimtarpunkt aðgreindan frá öðrum. Í bili erum við að slá inn „Fresh Install“ þar sem við enduruppsettum Windows 11 nýlega.
Þegar því er lokið, smelltu á 'Búa til'.
![Hvernig á að gera við Windows 11 [15 leiðir] Hvernig á að gera við Windows 11 [15 leiðir]](https://img2.webtech360.com/resources8/images31/image-2823-0105182723892.png)
Eftir stutta stund ætti endurheimtarpunkturinn þinn að vera tilbúinn. Þú ættir nú að geta athugað það með því að smella á 'System Restore' hnappinn.
![Hvernig á að gera við Windows 11 [15 leiðir] Hvernig á að gera við Windows 11 [15 leiðir]](https://img2.webtech360.com/resources8/images31/image-7821-0105182956057.png)
Smelltu á Next.
![Hvernig á að gera við Windows 11 [15 leiðir] Hvernig á að gera við Windows 11 [15 leiðir]](https://img2.webtech360.com/resources8/images31/image-7756-0105182724049.png)
Og nýstofnaður kerfisendurheimtarpunktur þinn ætti að vera hér.
![Hvernig á að gera við Windows 11 [15 leiðir] Hvernig á að gera við Windows 11 [15 leiðir]](https://img2.webtech360.com/resources8/images31/image-6893-0105182724113.png)
Með því að velja endurheimtunarstaðinn og smella á (síðan virkjaður) „Næsta“ hnappinn ætti að fara í gegnum endurheimt tölvunnar á því augnabliki sem endurheimtarpunkturinn var búinn til.
Aðferð #4: Notkun SFC skipanakvaðningartól
System File Checker (SFC) og Deployment Image Servicing and Management (DISM) eru tvö skipanalínuverkfæri sem eru oftar notuð af upplýsingatæknitækni í fyrirtækjum til að þjónusta Windows vélar.
Ef þetta er í fyrsta skipti sem þú heyrir um þessi verkfæri, þá er ekkert að hafa áhyggjur af, þar sem þetta eru almennt talin rafmagnsverkfæri og ekki margir vita um þau.
Við skulum byrja með SFC fyrst og sjá hvernig þú getur gert við Windows 11.
SFC er hægt að nota til að skanna og staðfesta verndaðar skrár (Windows Files). Ef það kemst að því að skrá hefur verið skemmd og ekki er hægt að sannreyna hana, reynir það að endurheimta nýtt afrit úr möppunni hér að neðan í tölvunni þinni.
C:\Windows
Hér er hvernig þú getur prófað þennan möguleika.
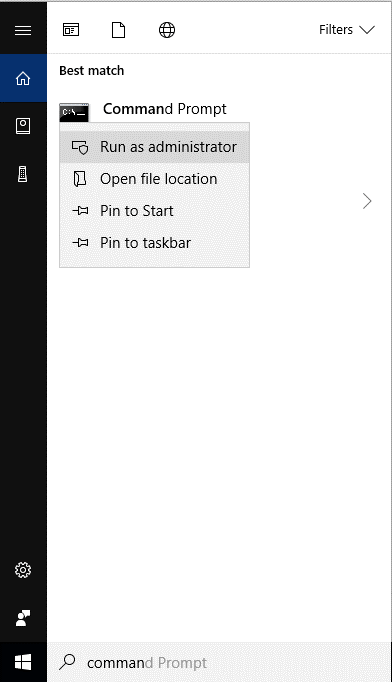
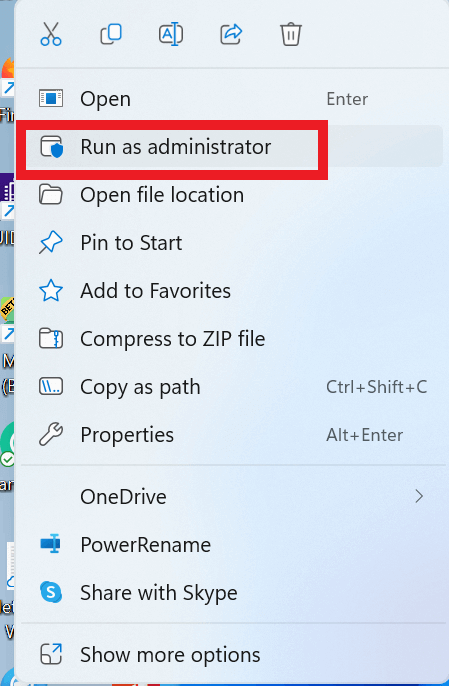
Smelltu á 'Byrja' hnappinn, sláðu inn "skipanakvaðningu" og vertu viss um að keyra forritið sem stjórnandi, eins og auðkennt er hér að neðan.
![Hvernig á að gera við Windows 11 [15 leiðir] Hvernig á að gera við Windows 11 [15 leiðir]](https://img2.webtech360.com/resources8/images31/image-8890-0105182956148.png)
Einu sinni í skipanalínunni skaltu slá inn eftirfarandi skipun eða einfaldlega afrita og líma hana. Smelltu síðan á 'Enter'.
sfc /scannow
Ofangreind skipun byrjar skönnun samstundis, sem tekur nokkurn veginn nokkrar mínútur fyrir fullkomna athugun.
![Hvernig á að gera við Windows 11 [15 leiðir] Hvernig á að gera við Windows 11 [15 leiðir]](https://img2.webtech360.com/resources8/images31/image-4377-0105182724504.png)
Ef skönnunin kemst að því að allar skrárnar þínar eru í góðu formi birtist þær eins og hér að neðan.
![Hvernig á að gera við Windows 11 [15 leiðir] Hvernig á að gera við Windows 11 [15 leiðir]](https://img2.webtech360.com/resources8/images31/image-5446-0105182724592.png)
En ef það eru skemmdir Windows skrár á tölvunni þinni ætti SFC að geta lagað þær með nýju afriti.
Aðferð #5: Notaðu DISM skipanakvaðningartól
DISM is another command-line tool that is far more powerful than SFC. It can work with multiple types of Windows 11 images in both .wim and .esd formats, manage drivers before deploying images to PCs and so much more.
Let’s take a look at how you can use DISM to repair Windows 11.
Open Command Prompt as Administrator using the steps we just mentioned for SFC.
Then paste the below command to scan your Windows 11 installation for errors and press Enter.
Dism /Online /Cleanup-Image /ScanHealth
You should see something like this.
![Hvernig á að gera við Windows 11 [15 leiðir] Hvernig á að gera við Windows 11 [15 leiðir]](https://img2.webtech360.com/resources8/images31/image-5068-0105182725172.png)
Once finished, the tool should report its findings. Here’s how our screen looks like.
![Hvernig á að gera við Windows 11 [15 leiðir] Hvernig á að gera við Windows 11 [15 leiðir]](https://img2.webtech360.com/resources8/images31/image-9689-0105182725280.png)
Then run this command to see if any issues were detected and how repairable your problem is.
Dism /Online /Cleanup-Image /CheckHealth
As our PC was working fine, the above command reported zero issues. Yours may be different.
![Hvernig á að gera við Windows 11 [15 leiðir] Hvernig á að gera við Windows 11 [15 leiðir]](https://img2.webtech360.com/resources8/images31/image-3654-0105182725335.png)
If DISM reported issues with your PC, the next command you should run is mentioned below. Paste it and hit ‘Enter’.
DISM /Online /Cleanup-Image /RestoreHealth
The above command will request valid copies of corrupted files from Windows Update. Here’s how the command looks in action.
![Hvernig á að gera við Windows 11 [15 leiðir] Hvernig á að gera við Windows 11 [15 leiðir]](https://img2.webtech360.com/resources8/images31/image-7724-0105182725565.png)
And here’s how it looks once it’s done processing.
![Hvernig á að gera við Windows 11 [15 leiðir] Hvernig á að gera við Windows 11 [15 leiðir]](https://img2.webtech360.com/resources8/images31/image-9311-0105182725854.png)
All you need to do is reboot your PC.
If you consider yourself someone who understands command-line tools and their parameters, and would like to know more about SFC and DISM along with the range of parameters that can be used with them, here’s the complete documentation about SFC, and here’s the complete reference for DISM. Feast on the information!
Tip: If your Windows 11 processes crash often, restart a few seconds later and show an alert with a bunch of numbers and alphabets (aka error codes), we highly recommend putting them in a search engine like Google and understanding what they mean. This method of troubleshooting is extremely effective against specific errors and problems, and can often prove to be a lifesaver.
Method #6: Using Windows 11 Startup Repair
Windows 11 comes equipped with a built-in startup repair tool that is designed to detect and repair common startup problems you may be facing. Let’s take a look at how you can use Startup Repair to fix Windows 11.
Open the ‘Start’ menu and click on the ‘Power’ button.
![Hvernig á að gera við Windows 11 [15 leiðir] Hvernig á að gera við Windows 11 [15 leiðir]](https://img2.webtech360.com/resources8/images31/image-3277-0105182725914.png)
Hold the ‘Shift’ Key and click on ‘Restart’.
![Hvernig á að gera við Windows 11 [15 leiðir] Hvernig á að gera við Windows 11 [15 leiðir]](https://img2.webtech360.com/resources8/images31/image-794-0105182726004.png)
Your PC should boot into a blue screen with a bunch of options. Click on ‘Troubleshoot’.
![Hvernig á að gera við Windows 11 [15 leiðir] Hvernig á að gera við Windows 11 [15 leiðir]](https://img2.webtech360.com/resources8/images31/image-5932-0105182726311.jpg)
Click on ‘Advanced Options’.
![Hvernig á að gera við Windows 11 [15 leiðir] Hvernig á að gera við Windows 11 [15 leiðir]](https://img2.webtech360.com/resources8/images31/image-5382-0105182726417.jpg)
Click on ‘Startup Repair’.
Soon after, Windows should now be scanning and diagnosing your PC for any issues that may be preventing it from functioning properly. Let it work its magic and after some time, your copy of Windows 11 should be free of all the problems.
Tip: If ‘Startup Repair’ fails and you see the screen shown below, there could be two possible reasons for this. Either Windows 11 failed to identify the issues or there is simply no issue with your PC.
![Hvernig á að gera við Windows 11 [15 leiðir] Hvernig á að gera við Windows 11 [15 leiðir]](https://img2.webtech360.com/resources8/images31/image-4518-0105182726486.jpg)
At this point, you could try to follow method #3’s option 2 to initiate a repair of Windows 11. You could also try to reinstall Windows 11 by using the “Upgrade” option in Windows 11 setup, instead of going for a clean install and wiping your drive.
This install method should reinstall Windows 11 while keeping all your files, apps, and settings.
Method #7: Using Windows 11 installer ISO file
Did you know that the files you used to install Windows 11, could also be used to repair a damaged copy of Windows 11?
Not a lot of people know this but it can easily be done and doesn’t take too long at all.
To make this method work, you need access to Windows 11 installation files (ISO) or the installer USB drive you may have used earlier to install Windows 11.
Option 1: Using the setup file from the Windows 11 ISO
See if you have the Windows 11 ISO stored somewhere on your PC. If you do, perfect! No need to download anything.
In case you don’t have the Windows 11 ISO around, we suggest you follow this guide to download the latest available ISO.
Before proceeding, make sure you can boot into Windows 11 and access the ISO. If you can, let’s move to the next step.
Locate the Windows 11 ISO and double-click it.
![Hvernig á að gera við Windows 11 [15 leiðir] Hvernig á að gera við Windows 11 [15 leiðir]](https://img2.webtech360.com/resources8/images31/image-7519-0105182726601.png)
The ISO should now be mounted on a virtual disk drive on your Windows 11 PC and should look similar to this
![Hvernig á að gera við Windows 11 [15 leiðir] Hvernig á að gera við Windows 11 [15 leiðir]](https://img2.webtech360.com/resources8/images31/image-6969-0105182726712.png)
Double-click the virtual drive. Once inside, there should be a file named ‘setup’, double-click it.
![Hvernig á að gera við Windows 11 [15 leiðir] Hvernig á að gera við Windows 11 [15 leiðir]](https://img2.webtech360.com/resources8/images31/image-4486-0105182726796.png)
Tip: Alternatively, you can also extract the ISO somewhere on your pc, which of course would take a bit of time but should give you the same result.
Wait for the Windows 11 setup to start. Once done, you should see a screen similar to below. Click on ‘Next’.
![Hvernig á að gera við Windows 11 [15 leiðir] Hvernig á að gera við Windows 11 [15 leiðir]](https://img2.webtech360.com/resources8/images31/image-3622-0105182726853.png)
Accept the Terms & Conditions.
![Hvernig á að gera við Windows 11 [15 leiðir] Hvernig á að gera við Windows 11 [15 leiðir]](https://img2.webtech360.com/resources8/images31/image-4691-0105182726957.png)
Choose the option that best suits you here and click ‘Next’. We would like to keep our files, hence we’ve chosen ‘Keep personal files and apps’.
![Hvernig á að gera við Windows 11 [15 leiðir] Hvernig á að gera við Windows 11 [15 leiðir]](https://img2.webtech360.com/resources8/images31/image-4141-0105182727056.png)
Click on ‘Install’ to start the installation.
![Hvernig á að gera við Windows 11 [15 leiðir] Hvernig á að gera við Windows 11 [15 leiðir]](https://img2.webtech360.com/resources8/images31/image-7142-0105182727192.png)
After a few seconds, setup should start preparing your PC for an in-place upgrade, which will repair and refresh all the files needed to run Windows 11 on your PC.
![Hvernig á að gera við Windows 11 [15 leiðir] Hvernig á að gera við Windows 11 [15 leiðir]](https://img2.webtech360.com/resources8/images31/image-4659-0105182727255.png)
Your PC may reboot a few times to complete the repair.
Once setup has finished, your copy of Windows 11 should be completely repaired and ready to use.
Option 2: Using a bootable USB drive
If for some reason, your PC fails to boot into Windows 11 or simply reboots repeatedly due to a corrupt Windows file, then this option will be perfect for you.
Before we start, see if you still have the Windows 11 USB install stick you may have used to install Windows 11 on your PC. If you do, then there’s nothing to worry about.
In case you don’t, here’s how you can create a Windows 11 USB installer within a couple of minutes. Do keep in mind that it requires another functional PC with internet to download Rufus and Windows 11 ISO. Simply connect the USB drive to your PC and restart your system. Press any key on your keyboard when prompted to boot from the recovery media and subsequently proceed to repair Windows with the on-screen instructions. You will have the option to reinstall Windows, fix missing files, fix boot order or even use CMD to perform your own checks. If you need any help, then you can this guide to reset Windows from within your recovery media setup and more.
Check this guide: How To Install Windows 11 From USB
Method #8: Repair or Fix Drivers
Many times you can face issues with your Windows installation due to incompatible, outdated, or conflicting drivers installed on your system. Drivers are essential programs that allow your components to communicate with your CPU and GPU for the proper functioning of your system. Having incompatible or conflicting drivers can cause issues with Windows and even take a significant impact on your performance. If some of your components seem to be misbehaving or you feel that your system is drastically slower than expected then it would be a good idea to check your drivers and perform any repairs if needed.
1. Check for conflicting or outdated drivers
Let’s check for conflicting or outdated drivers on your system. Windows automatically shows you a warning sign for misbehaving components or outdated drivers in Device Manager. Use the guide below to look for driver issues on your installation of Windows 11.
Press Windows + X on your keyboard and click on Device Manager.
![Hvernig á að gera við Windows 11 [15 leiðir] Hvernig á að gera við Windows 11 [15 leiðir]](https://img2.webtech360.com/resources8/images31/image-5728-0105182727364.png)
Look for components in the list with a warning side beside them. If any are found, use the methods below to troubleshoot driver issues on your system. However, if none are found then let’s check for new components on your system to identify misbehaving components.
Click on the ‘Scan for hardware changes’ button at the top of your screen.
![Hvernig á að gera við Windows 11 [15 leiðir] Hvernig á að gera við Windows 11 [15 leiðir]](https://img2.webtech360.com/resources8/images31/image-5177-0105182727469.png)
Windows will now scan for hardware changes and install any new components or drivers found on your PC.
![Hvernig á að gera við Windows 11 [15 leiðir] Hvernig á að gera við Windows 11 [15 leiðir]](https://img2.webtech360.com/resources8/images31/image-6246-0105182727564.png)
2. Fix driver issues
If you wish to fix driver issues on your system then you will need to reinstall drivers for the concerned component on your system. This can be done through Windows and manually as well. We recommend manually force removing drivers only if you are unable to remove the driver through Device Manager in Windows. Force removing the wrong drivers can cause serious issues on your system and even force you to reinstall Windows altogether. Hence, ensure that you identify and properly force remove drivers from your system only for the malfunctioning component. Use one of the guides below depending on your current needs and requirements.
Note: If you are using a laptop or a pre-built system then we recommend you download specific drivers for the concerned component from your OEM support side beforehand. This will allow you to install the necessary drivers easily once you have removed the malfunctioning driver.
Read: 6 Ways to Update Drivers on Windows 11
Option 1: Remove and reinstall a component through Device Manager
Press Windows + X on your keyboard and click on ‘Device Manager’.
![Hvernig á að gera við Windows 11 [15 leiðir] Hvernig á að gera við Windows 11 [15 leiðir]](https://img2.webtech360.com/resources8/images31/image-5728-0105182727364.png)
Right-click on the component for which you wish to remove the driver and select Properties.
![Hvernig á að gera við Windows 11 [15 leiðir] Hvernig á að gera við Windows 11 [15 leiðir]](https://img2.webtech360.com/resources8/images31/image-5695-0105182727667.png)
Now click and switch to the Driver tab at the top.
![Hvernig á að gera við Windows 11 [15 leiðir] Hvernig á að gera við Windows 11 [15 leiðir]](https://img2.webtech360.com/resources8/images31/image-3418-0105182727905.png)
Click on ‘Uninstall device’.
![Hvernig á að gera við Windows 11 [15 leiðir] Hvernig á að gera við Windows 11 [15 leiðir]](https://img2.webtech360.com/resources8/images31/image-2867-0105182728010.png)
Check the box for ‘Attempt to remove the driver for this device’.
![Hvernig á að gera við Windows 11 [15 leiðir] Hvernig á að gera við Windows 11 [15 leiðir]](https://img2.webtech360.com/resources8/images31/image-2316-0105182728120.png)
Finally, click on ‘Uninstall’.
![Hvernig á að gera við Windows 11 [15 leiðir] Hvernig á að gera við Windows 11 [15 leiðir]](https://img2.webtech360.com/resources8/images31/image-902-0105182728296.png)
The device driver will now be removed and the device will be uninstalled from your system. You will now be prompted to restart your device. Restart your device as soon as possible and then reinstall the concerned drivers from your OEM’s support site. If you do not have the concerned drivers on your OEM site, then simply scan for hardware changes using the guide above and the necessary drivers will be automatically installed on your system.
Option 2: Manually force remove a driver and reinstall it
You can also manually force remove a driver using a third-party utility. This is not recommended as if Windows is not allowing you to remove a driver then it is probably an essential component that could cause issues on your system. We recommend you properly identify the concerned drivers before removing them from your system. Additionally, you should keep the latest replacement drivers handy so that you can reinstall them as soon as possible. Use the guide below to manually force delete concerned drivers from your system.
We will be using Driver Store Explorer to manually force remove the concerned drivers from your system. Driver Store Explorer is an open-source utility used to identify and remove all the drivers installed on your system. It is hosted on GitHub and can be compiled natively too in case privacy is a concern.
Download Driver Store Explorer to your local storage using the link above. Extract the archive to a convenient location and then launch the app using Rapr.exe.
![Hvernig á að gera við Windows 11 [15 leiðir] Hvernig á að gera við Windows 11 [15 leiðir]](https://img2.webtech360.com/resources8/images31/image-3903-0105182728416.png)
The app will now launch and scan all the drivers installed on your system. Once the list shows up, you can sort it based on the various columns available to you. We recommend you sort your drivers by ‘Provider’ as this will make it easier for you to search the concerned driver based on the manufacturer. Click on Provider at the top to arrange all the drivers ascendingly based on their provider’s name.
![Hvernig á að gera við Windows 11 [15 leiðir] Hvernig á að gera við Windows 11 [15 leiðir]](https://img2.webtech360.com/resources8/images31/image-1420-0105182728498.png)
Scroll the list and identify the concerned driver. Once found check the box beside it.
![Hvernig á að gera við Windows 11 [15 leiðir] Hvernig á að gera við Windows 11 [15 leiðir]](https://img2.webtech360.com/resources8/images31/image-2489-0105182728594.png)
You can now also click on ‘Select oid drivers’ on your right to automatically identify and select other old drivers installed on your system. However, we wouldn’t recommend this on pre-built systems and laptops that can sometimes get faulty driver updates in the future as the device gets older which degrade overall performance in return.
![Hvernig á að gera við Windows 11 [15 leiðir] Hvernig á að gera við Windows 11 [15 leiðir]](https://img2.webtech360.com/resources8/images31/image-3558-0105182728684.png)
Check the box for ‘Force Deletion’ on your right.
![Hvernig á að gera við Windows 11 [15 leiðir] Hvernig á að gera við Windows 11 [15 leiðir]](https://img2.webtech360.com/resources8/images31/image-7422-0105182728754.png)
Finally, click on ‘Delete Driver(s)’. This will force delete all the selected drivers from your system. We highly recommend you restart your system after this and install the new updated drivers you downloaded as soon as possible.
![Hvernig á að gera við Windows 11 [15 leiðir] Hvernig á að gera við Windows 11 [15 leiðir]](https://img2.webtech360.com/resources8/images31/image-212-0105182728819.png)
If faulty drivers were the cause of your issues with Windows 11, then a manual reinstall should help fix this in most cases.
Method #9: Resetting your PC
Like Windows 10, Windows 11 also comes with a nifty feature called ‘Reset this PC’. This can be a lifesaver if you need to clean your PC and start over with Windows 11. Once initiated, the process will roll back Windows 11 to its factory settings.
Here’s how you can proceed with it.
Open the ‘Start’ menu and type in “reset this pc”. You should get a result similar to what’s shown below. Click on ‘Reset this PC’.
![Hvernig á að gera við Windows 11 [15 leiðir] Hvernig á að gera við Windows 11 [15 leiðir]](https://img2.webtech360.com/resources8/images31/image-3525-0105182728991.png)
You should now be in your PC’s Recovery section within the Settings app. To proceed with the reset, simply click on the ‘Reset PC’ button.
![Hvernig á að gera við Windows 11 [15 leiðir] Hvernig á að gera við Windows 11 [15 leiðir]](https://img2.webtech360.com/resources8/images31/image-4594-0105182729090.png)
The next screen should ask you if you’d like to keep your files or remove them entirely. Pick the appropriate option to start resetting your Windows 11.
![Hvernig á að gera við Windows 11 [15 leiðir] Hvernig á að gera við Windows 11 [15 leiðir]](https://img2.webtech360.com/resources8/images31/image-9527-0105182729253.png)
Your selection should be followed by a reboot or two and in a few minutes, your PC should boot into a refreshed Windows 11.
Method #10: Fix boot issues with Windows 11
If you are having boot issues with Windows 11 then we can use bootrec.exe tool to fix most boot issues. Use the guide below to run bootrec.exe on your system. You will need to boot into Windows Recovery and then use CMD to execute these commands though. Use one of the methods above to boot into recovery mode in Windows via Settings or a recovery media and then use the guide below to execute bootrec commands and fix boot issues with Windows 11.
When at the recovery screen press Shift + F10 to bring up the CMD at any point during the recovery process.
Type in the following command to run bootrec.exe and press Enter on your keyboard to execute it.
bootrec.exe
Enter the following command first and press Enter on your keyboard to execute it.
Bootrec /fixmbr
Now enter the one below and execute it.
Bootrec /fixboot
Finally, enter the command below to rebuild your boot device order.
Bootrec /rebuildbcd
And that’s it! We recommend you restart your system for good measure or exit the recovery screen and try booting into Windows again. If you were facing boot issues, then this will have most likely fixed the issue for you.
If you have been facing start menu issues within Windows 11 then there are many fixes that you can try. The new start menu seems to be a hit or miss with users and many have tried to customize it in their own way. This has been known to break start menu functionality with recent updates and if you are facing issues after a recent update then this is likely the cause for you as well.
You can use this comprehensive guide by us to fix all kinds of Start menu issues on your Windows 11 system. You will even find ways to restore the older start menu and new ways to get the start menu back up and running on your system in no time.
Related: How to Fix ‘Windows 11 Start Menu Not Working’ Issue? [17 Ways]
Method #12: Fix random app crashes
Random app crashes have been a known issue since Windows 11 was first announced and the first insider build hit the shelves. This is mainly due to some core changes to Windows that now break functionality for previously compatible programs with Windows 10. This might be heartbreaking for many users that are unable to get their favorite programs and apps back up and running within Windows 11. There are a couple of things you can do to fix this issue and the most prominent ones have been covered by us in this comprehensive guide. If you are facing random app crashes then this will most likely help you solve the majority of crashes on your system.
Read: How To Fix Software Crashing on Windows 11 Dev Build
Method #13: Fix corrupt registry
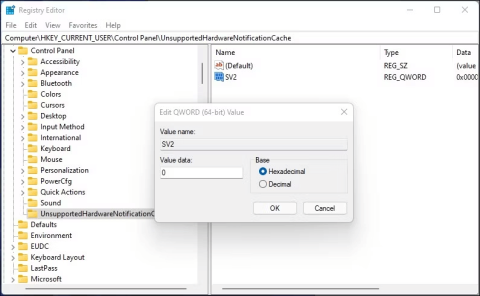
Registry changes, incorrect values, and deleted or missing registry entries can also cause a lot of issues with your system. Chances are that if you modified your registry with a registry hack or used a third-party tool to clean your registry then the values were messed up during this process.
Due to the core changes in Windows 11, the registry values, locations, and entries are different from the ones on Windows 10. Additionally, the ones that were okay to be deleted earlier might be vital to the functioning of Windows in the latest version.
Hence using a compatible cleaner or repair tool for the registry can remove vital values that could cause issues with your system. You can use the guide below to try and fix the registry on your Windows 11 installation. But as the OS is fairly new, this might not work for you and in case it doesn’t you will have to reset your Windows to restore your registry values to their default entries.
By this point, the registry should have been fixed on your system as you will have already run SFC and DISM scans on your system (as given above). However if your registry still seems to be corrupted, then you can use a third-party app to fix it.
We recommend you use CCleaner’s free utility which can be downloaded using the link above. Once downloaded, run the .exe file and install CCleaner on your system. Then launch the app and follow the on-screen instructions to fix your registry.
We recommend you do not clean your registry or temporary files using CCleaner until it has been officially updated to support Windows 11. As for fixing the registry, the app did not produce any issues on our end despite multiple tries so you should be safe to fix your registry using CCleaner.
Method #14: Fix lack of storage space
If you seem to be missing storage space to random files on your system and are unable to identify large files on your system then it is likely that temporary files have started to take a toll on your local storage. Windows 11 is designed to clear most temporary files by default but this can option can sometimes bug out which can cause a large number of temporary files to accumulate on your system.
You can use our guide to delete the temporary files from your system. Once deleted, you should be able to gain back some significant storage space especially after clearing previous Windows installation files and downloaded Windows Updates.
Method #15: Boot into safe mode to identify third party culprits
Lastly, it could also be that your issue is being caused by a third-party app. As Windows 11 is fairly new and most recent updates to popular apps are using compatibility layers to work, it is likely that you are facing a bug with a third-party app. Third-party apps can create huge conflicts and issues in the background depending on what they do and it can end up being quite tough to identify the culprit.
Thankfully, Windows comes with a safe mode to troubleshoot exactly this problem. Safe mode helps disable all third-party apps, services, and tasks in the background. You can then verify the functioning of Windows in safe mode and start removing the suspected culprits one by one.
Once you find the culprit, you can restore your previously removed apps and continue using the OS until a fix is released by the concerned developer.
Unfortunately, this is a tedious process and there is no way around it, but if a third-party app is causing issues on your system, safe mode can help you identify and remove the culprit easily. You can use this guide to help you navigate and activate safe mode in Windows 11.
You can also use this trick to directly restart your system in the advanced recovery options state. Click on the ‘Start’ menu icon in your taskbar.
Now click on the ‘Power’ icon.
![Hvernig á að gera við Windows 11 [15 leiðir] Hvernig á að gera við Windows 11 [15 leiðir]](https://img2.webtech360.com/resources8/images31/image-4249-0105182729349.png)
Hold down the ‘Shift’ key on your keyboard and then click on ‘Restart’.
![Hvernig á að gera við Windows 11 [15 leiðir] Hvernig á að gera við Windows 11 [15 leiðir]](https://img2.webtech360.com/resources8/images31/image-2835-0105182729531.png)
Your Windows 11 PC will now automatically reboot into the Advanced recovery options.
Click on ‘Troubleshoot’ to get started. Now, click Advanced options > See more recovery options > Startup Settings > Restart.
You will now get a list of all the ways your computer can start up with elevated settings or restricted services. You will have the following options for Safe modes.
- F4: Enable Safe mode
- F5: Enable Safe mode with networking
- F6: Enable Safe mode with command prompt
Press the desired key on your keyboard and your system will automatically restart in the desired Safe mode.
Well, these are all the proven methods that you can try to repair corrupted Windows 11. Some of these methods are fairly easy to use, while some may seem advanced for an average joe.
If you ever feel stuck at any point while following our methods, drop us a comment and we’d be happy to sort out the confusion.
Related:

![Hvernig á að gera við Windows 11 [15 leiðir] Hvernig á að gera við Windows 11 [15 leiðir]](https://img2.webtech360.com/resources8/images31/image-6439-0105182722076.png)
![Hvernig á að gera við Windows 11 [15 leiðir] Hvernig á að gera við Windows 11 [15 leiðir]](https://img2.webtech360.com/resources8/images31/image-405-0105182722143.png)
![Hvernig á að gera við Windows 11 [15 leiðir] Hvernig á að gera við Windows 11 [15 leiðir]](https://img2.webtech360.com/resources8/images31/image-9440-0105182722204.png)
![Hvernig á að gera við Windows 11 [15 leiðir] Hvernig á að gera við Windows 11 [15 leiðir]](https://img2.webtech360.com/resources8/images31/image-9235-0105182955896.png)
![Hvernig á að gera við Windows 11 [15 leiðir] Hvernig á að gera við Windows 11 [15 leiðir]](https://img2.webtech360.com/resources8/images31/image-6752-0105182955965.png)
![Hvernig á að gera við Windows 11 [15 leiðir] Hvernig á að gera við Windows 11 [15 leiðir]](https://img2.webtech360.com/resources8/images31/image-9408-0105182722517.png)
![Hvernig á að gera við Windows 11 [15 leiðir] Hvernig á að gera við Windows 11 [15 leiðir]](https://img2.webtech360.com/resources8/images31/image-1959-0105182722745.png)
![Hvernig á að gera við Windows 11 [15 leiðir] Hvernig á að gera við Windows 11 [15 leiðir]](https://img2.webtech360.com/resources8/images31/image-3028-0105182722836.png)
![Hvernig á að gera við Windows 11 [15 leiðir] Hvernig á að gera við Windows 11 [15 leiðir]](https://img2.webtech360.com/resources8/images31/image-2165-0105182722899.png)
![Hvernig á að gera við Windows 11 [15 leiðir] Hvernig á að gera við Windows 11 [15 leiðir]](https://img2.webtech360.com/resources8/images31/image-9581-0105182722985.png)
![Hvernig á að gera við Windows 11 [15 leiðir] Hvernig á að gera við Windows 11 [15 leiðir]](https://img2.webtech360.com/resources8/images31/image-7098-0105182723056.png)
![Hvernig á að gera við Windows 11 [15 leiðir] Hvernig á að gera við Windows 11 [15 leiðir]](https://img2.webtech360.com/resources8/images31/image-1063-0105182723121.png)
![Hvernig á að gera við Windows 11 [15 leiðir] Hvernig á að gera við Windows 11 [15 leiðir]](https://img2.webtech360.com/resources8/images31/image-2132-0105182723214.png)
![Hvernig á að gera við Windows 11 [15 leiðir] Hvernig á að gera við Windows 11 [15 leiðir]](https://img2.webtech360.com/resources8/images31/image-6753-0105182723323.png)
![Hvernig á að gera við Windows 11 [15 leiðir] Hvernig á að gera við Windows 11 [15 leiðir]](https://img2.webtech360.com/resources8/images31/image-2650-0105182723417.png)
![Hvernig á að gera við Windows 11 [15 leiðir] Hvernig á að gera við Windows 11 [15 leiðir]](https://img2.webtech360.com/resources8/images31/image-3719-0105182723520.png)
![Hvernig á að gera við Windows 11 [15 leiðir] Hvernig á að gera við Windows 11 [15 leiðir]](https://img2.webtech360.com/resources8/images31/image-7789-0105182723725.png)
![Hvernig á að gera við Windows 11 [15 leiðir] Hvernig á að gera við Windows 11 [15 leiðir]](https://img2.webtech360.com/resources8/images31/image-2823-0105182723892.png)
![Hvernig á að gera við Windows 11 [15 leiðir] Hvernig á að gera við Windows 11 [15 leiðir]](https://img2.webtech360.com/resources8/images31/image-7821-0105182956057.png)
![Hvernig á að gera við Windows 11 [15 leiðir] Hvernig á að gera við Windows 11 [15 leiðir]](https://img2.webtech360.com/resources8/images31/image-7756-0105182724049.png)
![Hvernig á að gera við Windows 11 [15 leiðir] Hvernig á að gera við Windows 11 [15 leiðir]](https://img2.webtech360.com/resources8/images31/image-6893-0105182724113.png)
![Hvernig á að gera við Windows 11 [15 leiðir] Hvernig á að gera við Windows 11 [15 leiðir]](https://img2.webtech360.com/resources8/images31/image-8890-0105182956148.png)
![Hvernig á að gera við Windows 11 [15 leiðir] Hvernig á að gera við Windows 11 [15 leiðir]](https://img2.webtech360.com/resources8/images31/image-4377-0105182724504.png)
![Hvernig á að gera við Windows 11 [15 leiðir] Hvernig á að gera við Windows 11 [15 leiðir]](https://img2.webtech360.com/resources8/images31/image-5446-0105182724592.png)
![Hvernig á að gera við Windows 11 [15 leiðir] Hvernig á að gera við Windows 11 [15 leiðir]](https://img2.webtech360.com/resources8/images31/image-5068-0105182725172.png)
![Hvernig á að gera við Windows 11 [15 leiðir] Hvernig á að gera við Windows 11 [15 leiðir]](https://img2.webtech360.com/resources8/images31/image-9689-0105182725280.png)
![Hvernig á að gera við Windows 11 [15 leiðir] Hvernig á að gera við Windows 11 [15 leiðir]](https://img2.webtech360.com/resources8/images31/image-3654-0105182725335.png)
![Hvernig á að gera við Windows 11 [15 leiðir] Hvernig á að gera við Windows 11 [15 leiðir]](https://img2.webtech360.com/resources8/images31/image-7724-0105182725565.png)
![Hvernig á að gera við Windows 11 [15 leiðir] Hvernig á að gera við Windows 11 [15 leiðir]](https://img2.webtech360.com/resources8/images31/image-9311-0105182725854.png)
![Hvernig á að gera við Windows 11 [15 leiðir] Hvernig á að gera við Windows 11 [15 leiðir]](https://img2.webtech360.com/resources8/images31/image-3277-0105182725914.png)
![Hvernig á að gera við Windows 11 [15 leiðir] Hvernig á að gera við Windows 11 [15 leiðir]](https://img2.webtech360.com/resources8/images31/image-794-0105182726004.png)
![Hvernig á að gera við Windows 11 [15 leiðir] Hvernig á að gera við Windows 11 [15 leiðir]](https://img2.webtech360.com/resources8/images31/image-5932-0105182726311.jpg)
![Hvernig á að gera við Windows 11 [15 leiðir] Hvernig á að gera við Windows 11 [15 leiðir]](https://img2.webtech360.com/resources8/images31/image-5382-0105182726417.jpg)
![Hvernig á að gera við Windows 11 [15 leiðir] Hvernig á að gera við Windows 11 [15 leiðir]](https://img2.webtech360.com/resources8/images31/image-4518-0105182726486.jpg)
![Hvernig á að gera við Windows 11 [15 leiðir] Hvernig á að gera við Windows 11 [15 leiðir]](https://img2.webtech360.com/resources8/images31/image-7519-0105182726601.png)
![Hvernig á að gera við Windows 11 [15 leiðir] Hvernig á að gera við Windows 11 [15 leiðir]](https://img2.webtech360.com/resources8/images31/image-6969-0105182726712.png)
![Hvernig á að gera við Windows 11 [15 leiðir] Hvernig á að gera við Windows 11 [15 leiðir]](https://img2.webtech360.com/resources8/images31/image-4486-0105182726796.png)
![Hvernig á að gera við Windows 11 [15 leiðir] Hvernig á að gera við Windows 11 [15 leiðir]](https://img2.webtech360.com/resources8/images31/image-3622-0105182726853.png)
![Hvernig á að gera við Windows 11 [15 leiðir] Hvernig á að gera við Windows 11 [15 leiðir]](https://img2.webtech360.com/resources8/images31/image-4691-0105182726957.png)
![Hvernig á að gera við Windows 11 [15 leiðir] Hvernig á að gera við Windows 11 [15 leiðir]](https://img2.webtech360.com/resources8/images31/image-4141-0105182727056.png)
![Hvernig á að gera við Windows 11 [15 leiðir] Hvernig á að gera við Windows 11 [15 leiðir]](https://img2.webtech360.com/resources8/images31/image-7142-0105182727192.png)
![Hvernig á að gera við Windows 11 [15 leiðir] Hvernig á að gera við Windows 11 [15 leiðir]](https://img2.webtech360.com/resources8/images31/image-4659-0105182727255.png)
![Hvernig á að gera við Windows 11 [15 leiðir] Hvernig á að gera við Windows 11 [15 leiðir]](https://img2.webtech360.com/resources8/images31/image-5728-0105182727364.png)
![Hvernig á að gera við Windows 11 [15 leiðir] Hvernig á að gera við Windows 11 [15 leiðir]](https://img2.webtech360.com/resources8/images31/image-5177-0105182727469.png)
![Hvernig á að gera við Windows 11 [15 leiðir] Hvernig á að gera við Windows 11 [15 leiðir]](https://img2.webtech360.com/resources8/images31/image-6246-0105182727564.png)
![Hvernig á að gera við Windows 11 [15 leiðir] Hvernig á að gera við Windows 11 [15 leiðir]](https://img2.webtech360.com/resources8/images31/image-5695-0105182727667.png)
![Hvernig á að gera við Windows 11 [15 leiðir] Hvernig á að gera við Windows 11 [15 leiðir]](https://img2.webtech360.com/resources8/images31/image-3418-0105182727905.png)
![Hvernig á að gera við Windows 11 [15 leiðir] Hvernig á að gera við Windows 11 [15 leiðir]](https://img2.webtech360.com/resources8/images31/image-2867-0105182728010.png)
![Hvernig á að gera við Windows 11 [15 leiðir] Hvernig á að gera við Windows 11 [15 leiðir]](https://img2.webtech360.com/resources8/images31/image-2316-0105182728120.png)
![Hvernig á að gera við Windows 11 [15 leiðir] Hvernig á að gera við Windows 11 [15 leiðir]](https://img2.webtech360.com/resources8/images31/image-902-0105182728296.png)
![Hvernig á að gera við Windows 11 [15 leiðir] Hvernig á að gera við Windows 11 [15 leiðir]](https://img2.webtech360.com/resources8/images31/image-3903-0105182728416.png)
![Hvernig á að gera við Windows 11 [15 leiðir] Hvernig á að gera við Windows 11 [15 leiðir]](https://img2.webtech360.com/resources8/images31/image-1420-0105182728498.png)
![Hvernig á að gera við Windows 11 [15 leiðir] Hvernig á að gera við Windows 11 [15 leiðir]](https://img2.webtech360.com/resources8/images31/image-2489-0105182728594.png)
![Hvernig á að gera við Windows 11 [15 leiðir] Hvernig á að gera við Windows 11 [15 leiðir]](https://img2.webtech360.com/resources8/images31/image-3558-0105182728684.png)
![Hvernig á að gera við Windows 11 [15 leiðir] Hvernig á að gera við Windows 11 [15 leiðir]](https://img2.webtech360.com/resources8/images31/image-7422-0105182728754.png)
![Hvernig á að gera við Windows 11 [15 leiðir] Hvernig á að gera við Windows 11 [15 leiðir]](https://img2.webtech360.com/resources8/images31/image-212-0105182728819.png)
![Hvernig á að gera við Windows 11 [15 leiðir] Hvernig á að gera við Windows 11 [15 leiðir]](https://img2.webtech360.com/resources8/images31/image-3525-0105182728991.png)
![Hvernig á að gera við Windows 11 [15 leiðir] Hvernig á að gera við Windows 11 [15 leiðir]](https://img2.webtech360.com/resources8/images31/image-4594-0105182729090.png)
![Hvernig á að gera við Windows 11 [15 leiðir] Hvernig á að gera við Windows 11 [15 leiðir]](https://img2.webtech360.com/resources8/images31/image-9527-0105182729253.png)
![Hvernig á að gera við Windows 11 [15 leiðir] Hvernig á að gera við Windows 11 [15 leiðir]](https://img2.webtech360.com/resources8/images31/image-4249-0105182729349.png)
![Hvernig á að gera við Windows 11 [15 leiðir] Hvernig á að gera við Windows 11 [15 leiðir]](https://img2.webtech360.com/resources8/images31/image-2835-0105182729531.png)
