Windows 11: Destinatario de correo Falta no menú Enviar a.
Busca a opción Destinatario de correo no menú Enviar a en Microsoft Windows 11.
A busca de Windows foi unha adición moi benvida para moitos usuarios. Permítelle atopar programas, ficheiros, cartafoles e outros elementos no seu PC cun simple termo de busca. Non obstante, ter unha busca activa indexa todos os teus ficheiros regularmente, isto pode producir un maior consumo de enerxía e un maior uso de recursos, o que non sería ideal para usuarios con ordenadores de gama baixa.
Se estás no mesmo barco e queres desfacerte da Busca de Windows, aquí tes todo o que necesitas saber sobre el. Imos comezar.
Contidos
Por que desactivar a Busca de Windows?
Desactivar a Busca de Windows pode axudarche de moitas maneiras. Aquí tes algúns motivos comúns polos que a maioría dos usuarios desactivan a Busca de Windows.
E máis. Desactivar a Busca de Windows é especialmente útil nos ordenadores de gama baixa que teñen dificultades con varias funcións de Windows 11. Desactivar a Busca axudará a reducir a carga de traballo do sistema que, á súa vez, fará que o teu PC se sinta máis rápido.
Relacionado: Como buscar en Windows 11
Deberías desactivar a Busca de Windows?
Non, a non ser que o teu sistema teña moi poucos recursos, non ten sentido desactivar a Busca de Windows. A Busca de Windows é a utilidade de busca máis eficiente para Windows 11. A maioría das alternativas de terceiros e de código aberto tardan máis en indexar ficheiros e consomen máis recursos en comparación coa Busca de Windows. Polo tanto, xa tes a utilidade máis eficiente do teu sistema.
Polo tanto, non ten sentido desactivar a Busca a menos que teñas moi poucos recursos. Ademais, recomendamos reducir as localizacións de indexación para a Busca de Windows para recuperar os teus recursos, xa que isto limitará o uso de recursos e o consumo de enerxía da Busca de Windows de forma eficiente. Se aínda queres desactivar a busca en Windows 11, podes usar os seguintes métodos.
Como desactivar a busca de Windows en Windows 11
Podes desactivar a Busca de Windows de forma temporal ou permanente dependendo das túas preferencias. Se estás buscando probar unha función ou instalar un programa que interfira coa Busca de Windows, podes desactivala temporalmente ata que remate a túa tarefa.
Non obstante, se non queres usar a Busca de Windows por completo, podes usar as formas permanentes de desactivala listadas a continuación. Imos comezar.
Caso #1: Como desactivar a busca temporalmente
Podes desactivar temporalmente a Busca de Windows no teu PC con Windows 11 detendo o servizo de busca en segundo plano ou usando CMD. Use un dos métodos a continuación que mellor se adapte ás súas necesidades e requisitos actuais.
Método # 01: Usando Servizos
Desactivar a busca de Windows
Preme Windows + Rno teu teclado, escribe o seguinte comando e preme Intro no teu teclado.
services.msc
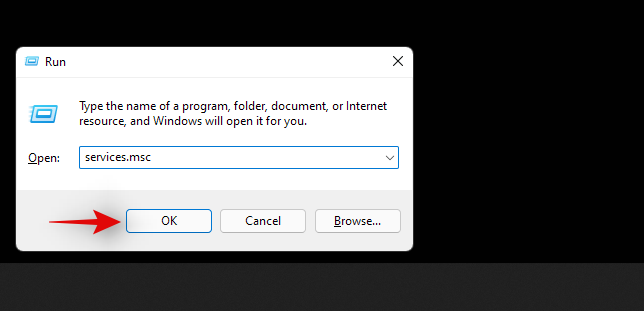
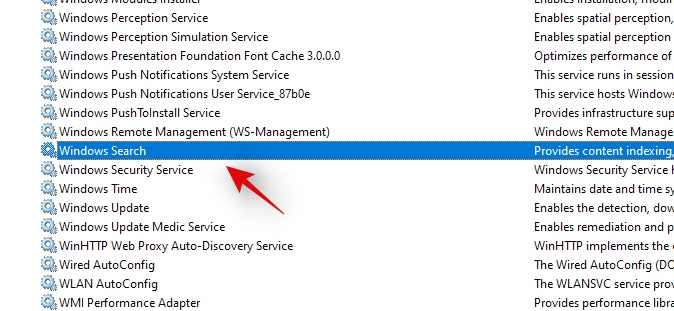
Unha vez que se inicie o cadro de diálogo de servizos, identifique a "Busca de Windows" na lista e fai clic co botón dereito sobre ela.
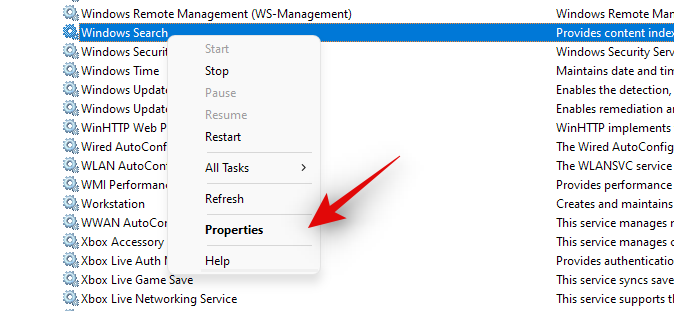
Seleccione 'Propiedades'.
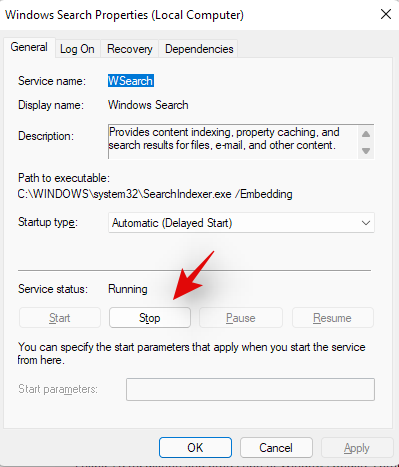
Agora fai clic en "Parar".
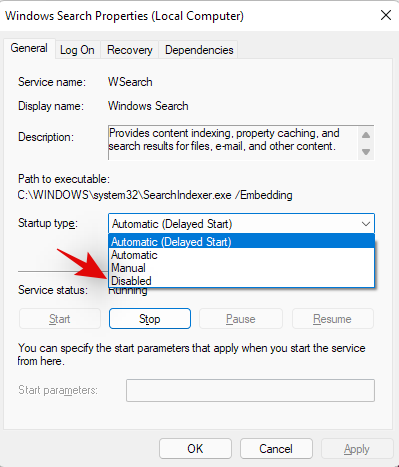
Fai clic no menú despregable e selecciona "Manual".
Fai clic en "Aceptar" para gardar os teus cambios.

O servizo de busca de Windows agora deterase e o reinicio automático debería estar desactivado. Windows Seach xa non debería funcionar no teu PC e agora podes facer a tarefa necesaria no teu PC. Use a seguinte guía para volver activar a Busca de Windows unha vez que remate.
Activa a busca de Windows
Preme Windows + Rno teu teclado e escribe o seguinte. Fai clic en "Aceptar" ou preme Intro no teu teclado unha vez que remates.
services.msc

Fai clic co botón dereito en "Procura de Windows".
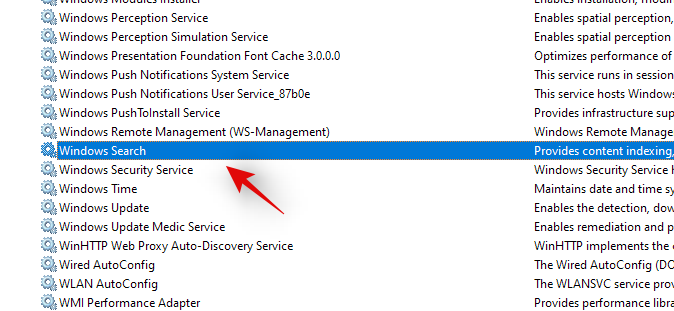
Seleccione 'Propiedades'.

Fai clic no menú despregable e selecciona "Automático (adiado)".
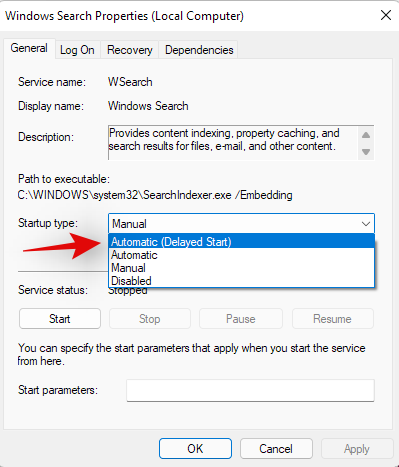
Agora fai clic en "Iniciar".
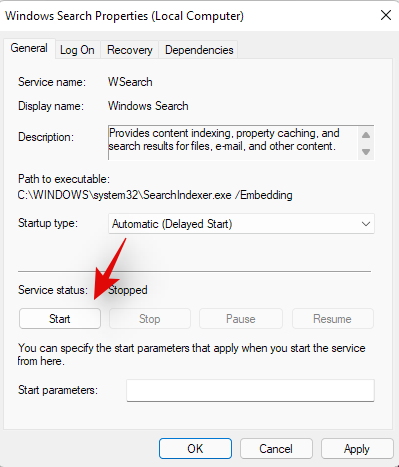
Fai clic en "Aceptar" para gardar os teus cambios.
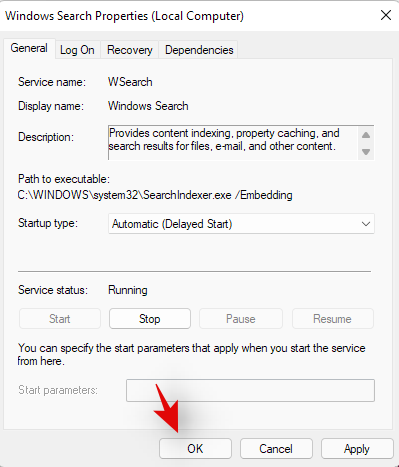
E xa está! Agora a busca de Windows debería estar activada de novo no teu PC.
Método #02: Usando CMD
Tamén pode desactivar e volver activar a Busca de Windows usando CMD no seu PC. Siga os pasos seguintes para guialo a través do proceso.
Desactivar a busca de Windows
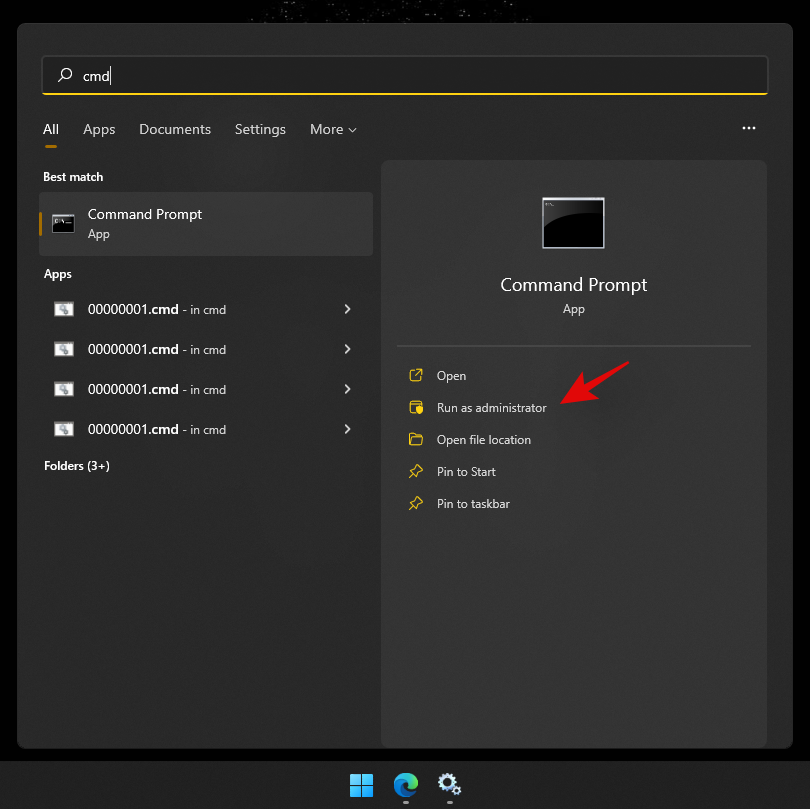
Press Windows + S on your keyboard and search for CMD. Click on ‘Run as administrator’ once it shows up in your search results.
Type in the following command to stop the Windows Search service. Press Enter on your keyboard once you are done.
REG UPDATE HKLM\SYSTEM\CurrentControlSet\Services\WSearch\Start=3

Once done, execute the command below.
net.exe stop "Windows Search"

And that’s it! Windows Search should now be temporarily disabled on your system. Please keep in mind that the search service will be activated after a restart as soon as you try searching for something. However, we recommend you re-enable it on your system using the guide below instead to avoid any background or startup conflicts.
Re-enable Windows Search
Press Windows + S on your PC and search for CMD. Click on ‘Run as administrator’.

Now type in the following command and press Enter on your keyboard.
REG UPDATE HKLM\SYSTEM\CurrentControlSet\Services\WSearch\Start=1

Now enter the following command and press Enter again.
net.exe start "Windows Search"

Windows Search should now be re-enabled on your PC. We recommend you restart your system for good measure to enable Search properly.
Case #2: How to Disable Search Permanently
If you are looking to disable search permanently, then there is no one sure shot way to do so. Instead, you will need to disable various aspects of Windows Search to ensure that it is not working and indexing files in the background. This includes disabling its service, scheduled tasks, renaming the folder, and editing the Registry. Another way to permanently disable Windows Search is by using the Group Policy Editor. However, this is only available to users with Windows 11 Pro or higher. Hence you can use one of the guides below depending on your current edition of Windows 11 installed on your PC.
Disable services:
Let’s start by disabling the Windows Search service first. Follow the guide below to get you started.
Press Windows + R on your keyboard and type in the following to open the Services app. Click on ‘Ok’ once you are done.
services.msc
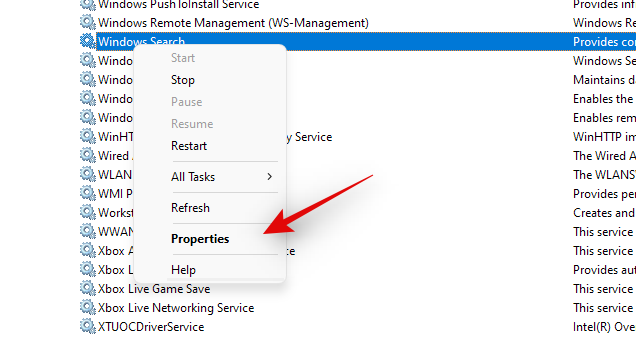
Now right-click on ‘Windows Search’ and select ‘Properties’.
Click on ‘Stop’.
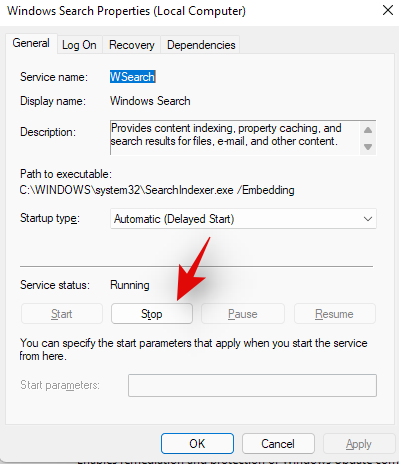
Click on the drop-down menu and select ‘Disabled’.
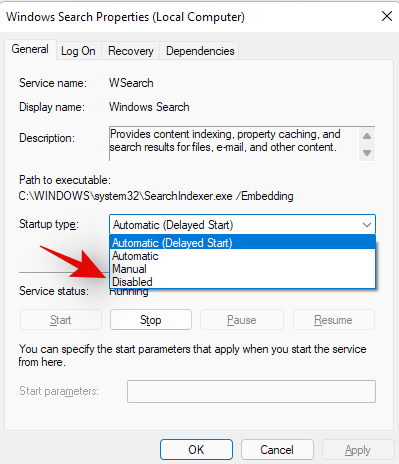
Now click on ‘Ok’ to save your changes.
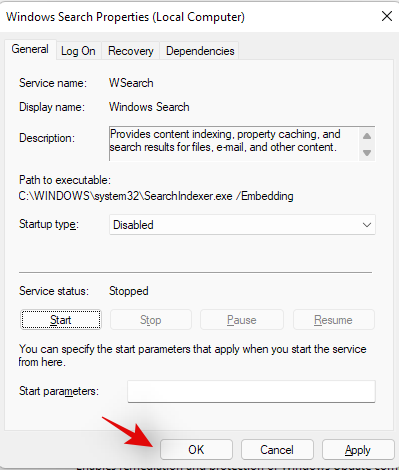
Windows Search should now be disabled on your system. Use the guide below to disable Windows Search tasks on your system.
Rename folder
We will now rename the folder for Windows Search which will prevent Windows from accessing the same path to launch Windows Search. This will break Windows Search functionality and should, in theory, help you disable Windows Search on your PC. Follow the guide below to get you started.
Press Windows + E on your keyboard and navigate to the following path. You can also copy-paste the same in your address bar.
C:\Windows\SystemApps\
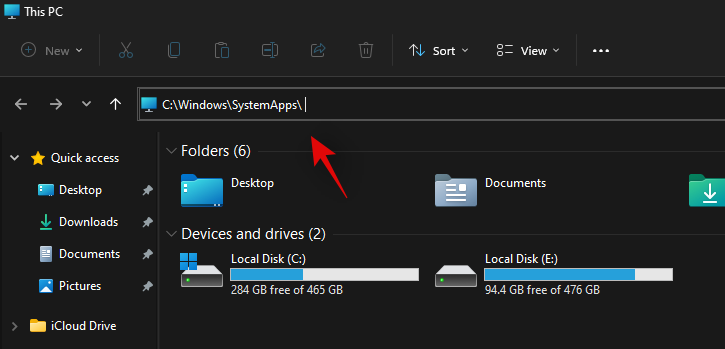
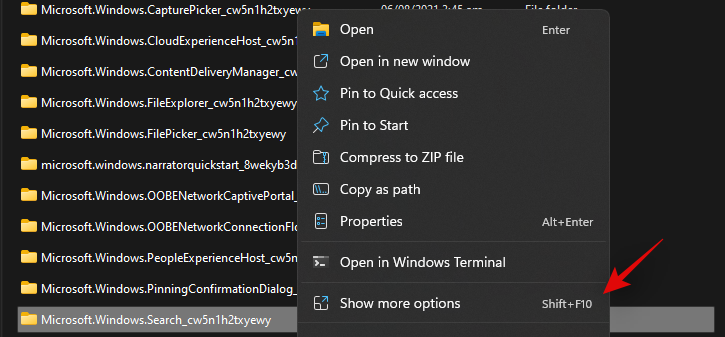
Find a folder named ‘Microsoft.Windows.Search_cw5n1h2txyewy’ and right-click on it.
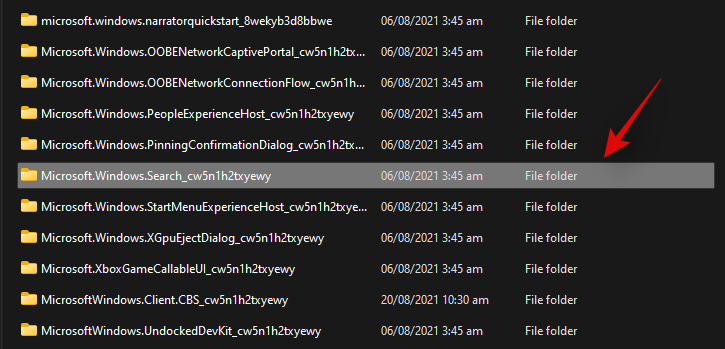
Select ‘Show more options’.
Click on ‘Rename’.
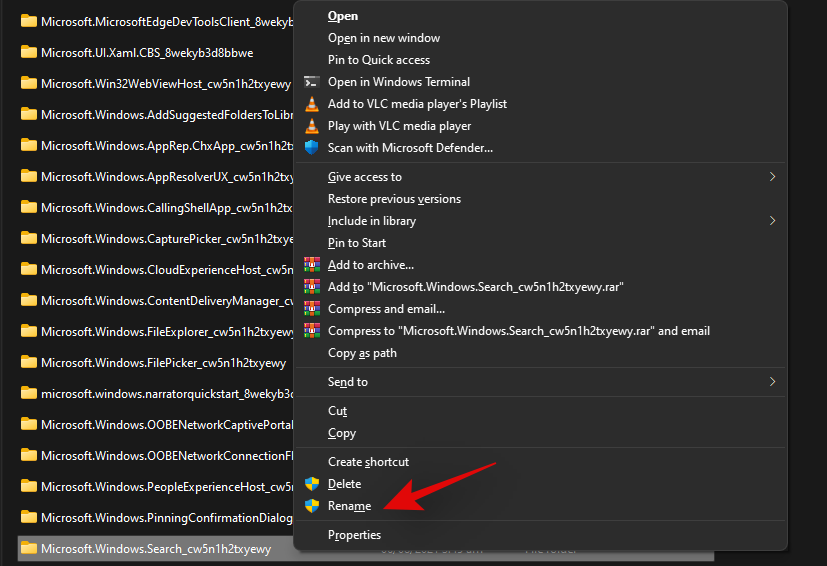
Now rename the file to the following. Just add ‘.back’ at the end of the file.
Microsoft.Windows.Search_cw5n1h2txyewy.back

Grant the necessary administrator permissions when requested. Double click and open the folder once done.

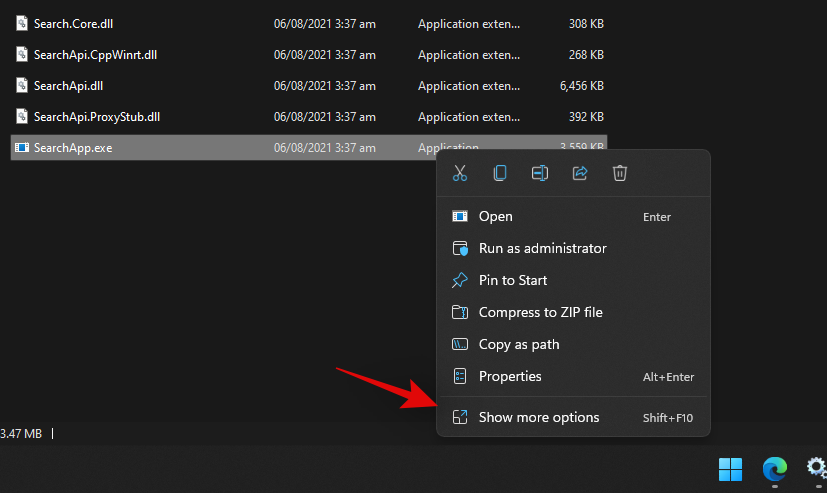
Right-click on ‘SearchApp.exe’ and click on ‘Show more options’.
Select Rename.
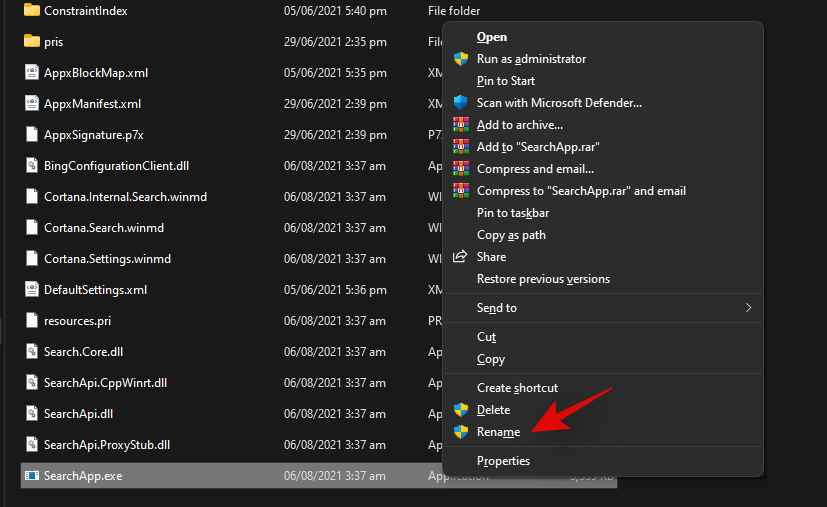
Enter the following name and press Enter on your keyboard.
SearchApp.exe.back

Now navigate to the following path. Right-click on ‘SearchHost.exe’ and select ‘Show more options’.
C:\Windows\SystemApps\MicrosoftWindows.Client.CBS_cw5n1h2txyewy
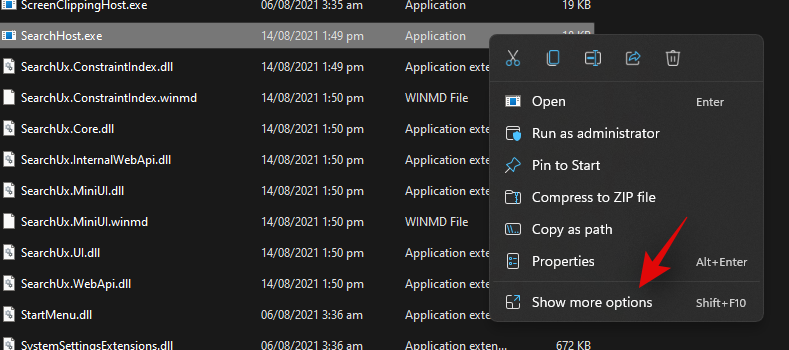
Rename the file to the following and press Enter on your keyboard.
SearchHost.exe.back

Grant the necessary permissions if prompted.
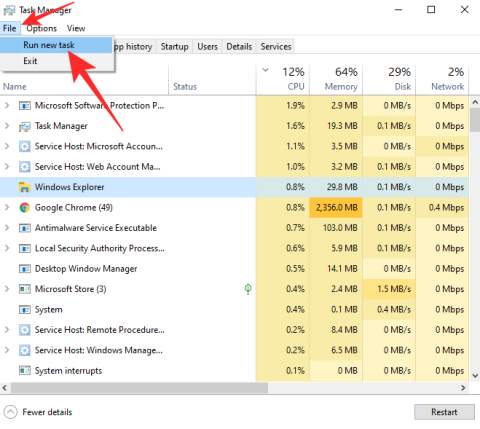
Close the File Explorer and restart your PC for good measure.
And that’s it! Renaming files and folders in conjunction with disabling the Windows Search service should help disable Windows Search on your system. Already indexed files will still be used to display search results on your PC in case you happen to use Search in the future. You can clear your indexed file cache in Windows 11 to disable this as well on your system.
How to disable web results in Windows Search
Windows Search can sometimes be annoying with its web results and it might be the reason why you are trying to disable Search on your PC. In such cases, you can selectively disable Web results in Windows Search using a registry change. Use the guide below to help you along with the process.
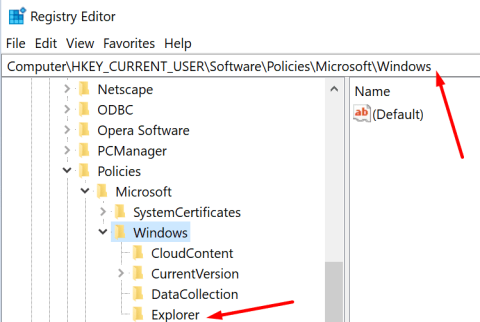
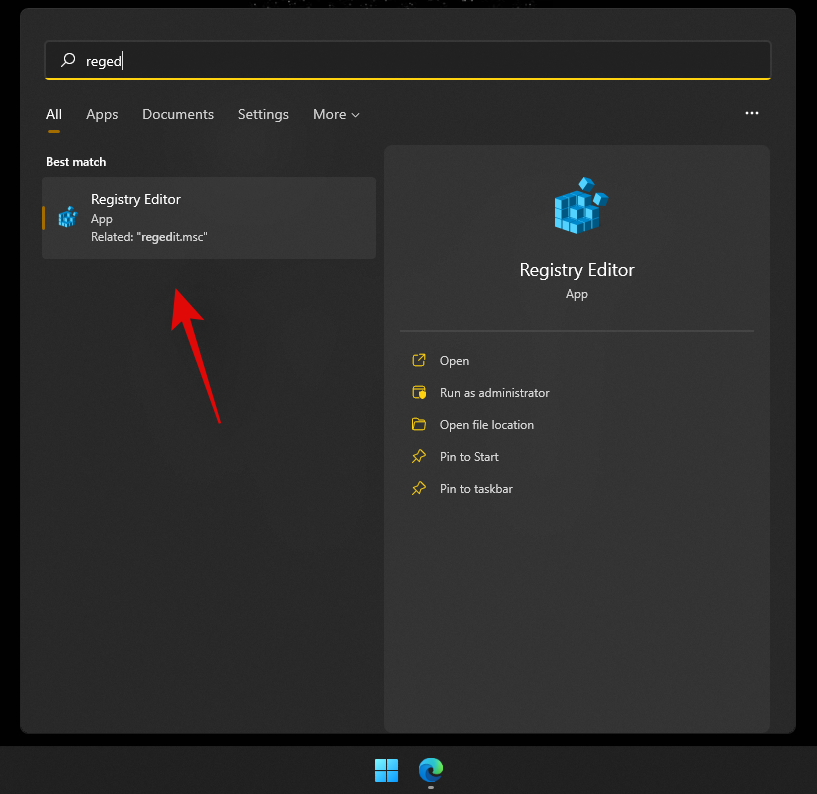
Press Windows + S on your keyboard and search for ‘regedit’. Click and launch the Registry Editor from your search results.
Navigate to the following path or copy-paste it in your address bar.
HKEY_CURRENT_USER\SOFTWARE\Policies\Microsoft\Windows\Explorer
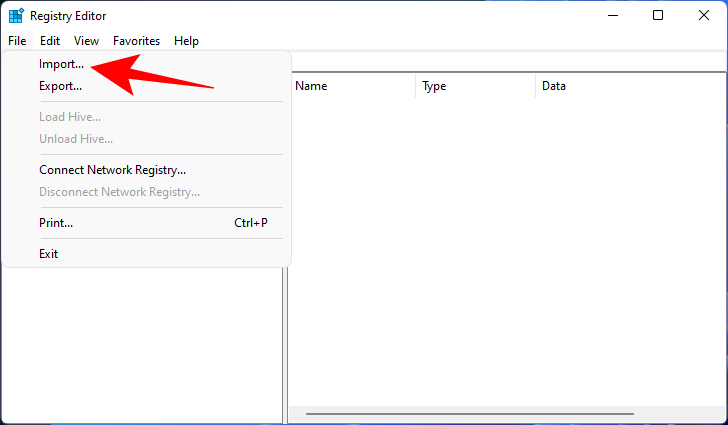
Right-click on your right and select ‘New’.

Select ‘DWORD (32-bit) value’.

Name it the following and press Enter on your keyboard. Double click on it once done.
DisableSearchBoxSuggestions

Set the value data as ‘1’ and click on ‘Ok’.
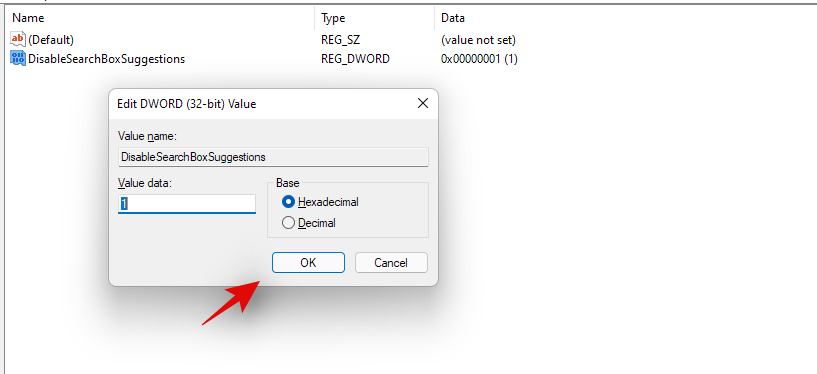
Restart your PC for good measure.
And that’s it! Web results within Windows Search should now be disabled on your PC.
How to remove the search icon from your taskbar
This is a simple one and you can use the Windows Settings app to get rid of the Search icon. Follow the guide below to get you started.
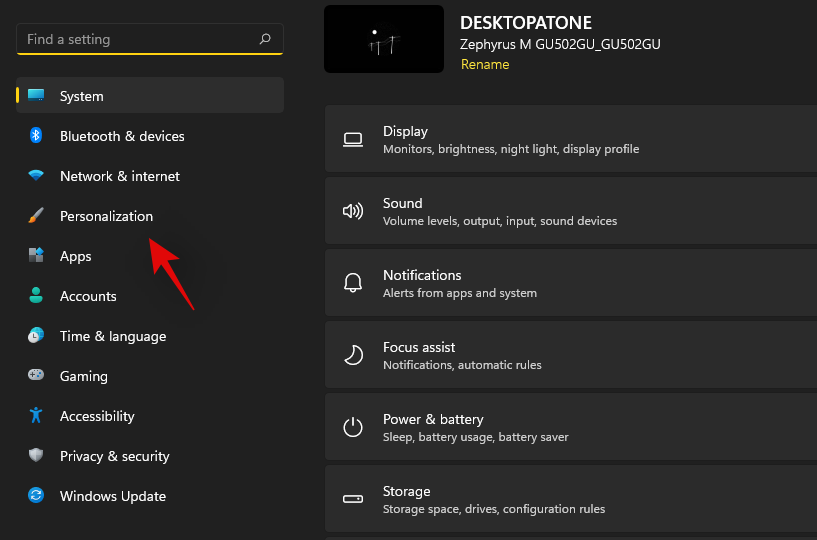
Press Windows + i on your keyboard and click on ‘Personalization’ on your left.
Now click on ‘Taskbar’.

Click and expand ‘Taskbar items’. Turn off the toggle for ‘Search’ as shown below.
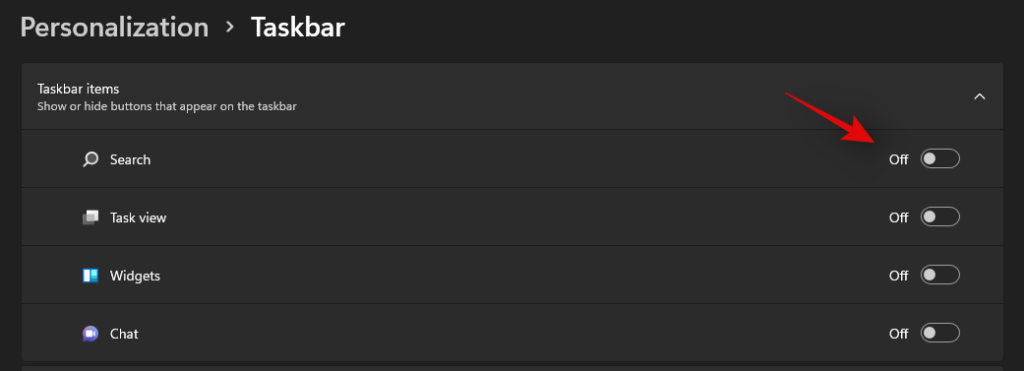
And that’s it! The Search icon should no longer be visible in your taskbar.
How to exclude a folder from indexing
Windows allows you to exclude a folder from being indexed easily. Use the guide below to help you out.
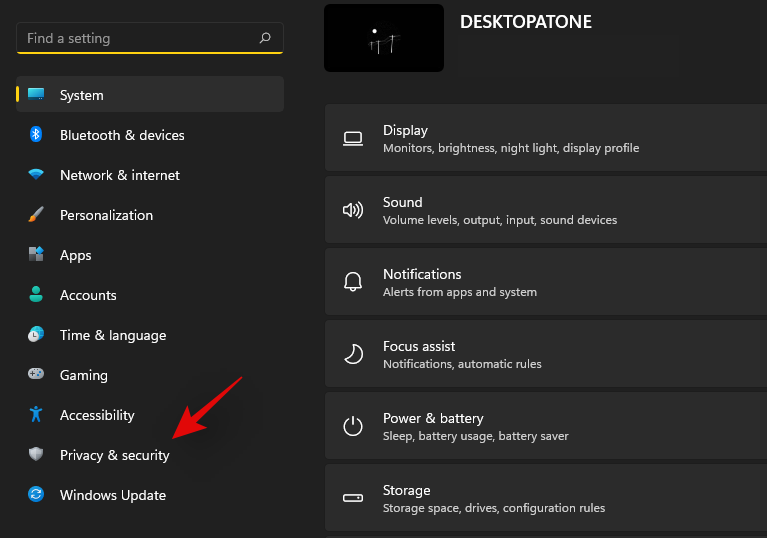
Press Windows + i on your keyboard and click on ‘Privacy & security’.
Now click on ‘Searching Windows’.
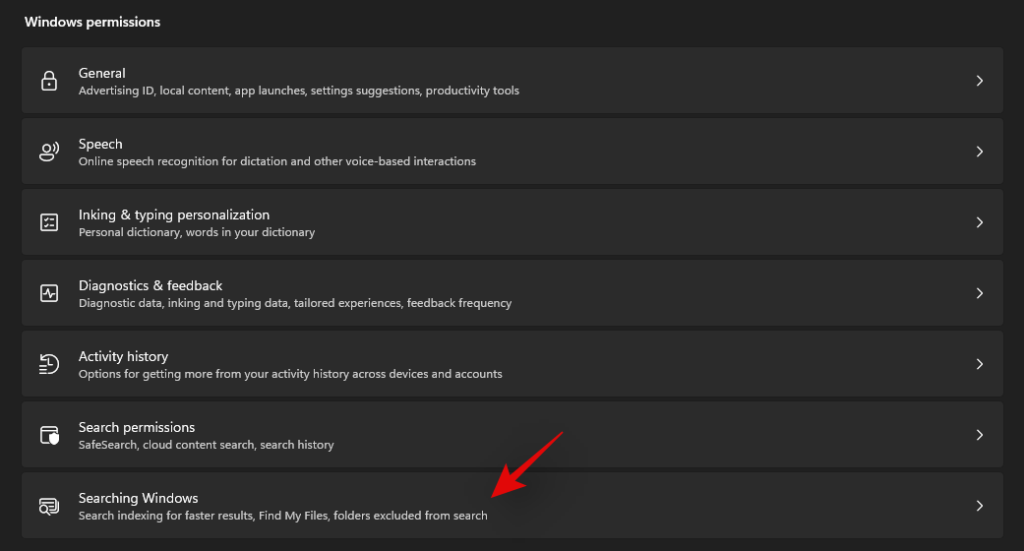
Click on ‘Add an excluded folder’.

Now browse to the desired folder and click and select it. Once selected, click on ‘Select folder’.
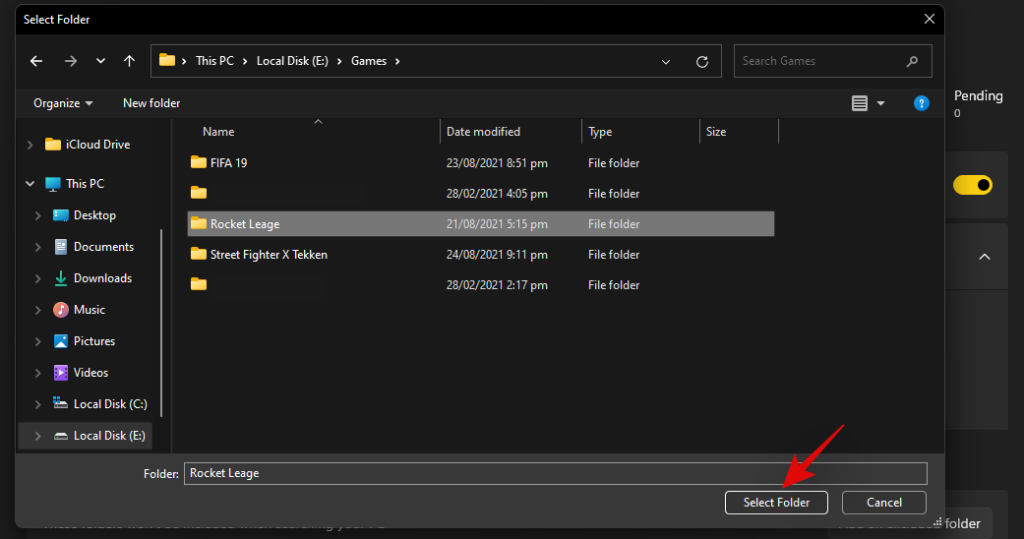
The selected folder will now be added to the exceptions list and its contents will no longer be indexed by Windows on your Pc.

How to allow Windows to index all your drives
You can easily allow Windows to index additional drives and partitions on your PC. Use the guide below to get you started.
Press Windows + i on your keyboard and click on ‘Privacy & security’ on your left.

Click on ‘Searching Windows’.

Now click on ‘Additional indexing options’ at the bottom of your screen.

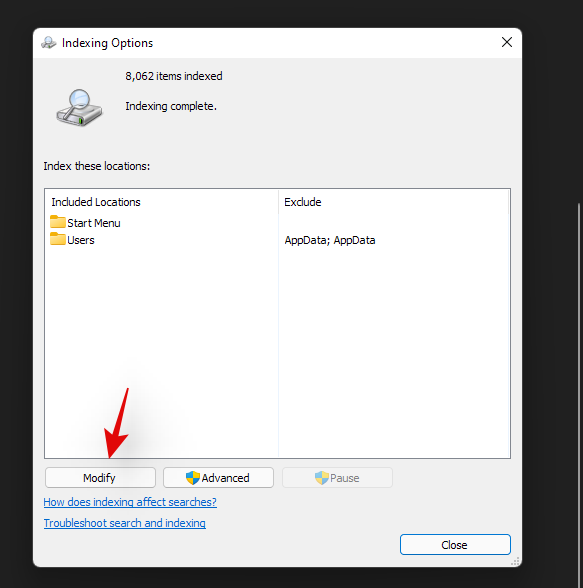
Click on ‘Modify’.
Check the boxes for all the drives and partitions you wish to be indexed.
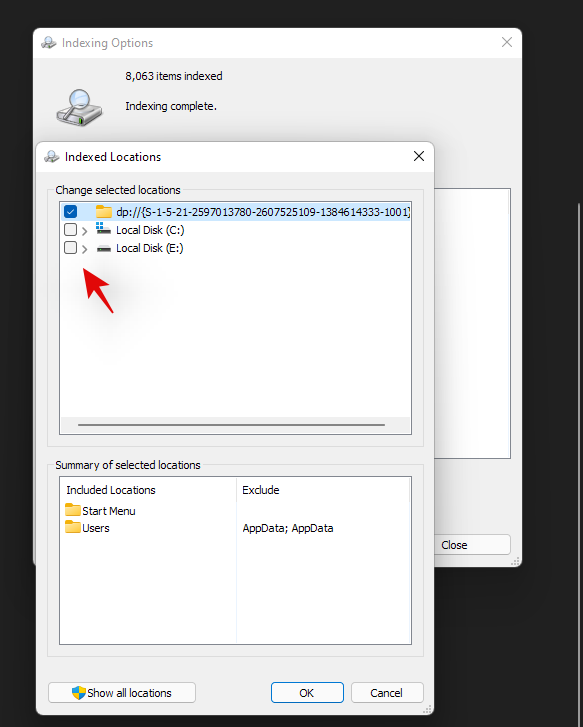
Click on ‘Ok’ once done.
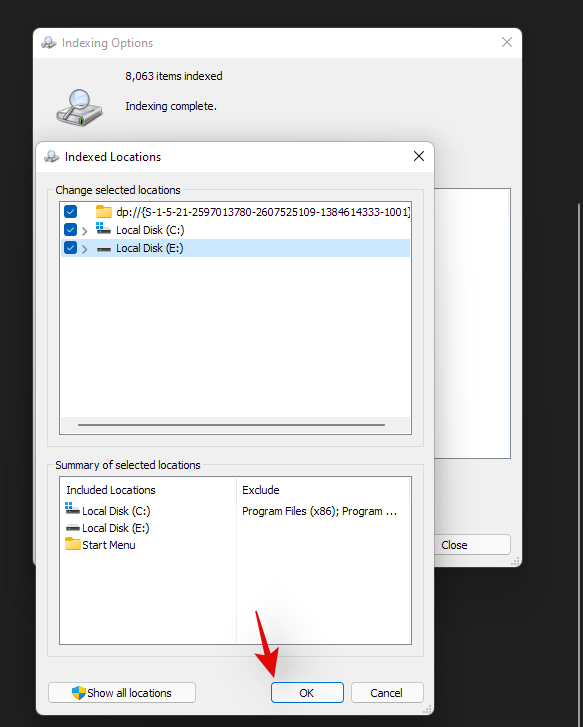
Click on ‘Close’.
Windows will now index all the selected partitions and drives on your PC.
How to make Windows Search power-efficient (laptops only)
You can have Windows Search indexing respect your power plan which will prevent it from indexing files when on battery power. This will help reduce your overall power consumption which should result in increased battery life on your laptop. Use the guide below to get you started.
Press Windows + i on your keyboard and select ‘Privacy & security’ from the sidebar.

Click on ‘Searching Windows’.

Enable the toggle for ‘Respect power settings when indexing’.

And that’s it! Windows Search will now minimize or disable indexing based on your power plan when your laptop is running on battery power.
We hope this guide helped you get familiar with disabling Windows Search in Windows 11. If you face any issues or errors, feel free to reach out to us using the comments section below.
Related:
Busca a opción Destinatario de correo no menú Enviar a en Microsoft Windows 11.
Atopa facilmente un ID de proceso de aplicación para Windows 11 usando varios dos métodos mencionados neste artigo. Aquí como obter resultados instantáneos.
Vexa o rápido que pode restablecer o seu ordenador con Windows 11 para dar un novo comezo a eliminar eses molestos problemas. Aquí están os pasos para principiantes.
Crea e personaliza escritorios virtuais en Windows 11 seguindo estes pasos para principiantes para separar o teu traballo e as cousas persoais.
Descobre as diferentes formas en que podes comprobar a intensidade do teu sinal wifi. Vexa como ver tamén a porcentaxe exacta do sinal.
Desactivar a busca de Bing debería ser suficiente para desfacerse das buscas rápidas. Podes facelo a través do Editor de rexistro de Windows 11s.
Manteña o Xestor de tarefas sempre en primeiro lugar en Windows 11 para que sexa fácil de atopar cando necesites ler a aplicación. Aquí están os pasos a seguir.
Corrixa a tecla ESC que non funciona en Windows 11 para que poidas usar o teu teclado como sempre o fixeches seguindo estes consellos sinxelos.
Os ficheiros baleiros do escritorio adoitan ser restos de antigas instalacións de Microsoft Office. Elimina a clave do rexistro de NameSpace para solucionar o problema.
Descobre como podes comprimir facilmente ficheiros en Windows 11 sen necesidade de software de terceiros. aquí están os pasos amigables para principiantes.
