Windows 11: Destinatario de correo Falta no menú Enviar a.
Busca a opción Destinatario de correo no menú Enviar a en Microsoft Windows 11.
O espazo de almacenamento é un dos compoñentes esenciais do seu sistema e, queira ou non, é probable que se quede sen el no futuro. Unha boa forma de liberar espazo de almacenamento é xestionar os teus ficheiros máis grandes. Podes movelos a unha unidade diferente , almacenamento na nube ou mesmo eliminalos se xa non son necesarios.
Nalgúns casos, incluso podes comprimir os teus ficheiros se non queres usalos en breve. Pero como atopar ficheiros grandes? Percorrer cada cartafol manualmente pode ser tedioso e usar un limpador simplemente non é o suficientemente eficiente. Afortunadamente, hai algunhas formas sinxelas de atopar ficheiros grandes no teu sistema en Windows 11. Usa as guías seguintes para comezar.
Contidos
Buscar ficheiros grandes en Windows 11: Consellos
A clasificación de ficheiros grandes pódese facer en función do tipo, tipo, data e moito máis. A mellor forma de facelo é empregando a Busca de Windows no explorador de ficheiros. Podes usar termos dedicados para definir os ficheiros que buscas e filtralos segundo o seu tamaño. Despois podes usar as opcións de ordenación do explorador de ficheiros para atopar as máis grandes nos teus resultados de busca.
En consecuencia, se isto non se axusta aos teus criterios ou non podes atopar os ficheiros que buscas, podes utilizar un dos outros métodos que se indican nesta guía.
Relacionado: Como cambiar a cor da barra de tarefas en Windows 11
Método n.º 01: usar a busca no explorador (recomendado)
Agora buscaremos ficheiros grandes segundo os teus criterios.
Preme Windows + Eno teu teclado para abrir o explorador de ficheiros e fai clic na caixa de busca na esquina superior dereita. Busca o seguinte termo.
size:gigantic
Agora filtraranse os resultados e os ficheiros de máis de 4 GB mostraranse na túa pantalla. Selecciona os ficheiros innecesarios que non necesitas no teu PC e simplemente elimínaos para liberar espazo. Se queres usar un tamaño mínimo de ficheiro máis pequeno, substitúe "xigantesco" por un dos termos que se indican a continuación, dependendo do tamaño que prefires.
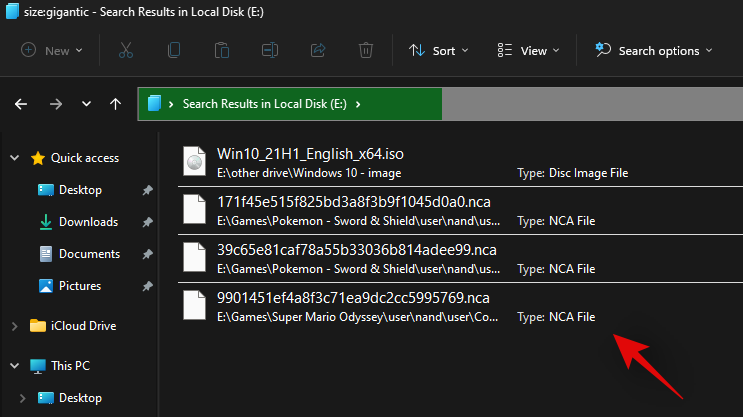
E xa está! Podes usar a Busca de Windows deste xeito para filtrar ficheiros polo seu tamaño e atopar os máis grandes actualmente no teu PC.
Nota: No caso de que o seu PC indexe e mostre tamén ficheiros do sistema, recomendámoslle que comprobe os ficheiros antes de eliminalos para evitar eliminar calquera ficheiro vital do sistema.
Agora atoparás ficheiros grandes no teu PC usando a Busca de Windows.
1.1 E se a busca non che funciona: Consellos para probar
Se escribir "tamaño:xigantesco" non che funciona, terás que cambiar ao explorador de ficheiros antigo de Windows 10. Utiliza a seguinte guía para comezar.
Unha vez que volvas ao explorador de ficheiros antigo, utiliza a guía anterior para buscar ficheiros grandes. Unha vez atopado, use a seguinte guía para recuperar o novo explorador de ficheiros de Windows 11 no seu sistema.
1.1.1 Cambia ao explorador de ficheiros antigo
Preme Windows + Sno teu teclado e busca "Regedit". Fai clic e inicia a aplicación desde os teus resultados de busca.
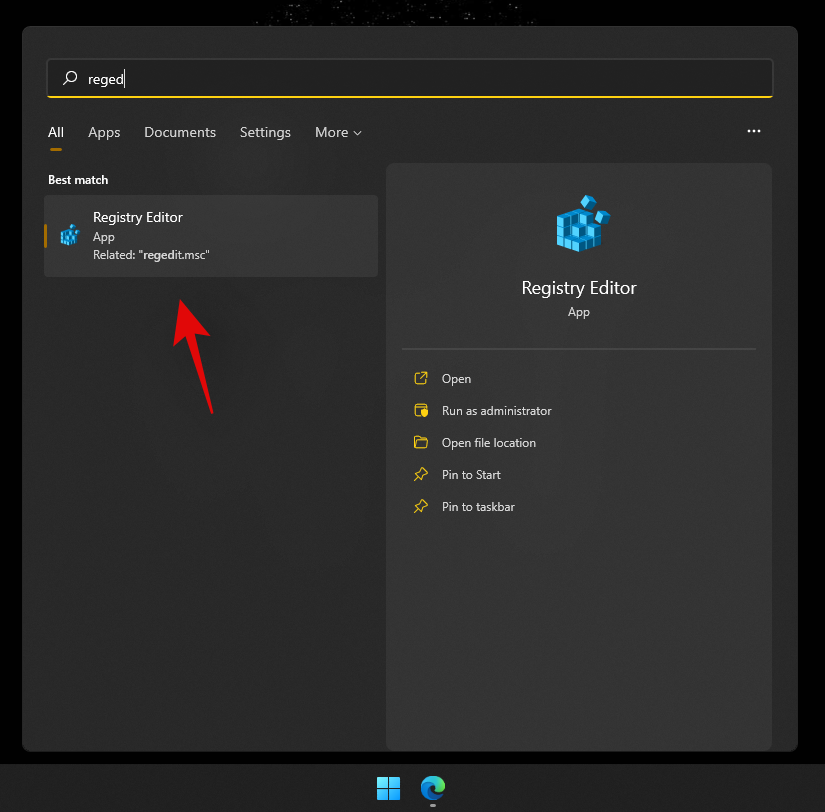
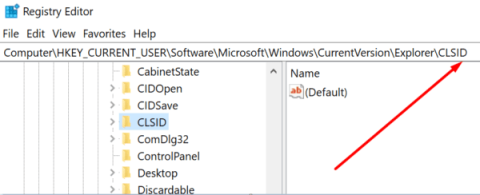
Navega ata o seguinte directorio ou copia e pega o enderezo que aparece a continuación na barra de enderezos.
HKEY_LOCAL_MACHINE\SOFTWARE\Microsoft\Windows\CurrentVersion\Shell Extensions
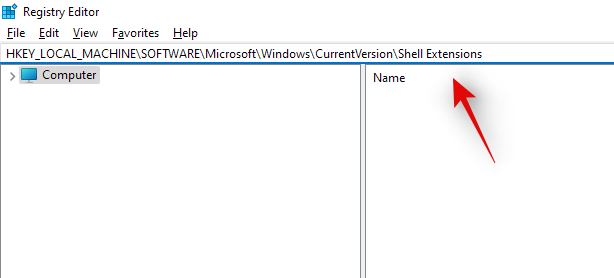
Fai clic no cartafol chamado "Bloqueado".
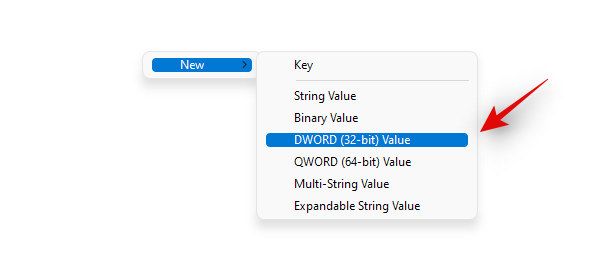
Fai clic co botón dereito nunha área baleira á túa dereita, selecciona "Novo" e, a continuación, fai clic en "Valor DWORD (32 bits)".
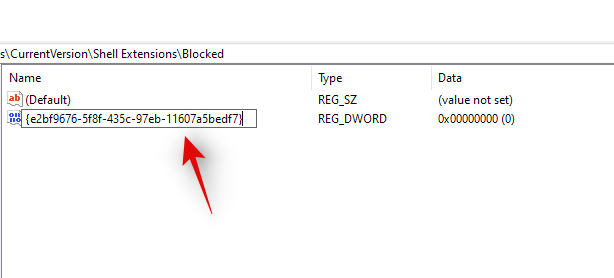
Introduce o seguinte nome e preme Intro no teu teclado. Recomendamos que copies e pegues o mesmo para evitar erros de nomeamento.
{e2bf9676-5f8f-435c-97eb-11607a5bedf7}
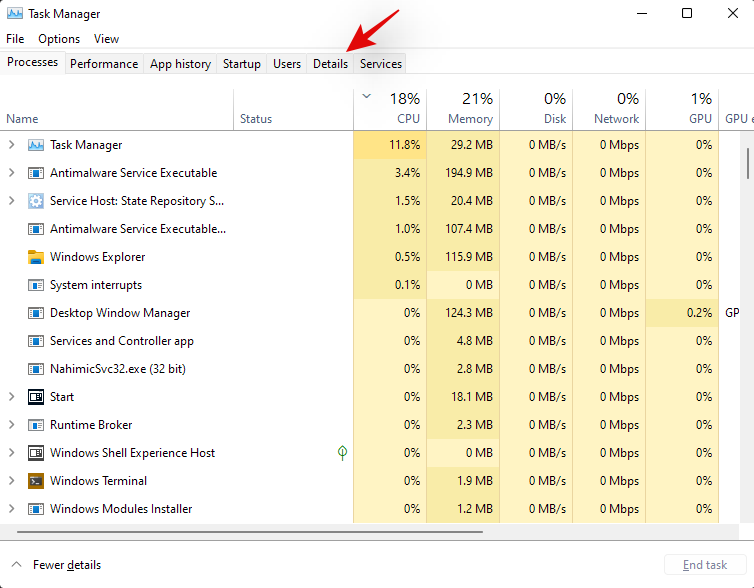
Pecha o editor do rexistro e prema Ctrl + Maiús + Esc para abrir o Xestor de tarefas. Cambia á pestana "Detalles".
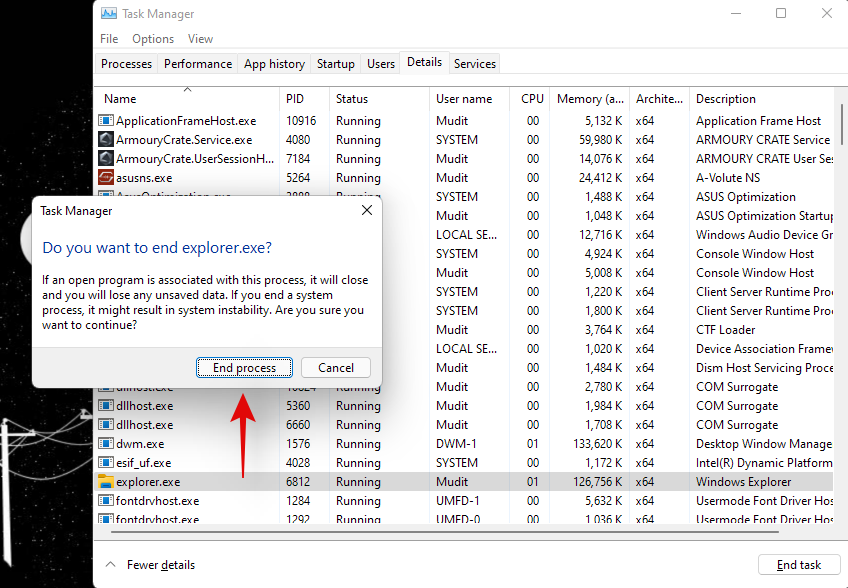
Fai clic en "Explorer.exe" e preme Supr no teu teclado.
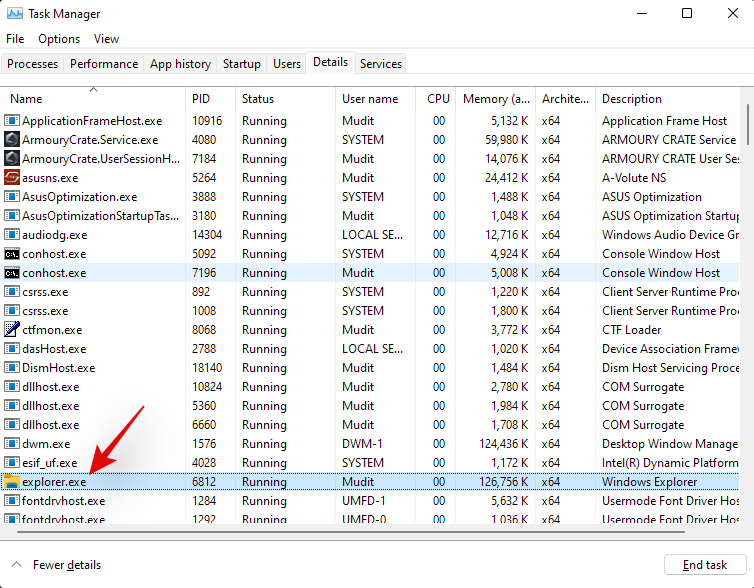
Fai clic en "Finalizar proceso" para confirmar a túa elección.
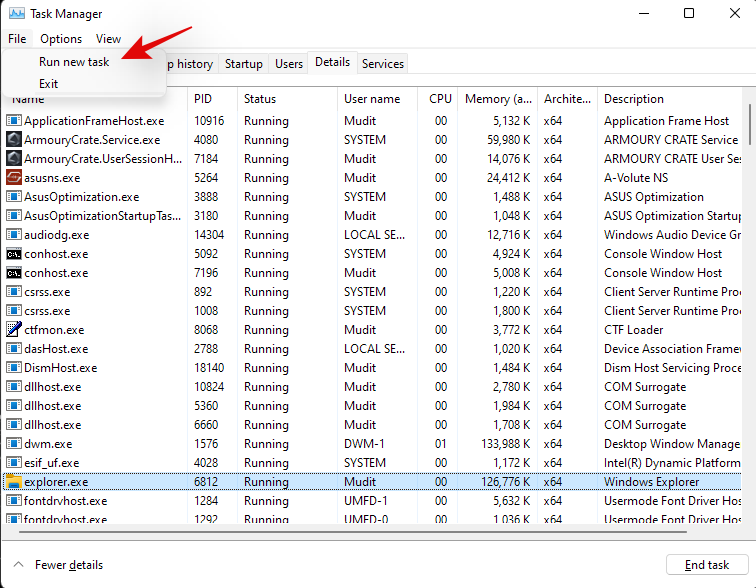
Fai clic en "Ficheiro" e selecciona "Executar nova tarefa".
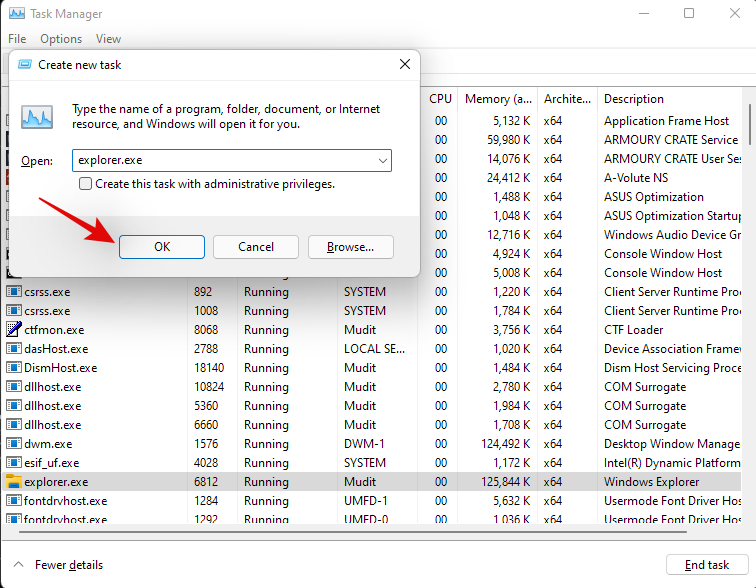
Introduza o seguinte na caixa de texto e prema en "Aceptar".
explorer.exe
Agora o Explorador de ficheiros de Windows reiniciarase no teu sistema e debería volver ao Explorador de ficheiros de Windows 10. Podes abrir un cartafol aleatorio para comprobar o mesmo. Confirma que volveches ao explorador de ficheiros antigo e utiliza a guía anterior para atopar ficheiros grandes no teu sistema.
1.1.2 Volve ao novo explorador de ficheiros
Agora podemos volver ao antigo explorador de ficheiros. Siga a guía a continuación para comezar.
Preme Windows + Sno teu teclado e busca Regedit. Fai clic e inicia a aplicación unha vez que apareza nos teus resultados de busca.

Navega ata o seguinte camiño abaixo ou cópiao e pégao na túa barra de enderezos.
HKEY_LOCAL_MACHINE\SOFTWARE\Microsoft\Windows\CurrentVersion\Shell Extensions

Simply click on the DWORD (32-bit) value we had created earlier and hit Del on your keyboard. Click on ‘Yes’ to confirm your choice.

Press Ctrl + Shift + Esc on your keyboard and switch to the ‘Details’ tab.

Click on ‘explorer.exe’ and hit Del on your keyboard.

Click on ‘End process’.

Click on ‘File’ and select ‘Run new task’.

Type in ‘explorer.exe’ and hit Enter on your keyboard.

You can close the task manager and registry editor on your PC now.
And that’s it! You will now have gone back to the new File Explorer on Windows 11. Apart from the size parameter, you can also use the commands below to search different files on your PC and sort them by size. This way you can find the largest ones on your system.
1.2 Find by file types
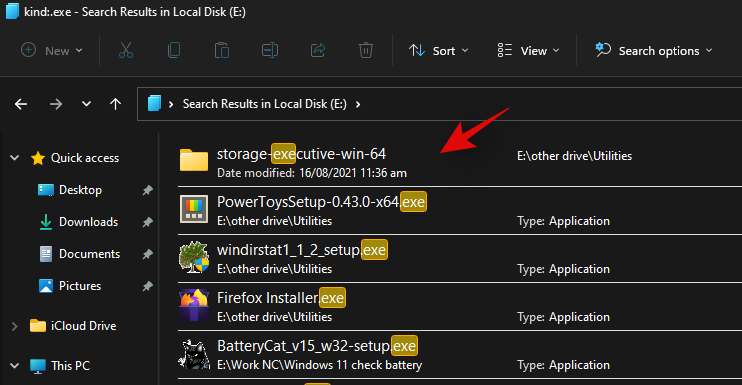
Similar to the command above, you can use the ‘kind:’ parameter to find certain files in the current directory. The ‘kind’ parameter will allow you to look for calendar files, text documents, pictures, videos games, and more.
When using the kind parameter this way you are not restricted to Windows’s predefined categories, instead you can define specific file extensions as well to find them on your PC as shown below.
kind:.exe
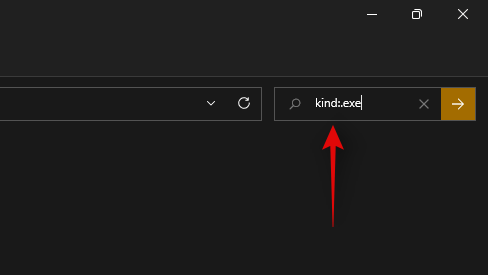
The command above will help you look for executables in the current directory.
Similarly using the command below will help you find PDF files in the selected directory.
kind:.pdf
And that’s it! You can use these commands to find certain files on your PC using Windows Search.
1.3 Find files by date
You can also use the ‘date:’ parameter to look for files created on a certain date. Additionally, this command can be used in conjunction with Boolean filters below to find files created or modified before or after a certain date on your PC. For example, if looking for a file created on the 1st of January 2020, then you can use the following command below.
date: 1/1/2020
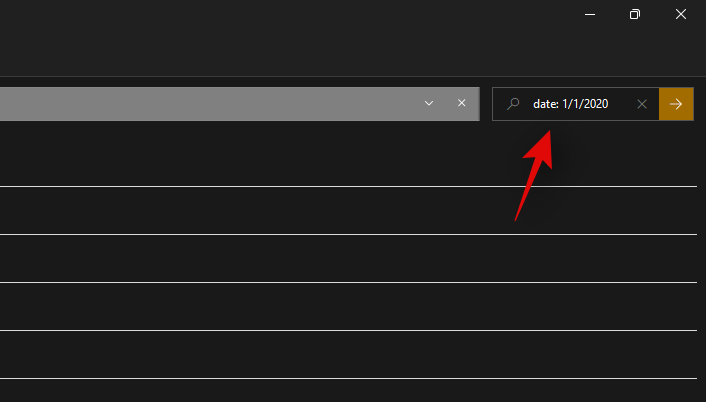
Similarly if looking for a file created on the 1st January 2021, then you can use the following command.
date: 1/1/2021
1.4 Use Boolean Filters
Boolean filters can help you search multiple terms simultaneously or in conjunction with each other. Use the filters below that best suit your current requirements.
1.4.1 The ‘AND’ parameter
You can use the AND parameter to search for two search terms together. This way you can look for a file containing both the terms and not either one of them which should help you filter out unwanted results containing either of the terms.
For example, if looking for a file containing the words ‘Samsung and ‘galaxy’ in its name then I can use the following term to search for your file.
Samsung AND galaxy
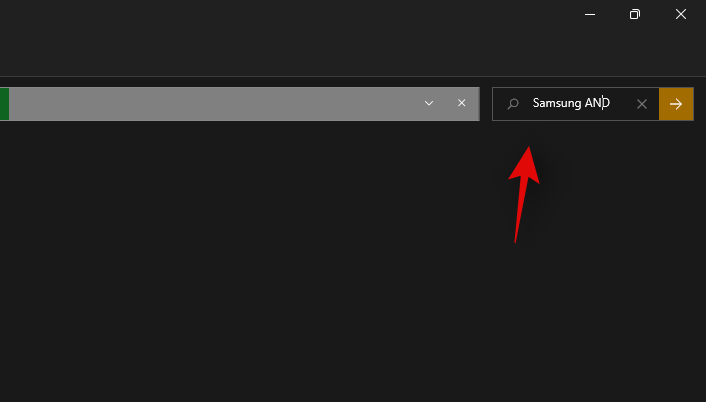
This will filter out files with only ‘Samsung’ and ‘Galaxy’ in their name. Files with either term will be filtered out.
The ‘OR’ parameter
The OR parameter is opposite to the AND parameter and allows you to search for files containing either of the terms in your search term. For example, if I wish to search for files with either ‘Apple’ or ‘Airpods’ in their name, then I can use the following search term.
apple OR airpods
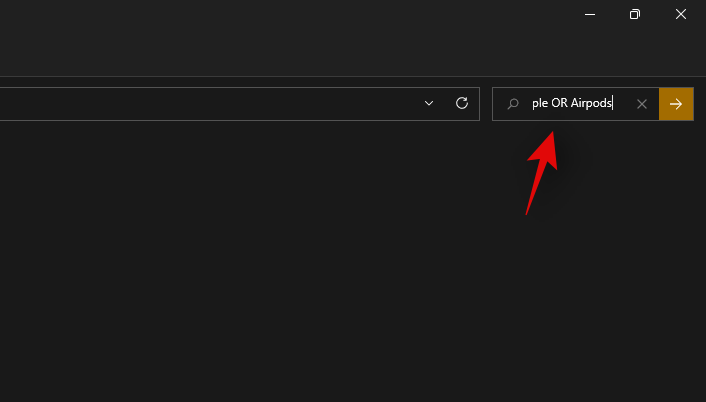
Similarly, if I am looking for PDF and EXE files in a particular directory, then I can use the following command below.
kind:.exe OR .pdf
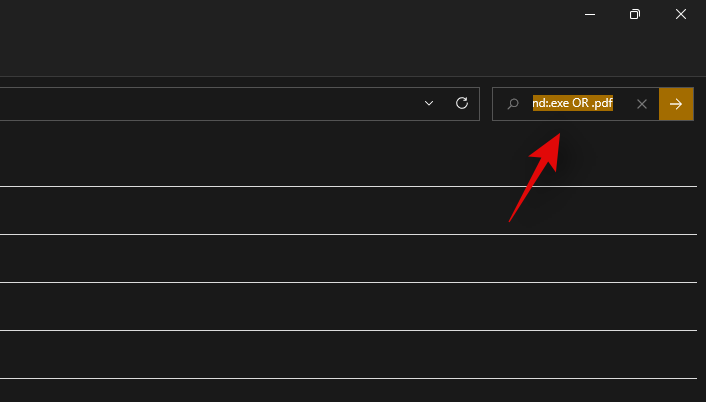
And that’s how you can use the OR parameter to look for multiple search terms in a single file name.
1.4.2 The ‘NOT’ parameter
If you are looking to filter out a certain search term or a filet type then you can use the NOT parameter. The NOT parameter will exclude the desired file type, kind, size, or name depending on your choice.
For example, if in a folder full of .docx files you are looking for other file types and wish to filter them all out, then you can use the following command.
kind: NOT .docx
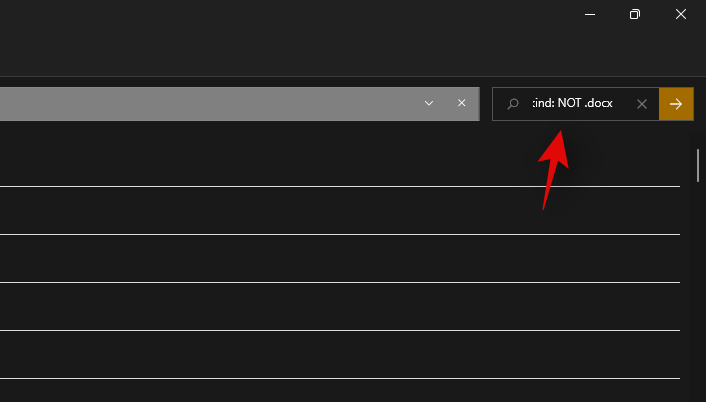
Similarly, if I am looking for a file that does not have ‘Apple” in its name then I can use the following search term.
NOT apple
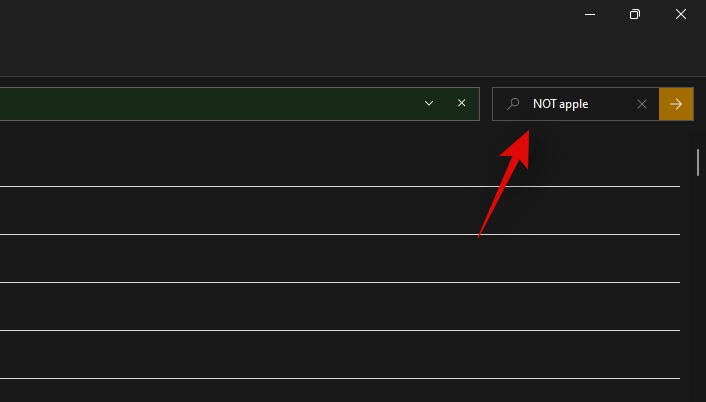
1.4.3 Parentheses
Parentheses is a Boolean filter that is usually used when you are searching file contents as well. Anything included between the parentheses () is searched for and files with either or all of the terms are displayed on your screen.
For example, if looking for a file containing either ‘Apple, Samsung, Mi, Microsoft, and Dell’ or all of these terms, then you can use the following term.
(Apple Samsung Mi Microsoft Dell)
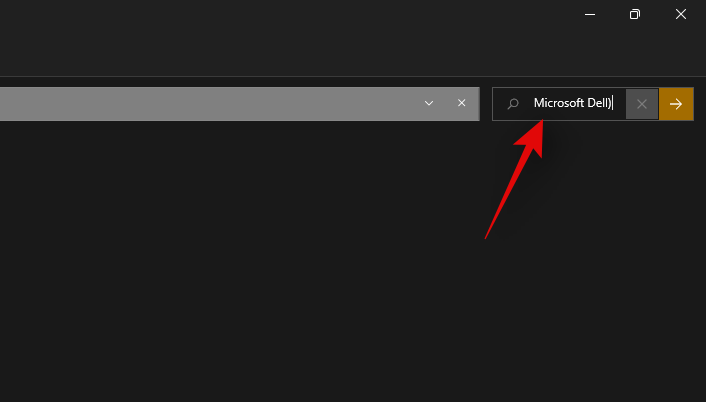
Similarly, you can use the following command if looking for multiple file types.
kind:(.exe .pdf .txt)
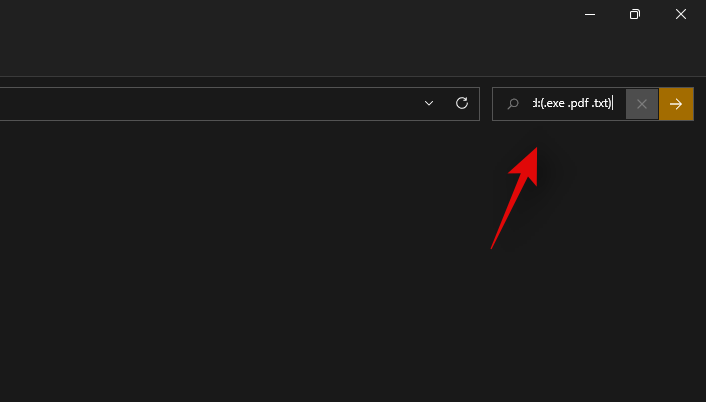
And that’s it! You will now have used parentheses to your advantage to look for multiple search terms in a particular file.
1.4.4 ‘>’ and ‘<‘>
These two Boolean filters are usually used when looking for file types or when sorting your results based on a parameter.
The greater than and less than parameters can be used to filter your results based on a number. For example, if looking for files dated after 1st January 2021 then you can use the following command.
date: >1/1/2021
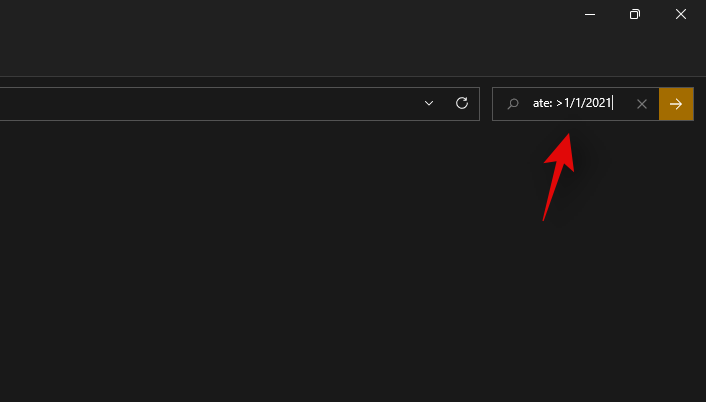
Similarly, if looking for files less than 10GB then you can use the following command.
size: <>
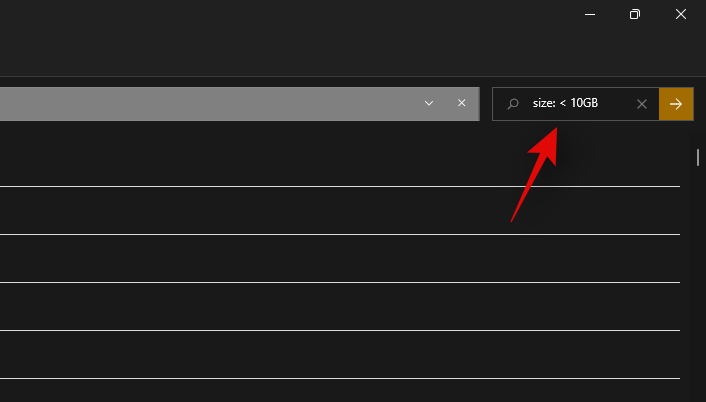
You can use the greater than and less than parameters to your advantage this way and find the desired files on your system.
Advanced methods to find large files on Windows
Some other ways in which you can find large files on your system have been listed below. Follow the guides to get you started.
Method #02: Using CMD
CMD can also help you find large files on your system. Use the guide below to get you started.
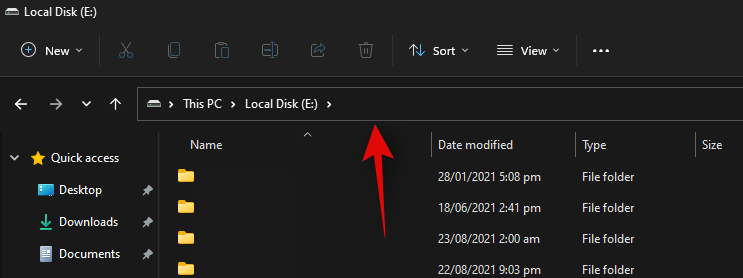
Press Windows + E on your keyboard and navigate to a location where you wish to search for large files and click on the address bar at the top.
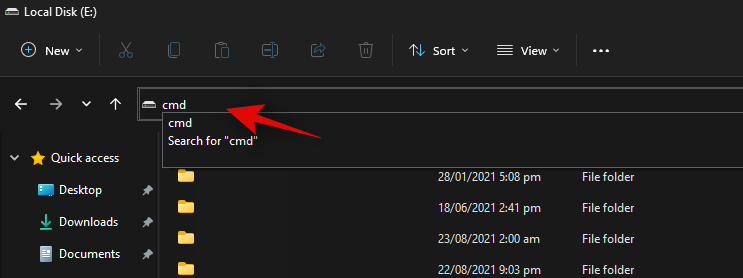
Type in CMD and press Enter on your keyboard.
CMD will now be launched in the particular folder. Type in the following command and replace ‘PATH’ with the path we copied to your clipboard.
forfiles /S /M * /C “cmd /c if @fsize GEQ 1073741824 echo @path > largefiles.txt
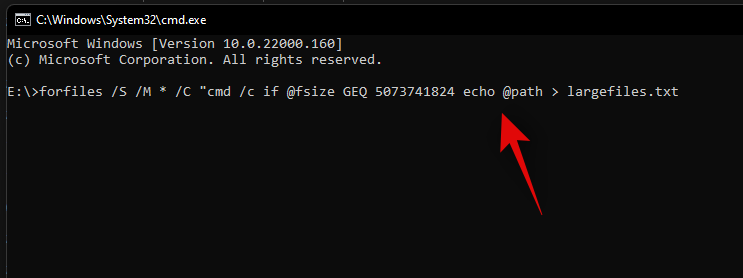
The above command will look for files larger than 1GB on your PC. If you wish to define a larger minimum size, then replace ‘1073741824’ with one of the following options below.
Execute the command with your desired variables and a text file will be created in the same location with a list of all the large files found on your system based on your criteria. You will also find the path for each file on your local storage in the text file.
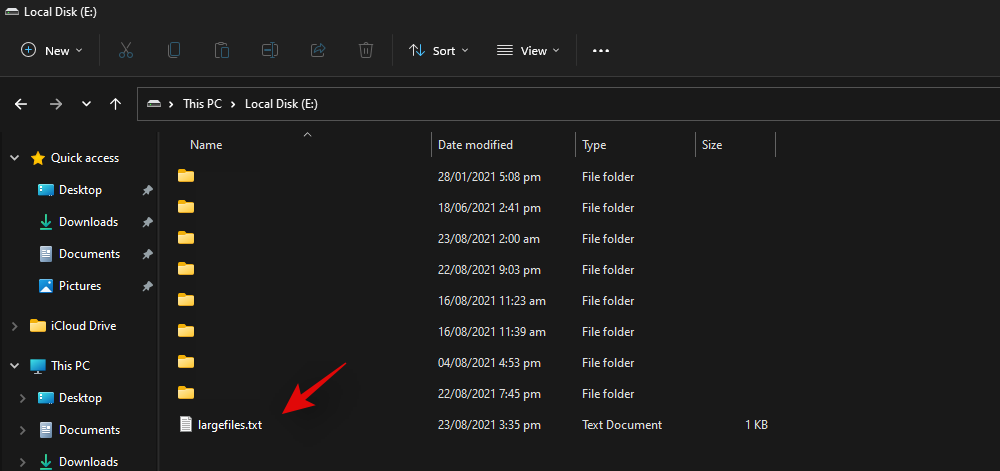
You can use this list to identify the largest files in the current location and then delete them at your discretion to free up some disk space on your system.
Method #03: Using PowerShell
You can also find large files on your system using PowerShell. Just like the command for CMD, PowerShell will scour your local files based on a minimum size and display all the files larger than it. Use the guide below to get you started.
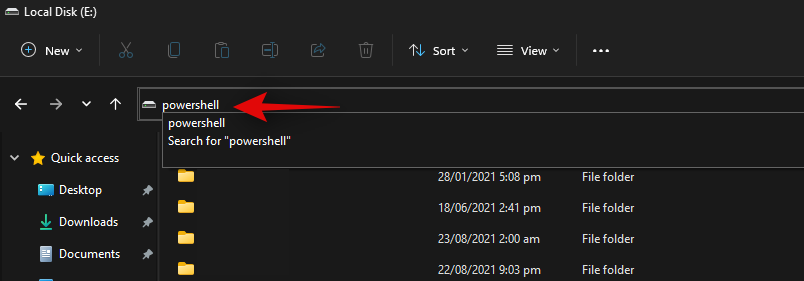
Press Windows + E on your keyboard and navigate to the location where you wish to look for large files. Click on the address bar at the top and type in ‘PowerShell’. Press Enter on your keyboard once you are done.
Copy-paste the command below in the PowerShell window and press Enter on your keyboard.
gci -r| sort -descending -property length | select -first 10 name, length

You will now get a list of the top 10 largest files currently taking the most disk space on your system. If you wish to view the top 20 files, then replace ‘select-first 10’ with ‘select-first 20’.
PowerShell will now find and display the 20 largest files on your system along with their size. The file size will be in bytes which can make it a bit difficult to judge the size of files in terms of gigabytes.
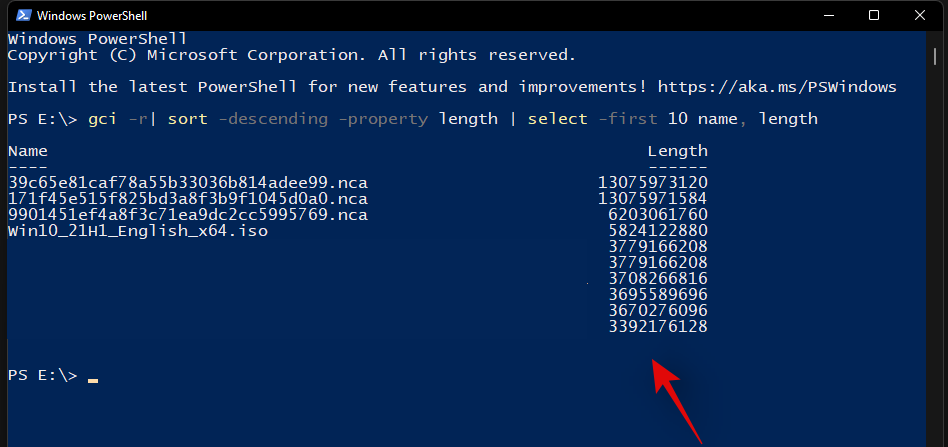
And that’s it! You will now have found the largest files on your PC using PowerShell in Windows 11.
2 Best apps to find large files on Windows
Many third-party tools allow you to view a visual representation of your PC’s disk usage.
This makes it much easier for you to identify large chunks of files taking significant space on your hard drive. Our recommended tools would be SpaceSniffer and WinDirStat. Use one of the guides below depending on the tool that you wish to use.
Method #04: Using SpaceSniffer
Space Sniffer is another popular third-party utility used to analyze disk space usage on Windows 11. SpaceSniffer can help you identify large files using huge amounts of space on your system. You can also find hidden files taking huge disk space on your PC using the SpaceSniffer. Use the guide below to get you started.
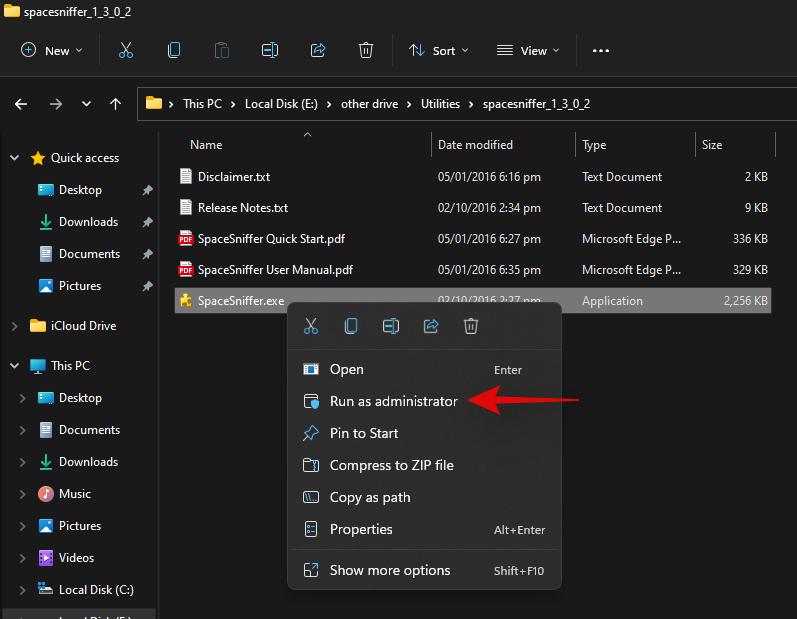
Download SpaceSniffer to your PC using the link above. A portable .exe will be downloaded to your system. Extract the archive and right-click on the .exe file.
Select ‘Run as administrator’.
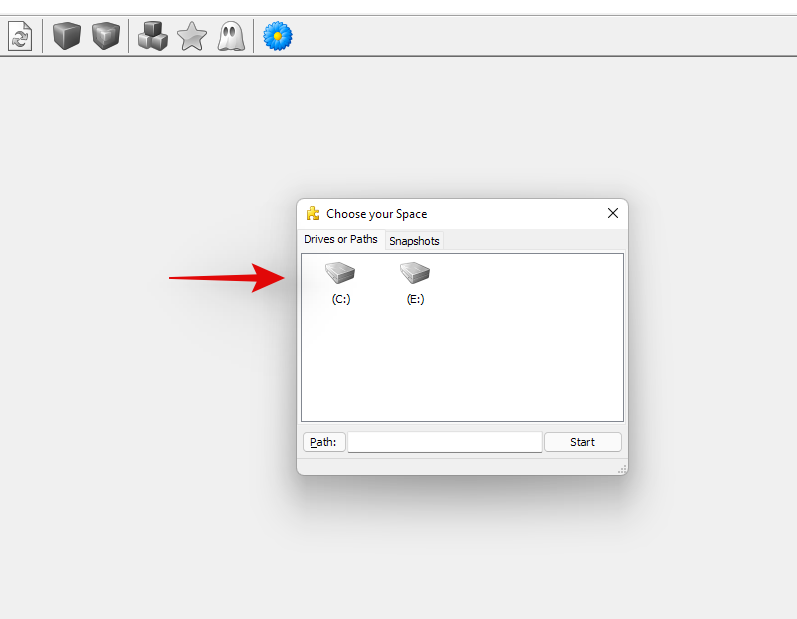
Now select the drive you wish to scan. If you wish to analyze and find large files in a particular directory, then you can enter its path in the text box below.
You will now be shown a graphical representation of your disk space usage on your screen. Simply hover over the largest chunk and you will be shown the name of the folder or file occupying that space.
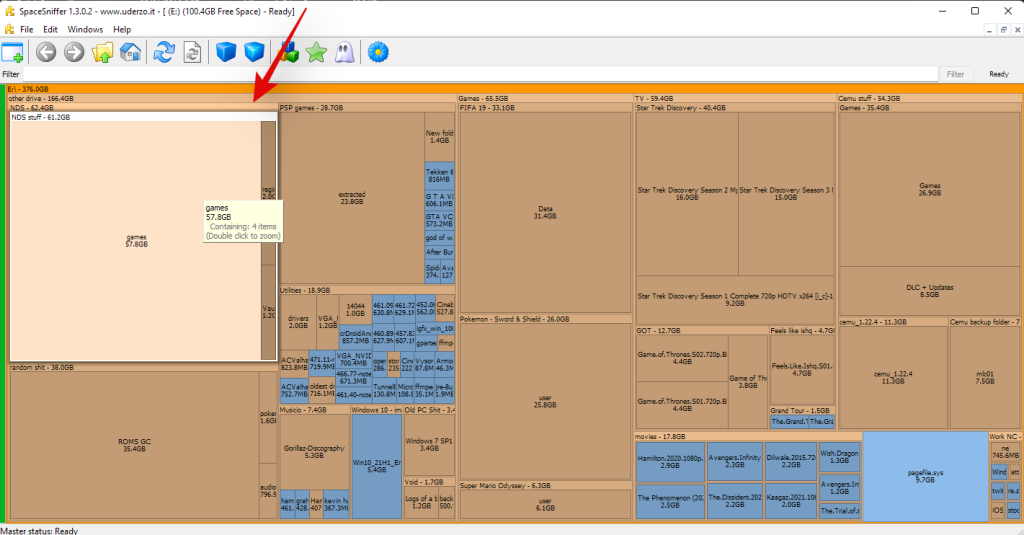
And that’s it! You can use SpaceSniffer this way to identify the largest files on your system by simply looking at the largest chunks on your screen.
Method #05: Using WinDirStat
WinDirStat is a popular open-source utility often used to generate a graphical representation of your local storage space in a user-friendly manner. This makes it easier to identify large chunks of your disk space occupied by a single file, folder, or archive, which in turn will make it easier for you to free up some space on your PC. Use the guide below to identify what is taking up space on your Windows 11 PC.
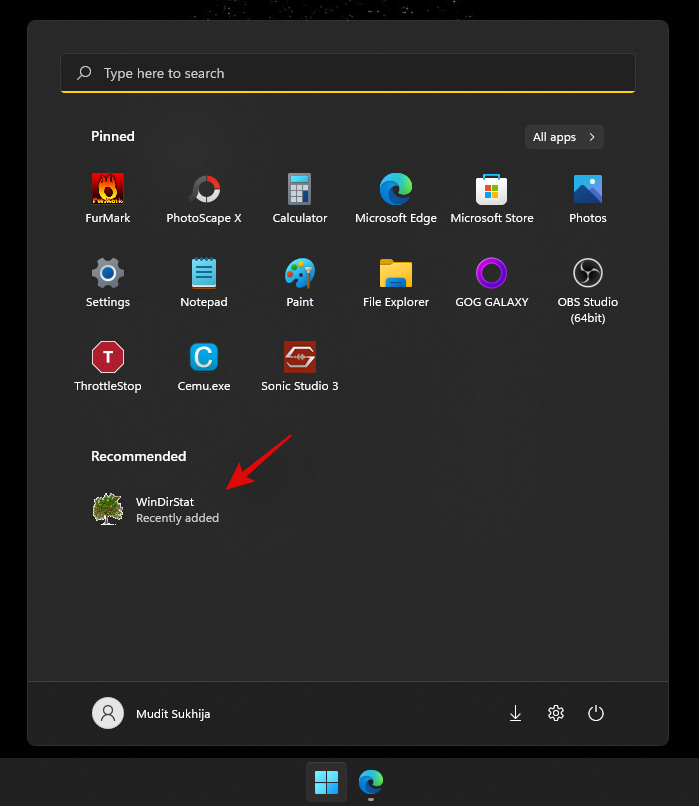
Download and install WinDirStat on your PC using the link above. Once installed, launch the app.
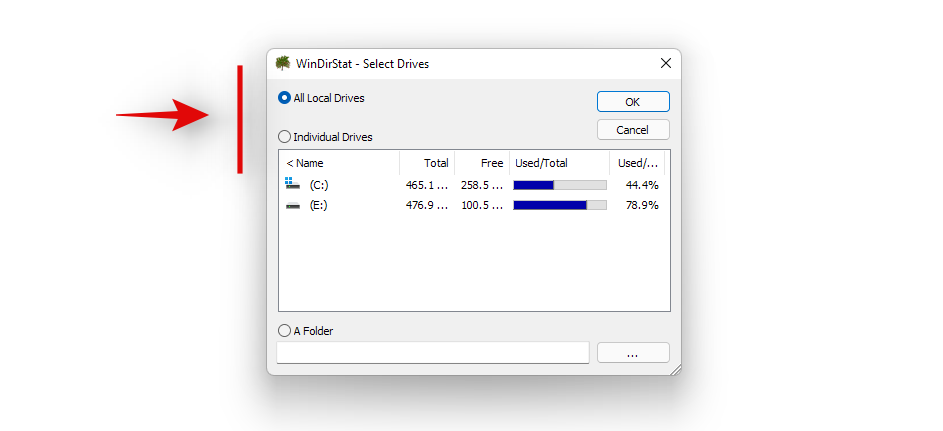
Now select one of the options that best suit your needs. If you only have a single drive installed on your system with a single partition, then you can skip this step. Click on ‘Ok’ once you are done.
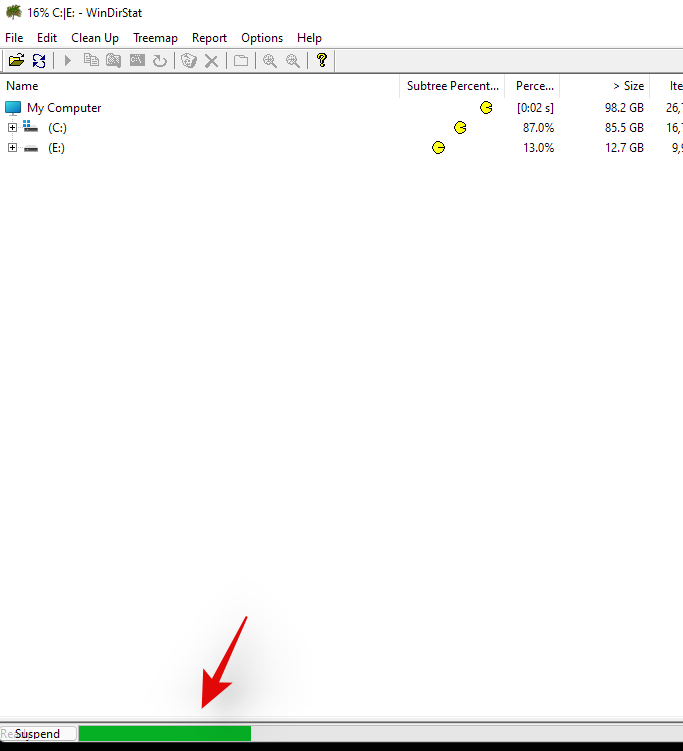
Your drives will now be analyzed and you can track the progress for the same at the bottom of the window.
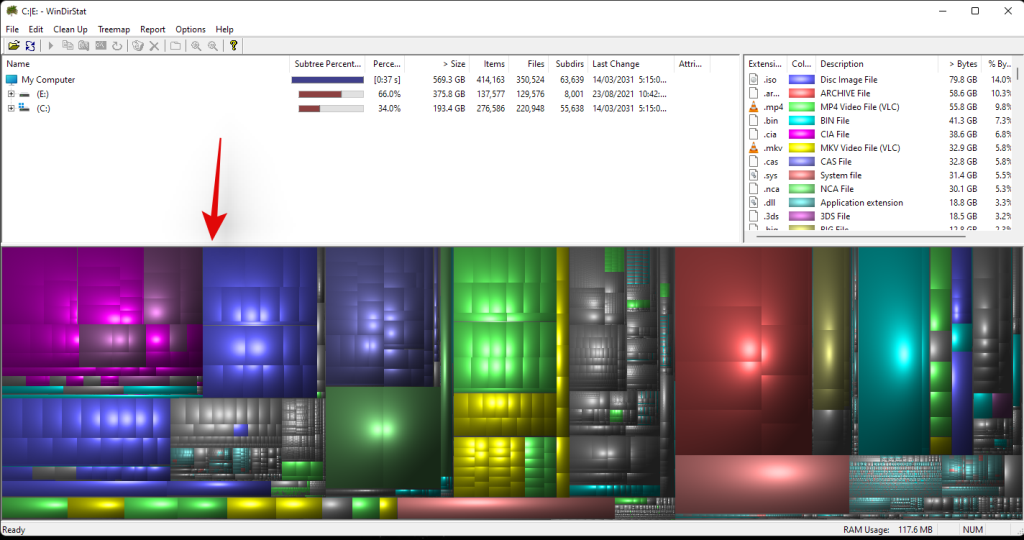
Once analyzed, a color-coded graphical representation of the disk space usage on the selected drive(s) will be shown on your screen. Simply click on the largest chunks to identify the largest files.
Press Del on your keyboard to delete the file. This will send it to your recycle bin and you can decide its fate when reviewing your recycle bin items. Alternatively, you can use Shift + Del to permanently delete the item from your system.
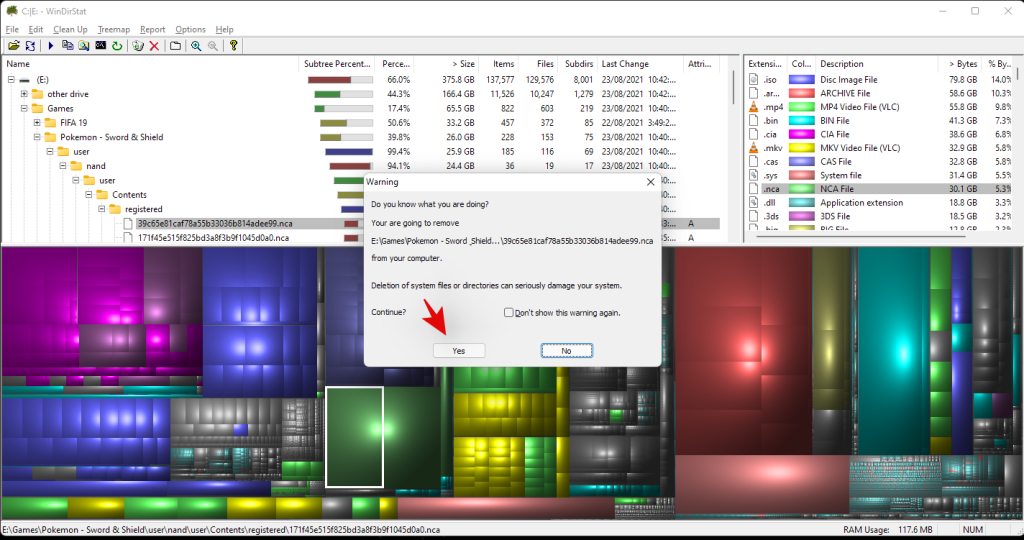
And that’s it! You can repeat the last steps to delete more of the largest files from your system.
Other Third-Party apps as alternative
The world of third-party alternatives is a huge one and thus, the above-mentioned tools are not the only ones that you can use to analyze your disk usage. Here are some alternatives with unique features that might be more suited for your current needs and requirements.
More ways to clear storage on Windows 11
If you’re looking to reclaim your storage space then there are tons of more things that you can do besides clearing or moving your largest files. You can clear caches, stop programs, reduce dedicated storage space, clear temporary files, remove leftover files, and much more. Refer to this dedicated guide by us that should help you clear space on Windows 11 in every way possible.
Should you use disk space analyzers?
Disk Space Analyzers have long been the ultimate utility to identify where exactly your disk space is being used. Most of them stem from long-standing communities while others have over decades of experience. If you’re divided on using disk space analyzers, then your best bet would be to opt for something that is open source.
The modern world of the internet is centered around data collection and like it or not, every service is gathering and collecting some type of data from your usage of their tool. Hence most disk analyzers nowadays, also have the option to share your usage data and more. Additionally, if you decide to opt for something new and untested then the risks are even higher.
Hence, we recommend you use disk space analyzers but do verify their origin and reputation before running them on your system. If you do not wish to go through the hassle of reading reviews, we recommend you simply try an open-source alternative from a trusted source.
We hope this guide helped you easily find the largest files using disk space on your system. If you face any issues or errors during the process, feel free to reach out to us using the comments section below.
Busca a opción Destinatario de correo no menú Enviar a en Microsoft Windows 11.
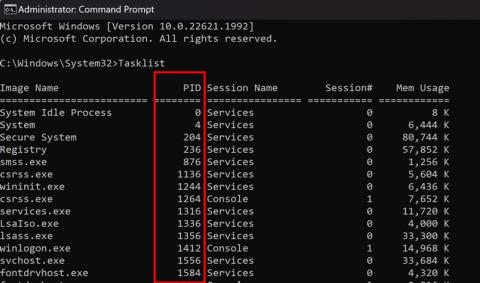
Atopa facilmente un ID de proceso de aplicación para Windows 11 usando varios dos métodos mencionados neste artigo. Aquí como obter resultados instantáneos.
Vexa o rápido que pode restablecer o seu ordenador con Windows 11 para dar un novo comezo a eliminar eses molestos problemas. Aquí están os pasos para principiantes.
Crea e personaliza escritorios virtuais en Windows 11 seguindo estes pasos para principiantes para separar o teu traballo e as cousas persoais.
Descobre as diferentes formas en que podes comprobar a intensidade do teu sinal wifi. Vexa como ver tamén a porcentaxe exacta do sinal.
Desactivar a busca de Bing debería ser suficiente para desfacerse das buscas rápidas. Podes facelo a través do Editor de rexistro de Windows 11s.
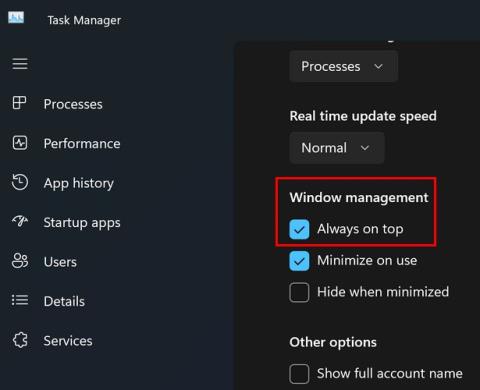
Manteña o Xestor de tarefas sempre en primeiro lugar en Windows 11 para que sexa fácil de atopar cando necesites ler a aplicación. Aquí están os pasos a seguir.
Corrixa a tecla ESC que non funciona en Windows 11 para que poidas usar o teu teclado como sempre o fixeches seguindo estes consellos sinxelos.
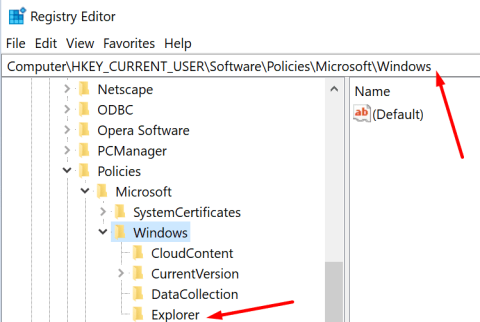
Os ficheiros baleiros do escritorio adoitan ser restos de antigas instalacións de Microsoft Office. Elimina a clave do rexistro de NameSpace para solucionar o problema.
Descobre como podes comprimir facilmente ficheiros en Windows 11 sen necesidade de software de terceiros. aquí están os pasos amigables para principiantes.
