Kuidas otsida opsüsteemis Windows 11: kõik, mida pead teadma

Kuidas kasutada Windows 11 otsingut tõhusalt ja kiiresti. Hanki kasulikud näpunäited ja parimad praktikad Windows 11 otsingufunktsiooni jaoks.
Windows 11 on kasutusele võtnud uue minimalistliku mattklaasi välimuse, mis tundub kõigile väga hästi sobivat. Ümardatud nurgad koos vahedega eraldatud kasutajaliidese elementidega annavad Windows 11-le futuristliku ilme, mida saab veelgi kohandada , määrates kohandatud taustapildi ja aktsentvärvi . Aga kas poleks tore, kui saaksite tegumiriba värvi muuta ?
Võib-olla võiks see sobida teie tapeediga või olla sama, mis teie aktsentvärv? Noh, Windows 11-s on selleks mõned viisid. Siin on kõik, mida pead teadma tegumiriba värvi kohandamise kohta operatsioonisüsteemis Windows 11.
Sisu
Kas saate Windows 11-s tegumiriba värvi algselt muuta?
Jah, saate lihtsa lülitiga seadistada tegumiriba kasutama praegust aktsentvärvi. Nii on teie tegumiriba sama värvi kui kiirseadete paanil, helitugevuse liuguril ja muul kasutatav aktsentvärv. Kui teie aktsentvärv valitakse taustapildilt automaatselt, valitakse ka tegumiriba värv automaatselt taustapildilt. Kui soovite tegumiriba värvi muuta, saate alustada alustamiseks allolevatest juhistest.
Kuidas muuta tegumiriba värvi
Tegumiriba värvi saate muuta, kasutades rakendust Seaded, muutes registrit või kasutades kolmanda osapoole tööriistu. Igal neist meetoditest on oma eelised ja puudused. Alustamiseks leidke see, mis teie vajadustele kõige paremini sobib, ja muutke Windows 11 tegumiriba värvi.
Meetod #01: Seadete kasutamine
Rakendus Seaded võimaldab teil Windows 11 tegumiriba algselt värvida. See kasutab tegumiriba värviks määramiseks teie aktsentvärvi, olenemata sellest, kas kasutate kohandatud värvi või mõnda taustapildist. Alustamiseks järgige allolevat juhendit.
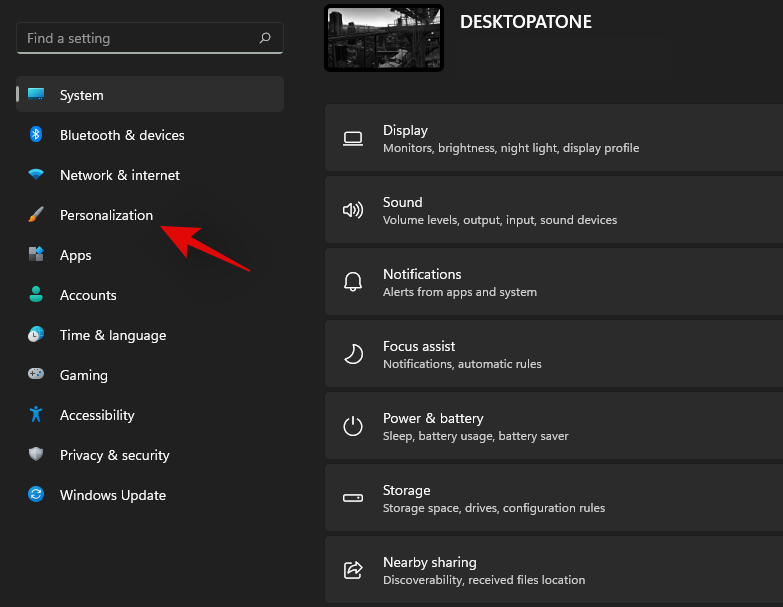
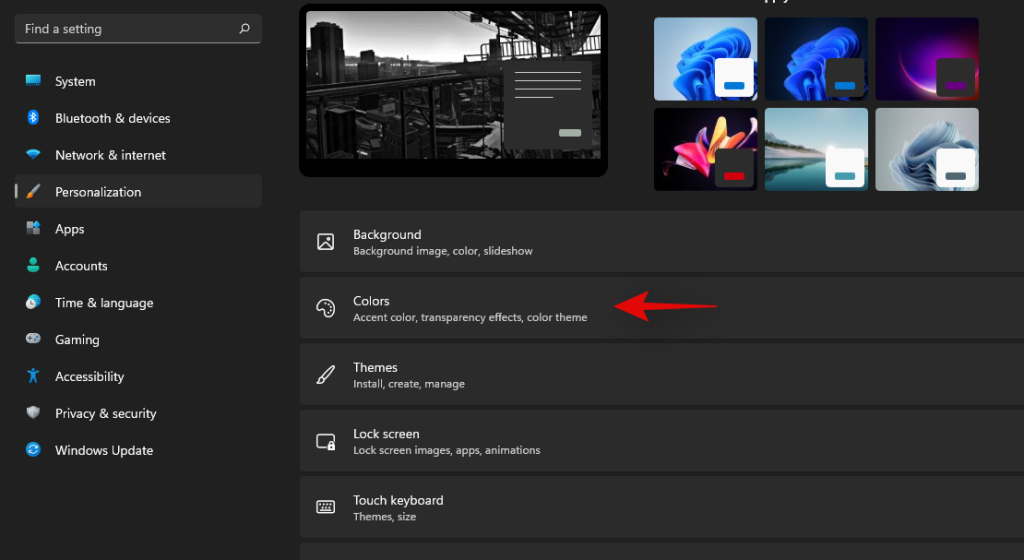
Windows + iRakenduse Seaded avamiseks vajutage klaviatuuril. Klõpsake vasakul asuval valikul Isikupärastamine.
Klõpsake "Värvid".
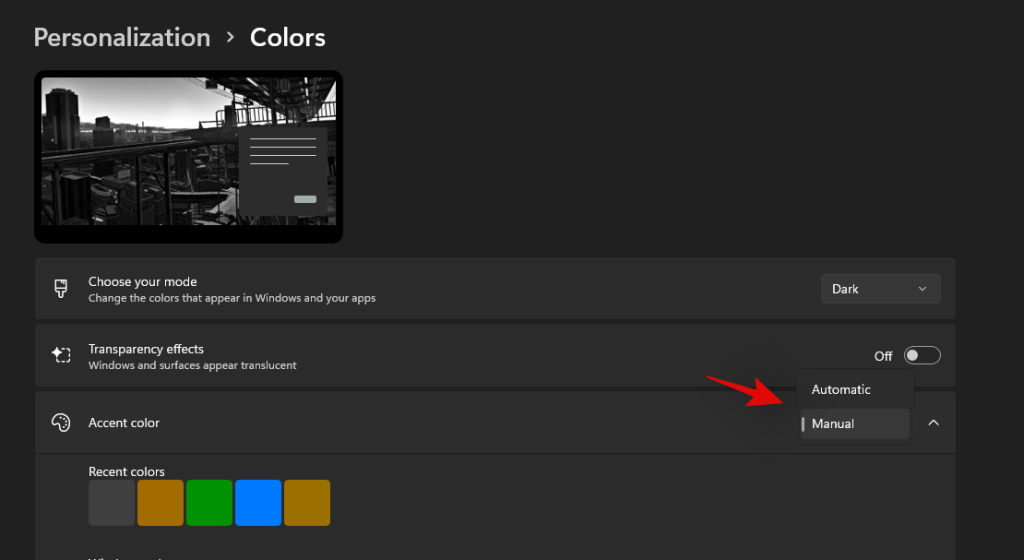
Klõpsake valiku „Aktsentvärv” kõrval asuval rippmenüül ja valige oma eelistustest lähtuv valik.
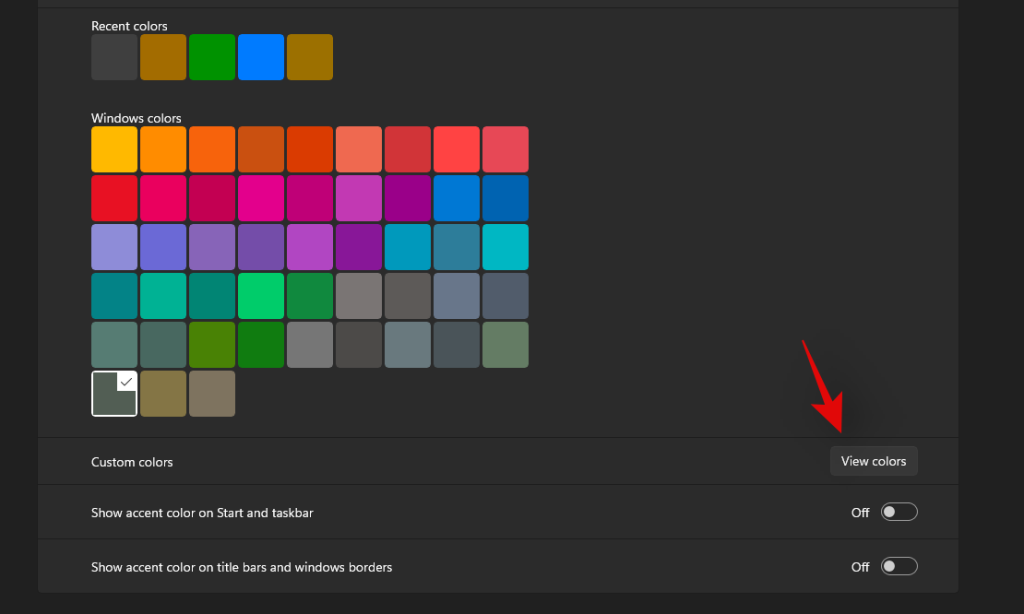
Kui soovite kasutada kohandatud aktsentvärvi, klõpsake valiku "Kohandatud värvid" kõrval "Vaata värve".
Valige ekraanil kuvatavast GUI-st soovitud värv.
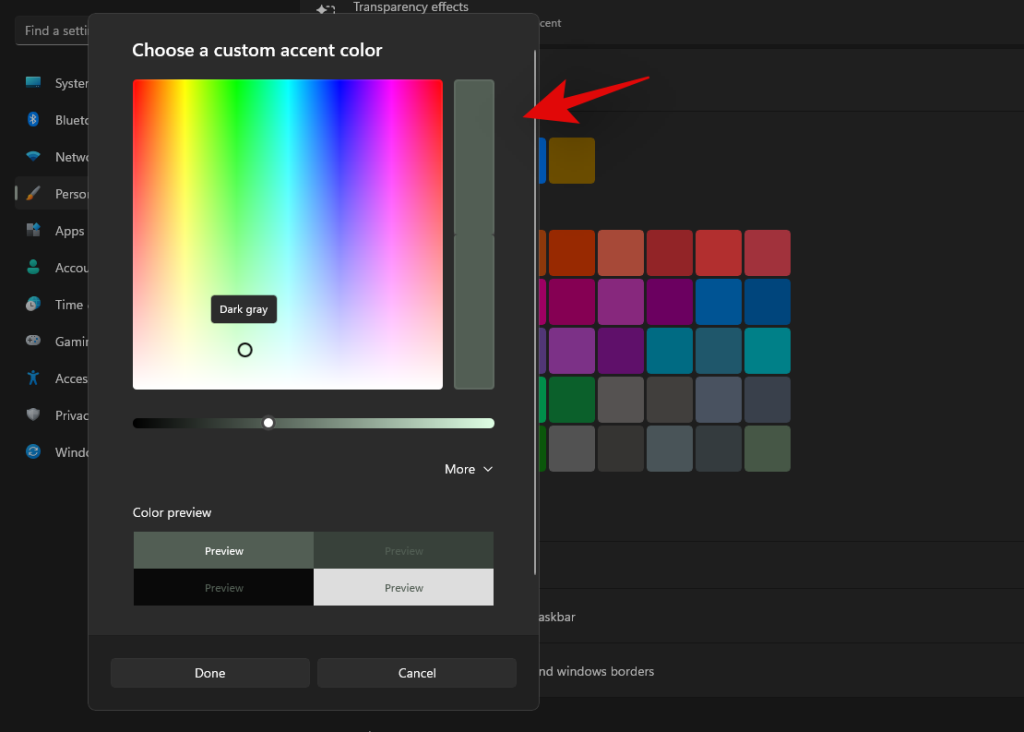
Kui soovite oma kohandatud värvi määratlemiseks kasutada RGB- või HEX-väärtusi, klõpsake nuppu "veel". Kui olete soovitud värvi valinud, klõpsake nuppu "Valmis".
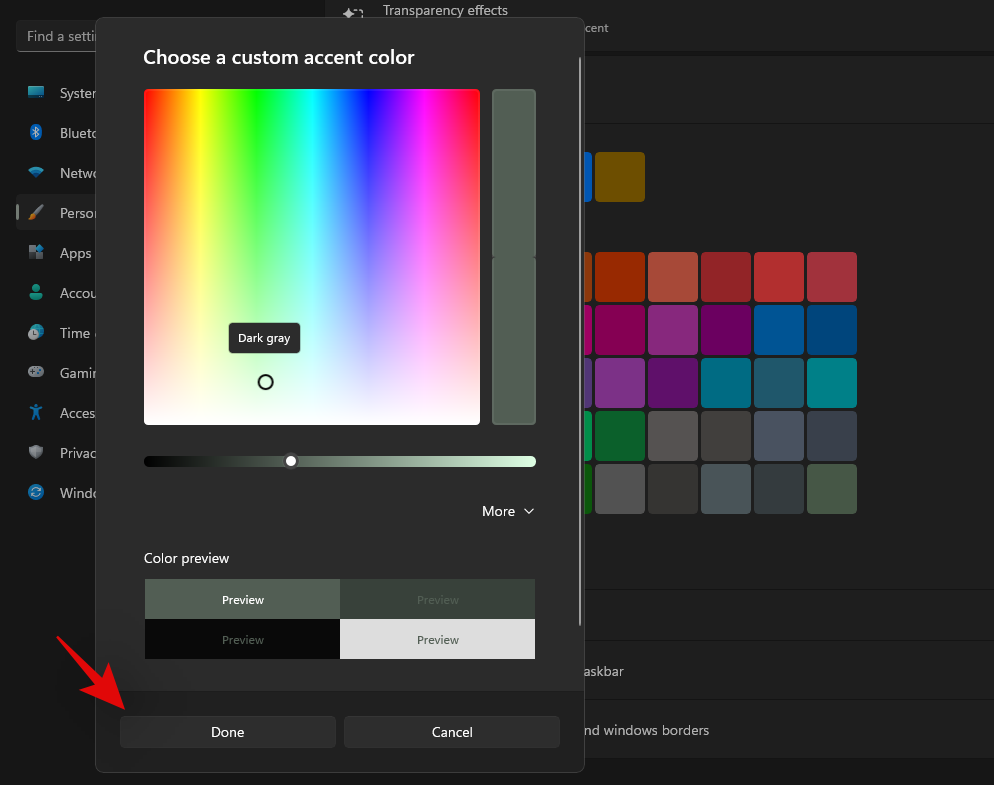
Kerige alla ja lülitage sisse lüliti „Näita aktsentvärvi Startis ja tegumiribal”.

Explorer peaks nüüd ennast värskendama ja uus aktsentvärv peaks nüüd kajastuma teie tegumiribal.

Kui ei, saate alloleva juhendi abil oma süsteemis exploreri taaskäivitada, mis peaks aitama muudatustel koheselt jõustuda.
Windowsi failiuurija taaskäivitamine:
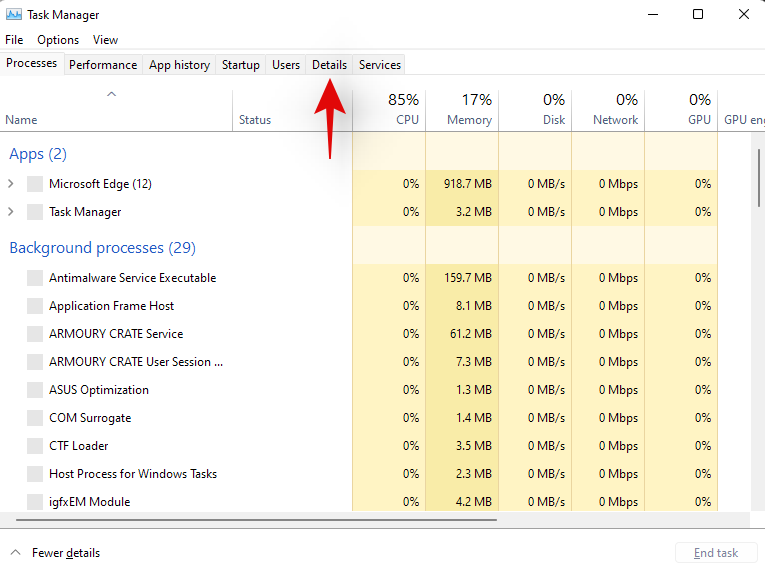
Vajutage Ctrl + Shift + Escklaviatuuril ja lülituge vahekaardile „Üksikasjad”.
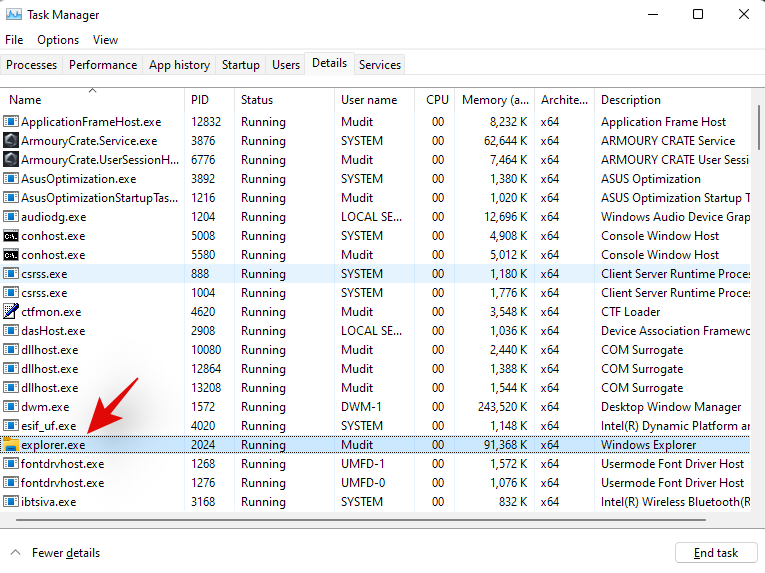
Klõpsake 'explorer.exe' ja vajutage klaviatuuril Kustuta.
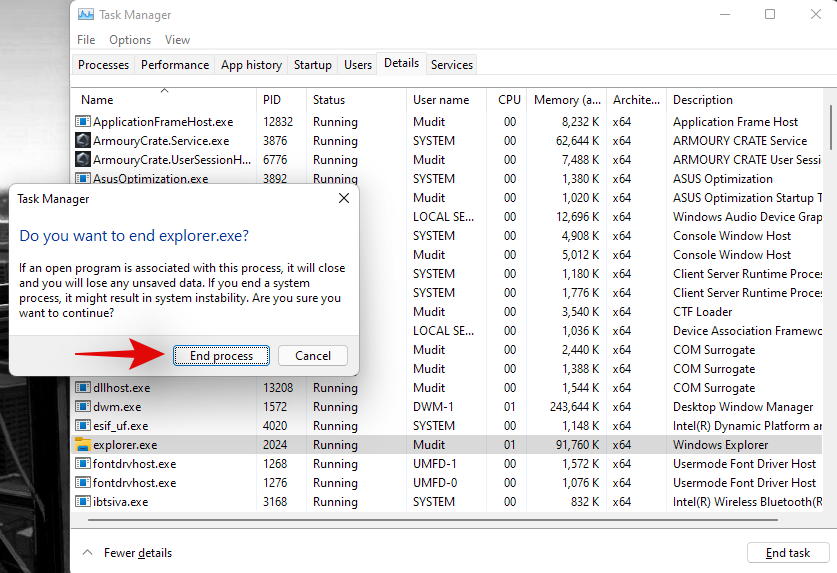
Oma valiku kinnitamiseks klõpsake nuppu "Lõpeta protsess".
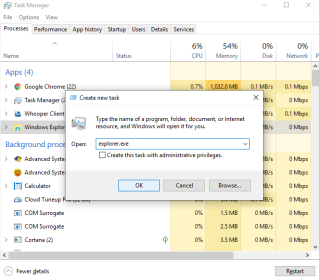
Nüüd klõpsake ekraani vasakus ülanurgas nuppu "Fail" ja valige "Käivita uus ülesanne".
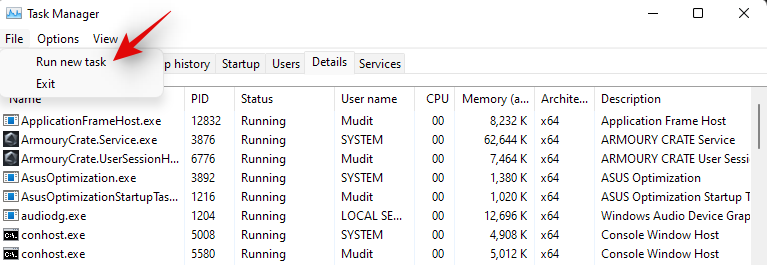
Sisestage järgmine nimi ja vajutage klaviatuuril sisestusklahvi.
explorer.exe
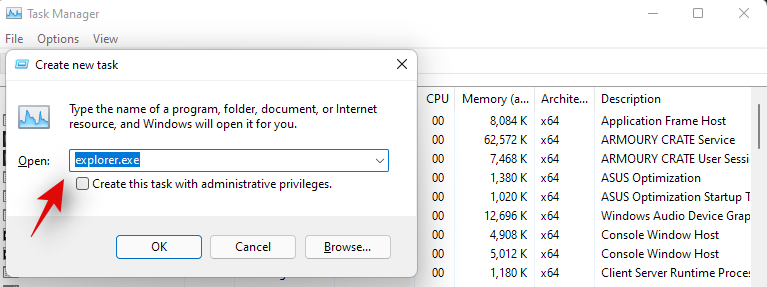
Explorer tuleks nüüd teie süsteemis taaskäivitada ja uus aktsentvärv peaks nüüd kajastuma teie tegumiribal.
Kuidas muuta Windows 11 tegumiriba värvi kolmanda osapoole tööriistadega:
Tegumiriba kohandamiseks saate kasutada ka kolmanda osapoole tööriistu. Need tööriistad on varustatud lisafunktsioonidega, mis aitavad teil tegumiriba muuta, kuid enamik neist kasutab vana koodi, mis on välja töötatud Windows 10 jaoks. See võib tekitada probleeme olemasolevate Windows 11 elementidega, mistõttu soovitame kasutada allolevaid tööriistu ainult aktsentvärvi muutmiseks. tegumiribal.
Meetod nr 02: OpenShelli kasutamine
OpenShell on äsja uuendatud projekt, mille eesmärk on hoida ClassicShell tänapäevaste kasutajate jaoks elus. ClassicShell on olnud kauaaegne utiliit, mida kasutajad üle maailma on kasutanud oma käivitusmenüü ja tegumiriba kohandamiseks. Saame kasutada OpenShelli enda huvides ja hõlpsalt värvida tegumiriba. Alustamiseks järgige allolevat juhendit.
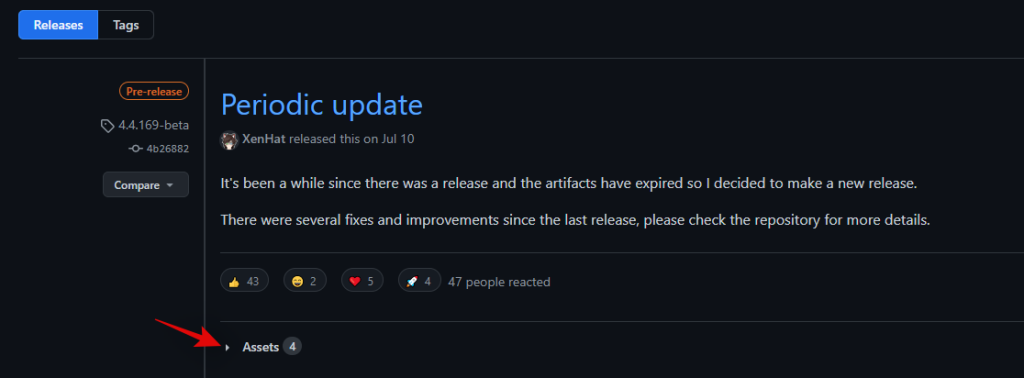
Allalaadimislehe avamiseks klõpsake ülaloleval lingil. Klõpsake ja laiendage valikut „Varad”.
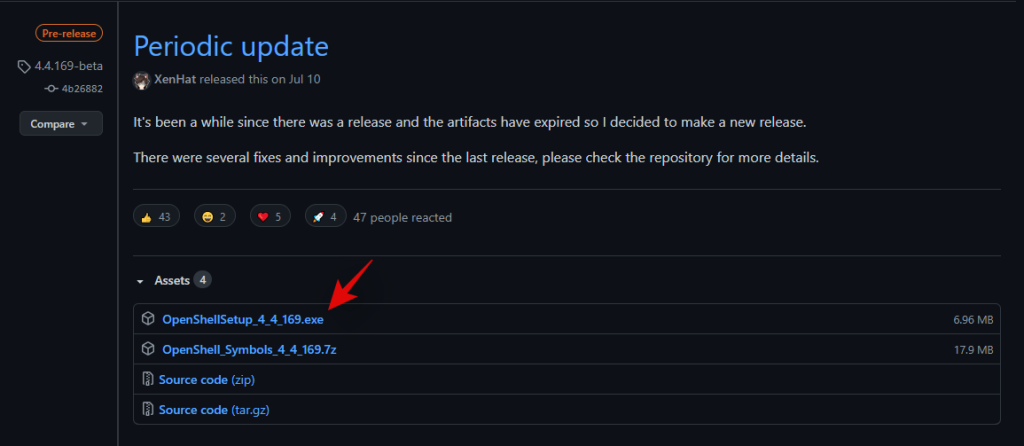
Nüüd klõpsake .exe-failil, et see oma arvutisse alla laadida. Pärast allalaadimist topeltklõpsake sellel ja installige rakendus.
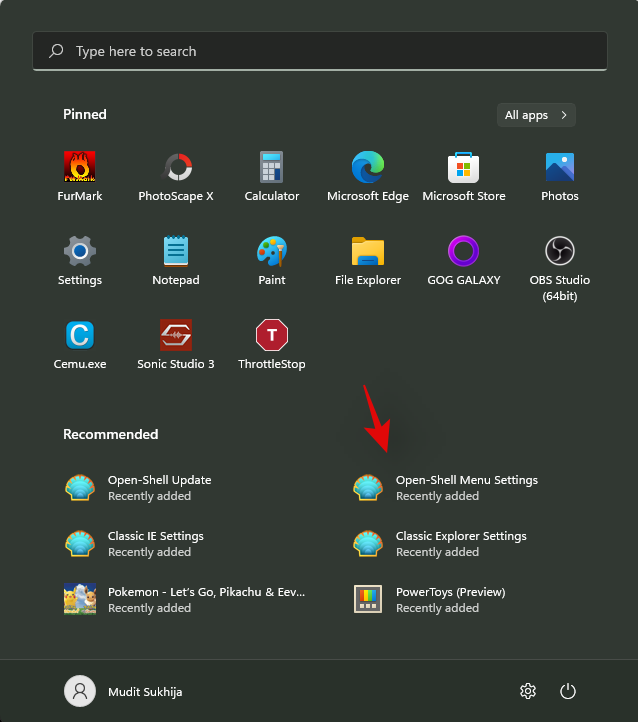
Pärast installimist käivitage OpenShelli menüü sätted. Ärge kartke, kui leiate, et teie algusmenüü on teistsugune. Taastame muudatused peagi.
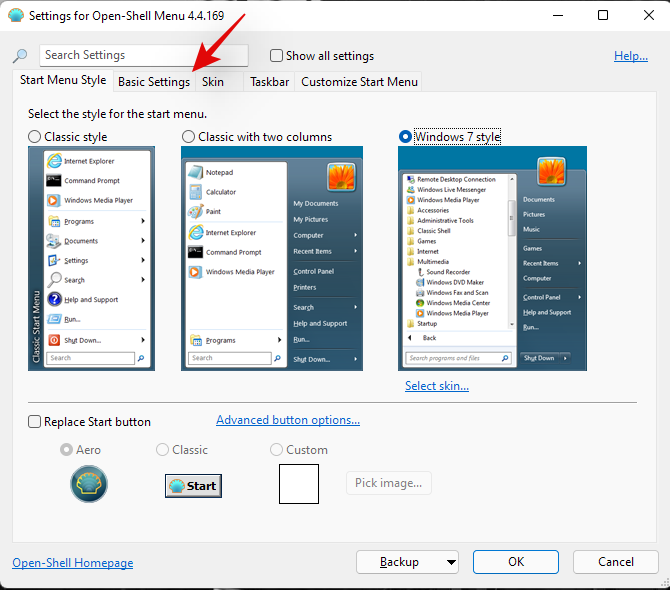
Klõpsake ja lülituge vahekaardile „Põhiseaded”.
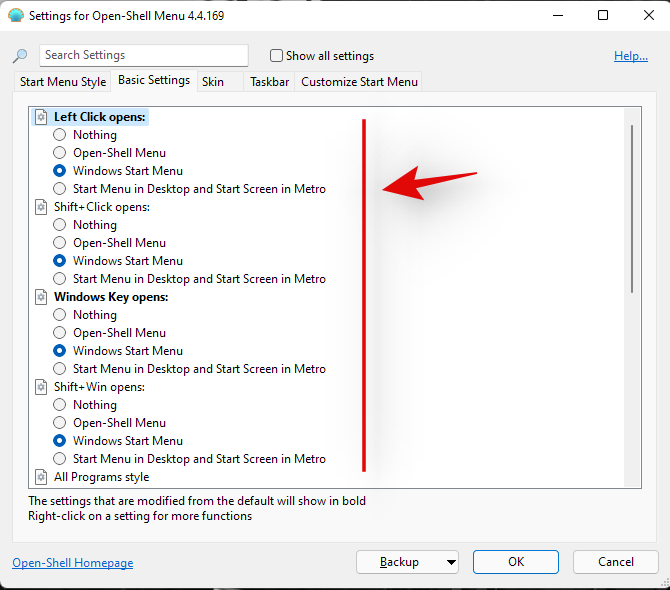
Nüüd muutke käivitusmenüü taastamiseks järgmisi väärtusi ja jätkake uue Windows 11 käivitusmenüü kasutamist.
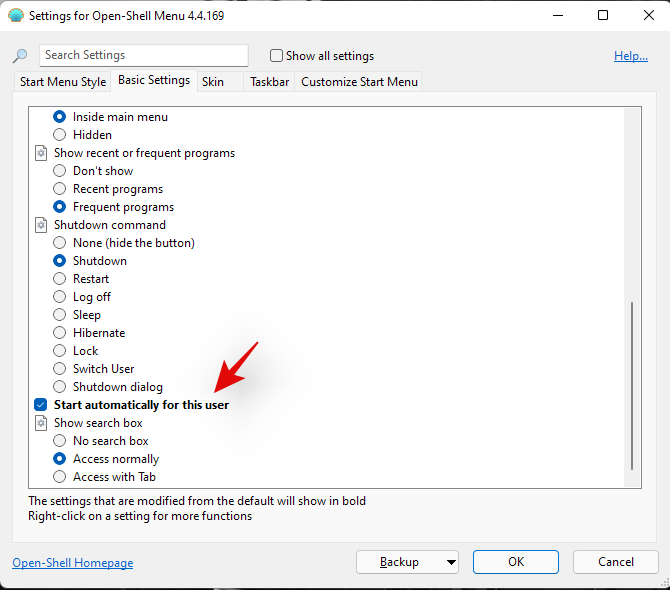
Lisaks tühjendage märkeruut "Käivita selle kasutaja jaoks automaatselt", kui soovite OpenShelli automaatse käivitamise keelata.
Nüüd lülituge vahekaardile "Tegumiriba", klõpsates sellel.
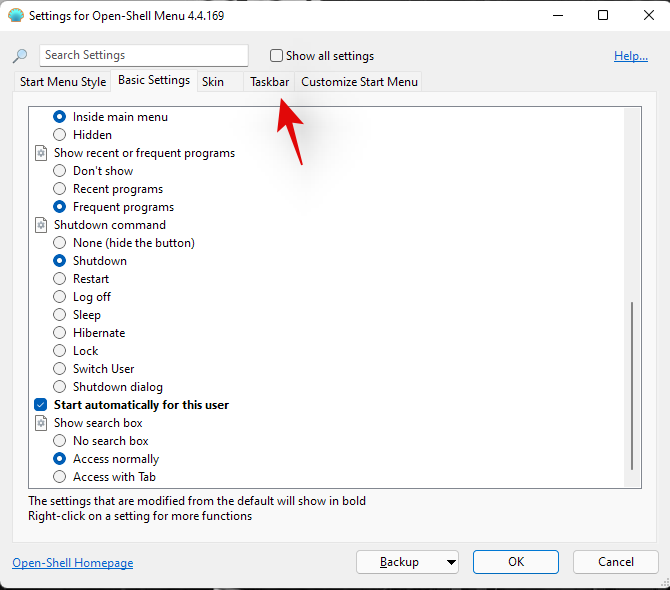
Sõltuvalt oma esteetilistest eelistustest valige üks allolevatest valikutest.
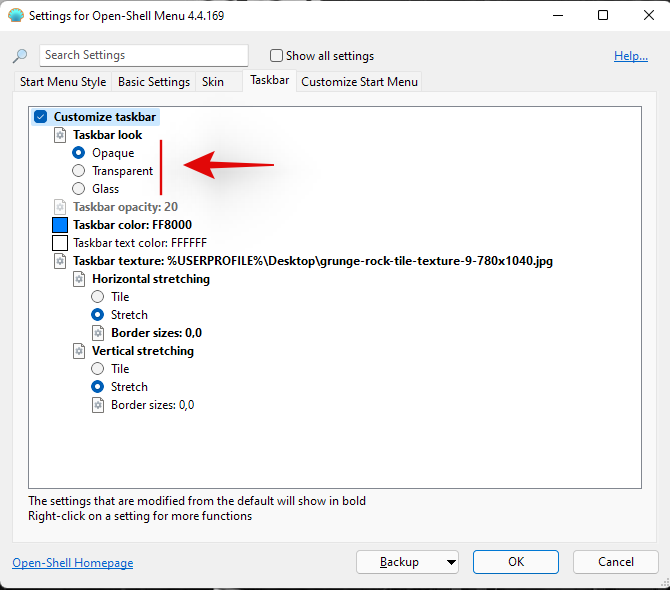
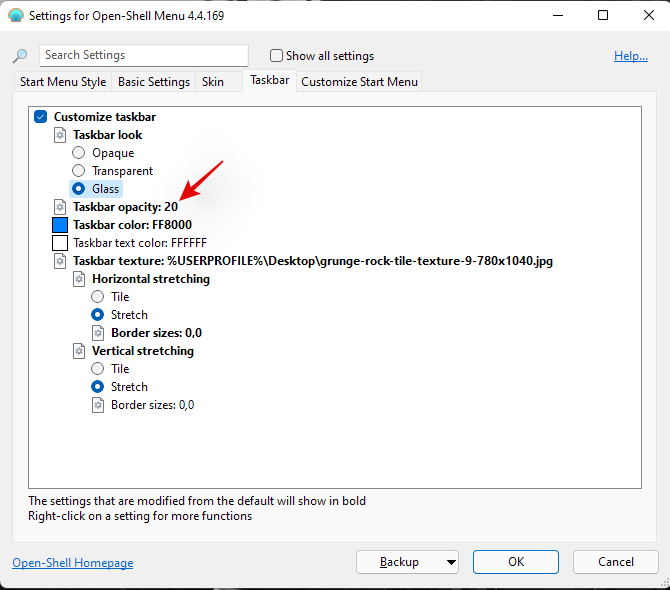
Kui valisite läbipaistva või klaasist, kasutage tegumiriba läbipaistvuse määramiseks tegumiriba läbipaistmatust. Saate neid väärtusi muuta, et täpsustada tegumiriba läbipaistvust vastavalt oma eelistustele ja teemale.
Nüüd klõpsake "Tegumiriba värv" ja valige selle kõrval olev "3-punktiline" menüüikoon.
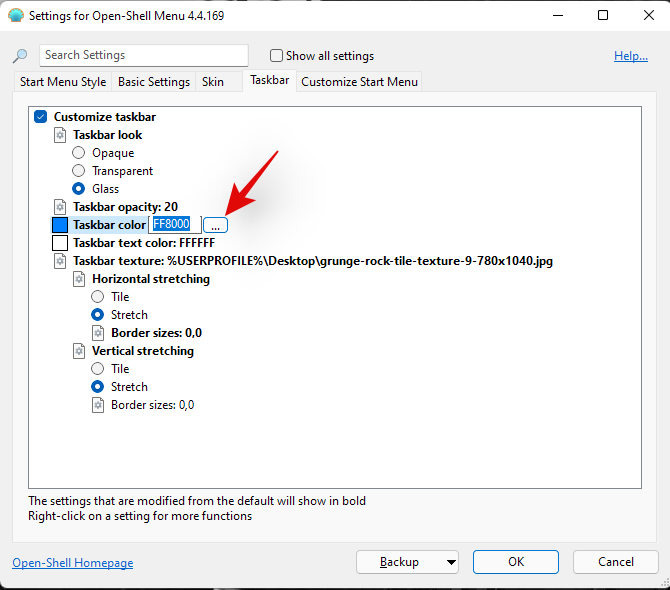
Valige värvivalijast teile meeldiv värv. Saate kasutada ka kohandatud värvi, klõpsates paremal pool soovitud ruumi.
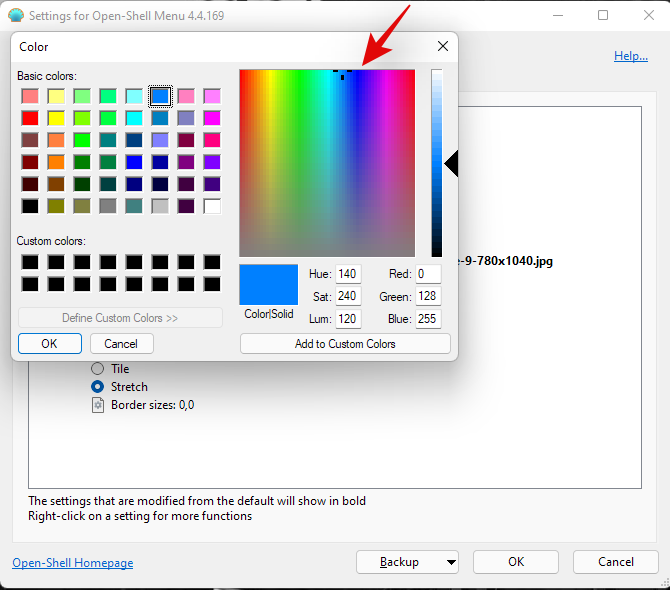
Kui olete eelistatud värvi valinud, klõpsake nuppu "OK".
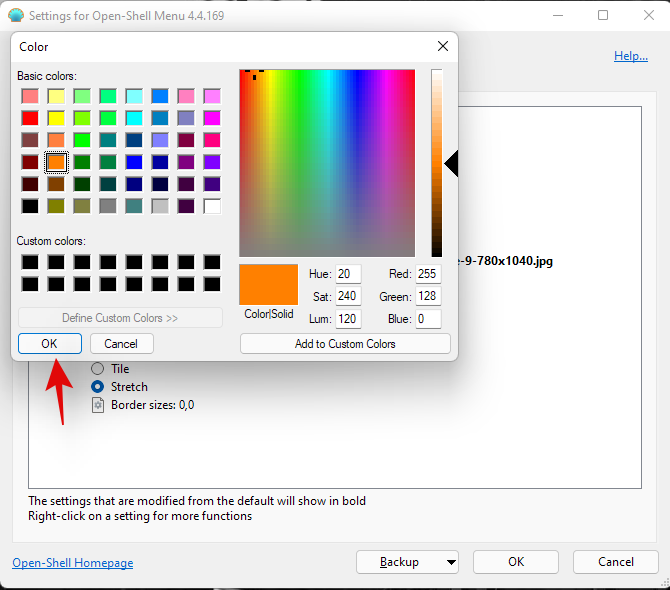
Värvimuutus peaks nüüd automaatselt kajastuma teie tegumiribal.

Klõpsake uuesti nuppu 'OK'.
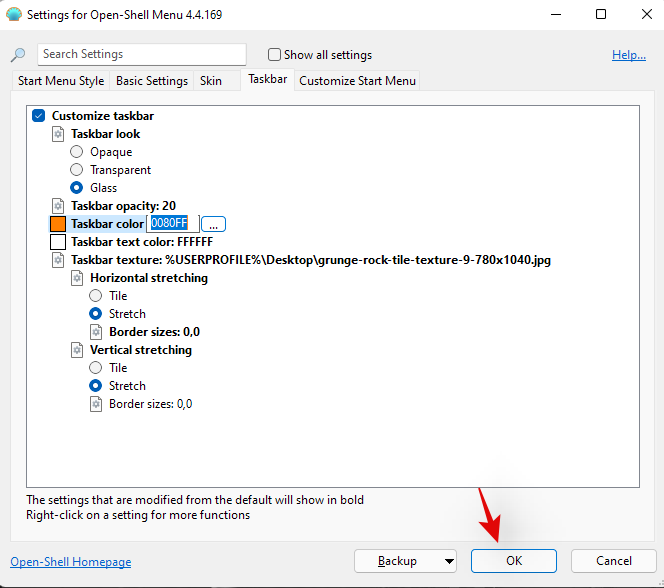
Ja see ongi kõik! Nüüd olete OpenShelli abil oma tegumiriba värvi muutnud. Pidage meeles, et kui olete OpenShelli sätete kaudu oma värvi ja tüübi määranud, ei mõjuta teie tegumiriba enam teie aktsendivärvi muutused. See tähendab, et kuigi saate Windows 11 kasutajaliidese kohandamiseks kasutada aktsentvärvi, peate muutma tegumiriba värvi, et see sobiks teie teemaga eraldi.
Meetod #03: TaskbarX-i kasutamine
TaskbarX on veel üks kauaaegne utiliit, mida kasutajad kasutasid peamiselt tegumiriba tsentreerimiseks, st kuni Windows 11 vabastati sama funktsiooniga kui algse funktsiooniga. Sellegipoolest võib TaskbarX aidata teil saavutada palju lahedaid asju ja üks neist on tegumiriba värvi muutmine. Sarnaselt OpenShelliga muudab TaskbarX teie tegumiriba värvi individuaalselt ja seda ei mõjuta teie Windows 11-s valitud üldine aktsentvärv. Saate seda oma eeliseks kasutada ja luua värvikombinatsioone, mis muidu poleks Windows 11-s võimalikud. Siin on, kuidas saate TaskbarX-i enda eeliseks kasutada ja tegumiriba värvi muuta.
Klõpsake ülaloleval lingil ja laadige TaskbarX oma arvutisse alla. Ekstraktige arhiiv sobivasse kohta ja topeltklõpsake ning käivitage 'TaskbarX Configurator'.
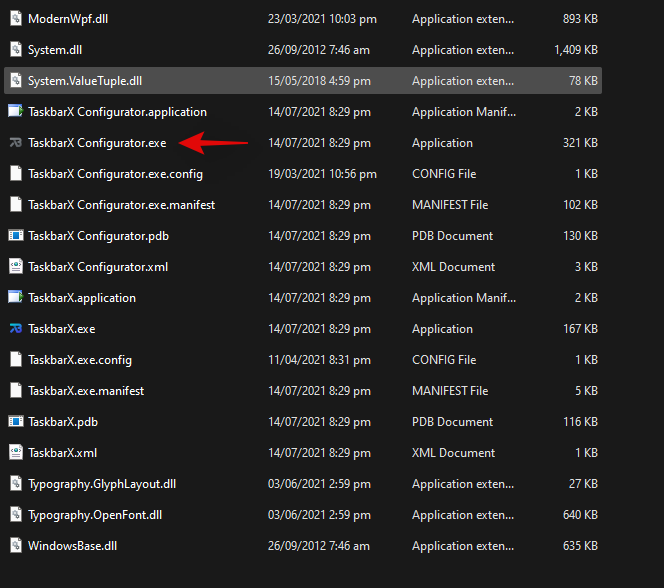
Märkus. Veenduge, et laadite alla õige versiooni, mis põhineb teie süsteemil. Kui te pole oma süsteemi ühilduvusest teadlik, peaksite enamiku kaasaegsete arvutite jaoks alla laadima faili TaskbarX_1.7.2.0_x64.zip . Pidage meeles, et kui laadite tulevikus TaskbarX-i alla, võib versiooninumber olla erinev.
Veenduge, et teie vasakul pool on valitud "Stiil", ja valige üks tegumiriba materjalidest allpool.
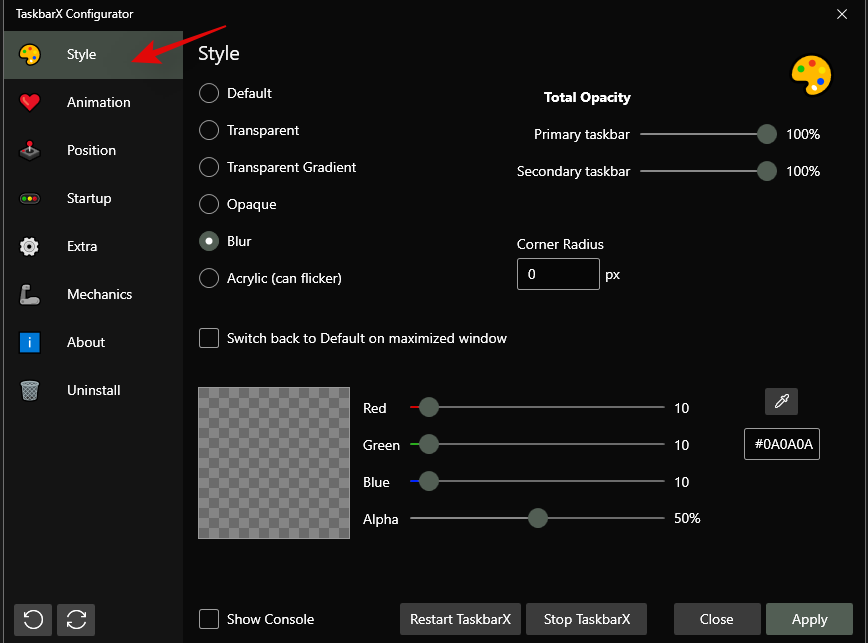
Need materjalid määravad teie tegumiriba tekstuuri, läbipaistvuse ja käitumise. Saate kasutada erinevaid materjale ja leida oma praegustele vajadustele ja nõudmistele kõige paremini vastava.
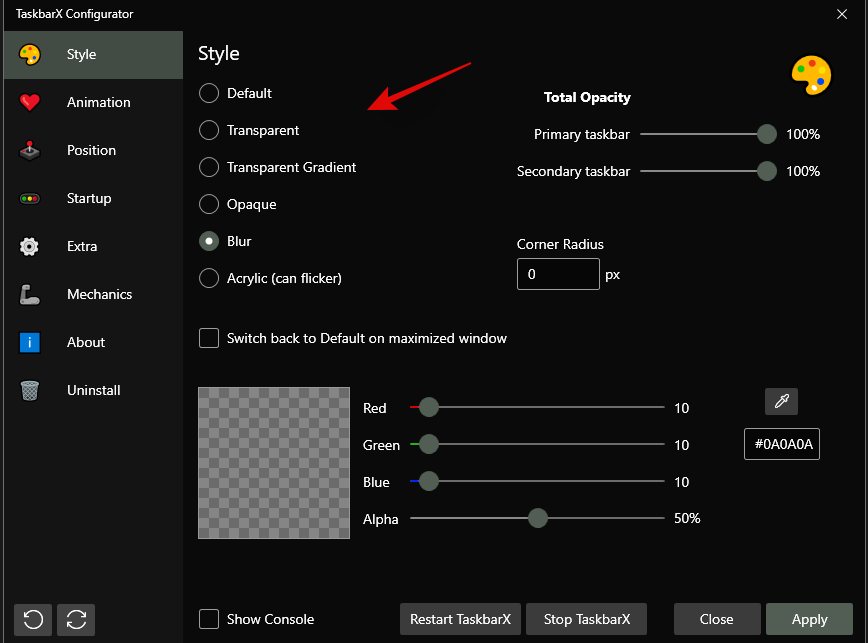
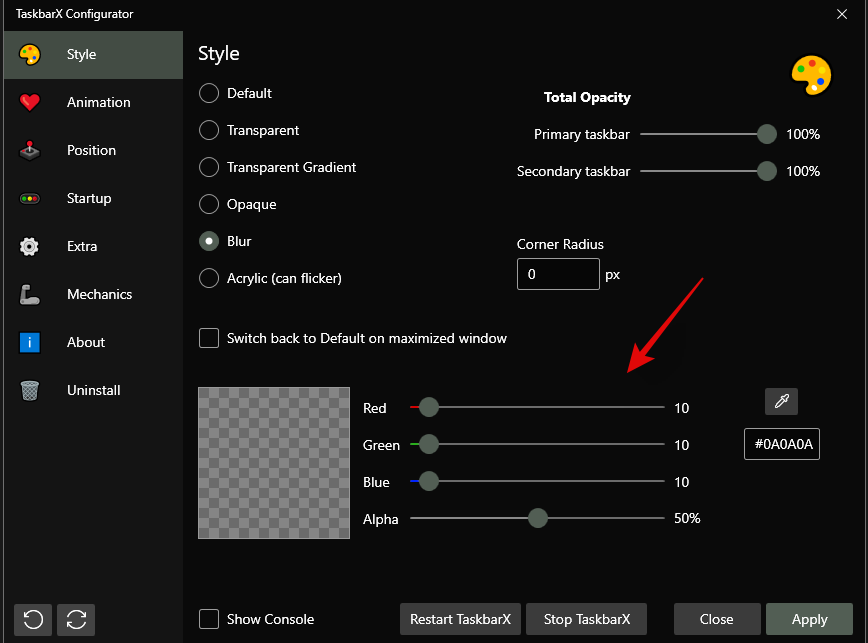
Kui olete soovitud suvandi valinud, muutke allosas olevaid RGB liugureid, et need kajastaksid soovitud kohandatud värvi, mida soovite kasutada.
Ekraanilt värvi valimiseks võite klõpsata ka tilgutiikoonil.
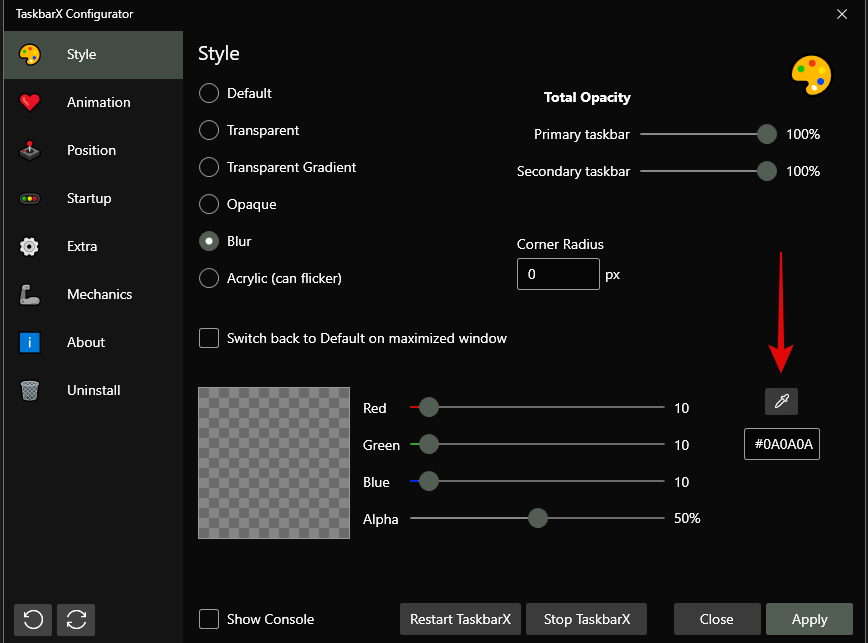
Lisaks, kui teil on HEX-väärtused, saate need sisestada järgmisse tekstikasti, nagu allpool näidatud.
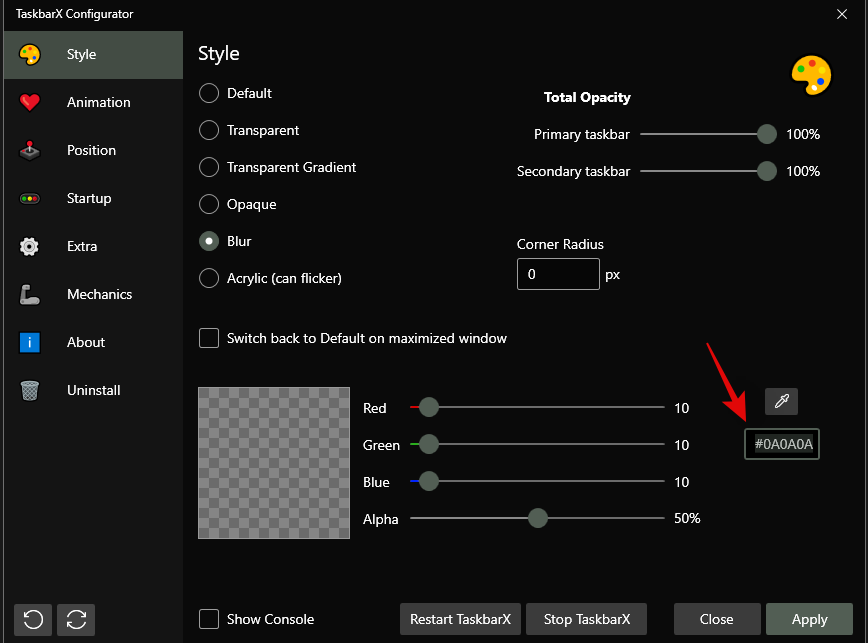
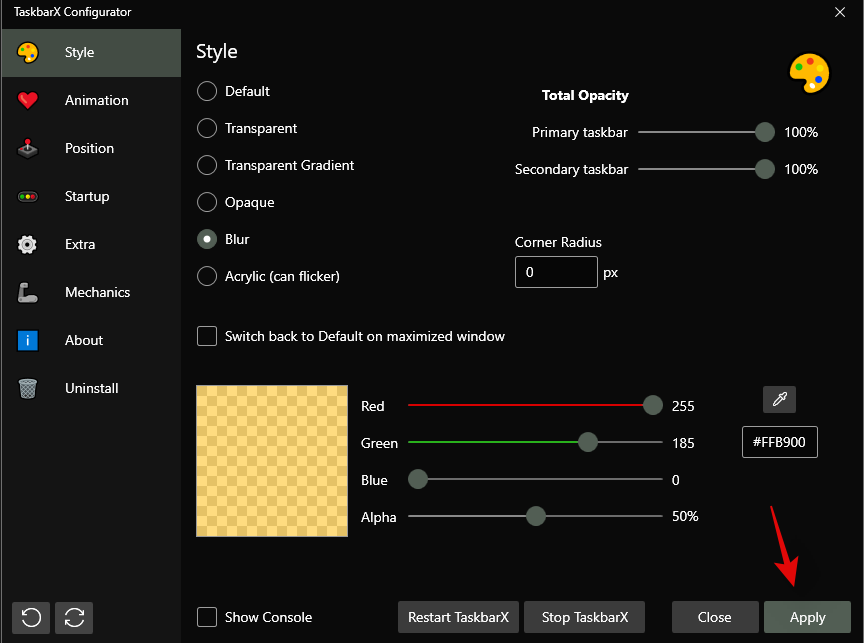
Kui olete lõpetanud, klõpsake nuppu "Rakenda".
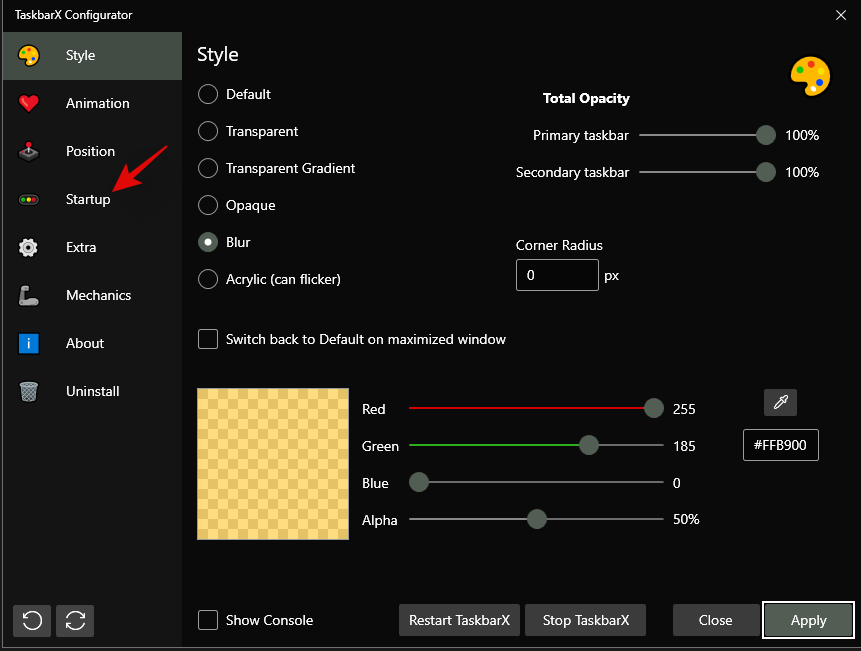
TaskbarX peab olema konfigureeritud teie arvutis automaatseks käivitumiseks, et kasutuskogemus oleks sujuv. Alustamiseks klõpsake nuppu "Startup".
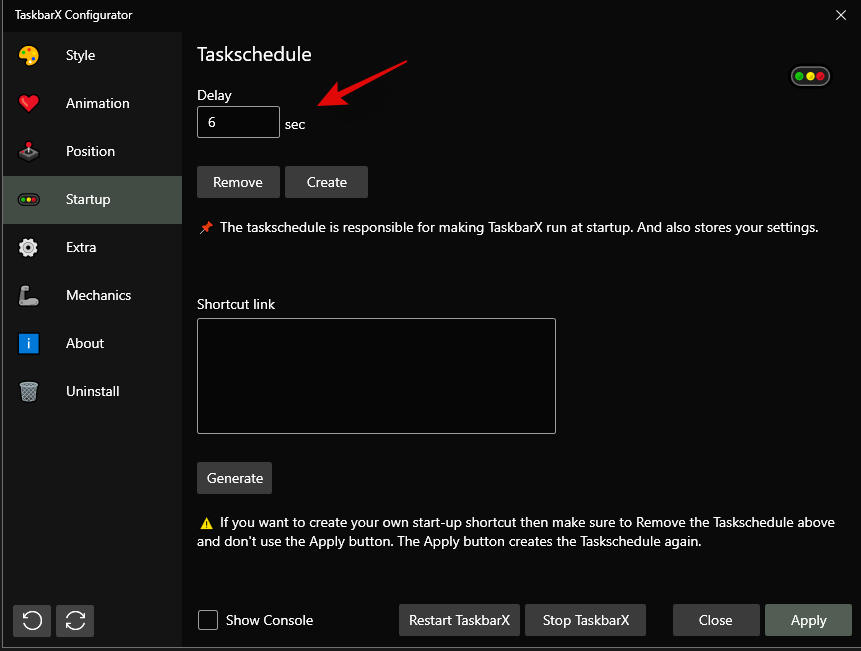
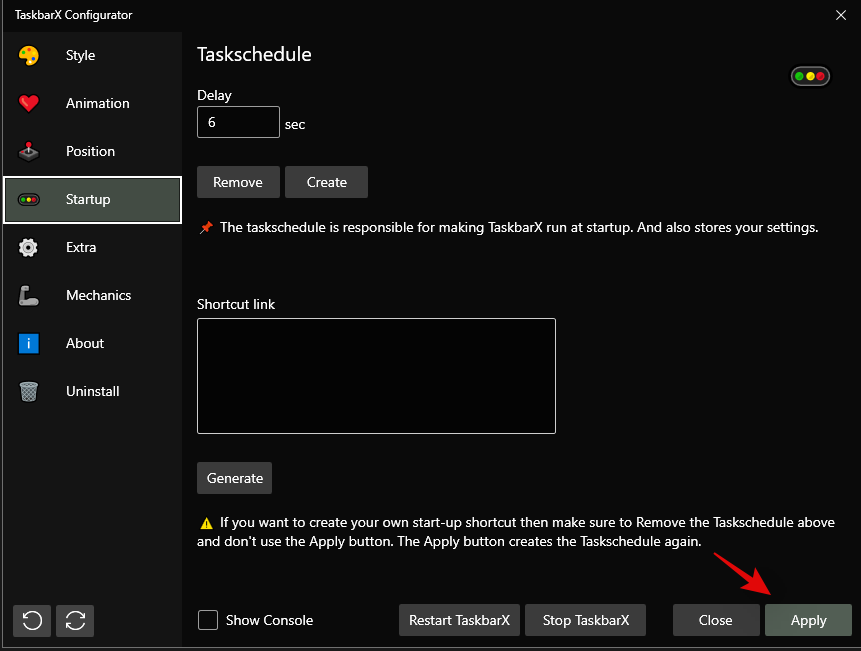
If you have a 4 core or less CPU, then set the ‘Delay’ to 10s or higher. If you have a 6 core CPU or higher, then let the time be 6s. You can reduce the startup interval further if you wish TaskbarX to be launched immediately upon logging in to your user account.
Click on ‘Apply’.
Now click on ‘Restart TaskbarX’ if changes are not reflected in your taskbar.
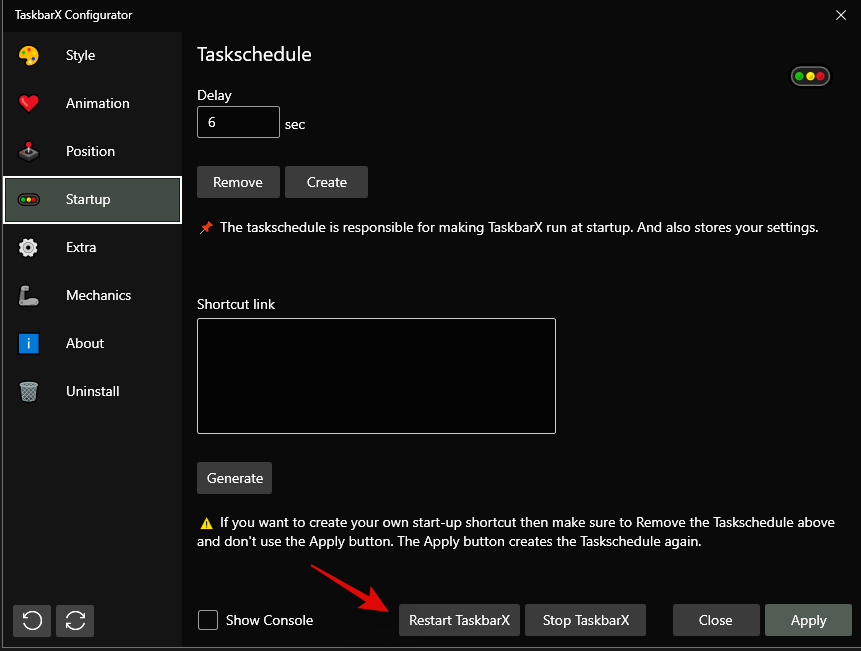
And that’s it! You will now have changed your taskbar color using TaskbarX in Windows 11.
Method #04: Using Windows 10 Color Control
Color Control is another popular utility that was developed to only change your DWM and accent color in Windows 10. However, the utility seems to work great on Windows 11 as well so you can use it to easily change the accent color of your taskbar in Windows 11. Use the guide below to get you started.
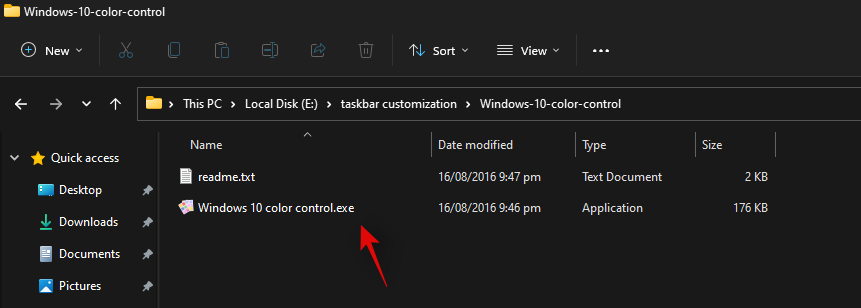
Download the archive using the link above to your local storage. Extract the archive and launch the .exe file by double-clicking on it.
Click on ‘Pick new color’ beside ‘Accent color’.
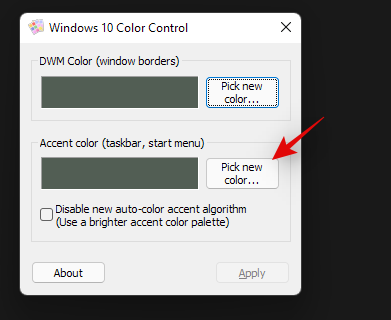
Choose a new color for your taskbar now. The same color will be used for your Start menu as well.
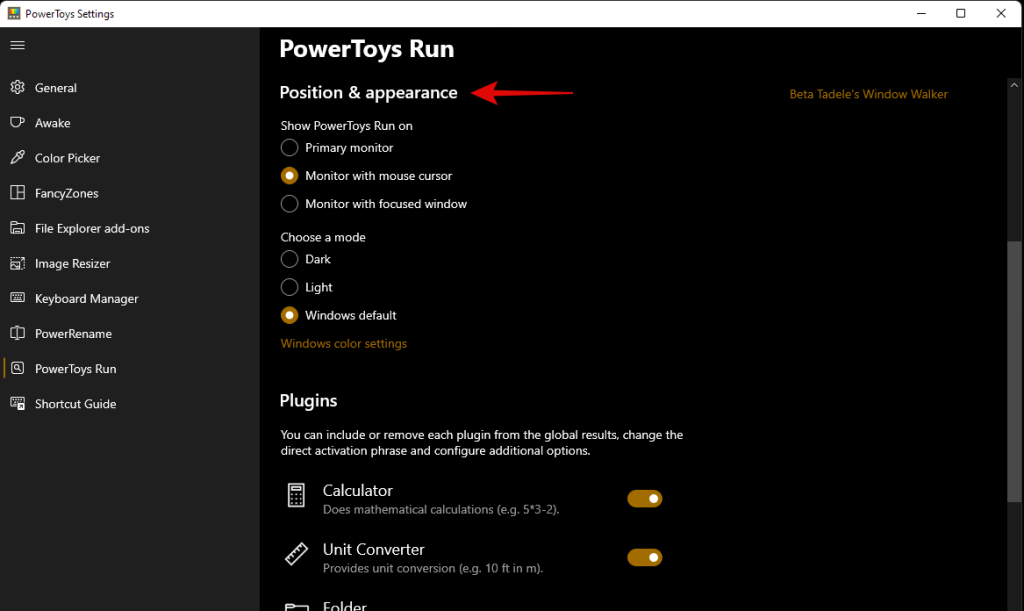
Check the box for ‘Disable new auto-color accent algorithm’.
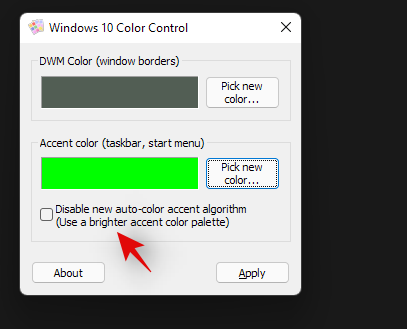
Click on ‘Apply’.
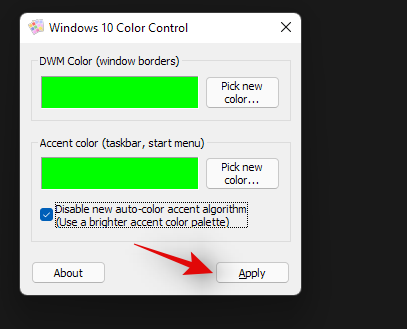
The newly selected color should now be reflected in your taskbar.

You can use the steps above to set a custom color for desktop windows manager as well. And that’s it! You will now have chosen a custom color for your taskbar using Windows 10 Color Control.
Can you set an accent color only for your taskbar?
Yes, you can set a custom accent color only for your taskbar provided that you are using one of the third-party utilities mentioned above. Either one of them can help you easily set a custom color for your taskbar. However, if you are looking to do the same natively in Windows 11, then sadly it is not possible. You will need to use one of the third-party utilities listed above. We would suggest you use TaskbarX as you won’t have to manage other tweaks in the third-party utility that can’t be disabled.
Unable to change Windows 11 taskbar color? How to fix
Have you been unable to change your Windows 11 taskbar color? Then there could be a couple of reasons for this issue. Use the troubleshooting guide below to fix this issue on your system.
Can you make the taskbar on Windows 11 transparent?
Yes, you can easily make Windows 11 taskbar transparent on your PC using a third-party utility. You can use the following apps to get a transparent taskbar on your PC.
Use the detailed guides above at the top of this post to help you choose a transparent taskbar on your PC. You can even add gradients and blur to your transparent taskbar to further customize it to match the look of your PC.
Can you further customize your taskbar?
Yes, you can use TaskbarX to further customize your taskbar on your PC. You can use the following options to further customize your taskbar in Windows 11.
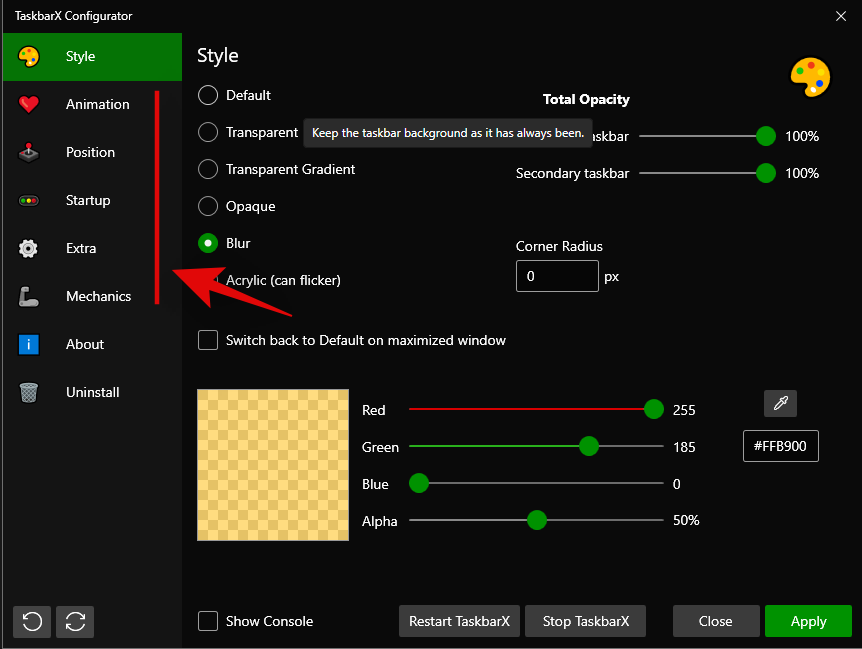
You can also use OpenShell to further customize your taskbar in Windows 11. OpenShell was recently updated for Windows 11 and hence comes with a few dedicated tweaks for the new OS. It offers similar options to TaskbarX to customize your taskbar. Simply switch to the ‘Tasksbar’ tab at the top and make the desired changes to customize your taskbar.
Apart from the above-discussed apps, you can also use Winaero Tweaker on your PC to customize your taskbar in Windows 11. Use the guide below to get familiar with Winaero Tweaker in Windows 11.
How to use Winaero Tweaker to customize the taskbar
Winaero Tweaker is a long-standing utility that has been used to customize Windows UI for a long time. The app was recently updated with some dedicated options to customize Windows 11 and here’s how you can use them to your advantage.
Download and install Winaero Tweaker to your PC using the link above. You can also extract a portable to your local storage if needed. Once installed/extracted, launch the .exe file on your system.
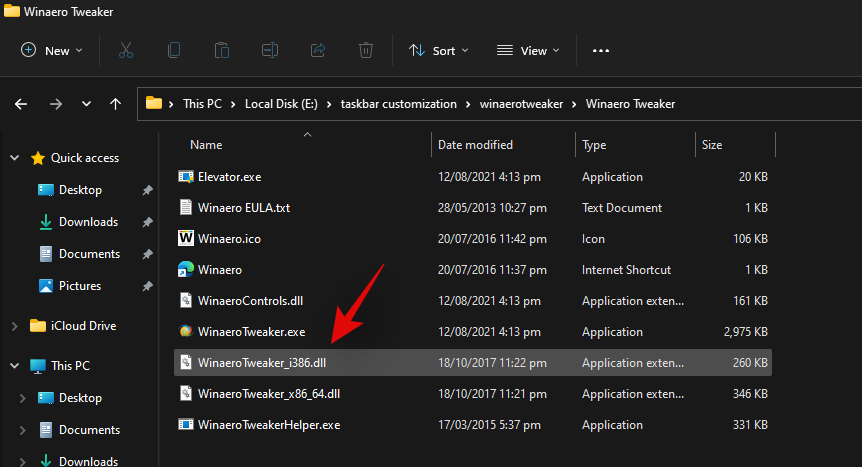
Click and expand Windows 11 on your left.
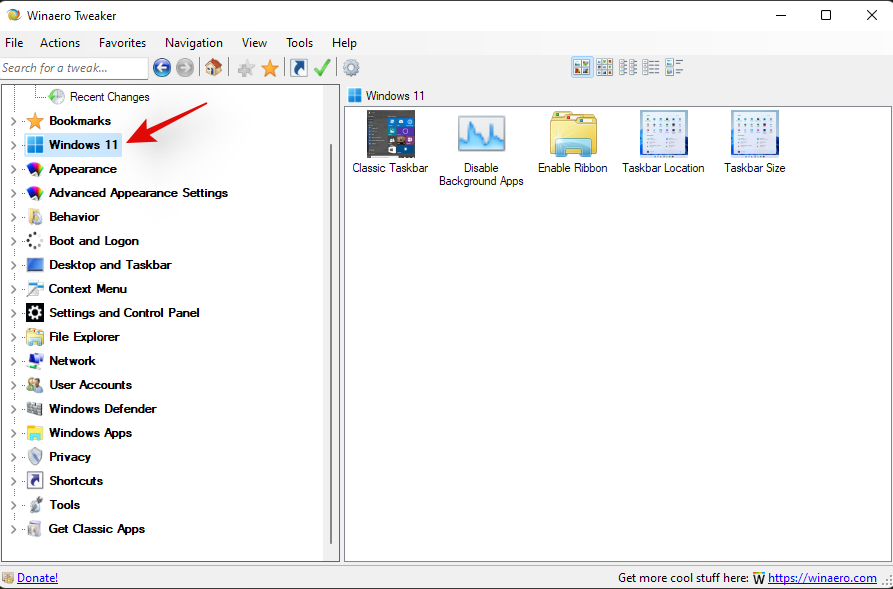
Now enable the following tweaks depending on your preferences.
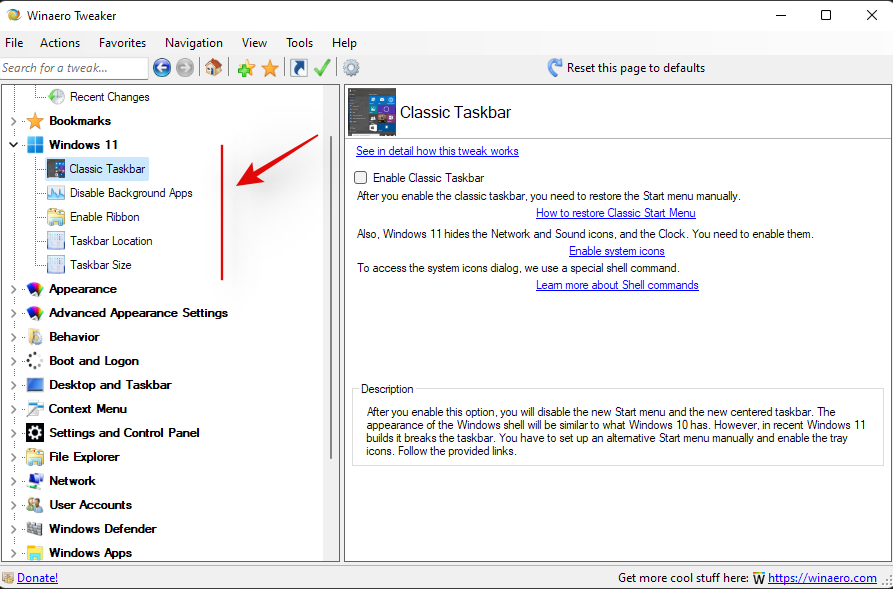
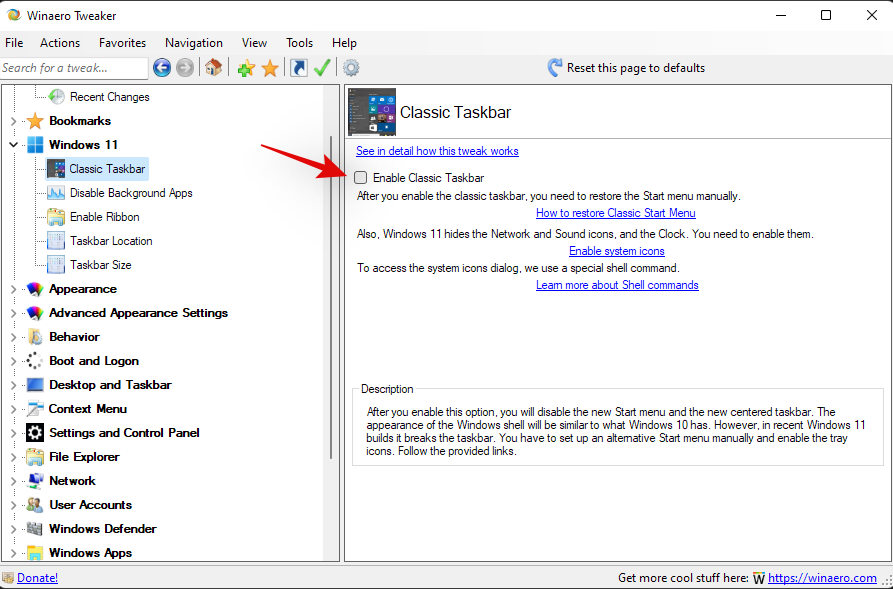
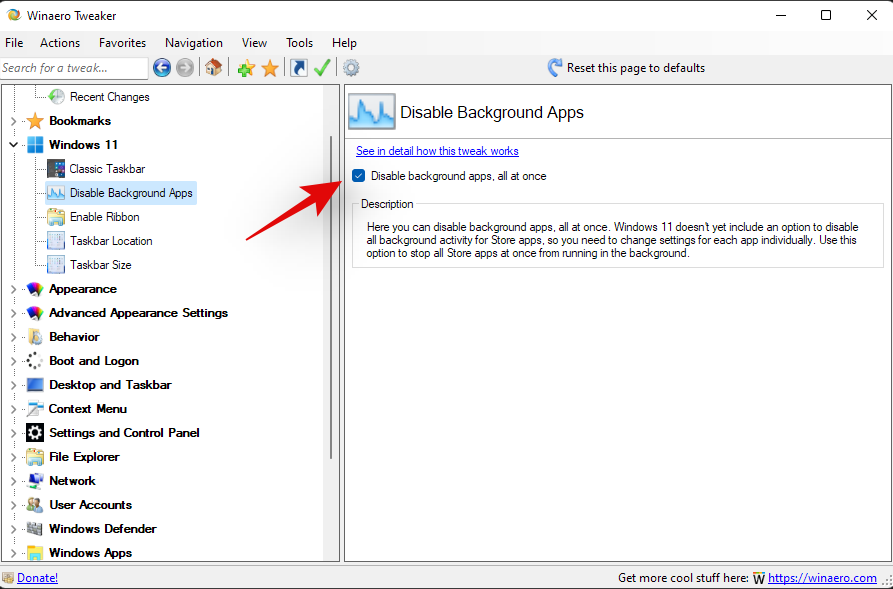
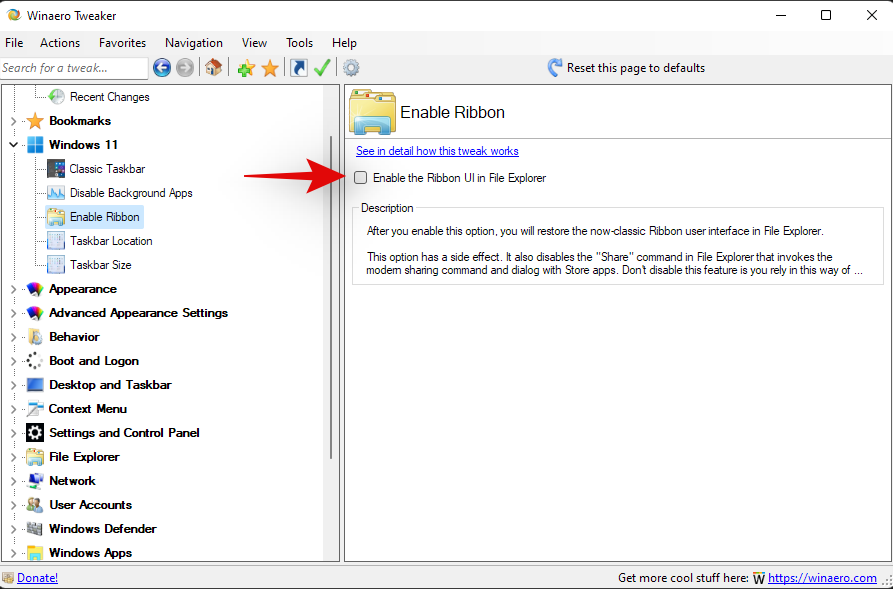
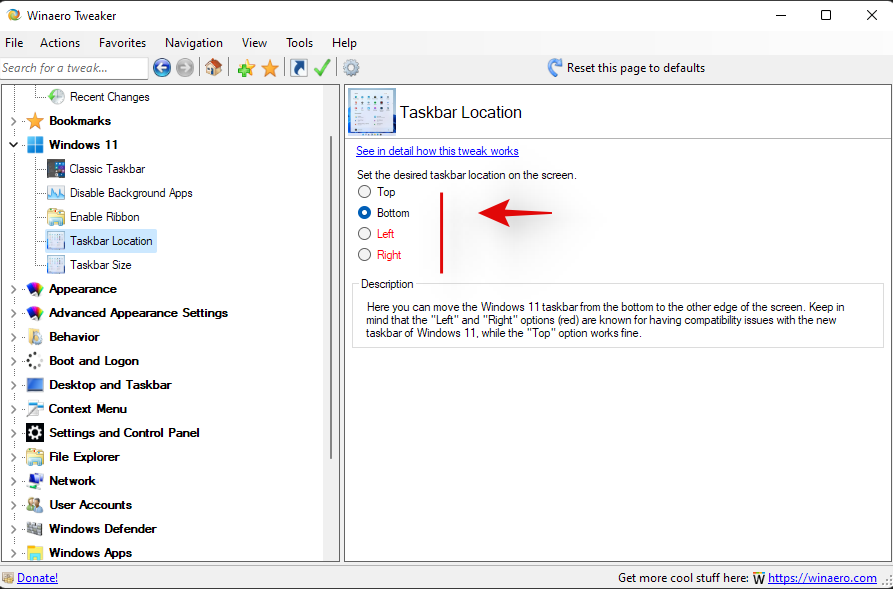
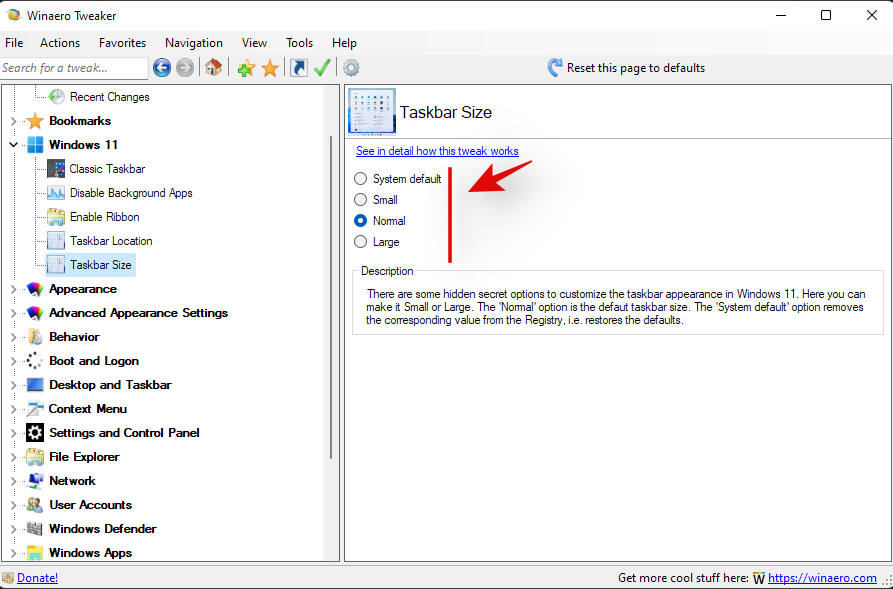
Click on ‘Restart explorer’ at the bottom of your screen, if prompted, after enabling any one of the options above.
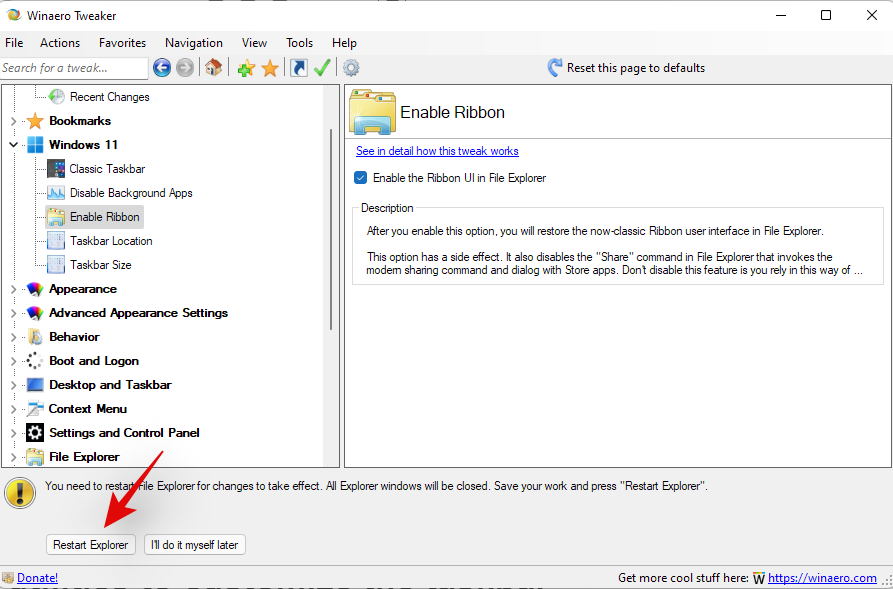
Note: You could also be prompted to sign out and sign back in to your account depending on the changes you decide to make on your PC.
And that’s it! You will now have customized your Windows 11 taskbar using Winaero tweaker.
Should you use third-party utilities to customize the taskbar?
As long as the third-party utility is trusted and compatible with Windows 11, you should have no problems using a third-party utility to customize your taskbar. However, if a utility is developed for Windows 10 then we recommend you avoid using it until it has been verified to work on Windows 11. The new OS comes with additional background services and changes to the registry that could get messed up if using incompatible applications. This could break the functionality of DWM in Windows and introduce glitches that might force you to reset your PC. Hence we recommend you verify the functionality of the concerned utility before using it on your system.
We hope this guide helped you easily change the color of your taskbar in Windows 11. If you face any issues or have any questions for us, feel free to reach out using the comments section below.
Kuidas kasutada Windows 11 otsingut tõhusalt ja kiiresti. Hanki kasulikud näpunäited ja parimad praktikad Windows 11 otsingufunktsiooni jaoks.
Windows 11 on avalikustatud ja Microsoft on välja andnud uue isikupärastatud assistendi, mis aitab teil pardale jõuda. Windows 11 toob kaasa arvukalt muudatusi, sealhulgas võimalust installida…
Windows 11 Insider Build on looduses lahti lastud ja äratab nii austajate kui ka kriitikute tähelepanu. Uus disain on üldiselt silmale meeldiv, kuid seal on mõned elemendid, mis…
Windows 11 leke ja Insider Dev Build on toonud kaasa miljoneid OS-i virtuaalseid ja natiivseid installimisi veidi enam kui nädala jooksul. Kui ka teie olete hüpanud Windows 11-le, võite…
Kuigi teatised on mõnel juhul hädavajalikud, muutub see mõnikord tähelepanu hajutavaks elemendiks. Nii nagu teie telefon, võib ka arvuti teid märguannetega häirida. Seetõttu sisaldab Windows 11…
Windows 11 on olnud väga pikka aega ja see OS ei ole ilma tohutute muudatusteta. On loomulik, et tunnete end muudatuste pärast solvatuna, kuid oma olemuselt on OS endiselt oma ...
Windows 11 on selle väljakuulutamisest saadik kaugele jõudnud ja näib, et beetaversioonid saavad iga päevaga üha rohkem testijaid. Windows kolis oma süsteemi jaoks UWP-rakendustele ja Windows Store'i tagasi ...
Kui teil on ühenduvusprobleeme, võiksite proovida oma DNS-i vahemälu tühjendada. Ärge muretsege, see ei nõua teilt tehnilisi teadmisi ja on üsna lihtne…
Pärast peaaegu 6 aastat kestnud kohanduste säilitamist uuendatakse meile nii tuttavat OS-i nüüd põhjalikult. Disaini põhialustes on muudatusi, mis hõlmavad nüüd senti…
Windows on tänapäeval kõige populaarsem tarbijale mõeldud OS. Kuid võib juhtuda, et peate teatud funktsiooni kasutamiseks vahetama operatsioonisüsteemide vahel või proovima lihtsalt teisi alternatiive. Wipi…
Ootus on lõpuks läbi, inimesed! Windows 11 on lõpuks avalikkusele avaldatud ja nüüd saate kehtiva litsentsiga oma arvutit Windows 10-lt tasuta uuendada. Uus OS toob kaasa arvukalt ch…
Asjatundmatute jaoks on inglise keel germaani keel, samas kui sellised keeled nagu hispaania, prantsuse, portugali, itaalia ja rumeenia on romaani keeled (nagu need, mis on tuletatud Vulgar L…
Kui loote võrguga ühenduse, salvestab Windows automaatselt paroolid ja muud ühenduse andmed, et saaksite uuesti sisse logida, kui see on levialas. Aga mis siis, kui soovite WiFi-ühenduse unustada…
Üks peamisi valdkondi, mis on saanud Windows 11 kapitaalremondi, on tegevuskeskus. See on strateegiliselt oluline ala, mis asub tegumiribal paremal ja on teenindanud Windowsi kasutajaid ...
Windows 11 esitab erinevate sündmuste jaoks erinevat tüüpi helisid, et teie, kasutaja, teaksite, mis toimub, ja saaksite selle kohta helikinnituse. Samuti hoiavad nad teid kursis mis tahes tõrgetega…
Windows 11-l on tänapäevaste mängudega olnud omajagu probleeme, kuid hiljutine viga Valorantiga näib olevat kõik hämmingus. Kas teil on tõrge nimega VAN 1067? Siis on see probleem Wi-ga…
Windowsi värskendused on alati olnud kurikuulsad selle poolest, et aeglustavad arvutite töötamist taustal. Need on kurikuulsad ka juhusliku taaskäivituse korral installimise poolest, mis kõik tuleneb võimalusest automatiseerida…
Windows 11 arendusversioon on nüüd väljas ja see on hea, kui soovite selle niipea kui füüsiliselt võimalik kätte saada. Kuid arvestades, et see on ainult arendusversioon, pole see kõik p…
Kui Microsoft avalikustas 24. juunil Windows 11 koos selle süsteeminõuetega, andis nad välja ka rakenduse PC Health Check, mille eesmärk oli võimaldada miljonitel arvutikasutajatel kontrollida, kas nende…
Sülearvuti kiirklahvid on olulised tööriistad, kui proovite pääseda juurde oma seadme põhifunktsioonidele. Need võimaldavad teil reguleerida helitugevust, reguleerida heledust, klaviatuuri taustvalgustust, puuteplaadi käitumist ja m…
Kui teie Windows 10 explorer ei tööta, oleme teid kaitsnud. Lugege ajaveebi, et leida lahendus, kui failiuurija ei tööta.
Kuidas värskendada draivereid Windows 11-s probleemide lahendamiseks ja seadmete ühilduvuse tagamiseks.
File Explorer on Windows 10 põhifunktsioon, mis võimaldab hõlpsasti leida ja hallata faile. Õppige, kuidas konfigureerida File Explorer avama "Seda arvutit" alates arvuti käivitamisest.
Kuidas kasutada Windows 11 otsingut tõhusalt ja kiiresti. Hanki kasulikud näpunäited ja parimad praktikad Windows 11 otsingufunktsiooni jaoks.
Iga arvutiga ühendatud seadet ja selle sees olevaid komponente haldavad seadmedraiverid. Draiverite värskendamine Windows 10-s on oluline mitmesuguste probleemide vältimiseks.
Kas näete File Explorer ei reageeri veateadet? Siit leiate tõhusad lahendused, et lahendada Windows 10 mittetöötava File Exploreri probleem.
Kuidas saada Windows 10-s abi - leidke parimad lahendused pea iga küsimusele, mis teil Microsoft Windows 10 kohta on.
Failiuurija ei reageeri tõrge Windows 10-s. File Explorer või Windows Exploreri protsess ei tööta operatsioonisüsteemis Windows 10. Hangi uued lahendused.
Uuri, kuidas tuua tagasi "Minu arvuti" ikoon Windows 11-s ja avada see lihtsalt, et pääseda oma failidele ja seadetele.
Kas te ei saa Windows 11 arvutis faile ja kaustu avada? Siit leiate teavet selle kohta, kuidas parandada, et Explorer.exe ei laadita käivitamisel ja tööle naasta.


![Rõhumärkide sisestamine Windows 11-s [6 võimalust] Rõhumärkide sisestamine Windows 11-s [6 võimalust]](https://blog.webtech360.com/resources8/images31/image-285-0105182715408.png)


