Jak zastavit vyskakovací okna v systému Windows 11
Zjistěte, jak efektivně blokovat vyskakovací okna a reklamy v systému Windows 11 a procházejte bez rušení.
Windows 11 byl uvolněn pro veřejnost a zdá se, že tato nová aktualizace dlouhotrvajícího operačního systému získává skvělé recenze. Microsoft zvýšil soukromí, zabezpečení přidal nové uživatelské rozhraní a možnost instalovat aplikace pro Android do Windows 11. Ale jako obvykle je Windows dodáván s mnoha předinstalovanými věcmi, které jsou pro téměř každého uživatele nepodstatné.
A pokud jste si zakoupili předpřipravený systém nebo notebook, je pravděpodobné, že je ve vašem systému nainstalován další reklamní software, který možná budete chtít odstranit. Většinu aplikací v systému Windows můžete snadno odebrat a odinstalovat jednoduchým kliknutím, ale když se dostanete k programům, aplikacím Windows Store, aktualizacím systému Windows a systémovým aplikacím, věci se trochu zkomplikují. Nebojte se, můžete se řídit našimi níže uvedenými průvodci a odstranit všechny druhy aplikací ze systému Windows bez ohledu na vaše aktuální nastavení. Začněme.
Obsah
Jak odinstalovat aplikace v systému Windows 11 [8 způsobů]
Zde jsou všechny způsoby, jak můžete odinstalovat aplikaci z počítače se systémem Windows 11. Informace o odinstalaci systémových aplikací naleznete v příslušných částech a speciálních metodách níže po této části.
Metoda č. 01: Použití Nastavení
Chcete-li odinstalovat aplikaci ze systému pomocí Nastavení, postupujte podle pokynů níže. V případě, že se pokoušíte odinstalovat výchozí aplikaci, doporučujeme ji předem změnit, aby pro vás možnost odinstalace nebyla zašedlá. V případě, že si nejste vědomi změny výchozí aplikace ve Windows 11, můžete postupovat podle níže uvedeného průvodce.
Krok 1: Nejprve změnit výchozí aplikaci? [Volitelný]
Poznámka: Před výměnou výchozí aplikace se ujistěte, že máte v systému nainstalovanou náhradní aplikaci. Pokud například měníte prohlížeč z Microsoft Edge, musíte mít v systému již nainstalovaný jiný prohlížeč, který chcete používat, abyste si jej mohli vybrat jako výchozí prohlížeč.
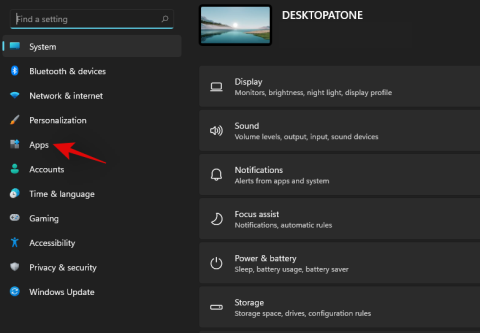
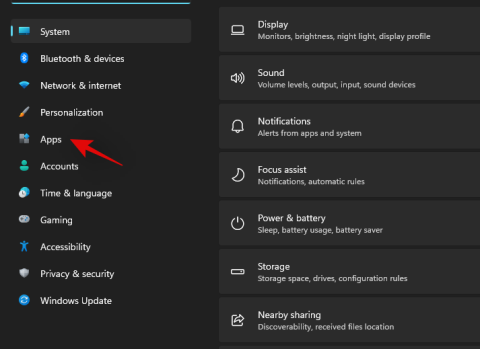
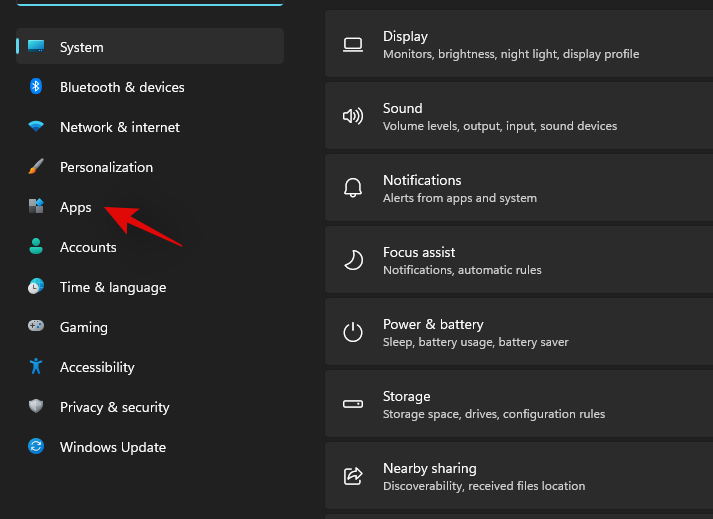
Stisknutím Windows + ina klávesnici otevřete aplikaci Nastavení. Nyní klikněte na „Aplikace“ na levém postranním panelu.
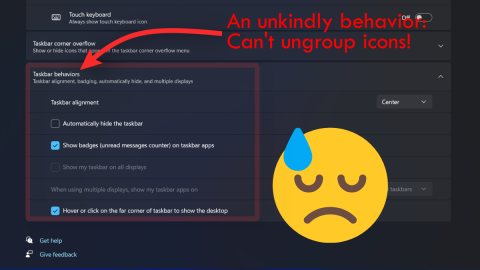
Klikněte a vyberte 'Výchozí aplikace' vpravo.
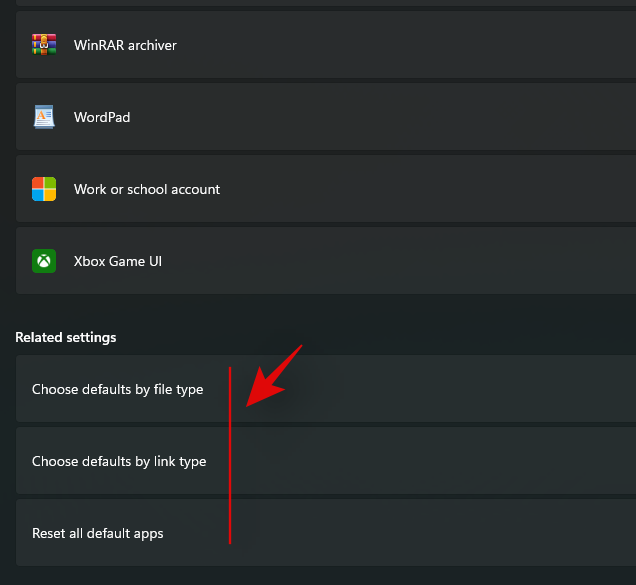
Nyní vyberte aplikaci, kterou chcete odebrat jako svou výchozí aplikaci, a klikněte na ni. V případě, že chcete změnit výchozí aplikaci podle typu souboru, klikněte na 'Vybrat výchozí podle typu souboru' dole, jak je znázorněno níže.
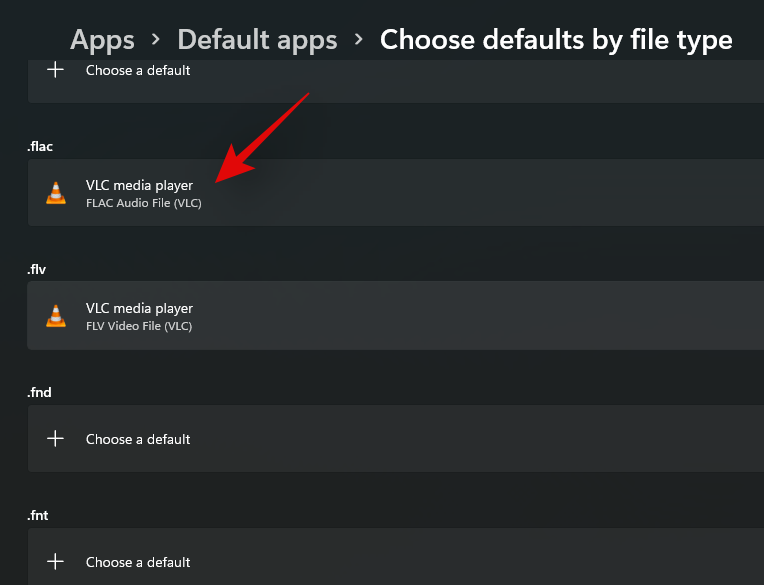
Nyní klikněte na požadovaný typ souboru/příponu a vyberte aplikaci podle svého výběru.
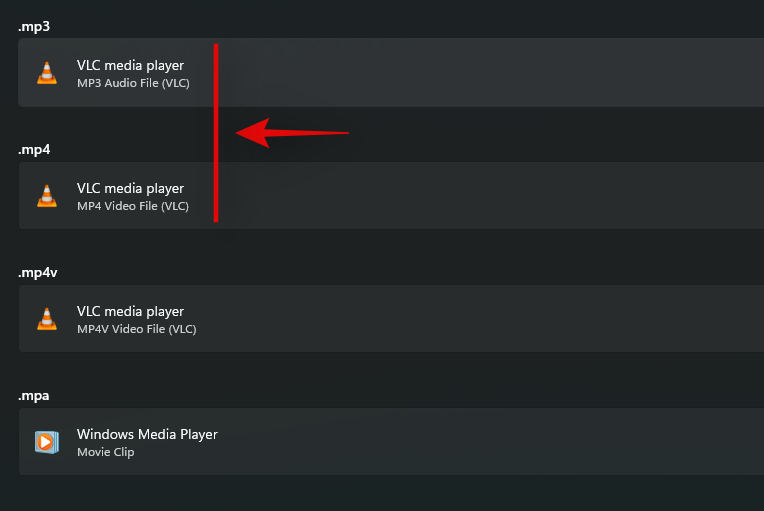
Opakujte výše uvedený krok pro všechny potřebné typy souborů/přípony.
Zavřete aplikaci Nastavení a restartujte systém.
A to je vše! Jakmile se váš systém restartuje, vaše výchozí aplikace by se měla změnit. Nyní můžete pomocí níže uvedeného průvodce odinstalovat potřebnou aplikaci prostřednictvím „Nastavení“ ve vašem systému.
Krok 2: Odinstalujte aplikaci z Nastavení
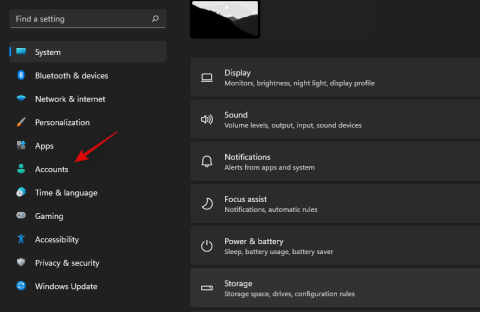
Stiskněte Windows + ina klávesnici a zleva vyberte „Aplikace“.

Nyní klikněte na „Aplikace a funkce“ vpravo.
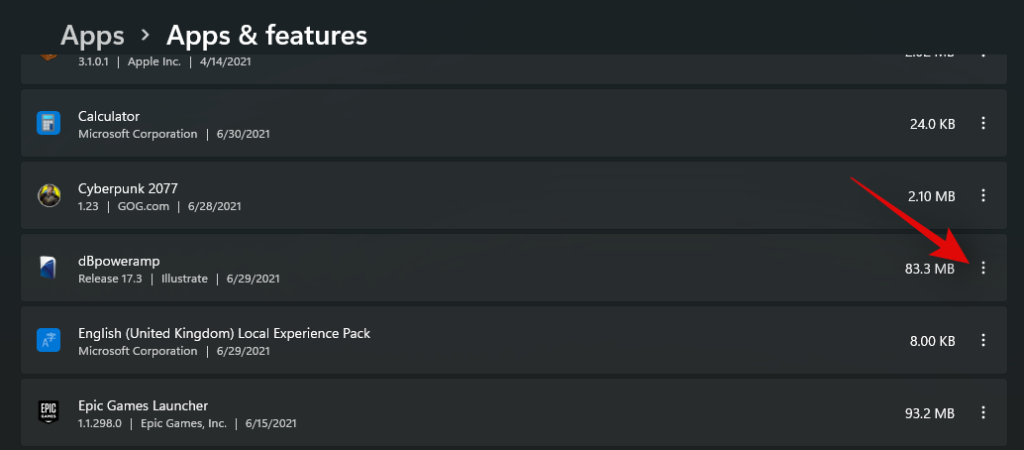
Procházejte seznam a najděte aplikaci, kterou chcete odinstalovat. Po nalezení klikněte na ikonu nabídky „3 tečky“ vpravo.
Klikněte a vyberte 'Odinstalovat'.
Nyní postupujte podle pokynů na obrazovce a odinstalujte aplikaci. Pokud odinstalujete předinstalovanou aplikaci nebo aplikaci Windows Store, bude automaticky odinstalována na pozadí. Pokud se však jedná o program detekovaný systémem Windows, v závislosti na programu se jej systém Windows buď pokusí odinstalovat na pozadí, nebo spustí soubor „uninstall.exe“ nebo „setup.msi“, abyste jej mohli odinstalovat sami. s požadovaným nastavením. Možná budete moci zachovat/uložit některá data, když narazíte na taková nastavení, včetně věcí, jako jsou soubory protokolu, uživatelská data, uložená data, obrázky a další.
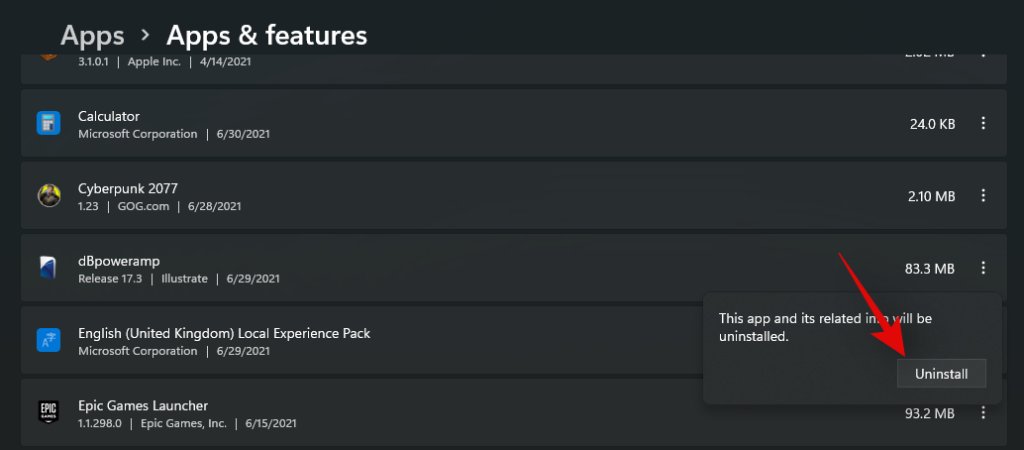
Případně budete mít také možnost zcela odstranit vše, co souvisí s programem, z vašeho systému.
A to je vše! Vybraná aplikace by nyní měla být odinstalována z vašeho systému. Pokud jste odinstalovali náročný program, doporučujeme vymazat mezipaměť pomocí tohoto průvodce, zejména pokud program přesáhl velikost 30+ GB.
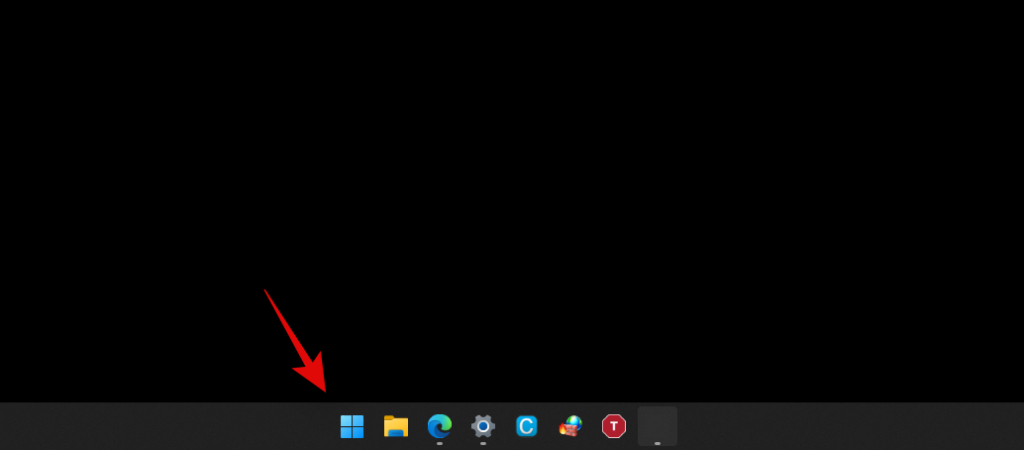
Stisknutím tlačítka „Windows“ na klávesnici vyvolejte nabídku „Start“. Případně můžete také kliknout na ikonu na hlavním panelu.
Najděte aplikaci, kterou chcete odinstalovat, a klikněte na ni pravým tlačítkem.
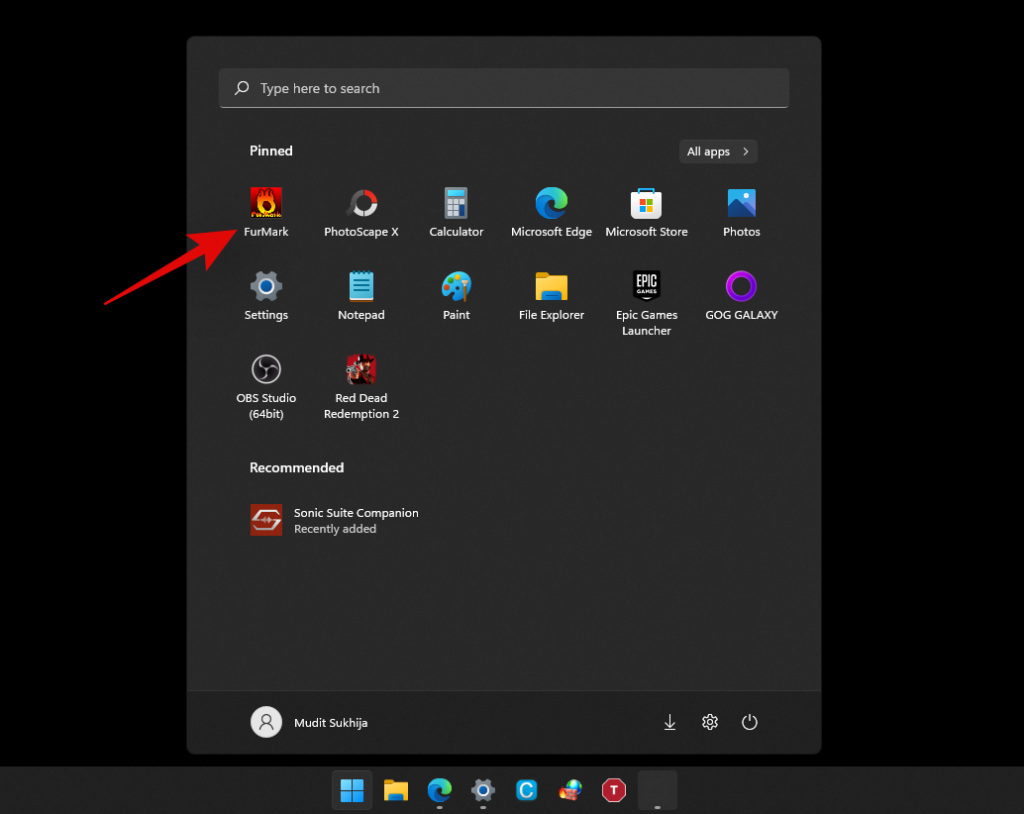
Nyní klikněte na 'Odinstalovat'. V případě potřeby postupujte podle pokynů na obrazovce a dokončete proces odinstalace.
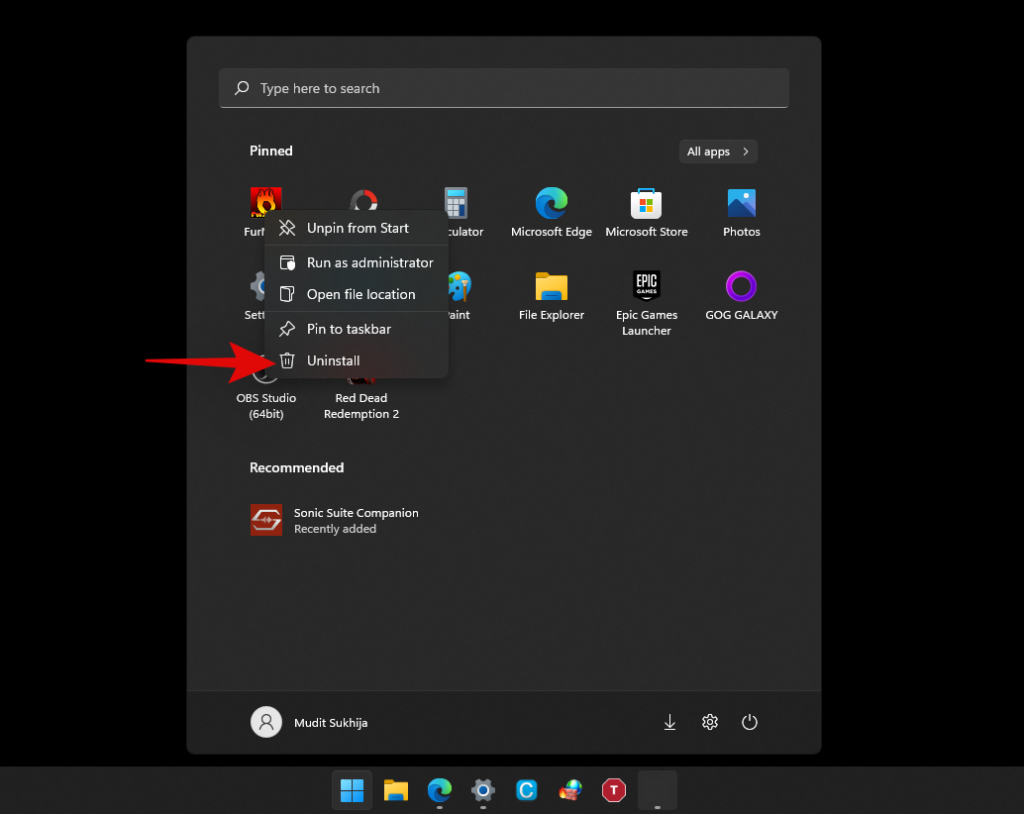
A to je vše! Nyní budete mít odinstalovanou aplikaci ze systému prostřednictvím nabídky Start.
Metoda #03: Použití odinstalačního souboru '.exe'
V ideálním případě byste neměli ručně spouštět spustitelný soubor pro odinstalaci programu, ale v některých případech, jako u starších programů, můžete mít v systému nainstalovaný program, jehož možnost odinstalace se nikde v Nastavení nezobrazuje. V takových případech můžete spustit odinstalační soubor sami pomocí níže uvedeného průvodce.
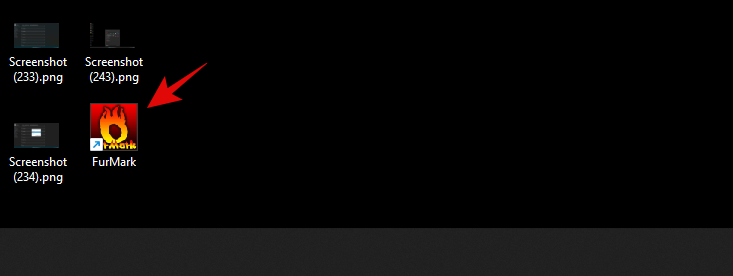
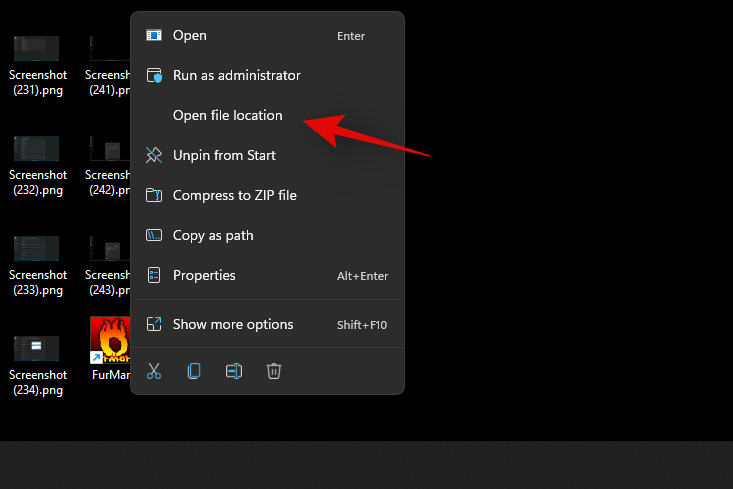
Najděte soubor .exe programu nebo zástupce, který obvykle používáte ke spuštění programu, a klikněte na něj pravým tlačítkem.
Vyberte 'Otevřít umístění souboru'. Pokud tuto možnost nevidíte, vyberte vlastnosti. Nyní najdete možnost 'Otevřít umístění souboru' na kartě 'Obecné', jak je uvedeno níže.
Nyní budete přesměrováni do instalačního adresáře programu. Vyhledejte soubor .exe s některým z následujících názvů nebo podobným názvem.
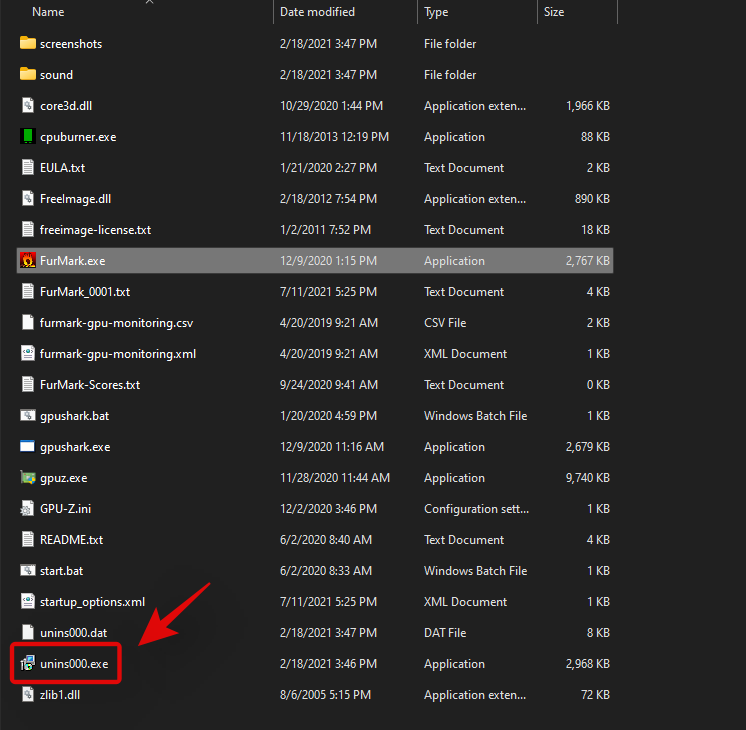
a více. Odinstalační program/nastavení bude pojmenováno podobně. Jakmile jej spustíte, můžete jej ze systému odinstalovat podle pokynů na obrazovce.
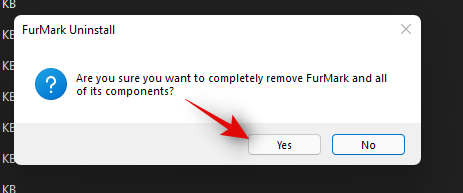
V některých případech můžete spolu s odinstalací získat také možnost opravit, přeinstalovat nebo upravit program. Můžete vybrat požadovanou možnost a pokračovat v nastavení, jak chcete.
Metoda č. 04: Použití ovládacího panelu
Programy a aplikace můžete také snadno odebrat z ovládacího panelu. V ideálním případě se doporučuje odinstalovat pouze starší a moderní programy pomocí ovládacího panelu, protože zde se nezobrazí všechny nainstalované aplikace. Chcete-li odinstalovat programy prostřednictvím ovládacího panelu, postupujte podle pokynů níže.
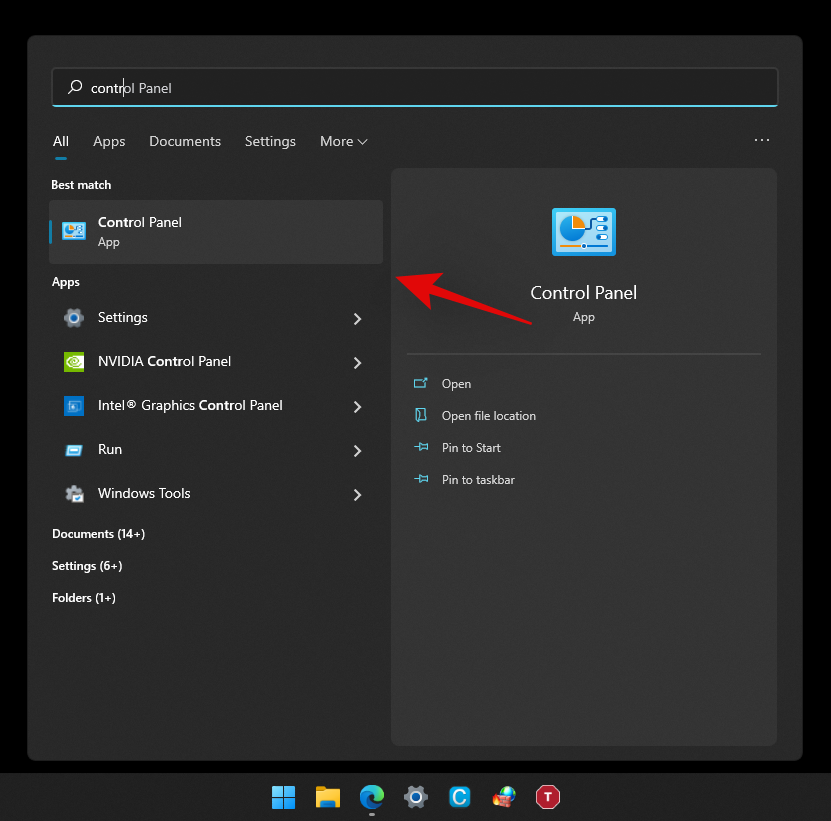
Stiskněte Windows + sna klávesnici a zadejte „Ovládací panely“. Klikněte a spusťte aplikaci, jakmile se zobrazí ve výsledcích vyhledávání.
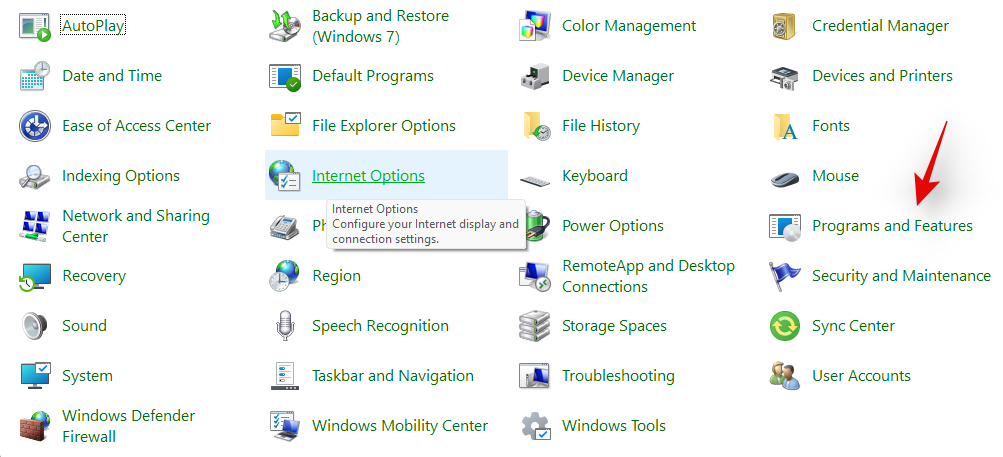
Nyní klikněte na „Programy a funkce“.
Nyní získáte seznam všech programů aktuálně nainstalovaných ve vašem systému. Najděte program, který chcete odinstalovat, a klikněte na něj.
Nyní nahoře vyberte 'Odinstalovat'.

Dokončete proces instalace podle pokynů na obrazovce. V některých případech se bude jednat o automatizovaný proces, zatímco v jiných můžete získat možnost opravit stávající instalaci nebo zvolit, která data si přejete zachovat a která data chcete smazat.
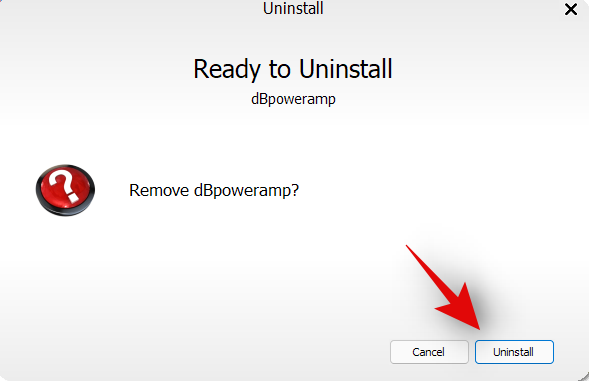
Jakmile provedete svá rozhodnutí, proběhne proces odinstalace a po dokončení procesu by měl být program z vašeho systému odstraněn.
Metoda #05: Použití PowerShellu
Aplikace můžete také odinstalovat prostřednictvím zvýšeného prostředí PowerShell ve Windows 11. Zatímco příkaz k odinstalaci je poměrně jednoduchý, získání názvu balíčku pro příslušnou aplikaci nebo program nikoli. Proto v níže uvedené příručce najdete, jak odinstalovat aplikace prostřednictvím PowerShell, pokud máte název balíčku.
Pokud však nevíte, jak získat celý název balíčku, doporučujeme vám postupovat podle níže uvedeného průvodce systémovými aplikacemi, který stejnou metodu popisuje mnohem podrobněji. Začněme.
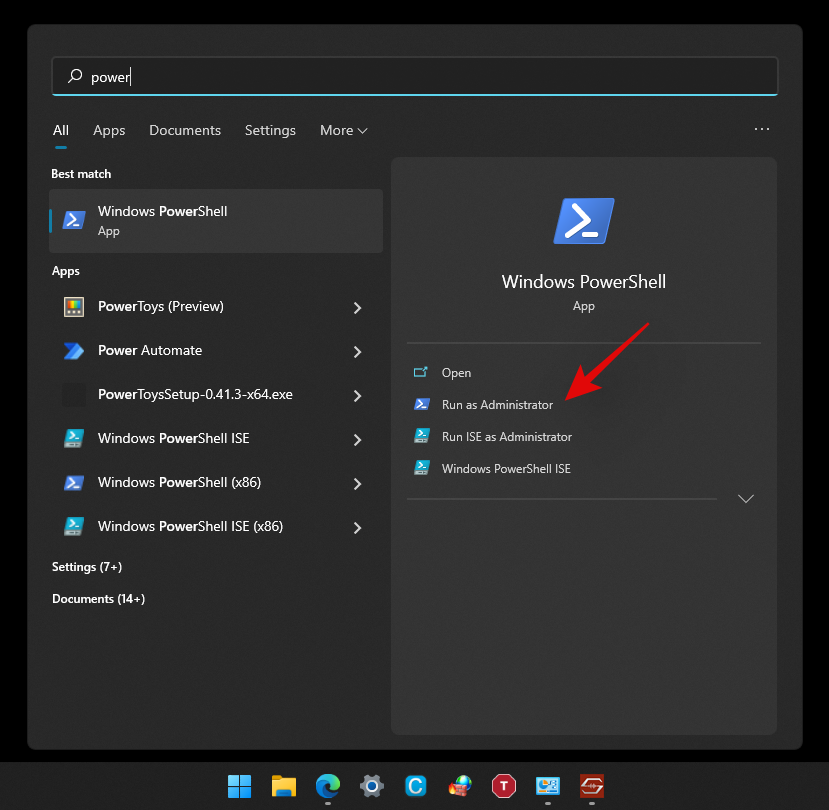
Stiskněte Windows + sna klávesnici a napište „PowerShell“. Nyní klikněte na „Spustit jako správce“, jakmile se zobrazí ve výsledcích vyhledávání.
Jakmile se na ploše zobrazí okno PowerShell, zadejte následující příkaz a stiskněte klávesu Enter na klávesnici. Ujistěte se, že jste „[Název]“ nahradili celým názvem balíčku příslušné aplikace.
Remove-AppxPackage [Name]

A to je vše! Powershell nyní udělá své kouzlo a odinstaluje příslušnou aplikaci z vašeho systému.
Metoda #06: Použití CMD
K odinstalování aplikací ze systému můžete také použít příkazový řádek ve Windows 11. Chcete-li začít, postupujte podle níže uvedeného průvodce.
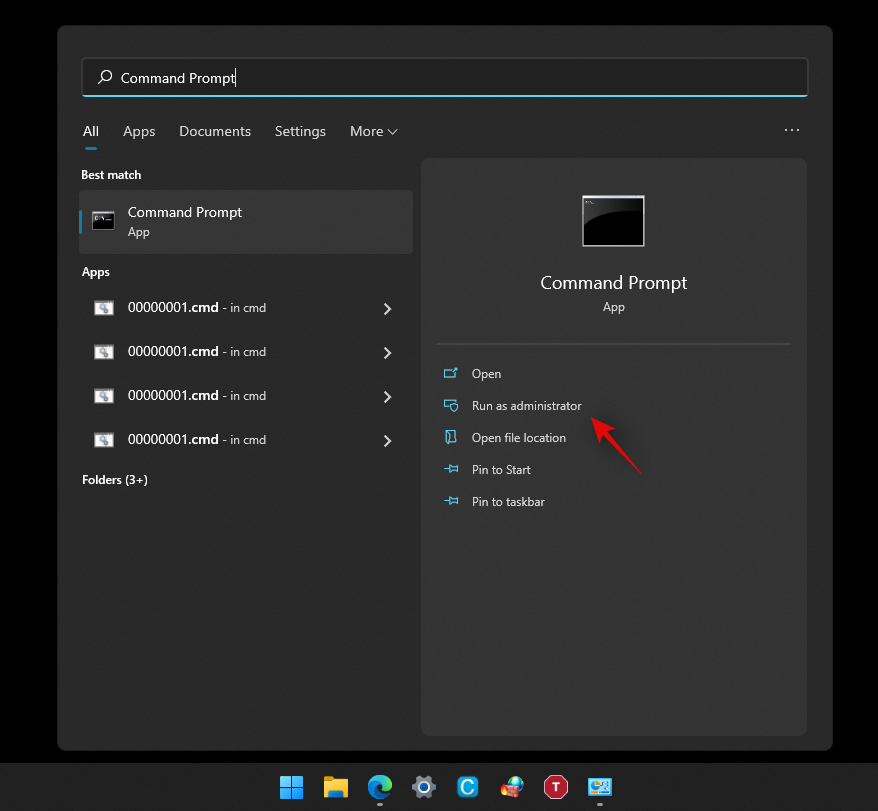
Stiskněte Windows + sna klávesnici a vyhledejte „CMD“. Jakmile se zobrazí ve výsledcích vyhledávání, klikněte na „Spustit jako správce“.
Jakmile se CMD spustí, zadejte následující příkaz a stiskněte 'Enter' na klávesnici.
wmic

Nyní zadejte následující příkaz, abyste získali seznam všech aplikací a programů nainstalovaných ve vašem systému.
product get name

Jakmile získáte seznam všech programů, najděte v tomto seznamu ten, který chcete odinstalovat. Jakmile jej najdete, poznamenejte si jeho celý název na vhodném místě.
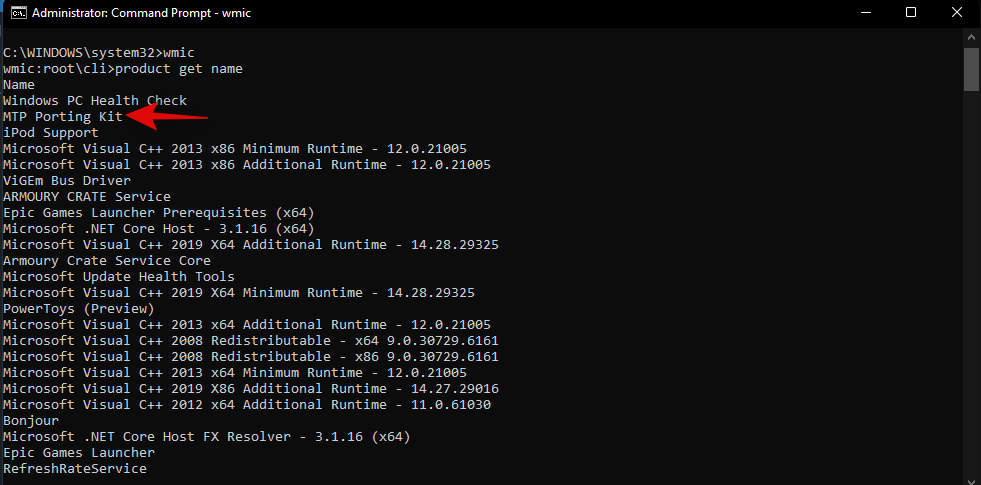
Nyní zadejte následující příkaz a nahraďte AppName názvem aplikace, který jste si poznamenali dříve.
product where name="AppName" call uninstall/nointeractive
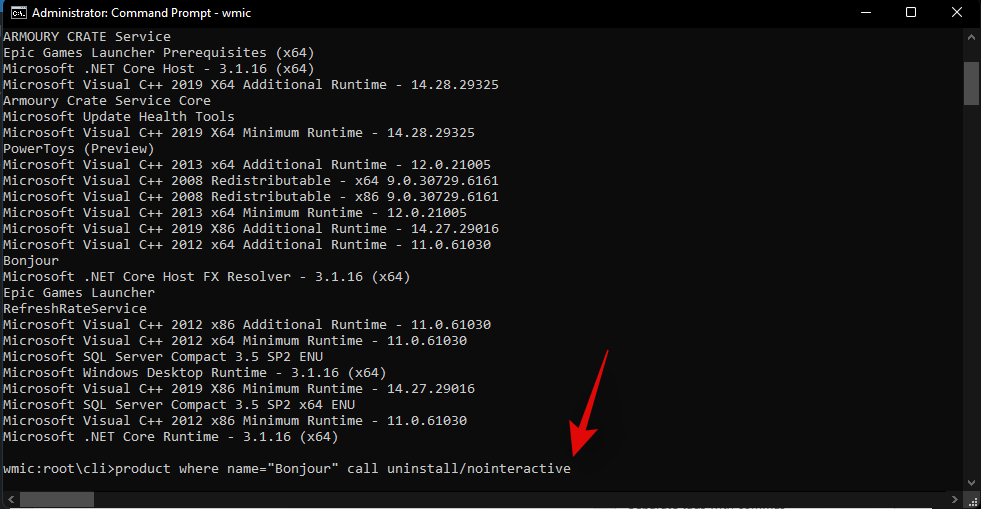
Poznámka: Neodstraňujte uvozovky z příkazu, protože jsou pro tuto syntaxi nezbytné.
Stisknutím klávesy „Enter“ na klávesnici spusťte příkaz.
Příkazový řádek nyní provede potřebné procesy na pozadí a po dokončení procesu byste měli obdržet potvrzení, jak je uvedeno níže.
A to je vše! Nyní budete mít odinstalovanou aplikaci ze systému prostřednictvím příkazového řádku.
Metoda #07: Pomocí setup.msi
V případě, že byl váš program dodán s instalačním souborem, který měl příponu .msi místo .exe, můžete stejný soubor použít také k odinstalaci programu. Pojďme se o souborech .msi dozvědět něco více, aby bylo snazší pochopit jejich funkci.
Co je soubor .msi?
Traditionally your installers come with a .exe extension. These are programs designed to install programs on your system with the setup files bundled with them. MSI files take this a step further by allowing you to bundle multiple installers together in the same file.
This allows the MSI file to perform various functions thanks to the bundled installers. This includes things like Update installers, software installers, program repairer, program modifier, and uninstaller. Hence, if your program came with a .msi setup file then you can use the guide below to use the same file to uninstall the program from your system.
Note: Older .msi files rarely work with newer installations of the same software. Keep this in mind in case you are trying to downgrade your program to a previous version.
Uninstall via .msi file
Locate the .msi setup file on your local storage and double click and launch the app.
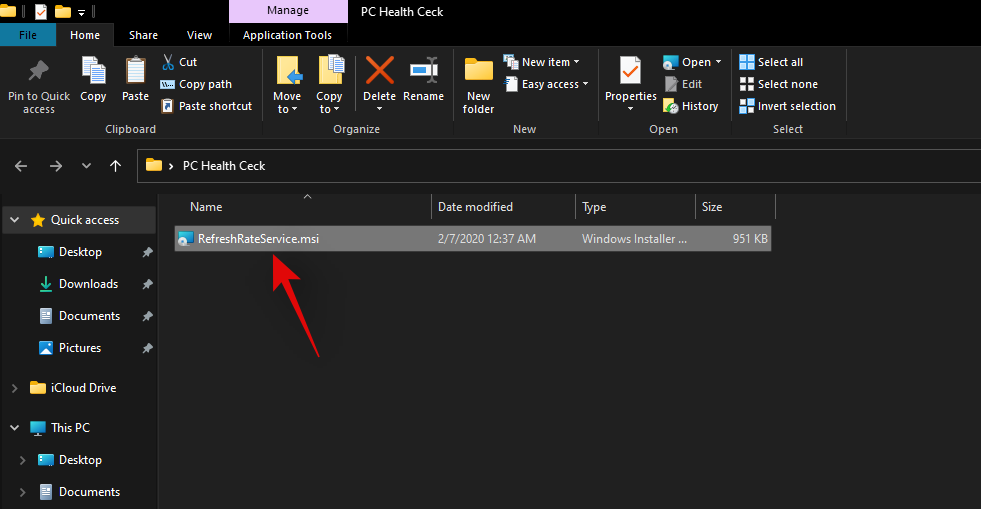
Follow the on-screen instructions until you are prompted to select one of the courses of action.
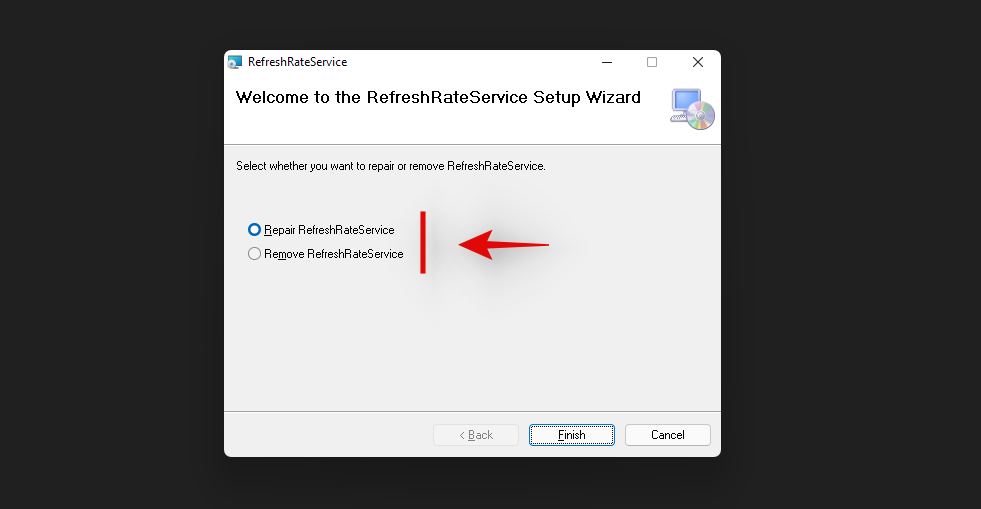
Select the desired option and continue with the on-screen instructions to complete the uninstallation process.
And that’s it! The selected program should now be removed from your system via its .msi setup file.
Method #08: Use a third-party uninstaller
There are various third-party uninstallers available on the market as well. These apps help identify all the system and third-party apps on your system which can then be uninstalled from your PC with a simple click. Most of these programs allow you to remove system apps after opting for the premium model of the software.
In case you decide to use the free version, you will be limited to a certain number of uninstalls in most cases. While this might sound redundant, these utilities are extremely useful for professionals and technicians that need to uninstall multiple programs with a single click. Most of these uninstallers support bulk uninstallations which is quite useful when setting up multiple systems for an office environment. We have linked the two most popular third-party uninstallers below. We hope you find them useful in your quest to uninstall programs from Windows 11.
How to uninstall system apps on Windows 11 [2 Ways]
You can uninstall system apps on Windows 11 either via an elevated PowerShell or by using a third-party PowerShell script. I would recommend that you use the PowerShell method, although it might seem more complicated, you won’t have to run third-party scripts with elevated privileges on your system.
However, if you still decide to use an automated script, ensure that you change your execution policy back to normal once the script has been executed. This will be paramount to your system’s security as leaving the execution policy unchanged might allow malicious users to run PowerShell scripts on your system easily. Use one of the methods below that best suits your current needs and requirements to get started.
Method #01: Using Powershell
The PowerShell uninstallation process for any program has two processes. First, sourcing the full package name of the concerned app and then using PowerShell to uninstall the concerned app. If your app does not show up in the PowerShell list, then you might have to use the third-party script below to remove the concerned app from your system. Let’s get started.
Step 1: Source full package name
Press Windows + s on your keyboard and search for ‘PowerShell’. Click on ‘Run as administrator’ once it shows up in your search results.

Once PowerShell launches, type in the command below and press ‘Enter’ on your screen.
get-appxpackage
PowerShell will now generate and show a list of all the apps installed on your system including built-in OEM apps and Windows app. Scroll the list to find your app, however, if this seems too tedious, start by right-clicking on the title bar at the top.
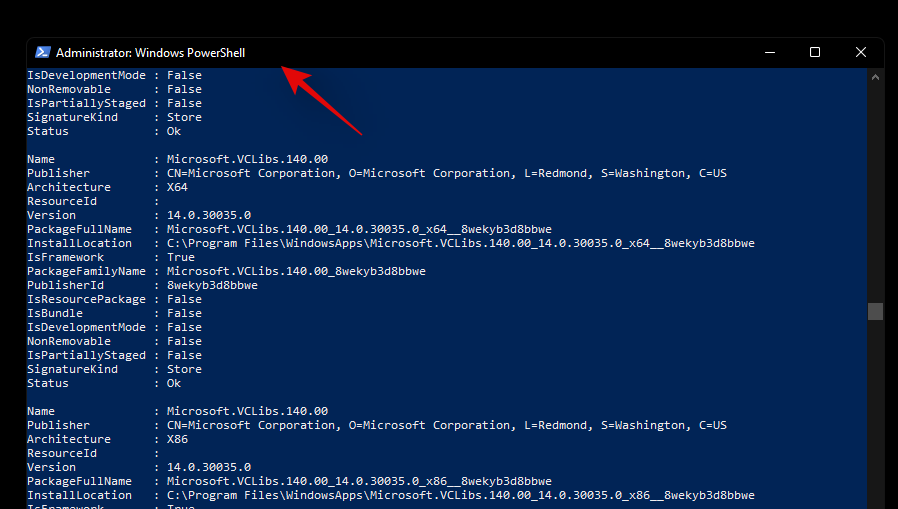
Now select ‘Edit’.
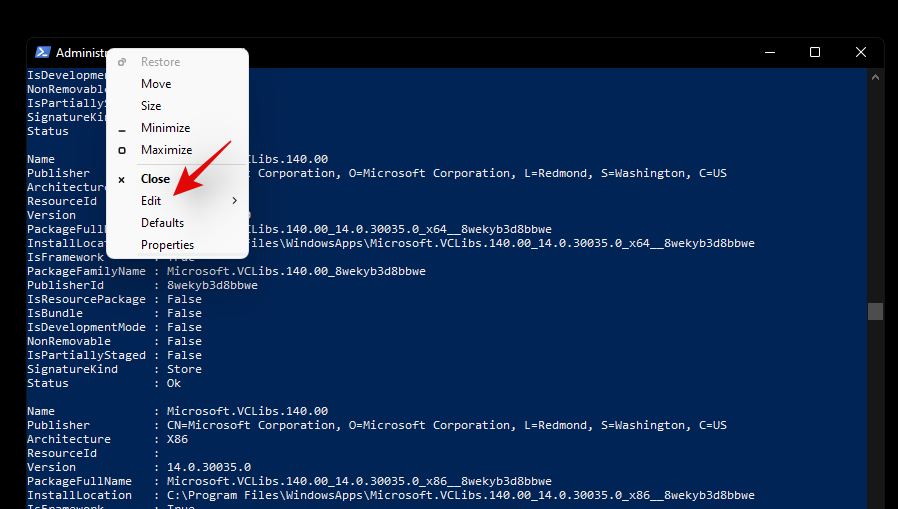
Click on ‘Find’.
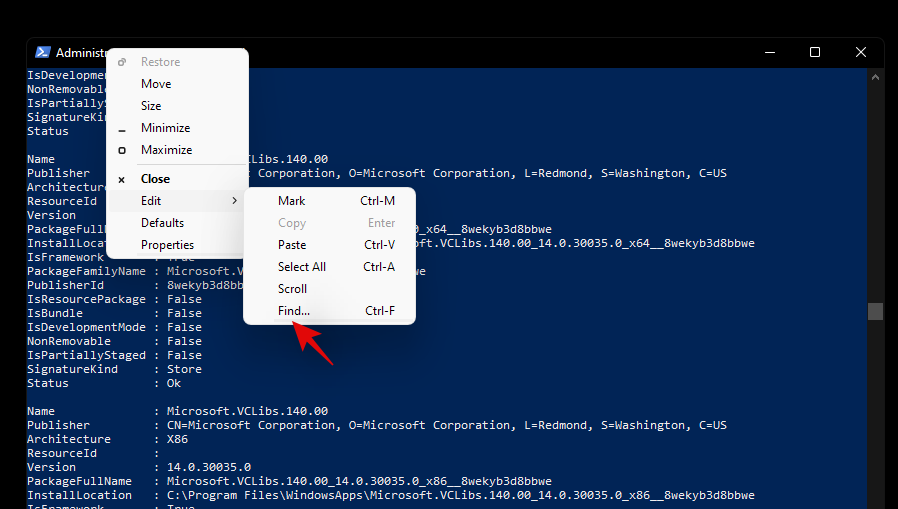
Now search for the general name of the app and the ‘Find’ feature should automatically take you to the app in the list.
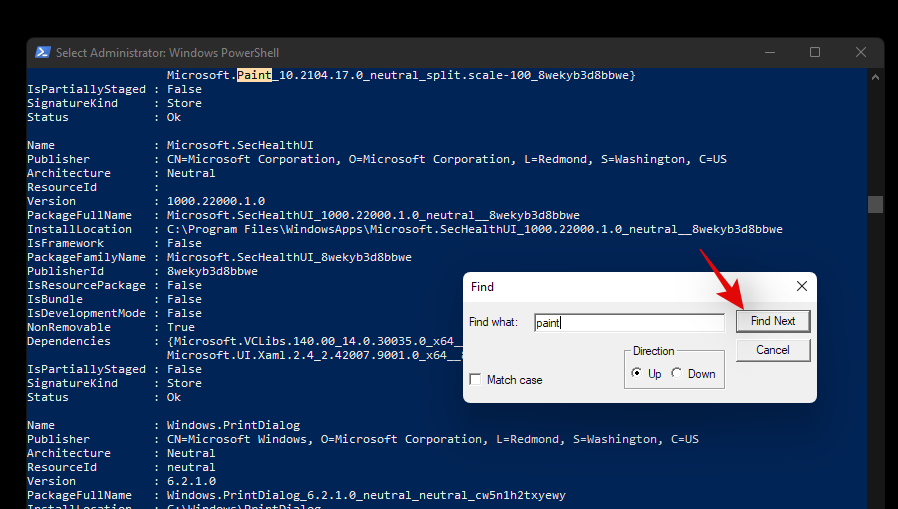
Note down the ‘FullPackageName’ of the concerned app as shown below.
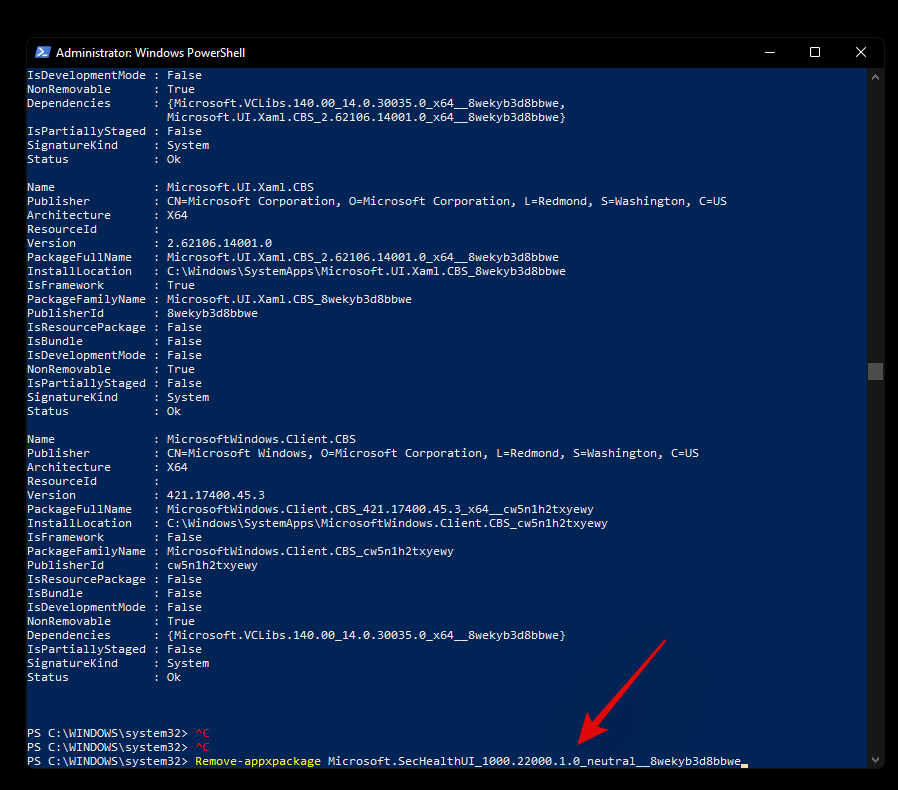
And that’s it! You will now have sourced the full package name for the concerned app on your system. You can now use the guide below to uninstall it from your system.
Step 2: Uninstall app via PowerShell
Open an elevated PowerShell using the guide above. If you already have one open on your screen, then start by typing in the following command. Ensure that you replace ‘[PackageName]’ with the full package name of the app we sourced above.
Remove-Appxpackage [PackageName]

Hit ‘Enter’ on your keyboard once you are done. PowerShell will now do its thing and the app should be installed from your system in no time.
Can’t remove an app using PowerShell? How to fix
If you are unable to remove the app via PowerShell then we recommend you do the following checks to solve the issue.
You should be able to solve your issue by crosschecking the above-stated checks. However, if you are still unable to uninstall the concerned app, then you can use the third-party script below.
Method #02: Using a third party script
You can also use a third-party script to remove system apps from your Windows 11 system. These scripts have been quite popular lately and have been the go-to choice for many users when setting up fresh installations of Windows. Use the guide below to get started.
Note: While this is a Windows 10 script, it has been verified to remove system apps on Windows 11 as well. However, we recommend you keep checking the download page for updates that should be better compatible with Windows 11. We recommend using the script to only remove system apps and nothing else offered by the script. Other features could potentially break Windows 11 until a compatible script for the same is released in the future.
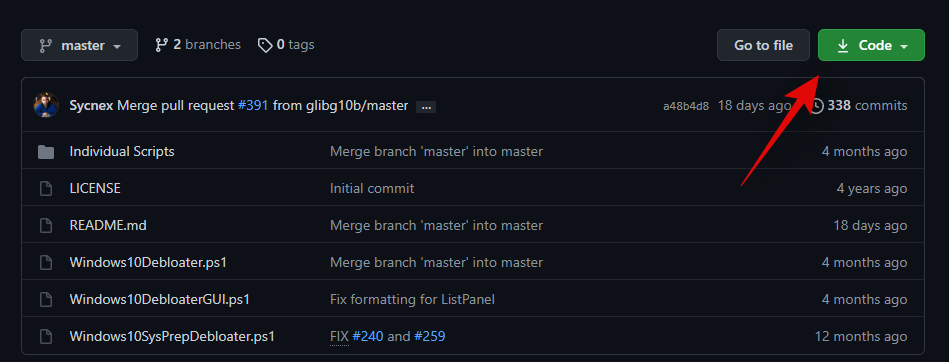
Visit the link above and you will be taken to the GitHub page for the script. Click on ‘Code’ in the top right corner.
Now click and select ‘Download ZIP’.
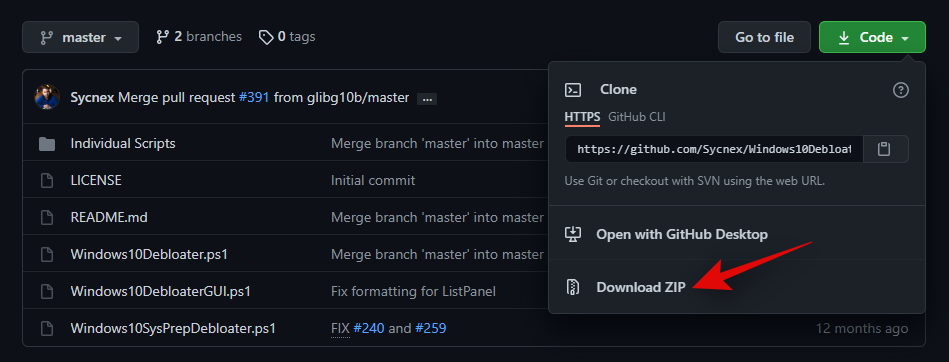
A Zip file will now be downloaded to your local storage. Extract the files to a convenient location.
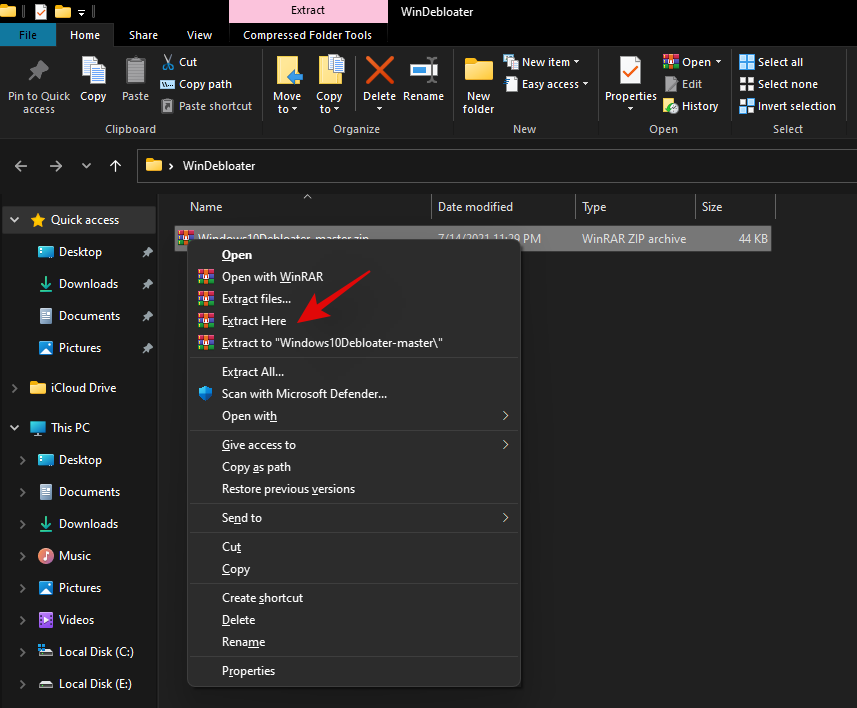
Once extracted, open the folder and click on ”File’ in the top left corner.
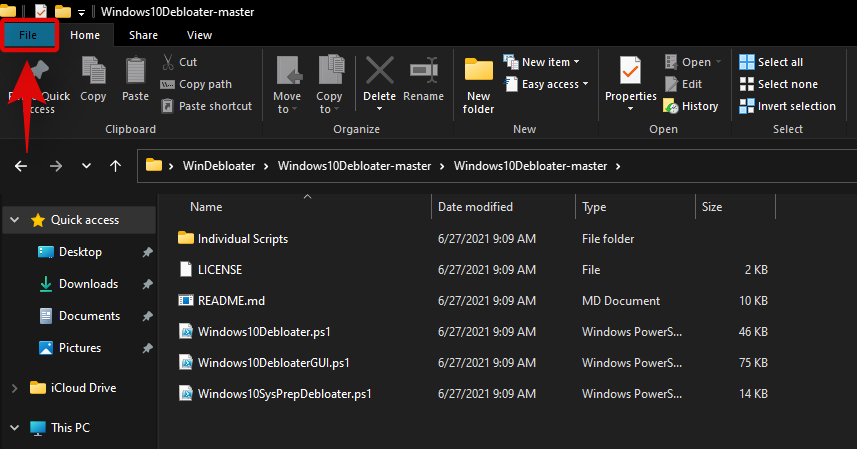
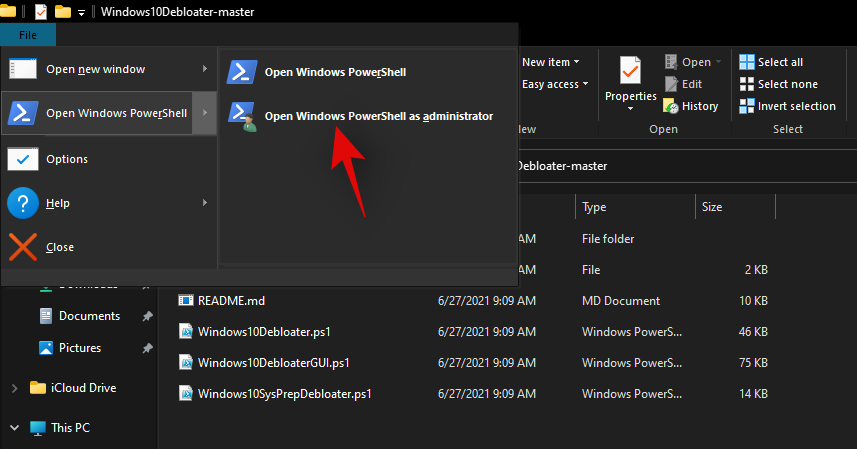
Hover over ‘Open Windows PowerShell’ and select ‘Open Windows PowerShell as administrator’.
An elevated PowerShell window will now launch on your system. Start by executing the following command given below.
Set-ExecutionPolicy Unrestricted -Force

This will set your script execution policy as unrestricted which will allow us to use the script on your system. Once executed, enter the following command in the window and press ‘Enter’ on your keyboard once you are done.
.\Windows10DebloaterGUI.ps1

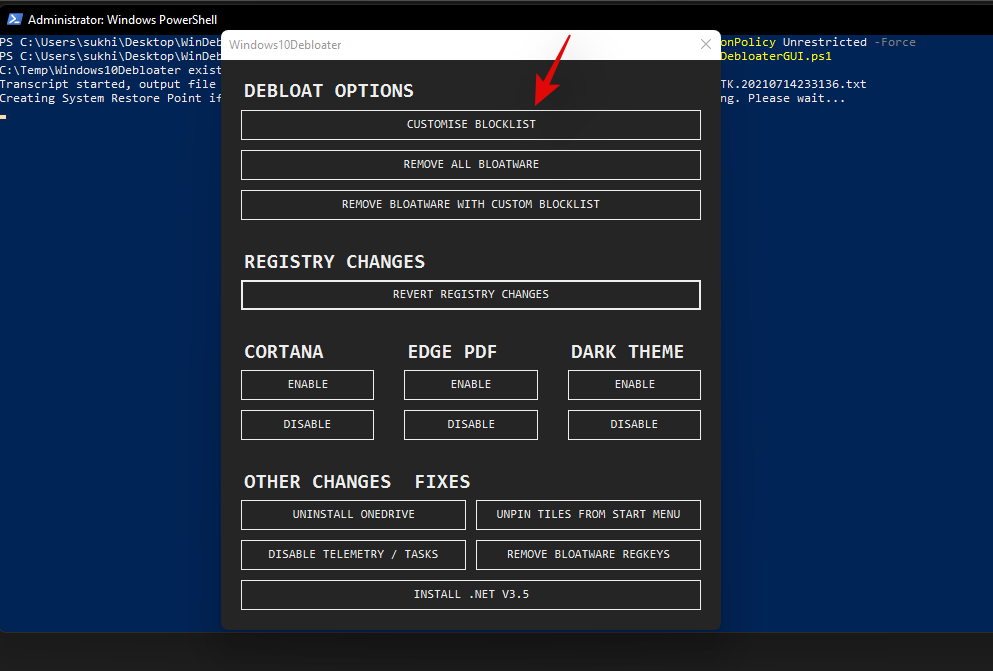
This will execute the debloat script and you should now get a graphical interface for it on your screen. Click on ‘Customize Blacklist’ at the top.
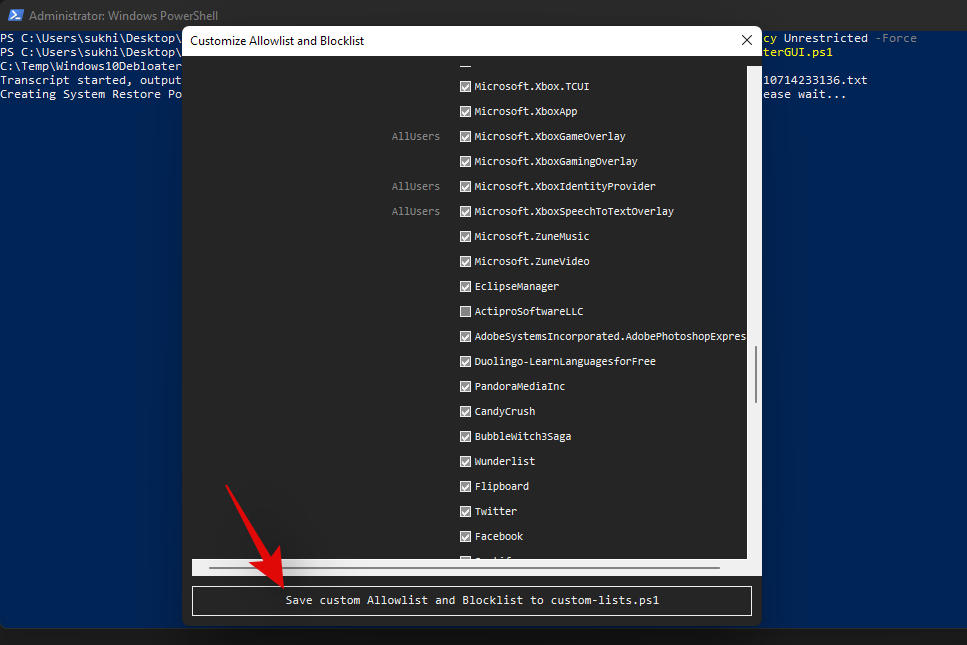
You will now get a list of all the apps installed on your system. Check the box for the apps you wish to uninstall and uncheck the box for the apps you wish to keep on your device. Ensure that you go through the entire list to remove any default selections made by the script for the programs that you wish to keep on your device.
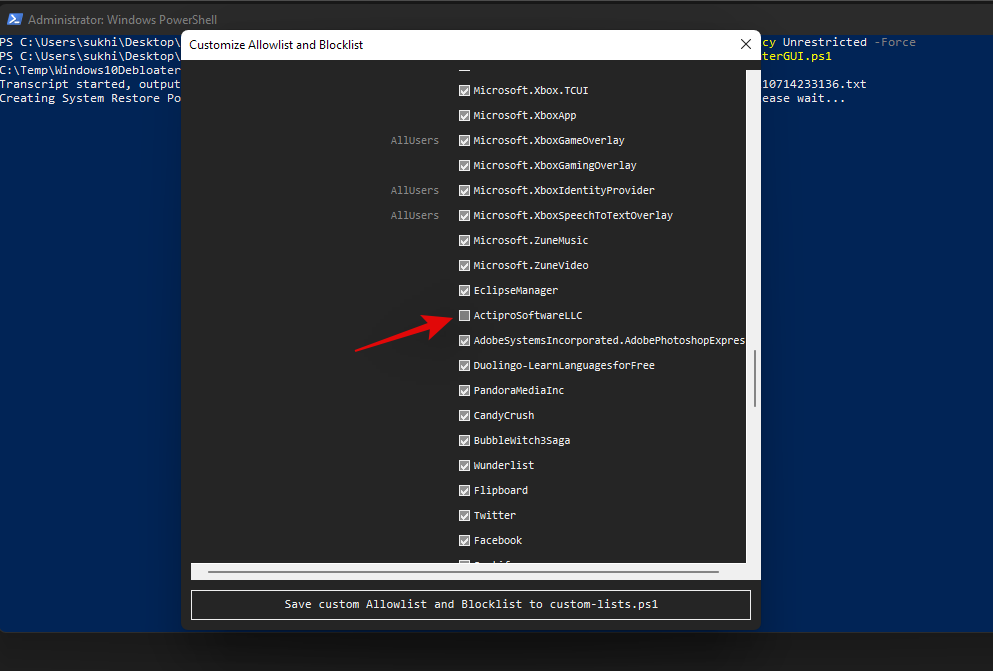
Once you have edited your list, simply click on ‘Save custom Whitelist and Blacklist to custom-lists.ps1’ at the top. You can now close this app selection window.
Now click on ‘Remove Bloatware with Customized Blacklist’. Keep an eye on the PowerShell window on the background once the command executes.
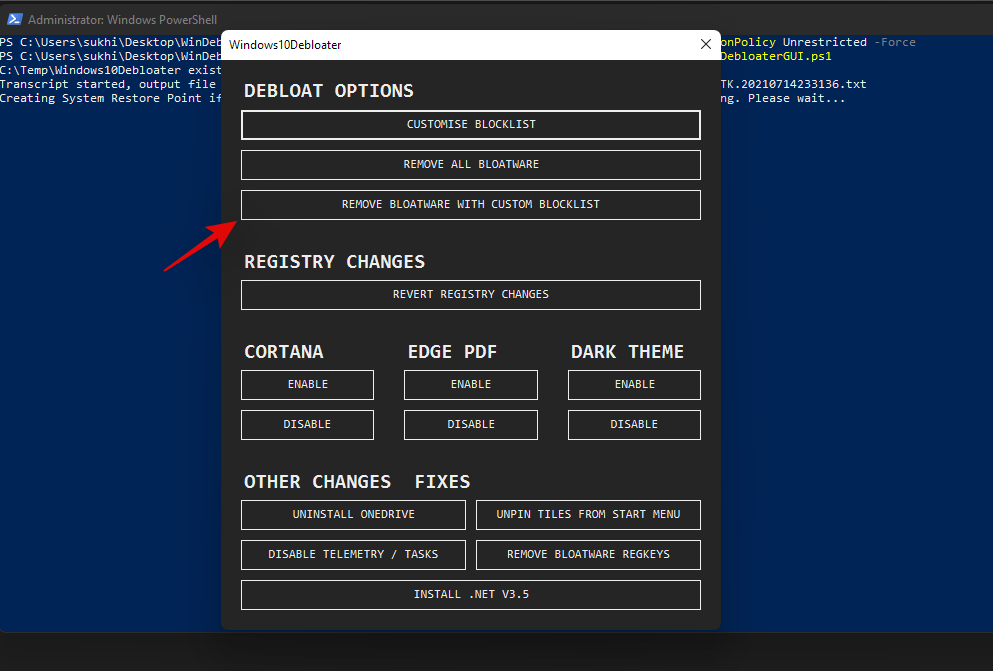
Once all programs have been removed, you will get a confirmation for the same in the PowerShell window in the background. Close the graphical interface by clicking on the ‘X’ in the top right corner.
Now go back to your PowerShell window and execute the following command.
Set-ExecutionPolicy Restricted -Force

This will revert changes to your execution policy and revert the changes we made earlier. Doing this is quite important to maintain proper security on your Windows system.
And that’s it! You will now have uninstalled system apps from your system via a third-party PowerShell script.
Can’t uninstall apps on Windows 11? How to fix
There could be a few reasons why you are unable to uninstall apps on your system. Here are a few workarounds that should help you uninstall persistent apps from your system easily.
Method #01: Close instance in task manager and try again
Chances are that the app has an instance or a process open in the background which is preventing it from being uninstalled. In such cases, you can try finding processes related to the app and kill them on your own. Once the processes have been killed, you can then try to uninstall the app again. Follow the guide below to find and kill the process.
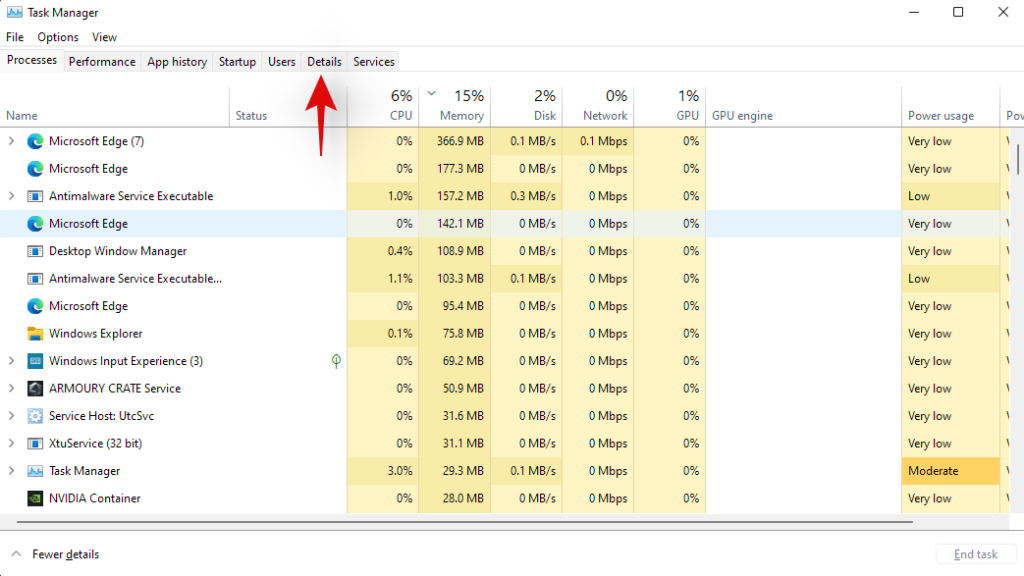
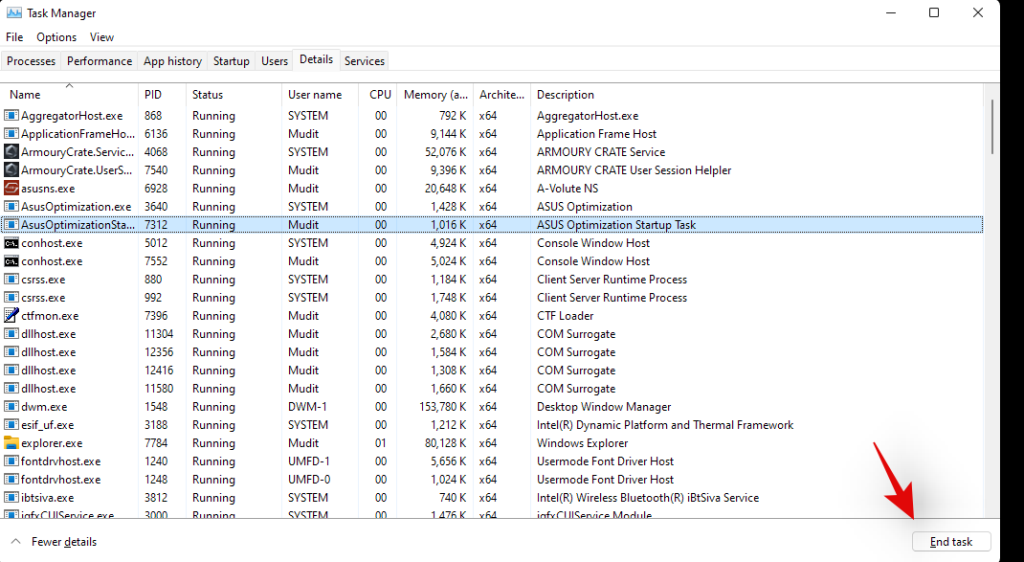
Press Ctrl + Shift + Esc on your keyboard to open the ‘Task Manager’. Switch to the ‘Details’ tab by clicking on it.
Now look for a process in the list for the concerned app. In our case, we are looking to uninstall ‘AsusOptimization’, hence we will look for a PowerToys process. Once found, click and select the process.
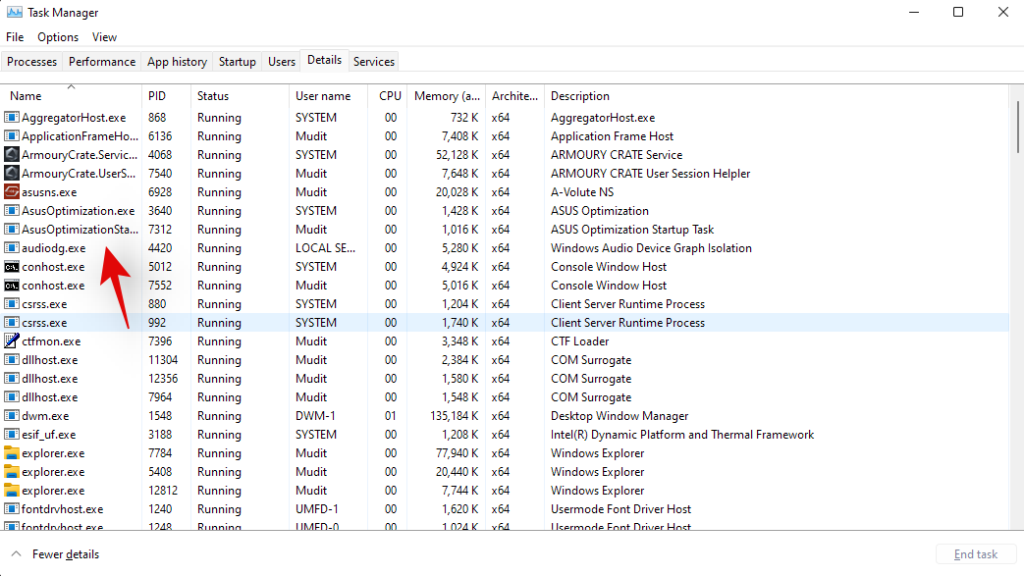
Hit delete on your keyboard or click on ‘End Task’.
Confirm your choice by selecting ‘End Process’.
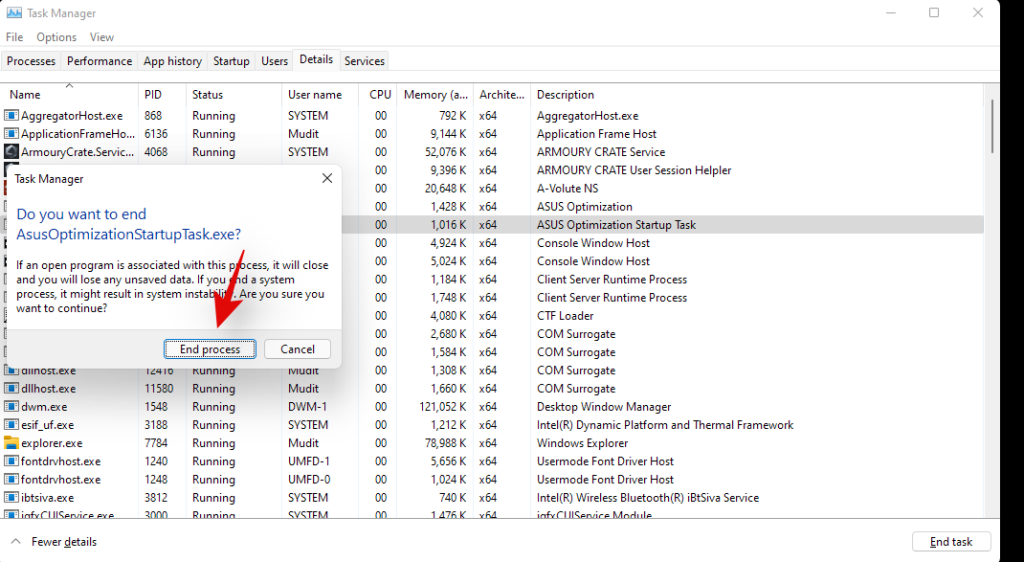
And that’s it! the process should now be killed and you can now try uninstalling the concerned app again.
Method #02: Uninstall in Safe mode
Another way to ensure that no third-party apps are launched or used in the background is to launch your system in safe mode and then try to uninstall your concerned app. You can use this comprehensive guide by us to enter safe mode on Windows 11.
Once in safe mode, follow the guide below to get the installer service back up and running on your system. Once the service is running in the background, you can use either of the methods above to uninstall the concerned app from your system.
Press Windows key + S key to open Windows Search and type in ‘cmd’. Click on ‘Run as administrator’ when the command prompt shows in your search results.
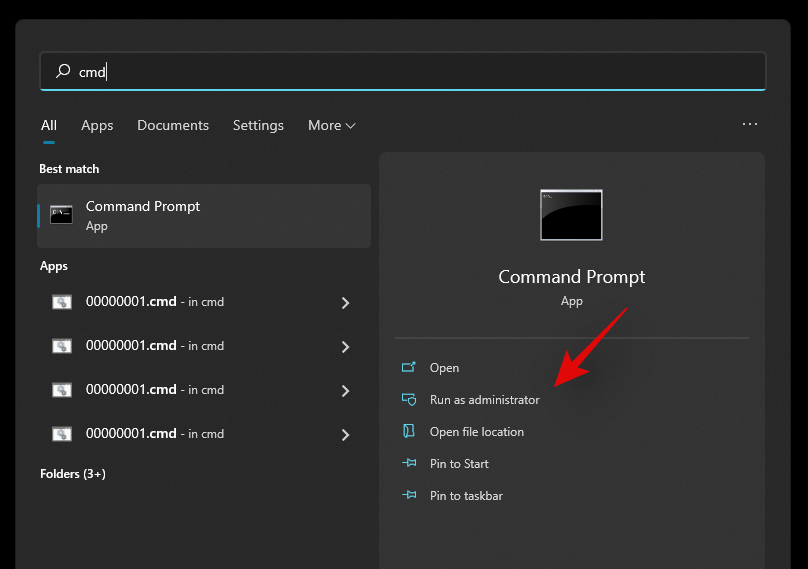
Enter the following commands in the command prompt one by one and hit Enter on your keyboard to execute each one of them.
REG ADD "HKLM\SYSTEM\CurrentControlSet\Control\SafeBoot\Minimal\MSIServer" /VE /T REG_SZ /F /D "Service"
REG ADD "HKLM\SYSTEM\CurrentControlSet\Control\SafeBoot\Network\MSIServer" /VE /T REG_SZ /F /D "Service"
net start msiserver

And that’s it! The installer service should now be running on your system and you should now be able to uninstall the concerned app using either one of the methods above.
Method #03: Run the Microsoft Uninstaller troubleshooter
You can also run a Microsoft Troubleshooter to try and fix uninstaller issues. Microsoft troubleshooters have come a long way since they were first introduced and can now fix most software and driver incompatibility issues without any user intervention.
Microsoft has also made it much easier for you to now launch any troubleshooter to try and solve your current issue. Use the guide below to launch an uninstaller troubleshooter on your Windows 11 system.
Required
Guide
Download the troubleshooter using the link above to your PC. Once downloaded, extract the .zip file to a convenient location. If you have trouble extracting the .zip file or it seems to be blocked, use the guide below to unblock it, else you can skip the guide and jump to the next guide.
Unblock the .zip file
Right-click on the .zip file and select ‘Properties’.
Check the box for ‘Unblock’ at the bottom of the Window.
Click on ‘Ok’.
Provide administrator permission to make the necessary change.
The file should now be unblocked on your system and you should now be able to extract it like any other .zip file on your system.
Run the troubleshooter
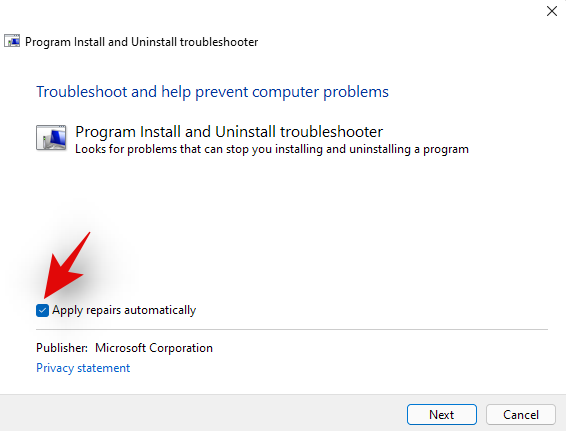
Navigate to the extracted files on your local storage. Cut the file named ‘MicrosoftProgram_Install_and_Uninstall.meta.diagcab’ and paste it on your desktop. Double click and run the file from your desktop. Click on ‘Advanced’ at the bottom once the troubleshooter is launched.
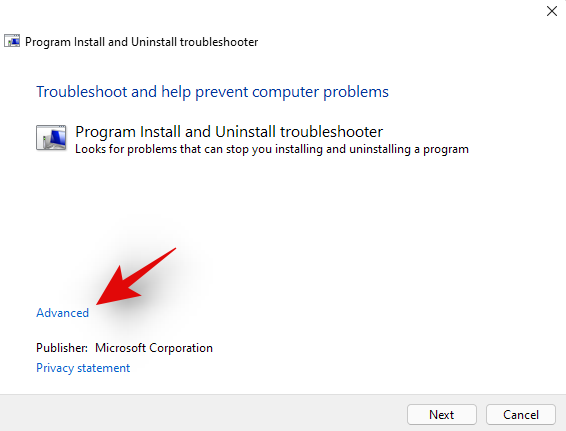
Check the box for ‘Apply repairs automatically’. Click on ‘Next’ once you are done.
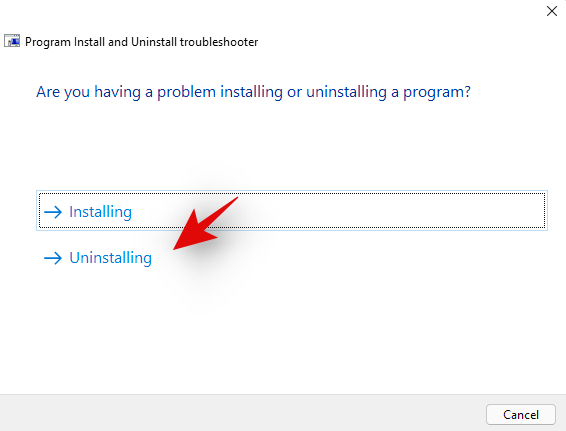
Select ‘Uninstallting’ on the next step.
Select the concerned program from the list provided on your screen. If your program does not appear in the list, click on ‘Not Listed’.
Now follow the on-screen instructions depending on your choice to complete the troubleshooting process.
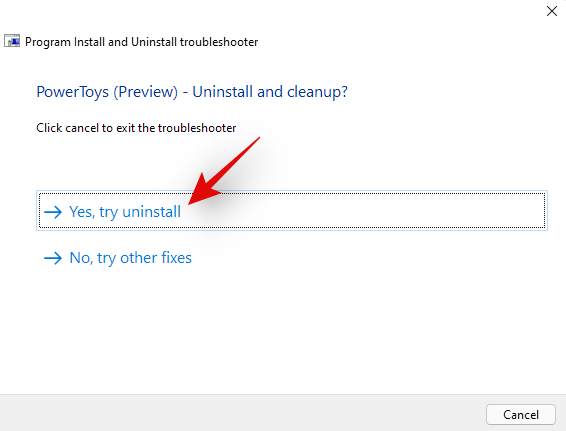
And that’s it! In most cases, the troubleshooter will detect your issue and solve it automatically. A report for the same will be presented to you at the end of the process with all the details.
Method #04: Use a restore point
If you are still having issues uninstalling the software from your system then it is time for some drastic steps as this could be malicious in nature. Let’s restore your PC to a restore point before the concerned app or program was installed on your system.
However, if you do not have a restore point then you can jump to one of the other methods listed below. Here’s how you can use a restore point to restore your PC to its previous state.
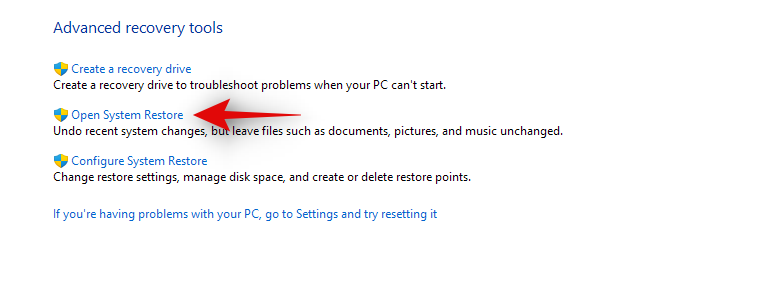
Press Windows + S on your keyboard and search for ‘Recovery’. Click and launch the app link once it shows up in your search results.
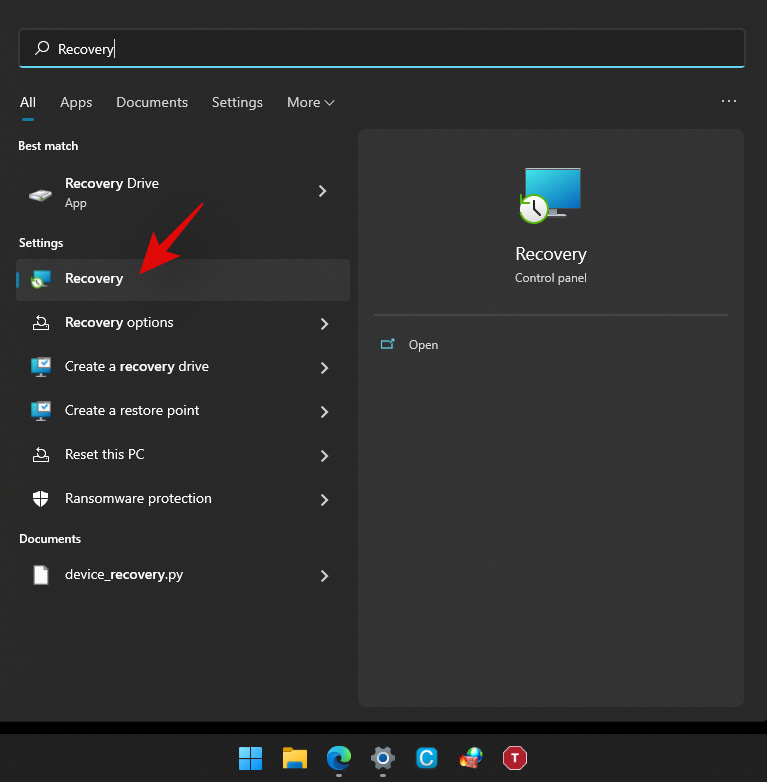
Click on ‘Open System Restore’.
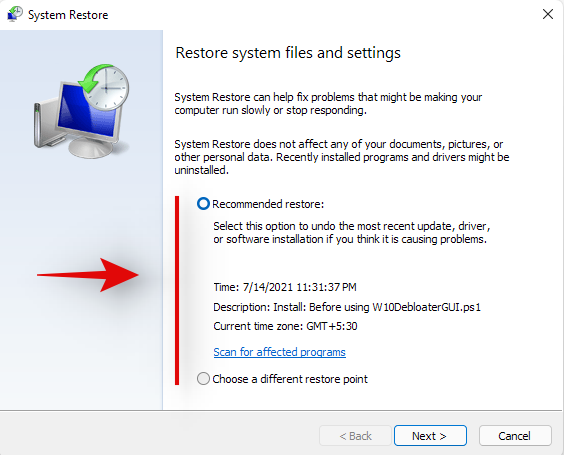
You will now be suggested a recent system restore point if you have one. Select that if needed, or click on ‘Choose a different restore point’ if you wish to choose an older one.
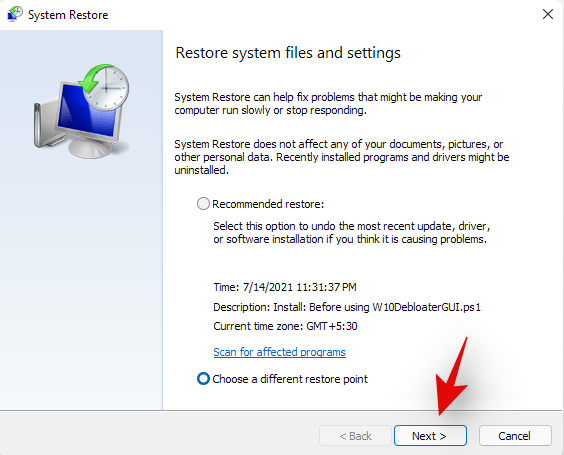
Select ‘Next’ or hit ‘Enter’ on your keyboard.
You can now select the desired Restore Point from the list at the top. You can check the box for ‘Show more restore points’ if you wish to look at more restore points.
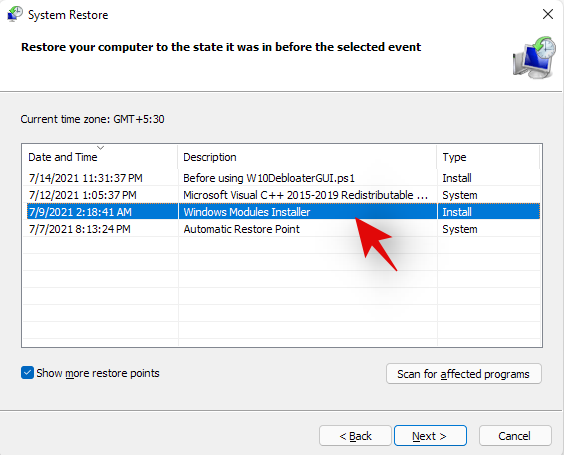
Once selected, click on ‘Next’.
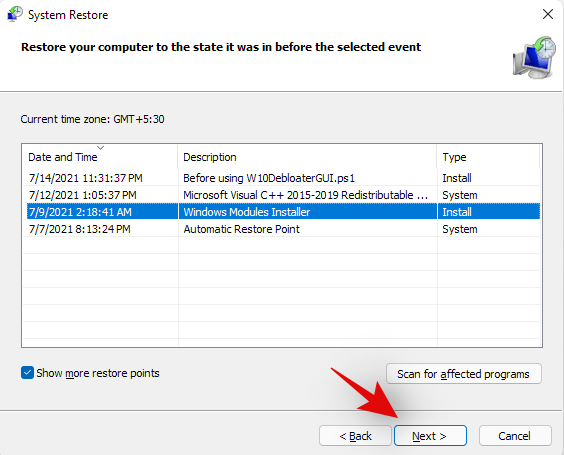
Finally, click on ‘Finish’.
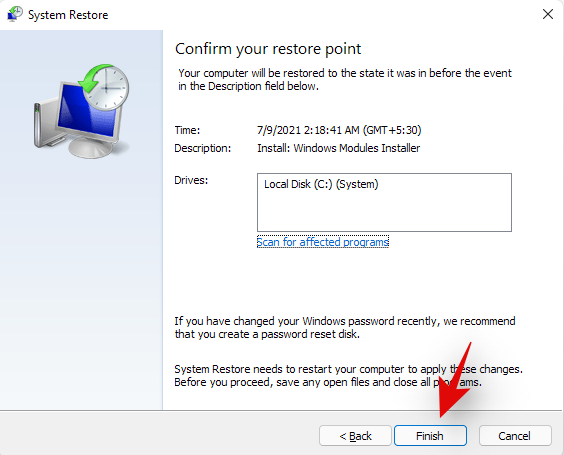
Windows 11 will now restore your system to the selected restore point and the concerned app should no longer be on your system once the process is completed.
Method #05: Contact Windows Support
If you are still unable to get the app uninstalled from your system then it might be time to contact Microsoft Support. Microsoft Support executives are trained to solve such issues with more expertise and can even remotely takeover your system if needed. It might be time to get in touch with the support team to solve your issue. Additionally, if you purchased a pre-built system, you can use your OEM support for some help as well. Use the link below to get in touch with Microsoft Support.
Uninstall programs on Windows 11: FAQs
Can you uninstall pre-installed apps?
Well, officially, you can not and it is not recommended by Microsoft. But still, if you wish to remove preinstalled apps, you can easily do so depending on the type of the app. If you wish to remove a system app then the process is a bit complicated. Else, if you wish to remove third-party pre-installed apps then you can simply do so by uninstalling them like any other app from your Windows 11 Pc using the guide below.
Can you uninstall system apps?
Yes, you can uninstall system apps but not officially. Officially Windows 11 or any Windows for that matter, doesn’t allow you to remove system apps from the OS. However, there are many workarounds to circumvent this restriction and uninstall preinstalled system apps from your system.
This includes using command prompt/PowerShell or a third-party software. Using these methods you should be able to easily uninstall system apps from your system. Follow our guides below for each of the methods depending on your current needs and requirements.
Can you uninstall apps downloaded from the Microsoft Store?
Yes, apps downloaded from the Microsoft Store can be uninstalled easily using either of the methods listed below. This includes Android apps that you may have downloaded on your system but did not find appealing enough. We recommend uninstalling Windows Store apps either via Settings or Start.
Chances are that the Store app will now show up in the Control Panel and if uninstalled via CMD or PowerShell, you could end up with leftover files including empty Start menu folders. Hence, use Powershell or CMD for Windows Store apps only if you are facing an issue uninstalling them via the Settings or the Start menu.
What happens when you uninstall a program?
Uninstallation is the process of removing a program or an app from your system. While apps are installed singularly with all dependencies available to them in a sandbox, programs operate differently. Programs usually have scheduled tasks, customized registry values to execute them, and dependencies for various Windows features and extensions that they need for their own installation process to create and place every file and task correctly.
Hence the removal process for all these things created by a program when it is first installed on your system is called uninstallation. All scheduled tasks, registered services, registry keys, executables, temporary files, log files, and more are removed once you uninstall a program from your system. In some cases, you will be leftover with settings and save files so that you don’t have to set up the program entirely when installing it in the future.
These files can be cleared by clearing your Windows Cache and temporary files in most cases. However, if you still suspect leftover files from a program on your system, then we recommend checking the following places for any leftover files. If found, you can simply delete them like any other file on your system.
How to remove data of uninstalled programs
If you still see the remaining files and folders or context menu options for a removed program or app, then you can try the fixes below to solve your issue.
Method #01: Clear cache and temporary files from Windows
You should first try clearing cache and temporary files from your Windows 11 system. In most cases, this will help the overall File Explorer UI to refresh itself which should automatically remove leftover files and context menu items for removed programs from your system.
You can use this comprehensive guide by us to easily clear your Windows 11 cache and storage. You can also use the same guide to free up storage space on your system as well by deleting other large files and installations that show up in the list.
Method #02: Check for leftover files manually
You can also check and delete all leftover files manually for the removed program or app. You should start by using Windows Search to look for any files or folders associated with the uninstalled program. You can then delete these manually from your local storage.
Once you have deleted all the files and folders that show up in the search, you can proceed to manually check the locations listed below. If they contain any leftover files or folders from the removed program, then you can simply select them and delete them from your system.
Method #03: Run a third-party uninstaller/cleaner
If you are still left with the remaining files and context menus for the program then it is time to use a third-party uninstaller or cleaner. These programs are specifically designed to identify and remove leftover files from previously uninstalled programs on your system. We recommend you give Revo uninstaller a try as even the free model for the app will help you identify the location of leftover files which can then be deleted by you manually. You can also use something like CCleaner that is designed to remove leftover files and free up storage and processing space on your system.
Method #04: Try to remove the app via PowerShell
If nothing works, then chances are that the concerned app was installed on your system using elevated privileges which prevents some files and folders from being removed from your system.
In such cases, we recommend you try to remove the app via PowerShell. You can use our guide above to remove system apps from Windows 11 via PowerShell. You will first need to source the full package name for your app or program, which can then be used to force uninstall it from your system.
Can you uninstall Windows Updates?
Yes you can easily uninstall Windows Update from your system. New updates can often introduce compatibility issues on older hardware and having the option to uninstall updates can always help. You can use the guide below to uninstall recently installed updates from your system.
How to uninstall Windows Updates
Follow the guide below to uninstall recently installed Windows Updates from your Windows 11 system.
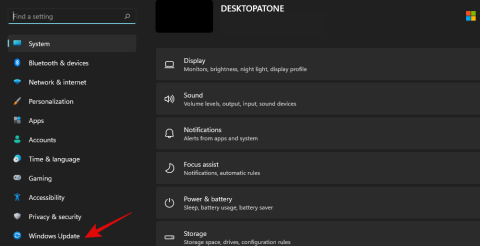
Press Windows + i on your keyboard to open the Settings app. Click on ‘Windows Update’ on your left.
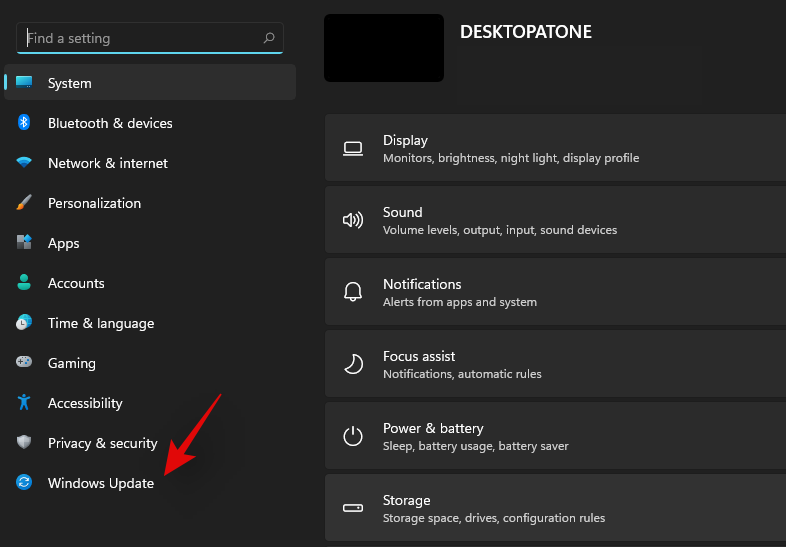
Now click on ‘Update history’.
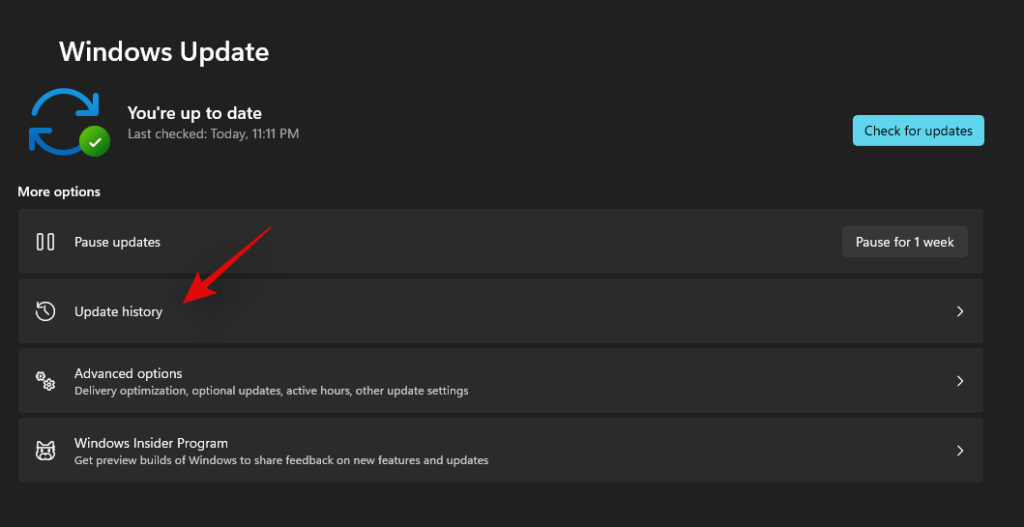
Scroll to the bottom on your right and click on ‘Uninstall Updates’.
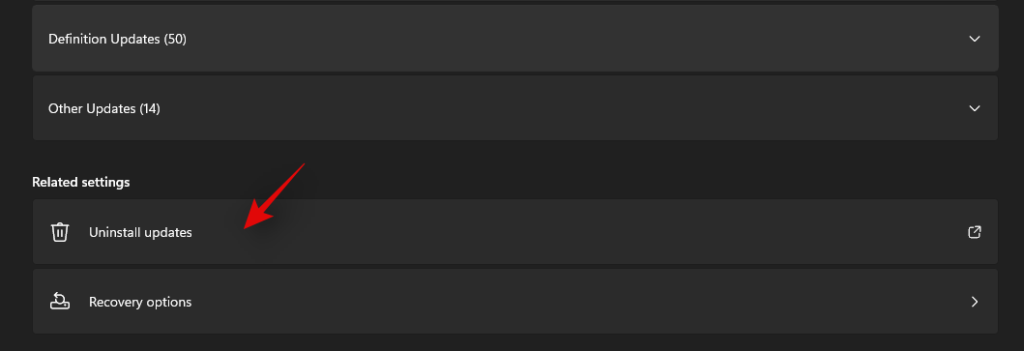
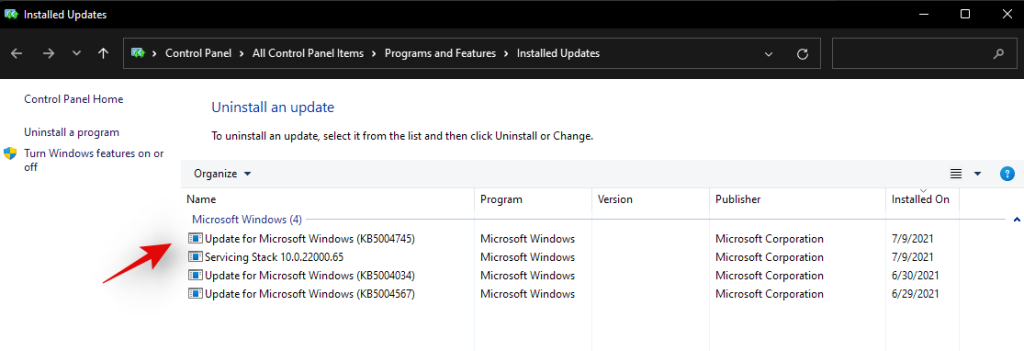
You will now get a list of all the recent updates installed on your system. Click and select the update you wish to uninstall.
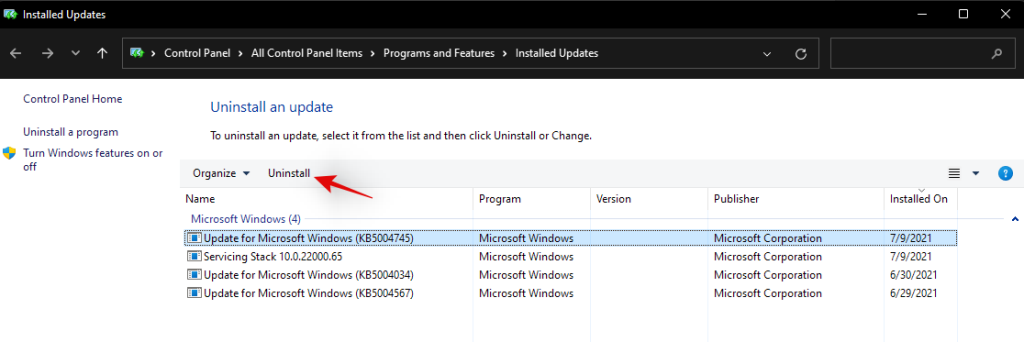
Click on ‘Uninstall’ at the top now.
Follow the on-screen instructions to complete the process.
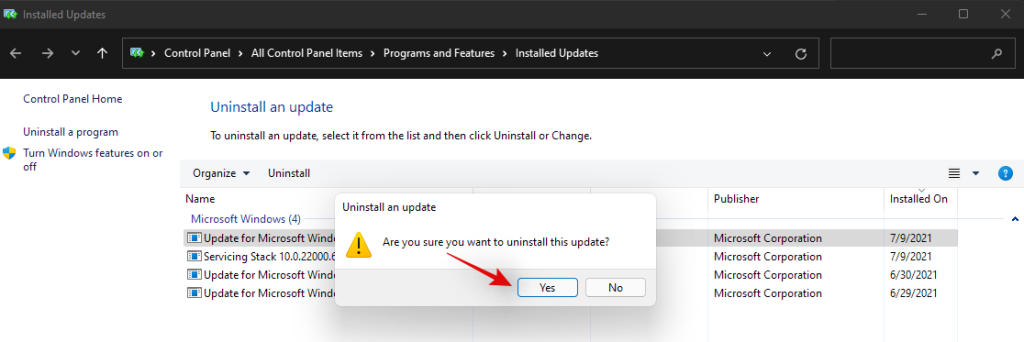
And that’s it! Your selected Windows update should now be uninstalled from your system.
We hope this guide helped you uninstall the concerned apps or programs from your system. If you still face issues, feel free to reach out to us using the comments section below.
Zjistěte, jak efektivně blokovat vyskakovací okna a reklamy v systému Windows 11 a procházejte bez rušení.
Přečtěte si, jak <strong>odinstalovat McAfee</strong> z vašeho systému Windows 11 jedním z 5 efektivních způsobů.
Počítače jsou integrovány do našich životů více než kdy jindy, a proto výrobci hledají nové způsoby, jak ušetřit energii na vašich mobilních zařízeních. Nicméně osvědčený manuál Sleep w…
Aktualizace Windows byly pro mnoho uživatelů od dob Windows XP vždy notorickou nepříjemností. Naštěstí se poskytování aktualizací systému Windows v posledních několika letech výrazně zlepšilo…
Windows 11 byl uvolněn pro veřejnost a zdá se, že tato nová aktualizace dlouhotrvajícího operačního systému získává skvělé recenze. Společnost Microsoft zvýšila soukromí, zabezpečení přidalo nové uživatelské rozhraní a schopnost…
Když hledáte položku ve Vyhledávání, Windows zobrazí místní výsledky pro aplikace, soubory nebo nastavení. Pokud se nic neobjeví, Windows má také vestavěné vyhledávání Bing, které zobrazí online položky…
Navzdory nejlepším pokusům Microsoftu nalákat vás na používání Teams, pokud se vám to stále nelíbí, možná budete chtít odstranit z hlavního panelu. No, můžete to snadno udělat a získat více prostoru…
Sestavení Windows Insider a beta sestavení jsou skvělým způsobem, jak ochutnat nadcházející aktualizaci. Kvůli nadcházejícímu vydání Windows 11 se mnoho uživatelů z celého světa připojilo k programu zasvěcených…
Upozornění se stala nedílnou součástí našich životů. Udržují nás aktuální, pomáhají nám udržovat náš rozvrh a především nám pomáhají získávat nejnovější a nejlepší zprávy. Zdá se však, že společnosti…
Windows 11 byl právě vydán a pokud jste se pokusili nainstalovat nejnovější OS, možná jste si uvědomili, že potřebujete Secure Boot a TPM. Tato nastavení lze snadno najít a aktivovat ve vás…
Máte potíže se stahováním z Obchodu Windows 11? Objevte osvědčená, podrobná řešení, která vám pomohou znovu hladce stahovat aplikace. Nejsou potřeba žádné technické znalosti!
Potýkáte se s mikrosekáním ve hrách ve Windows 11? Objevte osvědčená řešení, která eliminují zpoždění, zvýší FPS a užijí si plynulé hraní. Podrobná řešení pro hráče.
Zasekli jste se v frustrující smyčce automatické opravy systému Windows 11? Objevte osvědčené kroky pro řešení problémů pro rok 2026, které vám pomohou rychle obnovit váš počítač a vrátit se do normálního režimu. Podrobné opravy uvnitř.
Potýkáte se s frustrující chybou 0x800ccc0e v Outlooku ve Windows 11 v roce 2026? Objevte osvědčená podrobná řešení, která tento problém rychle vyřeší a pomohou vám obnovit e-maily bez ztráty dat. Odborné tipy pro trvalou úlevu.
Objevte podrobné pokyny, jak zálohovat systém Windows 11 do cloudu. Zabezpečte svá data spolehlivými metodami pomocí OneDrive, Disku Google a dalších služeb pro klid.
Máte potíže s rozmazaným pozadím přihlašovací obrazovky Windows 11? Objevte osvědčená řešení, která vám bez námahy obnoví ostrý a úžasný obraz. Podrobný návod pro bezproblémový zážitek.
Potýkáte se s frustrující modrou obrazovkou smrti způsobenou chybou volajícího po bazénu ve Windows 11? Tato komplexní příručka pro rok 2026 nabízí podrobné opravy, od základního řešení problémů až po pokročilá řešení. Získejte zpět hladký chod počítače bez ztráty dat. Aktualizováno nejnovějšími opravami systému Windows pro optimální výkon.
Objevte nejlepší způsoby, jak bez námahy urychlit aktualizace systému Windows 11. Seznamte se s osvědčenými tipy, jak optimalizovat počítač pro rychlejší stahování a instalaci, snížit frustraci a zabezpečit systém.
Máte potíže s nefunkční Kalkulačkou ve Windows 11 v roce 2026? Objevte osvědčené podrobné opravy, které vám pomohou znovu zajistit bezproblémový chod aplikace Kalkulačka. Nejsou potřeba žádné technické znalosti!
Zjistěte, jak snadno nastavit funkci Vždy navrchu ve Windows 11. Vylepšete si multitasking s naším podrobným návodem, jak udržet okna připnutá nad ostatními pro maximální efektivitu.
![Jak odinstalovat McAfee v systému Windows 11 [5 způsobů] Jak odinstalovat McAfee v systému Windows 11 [5 způsobů]](https://blog.webtech360.com/resources8/images31/image-4917-0105182719945.png)
