Jak odinstalovat McAfee v systému Windows 11 [5 způsobů]
![Jak odinstalovat McAfee v systému Windows 11 [5 způsobů] Jak odinstalovat McAfee v systému Windows 11 [5 způsobů]](https://blog.webtech360.com/resources8/images31/image-4917-0105182719945.png)
Přečtěte si, jak <strong>odinstalovat McAfee</strong> z vašeho systému Windows 11 jedním z 5 efektivních způsobů.
Aktualizace Windows byly pro mnoho uživatelů od dob Windows XP vždy notorickou nepříjemností. Naštěstí se poskytování aktualizací systému Windows v posledních několika letech výrazně zlepšilo a velmi málo aktualizací funkcí má v dnešní době tendenci způsobovat velké problémy .
Systém Windows můžete nakonfigurovat tak, aby se automaticky stahoval a aktualizoval na pozadí, a dokonce jej můžete nechat restartovat během neaktivních hodin. To vše je skvělé, ale co když je nainstalována aktualizace, kterou jste nepotřebovali? Nebo co když získáte aktualizaci, která sníží výkon vašeho počítače? V tomto případě můžete odinstalovat aktualizace systému Windows ve Windows 11. Zde je však několik věcí, které byste měli mít na paměti před odinstalováním aktualizací z počítače s Windows 11.
Související: Jak zakázat aktualizace v systému Windows 11
Obsah
Proč odinstalovat aktualizace systému Windows?
Důvodů, proč chcete odinstalovat aktualizace systému Windows, může být několik, zde jsou některé z nejběžnějších. Pokud řešíte chyby po nedávné aktualizaci systému Windows, můžete si také projít tento seznam.
V případě, že se ve svém systému potýkáte s podobnými problémy, můžete zkusit odinstalovat nejnovější aktualizaci systému Windows a pokusit se problém vyřešit.
a více. Při instalaci nové aktualizace pro Windows 11 může nastat spousta problémů, se kterými se můžete setkat, zejména pokud jste přihlášeni k odběru beta nebo zasvěceného kanálu. V takových případech se můžete pokusit odinstalovat příslušnou aktualizaci pomocí průvodce v tomto příspěvku.
Související: Jak zrušit čekající aktualizaci Windows Insider Update
Je bezpečné odinstalovat aktualizace systému Windows?
Ano, pokud neodebíráte aktualizace systému Windows ručně nebo pomocí zastaralého nástroje, měli byste bezpečně odinstalovat aktualizace systému Windows ze svého systému. Měli byste však mít na paměti, že Microsoft používá aktualizace systému Windows k poskytování bezpečnostních záplat, oprav hotfix a dalších, které pomáhají chránit váš systém před nejnovějšími hrozbami a slabými místy zabezpečení.
Odstranění aktualizací systému Windows také odinstaluje takové záplaty, které následně způsobí, že váš systém bude zranitelný vůči online hrozbám. To platí zejména v případě, že chcete odinstalovat nejnovější aktualizace zabezpečení.
I když tedy můžete bezpečně odinstalovat jakoukoli aktualizaci, doporučujeme vrátit změny, jakmile bude chyba opravena. Pokud vaše chyba nebo chyba přetrvává i po přeinstalaci aktualizace, můžete počkat, dokud společnost Microsoft nevydá další aktualizaci a opravu.
Související: Jak odebrat Bing z Windows 11
Jak najít aktualizace, které chcete odebrat
Aktualizace můžeme odstranit různými metodami, ale abyste zjistili, kterou aktualizaci chcete odebrat, musíte ji identifikovat na svém počítači. Každé aktualizaci společnosti Microsoft je přiřazeno číslo KB, které pomáhá určit a identifikovat aktualizaci na spotřebitelských počítačích i na serverech společnosti Microsoft. Toto číslo můžeme využít ve svůj prospěch a odstranit příslušnou aktualizaci z vašeho systému pomocí jednoho z níže uvedených průvodců. Zde je návod, jak identifikovat poslední aktualizace systému Windows nainstalované v počítači.
Metoda č. 01: Použití Nastavení
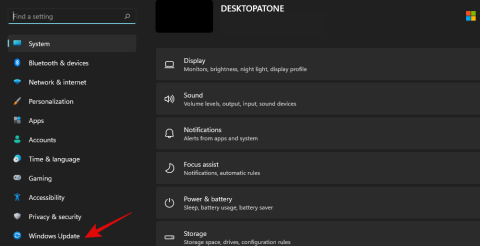
Stiskněte Windows + ina klávesnici a vlevo vyberte „Aktualizace systému Windows“.
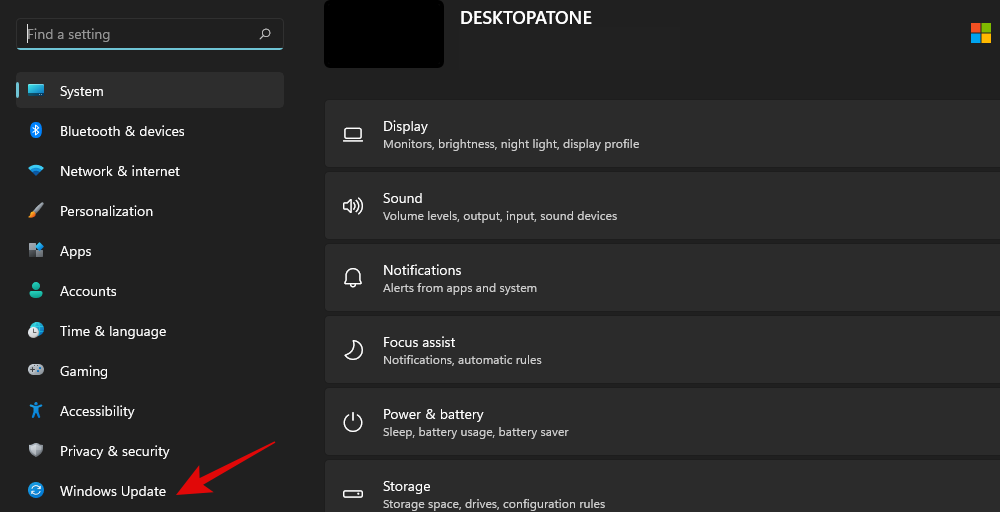
Nyní klikněte na 'Aktualizovat historii'.
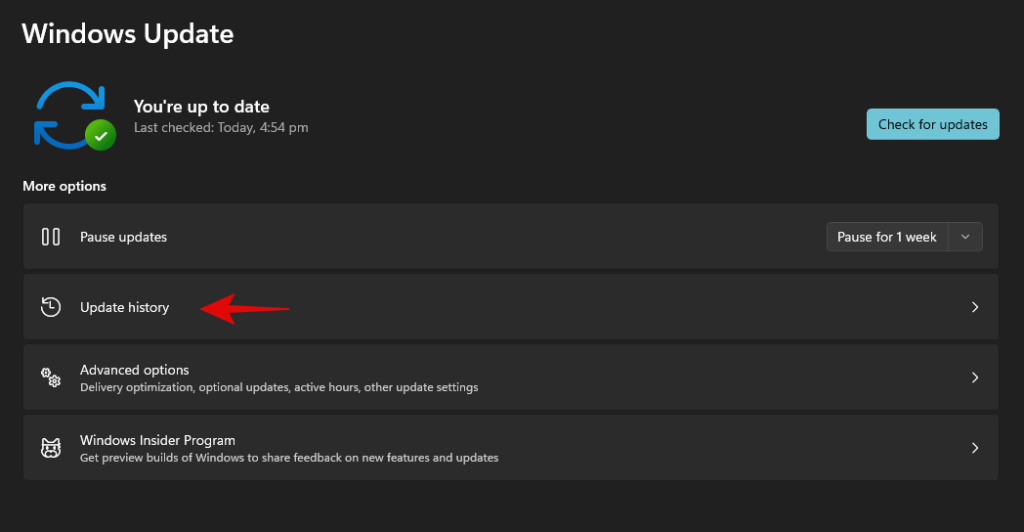
Nyní získáte seznam nedávno nainstalovaných aktualizací systému Windows ve vašem systému.
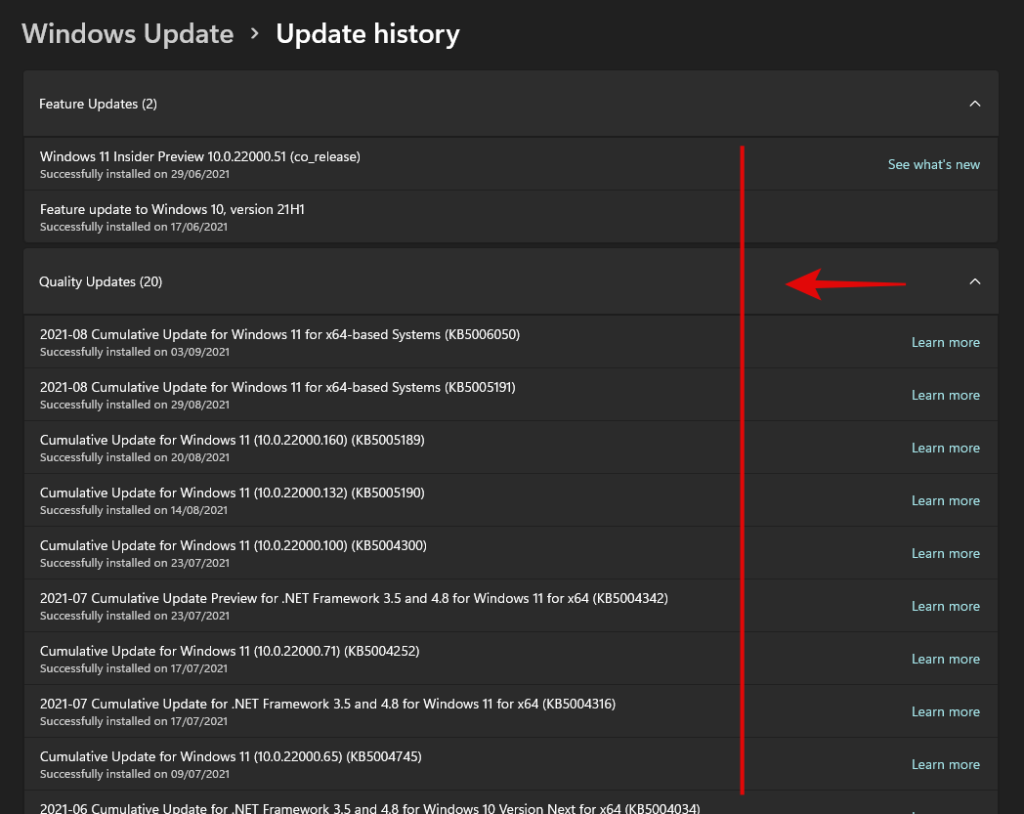
Jednoduše si poznamenejte číslo KB aktualizace, kterou chcete z počítače odebrat.
Metoda #02: Použití CMD
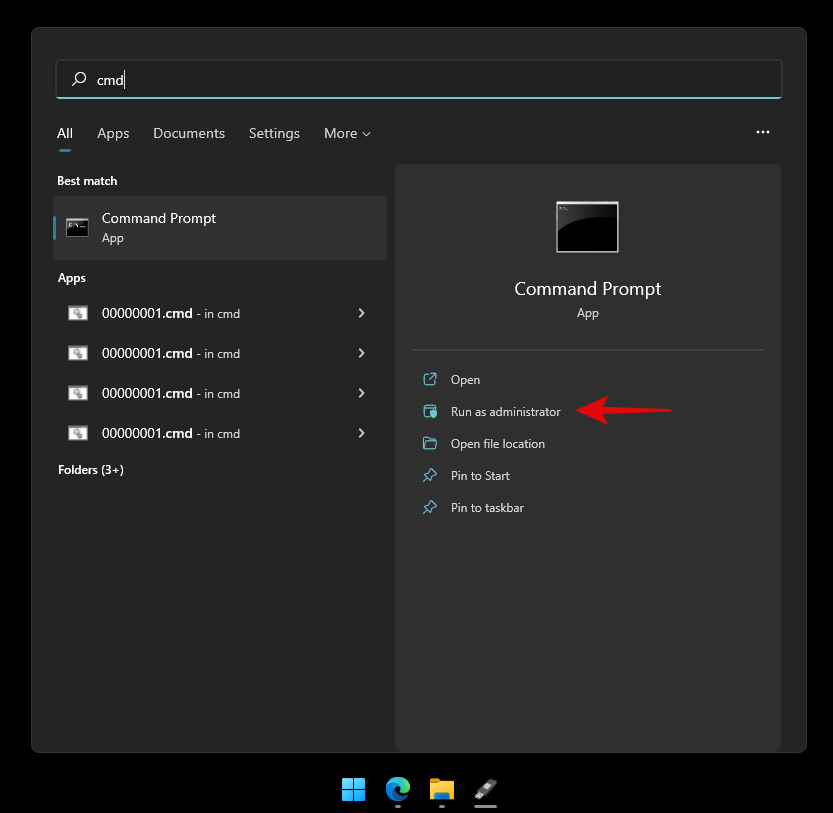
Stiskněte Windows + Sna klávesnici a vyhledejte CMD. Jakmile se aplikace zobrazí ve výsledcích vyhledávání, klikněte na „Spustit jako správce“.
Zadejte následující příkaz a stiskněte klávesu Enter na klávesnici.
wmic qfe list brief /format:table
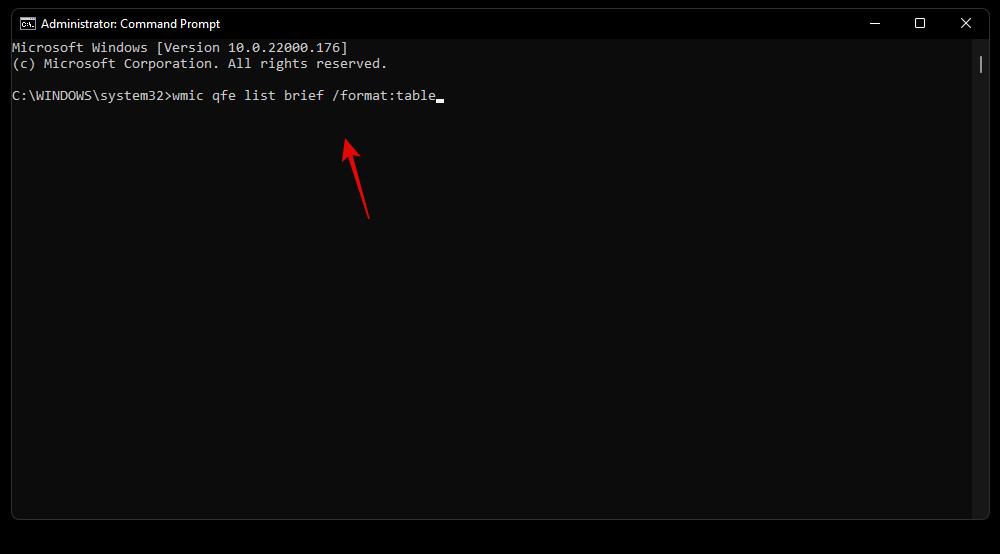
Nyní získáte seznam všech posledních aktualizací systému Windows nainstalovaných ve vašem počítači. Klikněte a rozbalte příslušnou kategorii ze seznamu níže.
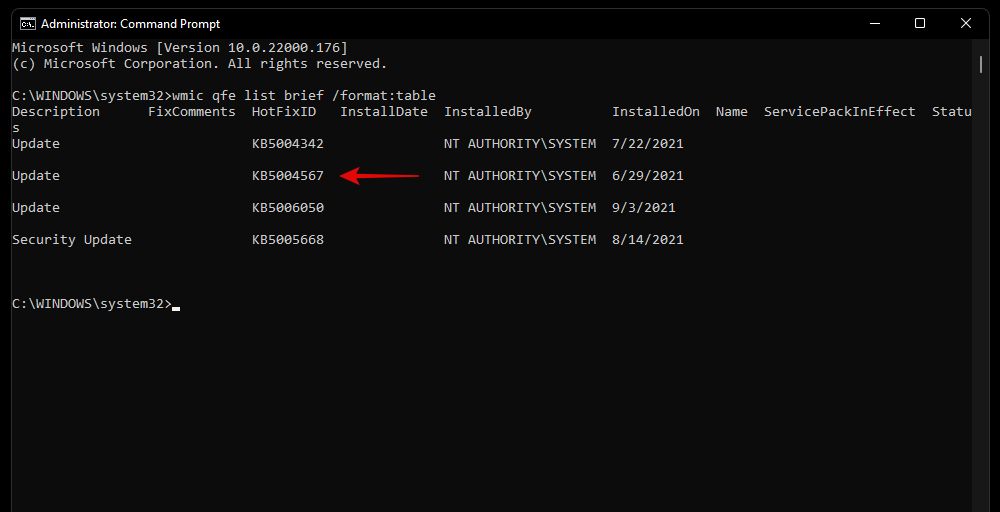
Identifikujte aktualizaci, kterou chcete odebrat, a poznamenejte si její 'HotFixID'. Toto ID použijeme k odstranění příslušné aktualizace pomocí níže uvedeného průvodce.
Jak odebrat aktualizace systému Windows z počítače
Aktualizace systému Windows můžete z počítače odebrat jedním z níže uvedených způsobů. Pokud nemáte Windows nebo nemůžete zavést počítač, doporučujeme použít metodu Windows RE nebo metodu CMD. Pokud máte přístup ke své ploše, můžete pomocí aplikace Nastavení snadno odebrat aktualizace ze systému. Použijte níže uvedené průvodce, abyste mohli začít v závislosti na vašich preferencích.
Metoda č. 01: Použití Nastavení
Stiskněte Windows + ina klávesnici a v levém postranním panelu klikněte na „Aktualizace systému Windows“.

Klikněte na 'Aktualizovat historii'.

Přejděte dolů a klikněte na „Odinstalovat aktualizace“.
Nyní budete přesměrováni na Ovládací panely, kde najdete seznam posledních aktualizací, které lze z vašeho systému odebrat.

Vyberte aktualizaci, kterou chcete odebrat, a klikněte na 'Odinstalovat' v horní části.

Podle pokynů na obrazovce odinstalujte příslušnou aktualizaci z počítače.
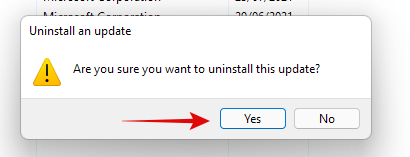
Nyní můžete restartovat počítač a všechny problémy, kterým jste čelili kvůli aktualizaci, by nyní měly být opraveny.
Metoda č. 02: Použití nástroje pro odstraňování problémů s aktualizací systému Windows
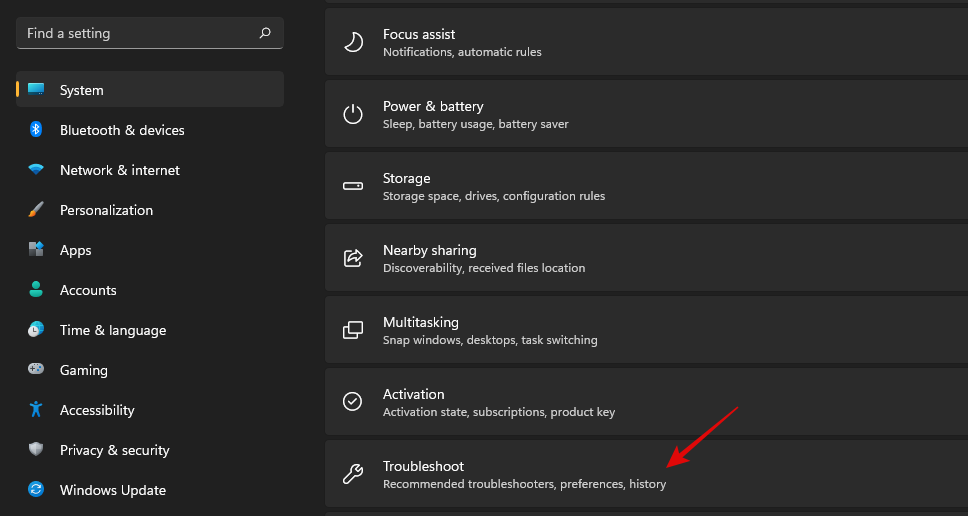
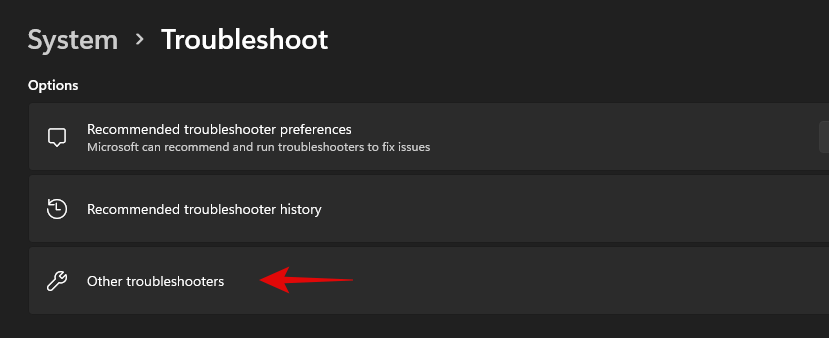
Stiskněte Windows + ina klávesnici a klikněte na „Odstraňovat problémy“.
Klikněte na 'Další nástroje pro odstraňování problémů'.
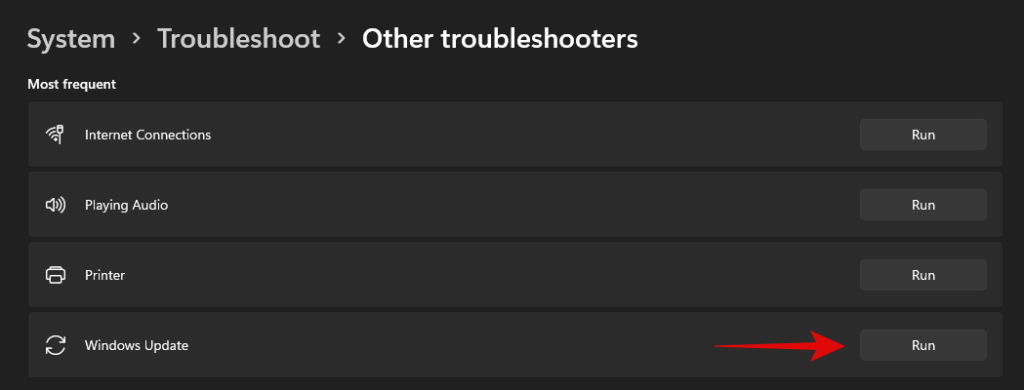
Klikněte na 'Spustit' vedle Windows Update.
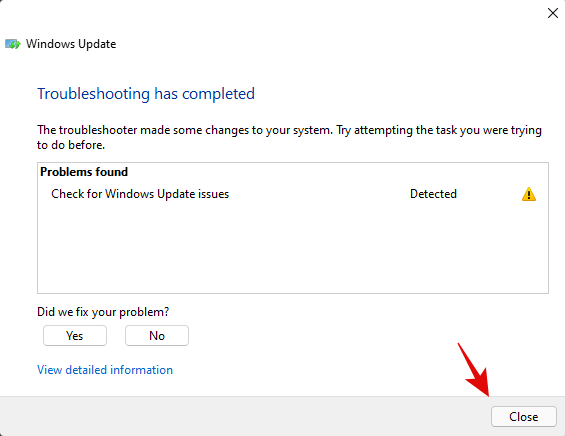
Poradce při potížích se systémem Windows nyní vyhledá problémy a způsobené aktualizacemi systému Windows ve vašem počítači. Pokud jsou nějaké nalezeny, nástroj pro odstraňování problémů problém automaticky vyřeší. Pokud se zjistí, že viníkem je nedávná aktualizace, nástroj pro odstraňování problémů vám dá možnost vybrat a odinstalovat potřebnou službu Windows Update. Pro úplné odstranění aktualizace postupujte podle následujících pokynů na obrazovce.
Po dokončení klikněte na 'Zavřít'.
Restartujte počítač a problém by měl být nyní vyřešen. Pokud ne, můžete pomocí níže uvedené metody prostředí PowerShell ručně odinstalovat požadovanou aktualizaci systému Windows ze systému.
Metoda #03: Použití prostředí PowerShell nebo CMD
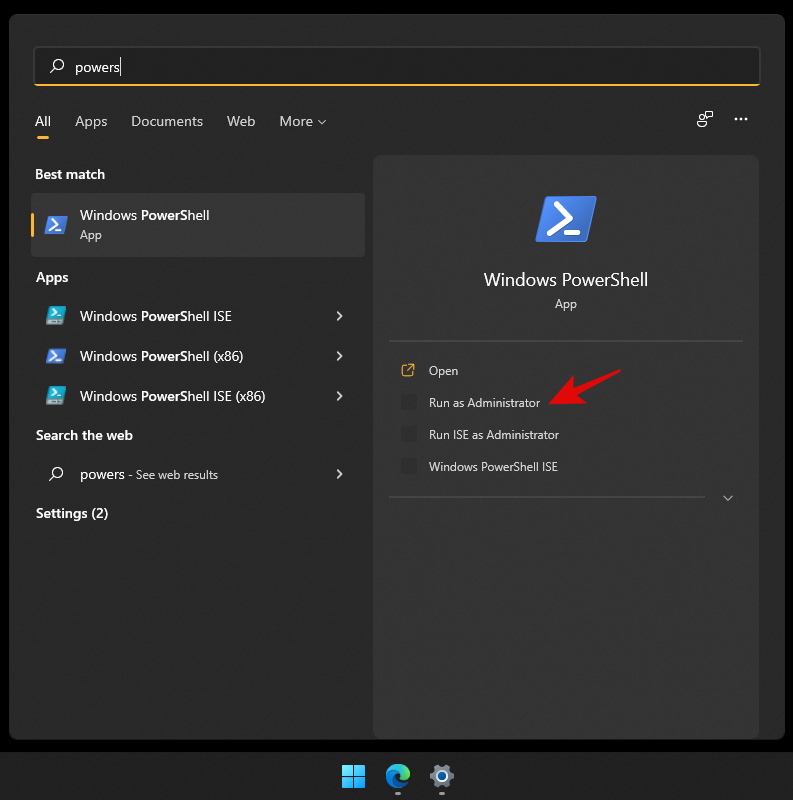
Stiskněte Windows + Sna klávesnici a vyhledejte PowerShell. Jakmile se aplikace zobrazí ve výsledcích vyhledávání, klikněte na „Spustit jako správce“.
Zadejte následující příkaz a stisknutím klávesy Enter na klávesnici jej spusťte.
wmic qfe list brief /format:table

Nyní získáte seznam všech nedávno nainstalovaných aktualizací systému Windows ve vašem systému ve formátu tabulky. Poznamenejte si číslo KB pro vybranou službu Windows Update.
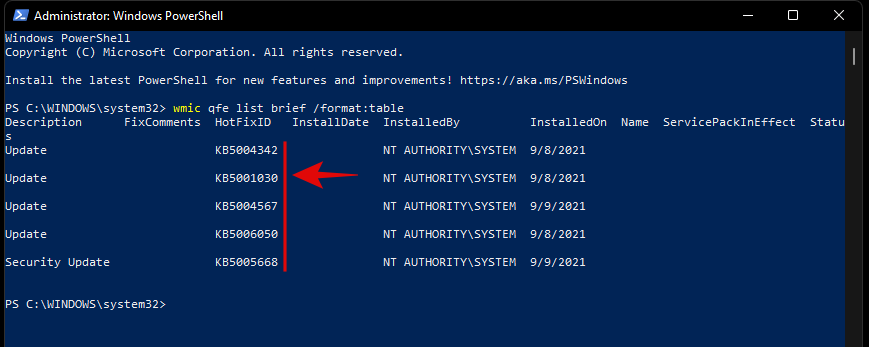
Poznámka: Potřebujete pouze číslo, nikoli písmena před ním.
Po dokončení zadejte níže uvedený příkaz a spusťte jej. Nahraďte „NUMBER“ číslem KB, které jste si poznamenali dříve.
wusa /uninstall /kb:NUMBER
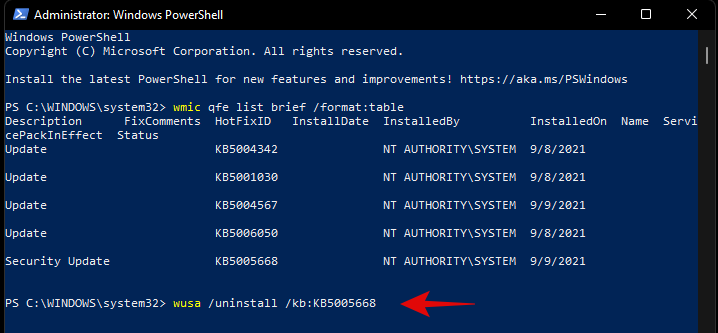
Po zobrazení výzvy potvrďte svou volbu.
Pokud budete vyzváni k restartu, doporučujeme restartovat systém nejdříve při ukládání práce na pozadí.
Pokud si však nepřejete dostávat potvrzení před odinstalací a restartem, můžete použít níže uvedený příkaz.
wusa /uninstall /kb:NUMBER /quiet
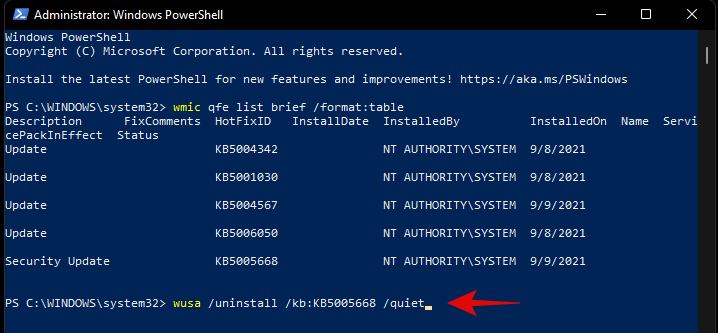
I když výše uvedený příkaz nebude vyžadovat potvrzení, bude čekat, až se vaše aplikace normálně vypnou na pozadí. Pokud chcete vynutit uzavření aplikací a okamžité restartování systému, můžete použít příkaz uvedený níže.
wusa /uninstall /kb:NUMBER /quiet /forcerestart
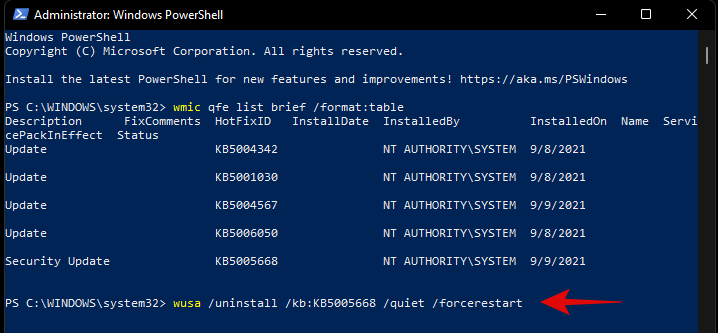
Následně, pokud chcete pouze potvrdit restart, můžete použít příkaz níže.
wusa /uninstall /kb:NUMBER /quiet /promptrestart
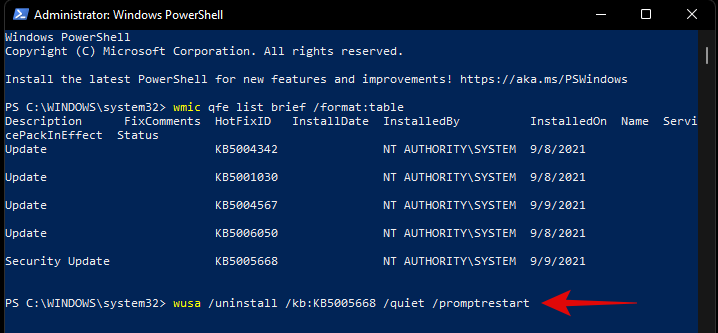
A to je vše! Problémová služba Windows Update by nyní měla být z vašeho počítače odinstalována.
Metoda #04: Z Windows RE
Windows Recovery Environment také umožňuje odinstalovat konfliktní aktualizace. Chcete-li začít, použijte průvodce níže. Pokud čelíte BSOD a jste již v prostředí Recovery Environment, můžete přeskočit prvních několik kroků této příručky.
Stiskněte Windows + ina klávesnici a zleva vyberte Windows Update.
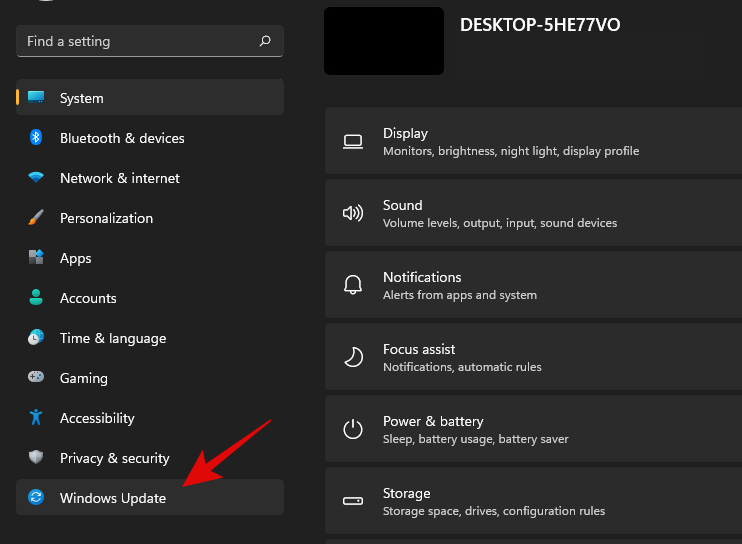
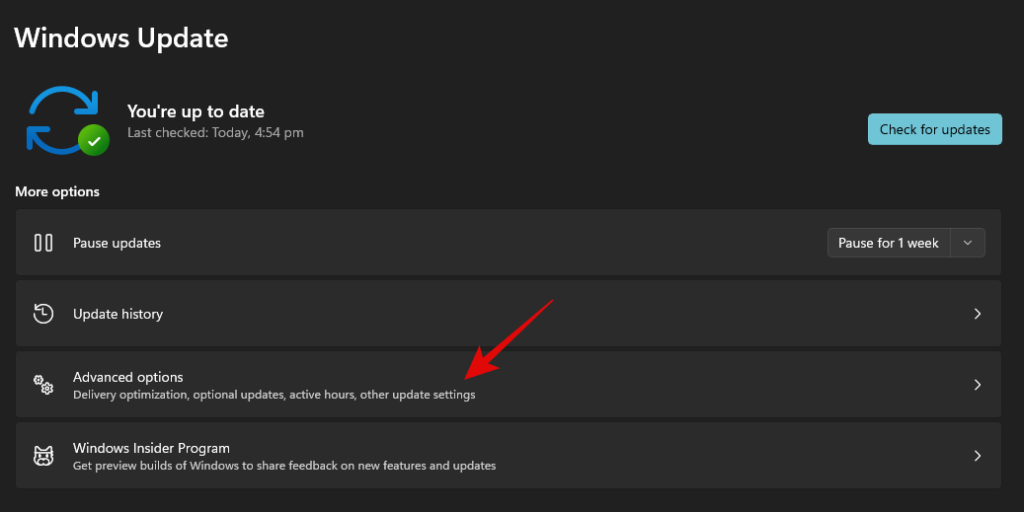
Nyní klikněte na 'Pokročilé možnosti'.
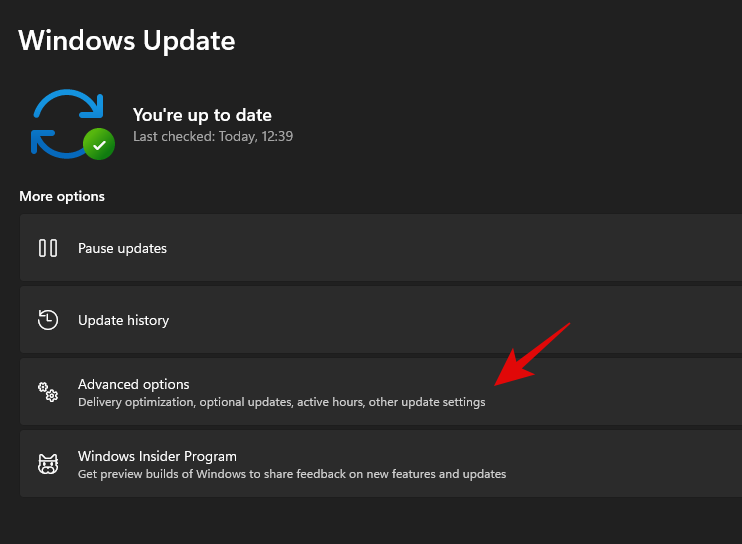
Vyberte 'Obnovení'.
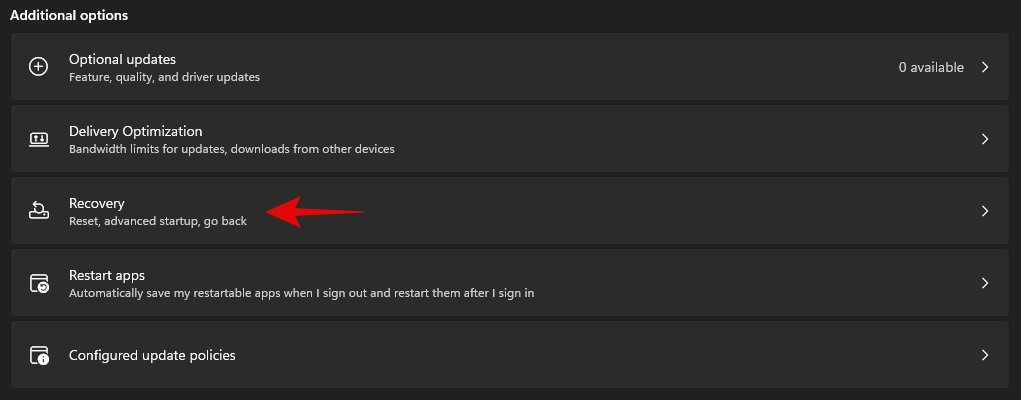
Click on ‘Restart now’ beside Advanced Startup.

You will now boot into the recovery environment. Click on ‘Troubleshoot’.
Now click on ‘Advanced Options’.
Select ‘Uninstall updates’.
Click and select the type of update you wish to install from the options on your screen.
Note: In case you are confused, feature updates refer to major updates to your Windows system that include new features, updated integrations, and sometimes new UI. Quality updates on the other hand encompass everything else including Security updates, Driver updates, Intelligence updates, Telemetry updates, and more.
Click on your administrator account and log in with your password.
Click on ‘Uninstall quality/feature’ update to confirm your choice.
Click on ‘Done’ once the process finishes.
Restart your PC and boot into Windows normally. You shouldn’t face any more issues caused by a problematic Windows update.
Method #05: Using DISM
DISM or Deployment Image Servicing and Management tool is an administrative tool within Windows that helps repair your Windows image and even mount images if needed. DISM supports image formats like .wim, .vhd, and more.
The tool can help you fix issues with your Windows installation and even remove problematic Windows updates. If you are looking to remove windows updates using DISM, then you can follow the steps below to get you started.
Note: DISM can be accessed via CMD and thus, you can use this guide from a recovery environment or an installation media as well. Follow the guide above to get CMD working on your lock screen or within Windows Recovery Environment.
Launch CMD and type in the following command. Press Enter on your keyboard once you are done.
dism /online /get-packages /format:table
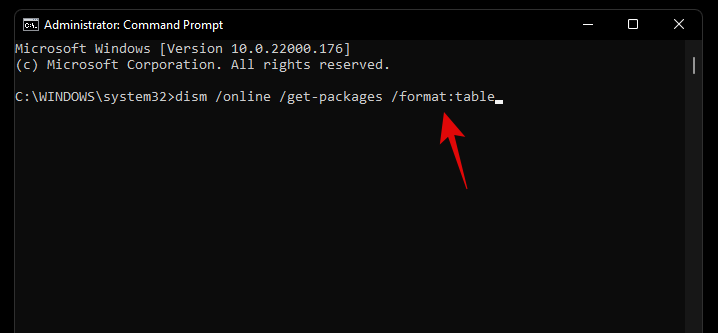
Unlike the WUSA commands we used earlier with PowerShell and CMD, you will need to note down the entire name of the Windows Update package we need to remove. Unfortunately, this includes special characters, spaces, and everything else included in the name. Thankfully you can easily copy the entire name to your clipboard by selecting it with your mouse and then using the keyboard shortcut. Once done, type in the command below and replace NAME with the package name you noted down earlier.
Note: This includes the term ‘Package_for_’ prefixed before some updates.
dism /online /Remove-Package /PackageName:NAME

The selected Windows Update will now be uninstalled from your system. In some cases, you will be prompted to restart your system, type in ‘Y’, and hit Enter on your keyboard to restart your system immediately.
How to stop receiving an update
While removing an update can help you, this does not mean that the broken Windows Update will stop showing up in your Updates section. This can be annoying and if you have automatic updates then you run the risk of automatically installing the problematic update in the background. In all such cases, you can try blocking Windows Updates on your system using the guides below depending on your preferences.
Method #01: Stop OEM driver updates through Windows update
OEM driver updates are delivered through Windows updates as well depending on their importance. Security vulnerabilities and bugs that have been recently found in components like CPU, GPU, or your wireless card, are instantly patched through such updates.
However, if you do not wish to install an OEM driver update provided by Windows update, then you can follow the guide below to block your OEM driver updates.
Press Windows + S on your keyboard and search for ‘Change device installation settings’. Click and launch the app from your search results.
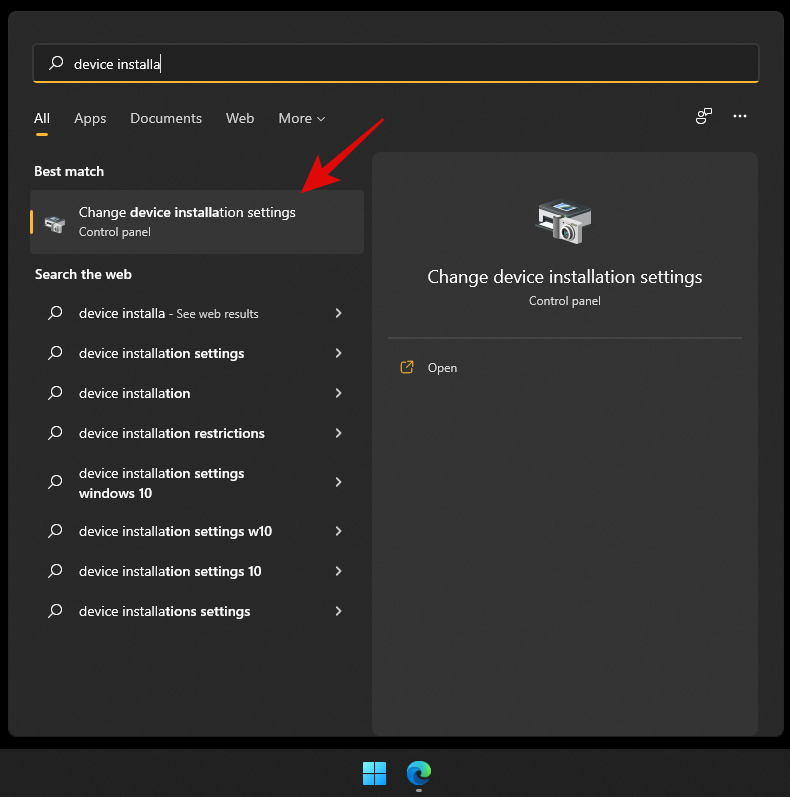
Select ‘No’.
Click on ‘Save changes’.
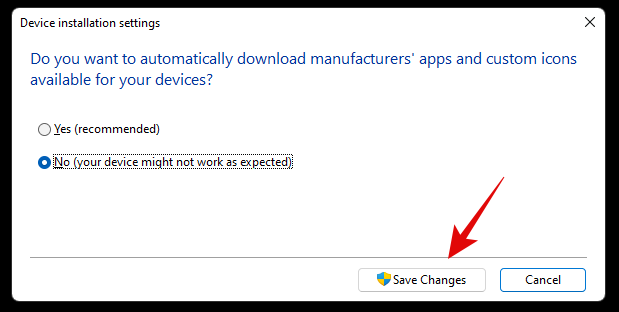
The changes will now be saved and you will no longer receive OEM driver updates through Windows Update.
Related: 6 Ways to Update Drivers on Windows 11
Method #02: Stop updates for Microsoft products
If you have been receiving constant updates for new Microsoft features and old products that keep messing up your system, then you can use the guide below to disable updates for Microsoft products via Windows Update.
Press Windows + i on your keyboard to open the Settings app and select ‘Windows Update’ from the left sidebar.

Click on ‘Advanced options’.

Now turn off the toggle for ‘Receive updates for other Microsoft products’ at the top.
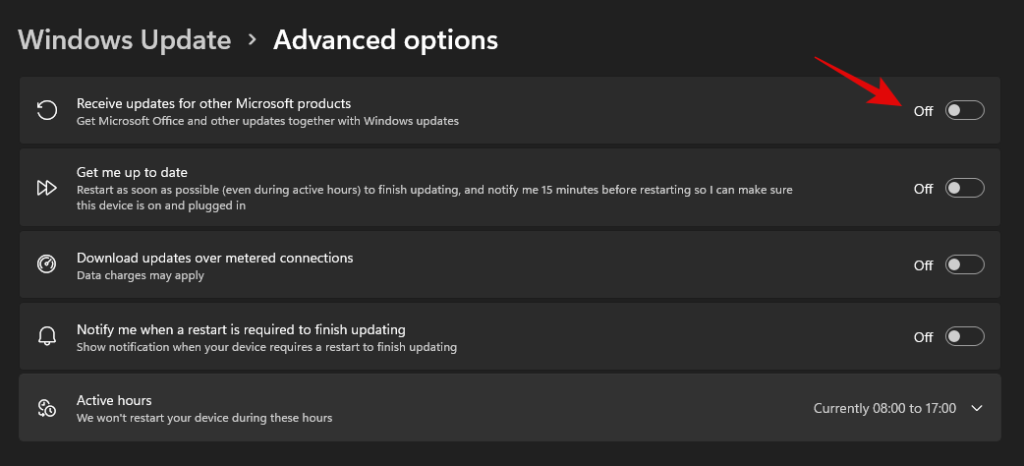
You will no longer receive updates for Microsoft products installed on your system via Windows update.
Method #03: Change active hours for background download and installation for updates
If you’re just looking to dismiss updates so that they don’t interfere with your work hours, then this is the perfect option for you. You can decide when Windows can download and update your PC in the background which will prevent Windows from interfering with your work hours. Follow the guide below to get you started.
Press Windows + i on your keyboard and click on ‘Windows Update’ on your left.

Click on ‘Advanced options’.

Now turn off the toggle for ‘Get me up to date’.
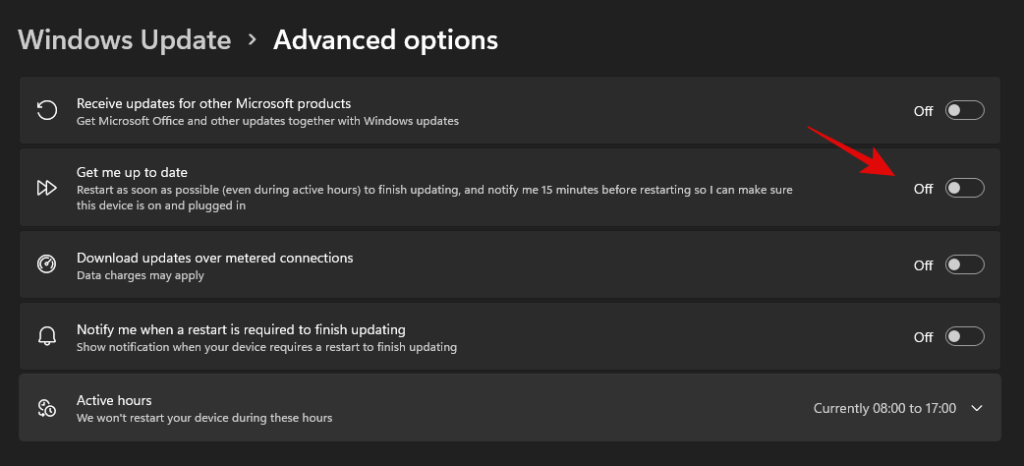
Click on ‘Active hours’.
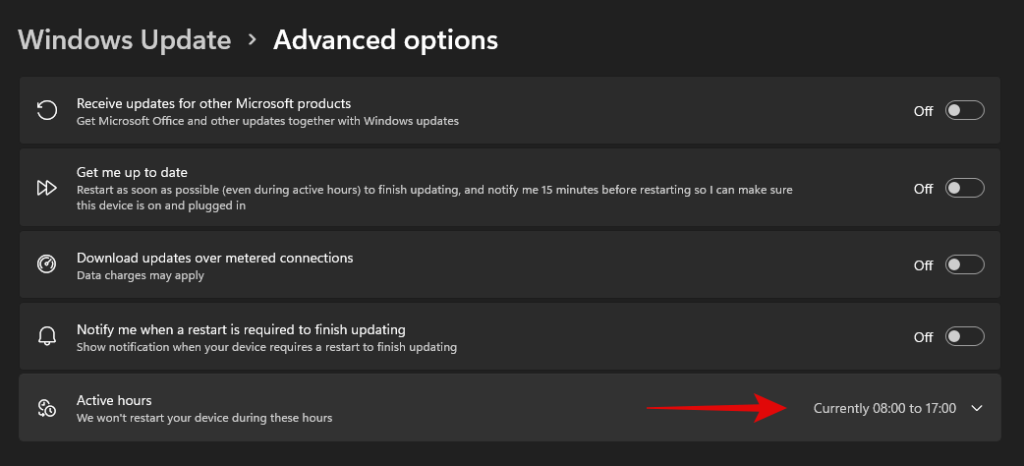
Click on the drop-down menu and select ‘Manually’.
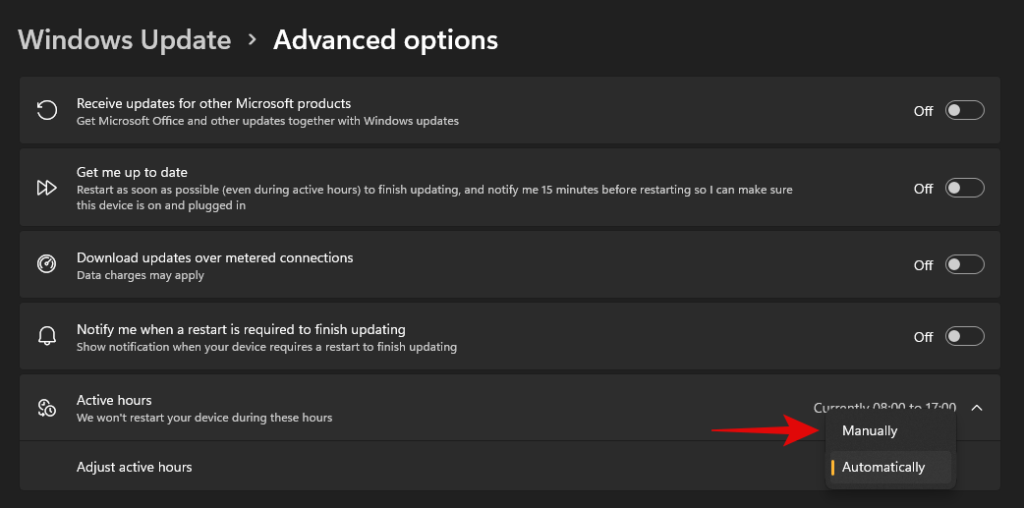
Define your desired start and end time. Windows won’t download updates and restart your PC during these hours.

And that’s it! Active hours should now be enabled for your system.
Method #04: Block Windows updates that you never wish to install
If you are receiving forced Windows updates that you don’t ever wish to install on your system then you can use a dedicated Windows troubleshooter to solve your issue.
This can be helpful in case you are trying to stop an update that disables a certain feature on your system that you don’t want disabled. This could be access to voltage controls, clock speed controls, turbo controls, fan controls, RGB control, and more. Follow the guide below to get you started.
Download the Windows Update Show Hide troubleshooter using the link above and launch it on your PC. Click on ‘Advanced’.
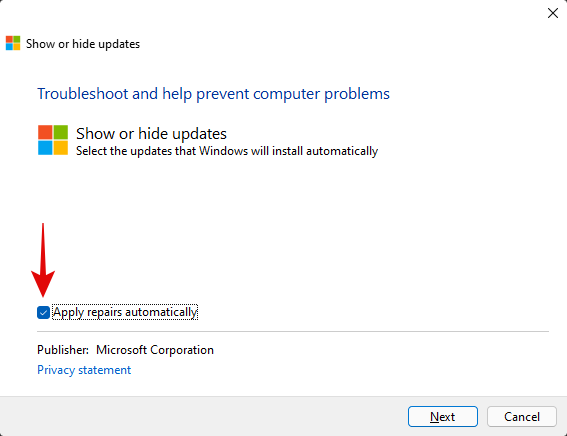
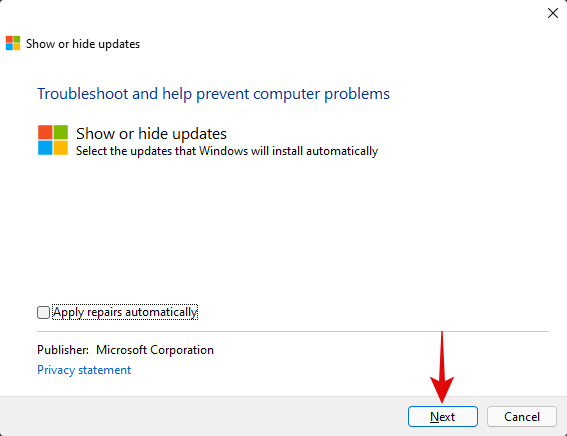
Uncheck the option for ‘Apply repairs automatically’.
Click on ‘Next’.
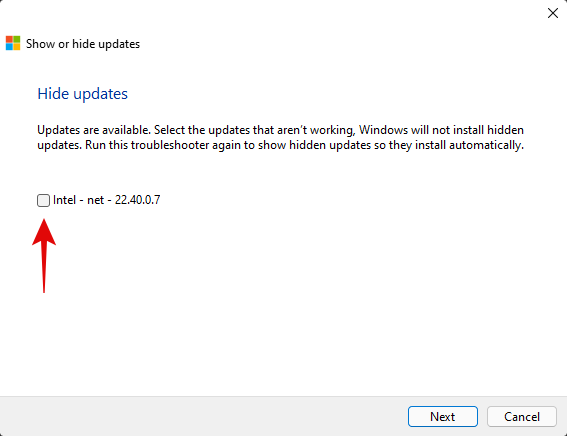
The troubleshooter will now look for pending updates and display them on your screen. Click on ‘Hide updates’.
Check the boxes for all the updates you don’t wish to receive on your PC.
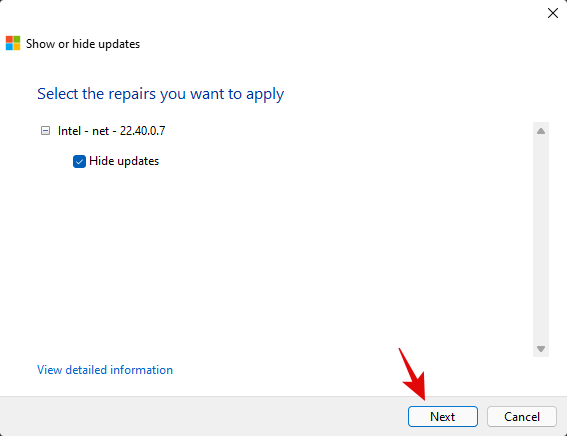
Click on ‘Next’.
Ensure that ‘Hide updates’ is selected and click on ‘Next’.
The troubleshooter will now hide the necessary Windows updates from your PC which in turn will prevent them from ever being downloaded on your PC. Click on ‘Close’.
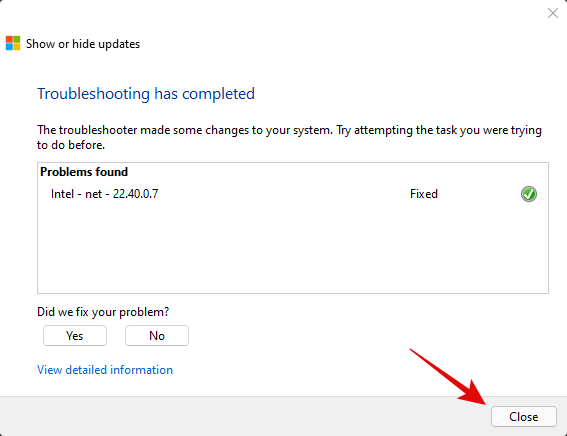
And that’s it! You will now have blocked the necessary updates on Windows 11.
Can you turn off Windows updates?
Yes, you can use certain workarounds and tricks to disable Windows updates on your PC. However, this isn’t recommended as you will lose out on important security patches which would leave you vulnerable to online threats including hackers, malware, adware, and more.
Hence we recommend you keep your PC updated or at least opt to install the latest security updates on your PC. Even if you are losing out on features it’s usually because of a hardware security vulnerability that would compromise your system.
However, if you still wish to disable Windows Updates on your PC, you can use this dedicated guide from us. If you face any issues, feel free to drop a comment.
Can’t uninstall Windows updates? Try these fixes!
If you are unable to install updates on your PC, then you can try the following fixes. However, if you are still unable to uninstall updates then this might indicate an issue with your Windows installation in which case resetting your PC might be the best option.
Follow the guides below to get you started.
Method #01: Reset Windows components and try again
If you have been unable to uninstall updates then you can try resetting your windows components. This will help fix corrupted system files in the background that might be preventing you from uninstalling updates on your system. We will be using a modified script from Mircosoft to help reset all components of Windows 11. The script was originally developed for Windows 10 or higher and hence will need some edits to work properly on Windows 11. This script will perform the following tasks on your system when executed;
Follow the steps below to run the script on your system and reset Windows update components on your PC.
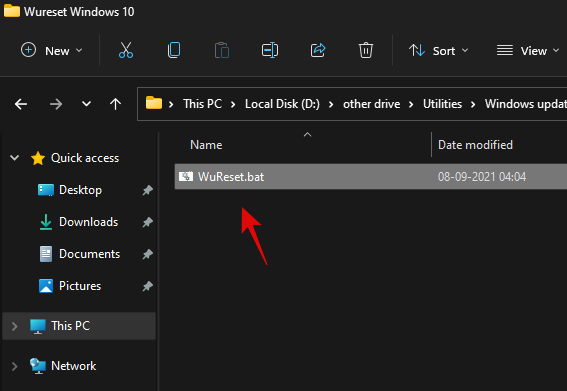
Download the script using the link above to your local storage and extract it to a convenient location. Once extracted right click on the script.
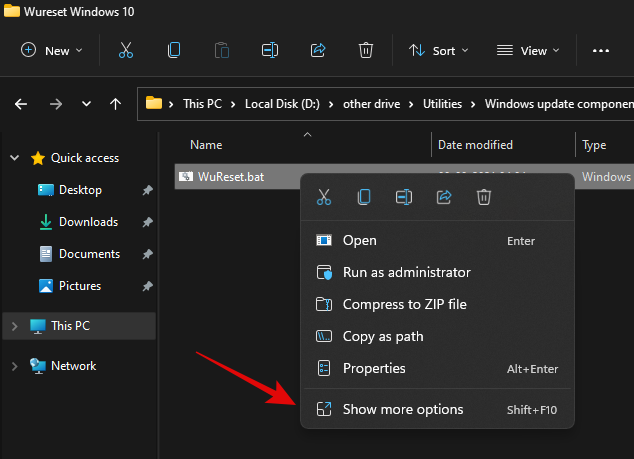
Click on ‘Show more options’.
Select ‘Rename’.
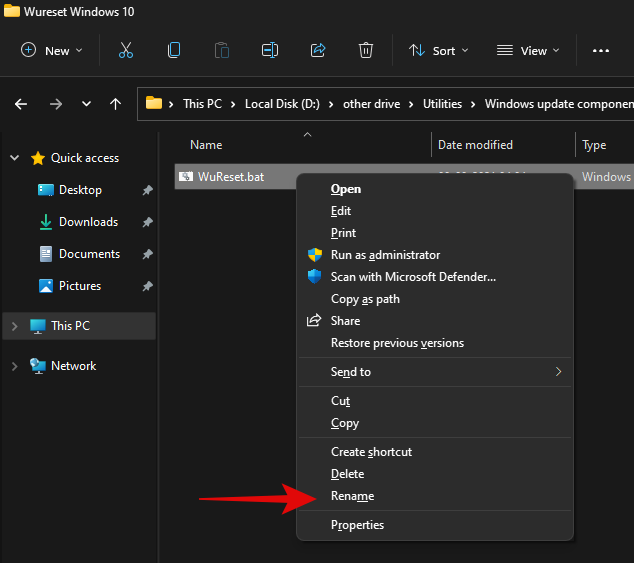
Replace ‘.bat’ with ‘.txt’.
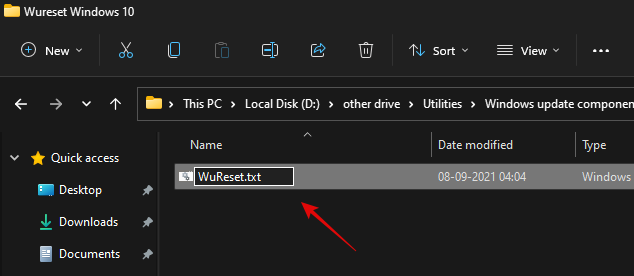
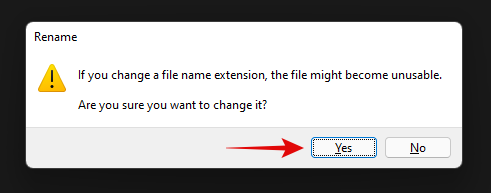
Click on ‘Yes’ to confirm your choice.
Now double click and open the file and it should open in your notepad. Once opened, scroll to the ‘:Reset’ section for resetting network commands and add the following line after the first delete command as shown below.
del /s /q /f "%SYSTEMROOT%\Logs\WindowsUpdate\*"
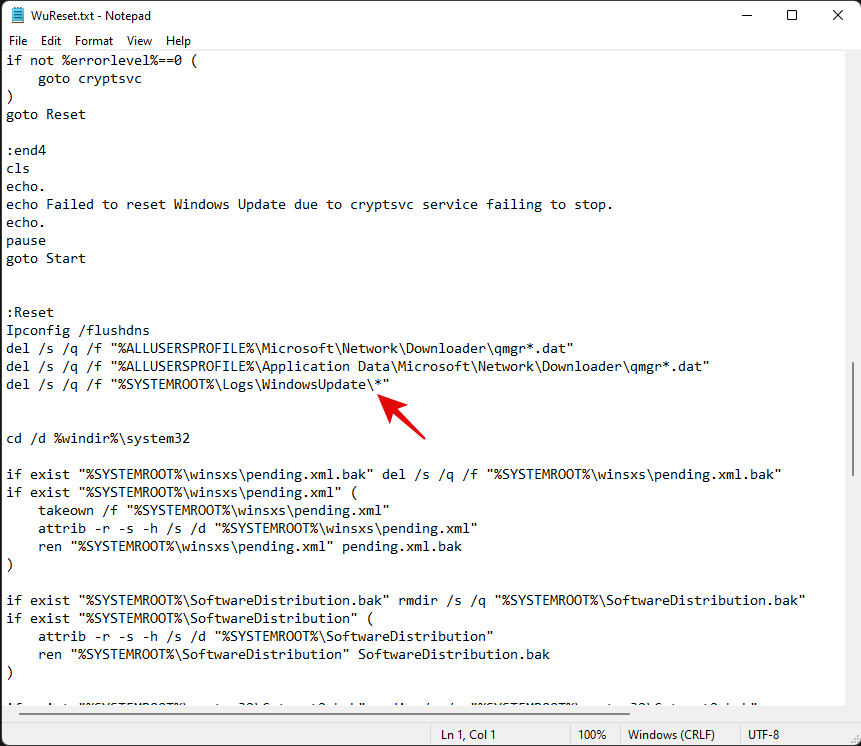
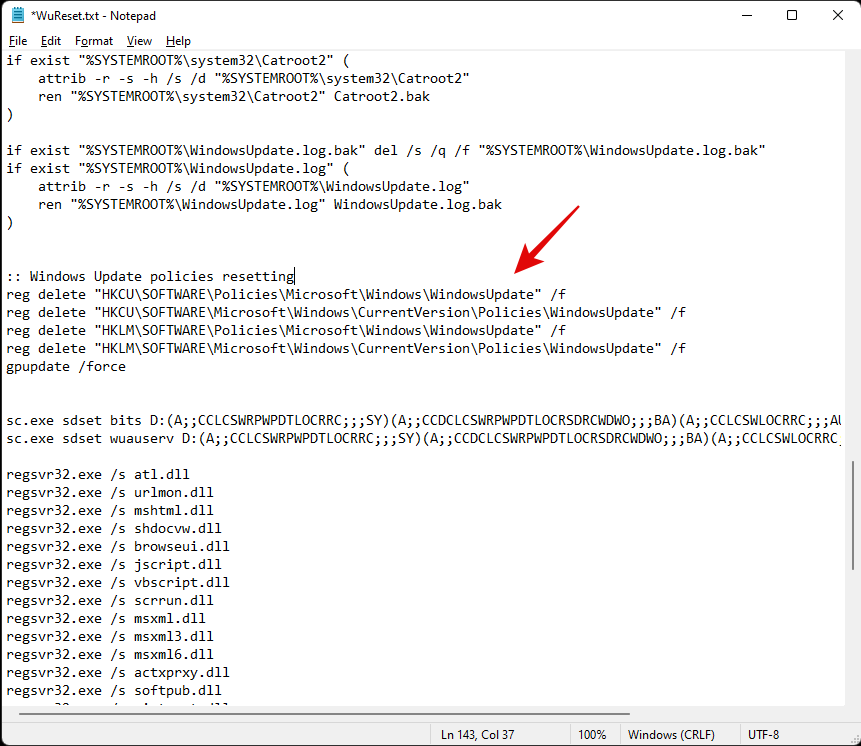
Once added, hit Ctrl + S on your keyboard. Ensure that there are no formatting changes or spaces before or after the line. The file will now be saved on your system along with its recent changes. We will now add some code to Reset Windows’s update policies on your system. Copy the lines below and paste them after your system commands. Ensure that two empty lines are available at either end of the code as shown below.
:: Windows Update policies resetting
reg delete "HKCU\SOFTWARE\Policies\Microsoft\Windows\WindowsUpdate" /f
reg delete "HKCU\SOFTWARE\Microsoft\Windows\CurrentVersion\Policies\WindowsUpdate" /f
reg delete "HKLM\SOFTWARE\Policies\Microsoft\Windows\WindowsUpdate" /f
reg delete "HKLM\SOFTWARE\Microsoft\Windows\CurrentVersion\Policies\WindowsUpdate" /f
gpupdate /force
Lastly, let’s add some lines to ensure that the startup type for this service is set to ‘Automatic’. Copy the code below and add the lines after your winsock reset commands but before your service starting commands as shown below. Copy and paste the code in its respective location.
:: Set the startup type as automatic
sc config wuauserv start= auto
sc config bits start= auto
sc config DcomLaunch start= auto
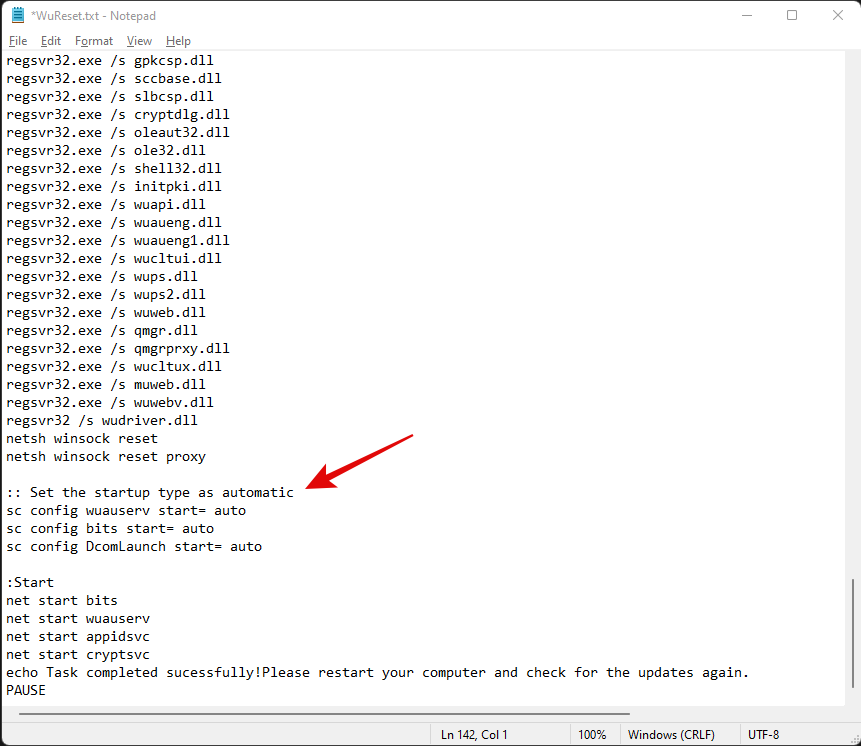
Once you are done, hit Ctrl + S on your keyboard to save your changes. Close the file and right-click on it again and select ‘Show more options’.
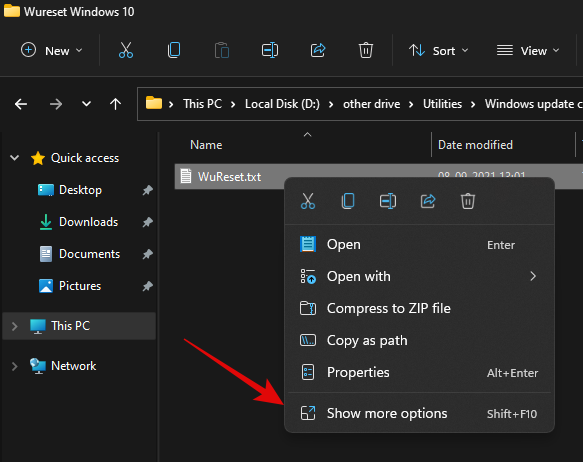
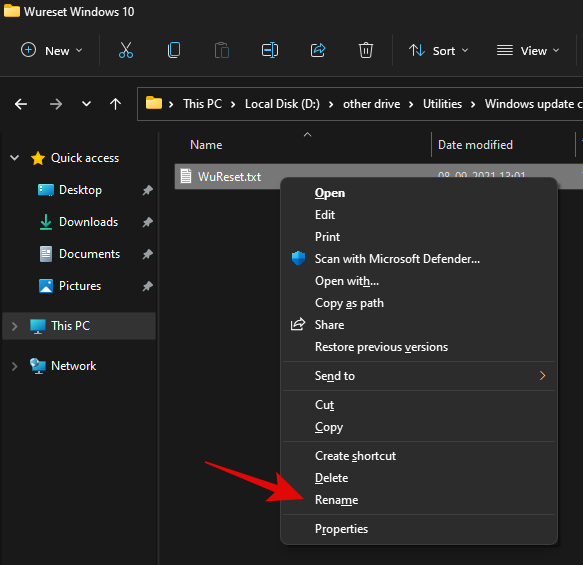
Click on ‘Rename’.
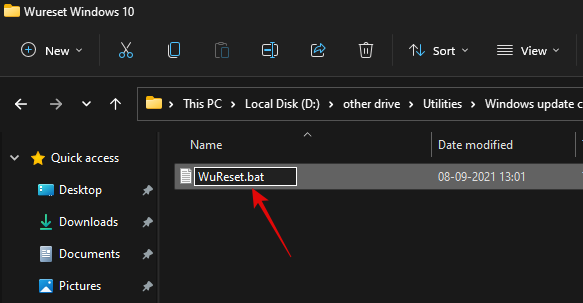
Replace ‘.txt’ with ‘.bat’.
Once done, right-click on the file and select ‘Run as administrator’.
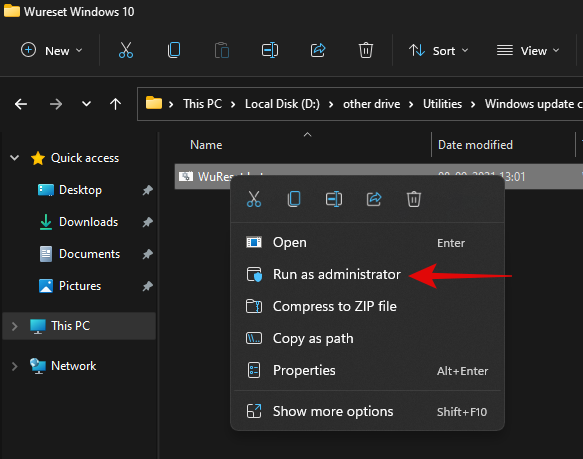
The batch script will now run on your PC and do its thing. Once the process completes, you will be asked to restart your PC. We highly recommend that you restart your PC at the earliest after running this script. Upon a restart, your Windows update should be reset and a fresh start should help you easily install pending Windows updates on your PC.
Method #02: Use DISM to uninstall the concerned packages
If you are still unable to uninstall specific Windows Update packages then simply use the DISM method to remove the concerned updates from your PC. This method force removes any available Windows updates from your PC without any issue. You will get a list of all the available updates in a table format which should make it much easier for you to find the culprit on your PC. Simply follow the guide at the top to get you started.
Method #03: Run SFC & DISM commands
At this point, if Windows still fails to update your system then you are facing a more serious issue than we anticipated earlier. This could indicate system-level corruption of files or missing system files from your system. In such cases, you can run SFC and DISM checks to fix corrupted files as well as restore missing system files. Follow the guide below to get you started.
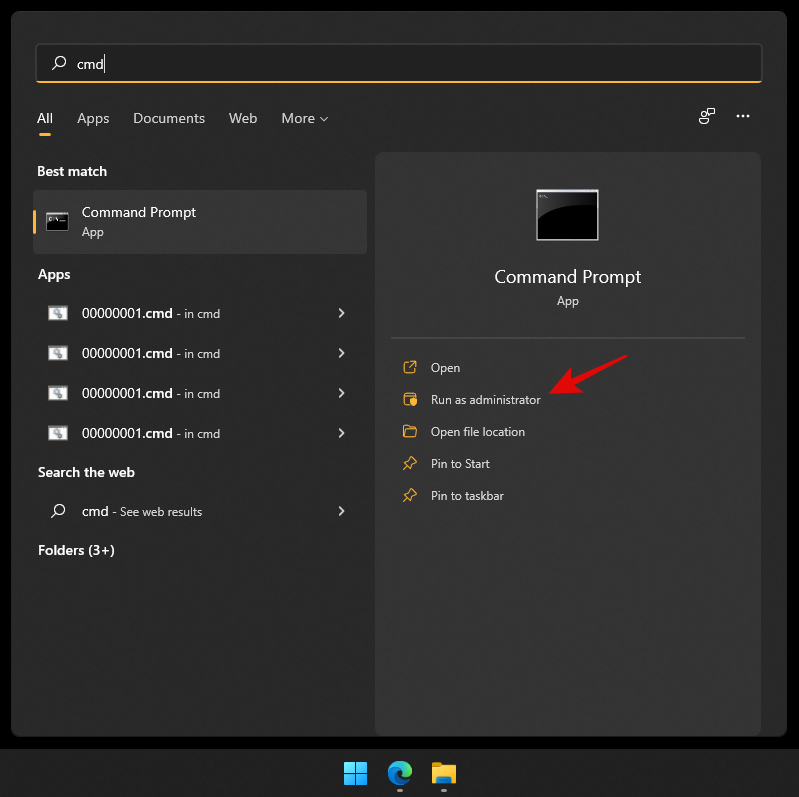
Press Windows + S on your keyboard and search for CMD. Click on ‘Run as administrator’ once it shows up in your search results.
Type in the following command and press Enter on your PC.
sfc /scannow
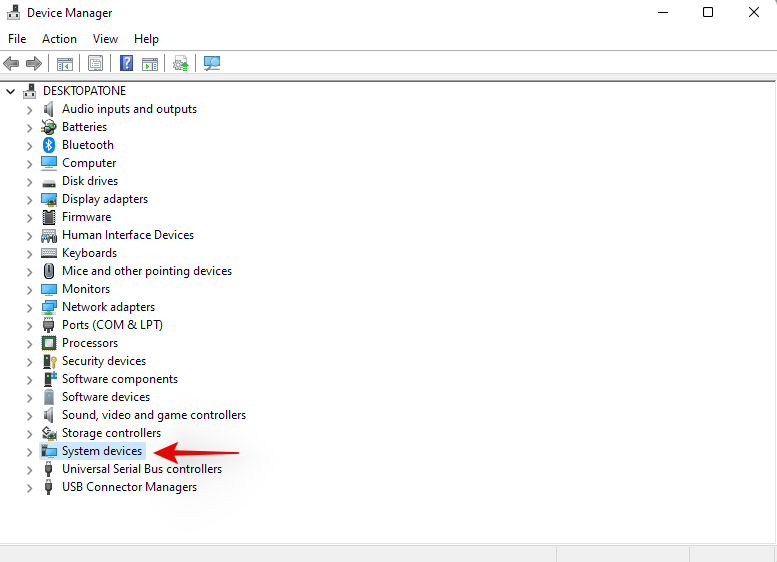
Once the SFC scan completes, type in the following command and execute it.
DISM /Online /Cleanup-Image /RestoreHealth
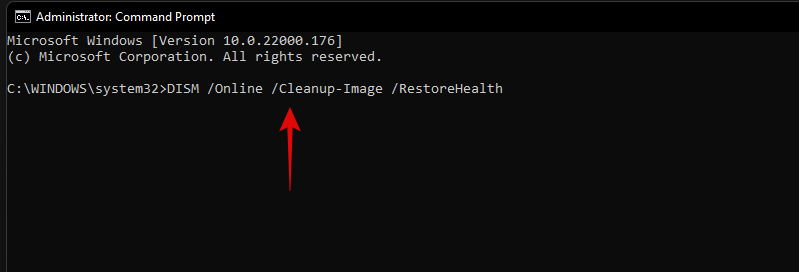
We recommend you restart your PC once the process completes.
Method #04: Last resort: Reset your PC
If nothing seems to be working for you then it might be time for a fresh installation of Windows 11 on your system. You can try getting in touch with your support team as well but if nothing works then a reset of your PC is the best option. In most cases, a reset while keeping your local files should help get Windows update working on your system.
Windows 11 connects to the update servers and updates your security definitions and drivers during OOBE. Windows will fix all update issues and reinstall necessary services on your system to get Windows update back up and running on your system during this process.
► You can use this dedicated guide from us to reset your Windows 11 PC.
We hope you were able to easily uninstall updates from your Windows 11 PC using the guide above. If you face any issues, feel free to drop a comment below.
Related:
Přečtěte si, jak <strong>odinstalovat McAfee</strong> z vašeho systému Windows 11 jedním z 5 efektivních způsobů.
Aktualizace Windows byly pro mnoho uživatelů od dob Windows XP vždy notorickou nepříjemností. Naštěstí se poskytování aktualizací systému Windows v posledních několika letech výrazně zlepšilo…
Microsoft Teams je jedním z nejoblíbenějších nástrojů, které pomáhají týmům spolupracovat z domova. Můžete komunikovat prostřednictvím přímých a skupinových zpráv, videokonferencí se členy vašeho týmu a sdílet soubory…
Microsoft Teams je skvělý nástroj pro spolupráci pro týmy a členy, kteří na projektu spolupracují na dálku. Poskytuje vám možnost bezproblémově spolu komunikovat, sdílet soubory,…
Místo na disku bylo vždy luxusem, ať už za starých časů DOSu, kde bylo vše uloženo na disketě, nebo naší moderní doby, kdy je pro nás obtížné uložit naše hudební knihovny na jeden disk…
Zjistěte, jak pomocí nástroje Vyčištění disku ve Windows 11 uvolnit místo, zvýšit výkon a zajistit plynulý chod počítače. Podrobný návod s tipy pro maximální efektivitu.
Objevte podrobné pokyny, jak si přizpůsobit hodiny na zamykací obrazovce systému Windows 11 pomocí osobních obrázků, písem a stylů. Vylepšete si zážitek z práce na počítači bez námahy.
Máte potíže s chybou „Přístup k ochrannému oddílu GPT byl odepřen“? Objevte osvědčené kroky, jak tento nepříjemný problém vyřešit a rychle a bezpečně znovu získat přístup k datům. Odborné tipy pro uživatele Windows.
Máte potíže s chybou „Nahrát posledních 30 sekund v herním panelu“? Objevte osvědčená řešení, která vám pomohou rychle a snadno obnovit záznam okamžitého přehrávání. Už žádné ztracené epické momenty!
Máte potíže s externím diskem, který systém Windows 11 nerozpozná? Objevte osvědčená podrobná řešení, která vám pomohou rychle a bez problémů obnovit přístup k úložišti. Nejsou potřeba žádné technické znalosti!
Zjistěte, jak oficiálně získat Windows 11 zdarma. Postupujte podle tohoto podrobného návodu a ověřte si kompatibilitu, proveďte hladký upgrade a užívejte si nejnovější funkce bez utrácení koruny. Ideální pro uživatele PC, kteří jsou připraveni na modernizaci.
Máte potíže s chybou „Vypršel časový limit připojení k prohlížeči Edge“? Objevte osvědčené kroky, jak tento nepříjemný problém rychle vyřešit a vrátit se k plynulému prohlížení. Důležité tipy pro uživatele Windows.
Objevte, jak rozdělit obrazovku ve Windows 11 jako profesionál. Odhalte tajemství multitaskingu, klávesové zkratky a pokročilé tipy, které vám pomohou vylepšit váš pracovní postup a zvládnout více věcí efektivněji.
Máte potíže s aktualizací Windows 11, která se zasekla na 0 % nebo 100 %? Objevte rychlá a účinná řešení, která vám pomohou s hladkou aktualizací systému bez problémů. Podrobný návod pro okamžitou úlevu.
Máte potíže se stahováním z Obchodu Windows 11? Objevte osvědčená, podrobná řešení, která vám pomohou znovu hladce stahovat aplikace. Nejsou potřeba žádné technické znalosti!
