Windows 11 është lëshuar për publikun dhe ky përditësim i ri i sistemit operativ afatgjatë duket se po merr disa vlerësime të shkëlqyera. Microsoft ka rritur privatësinë, sigurinë ka shtuar një UI të ri dhe aftësinë për të instaluar aplikacione Android në Windows 11. Por si zakonisht, Windows vjen me shumë gjëra të para-instaluara që janë të parëndësishme për pothuajse çdo përdorues.
Dhe nëse keni blerë një sistem të para-ndërtuar ose një laptop, atëherë shanset janë që të ketë softuer shtesë reklamimi të instaluar në sistemin tuaj, të cilin mund të dëshironi ta hiqni. Mund të hiqni dhe çinstaloni me lehtësi shumicën e aplikacioneve në Windows me një klikim të thjeshtë, megjithatë, gjërat ndërlikohen pak kur shkoni te programet, aplikacionet e Windows Store, Përditësimet e Windows dhe aplikacionet e sistemit. Mos kini frikë, mund të ndiqni udhëzuesit tanë më poshtë për të hequr të gjitha llojet e aplikacioneve nga sistemi juaj Windows, pavarësisht nga cilësimet tuaja aktuale. Le të fillojmë.
Përmbajtja
Si të çinstaloni aplikacionet në Windows 11 [8 Mënyra]
Këtu janë të gjitha mënyrat në të cilat mund të çinstaloni një aplikacion nga kompjuteri juaj Windows 11. Për çinstalimin e aplikacioneve të sistemit , shihni seksionet e tij të dedikuara dhe metodat speciale më poshtë pas këtij seksioni.
Metoda #01: Përdorimi i cilësimeve
Ndiqni udhëzuesin e mëposhtëm për të çinstaluar një aplikacion nëpërmjet Cilësimeve nga sistemi juaj. Në rast se po përpiqeni të çinstaloni një aplikacion të paracaktuar, ju rekomandojmë ta ndryshoni atë paraprakisht në mënyrë që opsioni i çinstalimit të mos jetë gri për ju. Në rast se nuk jeni në dijeni të ndryshimit të një aplikacioni të paracaktuar në Windows 11, mund të ndiqni udhëzuesin më poshtë.
Hapi 1: Ndryshoni fillimisht aplikacionin e paracaktuar? [Opsionale]
Shënim: Sigurohuni që paraprakisht të keni një aplikacion zëvendësues të instaluar në sistemin tuaj për të zëvendësuar aplikacionin tuaj të paracaktuar. Për shembull, nëse po ndryshoni shfletuesin tuaj nga Microsoft Edge, atëherë duhet të keni një shfletues tjetër që dëshironi të përdorni, të instaluar tashmë në sistemin tuaj, në mënyrë që të mund ta zgjidhni atë si shfletuesin tuaj të paracaktuar.
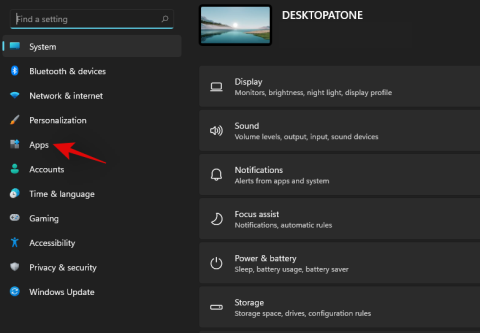
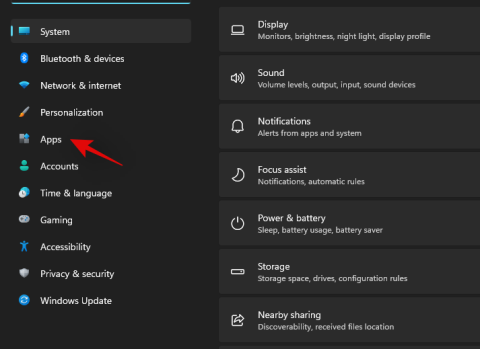
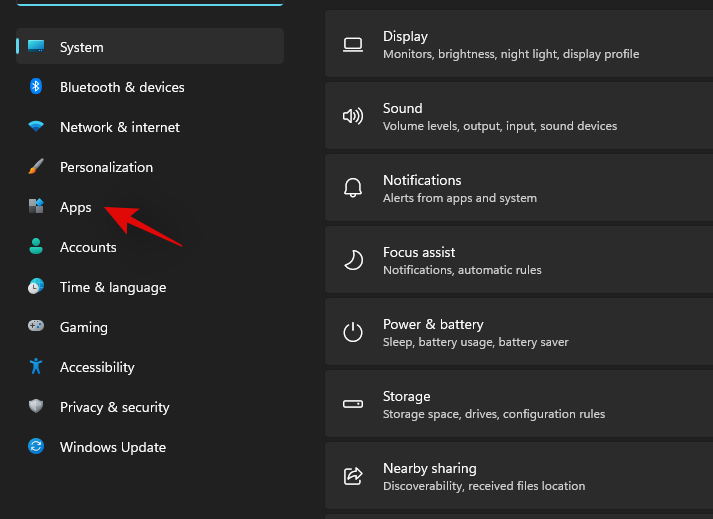
Shtypni Windows + inë tastierë për të hapur aplikacionin Cilësimet. Tani klikoni në "Aplikacionet" në shiritin anësor të majtë.
Klikoni dhe zgjidhni 'Aplikacionet e paracaktuara' në të djathtën tuaj.
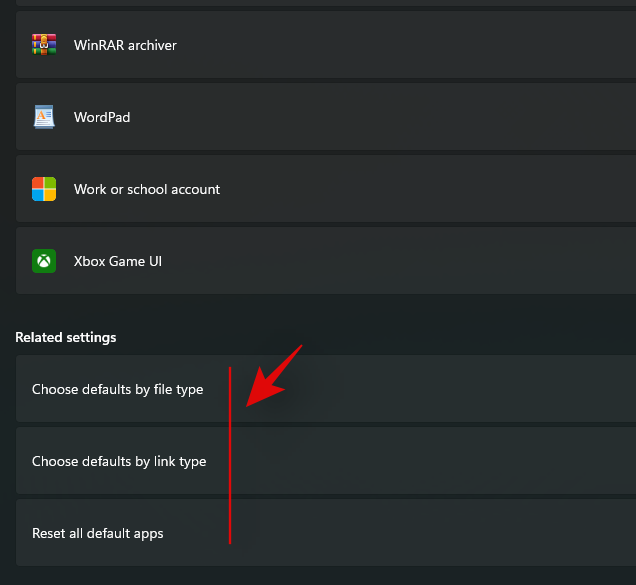
Tani zgjidhni aplikacionin që dëshironi të hiqni si aplikacionin tuaj të paracaktuar dhe klikoni mbi të. Në rast se dëshironi të ndryshoni aplikacionin tuaj të paracaktuar sipas llojit të skedarit, klikoni në "Zgjidhni parazgjedhjet sipas llojit të skedarit" në fund, siç tregohet më poshtë.
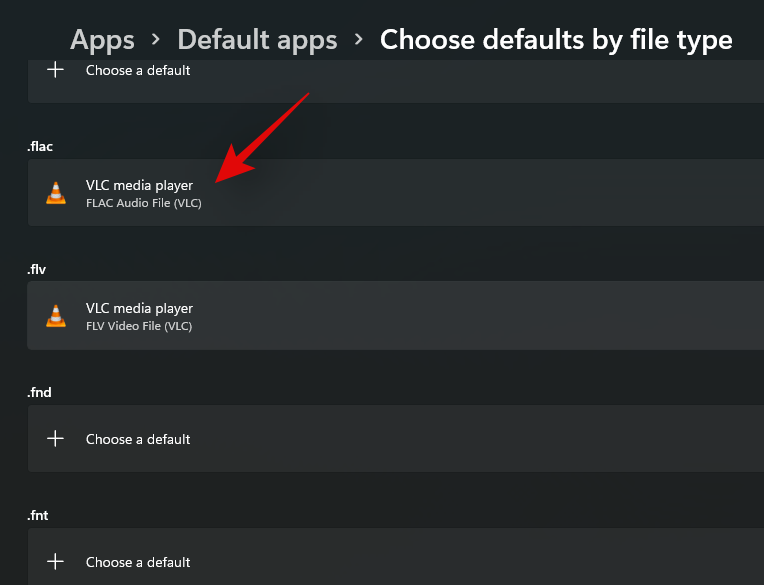
Tani klikoni në llojin/zgjerimin e skedarit të dëshiruar dhe zgjidhni një aplikacion sipas dëshirës tuaj.
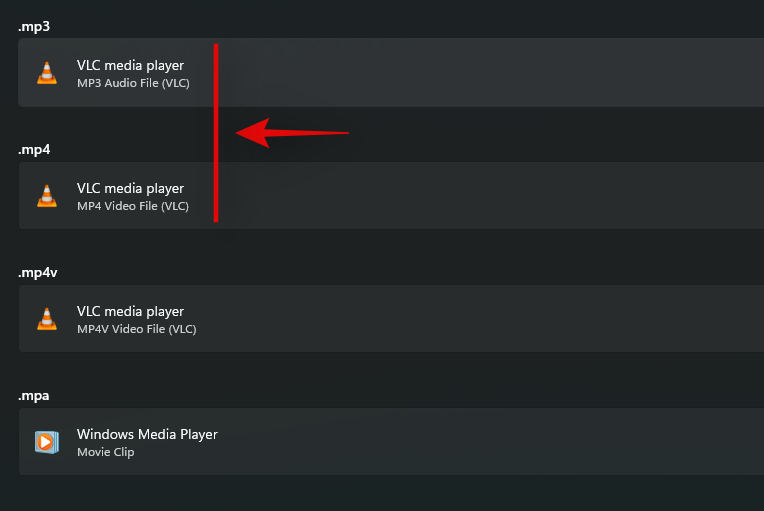
Përsëritni hapin e mësipërm për të gjitha llojet/shtesat e nevojshme të skedarëve.
Mbyllni aplikacionin Cilësimet dhe rinisni sistemin tuaj për një masë të mirë.
Dhe kjo eshte! Pasi sistemi juaj të riniset, aplikacioni juaj i paracaktuar duhet të ndryshohet. Tani mund të përdorni udhëzuesin më poshtë për të çinstaluar aplikacionin e nevojshëm nëpërmjet "Cilësimeve" në sistemin tuaj.
Hapi 2: Çinstaloni aplikacionin nga Cilësimet
Shtypni Windows + inë tastierën tuaj dhe zgjidhni "Aplikacionet" nga e majta.

Tani klikoni në "Aplikacionet dhe veçoritë" në të djathtën tuaj.
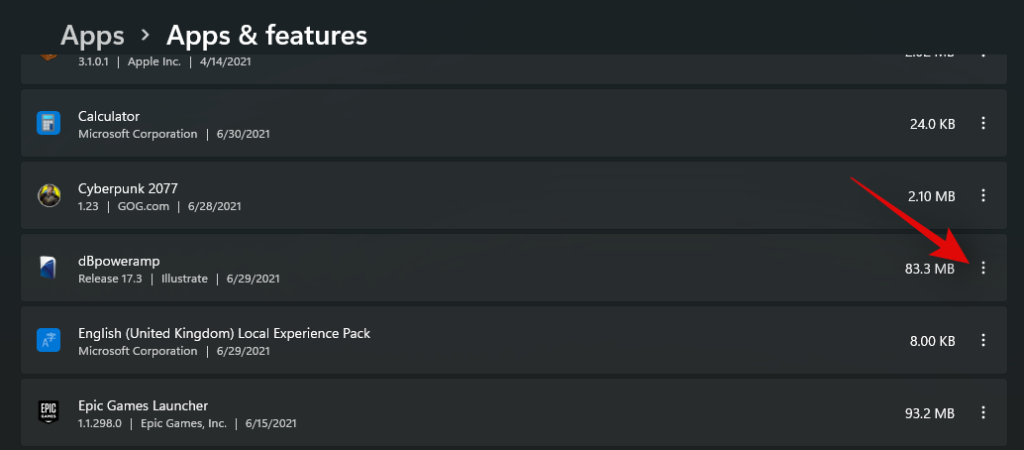
Lëvizni listën dhe gjeni aplikacionin që dëshironi të çinstaloni. Pasi ta gjeni, klikoni në ikonën e menusë "3-pika" në të djathtën tuaj.
Klikoni dhe zgjidhni 'Uninstall'.
Tani ndiqni udhëzimet në ekran për të çinstaluar aplikacionin. Nëse po çinstaloni një aplikacion të parainstaluar ose të Windows Store, atëherë ai do të çinstalohet automatikisht në sfond. Megjithatë, nëse është një program i zbuluar nga Windows, atëherë në varësi të programit, Windows ose do të përpiqet ta çinstalojë atë në sfond ose do të nisë 'uninstall.exe' ose 'setup.msi' në mënyrë që ta çinstaloni vetë. me cilësimet e dëshiruara. Ju mund të jeni në gjendje të ruani/ruani disa të dhëna kur hasni konfigurime të tilla, duke përfshirë gjëra të tilla si skedarët e regjistrit, të dhënat e përdoruesit, ruajtja e të dhënave, fotografitë dhe më shumë.
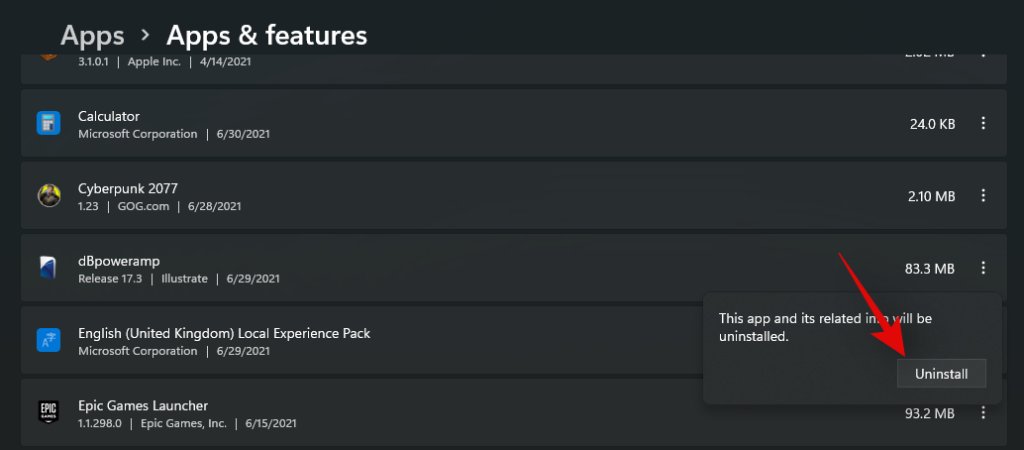
Përndryshe, ju gjithashtu do të keni mundësinë të hiqni plotësisht gjithçka që lidhet me programin nga sistemi juaj.
Dhe kjo eshte! Aplikacioni i zgjedhur tani duhet të çinstalohet nga sistemi juaj. Nëse keni çinstaluar një program të rëndë, ju rekomandojmë të pastroni cache-in tuaj duke përdorur këtë udhëzues, veçanërisht nëse programi tejkalon madhësinë prej 30+ GB.
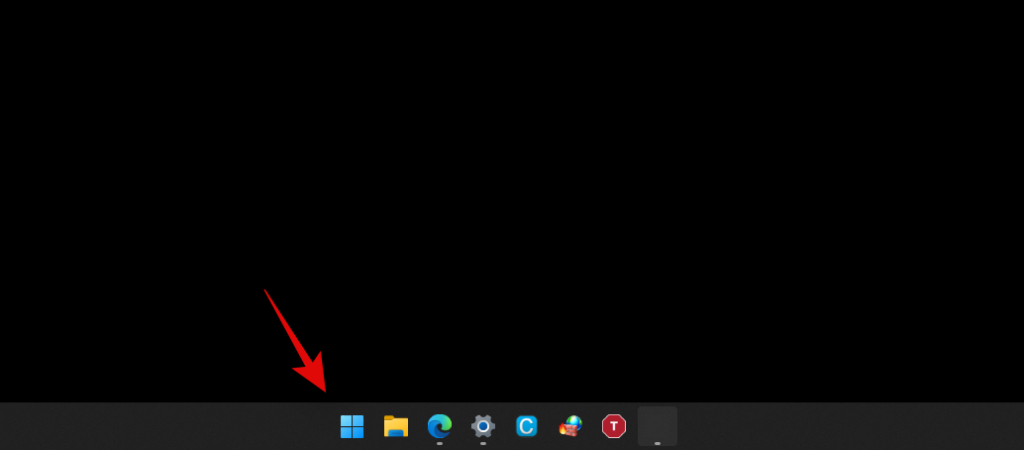
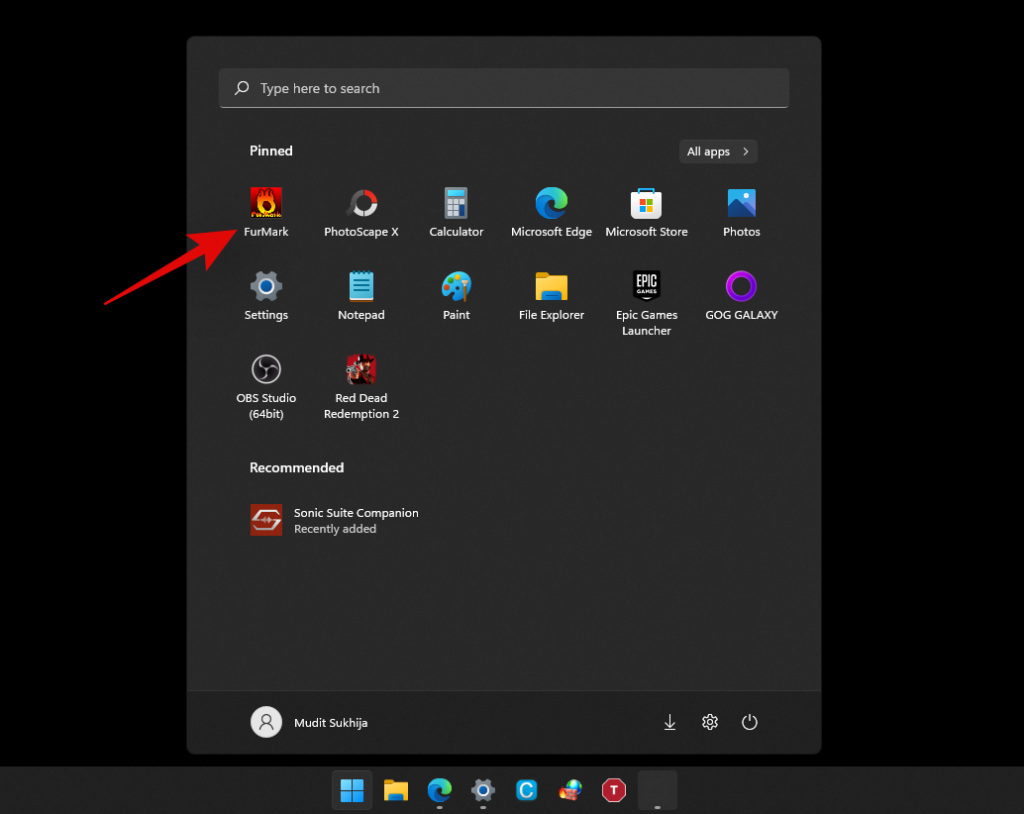
Shtypni butonin 'Windows' në tastierën tuaj për të hapur menynë 'Start'. Përndryshe, ju gjithashtu mund të klikoni në ikonën në "Taskbar" tuaj.
Gjeni aplikacionin që dëshironi të çinstaloni dhe kliko me të djathtën mbi të.
Tani klikoni në 'Uninstall'. Ndiqni udhëzimet në ekran, nëse është e nevojshme, për të përfunduar procesin e çinstalimit.
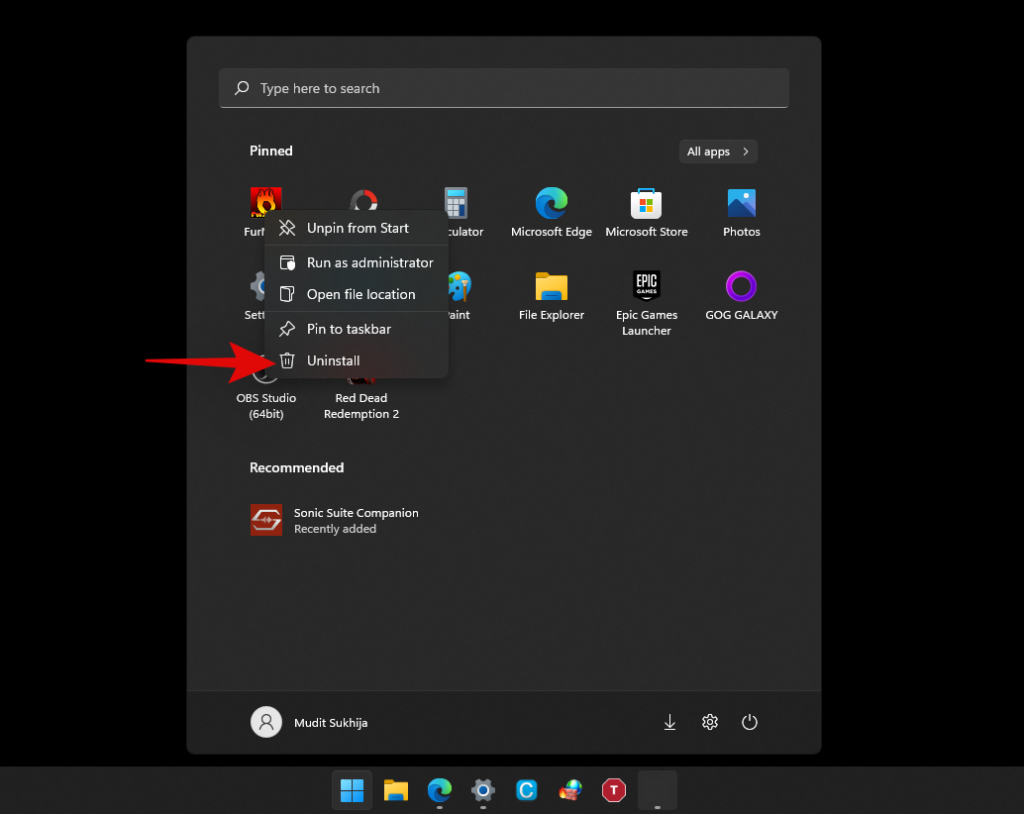
Dhe kjo eshte! Tani do të keni çinstaluar një aplikacion nga sistemi juaj nëpërmjet menysë Start.
Metoda #03: Përdorimi i skedarit të çinstalimit '.exe'
Në mënyrë ideale, nuk duhet të keni nevojë të nisni manualisht skedarin e ekzekutueshëm të çinstalimit për një program, por në disa raste, si programet e vjetra, mund të keni një program të instaluar në sistemin tuaj, opsioni i çinstalimit të të cilit nuk shfaqet askund në cilësimet tuaja. Në raste të tilla, mund ta nisni vetë skedarin e çinstalimit duke përdorur udhëzuesin më poshtë.
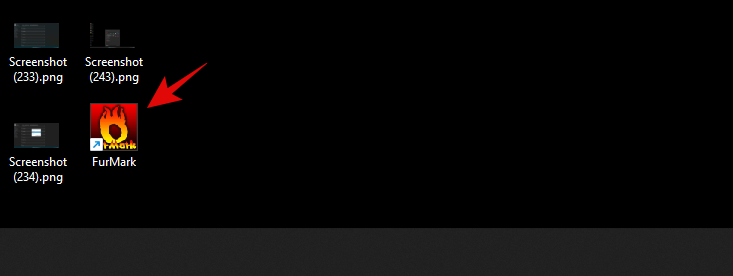
Gjeni skedarin .exe të programit ose shkurtoren që përdorni zakonisht për të nisur programin dhe kliko me të djathtën mbi të.
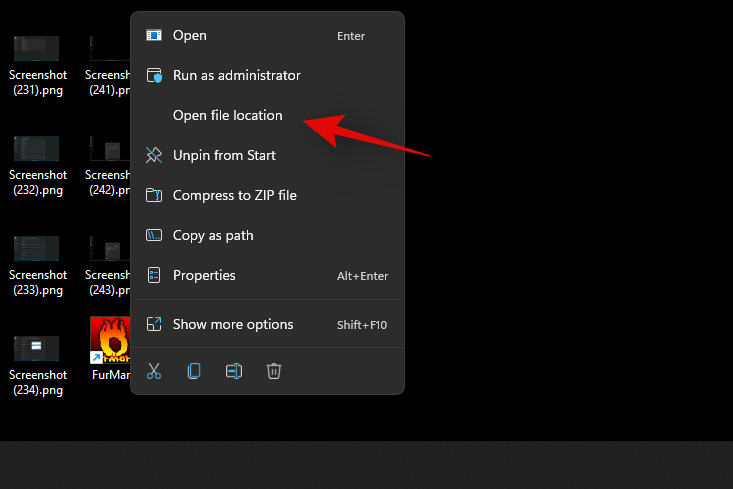
Zgjidhni "Hap vendndodhjen e skedarit". Nëse nuk e shihni këtë opsion, zgjidhni vetitë. Tani do të gjeni opsionin 'Open File Location' në skedën 'Të përgjithshme' siç tregohet më poshtë.
Tani do të çoheni te drejtoria e instalimit të programit. Kërkoni një skedar .exe me një nga emrat e mëposhtëm ose një emër të ngjashëm.
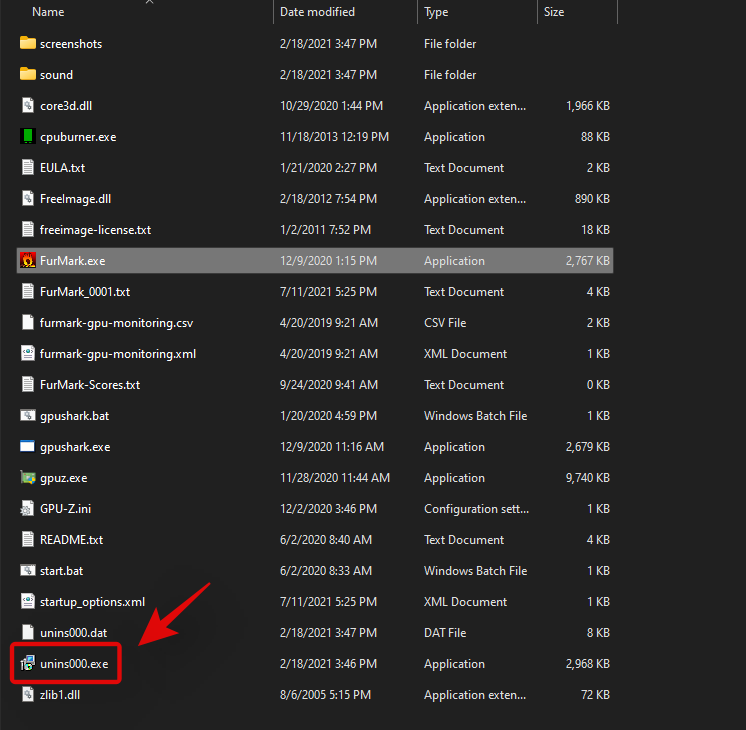
- uninst.exe
- uninstall.exe
- setup.exe
- konfigurim.msi
- (emri i programit)setup.exe/.msi
- (emri i programit) uninstall.exe/uninst.exe
dhe me shume. Programi/konfigurimi i çinstalimit do të emërtohet në mënyrë të ngjashme. Pasi ta nisni, mund të ndiqni udhëzimet në ekran për ta çinstaluar nga sistemi juaj.
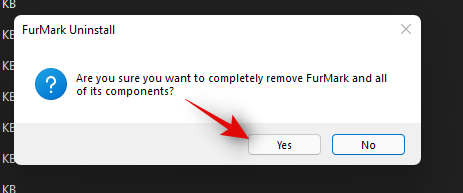
Në disa raste, mund të merrni gjithashtu opsionin për të riparuar, riinstaluar ose modifikuar programin së bashku me çinstalimin. Mund të zgjidhni opsionin e dëshiruar dhe të vazhdoni me konfigurimin ashtu siç dëshironi.
Metoda #04: Përdorimi i panelit të kontrollit
Ju gjithashtu mund t'i hiqni lehtësisht programet dhe aplikacionet nga Paneli i Kontrollit. Në mënyrë ideale, rekomandohet që të çinstaloni vetëm programet e vjetra dhe moderne duke përdorur Panelin e Kontrollit pasi jo të gjitha aplikacionet tuaja të instaluara do të shfaqen këtu. Ndiqni udhëzuesin më poshtë për të çinstaluar programet nëpërmjet panelit të kontrollit.
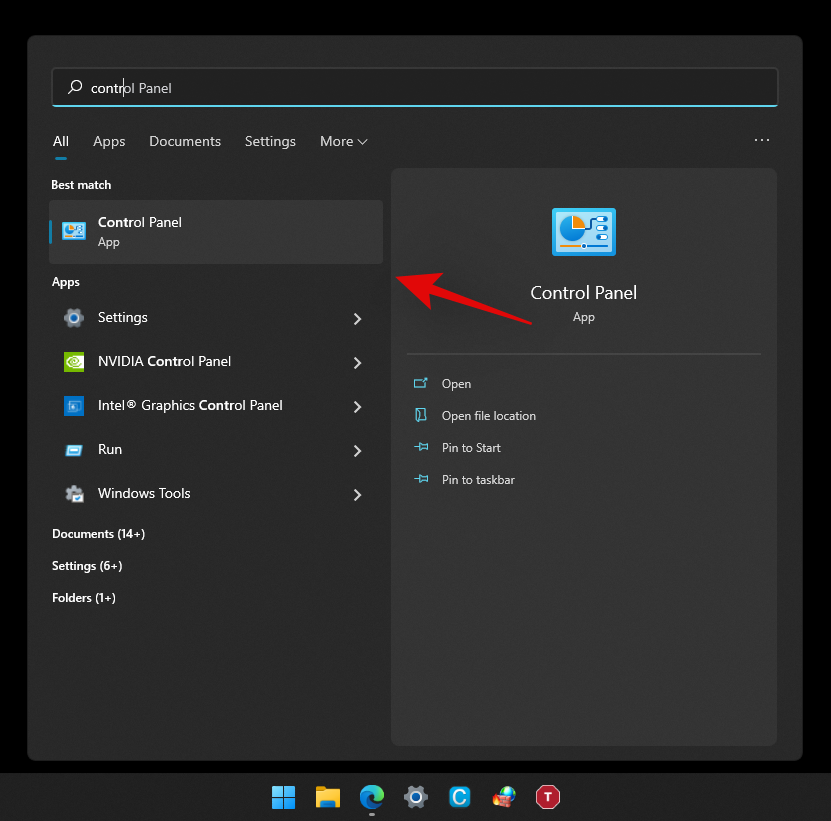
Shtypni Windows + snë tastierën tuaj dhe shkruani "Control Panel". Klikoni dhe hapni aplikacionin sapo të shfaqet në rezultatet e kërkimit tuaj.
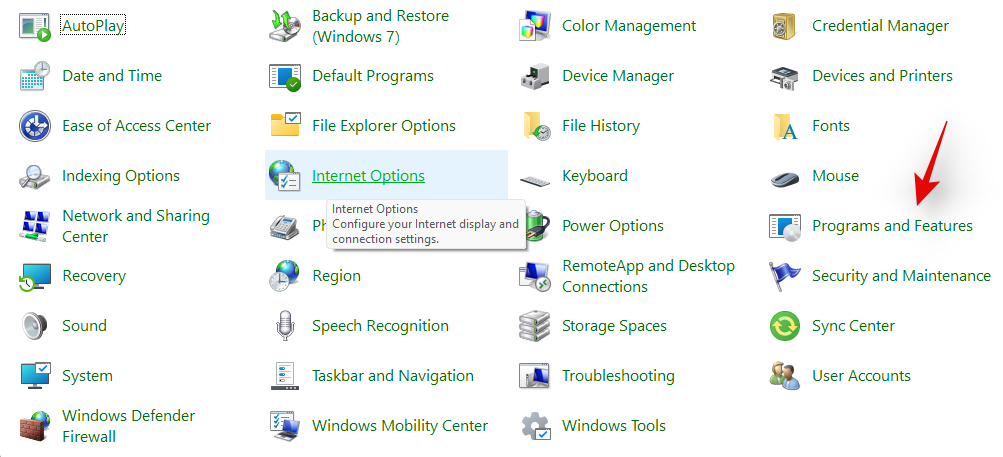
Tani klikoni në "Programet dhe veçoritë".
Tani do të merrni një listë të të gjitha programeve të instaluara aktualisht në sistemin tuaj. Gjeni programin që dëshironi të çinstaloni dhe klikoni mbi të.
Tani zgjidhni 'Uninstall' në krye.

Ndiqni udhëzimet në ekran për të përfunduar procesin e instalimit. Në disa raste, ky do të jetë një proces i automatizuar, ndërsa në të tjera, ju mund të merrni opsionin për të riparuar instalimin ekzistues ose të zgjidhni cilat të dhëna dëshironi të ruani dhe cilat të dhëna dëshironi të fshini.
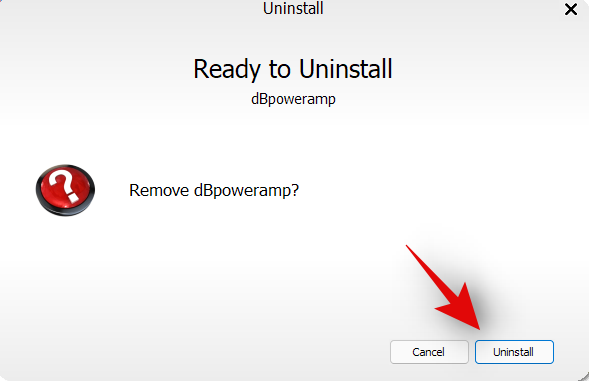
Pasi të keni bërë zgjedhjet tuaja, procesi i çinstalimit do të kryhet dhe programi duhet të hiqet nga sistemi juaj pasi të përfundojë procesi.
Metoda #05: Përdorimi i PowerShell
Ju gjithashtu mund të çinstaloni aplikacionet nëpërmjet një PowerShell të ngritur në Windows 11. Ndërsa komanda e çinstalimit është mjaft e thjeshtë, marrja e emrit të paketës për aplikacionin ose programin përkatës nuk është. Prandaj, në udhëzuesin më poshtë do të gjeni se si të çinstaloni aplikacionet përmes PowerShell nëse keni emrin e paketës.
Megjithatë, nëse nuk dini se si të merrni emrin e plotë të paketës suaj, ju rekomandojmë të ndiqni udhëzuesin e aplikacioneve të sistemit më poshtë, i cili mbulon të njëjtën metodë në shumë më tepër detaje. Le të fillojmë.
Shtypni Windows + snë tastierën tuaj dhe shkruani "PowerShell". Tani klikoni në 'Run si administrator' pasi të shfaqet në rezultatet e kërkimit tuaj.
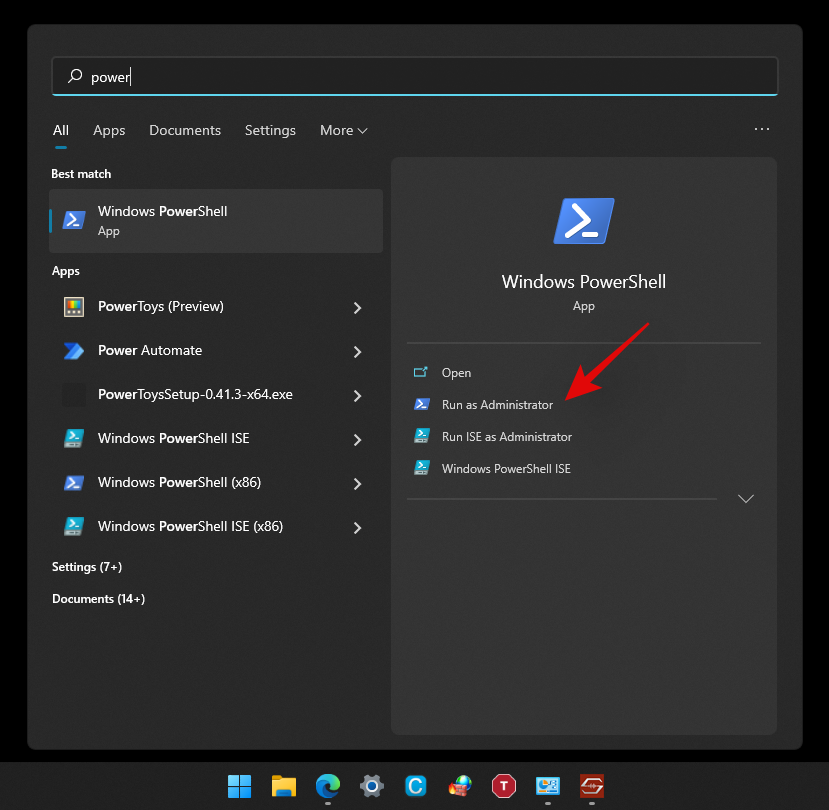
Pasi të keni marrë dritaren PowerShell në desktopin tuaj, shkruani komandën e mëposhtme dhe shtypni "Enter" në tastierën tuaj. Sigurohuni që të zëvendësoni '[Name]' me emrin e plotë të paketës së aplikacionit në fjalë.
Remove-AppxPackage [Name]

Dhe kjo eshte! Powershell tani do të bëjë magjinë e tij dhe do të çinstalojë aplikacionin në fjalë nga sistemi juaj.
Metoda #06: Përdorimi i CMD
Ju gjithashtu mund të përdorni vijën e komandës në Windows 11 për të çinstaluar aplikacionet nga sistemi juaj. Ndiqni udhëzuesin më poshtë për të filluar.
Shtypni Windows + snë tastierën tuaj dhe kërkoni për 'CMD'. Klikoni në 'Run si administrator' sapo të shfaqet në rezultatet e kërkimit tuaj.
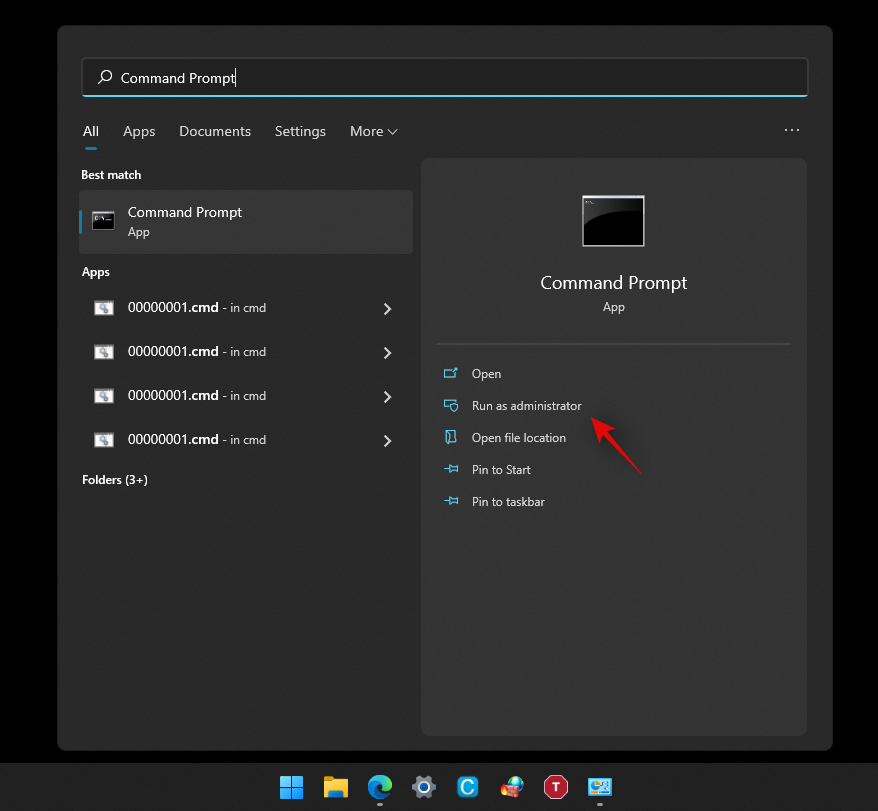
Pasi të nisë CMD, shkruani komandën e mëposhtme dhe shtypni 'Enter' në tastierën tuaj.
wmic

Tani shkruani komandën e mëposhtme për të marrë një listë të të gjitha aplikacioneve dhe programeve të instaluara në sistemin tuaj.
product get name

Pasi të keni marrë një listë të të gjitha programeve, gjeni atë që dëshironi të çinstaloni në këtë listë. Pasi ta gjeni, bëni një shënim të gjithë emrit të tij në një vend të përshtatshëm.
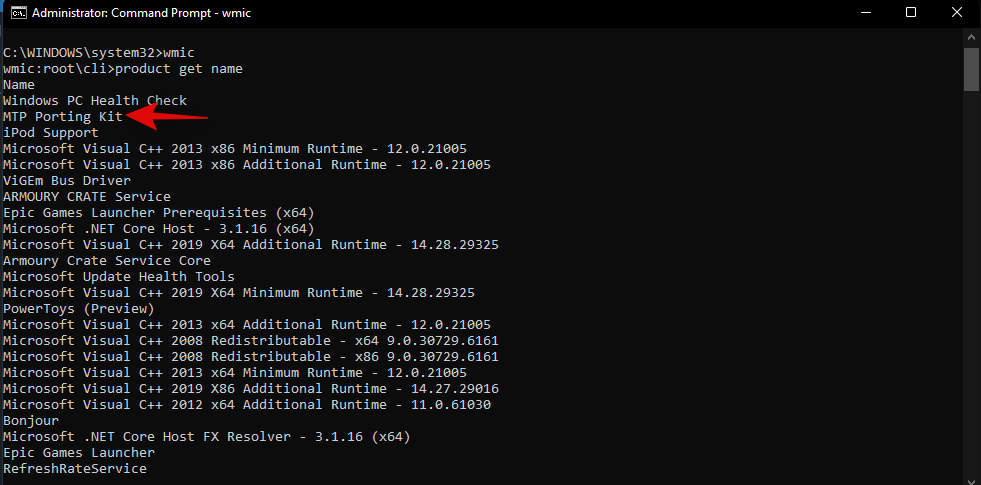
Tani shkruani komandën e mëposhtme dhe zëvendësoni AppName me emrin e aplikacionit që keni shënuar më herët.
product where name="AppName" call uninstall/nointeractive
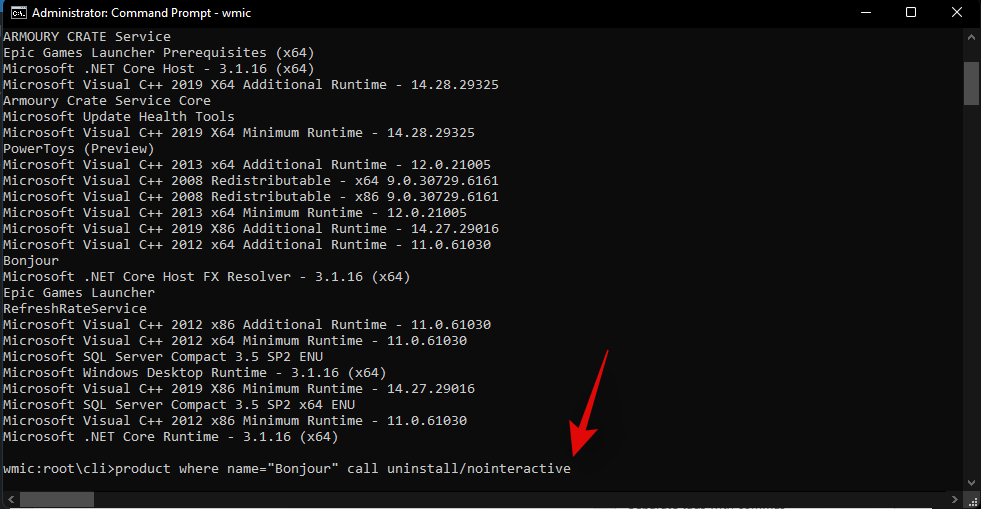
Shënim: Mos i hiqni thonjëzat nga komanda pasi ato janë të nevojshme për këtë sintaksë.
Shtypni 'Enter' në tastierën tuaj për të ekzekutuar komandën.
Command Prompt tani do të kryejë proceset e nevojshme në sfond dhe ju duhet të merrni një konfirmim siç tregohet më poshtë pasi të përfundojë procesi.
Dhe kjo eshte! Tani do të keni çinstaluar një aplikacion nga sistemi juaj nëpërmjet Command Prompt.
Metoda #07: Përdorimi i setup.msi
Në rast se programi juaj erdhi me një skedar konfigurimi që kishte një shtesë .msi në vend të .exe, atëherë mund të përdorni të njëjtin skedar për të çinstaluar gjithashtu programin tuaj. Le të zbulojmë pak më shumë rreth skedarëve .msi në mënyrë që të jetë më e lehtë për të kuptuar funksionin e tyre.
Çfarë është një skedar .msi?
Tradicionalisht instaluesit tuaj vijnë me një shtesë .exe. Këto janë programe të krijuara për të instaluar programe në sistemin tuaj me skedarët e konfigurimit të bashkuar me to. Skedarët MSI e çojnë këtë një hap më tej duke ju lejuar të bashkoni instalues të shumtë së bashku në të njëjtin skedar.
Kjo lejon që skedari MSI të kryejë funksione të ndryshme falë instaluesve të bashkuar. Kjo përfshin gjëra të tilla si instaluesit e përditësimeve, instaluesit e softuerit, riparues programi, modifikues programi dhe çinstalues. Prandaj, nëse programi juaj erdhi me një skedar konfigurimi .msi, atëherë mund të përdorni udhëzuesin më poshtë për të përdorur të njëjtin skedar për të çinstaluar programin nga sistemi juaj.
Shënim: Skedarët e vjetër .msi rrallë punojnë me instalime më të reja të të njëjtit softuer. Mbani në mend këtë në rast se po përpiqeni të reduktoni programin tuaj në një version të mëparshëm.
Çinstaloni përmes skedarit .msi
Gjeni skedarin e konfigurimit .msi në ruajtjen tuaj lokale dhe klikoni dy herë dhe hapni aplikacionin.
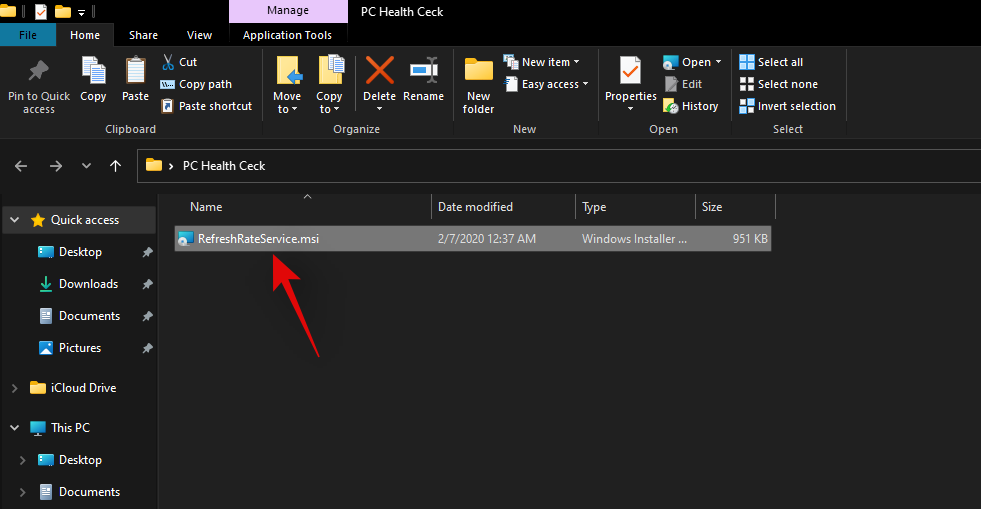
Ndiqni udhëzimet në ekran derisa t'ju kërkohet të zgjidhni një nga drejtimet e veprimit.
- Riparim
- Modifiko
- Çinstaloni
- Instaloni përditësimet
- Hiq përditësimet
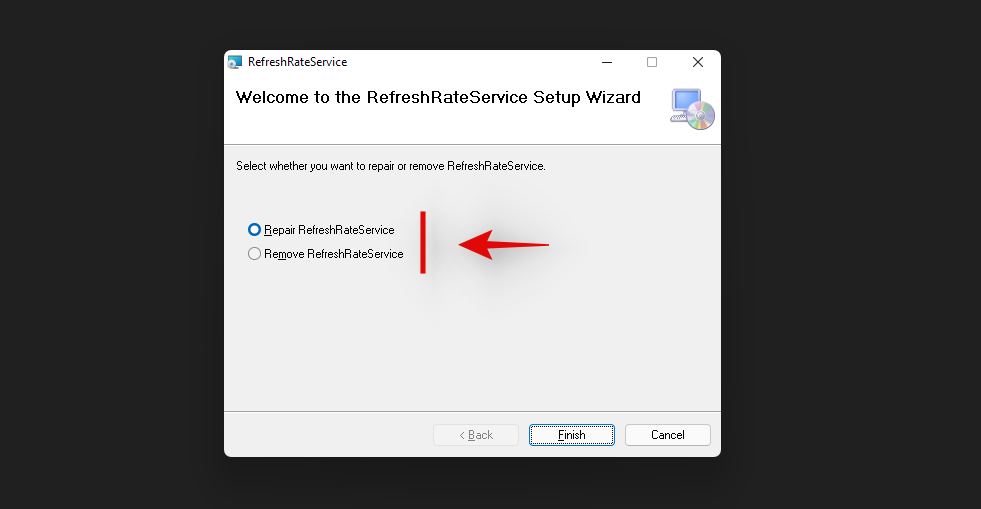
Zgjidhni opsionin e dëshiruar dhe vazhdoni me udhëzimet në ekran për të përfunduar procesin e çinstalimit.
Dhe kjo eshte! Programi i zgjedhur tani duhet të hiqet nga sistemi juaj nëpërmjet skedarit të konfigurimit .msi.
Metoda #08: Përdorni një çinstalues të palës së tretë
Në treg ka edhe çiinstalues të ndryshëm të palëve të treta. Këto aplikacione ndihmojnë në identifikimin e të gjithë sistemit dhe aplikacioneve të palëve të treta në sistemin tuaj, të cilat më pas mund të çinstalohen nga kompjuteri juaj me një klikim të thjeshtë. Shumica e këtyre programeve ju lejojnë të hiqni aplikacionet e sistemit pasi të zgjidhni modelin premium të softuerit.
Në rast se vendosni të përdorni versionin falas, në shumicën e rasteve do të kufizoheni në një numër të caktuar çiinstalimesh. Ndërsa kjo mund të duket e tepërt, këto shërbime janë jashtëzakonisht të dobishme për profesionistët dhe teknikët që duhet të çinstalojnë programe të shumta me një klikim të vetëm. Shumica e këtyre çiinstaluesve mbështesin çinstalime me shumicë, gjë që është mjaft e dobishme kur konfiguroni sisteme të shumta për një mjedis zyre. Më poshtë kemi lidhur dy çinstaluesit më të njohur të palëve të treta. Shpresojmë që t'i gjeni të dobishme në përpjekjen tuaj për të çinstaluar programet nga Windows 11.
Si të çinstaloni aplikacionet e sistemit në Windows 11 [2 Mënyra]
Mund të çinstaloni aplikacionet e sistemit në Windows 11 ose nëpërmjet një PowerShell të ngritur ose duke përdorur një skript të palës së tretë PowerShell. Unë do të rekomandoja që të përdorni metodën PowerShell, megjithëse mund të duket më e ndërlikuar, nuk do t'ju duhet të ekzekutoni skriptet e palëve të treta me privilegje të ngritura në sistemin tuaj.
Megjithatë, nëse ende vendosni të përdorni një skript të automatizuar, sigurohuni që ta ndryshoni politikën tuaj të ekzekutimit përsëri në normalitet pasi skripti të jetë ekzekutuar. Kjo do të jetë thelbësore për sigurinë e sistemit tuaj pasi lënia e politikës së ekzekutimit të pandryshuar mund t'i lejojë përdoruesit me qëllim të keq të ekzekutojnë me lehtësi skriptet PowerShell në sistemin tuaj. Përdorni një nga metodat e mëposhtme që i përshtatet më së miri nevojave dhe kërkesave tuaja aktuale për të filluar.
Metoda #01: Përdorimi i Powershell
Procesi i çinstalimit të PowerShell për çdo program ka dy procese. Së pari, merrni emrin e plotë të paketës së aplikacionit në fjalë dhe më pas përdorni PowerShell për të çinstaluar aplikacionin në fjalë. Nëse aplikacioni juaj nuk shfaqet në listën e PowerShell, atëherë mund t'ju duhet të përdorni skriptin e palës së tretë më poshtë për të hequr aplikacionin në fjalë nga sistemi juaj. Le të fillojmë.
Hapi 1: Emri i plotë i paketës së burimit
Shtypni Windows + snë tastierën tuaj dhe kërkoni për "PowerShell". Klikoni në 'Run si administrator' sapo të shfaqet në rezultatet e kërkimit tuaj.

Pasi të nisë PowerShell, shkruani komandën më poshtë dhe shtypni 'Enter' në ekranin tuaj.
get-appxpackage
PowerShell tani do të gjenerojë dhe shfaqë një listë të të gjitha aplikacioneve të instaluara në sistemin tuaj, duke përfshirë aplikacionet e integruara OEM dhe aplikacionin Windows. Lëvizni listën për të gjetur aplikacionin tuaj, megjithatë, nëse kjo ju duket shumë e lodhshme, filloni duke klikuar me të djathtën në shiritin e titullit në krye.
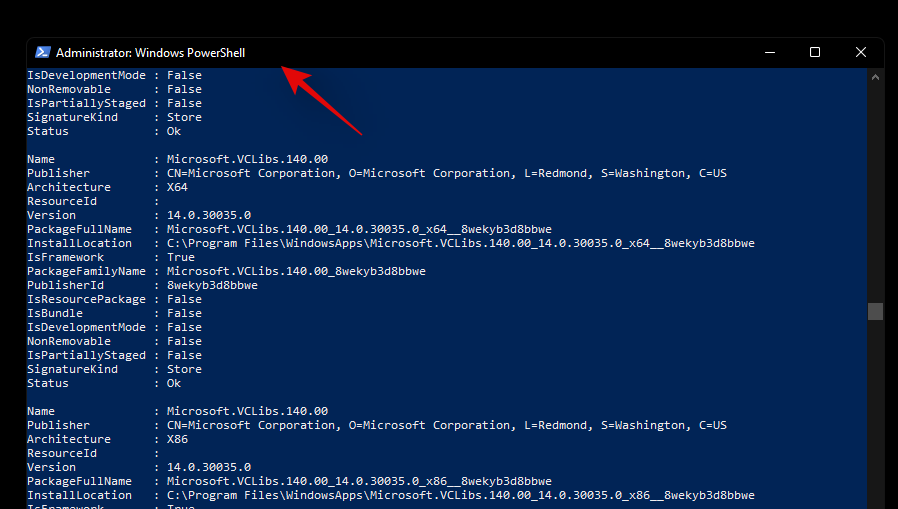
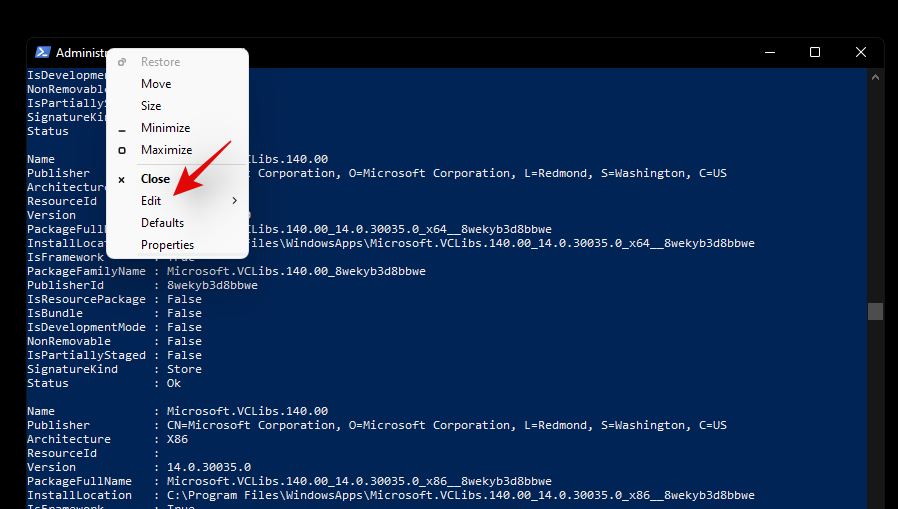
Tani zgjidhni 'Redakto'.
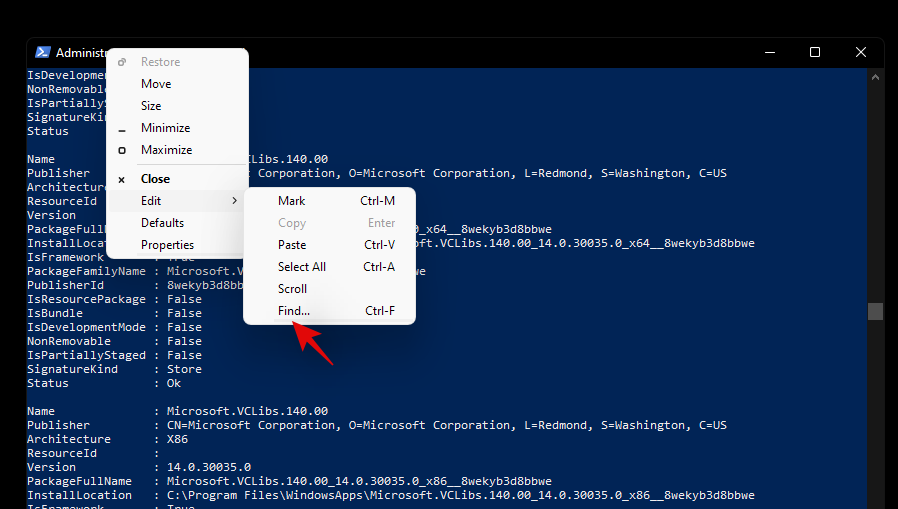
Klikoni në 'Gjeni'.
Tani kërkoni për emrin e përgjithshëm të aplikacionit dhe funksioni 'Gjeni' duhet t'ju çojë automatikisht te aplikacioni në listë.
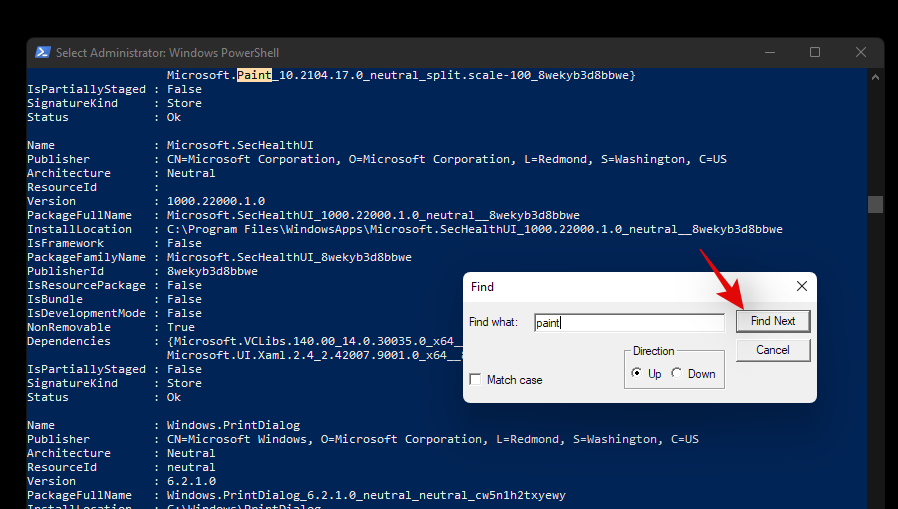
Shënoni 'FullPackageName' të aplikacionit në fjalë siç tregohet më poshtë.
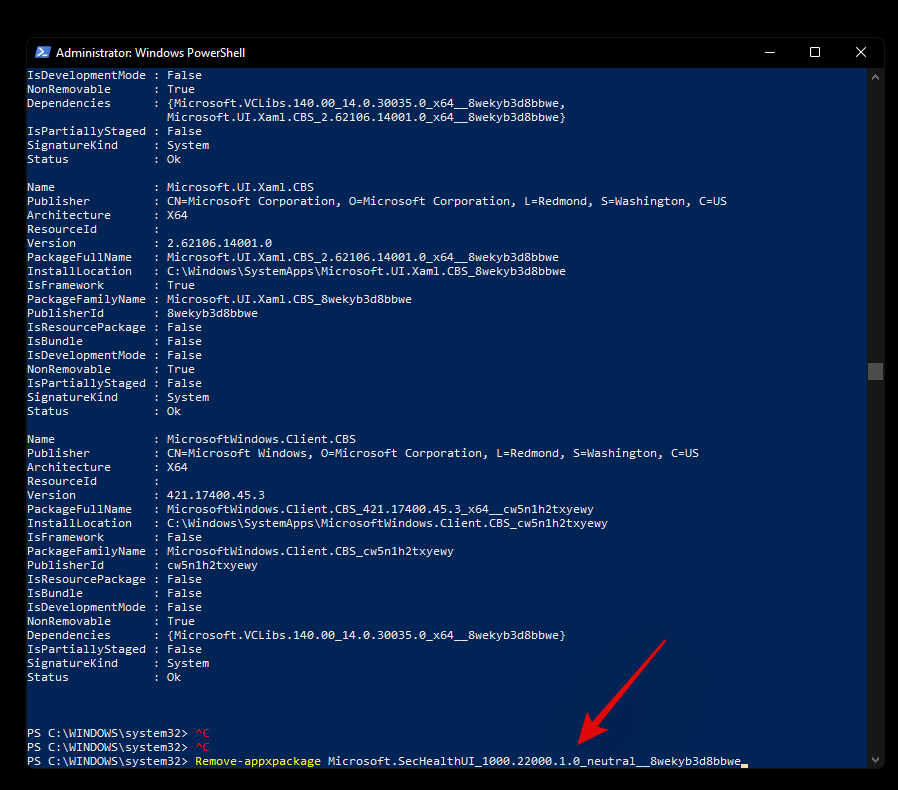
Dhe kjo eshte! Tani do të keni burim emrin e plotë të paketës për aplikacionin në fjalë në sistemin tuaj. Tani mund të përdorni udhëzuesin më poshtë për ta çinstaluar atë nga sistemi juaj.
Hapi 2: Çinstaloni aplikacionin përmes PowerShell
Hapni një PowerShell të ngritur duke përdorur udhëzuesin e mësipërm. Nëse tashmë keni një të hapur në ekranin tuaj, atëherë filloni duke shtypur komandën e mëposhtme. Sigurohuni që të zëvendësoni '[PackageName]' me emrin e plotë të paketës së aplikacionit që kemi marrë më lart.
Remove-Appxpackage [PackageName]

Shtypni 'Enter' në tastierë pasi të keni mbaruar. PowerShell tani do të bëjë gjënë e tij dhe aplikacioni duhet të instalohet nga sistemi juaj brenda një kohe të shkurtër.
Nuk mund të hiqni një aplikacion duke përdorur PowerShell? Si të rregulloni
Nëse nuk jeni në gjendje ta hiqni aplikacionin përmes PowerShell, atëherë ju rekomandojmë të bëni kontrollet e mëposhtme për të zgjidhur problemin.
- Sigurohuni që jeni duke përdorur një dritare të ngritur PowerShell.
- Sigurohuni që emri i plotë i paketës është marrë saktë.
- Verifikoni kodet e "çinstalimit" dhe përpiquni të mbani gjithçka me shkronja të vogla.
- Përsëritni të njëjtin udhëzues në modalitetin e sigurt.
- Verify if the app hasn’t been already removed from your system and only leftover registry files are showing up in PowerShell.
You should be able to solve your issue by crosschecking the above-stated checks. However, if you are still unable to uninstall the concerned app, then you can use the third-party script below.
Method #02: Using a third party script
You can also use a third-party script to remove system apps from your Windows 11 system. These scripts have been quite popular lately and have been the go-to choice for many users when setting up fresh installations of Windows. Use the guide below to get started.
- Windows10debloater by Sycnex | Download Link
Note: While this is a Windows 10 script, it has been verified to remove system apps on Windows 11 as well. However, we recommend you keep checking the download page for updates that should be better compatible with Windows 11. We recommend using the script to only remove system apps and nothing else offered by the script. Other features could potentially break Windows 11 until a compatible script for the same is released in the future.
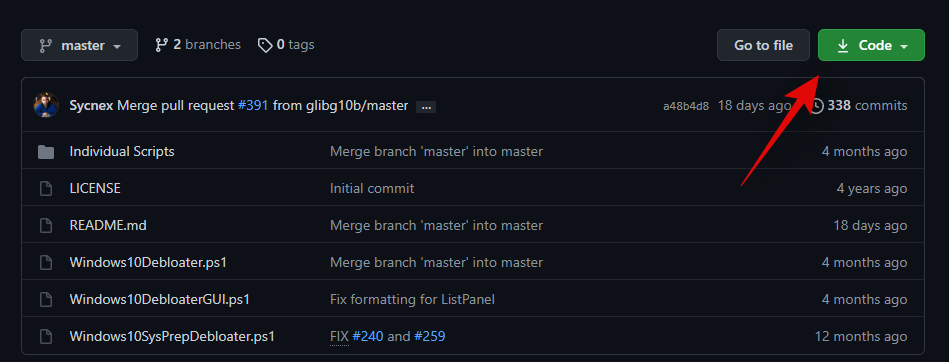
Visit the link above and you will be taken to the GitHub page for the script. Click on ‘Code’ in the top right corner.
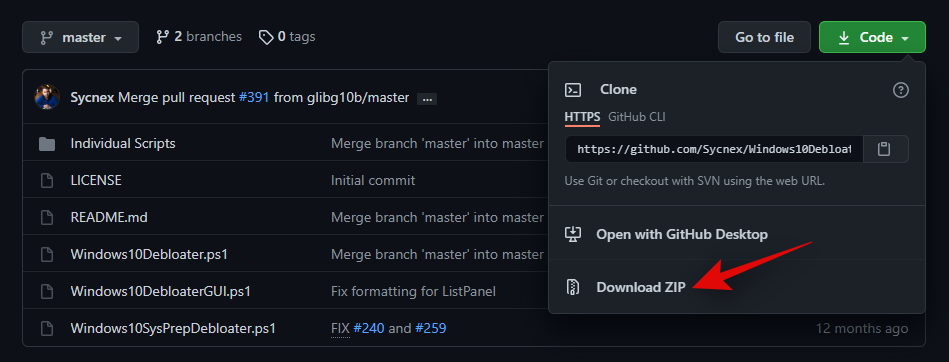
Now click and select ‘Download ZIP’.
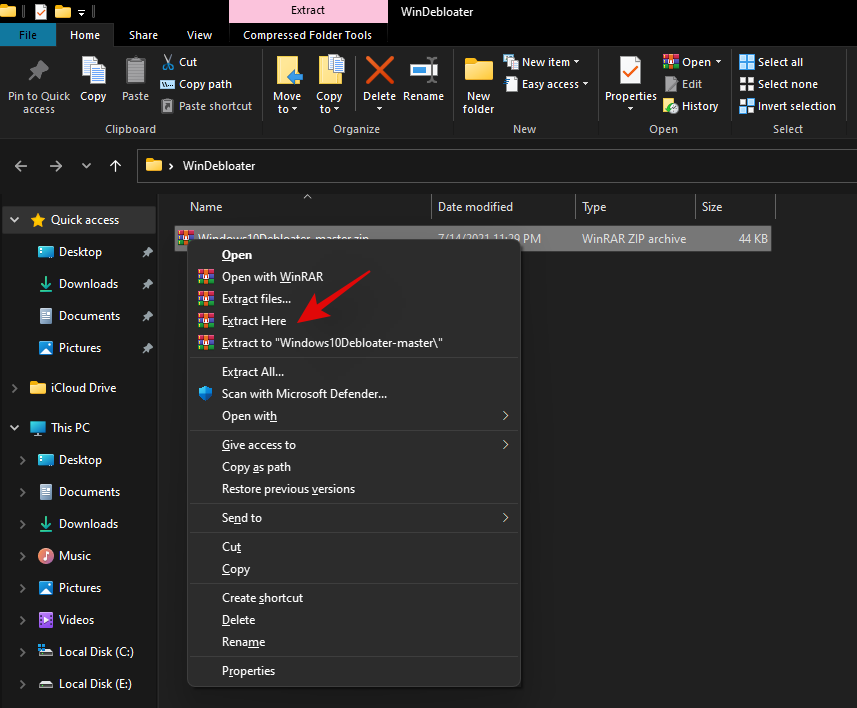
A Zip file will now be downloaded to your local storage. Extract the files to a convenient location.
Once extracted, open the folder and click on ”File’ in the top left corner.
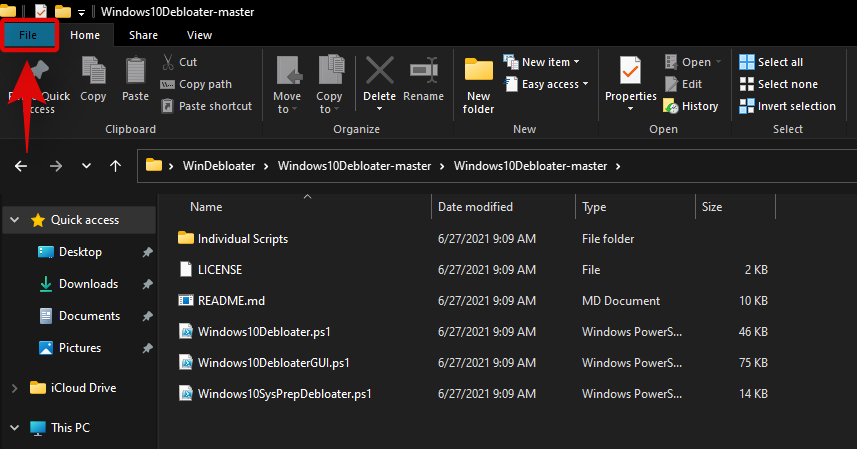
Hover over ‘Open Windows PowerShell’ and select ‘Open Windows PowerShell as administrator’.
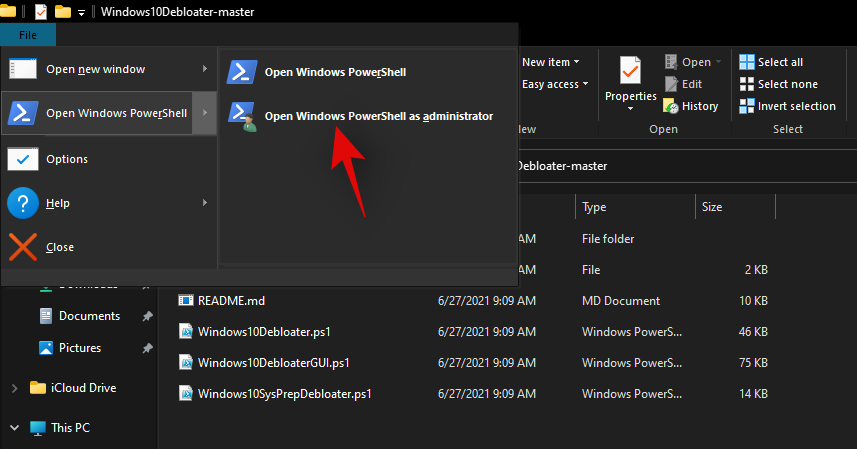
An elevated PowerShell window will now launch on your system. Start by executing the following command given below.
Set-ExecutionPolicy Unrestricted -Force

This will set your script execution policy as unrestricted which will allow us to use the script on your system. Once executed, enter the following command in the window and press ‘Enter’ on your keyboard once you are done.
.\Windows10DebloaterGUI.ps1

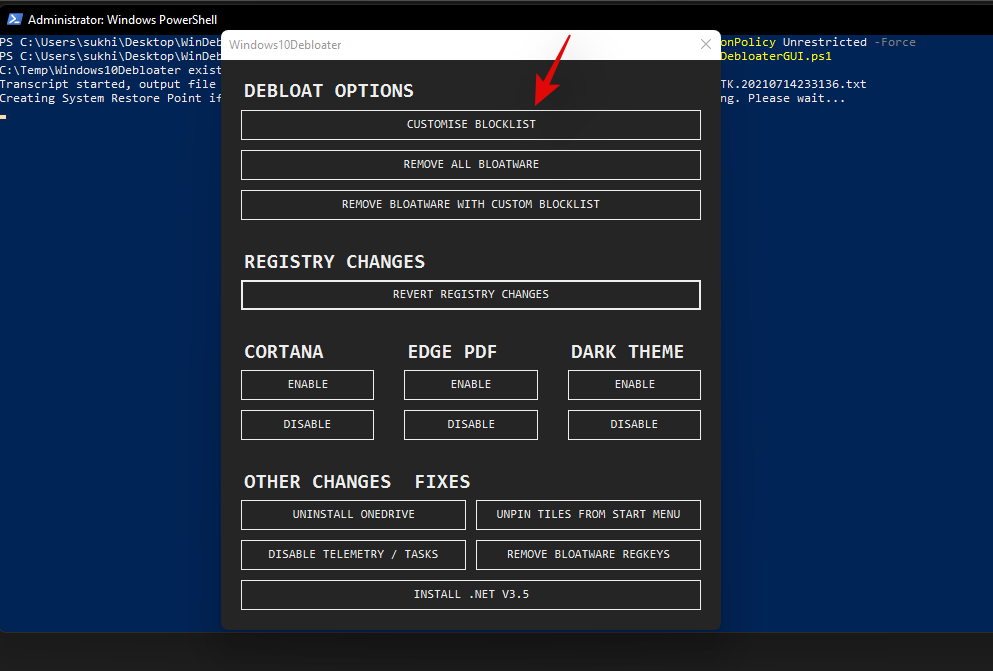
This will execute the debloat script and you should now get a graphical interface for it on your screen. Click on ‘Customize Blacklist’ at the top.
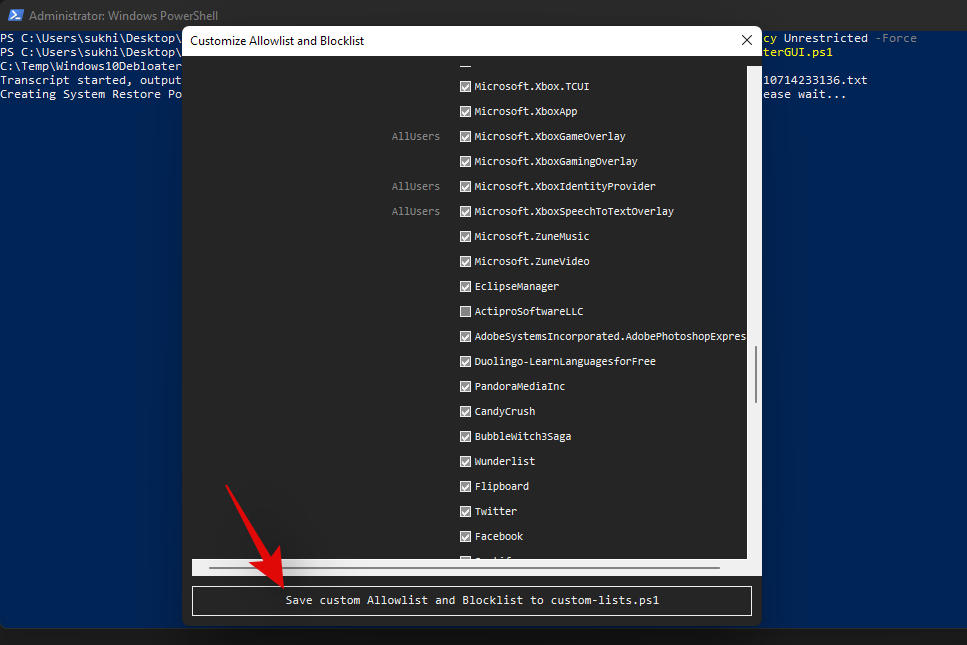
You will now get a list of all the apps installed on your system. Check the box for the apps you wish to uninstall and uncheck the box for the apps you wish to keep on your device. Ensure that you go through the entire list to remove any default selections made by the script for the programs that you wish to keep on your device.
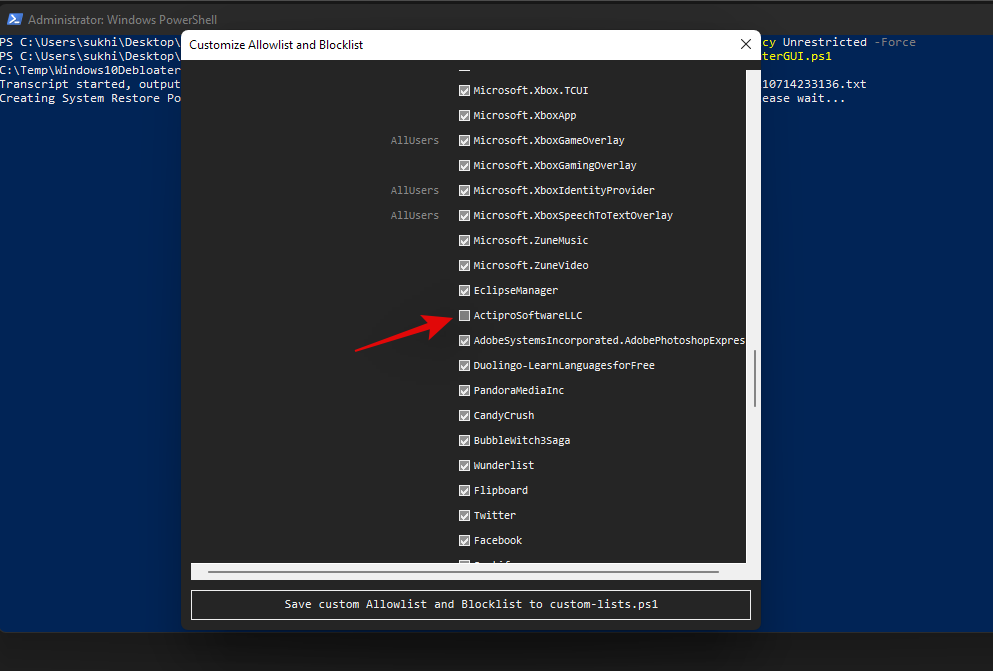
Once you have edited your list, simply click on ‘Save custom Whitelist and Blacklist to custom-lists.ps1’ at the top. You can now close this app selection window.
Now click on ‘Remove Bloatware with Customized Blacklist’. Keep an eye on the PowerShell window on the background once the command executes.
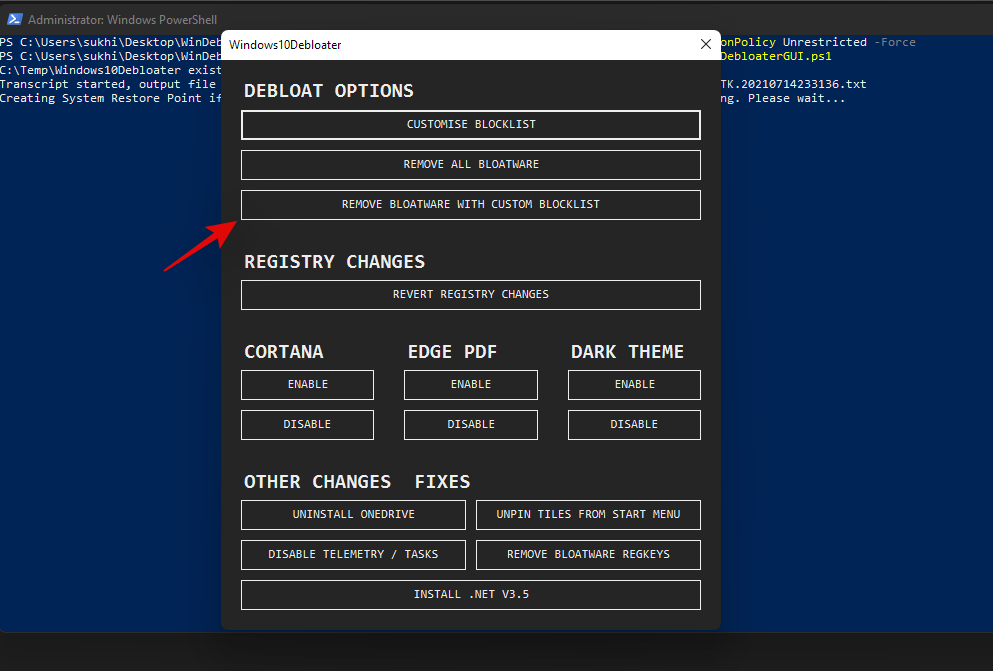
Once all programs have been removed, you will get a confirmation for the same in the PowerShell window in the background. Close the graphical interface by clicking on the ‘X’ in the top right corner.
Now go back to your PowerShell window and execute the following command.
Set-ExecutionPolicy Restricted -Force

This will revert changes to your execution policy and revert the changes we made earlier. Doing this is quite important to maintain proper security on your Windows system.
And that’s it! You will now have uninstalled system apps from your system via a third-party PowerShell script.
Can’t uninstall apps on Windows 11? How to fix
There could be a few reasons why you are unable to uninstall apps on your system. Here are a few workarounds that should help you uninstall persistent apps from your system easily.
Method #01: Close instance in task manager and try again
Chances are that the app has an instance or a process open in the background which is preventing it from being uninstalled. In such cases, you can try finding processes related to the app and kill them on your own. Once the processes have been killed, you can then try to uninstall the app again. Follow the guide below to find and kill the process.
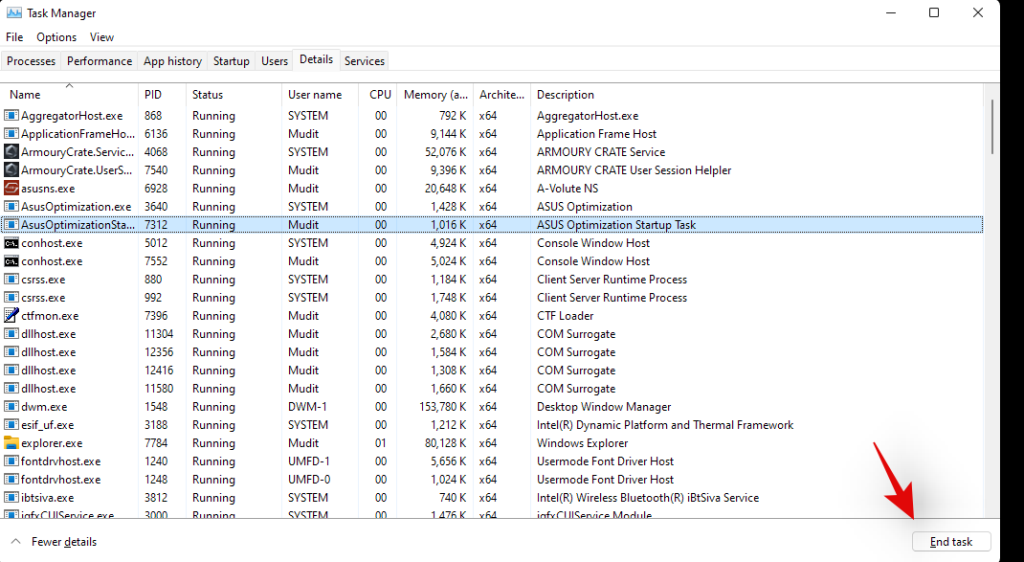
Press Ctrl + Shift + Esc on your keyboard to open the ‘Task Manager’. Switch to the ‘Details’ tab by clicking on it.
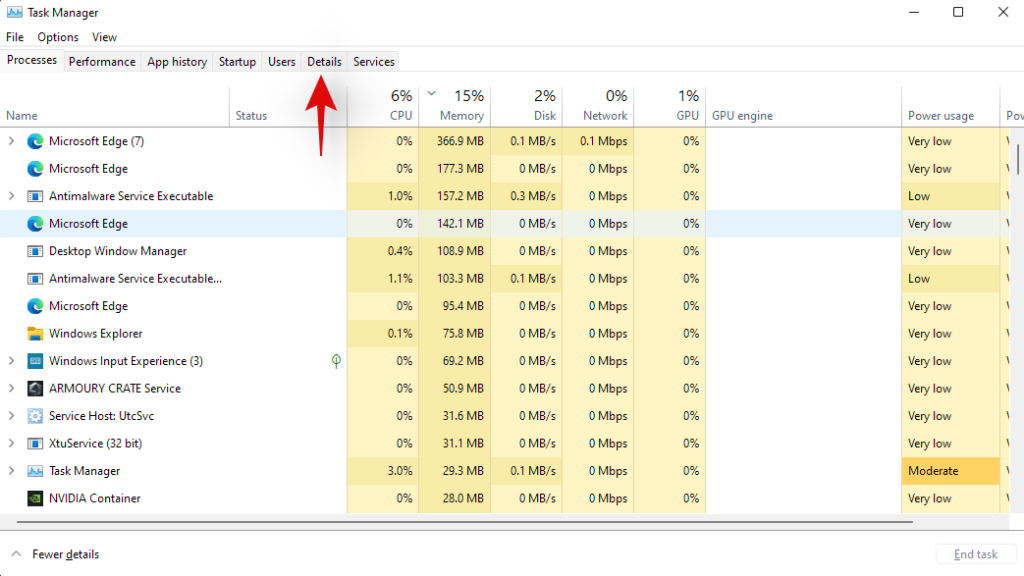
Now look for a process in the list for the concerned app. In our case, we are looking to uninstall ‘AsusOptimization’, hence we will look for a PowerToys process. Once found, click and select the process.
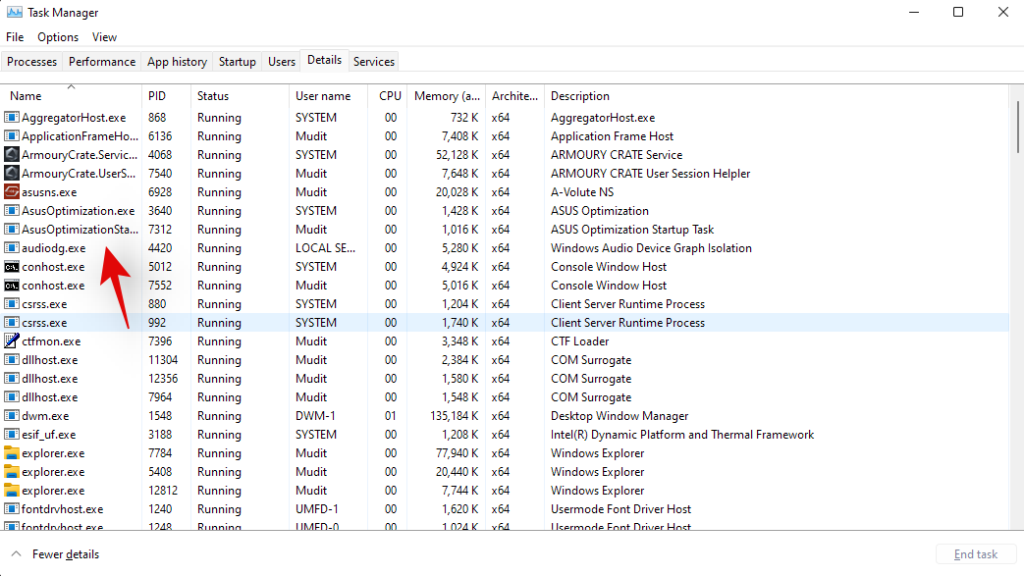
Hit delete on your keyboard or click on ‘End Task’.
Confirm your choice by selecting ‘End Process’.
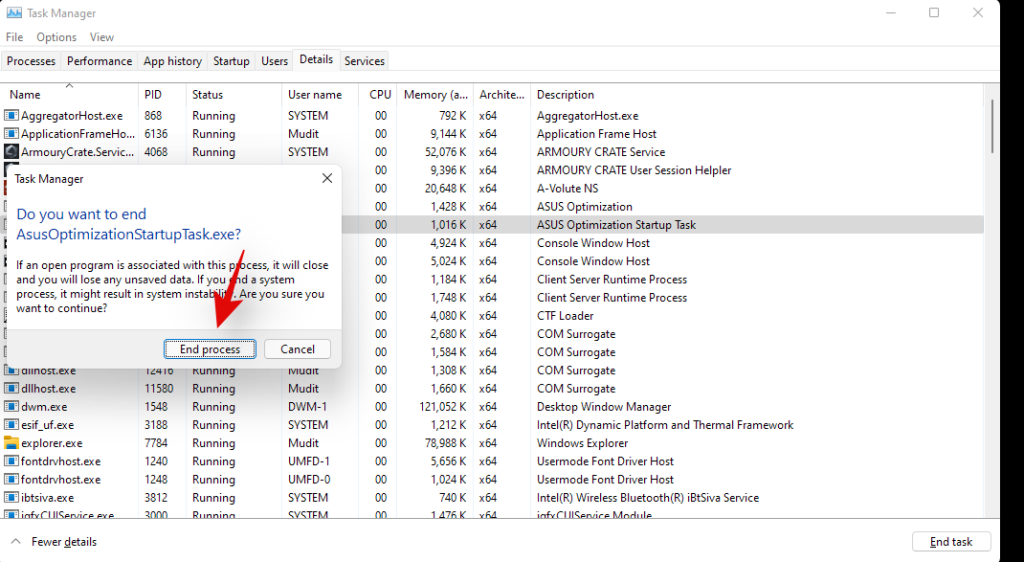
And that’s it! the process should now be killed and you can now try uninstalling the concerned app again.
Method #02: Uninstall in Safe mode
Another way to ensure that no third-party apps are launched or used in the background is to launch your system in safe mode and then try to uninstall your concerned app. You can use this comprehensive guide by us to enter safe mode on Windows 11.
Once in safe mode, follow the guide below to get the installer service back up and running on your system. Once the service is running in the background, you can use either of the methods above to uninstall the concerned app from your system.
Press Windows key + S key to open Windows Search and type in ‘cmd’. Click on ‘Run as administrator’ when the command prompt shows in your search results.
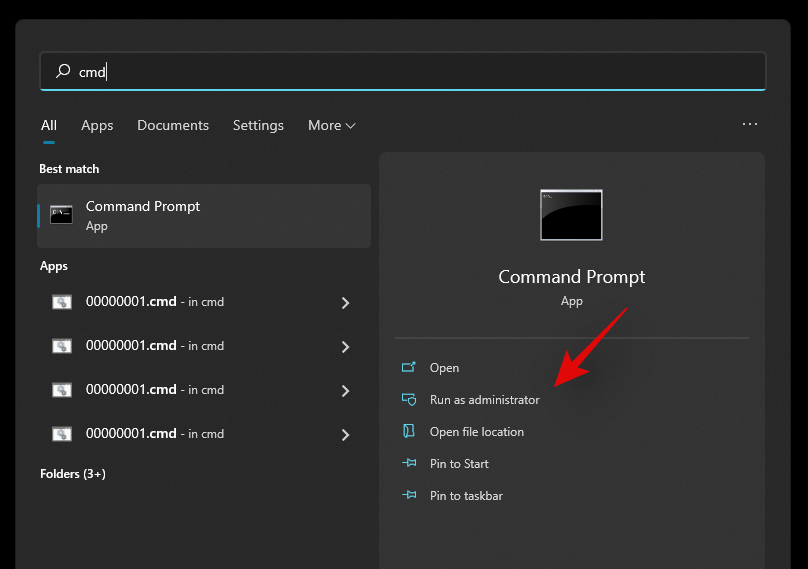
Enter the following commands in the command prompt one by one and hit Enter on your keyboard to execute each one of them.
REG ADD "HKLM\SYSTEM\CurrentControlSet\Control\SafeBoot\Minimal\MSIServer" /VE /T REG_SZ /F /D "Service"
REG ADD "HKLM\SYSTEM\CurrentControlSet\Control\SafeBoot\Network\MSIServer" /VE /T REG_SZ /F /D "Service"
net start msiserver

And that’s it! The installer service should now be running on your system and you should now be able to uninstall the concerned app using either one of the methods above.
Method #03: Run the Microsoft Uninstaller troubleshooter
You can also run a Microsoft Troubleshooter to try and fix uninstaller issues. Microsoft troubleshooters have come a long way since they were first introduced and can now fix most software and driver incompatibility issues without any user intervention.
Microsoft has also made it much easier for you to now launch any troubleshooter to try and solve your current issue. Use the guide below to launch an uninstaller troubleshooter on your Windows 11 system.
Required
Guide
Download the troubleshooter using the link above to your PC. Once downloaded, extract the .zip file to a convenient location. If you have trouble extracting the .zip file or it seems to be blocked, use the guide below to unblock it, else you can skip the guide and jump to the next guide.
Unblock the .zip file
Right-click on the .zip file and select ‘Properties’.
Check the box for ‘Unblock’ at the bottom of the Window.
Click on ‘Ok’.
Provide administrator permission to make the necessary change.
The file should now be unblocked on your system and you should now be able to extract it like any other .zip file on your system.
Run the troubleshooter
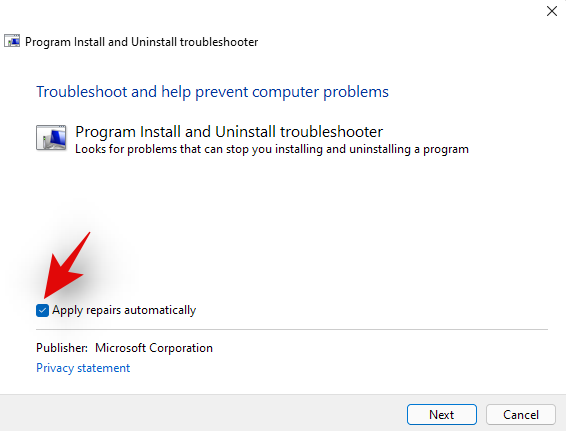
Navigate to the extracted files on your local storage. Cut the file named ‘MicrosoftProgram_Install_and_Uninstall.meta.diagcab’ and paste it on your desktop. Double click and run the file from your desktop. Click on ‘Advanced’ at the bottom once the troubleshooter is launched.
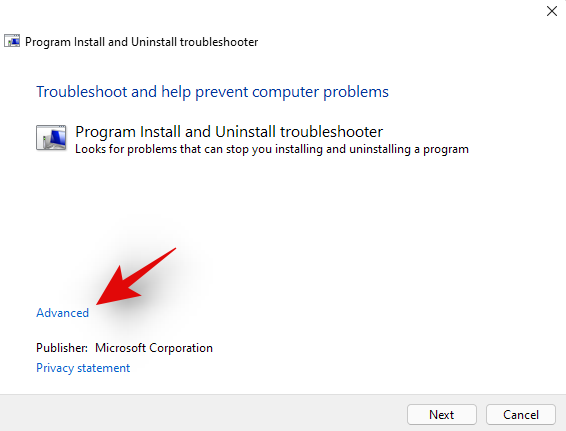
Check the box for ‘Apply repairs automatically’. Click on ‘Next’ once you are done.
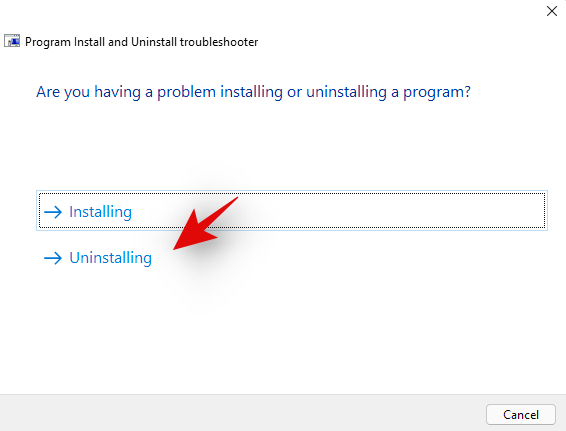
Select ‘Uninstallting’ on the next step.
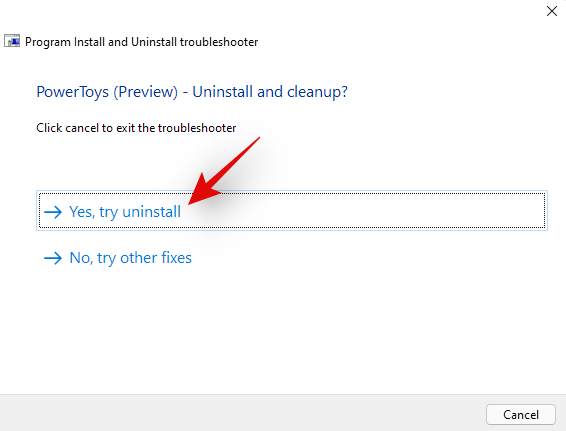
Select the concerned program from the list provided on your screen. If your program does not appear in the list, click on ‘Not Listed’.
Now follow the on-screen instructions depending on your choice to complete the troubleshooting process.
And that’s it! In most cases, the troubleshooter will detect your issue and solve it automatically. A report for the same will be presented to you at the end of the process with all the details.
Method #04: Use a restore point
If you are still having issues uninstalling the software from your system then it is time for some drastic steps as this could be malicious in nature. Let’s restore your PC to a restore point before the concerned app or program was installed on your system.
However, if you do not have a restore point then you can jump to one of the other methods listed below. Here’s how you can use a restore point to restore your PC to its previous state.
Press Windows + S on your keyboard and search for ‘Recovery’. Click and launch the app link once it shows up in your search results.
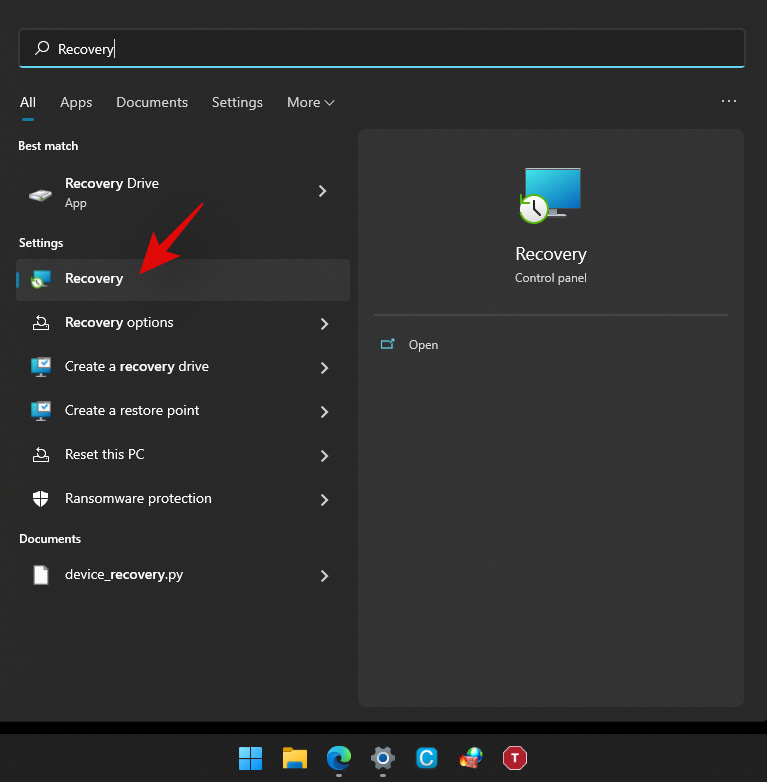
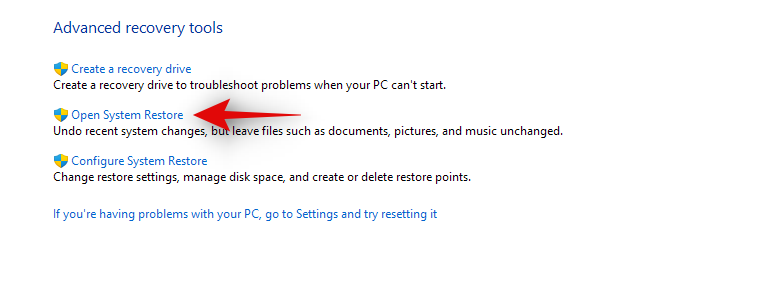
Click on ‘Open System Restore’.
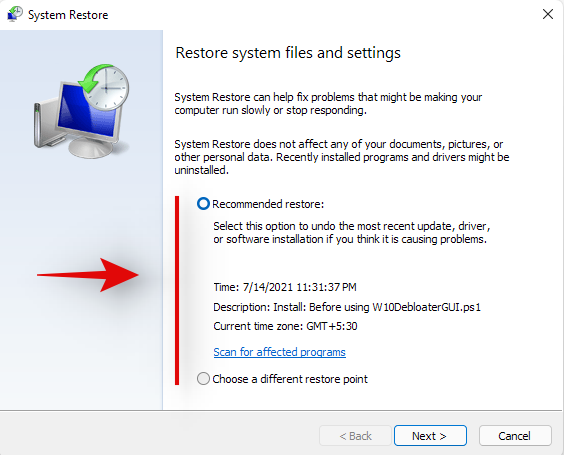
You will now be suggested a recent system restore point if you have one. Select that if needed, or click on ‘Choose a different restore point’ if you wish to choose an older one.
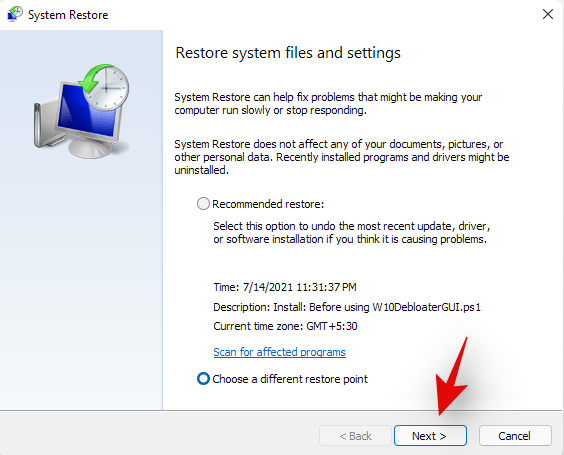
Select ‘Next’ or hit ‘Enter’ on your keyboard.
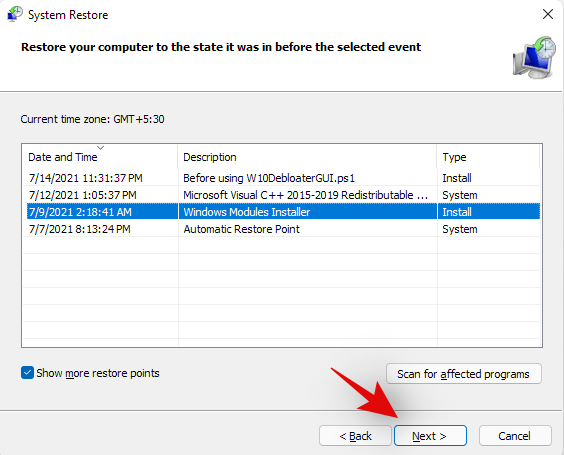
You can now select the desired Restore Point from the list at the top. You can check the box for ‘Show more restore points’ if you wish to look at more restore points.
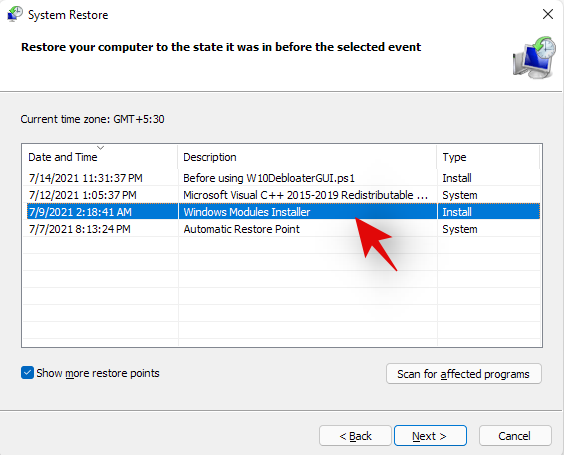
Once selected, click on ‘Next’.
Finally, click on ‘Finish’.
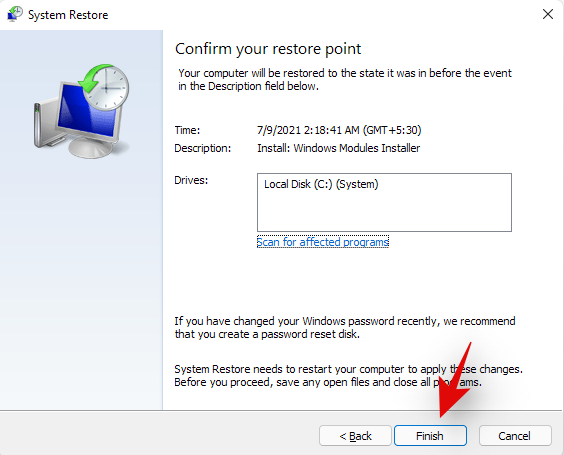
Windows 11 will now restore your system to the selected restore point and the concerned app should no longer be on your system once the process is completed.
Method #05: Contact Windows Support
If you are still unable to get the app uninstalled from your system then it might be time to contact Microsoft Support. Microsoft Support executives are trained to solve such issues with more expertise and can even remotely takeover your system if needed. It might be time to get in touch with the support team to solve your issue. Additionally, if you purchased a pre-built system, you can use your OEM support for some help as well. Use the link below to get in touch with Microsoft Support.
► Microsoft Support
Uninstall programs on Windows 11: FAQs
Can you uninstall pre-installed apps?
Well, officially, you can not and it is not recommended by Microsoft. But still, if you wish to remove preinstalled apps, you can easily do so depending on the type of the app. If you wish to remove a system app then the process is a bit complicated. Else, if you wish to remove third-party pre-installed apps then you can simply do so by uninstalling them like any other app from your Windows 11 Pc using the guide below.
Can you uninstall system apps?
Yes, you can uninstall system apps but not officially. Officially Windows 11 or any Windows for that matter, doesn’t allow you to remove system apps from the OS. However, there are many workarounds to circumvent this restriction and uninstall preinstalled system apps from your system.
This includes using command prompt/PowerShell or a third-party software. Using these methods you should be able to easily uninstall system apps from your system. Follow our guides below for each of the methods depending on your current needs and requirements.
Can you uninstall apps downloaded from the Microsoft Store?
Yes, apps downloaded from the Microsoft Store can be uninstalled easily using either of the methods listed below. This includes Android apps that you may have downloaded on your system but did not find appealing enough. We recommend uninstalling Windows Store apps either via Settings or Start.
Chances are that the Store app will now show up in the Control Panel and if uninstalled via CMD or PowerShell, you could end up with leftover files including empty Start menu folders. Hence, use Powershell or CMD for Windows Store apps only if you are facing an issue uninstalling them via the Settings or the Start menu.
What happens when you uninstall a program?
Uninstallation is the process of removing a program or an app from your system. While apps are installed singularly with all dependencies available to them in a sandbox, programs operate differently. Programs usually have scheduled tasks, customized registry values to execute them, and dependencies for various Windows features and extensions that they need for their own installation process to create and place every file and task correctly.
Hence the removal process for all these things created by a program when it is first installed on your system is called uninstallation. All scheduled tasks, registered services, registry keys, executables, temporary files, log files, and more are removed once you uninstall a program from your system. In some cases, you will be leftover with settings and save files so that you don’t have to set up the program entirely when installing it in the future.
These files can be cleared by clearing your Windows Cache and temporary files in most cases. However, if you still suspect leftover files from a program on your system, then we recommend checking the following places for any leftover files. If found, you can simply delete them like any other file on your system.
- /Documents
- C:\Program Files (x86)\Common Files
- C:\Program Files\Common Files
- C:\ProgramData
- C:\Users\USER\AppData\Local
- C:\Users\USER\AppData\LocalLow
- C:\Users\USER\AppData\Roaming
- C:\Users\USER
How to remove data of uninstalled programs
If you still see the remaining files and folders or context menu options for a removed program or app, then you can try the fixes below to solve your issue.
Method #01: Clear cache and temporary files from Windows
You should first try clearing cache and temporary files from your Windows 11 system. In most cases, this will help the overall File Explorer UI to refresh itself which should automatically remove leftover files and context menu items for removed programs from your system.
You can use this comprehensive guide by us to easily clear your Windows 11 cache and storage. You can also use the same guide to free up storage space on your system as well by deleting other large files and installations that show up in the list.
Method #02: Check for leftover files manually
You can also check and delete all leftover files manually for the removed program or app. You should start by using Windows Search to look for any files or folders associated with the uninstalled program. You can then delete these manually from your local storage.
Once you have deleted all the files and folders that show up in the search, you can proceed to manually check the locations listed below. If they contain any leftover files or folders from the removed program, then you can simply select them and delete them from your system.
- /Documents
- C:\Program Files (x86)\Common Files
- C:\Program Files\Common Files
- C:\ProgramData
- C:\Users\USER\AppData\Local
- C:\Users\USER\AppData\LocalLow
- C:\Users\USER\AppData\Roaming
- C:\Users\USER
Method #03: Run a third-party uninstaller/cleaner
If you are still left with the remaining files and context menus for the program then it is time to use a third-party uninstaller or cleaner. These programs are specifically designed to identify and remove leftover files from previously uninstalled programs on your system. We recommend you give Revo uninstaller a try as even the free model for the app will help you identify the location of leftover files which can then be deleted by you manually. You can also use something like CCleaner that is designed to remove leftover files and free up storage and processing space on your system.
Method #04: Try to remove the app via PowerShell
If nothing works, then chances are that the concerned app was installed on your system using elevated privileges which prevents some files and folders from being removed from your system.
In such cases, we recommend you try to remove the app via PowerShell. You can use our guide above to remove system apps from Windows 11 via PowerShell. You will first need to source the full package name for your app or program, which can then be used to force uninstall it from your system.
Can you uninstall Windows Updates?
Yes you can easily uninstall Windows Update from your system. New updates can often introduce compatibility issues on older hardware and having the option to uninstall updates can always help. You can use the guide below to uninstall recently installed updates from your system.
How to uninstall Windows Updates
Follow the guide below to uninstall recently installed Windows Updates from your Windows 11 system.
Press Windows + i on your keyboard to open the Settings app. Click on ‘Windows Update’ on your left.
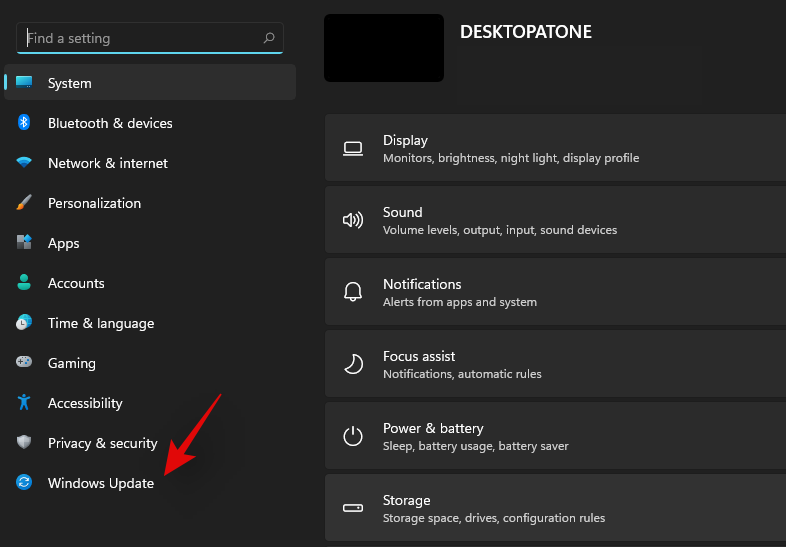
Now click on ‘Update history’.
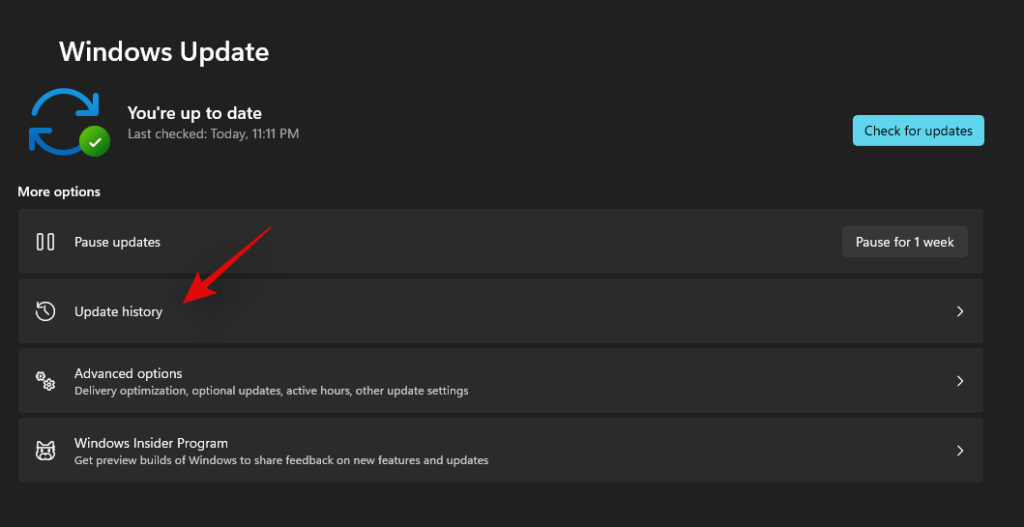
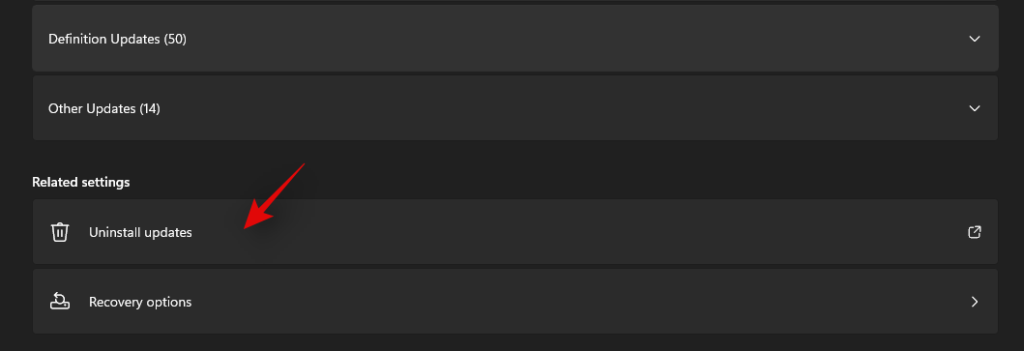
Scroll to the bottom on your right and click on ‘Uninstall Updates’.
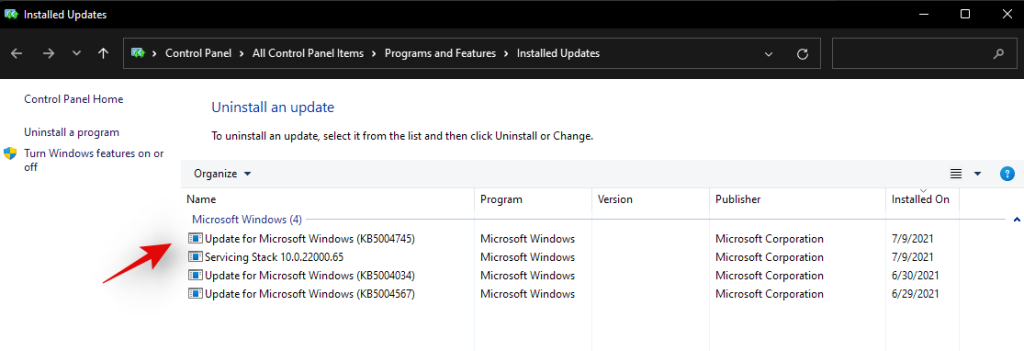
You will now get a list of all the recent updates installed on your system. Click and select the update you wish to uninstall.
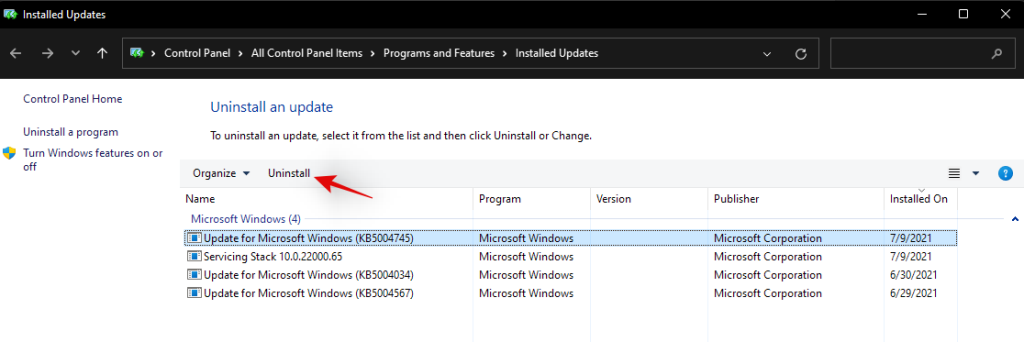
Click on ‘Uninstall’ at the top now.
Follow the on-screen instructions to complete the process.
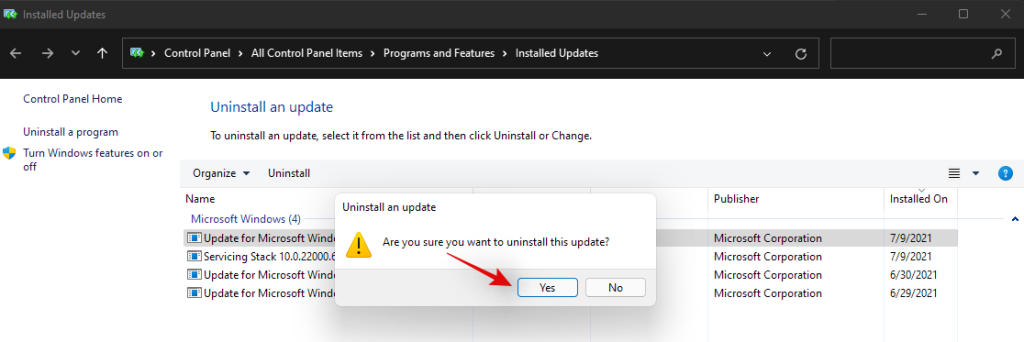
And that’s it! Your selected Windows update should now be uninstalled from your system.
We hope this guide helped you uninstall the concerned apps or programs from your system. If you still face issues, feel free to reach out to us using the comments section below.
