Windows 11 har släppts för allmänheten och den här nya uppdateringen till det långvariga operativsystemet verkar få bra recensioner. Microsoft har ökat integriteten, säkerheten lagt till ett nytt användargränssnitt och möjligheten att installera Android-appar till Windows 11. Men som vanligt kommer Windows med en massa förinstallerade saker som är irrelevanta för nästan alla användare.
Och om du köpte ett förbyggt system eller en bärbar dator, är chansen stor att det finns ytterligare reklamprogram installerad på ditt system som du kanske vill ta bort. Du kan enkelt ta bort och avinstallera de flesta appar på Windows med ett enkelt klick, men saker och ting blir lite komplicerade när du kommer till program, Windows Store-appar, Windows-uppdateringar och systemappar. Var inte rädd, du kan följa våra guider nedan för att ta bort alla typer av appar från ditt Windows-system oavsett dina nuvarande inställningar. Låt oss börja.
Innehåll
Hur man avinstallerar appar på Windows 11 [8 sätt]
Här är alla sätt som du kan avinstallera en app från din Windows 11-dator. För att avinstallera systemappar , se dess dedikerade avsnitt och specialmetoder nedan efter detta avsnitt.
Metod #01: Använda inställningar
Följ guiden nedan för att avinstallera en app via Inställningar från ditt system. Om du försöker avinstallera en standardapp rekommenderar vi att du ändrar den i förväg så att avinstallationsalternativet inte är nedtonat för dig. Om du inte är medveten om att ändra en standardapp i Windows 11 kan du följa guiden nedan.
Steg 1: Ändra standardappen först? [Frivillig]
Obs: Se till att du har en ersättningsapp installerad på ditt system i förväg för att ersätta din standardapp. Om du till exempel byter webbläsare från Microsoft Edge måste du ha en annan webbläsare som du vill använda redan installerad på ditt system så att du kan välja den som din standardwebbläsare istället.
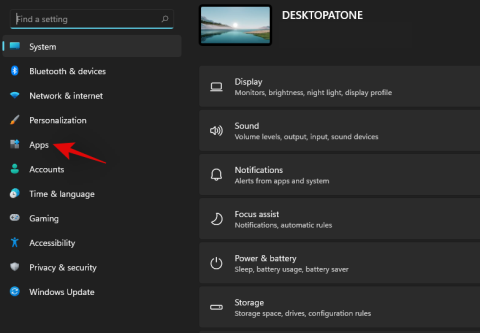
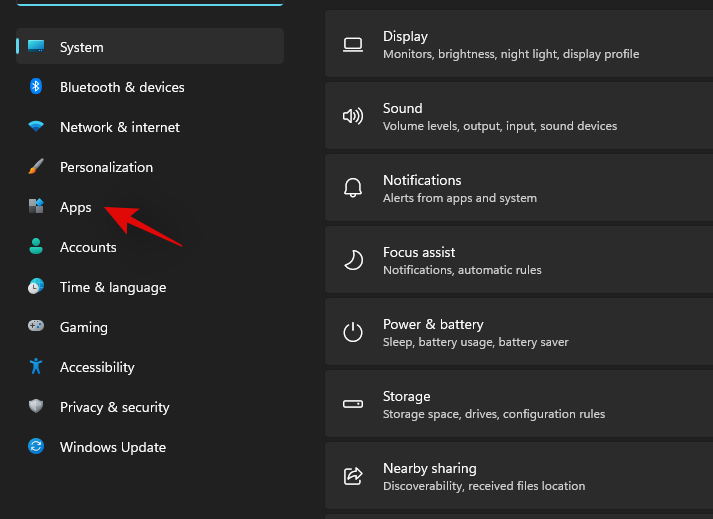
Tryck Windows + ipå ditt tangentbord för att öppna appen Inställningar. Klicka nu på "Appar" i din vänstra sidofält.
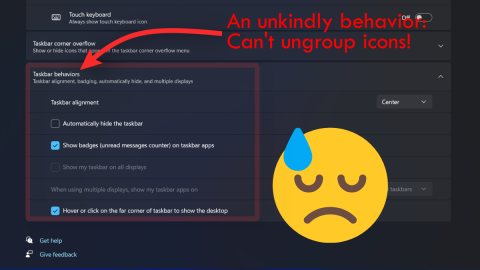
Klicka och välj "Standardappar" till höger.
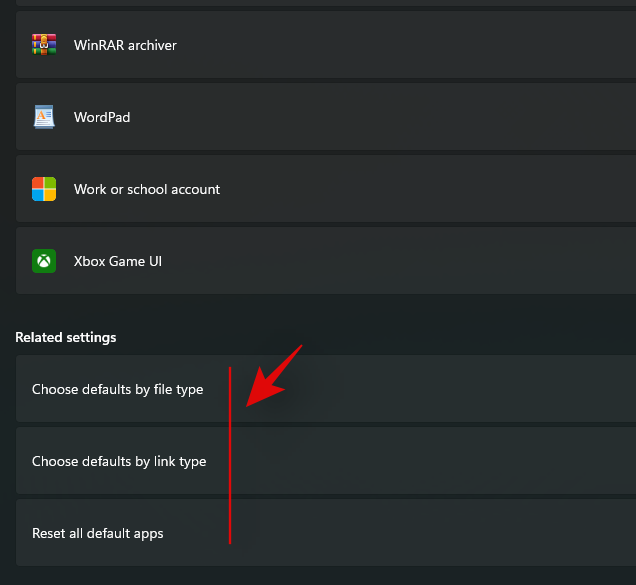
Välj nu appen du vill ta bort som din standardapp och klicka på den. Om du vill ändra din standardapp efter filtyp, klicka på "Välj standardinställningar efter filtyp" längst ner som visas nedan.
Klicka nu på önskad filtyp/tillägg och välj en app som du väljer.
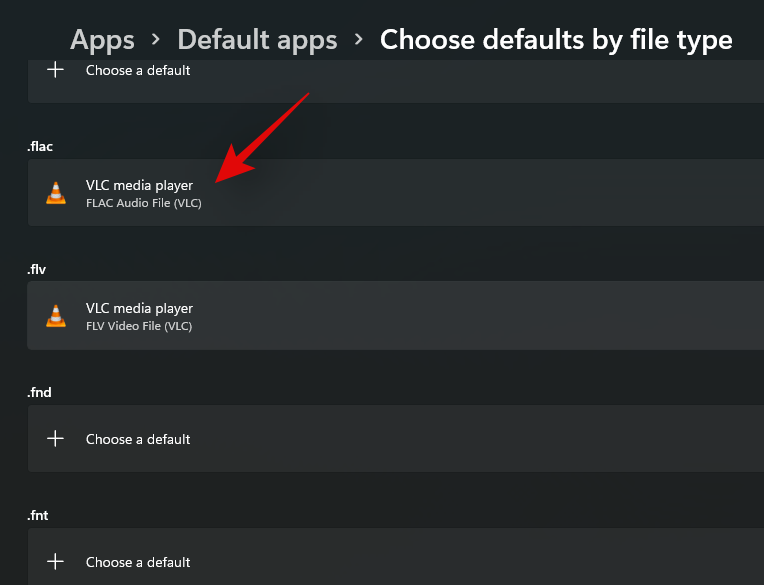
Upprepa steget ovan för alla nödvändiga filtyper/tillägg.
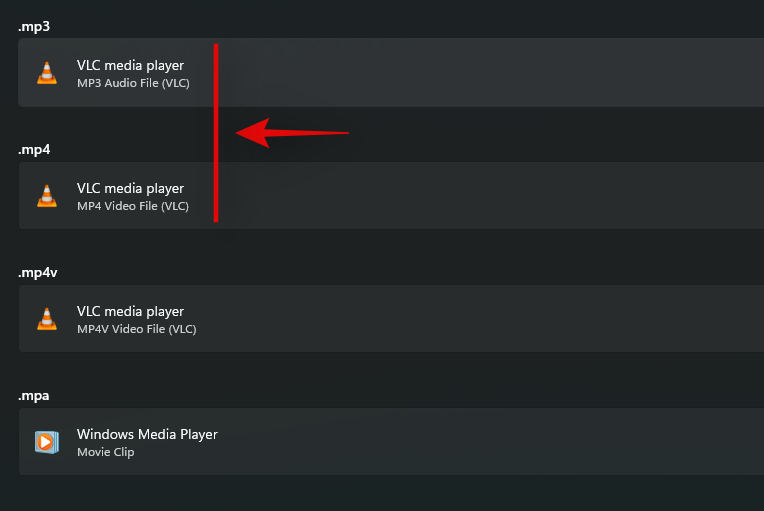
Stäng appen Inställningar och starta om ditt system för gott.
Och det är allt! När ditt system startar om bör din standardapp ändras. Du kan nu använda guiden nedan för att avinstallera den nödvändiga appen via "Inställningar" på ditt system.
Steg 2: Avinstallera appen från Inställningar
Tryck Windows + ipå ditt tangentbord och välj "Appar" från vänster.

Klicka nu på "Appar och funktioner" till höger.
Bläddra i listan och hitta appen du vill avinstallera. När du har hittat den klickar du på menyikonen med tre punkter till höger.
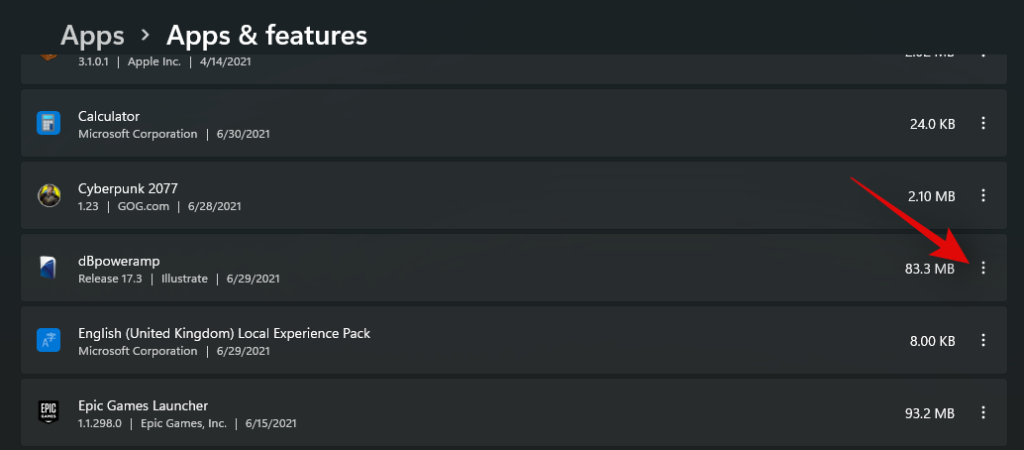
Klicka och välj "Avinstallera".
Följ nu instruktionerna på skärmen för att avinstallera appen. Om du avinstallerar en förinstallerad eller Windows Store-app avinstalleras den automatiskt i bakgrunden. Men om det är ett program som upptäckts av Windows, kommer Windows, beroende på programmet, antingen att försöka avinstallera det i bakgrunden eller starta "uninstall.exe" eller "setup.msi" så att du kan avinstallera det på egen hand med önskade inställningar. Du kanske kan behålla/spara vissa data när du stöter på sådana inställningar, inklusive saker som loggfiler, användardata, spara data, bilder och mer.
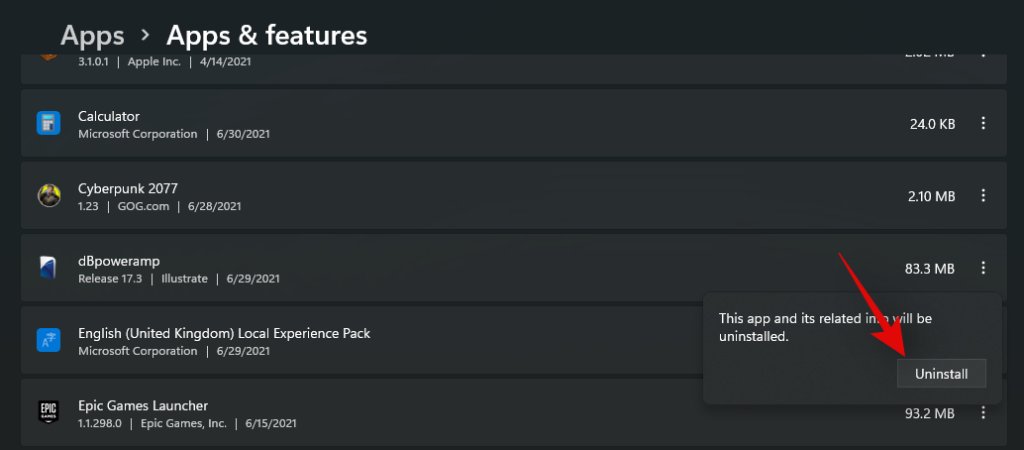
Alternativt kan du också välja att helt ta bort allt som har med programmet att göra från ditt system.
Och det är allt! Den valda appen bör nu avinstalleras från ditt system. Om du har avinstallerat ett tungt program rekommenderar vi att du rensar cacheminnet med hjälp av den här guiden, särskilt om programmet översteg storleken på 30+ GB.
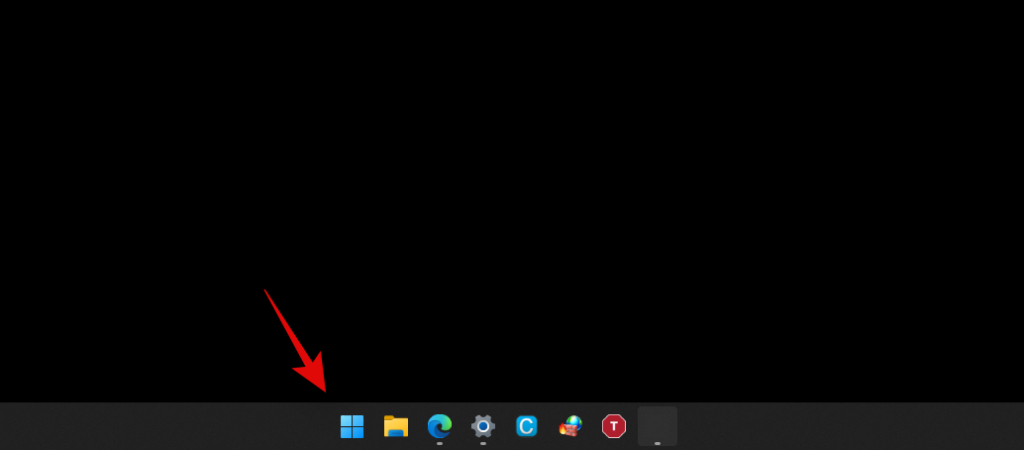
Tryck på "Windows"-knappen på ditt tangentbord för att ta fram "Start"-menyn. Alternativt kan du också klicka på ikonen i din "aktivitetsfält".
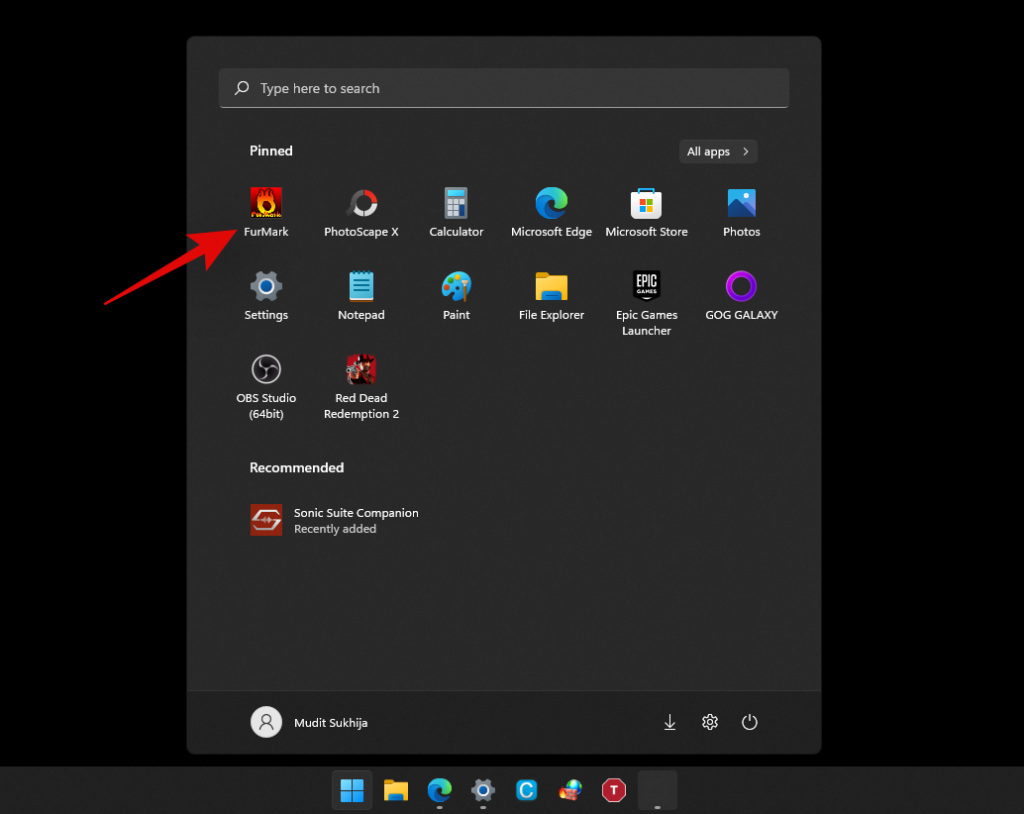
Hitta appen du vill avinstallera och högerklicka på den.
Klicka nu på "Avinstallera". Följ instruktionerna på skärmen om det behövs för att slutföra avinstallationsprocessen.
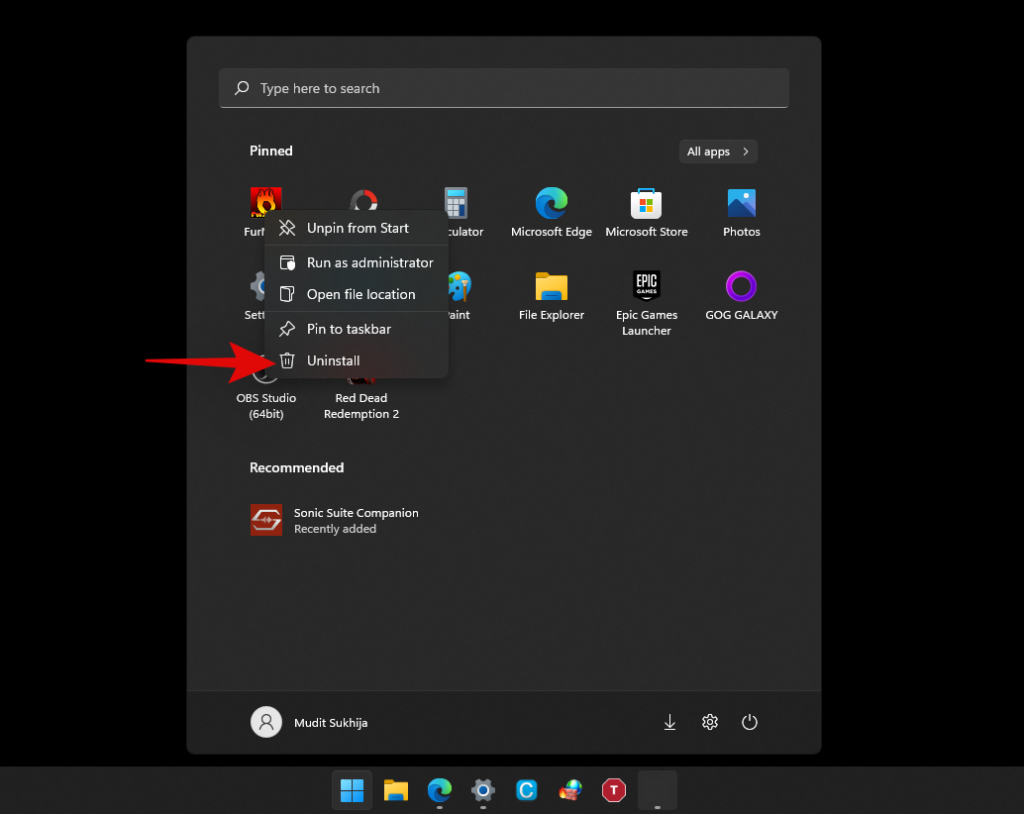
Och det är allt! Du kommer nu att ha avinstallerat en app från ditt system via Start-menyn.
Metod #03: Använd avinstallationsfilen '.exe'
Helst skulle du inte behöva starta den körbara avinstallationsfilen för ett program manuellt, men i vissa fall, som äldre program, kan du ha ett program installerat på ditt system, vars avinstallationsalternativ inte visas någonstans i dina inställningar. I sådana fall kan du starta avinstallationsfilen på egen hand med hjälp av guiden nedan.
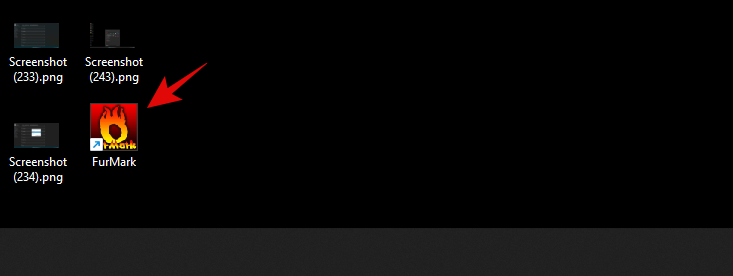
Leta upp programmets .exe-fil eller genvägen som du vanligtvis använder för att starta programmet och högerklicka på den.
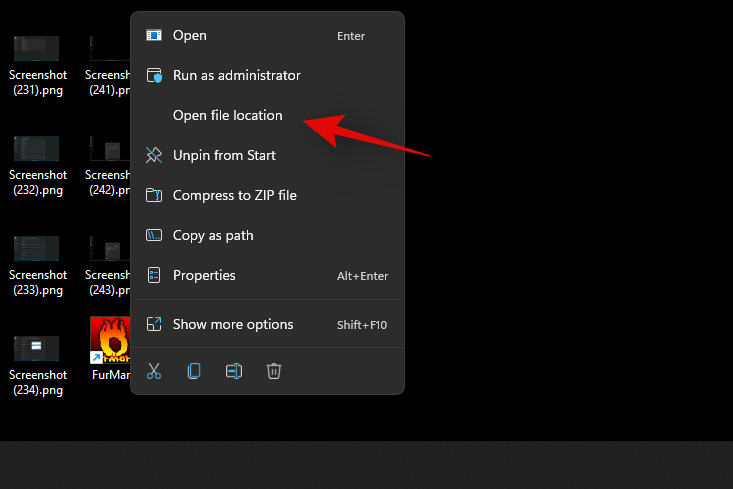
Välj "Öppna filplats". Om du inte ser det här alternativet, välj egenskaper. Du hittar nu alternativet 'Öppna filplats' på fliken 'Allmänt' som visas nedan.
Du kommer nu att tas till programmets installationskatalog. Leta efter en .exe-fil med något av följande namn eller ett liknande namn.
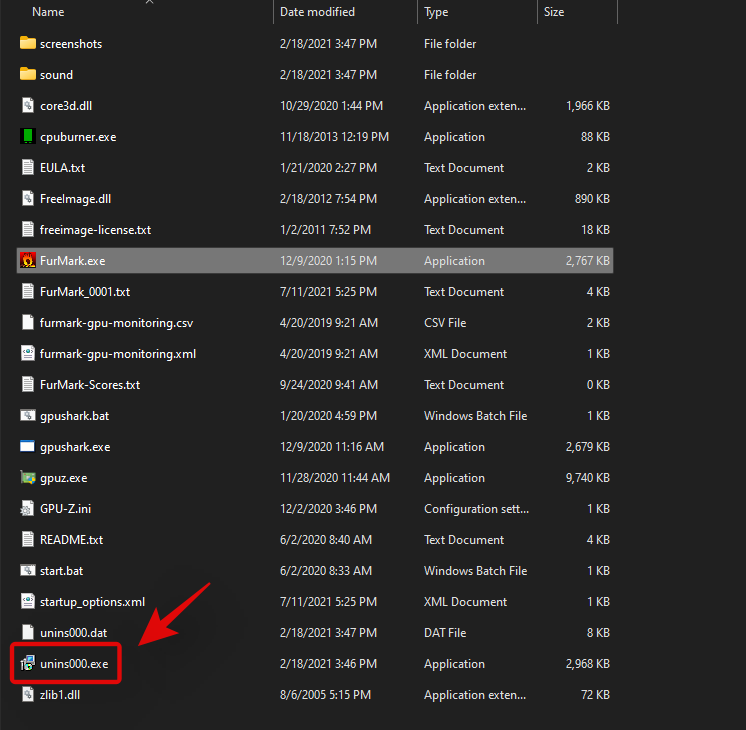
- uninst.exe
- uninstall.exe
- setup.exe
- setup.msi
- (programnamn)setup.exe/.msi
- (programnamn)uninstall.exe/uninst.exe
och mer. Avinstallationsprogrammet/installationen kommer att heta liknande. När du har startat den kan du följa instruktionerna på skärmen för att avinstallera den från ditt system.
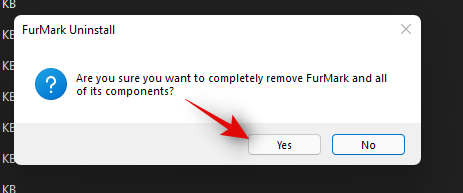
I vissa fall kan du också få möjlighet att reparera, installera om eller ändra programmet tillsammans med avinstallationen. Du kan välja önskat alternativ och fortsätta med inställningen som du vill.
Metod #04: Använda kontrollpanelen
Du kan också enkelt ta bort program och appar från kontrollpanelen. Helst rekommenderas det att du bara avinstallerar äldre och moderna program med kontrollpanelen eftersom inte alla dina installerade appar kommer att dyka upp här. Följ guiden nedan för att avinstallera program via kontrollpanelen.
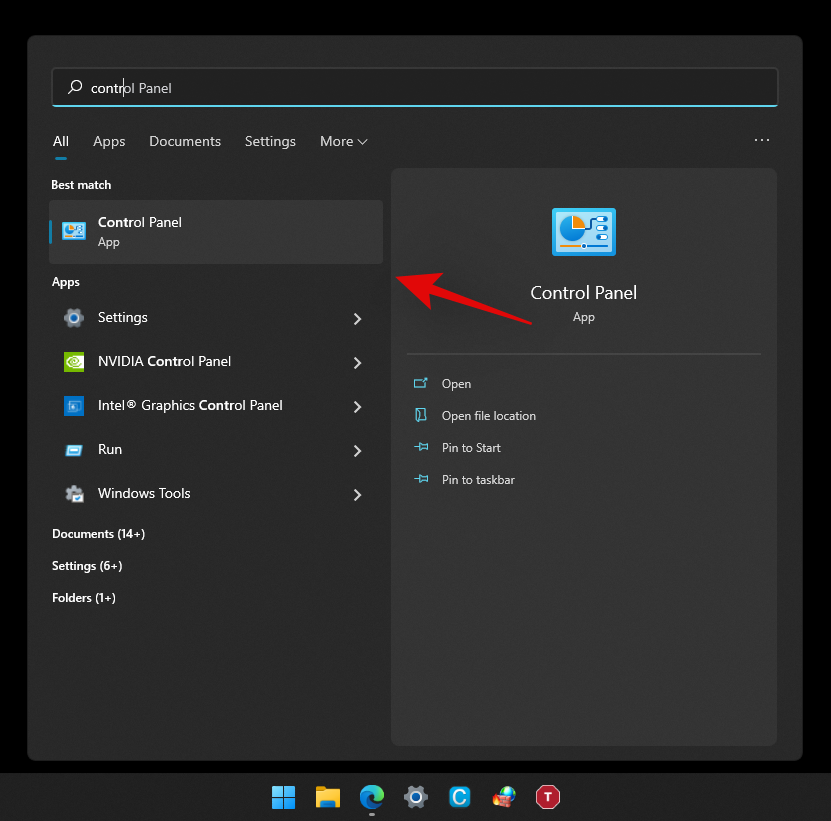
Tryck Windows + spå ditt tangentbord och skriv in "Kontrollpanelen". Klicka och starta appen när den dyker upp i dina sökresultat.
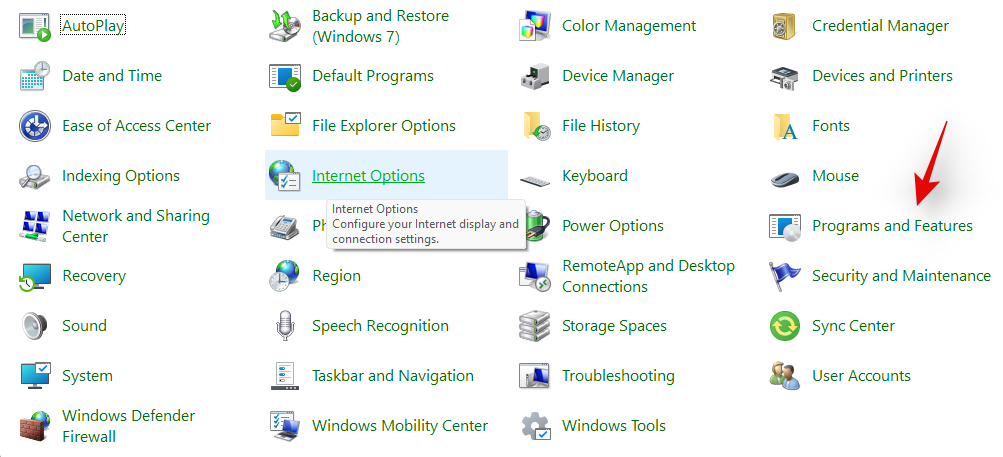
Klicka nu på "Program och funktioner".
Du kommer nu att få en lista över alla program som för närvarande är installerade på ditt system. Hitta programmet du vill avinstallera och klicka på det.
Välj nu "Avinstallera" högst upp.

Följ instruktionerna på skärmen för att slutföra installationsprocessen. I vissa fall kommer detta att vara en automatiserad process medan du i andra kan få möjlighet att reparera den befintliga installationen eller välja vilken data du vill behålla och vilken data du vill radera.
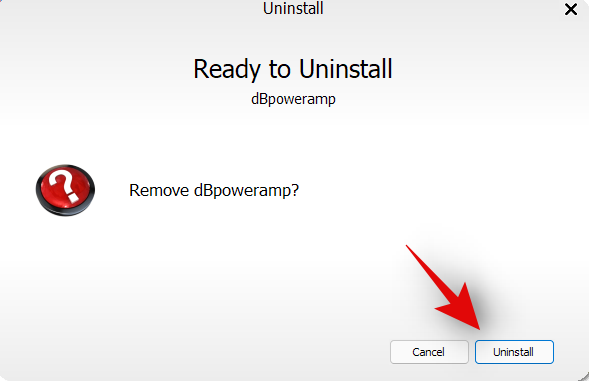
När du har gjort dina val kommer avinstallationsprocessen att äga rum och programmet bör tas bort från ditt system när processen är klar.
Metod #05: Använda PowerShell
Du kan också avinstallera appar via en förhöjd PowerShell i Windows 11. Även om avinstallationskommandot är ganska enkelt, är det inte att få paketnamnet för den berörda appen eller programmet. Därför hittar du i guiden nedan hur du avinstallerar appar via PowerShell om du har paketnamnet.
Men om du inte vet hur du hämtar ditt fullständiga paketnamn rekommenderar vi att du följer systemappguiden nedan som täcker samma metod i mycket mer detalj. Låt oss börja.
Tryck Windows + spå ditt tangentbord och skriv in 'PowerShell'. Klicka nu på "Kör som administratör" när det dyker upp i dina sökresultat.
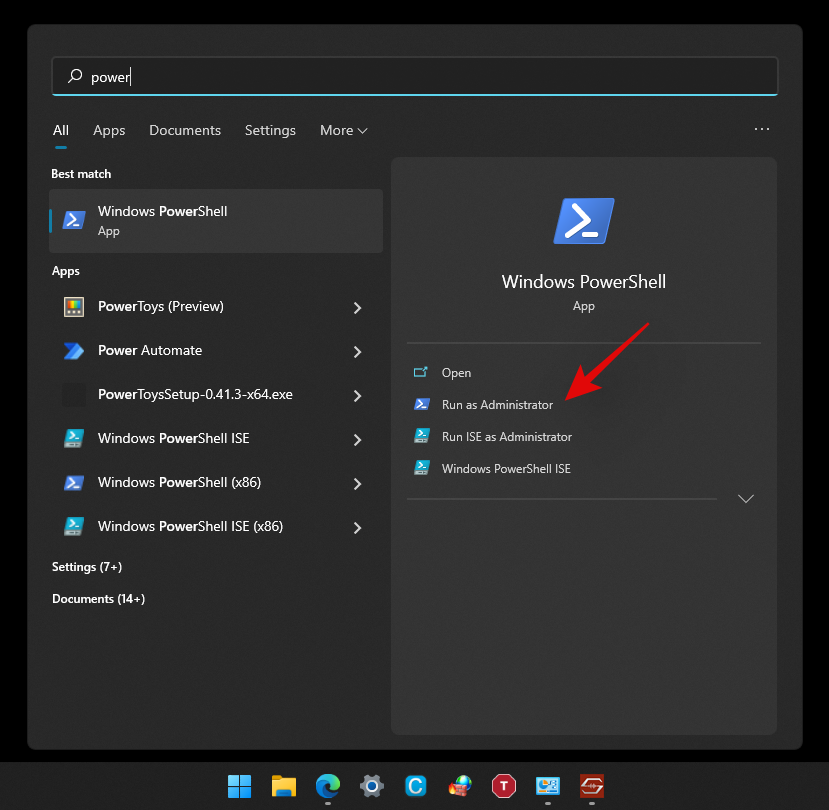
När du får upp PowerShell-fönstret på skrivbordet, skriv in följande kommando och tryck på 'Enter' på tangentbordet. Se till att du ersätter "[Namn]" med det fullständiga paketnamnet för den berörda appen.
Remove-AppxPackage [Name]

Och det är allt! Powershell kommer nu att göra sin magi och avinstallera den berörda appen från ditt system.
Metod #06: Använder CMD
Du kan också använda kommandotolken i Windows 11 för att avinstallera appar från ditt system. Följ guiden nedan för att komma igång.
Tryck Windows + spå ditt tangentbord och sök efter "CMD". Klicka på "Kör som administratör" när det dyker upp i dina sökresultat.
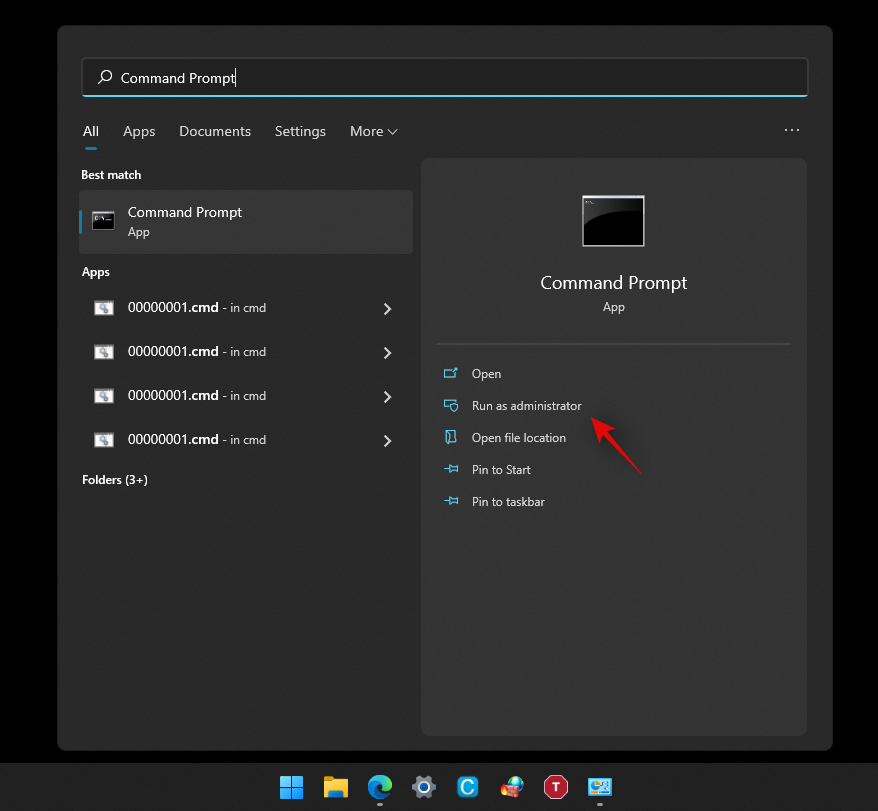
När CMD startar, skriv in följande kommando och tryck på 'Enter' på ditt tangentbord.
wmic

Skriv nu in följande kommando för att få en lista över alla appar och program installerade på ditt system.
product get name

När du får en lista över alla program, hitta det som du vill avinstallera i den här listan. När du har hittat det, anteckna hela namnet på en lämplig plats.
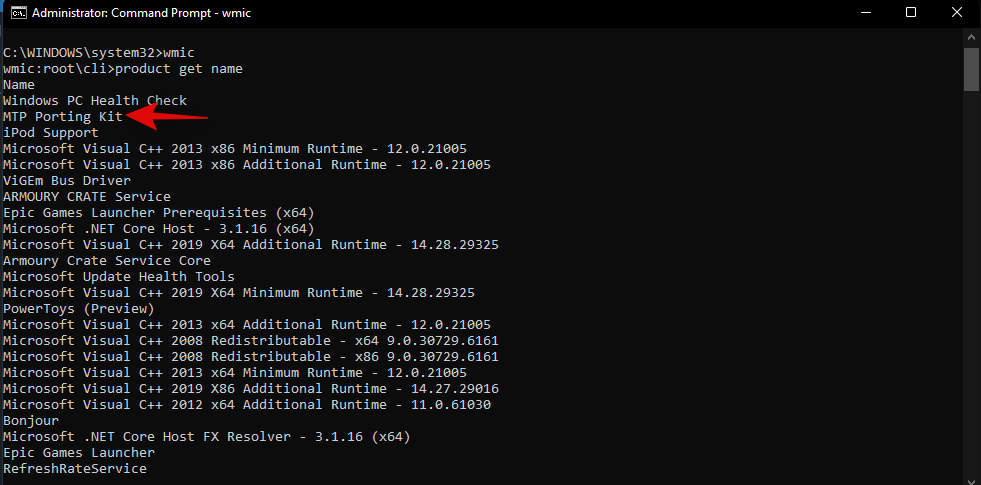
Skriv nu in följande kommando och ersätt AppName med namnet på appen du noterade tidigare.
product where name="AppName" call uninstall/nointeractive
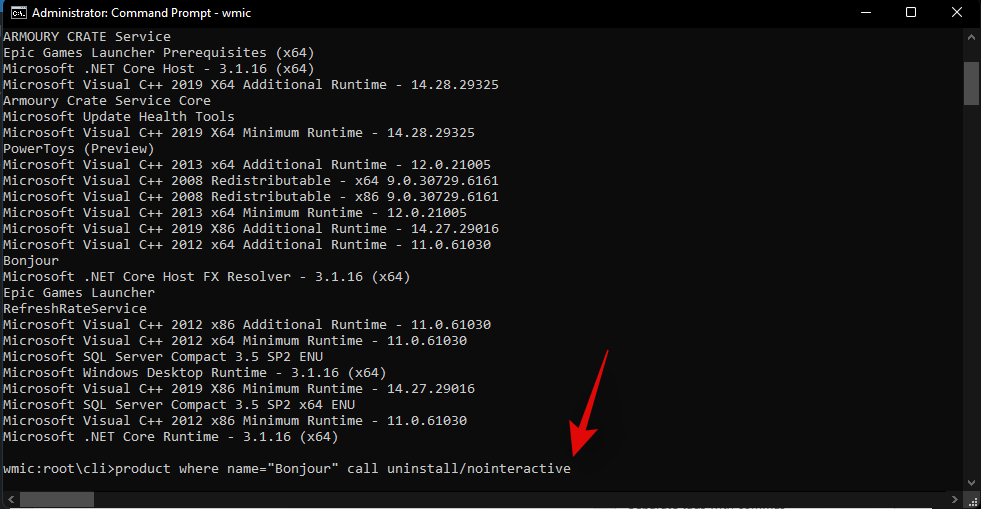
Obs: Ta inte bort citattecken från kommandot eftersom de är nödvändiga för denna syntax.
Tryck på "Enter" på ditt tangentbord för att utföra kommandot.
Kommandotolken kommer nu att utföra de nödvändiga processerna i bakgrunden och du bör få en bekräftelse enligt nedan när processen är klar.
Och det är allt! Du kommer nu att ha avinstallerat en app från ditt system via kommandotolken.
Metod #07: Använda setup.msi
Om ditt program kom med en installationsfil som hade filtillägget .msi istället för .exe, kan du använda samma fil för att avinstallera programmet också. Låt oss ta reda på lite mer om .msi-filer så att det är lättare att förstå deras funktion.
Vad är en .msi-fil?
Traditionellt kommer dina installatörer med ett .exe-tillägg. Dessa är program utformade för att installera program på ditt system med installationsfilerna som medföljer dem. MSI-filer tar detta ett steg längre genom att låta dig bunta ihop flera installationsprogram i samma fil.
Detta gör att MSI-filen kan utföra olika funktioner tack vare de medföljande installationsprogrammen. Detta inkluderar saker som uppdateringsinstallatörer, programvaruinstallatörer, programreparatör, programmodifierare och avinstallationsprogram. Därför, om ditt program kom med en .msi-installationsfil kan du använda guiden nedan för att använda samma fil för att avinstallera programmet från ditt system.
Obs! Äldre .msi-filer fungerar sällan med nyare installationer av samma programvara. Tänk på detta om du försöker nedgradera ditt program till en tidigare version.
Avinstallera via .msi-fil
Leta upp .msi-installationsfilen på din lokala lagring och dubbelklicka och starta appen.
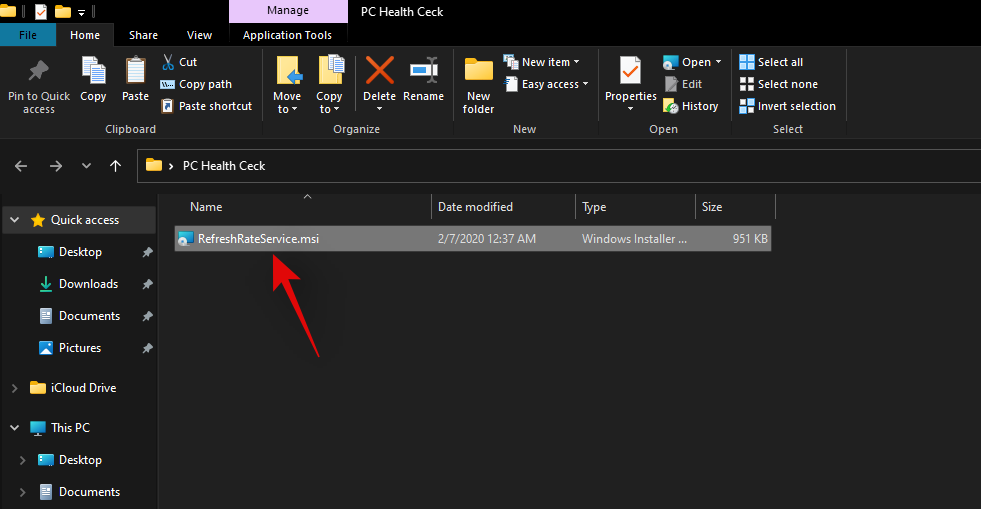
Följ instruktionerna på skärmen tills du uppmanas att välja ett av åtgärderna.
- Reparera
- Ändra
- Avinstallera
- Installera uppdateringar
- Ta bort uppdateringar
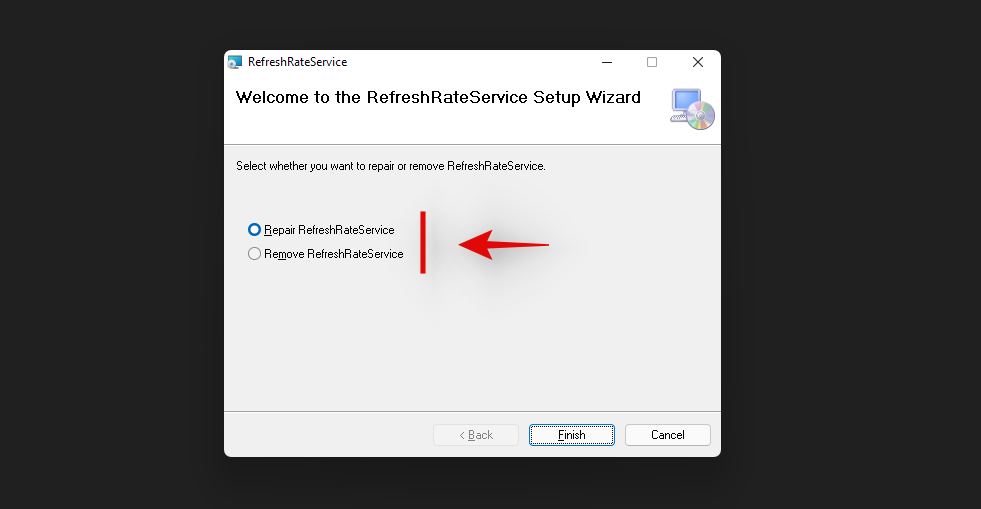
Välj önskat alternativ och fortsätt med instruktionerna på skärmen för att slutföra avinstallationsprocessen.
Och det är allt! Det valda programmet bör nu tas bort från ditt system via dess .msi-installationsfil.
Metod #08: Använd ett avinstallationsprogram från tredje part
Det finns olika avinstallationsprogram från tredje part tillgängliga på marknaden också. Dessa appar hjälper till att identifiera alla system- och tredjepartsappar på ditt system som sedan kan avinstalleras från din PC med ett enkelt klick. De flesta av dessa program låter dig ta bort systemappar efter att ha valt premiummodellen av programvaran.
Om du bestämmer dig för att använda gratisversionen kommer du att vara begränsad till ett visst antal avinstallationer i de flesta fall. Även om detta kan låta överflödigt, är dessa verktyg extremt användbara för proffs och tekniker som behöver avinstallera flera program med ett enda klick. De flesta av dessa avinstallationsprogram stöder massavinstallationer, vilket är mycket användbart när du konfigurerar flera system för en kontorsmiljö. Vi har länkat de två mest populära avinstallationsprogram från tredje part nedan. Vi hoppas att du hittar dem användbara i din strävan att avinstallera program från Windows 11.
Hur man avinstallerar systemappar på Windows 11 [2 sätt]
Du kan avinstallera systemappar på Windows 11 antingen via ett förhöjt PowerShell eller genom att använda ett PowerShell-skript från tredje part. Jag skulle rekommendera att du använder PowerShell-metoden, även om det kan verka mer komplicerat, behöver du inte köra skript från tredje part med förhöjda privilegier på ditt system.
Men om du ändå bestämmer dig för att använda ett automatiserat skript, se till att du ändrar din körningspolicy tillbaka till det normala när skriptet har körts. Detta kommer att vara av avgörande betydelse för ditt systems säkerhet eftersom att lämna körningspolicyn oförändrad kan göra det möjligt för skadliga användare att köra PowerShell-skript på ditt system enkelt. Använd en av metoderna nedan som bäst passar dina nuvarande behov och krav för att komma igång.
Metod #01: Använda Powershell
PowerShell-avinstallationsprocessen för alla program har två processer. Först skaffa hela paketnamnet för den berörda appen och sedan använda PowerShell för att avinstallera den berörda appen. Om din app inte visas i PowerShell-listan kan du behöva använda tredjepartsskriptet nedan för att ta bort den berörda appen från ditt system. Låt oss börja.
Steg 1: Källans fullständiga paketnamn
Tryck Windows + spå ditt tangentbord och sök efter "PowerShell". Klicka på "Kör som administratör" när det dyker upp i dina sökresultat.

När PowerShell startar, skriv in kommandot nedan och tryck på "Enter" på skärmen.
get-appxpackage
PowerShell kommer nu att generera och visa en lista över alla appar som är installerade på ditt system inklusive inbyggda OEM-appar och Windows-appar. Bläddra i listan för att hitta din app, men om detta verkar för tråkigt, börja med att högerklicka på titelfältet högst upp.
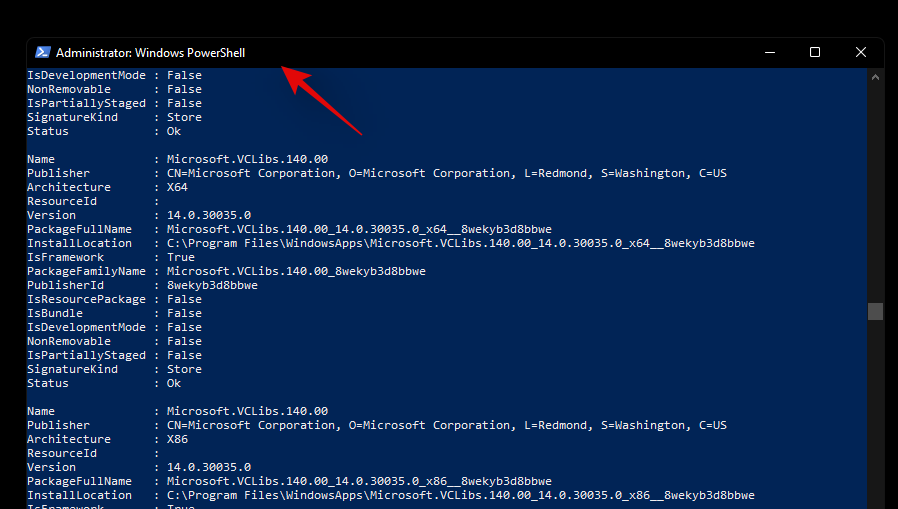
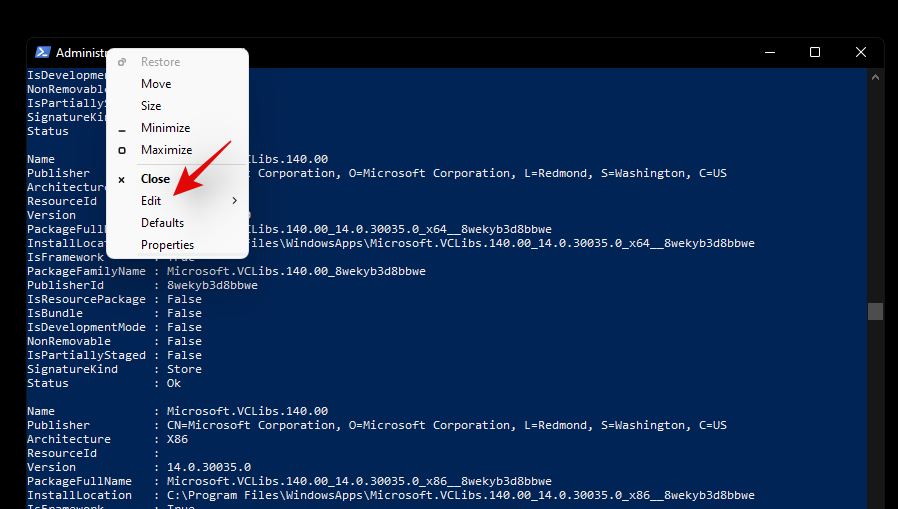
Välj nu "Redigera".
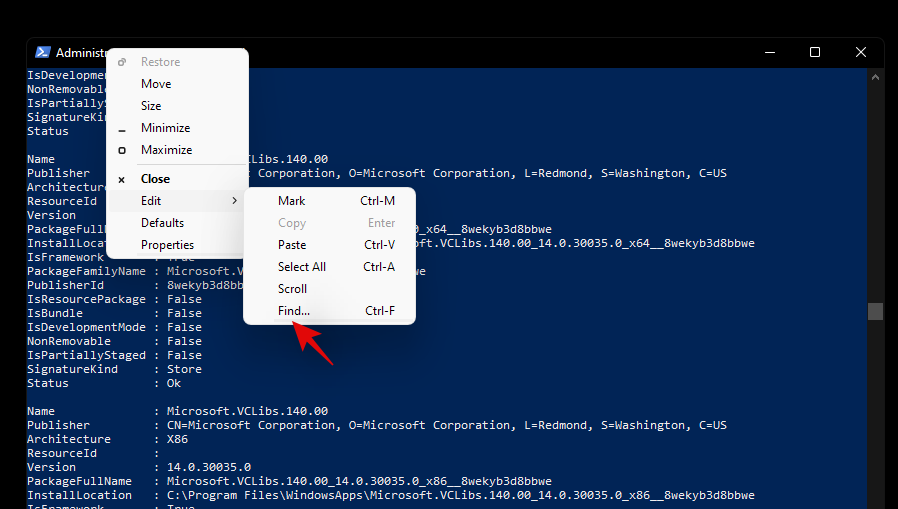
Klicka på 'Sök'.
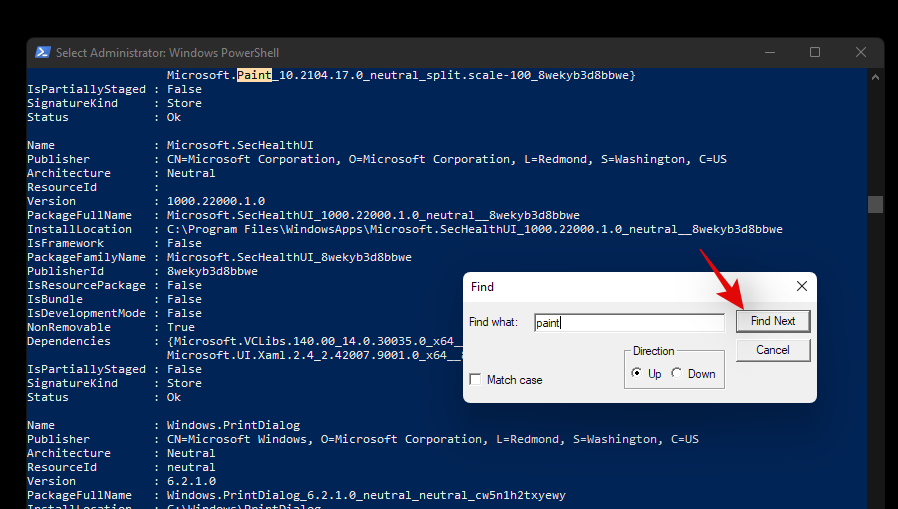
Sök nu efter det allmänna namnet på appen och "Hitta"-funktionen ska automatiskt ta dig till appen i listan.
Notera "FullPackageName" för den berörda appen som visas nedan.
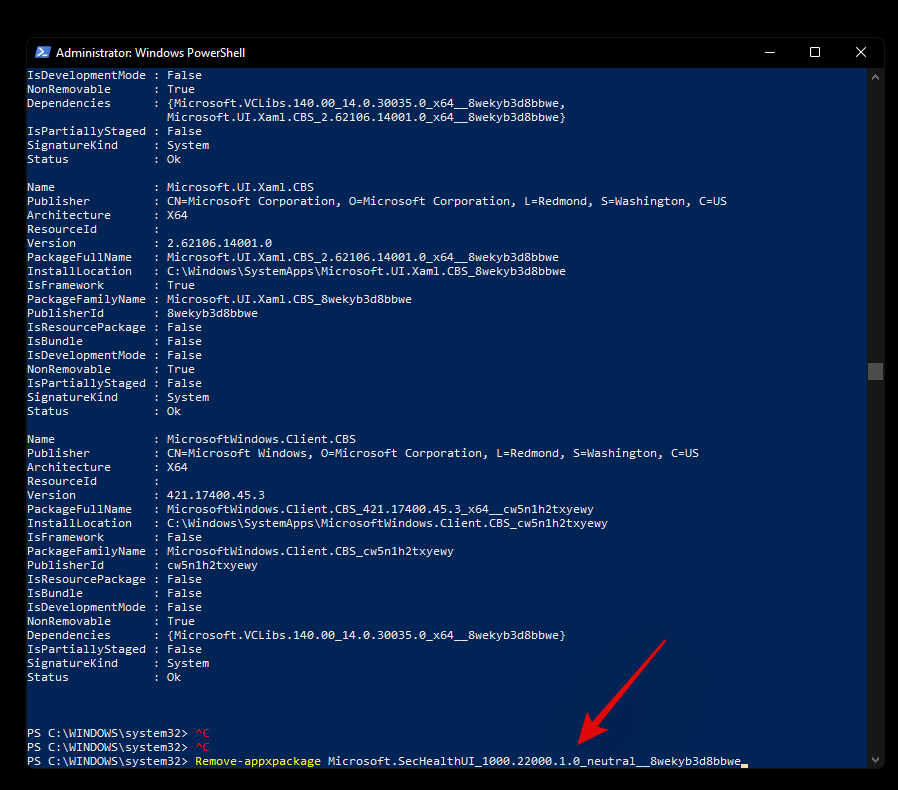
Och det är allt! Du kommer nu att ha hämtat hela paketnamnet för den berörda appen på ditt system. Du kan nu använda guiden nedan för att avinstallera den från ditt system.
Steg 2: Avinstallera appen via PowerShell
Open an elevated PowerShell using the guide above. If you already have one open on your screen, then start by typing in the following command. Ensure that you replace ‘[PackageName]’ with the full package name of the app we sourced above.
Remove-Appxpackage [PackageName]

Hit ‘Enter’ on your keyboard once you are done. PowerShell will now do its thing and the app should be installed from your system in no time.
Can’t remove an app using PowerShell? How to fix
If you are unable to remove the app via PowerShell then we recommend you do the following checks to solve the issue.
- Ensure that you are using an elevated PowerShell window.
- Ensure that the Full Package Name has been sourced correctly.
- Verify your ‘uninstall’ codes and try to keep everything lowercase.
- Repeat the same guide in Safe mode.
- Verify if the app hasn’t been already removed from your system and only leftover registry files are showing up in PowerShell.
You should be able to solve your issue by crosschecking the above-stated checks. However, if you are still unable to uninstall the concerned app, then you can use the third-party script below.
Method #02: Using a third party script
You can also use a third-party script to remove system apps from your Windows 11 system. These scripts have been quite popular lately and have been the go-to choice for many users when setting up fresh installations of Windows. Use the guide below to get started.
- Windows10debloater by Sycnex | Download Link
Note: While this is a Windows 10 script, it has been verified to remove system apps on Windows 11 as well. However, we recommend you keep checking the download page for updates that should be better compatible with Windows 11. We recommend using the script to only remove system apps and nothing else offered by the script. Other features could potentially break Windows 11 until a compatible script for the same is released in the future.
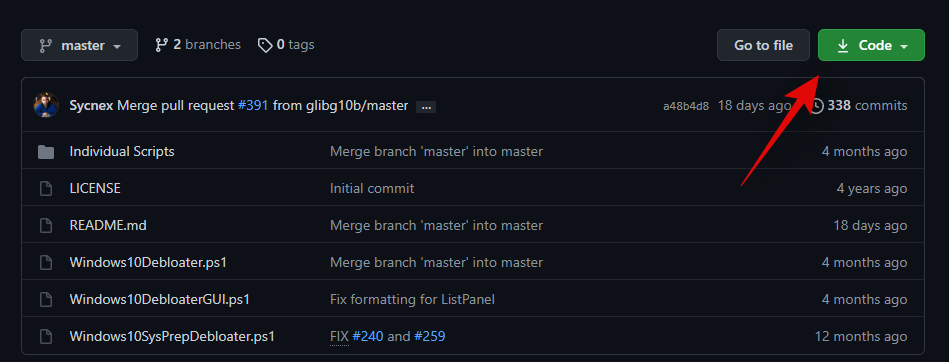
Visit the link above and you will be taken to the GitHub page for the script. Click on ‘Code’ in the top right corner.
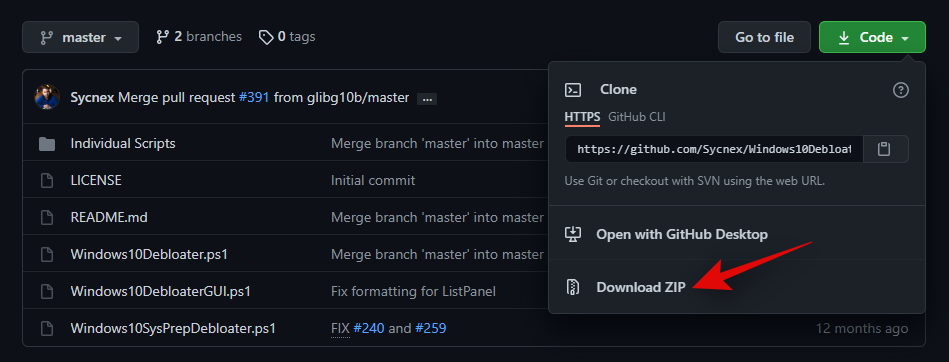
Now click and select ‘Download ZIP’.
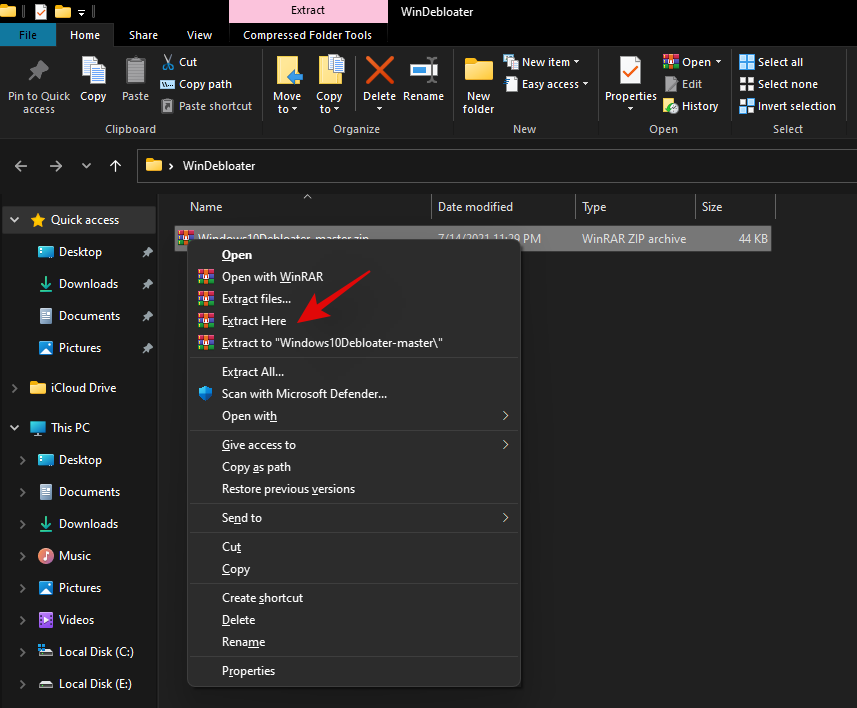
A Zip file will now be downloaded to your local storage. Extract the files to a convenient location.
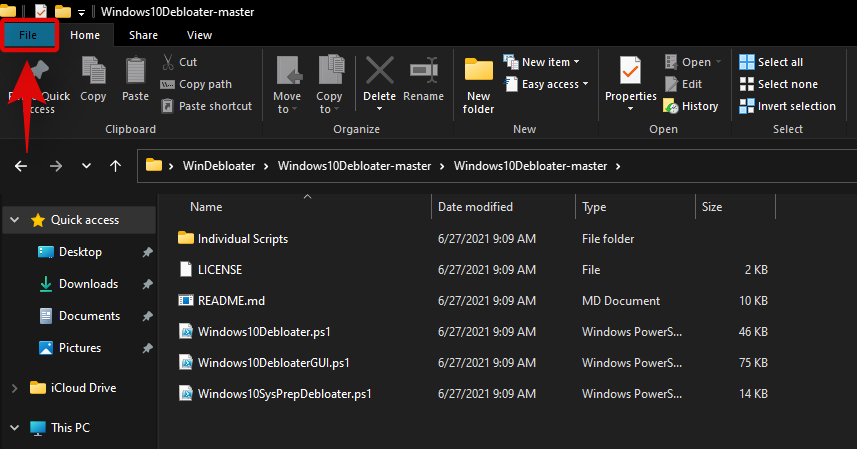
Once extracted, open the folder and click on ”File’ in the top left corner.
Hover over ‘Open Windows PowerShell’ and select ‘Open Windows PowerShell as administrator’.
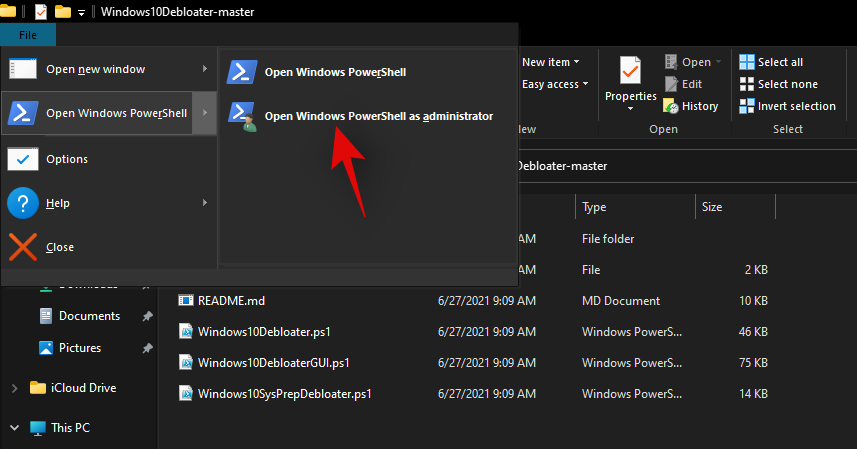
An elevated PowerShell window will now launch on your system. Start by executing the following command given below.
Set-ExecutionPolicy Unrestricted -Force

This will set your script execution policy as unrestricted which will allow us to use the script on your system. Once executed, enter the following command in the window and press ‘Enter’ on your keyboard once you are done.
.\Windows10DebloaterGUI.ps1

This will execute the debloat script and you should now get a graphical interface for it on your screen. Click on ‘Customize Blacklist’ at the top.
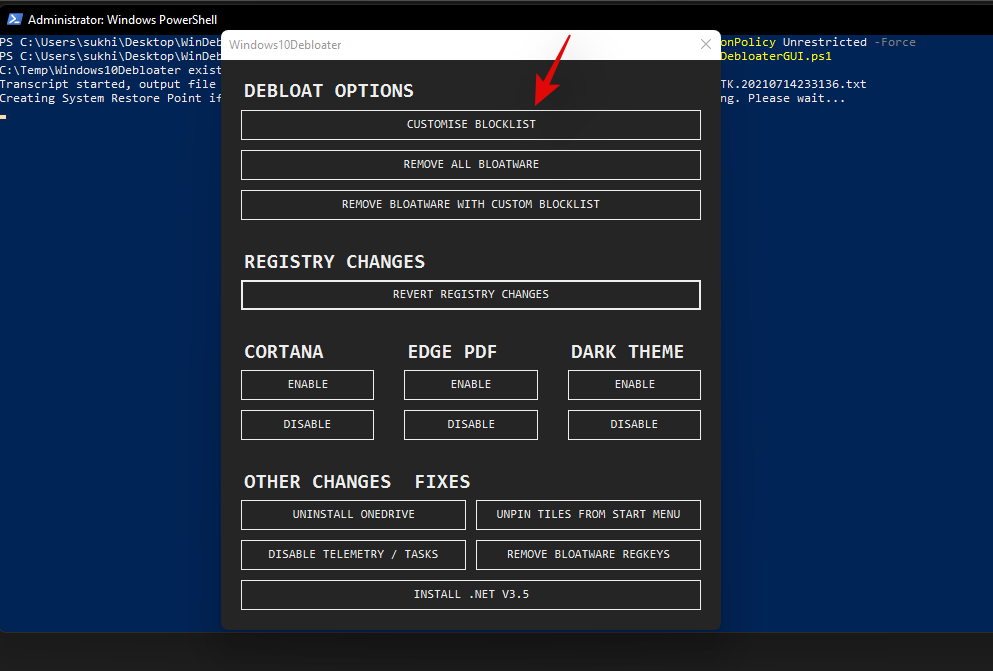
You will now get a list of all the apps installed on your system. Check the box for the apps you wish to uninstall and uncheck the box for the apps you wish to keep on your device. Ensure that you go through the entire list to remove any default selections made by the script for the programs that you wish to keep on your device.
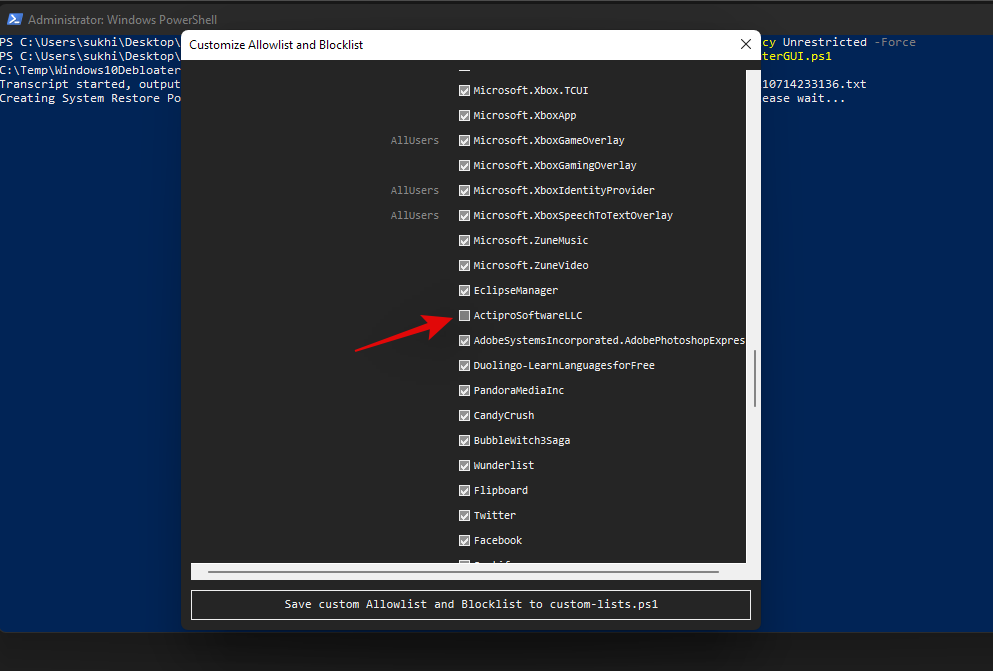
Once you have edited your list, simply click on ‘Save custom Whitelist and Blacklist to custom-lists.ps1’ at the top. You can now close this app selection window.
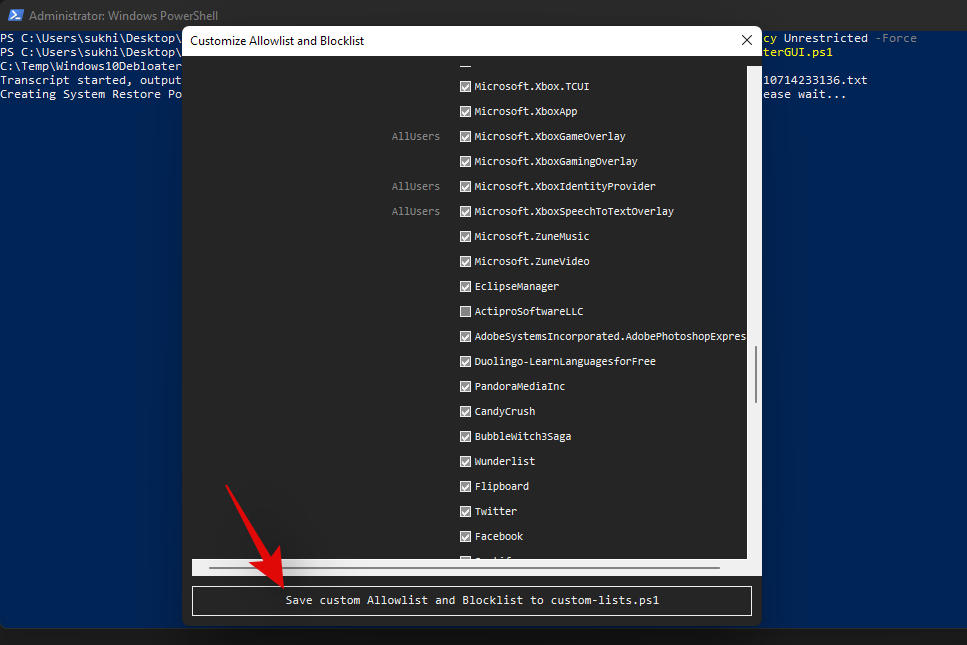
Now click on ‘Remove Bloatware with Customized Blacklist’. Keep an eye on the PowerShell window on the background once the command executes.
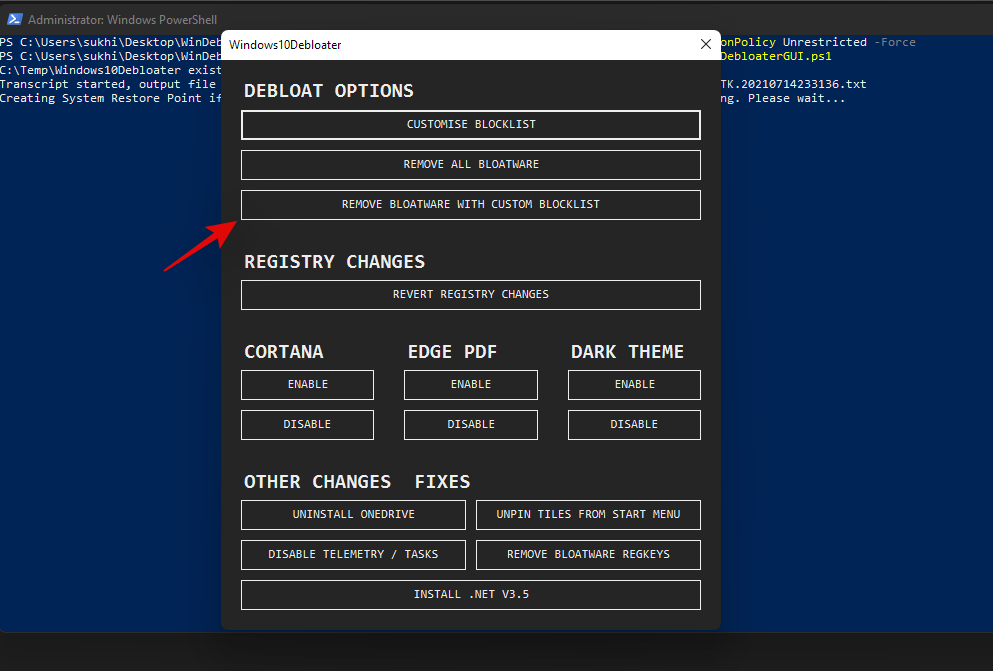
Once all programs have been removed, you will get a confirmation for the same in the PowerShell window in the background. Close the graphical interface by clicking on the ‘X’ in the top right corner.
Now go back to your PowerShell window and execute the following command.
Set-ExecutionPolicy Restricted -Force

This will revert changes to your execution policy and revert the changes we made earlier. Doing this is quite important to maintain proper security on your Windows system.
And that’s it! You will now have uninstalled system apps from your system via a third-party PowerShell script.
Can’t uninstall apps on Windows 11? How to fix
There could be a few reasons why you are unable to uninstall apps on your system. Here are a few workarounds that should help you uninstall persistent apps from your system easily.
Method #01: Close instance in task manager and try again
Chances are that the app has an instance or a process open in the background which is preventing it from being uninstalled. In such cases, you can try finding processes related to the app and kill them on your own. Once the processes have been killed, you can then try to uninstall the app again. Follow the guide below to find and kill the process.
Press Ctrl + Shift + Esc on your keyboard to open the ‘Task Manager’. Switch to the ‘Details’ tab by clicking on it.
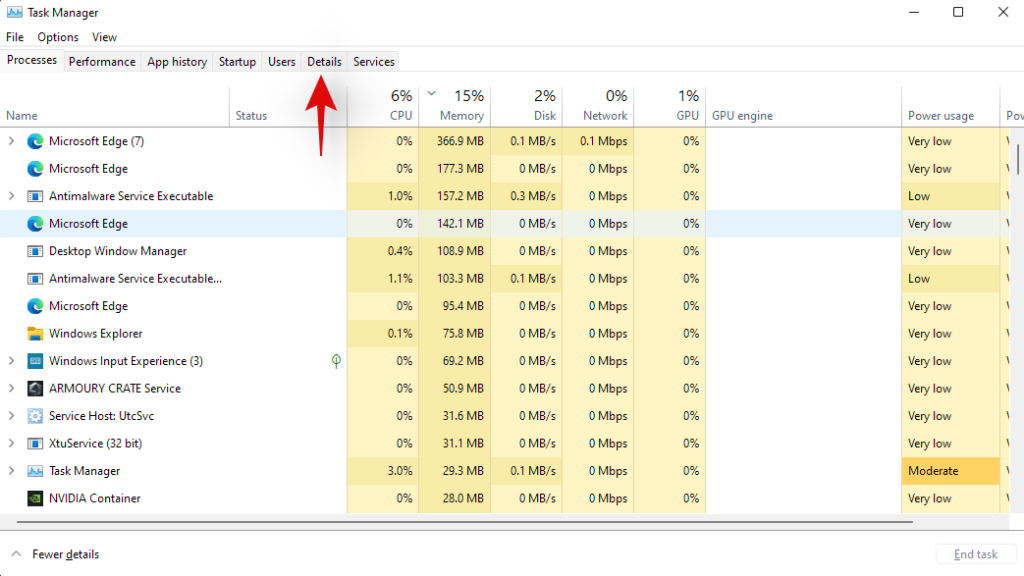
Now look for a process in the list for the concerned app. In our case, we are looking to uninstall ‘AsusOptimization’, hence we will look for a PowerToys process. Once found, click and select the process.
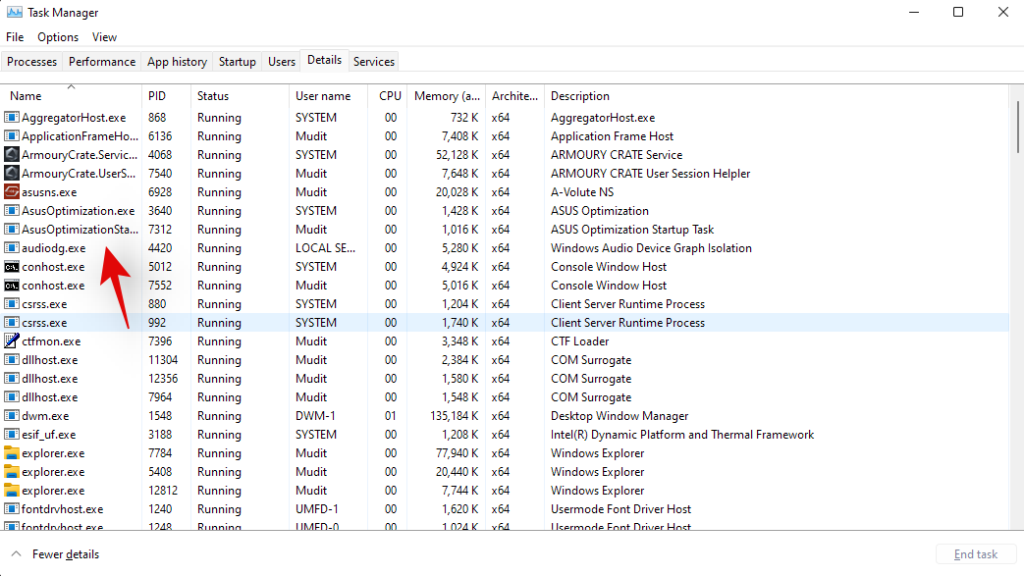
Hit delete on your keyboard or click on ‘End Task’.
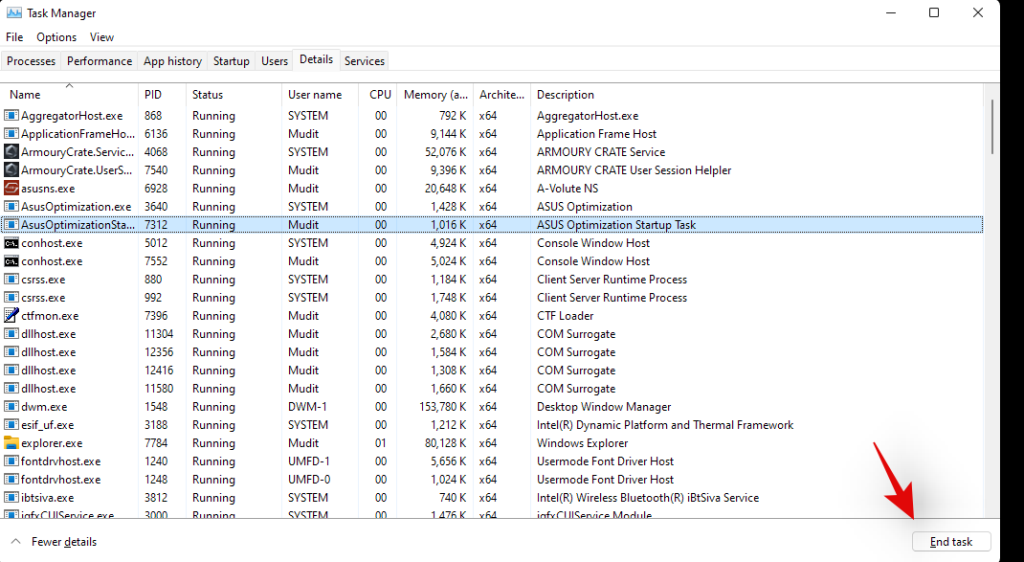
Confirm your choice by selecting ‘End Process’.
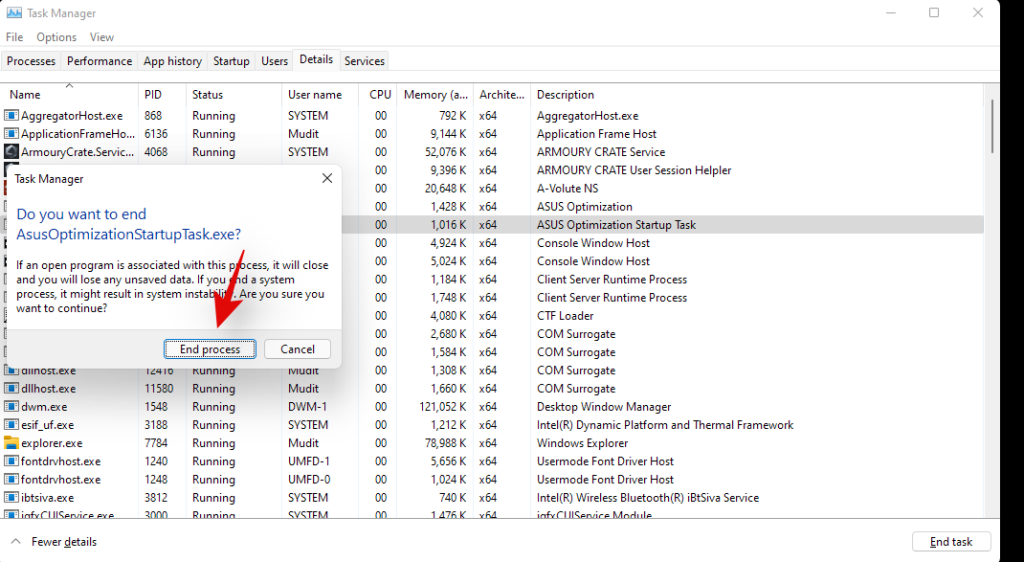
And that’s it! the process should now be killed and you can now try uninstalling the concerned app again.
Method #02: Uninstall in Safe mode
Another way to ensure that no third-party apps are launched or used in the background is to launch your system in safe mode and then try to uninstall your concerned app. You can use this comprehensive guide by us to enter safe mode on Windows 11.
Once in safe mode, follow the guide below to get the installer service back up and running on your system. Once the service is running in the background, you can use either of the methods above to uninstall the concerned app from your system.
Press Windows key + S key to open Windows Search and type in ‘cmd’. Click on ‘Run as administrator’ when the command prompt shows in your search results.
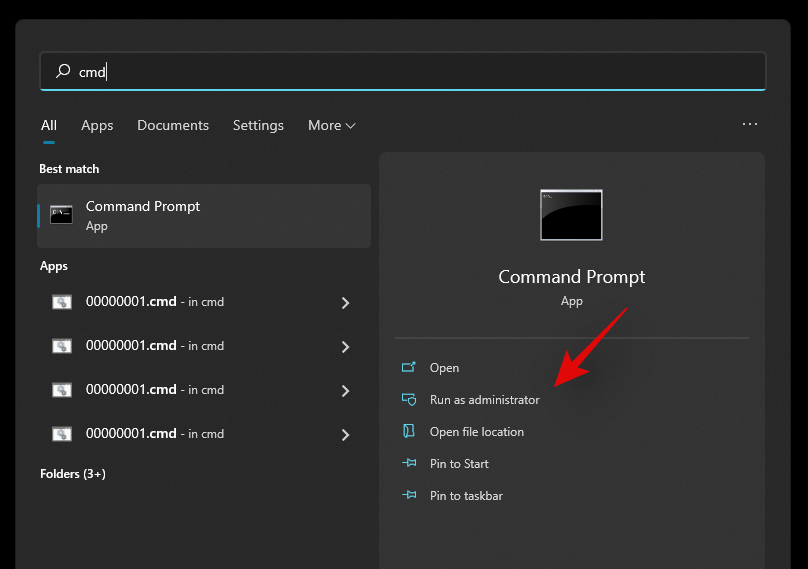
Enter the following commands in the command prompt one by one and hit Enter on your keyboard to execute each one of them.
REG ADD "HKLM\SYSTEM\CurrentControlSet\Control\SafeBoot\Minimal\MSIServer" /VE /T REG_SZ /F /D "Service"
REG ADD "HKLM\SYSTEM\CurrentControlSet\Control\SafeBoot\Network\MSIServer" /VE /T REG_SZ /F /D "Service"
net start msiserver

And that’s it! The installer service should now be running on your system and you should now be able to uninstall the concerned app using either one of the methods above.
Method #03: Run the Microsoft Uninstaller troubleshooter
You can also run a Microsoft Troubleshooter to try and fix uninstaller issues. Microsoft troubleshooters have come a long way since they were first introduced and can now fix most software and driver incompatibility issues without any user intervention.
Microsoft has also made it much easier for you to now launch any troubleshooter to try and solve your current issue. Use the guide below to launch an uninstaller troubleshooter on your Windows 11 system.
Required
Guide
Download the troubleshooter using the link above to your PC. Once downloaded, extract the .zip file to a convenient location. If you have trouble extracting the .zip file or it seems to be blocked, use the guide below to unblock it, else you can skip the guide and jump to the next guide.
Unblock the .zip file
Right-click on the .zip file and select ‘Properties’.
Check the box for ‘Unblock’ at the bottom of the Window.
Click on ‘Ok’.
Provide administrator permission to make the necessary change.
The file should now be unblocked on your system and you should now be able to extract it like any other .zip file on your system.
Run the troubleshooter
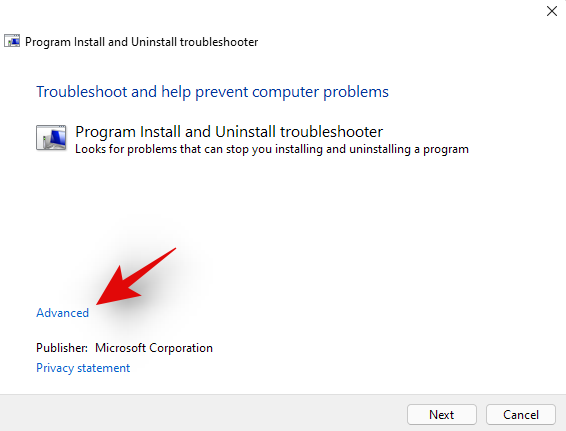
Navigate to the extracted files on your local storage. Cut the file named ‘MicrosoftProgram_Install_and_Uninstall.meta.diagcab’ and paste it on your desktop. Double click and run the file from your desktop. Click on ‘Advanced’ at the bottom once the troubleshooter is launched.
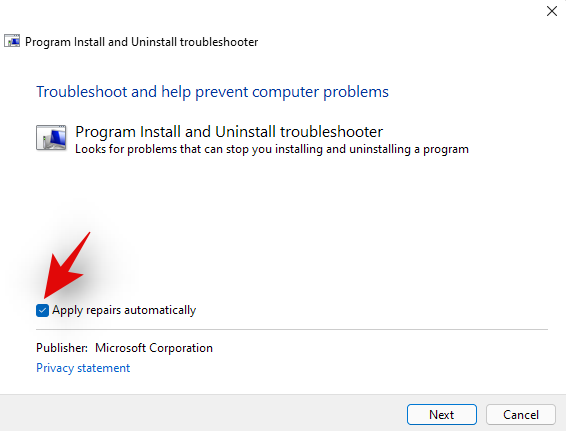
Check the box for ‘Apply repairs automatically’. Click on ‘Next’ once you are done.
Select ‘Uninstallting’ on the next step.
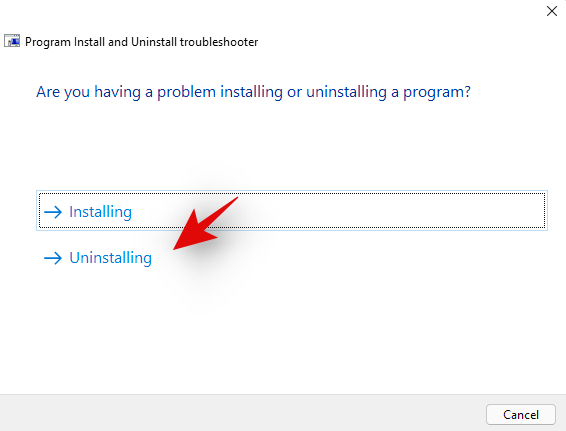
Select the concerned program from the list provided on your screen. If your program does not appear in the list, click on ‘Not Listed’.
Now follow the on-screen instructions depending on your choice to complete the troubleshooting process.
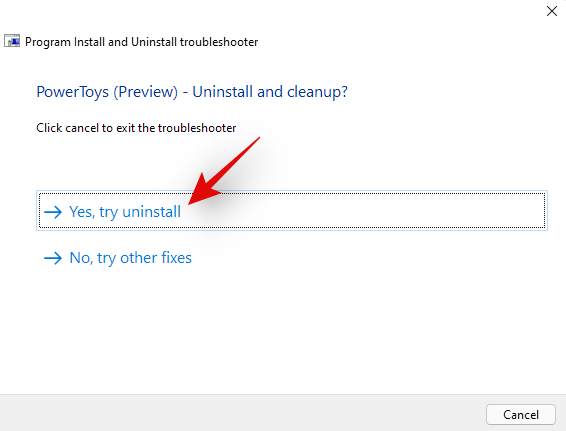
And that’s it! In most cases, the troubleshooter will detect your issue and solve it automatically. A report for the same will be presented to you at the end of the process with all the details.
Method #04: Use a restore point
If you are still having issues uninstalling the software from your system then it is time for some drastic steps as this could be malicious in nature. Let’s restore your PC to a restore point before the concerned app or program was installed on your system.
However, if you do not have a restore point then you can jump to one of the other methods listed below. Here’s how you can use a restore point to restore your PC to its previous state.
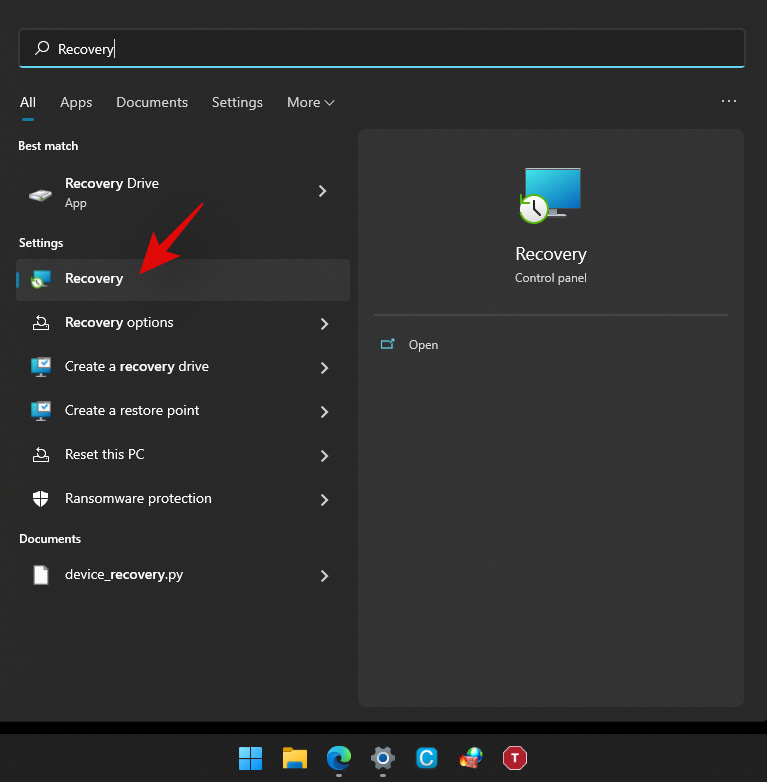
Press Windows + S on your keyboard and search for ‘Recovery’. Click and launch the app link once it shows up in your search results.
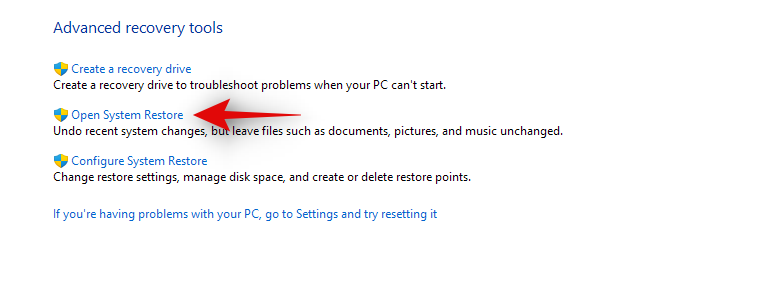
Click on ‘Open System Restore’.
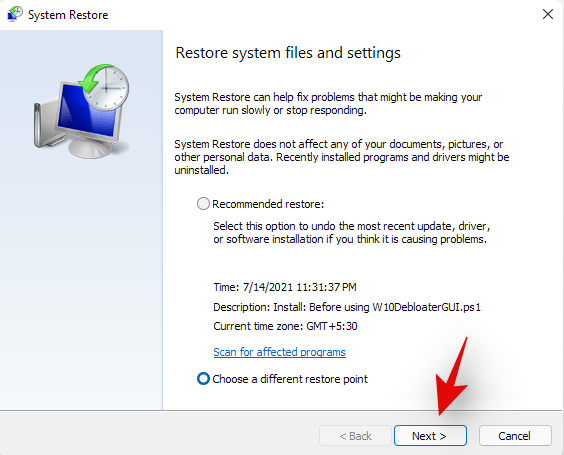
You will now be suggested a recent system restore point if you have one. Select that if needed, or click on ‘Choose a different restore point’ if you wish to choose an older one.
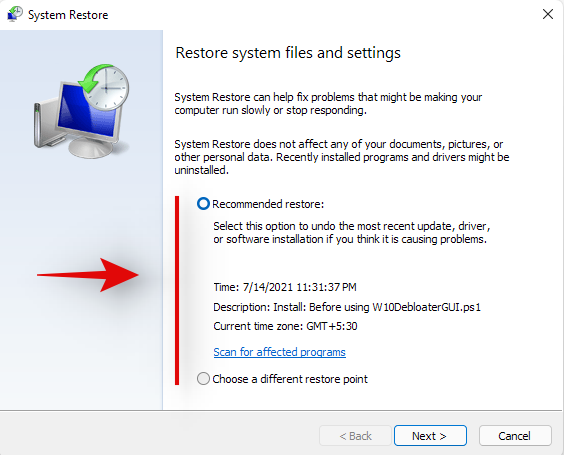
Select ‘Next’ or hit ‘Enter’ on your keyboard.
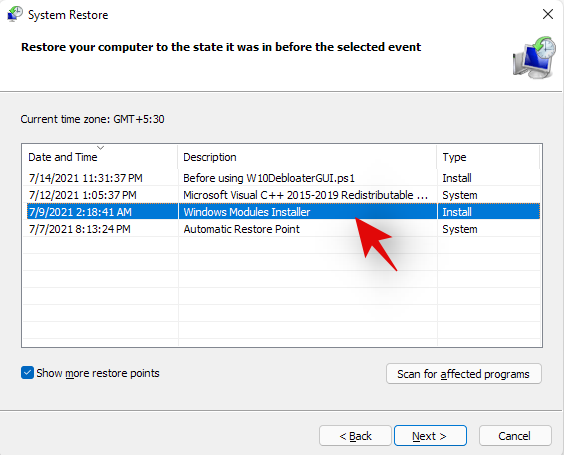
You can now select the desired Restore Point from the list at the top. You can check the box for ‘Show more restore points’ if you wish to look at more restore points.
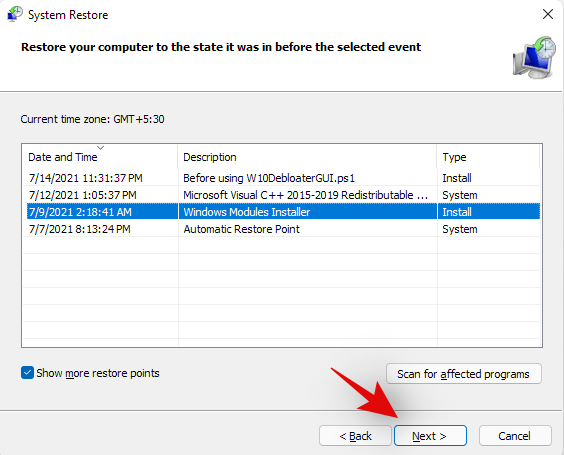
Once selected, click on ‘Next’.
Finally, click on ‘Finish’.
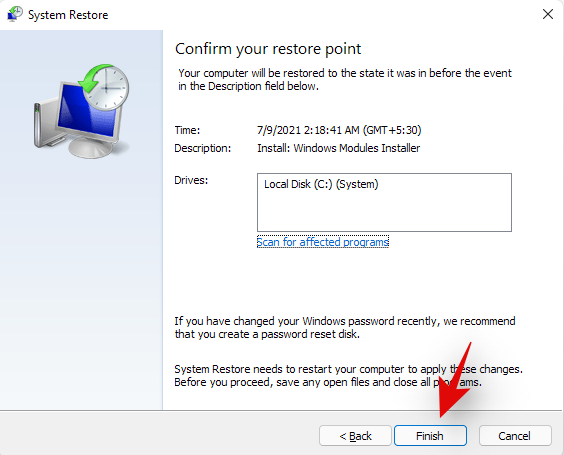
Windows 11 will now restore your system to the selected restore point and the concerned app should no longer be on your system once the process is completed.
Method #05: Contact Windows Support
If you are still unable to get the app uninstalled from your system then it might be time to contact Microsoft Support. Microsoft Support executives are trained to solve such issues with more expertise and can even remotely takeover your system if needed. It might be time to get in touch with the support team to solve your issue. Additionally, if you purchased a pre-built system, you can use your OEM support for some help as well. Use the link below to get in touch with Microsoft Support.
► Microsoft Support
Uninstall programs on Windows 11: FAQs
Can you uninstall pre-installed apps?
Well, officially, you can not and it is not recommended by Microsoft. But still, if you wish to remove preinstalled apps, you can easily do so depending on the type of the app. If you wish to remove a system app then the process is a bit complicated. Else, if you wish to remove third-party pre-installed apps then you can simply do so by uninstalling them like any other app from your Windows 11 Pc using the guide below.
Can you uninstall system apps?
Yes, you can uninstall system apps but not officially. Officially Windows 11 or any Windows for that matter, doesn’t allow you to remove system apps from the OS. However, there are many workarounds to circumvent this restriction and uninstall preinstalled system apps from your system.
This includes using command prompt/PowerShell or a third-party software. Using these methods you should be able to easily uninstall system apps from your system. Follow our guides below for each of the methods depending on your current needs and requirements.
Can you uninstall apps downloaded from the Microsoft Store?
Yes, apps downloaded from the Microsoft Store can be uninstalled easily using either of the methods listed below. This includes Android apps that you may have downloaded on your system but did not find appealing enough. We recommend uninstalling Windows Store apps either via Settings or Start.
Chances are that the Store app will now show up in the Control Panel and if uninstalled via CMD or PowerShell, you could end up with leftover files including empty Start menu folders. Hence, use Powershell or CMD for Windows Store apps only if you are facing an issue uninstalling them via the Settings or the Start menu.
What happens when you uninstall a program?
Uninstallation is the process of removing a program or an app from your system. While apps are installed singularly with all dependencies available to them in a sandbox, programs operate differently. Programs usually have scheduled tasks, customized registry values to execute them, and dependencies for various Windows features and extensions that they need for their own installation process to create and place every file and task correctly.
Hence the removal process for all these things created by a program when it is first installed on your system is called uninstallation. All scheduled tasks, registered services, registry keys, executables, temporary files, log files, and more are removed once you uninstall a program from your system. In some cases, you will be leftover with settings and save files so that you don’t have to set up the program entirely when installing it in the future.
These files can be cleared by clearing your Windows Cache and temporary files in most cases. However, if you still suspect leftover files from a program on your system, then we recommend checking the following places for any leftover files. If found, you can simply delete them like any other file on your system.
- /Documents
- C:\Program Files (x86)\Common Files
- C:\Program Files\Common Files
- C:\ProgramData
- C:\Users\USER\AppData\Local
- C:\Users\USER\AppData\LocalLow
- C:\Users\USER\AppData\Roaming
- C:\Users\USER
How to remove data of uninstalled programs
If you still see the remaining files and folders or context menu options for a removed program or app, then you can try the fixes below to solve your issue.
Method #01: Clear cache and temporary files from Windows
You should first try clearing cache and temporary files from your Windows 11 system. In most cases, this will help the overall File Explorer UI to refresh itself which should automatically remove leftover files and context menu items for removed programs from your system.
You can use this comprehensive guide by us to easily clear your Windows 11 cache and storage. You can also use the same guide to free up storage space on your system as well by deleting other large files and installations that show up in the list.
Method #02: Check for leftover files manually
You can also check and delete all leftover files manually for the removed program or app. You should start by using Windows Search to look for any files or folders associated with the uninstalled program. You can then delete these manually from your local storage.
Once you have deleted all the files and folders that show up in the search, you can proceed to manually check the locations listed below. If they contain any leftover files or folders from the removed program, then you can simply select them and delete them from your system.
- /Documents
- C:\Program Files (x86)\Common Files
- C:\Program Files\Common Files
- C:\ProgramData
- C:\Users\USER\AppData\Local
- C:\Users\USER\AppData\LocalLow
- C:\Users\USER\AppData\Roaming
- C:\Users\USER
Method #03: Run a third-party uninstaller/cleaner
If you are still left with the remaining files and context menus for the program then it is time to use a third-party uninstaller or cleaner. These programs are specifically designed to identify and remove leftover files from previously uninstalled programs on your system. We recommend you give Revo uninstaller a try as even the free model for the app will help you identify the location of leftover files which can then be deleted by you manually. You can also use something like CCleaner that is designed to remove leftover files and free up storage and processing space on your system.
Method #04: Try to remove the app via PowerShell
If nothing works, then chances are that the concerned app was installed on your system using elevated privileges which prevents some files and folders from being removed from your system.
In such cases, we recommend you try to remove the app via PowerShell. You can use our guide above to remove system apps from Windows 11 via PowerShell. You will first need to source the full package name for your app or program, which can then be used to force uninstall it from your system.
Can you uninstall Windows Updates?
Yes you can easily uninstall Windows Update from your system. New updates can often introduce compatibility issues on older hardware and having the option to uninstall updates can always help. You can use the guide below to uninstall recently installed updates from your system.
How to uninstall Windows Updates
Follow the guide below to uninstall recently installed Windows Updates from your Windows 11 system.
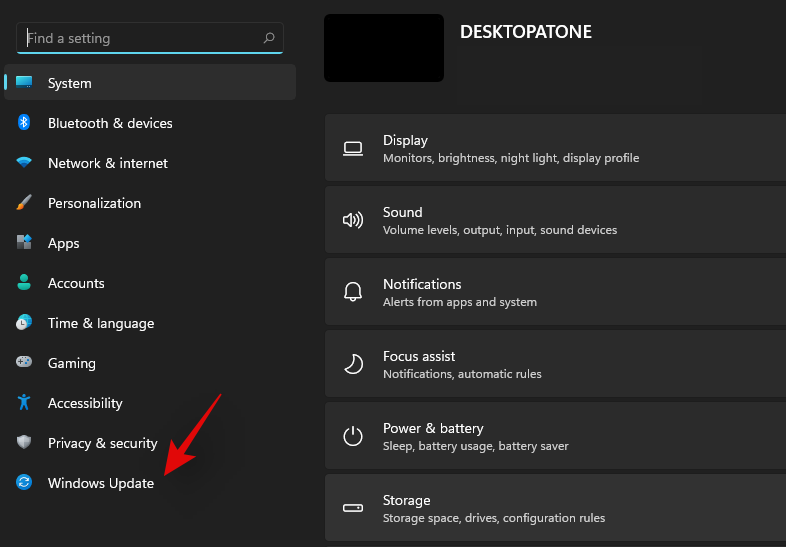
Press Windows + i on your keyboard to open the Settings app. Click on ‘Windows Update’ on your left.
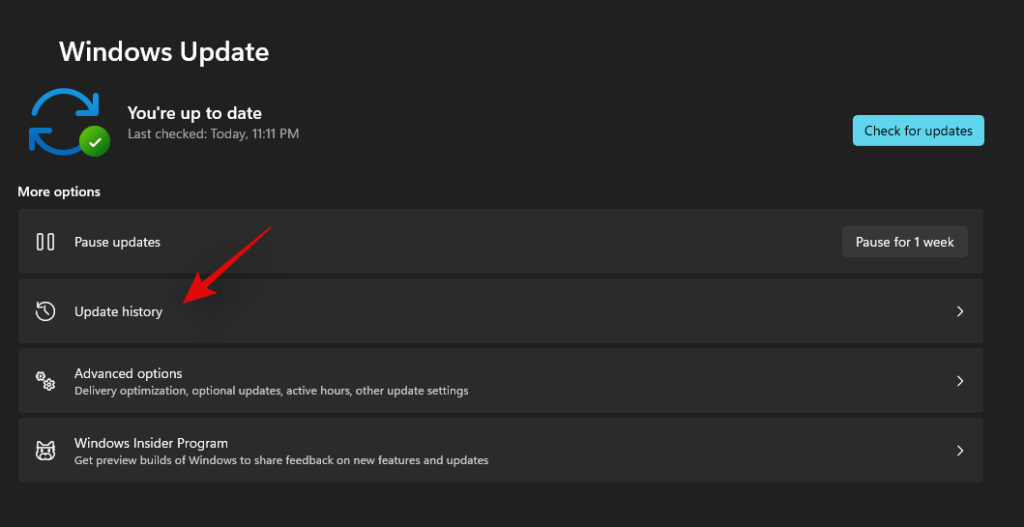
Now click on ‘Update history’.
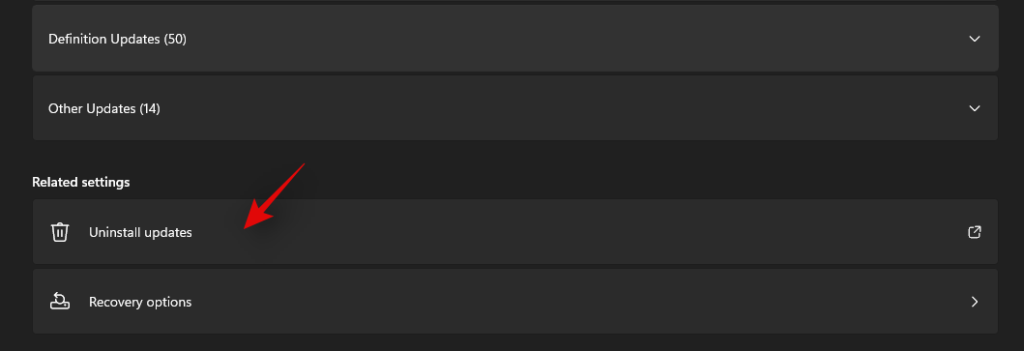
Scroll to the bottom on your right and click on ‘Uninstall Updates’.
You will now get a list of all the recent updates installed on your system. Click and select the update you wish to uninstall.
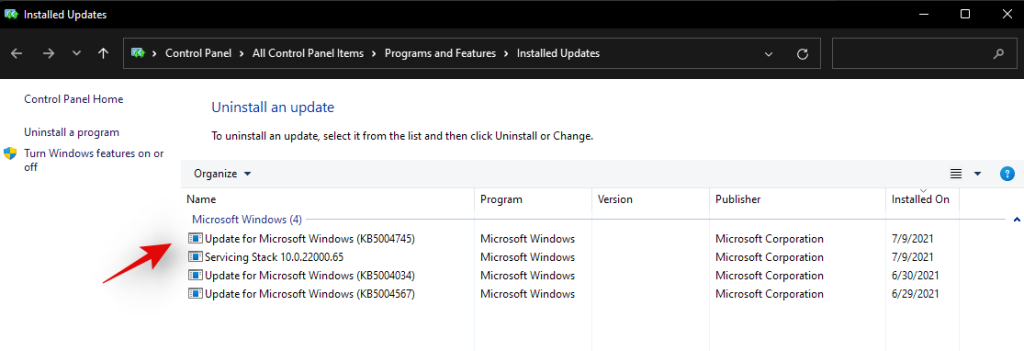
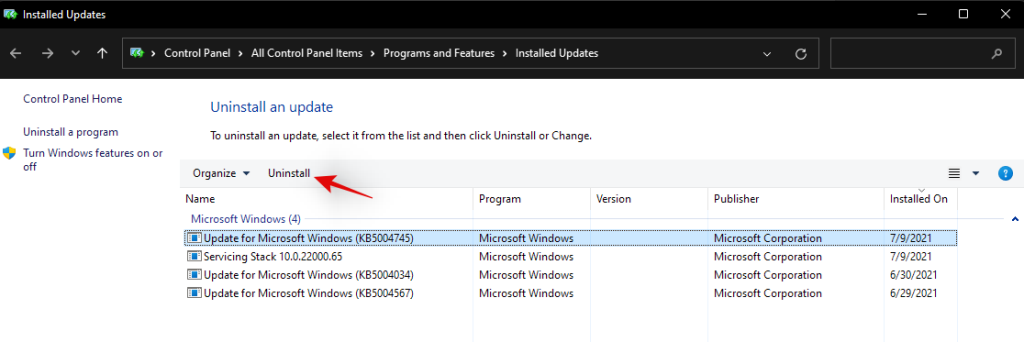
Click on ‘Uninstall’ at the top now.
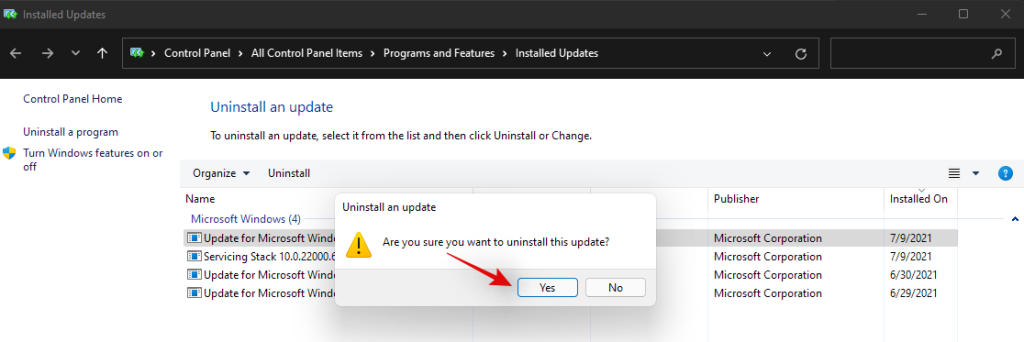
Follow the on-screen instructions to complete the process.
And that’s it! Your selected Windows update should now be uninstalled from your system.
We hope this guide helped you uninstall the concerned apps or programs from your system. If you still face issues, feel free to reach out to us using the comments section below.
