Ako obnoviť prístup k pevnému disku, opraviť chybu, že sa pevný disk nedá otvoriť
V tomto článku vám ukážeme, ako znovu získať prístup k pevnému disku, keď zlyhá. Poďme na to!
Ak inovujete na nový počítač, je pravdepodobné, že sa pokúšate znova použiť pevný disk zo starého počítača. Ak nie, možno ho plánujete darovať členovi rodiny alebo priateľovi. Ale skôr, ako budete pokračovať v niektorej z týchto možností, mali by ste úplne vymazať svoj starý pevný disk, aby ďalšia osoba začala s pevným diskom odznova.
V tomto príspevku sa budeme zaoberať niekoľkými spôsobmi vymazania pevného disku v systéme Windows 11 .
Obsah
Prečo by ste mali vymazať pevný disk?
Predtým, ako prejdeme k metódam, nájdime chvíľu, aby sme pochopili, prečo by ste mali vymazať pevné disky.
Zjavnejším dôvodom vymazania pevného disku je vymazanie všetkých vašich osobných súborov a aplikácií z disku, aby ste sa uistili, že ich nemožno obnoviť pomocou nástrojov na obnovu dát – či už po obnovení továrenského nastavenia alebo nie. Ďalším dôvodom na vymazanie disku môže byť jednoducho získanie väčšieho úložného priestoru pre vaše nové súbory. Alebo možno len chcete nastaviť počítač od začiatku s čistou inštaláciou systému Windows a novými oddielmi pre váš pevný disk.
Nech už je dôvod akýkoľvek, poďme sa pozrieť na predpoklady vymazania pevného disku.
Čo robiť pred vymazaním pevného disku?
Pred vymazaním disku je niekoľko vecí, o ktoré sa musíte postarať.
Poďme sa pozrieť na spôsoby vymazania pevného disku v systéme Windows 11.
Súvisiace: Ako mapovať disk v systéme Windows 11
Ako naformátovať jednotku v systéme Windows 11 alebo 10
Jednotku môžete naformátovať viacerými spôsobmi v závislosti od typu prístupu, ktorý máte k svojmu systému. Použite jednu z nižšie uvedených príručiek, ktorá najlepšie vyhovuje vašej aktuálnej situácii a požiadavkám.
Toto je nepochybne jeden z najjednoduchších a najrýchlejších spôsobov vymazania pevného disku. Tento proces trvá len pár sekúnd a je ideálny, keď chcete na pevnom disku vytvoriť miesto pre nové súbory.
Poznámka: Táto metóda bude fungovať iba pre sekundárne jednotky vo vašom systéme a nie pre spúšťaciu jednotku.
Tu sú kroky.
Stlačením Win key + rotvoríte pole Spustiť. Zadajte „prieskumník“ a stlačte kláves Enter.
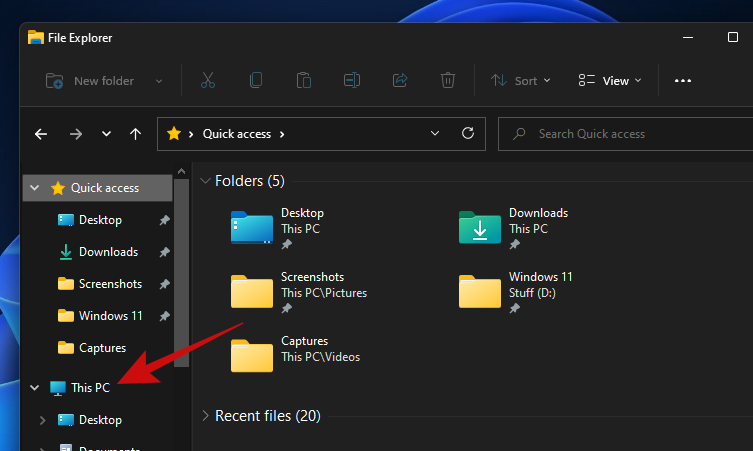
Zobrazí sa okno s názvom Prieskumník súborov. Kliknite na 'Tento počítač'.
Teraz by ste mali vidieť všetky jednotky pripojené k počítaču. Naša má tri jednotky, z ktorých budeme v tejto príručke používať jednotku „Dáta“.
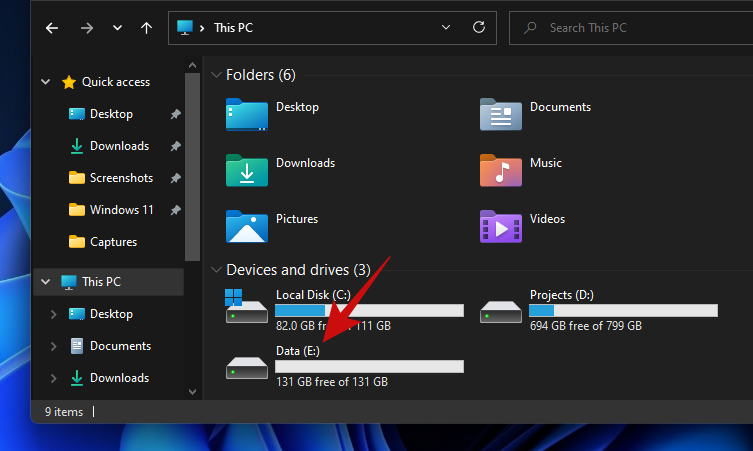
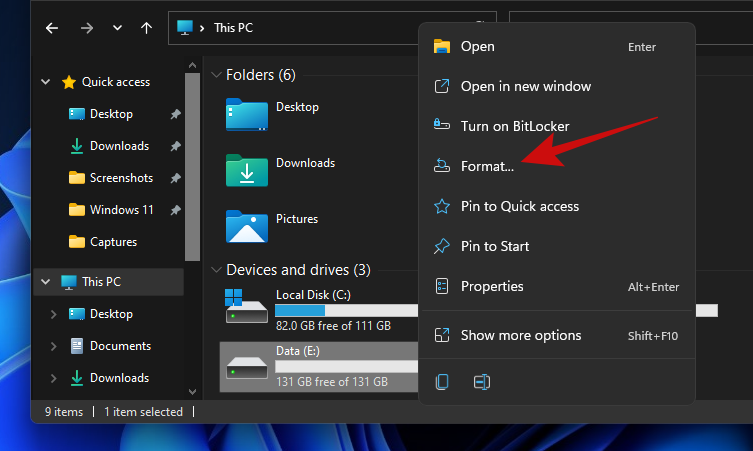
Všetko, čo musíte urobiť, je kliknúť pravým tlačidlom myši na jednotku, ktorú chcete vymazať, a kliknúť na „Formátovať“.
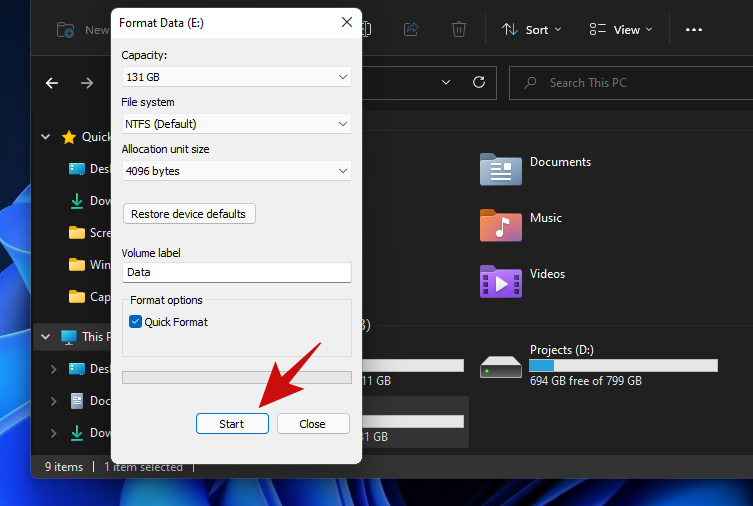
Mali by ste vidieť malé vyskakovacie okno „Formát“ s množstvom možností. Ak chcete vykonať rýchle vymazanie údajov bez toho, aby ste sa museli zaoberať inými možnosťami, kliknite na tlačidlo „Štart“.
Tip: Pre bezpečnejšie vymazanie údajov zrušte začiarknutie možnosti „Rýchle formátovanie“ a potom kliknite na „Štart“. Majte na pamäti, že dôkladné vymazanie bude trvať oveľa dlhšie ako rýchle formátovanie.
Po dokončení vymazania by ste mali vidieť správu potvrdzujúcu to isté. Kliknutím na „OK“ zrušíte upozornenie.
Váš disk je teraz úplne čistý a pripravený na opätovné použitie.
Metóda č. 2: Použitie správy diskov
Otvorte ponuku Štart a zadajte „Správa diskov“. Kliknite na výsledok vyhľadávania alebo na tlačidlo Otvoriť.
Takto vyzerá nástroj Správa diskov.
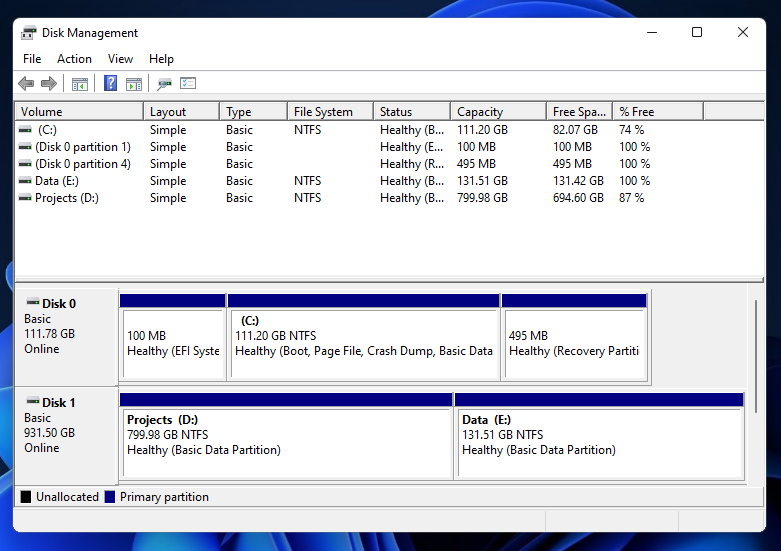
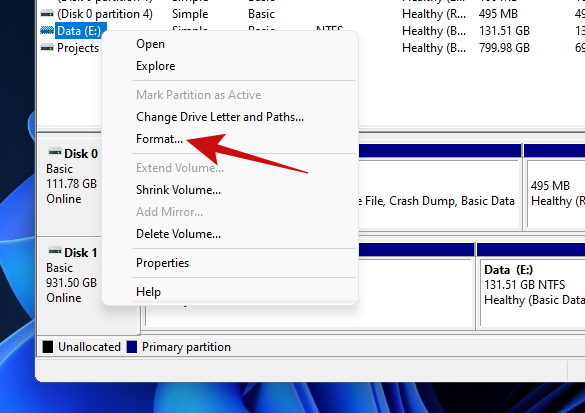
Kliknite pravým tlačidlom myši na zväzok, ktorý chcete vymazať, a kliknite na položku Formátovať.
V ďalšom kontextovom okne by ste mali mať niekoľko možností, ako je zmena názvu zväzku, súborových systémov a ďalšie.
Opäť, rovnako ako pri predchádzajúcej metóde, by ste mali ponechať zaškrtnutú možnosť „Vykonať rýchle formátovanie“, ak nechcete dlho čakať na vymazanie disku.
Tip: Pre dôkladné vymazanie, ktoré by malo odstrániť všetky stopy vašich údajov z disku, zrušte začiarknutie možnosti „Vykonať rýchle formátovanie“.
Kliknutím na tlačidlo „OK“ spustíte vymazanie disku.
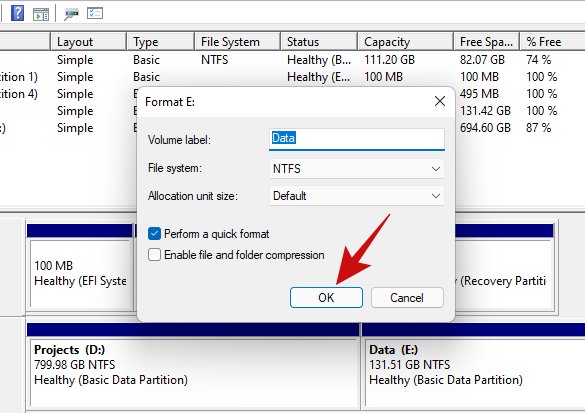
Kliknutím na tlačidlo 'OK' potvrďte vymazanie údajov a váš disk by mal byť čistý v priebehu niekoľkých minút.
Metóda #3: Použitie Diskpart v CMD (príkazový riadok)
Diskpart je nástroj príkazového riadka, ktorý možno použiť na správu všetkých jednotiek pripojených k počítaču. S diskpart môžete robiť všetko od zoznamu diskov, vytvárania a odstraňovania partícií a ešte oveľa viac.
Poďme sa pozrieť na to, ako môžete vymazať pevný disk diskpartom.
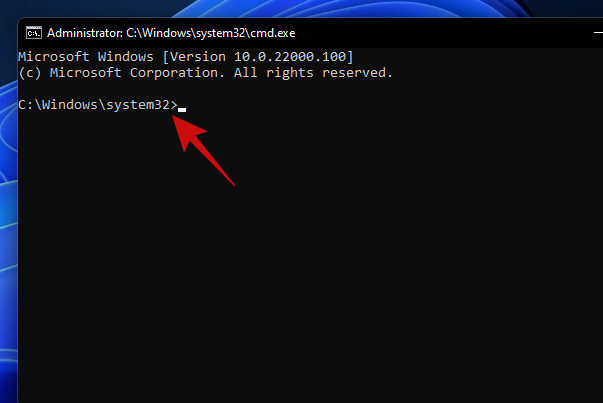
Stlačením Win key + rotvoríte pole Spustiť. Napíšte „cmd“ a stlačte Ctrl + Shift + Enterklávesy namiesto klávesu Enter. Tým sa otvorí zvýšený príkazový riadok.
Predvolená cesta zo zvýšeného príkazového riadka by mala vyzerať takto.
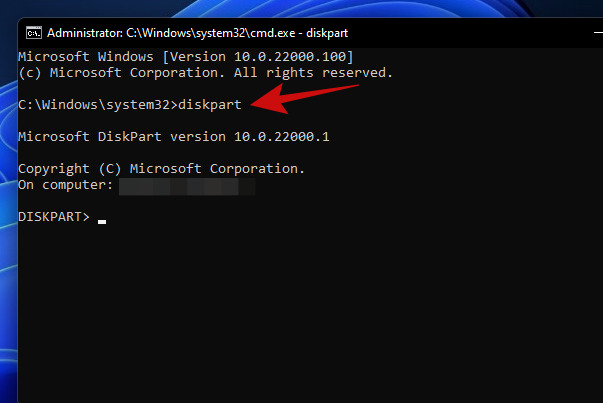
Zadajte „diskpart“ a stlačte kláves Enter. Teraz by ste mali byť v obslužnom programe diskpart.
Napíšte „list disk“ a stlačte Enter. Toto by malo obsahovať zoznam všetkých diskov pripojených k vášmu počítaču.
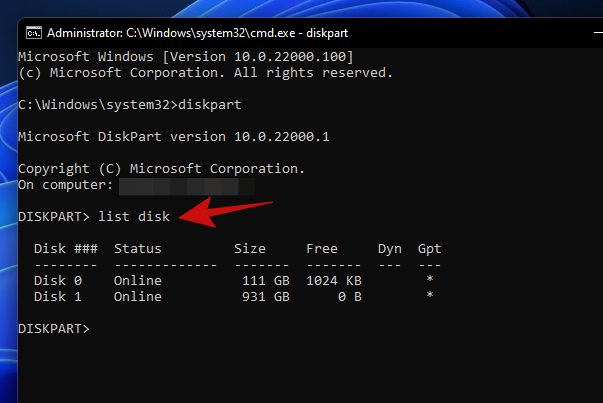
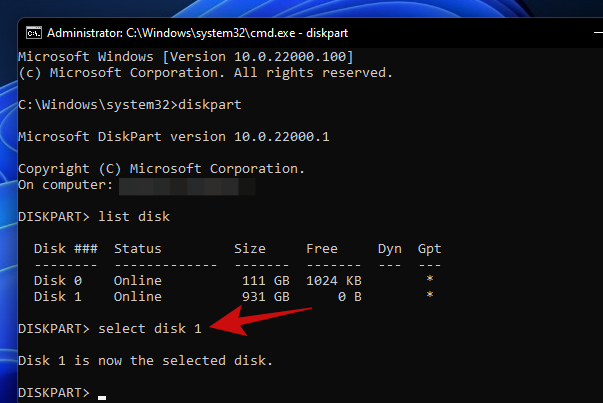
Ak chcete pokračovať vo vymazaní disku, zadajte „vybrať disk“. Náš laptop má dva pevné disky a v tejto príručke budeme pokračovať s Diskom 1, takže sme zadali „vybrať disk 1“ a stlačili Enter.
Zadajte „čistý“ a stlačte kláves enter.
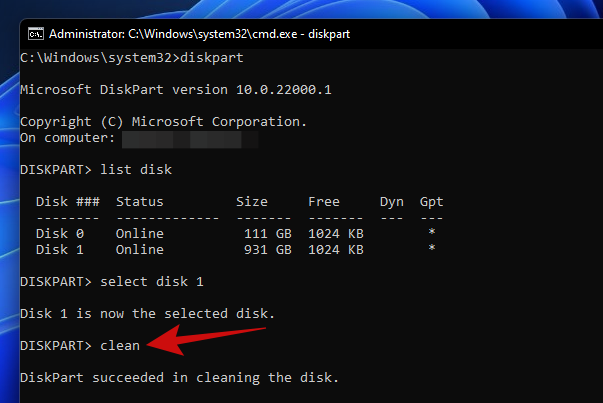
Váš disk by mal byť teraz úplne prázdny a premenený na nepridelené miesto. Vašou ďalšou úlohou by malo byť vytvorenie oddielov pomocou nástroja Správa diskov, ktorý sme použili predtým. Jednoducho spustite nástroj a inicializujte disk. Potom by ste mali byť schopní vytvárať oddiely ľubovoľnej veľkosti, ktorá vám najviac vyhovuje.
Metóda č. 4: Použitie možnosti Reset
Windows 11 je dodávaný s možnosťou s názvom „Reset this PC“, ktorá resetuje Windows na výrobné nastavenia. A najlepšie na Reset this PC je, že používateľom ponúka možnosť buď ponechať všetky svoje súbory a resetovať Windows, alebo odstrániť všetko pri resetovaní Windowsu.
Ak vymazávate disk len kvôli preinštalovaniu systému Windows, odporúčame vám vyskúšať túto metódu pred pokračovaním v čistej inštalácii.
Tu je návod, ako to môžete urobiť.
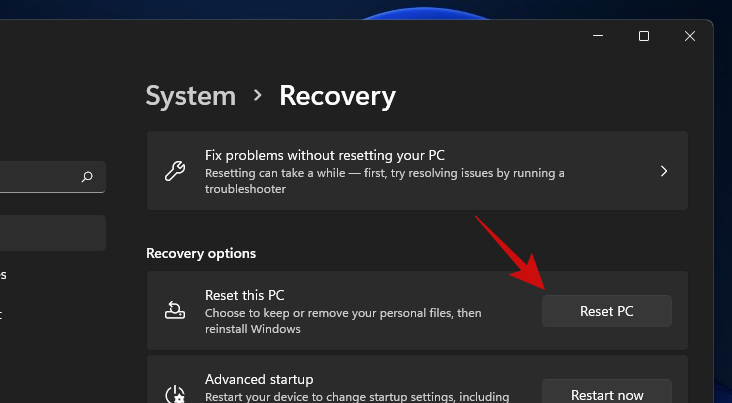
Otvorte ponuku Štart a zadajte „Obnoviť tento počítač“. Kliknite na výsledok vyhľadávania, ktorý sa zobrazí, alebo kliknite na tlačidlo Otvoriť.
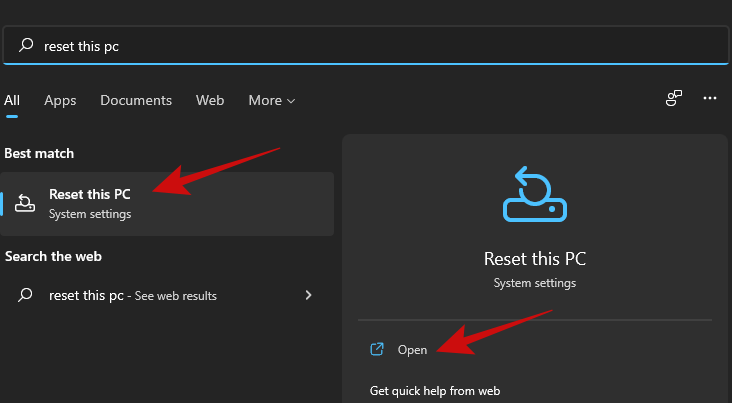
Kliknutím na tlačidlo „Resetovať počítač“ spustíte proces resetovania systému Windows.
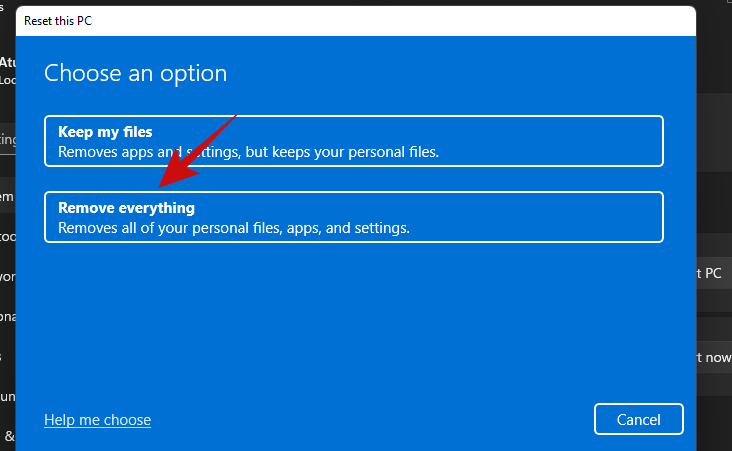
Mali by ste vidieť modrú obrazovku s dvoma možnosťami. Kliknutím na „Odstrániť všetko“ preinštalujete systém Windows a zároveň odstránite všetky súbory, aplikácie a nastavenia.
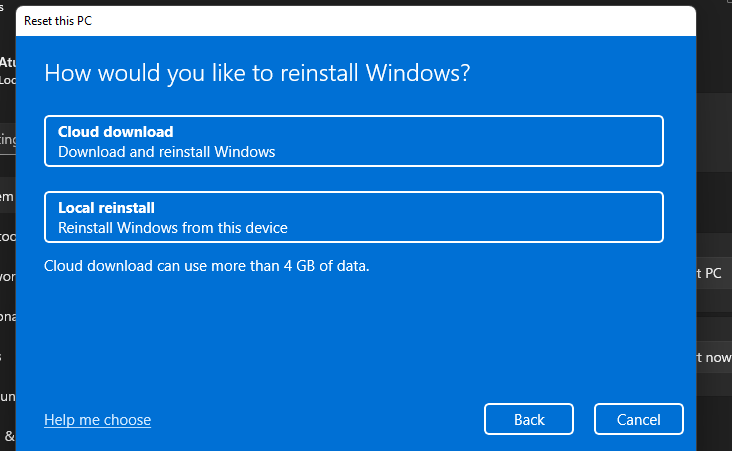
Na ďalšej obrazovke by ste sa mali opýtať, ako chcete preinštalovať systém Windows. Ak má váš počítač pripojenie na internet, môžete pokračovať s možnosťou „Prevzatie z cloudu“, v opačnom prípade pokračujte s „Preinštalovaním na mieste“.
Postupujte podľa zvyšných pokynov na obrazovke a váš počítač bude čoskoro pripravený s čerstvou inštaláciou systému Windows 11 a bez stopy po starých súboroch a aplikáciách na pevnom disku.
Metóda č. 5: Použitie prostredia PowerShell
Jednotky môžete formátovať aj pomocou prostredia PowerShell. Ak chcete naformátovať jednotku pomocou prostredia PowerShell v systéme Windows 11, postupujte podľa nasledujúcich krokov.
Stlačte Windows + Sna klávesnici a vyhľadajte PowerShell. Kliknite na „Spustiť ako správca“, keď sa zobrazí vo výsledkoch vyhľadávania.
Zadajte nasledujúci príkaz, aby ste získali zoznam všetkých zväzkov z diskov nainštalovaných vo vašom systéme. To vám pomôže identifikovať a nájsť disk, ktorý chcete naformátovať.
get-volume

Vyberte zväzok, ktorý chcete naformátovať, a potom ho vyberte pomocou príkazu nižšie. Nahraďte X písmenom priradeným k príslušnému zväzku.
select X

Teraz použite príkaz nižšie na formátovanie vybratého zväzku. Nahraďte NAME názvom podľa vlastného výberu, ktorý bude zväzku priradený po jeho naformátovaní.
format-volume -filesystem NTFS -newfilesystemlabel NAME
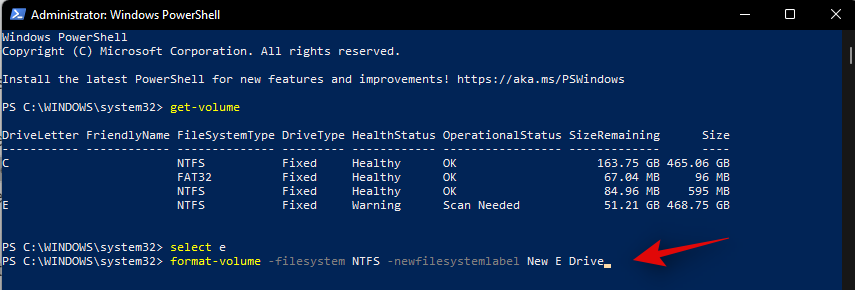
And that’s it! The selected volume on the concerned drive will now be formatted. Wait for the process to complete and close the PowerShell to use the disk as usual.
Method #6: Using a third-party utility
There are tons of partition managers out there that can help you manage and format all disks installed on your system easily. Follow the guide below to get you started. We will be using Gnome Partition Manager for this guide which is a long-trusted industry tool that is completely free. Use the link below to download it to your local storage.
Once GParted is downloaded to your system, you can simply mount it like any other ISO and get started. If you wish to clean and wipe your boot drive, then we recommend you mount the ISO to a removable media which should allow you to format the drive outside of your current Windows 11 installation. Once mounted, restart your system and access the Gnome Partition Manager from your boot menu. We will be using Rufus to mount the disk image to removable media and then reboot our current system.
Note: Make sure secure boot is disabled on your system so that you can boot from your USB. Additionally, switch your storage configuration to AHCI instead of Intel Optane memory in case available. GParted won’t be able to recognize your drives if the storage configuration is not set to AHCI.
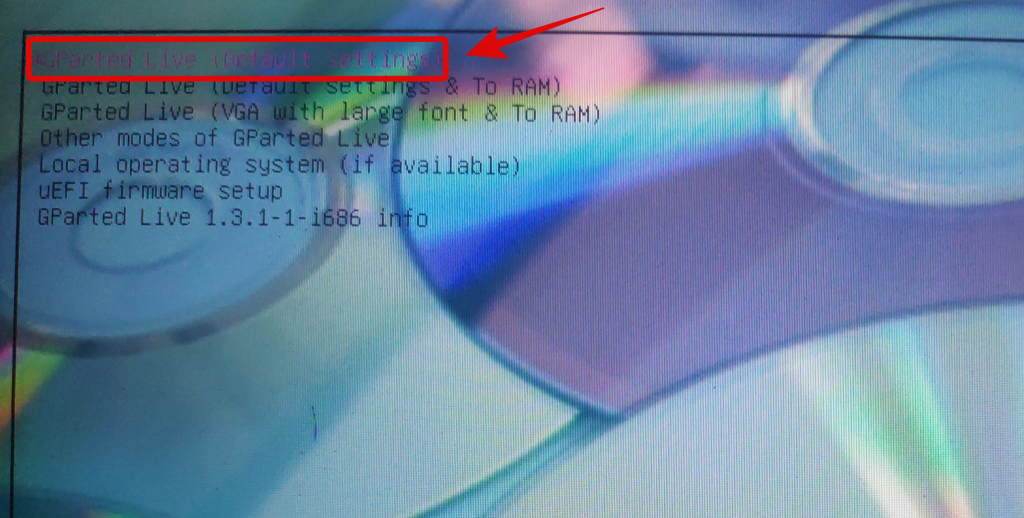
Once you boot into your USB drive, you will have the option to launch GParted with various settings. We recommend you opt for the first option and select ‘Launch GParted with default settings’.
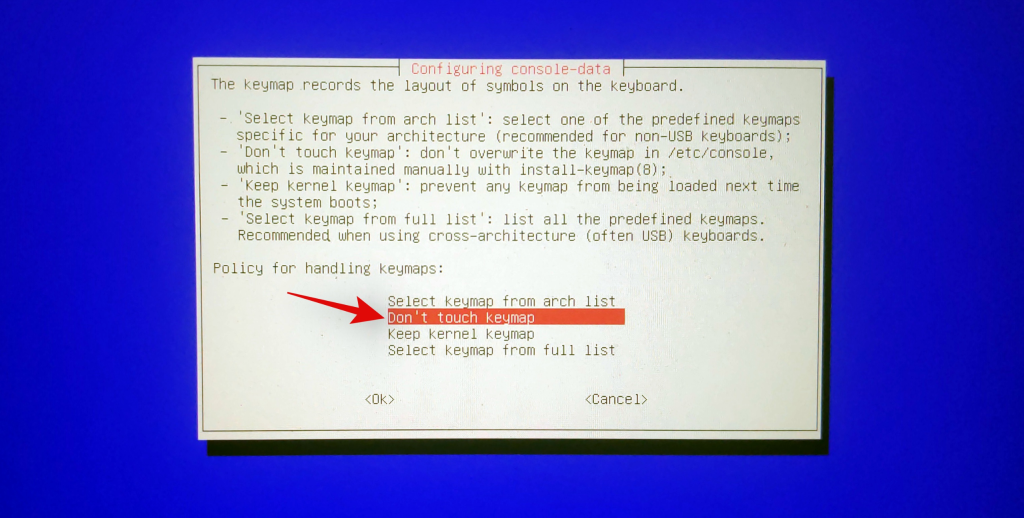
You will now be prompted to select a keymap. This page comes in handy in case your keyboard is incorrectly recognized by Gnome. If your keyboard seems to be responsive then select ‘Don’t touch keymap’ to proceed with the process.
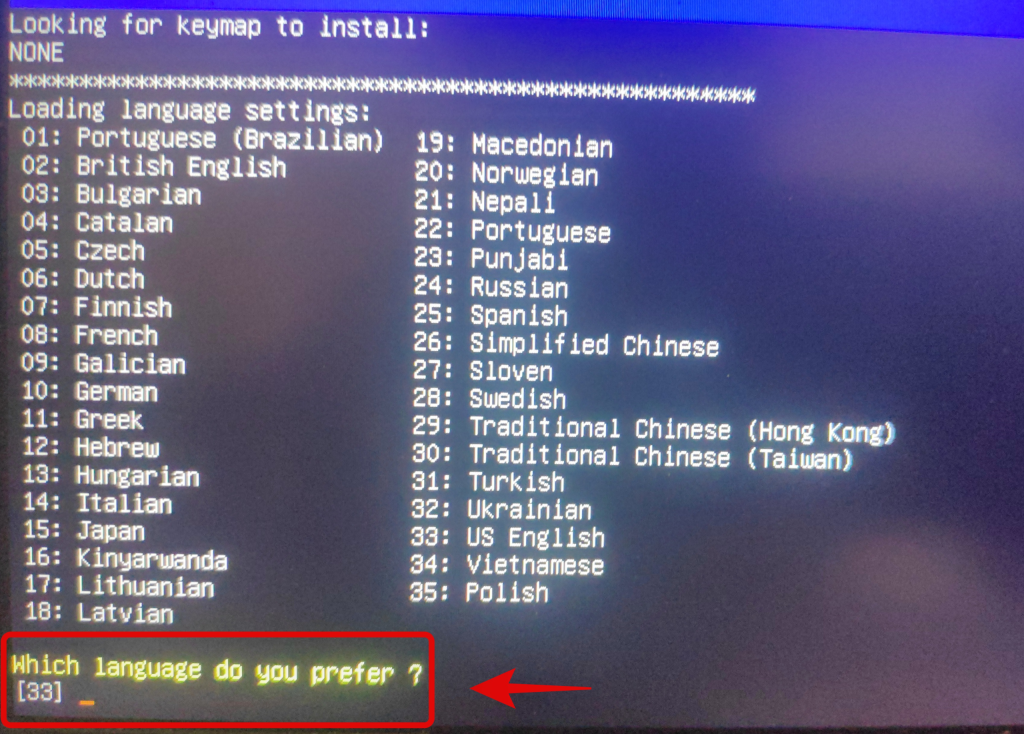
Now go ahead and select your language by entering its corresponding number. Enter ’33’ if you wish to select US English.
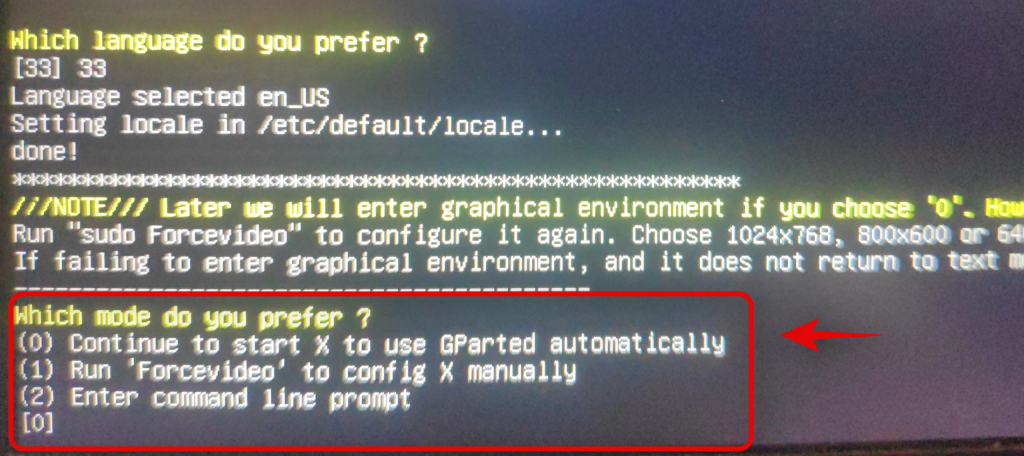
You will now be asked if you wish to load GParted with forced video drivers or the default settings. Force video driver option comes in handy in case GParted is unable to recognize your display or if you are having resolution problems on your system. We recommend you select the first option. Enter ‘0’ to select the option.
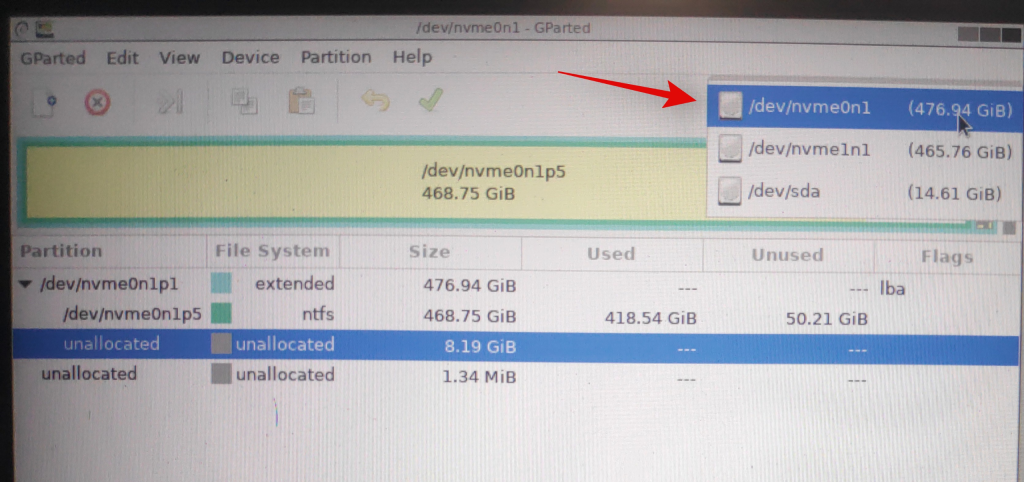
GParted will now be booted and you will be taken to its temporary desktop. The partition manager should automatically launch on your system now. Click on the drop-down menu in the top left and select the desired disk that you wish to format.
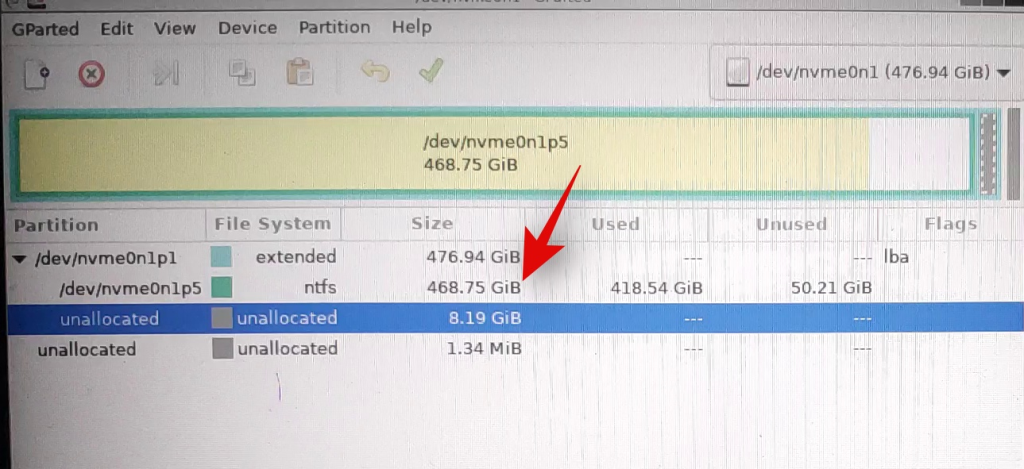
You will now get a list of existing volumes on the selected disk. Click and select the desired volume that you wish to format.
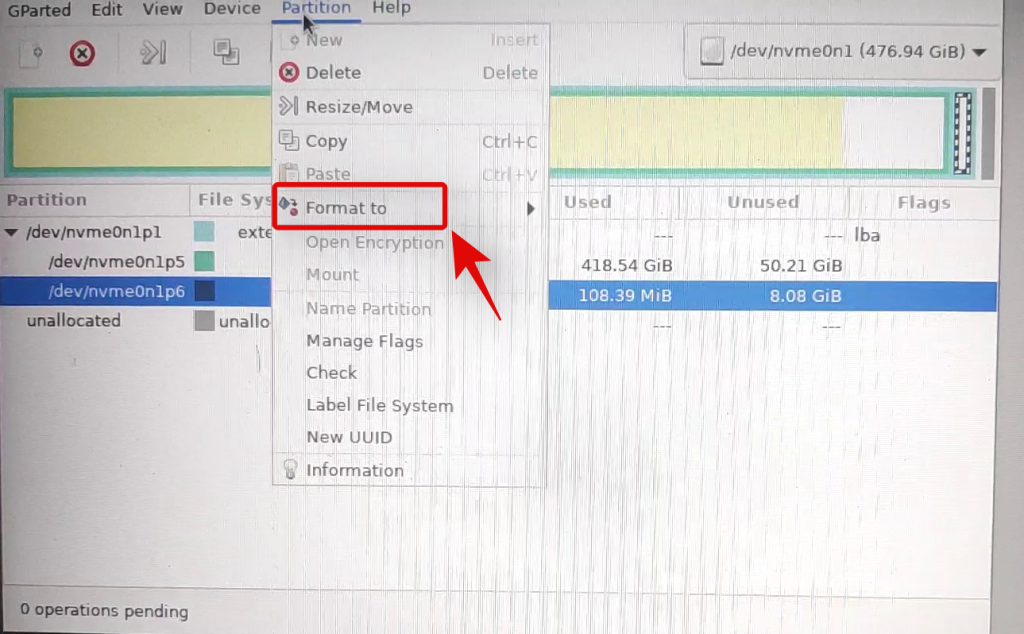
Now click on ‘Partition’ at the top and hover over ‘Format to’.
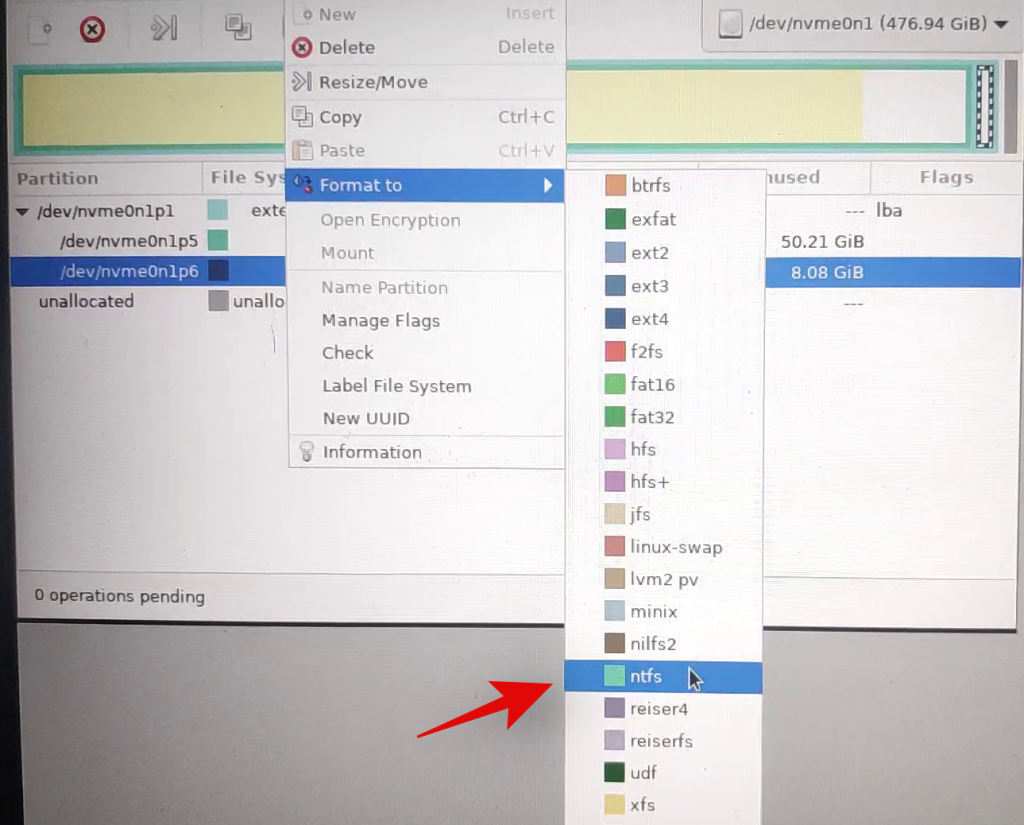
Select your desired drive format but it is recommended that you format your drive in NTFS for all modern systems.
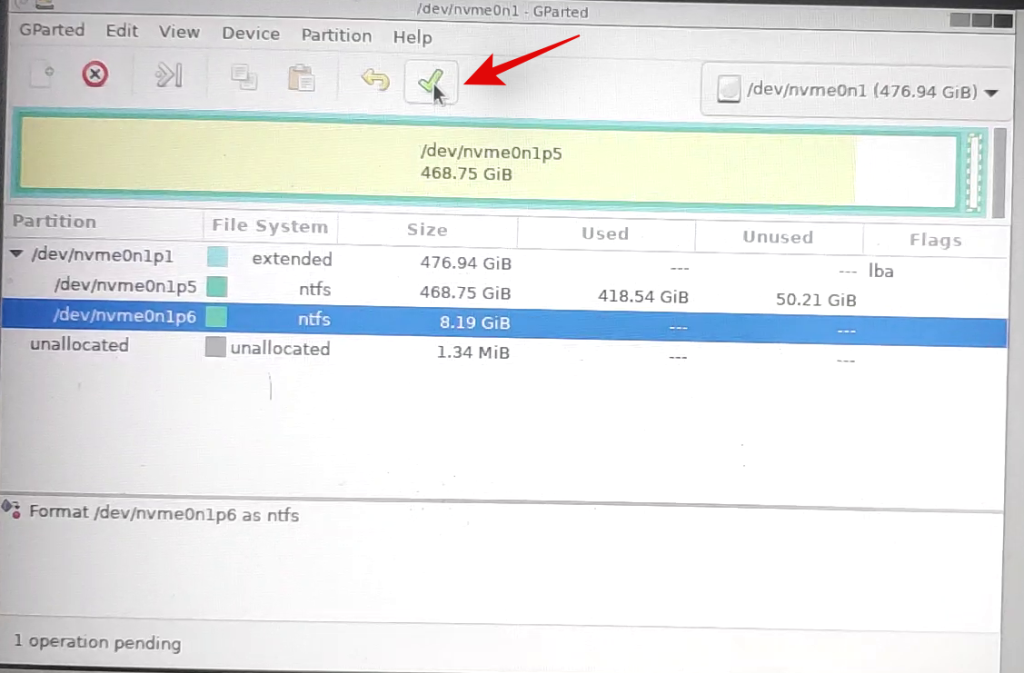
Once you select the desired disk format, GParted will cue the current operation in its task list. Click on the checkmark in the toolbar at the task to execute cued tasks.
Click on ‘Apply’ to confirm your choice.
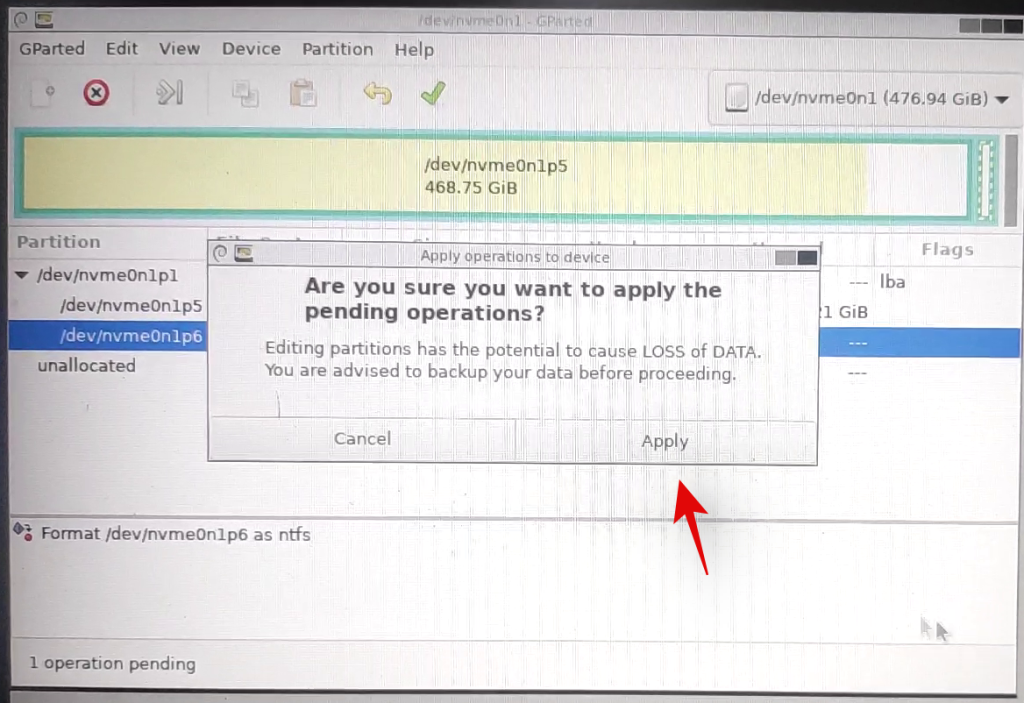
GParted will now perform the necessary operations and the selected volume should be automatically formatted at the end of this process. Close the GParted utility and click on the Power icon on the desktop. Click and select ‘Restart’ and then click on ‘Ok’.
Boot into the BIOS on your system and revert the changes you made earlier. This includes enabling secure boot, changing your storage configuration back to its default settings, and changing your boot device order.
Once you have reverted the changes, unplug your USB and exit the BIOS while saving the changes you made.
You will now be booted into Windows normally and the selected volume should now be formatted and wiped on your system.
Method #7 From Recovery
If you are in Windows Recovery Environment and unable to boot into Windows, then you can use the guide below to format a drive on your system. Please keep in mind that it is not recommended to format your boot drive using the guide below from your recovery environment as this could cause issues with your boot drive and make it unrecognizable. You will then have to completely format the drive and set it up again and install a new version of Windows on it. Hence, use the guide below only to format secondary drives from the Recovery environment or ensure that you have a Windows 11 installation media handy to reinstall the OS that you will remove from your boot drive.
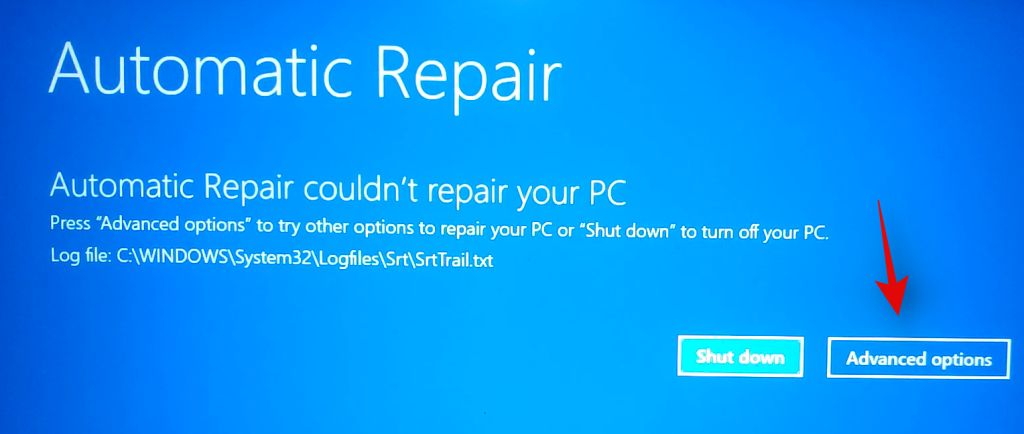
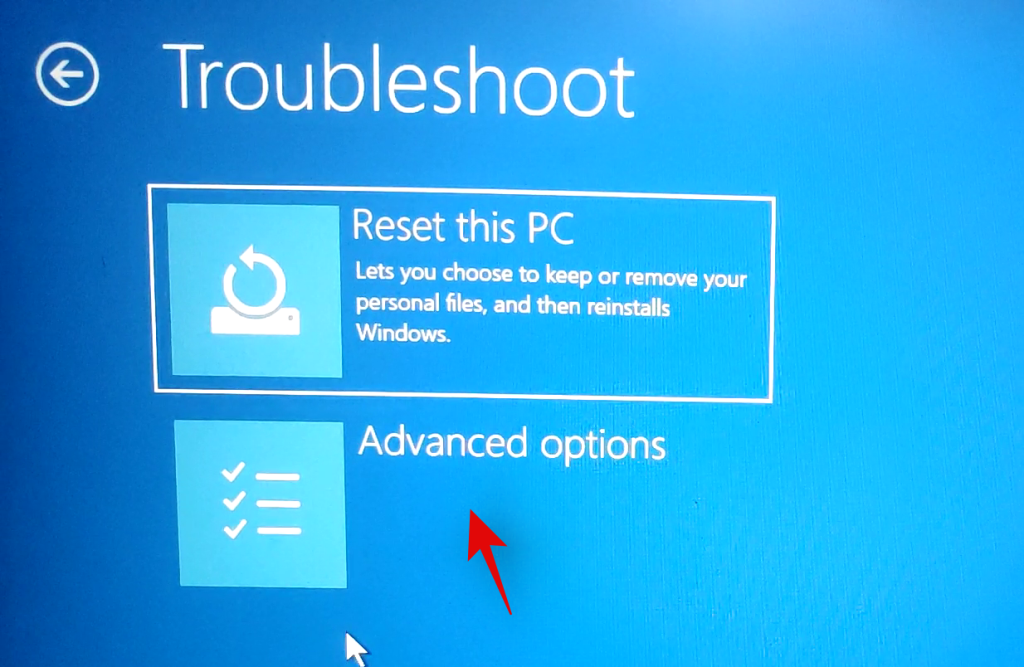
Once you are on the Windows Recovery or troubleshooting screen, click and select ‘Advanced Options’.
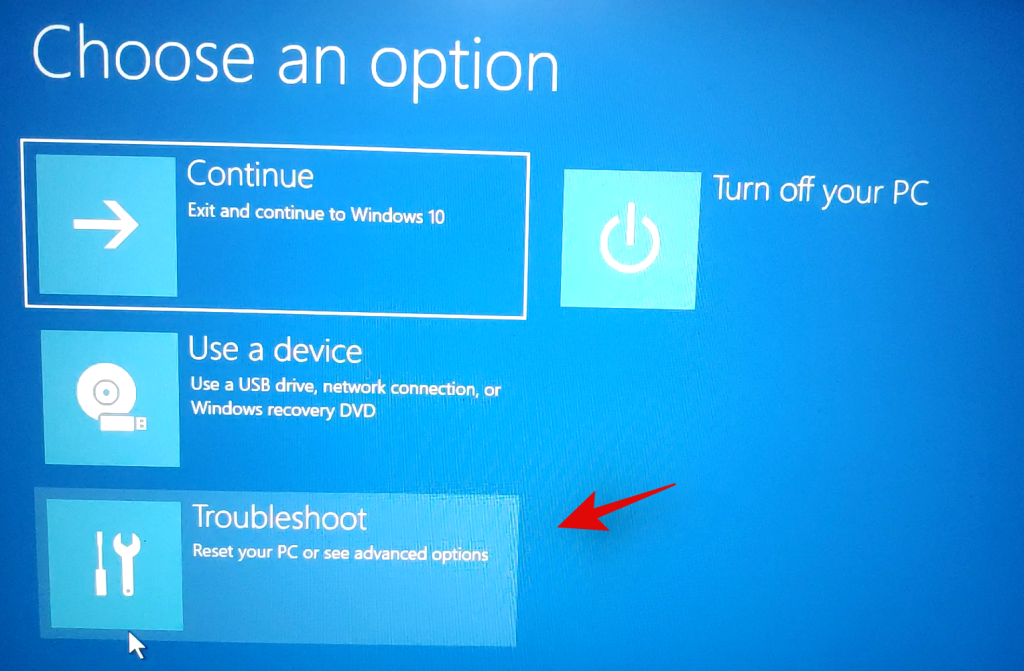
Click on ‘Troubleshoot’.
Select ‘Advanced Options’ again.
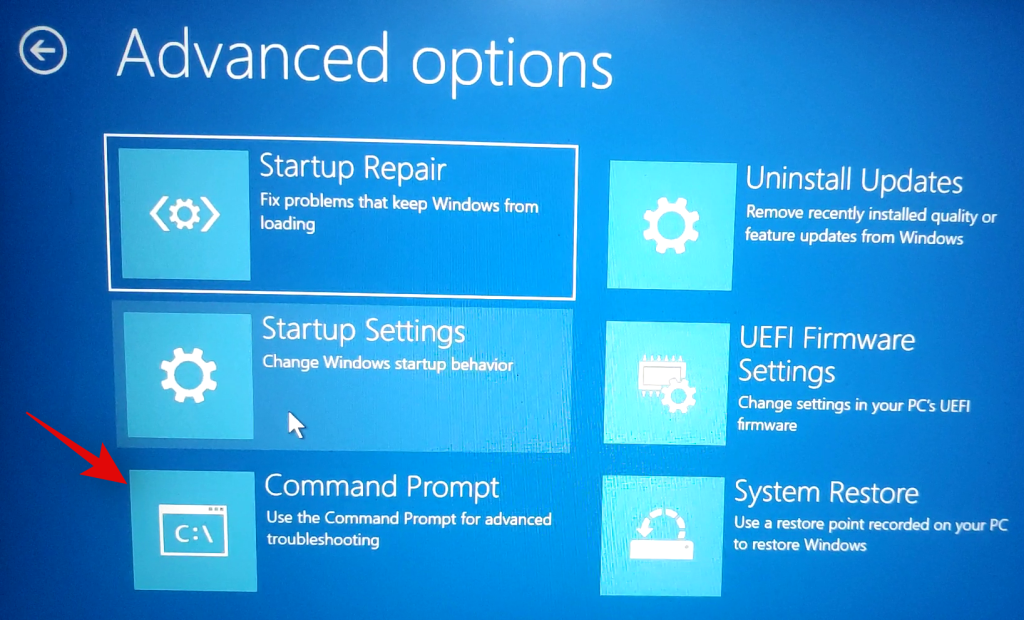
Now click on ‘Command Prompt’ to launch the command prompt.
Type in the following command to launch the diskpart utility.
diskpart
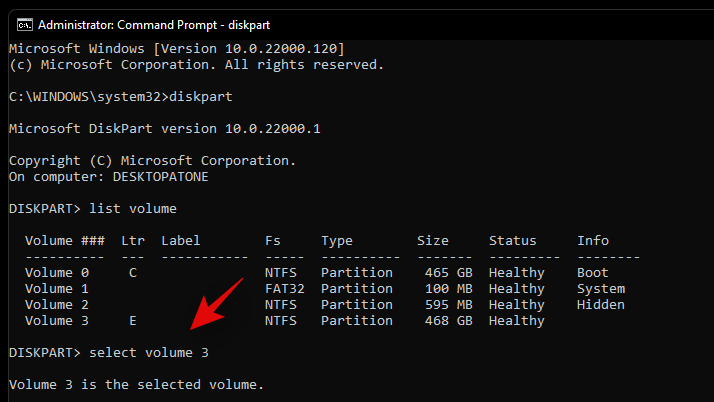
Now execute the following command.
list volume

Find the volume you wish to format and use the command below to select it. Replace X with the dedicated number of the volume you selected.
select volume x
Now use the following command to format the selected volume with NTFS as its format. Replace NAME with the name you wish to give your newly formatted volume.
format fs=ntfs quick label=NAME
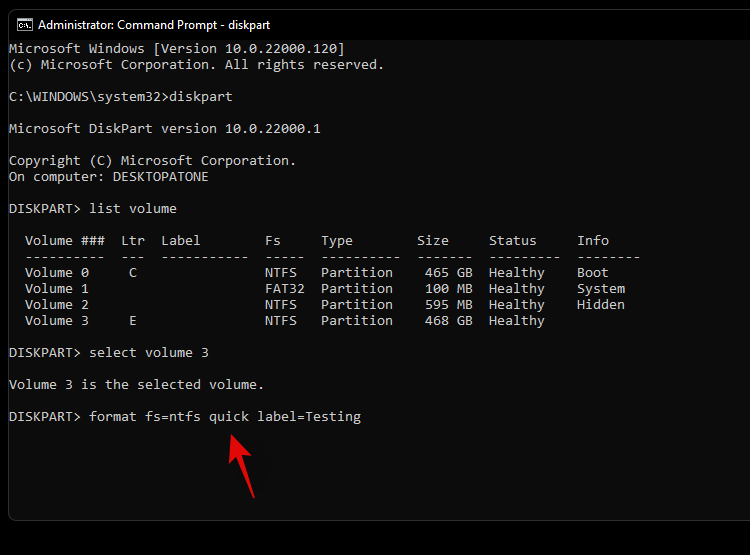
Let diskpart do its thing and the volume should be formatted within a few seconds. Once formatted, type in the following command to exit CMD.
exit
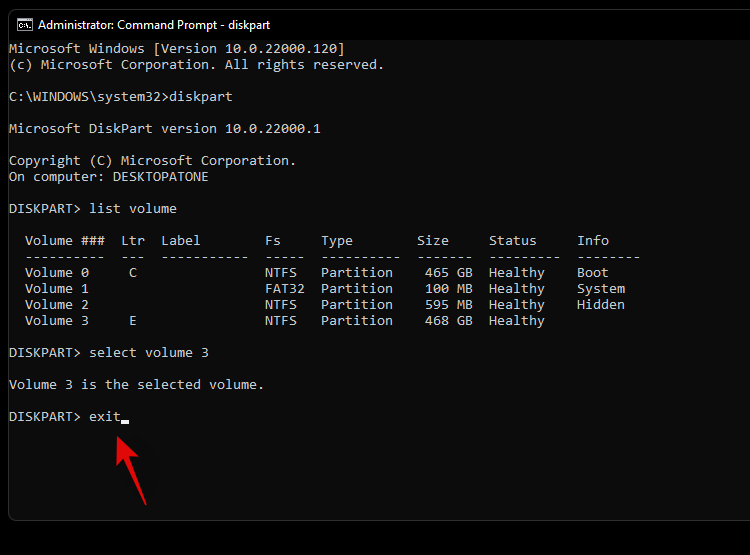
Now restart your PC and the selected volume should be formatted on your system.
Method #8: Using the Windows Setup
You can also format a drive-by directly using the Windows setup as well. Depending on your requirements, you can then exit the setup or continue installing Windows on the freshly formatted drive.
Launch the Windows setup from the installation media when prompted at the time of boot. Once the setup is launched, select your language and click on ‘Next’.
Click on ‘Install Windows’.
Windows Setup will now detect the drives installed on your system. Click and select the drive you wish to format and click on ‘Format drive’ at the bottom.
Confirm your choice and Windows will now proceed to format the selected drive.
And that’s it! Once the drive is formatted, you can continue formatting other drives on your system using the setup or continue with the Windows installation depending on your requirements.
How to completely format a drive on Windows 11 or 10
Completely formatting a drive is a little different from the traditional format methods listed above. While the above-listed methods will delete all your data from the drive, the existing partitions will remain. Additionally, if it is the boot drive that we are talking about then you will also have recovery and EFI partitions on the drive. While this shouldn’t be an issue on your system, they can cause problems when switching systems as the boot order or the recovery media can be recognized incorrectly by the new system.
In such cases, you can wipe all partitions from a drive and completely format it. You can then create new partitions and volumes on the drive depending on the need of the new system that you are switching to. Follow one of the guides below to completely format a drive and remove all partitions and volumes.
Method #1: From a third-party utility
If you wish to completely format your drive using a third-party utility then we recommend using the Gnome Partition Manager. This is an open-source and completely free utility hosted on Sourceforge. You can even compile the binaries on your own in case the privacy is a concern. Follow the guide below to get you started. The Gnome Partition Manager is available in ISO format which allows you to mount it to a removable media and use it individually as well, in case you are looking to completely format your boot drive. Use Rufus to create a USB installation media using the Gnome Partition Manager ISO.
Required
Guide
Make the necessary BIOS changes on your system and plug in the GParted USB into your system. Once plugged in, reboot your device and boot from the USB by pressing a key if prompted.
You will now be at the GParted Splash Screen where you will be requested to select the relevant version of GParted that you wish to use. We recommend you select the first one which is GParted Live with default settings.

Once booted, you will be prompted to change your keymap if needed. If your keyboard seems to be working as intended, select ‘Don’t touch keymap’ or use one of the other options to get keyboard working within Gnome.

Select your preferred language by entering its relevant number. Use number 33 for US English.

Now if you wish to manually install or configure your video output then enter 1 on the next screen. Else if the resolution and video response times seem to be fine for now then enter ‘0’.

GParted will now boot with the dictated settings. Once launched, you will be taken to the temporary desktop where the GParted utility will be launched automatically. Click on the drop-down menu in the top right corner and select the desired disk that you wish to completely format.

Now select a volume on the selected disk and click on ‘Partition’ at the top. Select ‘Format to’ and then select ‘NTFS’.

Repeat the steps above for all the partitions on the disk. Once each partition is cued for formatting, click on the checkmark in your toolbar to execute these tasks.

Confirm your choice by clicking on ‘Apply’.
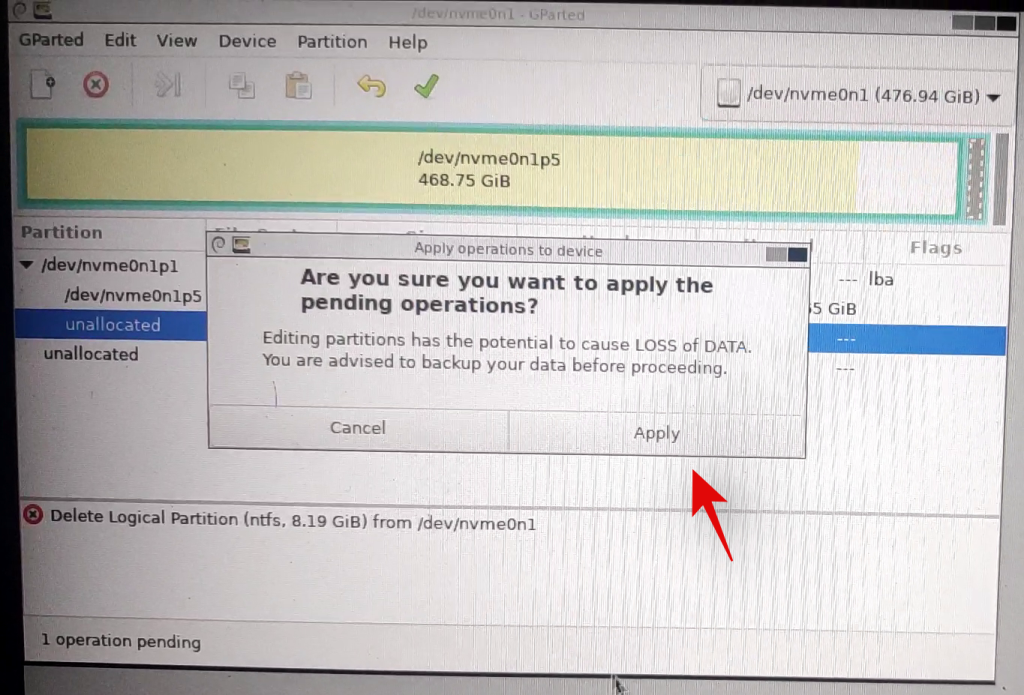
All the selected partitions will now be formatted. We can now delete these partitions. Click and select each partition one by one and then click on the X in your toolbar. This will cue each partition for deletion.
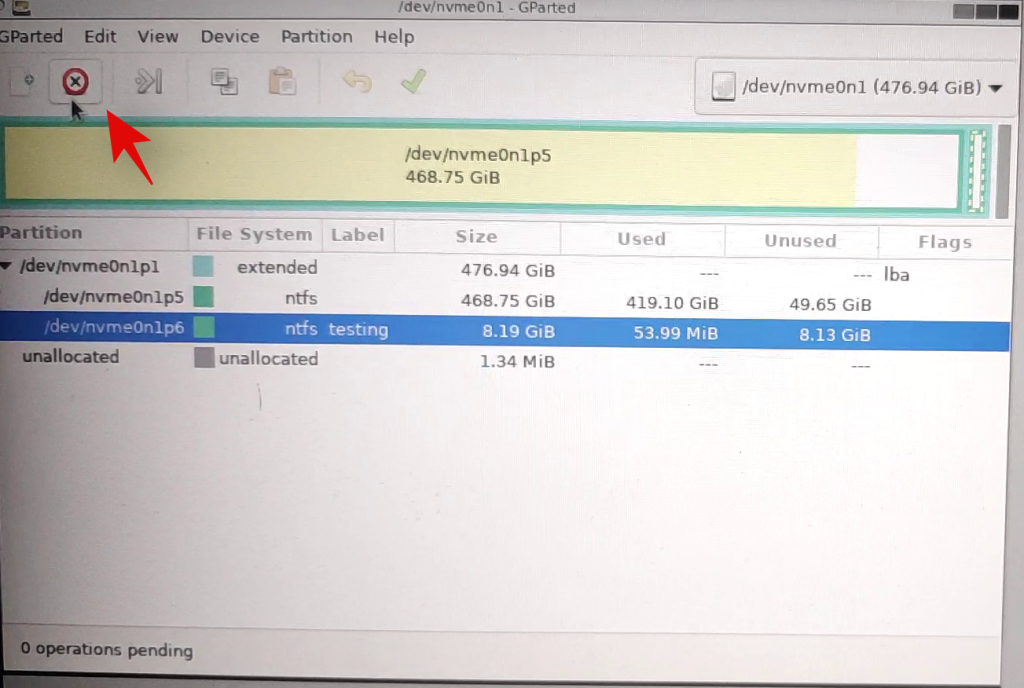
Click on the checkmark again to delete all the selected partitions.
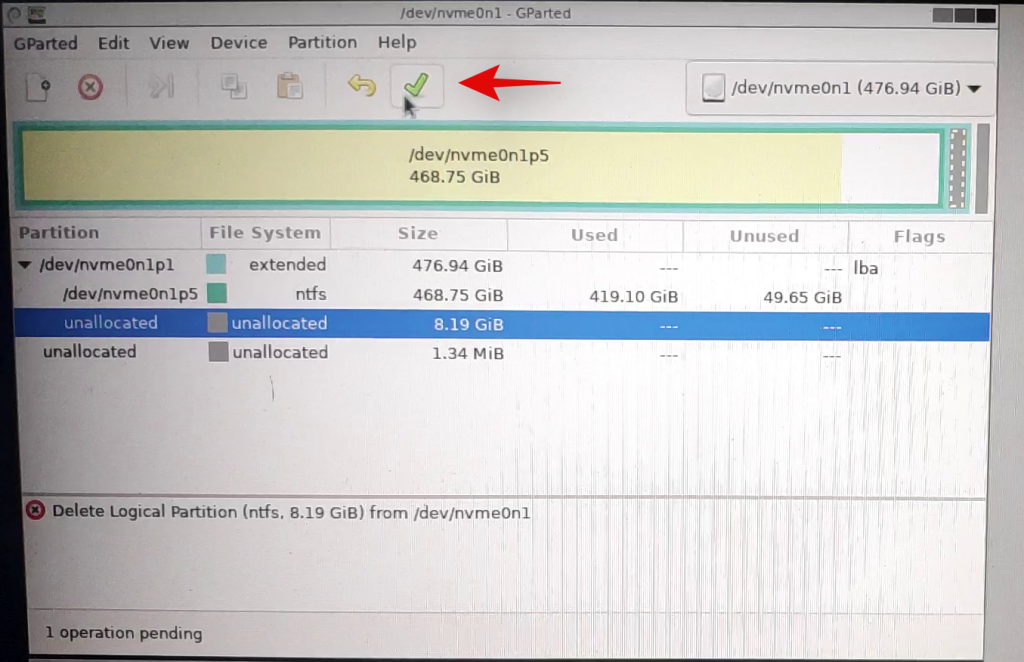
Confirm your choice by clicking on ‘Apply’.

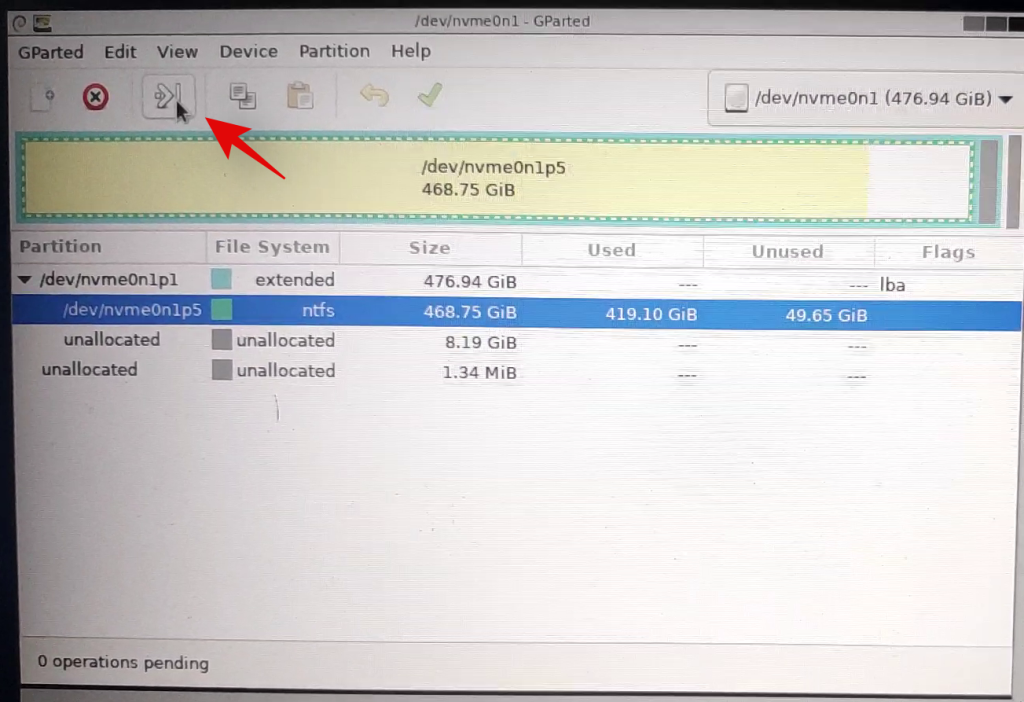
Once all partitions are deleted from the disk, click and select the unallocated volume on the disk and then click on ‘New’ at the top. If you have an existing primary partition on the disk then select that partition and click on the ‘Resize’ icon instead.
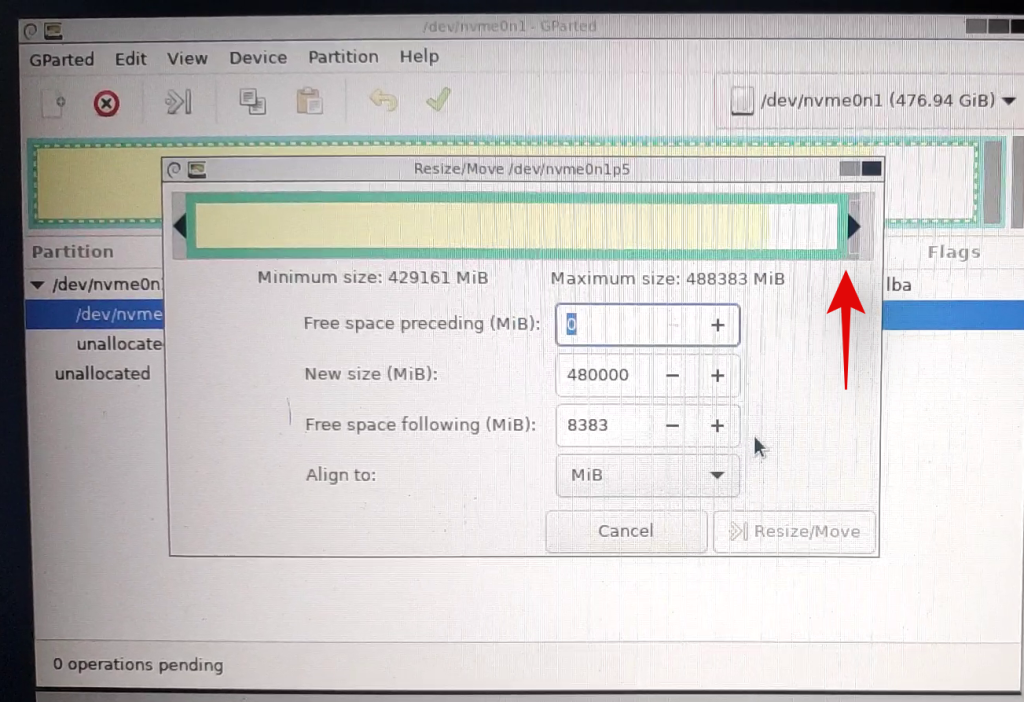
Select the entire size of your disk and enter a name for your disk beside the label text field. If resizing an existing partition, use the slider at the top to drag it to the maximum size.
Click on ‘Ok’ or ‘Resize/Move’ depending on your choice.
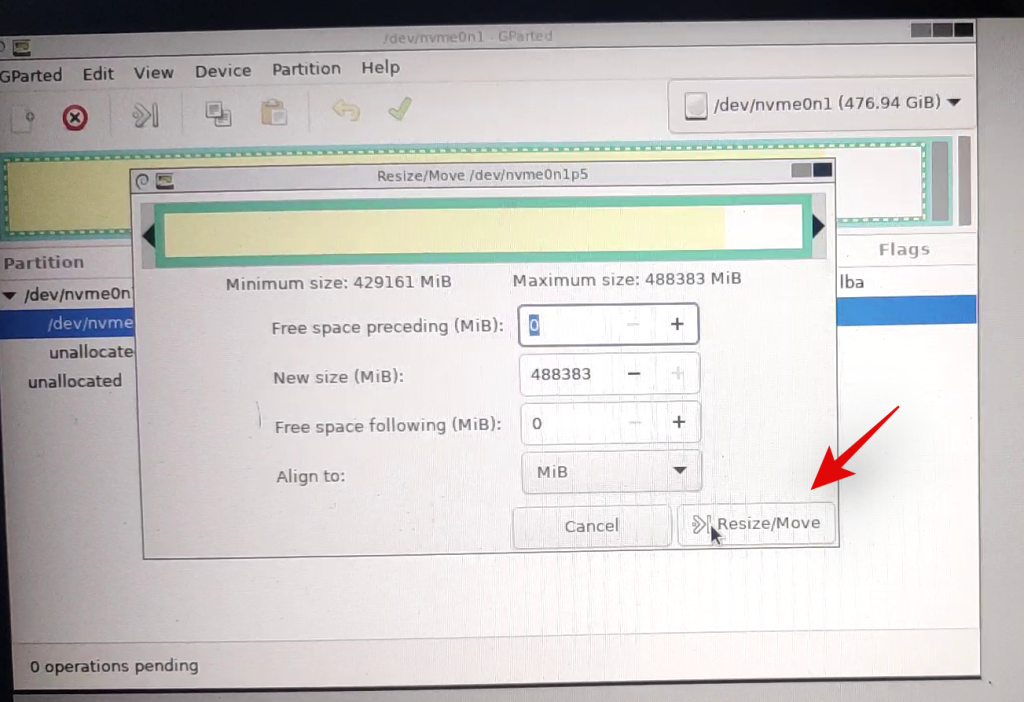
And that’s it! Your entire drive should now be formatted and a single partition equal to the entire size of your drive should now be created which will allow you to use the drive, however, you wish. You can now exit GParted by clicking on the power icon on the desktop. Once rebooting, boot into your BIOS and revert the changes you made earlier. Once reverted, unplug the USB and boot into Windows normally.
Method #2: From CMD
Diskpart is a hugely versatile utility that can be used to completely format a drive as well. Once completely formatted via diskpart, you will need to set your disk as GPT or MBR depending on your platform needs for the drive to be recognized properly.
Launch CMD using one of the guides above depending on the current state of your system. Once CMD is launched, enter the command below to launch diskpart.
diskpart

Now enter the following command and find the disk you wish to completely format.
list disk

Note down the concerned disk’s number and use the command below to select it. Replace N with the disk number you noted down earlier.
select disk N
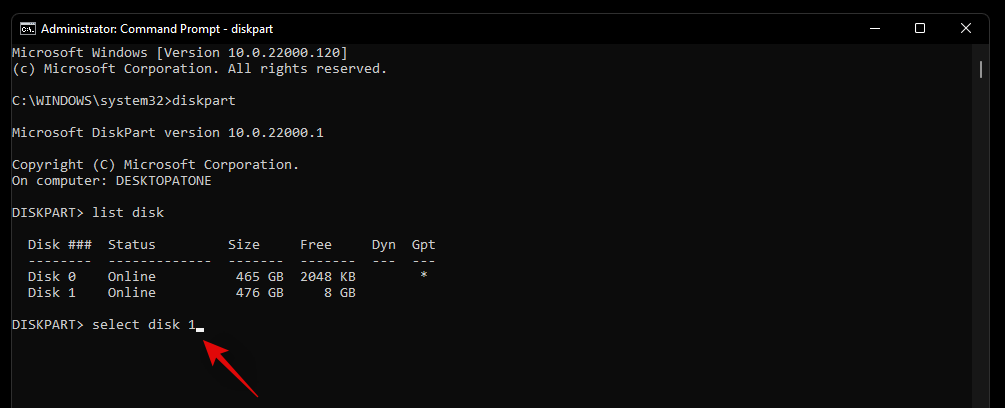
Now enter the command below to clean your disk.
clean
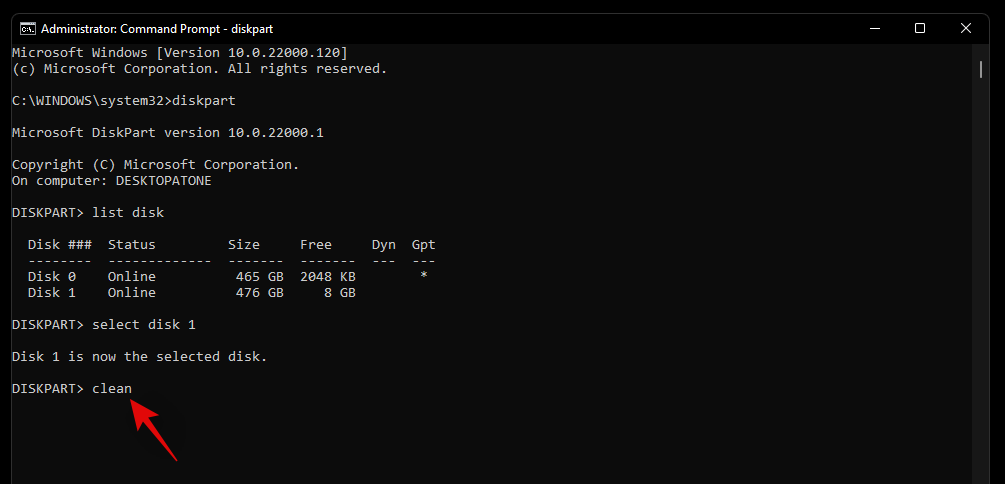
We will now need to create a partition on the selected disk so that it is usable. Enter the command below to get started.
create partition primary
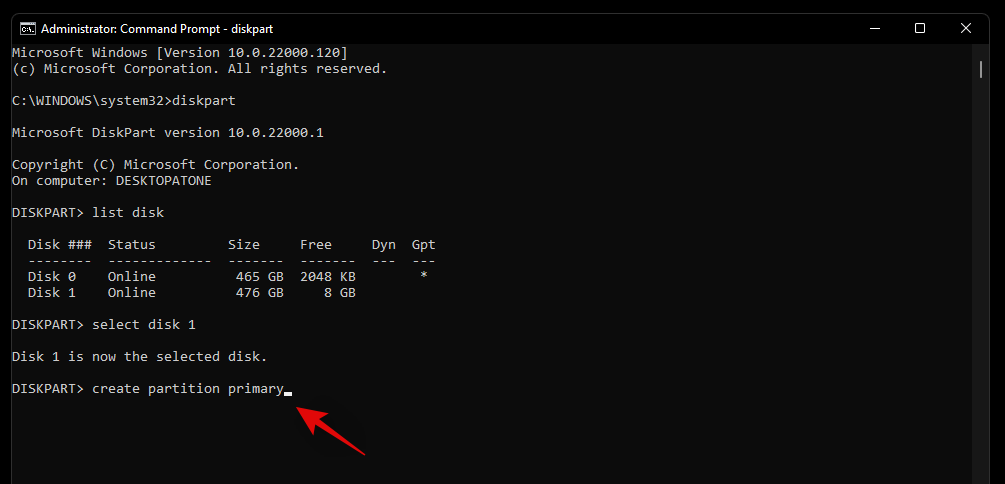
Use the command below to format the newly created volume now.
format fs=ntfs
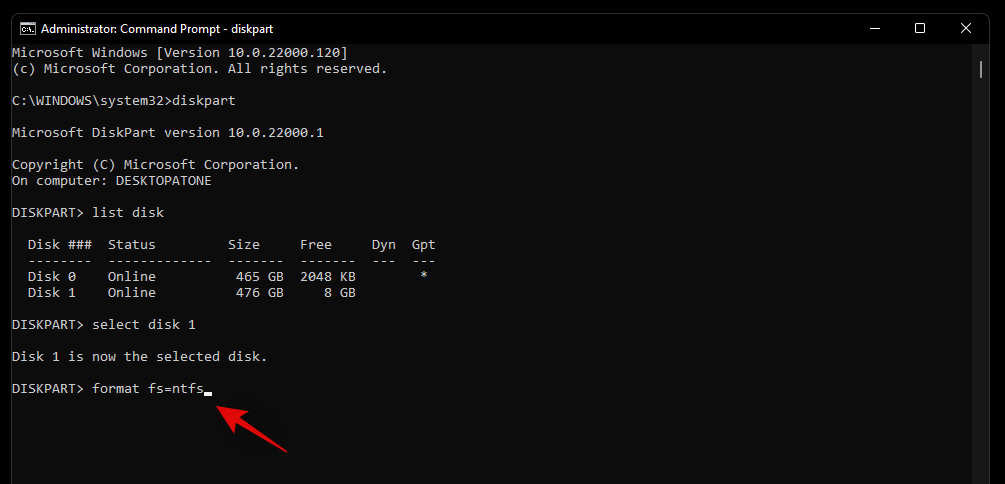
Enter the following command to assign a letter to the drive. Replace X with the letter of your choice.
assign letter=X
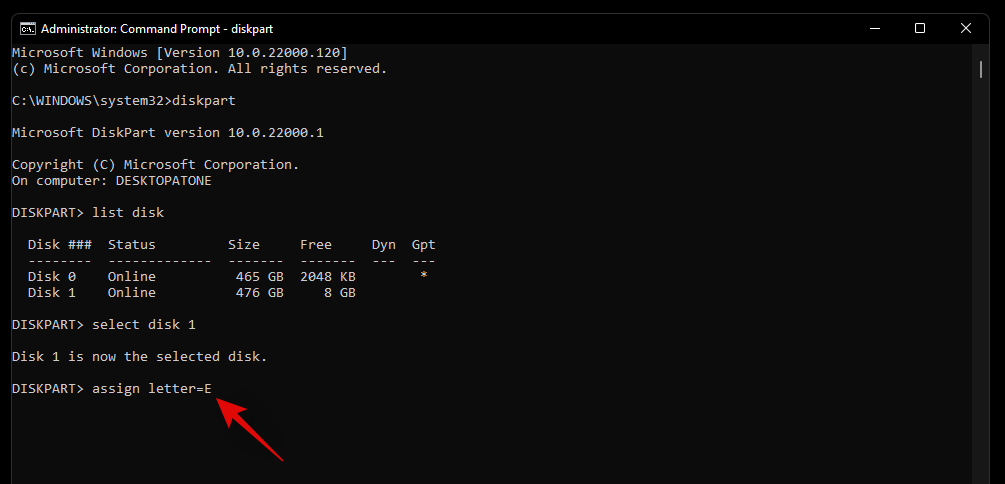
And that’s it! The selected drive should now be completely formatted. Any recovery or EFI partitions on the drive should also now be deleted.
How to switch between MBR and GPT
MBR and GPT are types of disk setups that are used to install new OS on a drive. These types are essential in case you are trying to switch between platforms or use Linux on yoru system. While GPT is a new disk setup with various advantages, MBR is still the most compatible setup format out there. If you are trying to switch your disk setup from MBR to GPT or vice versa then you can use the guide below to change the disk type.
Note: When converting, your disk will be cleaned and all the data will be removed from it. You will need to create new partitions on the drive as well so ensure that you have backed up your data before proceeding with the guide below.
Launch CMD on your system either from the recovery environment or from within Windows depending on the current state of your system. Once launched enter the command below to launch the diskpart utility.
diskpart

Now enter the following command to get a list of all the disks on your system. Note down the number for the concerned list so that you can access it later on.
list disk
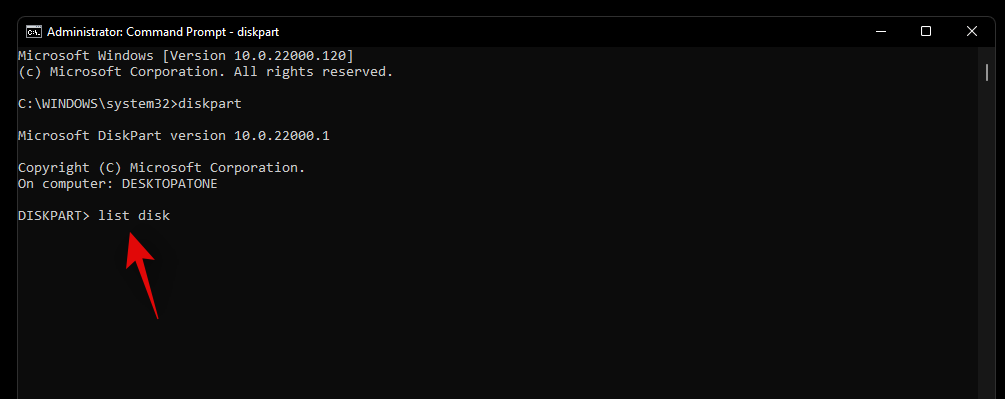
Enter the following command and replace N with the disk number you noted down earlier.
select disk N
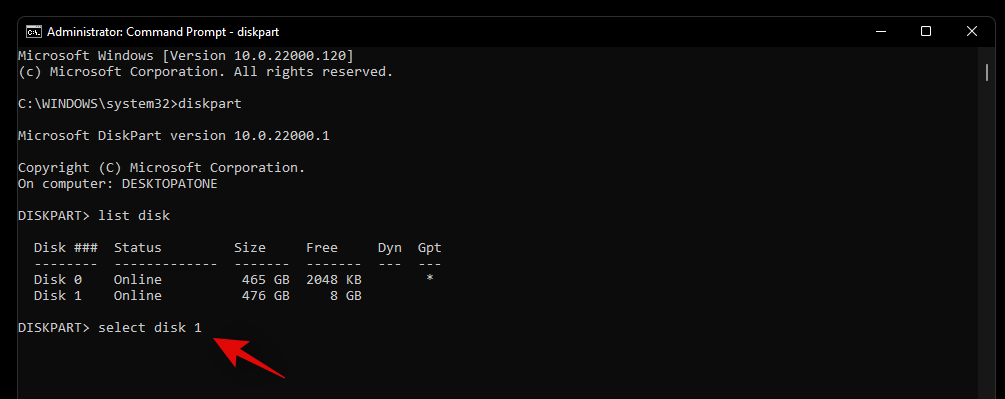
Use the command below to clean the drive.
clean
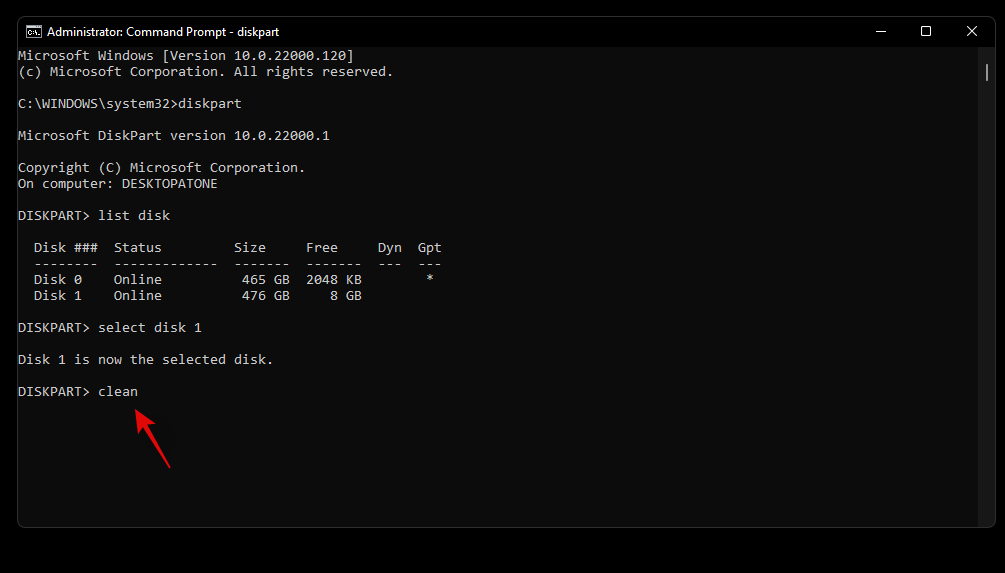
Now let’s convert the drive to your desired disk type. Replace TYPE with MBR or GPT depending on your current requirements.
convert TYPE
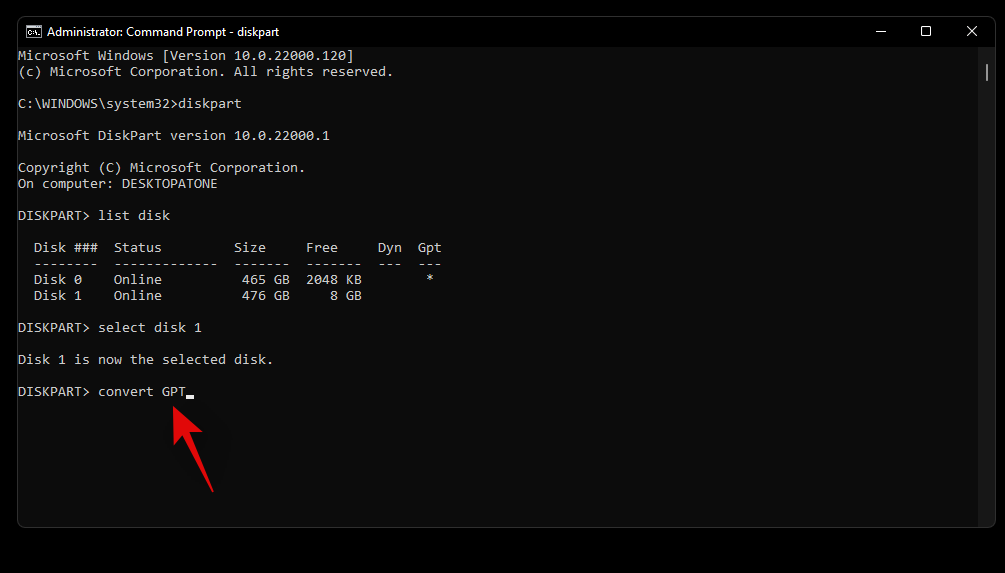
Once the disk has been converted, use the command below to create a primary partition.
create partition primary
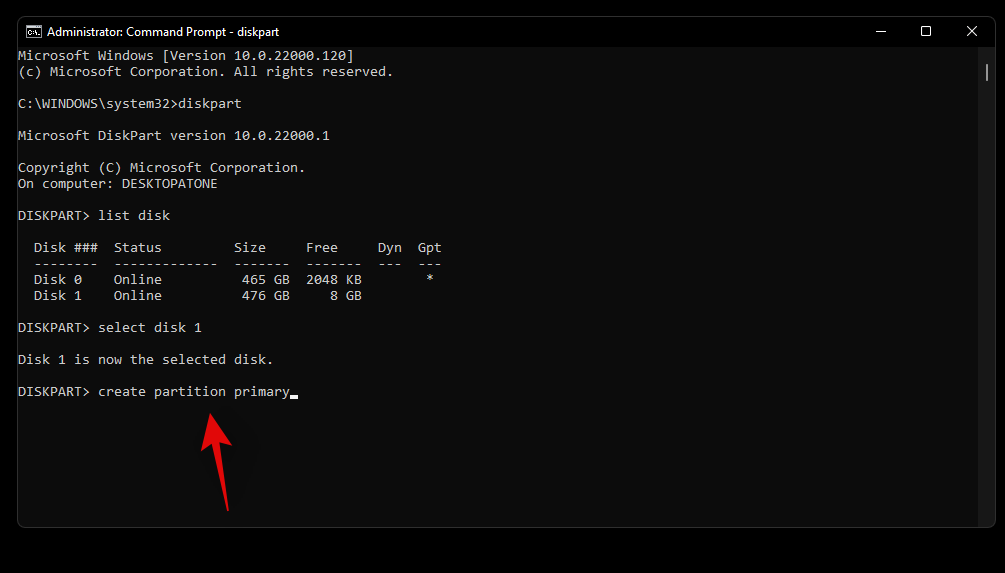
Now use the command below to assign a letter to the drive. Replace X with the drive letter of your choice.
assign letter=X
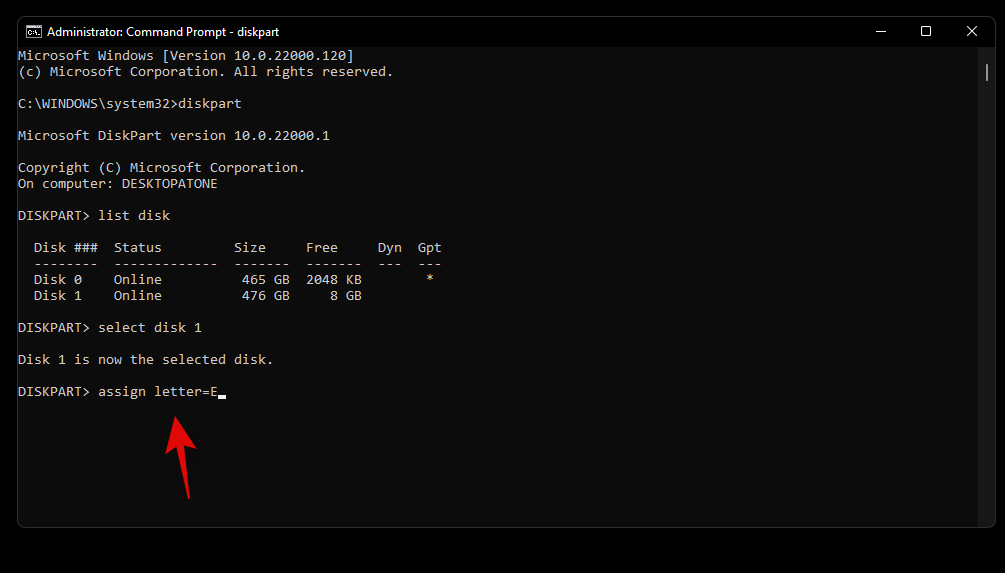
And that’s it! You will now have converted the selected drive to GPT or MBR depending on your current requirements.
How to create new volumes and partitions
Once you have formatted your drives you will find that it is not that easy to use them within Windows. Formatted drives need dedicated partitions which can then be used as storage spaces to store your data or install an OS. Use the guide below to create custom partitions for a selected drive in Windows 11.
Method #1: From CMD
Launch CMD and use the command below to enter diskpart.
diskpart
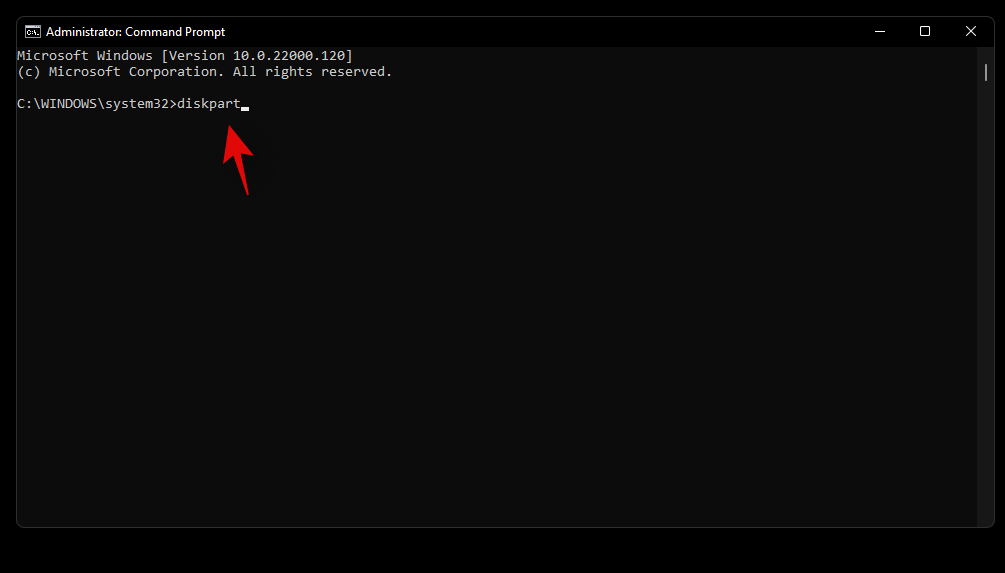
Enter the following command to get a list of all the disks installed on your system. Note down the disk number of the concerned disk.
list disk
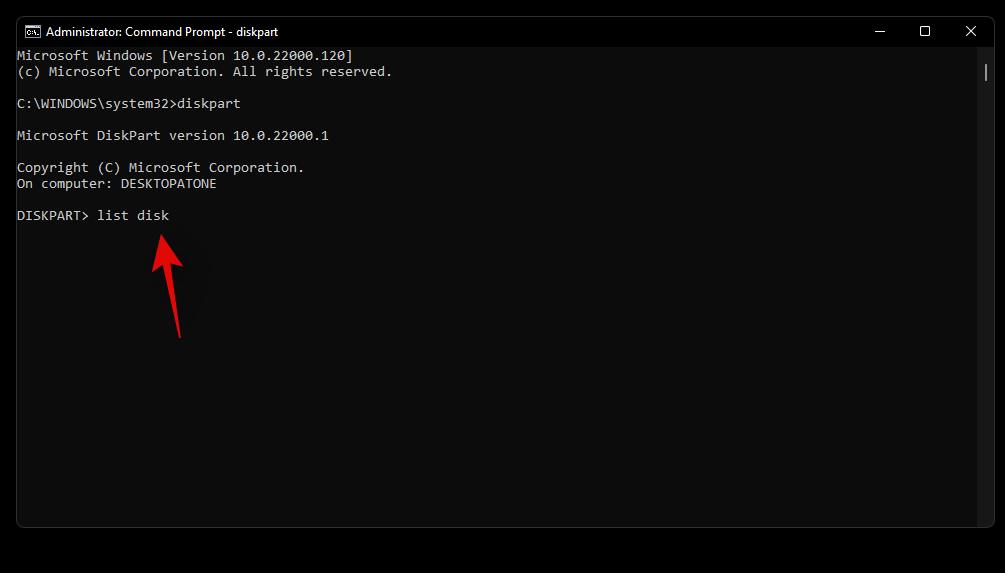
Now enter the command below and replace N with the disk number you noted down earlier.
select disk N
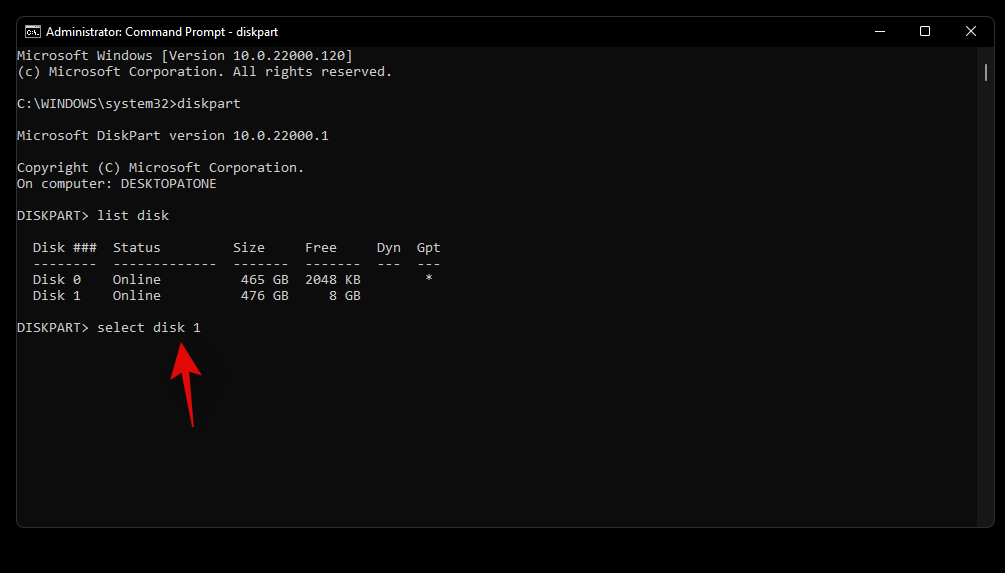
Use the command below to create a custom partition on the selected disk drive. If a partition already exists on the drive then replace ‘primary’ with ‘extended’. Additionally, replace XXXX with the size of your choice for the partition. The size is measured in megabytes where 1000MB = 1GB.
create partition primary size=SIZE
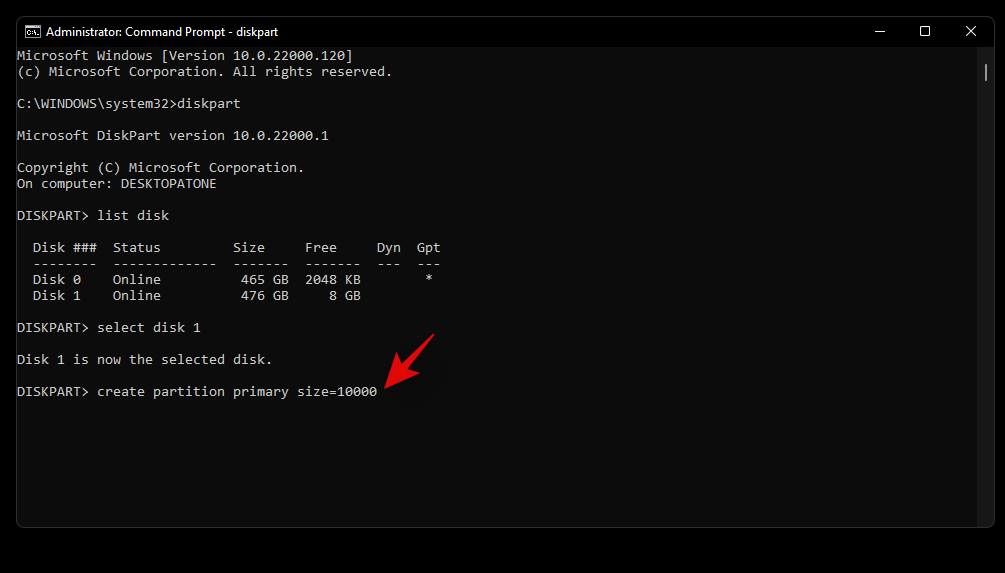
Now enter the following command. Your newly created partition will now show up in this list. Note down its volume number
list volume
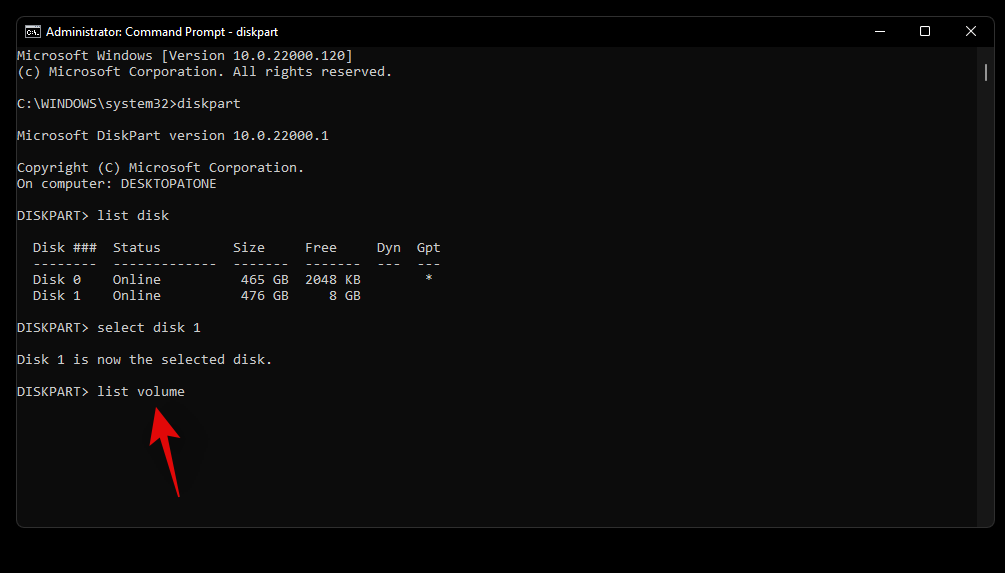
Enter the following command and replace N with the volume number you noted down earlier.
select volume N

Now use the following command to assign a letter to the selected volume. Replace X with the letter of your choice.
assign letter=X
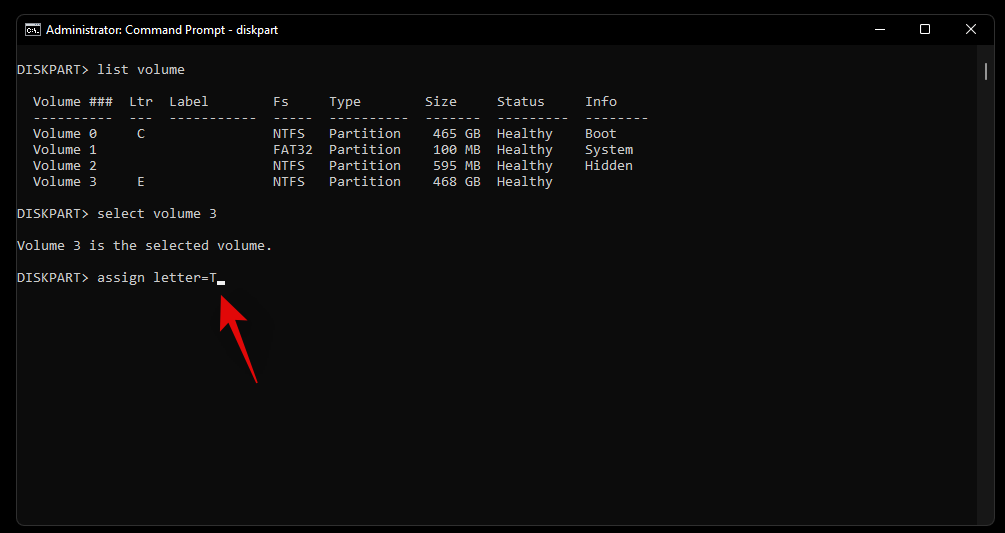
And that’s it! You will now have created a new partition on the selected drive depending on your current needs and requirements.
Method #2: From Disk Management
You can also create a new partition son your system using the Disk Management utility provided within Windows. Use the guide below to get you started.
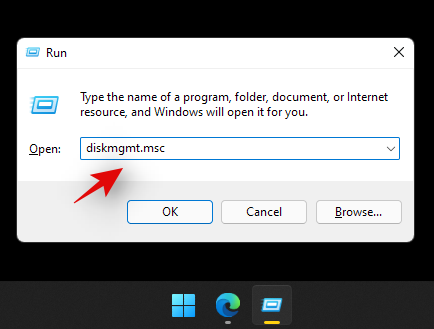
Press Windows + R on your keyboard and type in the following. Press Enter on your keyboard to launch the disk management utility.
diskmgmt.msc
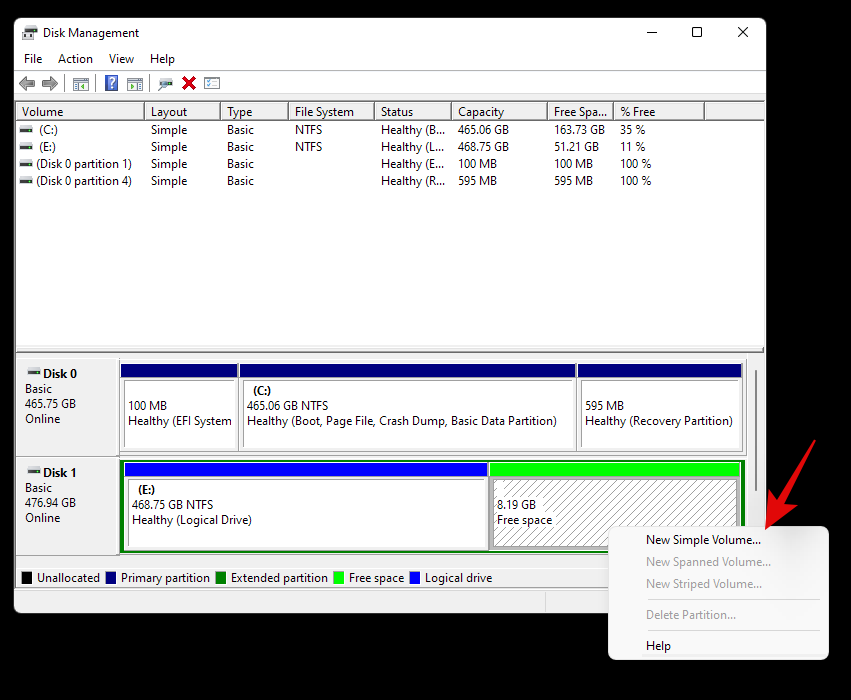
Once the disk management utility is launched, you will get a graphical representation for all your drives. Right-click on the unallocated space at the bottom of your screen and click on ‘New Simple Volume’.
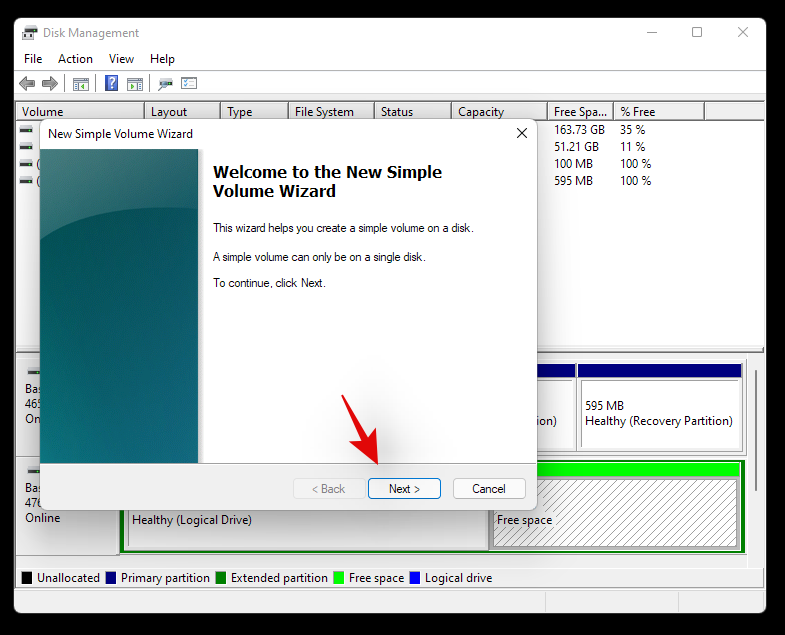
The volume creation wizard will now be launched. Click on ‘Next’ to get started.
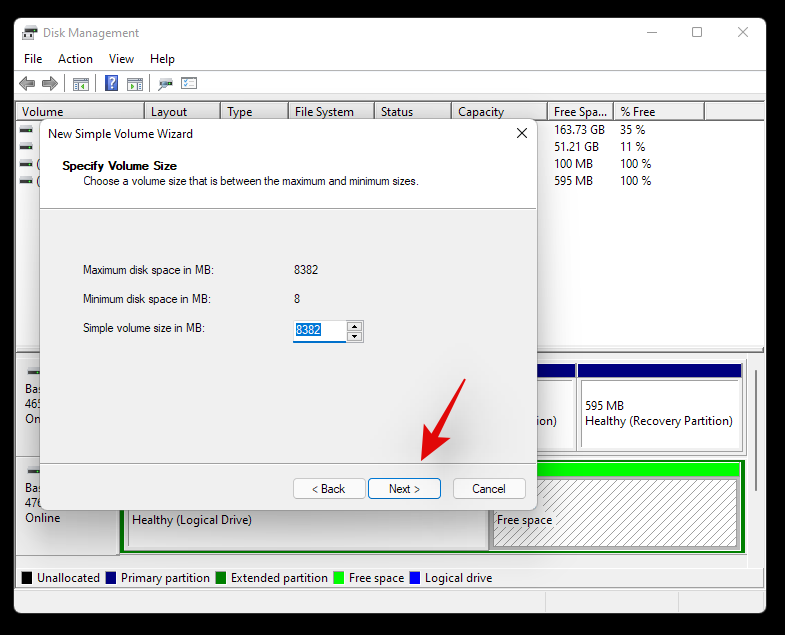
Select a custom size if needed. By default, Windows will use the entire unallocated space to create a new simple volume on your drive. Click on ‘Next’ once you have set the desired size.
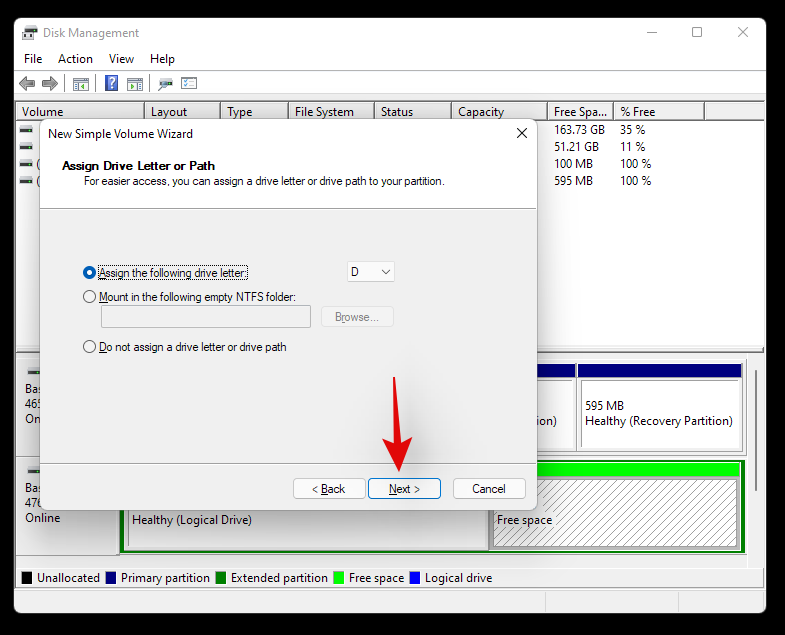
Choose a drive letter for your new volume now. Click on ‘Next’ once you are done.
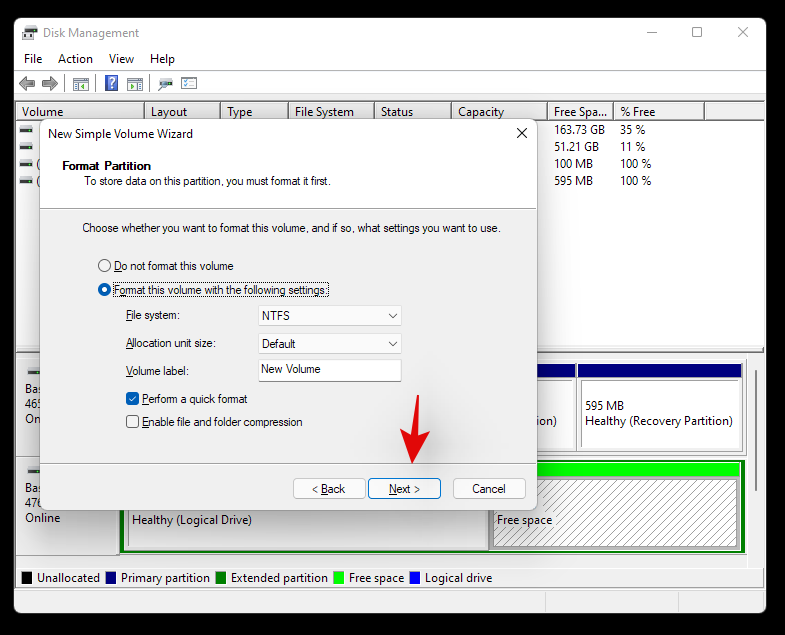
You will now be given the option to format the unallocated space before the volume is created. Choose your disk format by clicking on the drop-down menu and set a name for the new volume beside Volume Label. If you do not wish to format the unallocated space, then click and select ‘Do not format this volume’. Click on ‘Next once you are done.
Finally, click on ‘Finish’ and the new volume will now start being created.
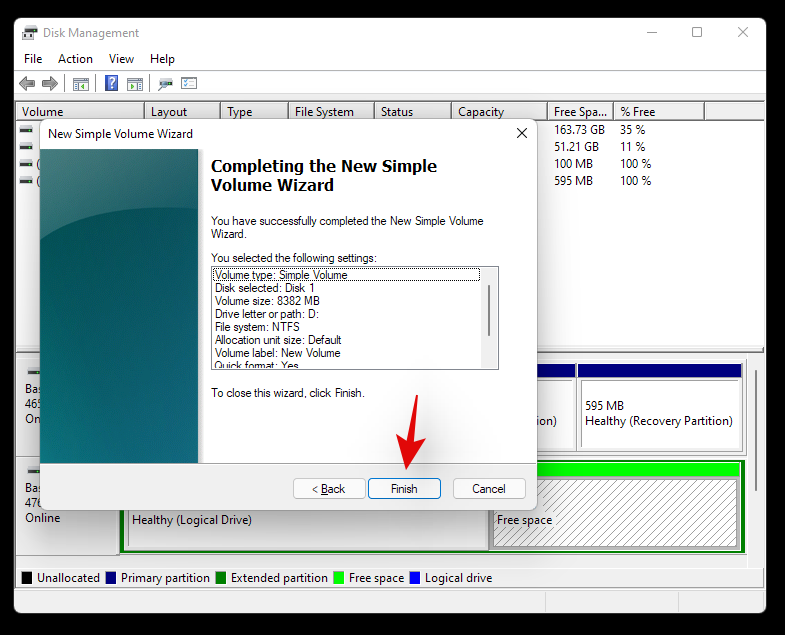
And that’s it! A new volume should now be created on the selected drive.
We hope this guide helped you easily format or wipe your drive in Windows 11 depending on your current needs and requirements. If you face any issues or have any questions for us, feel free to reach out to us using the comments section below.
Related:
V tomto článku vám ukážeme, ako znovu získať prístup k pevnému disku, keď zlyhá. Poďme na to!
Ak inovujete na nový počítač, je pravdepodobné, že sa pokúšate znova použiť pevný disk zo starého počítača. Ak nie, možno ho plánujete darovať členovi rodiny alebo priateľovi. Ale pred vami…
Zistite, ako bez námahy povoliť šifrovanie BitLocker vo Windowse 11. Ochráňte svoje súbory pomocou tohto komplexného sprievodcu vrátane predpokladov, krokov a osvedčených postupov pre maximálnu bezpečnosť údajov.
Ponorte sa do nášho podrobného návodu, ako používať video editor Clipchamp pre Windows 11. Vytvárajte profesionálne videá bez námahy s tipmi, trikmi a najnovšími funkciami pre začiatočníkov aj profesionálov.
Máte problémy s chybou „Súbor VCRUNTIME140.dll sa nenašiel vo Windowse 11“? Objavte overené podrobné riešenia, ktoré vám pomôžu rýchlo ju opraviť a znova zabezpečiť bezproblémový chod vašich aplikácií. Nie sú potrebné žiadne technické znalosti!
Máte problémy s chybami Cortany a Copilota s umelou inteligenciou v systéme Windows 11? Objavte overené opravy na vyriešenie problémov s pádmi, nereagovaním a integráciou. Vráťte svojich asistentov s umelou inteligenciou do starých koľají bez námahy.
Máte problémy s chybou „SSID sa nenašlo“ v systéme Windows 11 pri pripájaní k skrytej sieti Wi-Fi? Táto podrobná príručka ponúka overené riešenia, ktoré vám pomôžu rýchlo a bezpečne sa vrátiť do online režimu. Objavte jednoduché tipy na riešenie problémov pre bezproblémové pripojenie.
Zistite, ako využiť najnovšie funkcie prístupnosti systému Windows 11 v roku 2026, aby bola práca s počítačom jednoduchšia a inkluzívnejšia. Podrobné návody pre vizuálne, sluchové, mobilné a kognitívne pomôcky, ktoré posilnia všetkých používateľov.
Máte problémy s pomalým PyCharm a IntelliJ vo Windowse 11? Objavte overené opravy, ktoré zrýchlia vaše IDE, optimalizujú výkon a obnovia vašu produktivitu. Podrobné riešenia pre vývojárov.
Trápi vás frustrujúca chyba klikania pevného disku vo Windowse 11? Objavte overené, podrobné opravy, ktoré obnoví plynulý výkon a zabráni strate údajov. Dostaňte svoj počítač späť do správnych koľají ešte dnes!
Zistite, ako používať funkciu Storage Sense vo Windowse 11 na automatické uvoľnenie miesta na disku. Podrobný návod na optimalizáciu úložiska, odstránenie dočasných súborov a zabezpečenie plynulého chodu počítača. Základné tipy pre začiatočníkov.
Zistite, ako bezpečne nastaviť zálohu registra systému Windows 11 pomocou podrobných pokynov. Chráňte nastavenia systému bez námahy a vyhnite sa bežným nástrahám, aby ste mali bezpečný počítač.

