Mašīnu pieaugums: AI reālās pasaules lietojumi
Mākslīgais intelekts nav nākotnē, tas ir šeit, tagadnē. Šajā emuārā lasiet, kā mākslīgā intelekta lietojumprogrammas ir ietekmējušas dažādas nozares.
AirSonic is a free and open source media streaming server. In this tutorial, I will guide you through the process of deploying an AirSonic server instance from scratch on a CentOS 7 server instance.
203.0.113.1.airsonic.example.com being pointed to the server instance mentioned above.In order to get better system performance, it's recommended to create a 2GB (2048M) swap file on a machine with 2GB of memory:
sudo dd if=/dev/zero of=/swapfile count=2048 bs=1M
sudo chmod 600 /swapfile
sudo mkswap /swapfile
sudo swapon /swapfile
echo '/swapfile   none    swap    sw    0   0' | sudo tee -a /etc/fstab
free -m
Note: If you are using a different server size, the suitable size of the swap partition may vary.
Properly setting up a hostname and an FQDN for the machine is required for enabling HTTPS security with a Let's Encrypt SSL certificate.
The following commands will setup a hostname airsonic and an FQDN airsonic.example.com for the machine:
sudo hostnamectl set-hostname airsonic
cat <<EOF | sudo tee /etc/hosts
127.0.0.1   localhost localhost.localdomain localhost4 localhost4.localdomain4
::1         localhost localhost.localdomain localhost6 localhost6.localdomain6
203.0.113.1 airsonic.example.com airsonic
127.0.0.1 airsonic
::1       airsonic
EOF
The results can be confirmed with the following:
hostname
hostname -f
Remove CentOS 7's default block on ports 80 (HTTP) and 443 (HTTPS):
sudo firewall-cmd --permanent --add-service=http
sudo firewall-cmd --permanent --add-service=https
sudo systemctl reload firewalld.service
Install the EPEL YUM repo and then update the system:
sudo yum install -y epel-release
sudo yum -y update && sudo shutdown -r now
After the system reboots, log back in as the same sudo user to move on.
Install OpenJDK JRE 8 and then confirm the result on CentOS 7:
sudo yum install -y java-1.8.0-openjdk.x86_64
java -version
The output of the second command will be similar to the following:
openjdk version "1.8.0_171"
OpenJDK Runtime Environment (build 1.8.0_171-8u171-b11-0ubuntu0.18.04.1-b11)
OpenJDK 64-Bit Server VM (build 25.171-b11, mixed mode)
In addition, you need to setup the JAVA_HOME environment variable as follows:
echo "JAVA_HOME=$(readlink -f /usr/bin/java | sed "s:bin/java::")" | sudo tee -a /etc/profile
source /etc/profile
AirSonic can be deployed using various methods. In this tutorial, we will install AirSonic using the AirSonic WAR package.
Create a dedicated user and a dedicated group, both named airsonic:
sudo groupadd airsonic
sudo mkdir /var/airsonic
sudo useradd -s /bin/nologin -g airsonic -d /var/airsonic -M airsonic
Download the latest AirSonic WAR package:
cd /var/airsonic
sudo wget https://github.com/airsonic/airsonic/releases/download/v10.1.2/airsonic.war
sudo chown -R airsonic:airsonic /var/airsonic
Download the predefined AirSonic systemd unit files and then start the AirSonic service:
sudo wget https://raw.githubusercontent.com/airsonic/airsonic/master/contrib/airsonic.service -O /etc/systemd/system/airsonic.service
sudo wget https://raw.githubusercontent.com/airsonic/airsonic/master/contrib/airsonic-systemd-env -O /etc/sysconfig/airsonic
sudo systemctl daemon-reload
sudo systemctl start airsonic.service
sudo systemctl enable airsonic.service
Note: You may need to review and customize the two AirSonic systemd unit files on your own machine.
AirSonic will be up and running now, listening on port 8080. You can use the following command to confirm that this is the case:
ps -ef|grep airsonic
You can also directly visit the AirSonic site, but you need to temporarily modify firewall rules first:
sudo firewall-cmd --permanent --add-port=8080/tcp
sudo systemctl reload firewalld.service
Next, point your favorite web browser to http://203.0.113.1:8080/airsonic, and then use the default credentials listed below to log in:
adminadminFor security purposes, you should change the administrator's password immediately after logging in.
Once the result is confirmed, restrict access on port 8080 again:
sudo firewall-cmd --permanent --remove-port=8080/tcp
sudo systemctl reload firewalld.service
For security purposes, it's recommended to enable HTTPS security on every newly created website. The most convenient practice for that is to deploy a Let's Encrypt SSL certificate as follows.
Install the Certbot utility on CentOS 7:
sudo yum -y install yum-utils
sudo yum-config-manager --enable rhui-REGION-rhel-server-extras rhui-REGION-rhel-server-optional
sudo yum install -y certbot
Use Certbot to apply for a Let's Encrypt SSL certificate for the domain airsonic.example.com:
sudo certbot certonly --standalone --agree-tos --no-eff-email -m admin@example.com -d airsonic.example.com
The certificate and chain will be saved at the following:
/etc/letsencrypt/live/airsonic.example.com/fullchain.pem
The key file will be saved here:
/etc/letsencrypt/live/airsonic.example.com/privkey.pem
The Let's Encrypt SSL certificate is designed to expire in three months. You can setup a cron job to renew your certificates automatically:
sudo crontab -e
Press I, and then input the following entry:
0 0,12 * * * python -c 'import random; import time; time.sleep(random.random() * 3600)' && certbot renew
Save and quit:
:wq
This cron job will attempt to update the Let's Encrypt certificate every day at noon.
With the help of Nginx, you can both facilitate visitors' access (so that they no longer need to input the 8080 port number), and enable HTTPS security on your AirSonic website.
Install Nginx using YUM:
sudo yum install -y nginx
Next, create a config file for AirSonic:
cat <<EOF | sudo tee /etc/nginx/conf.d/airsonic.conf
# Redirect HTTP to HTTPS
server {
    listen      80;
    server_name airsonic.example.com;
    return      301 https://\$server_name\$request_uri;
}

server {

    # Setup HTTPS certificates
    listen       443 default ssl;
    server_name  airsonic.example.com;
    ssl_certificate      /etc/letsencrypt/live/airsonic.example.com/fullchain.pem;
    ssl_certificate_key  /etc/letsencrypt/live/airsonic.example.com/privkey.pem;

    # Proxy to the Airsonic server
    location /airsonic {
        proxy_set_header X-Real-IP         \$remote_addr;
        proxy_set_header X-Forwarded-For   \$proxy_add_x_forwarded_for;
        proxy_set_header X-Forwarded-Proto https;
        proxy_set_header X-Forwarded-Host  \$http_host;
        proxy_set_header Host              \$http_host;
        proxy_max_temp_file_size           0;
        proxy_pass                         http://127.0.0.1:8080;
        proxy_redirect                     http:// https://;
    }
}
EOF
Restart Nginx in order to put your configuration into effect:
sudo systemctl restart nginx.service
sudo systemctl enable nginx.service
Finally, point your favorite web browser to http://airsonic.example.com/airsonic or https://airsonic.example.com/airsonic to start exploring your AirSonic website.
Mākslīgais intelekts nav nākotnē, tas ir šeit, tagadnē. Šajā emuārā lasiet, kā mākslīgā intelekta lietojumprogrammas ir ietekmējušas dažādas nozares.
Vai arī jūs esat DDOS uzbrukumu upuris un esat neizpratnē par profilakses metodēm? Izlasiet šo rakstu, lai atrisinātu savus jautājumus.
Iespējams, esat dzirdējuši, ka hakeri pelna daudz naudas, bet vai esat kādreiz domājuši, kā viņi nopelna šādu naudu? pārrunāsim.
Vai vēlaties redzēt revolucionārus Google izgudrojumus un to, kā šie izgudrojumi mainīja katra cilvēka dzīvi mūsdienās? Pēc tam lasiet emuārā, lai redzētu Google izgudrojumus.
Pašpiedziņas automobiļu koncepcija izbraukt uz ceļiem ar mākslīgā intelekta palīdzību ir mūsu sapnis jau kādu laiku. Bet, neskatoties uz vairākiem solījumiem, tie nekur nav redzami. Lasiet šo emuāru, lai uzzinātu vairāk…
Zinātnei strauji attīstoties, pārņemot lielu daļu mūsu pūļu, palielinās arī risks pakļaut sevi neizskaidrojamai singularitātei. Izlasiet, ko singularitāte varētu nozīmēt mums.
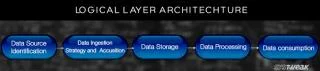
Lasiet emuāru, lai vienkāršākā veidā uzzinātu dažādus lielo datu arhitektūras slāņus un to funkcijas.
Datu uzglabāšanas metodes ir attīstījušās kopš datu dzimšanas. Šajā emuārā ir aprakstīta datu uzglabāšanas attīstība, pamatojoties uz infografiku.
Šajā digitālajā pasaulē viedās mājas ierīces ir kļuvušas par būtisku dzīves sastāvdaļu. Šeit ir daži pārsteidzoši viedo mājas ierīču ieguvumi, lai padarītu mūsu dzīvi dzīves vērtu un vienkāršāku.
Nesen Apple izlaida macOS Catalina 10.15.4 papildinājuma atjauninājumu, lai novērstu problēmas, taču šķiet, ka atjauninājums rada vairāk problēmu, kas izraisa Mac datoru bloķēšanu. Izlasiet šo rakstu, lai uzzinātu vairāk