Uppfærslur eru mikilvægar. Þeir laga öryggisvandamál, bæta árangur, kynna nýja eiginleika og margt fleira. Sjálfgefið er að Windows hleður niður og uppfærir sjálft sig um leið og þetta er gert aðgengilegt og það er þægileg lítil aðgerð.
Hins vegar verður þetta vandamál vegna þess að þessar uppfærslur eru lagðar á notendur jafnvel þegar þeir vilja ekki hafa þær. Það er ekkert leyndarmál að sumar uppfærslur innihalda villur sem geta sett strik í reikninginn þinn annars venjulega Windows virkni. Maður ætti að hafa stjórn og val um að slökkva á og stöðva uppfærslur ef á þarf að halda.
Svo, með það í huga, hér er allt sem þú þarft að vita um að slökkva á uppfærslum á Windows 11.
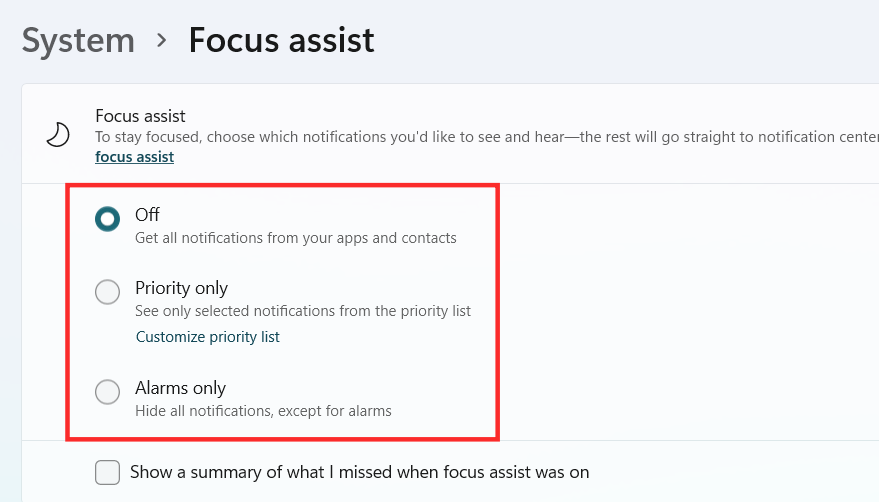
Tengt: Hvernig á að nota Focus Assist á Windows 11
Innihald
Hvað gerist þegar þú gerir uppfærslur óvirkar á Windows 11?
Ef þú veist fyrir hvað þú ert að slökkva á uppfærslunum, farðu þá og notaðu ráðlagðar aðferðir okkar hér að ofan til að gera það. En ef þú ert á villigötum um að slökkva á Windows uppfærslum ættu kannski aðeins meiri upplýsingar um þær að hjálpa þér að ákveða.
Augljóslega muntu ekki fá reglulegar uppsafnaðar uppfærslur fyrir Windows 11 þegar þú kveikir á Windows uppfærslum, né færðu neina öryggisplástra eða villuleiðréttingar sem eru gefnar út oft.
Í einhvern tíma gætirðu ekki fengið neinar uppfærslur fyrir kerfisreklana þína heldur. Ef þú vilt setja upp rekla og plástra á meðan slökkt er á Windows uppfærslum verður þú að gera það handvirkt.
Tengt: Hvernig á að gera við Windows 11 [15 leiðir]
Hvernig á að stöðva uppfærslur á Windows 11
Áður en nokkuð er sagt og gert skaltu vita að Windows uppfærslur eru að mestu leyti nokkuð öruggar og mælt er með því að þú hafir kveikt á þeim ef þú vilt njóta allra uppsafnaðra uppfærslna og frammistöðuaukningar sem þeim fylgja.
En annað slagið geturðu fengið slæman plástur sem kynnir villur og brýtur eiginleika. Svo ef þú ert einhver sem finnst gaman að skoða uppfærslurnar áður en þú halar niður og setur þær upp, eða vilt hætta þeim alveg, hér er hvernig þú getur gert það á Windows 11.
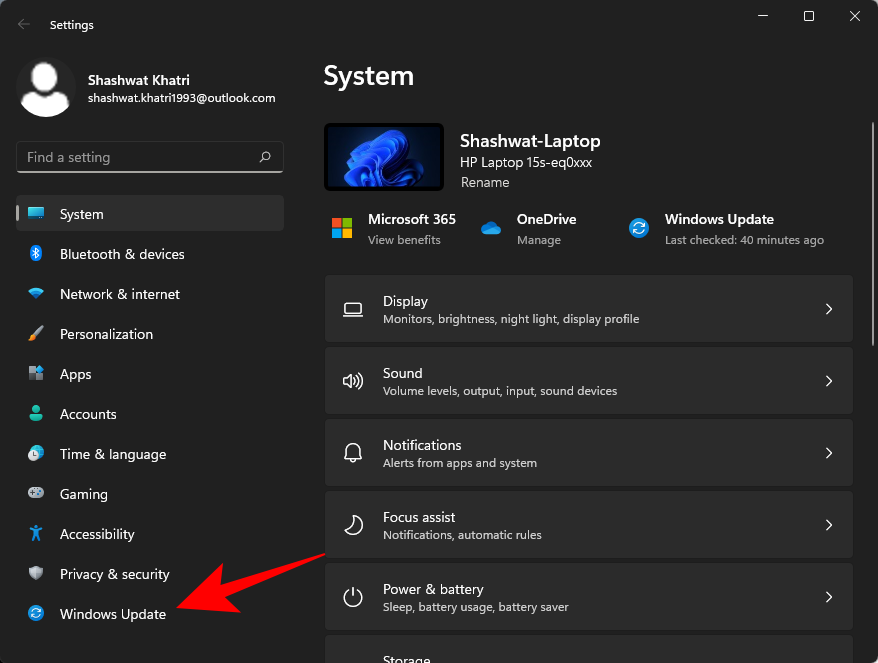
Ýttu á Win + Itil að opna Stillingar, smelltu síðan á Windows Update í vinstri spjaldinu.
Hægra megin, við hliðina á 'Gera hlé á uppfærslum', smelltu á Gera hlé í 1 viku .
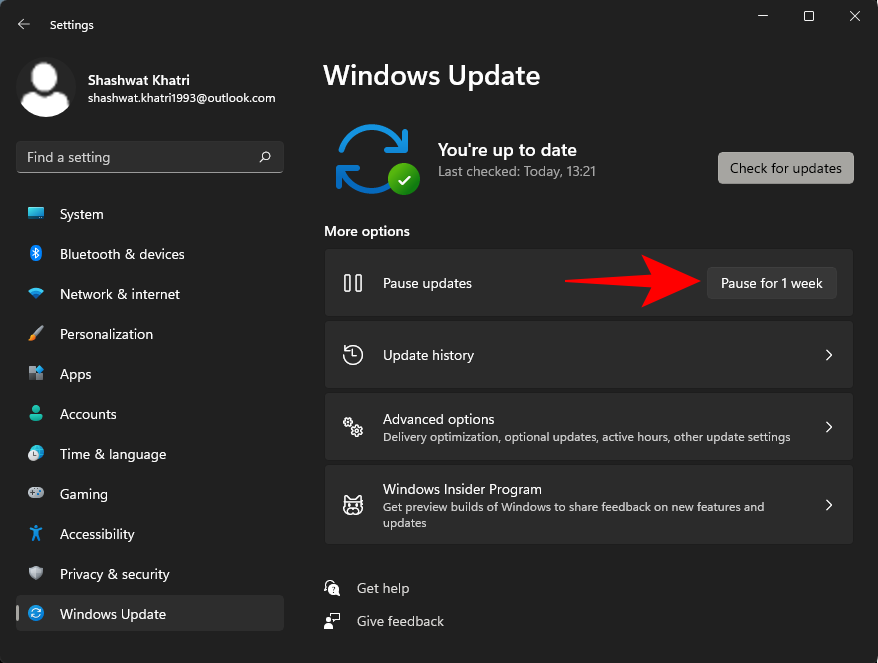
Eins og er, þar sem Windows 11 er enn á þróunarstigi, muntu ekki fá neinn annan tímaramma til að gera hlé á uppfærslum, né geturðu tilgreint einn. Við gerum ráð fyrir að fá fleiri valkosti fyrir „Hlé uppfærslur“ eftir því sem nýrri smíði Windows 11 kemur út í gegnum - þú giskaðir á það - Windows uppfærslur.
Aðferð #02: Slökktu á Windows Update Service
Til að slökkva algjörlega á uppfærslu Windows 11 þarftu að nota gluggann „Þjónusta“. Svona á að gera það:
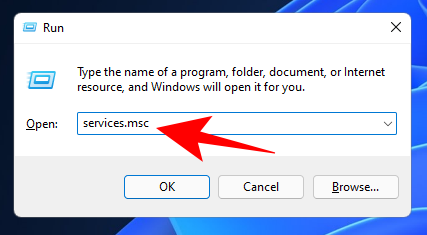
Ýttu á Win + Rtil að opna RUN valmyndina, sláðu inn services.msc og ýttu á Enter.
Skrunaðu nú niður og tvísmelltu á Windows Update .
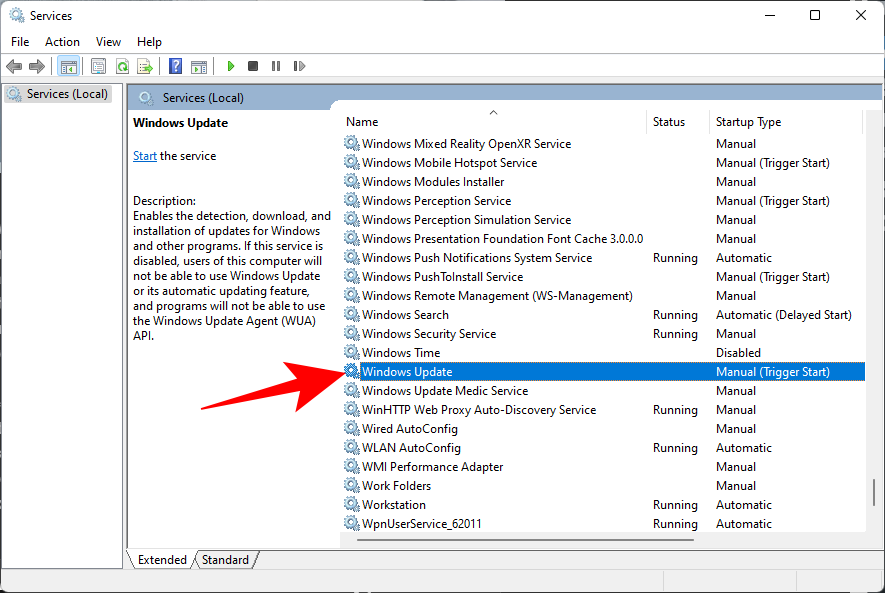
Ef það er í gangi, smelltu á Stop .
Smelltu síðan á fellivalmyndina við hliðina á 'Opssetningargerð'.
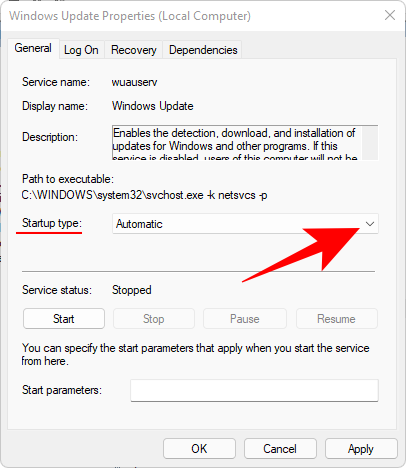
Veldu Óvirkt .
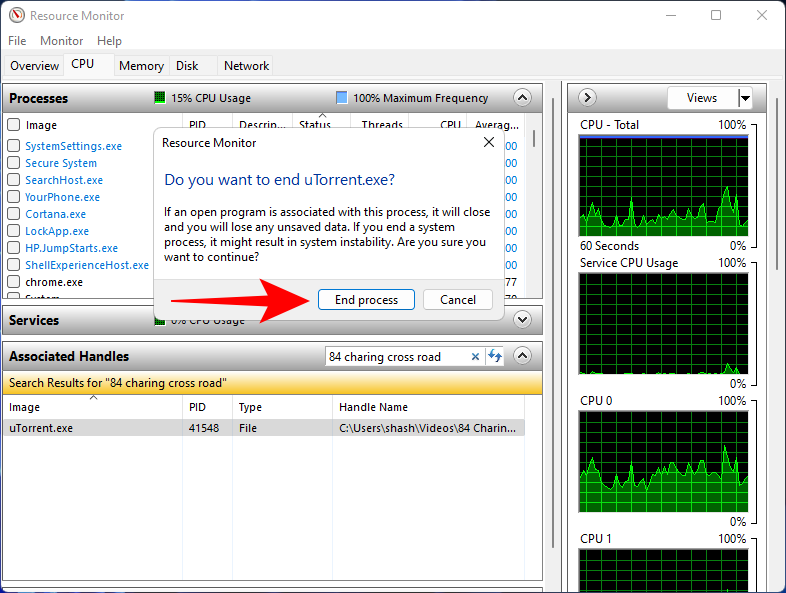
Smelltu á OK .
Tengt: Hvernig á að pakka niður skrám á Windows 11
Aðferð #03: Slökktu á eða takmarkaðu uppfærslur með Group Policy Editor
Hópstefnuritstjórinn er gagnlegt tæki fyrir Professional, Enterprise og Education útgáfur af Windows. Svona geturðu takmarkað Windows uppfærslur eða gert þær algjörlega óvirkar:
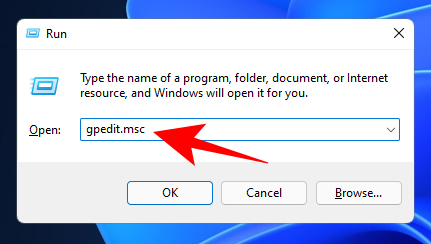
Ýttu á Win + Rtil að opna RUN reitinn, sláðu inn gpedit.msc og ýttu á Enter.
Farðu síðan að eftirfarandi slóð í vinstri spjaldinu:
Computer Configuration > Administrative Templates > Windows Components > Windows Update > Manage end user experience
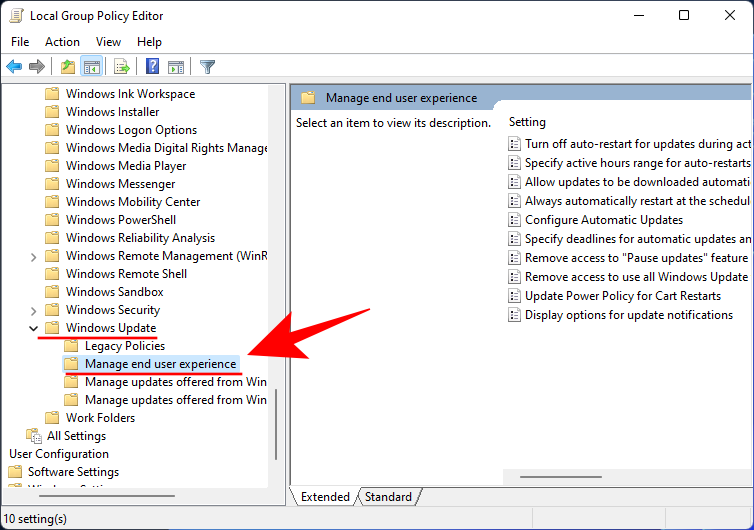
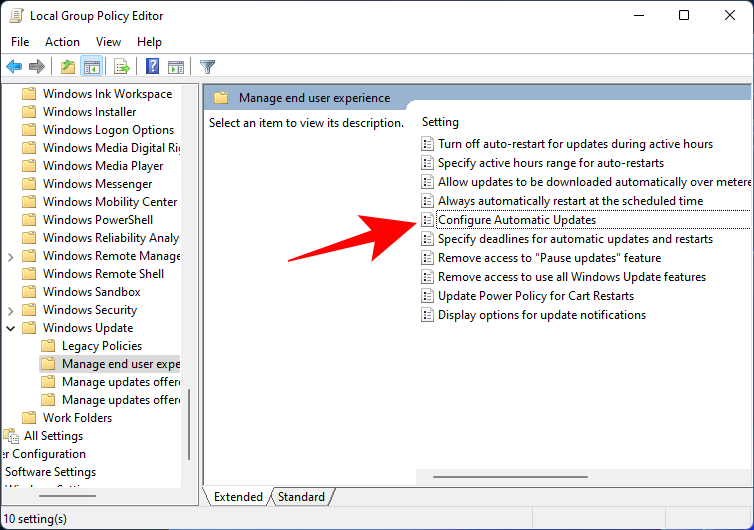
Nú, hægra megin, tvísmelltu á Stilla sjálfvirkar uppfærslur .
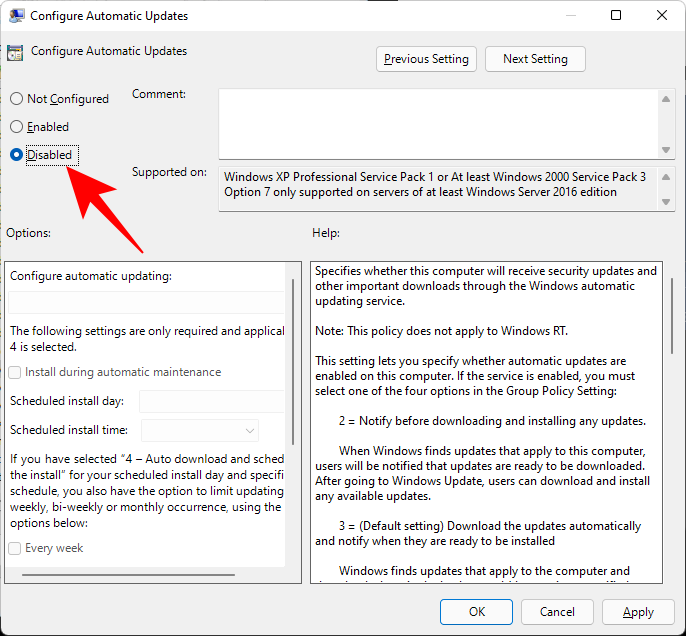
Til að slökkva alveg á Windows uppfærslum skaltu velja Óvirkt .
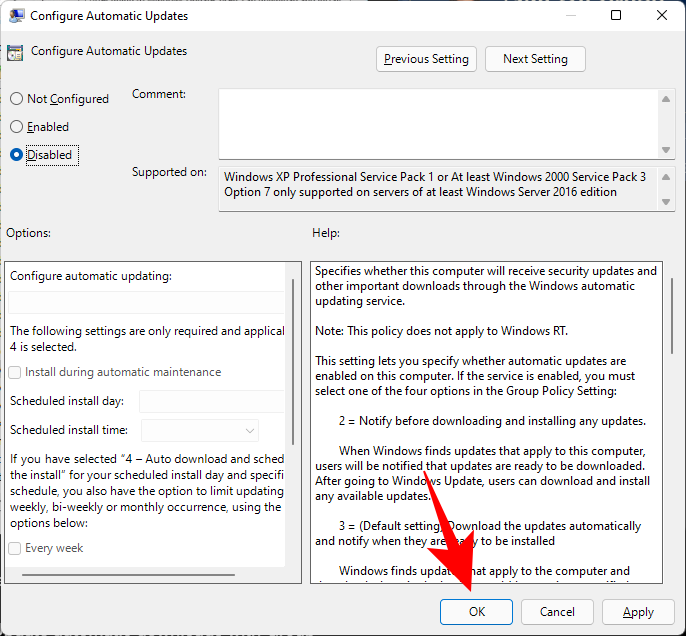
Smelltu síðan á OK .
Ef þú vilt ekki slökkva alveg á Windows 11 uppfærslum, þá eru nokkrar aðrar Windows uppfærslustillingar sem þú getur skoðað. Svona:
Í sama stefnuglugga 'Stilla sjálfvirkar uppfærslur' skaltu fyrst velja Virkt .
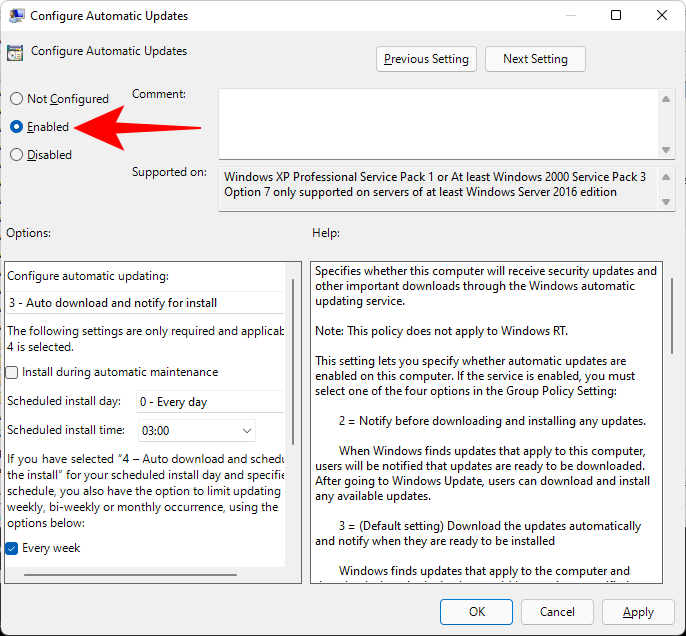
Síðan, undir 'Stilla sjálfvirka uppfærslu', smelltu á fellivalmyndina og veldu eitt af eftirfarandi:
- 2 - Tilkynna um niðurhal og sjálfvirka uppsetningu. (mælt með)
- 3 - Sjálfvirk niðurhal og tilkynning um uppsetningu.
- 4 - Sæktu sjálfkrafa og tímasettu uppsetninguna.
- 5 - Leyfa staðbundnum stjórnanda að velja stillingar.
- 7 - Leyfa niðurhal, tilkynna til að setja upp, tilkynna til að endurræsa.
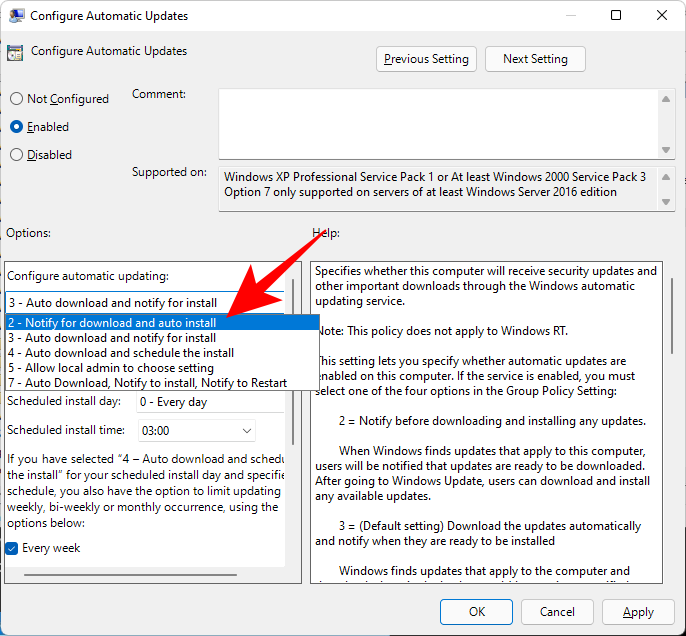
Við erum að fara með ráðlagða númer 2 - 'Tilkynna um niðurhal og sjálfvirka uppsetningu'. Með þessum valkosti er uppfærslum ekki hlaðið niður sjálfkrafa. Þess í stað verður þú að kveikja handvirkt á Windows Update stillingasíðunni.
Þegar þú hefur valið stillingar Windows uppfærslunnar skaltu smella á OK .
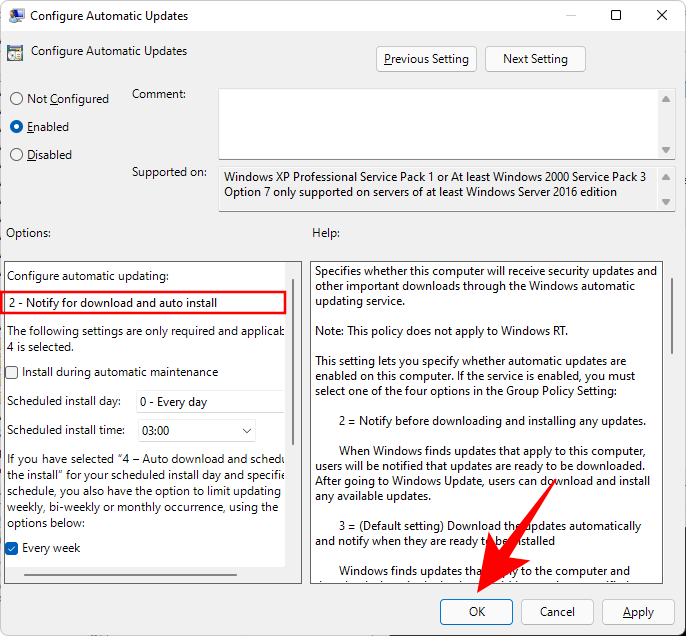
Endurræstu tölvuna þína til að breytingarnar taki gildi.
Aðferð #04: Slökktu á eða takmarkaðu uppfærslur úr skránni
Líkt og fyrri aðferðin geturðu einnig slökkt á Windows uppfærslu algjörlega eða lagfært uppfærslustillingar Windows úr skránni. Svona:
Ýttu á Win + Rtil að opna RUN reitinn, sláðu inn regedit og ýttu á Enter.
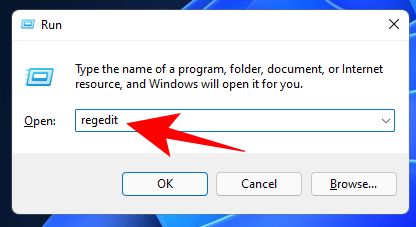
Farðu að eftirfarandi lykli:
Computer\HKEY_LOCAL_MACHINE\SOFTWARE\Policies\Microsoft\Windows
Að öðrum kosti geturðu afritað ofangreint og límt það í veffangastiku Registry Editor og ýtt á Enter.
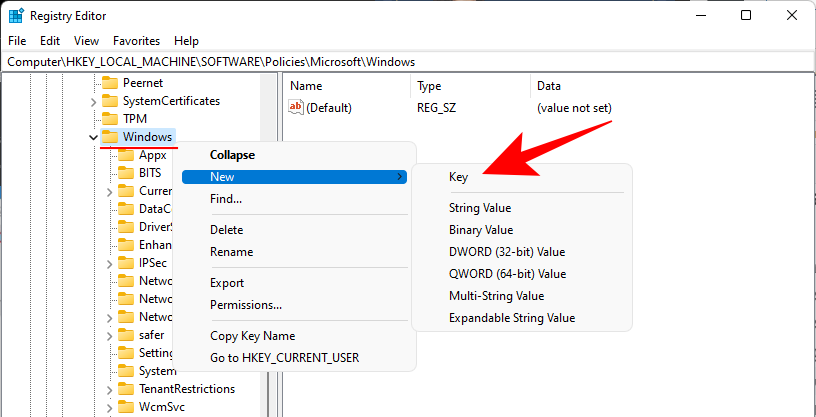
Hægrismelltu núna á valda 'Windows' möppu og veldu Nýtt > Lykill .
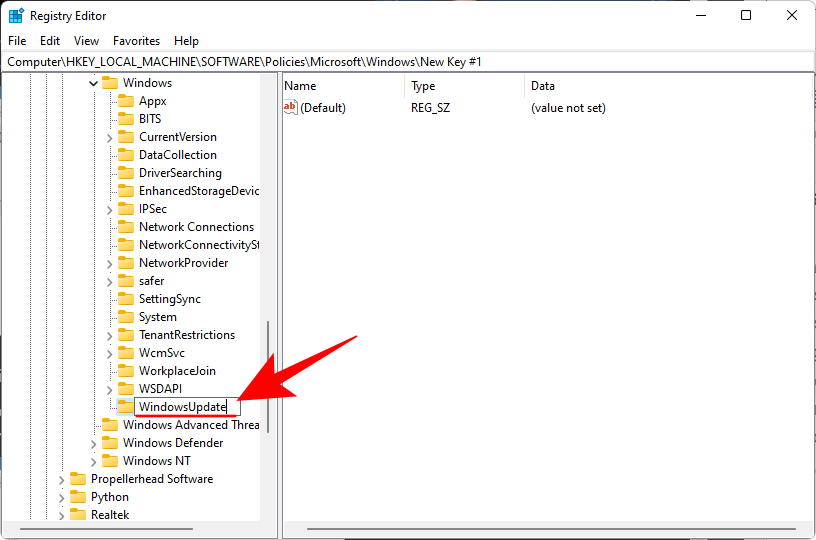
Nefndu þennan lykil WindowsUpdate og ýttu á Enter.
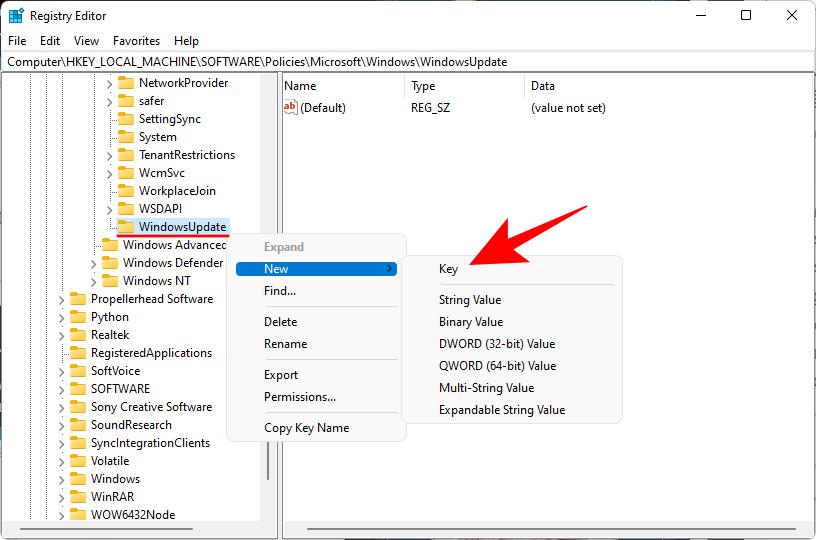
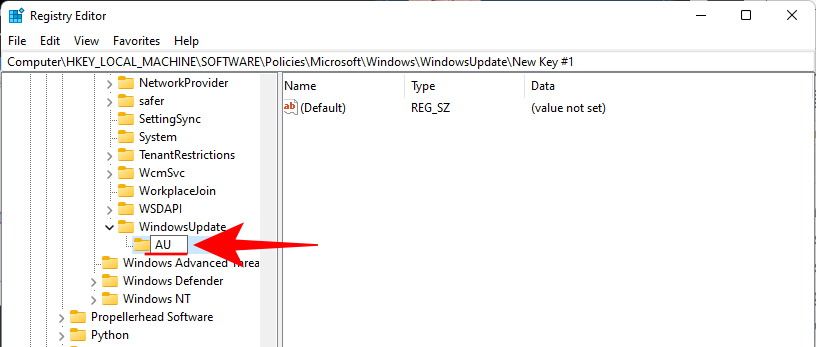
Hægrismelltu núna á þennan lykil og búðu til undirlykil í gegnum New > Key .
Nefndu þennan lykil AU .
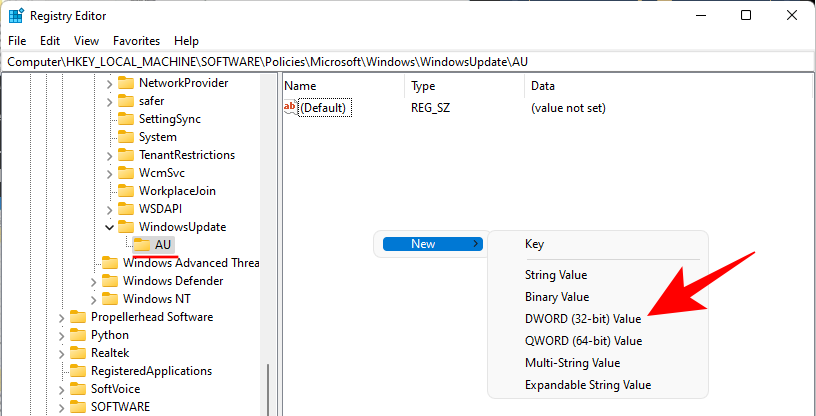
Með nýstofnaða AU-lyklinum valinn, hægrismelltu á auða plássið hægra megin og veldu Nýtt > DWORD (32-bita) gildi .
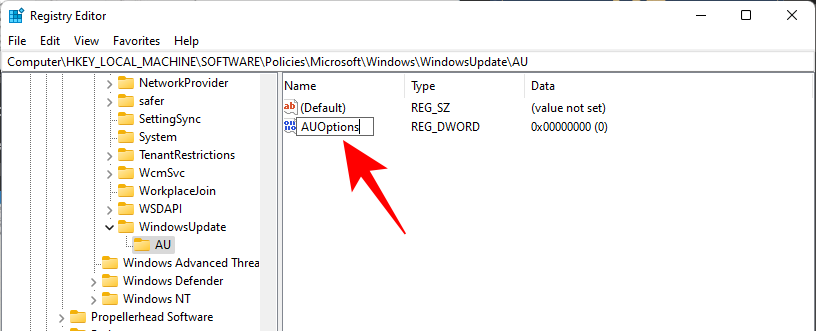
Nefndu þennan lykil AUOptions .
Tvísmelltu á 'AUOptions' og breyttu gildi þess í eina af eftirfarandi tölum (samsvarandi breyting þeirra er nefnd hér að neðan):
- 2 - Tilkynna um niðurhal og sjálfvirka uppsetningu. (mælt með)
- 3 – Auto download and notify for install.
- 4 – Auto download and schedule the install.
- 5 – Allow local admin to choose settings.
- 7 – Allow download, Notify to install, Notify to restart.
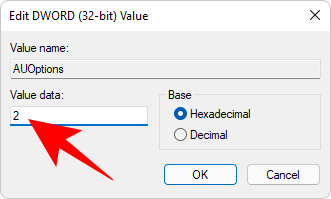
Make sure to only enter the number, depending on how you want the Windows updates to be configured. For instance, we want to be notified for download and auto install so we’re changing the value to ‘2‘. Then click OK.
Note that these options work exactly like the Group Policy method but with the sole exception of not being able to completely disable updates. The only option that comes close to disabling Windows Updates is the recommended option number 2. Restart your computer for the changes to take effect.
Method #05: Set a Metered Connection
Another way to prevent Windows from updating automatically is to set up a metered connection. This will tell Windows that you’re on limited bandwidth and that updates are not your priority. Here’s how you can set it up:
Press Win + I to open Setings, then click on Network & internet in the left panel.
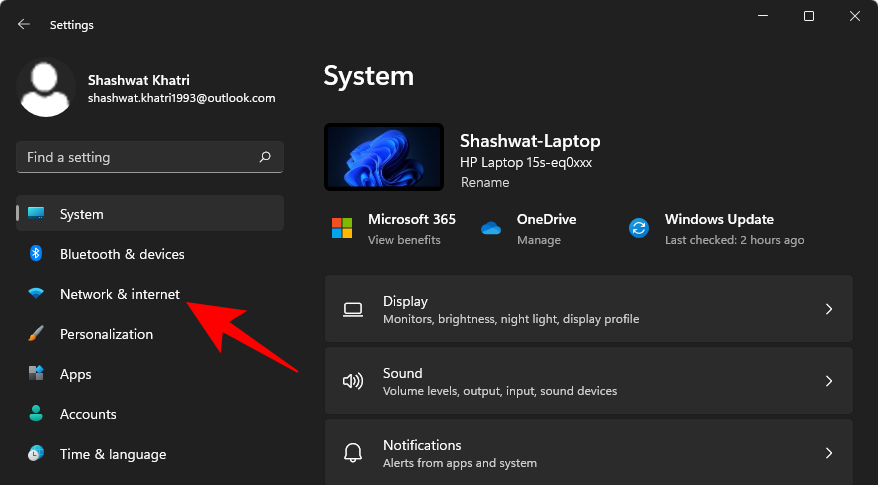
Click on Wi-Fi.
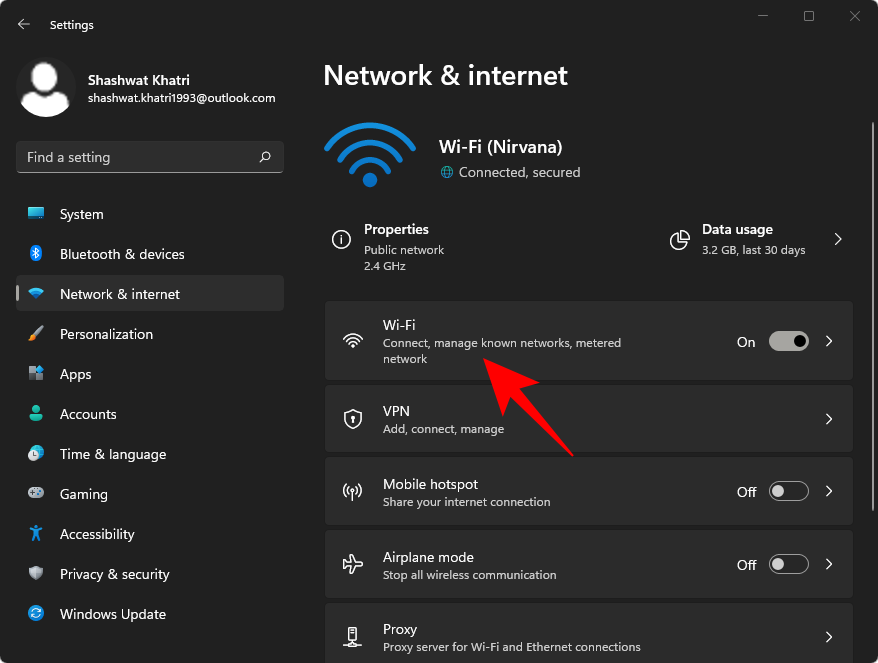
Select your Wi-Fi connection.
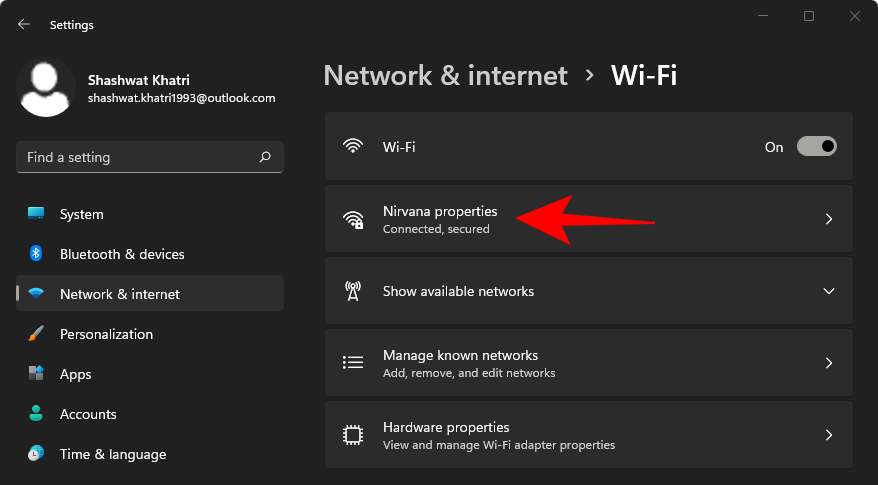
Toggle On Metered connection.
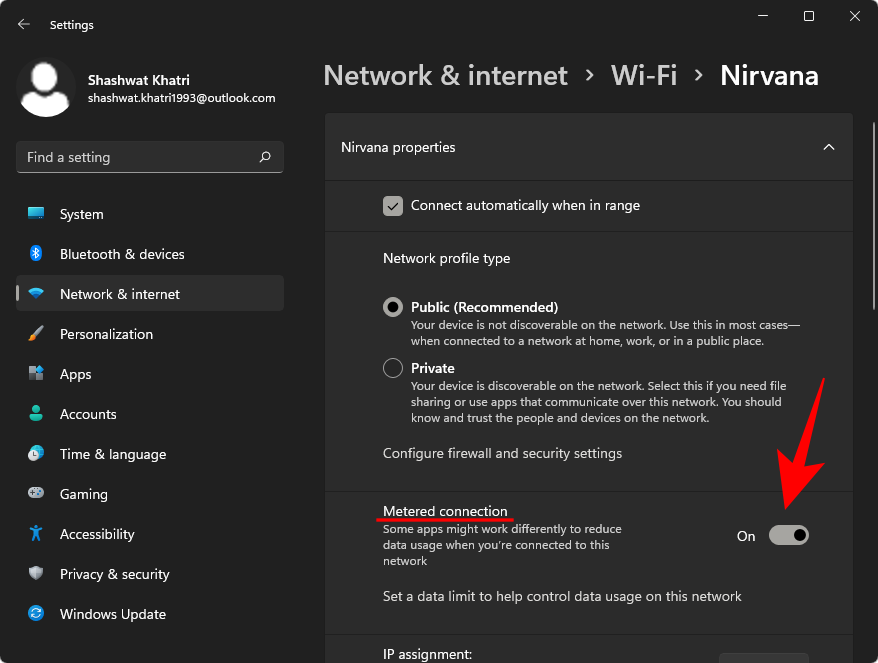
And that’s it! You’ve now set up a metered connection and Windows updates will be temporarily disabled. However, this is not the ideal solution for stopping Windows updates as important security updates can still be downloaded and installed. On top of that, some important apps may not be updated with a metered connection, such as OneDrive or any of the ‘Store apps’.
Method #06: Hide Updates with Microsoft’s Show/Hide troubleshooter
Microsoft has a Windows update troubleshooter tool that lets you hide (or show) specific updates that you don’t want to be installed while keeping everything else up to date.
Download: wushowhide.diagcab
After downloading the show/hide tool from the above link, run the tool and click Next.
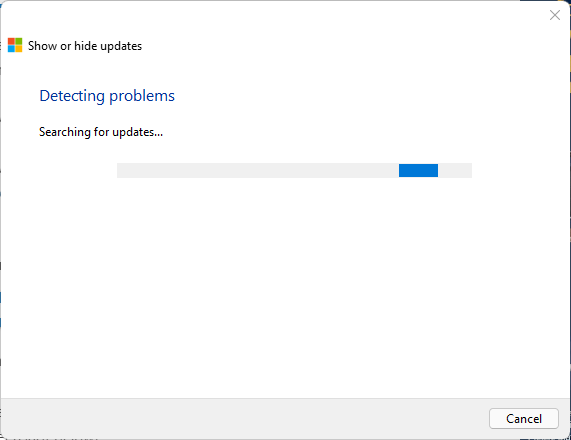
The troubleshooter will now begin.
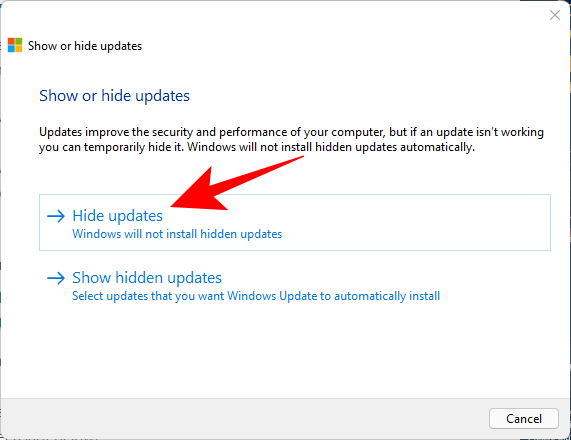
Click on Hide updates.
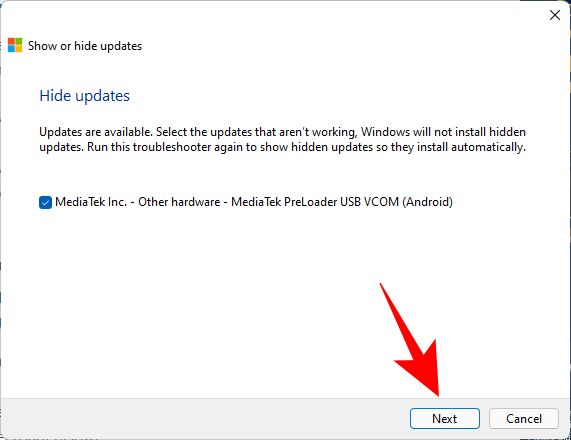
Now select the available update that you want to hide. These will not be installed anymore. Then click Next.
Once the selected updates are hidden, click on Close.
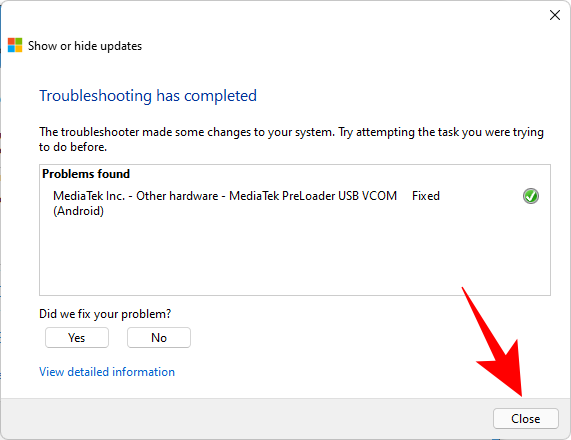
The only caveat with this troubleshooter tool is that the updates have to be downloaded before and waiting to be installed.
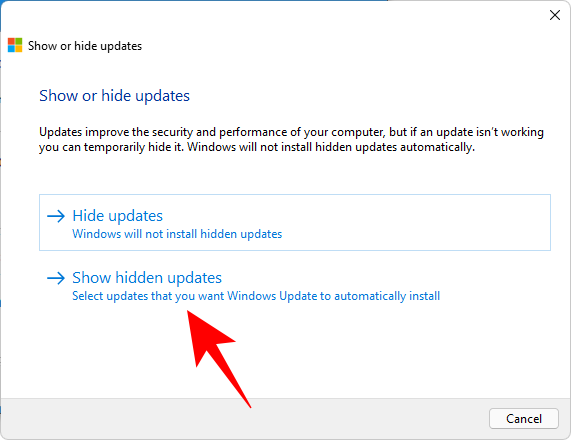
If you think you’ve hidden an update by accident, open the troubleshooter tool again but this time select Show updates.
Select your hidden update and click Next.
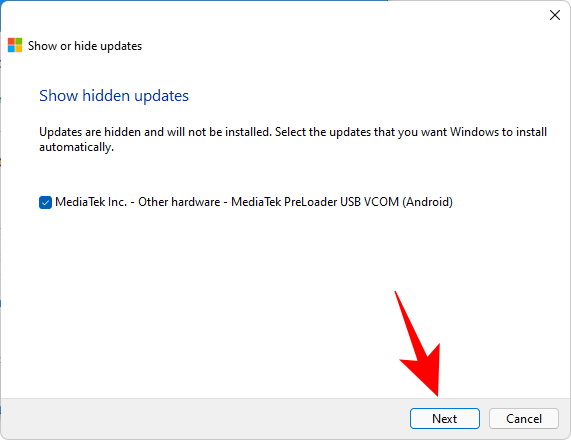
Your hidden update should now become available again.
Method #07: Use a third-party app to disable or stop updates on Windows 11
There are various third-party apps that can disable or stop updates entirely on Windows 11. Apart from the Show/Hide troubleshooter that we saw before, the Win Update Stop application is another tool that you can use to disable updates.
All you have to do is run the setup, run the application, and use its one-click interface to quickly enable or disable updates.
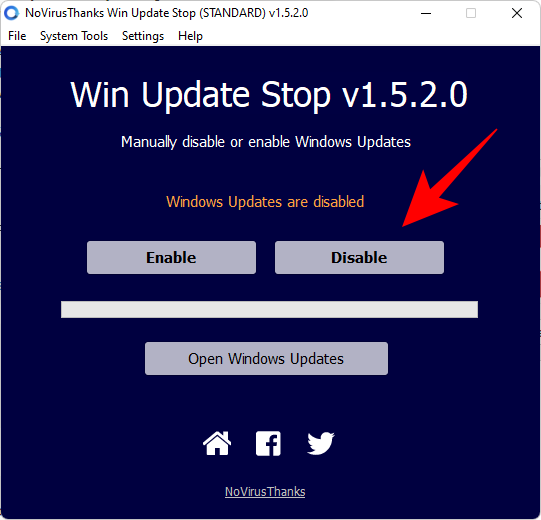
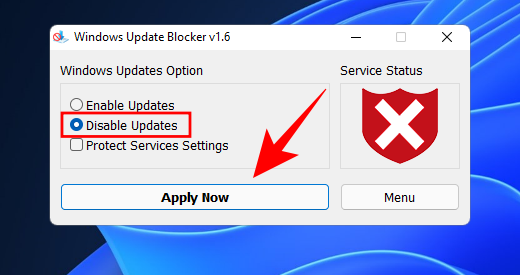
You may also want to give Windows Update Blocker a go – a portable application that lets you disable updates in a flash. Use the link above to download the file, then extract the contents and run the application. Thereafter, all you have to do is ensure that ‘Disable Updates’ is selected and then click ‘Apply Now’.
Why you may want to disable Windows updates
Though turning off Windows updates is not generally recommended, there are cases when it becomes necessary to do so.
It isn’t a rare thing to receive updates that bring their own set of security vulnerabilities and bugs, and many have had to suffer because of it in the past.
Similarly, if you don’t want Windows automatically updating your hardware drivers because, say, the latest version is causing you trouble and you’ve opted for an older one, you may benefit from keeping Windows updates disabled.
Some users also like having more granular control over their updates and configure Windows updates to notify them before downloading and installing any so they can review them and decide which ones to let through.
How to stop updates for other Microsoft products
If you don’t want to receive Windows updates mainly because you don’t want other Microsoft products to get updated, there is a dedicated option to configure that.
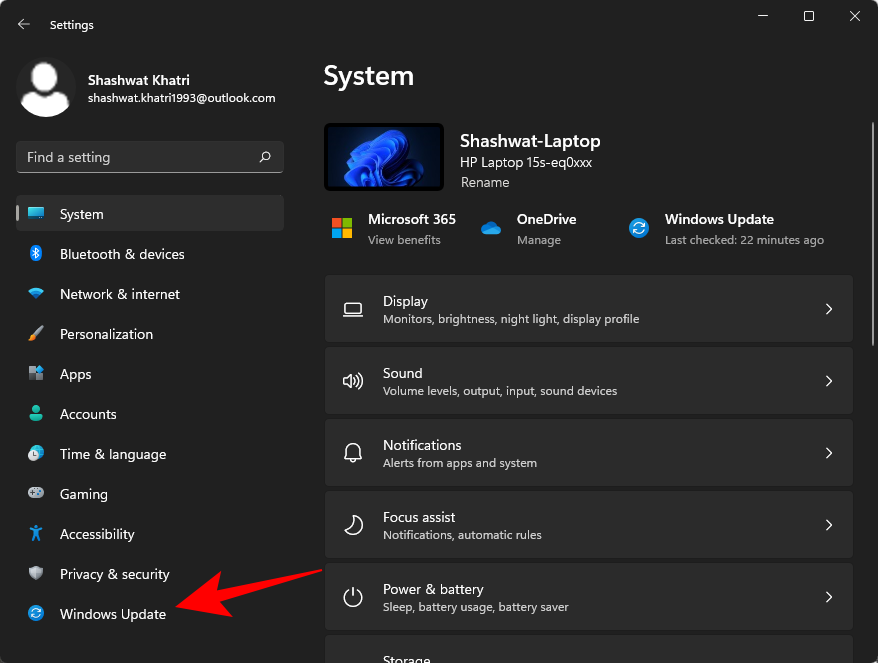
Press Win + I to open Settings and click on Windows Update on the left.
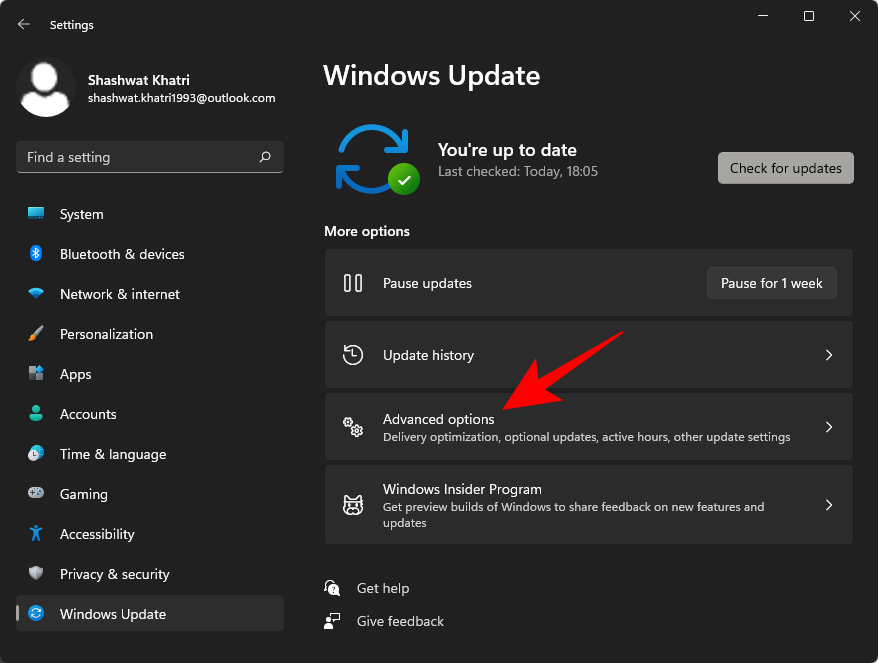
Click on Advanced options.
Then toggle Off Receive updates for other Microsoft products.
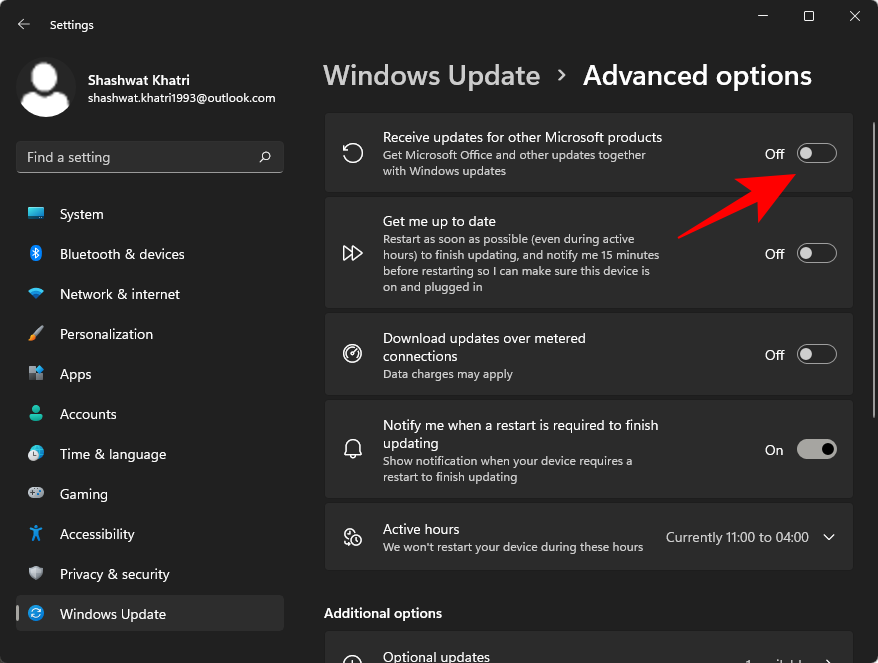
Exactly which Microsoft products get their updates this way is a hard guess as Microsoft has never made it clear. But from what can be surmised over the years, Office and Silverlight are definitely among them.
How to uninstall Windows 11 updates
Sometimes, disabling Windows updates entirely can seem a bit excessive if you’re doing so only because you’ve received a bad update. There’s a much more practical ‘Uninstall updates’ option that you can use instead. Here’s how:
Press Win + I to open Settings and click on Windows Update on the left.
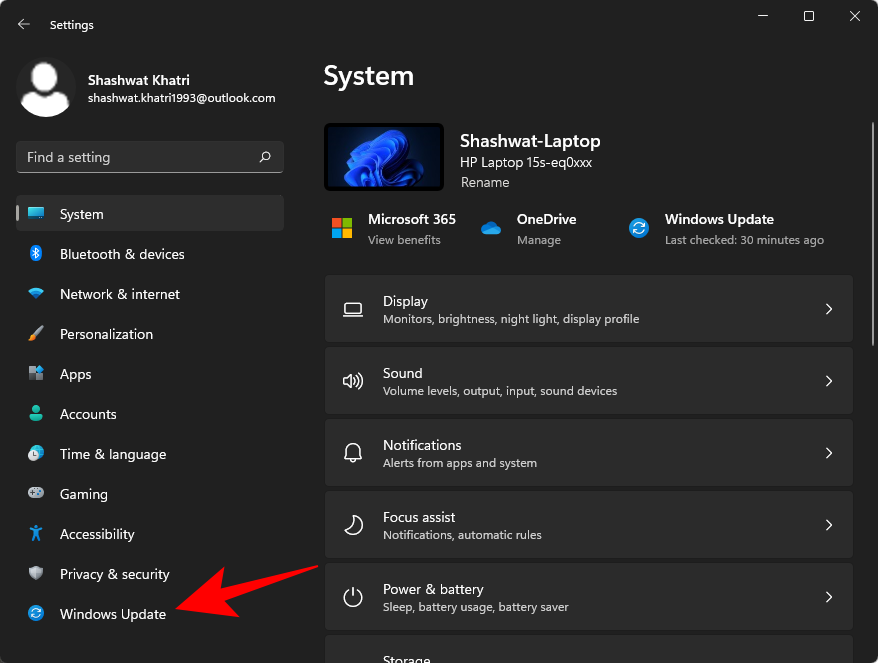
Then click on Update history.
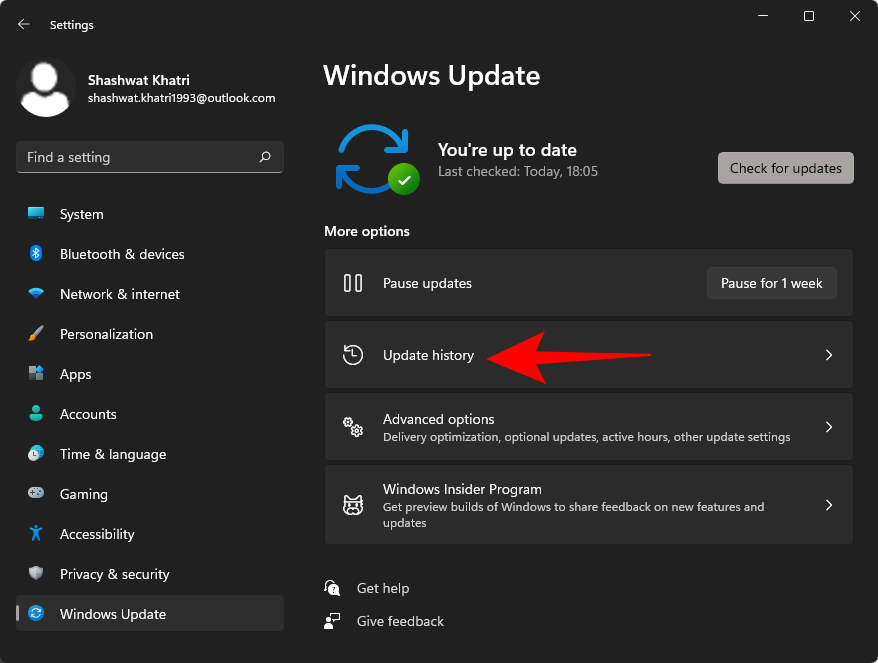
Scroll down and click on Uninstall updates.
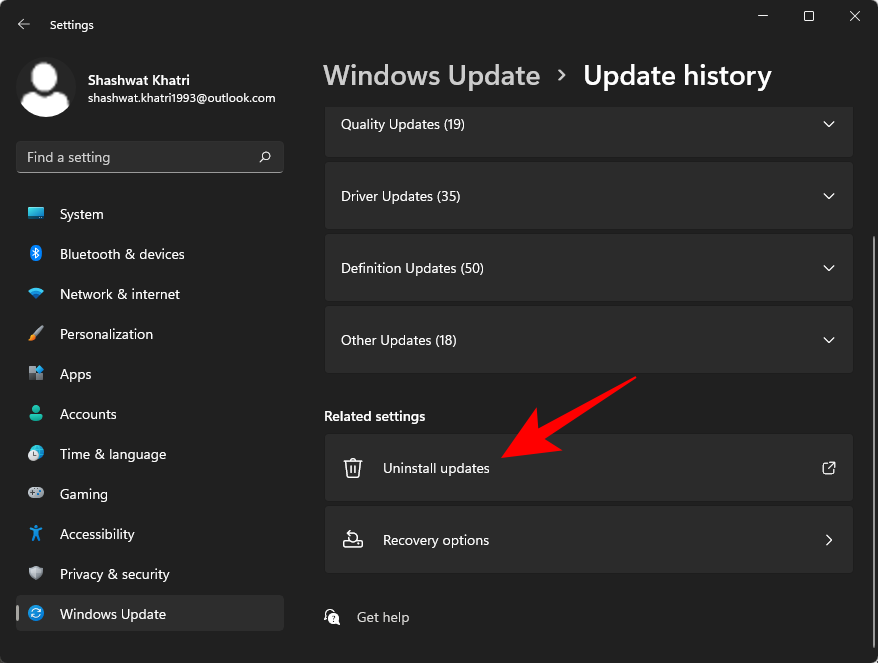
Here, find the update that’s bugging you and select it. Then click on Uninstall.
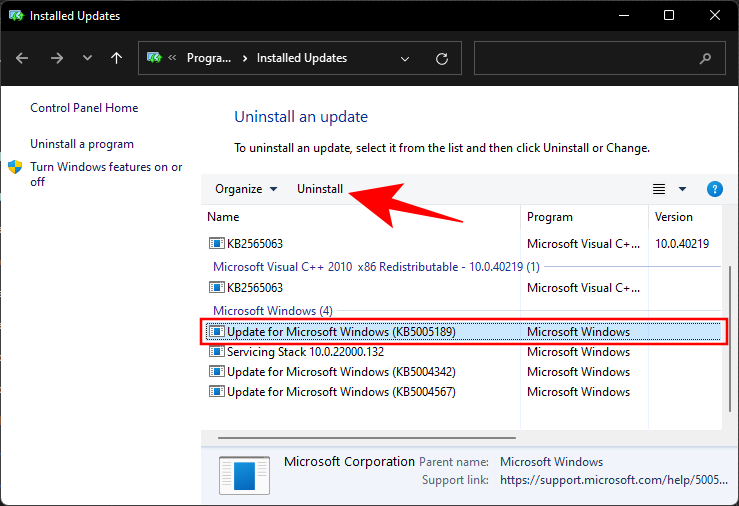
Confirm with a Yes.
Note: Some minor updates may not have the ‘Uninstall’ button.
Frequently Asked Questions (FAQs):
Let’s take a look at some common queries concerning Windows updates.
Should I disable Windows updates?
Windows Updates should be disabled only if there’s a great need for it. If you’re not suffering from any buggy patches and if all your drivers are functioning without a hitch, keep Windows updates on. Though the updates that you get aren’t always perfect, they are the only source of future security patches and cumulative updates that you’re invariably going to need sooner or later.
Can I permanently disable updates?
Já, þú getur slökkt varanlega á uppfærslum. Jafnvel þó að Microsoft sé nokkuð árásargjarn í að neyða notendur til að halda Windows uppfærðum, og af góðum ástæðum líka, munu aðferðirnar sem nefndar eru í þessari handbók hjálpa þér að koma í veg fyrir það.
TENGT
