Windows er alhliða stýrikerfi sem gerir þér kleift að fyrirskipa og hafa umsjón með aðgangsheimildum byggt á virkum reikningi. Þetta auðveldar stjórnendum töluvert að stjórna tölvum í fyrirtæki sínu með því að leyfa þeim að veita völdum einstaklingum auknar heimildir.
En hvað ef þú átt tölvuna þína? Hvernig stjórnar þú staðbundnum reikningum? Hvað ef þú ert ekki með stjórnandareikning? Ertu útilokaður að eilífu? Ef þú hefur verið með þessar spurningar eða nýlega staðið frammi fyrir villu þar sem þú þurftir leyfi stjórnanda, þá erum við með fullkomna leiðbeiningar fyrir þig.
Hér er allt sem þú þarft að vita um stjórnandareikninga í Windows 11.
Athugasemd um Windows 10 eindrægni: Leiðbeiningarnar á þessari síðu hafa verið settar saman með Windows 11, þannig að notendaviðmótið sem notað er í skjámyndunum er af Windows 11. En þessar leiðbeiningar virka algjörlega á Windows 10 líka. Svo, ekki hika við að nota leiðbeiningarnar á Windows 11 sem og Windows 10 PC.
Tengt: Hvernig á að leita í Windows 11
Innihald
Hvað er stjórnandi reikningur í Windows 11?
Stjórnandareikningur er efsti reikningur í Microsoft Windows með hæstu réttindi. Þetta gerir þér sem stjórnanda kleift að stjórna tölvunni þinni hvernig sem þú vilt. Þú getur gert breytingar á kerfisskrám, sett upp hækkuð forrit, breytt Windows uppsetningunni þinni, sett upp sérsniðna sjálfvirkni og margt fleira. Leyfi til að framkvæma slík verkefni er ekki tiltækt fyrir venjulega notendur eða gestanotendur. Þar að auki, sem stjórnandi, geturðu stjórnað Windows eiginleikum og fyrirskipað hverjir eru tiltækir og aðgengilegir notendum þínum.
Af hverju þarftu stjórnandareikning?
Stjórnandareikningur er reikningur með hæstu réttindi í Windows. Þetta þýðir að þú getur gert breytingar á kerfisstigi á stýrikerfinu þínu með því að nota stjórnandareikning án nokkurra takmarkana. Hér eru nokkrar algengar ástæður fyrir því að þú gætir þurft stjórnandareikning á tölvunni þinni.
- Til að gera breytingar á kerfisstigi á kerfinu þínu
- Til að breyta/breyta eða gera við kerfisskrárnar þínar
- Til að keyra stjórnandastig skipanir og forskriftir
- Til að virkja eða slökkva á Windows eiginleika
- Til að setja upp forrit og lagfæringar á kerfisstigi
- Til að breyta eða setja upp reklana þína aftur
- Til að fá aðgang að sérstillingum innan Windows
- Til að endurstilla eða breyta lykilorðum fyrir staðbundin reikning
og margt fleira. Það gætu verið margar ástæður fyrir því að þú þarft stjórnandareikning í Windows 11 en vissir þú að það eru tvenns konar stjórnandareikningar innan Windows. Jæja ekki nákvæmlega, en hér er allt sem þú þarft að vita um þá.
Tengt: Hvernig á að slökkva á Windows 11 viðvörunarhljóðum
Skráðu þig inn sem admin: Hlutir sem þú þarft að vita
Windows kemur sjálfgefið með innbyggðum stjórnandareikningi, jafnvel þótt hann sé ekki tiltækur á lásskjánum þínum. Þessi sjálfgefna reikningur er búinn til þegar Windows er sett upp til að samþykkja allar kerfisbreytingar sem gerðar eru á tölvunni þinni við uppsetningu Windows.
Að auki gerir Windows þér einnig kleift að setja upp viðbótar stjórnandareikning af staðbundnum reikningi þínum ef þú hefur nauðsynlegar heimildir. Þú getur líka breytt núverandi reikningi þínum í stjórnandareikning ef þú ert að nota venjulegan reikning í Windows 11.
Að setja upp hvern þessara reikninga hefur mismunandi kröfur og eftir núverandi uppsetningu geturðu valið um aðra hvora uppsetninguna. En ef þú ert að reyna að endurheimta lykilorðið þitt fyrir staðbundna reikninginn þinn, þá er besti kosturinn að nota sjálfgefna stjórnandareikninginn þar sem þú gætir ekki komist framhjá lásskjánum í þessu tilfelli.
Að auki eru hér nokkur algeng atriði sem þú ættir að hafa í huga áður en þú heldur áfram með leiðbeiningarnar hér að neðan.
- Sjálfgefinn stjórnandi er ekki með innskráningarlykilorð nema það sé sérsniðið af stjórnandanum þínum
- Ef einingin þín var gefin út af fyrirtækinu þínu eða menntastofnun þá munu aðferðirnar hér að neðan líklega ekki virka fyrir þig. Sjálfgefinn stjórnandareikningur verður læstur af fyrirtækinu þínu og núverandi reikningur þinn mun ekki hafa nauðsynleg réttindi til að halda áfram með aðrar aðferðir í þessari handbók. Þú þarft að öllum líkindum að hafa samband við stjórnanda þinn ef þú átt slíka einingu.
- Ef þú deilir tækinu með öðrum notendum ættirðu að slökkva á stjórnandareikningnum þegar þú hefur gert nauðsynlegar breytingar á kerfinu þínu til að forðast óviðkomandi aðgang að viðkvæmum upplýsingum. Einnig er mælt með því að þú setjir lykilorð fyrir sjálfgefna stjórnandareikninginn þinn í slíkum tilvikum.
- Sumar aðferðir hér að neðan krefjast þess að þú hafir Windows 11 Pro eða nýrra uppsett á kerfinu þínu. Ef þú ert að nota Windows 11 heimaútgáfu þá verða möguleikar þínir takmarkaðir.
Mismunur á sjálfgefnum stjórnandareikningi og því að veita stjórnanda aðgang að notandareikningi
Sjálfgefinn stjórnandareikningur er sérstakur reikningur sem er í hverri uppsetningu á Windows, óháð tækinu þínu eða Windows útgáfu. Breyttur reikningur er aftur á móti venjulegur eða gestareikningur á tölvunni þinni sem hefur verið hækkaður í stjórnandaréttindi.
Þegar búið er að hækka reikninginn þinn mun reikningurinn þinn tilheyra stjórnandahópnum og þú munt hafa allar nauðsynlegar stjórnandaheimildir til að gera breytingar á kerfisstigi á tölvunni þinni. Sjálfgefinn stjórnandi er aðallega notaður þegar reynt er að endurheimta glatað lykilorð fyrir staðbundna notendareikninga á tölvunni þinni.
Að umbreyta reikningi er aftur á móti einfalt ferli til að hækka heimildir núverandi reiknings þíns sem gerir þér kleift að starfa sem stjórnandi núverandi tækis. Hægt er að slökkva á sjálfgefnum stjórnanda á kerfinu þínu með einfaldri skipun, á meðan þarf að breyta staðbundnum reikningi þínum aftur ef þú vilt afturkalla breytingarnar. Notaðu eina af aðferðunum hér að neðan sem passar best við núverandi þarfir þínar.
Tengt: Hvernig á að slökkva á lyklaborðinu á Windows 11
Hvernig á að skrá þig inn sem stjórnandi í Windows 11
Þú getur skráð þig inn sem stjórnandi í Windows 11 með því að nota hinar ýmsu aðferðir sem við tókum fyrir hér að ofan. Þú getur annað hvort virkjað sjálfgefna stjórnandareikninginn ef þú vilt gera tímabundnar breytingar á tölvunni þinni eða endurheimta glatað lykilorð. Þú getur líka sett upp nýjan stjórnandareikning fyrir nýjan notanda ef þú ert að leita að því að deila tækinu þínu með einhverjum. Að lokum geturðu breytt núverandi staðbundnum reikningi þínum í stjórnandareikning ef þú ert sjálfur að leita að stjórnandaréttindi á núverandi tæki. Fylgdu einni af aðferðunum hér að neðan sem hentar best núverandi þörfum þínum og kröfum.
Aðferð #01: Notaðu sjálfgefna stjórnandareikninginn
Þú getur notað sjálfgefna stjórnandareikninginn á Windows 11 tölvunni þinni til að gera nauðsynlegar breytingar með því að nota handbókina hér að neðan. Þegar þú hefur gert breytingarnar geturðu gert reikninginn óvirkan með því að nota eftirfarandi handbók. Byrjum.
1.1 Virkja sjálfgefinn stjórnandareikning
Við þurfum fyrst að virkja/opna stjórnandareikninginn á tölvunni þinni. Þetta er hægt að gera með ýmsum aðferðum. Ef þú kemst framhjá lásskjánum geturðu notað aðra hvora af þessum aðferðum. Hins vegar, ef þú getur ekki komist framhjá lásskjánum, þá þarftu að fá aðgang að CMD frá lásskjánum þínum og nota leiðbeiningarnar hér að neðan. Í slíkum tilfellum geturðu notað leiðbeiningarnar neðst til að virkja CMD beint frá heimaskjánum þínum. Byrjum.
1.1.1 Notkun CMD
Ræstu CMD á vélinni þinni og sláðu inn skipunina hér að neðan. Þegar því er lokið, ýttu á Enter á lyklaborðinu þínu til að framkvæma það.
net user administrator /active:yes

Skipuninni ætti nú að vera lokið með góðum árangri.

Ýttu á Windows takkann á lyklaborðinu þínu og smelltu á notendanafnið þitt neðst í vinstra horninu. Stjórnandareikningur ætti nú að vera sýnilegur í þessum hluta.
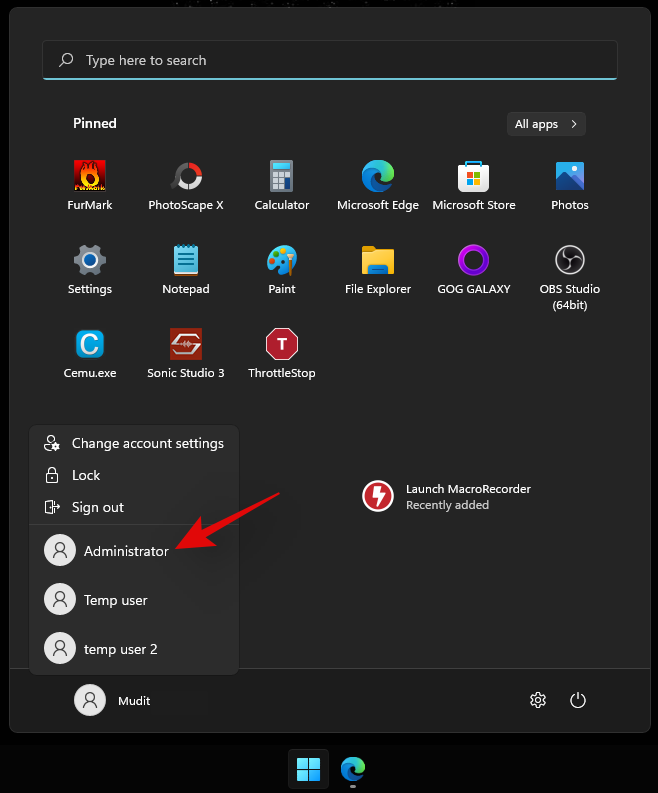
Þetta þýðir að ferlið hefur gengið vel. Þú getur nú skráð þig út af reikningnum þínum og skráð þig inn á stjórnandareikninginn. Sjálfgefinn stjórnandareikningur er ekki með lykilorð og OOBE tekur á móti þér þegar þú skráir þig inn á reikninginn. Þú getur nú notað síðari leiðbeiningarnar til að endurstilla Windows lykilorðið þitt ef þörf krefur.
1.1.2 Notkun stjórnunarverkfæra
Ýttu Windows + Rá lyklaborðið til að ræsa hlaupagluggann. Sláðu inn eftirfarandi hugtak þegar það er ræst og ýttu á Enter á lyklaborðinu þínu.
lusrmgr.msc
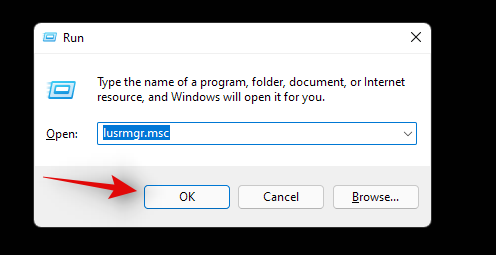
Staðbundinn hópstjóri verður nú ræstur á tölvunni þinni. Byrjaðu á því að velja 'Notendur' vinstra megin.
Smelltu á Administrator hægra megin. Nú skaltu smella á Fleiri aðgerðir og síðan Eiginleikar .
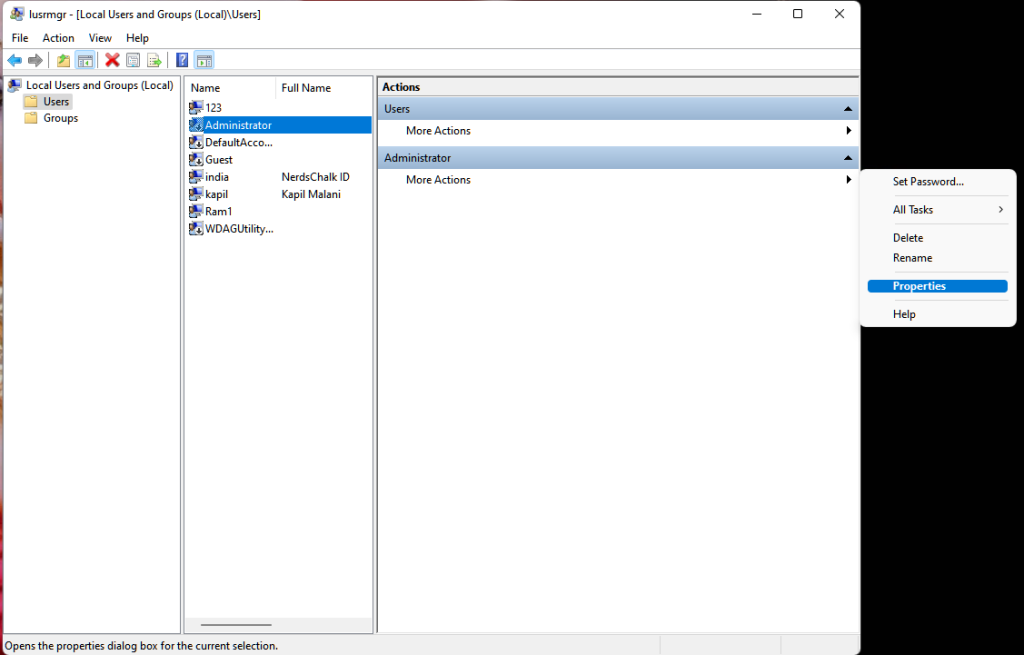
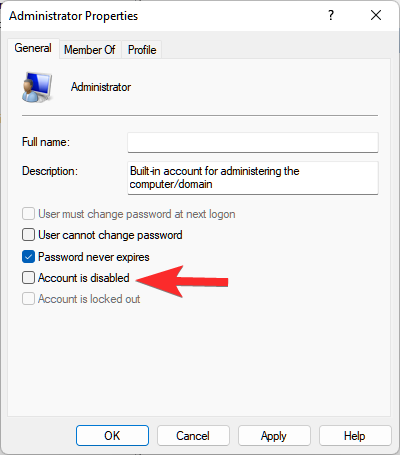
Nýr gluggi opnast nú á skjánum þínum. Taktu hakið úr valkostinum fyrir 'Reikningur er óvirkur'.
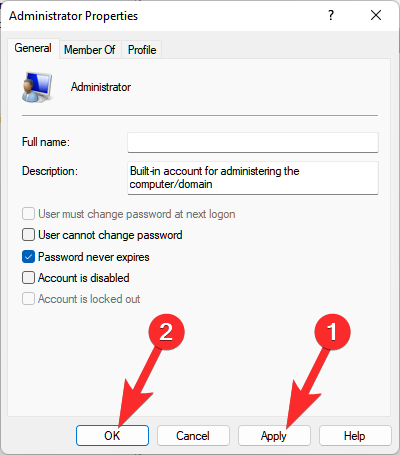
Smelltu á 'Apply' og síðan á 'OK'.
Lokaðu staðbundnum hópstjóra og virkjaðu Start valmyndina. Smelltu nú á notandanafnið þitt neðst til vinstri og nýr 'Administrator' reikningur ætti nú að vera tiltækur í þessum hluta. Þú getur nú skráð þig út af núverandi reikningi þínum og skráð þig inn á nýja stjórnandareikninginn. Reikningurinn mun ekki hafa lykilorð og þú ættir að geta auðveldlega skráð þig inn á hann með því einfaldlega að smella á 'Skráðu inn'.
1.1.3 Notkun Registry Editor
The registry editor method is only applicable to users with Windows 11 Pro or higher installed on their systems. This is because the registry path we need to access for this method is only available to Windows 11 Pro or higher users. If you are a Windows 11 Home user then you can use the CMD method listed above instead.
Press Windows + R on your keyboard and type in the following term. Press Enter on your keyboard once you are done.
regedit
Now navigate to the following path. You can also copy-paste the same in your address bar at the top.
Computer\HKEY_LOCAL_MACHINE\SOFTWARE\Microsoft\Windows NT\CurrentVersion\Winlogon\SpecialAccounts\UserList

With UserList selected on your left, right-click on an empty area on your right and select ‘New’.
Click on ‘DWORD (32-bit) value’.
Name the value as ‘Administrator’ and press Enter on your keyboard.
Once the value is added, close the Registry Editor and restart your PC for good measure. An administrator account should now be available in the bottom left corner of your screen when at the lock screen.
1.1.4 Using GPO
If you are using an enterprise machine then you can also use the Group Policy Editor to enable the default administrator account on your PC. However, this option will be unavailable to users with Windows 11 Home edition. Follow the guide below to get you started.
Press Windows + R, enter the following term and press Enter on your keyboard to open the Group Policy Editor on your PC.
gpedit.msc
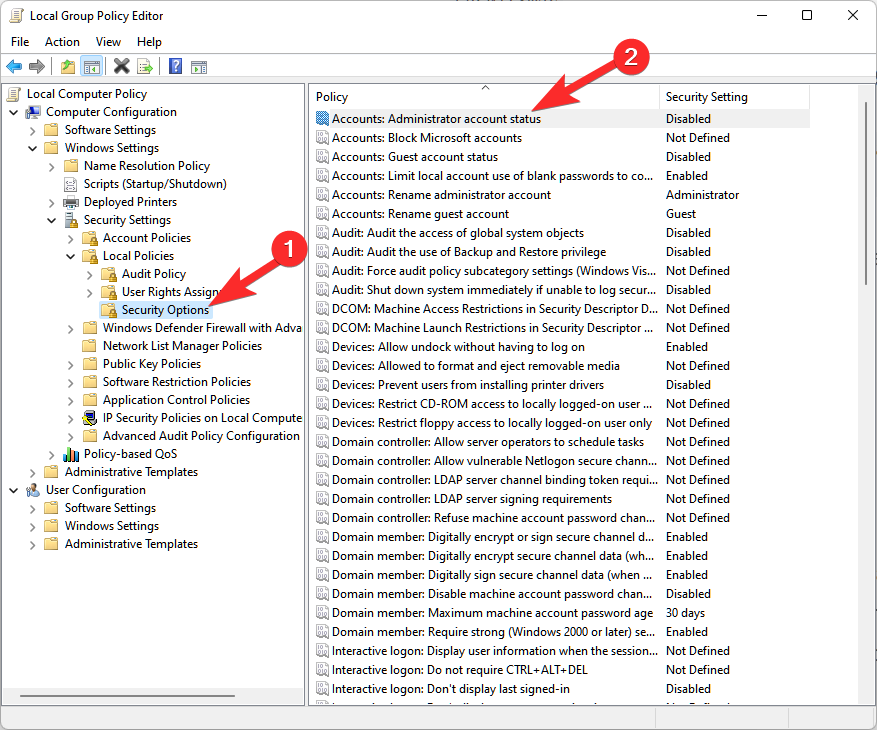
Navigate to the following directory using the left sidebar.
Computer Configuration\Windows Settings\Security Settings\Local Policies\Security Options\
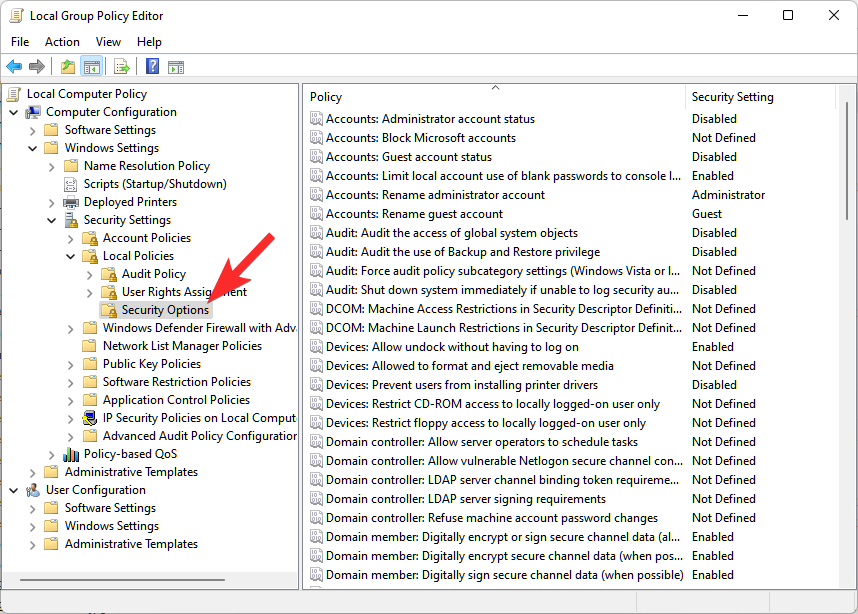
Now double click on the following value on your right: Accounts: Administrator account status
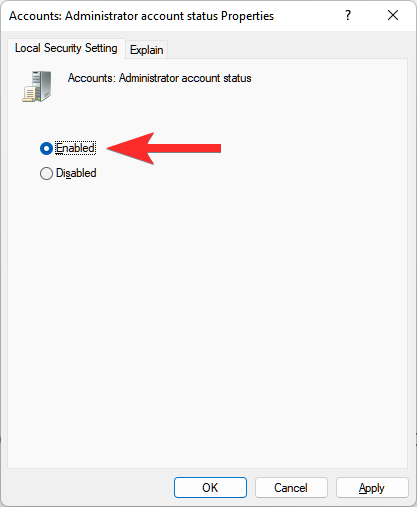
Select ‘Enabled’.
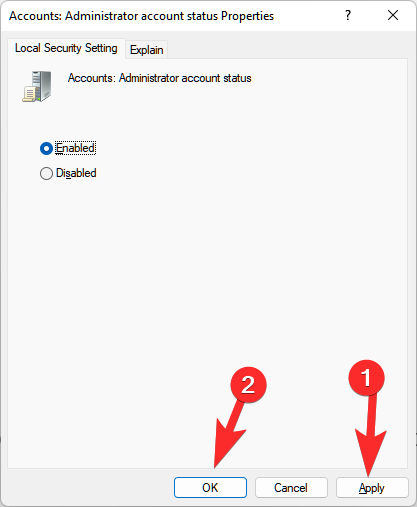
Click on ‘Apply’ and then on ‘OK’.
Close the GPO window now and press the Windows key on your keyboard to open the Start menu. Now click on your username in the bottom left corner of your screen and a new Administrator account should now be available to you.
1.2 Disable the default administrator account
Now that you are done with your administrative tasks, it is recommended that you disable your administrator account to prevent unauthorized access to your system. Use one of the methods below that best suits your current needs and requirements. Let’s get started.
1.2.1 Using CMD
Activate CMD on your PC depending on your current setup and type in the following command. Press Enter on your keyboard to execute it.
net user administrator /active:no

And that’s it! The default administrator account should now be disabled on your PC.
1.2.2 Using Admin Tools
Press Windows + R and enter the following term in the Run dialog box. Press Enter on your keyboard once you are done.
lusrmgr.msc

Select ‘Users’ from the left sidebar and click on ‘Administrator’ on your right.
Select the checkbox for ‘Account is disabled’ option.
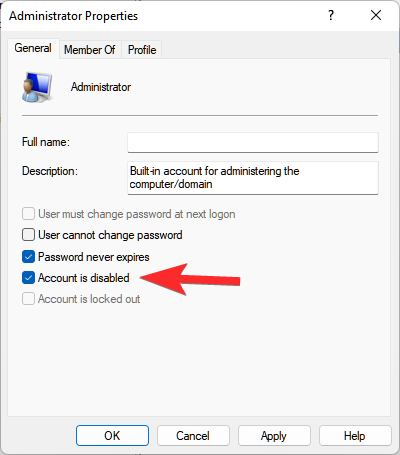
Click Apply and then OK.

Close the admin tools window and the default administrator account should now be disabled on your PC.
1.2.3 Using Registry Editor
Press Windows + R, type in the following, and press Enter on your keyboard to open the Registry Editor on your PC.
regedit

Once the registry editor opens, navigate to the path given below.
Computer\HKEY_LOCAL_MACHINE\SOFTWARE\Microsoft\Windows NT\CurrentVersion\Winlogon\SpecialAccounts\UserList

Click on ‘Administrator’ on your right and hit Del on your keyboard.
Confirm your choice by clicking on ‘Yes’.
Restart your PC and the default admin account should no longer be available on your lock screen.
1.2.4 Using GPO
Press Windows + R and type in the following. Press Enter on your keyboard once you are done.
gpedit.msc
Now navigate to the following path.
Computer Configuration\Windows Settings\Security Settings\Local Policies\Security Options\

Now double click on the following value on your right: Accounts: Administrator account status

Select ‘Disabled’.
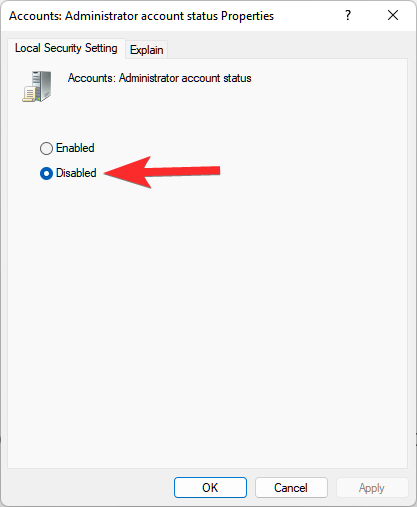
Click on ‘Apply’ and then on ‘OK’.
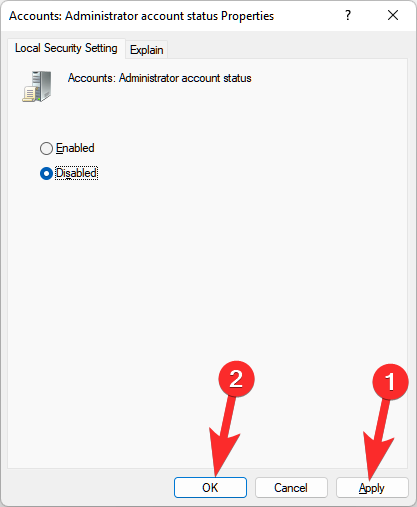
Close the GPO window.
The default administrator account will now be disabled on your PC via the Group Policy Editor in Windows 11.
1.3 Login as admin using command prompt (can’t get past the lock screen issue)
If you are locked out of Windows and would like to access the administrator account to reset your password then you will need to launch CMD from your lock screen first. You will need a recovery environment to proceed with this guide.
You will need to first access CMD using Windows installation media (a Windows bootable USB) for this guide and then follow the steps below. If using an installation media press Shift + F10 during the setup to launch CMD anywhere.
Follow the guide below to get you started once you have launched CMD as given above.
Once the command prompt launches, enter the following command and press Enter on your keyboard.
cd windows

You will now be taken to your default boot drive in CMD. Enter the following command and execute it by press Enter on your keyboard.
cd system32

You will now be in the System32 directory. Execute the command below to create a backup of utilman.exe.
copy utilman.exe utilman.exe.back

Execute the command below within CMD now.
copy cmd.exe cmd1.exe

Now let’s delete the default utilman.exe.
del utilman.exe

We will now rename CMD so that it can be accessed as utilman.exe.
rename cmd.exe utilman.exe

Once all the commands are executed successfully, close the command prompt by typing in the following command.
exit

Restart your PC and proceed to the Windows lock screen as you normally would. Click on the accessibility icon in the bottom right corner and you should now be able to access CMD on your lock screen. Follow the guide above to enable administrator account on your system. Once enabled, you can use the guide below to reset a local account’s password. Once you have reset your password it is highly recommended that you revert the changes we made to cmd.exe and utilman.exe earlier. Use the steps below to revert your changes.
Press Windows + S on your keyboard and search for CMD. Click on ‘Run as administrator’ once it shows up in your search results.
Now enter the following commands one by one and execute them to revert your changes. Make sure to execute each command one after the other without changing their order.


rename utilman.exe.back utilman.exe

CMD functionality should now be restored within Windows 11. You can check for the same by pressing Windows + R on your keyboard, typing in CMD, and hitting Enter on your keyboard. If CMD launches on your system then all the necessary changes have been reverted successfully.
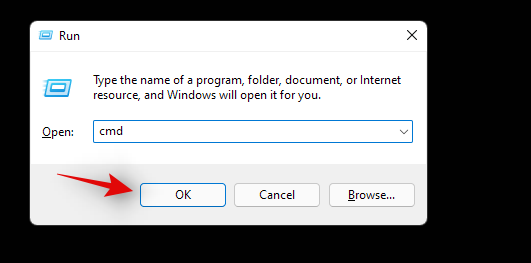
However, if CMD does not launch, make sure that you executed each command successfully on your system by re-verifying each one in the list above.
And that’s it! You should now be able to access CMD from your lock screen.
1.4 Reset password for a local account
You can now reset your local account’s password with the default administrator account we just enabled. Follow the steps below to get you started.
Log in to the Windows administrator account and then press Windows + S on your keyboard. Search for Control Panel and click and launch the app once it shows up in your search results.
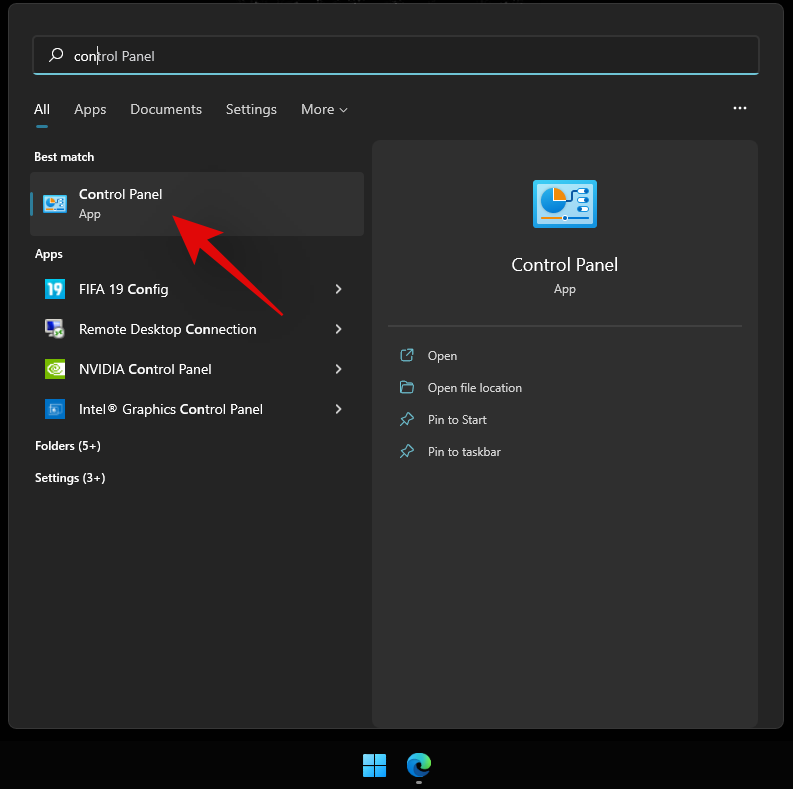
Click on ‘User Accounts’.
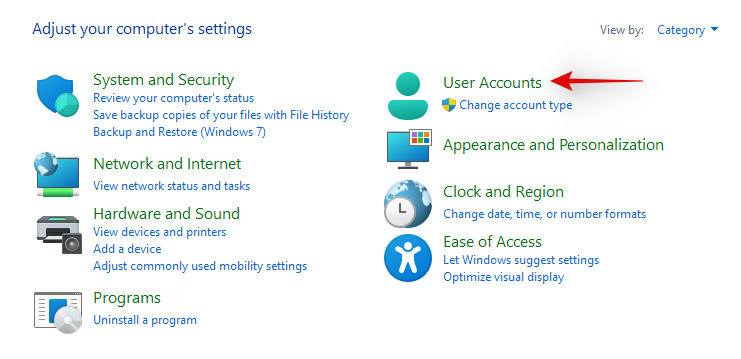
Click on ‘User Accounts’ again.
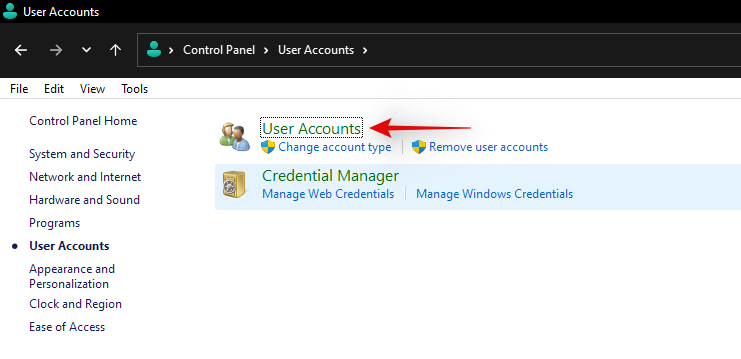
Click on ‘Manage another account’.
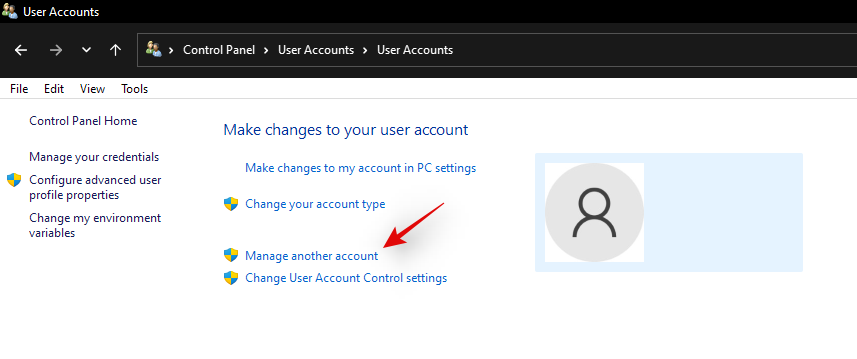
Click and select the account for which you wish to change the password.
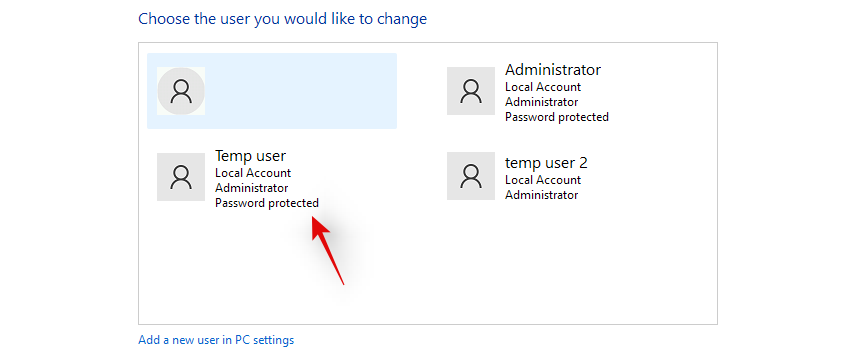
Now click on ‘Change the password’.

Type in your new password and confirm the same in the respective text boxes
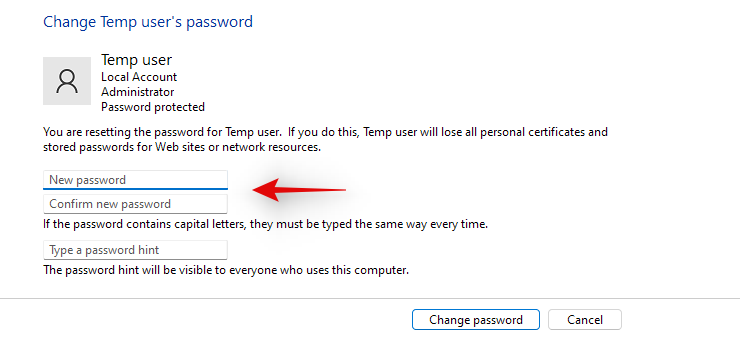
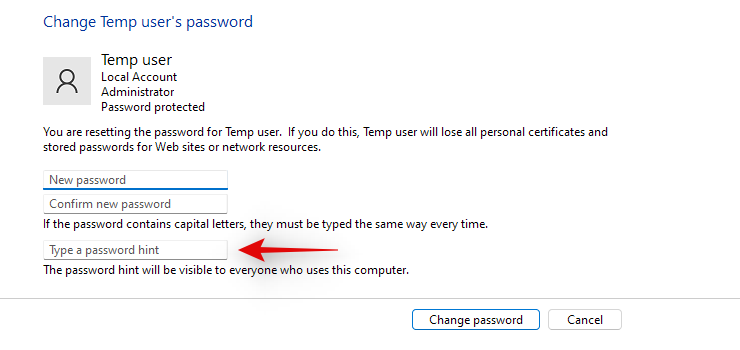
Set a password hint if needed.
Click on ‘Change password’ once you are done.
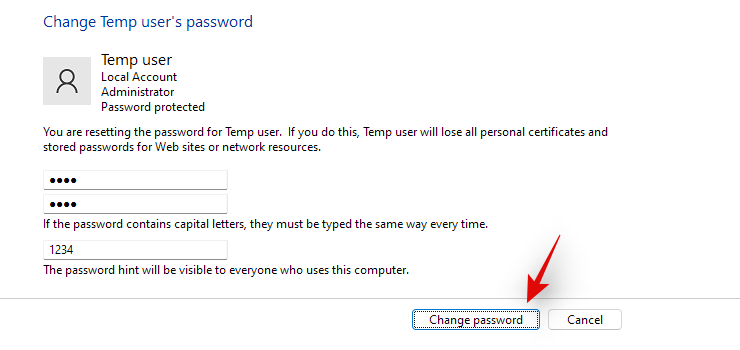
And that’s it! The password for the selected account should now be changed. You can now visit the lock screen and log into your local account using your new password. We recommend you revert any changes made at this point to maintain your security and privacy. You should revert any CMD changes made as well as disable the default administrator account on your system using the guides above.
Method #02: Create a new administrator account in Windows 11
If you wish to create a new administrator account in Windows 11, then you can follow the steps below. Please keep in mind that you will need administrator privileges to create a new administrator user account on your device. Follow the guide below to get you started.
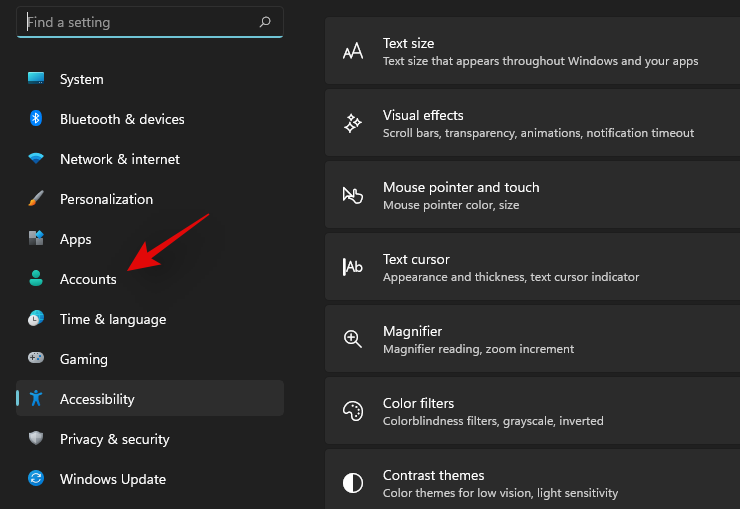
Press Windows + i on your keyboard and select ‘Accounts’ from the left sidebar.
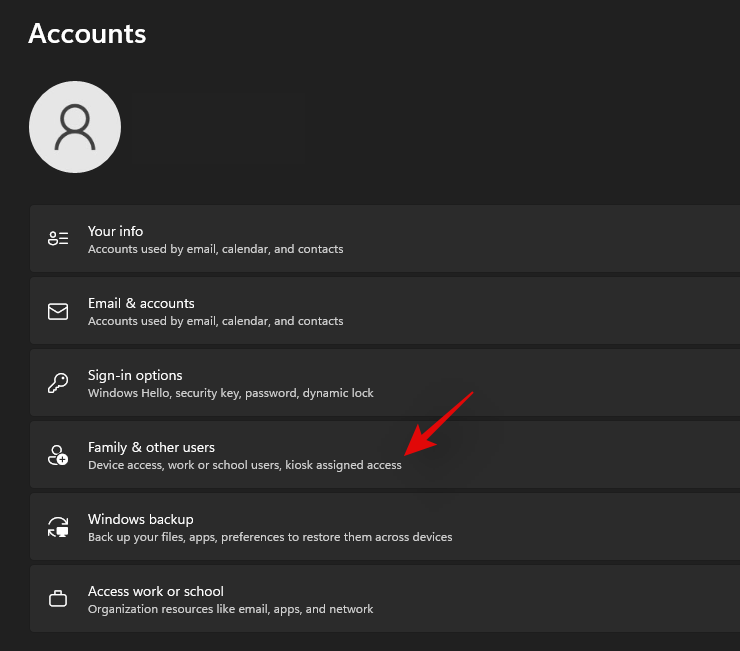
Click on ‘Family & other users’.
Click on ‘Add account’.

At this point, you can enter the Microsoft Account details of the new user and follow the on-screen steps to set up a new account. However, if you are looking to create a new local account then you can continue with the steps below.
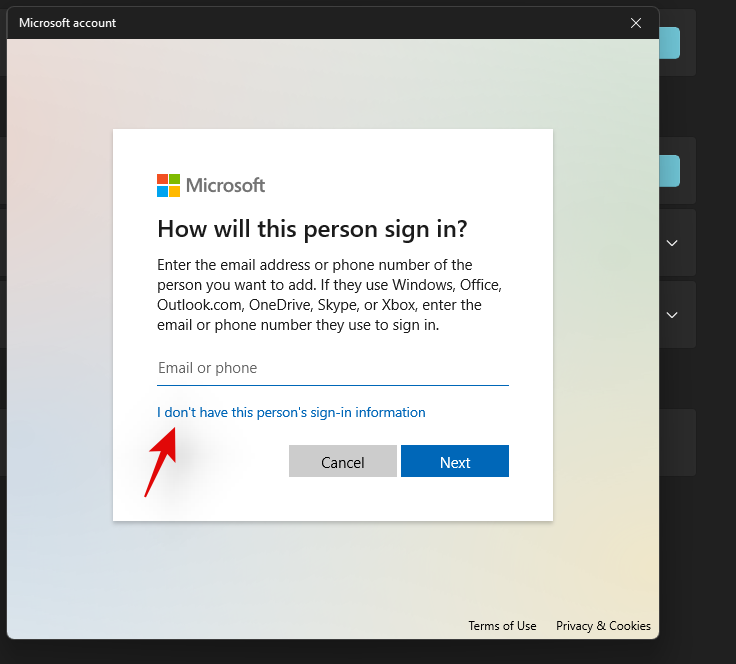
Click on ‘I don’t have this person’s sign-in information’.
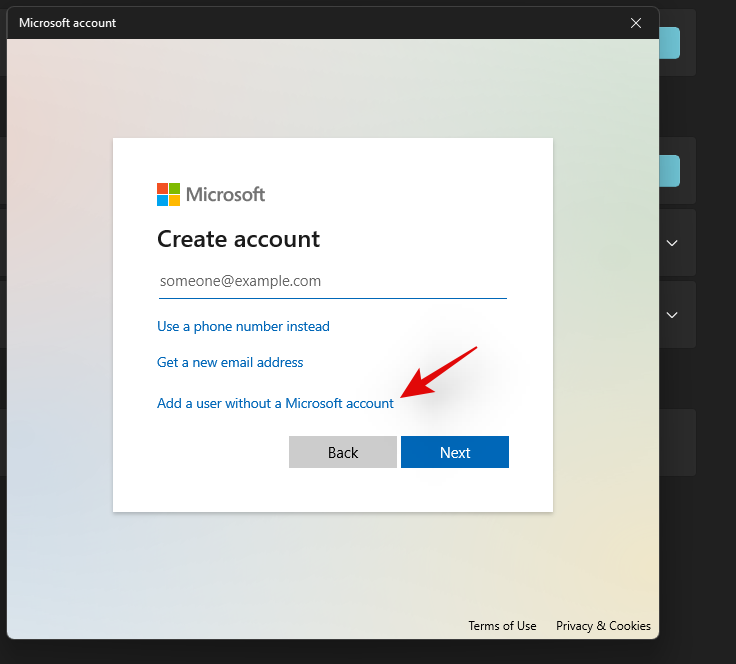
Click on ‘Add a user without a Microsoft account’.
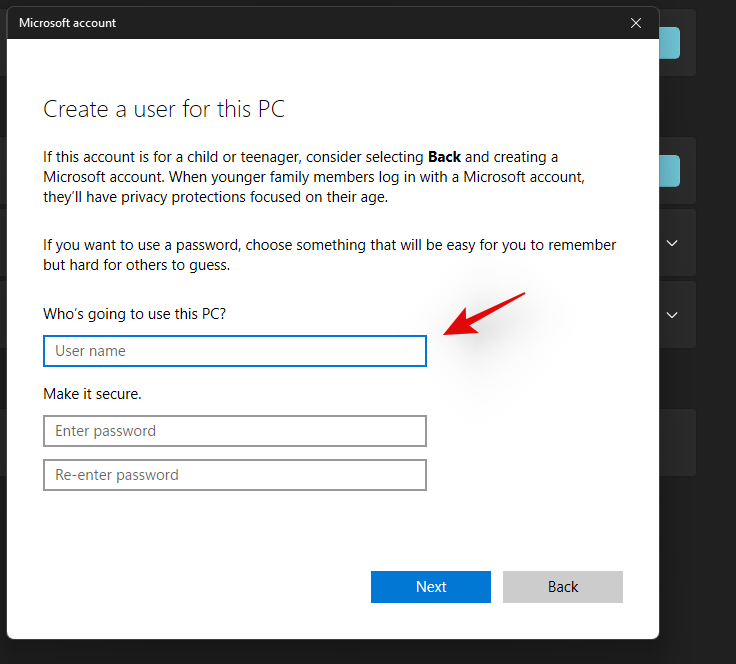
Enter the name of the new user.
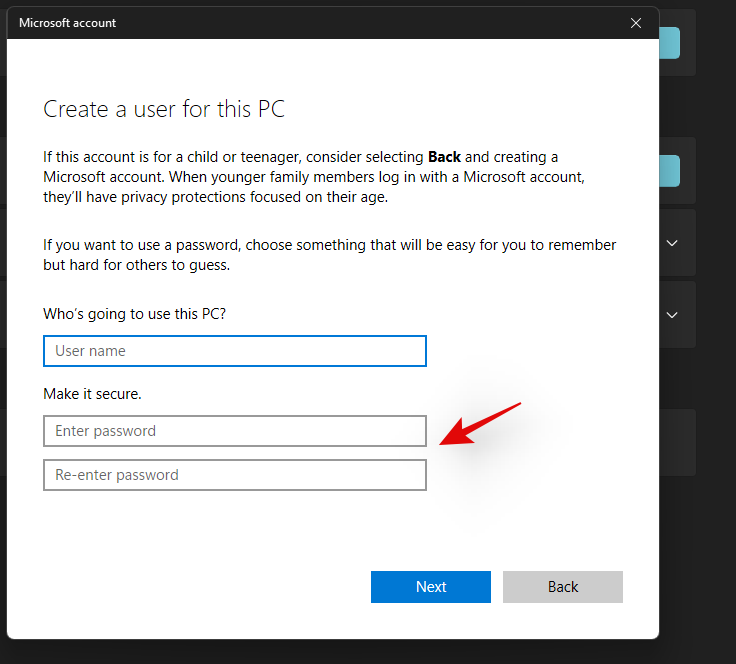
Now set a password and confirm the same.
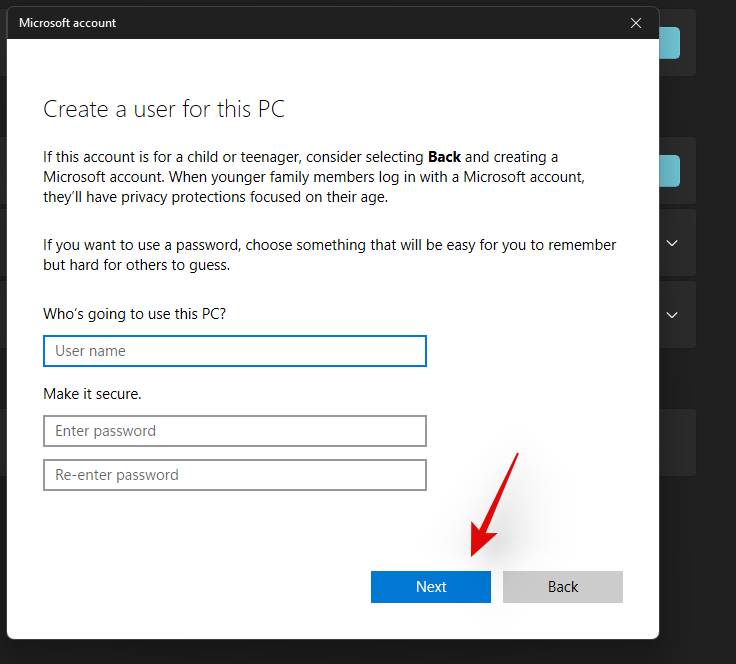
Click on ‘Next’ once you are done.
 \
\
A new account will now be added to your PC. However, the newly added account is a standard account. Let’s convert it into an administrator account. Press Windows + S on your keyboard and search for Control Panel. Click and launch the app from your search results.
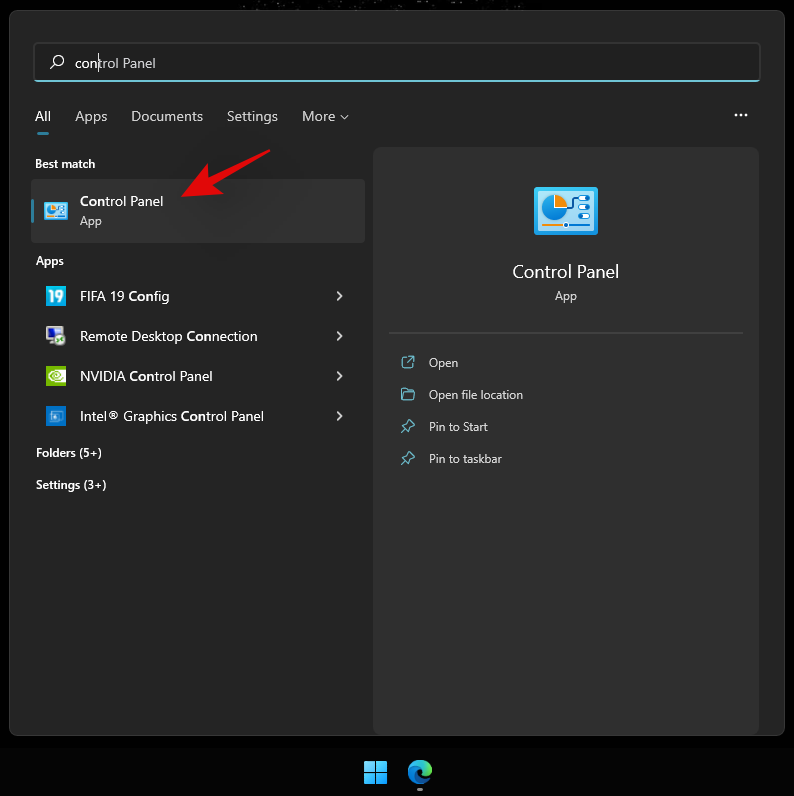
Click on ‘User Accounts’.
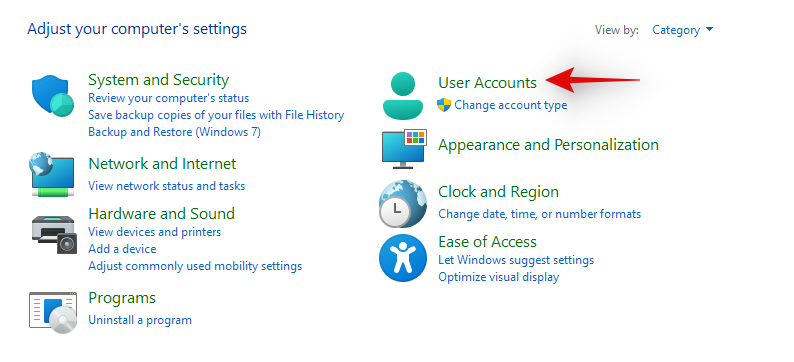
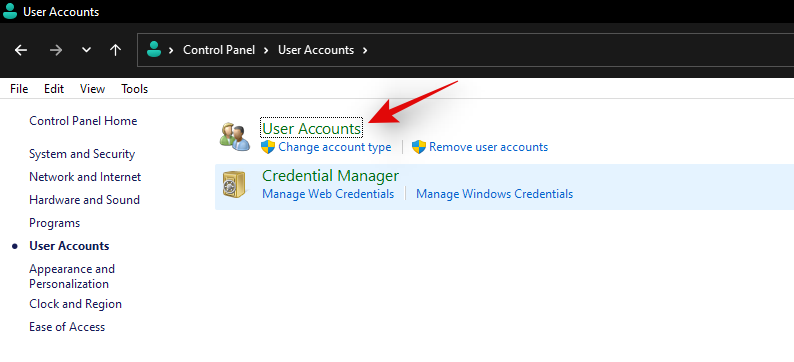
Click on ‘User Accounts’ again.
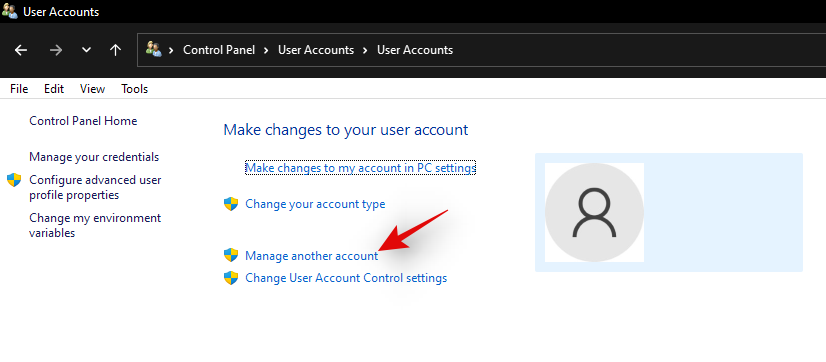
Click on ‘Manage another account’.
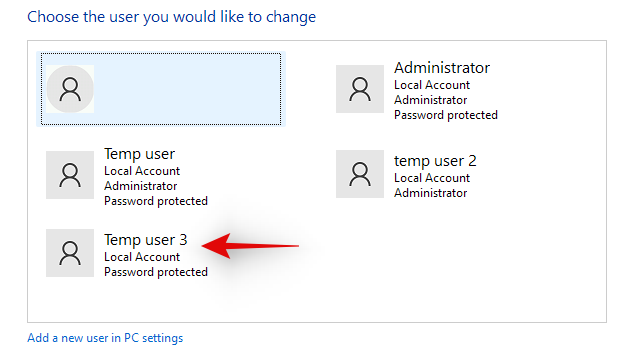
Now click and select the new account you just created.
Click on ��Change the account type’.

Click and select ‘Administrator’.
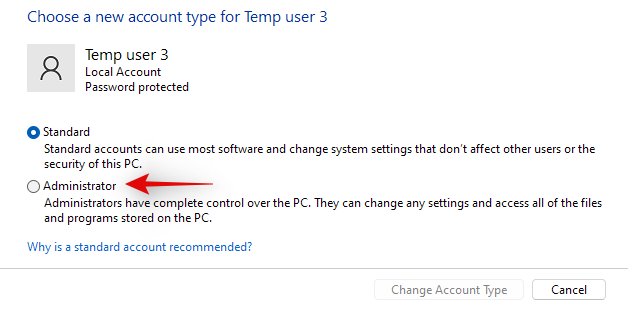
Finally, click on ‘Change account type’.
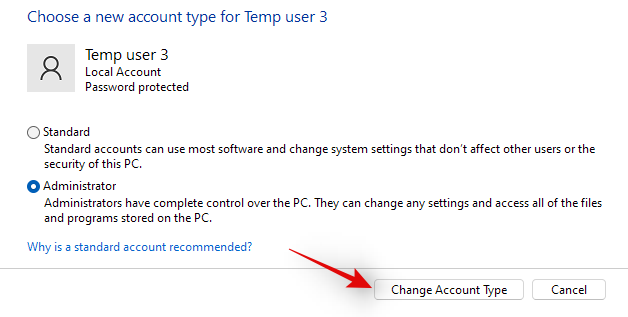
And that’s it! You will now have created a new local administrator account on your device.
Method #03: Change a standard account to an administrator account
If you have a standard account then you can simply switch to an administrator account. If using the Windows Home edition then you can either use the Control Panel method or the ‘netplwiz’ method. On the other hand, Windows Pro and higher users can use either of the methods listed below. Let’s get started.
Note: If you are logged in as a standard user and would like to convert the same account to an administrator account then we recommend you use the netplwiz guide in the methods below.
3.1 Using Control Panel (Windows home)
Press Windows + S on your keyboard, search for Control Panel and launch the app once it shows up in your search results.

Click on ‘User Accounts’.

Click on ‘User Accounts’ again.

If you wish to change your own account’s type then click on ‘Change your account type’. If you wish to convert another local account then select ‘Manage another account’ and select the concerned account. Once selected, click on ‘Change account type’.

Select ‘Administrator’.

Click on ‘Change account type’.

And that’s it, the concerned account should now be an administrator account on your system.
3.2 Using netplwiz
You can also use netplwiz to your advantage and convert user accounts on your PC. Follow the guide below to get you started.
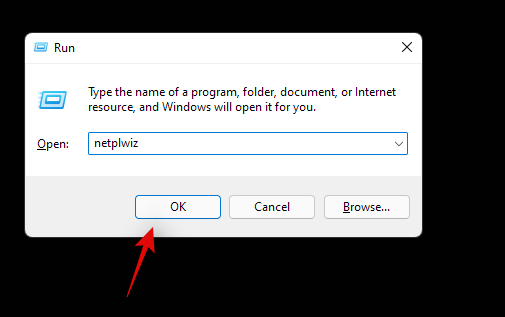
Press Windows + R on your keyboard to launch the run dialog box. Once launched, type in the following and press Enter on your keyboard.
netplwiz
Check the box for ‘Users must enter a user name and password to use this computer’ at the top.
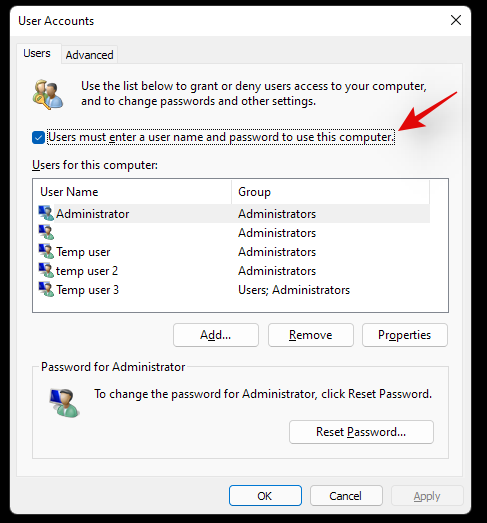
Now click and select the user account you wish to convert from the list below.
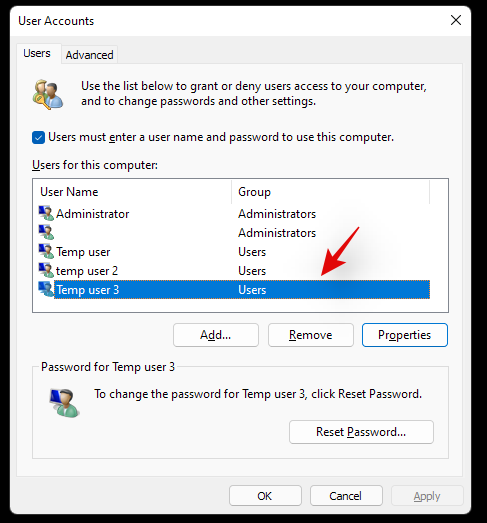
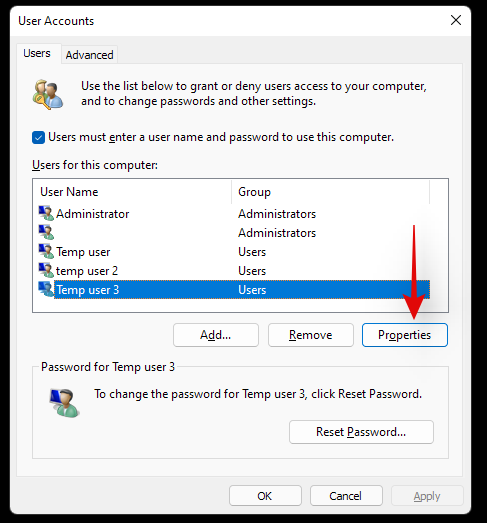
Click on ‘Properties’.
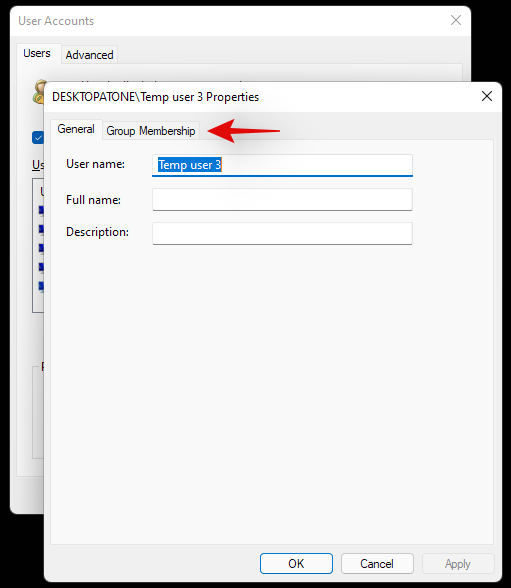
Switch to the ‘Group Membership’ tab at the top.
Click and select ‘Administrator’.
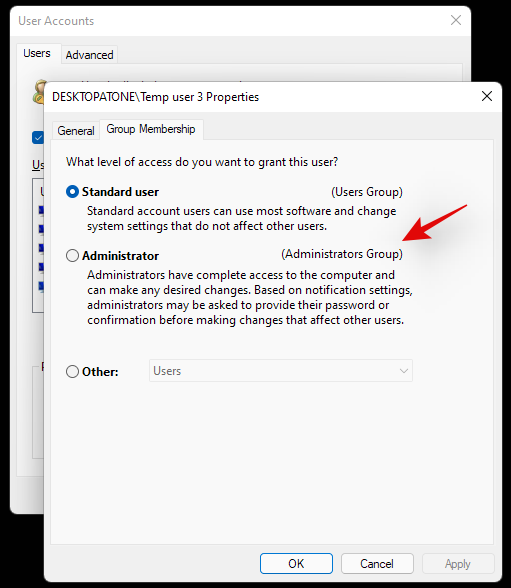
Click on ‘Ok’ twice, once you are done.
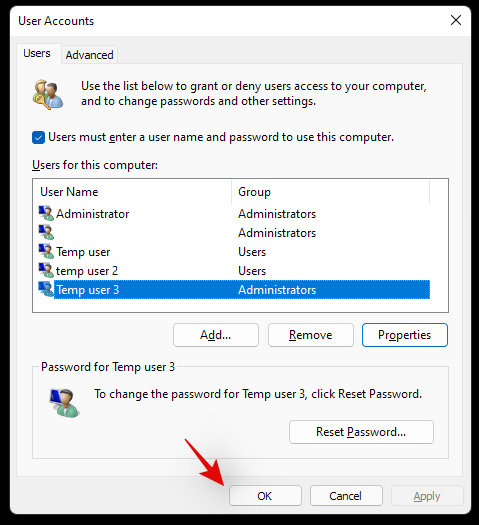
If you converted the current local account that you are signed in with then you will be prompted to re-login to the account for the changes to take effect. Click on ‘Yes’ to confirm your choice.
You will now be taken to the lock screen. Login to the concerned account and you should now have administrator privileges within it.
3.3 Using Local groups manager (Windows Pro and higher)
Press Windows + R on your keyboard, type in the following, and press Enter on your keyboard.
lusrmgr.msc
The local groups manager should now launch on your PC. Click and open ‘Users’ on your left.
Now select the desired User account that you wish to convert from your right and double click on it.
Switch to the ‘Member of’ tab and select the ‘Administrator’ group.
Click on ‘Ok’ once you are done.
And that’s it! The selected account will now have elevated administrator privileges within Windows.
Can you set or reset a password when logged in as an administrator?
Yes, you can easily reset your password as an administrator in Windows 11. This can be done in multiple ways and you can reset the password for a standard account or an administrator account using this method. This can be quite useful if you have forgotten your password and would like to get back into your system without losing your data.
However, you should keep in mind that this can be used by anyone to change your password and get access to your system. Hence, it is recommended that you set a secure password for your default account whenever possible.
For now, you can use the guide below to reset a password in Windows 11 when logged in as an administrator.
How to reset the password once logged in as an administrator
Resetting your password is quite easy when you are logged in to Windows 11 as an administrator. The best way to do this is by using either the Control Panel or CMD. Use one of the guides below that best fits your current needs and requirements. Follow any one of the guides below to get you started.
1. Using Control Panel
Press Windows + S and search for Control Panel. Click and launch the app from your search results.

Click on ‘User Accounts’.

Now click on ‘User Accounts’ again.

Click on ‘Manage another account’.

Now click and select your local account for which you wish to reset your password.

Click on ‘Change the password’.

Add a new password for your local account and confirm the same in their respective text boxes.

Now add a password hint if required.

Click on ‘Change password’ once done.

And that’s it! The password for the selected account should now be changed based on your preferences.
2. Using CMD
You can also reset a local account’s password using CMD. Follow the guide below to get you started.
Press Windows + S on your keyboard and search for CMD. Click on ‘Run as administrator’ once the app shows up in your search result.
Type in the following and press Enter on your keyboard.
net user

You will get a list of all the accounts currently available on your PC. Make a note of the desired account’s username and then type in the command below. Replace ‘NAME’ with the name you noted down earlier and replace ‘PASSWORD’ with your new password. Once done, press Enter on your keyboard.
net user NAME PASSWORD
And that’s it! Once the command is executed, the password for the desired account should be automatically changed on your PC.
How to add a password for the administrator account
If you are looking to secure your PC further then it is recommended that you add a password for the default administrator account. This will ensure that no one aware of this trick can access your Windows account without your authorization. We can add a password for your default admin account in several ways but we recommend you do so either via the advanced menu or via the CMD method. Follow any one of the guides below to get you started.
1. Using Ctrl + Alt + Del
Log in to the default administrator account and press Ctrl + Alt + Del on your keyboard.
Now click and select ‘Change password’.
Enter a new password and confirm the same in their respective fields.
Add a password hint or security question depending on your preferences.
Click on ‘Ok’ once you are done.
And that’s it! Your default administrator account’s password should now be changed on your PC.
2. Using CMD
Log in to the default administrator account and press Windows + S on your keyboard. Search for CMD and click on ‘Run as administrator’ once the app shows up in your search results.
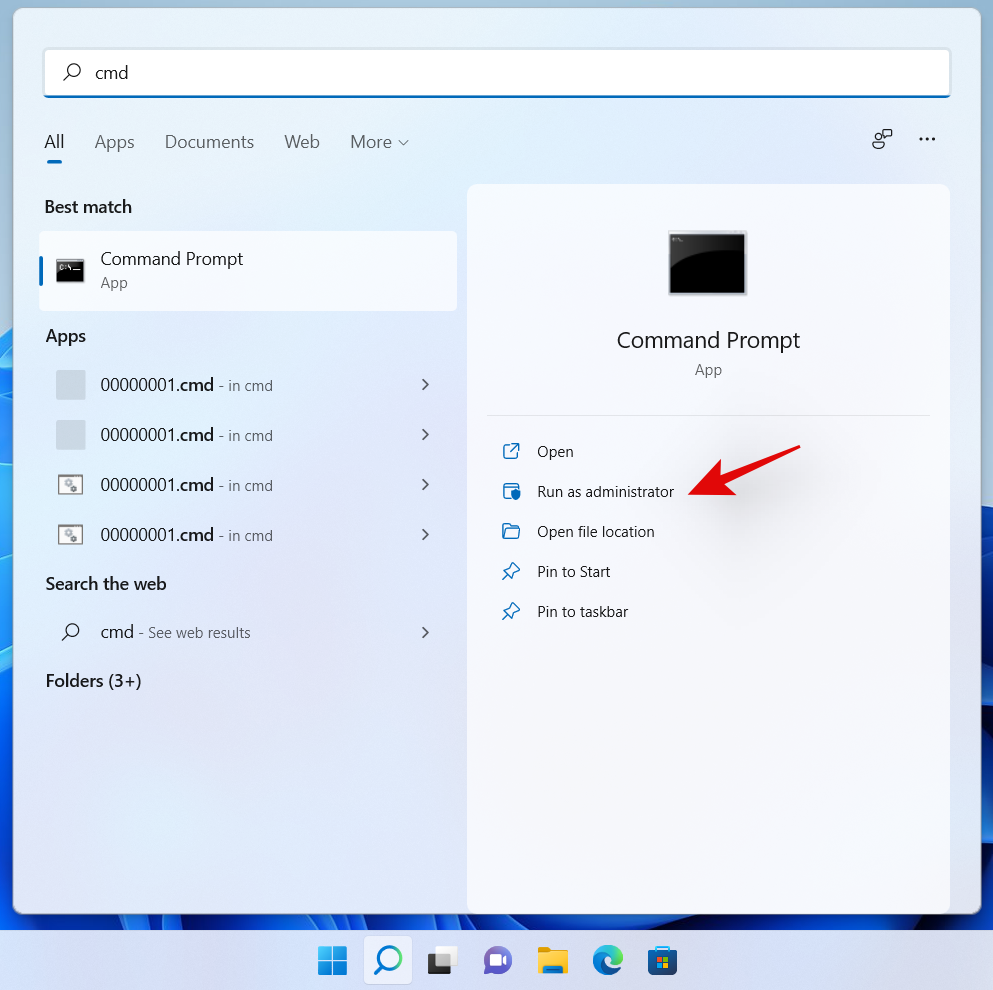
Now enter the following command. Replace ‘PASSWORD’ with a password of your desired choice.
net user Administrator PASSWORD

And that’s it! The new password should now be set for your default administrator account.
Should you keep the administrator account enabled?
No, it is not recommended to keep your default/super administrator account enabled. This account has higher and more elevated privileges when compared to a normal administrator account in Windows. This account is used by Windows to perform system-level tasks in the background as well hence it could cause several privacy issues on your system.
In case somebody can access this account, they would have access to your entire data and hardware. The user could then proceed to take control of your entire system or simply infect it with malware, adware, and in the worst cases, ransomware.
We hope you were able to easily log in as an administrator in Windows 11 using the guide above. If you face any issues or have any more questions for us, feel free to reach out to us using the comments section below.
Related:


 \
\


