The Rise of Machines: Real World Applications of AI

Gervigreind er ekki í framtíðinni, hún er hér í nútímanum Í þessu bloggi Lestu hvernig gervigreindarforrit hafa haft áhrif á ýmsa geira.
TLS 1.3 is a version of the Transport Layer Security (TLS) protocol that was published in 2018 as a proposed standard in RFC 8446. It offers security and performance improvements over its predecessors.
This guide will demonstrate how to enable TLS 1.3 using the Nginx web server on Ubuntu 18.04 LTS.
1.13.0 or greater.1.1.1 or greater.A/AAAA/CNAME DNS records for your domain.Check the Ubuntu version.
lsb_release -ds
# Ubuntu 18.04.1 LTS
Create a new non-root user account with sudo access and switch to it.
adduser johndoe --gecos "John Doe"
usermod -aG sudo johndoe
su - johndoe
NOTE: Replace johndoe with your username.
Set up the timezone.
sudo dpkg-reconfigure tzdata
Ensure that your system is up to date.
sudo apt update && sudo apt upgrade -y
Install build-essential, socat and git packages.
sudo apt install -y build-essential socat git
Download and install Acme.sh.
sudo mkdir /etc/letsencrypt
git clone https://github.com/Neilpang/acme.sh.git
cd acme.sh
sudo ./acme.sh --install --home /etc/letsencrypt --accountemail your_email@example.com
cd ~
source ~/.bashrc
Check the version.
acme.sh --version
# v2.8.0
Obtain RSA and ECDSA certificates for your domain.
# RSA 2048
sudo /etc/letsencrypt/acme.sh --issue --standalone --home /etc/letsencrypt -d example.com --ocsp-must-staple --keylength 2048
# ECDSA
sudo /etc/letsencrypt/acme.sh --issue --standalone --home /etc/letsencrypt -d example.com --ocsp-must-staple --keylength ec-256
NOTE: Replace example.com in commands with your domain name.
After running the previous commands, your certificates and keys will be accessible at:
/etc/letsencrypt/example.com directory./etc/letsencrypt/example.com_ecc directory.Nginx added support for TLS 1.3 in version 1.13.0. On most Linux distributions, including Ubuntu 18.04, Nginx is built with the older OpenSSL version, which does not support TLS 1.3. Consequently, we need our own custom Nginx build linked to the OpenSSL 1.1.1 release, which includes support for TLS 1.3.
Download the latest mainline version of the Nginx source code and extract it.
wget https://nginx.org/download/nginx-1.15.5.tar.gz && tar zxvf nginx-1.15.5.tar.gz
Download the OpenSSL 1.1.1 source code and extract it.
# OpenSSL version 1.1.1
wget https://www.openssl.org/source/openssl-1.1.1.tar.gz && tar xzvf openssl-1.1.1.tar.gz
Delete all .tar.gz files, as they will not be needed anymore.
rm -rf *.tar.gz
Enter the Nginx source directory.
cd ~/nginx-1.15.5
Configure, compile and install Nginx. For the simplicity's sake, we will compile only essential modules that are required for TLS 1.3 to work. If you need a full Nginx build, you can read this Vultr guide about Nginx compilation.
./configure --prefix=/etc/nginx \
            --sbin-path=/usr/sbin/nginx \
            --modules-path=/usr/lib/nginx/modules \
            --conf-path=/etc/nginx/nginx.conf \
            --error-log-path=/var/log/nginx/error.log \
            --pid-path=/var/run/nginx.pid \
            --lock-path=/var/run/nginx.lock \
            --user=nginx \
            --group=nginx \
            --build=Ubuntu \
            --builddir=nginx-1.15.5 \
            --http-log-path=/var/log/nginx/access.log \
            --http-client-body-temp-path=/var/cache/nginx/client_temp \
            --http-proxy-temp-path=/var/cache/nginx/proxy_temp \
            --http-fastcgi-temp-path=/var/cache/nginx/fastcgi_temp \
            --http-uwsgi-temp-path=/var/cache/nginx/uwsgi_temp \
            --http-scgi-temp-path=/var/cache/nginx/scgi_temp \
            --with-compat \
            --with-http_ssl_module \
            --with-http_v2_module \
            --with-openssl=../openssl-1.1.1 \
            --with-openssl-opt=no-nextprotoneg \
            --without-http_rewrite_module \
            --without-http_gzip_module

make
sudo make install
Create Nginx system group and user.
sudo adduser --system --home /nonexistent --shell /bin/false --no-create-home --disabled-login --disabled-password --gecos "nginx user" --group nginx
Symlink /usr/lib/nginx/modules to /etc/nginx/modules directory. etc/nginx/modules is a standard place for Nginx modules.
sudo ln -s /usr/lib/nginx/modules /etc/nginx/modules
Create Nginx cache directories and set proper permissions.
sudo mkdir -p /var/cache/nginx/client_temp /var/cache/nginx/fastcgi_temp /var/cache/nginx/proxy_temp /var/cache/nginx/scgi_temp /var/cache/nginx/uwsgi_temp
sudo chmod 700 /var/cache/nginx/*
sudo chown nginx:root /var/cache/nginx/*
Check the Nginx version.
sudo nginx -V

# nginx version: nginx/1.15.5 (Ubuntu)
# built by gcc 7.3.0 (Ubuntu 7.3.0-27ubuntu1~18.04)
# built with OpenSSL 1.1.1  11 Sep 2018
# TLS SNI support enabled
# configure arguments: --prefix=/etc/nginx --sbin-path=/usr/sbin/nginx . . .
# . . .
Create Nginx systemd unit file.
sudo vim /etc/systemd/system/nginx.service
Populate the file with the following configuration.
[Unit]
Description=nginx - high performance web server
Documentation=https://nginx.org/en/docs/
After=network-online.target remote-fs.target nss-lookup.target
Wants=network-online.target

[Service]
Type=forking
PIDFile=/var/run/nginx.pid
ExecStartPre=/usr/sbin/nginx -t -c /etc/nginx/nginx.conf
ExecStart=/usr/sbin/nginx -c /etc/nginx/nginx.conf
ExecReload=/bin/kill -s HUP $MAINPID
ExecStop=/bin/kill -s TERM $MAINPID

[Install]
WantedBy=multi-user.target
Start and enable Nginx.
sudo systemctl start nginx.service
sudo systemctl enable nginx.service
Create conf.d, sites-available and sites-enabled directories in /etc/nginx directory.
sudo mkdir /etc/nginx/{conf.d,sites-available,sites-enabled}
Run sudo vim /etc/nginx/nginx.conf and add the following two directives to the end of file, just before the closing }.
    . . .
    . . .
    include /etc/nginx/conf.d/*.conf;
    include /etc/nginx/sites-enabled/*.conf;
}
Save the file and exit with :+W+Q.
Now that we have successfully built Nginx, we are ready to configure it to start using TLS 1.3 on our server.
Run sudo vim /etc/nginx/conf.d/example.com.conf and populate the file with the following configuration.
server {
  listen 443 ssl http2;
  listen [::]:443 ssl http2;

  # RSA
  ssl_certificate /etc/letsencrypt/example.com/fullchain.cer;
  ssl_certificate_key /etc/letsencrypt/example.com/example.com.key;
  # ECDSA
  ssl_certificate /etc/letsencrypt/example.com_ecc/fullchain.cer;
  ssl_certificate_key /etc/letsencrypt/example.com_ecc/example.com.key;

  ssl_protocols TLSv1.2 TLSv1.3;

  ssl_prefer_server_ciphers on;

  ssl_ciphers 'ECDHE-ECDSA-AES256-GCM-SHA384:ECDHE-RSA-AES256-GCM-SHA384:ECDHE-ECDSA-CHACHA20-POLY1305:ECDHE-RSA-CHACHA20-POLY1305:ECDHE-ECDSA-AES128-GCM-SHA256:ECDHE-RSA-AES128-GCM-SHA256:ECDHE-ECDSA-AES256-SHA384:ECDHE-RSA-AES256-SHA384:ECDHE-ECDSA-AES128-SHA256:ECDHE-RSA-AES128-SHA256';
}
Save the file and exit with :+W+Q.
Notice the new TLSv1.3 parameter of the ssl_protocols directive. This parameter is necessary to enable TLS 1.3.
Check the configuration.
sudo nginx -t
Reload Nginx.
sudo systemctl reload nginx.service
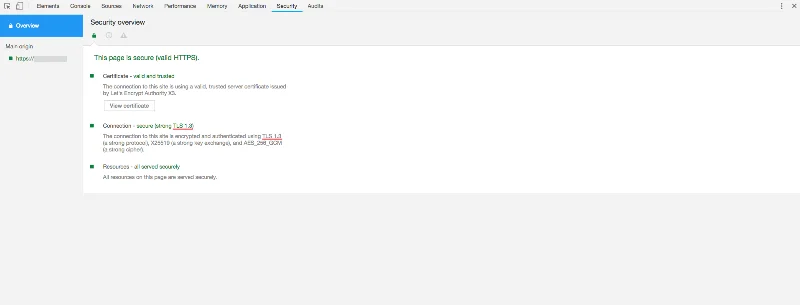
To verify TLS 1.3, you can use browser dev tools or SSL Labs service. The screenshots below shows Chrome's security tab that shows that TLS 1.3 is working.

Congratulations! You have successfully enabled TLS 1.3 on your Ubuntu 18.04 web server.
Gervigreind er ekki í framtíðinni, hún er hér í nútímanum Í þessu bloggi Lestu hvernig gervigreindarforrit hafa haft áhrif á ýmsa geira.
Ertu líka fórnarlamb DDOS árása og ruglaður með forvarnaraðferðirnar? Lestu þessa grein til að leysa spurningar þínar.
Þú gætir hafa heyrt að tölvuþrjótar græða mikið af peningum, en hefur þú einhvern tíma velt því fyrir þér hvernig þeir vinna sér inn svona peninga? við skulum ræða.
Viltu sjá byltingarkenndar uppfinningar frá Google og hvernig þessar uppfinningar breyttu lífi hvers manns í dag? Lestu síðan til að blogga til að sjá uppfinningar frá Google.
Hugmyndin um að sjálfkeyrandi bílar fari á göturnar með hjálp gervigreindar er draumur sem við höfum átt um tíma núna. En þrátt fyrir nokkur loforð eru þau hvergi sjáanleg. Lestu þetta blogg til að læra meira…
Þar sem vísindin þróast hratt og taka yfir mikið af viðleitni okkar, eykst hættan á því að verða fyrir óútskýranlegri einstæðu. Lestu, hvað sérkenni gæti þýtt fyrir okkur.
Lestu bloggið til að þekkja mismunandi lög í Big Data Architecture og virkni þeirra á einfaldasta hátt.
Geymsluaðferðir gagna hafa verið að þróast gæti verið frá fæðingu gagna. Þetta blogg fjallar um þróun gagnageymslu á grundvelli upplýsingamynda.
Í þessum stafræna heimi hafa snjallheimilistæki orðið afgerandi hluti af lífi. Hér eru nokkrir ótrúlegir kostir snjallheimatækja um hvernig þau gera líf okkar þess virði að lifa því og einfaldara.
Nýlega gaf Apple út macOS Catalina 10.15.4 viðbótaruppfærslu til að laga vandamál en svo virðist sem uppfærslan sé að valda fleiri vandamálum sem leiða til múrsteins á Mac vélum. Lestu þessa grein til að læra meira