A Windows-frissítések a Windows XP napjai óta mindig is hírhedt kellemetlenséget okoztak sok felhasználó számára. Szerencsére a Windows-frissítések szállítása drasztikusan javult az elmúlt néhány évben, és manapság nagyon kevés szolgáltatásfrissítés okoz komoly problémákat .
Beállíthatja a Windows rendszert úgy, hogy a háttérben automatikusan töltsön le és frissítsen, és akár az inaktív órákban is újraindul. Mindez nagyszerű, de mi van, ha olyan frissítés van telepítve, amelyre nincs szüksége? Vagy mi van, ha olyan frissítést kap, amely rontja a gép teljesítményét ? Nos, ebben az esetben eltávolíthatja a Windows frissítéseket a Windows 11 rendszerből. Íme azonban néhány dolog, amelyet szem előtt kell tartania, mielőtt eltávolítja a frissítéseket a Windows 11 rendszerű számítógépről.
Kapcsolódó: A frissítések letiltása a Windows 11 rendszeren
Tartalom
Miért távolítsa el a Windows frissítéseket?
Számos oka lehet annak, hogy miért szeretné eltávolítani a Windows frissítéseket, íme néhány a leggyakoribbak közül. Ha a legutóbbi Windows-frissítést követően hibaelhárítást végez, akkor végignézheti ezt a listát.
Ha ilyen problémákkal szembesül a rendszerében, megpróbálhatja eltávolítani a legújabb Windows-frissítést a probléma megoldásához.
- Csökkent általános rendszerteljesítmény
- Hibás illesztőprogram-frissítések
- A Windows szolgáltatásainak működése megszakadt
- Rosszul kezelt erőforrások a háttérben
- Magas CPU vagy lemezhasználat
- Nem kívánt illesztőprogram-frissítés, amelyet megpróbált elkerülni
- Rosszul működik a Windows Security vagy az UAC
- Helytelen régióbeállítások, amelyek nem módosíthatók
- Hiányzó beállítások vagy opciók a Windows 11 rendszeren belül
és több. Rengeteg problémával szembesülhet, amikor új frissítést telepít a Windows 11 rendszerhez, különösen akkor, ha feliratkozott a bétaverzióra vagy a bennfentes csatornára. Ilyen esetekben megpróbálhatja eltávolítani az érintett frissítést az ebben a bejegyzésben található útmutató segítségével.
Kapcsolódó: Hogyan lehet törölni egy függőben lévő Windows Insider frissítést
Biztonságos a Windows frissítések eltávolítása?
Igen, mindaddig, amíg nem távolítja el erőszakosan a Windows-frissítéseket manuálisan, vagy nem használ elavult segédprogramot, biztonságosan eltávolíthatja a Windows-frissítéseket a rendszerről. Ne feledje azonban, hogy a Microsoft a Windows-frissítések segítségével biztonsági javításokat, gyorsjavításokat és egyebeket szállít, hogy megvédje rendszerét a legújabb fenyegetések és biztonsági rések ellen.
A Windows-frissítések eltávolítása az ilyen javításokat is eltávolítja, ami viszont sebezhetővé teszi a rendszert az online fenyegetésekkel szemben. Ez különösen akkor fordul elő, ha a legutóbbi biztonsági frissítéseket szeretné eltávolítani.
Ezért, bár biztonságosan eltávolíthatja a frissítéseket, javasoljuk, hogy a hiba kijavítása után azonnal vonja vissza a módosításokat. Ha a hiba vagy hiba továbbra is fennáll a frissítés újratelepítése után, akkor kitarthat addig, amíg a Microsoft ki nem ad egy következő frissítést és javítást.
Kapcsolódó: A Bing eltávolítása a Windows 11 rendszerből
Hogyan találhatja meg az eltávolítani kívánt frissítéseket
A frissítéseket különféle módszerekkel távolíthatjuk el, de ahhoz, hogy megtalálja az eltávolítani kívánt frissítést, azonosítania kell azt a számítógépén. Minden Microsoft-frissítéshez hozzá van rendelve egy KB szám, amely segít meghatározni és azonosítani a frissítést a fogyasztói PC-ken és a Microsoft szerverein. Ezt a számot előnyünkre használhatjuk, és az alábbi útmutatók egyikével eltávolíthatjuk az érintett frissítést a rendszerből. A következőképpen azonosíthatja a számítógépére telepített Windows frissítéseket.
01. módszer: A beállítások használata
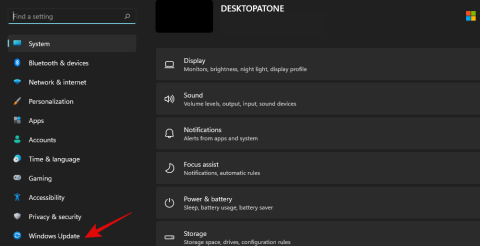
Nyomja Windows + imeg a billentyűzeten a gombot , és a bal oldalon válassza a „Windows frissítés” lehetőséget.
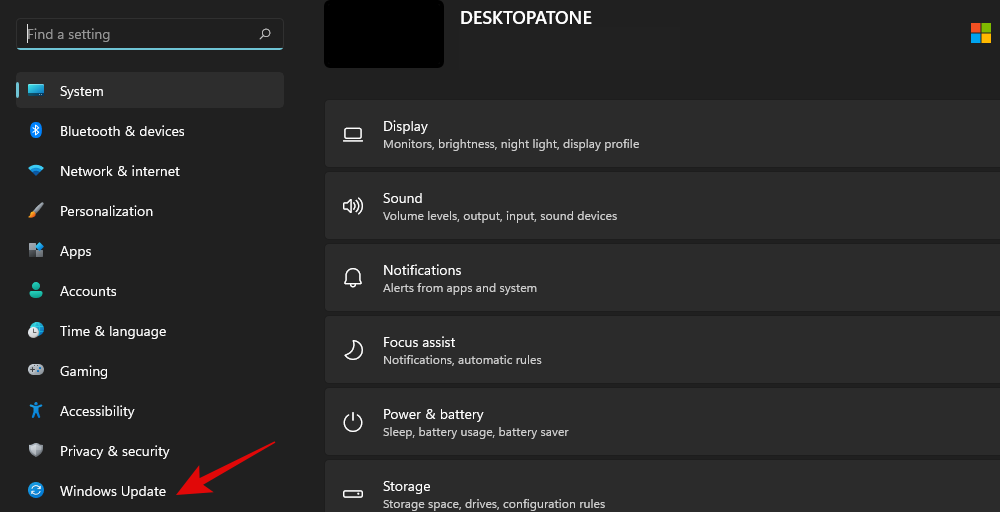
Kattintson az „Előzmények frissítése” lehetőségre most.
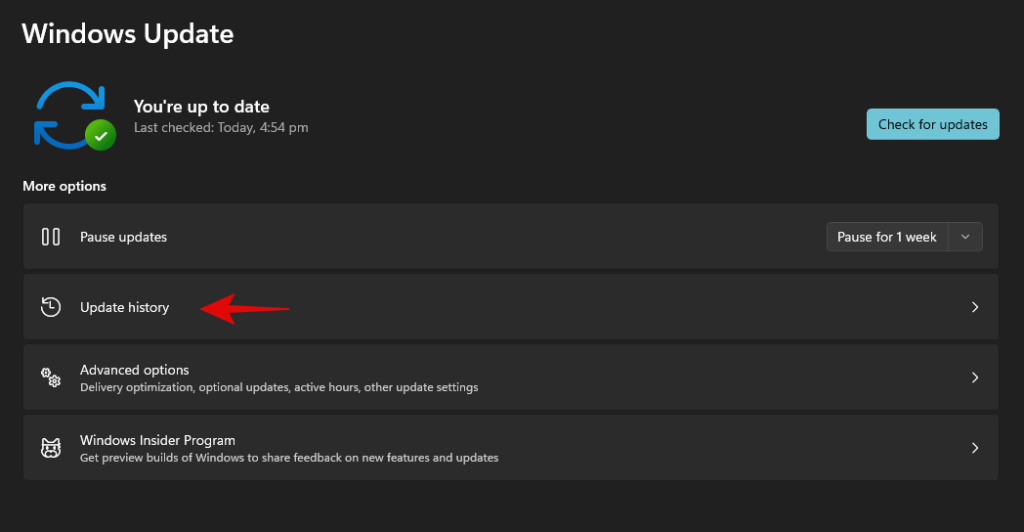
Ekkor megjelenik a rendszerére nemrég telepített Windows-frissítések listája.
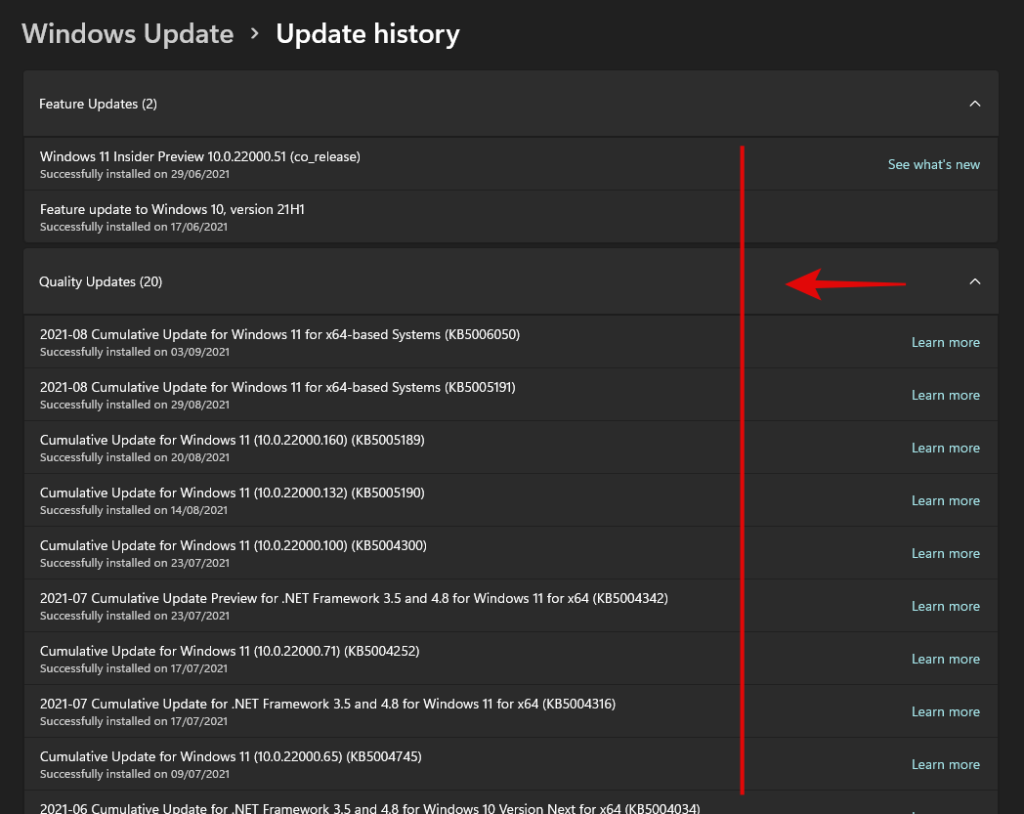
Egyszerűen jegyezze fel a számítógépről eltávolítani kívánt frissítés KB-os számát.
02. módszer: CMD használata
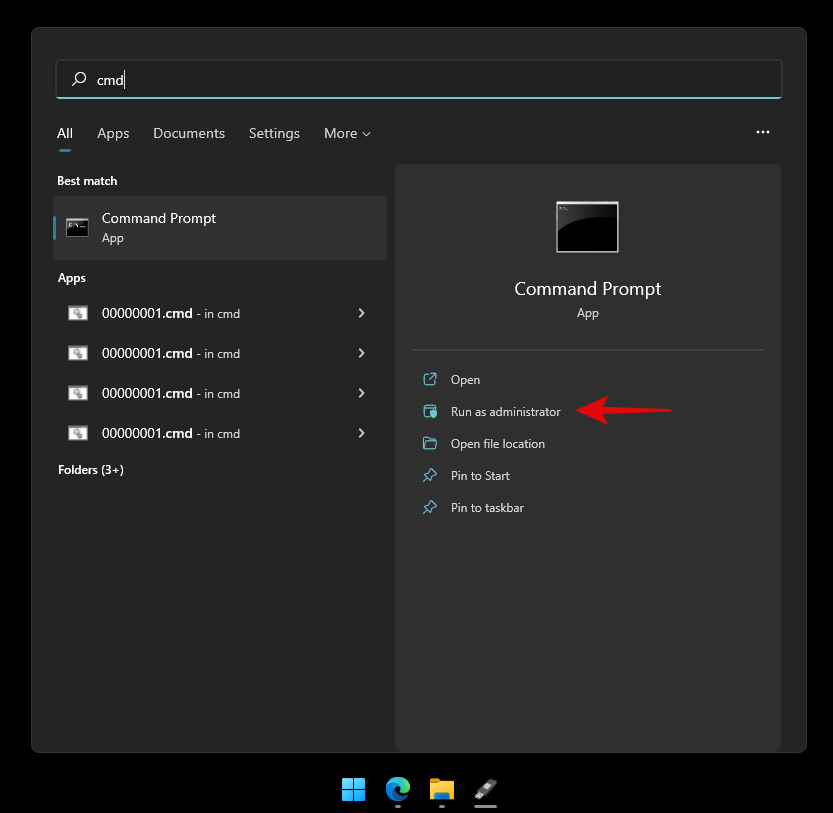
Nyomja Windows + Smeg a billentyűzetet, és keresse meg a CMD kifejezést. Kattintson a „Futtatás rendszergazdaként” lehetőségre, miután az alkalmazás megjelenik a keresési eredmények között.
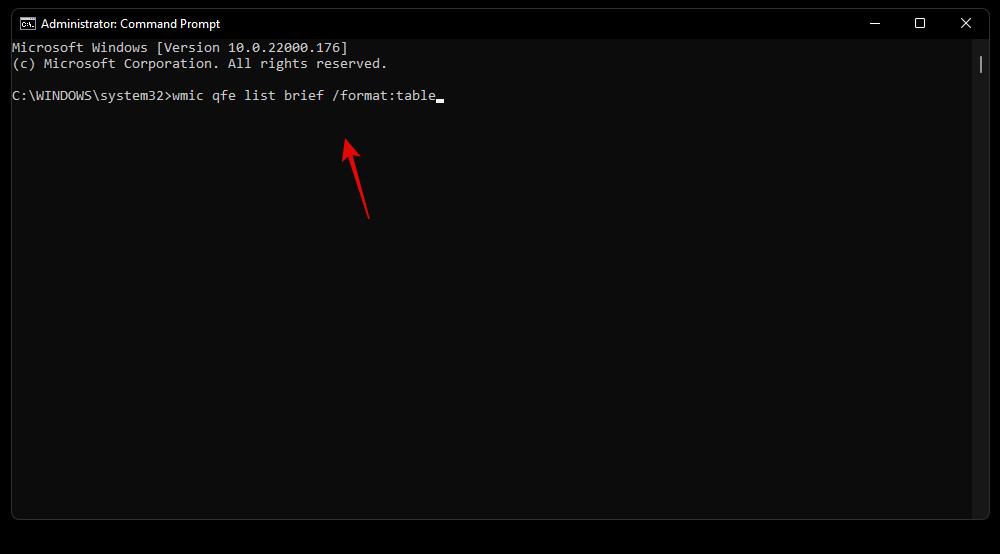
Írja be a következő parancsot, és nyomja meg az Enter billentyűt a billentyűzeten.
wmic qfe list brief /format:table
Ekkor megjelenik a számítógépére telepített összes legutóbbi Windows-frissítés listája. Kattintson és bontsa ki az érintett kategóriát az alábbi listából.
- Minőségi frissítések: Funkciófrissítések a Windows 11 rendszerhez, amelyek jelentős változásokat vezetnek be az operációs rendszerben.
- Illesztőprogram-frissítések: Általános/OEM-illesztőprogram-frissítések a perifériákhoz és a Windows-frissítésen keresztül szállított összetevőkhöz.
- Definíciófrissítések: Biztonsági definíciófrissítések, amelyek segítenek a Microsoft Defendernek azonosítani és karanténba helyezni a rendszeren lévő fenyegetéseket.
- Egyéb frissítések: Frissítések a Microsoft-termékekhez, -szolgáltatásokhoz és az eszközhöz kapcsolódó egyéb OEM-funkciókhoz. A Windows szolgáltatásai és élménycsomagjai is frissülnek ebben a kategóriában.
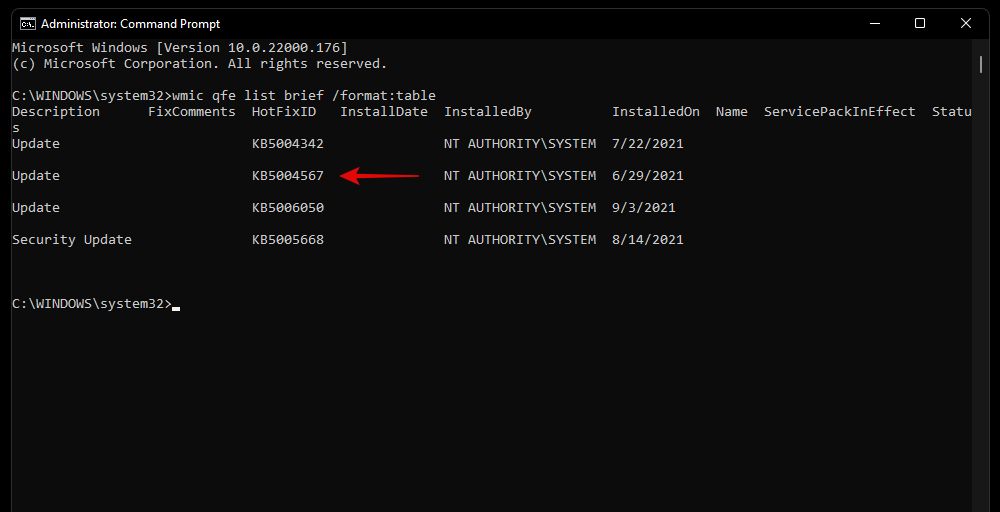
Határozza meg az eltávolítani kívánt frissítést, és jegyezze fel a „HotFixID” azonosítóját. Ezt az azonosítót fogjuk használni az érintett frissítés eltávolításához az alábbi útmutató alapján.
A Windows frissítések eltávolítása a számítógépről
A Windows frissítéseket az alábbi módszerek valamelyikével távolíthatja el a számítógépéről. Ha ki van zárva a Windowsból, vagy nem tud az asztalról indítani, akkor a Windows RE vagy a CMD módszer használatát javasoljuk. Ha hozzáfér az asztalához, akkor a Beállítások alkalmazás segítségével egyszerűen eltávolíthatja a frissítéseket a rendszerről. Használja az alábbi útmutatókat a kezdéshez, preferenciáitól függően.
01. módszer: A beállítások használata
Nyomja Windows + imeg a billentyűzetet, és kattintson a „Windows frissítés” elemre a bal oldalsávon.

Kattintson az „Előzmények frissítése” gombra.

Görgessen le, és kattintson a „Frissítések eltávolítása” elemre.
Ekkor a rendszer átirányítja a Vezérlőpultra, ahol megtalálja a rendszerből eltávolítható legutóbbi frissítések listáját.

Válassza ki az eltávolítani kívánt frissítést, és kattintson az „Eltávolítás” gombra a tetején.

Kövesse a képernyőn megjelenő utasításokat az érintett frissítés eltávolításához a számítógépről.
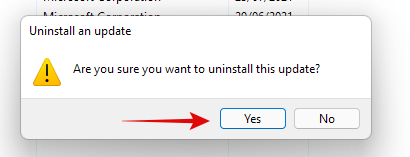
Most újraindíthatja számítógépét, és a frissítés miatt felmerülő problémákat most meg kell javítani.
02. módszer: A Windows frissítési hibaelhárító használata
Nyomja Windows + imeg a billentyűzetet, és kattintson a „Hibaelhárítás” gombra.
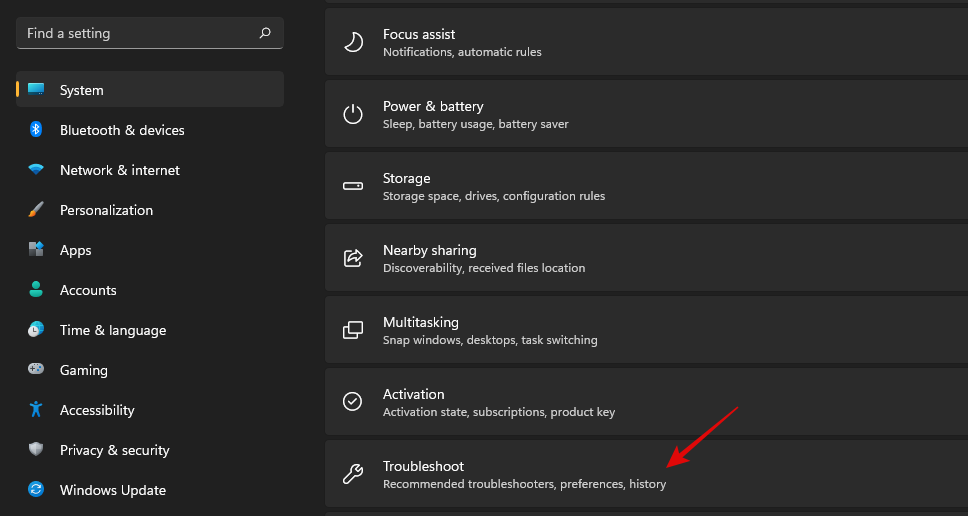
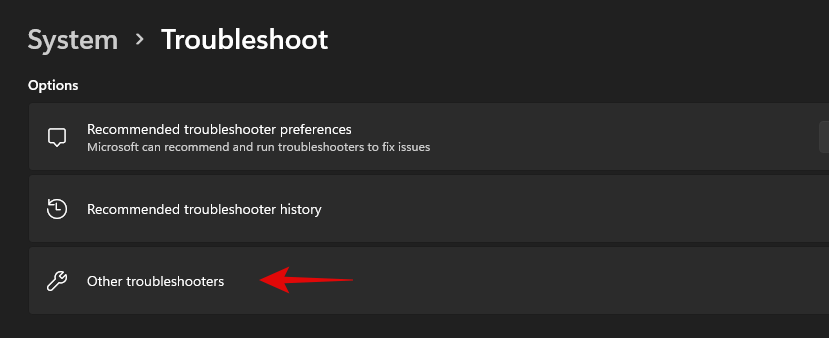
Kattintson az "Egyéb hibaelhárítók" elemre.
Kattintson a "Futtatás" elemre a Windows Update mellett.
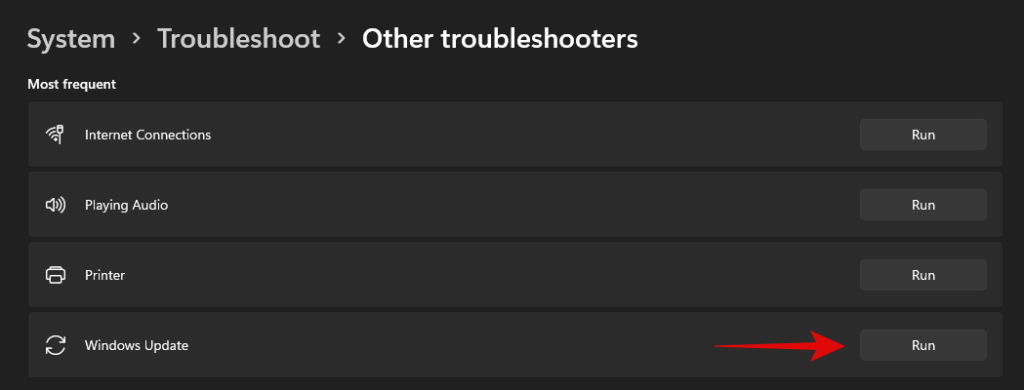
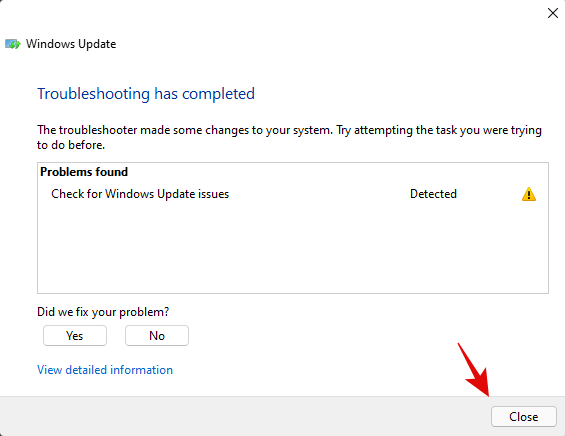
A Windows hibaelhárító mostantól megkeresi a számítógépén lévő Windows-frissítésekkel kapcsolatos és az általuk okozott problémákat. Ha talál ilyet, a hibaelhárító automatikusan megoldja a problémát. Ha egy legutóbbi frissítést találnak a tettesnek, a hibaelhárító lehetőséget ad a szükséges Windows Update kiválasztására és eltávolítására. A frissítés teljes eltávolításához kövesse a képernyőn megjelenő utasításokat.
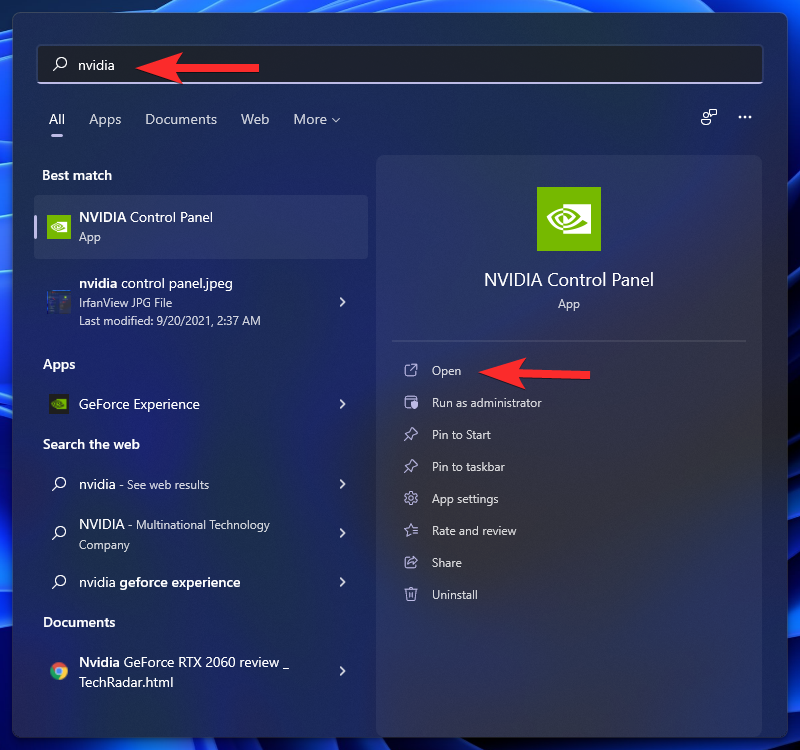
Ha elkészült, kattintson a „Bezárás” gombra.
Indítsa újra a számítógépet a megfelelő intézkedés érdekében, és a problémát ezen a ponton meg kell javítani. Ha nem, az alábbi PowerShell-módszerrel manuálisan távolíthatja el a kívánt Windows-frissítést a rendszerről.
03. módszer: PowerShell vagy CMD használata
Nyomja Windows + Smeg a billentyűzetet, és keresse meg a PowerShell kifejezést. Kattintson a „Futtatás rendszergazdaként” lehetőségre, miután az alkalmazás megjelenik a keresési eredmények között.
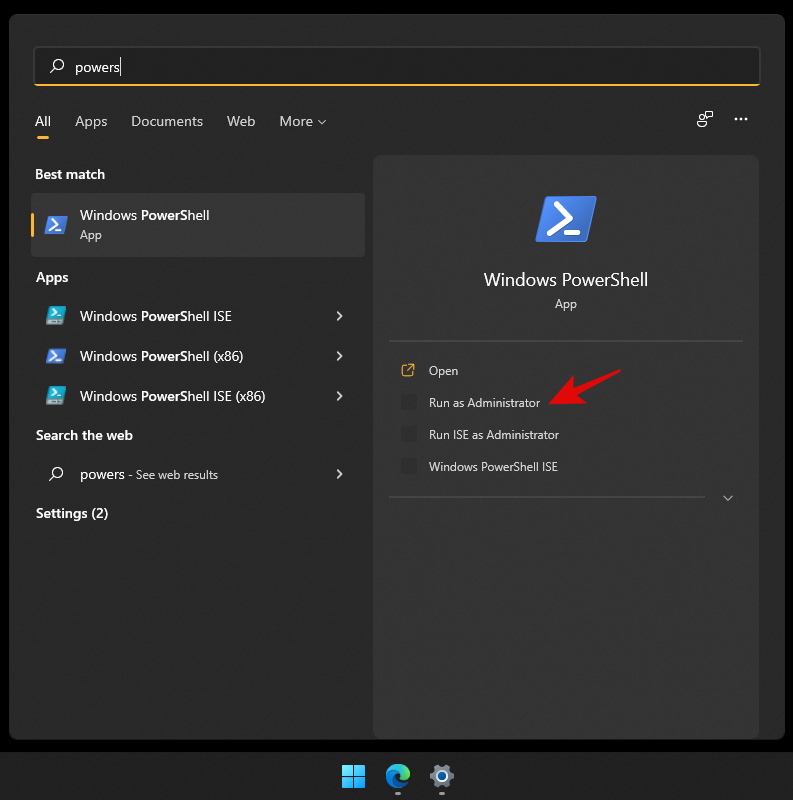
Írja be a következő parancsot, és nyomja meg az Enter billentyűt a billentyűzeten a végrehajtásához.
wmic qfe list brief /format:table

Ekkor megjelenik a rendszerére nemrég telepített Windows frissítések listája táblázatos formátumban. Jegyezze fel a kiválasztott Windows Update KB-számát.
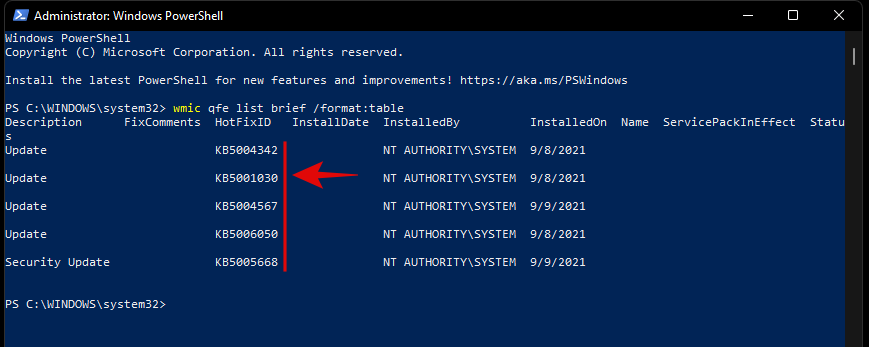
Megjegyzés: Csak a számra van szüksége, az előtte lévő betűkre nem.
Ha elkészült, írja be az alábbi parancsot, és hajtsa végre. Cserélje ki a 'NUMBER'-t a korábban jegyzett KB számra.
wusa /uninstall /kb:NUMBER
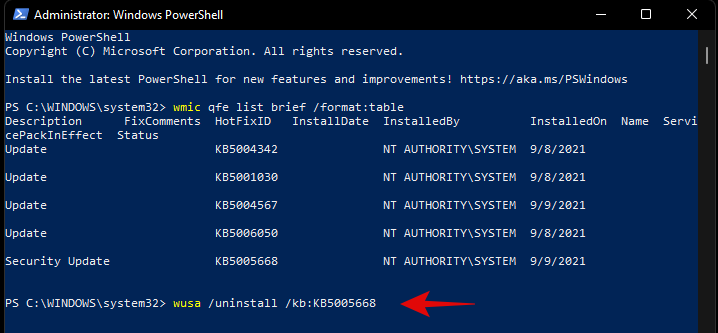
Ha a rendszer kéri, erősítse meg választását.
Ha a rendszer újraindítást kér, azt javasoljuk, hogy legkorábban indítsa újra a rendszert, miközben a háttérben menti a munkáját.
Ha azonban nem szeretne megerősítést kapni az eltávolítás és az újraindítás előtt, akkor használhatja az alábbi parancsot.
wusa /uninstall /kb:NUMBER /quiet
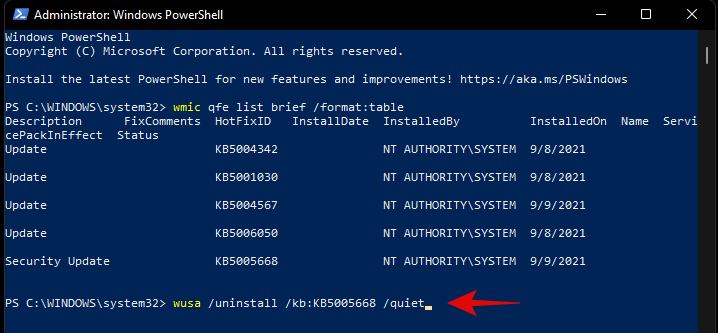
While the command above won’t prompt for confirmations, it will wait for your apps to shut down normally in the background. If you are looking to force close your apps and restart your system immediately, then you can use the command given below.
wusa /uninstall /kb:NUMBER /quiet /forcerestart
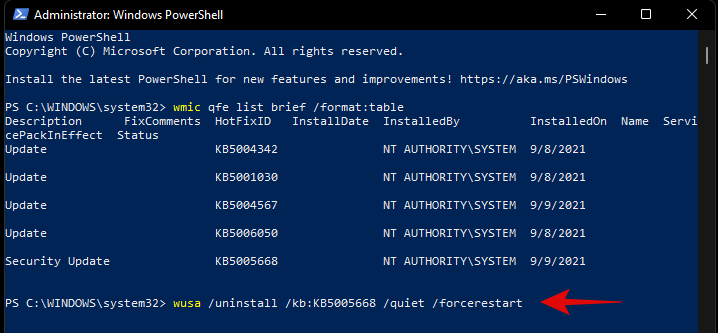
Subsequently, if you only wish to confirm a restart, then you can use the command below.
wusa /uninstall /kb:NUMBER /quiet /promptrestart
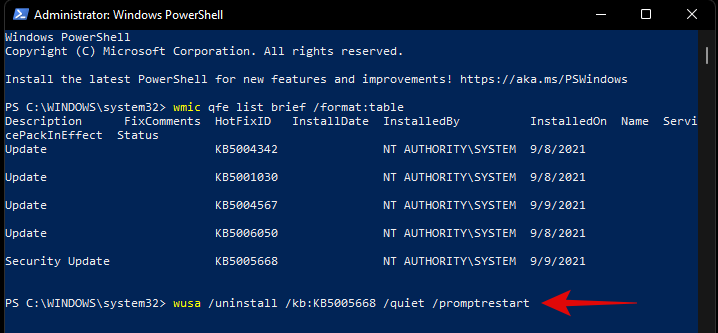
And that’s it! The problematic Windows Update should now be uninstalled from your PC.
Method #04: From Windows RE
Windows Recovery Environment also allows you to uninstall conflicting updates. Use the guide below to get you started. If you are facing a BSOD and are already in the Recovery Environment, then you can skip the first few steps of this guide.
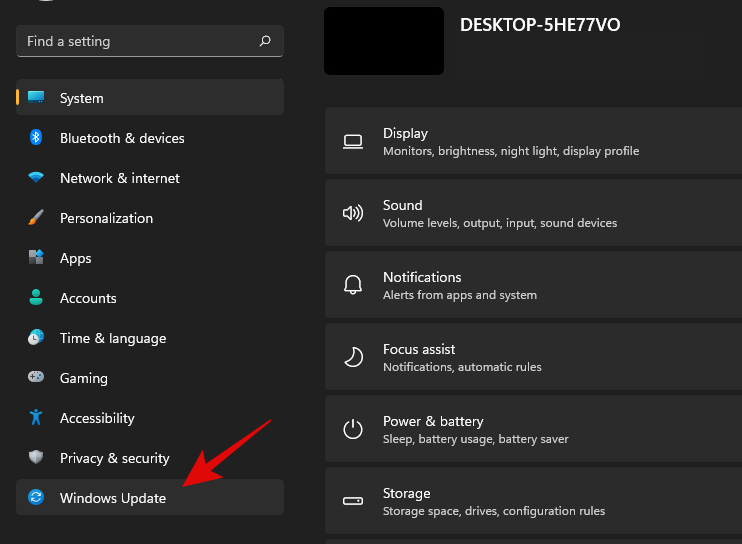
Press Windows + i on your keyboard and select Windows Update from your left.
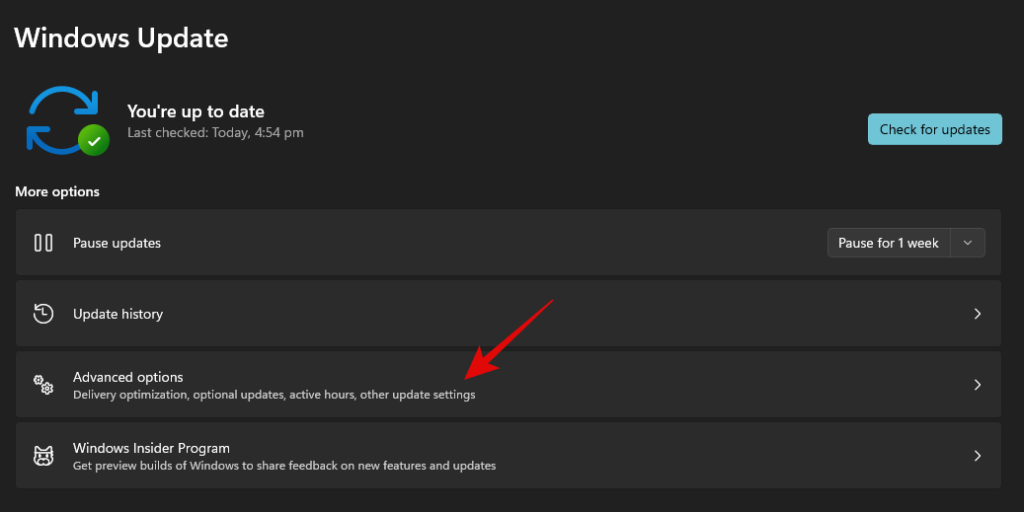
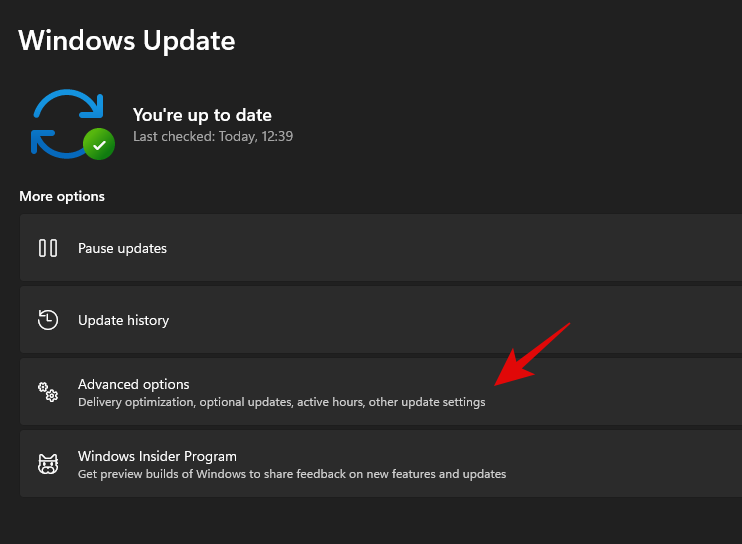
Click on ‘Advanced options’ now.
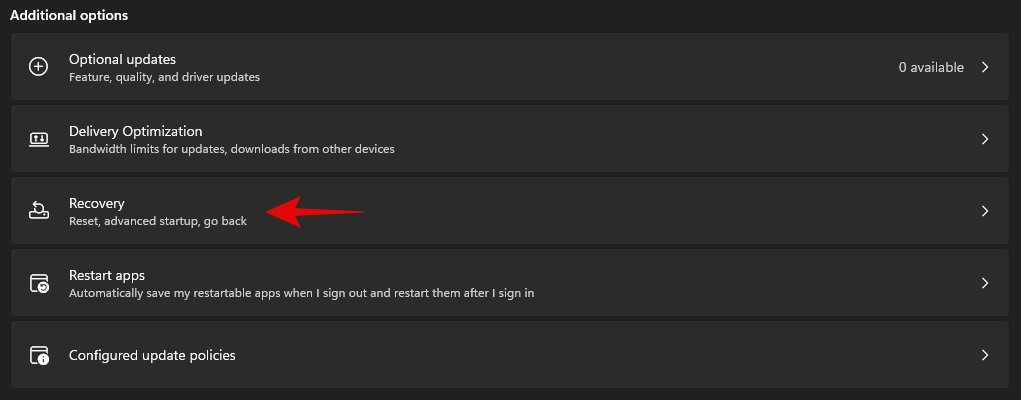
Select ‘Recovery’.
Click on ‘Restart now’ beside Advanced Startup.

You will now boot into the recovery environment. Click on ‘Troubleshoot’.
Now click on ‘Advanced Options’.
Select ‘Uninstall updates’.
Click and select the type of update you wish to install from the options on your screen.
- Uninstall latest quality update
- Uninstall latest feature update
Note: In case you are confused, feature updates refer to major updates to your Windows system that include new features, updated integrations, and sometimes new UI. Quality updates on the other hand encompass everything else including Security updates, Driver updates, Intelligence updates, Telemetry updates, and more.
Click on your administrator account and log in with your password.
Click on ‘Uninstall quality/feature’ update to confirm your choice.
Click on ‘Done’ once the process finishes.
Restart your PC and boot into Windows normally. You shouldn’t face any more issues caused by a problematic Windows update.
Method #05: Using DISM
DISM or Deployment Image Servicing and Management tool is an administrative tool within Windows that helps repair your Windows image and even mount images if needed. DISM supports image formats like .wim, .vhd, and more.
The tool can help you fix issues with your Windows installation and even remove problematic Windows updates. If you are looking to remove windows updates using DISM, then you can follow the steps below to get you started.
Note: DISM can be accessed via CMD and thus, you can use this guide from a recovery environment or an installation media as well. Follow the guide above to get CMD working on your lock screen or within Windows Recovery Environment.
Launch CMD and type in the following command. Press Enter on your keyboard once you are done.
dism /online /get-packages /format:table
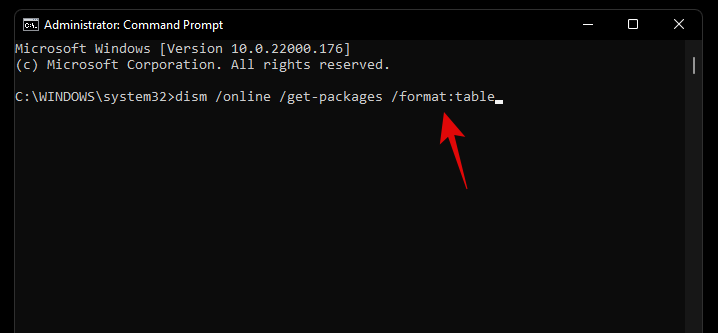
Unlike the WUSA commands we used earlier with PowerShell and CMD, you will need to note down the entire name of the Windows Update package we need to remove. Unfortunately, this includes special characters, spaces, and everything else included in the name. Thankfully you can easily copy the entire name to your clipboard by selecting it with your mouse and then using the keyboard shortcut. Once done, type in the command below and replace NAME with the package name you noted down earlier.
Note: This includes the term ‘Package_for_’ prefixed before some updates.
dism /online /Remove-Package /PackageName:NAME

The selected Windows Update will now be uninstalled from your system. In some cases, you will be prompted to restart your system, type in ‘Y’, and hit Enter on your keyboard to restart your system immediately.
How to stop receiving an update
While removing an update can help you, this does not mean that the broken Windows Update will stop showing up in your Updates section. This can be annoying and if you have automatic updates then you run the risk of automatically installing the problematic update in the background. In all such cases, you can try blocking Windows Updates on your system using the guides below depending on your preferences.
Method #01: Stop OEM driver updates through Windows update
OEM driver updates are delivered through Windows updates as well depending on their importance. Security vulnerabilities and bugs that have been recently found in components like CPU, GPU, or your wireless card, are instantly patched through such updates.
However, if you do not wish to install an OEM driver update provided by Windows update, then you can follow the guide below to block your OEM driver updates.
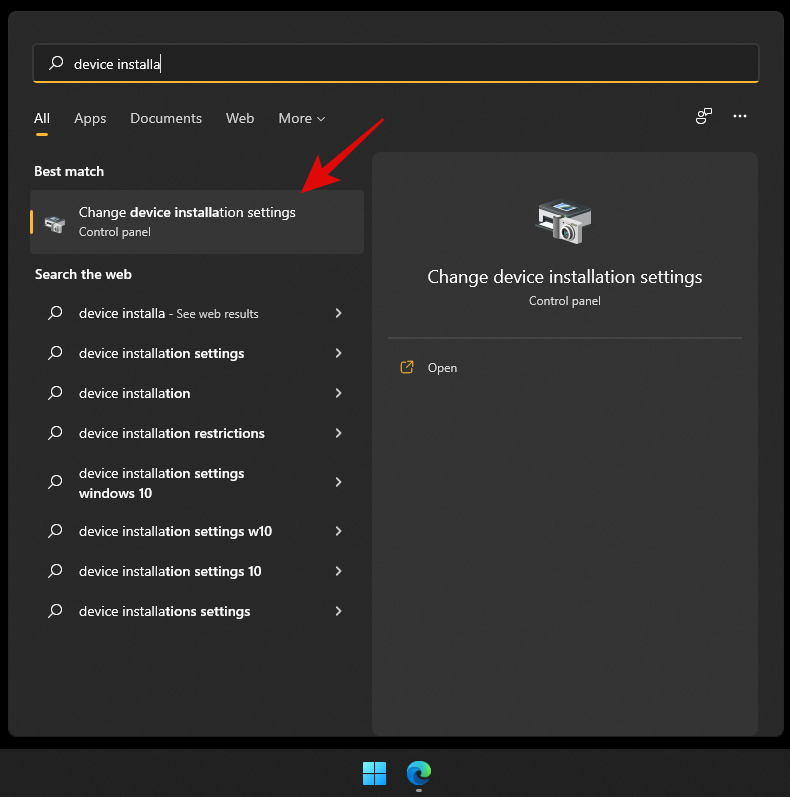
Press Windows + S on your keyboard and search for ‘Change device installation settings’. Click and launch the app from your search results.
Select ‘No’.
Click on ‘Save changes’.
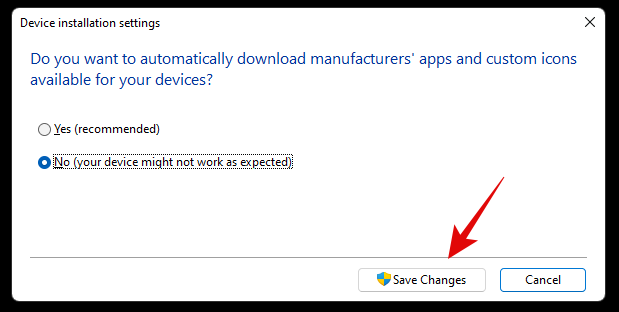
The changes will now be saved and you will no longer receive OEM driver updates through Windows Update.
Related: 6 Ways to Update Drivers on Windows 11
Method #02: Stop updates for Microsoft products
If you have been receiving constant updates for new Microsoft features and old products that keep messing up your system, then you can use the guide below to disable updates for Microsoft products via Windows Update.
Press Windows + i on your keyboard to open the Settings app and select ‘Windows Update’ from the left sidebar.

Click on ‘Advanced options’.

Now turn off the toggle for ‘Receive updates for other Microsoft products’ at the top.
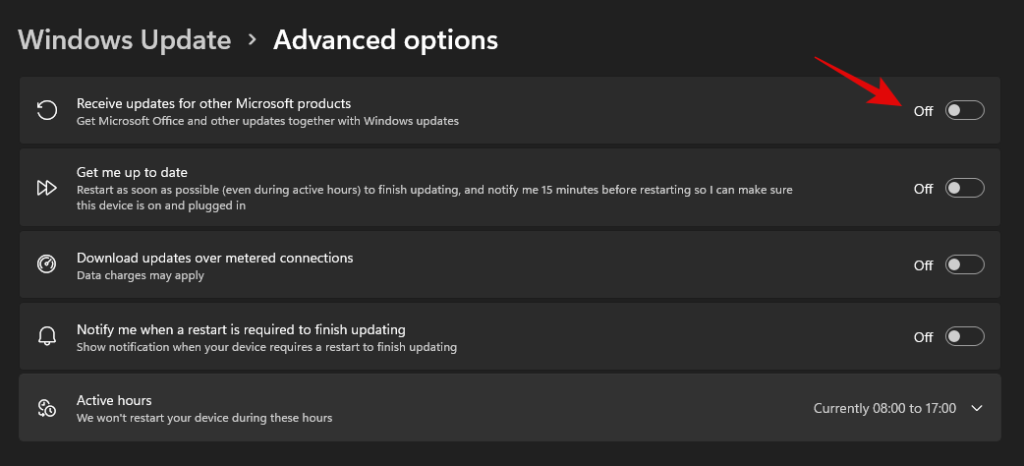
You will no longer receive updates for Microsoft products installed on your system via Windows update.
Method #03: Change active hours for background download and installation for updates
If you’re just looking to dismiss updates so that they don’t interfere with your work hours, then this is the perfect option for you. You can decide when Windows can download and update your PC in the background which will prevent Windows from interfering with your work hours. Follow the guide below to get you started.
Press Windows + i on your keyboard and click on ‘Windows Update’ on your left.

Click on ‘Advanced options’.

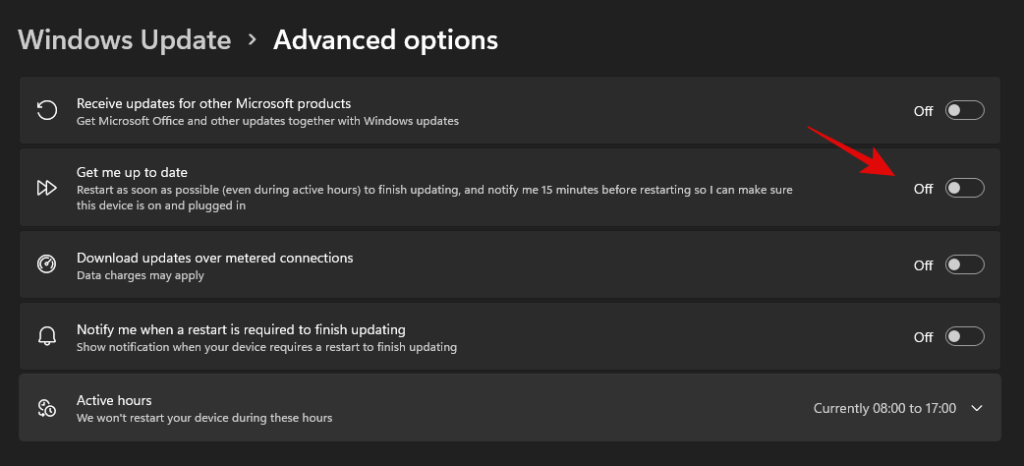
Now turn off the toggle for ‘Get me up to date’.
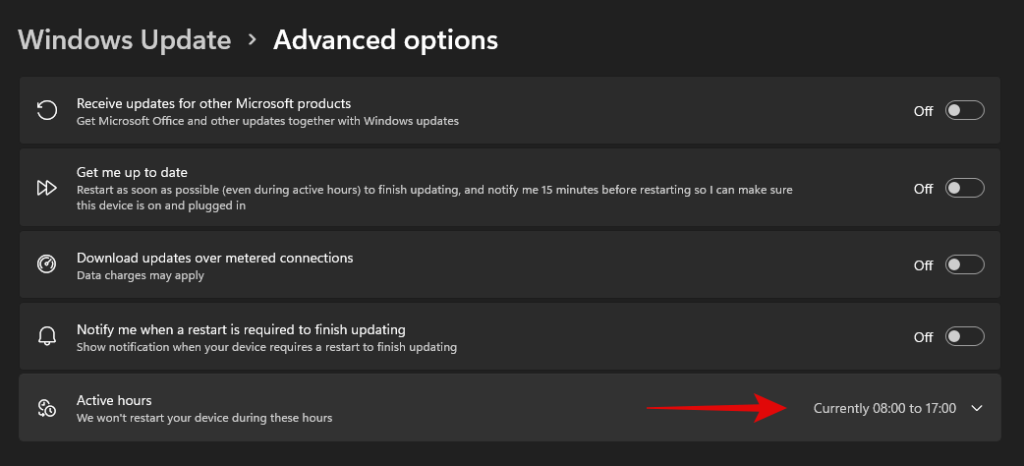
Click on ‘Active hours’.
Click on the drop-down menu and select ‘Manually’.
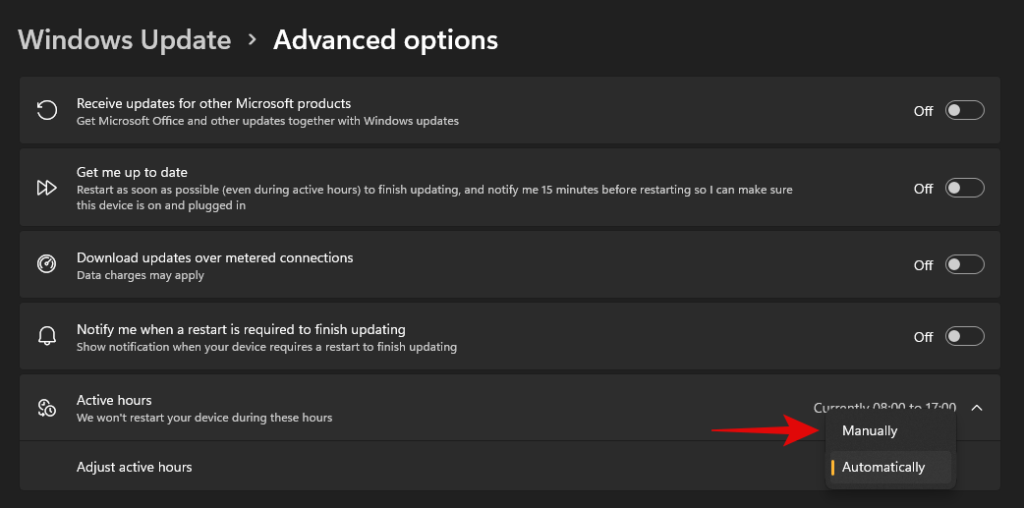
Define your desired start and end time. Windows won’t download updates and restart your PC during these hours.

And that’s it! Active hours should now be enabled for your system.
Method #04: Block Windows updates that you never wish to install
If you are receiving forced Windows updates that you don’t ever wish to install on your system then you can use a dedicated Windows troubleshooter to solve your issue.
This can be helpful in case you are trying to stop an update that disables a certain feature on your system that you don’t want disabled. This could be access to voltage controls, clock speed controls, turbo controls, fan controls, RGB control, and more. Follow the guide below to get you started.
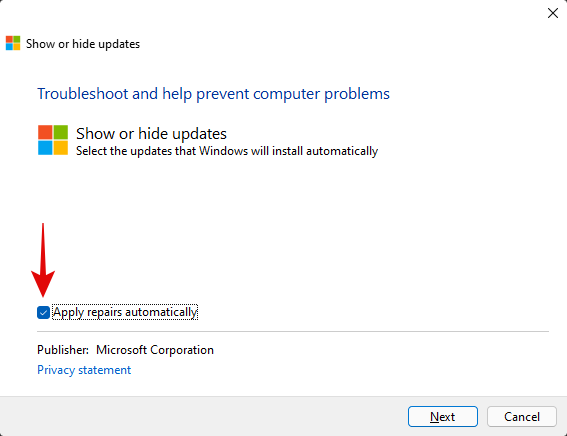
Download the Windows Update Show Hide troubleshooter using the link above and launch it on your PC. Click on ‘Advanced’.
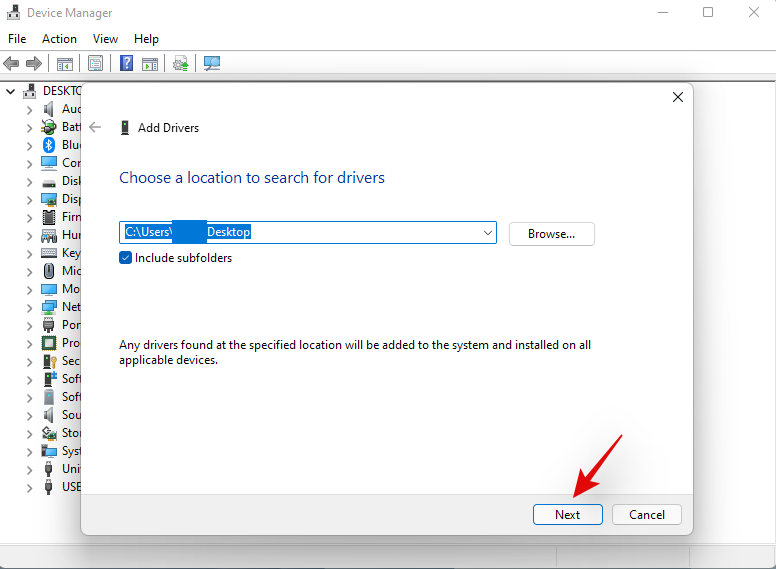
Uncheck the option for ‘Apply repairs automatically’.
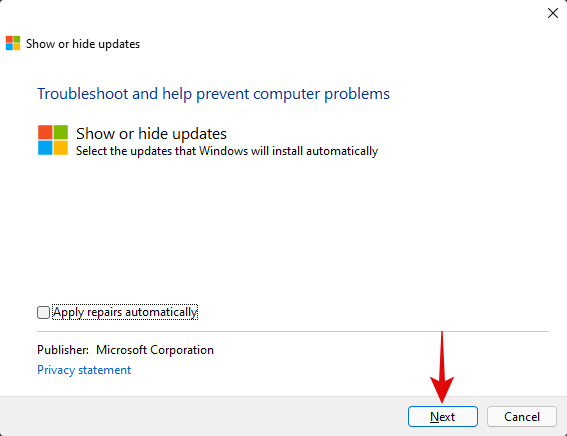
Click on ‘Next’.
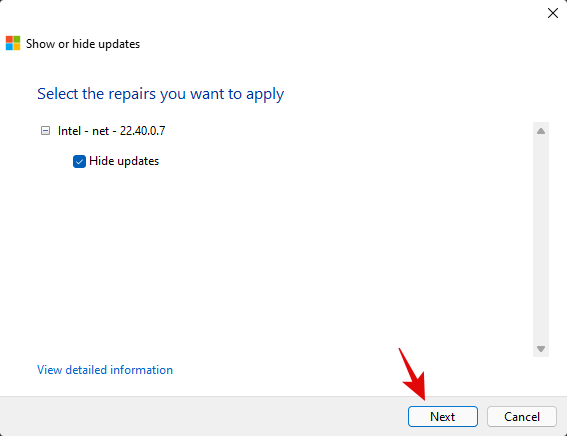
The troubleshooter will now look for pending updates and display them on your screen. Click on ‘Hide updates’.
Check the boxes for all the updates you don’t wish to receive on your PC.
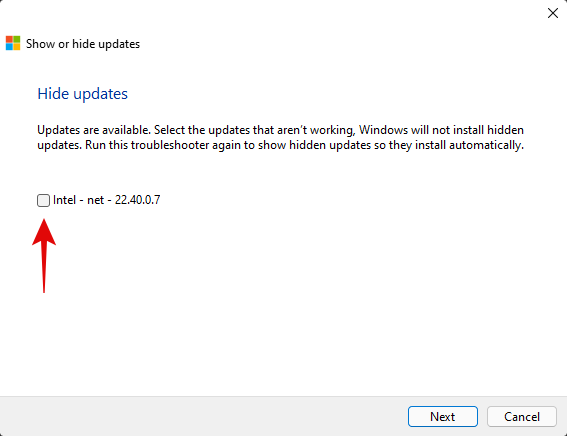
Click on ‘Next’.
Ensure that ‘Hide updates’ is selected and click on ‘Next’.
The troubleshooter will now hide the necessary Windows updates from your PC which in turn will prevent them from ever being downloaded on your PC. Click on ‘Close’.
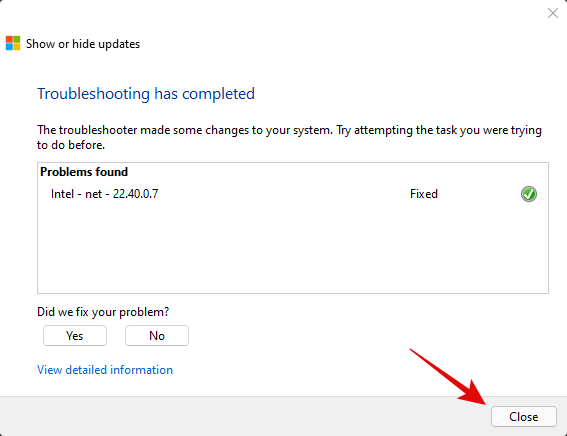
And that’s it! You will now have blocked the necessary updates on Windows 11.
Can you turn off Windows updates?
Yes, you can use certain workarounds and tricks to disable Windows updates on your PC. However, this isn’t recommended as you will lose out on important security patches which would leave you vulnerable to online threats including hackers, malware, adware, and more.
Hence we recommend you keep your PC updated or at least opt to install the latest security updates on your PC. Even if you are losing out on features it’s usually because of a hardware security vulnerability that would compromise your system.
However, if you still wish to disable Windows Updates on your PC, you can use this dedicated guide from us. If you face any issues, feel free to drop a comment.
Can’t uninstall Windows updates? Try these fixes!
If you are unable to install updates on your PC, then you can try the following fixes. However, if you are still unable to uninstall updates then this might indicate an issue with your Windows installation in which case resetting your PC might be the best option.
Follow the guides below to get you started.
Method #01: Reset Windows components and try again
If you have been unable to uninstall updates then you can try resetting your windows components. This will help fix corrupted system files in the background that might be preventing you from uninstalling updates on your system. We will be using a modified script from Mircosoft to help reset all components of Windows 11. The script was originally developed for Windows 10 or higher and hence will need some edits to work properly on Windows 11. This script will perform the following tasks on your system when executed;
- Remove older Windows updates folder
- Re-register Windows update files
- Reset your network connection
Follow the steps below to run the script on your system and reset Windows update components on your PC.
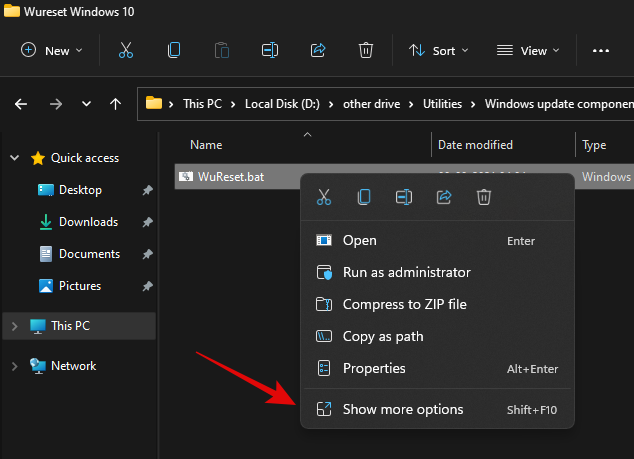
Download the script using the link above to your local storage and extract it to a convenient location. Once extracted right click on the script.
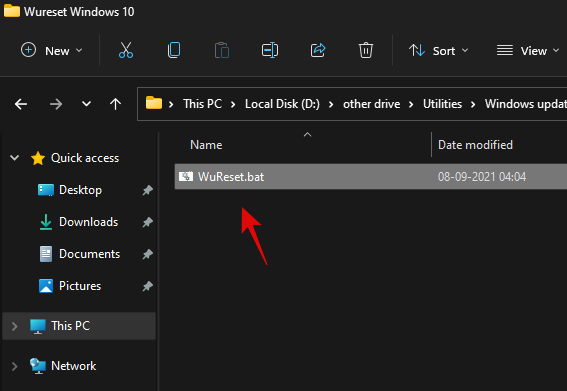
Click on ‘Show more options’.
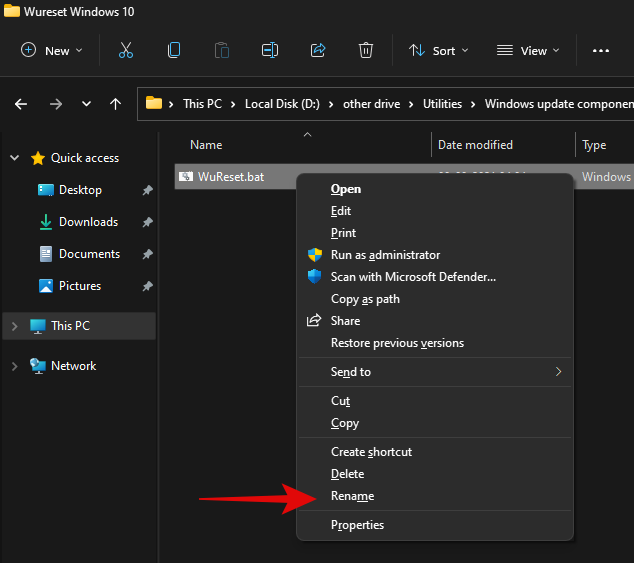
Select ‘Rename’.
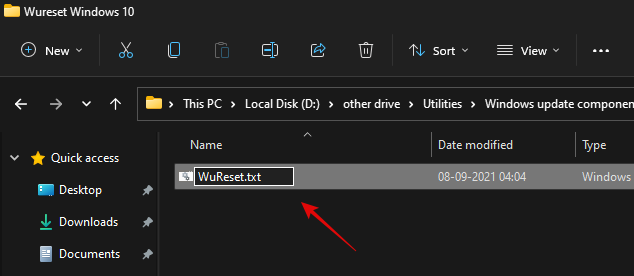
Replace ‘.bat’ with ‘.txt’.
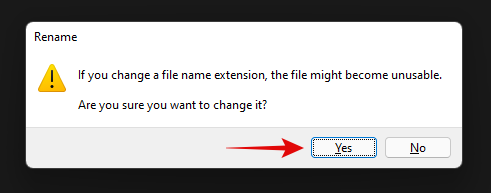
Click on ‘Yes’ to confirm your choice.
Now double click and open the file and it should open in your notepad. Once opened, scroll to the ‘:Reset’ section for resetting network commands and add the following line after the first delete command as shown below.
del /s /q /f "%SYSTEMROOT%\Logs\WindowsUpdate\*"
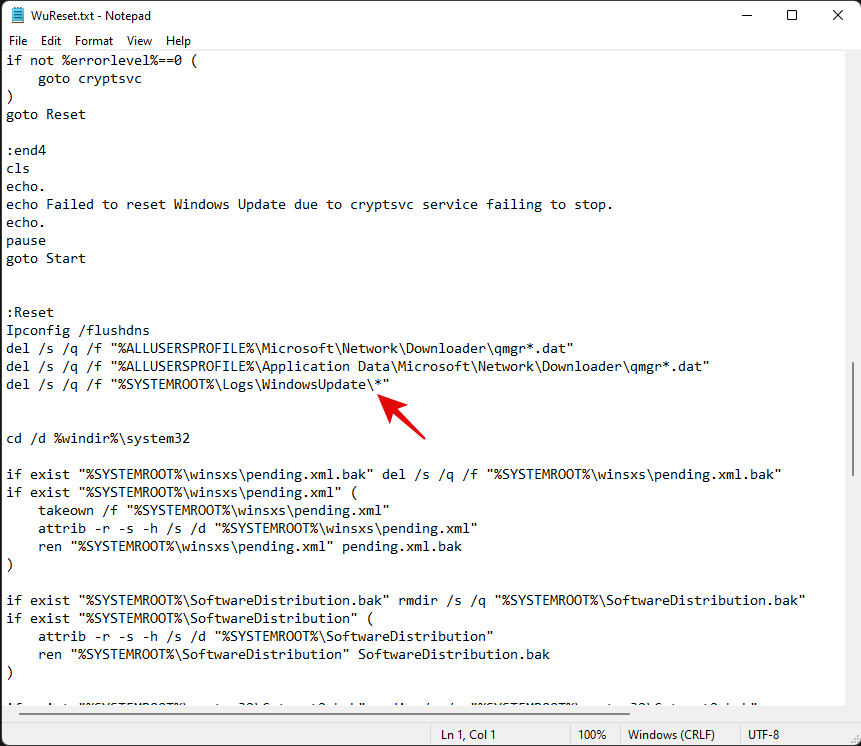
Once added, hit Ctrl + S on your keyboard. Ensure that there are no formatting changes or spaces before or after the line. The file will now be saved on your system along with its recent changes. We will now add some code to Reset Windows’s update policies on your system. Copy the lines below and paste them after your system commands. Ensure that two empty lines are available at either end of the code as shown below.
:: Windows Update policies resetting
reg delete "HKCU\SOFTWARE\Policies\Microsoft\Windows\WindowsUpdate" /f
reg delete "HKCU\SOFTWARE\Microsoft\Windows\CurrentVersion\Policies\WindowsUpdate" /f
reg delete "HKLM\SOFTWARE\Policies\Microsoft\Windows\WindowsUpdate" /f
reg delete "HKLM\SOFTWARE\Microsoft\Windows\CurrentVersion\Policies\WindowsUpdate" /f
gpupdate /force
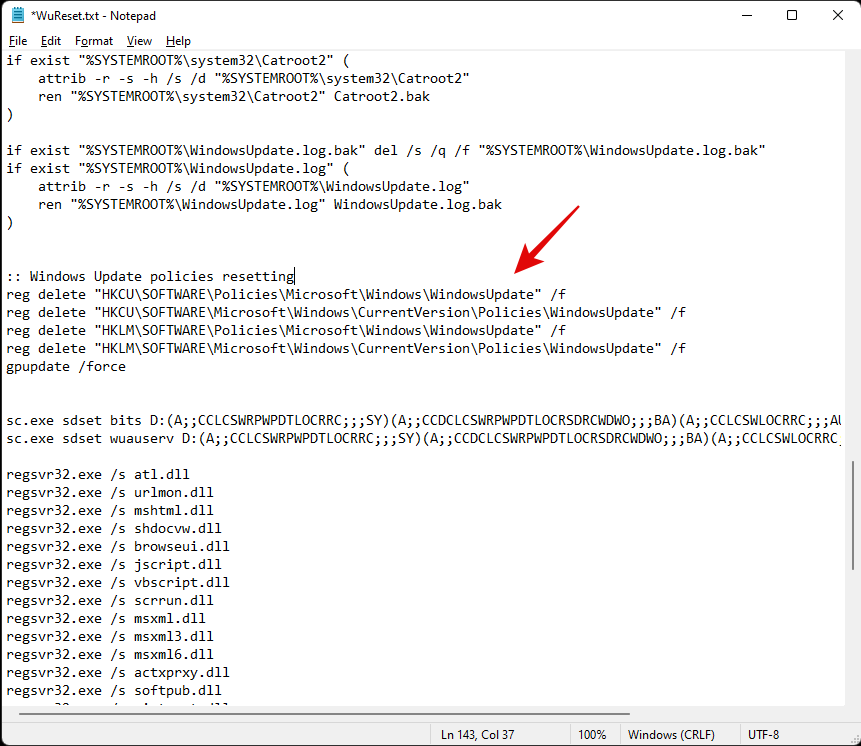
Lastly, let’s add some lines to ensure that the startup type for this service is set to ‘Automatic’. Copy the code below and add the lines after your winsock reset commands but before your service starting commands as shown below. Copy and paste the code in its respective location.
:: Set the startup type as automatic
sc config wuauserv start= auto
sc config bits start= auto
sc config DcomLaunch start= auto
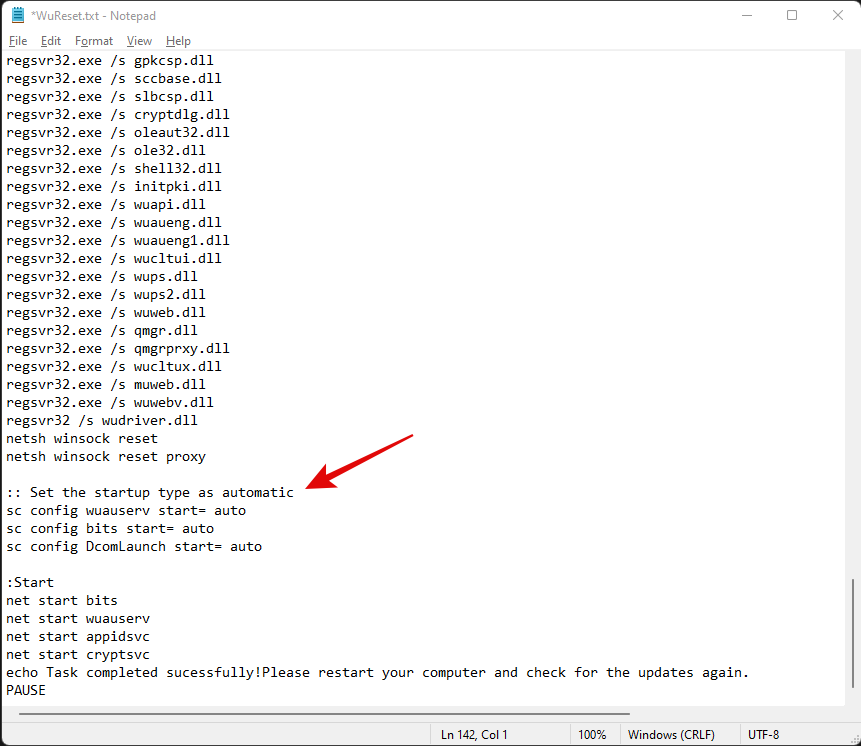
Once you are done, hit Ctrl + S on your keyboard to save your changes. Close the file and right-click on it again and select ‘Show more options’.
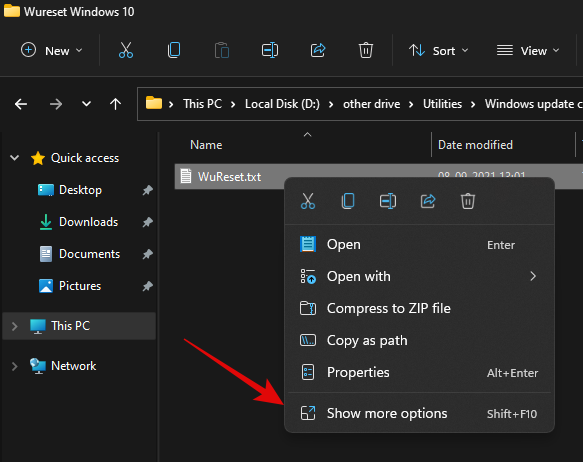
Click on ‘Rename’.
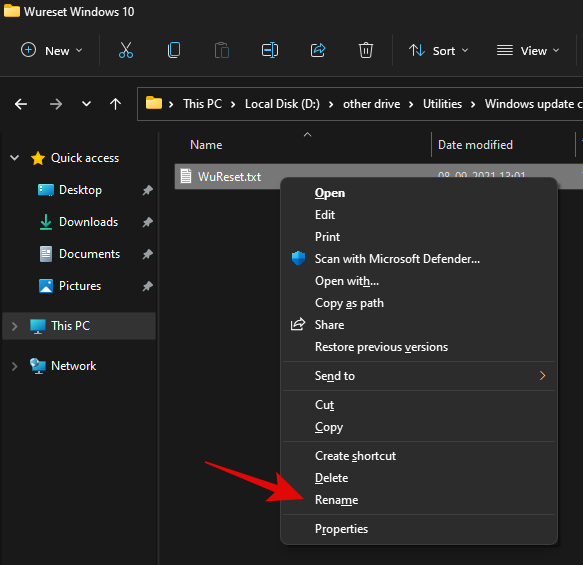
Replace ‘.txt’ with ‘.bat’.
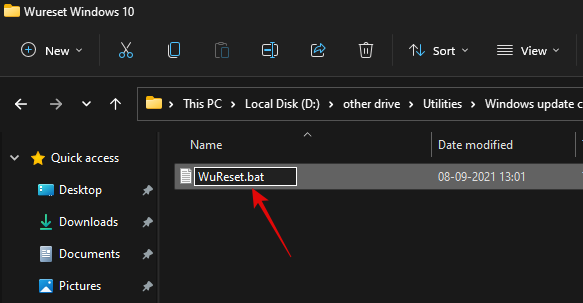
Once done, right-click on the file and select ‘Run as administrator’.
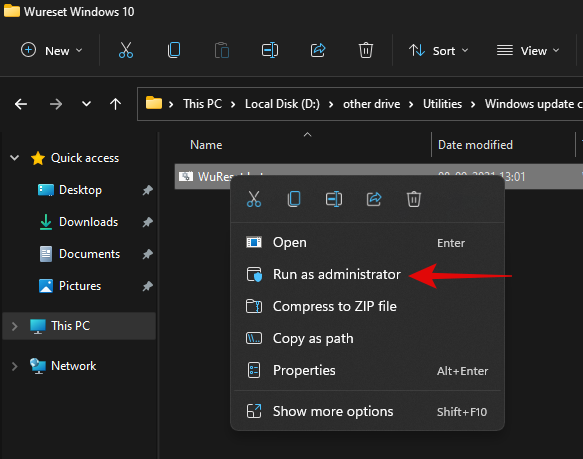
The batch script will now run on your PC and do its thing. Once the process completes, you will be asked to restart your PC. We highly recommend that you restart your PC at the earliest after running this script. Upon a restart, your Windows update should be reset and a fresh start should help you easily install pending Windows updates on your PC.
Method #02: Use DISM to uninstall the concerned packages
If you are still unable to uninstall specific Windows Update packages then simply use the DISM method to remove the concerned updates from your PC. This method force removes any available Windows updates from your PC without any issue. You will get a list of all the available updates in a table format which should make it much easier for you to find the culprit on your PC. Simply follow the guide at the top to get you started.
Method #03: Run SFC & DISM commands
At this point, if Windows still fails to update your system then you are facing a more serious issue than we anticipated earlier. This could indicate system-level corruption of files or missing system files from your system. In such cases, you can run SFC and DISM checks to fix corrupted files as well as restore missing system files. Follow the guide below to get you started.
Press Windows + S on your keyboard and search for CMD. Click on ‘Run as administrator’ once it shows up in your search results.
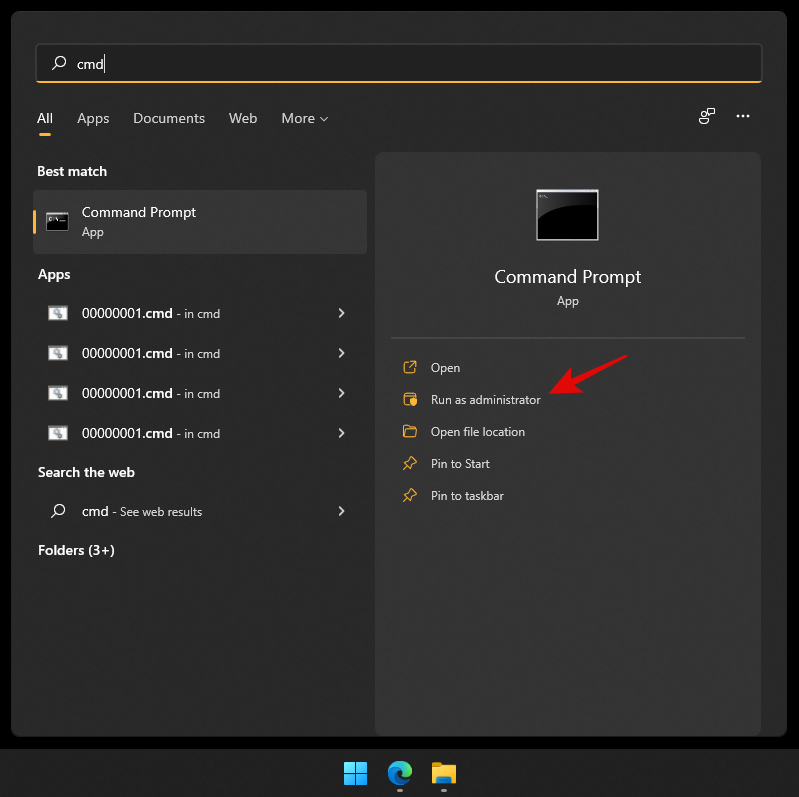
Type in the following command and press Enter on your PC.
sfc /scannow
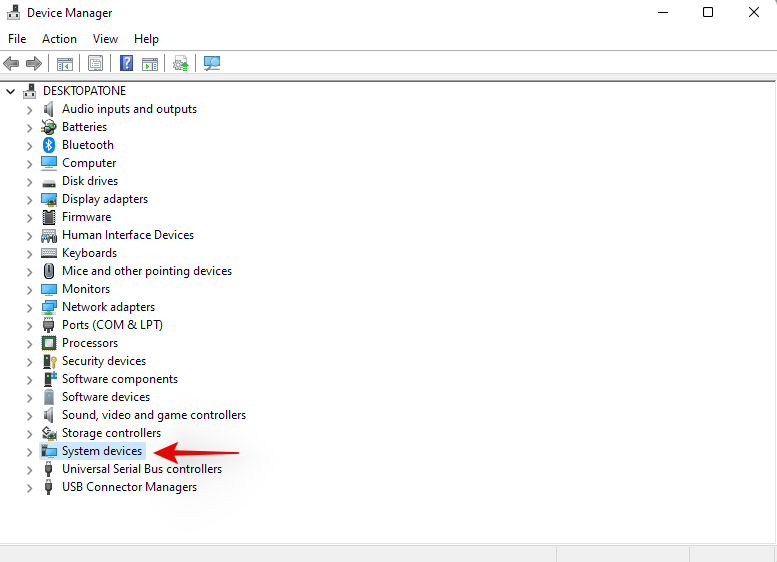
Once the SFC scan completes, type in the following command and execute it.
DISM /Online /Cleanup-Image /RestoreHealth
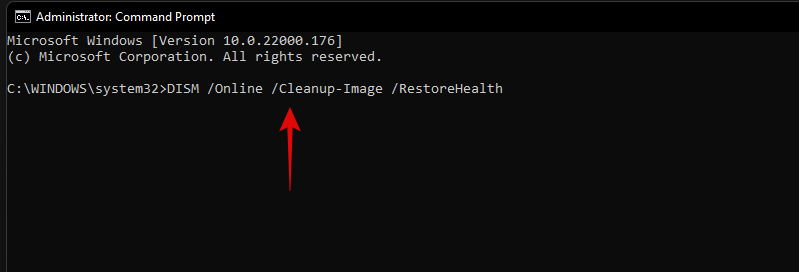
We recommend you restart your PC once the process completes.
Method #04: Last resort: Reset your PC
If nothing seems to be working for you then it might be time for a fresh installation of Windows 11 on your system. You can try getting in touch with your support team as well but if nothing works then a reset of your PC is the best option. In most cases, a reset while keeping your local files should help get Windows update working on your system.
Windows 11 connects to the update servers and updates your security definitions and drivers during OOBE. Windows will fix all update issues and reinstall necessary services on your system to get Windows update back up and running on your system during this process.
► You can use this dedicated guide from us to reset your Windows 11 PC.
We hope you were able to easily uninstall updates from your Windows 11 PC using the guide above. If you face any issues, feel free to drop a comment below.
Related:


![A McAfee eltávolítása Windows 11 rendszeren [5 módszer] A McAfee eltávolítása Windows 11 rendszeren [5 módszer]](https://blog.webtech360.com/resources8/images31/image-4917-0105182719945.png)
