A Windows egy átfogó operációs rendszer, amely lehetővé teszi a hozzáférési engedélyek diktálását és kezelését rendszergazdai fiókok által. Ismerje meg a Windows 11 rendszergazdái fiókokkal kapcsolatos tudnivalókat!
A Windows egy átfogó operációs rendszer, amely lehetővé teszi a hozzáférési engedélyek diktálását és kezelését az éppen aktív fiók alapján. Ez jelentősen megkönnyíti az adminisztrátorok számára a szervezetükben lévő számítógépek kezelését, mivel lehetővé teszi számukra, hogy magasabb szintű jogosultságokat biztosítsanak a kiválasztott személyeknek.
De mi van akkor, ha Ön a saját számítógépe? Hogyan kezeli a helyi fiókokat? Mi a teendő, ha nincs rendszergazdai fiókja? Örökre ki van zárva? Ha ezek a kérdések merültek fel Önben, vagy a közelmúltban olyan hibával szembesült, amely miatt a rendszergazda engedélyére volt szüksége, akkor tökéletes útmutatónk van az Ön számára.
Itt van minden, amit a Windows 11 rendszergazdai fiókjairól tudnia kell.
Megjegyzés a Windows 10-kompatibilitásról: Az ezen az oldalon található útmutatók Windows 11-el lettek összeállítva, így a képernyőképeken használt felhasználói felület a Windows 11-es. De ezek az útmutatók teljesen működnek Windows 10-en is. Tehát nyugodtan használja az útmutatókat a Windows 11 és a Windows 10 számítógépeken.
Kapcsolódó: Keresés a Windows 11 rendszerben
Tartalom
Mi az a rendszergazdai fiók a Windows 11 rendszerben?
A rendszergazdai fiók a Microsoft Windows legfelső fiókja, amely a legmagasabb jogosultságokkal rendelkezik. Ez lehetővé teszi, hogy rendszergazdaként tetszés szerint kezelje számítógépét. Módosíthatja a rendszerfájlokat, telepítheti a magasabb szintű programokat, módosíthatja a Windows telepítését, beállíthat egyéni automatizálást és még sok mást. Az ilyen feladatok elvégzésére vonatkozó engedély nem áll rendelkezésre a normál vagy a vendég felhasználók számára. Ezenkívül rendszergazdaként kezelheti a Windows szolgáltatásait, és megszabhatja, hogy melyek legyenek elérhetők és elérhetők a felhasználók számára.
Miért van szüksége rendszergazdai fiókra?
A rendszergazdai fiók a legmagasabb jogosultságokkal rendelkező fiók a Windows rendszerben. Ez azt jelenti, hogy rendszerszintű módosításokat hajthat végre az operációs rendszeren egy rendszergazdai fiók használatával korlátozás nélkül. Íme néhány gyakori ok, amiért szükség lehet rendszergazdai fiókra a számítógépen.
- Rendszerszintű módosítások végrehajtása a rendszeren
- A rendszerfájlok szerkesztéséhez/módosításához vagy javításához
- Rendszergazda szintű parancsok és parancsfájlok futtatásához
- A Windows szolgáltatásainak engedélyezése vagy letiltása
- Rendszerszintű programok és módosítások telepítéséhez
- Az illesztőprogramok módosításához vagy újratelepítéséhez
- A testreszabási beállítások elérése a Windows rendszeren belül
- Helyi fiók jelszavak visszaállítása vagy módosítása
és még sok más. Számos oka lehet annak, hogy miért van szüksége rendszergazdai fiókra a Windows 11 rendszerben, de tudta-e, hogy a Windows rendszerben kétféle rendszergazdai fiók létezik. Nos, nem egészen, de itt van minden, amit tudnod kell róluk.
Kapcsolódó: Windows 11 figyelmeztető hangok letiltása
Bejelentkezés adminisztrátorként: Amit tudnod kell
A Windows alapértelmezés szerint beépített rendszergazdai fiókkal rendelkezik, még akkor is, ha ez nem érhető el a lezárási képernyőn. Ez az alapértelmezett fiók a Windows telepítésekor jön létre, hogy jóváhagyja a számítógépén a Windows beállításakor végrehajtott összes rendszermódosítást.
Ezenkívül a Windows lehetővé teszi egy további rendszergazdai fiók beállítását a helyi fiókból, ha rendelkezik a szükséges engedélyekkel. Aktuális fiókját rendszergazdai fiókká is átalakíthatja, ha jelenleg szabványos fiókot használ a Windows 11 rendszeren belül.
Az egyes fiókok beállításához különböző követelmények vonatkoznak, és az aktuális beállítástól függően bármelyik beállítás közül választhat. De abban az esetben, ha megpróbálja visszaállítani a helyi fiók jelszavát, akkor az alapértelmezett rendszergazdai fiók használata a legjobb megoldás, mivel ebben az esetben nem tud túllépni a lezárási képernyőn.
Ezenkívül itt van néhány gyakori dolog, amelyet szem előtt kell tartania, mielőtt folytatná az alábbi útmutatókat.
- Az alapértelmezett adminisztrátornak nincs bejelentkezési jelszava, kivéve, ha azt a rendszergazda személyre szabta
- Ha az egységet az Ön szervezete vagy oktatási intézménye adta ki, akkor az alábbi módszerek valószínűleg nem működnek az Ön számára. Az alapértelmezett adminisztrátori fiókot az Ön szervezete zárolja, és jelenlegi fiókja nem rendelkezik a szükséges jogosultságokkal ahhoz, hogy folytassa az útmutatóban szereplő egyéb módszerekkel. Valószínűleg fel kell vennie a kapcsolatot a rendszergazdával, ha ilyen egység tulajdonosa.
- Ha megosztja az eszközt más felhasználókkal, akkor tiltsa le az adminisztrátori fiókot, miután elvégezte a szükséges módosításokat a rendszeren, hogy elkerülje az érzékeny adatokhoz való jogosulatlan hozzáférést. Javasoljuk, hogy ilyen esetekben jelszót állítson be alapértelmezett rendszergazdai fiókjához.
- Néhány alábbi módszer megköveteli, hogy a Windows 11 Pro vagy újabb verziója telepítve legyen a rendszerére. Ha Windows 11 otthoni kiadást használ, akkor a lehetőségei korlátozottak lesznek.
Az alapértelmezett rendszergazdai fiók és a felhasználói fiókhoz adminisztrátori hozzáférés megadása közötti különbség
Az alapértelmezett rendszergazdai fiók egy külön fiók, amely a Windows minden telepítésében megtalálható, függetlenül az eszköztől vagy a Windows verziójától. A konvertált fiók viszont egy szabványos vagy vendégfiók a számítógépén, amely rendszergazdai jogosultságokkal rendelkezik.
Ha megemelte, fiókja az Adminisztrátor csoportba fog tartozni, és minden szükséges rendszergazdai jogosultsággal rendelkezik a rendszerszintű változtatások végrehajtásához a számítógépen. Az alapértelmezett rendszergazda legtöbbször akkor használatos, amikor megpróbálja helyreállítani a számítógépen lévő helyi felhasználói fiókok elveszett jelszavait.
A fiók konvertálása viszont egy egyszerű folyamat az aktuális fiók engedélyeinek emelésére, ami lehetővé teszi, hogy az aktuális eszköz rendszergazdájaként működjön. Az alapértelmezett adminisztrátor egy egyszerű paranccsal letiltható a rendszeren, míg a helyi fiókot újra át kell alakítani, ha vissza kívánja vonni a változtatásokat. Használja az alábbi módszerek egyikét, amely a legjobban megfelel jelenlegi igényeinek.
Kapcsolódó: A billentyűzet letiltása Windows 11 rendszeren
Hogyan jelentkezz be rendszergazdaként a Windows 11 rendszerben
A Windows 11 rendszerben rendszergazdaként jelentkezhet be a fent ismertetett különféle módszerekkel. Engedélyezheti az alapértelmezett rendszergazdai fiókot, ha ideiglenes módosításokat szeretne végrehajtani a számítógépén, vagy vissza szeretné állítani az elveszett jelszót. Új rendszergazdai fiókot is beállíthat egy új felhasználó számára arra az esetre, ha meg szeretné osztani az eszközt valakivel. Végül átalakíthatja jelenlegi helyi fiókját rendszergazdai fiókká, ha saját maga szeretne rendszergazdai jogosultságokat szerezni az aktuális eszközön. Kövesse az alábbi módszerek egyikét, amely a legjobban megfelel jelenlegi igényeinek és követelményeinek.
01. módszer: Használja az alapértelmezett rendszergazdai fiókot
Használhatja az alapértelmezett rendszergazdai fiókot a Windows 11 számítógépen a szükséges módosítások elvégzéséhez az alábbi útmutató segítségével. Miután elvégezte a módosításokat, a következő útmutató segítségével letilthatja a fiókot. Lássunk neki.
1.1 Engedélyezze az alapértelmezett rendszergazdai fiókot
Először engedélyeznünk kell/fel kell fednünk a rendszergazdai fiókot a számítógépen. Ezt különféle módszerekkel lehet megtenni. Ha túl tud lépni a lezárási képernyőn, használhatja az alábbi módszerek bármelyikét. Ha azonban nem tud túllépni a lezárási képernyőn, akkor a lezárási képernyőről kell elérnie a CMD-t, és használnia kell az alábbi útmutatót. Ilyen esetekben az alul található útmutató segítségével aktiválhatja a CMD-t közvetlenül a kezdőképernyőről. Lássunk neki.
1.1.1 CMD használata
Indítsa el a CMD-t a rendszeren, és írja be az alábbi parancsot. Ha végzett, nyomja meg az Enter billentyűt a billentyűzeten a végrehajtáshoz.
net user administrator /active:yes

A parancsnak most sikeresnek kell lennie.

Nyomja meg a Windows billentyűt a billentyűzeten, és kattintson a felhasználónevére a bal alsó sarokban. A rendszergazdai fióknak most már láthatónak kell lennie ebben a szakaszban.
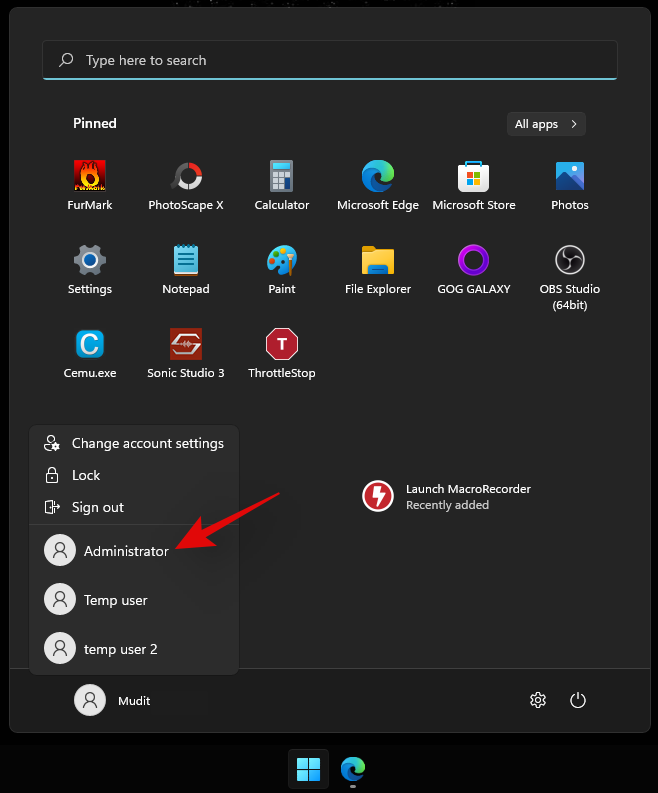
Ez azt jelenti, hogy a folyamat sikeres volt. Most már kijelentkezhet fiókjából, és bejelentkezhet a rendszergazdai fiókba. Az alapértelmezett rendszergazdai fiókhoz nem tartozik jelszó, és az OOBE üdvözölni fogja, amint bejelentkezik a fiókba. Most már használhatja a következő útmutatókat a Windows-jelszó visszaállításához, ha szükséges.
1.1.2 Az Admin Tools használata
Nyomja Windows + Rmeg a billentyűzetet a futtatás párbeszédpanel elindításához. Az indítás után írja be a következő kifejezést, és nyomja meg az Enter billentyűt a billentyűzeten.
lusrmgr.msc
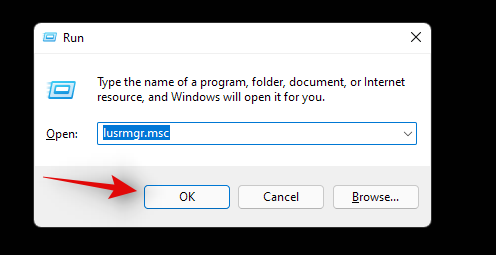
A helyi csoportkezelő most elindul a számítógépén. Kezdje a „Felhasználók” kiválasztásával a bal oldalon.
Kattintson az Adminisztrátor elemre a jobb oldalon. Most kattintson a További műveletek , majd a Tulajdonságok elemre .
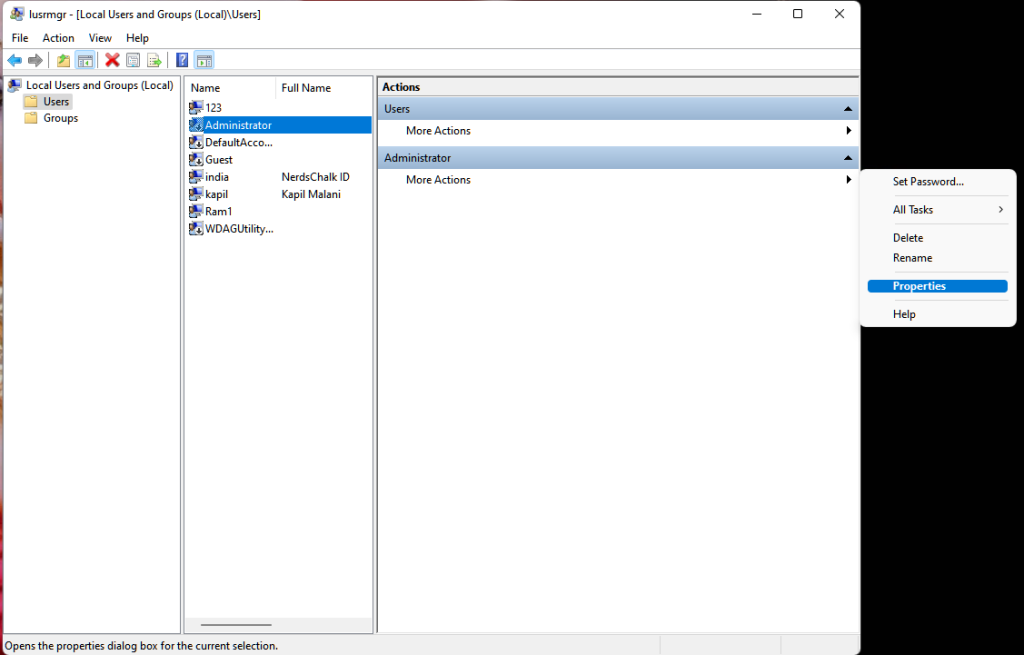
Most egy új ablak jelenik meg a képernyőn. Törölje a jelölést a „Fiók le van tiltva” jelölőnégyzetből.
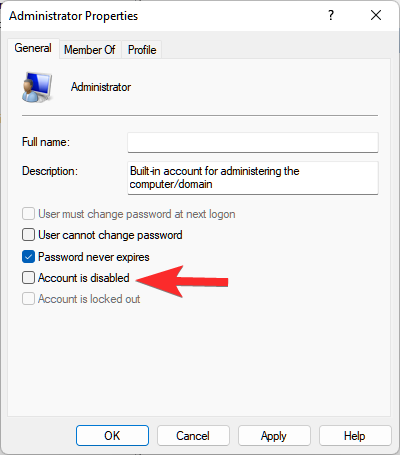
Kattintson az „Alkalmaz”, majd az „OK” gombra.
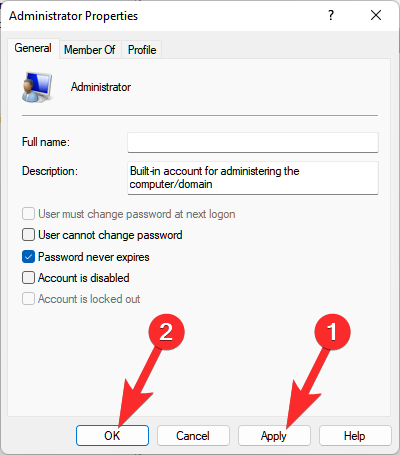
Zárja be a helyi csoportkezelőt, és aktiválja a Start menüt. Most kattintson a felhasználónevére a bal alsó sarokban, és egy új „Adminisztrátor” fióknak elérhetővé kell válnia ebben a részben. Mostantól kijelentkezhet jelenlegi fiókjából, és bejelentkezhet az új rendszergazdai fiókba. A fiókhoz nem lesz jelszó, és egyszerűen be kell tudni jelentkezni a „Bejelentkezés” gombra kattintva.
1.1.3 A Rendszerleíróadatbázis-szerkesztő használata
A beállításjegyzék-szerkesztő módszer csak azokra a felhasználókra vonatkozik, akiknek rendszerükre Windows 11 Pro vagy újabb verzió van telepítve. Ennek az az oka, hogy a rendszerleíró adatbázis elérési útja ehhez a módszerhez csak a Windows 11 Pro vagy újabb felhasználók számára érhető el. Ha Ön Windows 11 Home felhasználó, akkor helyette használhatja a fent felsorolt CMD-módszert.
Nyomja Windows + Rmeg a billentyűzetet, és írja be a következő kifejezést. Nyomja meg az Enter billentyűt a billentyűzeten, ha végzett.
regedit
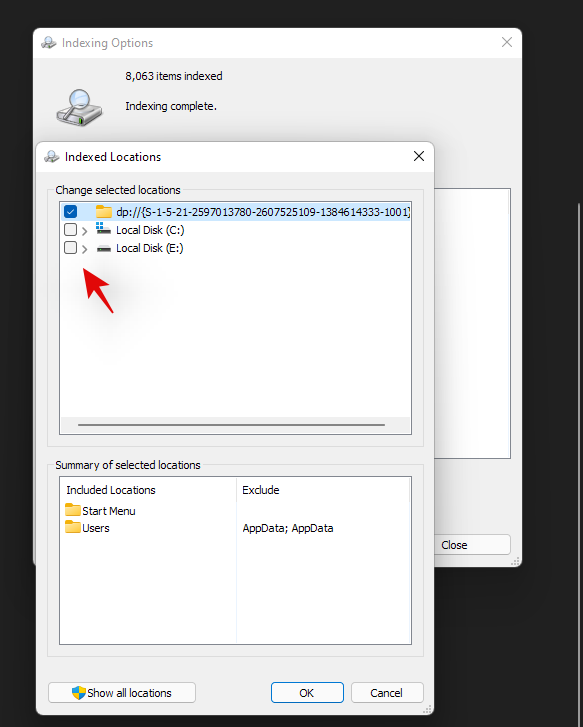
Most navigáljon a következő útvonalra. Ugyanezt másolhatja és beillesztheti a felső címsorba is.
Computer\HKEY_LOCAL_MACHINE\SOFTWARE\Microsoft\Windows NT\CurrentVersion\Winlogon\SpecialAccounts\UserList

Ha a UserList ki van választva a bal oldalon, kattintson jobb gombbal egy üres területre a jobb oldalon, és válassza az „Új” lehetőséget.
Kattintson a „DWORD (32 bites) érték” elemre.
Nevezze el az értéket „Administrator”-nak, és nyomja meg az Enter billentyűt a billentyűzeten.
Once the value is added, close the Registry Editor and restart your PC for good measure. An administrator account should now be available in the bottom left corner of your screen when at the lock screen.
1.1.4 Using GPO
If you are using an enterprise machine then you can also use the Group Policy Editor to enable the default administrator account on your PC. However, this option will be unavailable to users with Windows 11 Home edition. Follow the guide below to get you started.
Press Windows + R, enter the following term and press Enter on your keyboard to open the Group Policy Editor on your PC.
gpedit.msc
Navigate to the following directory using the left sidebar.
Computer Configuration\Windows Settings\Security Settings\Local Policies\Security Options\
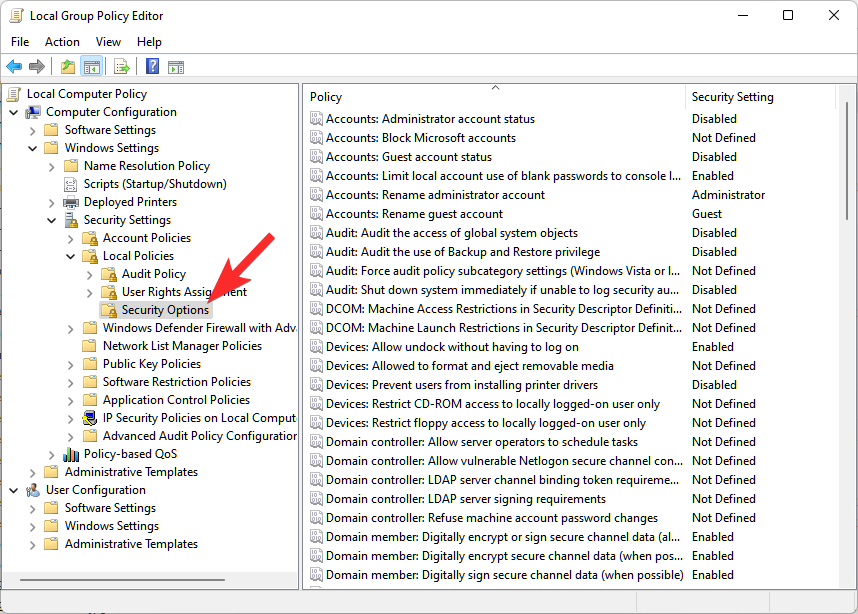
Now double click on the following value on your right: Accounts: Administrator account status
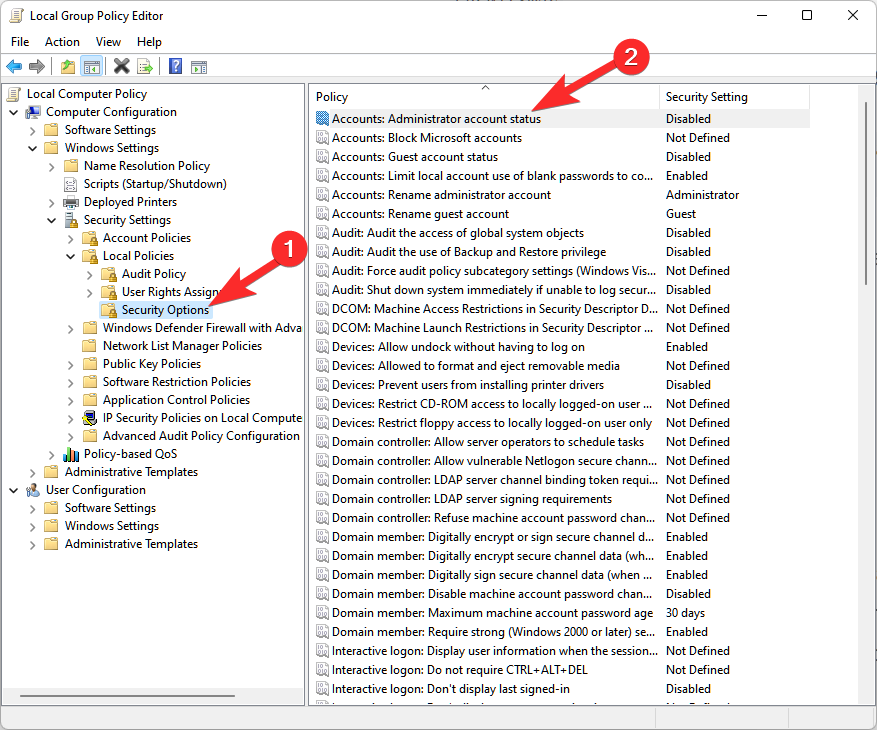
Select ‘Enabled’.
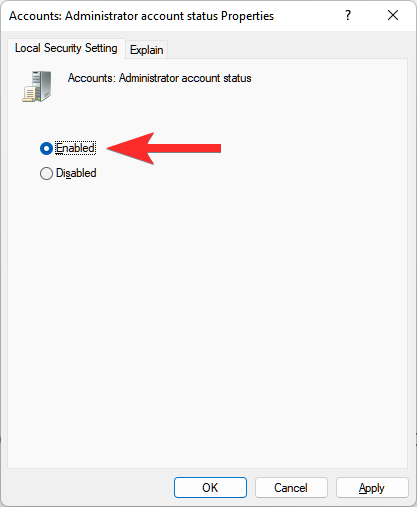
Click on ‘Apply’ and then on ‘OK’.
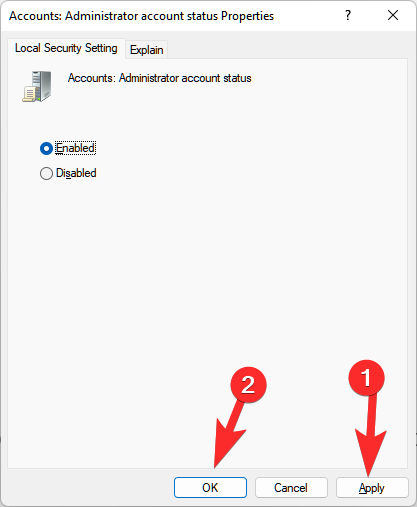
Close the GPO window now and press the Windows key on your keyboard to open the Start menu. Now click on your username in the bottom left corner of your screen and a new Administrator account should now be available to you.
1.2 Disable the default administrator account
Now that you are done with your administrative tasks, it is recommended that you disable your administrator account to prevent unauthorized access to your system. Use one of the methods below that best suits your current needs and requirements. Let’s get started.
1.2.1 Using CMD
Activate CMD on your PC depending on your current setup and type in the following command. Press Enter on your keyboard to execute it.
net user administrator /active:no

And that’s it! The default administrator account should now be disabled on your PC.
1.2.2 Using Admin Tools
Press Windows + R and enter the following term in the Run dialog box. Press Enter on your keyboard once you are done.
lusrmgr.msc

Select ‘Users’ from the left sidebar and click on ‘Administrator’ on your right.
Select the checkbox for ‘Account is disabled’ option.
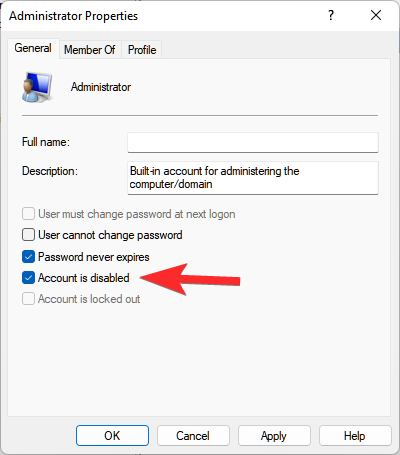
Click Apply and then OK.

Close the admin tools window and the default administrator account should now be disabled on your PC.
1.2.3 Using Registry Editor
Press Windows + R, type in the following, and press Enter on your keyboard to open the Registry Editor on your PC.
regedit

Once the registry editor opens, navigate to the path given below.
Computer\HKEY_LOCAL_MACHINE\SOFTWARE\Microsoft\Windows NT\CurrentVersion\Winlogon\SpecialAccounts\UserList

Click on ‘Administrator’ on your right and hit Del on your keyboard.
Confirm your choice by clicking on ‘Yes’.
Restart your PC and the default admin account should no longer be available on your lock screen.
1.2.4 Using GPO
Press Windows + R and type in the following. Press Enter on your keyboard once you are done.
gpedit.msc
Now navigate to the following path.
Computer Configuration\Windows Settings\Security Settings\Local Policies\Security Options\

Now double click on the following value on your right: Accounts: Administrator account status

Select ‘Disabled’.
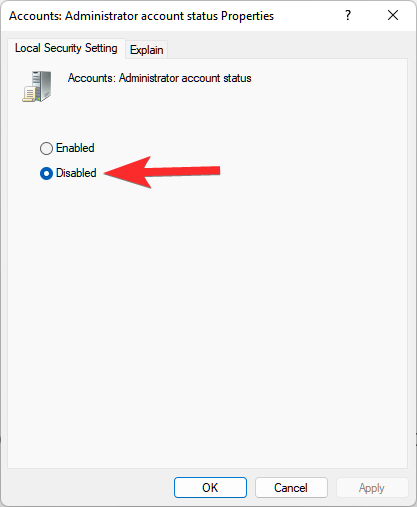
Click on ‘Apply’ and then on ‘OK’.
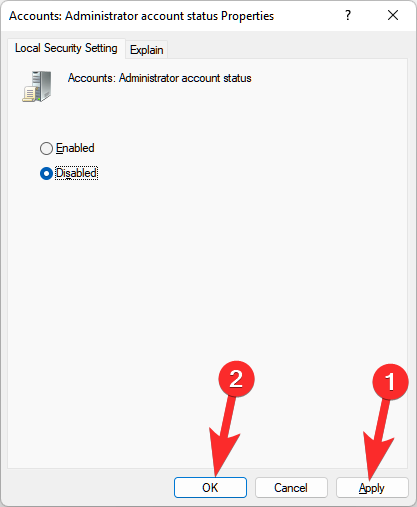
Close the GPO window.
The default administrator account will now be disabled on your PC via the Group Policy Editor in Windows 11.
1.3 Login as admin using command prompt (can’t get past the lock screen issue)
If you are locked out of Windows and would like to access the administrator account to reset your password then you will need to launch CMD from your lock screen first. You will need a recovery environment to proceed with this guide.
You will need to first access CMD using Windows installation media (a Windows bootable USB) for this guide and then follow the steps below. If using an installation media press Shift + F10 during the setup to launch CMD anywhere.
Follow the guide below to get you started once you have launched CMD as given above.
Once the command prompt launches, enter the following command and press Enter on your keyboard.
cd windows

You will now be taken to your default boot drive in CMD. Enter the following command and execute it by press Enter on your keyboard.
cd system32

You will now be in the System32 directory. Execute the command below to create a backup of utilman.exe.
copy utilman.exe utilman.exe.back

Execute the command below within CMD now.
copy cmd.exe cmd1.exe

Now let’s delete the default utilman.exe.
del utilman.exe

We will now rename CMD so that it can be accessed as utilman.exe.
rename cmd.exe utilman.exe

Once all the commands are executed successfully, close the command prompt by typing in the following command.
exit

Restart your PC and proceed to the Windows lock screen as you normally would. Click on the accessibility icon in the bottom right corner and you should now be able to access CMD on your lock screen. Follow the guide above to enable administrator account on your system. Once enabled, you can use the guide below to reset a local account’s password. Once you have reset your password it is highly recommended that you revert the changes we made to cmd.exe and utilman.exe earlier. Use the steps below to revert your changes.
Press Windows + S on your keyboard and search for CMD. Click on ‘Run as administrator’ once it shows up in your search results.
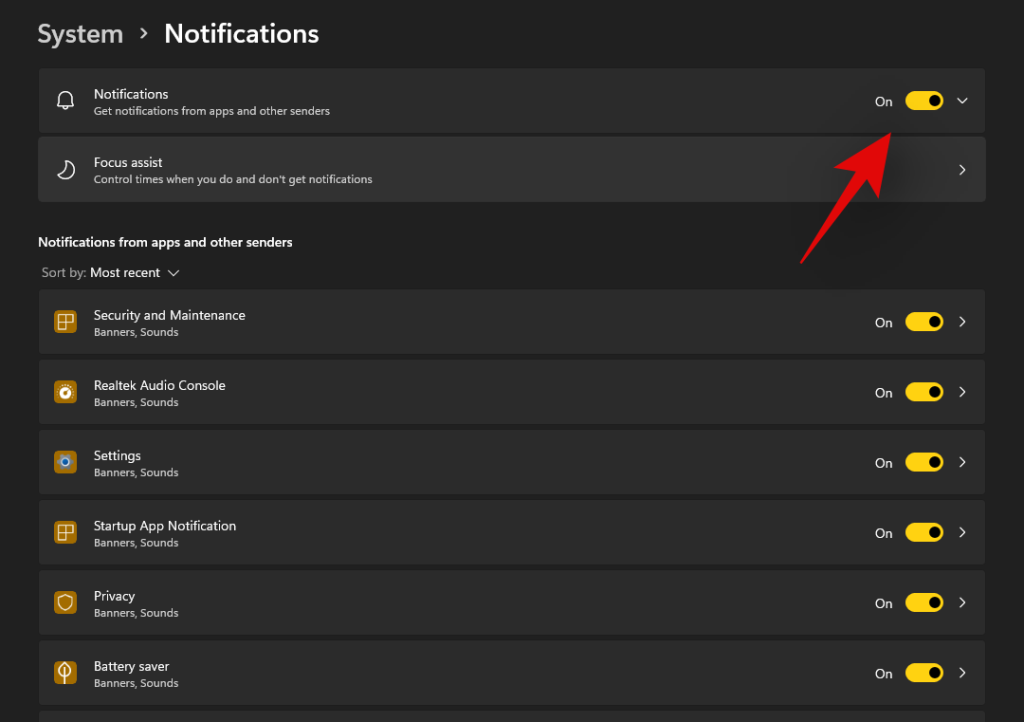
Now enter the following commands one by one and execute them to revert your changes. Make sure to execute each command one after the other without changing their order.


rename utilman.exe.back utilman.exe

CMD functionality should now be restored within Windows 11. You can check for the same by pressing Windows + R on your keyboard, typing in CMD, and hitting Enter on your keyboard. If CMD launches on your system then all the necessary changes have been reverted successfully.
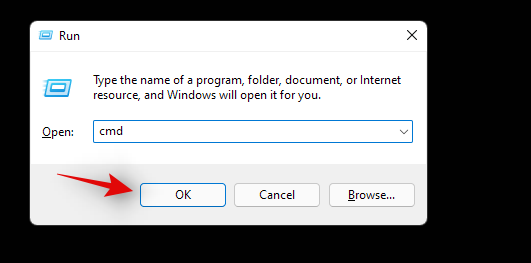
However, if CMD does not launch, make sure that you executed each command successfully on your system by re-verifying each one in the list above.
And that’s it! You should now be able to access CMD from your lock screen.
1.4 Reset password for a local account
You can now reset your local account’s password with the default administrator account we just enabled. Follow the steps below to get you started.
Log in to the Windows administrator account and then press Windows + S on your keyboard. Search for Control Panel and click and launch the app once it shows up in your search results.
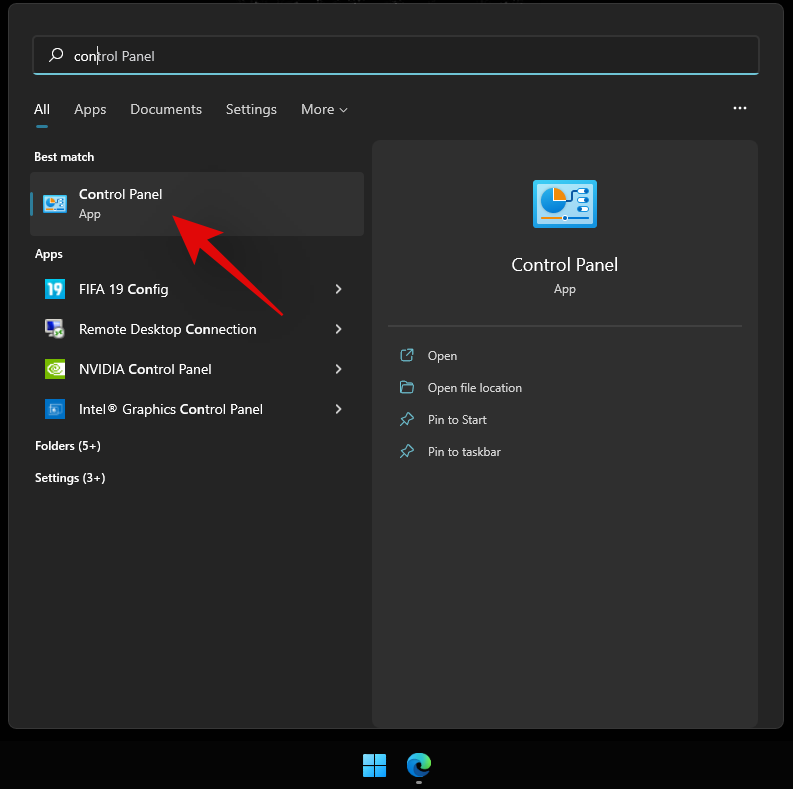
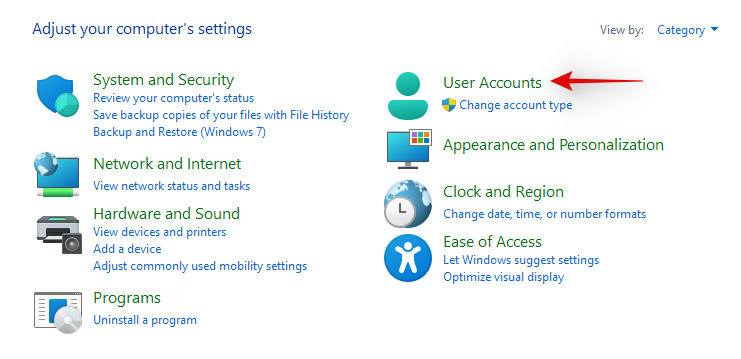
Click on ‘User Accounts’.
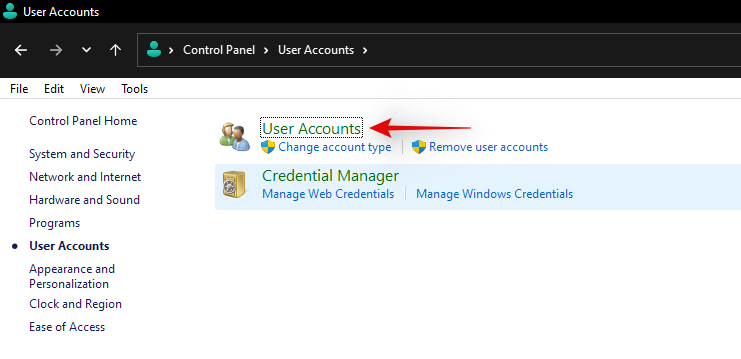
Click on ‘User Accounts’ again.
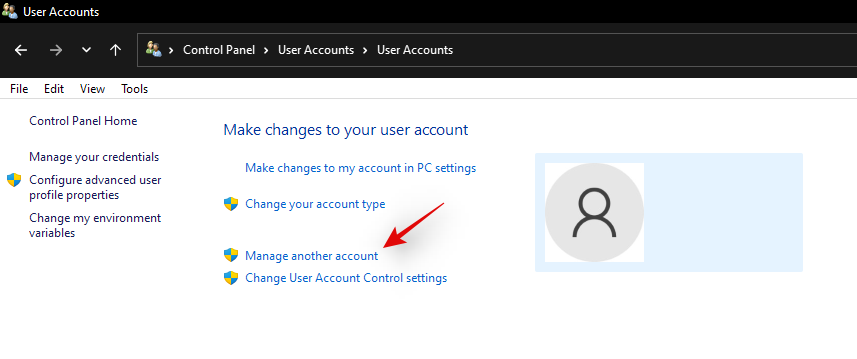
Click on ‘Manage another account’.
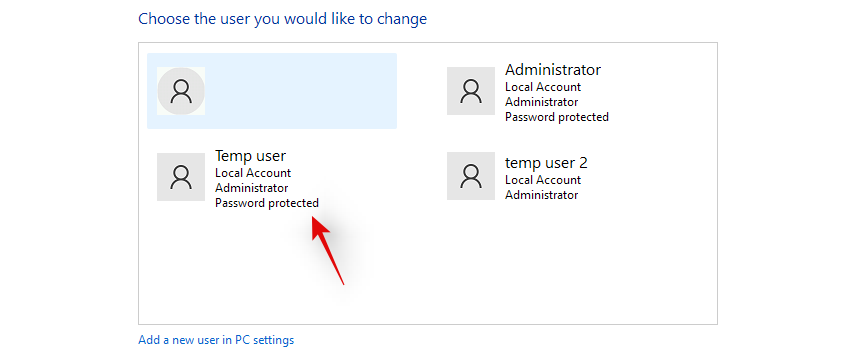
Click and select the account for which you wish to change the password.
Now click on ‘Change the password’.

Type in your new password and confirm the same in the respective text boxes
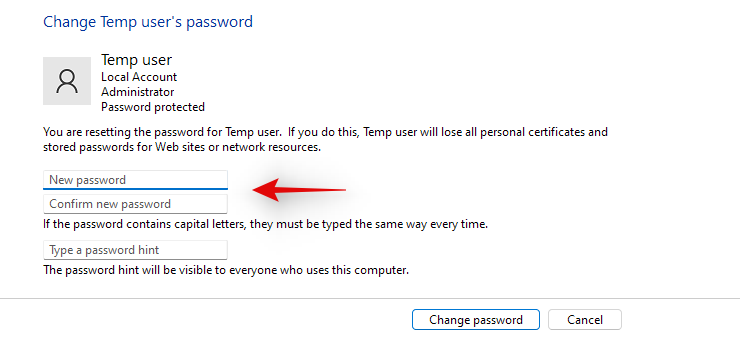
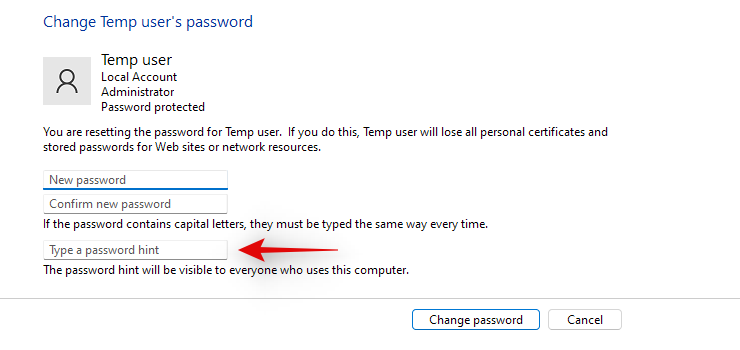
Set a password hint if needed.
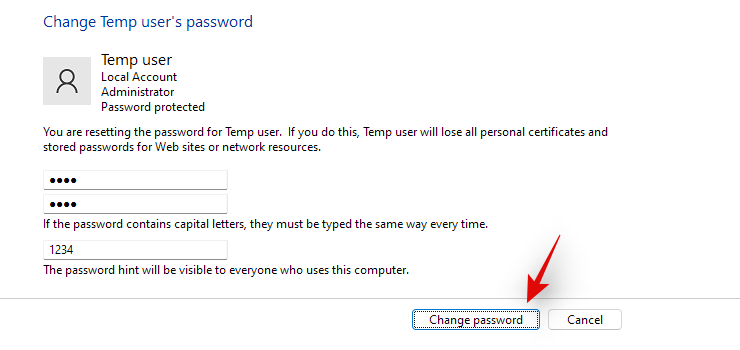
Click on ‘Change password’ once you are done.
And that’s it! The password for the selected account should now be changed. You can now visit the lock screen and log into your local account using your new password. We recommend you revert any changes made at this point to maintain your security and privacy. You should revert any CMD changes made as well as disable the default administrator account on your system using the guides above.
Method #02: Create a new administrator account in Windows 11
If you wish to create a new administrator account in Windows 11, then you can follow the steps below. Please keep in mind that you will need administrator privileges to create a new administrator user account on your device. Follow the guide below to get you started.
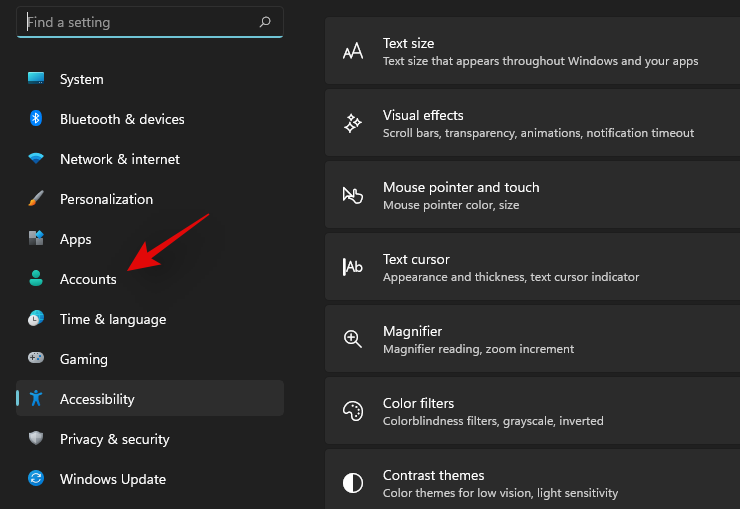
Press Windows + i on your keyboard and select ‘Accounts’ from the left sidebar.
Click on ‘Family & other users’.
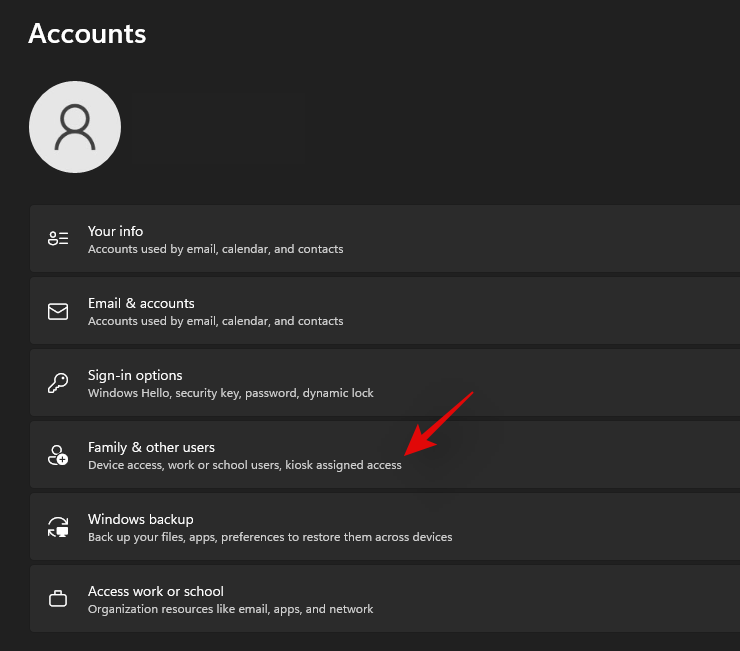
Click on ‘Add account’.

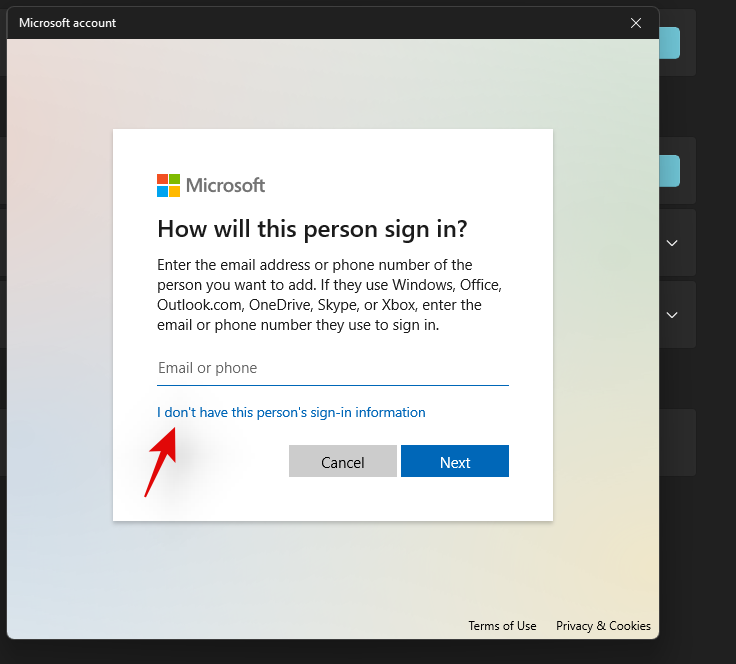
At this point, you can enter the Microsoft Account details of the new user and follow the on-screen steps to set up a new account. However, if you are looking to create a new local account then you can continue with the steps below.
Click on ‘I don’t have this person’s sign-in information’.
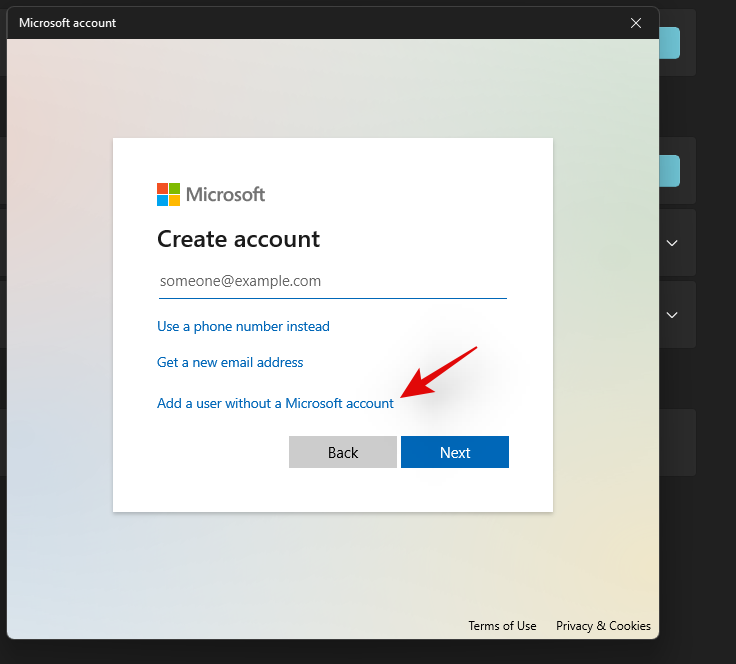
Click on ‘Add a user without a Microsoft account’.
Enter the name of the new user.
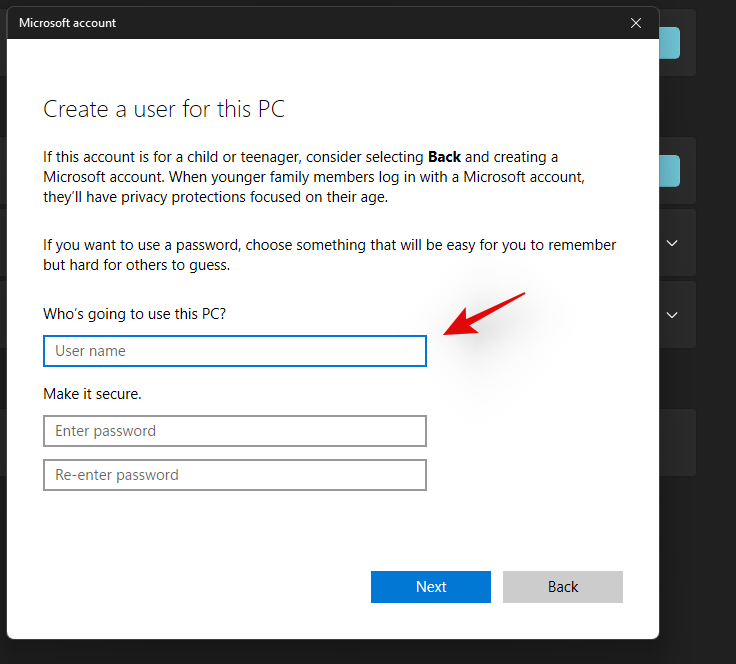
Now set a password and confirm the same.
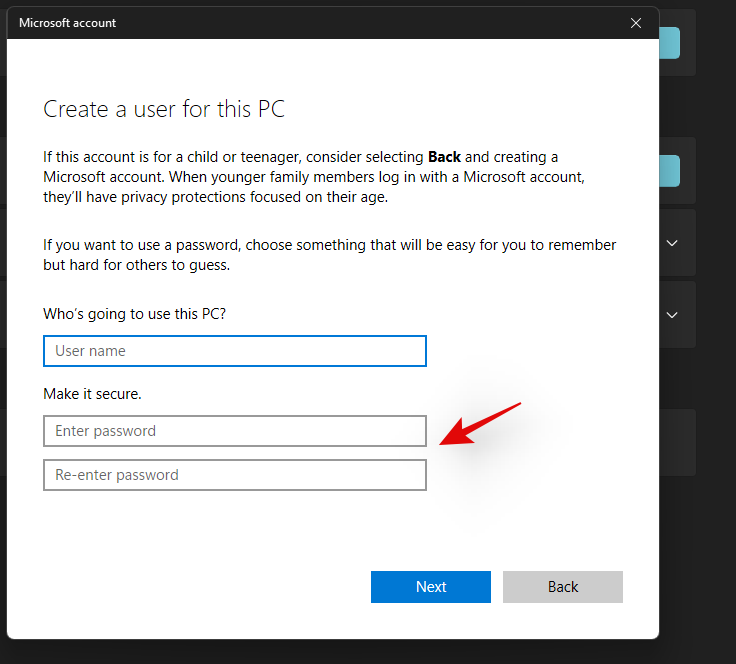
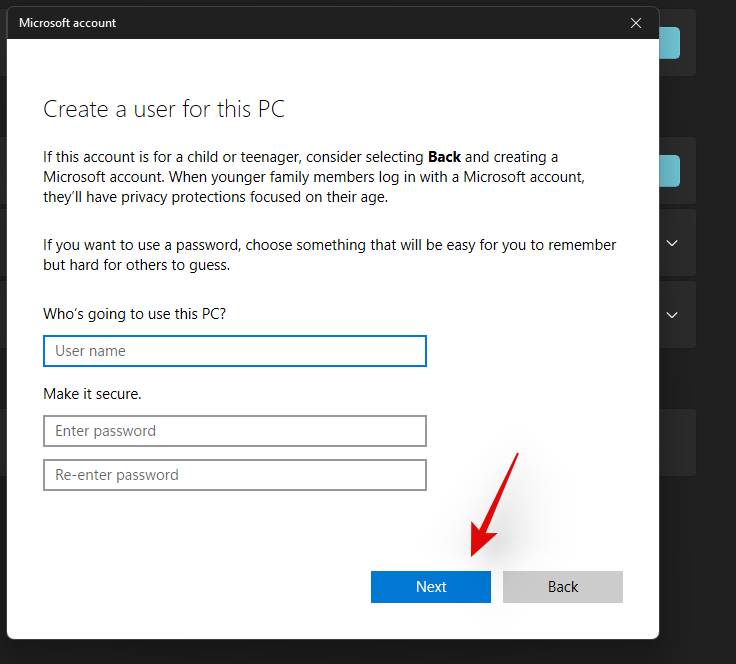
Click on ‘Next’ once you are done.
 \
\
A new account will now be added to your PC. However, the newly added account is a standard account. Let’s convert it into an administrator account. Press Windows + S on your keyboard and search for Control Panel. Click and launch the app from your search results.
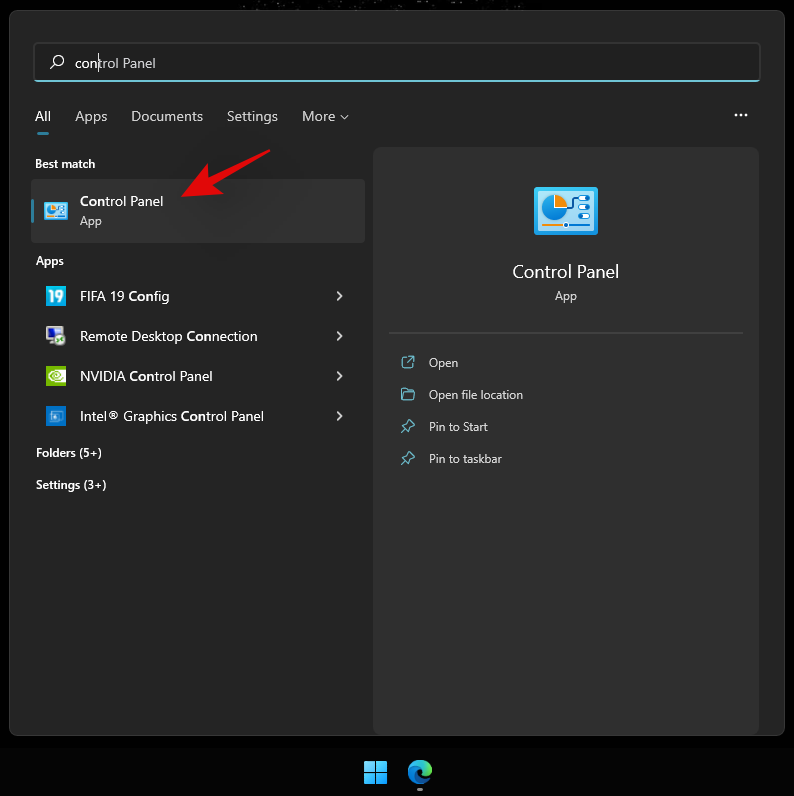
Click on ‘User Accounts’.
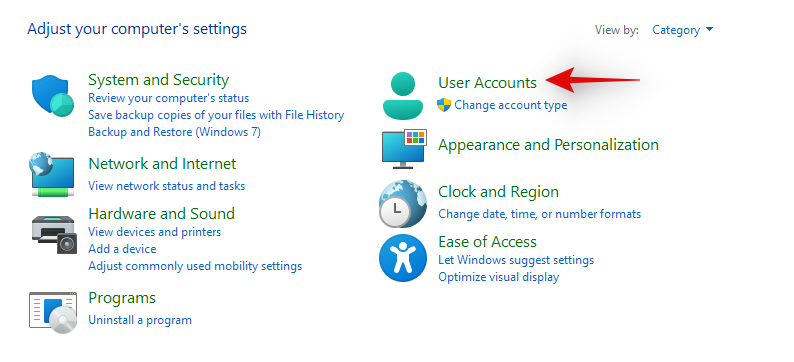
Click on ‘User Accounts’ again.
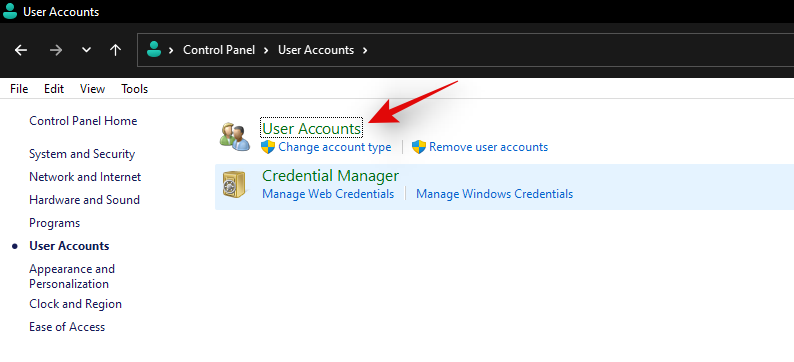
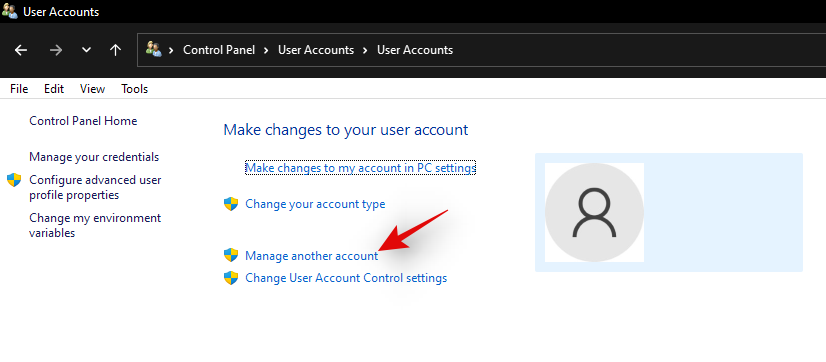
Click on ‘Manage another account’.
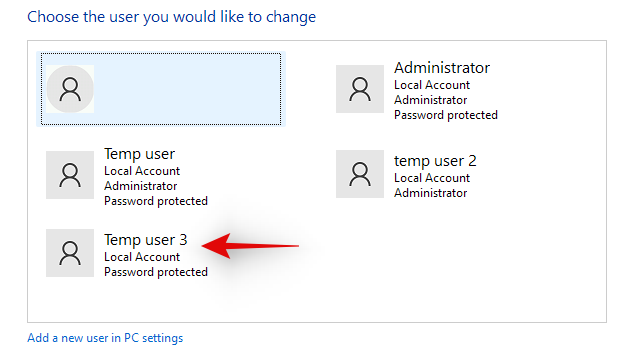
Now click and select the new account you just created.
Click on ‘Change the account type’.

Click and select ‘Administrator’.
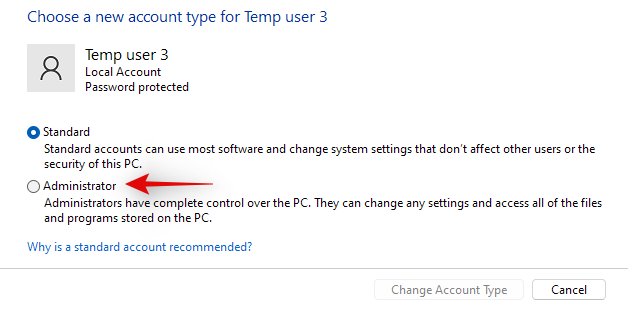
Finally, click on ‘Change account type’.
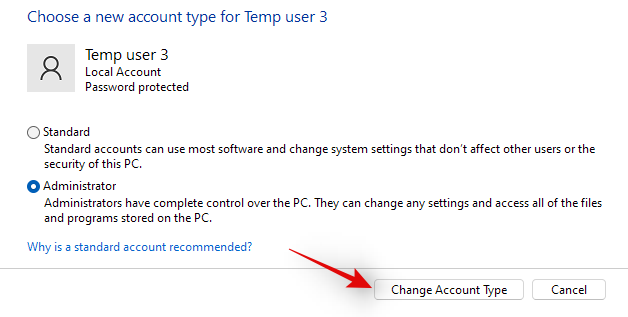
And that’s it! You will now have created a new local administrator account on your device.
Method #03: Change a standard account to an administrator account
If you have a standard account then you can simply switch to an administrator account. If using the Windows Home edition then you can either use the Control Panel method or the ‘netplwiz’ method. On the other hand, Windows Pro and higher users can use either of the methods listed below. Let’s get started.
Note: If you are logged in as a standard user and would like to convert the same account to an administrator account then we recommend you use the netplwiz guide in the methods below.
3.1 Using Control Panel (Windows home)
Press Windows + S on your keyboard, search for Control Panel and launch the app once it shows up in your search results.

Click on ‘User Accounts’.

Click on ‘User Accounts’ again.

If you wish to change your own account’s type then click on ‘Change your account type’. If you wish to convert another local account then select ‘Manage another account’ and select the concerned account. Once selected, click on ‘Change account type’.

Select ‘Administrator’.

Click on ‘Change account type’.

And that’s it, the concerned account should now be an administrator account on your system.
3.2 Using netplwiz
You can also use netplwiz to your advantage and convert user accounts on your PC. Follow the guide below to get you started.
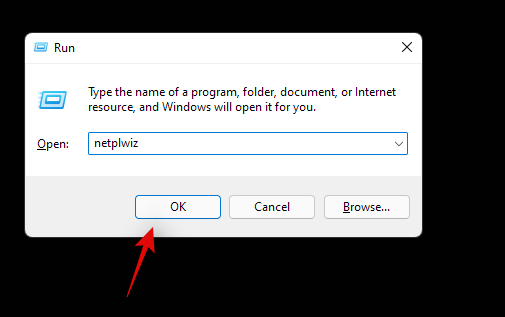
Press Windows + R on your keyboard to launch the run dialog box. Once launched, type in the following and press Enter on your keyboard.
netplwiz
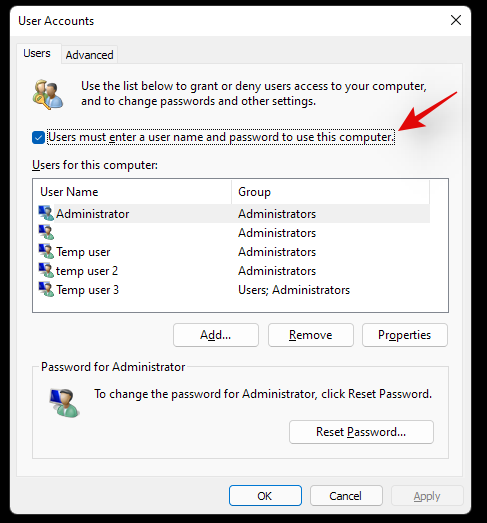
Check the box for ‘Users must enter a user name and password to use this computer’ at the top.
Now click and select the user account you wish to convert from the list below.
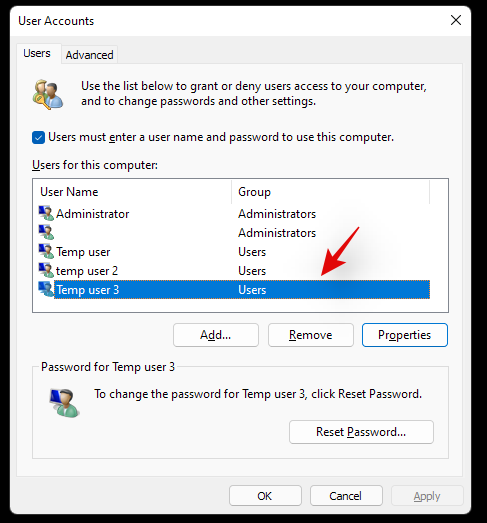
Click on ‘Properties’.
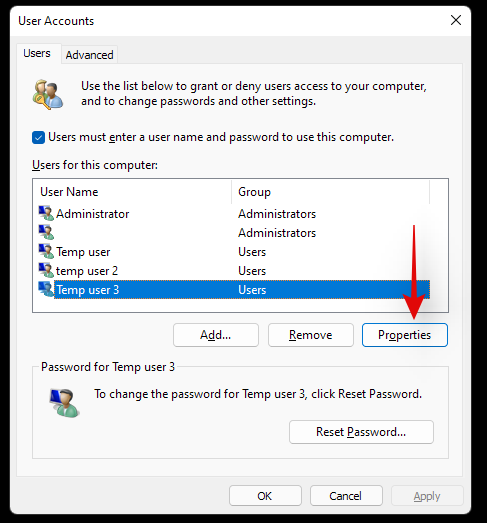
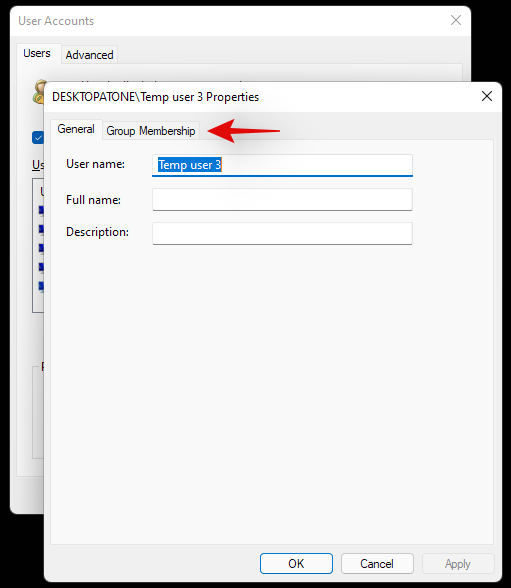
Switch to the ‘Group Membership’ tab at the top.
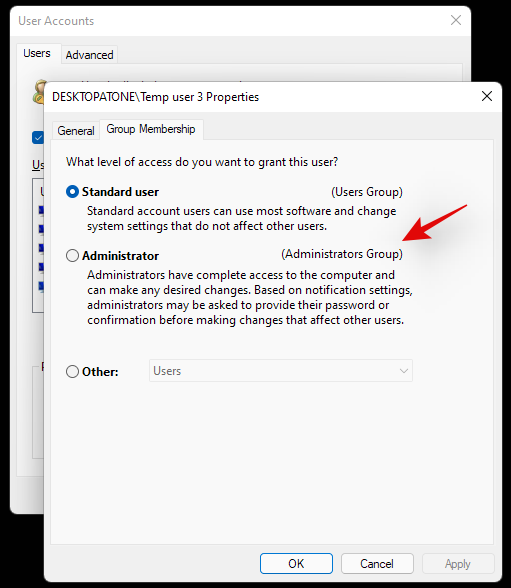
Click and select ‘Administrator’.
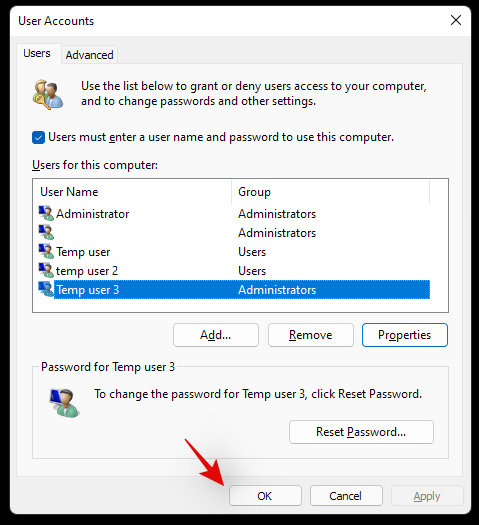
Click on ‘Ok’ twice, once you are done.
If you converted the current local account that you are signed in with then you will be prompted to re-login to the account for the changes to take effect. Click on ‘Yes’ to confirm your choice.
You will now be taken to the lock screen. Login to the concerned account and you should now have administrator privileges within it.
3.3 Using Local groups manager (Windows Pro and higher)
Press Windows + R on your keyboard, type in the following, and press Enter on your keyboard.
lusrmgr.msc
The local groups manager should now launch on your PC. Click and open ‘Users’ on your left.
Now select the desired User account that you wish to convert from your right and double click on it.
Switch to the ‘Member of’ tab and select the ‘Administrator’ group.
Click on ‘Ok’ once you are done.
And that’s it! The selected account will now have elevated administrator privileges within Windows.
Can you set or reset a password when logged in as an administrator?
Yes, you can easily reset your password as an administrator in Windows 11. This can be done in multiple ways and you can reset the password for a standard account or an administrator account using this method. This can be quite useful if you have forgotten your password and would like to get back into your system without losing your data.
However, you should keep in mind that this can be used by anyone to change your password and get access to your system. Hence, it is recommended that you set a secure password for your default account whenever possible.
For now, you can use the guide below to reset a password in Windows 11 when logged in as an administrator.
How to reset the password once logged in as an administrator
Resetting your password is quite easy when you are logged in to Windows 11 as an administrator. The best way to do this is by using either the Control Panel or CMD. Use one of the guides below that best fits your current needs and requirements. Follow any one of the guides below to get you started.
1. Using Control Panel
Press Windows + S and search for Control Panel. Click and launch the app from your search results.

Click on ‘User Accounts’.

Now click on ‘User Accounts’ again.

Click on ‘Manage another account’.

Now click and select your local account for which you wish to reset your password.

Click on ‘Change the password’.

Add a new password for your local account and confirm the same in their respective text boxes.

Now add a password hint if required.

Click on ‘Change password’ once done.

And that’s it! The password for the selected account should now be changed based on your preferences.
2. Using CMD
You can also reset a local account’s password using CMD. Follow the guide below to get you started.
Press Windows + S on your keyboard and search for CMD. Click on ‘Run as administrator’ once the app shows up in your search result.
Type in the following and press Enter on your keyboard.
net user

You will get a list of all the accounts currently available on your PC. Make a note of the desired account’s username and then type in the command below. Replace ‘NAME’ with the name you noted down earlier and replace ‘PASSWORD’ with your new password. Once done, press Enter on your keyboard.
net user NAME PASSWORD
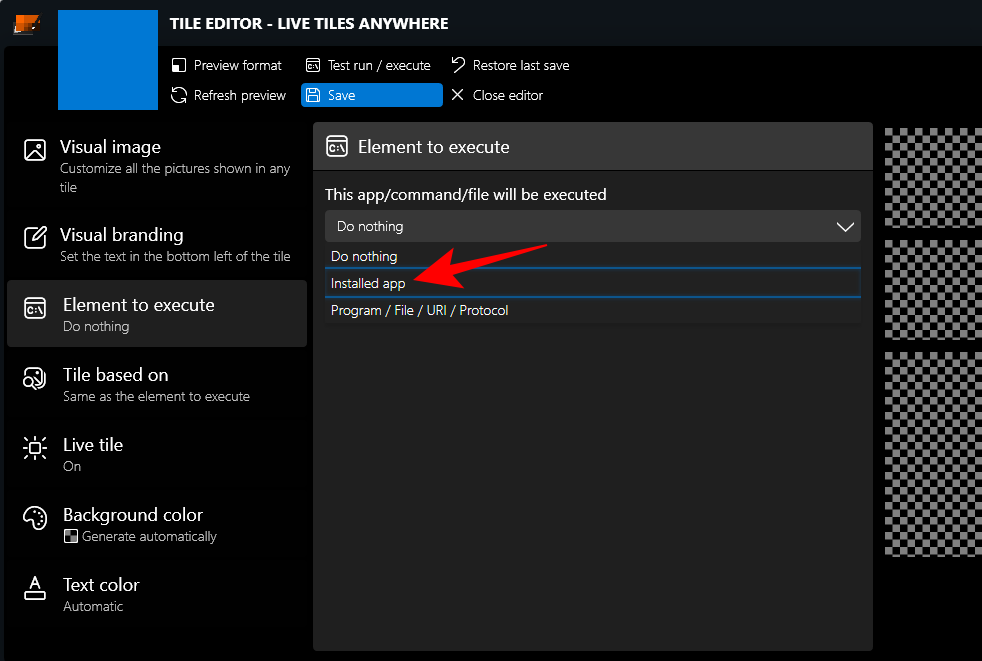
And that’s it! Once the command is executed, the password for the desired account should be automatically changed on your PC.
How to add a password for the administrator account
If you are looking to secure your PC further then it is recommended that you add a password for the default administrator account. This will ensure that no one aware of this trick can access your Windows account without your authorization. We can add a password for your default admin account in several ways but we recommend you do so either via the advanced menu or via the CMD method. Follow any one of the guides below to get you started.
1. Using Ctrl + Alt + Del
Log in to the default administrator account and press Ctrl + Alt + Del on your keyboard.
Now click and select ‘Change password’.
Enter a new password and confirm the same in their respective fields.
Add a password hint or security question depending on your preferences.
Click on ‘Ok’ once you are done.
And that’s it! Your default administrator account’s password should now be changed on your PC.
2. Using CMD
Log in to the default administrator account and press Windows + S on your keyboard. Search for CMD and click on ‘Run as administrator’ once the app shows up in your search results.
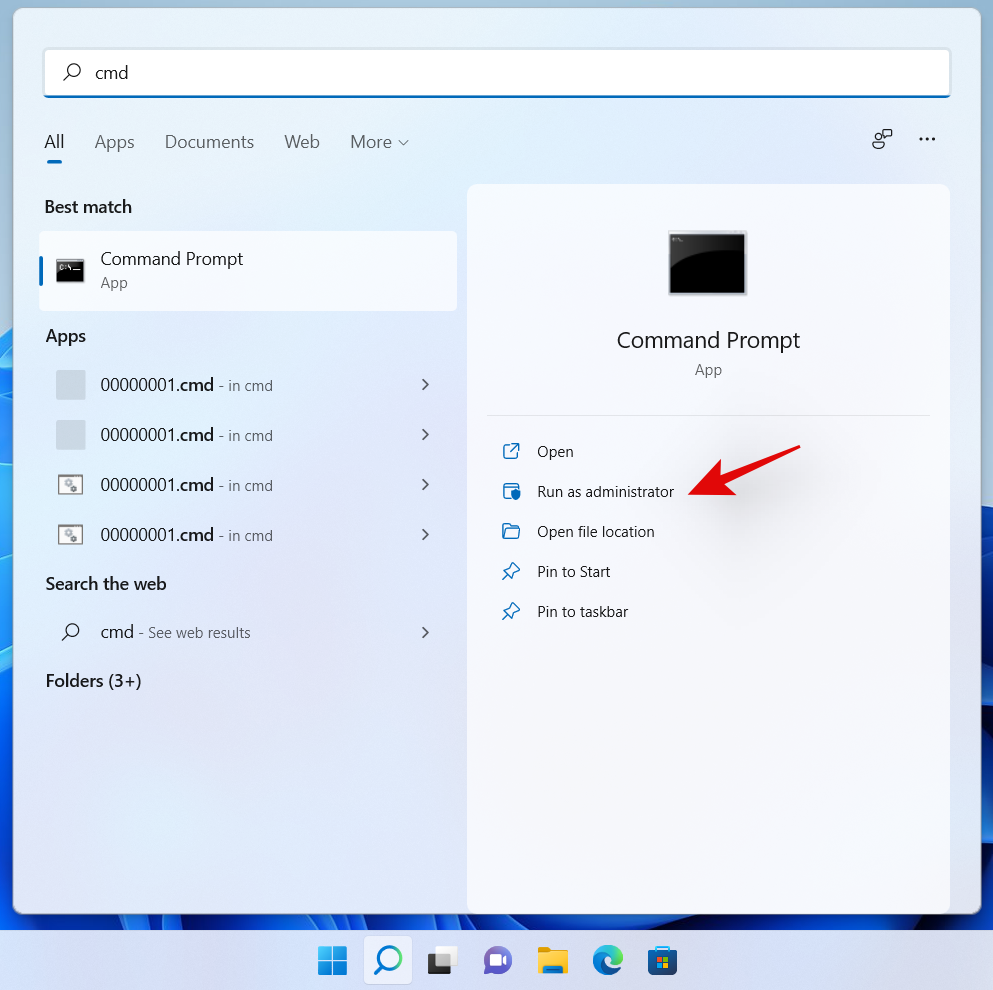
Now enter the following command. Replace ‘PASSWORD’ with a password of your desired choice.
net user Administrator PASSWORD

And that’s it! The new password should now be set for your default administrator account.
Should you keep the administrator account enabled?
No, it is not recommended to keep your default/super administrator account enabled. This account has higher and more elevated privileges when compared to a normal administrator account in Windows. This account is used by Windows to perform system-level tasks in the background as well hence it could cause several privacy issues on your system.
In case somebody can access this account, they would have access to your entire data and hardware. The user could then proceed to take control of your entire system or simply infect it with malware, adware, and in the worst cases, ransomware.
We hope you were able to easily log in as an administrator in Windows 11 using the guide above. If you face any issues or have any more questions for us, feel free to reach out to us using the comments section below.
Related:


 \
\






Linda -
Hatalmas köszi! Mióta a gyerekek is használják a gépet, elég gyakran kell rendszergazdaként bejelentkeznem, jó, hogy van egy jól érthető leírás
József -
A Windows 11 valóban igényes a frissítések során. Van valami javaslatotok arra, hogyan lehet a legjobban kezelni a problémákat
Mókus -
Én csak most váltottam, és ez a bejelentkezés dolog nagyon bonyolultnak tűnik számomra. Van valakinek valami segítő tippje
András -
A Windows 10-es és 11-es bejelentkezési folyamatok eltérnek? Valamicsoda különbséget figyeltem meg, de nem tudom pontosan, mi az.
Erika M. -
Ez a bejelentkezés rendszergazdaként tényleg életmentő! Sokat szenvedtem már emiatt. Mindenkinek ajánlom ezt a cikket
Gábor IT -
Remek, végre találtam valami hasznosat a témában. Windows 10-en is csináltam már, de a Windows 11-es változásokról nem tudtam. Kérlek, meséljetek tapasztalatokról
Márton -
Ez a bejelentkezés tényleg megnehezíti az ember életét, de ezzel a cikkel már könnyebb. Nagy köszönet érte
Bence C. -
Érdekes, hogy sokan belefutnak ebbe a problémába. Pedig a Windows 11 elvileg jobb! Kíváncsi vagyok mások tapasztalataira
Viki M. -
Hogy lehet a bejelentkező képernyőt egyedi képpel személyre szabni? Valaki esetleg tudja, mi a pontos lépés?
Róbert -
Az utasítások világosak voltak, de a Windows 11 felület nekem eléggé zavaros. Türelmesnek kell lennem, de szeretném jobban megérteni
Csilla -
A legjobb, amit eddig olvastam erről! Néhány apró trükköt is megoszthatnál a témában, például, miképp lehet gyorsan váltani a bejelentkezési módok között.
Maria -
Köszönöm az információkat! Régóta kerestem már egy ilyen útmutatót, mert néha nehézségeim vannak a rendszergazdai bejelentkezéssel Windows 11 alatt
Zsuzsi -
Szuper hasznos információk! Az a szívfájdalmam, hogy néha elfelejtem a jelszavamat, van rá valami tipp
Ádám -
Amióta Windows 11-re váltottam, a bejelentkezéssel sok gondom volt. Ez a cikk nagyon segített! Köszi
Peter B. -
Szuper cikk, nagyon jól összefoglalja a lépéseket! Én már kipróbáltam, és tényleg működik. Ajánlom mindenkinek!
Anna B -
Bár én inkább Mac-et használok, a barátomnak szüksége lehet erre az információra. Meg fogom osztani vele!
Mihály -
Hihetetlen, hogy mennyi nehézséggel találkoztam eddig, de most végre meg van a megoldás! Köszönöm, barátom
Kitti -
Hű, de jó! A múltkor pont ezzel szenvedtem, most már tudom, mit tegyek! Köszönet érte
László -
Tök jó, nagyon részletesen le van írva! A Windows 10-es verzióval hasonlítva, persze kicsit eltérő. Kérlek, írjatok még több ilyen cikket!
Feri -
Ez az útmutató jó! De néha nekem úgy tűnik, hogy Windows 10 és 11 esetén a beállítások nem mindig egyértelműek
Anna K -
Honnan tudom, hogy a fiókom rendszergazdai jogokkal rendelkezik? Esetleg van valami trükk, amivel ezt le tudom ellenőrizni