Εάν κάνετε αναβάθμιση σε νέο υπολογιστή, το πιθανότερο είναι ότι μπορεί να προσπαθείτε να επαναχρησιμοποιήσετε τον σκληρό δίσκο από τον παλιό σας υπολογιστή. Εάν όχι, μπορεί να σχεδιάζετε να το δώσετε σε ένα μέλος της οικογένειας ή σε έναν φίλο. Αλλά προτού προχωρήσετε σε οποιαδήποτε από αυτές τις επιλογές, θα πρέπει να σκουπίσετε τελείως τον παλιό σας σκληρό δίσκο, έτσι ώστε το επόμενο άτομο να ξεκινήσει καινούργια με τον σκληρό δίσκο.
Σε αυτήν την ανάρτηση, θα καλύψουμε πολλούς τρόπους για να σκουπίσετε έναν σκληρό δίσκο στα Windows 11 .
Περιεχόμενα
Γιατί πρέπει να σκουπίσετε έναν σκληρό δίσκο;
Πριν προχωρήσουμε στις μεθόδους, ας αφιερώσουμε ένα λεπτό για να καταλάβουμε γιατί πρέπει να σκουπίσετε τους σκληρούς σας δίσκους.
Ο πιο προφανής λόγος πίσω από το σκούπισμα ενός σκληρού δίσκου είναι να ξεπλύνετε όλα τα προσωπικά σας αρχεία και εφαρμογές από τη μονάδα, διασφαλίζοντας ότι δεν μπορούν να ανακτηθούν από εργαλεία ανάκτησης δεδομένων — μετά από επαναφορά εργοστασιακών ρυθμίσεων ή όχι. Ένας άλλος λόγος για να σκουπίσετε τη μονάδα δίσκου θα μπορούσε να είναι απλώς να αποκτήσετε περισσότερο χώρο αποθήκευσης για τα νέα σας αρχεία. Ή ίσως θέλετε απλώς να ρυθμίσετε τον υπολογιστή σας από την αρχή με μια καθαρ�� εγκατάσταση των Windows και νέα διαμερίσματα για τον σκληρό σας δίσκο.
Όποιος κι αν είναι ο λόγος, ας ρίξουμε μια ματιά στις προϋποθέσεις για να σκουπίσετε τον σκληρό σας δίσκο.
Τι πρέπει να κάνετε πριν σκουπίσετε έναν σκληρό δίσκο;
Πριν σκουπίσετε τη μονάδα δίσκου σας, υπάρχουν μερικά πράγματα που πρέπει να προσέξετε.
- Βεβαιωθείτε ότι έχετε αντιγράψει όλα τα περιεχόμενα της μονάδας δίσκου σε άλλη θέση, αποτρέποντας τυχόν απώλεια δεδομένων.
- Εάν χρησιμοποιείτε φορητό υπολογιστή για να σκουπίσετε τη μονάδα δίσκου, συνιστούμε να συνδέσετε το φορητό υπολογιστή σας στο ρεύμα, καθώς ορισμένες μέθοδοι ενδέχεται να χρειαστούν πολύ χρόνο για να ολοκληρωθούν.
- Κλείστε τυχόν εφαρμογές ή αρχεία που μπορεί να εκτελούνται από τον σκληρό δίσκο που προσπαθείτε να σκουπίσετε.
Ας ρίξουμε μια ματιά στις μεθόδους σκουπίσματος ενός σκληρού δίσκου στα Windows 11.
Σχετικό: Πώς να αντιστοιχίσετε μια μονάδα δίσκου στα Windows 11
Πώς να διαμορφώσετε μια μονάδα δίσκου στα Windows 11 ή 10
Μπορείτε να διαμορφώσετε μια μονάδα δίσκου με πολλούς τρόπους, ανάλογα με τον τύπο πρόσβασης που έχετε στο σύστημά σας. Χρησιμοποιήστε έναν από τους παρακάτω οδηγούς που ταιριάζει καλύτερα στην τρέχουσα κατάσταση και τις απαιτήσεις σας.
Αυτός είναι αναμφίβολα ένας από τους απλούστερους και πιο γρήγορους τρόπους για να σκουπίσετε έναν σκληρό δίσκο. Η διαδικασία διαρκεί μόνο μερικά δευτερόλεπτα και είναι ιδανική για όταν θέλετε να δημιουργήσετε χώρο για νέα αρχεία στον σκληρό σας δίσκο.
Σημείωση: Αυτή η μέθοδος θα λειτουργεί μόνο για δευτερεύουσες μονάδες δίσκου στο σύστημά σας και όχι για τη μονάδα εκκίνησης.
Εδώ είναι τα βήματα.
Πατήστε Win key + rγια να ανοίξετε το πλαίσιο Εκτέλεση. Πληκτρολογήστε 'explorer' και πατήστε enter.
Θα δείτε να ανοίγει ένα παράθυρο με τίτλο «Εξερεύνηση αρχείων». Κάντε κλικ στο 'Αυτός ο υπολογιστής'.
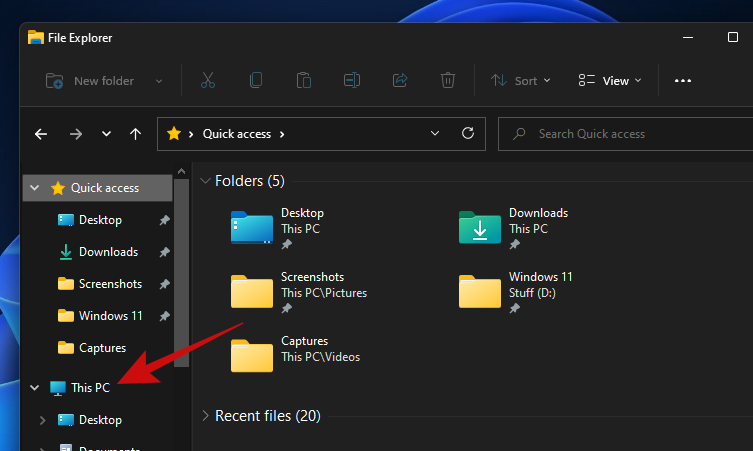
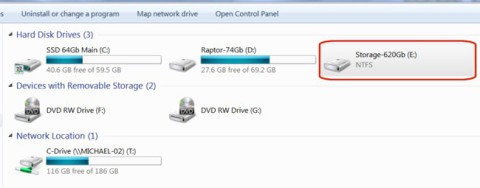
Θα πρέπει τώρα να δείτε όλες τις μονάδες που είναι συνδεδεμένες στον υπολογιστή σας. Το δικό μας έχει τρεις μονάδες δίσκου, εκ των οποίων θα χρησιμοποιήσουμε τη μονάδα δίσκου «Δεδομένα» για αυτόν τον οδηγό.
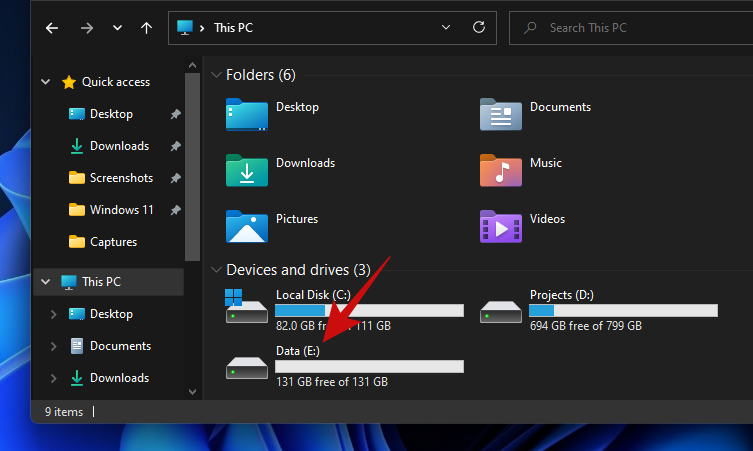
Το μόνο που χρειάζεται να κάνετε είναι να κάνετε δεξί κλικ στη μονάδα δίσκου που θέλετε να σκουπίσετε και να κάνετε κλικ στο «Μορφοποίηση».
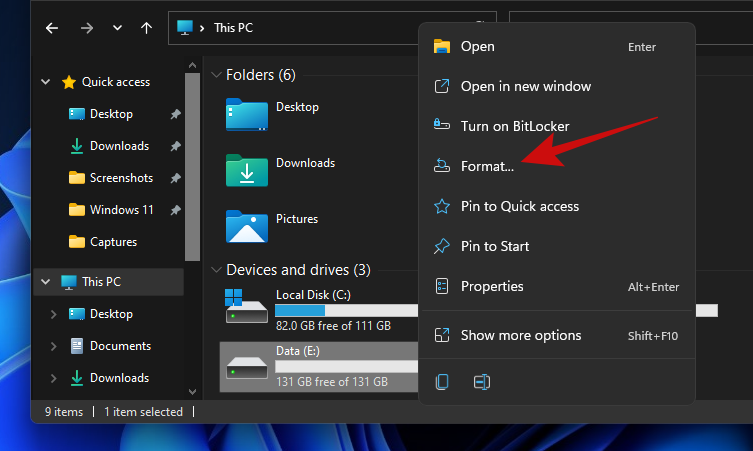
Θα πρέπει να δείτε ένα μικρό αναδυόμενο παράθυρο "Μορφή" ανοιχτό με μια δέσμη επιλογών. Εάν θέλετε να κάνετε μια γρήγορη διαγραφή δεδομένων, χωρίς να μπλέκετε με άλλες επιλογές, κάντε κλικ στο κουμπί «Έναρξη».
Συμβουλή: Για πιο ασφαλή διαγραφή δεδομένων, καταργήστε την επιλογή «Γρήγορη μορφοποίηση» και, στη συνέχεια, κάντε κλικ στο «Έναρξη». Λάβετε υπόψη σας, ότι ένα λεπτομερές σκούπισμα θα διαρκέσει πολύ περισσότερο από ένα γρήγορο φορμάρισμα.
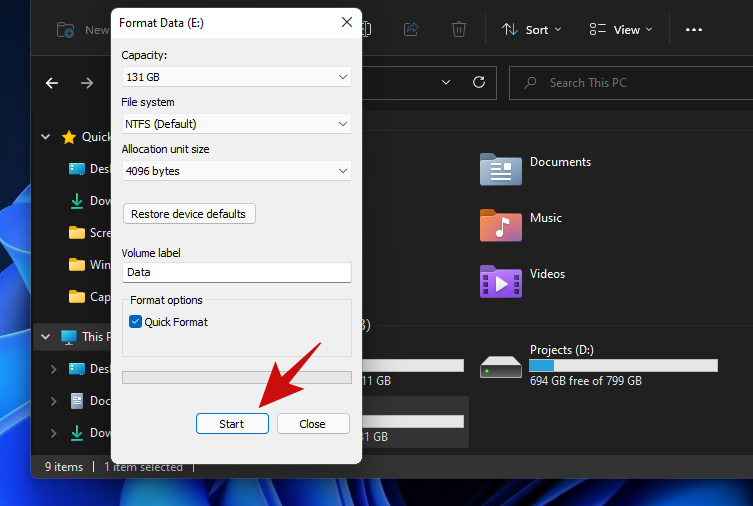
Μόλις ολοκληρωθεί το σκούπισμα, θα δείτε ένα μήνυμα που επιβεβαιώνει το ίδιο. Κάντε κλικ στο «OK» για να απορρίψετε την ειδοποίηση.
Η μονάδα σας είναι πλέον πλήρως καθαρή και έτοιμη να χρησιμοποιηθεί ξανά.
Μέθοδος #2: Χρήση διαχείρισης δίσκων
Ανοίξτε το μενού Έναρξη και πληκτρολογήστε «Διαχείριση δίσκων». Κάντε κλικ στο αποτέλεσμα αναζήτησης ή στο κουμπί άνοιγμα.
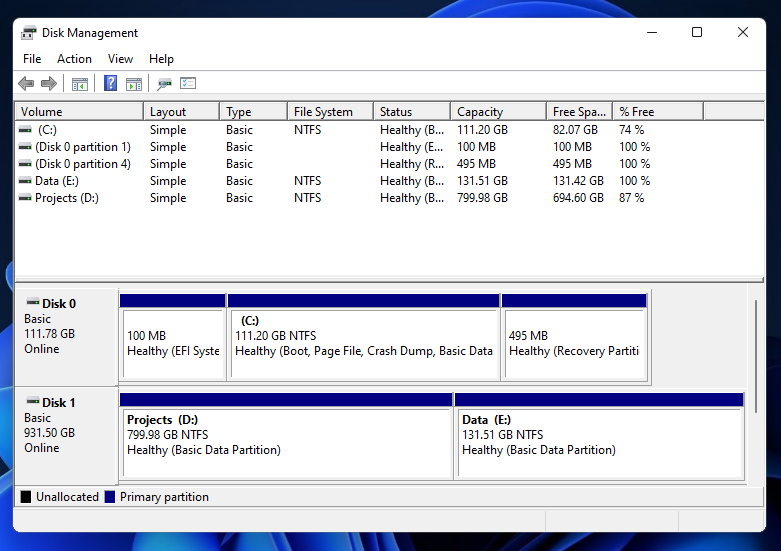
Δείτε πώς φαίνεται το εργαλείο διαχείρισης δίσκων.
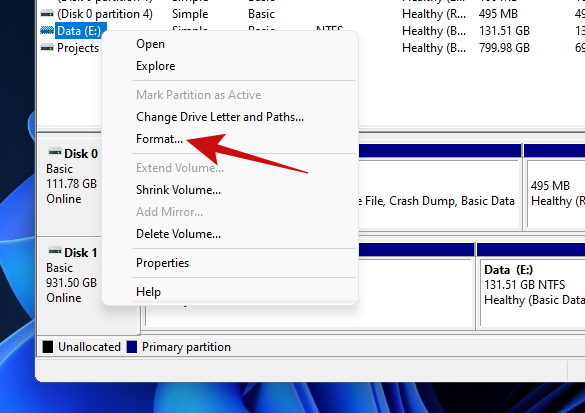
Κάντε δεξί κλικ στον τόμο που θέλετε να σκουπίσετε και κάντε κλικ στο Μορφοποίηση.
Στο επόμενο αναδυόμενο παράθυρο, θα πρέπει να έχετε μια χούφτα επιλογές όπως αλλαγή του ονόματος του τόμου, των συστημάτων αρχείων και πολλά άλλα.
Και πάλι, όπως και η προηγούμενη μέθοδος, θα πρέπει να κρατήσετε ενεργοποιημένη την επιλογή "Εκτέλεση γρήγορης μορφοποίησης" εάν δεν θέλετε να περιμένετε πολύ για να σκουπίσετε τη μονάδα δίσκου σας.
Συμβουλή: Για μια λεπτομερή διαγραφή που θα αφαιρέσει όλα τα ίχνη των δεδομένων σας από τη μονάδα δίσκου σας, καταργήστε την επιλογή "Εκτέλεση γρήγορης μορφοποίησης".
Κάντε κλικ στο κουμπί «OK» για να ξεκινήσετε να σκουπίζετε τη μονάδα δίσκου σας.
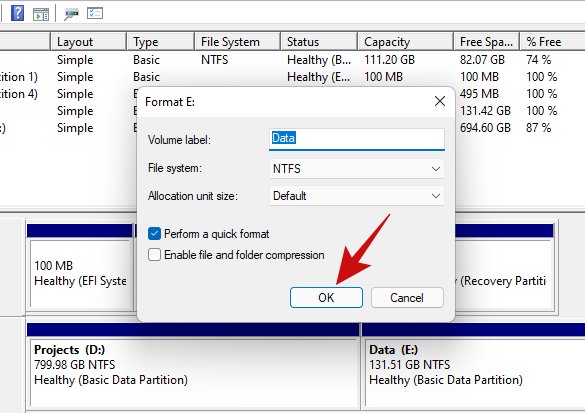
Κάντε κλικ στο κουμπί «OK» για να επιβεβαιώσετε τη διαγραφή δεδομένων και η μονάδα σας θα πρέπει να είναι καθαρή μέσα σε λίγα λεπτά.
Μέθοδος #3: Χρήση Diskpart στο CMD (γραμμή εντολών)
Το Diskpart είναι ένα βοηθητικό πρόγραμμα γραμμής εντολών που μπορεί να χρησιμοποιηθεί για τη διαχείριση όλων των μονάδων δίσκου που είναι συνδεδεμένες στον υπολογιστή σας. Μπορείτε να κάνετε τα πάντα, από την καταχώριση των δίσκων, τη δημιουργία και τη διαγραφή κατατμήσεων και πολλά άλλα με το diskpart.
Ας ρίξουμε μια ματιά στο πώς μπορείτε να σκουπίσετε τον σκληρό σας δίσκο με το diskpart.
Πατήστε Win key + rγια να ανοίξετε το πλαίσιο Εκτέλεση. Πληκτρολογήστε 'cmd' και πατήστε τα Ctrl + Shift + Enterπλήκτρα αντί για το πλήκτρο enter. Αυτό θα ανοίξει μια ανυψωμένη γραμμή εντολών.
Η προεπιλεγμένη διαδρομή από μια ανυψωμένη γραμμή εντολών θα πρέπει να μοιάζει με αυτό.
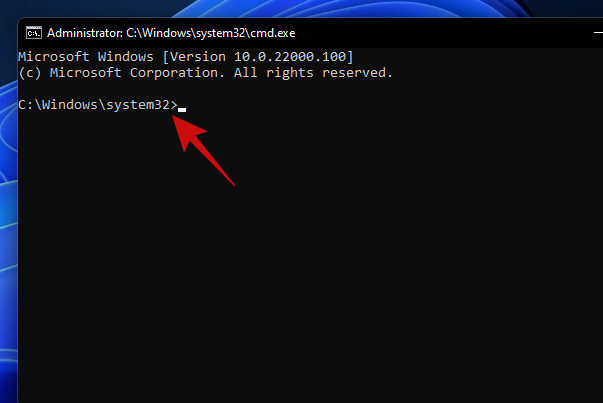
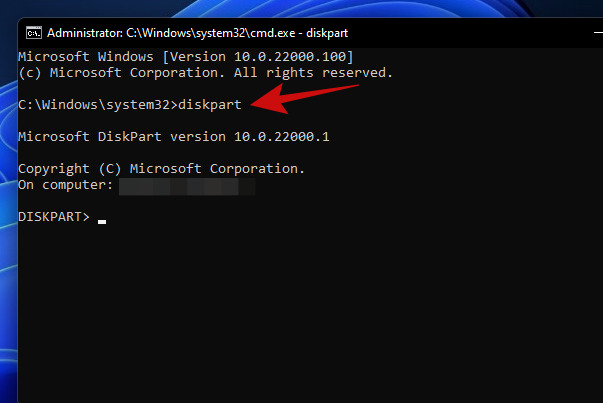
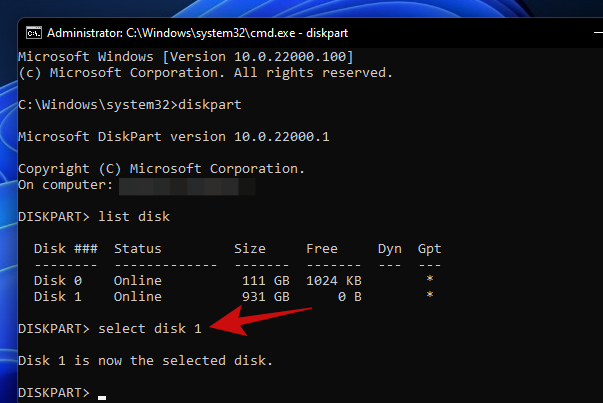
Πληκτρολογήστε "diskpart" και πατήστε enter. Θα πρέπει τώρα να βρίσκεστε στο βοηθητικό πρόγραμμα diskpart.
Πληκτρολογήστε "list disk" και πατήστε enter. Αυτό θα πρέπει να περιλαμβάνει όλους τους δίσκους που είναι συνδεδεμένοι στον υπολογιστή σας.
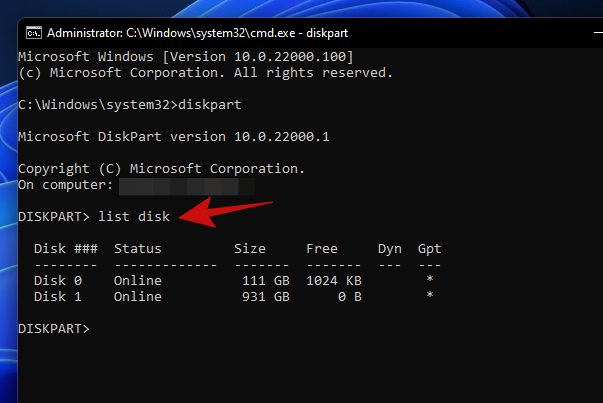
Για να συνεχίσετε με το σκούπισμα του δίσκου, πληκτρολογήστε 'επιλογή δίσκου'. Ο φορητός μας υπολογιστής έχει δύο σκληρούς δίσκους και για αυτόν τον οδηγό, θα προχωρήσουμε με τον Δίσκο 1, οπότε πληκτρολογήσαμε 'επιλογή δίσκου 1' και πατήσαμε enter.
Πληκτρολογήστε 'clean' και πατήστε enter.
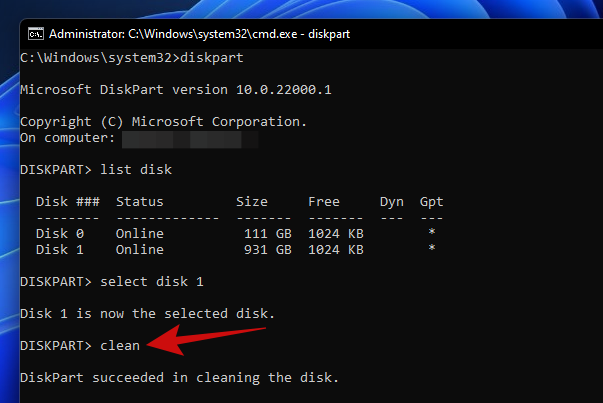
Ο δίσκος σας θα πρέπει τώρα να είναι εντελώς άδειος και να μετατραπεί σε μη εκχωρημένο χώρο. Η επόμενη εργασία σας θα πρέπει να είναι η δημιουργία κατατμήσεων χρησιμοποιώντας το εργαλείο διαχείρισης δίσκων που χρησιμοποιήσαμε νωρίτερα. Απλώς εκτελέστε το εργαλείο και αρχικοποιήστε το δίσκο. Μετά από αυτό, θα πρέπει να μπορείτε να δημιουργήσετε διαμερίσματα οποιουδήποτε μεγέθους που σας ταιριάζει καλύτερα.
Μέθοδος #4: Χρήση της επιλογής επαναφοράς
Τα Windows 11 συνοδεύονται από μια επιλογή που ονομάζεται "Επαναφορά αυτού του υπολογιστή", η οποία επαναφέρει τα Windows στις εργοστασιακές ρυθμίσεις τους. Και το καλύτερο μέρος της Επαναφοράς αυτού του υπολογιστή είναι ότι προσφέρει στους χρήστες την επιλογή είτε να διατηρήσουν όλα τα αρχεία τους και να επαναφέρουν τα Windows είτε να αφαιρέσουν τα πάντα κατά την επαναφορά των Windows.
Εάν σκουπίζετε τη μονάδα δίσκου μόνο για να επανεγκαταστήσετε τα Windows, σας συνιστούμε να δοκιμάσετε αυτήν τη μέθοδο πριν προχωρήσετε σε καθαρή εγκατάσταση.
Δείτε πώς μπορείτε να το κάνετε.
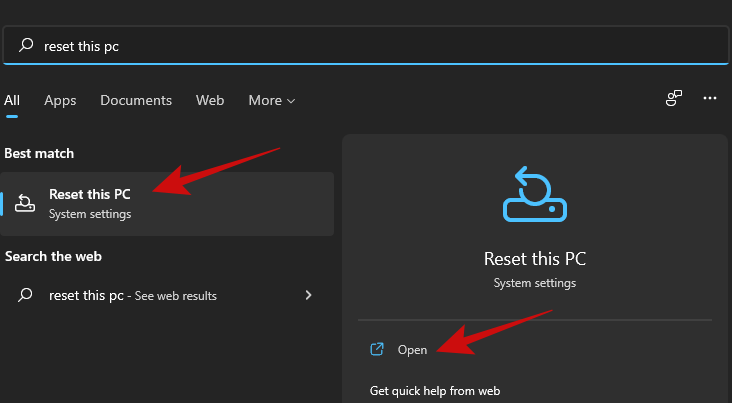
Ανοίξτε το μενού Έναρξη και πληκτρολογήστε «Επαναφορά αυτού του υπολογιστή». Κάντε κλικ στο αποτέλεσμα αναζήτησης που εμφανίζεται ή κάντε κλικ στο κουμπί άνοιγμα.
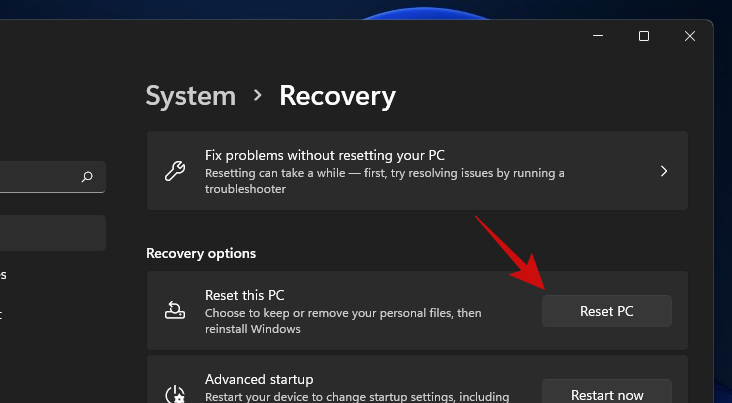
Κάντε κλικ στο κουμπί «Επαναφορά υπολογιστή» για να ενεργοποιήσετε τη διαδικασία επαναφοράς των Windows.
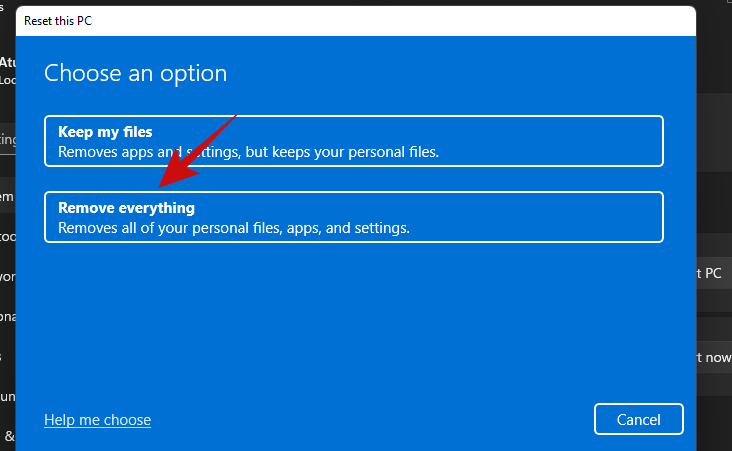
Θα πρέπει να δείτε μια μπλε οθόνη με δύο επιλογές. Κάντε κλικ στο «Κατάργηση όλων» για να επανεγκαταστήσετε τα Windows ενώ αφαιρείτε όλα τα αρχεία, τις εφαρμογές και τις ρυθμίσεις σας.
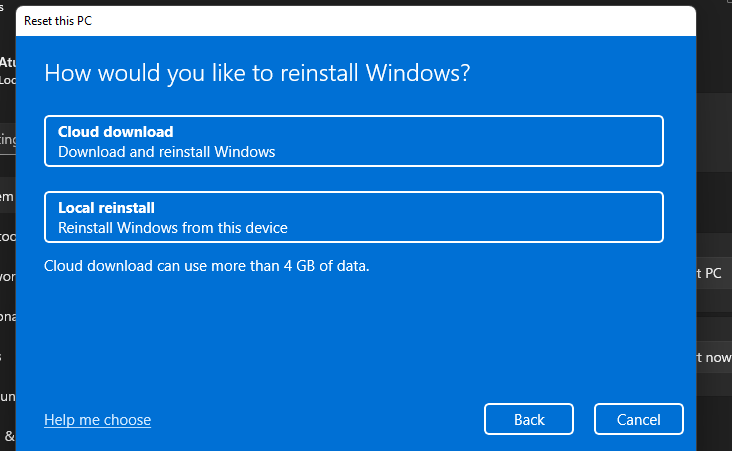
Η επόμενη οθόνη θα σας ρωτήσει πώς θα θέλατε να επανεγκαταστήσετε τα Windows. Εάν ο υπολογιστής σας έχει σύνδεση στο Διαδίκτυο, μπορείτε να προχωρήσετε με την επιλογή «Λήψη Cloud», διαφορετικά προχωρήστε στην «Τοπική επανεγκατάσταση».
Ακολουθήστε τις υπόλοιπες οδηγίες στην οθόνη και σε χρόνο μηδέν, θα έχετε τον υπολογιστή σας έτοιμο με μια νέα εγκατάσταση των Windows 11 και χωρίς ίχνος από τα παλιά αρχεία και τις εφαρμογές σας στον σκληρό σας δίσκο.
Μέθοδος #5: Χρήση PowerShell
Μπορείτε επίσης να μορφοποιήσετε μονάδες δίσκου χρησιμοποιώντας το PowerShell. Ακολουθήστε τα παρακάτω βήματα για να μορφοποιήσετε μια μονάδα δίσκου χρησιμοποιώντας το PowerShell στα Windows 11.
Πατήστε Windows + Sστο πληκτρολόγιό σας και αναζητήστε το PowerShell. Κάντε κλικ στο «Εκτέλεση ως διαχειριστής» μόλις εμφανιστεί στα αποτελέσματα αναζήτησής σας.
Πληκτρολογήστε την ακόλουθη εντολή για να λάβετε μια λίστα με όλους τους τόμους από δίσκους που είναι εγκατεστημένοι στο σύστημά σας. Αυτό θα σας βοηθήσει να αναγνωρίσετε και να βρείτε τον δίσκο που θέλετε να μορφοποιήσετε.
get-volume

Επιλέξτε τον τόμο που θέλετε να μορφοποιήσετε και, στη συνέχεια, χρησιμοποιήστε την παρακάτω εντολή για να τον επιλέξετε. Αντικαταστήστε το X με το γράμμα που αντιστοιχεί στον σχετικό τόμο.
select X

Τώρα χρησιμοποιήστε την παρακάτω εντολή για να μορφοποιήσετε τον επιλεγμένο τόμο. Αντικαταστήστε το NAME με ένα όνομα της επιλογής σας που θα εκχωρηθεί στον τόμο μόλις μορφοποιηθεί.
format-volume -filesystem NTFS -newfilesystemlabel NAME
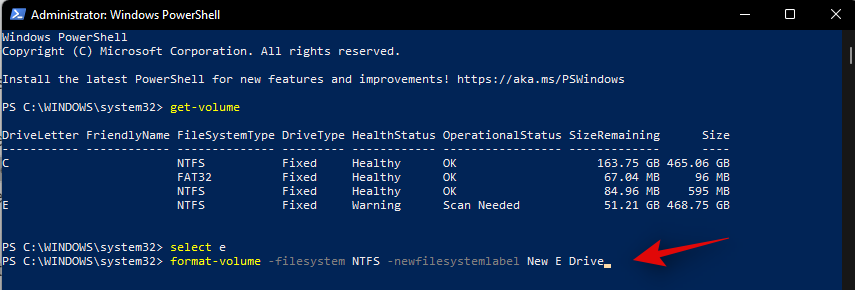
Και τέλος! Ο επιλεγμένος τόμος στη σχετική μονάδα δίσκου θα διαμορφωθεί τώρα. Περιμένετε να ολοκληρωθεί η διαδικασία και κλείστε το PowerShell για να χρησιμοποιήσετε το δίσκο ως συνήθως.
Μέθοδος #6: Χρήση βοηθητικού προγράμματος τρίτων
Υπάρχουν πολλοί διαχειριστές διαμερισμάτων εκεί έξω που μπορούν να σας βοηθήσουν να διαχειριστείτε και να μορφοποιήσετε εύκολα όλους τους δίσκους που είναι εγκατεστημένοι στο σύστημά σας. Ακολουθήστε τον παρακάτω οδηγό για να ξεκινήσετε. Θα χρησιμοποιήσουμε το Gnome Partition Manager για αυτόν τον οδηγό, ο οποίος είναι ένα μακροχρόνια αξιόπιστο βιομηχανικό εργαλείο που είναι εντελώς δωρεάν. Χρησιμοποιήστε τον παρακάτω σύνδεσμο για να το κατεβάσετε στον τοπικό σας αποθηκευτικό χώρο.
Μόλις γίνει λήψη του GParted στο σύστημά σας, μπορείτε απλά να το προσαρτήσετε όπως οποιοδήποτε άλλο ISO και να ξεκινήσετε. Εάν θέλετε να καθαρίσετε και να σκουπίσετε τη μονάδα εκκίνησης, τότε σας συνιστούμε να τοποθετήσετε το ISO σε ένα αφαιρούμενο μέσο που θα σας επιτρέψει να διαμορφώσετε τη μονάδα εκτός της τρέχουσας εγκατάστασης των Windows 11. Μόλις προσαρτηθεί, επανεκκινήστε το σύστημά σας και αποκτήστε πρόσβαση στο Gnome Partition Manager από το μενού εκκίνησης. Θα χρησιμοποιήσουμε το Rufus για να προσαρτήσουμε την εικόνα του δίσκου σε αφαιρούμενα μέσα και στη συνέχεια να επανεκκινήσουμε το τρέχον σύστημά μας.
Σημείωση: Βεβαιωθείτε ότι η ασφαλής εκκίνηση είναι απενεργοποιημένη στο σύστημά σας, ώστε να μπορείτε να κάνετε εκκίνηση από το USB σας. Επιπλέον, αλλάξτε τη διαμόρφωση αποθήκευσης σε AHCI αντί για μνήμη Intel Optane σε περίπτωση που είναι διαθέσιμη. Το GParted δεν θα μπορεί να αναγνωρίσει τους δίσκους σας εάν η διαμόρφωση αποθήκευσης δεν έχει οριστεί σε AHCI.
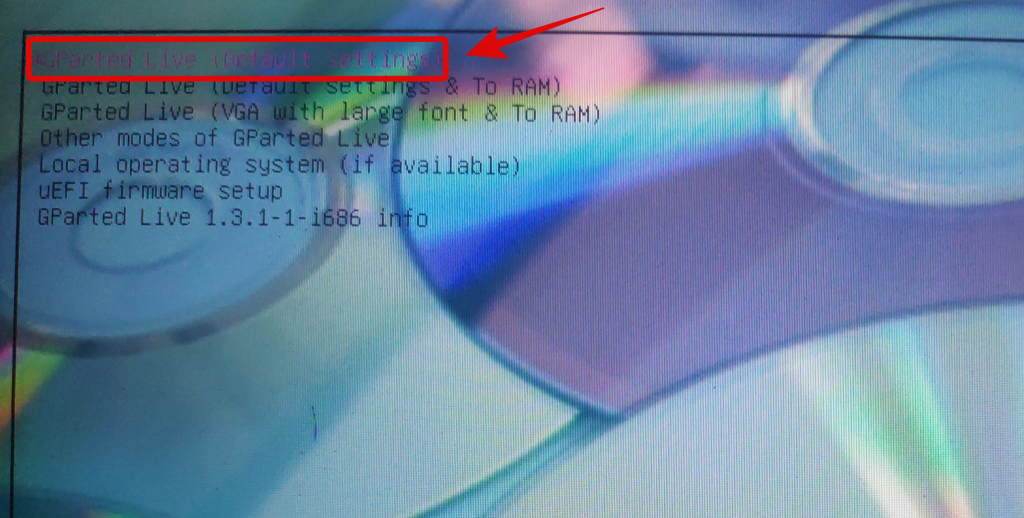
Μόλις εκκινήσετε στη μονάδα USB, θα έχετε την επιλογή να εκκινήσετε το GParted με διάφορες ρυθμίσεις. Σας συνιστούμε να επιλέξετε την πρώτη επιλογή και να επιλέξετε «Εκκίνηση GParted με προεπιλεγμένες ρυθμίσεις».
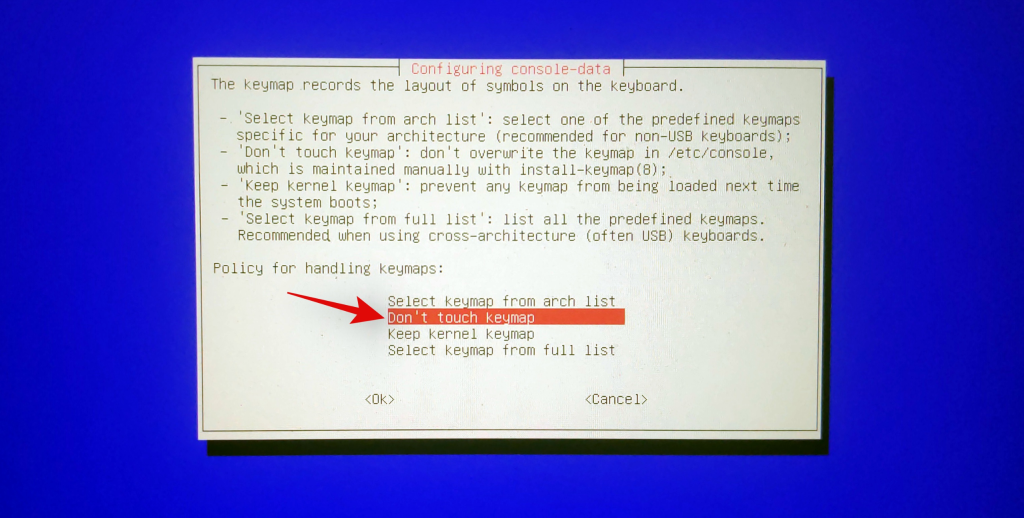
Τώρα θα σας ζητηθεί να επιλέξετε έναν χάρτη πλήκτρων. Αυτή η σελίδα είναι χρήσιμη σε περίπτωση που το πληκτρολόγιό σας αναγνωρίζεται εσφαλμένα από το Gnome. Εάν το πληκτρολόγιό σας φαίνεται να αποκρίνεται, επιλέξτε «Μην αγγίξετε το πληκτρολόγιο» για να προχωρήσετε στη διαδικασία.
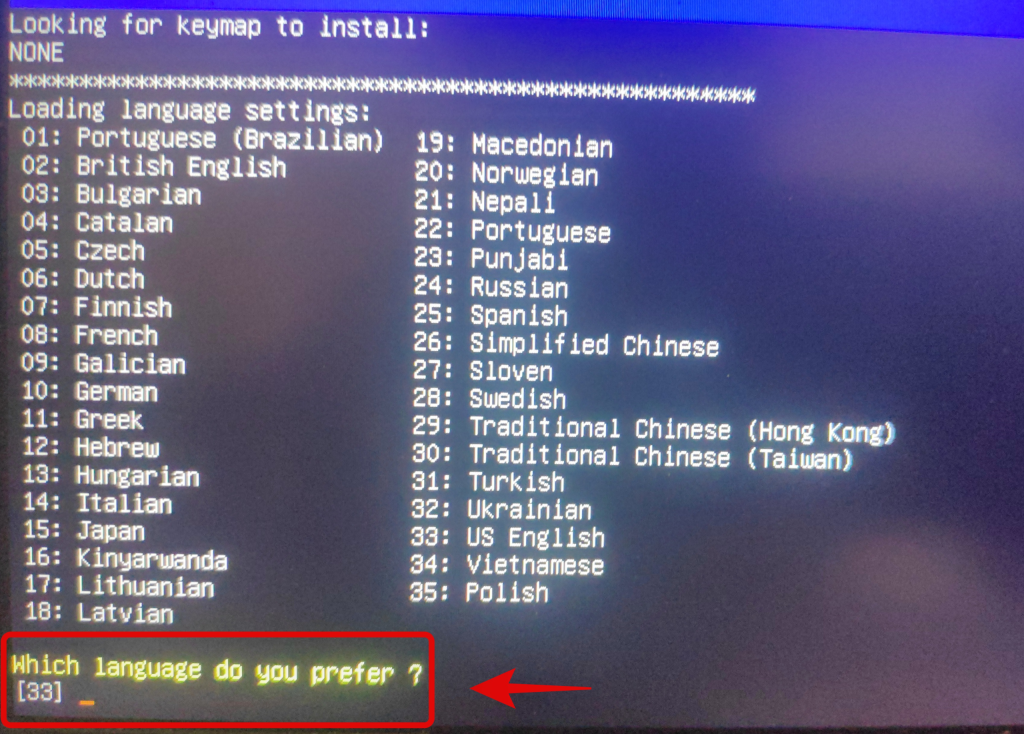
Τώρα προχωρήστε και επιλέξτε τη γλώσσα σας εισάγοντας τον αντίστοιχο αριθμό. Εισαγάγετε '33' εάν θέλετε να επιλέξετε Αγγλικά ΗΠΑ.
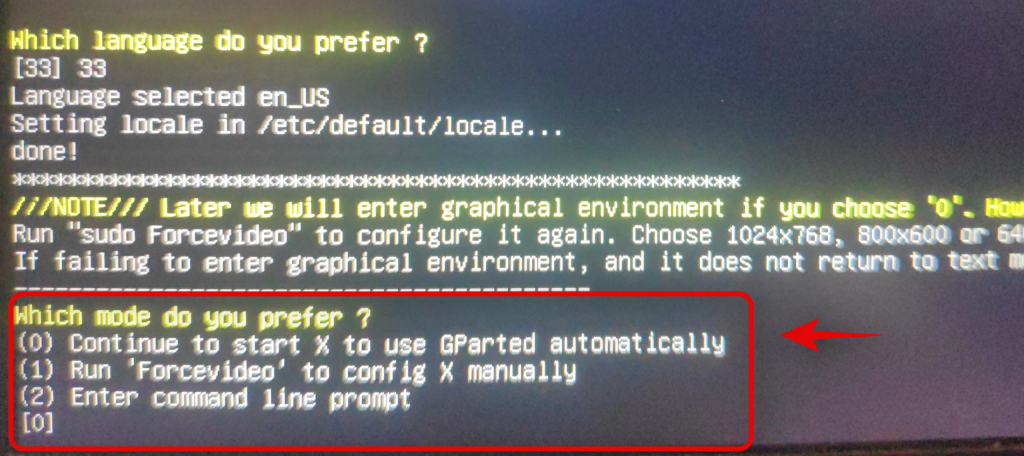
Τώρα θα ερωτηθείτε εάν θέλετε να φορτώσετε το GParted με υποχρεωτικά προγράμματα οδήγησης βίντεο ή τις προεπιλεγμένες ρυθμίσεις. Η επιλογή Force video driver είναι χρήσιμη σε περίπτωση που το GParted δεν μπορεί να αναγνωρίσει την οθόνη σας ή εάν αντιμετωπίζετε προβλήματα επίλυσης στο σύστημά σας. Σας συνιστούμε να επιλέξετε την πρώτη επιλογή. Πληκτρολογήστε '0' για να επιλέξετε την επιλογή.
Το GParted θα εκκινηθεί τώρα και θα μεταφερθείτε στην προσωρινή επιφάνεια εργασίας του. Η διαχείριση διαμερισμάτων θα πρέπει να ξεκινήσει αυτόματα στο σύστημά σας τώρα. Κάντε κλικ στο αναπτυσσόμενο μενού επάνω αριστερά και επιλέξτε τον επιθυμητό δίσκο που θέλετε να μορφοποιήσετε.
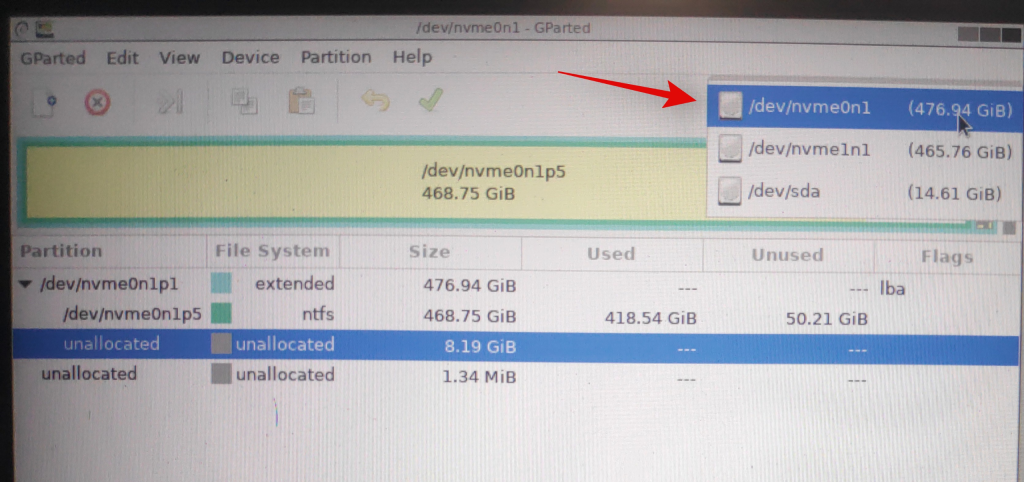
Θα λάβετε τώρα μια λίστα με υπάρχοντες τόμους στον επιλεγμένο δίσκο. Κάντε κλικ και επιλέξτε τον επιθυμητό τόμο που θέλετε να μορφοποιήσετε.
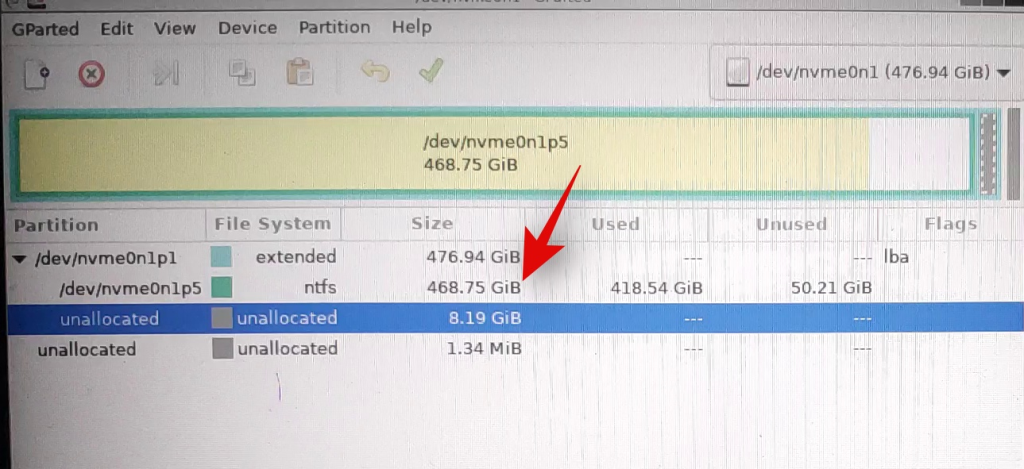
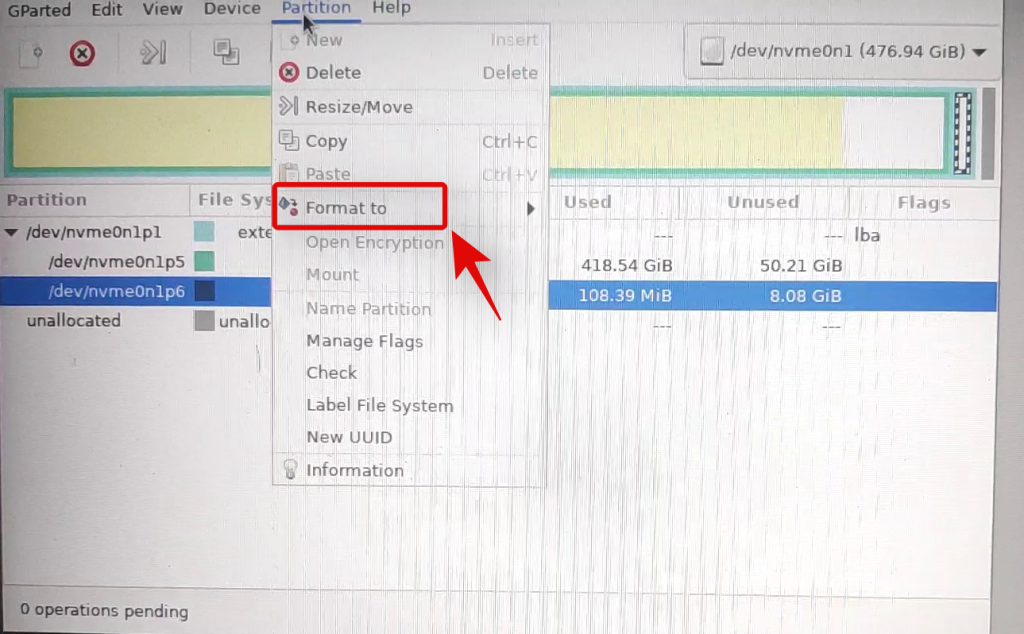
Τώρα κάντε κλικ στο «Διαμέρισμα» στο επάνω μέρος και τοποθετήστε το δείκτη του ποντικιού πάνω στο «Μορφοποίηση σε».
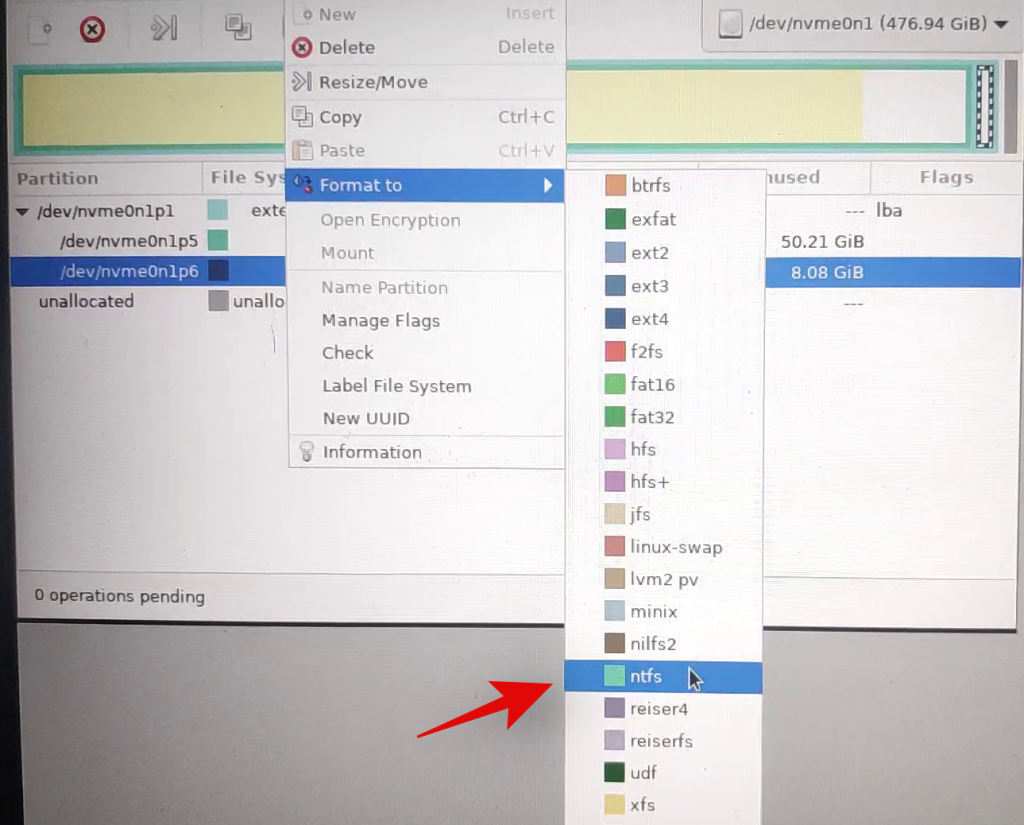
Επιλέξτε τη μορφή της μονάδας που θέλετε, αλλά συνιστάται να διαμορφώσετε τη μονάδα δίσκου σας σε NTFS για όλα τα σύγχρονα συστήματα.
Μόλις επιλέξετε την επιθυμητή μορφή δίσκου, το GParted θα εμφανίσει την τρέχουσα λειτουργία στη λίστα εργασιών του. Κάντε κλικ στο σημάδι επιλογής στη γραμμή εργαλείων στην εργασία για να εκτελέσετε εργασίες που έχουν καθοριστεί.
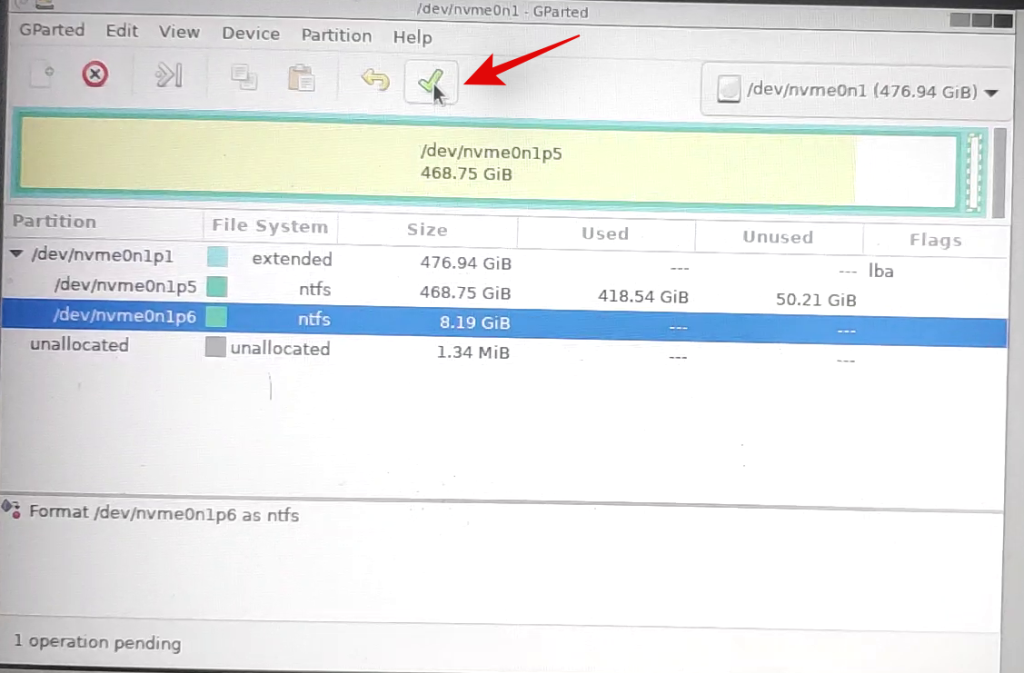
Κάντε κλικ στο «Εφαρμογή» για να επιβεβαιώσετε την επιλογή σας.
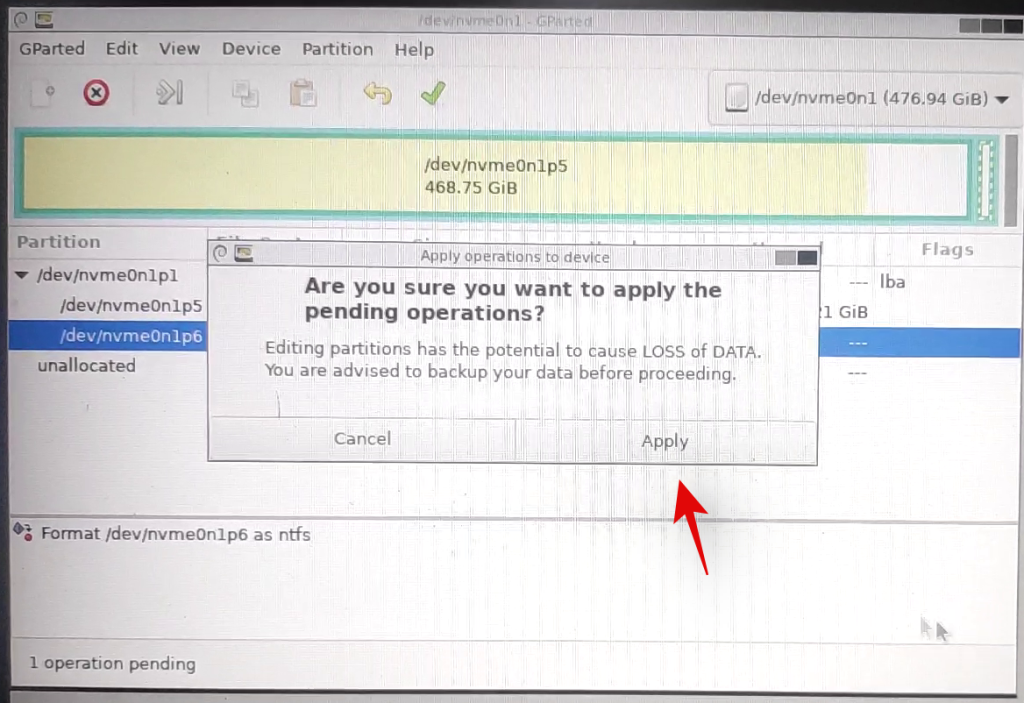
Το GParted θα εκτελέσει τώρα τις απαραίτητες λειτουργίες και ο επιλεγμένος τόμος θα πρέπει να μορφοποιηθεί αυτόματα στο τέλος αυτής της διαδικασίας. Κλείστε το βοηθητικό πρόγραμμα GParted και κάντε κλικ στο εικονίδιο Power στην επιφάνεια εργασίας. Κάντε κλικ και επιλέξτε «Επανεκκίνηση» και μετά κάντε κλικ στο «Ok».
Κάντε εκκίνηση στο BIOS του συστήματός σας και επαναφέρετε τις αλλαγές που κάνατε νωρίτερα. Αυτό περιλαμβάνει την ενεργοποίηση της ασφαλούς εκκίνησης, την αλλαγή της διαμόρφωσης αποθήκευσης στις προεπιλεγμένες ρυθμίσεις και την αλλαγή της σειράς της συσκευής εκκίνησης.
Once you have reverted the changes, unplug your USB and exit the BIOS while saving the changes you made.
You will now be booted into Windows normally and the selected volume should now be formatted and wiped on your system.
Method #7 From Recovery
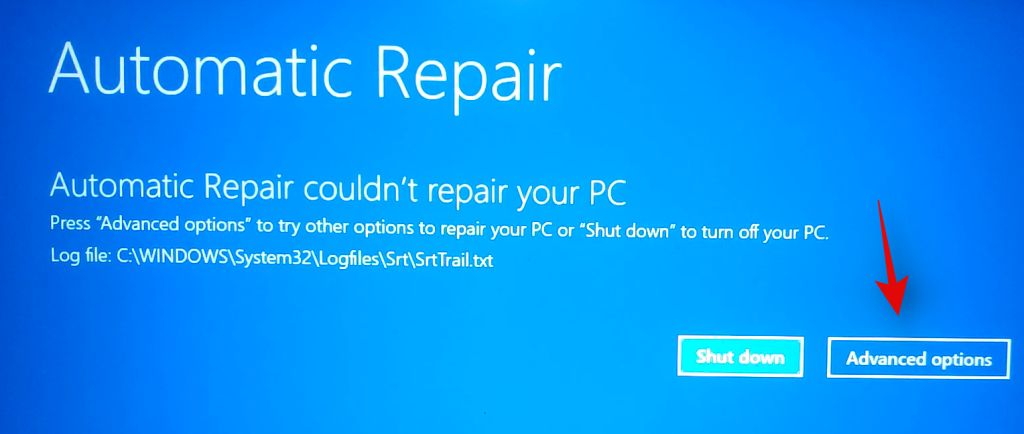
If you are in Windows Recovery Environment and unable to boot into Windows, then you can use the guide below to format a drive on your system. Please keep in mind that it is not recommended to format your boot drive using the guide below from your recovery environment as this could cause issues with your boot drive and make it unrecognizable. You will then have to completely format the drive and set it up again and install a new version of Windows on it. Hence, use the guide below only to format secondary drives from the Recovery environment or ensure that you have a Windows 11 installation media handy to reinstall the OS that you will remove from your boot drive.
Once you are on the Windows Recovery or troubleshooting screen, click and select ‘Advanced Options’.
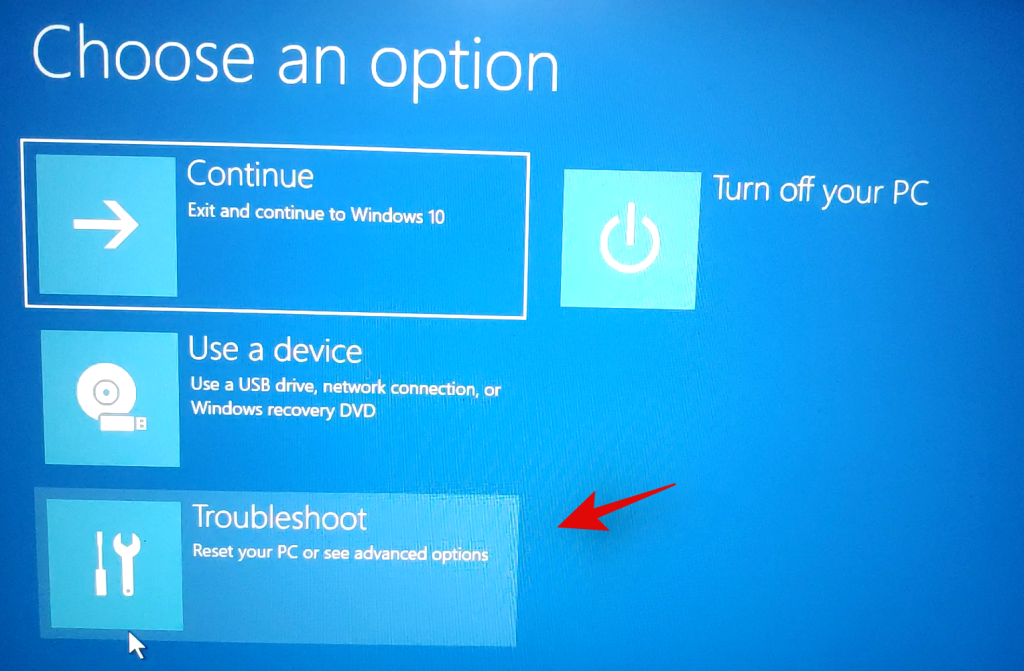
Click on ‘Troubleshoot’.
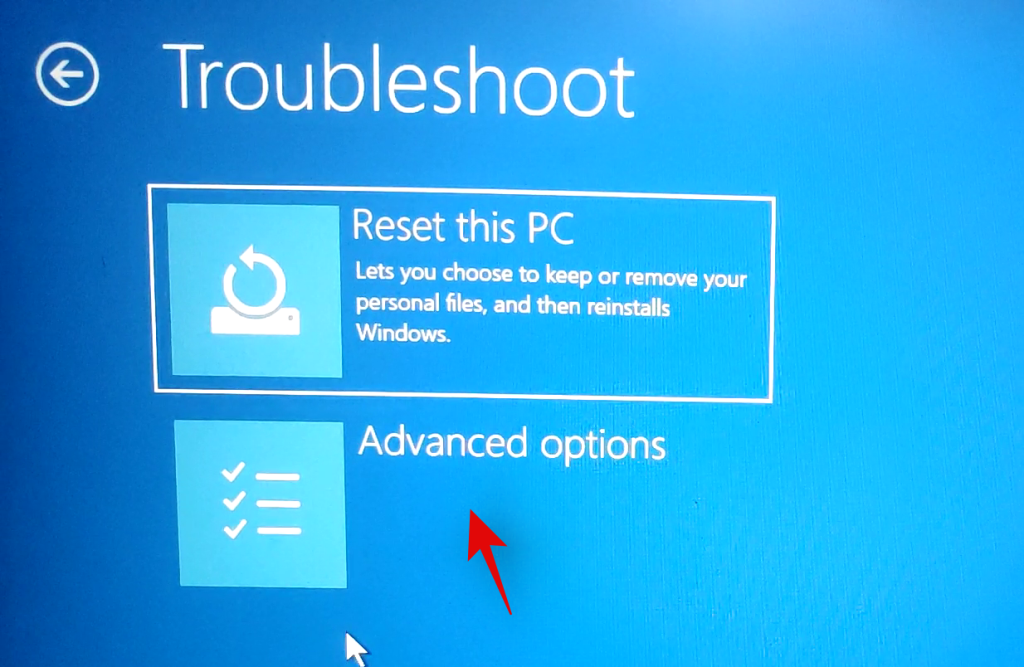
Select ‘Advanced Options’ again.
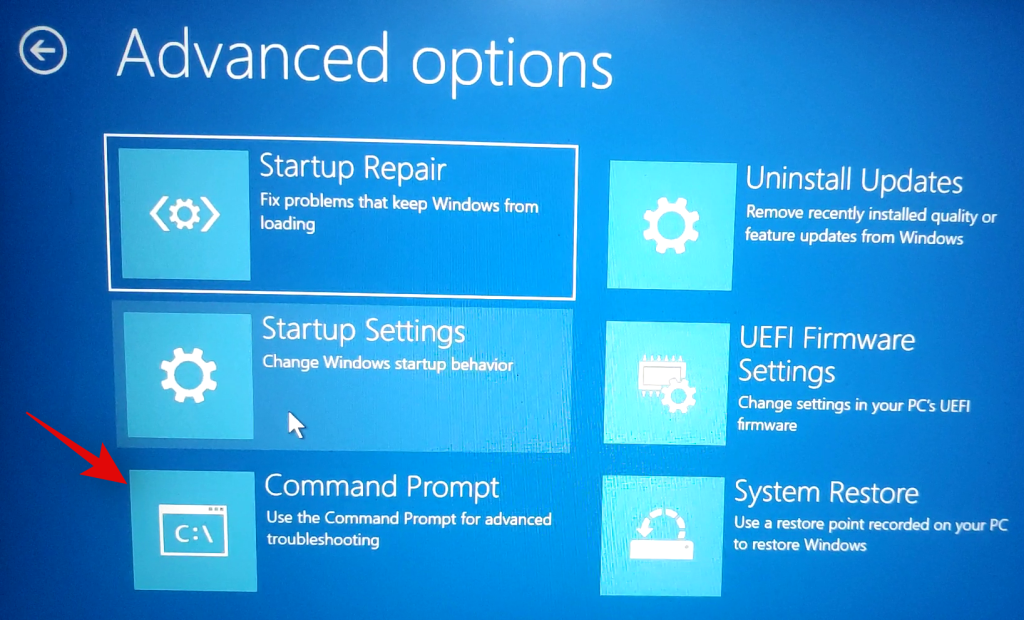
Now click on ‘Command Prompt’ to launch the command prompt.
Type in the following command to launch the diskpart utility.
diskpart
Now execute the following command.
list volume

Find the volume you wish to format and use the command below to select it. Replace X with the dedicated number of the volume you selected.
select volume x
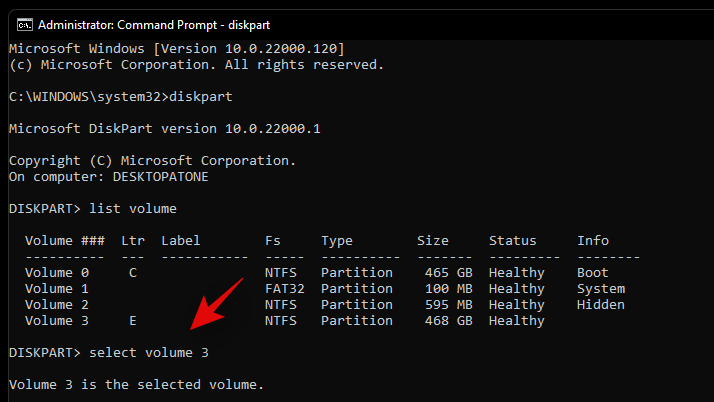
Now use the following command to format the selected volume with NTFS as its format. Replace NAME with the name you wish to give your newly formatted volume.
format fs=ntfs quick label=NAME
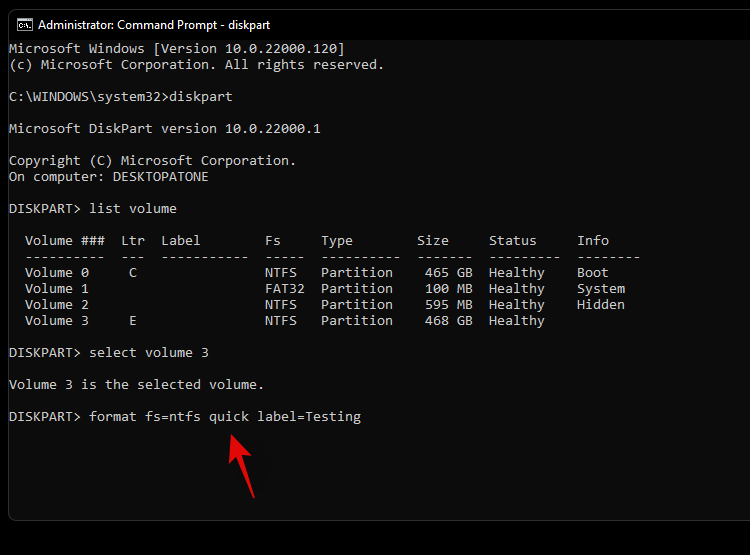
Let diskpart do its thing and the volume should be formatted within a few seconds. Once formatted, type in the following command to exit CMD.
exit
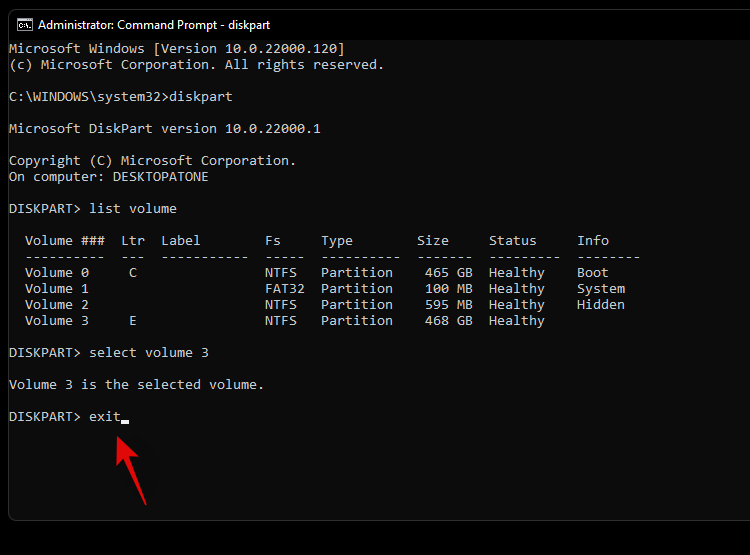
Now restart your PC and the selected volume should be formatted on your system.
Method #8: Using the Windows Setup
You can also format a drive-by directly using the Windows setup as well. Depending on your requirements, you can then exit the setup or continue installing Windows on the freshly formatted drive.
Launch the Windows setup from the installation media when prompted at the time of boot. Once the setup is launched, select your language and click on ‘Next’.
Click on ‘Install Windows’.
Windows Setup will now detect the drives installed on your system. Click and select the drive you wish to format and click on ‘Format drive’ at the bottom.
Confirm your choice and Windows will now proceed to format the selected drive.
And that’s it! Once the drive is formatted, you can continue formatting other drives on your system using the setup or continue with the Windows installation depending on your requirements.
How to completely format a drive on Windows 11 or 10
Completely formatting a drive is a little different from the traditional format methods listed above. While the above-listed methods will delete all your data from the drive, the existing partitions will remain. Additionally, if it is the boot drive that we are talking about then you will also have recovery and EFI partitions on the drive. While this shouldn’t be an issue on your system, they can cause problems when switching systems as the boot order or the recovery media can be recognized incorrectly by the new system.
In such cases, you can wipe all partitions from a drive and completely format it. You can then create new partitions and volumes on the drive depending on the need of the new system that you are switching to. Follow one of the guides below to completely format a drive and remove all partitions and volumes.
Method #1: From a third-party utility
If you wish to completely format your drive using a third-party utility then we recommend using the Gnome Partition Manager. This is an open-source and completely free utility hosted on Sourceforge. You can even compile the binaries on your own in case the privacy is a concern. Follow the guide below to get you started. The Gnome Partition Manager is available in ISO format which allows you to mount it to a removable media and use it individually as well, in case you are looking to completely format your boot drive. Use Rufus to create a USB installation media using the Gnome Partition Manager ISO.
Required
- Gnome Partition Manager | Gnome Partition Manager
- AHCI Storage mode enabled in BIOS
- Secure boot disabled in BIOS
- Boot device order changed (if needed to boot from USB on your system)
Guide
Make the necessary BIOS changes on your system and plug in the GParted USB into your system. Once plugged in, reboot your device and boot from the USB by pressing a key if prompted.
You will now be at the GParted Splash Screen where you will be requested to select the relevant version of GParted that you wish to use. We recommend you select the first one which is GParted Live with default settings.

Once booted, you will be prompted to change your keymap if needed. If your keyboard seems to be working as intended, select ‘Don’t touch keymap’ or use one of the other options to get keyboard working within Gnome.

Select your preferred language by entering its relevant number. Use number 33 for US English.

Now if you wish to manually install or configure your video output then enter 1 on the next screen. Else if the resolution and video response times seem to be fine for now then enter ‘0’.

GParted will now boot with the dictated settings. Once launched, you will be taken to the temporary desktop where the GParted utility will be launched automatically. Click on the drop-down menu in the top right corner and select the desired disk that you wish to completely format.

Now select a volume on the selected disk and click on ‘Partition’ at the top. Select ‘Format to’ and then select ‘NTFS’.

Repeat the steps above for all the partitions on the disk. Once each partition is cued for formatting, click on the checkmark in your toolbar to execute these tasks.

Confirm your choice by clicking on ‘Apply’.
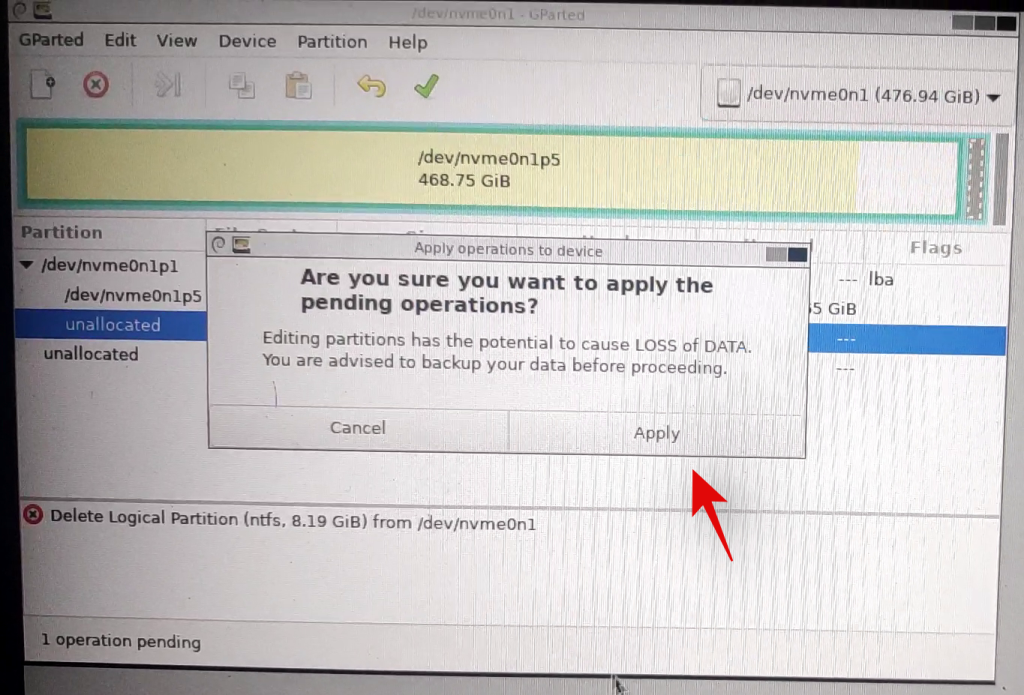
All the selected partitions will now be formatted. We can now delete these partitions. Click and select each partition one by one and then click on the X in your toolbar. This will cue each partition for deletion.
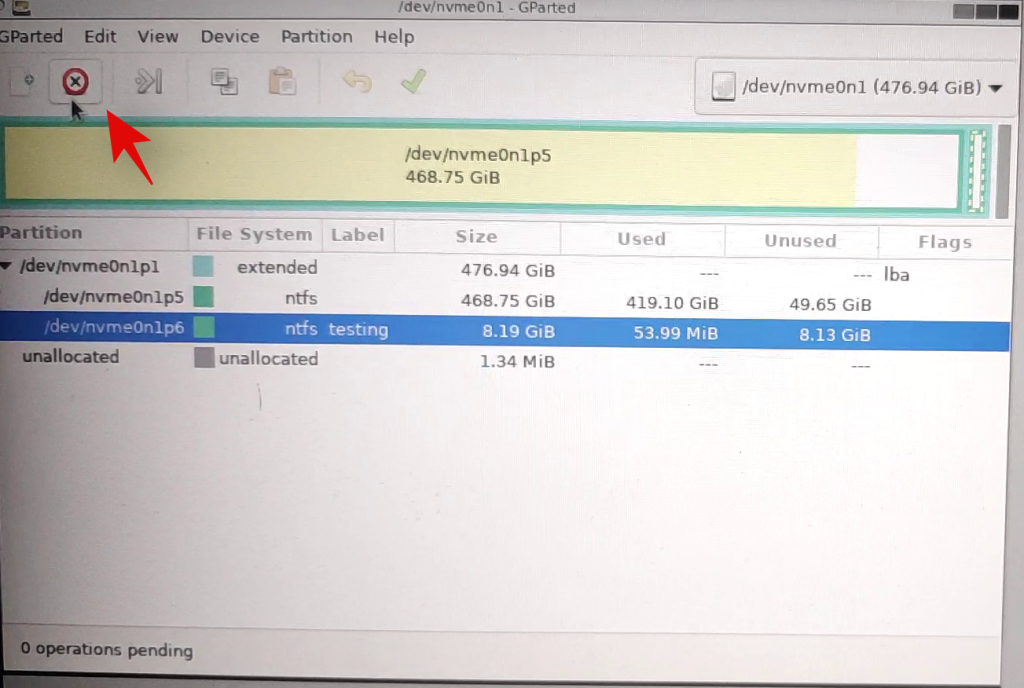
Click on the checkmark again to delete all the selected partitions.
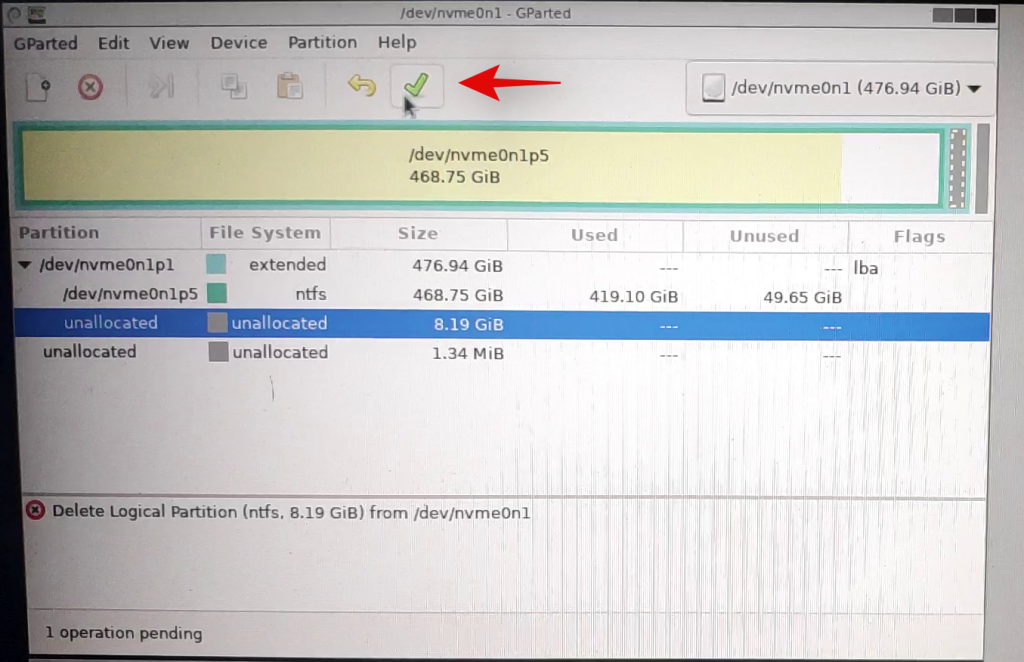
Confirm your choice by clicking on ‘Apply’.

Once all partitions are deleted from the disk, click and select the unallocated volume on the disk and then click on ‘New’ at the top. If you have an existing primary partition on the disk then select that partition and click on the ‘Resize’ icon instead.
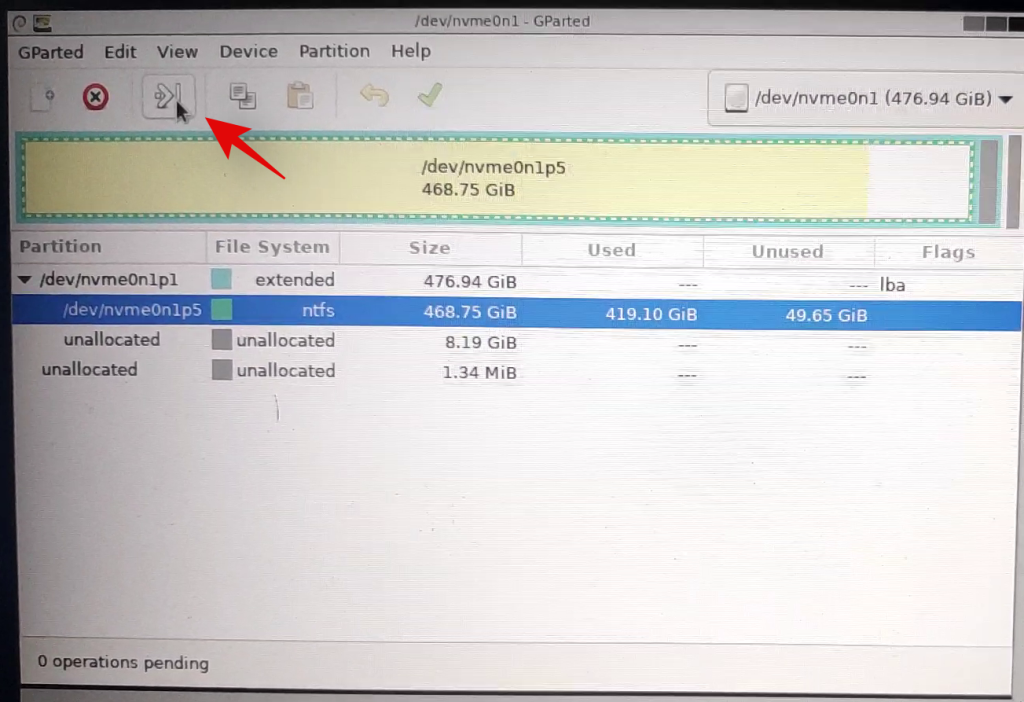
Select the entire size of your disk and enter a name for your disk beside the label text field. If resizing an existing partition, use the slider at the top to drag it to the maximum size.
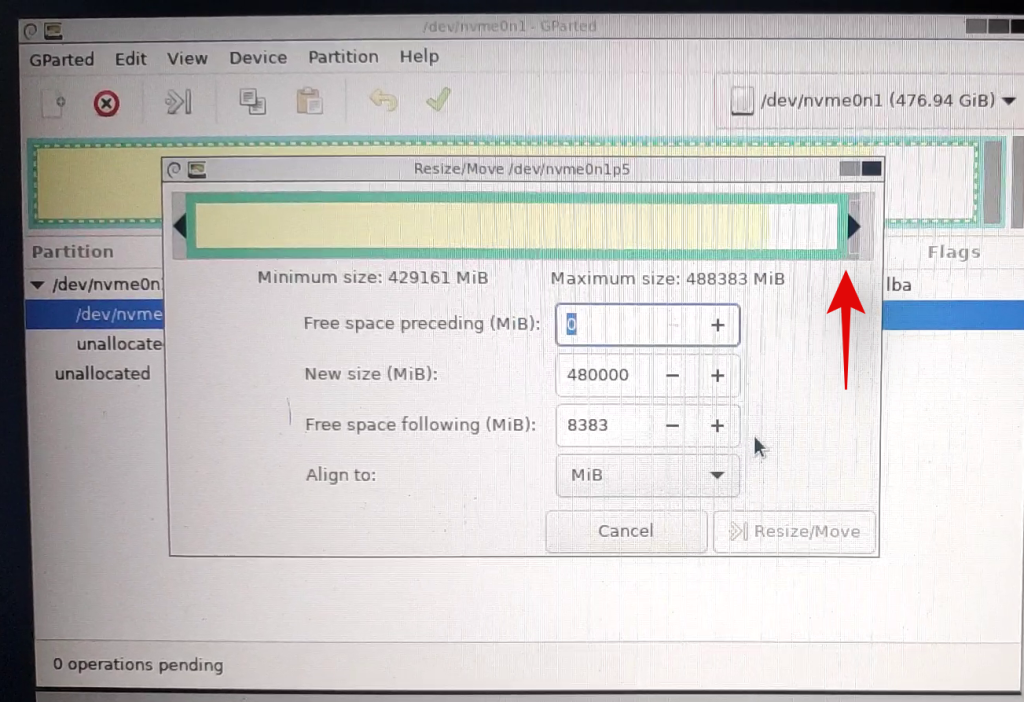
Click on ‘Ok’ or ‘Resize/Move’ depending on your choice.
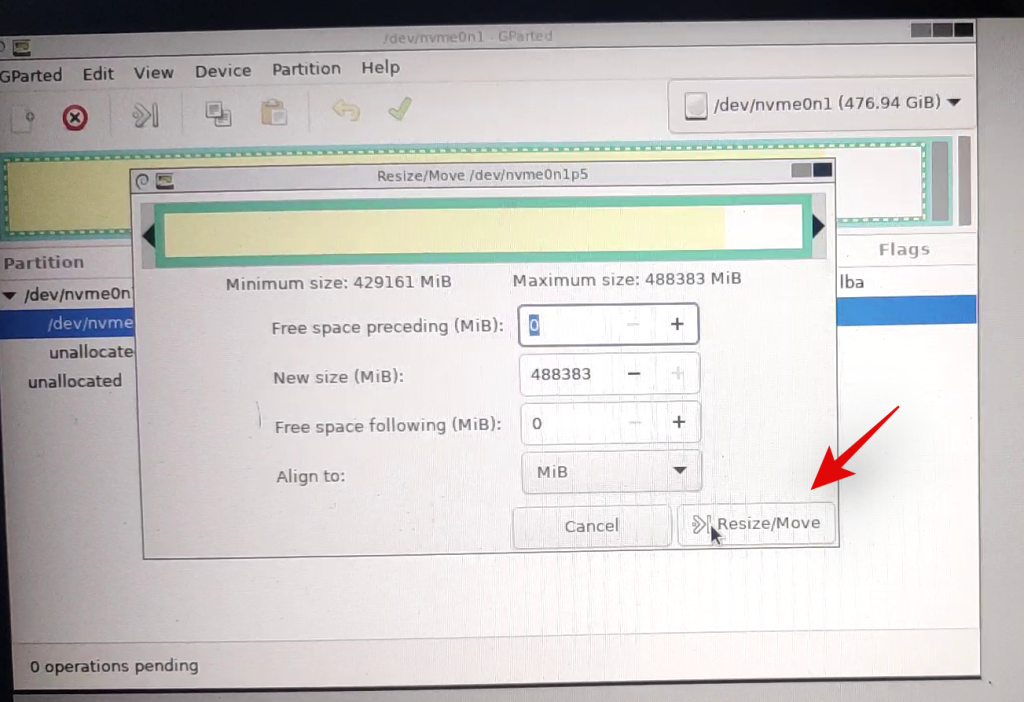
And that’s it! Your entire drive should now be formatted and a single partition equal to the entire size of your drive should now be created which will allow you to use the drive, however, you wish. You can now exit GParted by clicking on the power icon on the desktop. Once rebooting, boot into your BIOS and revert the changes you made earlier. Once reverted, unplug the USB and boot into Windows normally.
Method #2: From CMD
Diskpart is a hugely versatile utility that can be used to completely format a drive as well. Once completely formatted via diskpart, you will need to set your disk as GPT or MBR depending on your platform needs for the drive to be recognized properly.
Launch CMD using one of the guides above depending on the current state of your system. Once CMD is launched, enter the command below to launch diskpart.
diskpart

Now enter the following command and find the disk you wish to completely format.
list disk

Note down the concerned disk’s number and use the command below to select it. Replace N with the disk number you noted down earlier.
select disk N
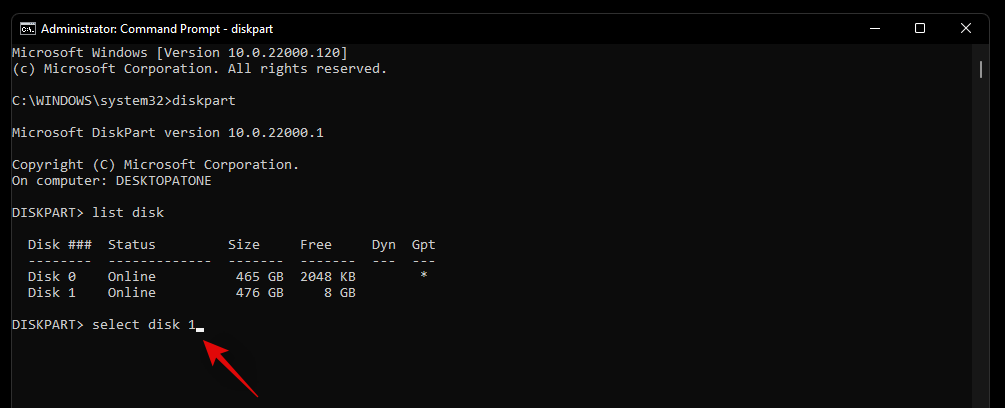
Now enter the command below to clean your disk.
clean
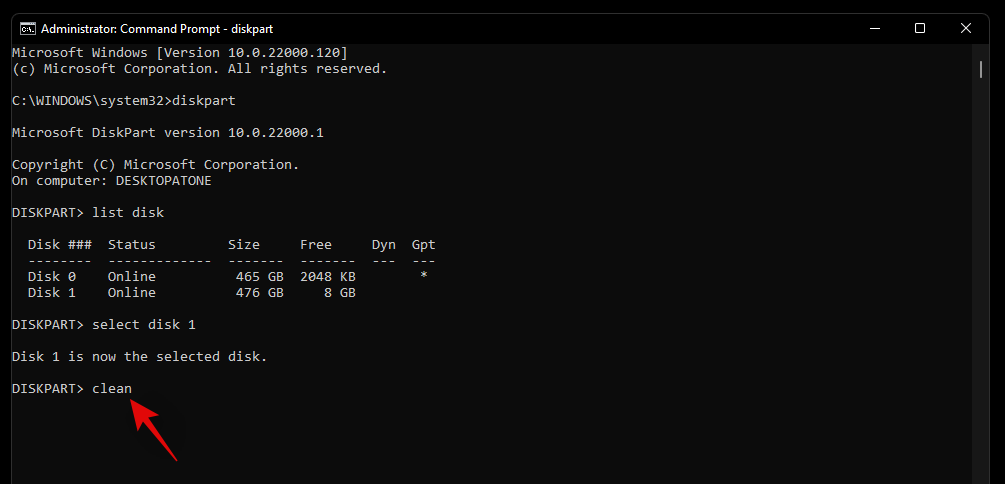
We will now need to create a partition on the selected disk so that it is usable. Enter the command below to get started.
create partition primary
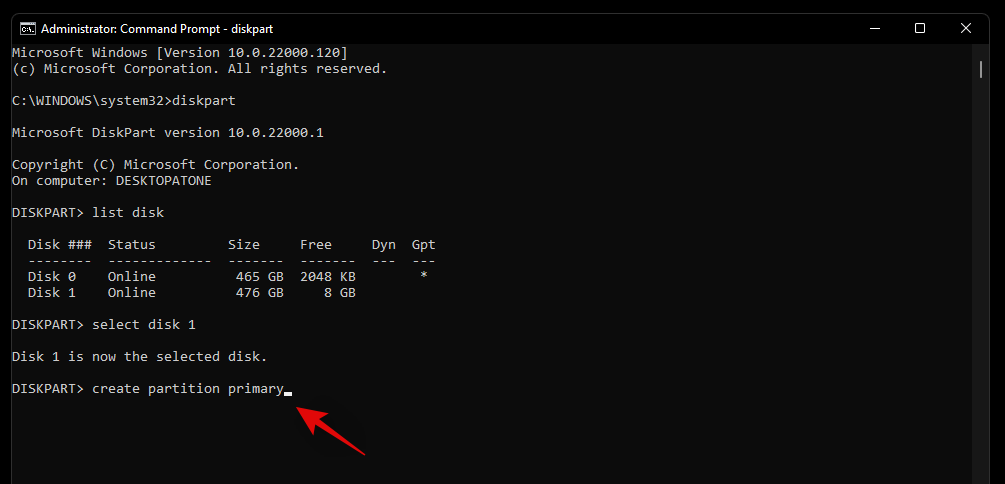
Use the command below to format the newly created volume now.
format fs=ntfs
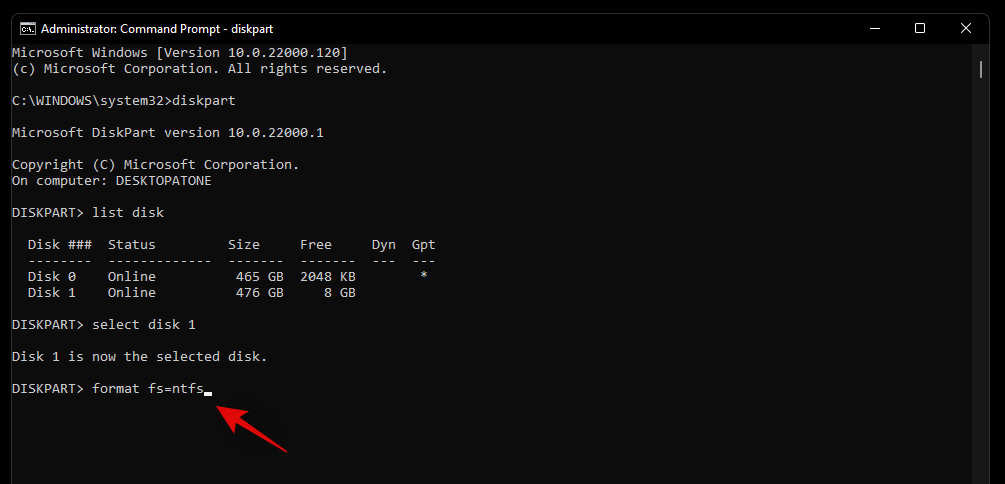
Enter the following command to assign a letter to the drive. Replace X with the letter of your choice.
assign letter=X
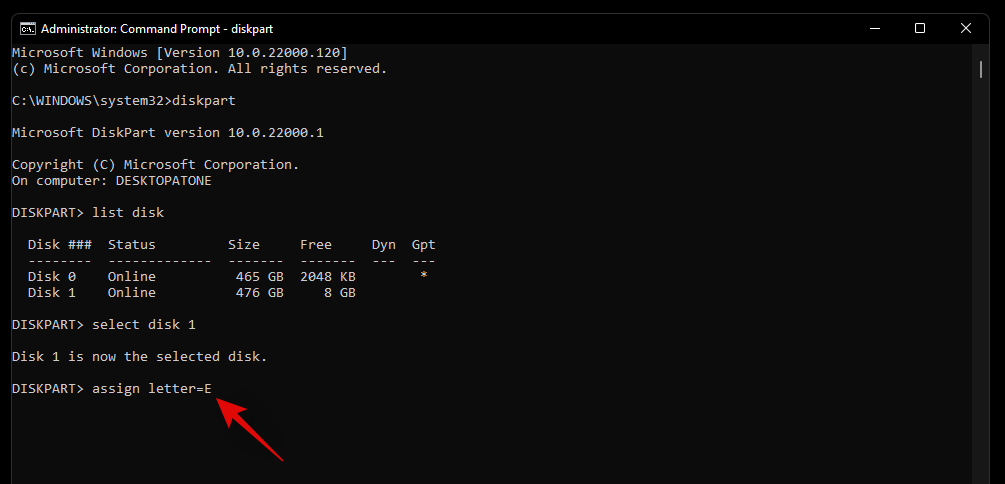
And that’s it! The selected drive should now be completely formatted. Any recovery or EFI partitions on the drive should also now be deleted.
How to switch between MBR and GPT
MBR and GPT are types of disk setups that are used to install new OS on a drive. These types are essential in case you are trying to switch between platforms or use Linux on yoru system. While GPT is a new disk setup with various advantages, MBR is still the most compatible setup format out there. If you are trying to switch your disk setup from MBR to GPT or vice versa then you can use the guide below to change the disk type.
Note: When converting, your disk will be cleaned and all the data will be removed from it. You will need to create new partitions on the drive as well so ensure that you have backed up your data before proceeding with the guide below.
Launch CMD on your system either from the recovery environment or from within Windows depending on the current state of your system. Once launched enter the command below to launch the diskpart utility.
diskpart

Now enter the following command to get a list of all the disks on your system. Note down the number for the concerned list so that you can access it later on.
list disk
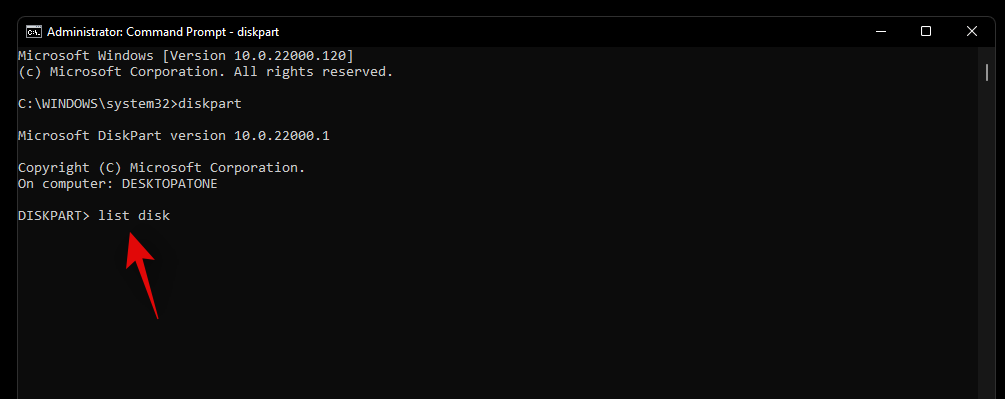
Enter the following command and replace N with the disk number you noted down earlier.
select disk N
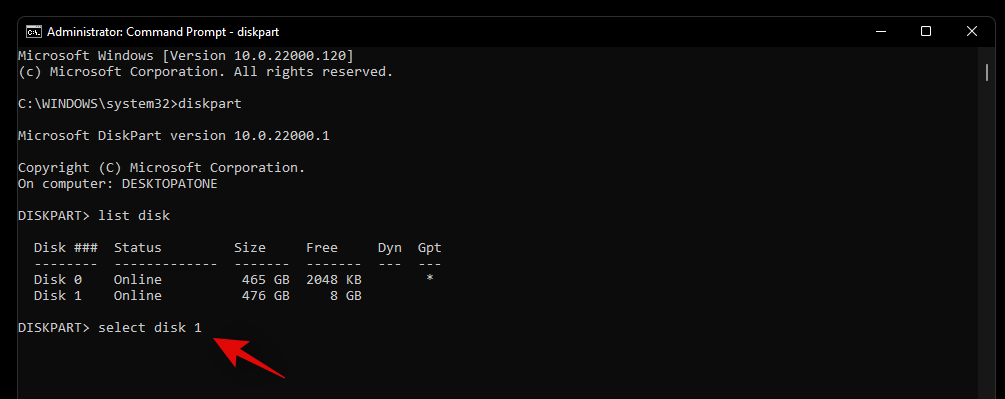
Use the command below to clean the drive.
clean
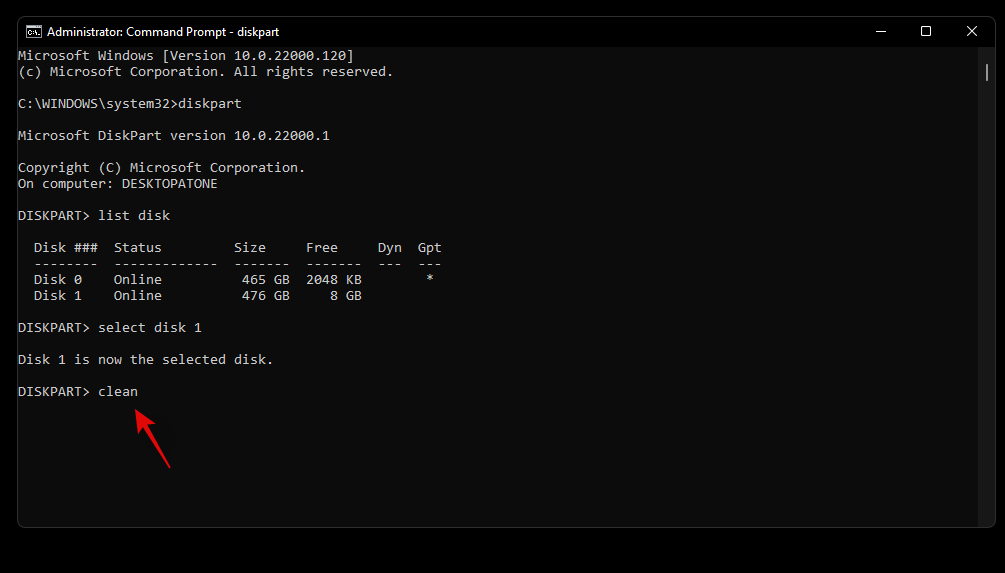
Now let’s convert the drive to your desired disk type. Replace TYPE with MBR or GPT depending on your current requirements.
convert TYPE
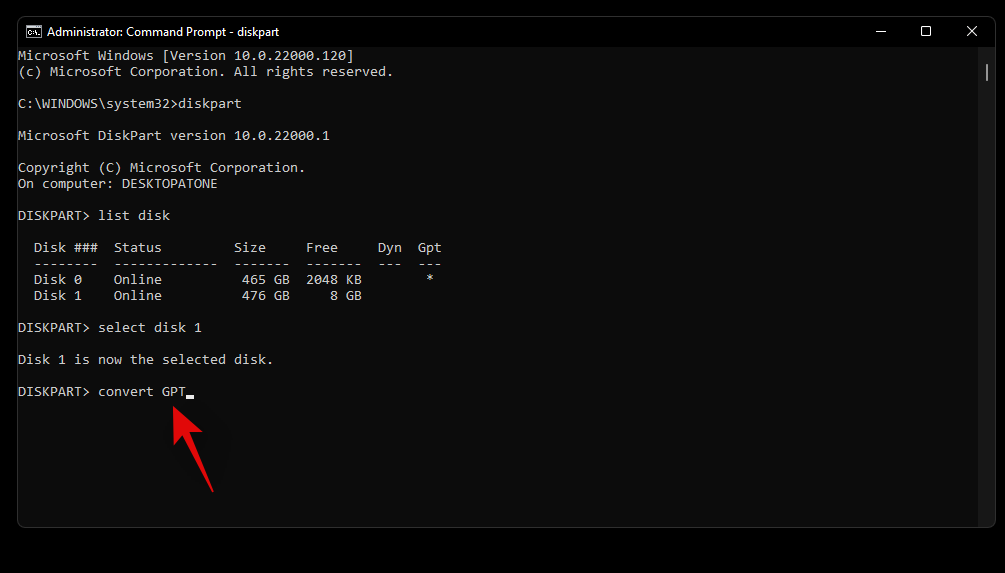
Once the disk has been converted, use the command below to create a primary partition.
create partition primary
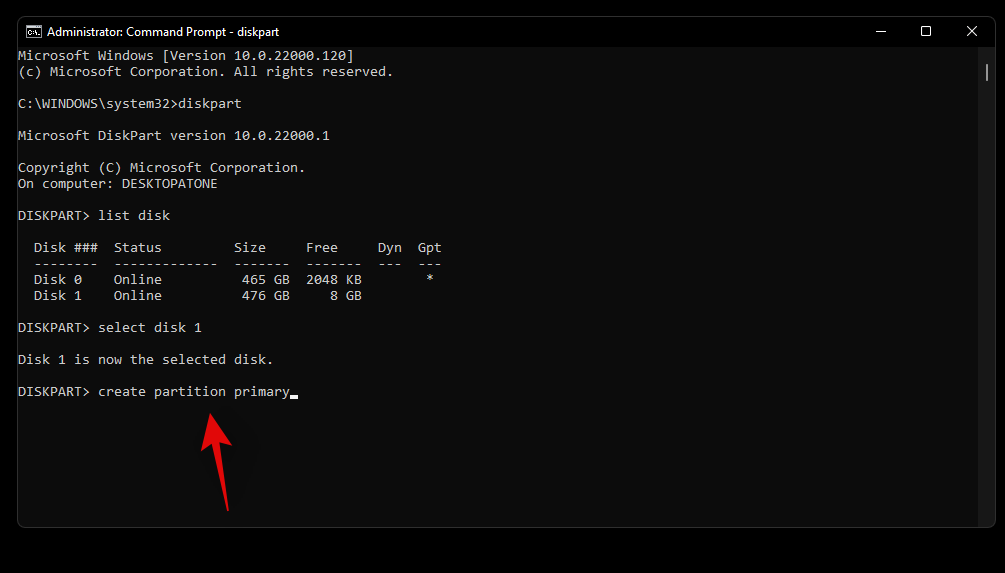
Now use the command below to assign a letter to the drive. Replace X with the drive letter of your choice.
assign letter=X
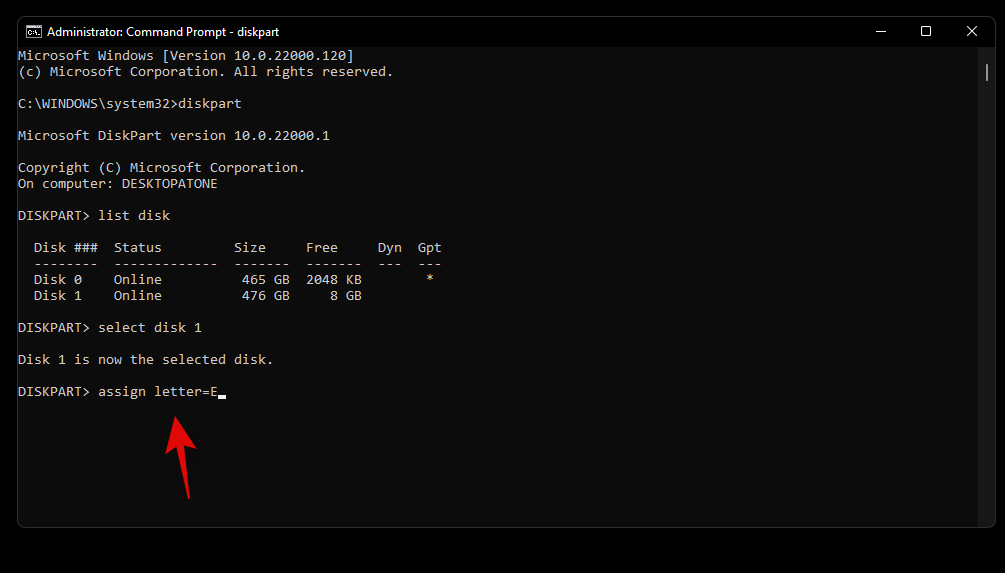
And that’s it! You will now have converted the selected drive to GPT or MBR depending on your current requirements.
How to create new volumes and partitions
Once you have formatted your drives you will find that it is not that easy to use them within Windows. Formatted drives need dedicated partitions which can then be used as storage spaces to store your data or install an OS. Use the guide below to create custom partitions for a selected drive in Windows 11.
Method #1: From CMD
Launch CMD and use the command below to enter diskpart.
diskpart
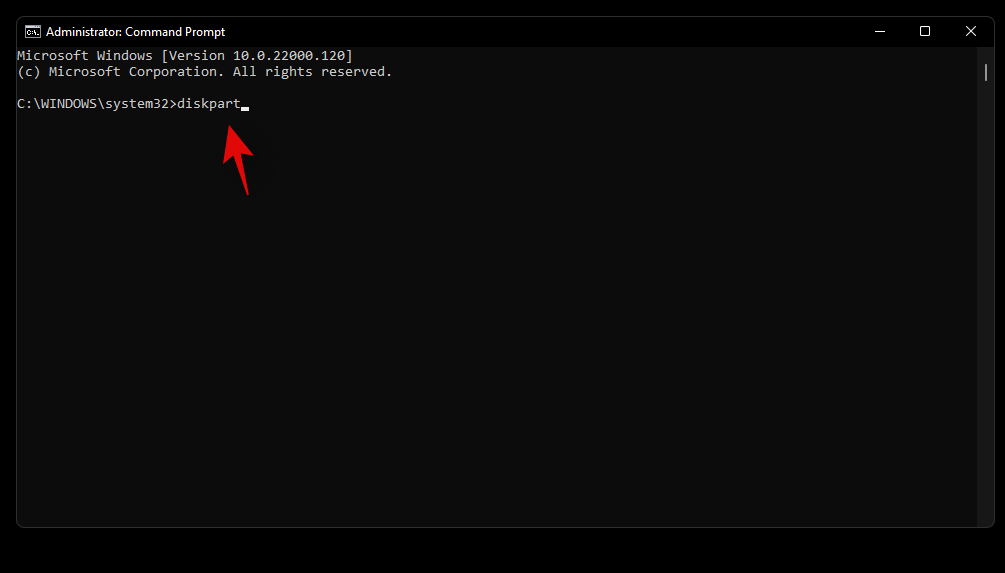
Enter the following command to get a list of all the disks installed on your system. Note down the disk number of the concerned disk.
list disk
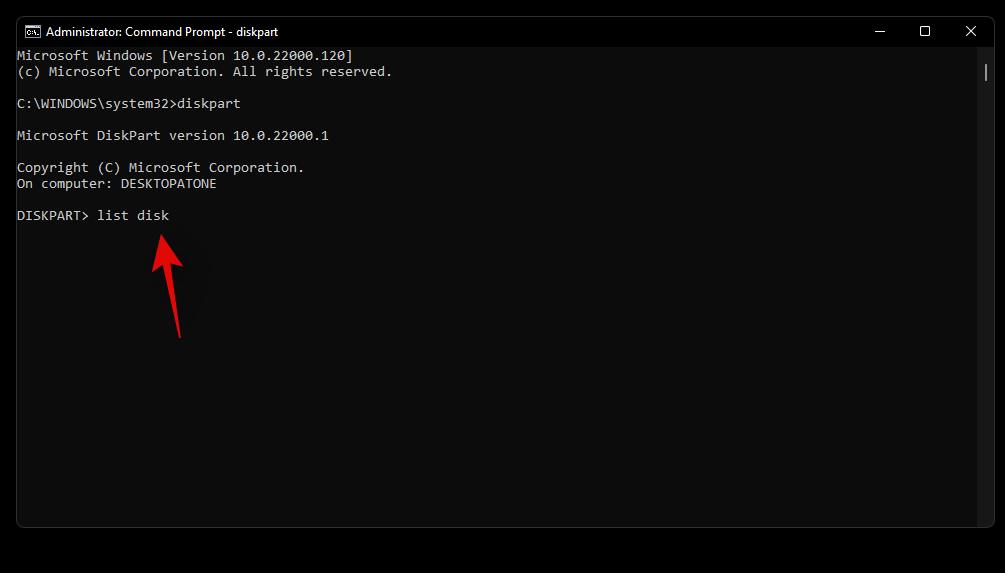
Now enter the command below and replace N with the disk number you noted down earlier.
select disk N
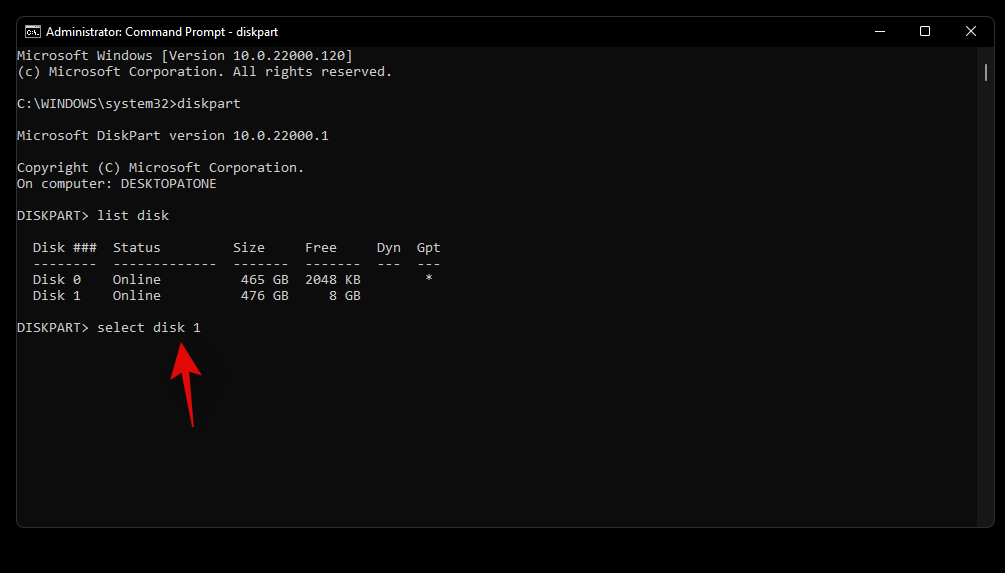
Use the command below to create a custom partition on the selected disk drive. If a partition already exists on the drive then replace ‘primary’ with ‘extended’. Additionally, replace XXXX with the size of your choice for the partition. The size is measured in megabytes where 1000MB = 1GB.
create partition primary size=SIZE
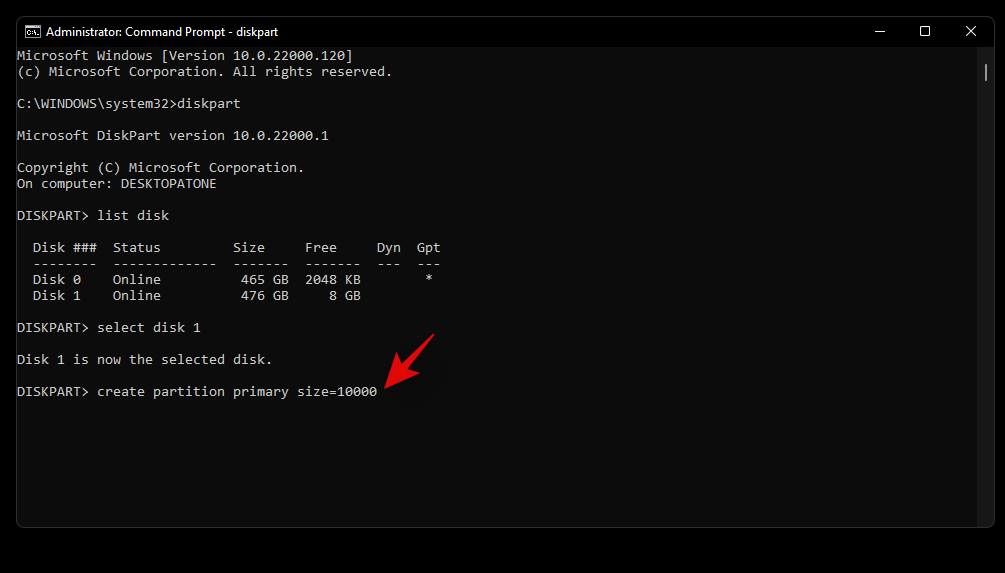
Now enter the following command. Your newly created partition will now show up in this list. Note down its volume number
list volume
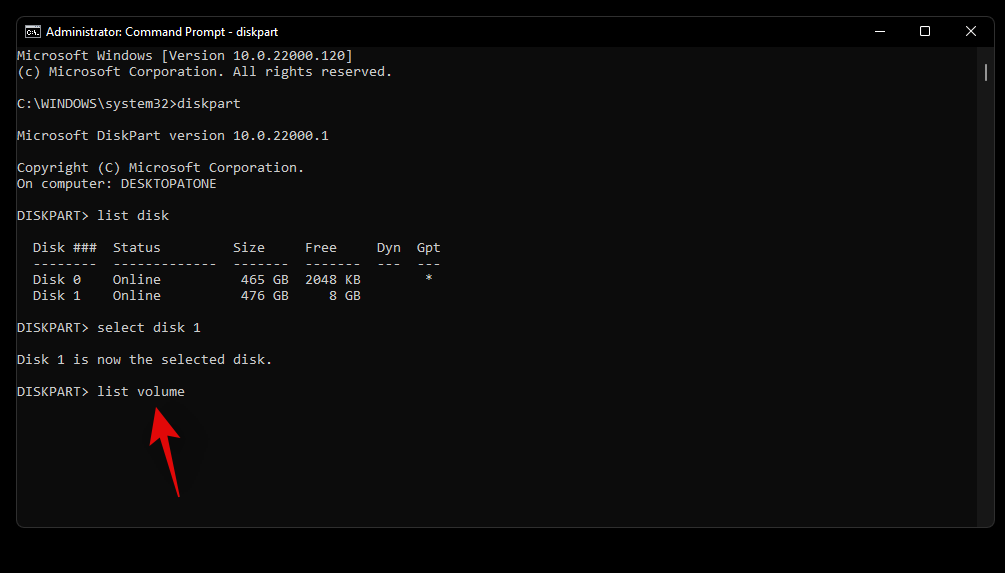
Enter the following command and replace N with the volume number you noted down earlier.
select volume N

Now use the following command to assign a letter to the selected volume. Replace X with the letter of your choice.
assign letter=X
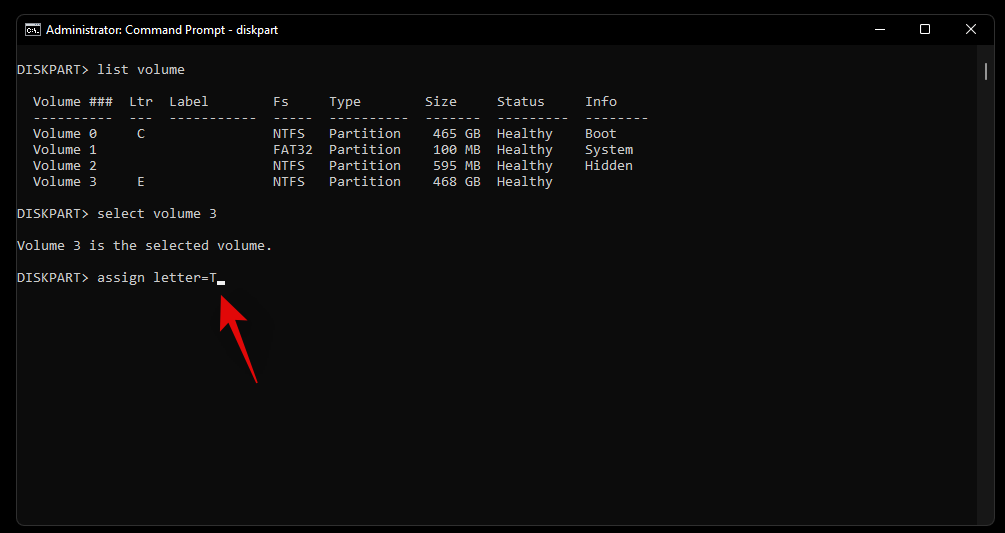
And that’s it! You will now have created a new partition on the selected drive depending on your current needs and requirements.
Method #2: From Disk Management
You can also create a new partition son your system using the Disk Management utility provided within Windows. Use the guide below to get you started.
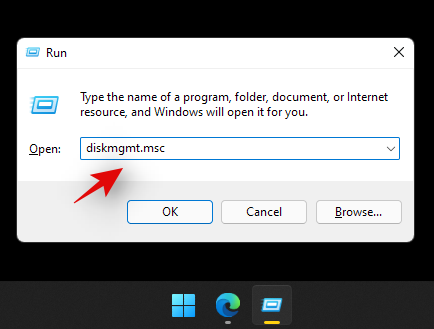
Press Windows + R on your keyboard and type in the following. Press Enter on your keyboard to launch the disk management utility.
diskmgmt.msc
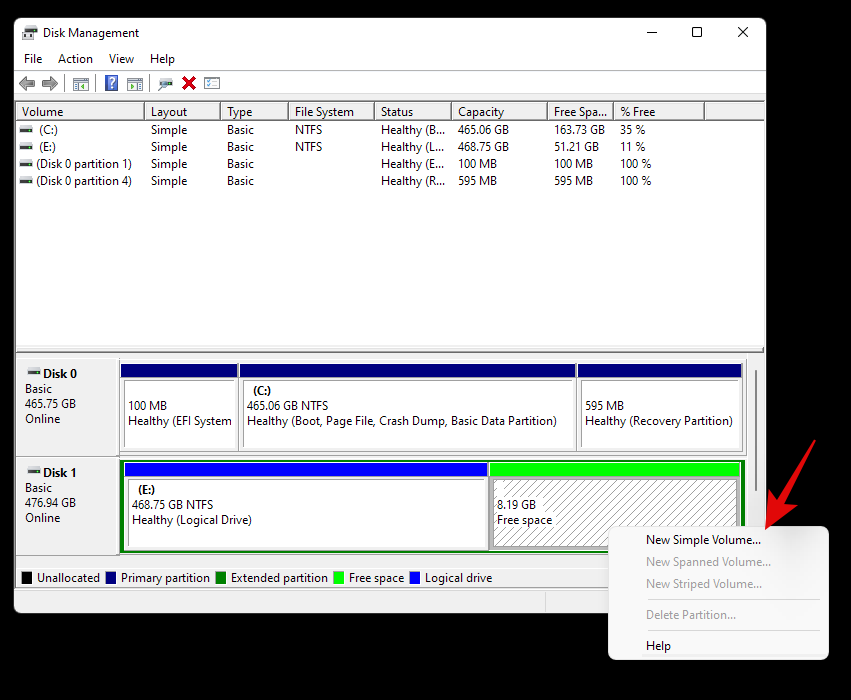
Once the disk management utility is launched, you will get a graphical representation for all your drives. Right-click on the unallocated space at the bottom of your screen and click on ‘New Simple Volume’.
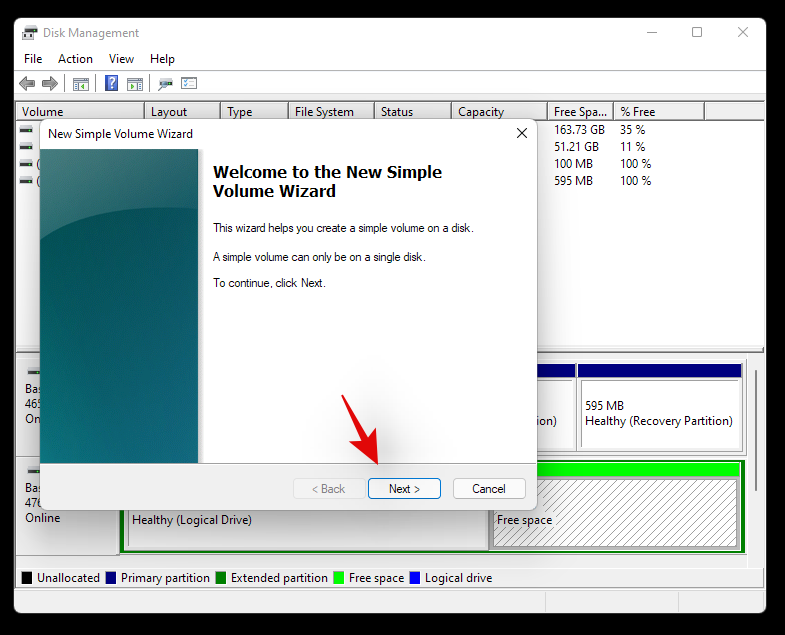
The volume creation wizard will now be launched. Click on ‘Next’ to get started.
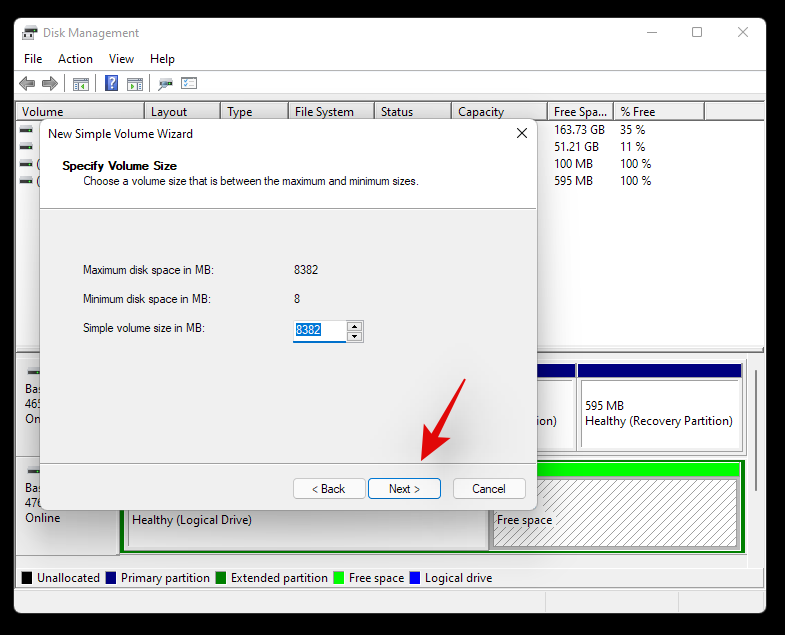
Select a custom size if needed. By default, Windows will use the entire unallocated space to create a new simple volume on your drive. Click on ‘Next’ once you have set the desired size.
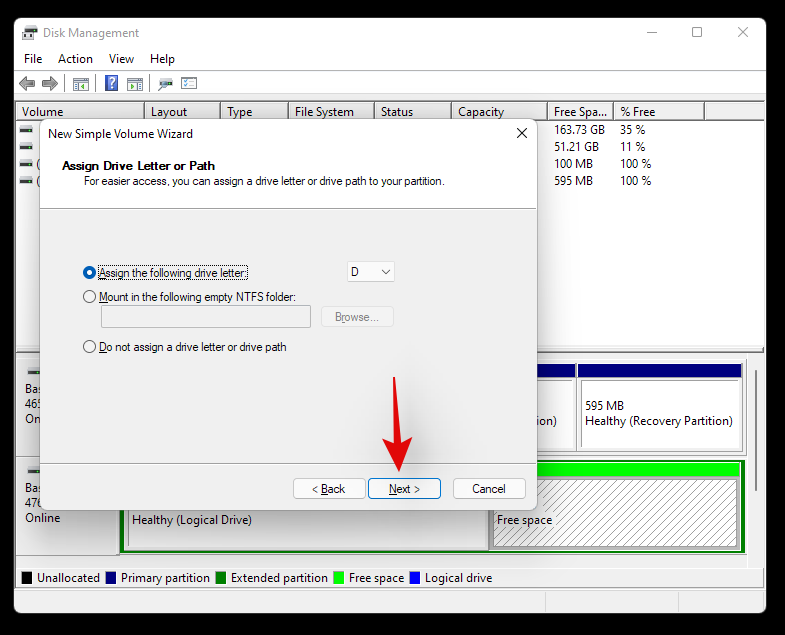
Choose a drive letter for your new volume now. Click on ‘Next’ once you are done.
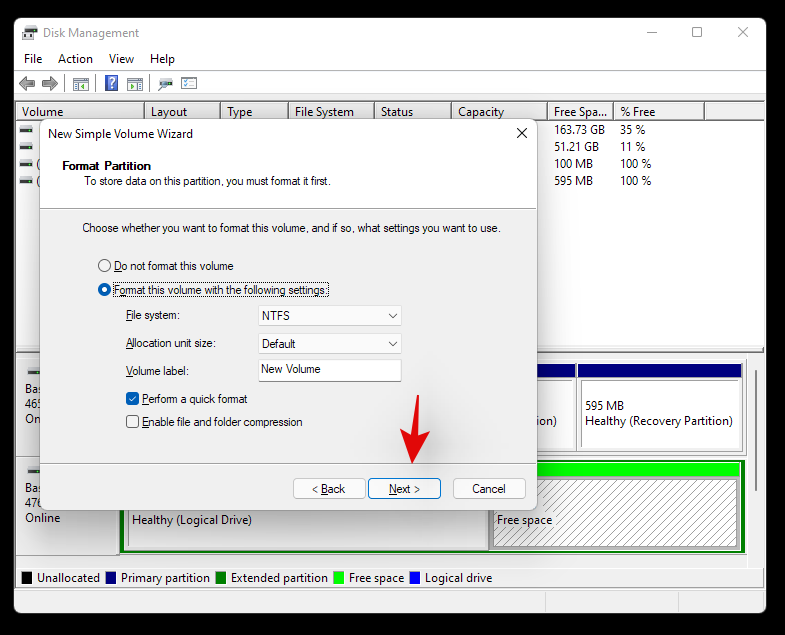
You will now be given the option to format the unallocated space before the volume is created. Choose your disk format by clicking on the drop-down menu and set a name for the new volume beside Volume Label. If you do not wish to format the unallocated space, then click and select ‘Do not format this volume’. Click on ‘Next once you are done.
Finally, click on ‘Finish’ and the new volume will now start being created.
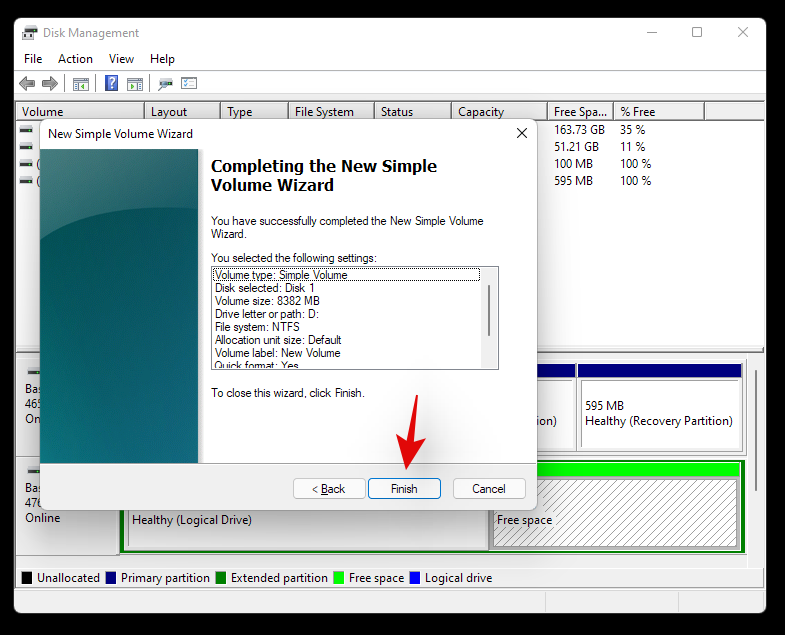
And that’s it! A new volume should now be created on the selected drive.
We hope this guide helped you easily format or wipe your drive in Windows 11 depending on your current needs and requirements. If you face any issues or have any questions for us, feel free to reach out to us using the comments section below.
Related:
