Sådan afinstalleres McAfee på Windows 11 [5 måder]
![Sådan afinstalleres McAfee på Windows 11 [5 måder] Sådan afinstalleres McAfee på Windows 11 [5 måder]](https://blog.webtech360.com/resources8/images31/image-4917-0105182719945.png)
Oplev hvordan du effektivt fjerner McAfee fra din Windows 11 pc. Få indsigt i alternative antivirusløsninger og metoder til afinstallation af McAfee.
Windows 11 er blevet frigivet til offentligheden, og denne nye opdatering til det langvarige operativsystem ser ud til at få nogle gode anmeldelser. Microsoft har øget privatlivets fred, sikkerhed tilføjet en ny brugergrænseflade og muligheden for at installere Android-apps til Windows 11. Men som sædvanlig kommer Windows med en masse forudinstallerede ting, der er irrelevante for næsten alle brugere.
Og hvis du har købt et forudbygget system eller en bærbar computer, så er chancerne for, at der er installeret yderligere reklamesoftware på dit system, som du måske ønsker at fjerne. Du kan nemt fjerne og afinstallere de fleste apps på Windows med et enkelt klik, men tingene bliver en smule komplicerede, når du kommer til programmer, Windows Store-apps, Windows-opdateringer og systemapps. Frygt ikke, du kan følge vores guider nedenfor for at fjerne alle slags apps fra dit Windows-system, uanset dine nuværende indstillinger. Lad os komme igang.
Indhold
Sådan afinstalleres apps på Windows 11 [8 måder]
Her er alle måder, hvorpå du kan afinstallere en app fra din Windows 11-pc. For at afinstallere systemapps , se de dedikerede sektioner og specielle metoder nedenfor efter dette afsnit.
Metode #01: Brug af indstillinger
Følg vejledningen nedenfor for at afinstallere en app via Indstillinger fra dit system. I tilfælde af at du forsøger at afinstallere en standardapp, anbefaler vi, at du ændrer den på forhånd, så afinstallationsindstillingen ikke er nedtonet for dig. Hvis du ikke er klar over at ændre en standardapp i Windows 11, kan du følge vejledningen nedenfor.
Trin 1: Ændre standardappen først? [Valgfri]
Bemærk: Sørg for, at du har en erstatningsapp installeret på dit system på forhånd for at erstatte din standardapp. For eksempel, hvis du ændrer din browser fra Microsoft Edge, skal du have en anden browser, som du ønsker at bruge, allerede installeret på dit system, så du i stedet kan vælge den som din standardbrowser.
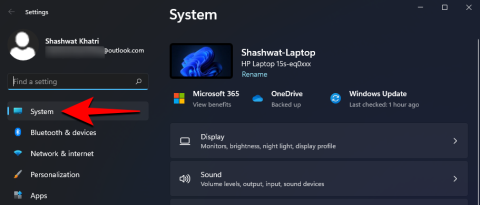
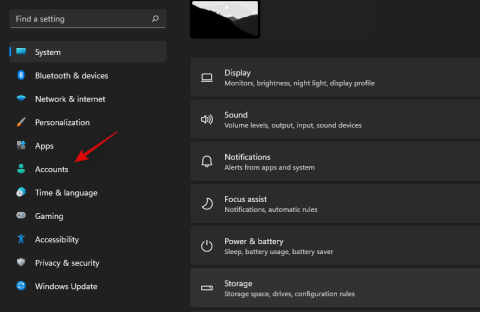
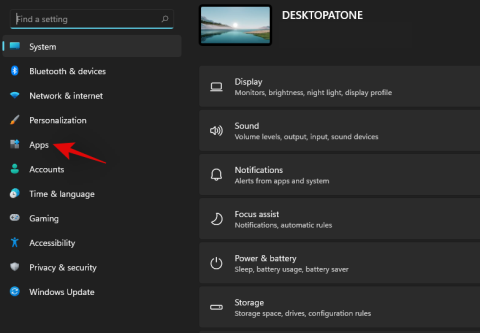
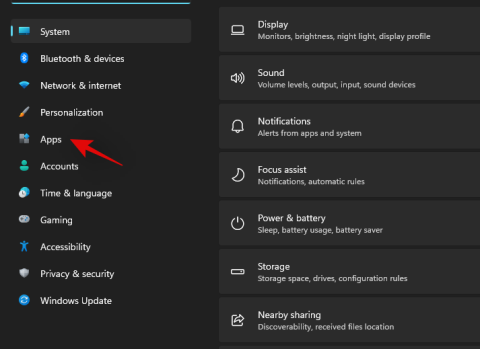
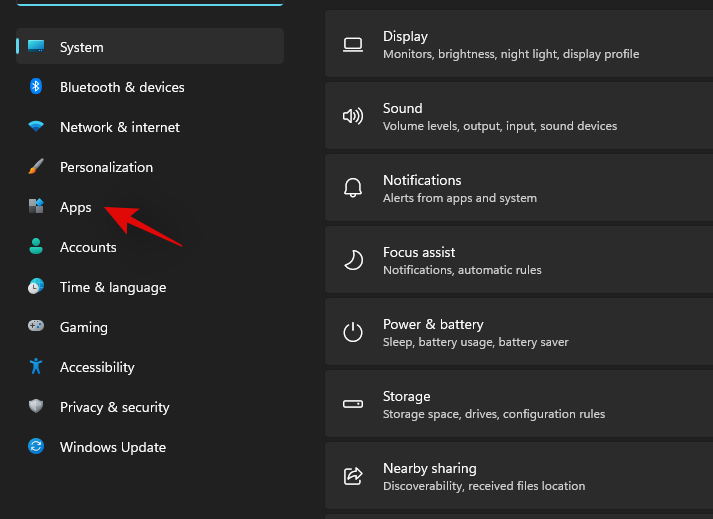
Tryk Windows + ipå dit tastatur for at åbne appen Indstillinger. Klik nu på 'Apps' i din venstre sidebjælke.
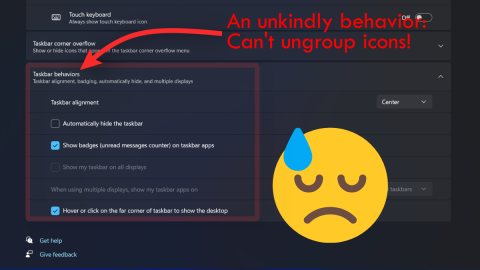
Klik og vælg 'Standard Apps' til højre.
Vælg nu den app, du ønsker at fjerne, som din standardapp, og klik på den. Hvis du ønsker at ændre din standardapp efter filtype, skal du klikke på 'Vælg standardindstillinger efter filtype' nederst som vist nedenfor.
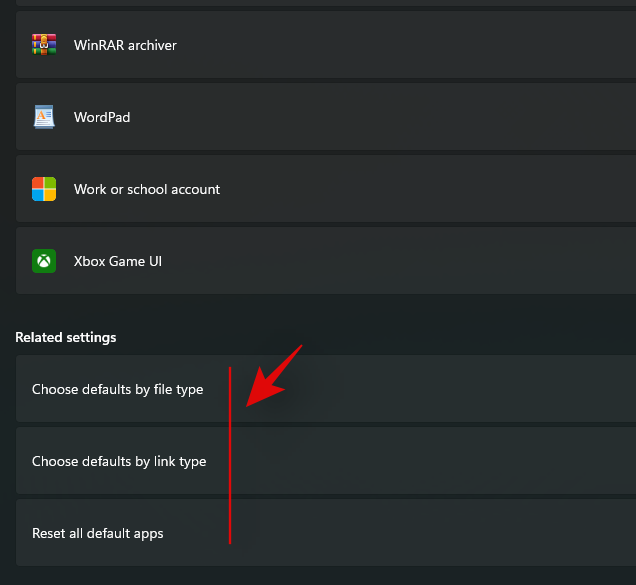
Klik nu på den ønskede filtype/udvidelse og vælg en app efter eget valg.
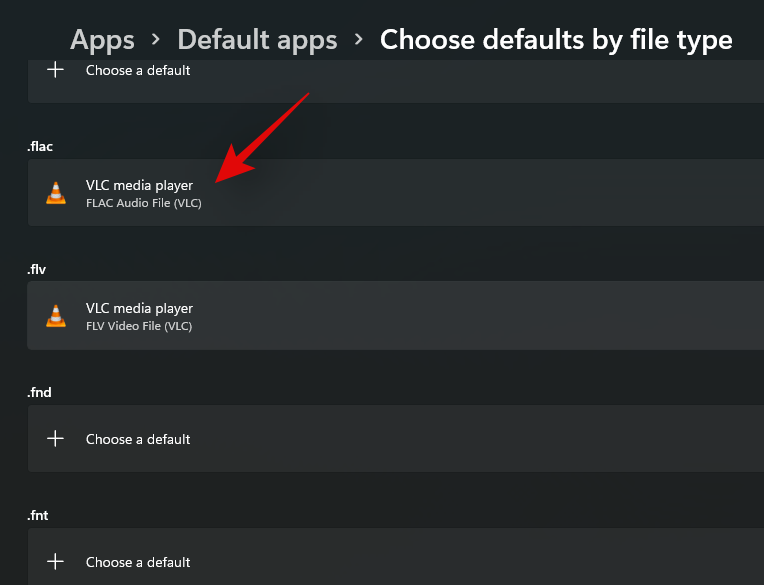
Gentag ovenstående trin for alle nødvendige filtyper/udvidelser.
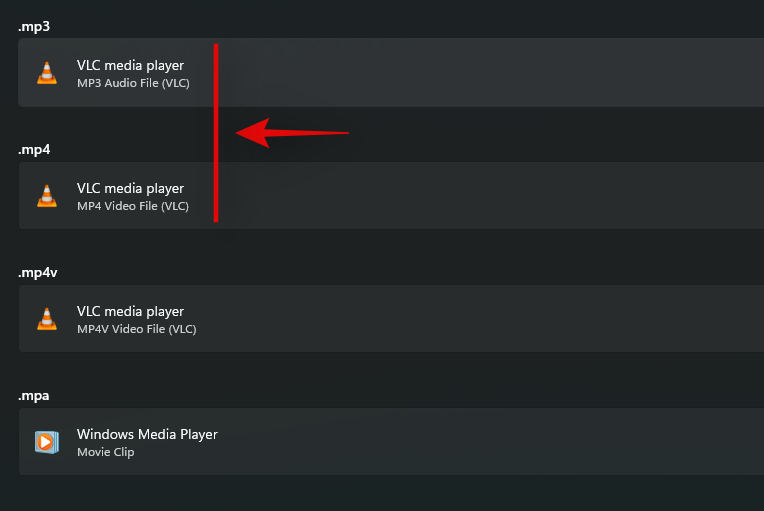
Luk appen Indstillinger og genstart dit system for en god ordens skyld.
Og det er det! Når dit system genstarter, skal din standardapp ændres. Du kan nu bruge vejledningen nedenfor til at afinstallere den nødvendige app via 'Indstillinger' på dit system.
Trin 2: Afinstaller appen fra Indstillinger
Tryk Windows + ipå dit tastatur og vælg 'Apps' fra venstre side.

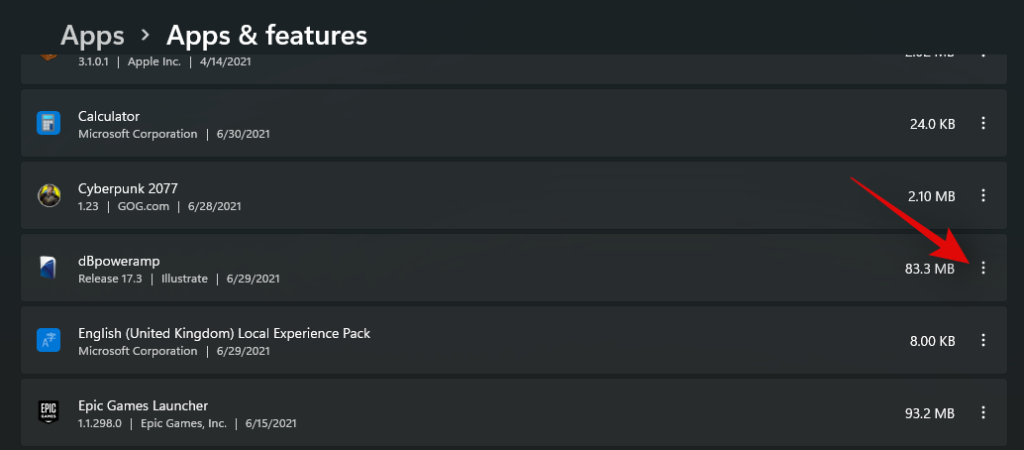
Klik nu på 'Apps og funktioner' til højre.
Rul gennem listen og find den app, du ønsker at afinstallere. Når du er fundet, skal du klikke på menuikonet med 3 prikker til højre.
Klik og vælg 'Afinstaller'.
Følg nu instruktionerne på skærmen for at afinstallere appen. Hvis du afinstallerer en forudinstalleret eller Windows Store-app, bliver den automatisk afinstalleret i baggrunden. Men hvis det er et program, der er fundet af Windows, vil Windows, afhængigt af programmet, enten forsøge at afinstallere det i baggrunden eller starte 'uninstall.exe' eller 'setup.msi', så du kan afinstallere det på egen hånd med de ønskede indstillinger. Du kan muligvis beholde/gemme nogle data, når du støder på sådanne opsætninger, herunder ting som logfiler, brugerdata, gemme data, billeder og mere.
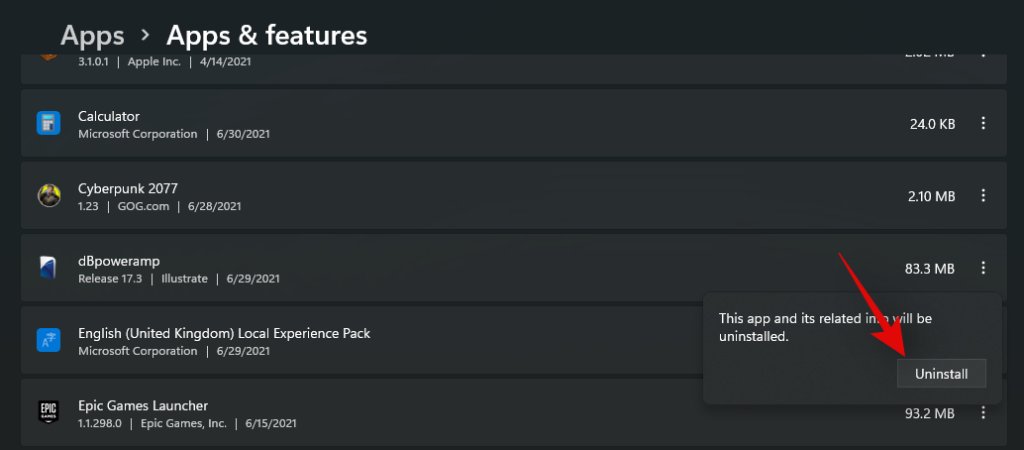
Alternativt vil du også have mulighed for helt at fjerne alt relateret til programmet fra dit system.
Og det er det! Den valgte app skulle nu være afinstalleret fra dit system. Hvis du har afinstalleret et tungt program, anbefaler vi at rydde din cache ved hjælp af denne vejledning, især hvis programmet oversteg størrelsen på 30+ GB.
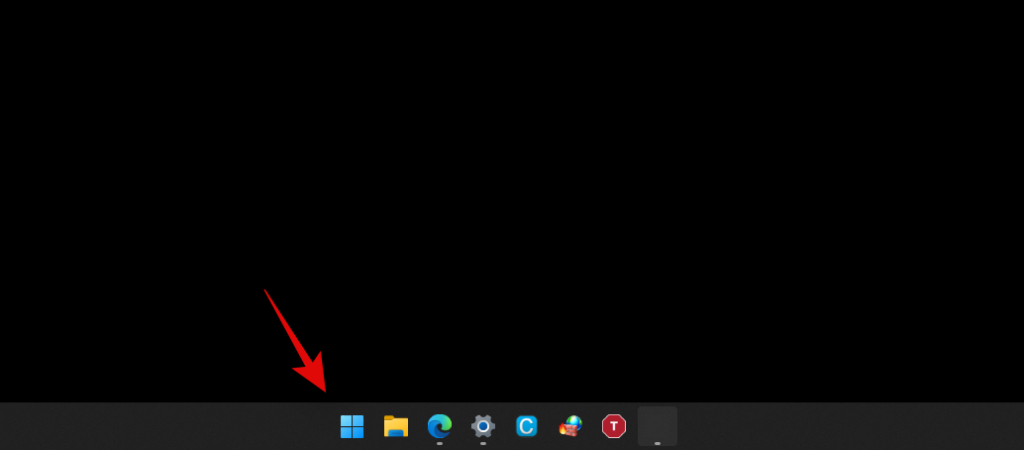
Tryk på 'Windows'-knappen på dit tastatur for at få menuen 'Start' frem. Alternativt kan du også klikke på ikonet i din 'Proceslinje'.
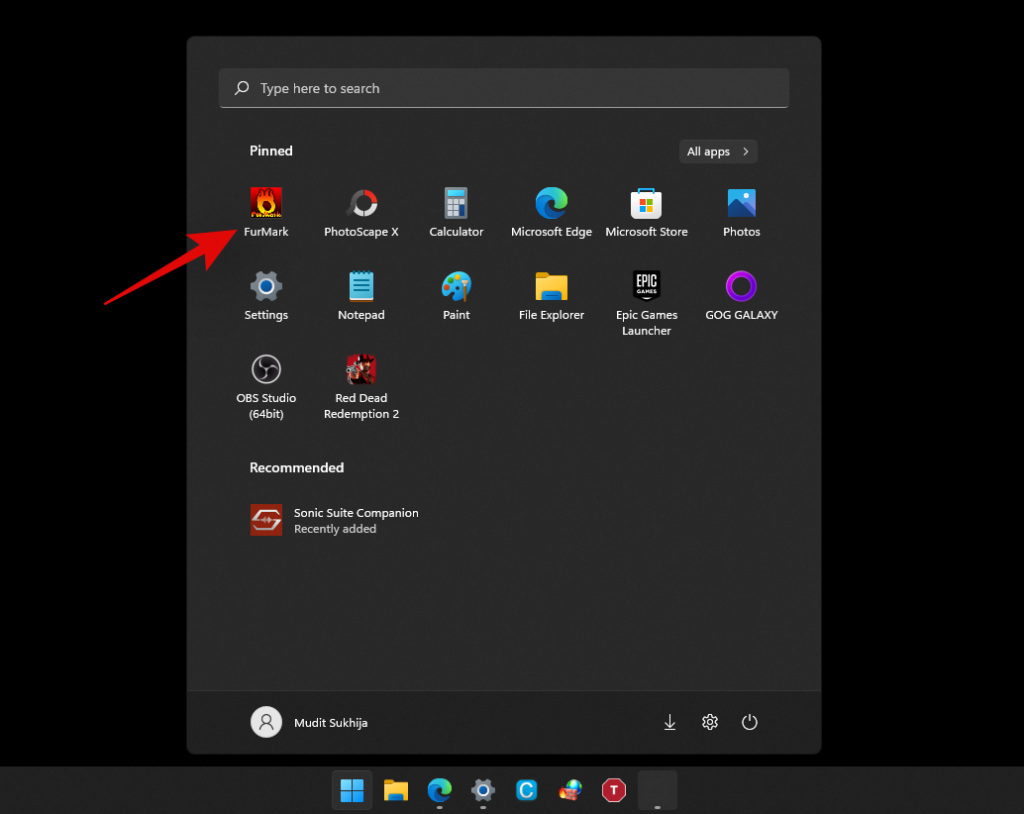
Find den app, du ønsker at afinstallere, og højreklik på den.
Klik nu på 'Afinstaller'. Følg instruktionerne på skærmen, hvis det er nødvendigt, for at fuldføre afinstallationsprocessen.
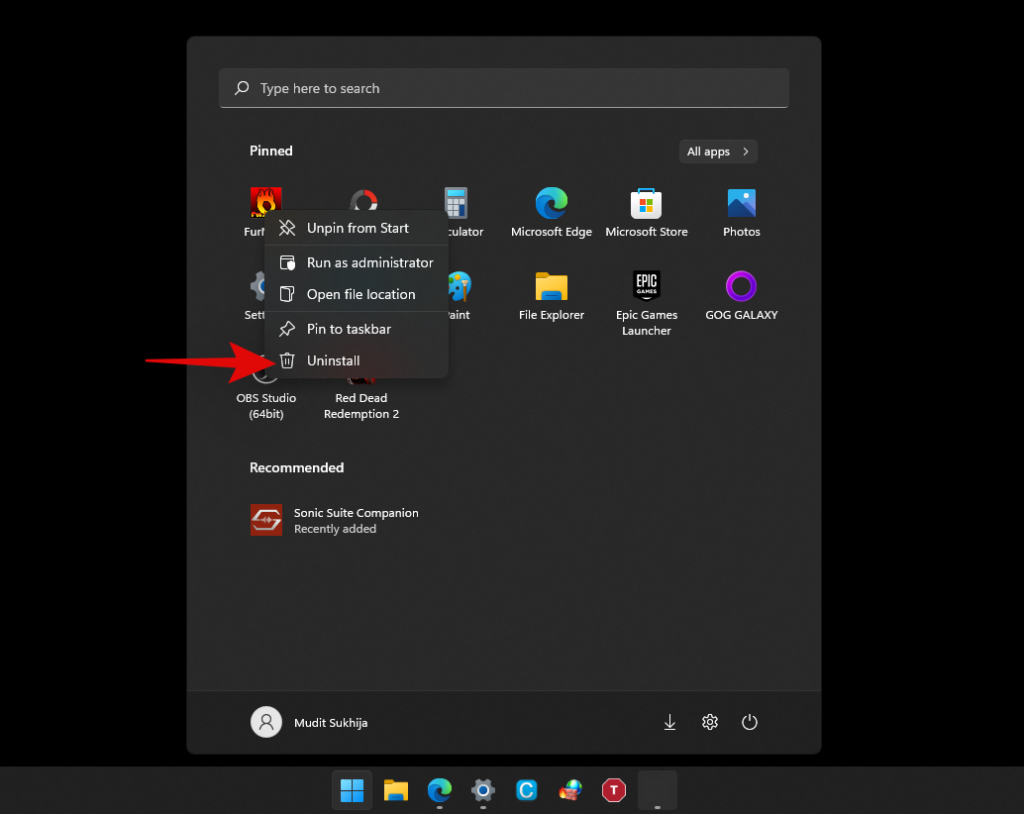
Og det er det! Du vil nu have afinstalleret en app fra dit system via Start-menuen.
Metode #03: Brug af afinstallationsfilen '.exe'
Ideelt set behøver du ikke manuelt at starte den eksekverbare afinstallationsfil for et program, men i nogle tilfælde, ligesom ældre programmer, kan du have et program installeret på dit system, hvis afinstallationsindstilling ikke vises nogen steder i dine indstillinger. I sådanne tilfælde kan du starte afinstallationsfilen på egen hånd ved hjælp af vejledningen nedenfor.
Find programmets .exe-fil eller den genvej, du normalt bruger til at starte programmet, og højreklik på den.
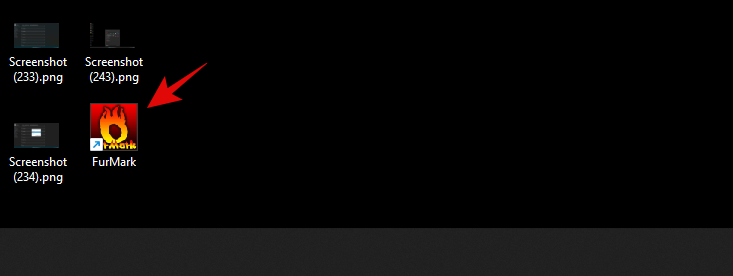
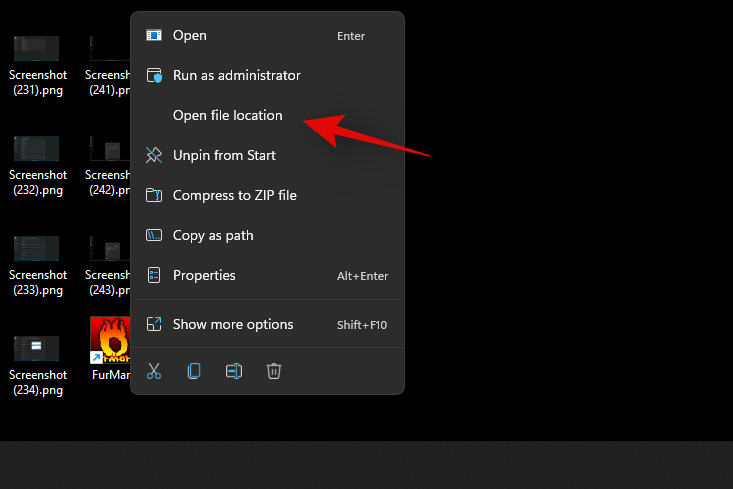
Vælg 'Åbn filplacering'. Hvis du ikke kan se denne mulighed, skal du vælge egenskaber. Du vil nu finde muligheden 'Åbn filplacering' i fanen 'Generelt' som vist nedenfor.
Du vil nu blive ført til programmets installationsmappe. Se efter en .exe-fil med et af følgende navne eller et lignende navn.
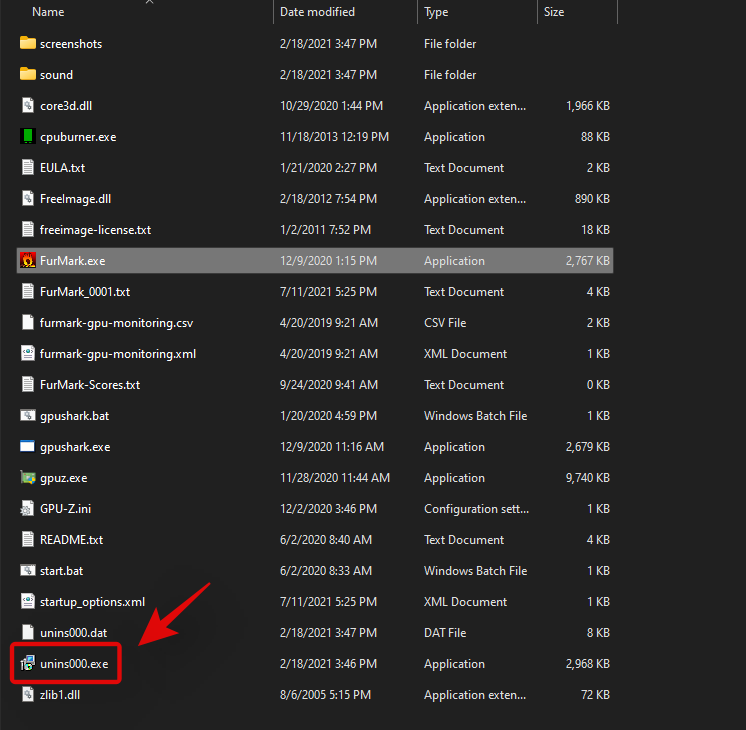
og mere. Afinstallationsprogrammet/opsætningen vil få samme navn. Når du har startet det, kan du følge instruktionerne på skærmen for at afinstallere det fra dit system.
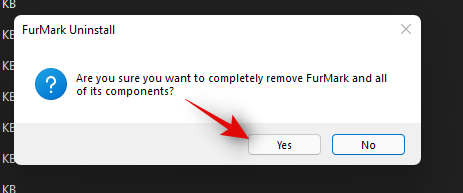
I nogle tilfælde kan du også få mulighed for at reparere, geninstallere eller ændre programmet sammen med afinstallation. Du kan vælge den ønskede mulighed og fortsætte med opsætningen, som du ønsker.
Metode #04: Brug af kontrolpanel
Du kan også nemt fjerne programmer og apps fra kontrolpanelet. Ideelt set anbefales det, at du kun afinstallerer ældre og moderne programmer ved hjælp af kontrolpanelet, da ikke alle dine installerede apps vises her. Følg vejledningen nedenfor for at afinstallere programmer via kontrolpanelet.
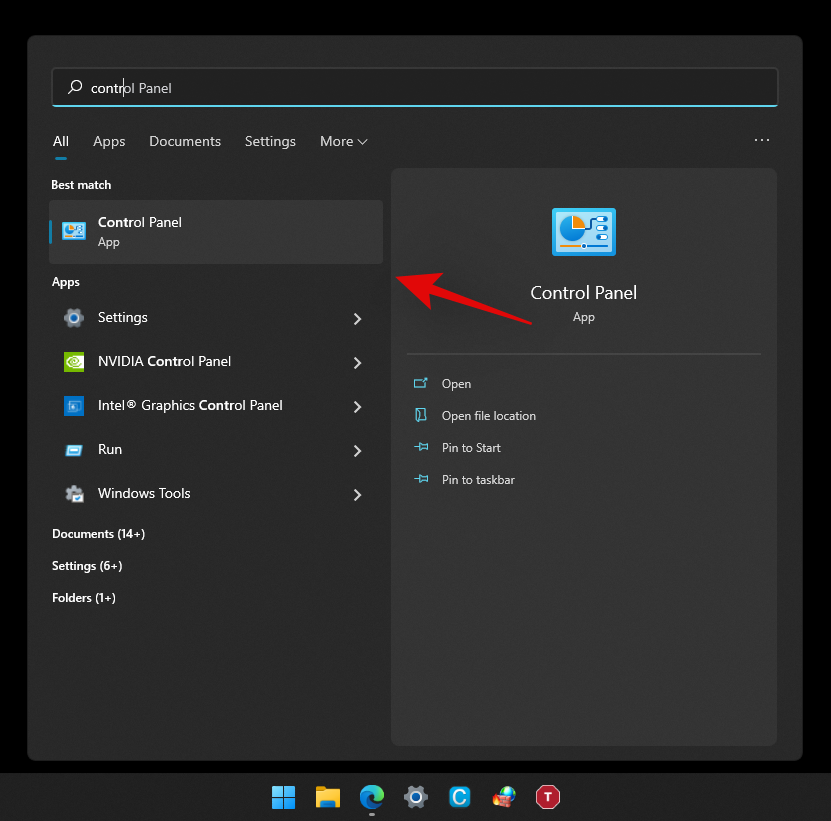
Tryk Windows + spå dit tastatur og skriv 'Kontrolpanel'. Klik og start appen, når den vises i dine søgeresultater.
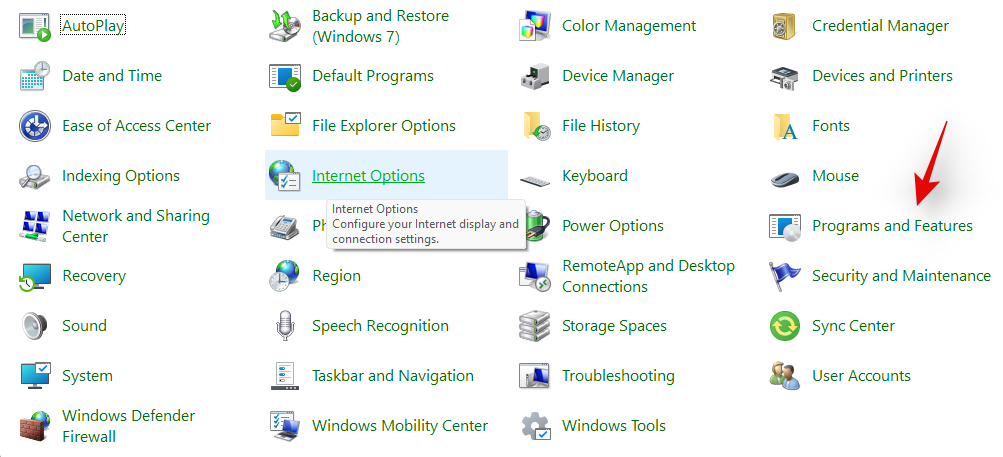
Klik nu på 'Programmer og funktioner'.
Du vil nu få en liste over alle de programmer, der er installeret på dit system i øjeblikket. Find det program, du ønsker at afinstallere, og klik på det.
Vælg nu 'Afinstaller' øverst.

Følg instruktionerne på skærmen for at fuldføre installationsprocessen. I nogle tilfælde vil dette være en automatiseret proces, mens du i andre kan få mulighed for at reparere den eksisterende installation eller vælge, hvilke data du ønsker at beholde, og hvilke data du ønsker at slette.
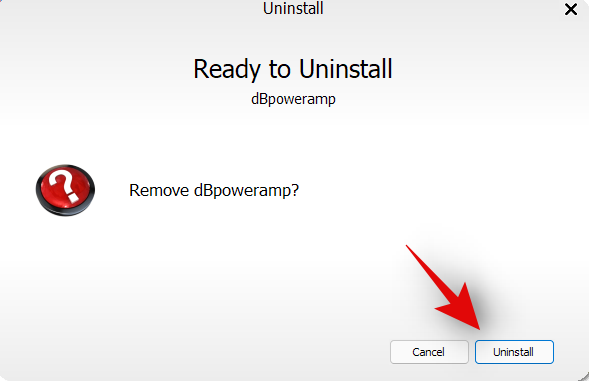
Når du har truffet dine valg, vil afinstallationsprocessen finde sted, og programmet bør fjernes fra dit system, når processen er fuldført.
Metode #05: Brug af PowerShell
Du kan også afinstallere apps via en forhøjet PowerShell i Windows 11. Selvom afinstallationskommandoen er ret enkel, er det ikke at få pakkenavnet til den pågældende app eller program. Derfor vil du i vejledningen nedenfor finde, hvordan du afinstallerer apps via PowerShell, hvis du har pakkenavnet.
Men hvis du ikke ved, hvordan du henter dit fulde pakkenavn, anbefaler vi, at du følger systemappguiden nedenfor, som dækker den samme metode meget mere detaljeret. Lad os komme igang.
Tryk Windows + spå dit tastatur og skriv 'PowerShell'. Klik nu på 'Kør som administrator', når det vises i dine søgeresultater.
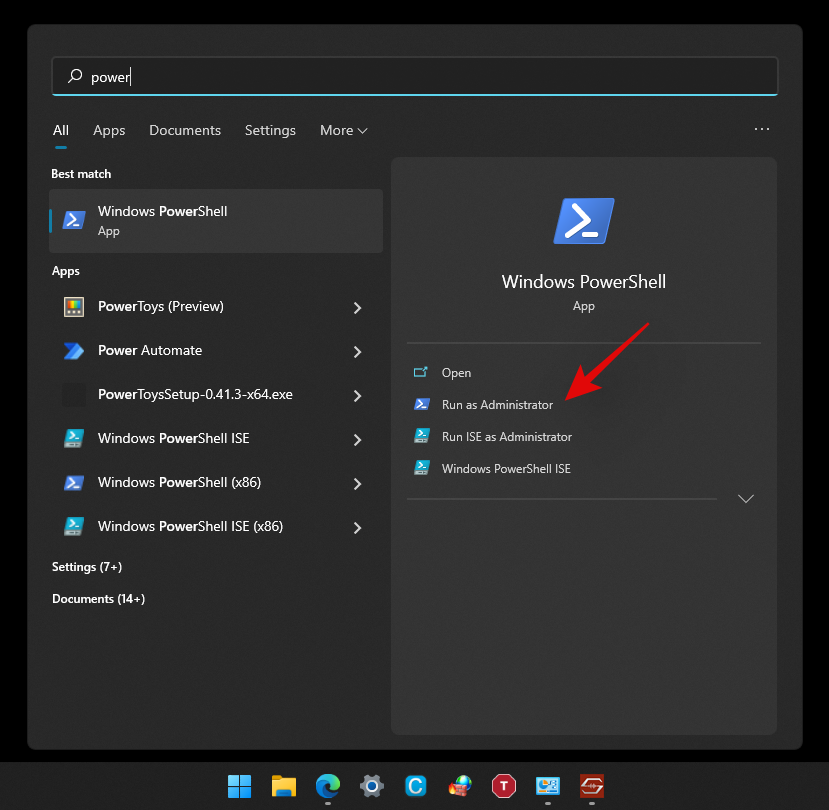
Når du får PowerShell-vinduet på dit skrivebord, skal du indtaste følgende kommando og trykke på 'Enter' på dit tastatur. Sørg for, at du erstatter "[Navn]" med det fulde pakkenavn på den pågældende app.
Remove-AppxPackage [Name]

Og det er det! Powershell vil nu gøre sin magi og afinstallere den pågældende app fra dit system.
Metode #06: Brug af CMD
Du kan også bruge kommandoprompten i Windows 11 til at afinstallere apps fra dit system. Følg guiden nedenfor for at komme i gang.
Tryk Windows + spå dit tastatur og søg efter 'CMD'. Klik på 'Kør som administrator', når det vises i dine søgeresultater.
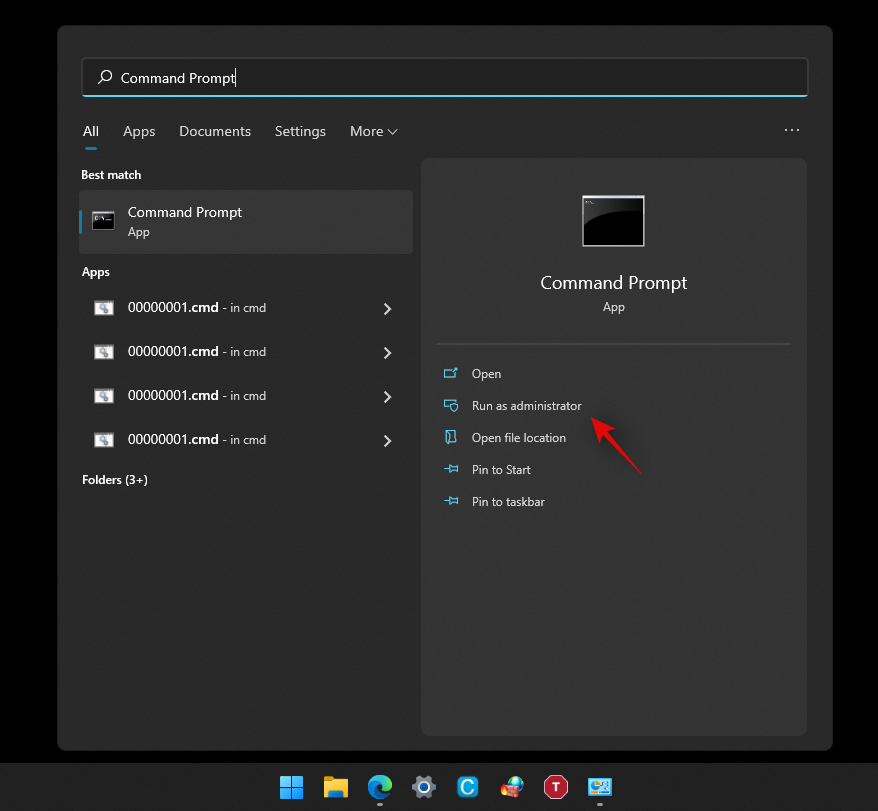
Når CMD starter, skal du indtaste følgende kommando og trykke på 'Enter' på dit tastatur.
wmic

Indtast nu følgende kommando for at få en liste over alle apps og programmer installeret på dit system.
product get name

Når du har fået en liste over alle programmerne, skal du finde den, du ønsker at afinstallere, på denne liste. Når det er fundet, noter du hele navnet på et passende sted.
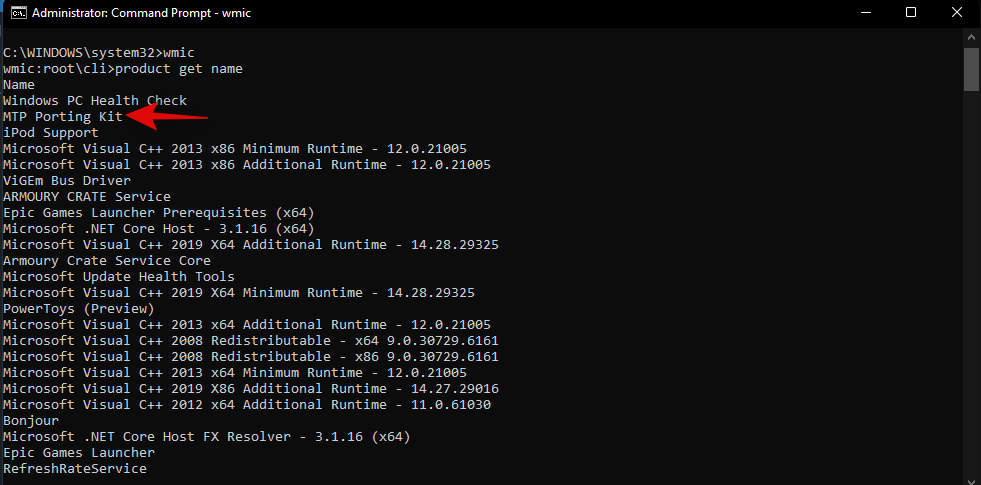
Now type in the following command, and replace AppName with the name of the app you noted down earlier.
product where name="AppName" call uninstall/nointeractive
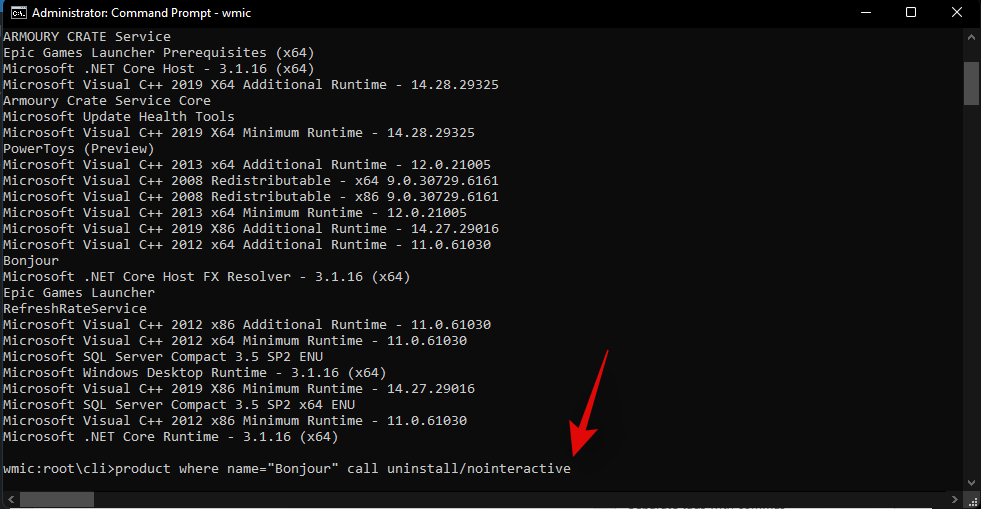
Note: Do not remove the quotes from the command as they are necessary for this syntax.
Press ‘Enter’ on your keyboard to execute the command.
Command Prompt will now carry out the necessary processes in the background and you should get a confirmation as shown below once the process is complete.
And that’s it! You will now have uninstalled an app from your system via the Command Prompt.
Method #07: Using setup.msi
In case your program came with a setup file that had a .msi extension instead of .exe, then you can use the same file to uninstall your program as well. Let’s find out a bit more about .msi files so that it is easier to comprehend their function.
What is a .msi file?
Traditionally your installers come with a .exe extension. These are programs designed to install programs on your system with the setup files bundled with them. MSI files take this a step further by allowing you to bundle multiple installers together in the same file.
This allows the MSI file to perform various functions thanks to the bundled installers. This includes things like Update installers, software installers, program repairer, program modifier, and uninstaller. Hence, if your program came with a .msi setup file then you can use the guide below to use the same file to uninstall the program from your system.
Note: Older .msi files rarely work with newer installations of the same software. Keep this in mind in case you are trying to downgrade your program to a previous version.
Uninstall via .msi file
Locate the .msi setup file on your local storage and double click and launch the app.
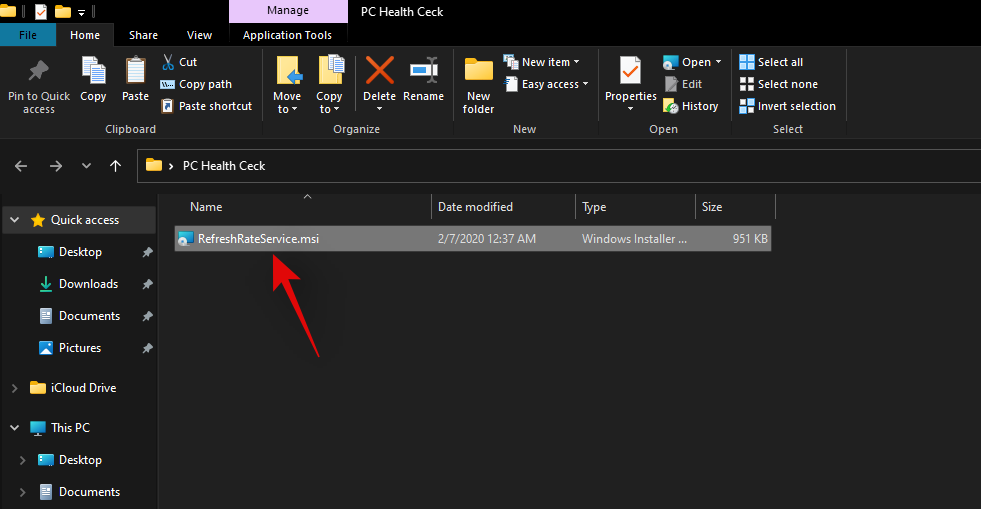
Follow the on-screen instructions until you are prompted to select one of the courses of action.
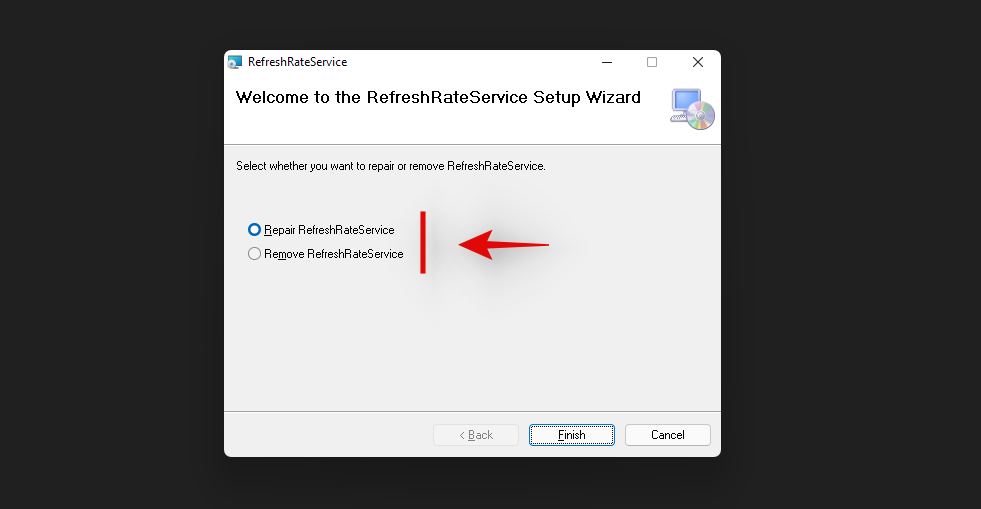
Select the desired option and continue with the on-screen instructions to complete the uninstallation process.
And that’s it! The selected program should now be removed from your system via its .msi setup file.
Method #08: Use a third-party uninstaller
There are various third-party uninstallers available on the market as well. These apps help identify all the system and third-party apps on your system which can then be uninstalled from your PC with a simple click. Most of these programs allow you to remove system apps after opting for the premium model of the software.
In case you decide to use the free version, you will be limited to a certain number of uninstalls in most cases. While this might sound redundant, these utilities are extremely useful for professionals and technicians that need to uninstall multiple programs with a single click. Most of these uninstallers support bulk uninstallations which is quite useful when setting up multiple systems for an office environment. We have linked the two most popular third-party uninstallers below. We hope you find them useful in your quest to uninstall programs from Windows 11.
How to uninstall system apps on Windows 11 [2 Ways]
You can uninstall system apps on Windows 11 either via an elevated PowerShell or by using a third-party PowerShell script. I would recommend that you use the PowerShell method, although it might seem more complicated, you won’t have to run third-party scripts with elevated privileges on your system.
However, if you still decide to use an automated script, ensure that you change your execution policy back to normal once the script has been executed. This will be paramount to your system’s security as leaving the execution policy unchanged might allow malicious users to run PowerShell scripts on your system easily. Use one of the methods below that best suits your current needs and requirements to get started.
Method #01: Using Powershell
The PowerShell uninstallation process for any program has two processes. First, sourcing the full package name of the concerned app and then using PowerShell to uninstall the concerned app. If your app does not show up in the PowerShell list, then you might have to use the third-party script below to remove the concerned app from your system. Let’s get started.
Step 1: Source full package name
Press Windows + s on your keyboard and search for ‘PowerShell’. Click on ‘Run as administrator’ once it shows up in your search results.

Once PowerShell launches, type in the command below and press ‘Enter’ on your screen.
get-appxpackage
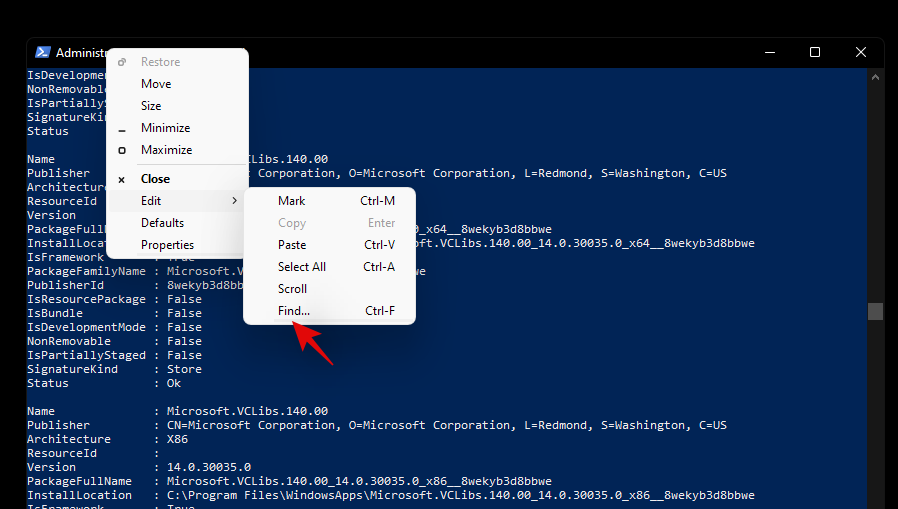
PowerShell will now generate and show a list of all the apps installed on your system including built-in OEM apps and Windows app. Scroll the list to find your app, however, if this seems too tedious, start by right-clicking on the title bar at the top.
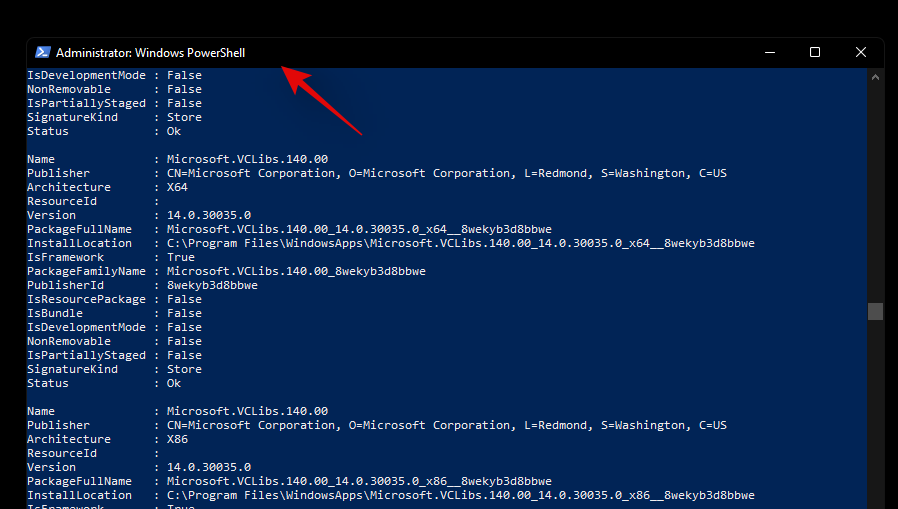
Now select ‘Edit’.
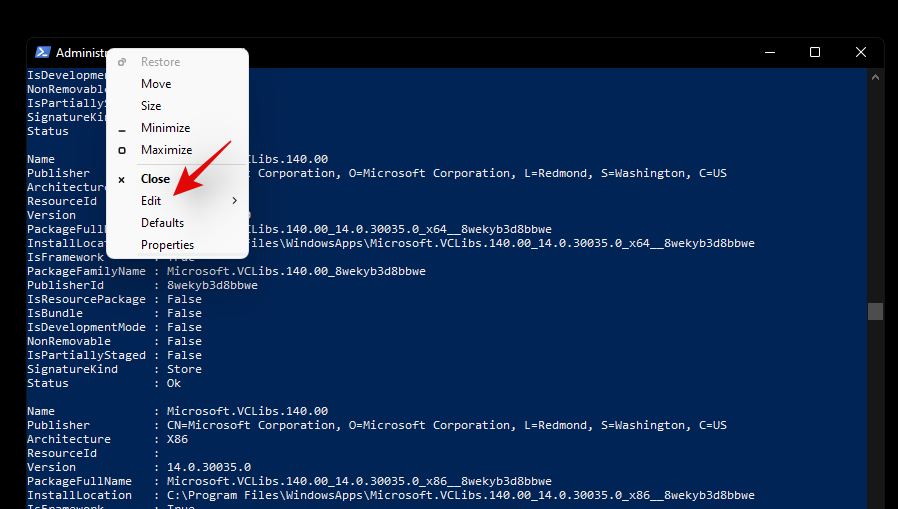
Click on ‘Find’.
Now search for the general name of the app and the ‘Find’ feature should automatically take you to the app in the list.
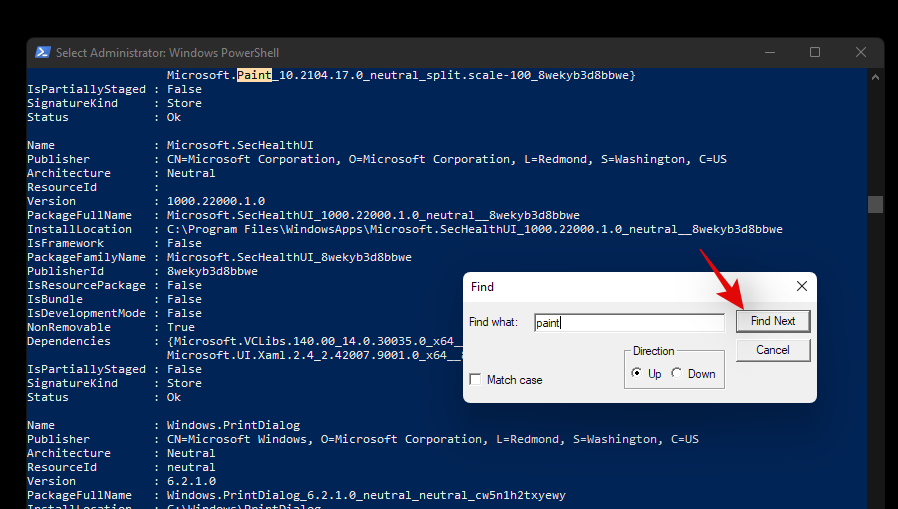
Note down the ‘FullPackageName’ of the concerned app as shown below.
And that’s it! You will now have sourced the full package name for the concerned app on your system. You can now use the guide below to uninstall it from your system.
Step 2: Uninstall app via PowerShell
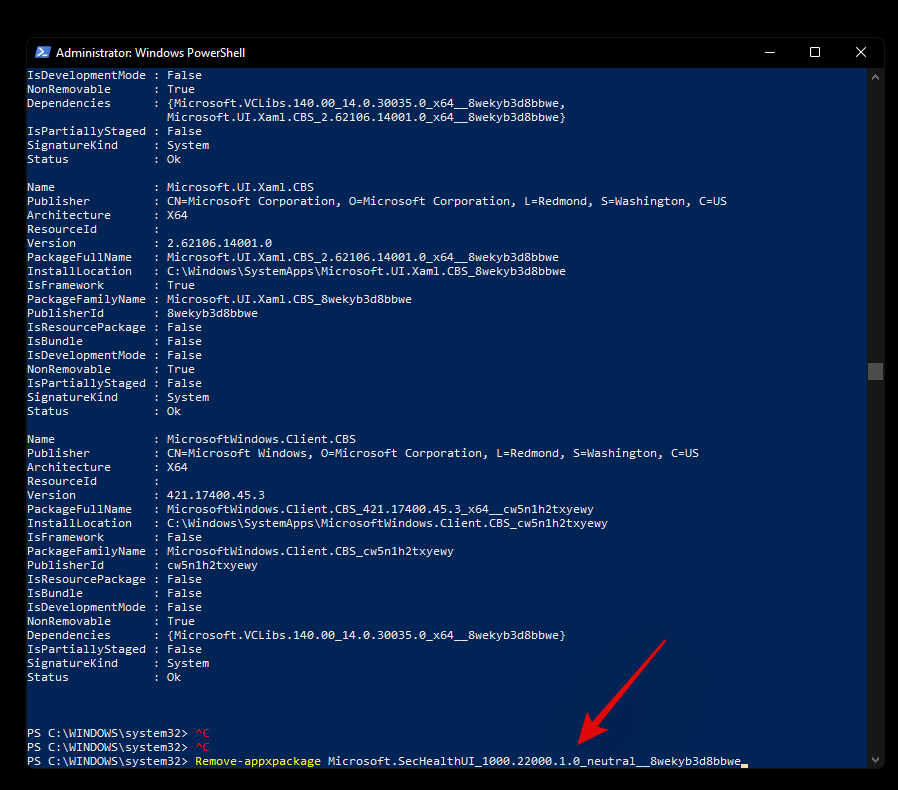
Open an elevated PowerShell using the guide above. If you already have one open on your screen, then start by typing in the following command. Ensure that you replace ‘[PackageName]’ with the full package name of the app we sourced above.
Remove-Appxpackage [PackageName]

Hit ‘Enter’ on your keyboard once you are done. PowerShell will now do its thing and the app should be installed from your system in no time.
Can’t remove an app using PowerShell? How to fix
If you are unable to remove the app via PowerShell then we recommend you do the following checks to solve the issue.
You should be able to solve your issue by crosschecking the above-stated checks. However, if you are still unable to uninstall the concerned app, then you can use the third-party script below.
Method #02: Using a third party script
You can also use a third-party script to remove system apps from your Windows 11 system. These scripts have been quite popular lately and have been the go-to choice for many users when setting up fresh installations of Windows. Use the guide below to get started.
Note: While this is a Windows 10 script, it has been verified to remove system apps on Windows 11 as well. However, we recommend you keep checking the download page for updates that should be better compatible with Windows 11. We recommend using the script to only remove system apps and nothing else offered by the script. Other features could potentially break Windows 11 until a compatible script for the same is released in the future.
Visit the link above and you will be taken to the GitHub page for the script. Click on ‘Code’ in the top right corner.
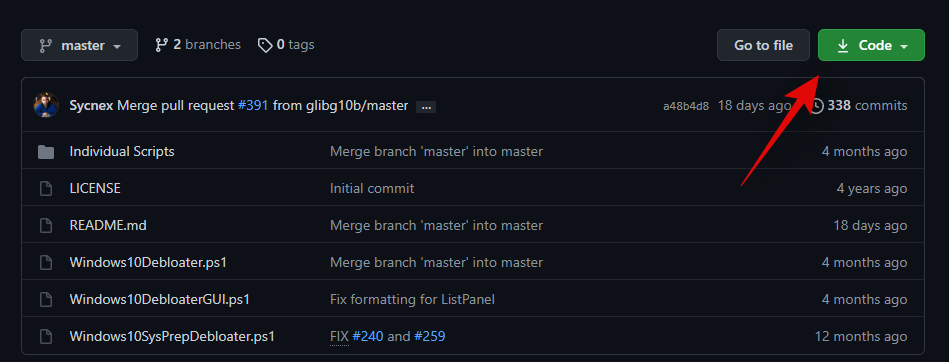
Now click and select ‘Download ZIP’.
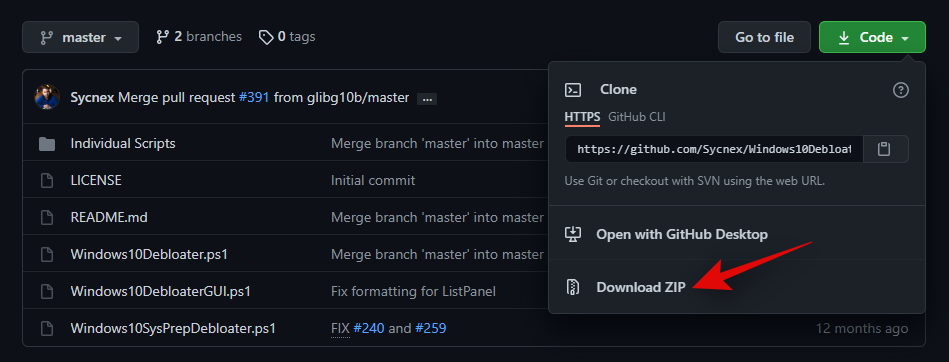
A Zip file will now be downloaded to your local storage. Extract the files to a convenient location.
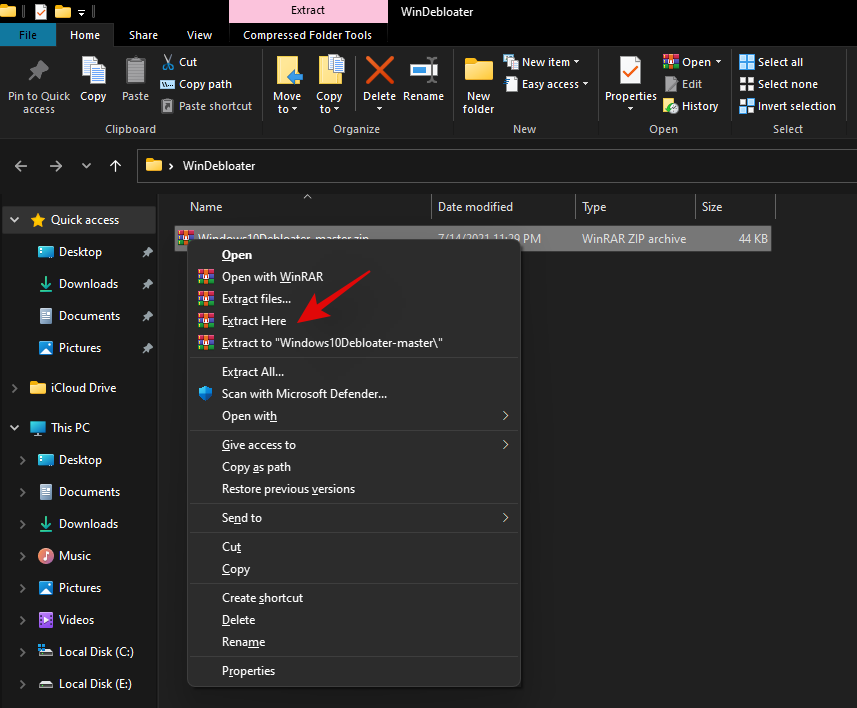
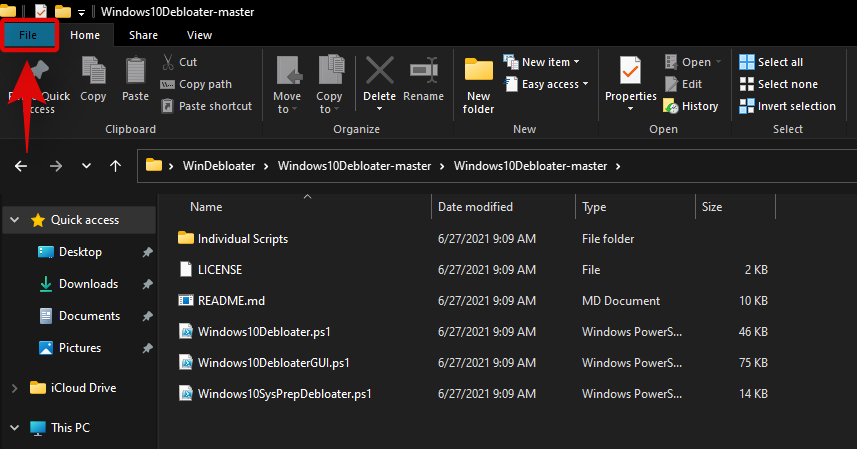
Once extracted, open the folder and click on ”File’ in the top left corner.
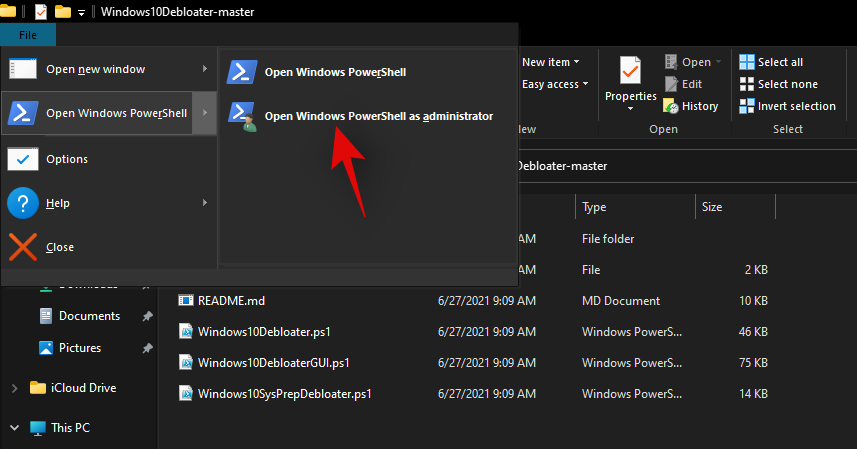
Hover over ‘Open Windows PowerShell’ and select ‘Open Windows PowerShell as administrator’.
An elevated PowerShell window will now launch on your system. Start by executing the following command given below.
Set-ExecutionPolicy Unrestricted -Force

This will set your script execution policy as unrestricted which will allow us to use the script on your system. Once executed, enter the following command in the window and press ‘Enter’ on your keyboard once you are done.
.\Windows10DebloaterGUI.ps1

This will execute the debloat script and you should now get a graphical interface for it on your screen. Click on ‘Customize Blacklist’ at the top.
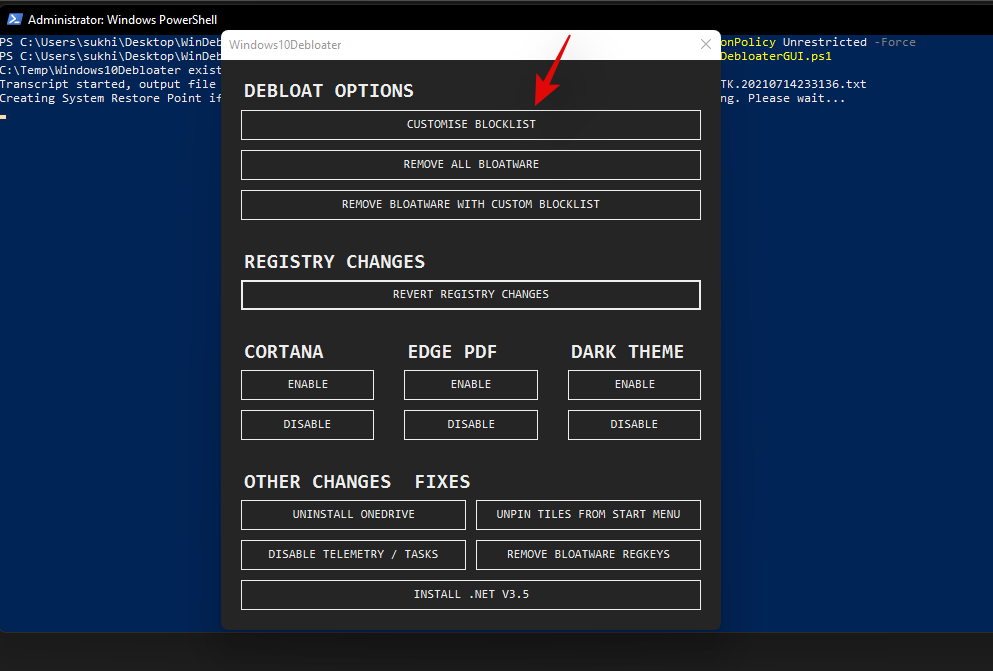
You will now get a list of all the apps installed on your system. Check the box for the apps you wish to uninstall and uncheck the box for the apps you wish to keep on your device. Ensure that you go through the entire list to remove any default selections made by the script for the programs that you wish to keep on your device.
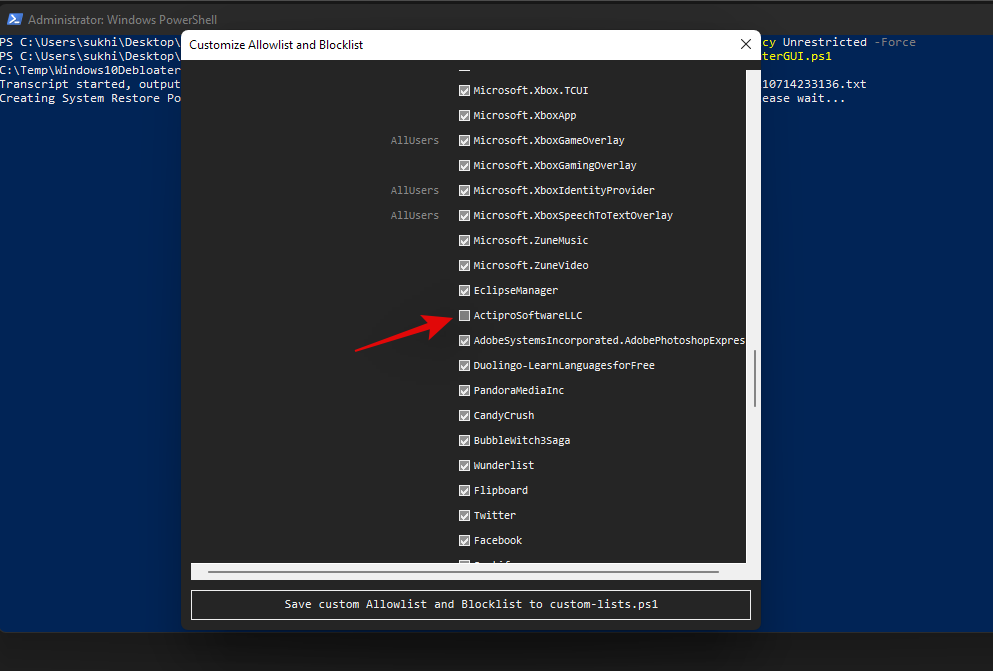
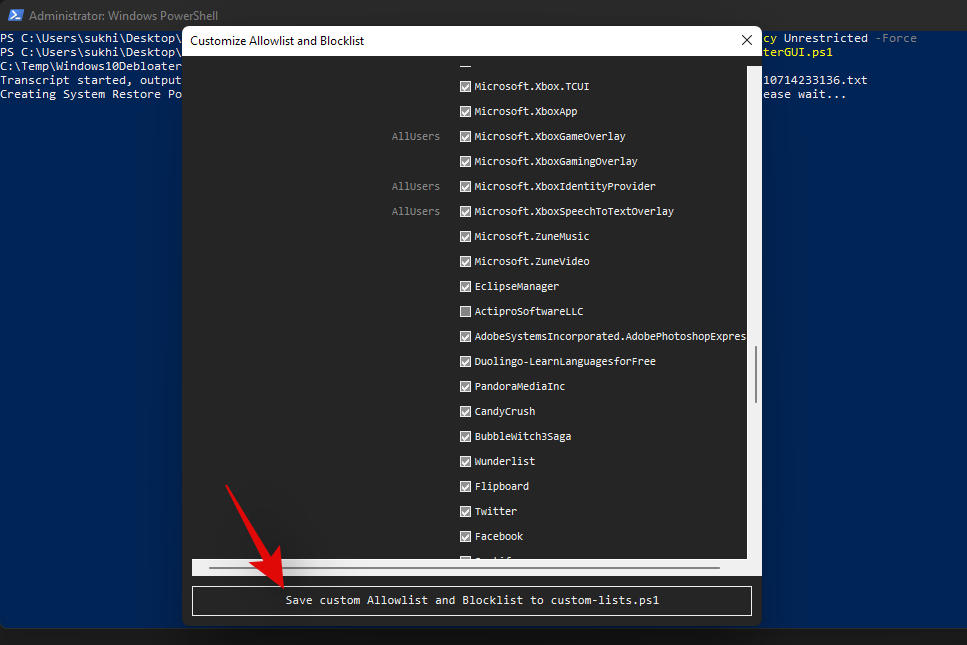
Once you have edited your list, simply click on ‘Save custom Whitelist and Blacklist to custom-lists.ps1’ at the top. You can now close this app selection window.
Now click on ‘Remove Bloatware with Customized Blacklist’. Keep an eye on the PowerShell window on the background once the command executes.
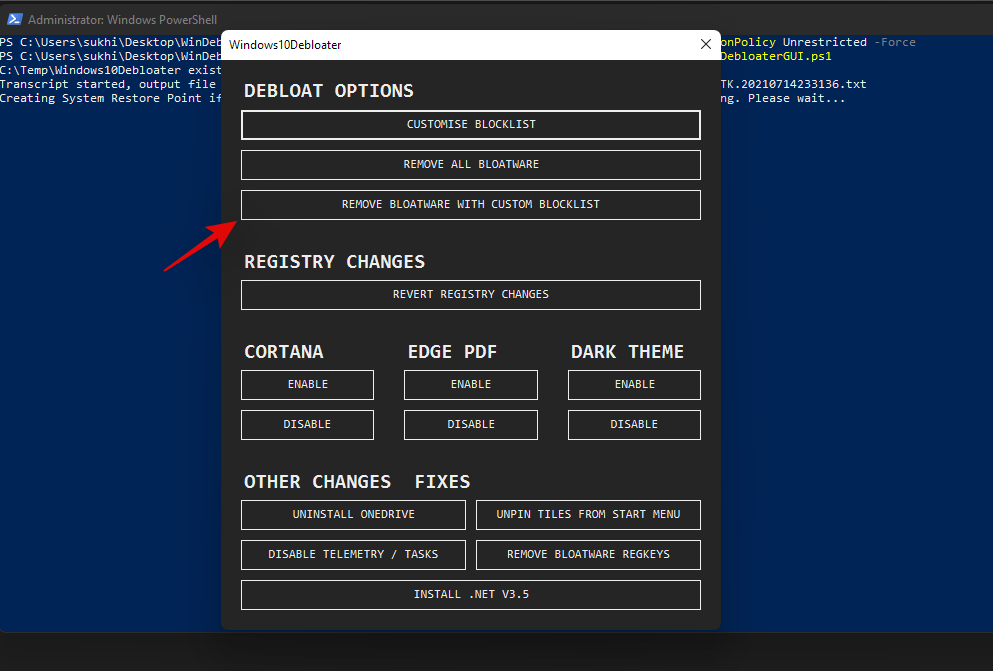
Once all programs have been removed, you will get a confirmation for the same in the PowerShell window in the background. Close the graphical interface by clicking on the ‘X’ in the top right corner.
Now go back to your PowerShell window and execute the following command.
Set-ExecutionPolicy Restricted -Force

This will revert changes to your execution policy and revert the changes we made earlier. Doing this is quite important to maintain proper security on your Windows system.
And that’s it! You will now have uninstalled system apps from your system via a third-party PowerShell script.
Can’t uninstall apps on Windows 11? How to fix
There could be a few reasons why you are unable to uninstall apps on your system. Here are a few workarounds that should help you uninstall persistent apps from your system easily.
Method #01: Close instance in task manager and try again
Chances are that the app has an instance or a process open in the background which is preventing it from being uninstalled. In such cases, you can try finding processes related to the app and kill them on your own. Once the processes have been killed, you can then try to uninstall the app again. Follow the guide below to find and kill the process.
Press Ctrl + Shift + Esc on your keyboard to open the ‘Task Manager’. Switch to the ‘Details’ tab by clicking on it.
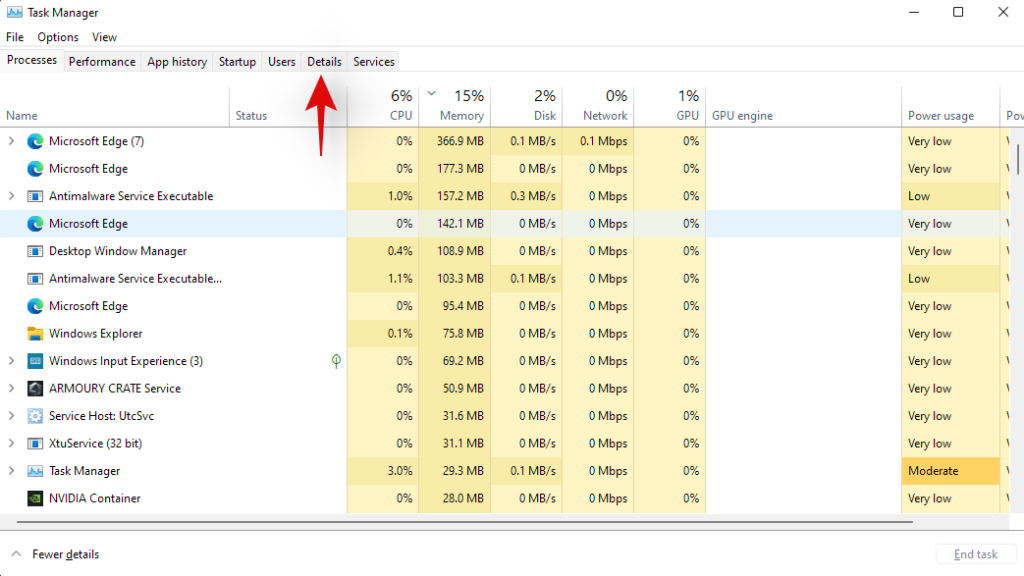
Now look for a process in the list for the concerned app. In our case, we are looking to uninstall ‘AsusOptimization’, hence we will look for a PowerToys process. Once found, click and select the process.
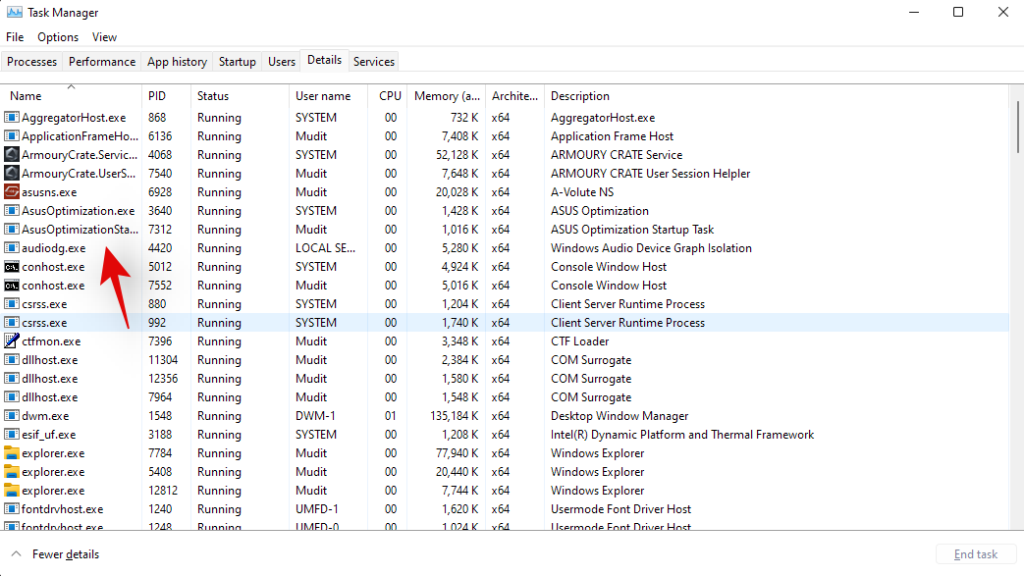
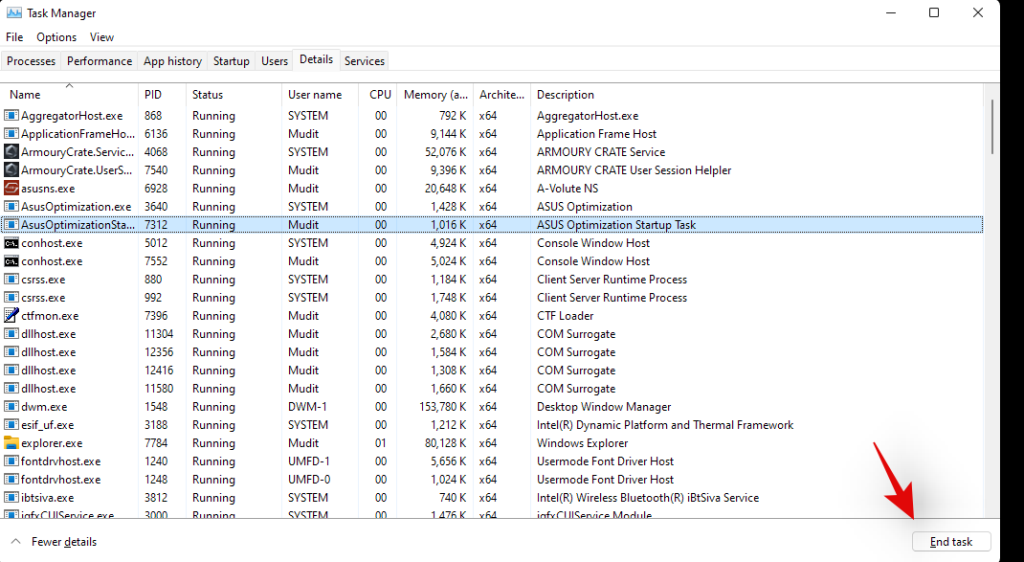
Hit delete on your keyboard or click on ‘End Task’.
Confirm your choice by selecting ‘End Process’.
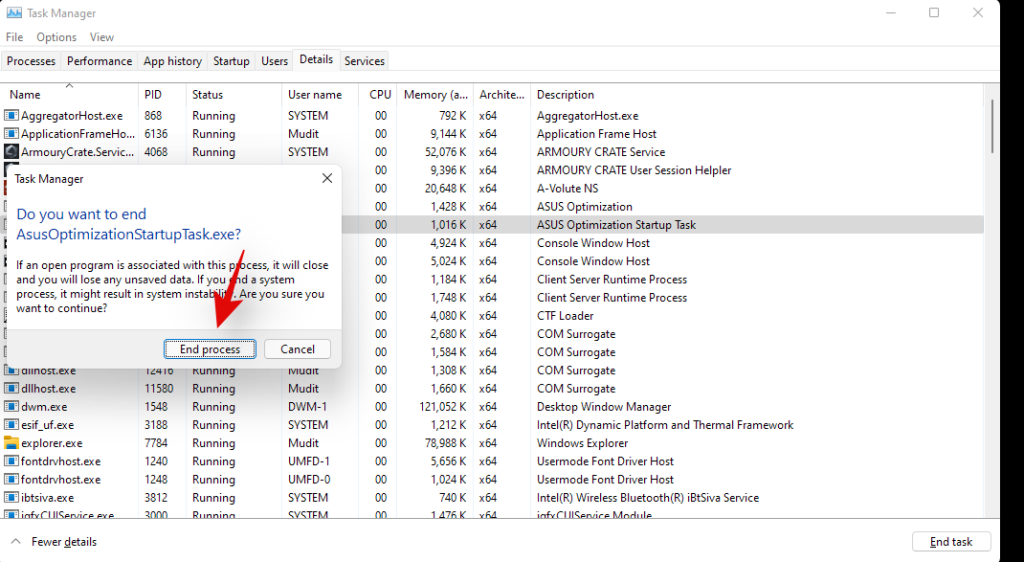
And that’s it! the process should now be killed and you can now try uninstalling the concerned app again.
Method #02: Uninstall in Safe mode
Another way to ensure that no third-party apps are launched or used in the background is to launch your system in safe mode and then try to uninstall your concerned app. You can use this comprehensive guide by us to enter safe mode on Windows 11.
Once in safe mode, follow the guide below to get the installer service back up and running on your system. Once the service is running in the background, you can use either of the methods above to uninstall the concerned app from your system.
Press Windows key + S key to open Windows Search and type in ‘cmd’. Click on ‘Run as administrator’ when the command prompt shows in your search results.
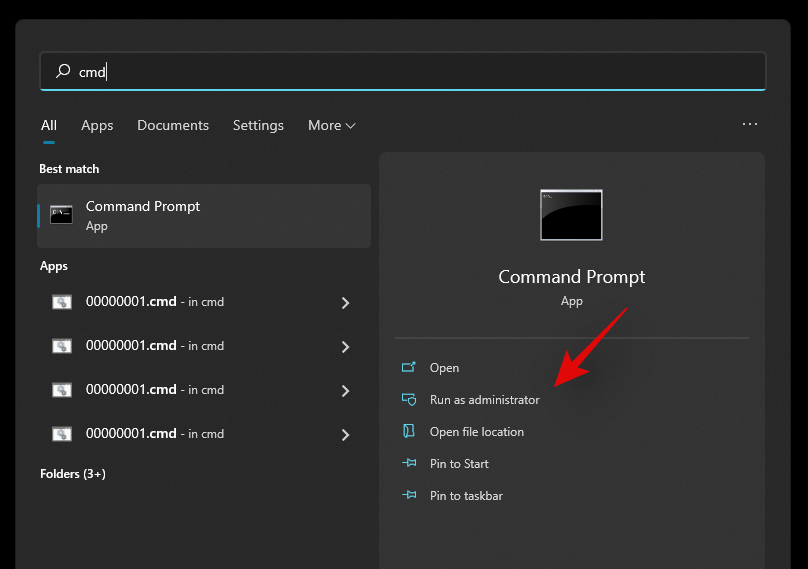
Enter the following commands in the command prompt one by one and hit Enter on your keyboard to execute each one of them.
REG ADD "HKLM\SYSTEM\CurrentControlSet\Control\SafeBoot\Minimal\MSIServer" /VE /T REG_SZ /F /D "Service"
REG ADD "HKLM\SYSTEM\CurrentControlSet\Control\SafeBoot\Network\MSIServer" /VE /T REG_SZ /F /D "Service"
net start msiserver

And that’s it! The installer service should now be running on your system and you should now be able to uninstall the concerned app using either one of the methods above.
Method #03: Run the Microsoft Uninstaller troubleshooter
You can also run a Microsoft Troubleshooter to try and fix uninstaller issues. Microsoft troubleshooters have come a long way since they were first introduced and can now fix most software and driver incompatibility issues without any user intervention.
Microsoft has also made it much easier for you to now launch any troubleshooter to try and solve your current issue. Use the guide below to launch an uninstaller troubleshooter on your Windows 11 system.
Required
Guide
Download the troubleshooter using the link above to your PC. Once downloaded, extract the .zip file to a convenient location. If you have trouble extracting the .zip file or it seems to be blocked, use the guide below to unblock it, else you can skip the guide and jump to the next guide.
Unblock the .zip file
Right-click on the .zip file and select ‘Properties’.
Check the box for ‘Unblock’ at the bottom of the Window.
Click on ‘Ok’.
Provide administrator permission to make the necessary change.
The file should now be unblocked on your system and you should now be able to extract it like any other .zip file on your system.
Run the troubleshooter
Navigate to the extracted files on your local storage. Cut the file named ‘MicrosoftProgram_Install_and_Uninstall.meta.diagcab’ and paste it on your desktop. Double click and run the file from your desktop. Click on ‘Advanced’ at the bottom once the troubleshooter is launched.
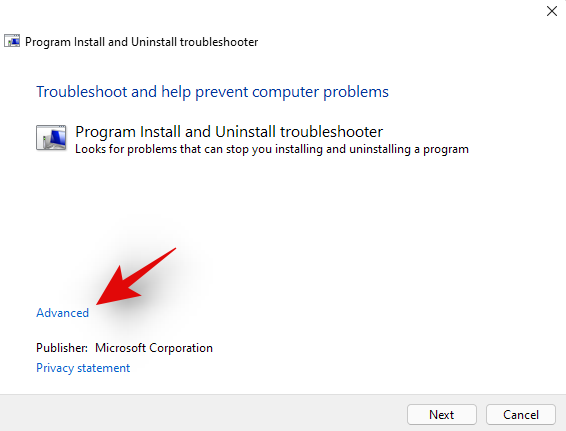
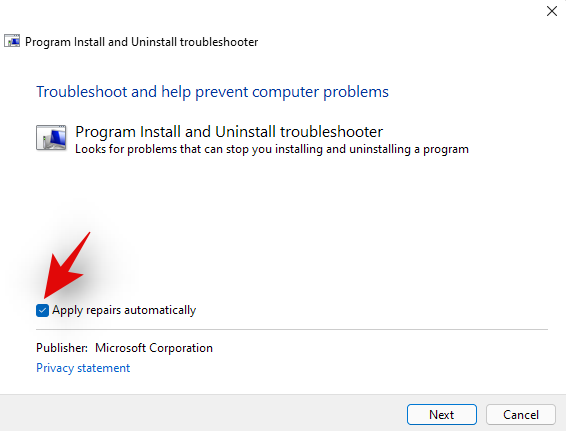
Check the box for ‘Apply repairs automatically’. Click on ‘Next’ once you are done.
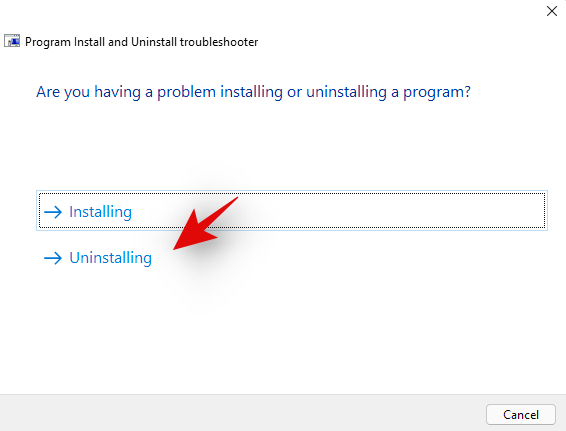
Select ‘Uninstallting’ on the next step.
Select the concerned program from the list provided on your screen. If your program does not appear in the list, click on ‘Not Listed’.
Now follow the on-screen instructions depending on your choice to complete the troubleshooting process.
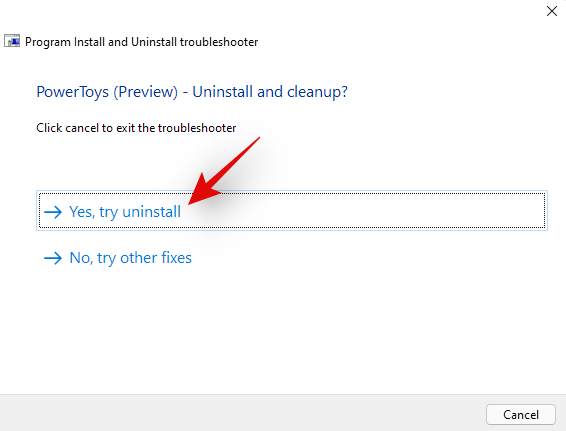
And that’s it! In most cases, the troubleshooter will detect your issue and solve it automatically. A report for the same will be presented to you at the end of the process with all the details.
Method #04: Use a restore point
If you are still having issues uninstalling the software from your system then it is time for some drastic steps as this could be malicious in nature. Let’s restore your PC to a restore point before the concerned app or program was installed on your system.
However, if you do not have a restore point then you can jump to one of the other methods listed below. Here’s how you can use a restore point to restore your PC to its previous state.
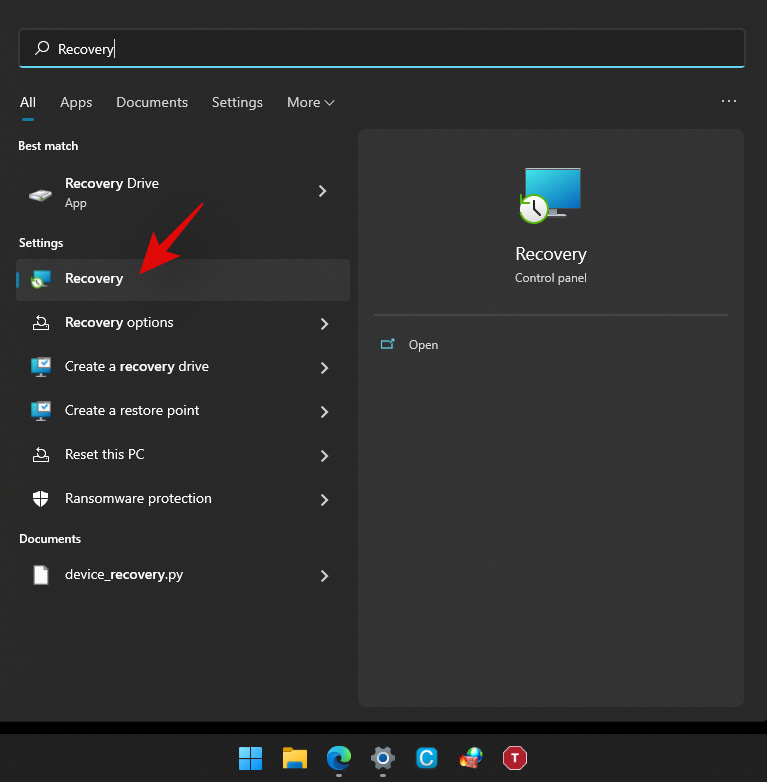
Press Windows + S on your keyboard and search for ‘Recovery’. Click and launch the app link once it shows up in your search results.
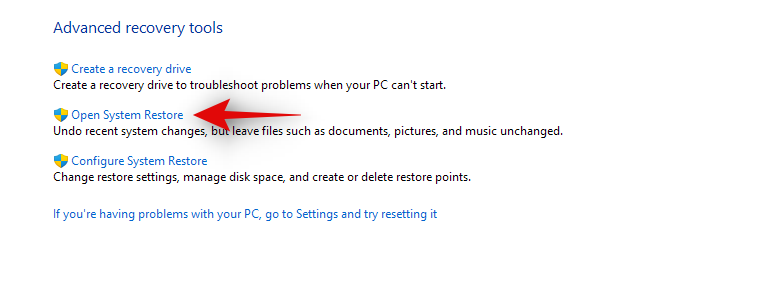
Click on ‘Open System Restore’.
You will now be suggested a recent system restore point if you have one. Select that if needed, or click on ‘Choose a different restore point’ if you wish to choose an older one.
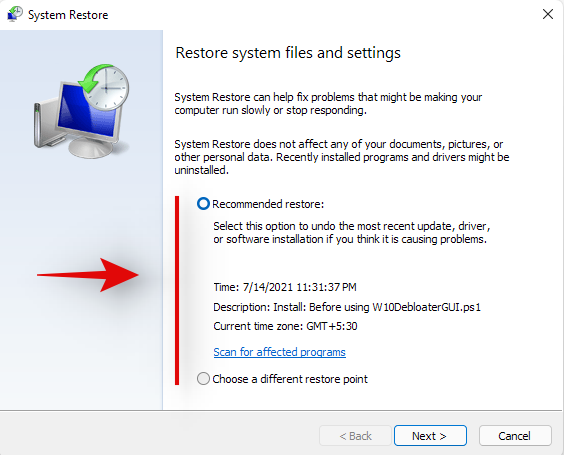
Select ‘Next’ or hit ‘Enter’ on your keyboard.
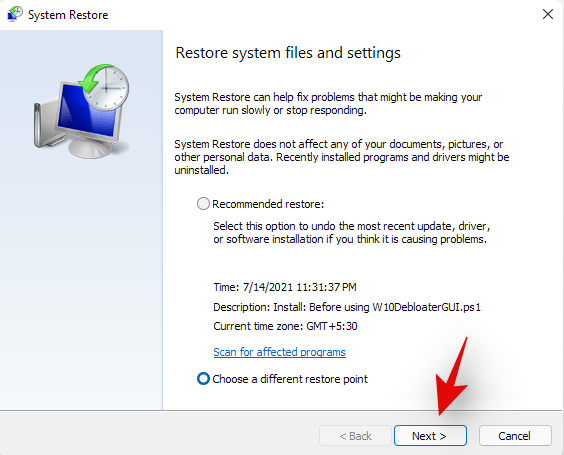
You can now select the desired Restore Point from the list at the top. You can check the box for ‘Show more restore points’ if you wish to look at more restore points.
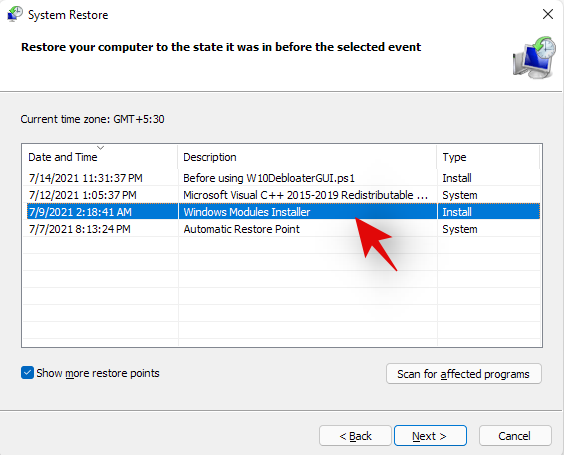
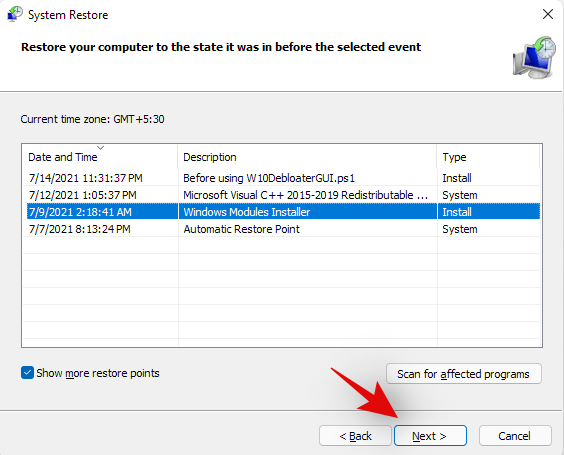
Once selected, click on ‘Next’.
Finally, click on ‘Finish’.
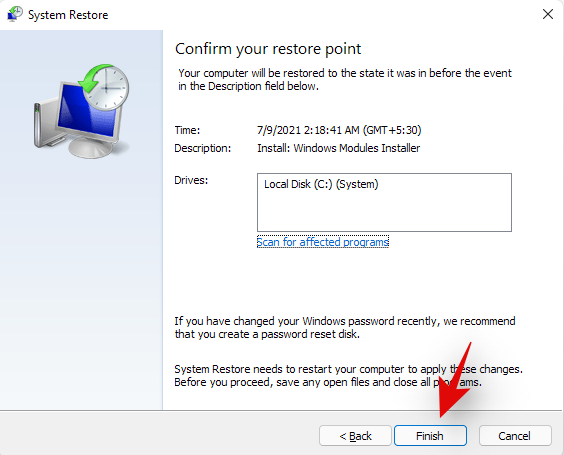
Windows 11 will now restore your system to the selected restore point and the concerned app should no longer be on your system once the process is completed.
Method #05: Contact Windows Support
If you are still unable to get the app uninstalled from your system then it might be time to contact Microsoft Support. Microsoft Support executives are trained to solve such issues with more expertise and can even remotely takeover your system if needed. It might be time to get in touch with the support team to solve your issue. Additionally, if you purchased a pre-built system, you can use your OEM support for some help as well. Use the link below to get in touch with Microsoft Support.
Uninstall programs on Windows 11: FAQs
Can you uninstall pre-installed apps?
Well, officially, you can not and it is not recommended by Microsoft. But still, if you wish to remove preinstalled apps, you can easily do so depending on the type of the app. If you wish to remove a system app then the process is a bit complicated. Else, if you wish to remove third-party pre-installed apps then you can simply do so by uninstalling them like any other app from your Windows 11 Pc using the guide below.
Can you uninstall system apps?
Yes, you can uninstall system apps but not officially. Officially Windows 11 or any Windows for that matter, doesn’t allow you to remove system apps from the OS. However, there are many workarounds to circumvent this restriction and uninstall preinstalled system apps from your system.
This includes using command prompt/PowerShell or a third-party software. Using these methods you should be able to easily uninstall system apps from your system. Follow our guides below for each of the methods depending on your current needs and requirements.
Can you uninstall apps downloaded from the Microsoft Store?
Yes, apps downloaded from the Microsoft Store can be uninstalled easily using either of the methods listed below. This includes Android apps that you may have downloaded on your system but did not find appealing enough. We recommend uninstalling Windows Store apps either via Settings or Start.
Chances are that the Store app will now show up in the Control Panel and if uninstalled via CMD or PowerShell, you could end up with leftover files including empty Start menu folders. Hence, use Powershell or CMD for Windows Store apps only if you are facing an issue uninstalling them via the Settings or the Start menu.
What happens when you uninstall a program?
Uninstallation is the process of removing a program or an app from your system. While apps are installed singularly with all dependencies available to them in a sandbox, programs operate differently. Programs usually have scheduled tasks, customized registry values to execute them, and dependencies for various Windows features and extensions that they need for their own installation process to create and place every file and task correctly.
Hence the removal process for all these things created by a program when it is first installed on your system is called uninstallation. All scheduled tasks, registered services, registry keys, executables, temporary files, log files, and more are removed once you uninstall a program from your system. In some cases, you will be leftover with settings and save files so that you don’t have to set up the program entirely when installing it in the future.
These files can be cleared by clearing your Windows Cache and temporary files in most cases. However, if you still suspect leftover files from a program on your system, then we recommend checking the following places for any leftover files. If found, you can simply delete them like any other file on your system.
How to remove data of uninstalled programs
If you still see the remaining files and folders or context menu options for a removed program or app, then you can try the fixes below to solve your issue.
Method #01: Clear cache and temporary files from Windows
You should first try clearing cache and temporary files from your Windows 11 system. In most cases, this will help the overall File Explorer UI to refresh itself which should automatically remove leftover files and context menu items for removed programs from your system.
You can use this comprehensive guide by us to easily clear your Windows 11 cache and storage. You can also use the same guide to free up storage space on your system as well by deleting other large files and installations that show up in the list.
Method #02: Check for leftover files manually
You can also check and delete all leftover files manually for the removed program or app. You should start by using Windows Search to look for any files or folders associated with the uninstalled program. You can then delete these manually from your local storage.
Once you have deleted all the files and folders that show up in the search, you can proceed to manually check the locations listed below. If they contain any leftover files or folders from the removed program, then you can simply select them and delete them from your system.
Method #03: Run a third-party uninstaller/cleaner
If you are still left with the remaining files and context menus for the program then it is time to use a third-party uninstaller or cleaner. These programs are specifically designed to identify and remove leftover files from previously uninstalled programs on your system. We recommend you give Revo uninstaller a try as even the free model for the app will help you identify the location of leftover files which can then be deleted by you manually. You can also use something like CCleaner that is designed to remove leftover files and free up storage and processing space on your system.
Method #04: Try to remove the app via PowerShell
If nothing works, then chances are that the concerned app was installed on your system using elevated privileges which prevents some files and folders from being removed from your system.
In such cases, we recommend you try to remove the app via PowerShell. You can use our guide above to remove system apps from Windows 11 via PowerShell. You will first need to source the full package name for your app or program, which can then be used to force uninstall it from your system.
Can you uninstall Windows Updates?
Yes you can easily uninstall Windows Update from your system. New updates can often introduce compatibility issues on older hardware and having the option to uninstall updates can always help. You can use the guide below to uninstall recently installed updates from your system.
How to uninstall Windows Updates
Follow the guide below to uninstall recently installed Windows Updates from your Windows 11 system.
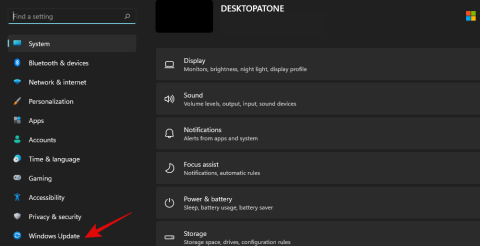
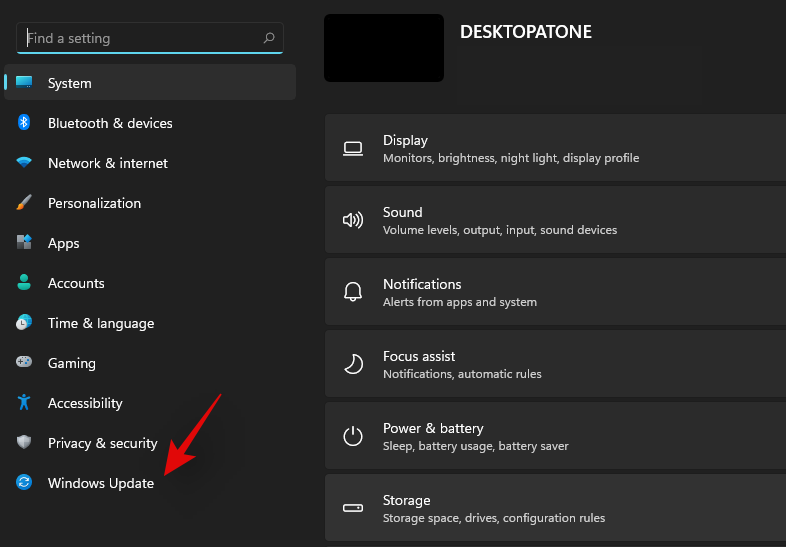
Press Windows + i on your keyboard to open the Settings app. Click on ‘Windows Update’ on your left.
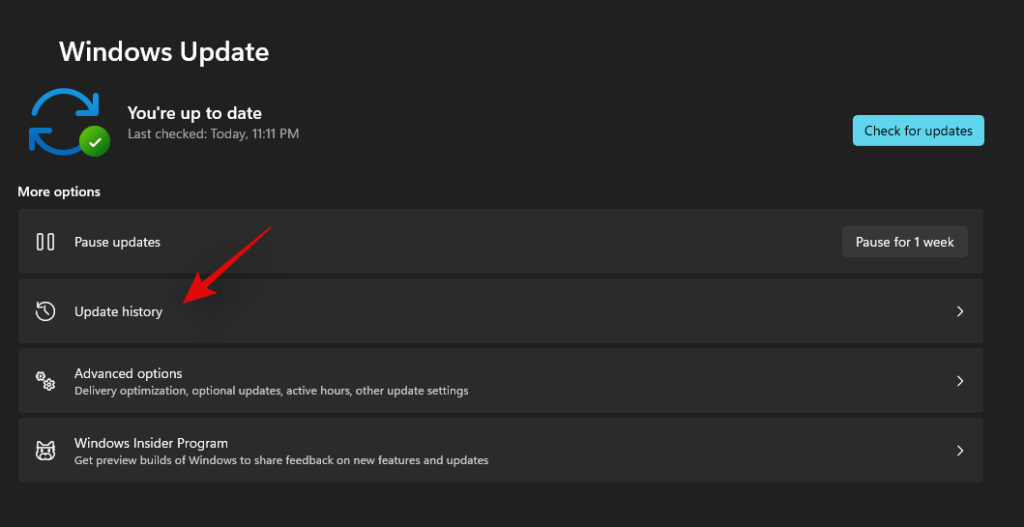
Now click on ‘Update history’.
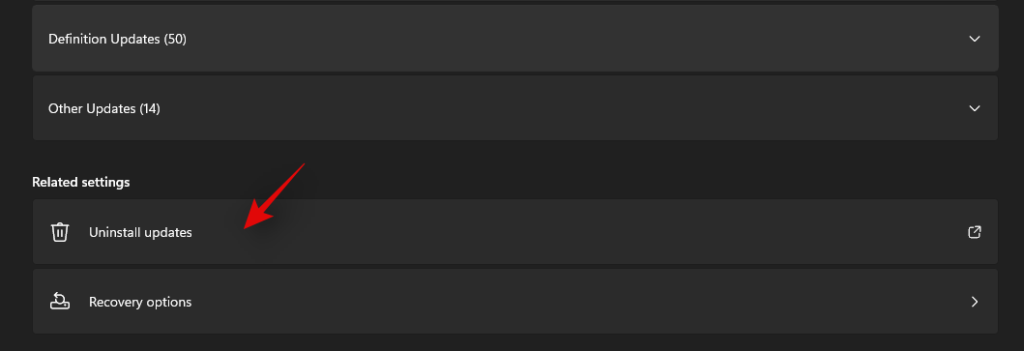
Scroll to the bottom on your right and click on ‘Uninstall Updates’.
You will now get a list of all the recent updates installed on your system. Click and select the update you wish to uninstall.
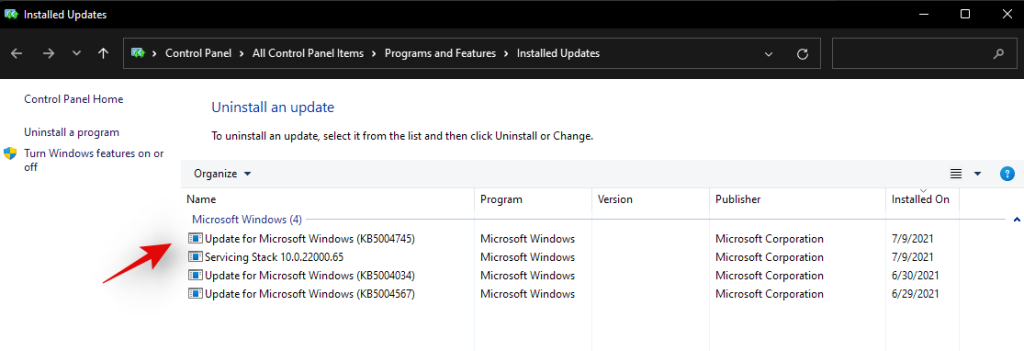
Click on ‘Uninstall’ at the top now.
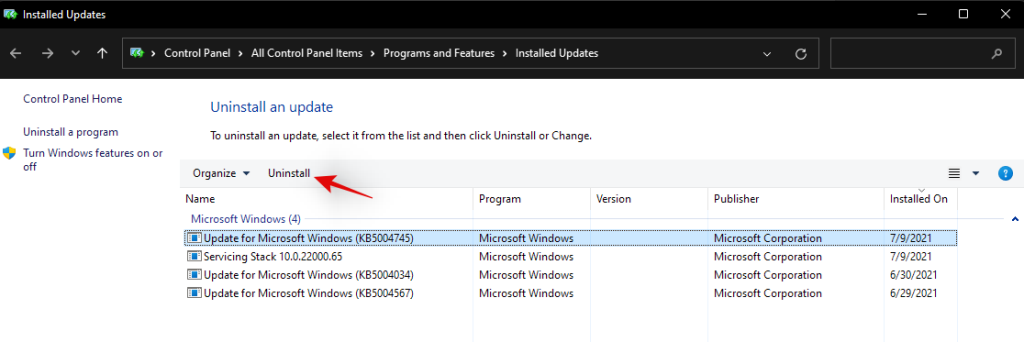
Follow the on-screen instructions to complete the process.
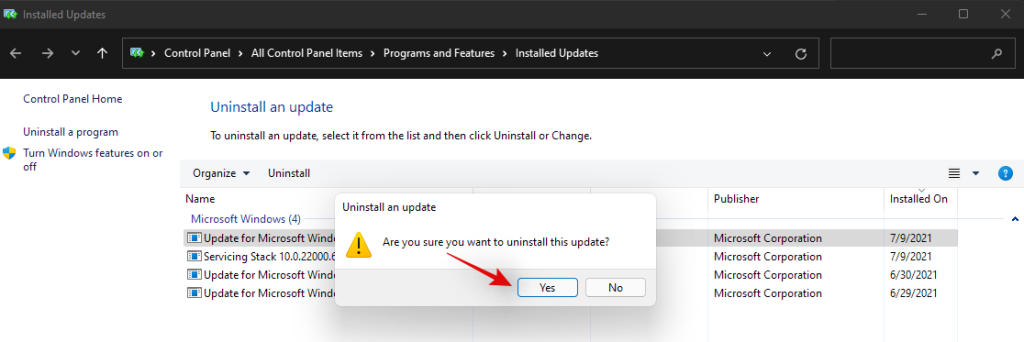
And that’s it! Your selected Windows update should now be uninstalled from your system.
We hope this guide helped you uninstall the concerned apps or programs from your system. If you still face issues, feel free to reach out to us using the comments section below.
Oplev hvordan du effektivt fjerner McAfee fra din Windows 11 pc. Få indsigt i alternative antivirusløsninger og metoder til afinstallation af McAfee.
Lær hvordan du fjerner Bing fra Windows 11 med nemme metoder og gør din søgeoplevelse mere effektiv.
Den seneste iteration af Windows er alt, hvad teknologientusiaster ville have det til. Fra bedre app-kompatibilitet til en smuk brugergrænseflade, der er meget at savle over. Men der en…
Computere er blevet mere integreret i vores liv end nogensinde, og derfor leder producenterne efter nye måder at spare strøm på dine mobile enheder. Men den gennemprøvede manual Sleep w...
Windows-opdateringer har altid været en berygtet gene for mange brugere siden Windows XP's dage. Heldigvis er leveringen af Windows-opdateringer forbedret drastisk i de sidste par år, og...
Windows 11 er blevet frigivet til offentligheden, og denne nye opdatering til det langvarige operativsystem ser ud til at få nogle gode anmeldelser. Microsoft har øget privatlivets fred, sikkerhed tilføjet en ny brugergrænseflade og muligheden for...
På trods af Microsofts bedste forsøg på at bejle til dig med at bruge Teams, kan du, hvis du stadig ikke kan lide det, fjerne det fra proceslinjen. Nå, du kan nemt gøre det og få mere plads...
Windows Insider builds og beta builds er en fantastisk måde at få en forsmag på den kommende opdatering. På grund af den kommende Windows 11-udgivelse har mange brugere over hele verden sluttet sig til insider-programmet for at ...
Notifikationer er blevet en integreret del af vores liv. De holder os opdateret, hjælper os med at holde vores tidsplan og hjælper os frem for alt med at få de seneste og bedste nyheder. Men virksomheder ser ud til at...
Windows 11 er netop blevet frigivet, og hvis du har prøvet at installere det nyeste operativsystem, har du måske indset behovet for sikker opstart og TPM. Disse indstillinger kan nemt findes og aktiveres i dig...
Opdag, hvordan du aktiverer Auto HDR via Game Bar i Windows 11 for at få betagende spilgrafik. Følg vores nemme trinvise vejledning for at forbedre din spiloplevelse med levende farver og dybere kontraster uden besvær.
Har du problemer med makrotaster, der ikke virker på Windows 11? Opdag dokumenterede løsninger til Logitech-, Razer- og flere tastaturer. Trinvis fejlfinding, der får dine makroer til at køre problemfrit på ingen tid. Opdateret med de seneste 2026-patches.
Kæmper du med ERR_QUIC_PROTOCOL_ERROR i Microsoft Edge? Opdag gennemprøvede, trinvise løsninger til at løse dette frustrerende problem og få problemfri browsing tilbage. Opdateret med de nyeste tips til optimal ydeevne.
Kæmper du med tastaturfejl på Windows 11? Opdag, hvordan du nemt downloader de nyeste Windows 11-tastaturdrivere til alle modeller. Trinvise vejledninger, tips og fejlfinding, så du kan skrive problemfrit igen.
Kæmper du med Windows 11 RAID-konfigurationsfejlen? Opdag gennemprøvede trinvise løsninger, der hurtigt løser dette frustrerende problem og får din pc til at køre problemfrit igen. Ingen teknisk ekspertise kræves!
Opdag, hvordan du nemt aktiverer og bruger Windows 11 Live Captions til undertekster i realtid i videoer, opkald og meget mere. Øg tilgængeligheden, og hold dig engageret med vores trinvise vejledning.
Har du problemer med Bluetooth-synkronisering i Windows 11? Opdag trinvise løsninger, der kan gendanne problemfri forbindelse for dine enheder. Få din Bluetooth tilbage på sporet i dag!
Kæmper du med den frygtede KMODE_EXCEPTION_NOT_HANDLED-fejl i Windows 11? Denne trinvise guide leverer dokumenterede løsninger til at løse Blue Screen of Death (BSOD) hurtigt og sikkert og gendanne din pc.
Har du problemer med UEFI- og GPT-kravene til Windows 11? Dyk ned i denne omfattende fejlfindingsguide for at løse kompatibilitetsproblemer, konvertere diske og opgradere problemfrit. Eksperttips til en frustrationsfri installation.
Opdag, hvordan du konfigurerer privatlivsindstillingerne i Windows 11 i 2026 for maksimal beskyttelse. Trin-for-trin-guide til at kontrollere datadeling, apptilladelser og mere for at holde dine oplysninger sikre og private.

