Виндовс ажурирања су одувек била озлоглашена сметња за многе кориснике још од времена Виндовс КСП-а. Срећом, испорука ажурирања за Виндовс драстично се побољшала у последњих неколико година и врло мало ажурирања функција данас изазива велике проблеме .
Можете да конфигуришете Виндовс да аутоматски преузима и ажурира у позадини, па чак и да се поново покреће током ваших неактивних сати. Све је ово сјајно, али шта ако је инсталирано ажурирање које вам није било потребно? Или шта ако добијете ажурирање које деградира перформансе ваше машине? Па, у овом случају, можете да деинсталирате ажурирања за Виндовс у оперативном систему Виндовс 11. Али ево неколико ствари које треба да имате на уму пре него што деинсталирате ажурирања са Виндовс 11 рачунара.
Повезано: Како онемогућити ажурирања на Виндовс 11
Садржај
Зашто деинсталирати ажурирања за Виндовс?
Може постојати више разлога зашто желите да деинсталирате ажурирања за Виндовс, ево неких од најчешћих. Ако решавате грешке након недавног ажурирања оперативног система Виндовс, можете и да прођете кроз ову листу.
У случају да се суочите са таквим проблемима на свом систему, можете покушати да деинсталирате најновију исправку за Виндовс да бисте покушали да решите проблем.
- Деградиране укупне перформансе система
- Неисправна ажурирања драјвера
- Покварена функционалност Виндовс функција
- Погрешно управљани ресурси у позадини
- Висока употреба ЦПУ-а или диска
- Нежељено ажурирање драјвера које сте покушавали да избегнете
- Лоше понашање Виндовс безбедност или УАЦ
- Нетачна подешавања региона која се не могу променити
- Недостају подешавања или опције у оквиру Виндовс 11
и још. Може постојати мноштво проблема са којима се можете суочити када инсталирате нову исправку за Виндовс 11, посебно ако сте претплаћени на бета или инсајдерски канал. У таквим случајевима, можете покушати да деинсталирате дотичну исправку користећи водич у овом посту.
Повезано: Како отказати ажурирање Виндовс Инсајдера на чекању
Да ли је безбедно деинсталирати ажурирања за Виндовс?
Да, све док не уклањате принудно ажурирања за Виндовс ручно или користите застарели услужни програм, требало би да будете сигурни да деинсталирате ажурирања за Виндовс са свог система. Међутим, треба да имате на уму да Мицрософт користи Виндовс ажурирања да испоручи безбедносне закрпе, хитне исправке и још много тога како би заштитио ваш систем од најновијих претњи и безбедносних пропуста.
Уклањање ажурирања за Виндовс ће такође деинсталирати такве закрпе које ће заузврат учинити ваш систем рањивим на претње на мрежи. Ово је посебно случај ако желите да деинсталирате недавна безбедносна ажурирања.
Стога, иако можете безбедно да деинсталирате било које ажурирање, препоручује се да вратите промене чим се грешка поправи. Ако је ваша грешка или грешка упорна након поновног инсталирања ажурирања, можете сачекати док Мицрософт не објави накнадну исправку и исправку.
Повезано: Како уклонити Бинг из Виндовса 11
Како пронаћи ажурирања која желите да уклоните
Ажурирања можемо уклонити на различите начине, али да бисте пронашли које ажурирање желите да уклоните, морате га идентификовати на свом рачунару. Сваком Мицрософт ажурирању се додељује КБ број који помаже у одређивању и идентификацији ажурирања на потрошачким рачунарима, као и на Мицрософт-овим серверима. Можемо да искористимо овај број у нашу предност и да уклонимо релевантно ажурирање са вашег система користећи један од водича у наставку. Ево како можете да идентификујете недавна ажурирања за Виндовс инсталирана на вашем рачунару.
Метод #01: Коришћење подешавања
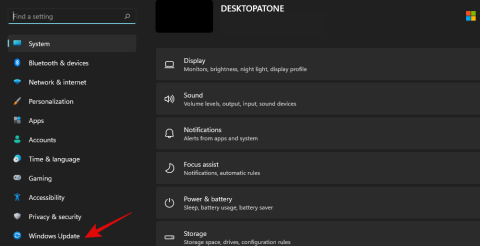
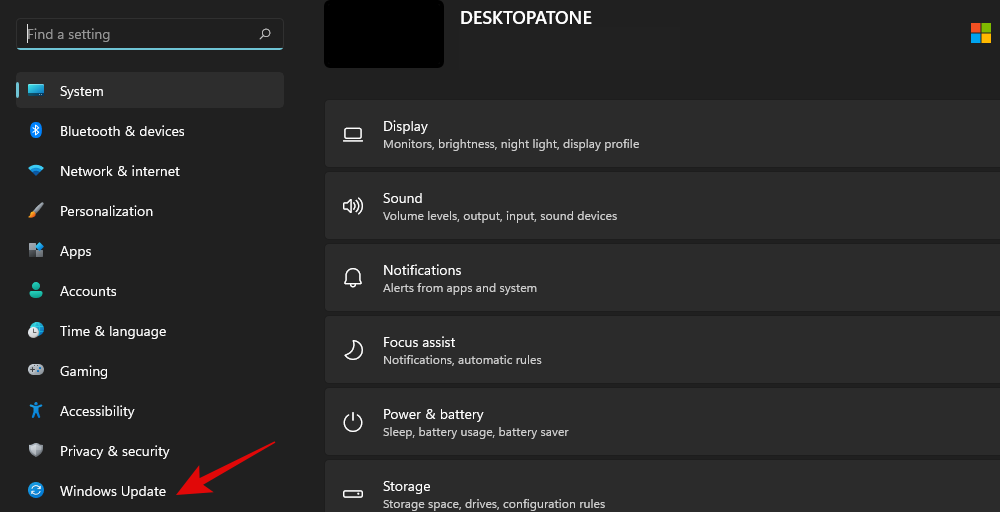
Притисните Windows + iна тастатури и изаберите „Ажурирање за Виндовс“ са леве стране.
Кликните на „Ажурирај историју“ сада.
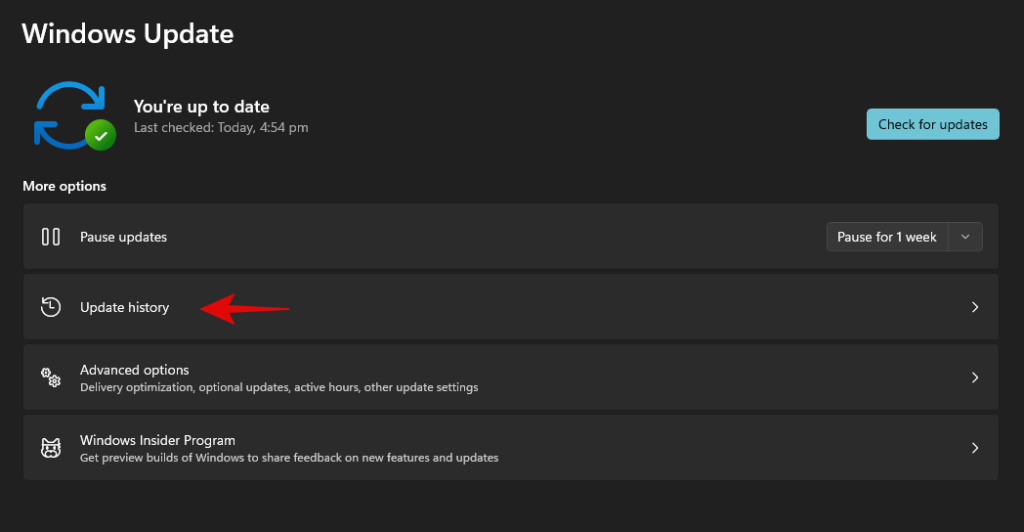
Сада ћете добити листу недавно инсталираних ажурирања за Виндовс на вашем систему.
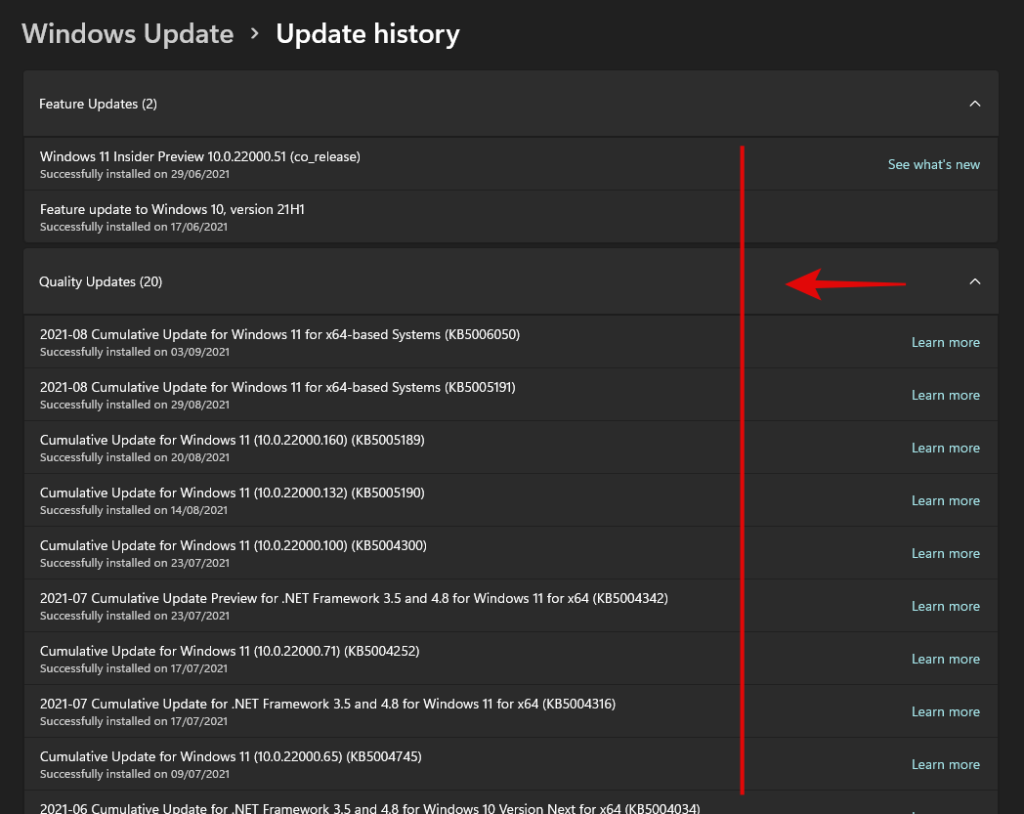
Једноставно забележите КБ број ажурирања које желите да уклоните са свог рачунара.
Метод #02: Коришћење ЦМД-а
Притисните Windows + Sна тастатури и потражите ЦМД. Кликните на „Покрени као администратор“ када се апликација појави у резултатима претраге.
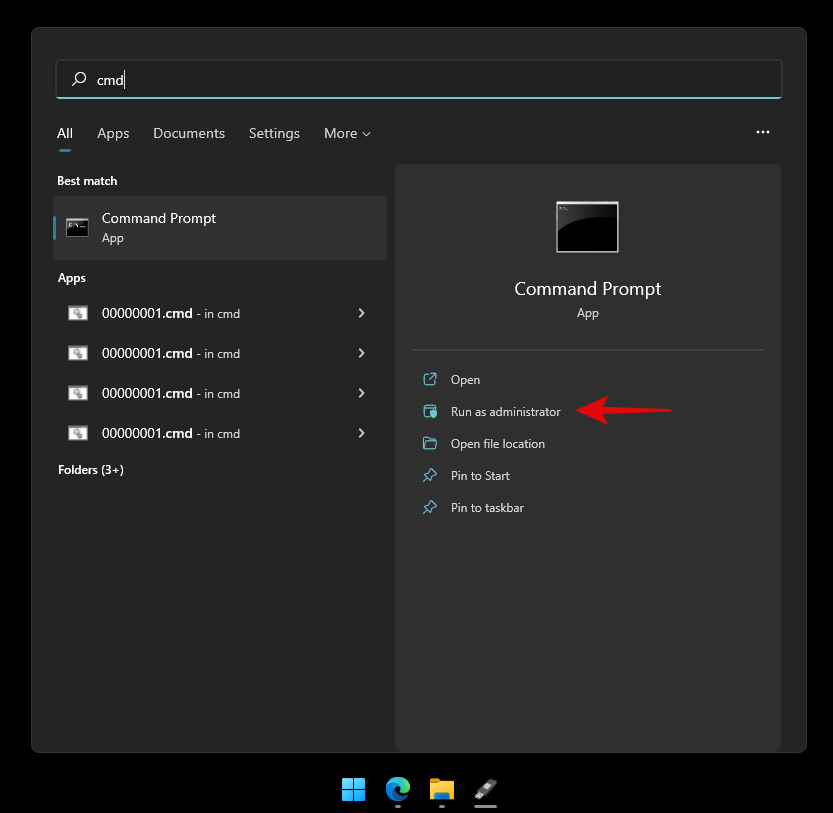
Унесите следећу команду и притисните Ентер на тастатури.
wmic qfe list brief /format:table
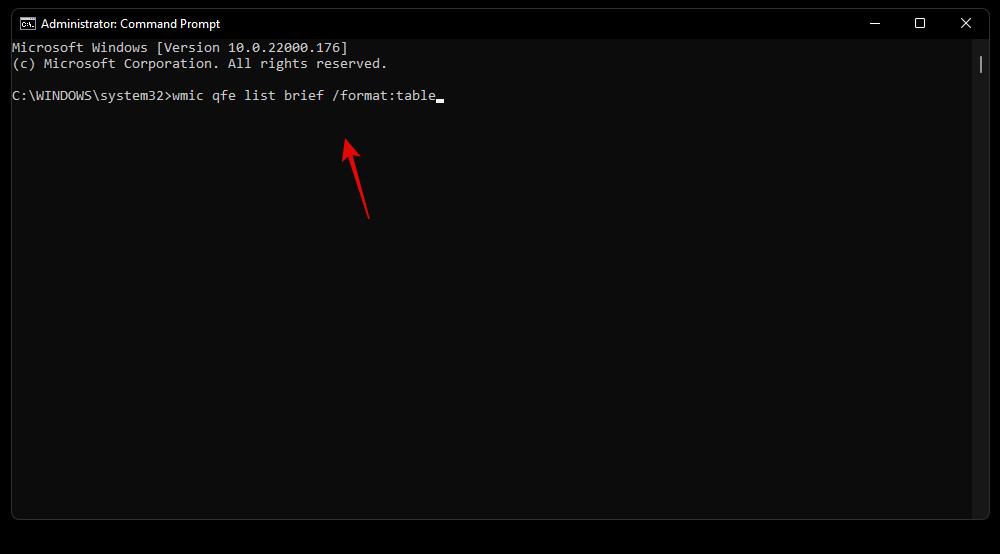
Сада ћете добити листу свих недавних Виндовс ажурирања инсталираних на вашем рачунару. Кликните и проширите дотичну категорију са листе испод.
- Ажурирања квалитета: Исправке функција за Виндовс 11 које уводе велике промене у ОС.
- Ажурирања драјвера: Генеричка/ОЕМ ажурирања драјвера за ваше периферне уређаје и компоненте се испоручују путем ажурирања за Виндовс.
- Ажурирања дефиниција: Исправке безбедносних дефиниција које помажу Мицрософт Дефендер-у да идентификује претње и стави их у карантин на вашем систему.
- Остала ажурирања: Ажурирања за Мицрософт производе, функције и друге ОЕМ функције специфичне за ваш уређај. Виндовс функције и пакети искуства ће такође бити ажурирани у овој категорији.
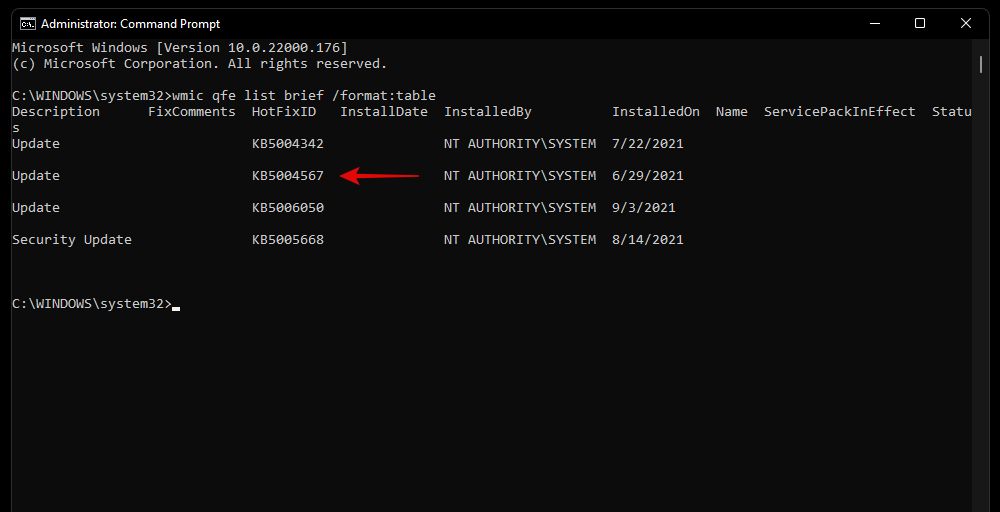
Идентификујте ажурирање које желите да уклоните и забележите његов „ХотФикИД“. Користићемо овај ИД за уклањање дотичног ажурирања помоћу водича у наставку.
Како уклонити ажурирања за Виндовс са рачунара
Можете уклонити ажурирања за Виндовс са рачунара користећи било који од метода у наставку. Ако немате приступ Виндовс-у или не можете да покренете радну површину, препоручујемо да користите Виндовс РЕ методу или ЦМД методу. Ако можете да приступите радној површини, можете да користите апликацију Подешавања да лако уклоните ажурирања са свог система. Користите доленаведене водиче да бисте започели у зависности од ваших преференција.
Метод #01: Коришћење подешавања
Притисните Windows + iна тастатури и кликните на „Ажурирање за Виндовс“ на левој бочној траци.

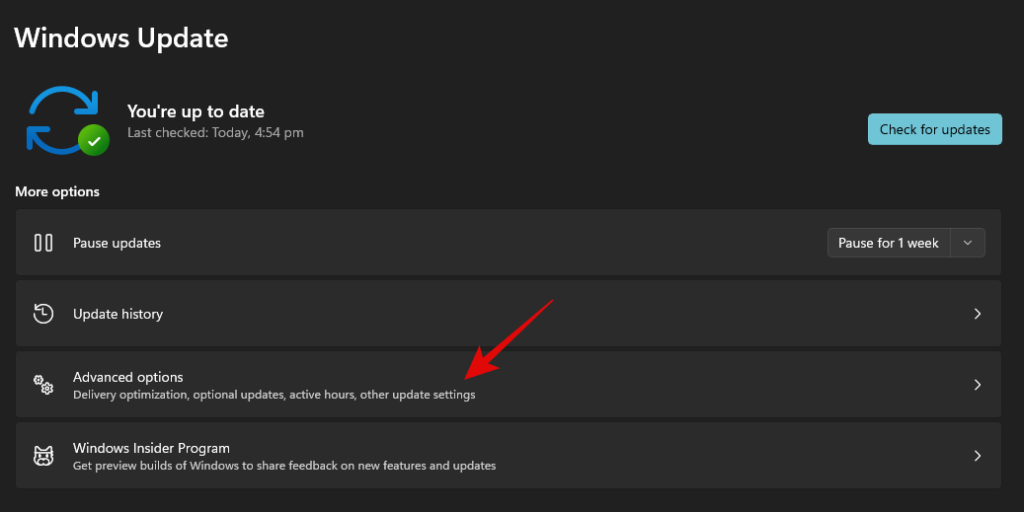
Кликните на „Ажурирај историју“.

Померите се до дна и кликните на „Деинсталирај ажурирања“.
Сада ћете бити преусмерени на контролну таблу где ћете пронаћи листу недавних ажурирања која се могу уклонити са вашег система.

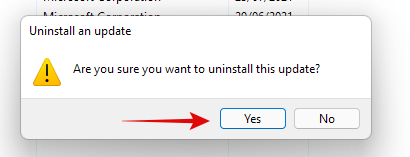
Изаберите ажурирање које желите да уклоните и кликните на „Деинсталирај“ на врху.

Пратите упутства на екрану да бисте деинсталирали дотичну исправку са свог рачунара.
Сада можете поново покренути рачунар и сви проблеми са којима сте се суочили због ажурирања сада би требало да буду поправљени.
Метод #02: Коришћење алатке за решавање проблема са ажурирањем Виндовс-а
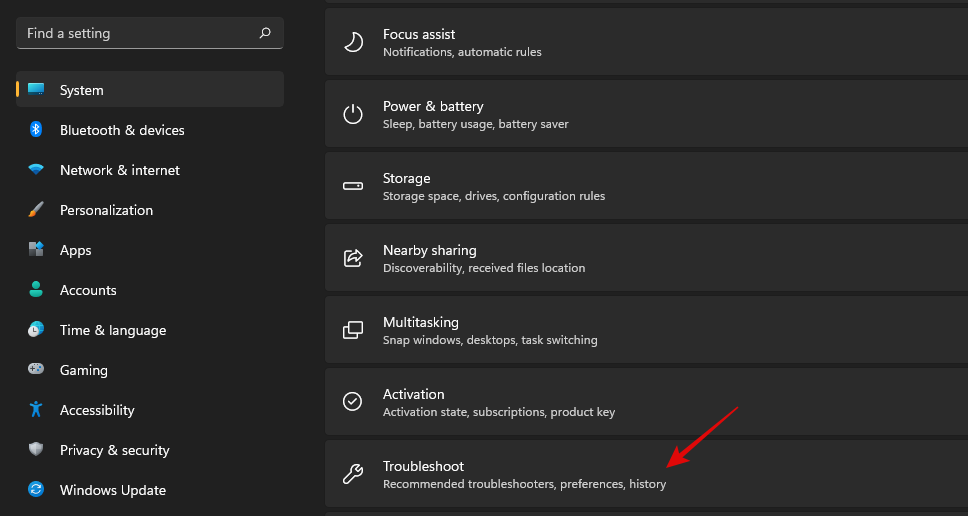
Притисните Windows + iна тастатури и кликните на „Решавање проблема“.
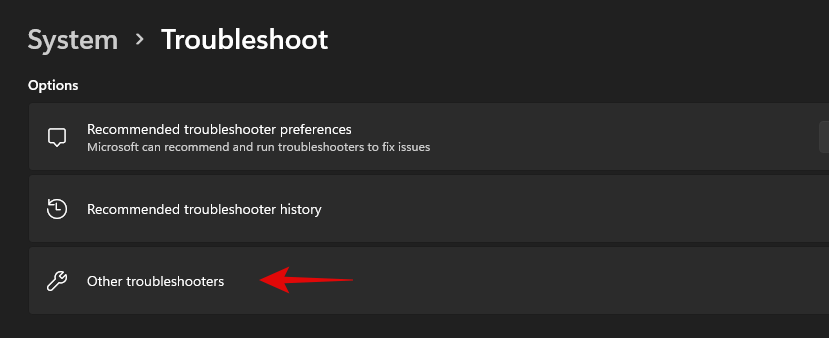
Кликните на „Друге алатке за решавање проблема“.
Кликните на „Покрени“ поред Виндовс Упдате.
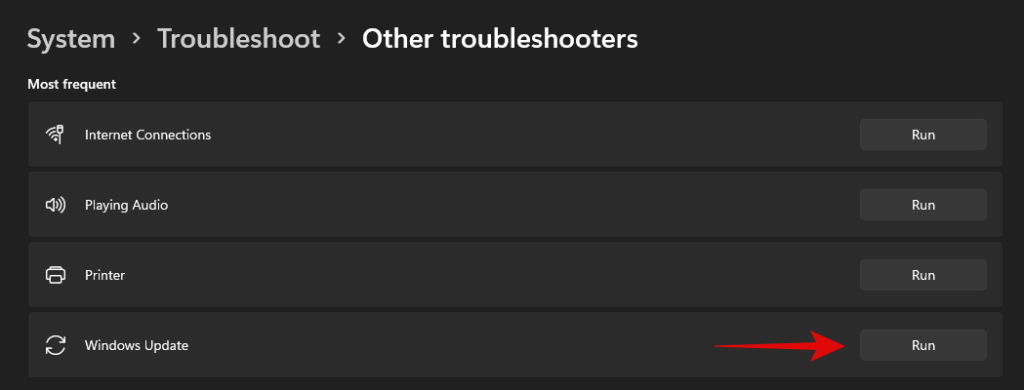
Алатка за решавање проблема у оперативном систему Виндовс ће сада тражити проблеме са исправкама за Виндовс и изазване њима на вашем рачунару. Ако их се пронађе, алатка за решавање проблема ће аутоматски решити проблем. Ако се открије да је кривац недавно ажурирање, алат за решавање проблема ће вам дати опцију да изаберете и деинсталирате неопходну Виндовс Упдате. Пратите следећа упутства на екрану да бисте потпуно уклонили ажурирање.
Када завршите, кликните на 'Затвори'.
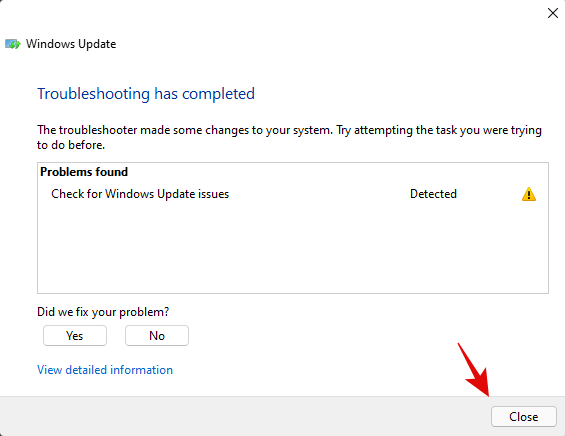
Поново покрените рачунар за добру меру и проблем би сада требало да буде решен у овом тренутку. Ако не, можете користити ПоверСхелл метод у наставку да ручно деинсталирате жељено ажурирање за Виндовс са вашег система.
Метод #03: Коришћење ПоверСхелл-а или ЦМД-а
Притисните Windows + Sна тастатури и потражите ПоверСхелл. Кликните на „Покрени као администратор“ када се апликација појави у резултатима претраге.
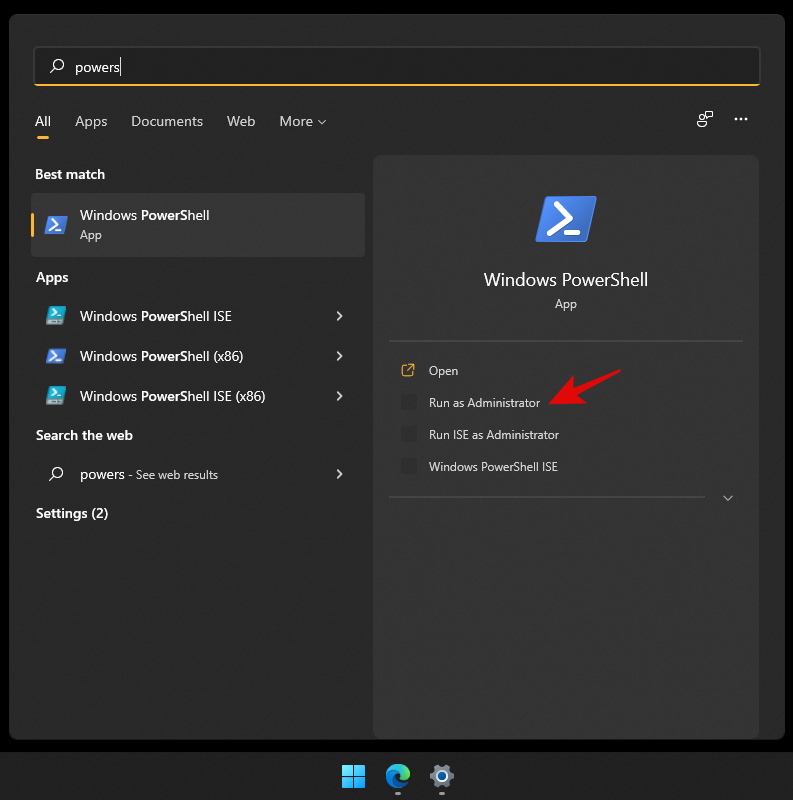
Type in the following command and press Enter on your keyboard to execute it.
wmic qfe list brief /format:table

You will now get a list of all the recently installed Windows Updates on your system in a table format. Note down the KB number for the selected Windows Update.
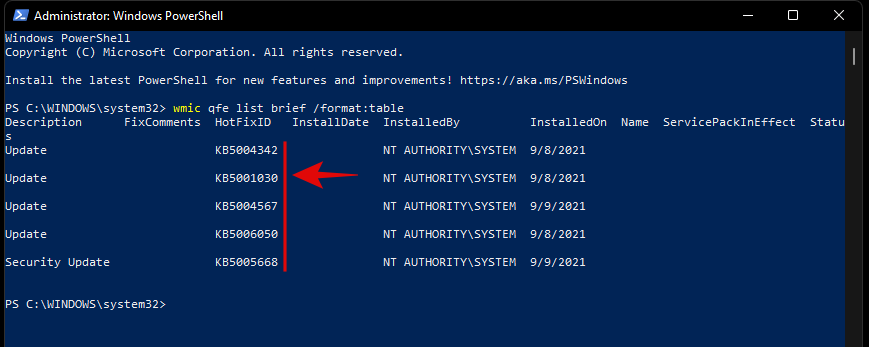
Note: You only need the number and not the letters before it.
Once done, type in the command below and execute it. Replace ‘NUMBER’ with the KB number you noted down earlier.
wusa /uninstall /kb:NUMBER
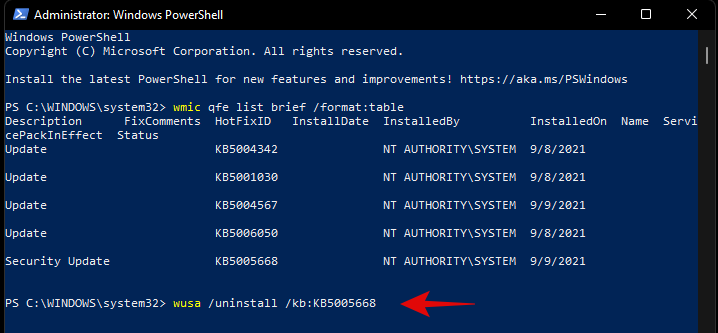
Once prompted, confirm your choice.
If prompted for a restart, we recommend you restart your system at the earliest while saving your work in the background.
If however, you do not wish to receive confirmations before uninstallation and a restart, then you can use the command below.
wusa /uninstall /kb:NUMBER /quiet
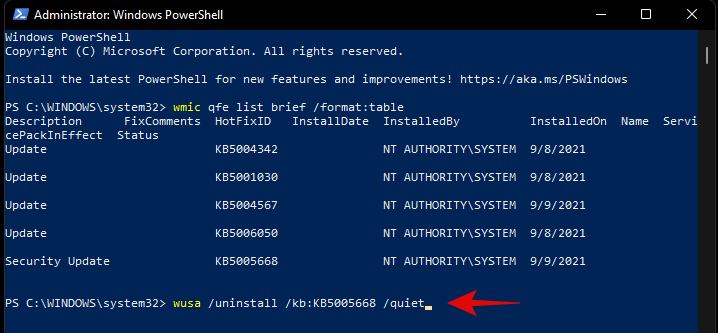
While the command above won’t prompt for confirmations, it will wait for your apps to shut down normally in the background. If you are looking to force close your apps and restart your system immediately, then you can use the command given below.
wusa /uninstall /kb:NUMBER /quiet /forcerestart
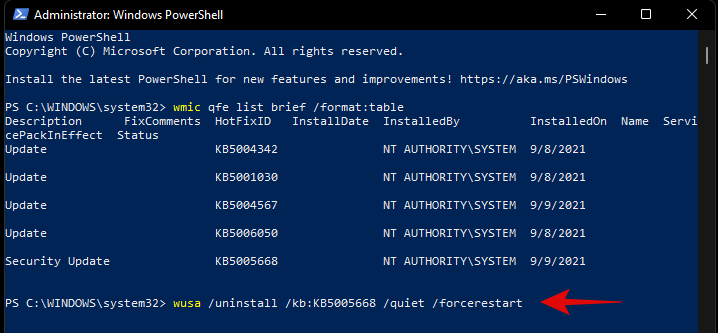
Subsequently, if you only wish to confirm a restart, then you can use the command below.
wusa /uninstall /kb:NUMBER /quiet /promptrestart
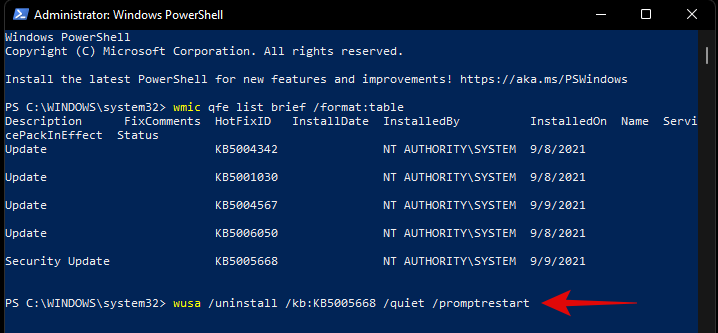
And that’s it! The problematic Windows Update should now be uninstalled from your PC.
Method #04: From Windows RE
Windows Recovery Environment also allows you to uninstall conflicting updates. Use the guide below to get you started. If you are facing a BSOD and are already in the Recovery Environment, then you can skip the first few steps of this guide.
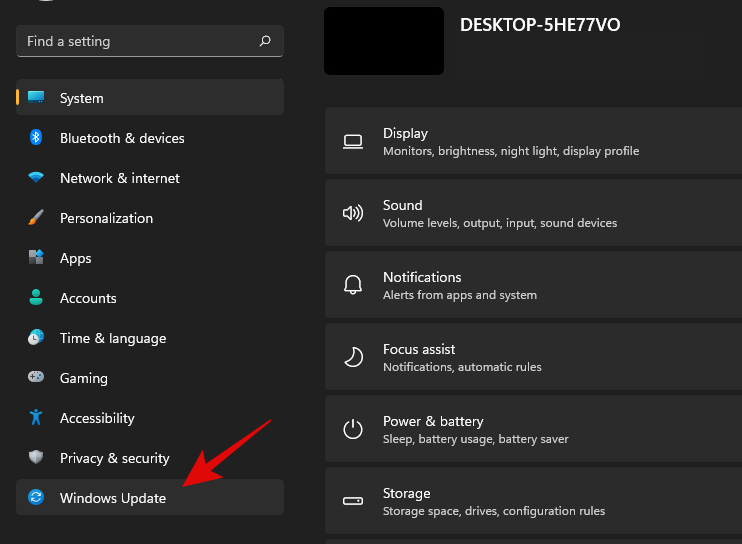
Press Windows + i on your keyboard and select Windows Update from your left.
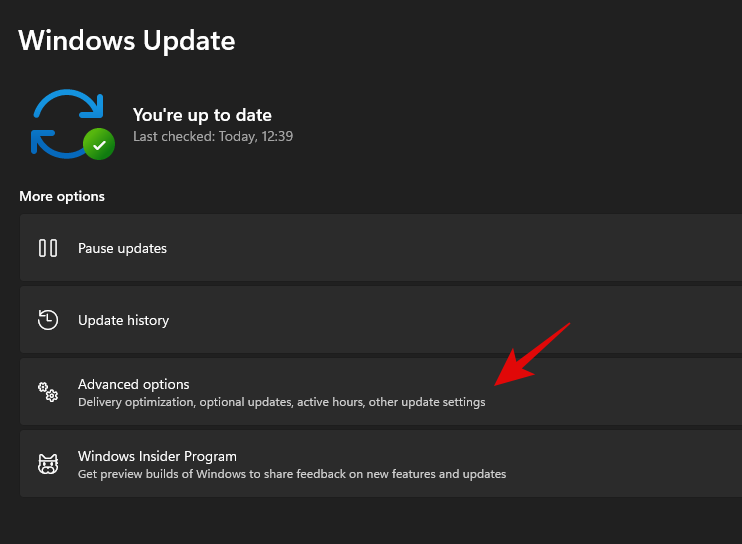
Click on ‘Advanced options’ now.
Select ‘Recovery’.
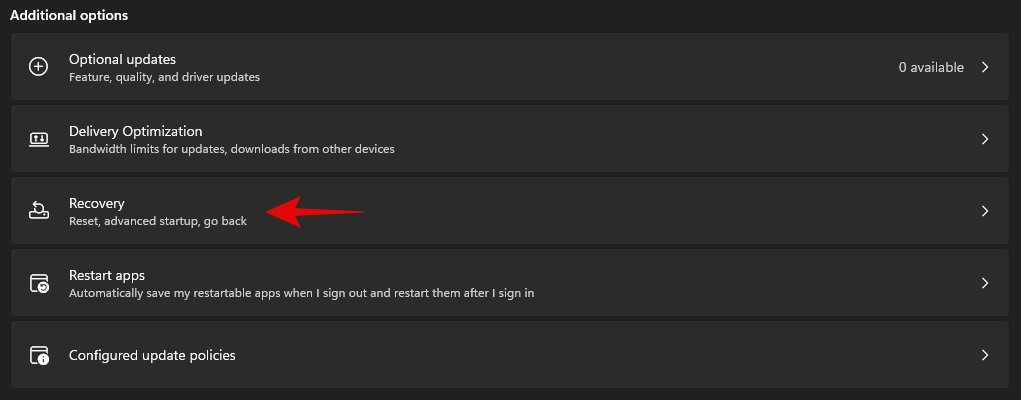
Click on ‘Restart now’ beside Advanced Startup.

You will now boot into the recovery environment. Click on ‘Troubleshoot’.
Now click on ‘Advanced Options’.
Select ‘Uninstall updates’.
Click and select the type of update you wish to install from the options on your screen.
- Uninstall latest quality update
- Uninstall latest feature update
Note: In case you are confused, feature updates refer to major updates to your Windows system that include new features, updated integrations, and sometimes new UI. Quality updates on the other hand encompass everything else including Security updates, Driver updates, Intelligence updates, Telemetry updates, and more.
Click on your administrator account and log in with your password.
Click on ‘Uninstall quality/feature’ update to confirm your choice.
Click on ‘Done’ once the process finishes.
Restart your PC and boot into Windows normally. You shouldn’t face any more issues caused by a problematic Windows update.
Method #05: Using DISM
DISM or Deployment Image Servicing and Management tool is an administrative tool within Windows that helps repair your Windows image and even mount images if needed. DISM supports image formats like .wim, .vhd, and more.
The tool can help you fix issues with your Windows installation and even remove problematic Windows updates. If you are looking to remove windows updates using DISM, then you can follow the steps below to get you started.
Note: DISM can be accessed via CMD and thus, you can use this guide from a recovery environment or an installation media as well. Follow the guide above to get CMD working on your lock screen or within Windows Recovery Environment.
Launch CMD and type in the following command. Press Enter on your keyboard once you are done.
dism /online /get-packages /format:table
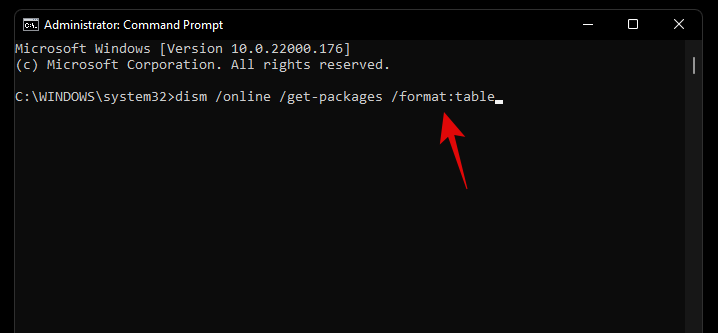
Unlike the WUSA commands we used earlier with PowerShell and CMD, you will need to note down the entire name of the Windows Update package we need to remove. Unfortunately, this includes special characters, spaces, and everything else included in the name. Thankfully you can easily copy the entire name to your clipboard by selecting it with your mouse and then using the keyboard shortcut. Once done, type in the command below and replace NAME with the package name you noted down earlier.
Note: This includes the term ‘Package_for_’ prefixed before some updates.
dism /online /Remove-Package /PackageName:NAME

The selected Windows Update will now be uninstalled from your system. In some cases, you will be prompted to restart your system, type in ‘Y’, and hit Enter on your keyboard to restart your system immediately.
How to stop receiving an update
While removing an update can help you, this does not mean that the broken Windows Update will stop showing up in your Updates section. This can be annoying and if you have automatic updates then you run the risk of automatically installing the problematic update in the background. In all such cases, you can try blocking Windows Updates on your system using the guides below depending on your preferences.
Method #01: Stop OEM driver updates through Windows update
OEM driver updates are delivered through Windows updates as well depending on their importance. Security vulnerabilities and bugs that have been recently found in components like CPU, GPU, or your wireless card, are instantly patched through such updates.
However, if you do not wish to install an OEM driver update provided by Windows update, then you can follow the guide below to block your OEM driver updates.
Press Windows + S on your keyboard and search for ‘Change device installation settings’. Click and launch the app from your search results.
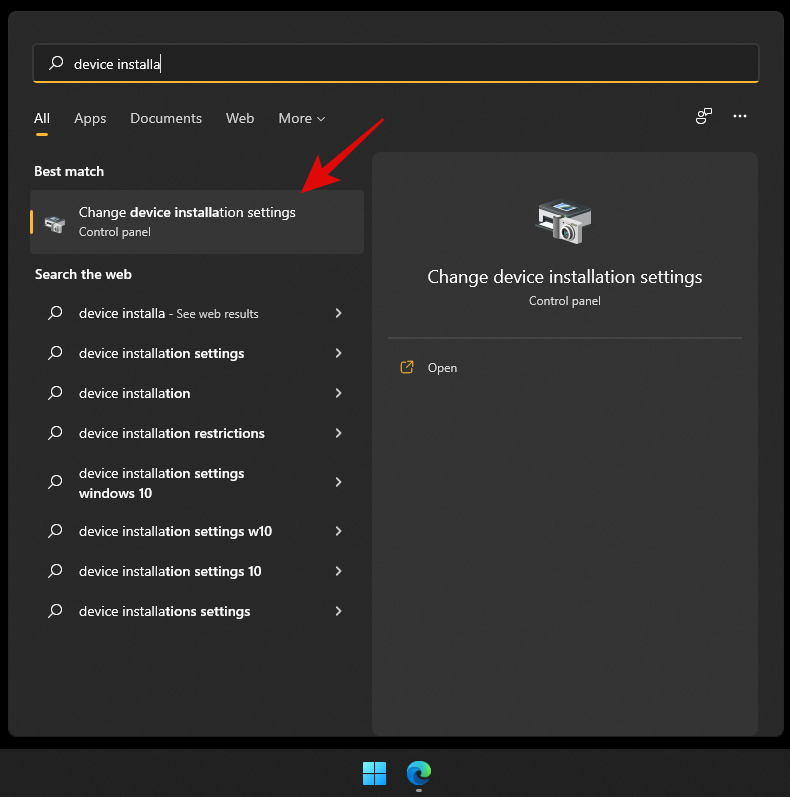
Select ‘No’.
Click on ‘Save changes’.
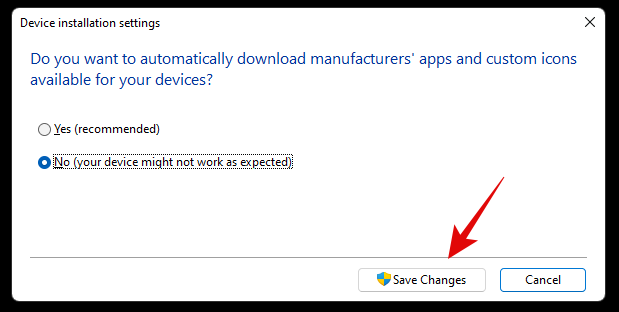
The changes will now be saved and you will no longer receive OEM driver updates through Windows Update.
Related: 6 Ways to Update Drivers on Windows 11
Method #02: Stop updates for Microsoft products
If you have been receiving constant updates for new Microsoft features and old products that keep messing up your system, then you can use the guide below to disable updates for Microsoft products via Windows Update.
Press Windows + i on your keyboard to open the Settings app and select ‘Windows Update’ from the left sidebar.

Click on ‘Advanced options’.

Now turn off the toggle for ‘Receive updates for other Microsoft products’ at the top.
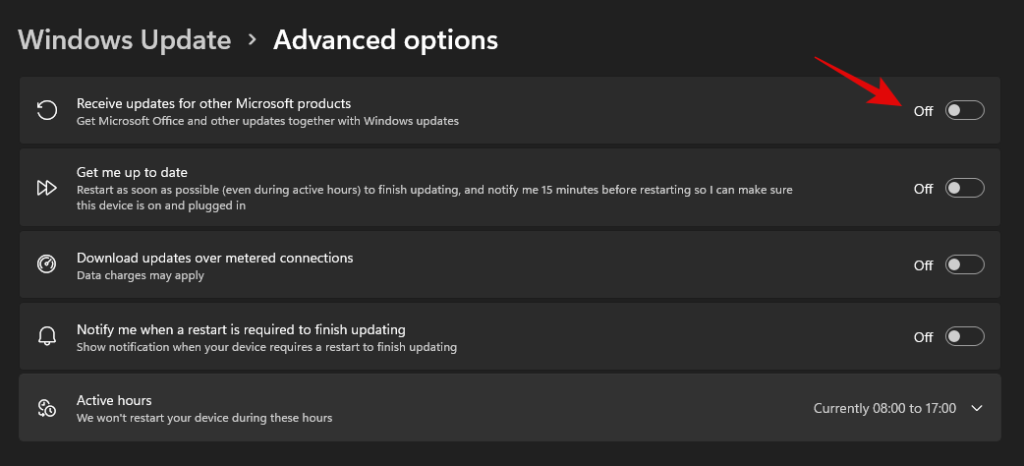
You will no longer receive updates for Microsoft products installed on your system via Windows update.
Method #03: Change active hours for background download and installation for updates
If you’re just looking to dismiss updates so that they don’t interfere with your work hours, then this is the perfect option for you. You can decide when Windows can download and update your PC in the background which will prevent Windows from interfering with your work hours. Follow the guide below to get you started.
Press Windows + i on your keyboard and click on ‘Windows Update’ on your left.

Click on ‘Advanced options’.

Now turn off the toggle for ‘Get me up to date’.
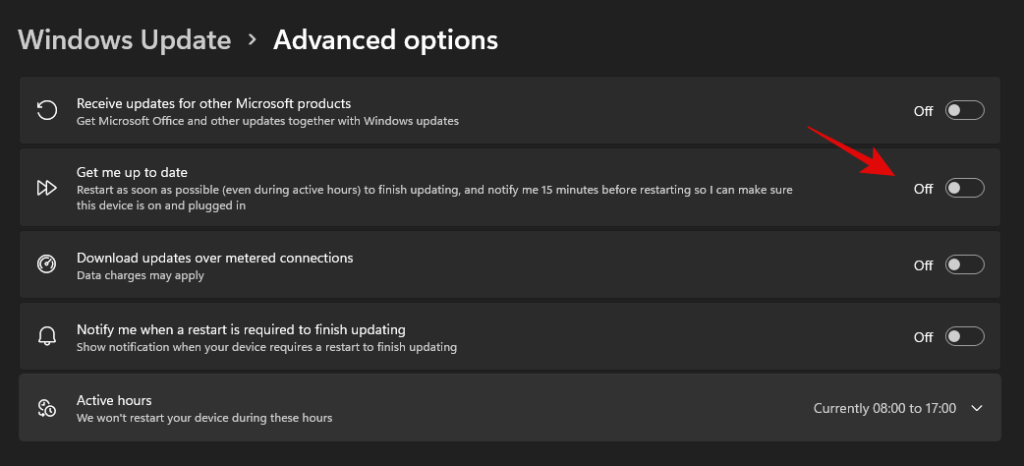
Click on ‘Active hours’.
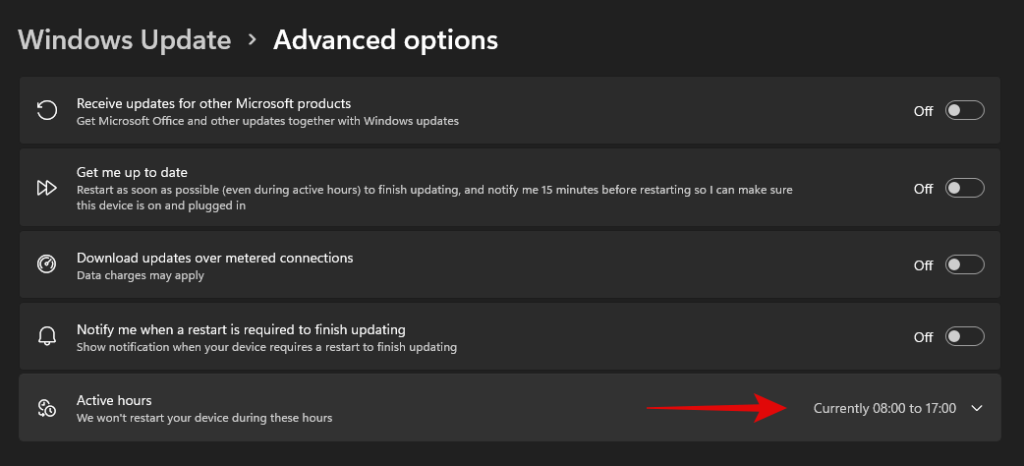
Click on the drop-down menu and select ‘Manually’.
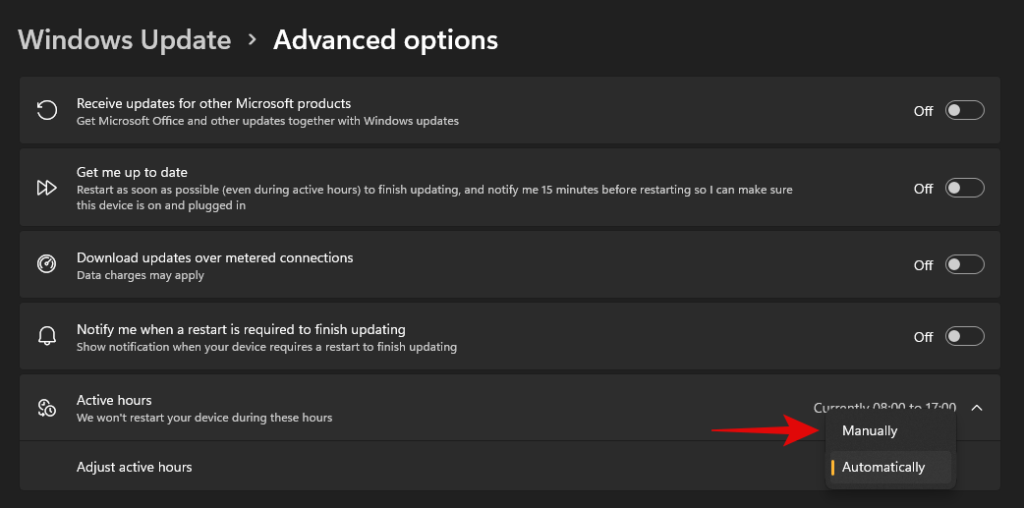
Define your desired start and end time. Windows won’t download updates and restart your PC during these hours.

And that’s it! Active hours should now be enabled for your system.
Method #04: Block Windows updates that you never wish to install
If you are receiving forced Windows updates that you don’t ever wish to install on your system then you can use a dedicated Windows troubleshooter to solve your issue.
This can be helpful in case you are trying to stop an update that disables a certain feature on your system that you don’t want disabled. This could be access to voltage controls, clock speed controls, turbo controls, fan controls, RGB control, and more. Follow the guide below to get you started.
Download the Windows Update Show Hide troubleshooter using the link above and launch it on your PC. Click on ‘Advanced’.
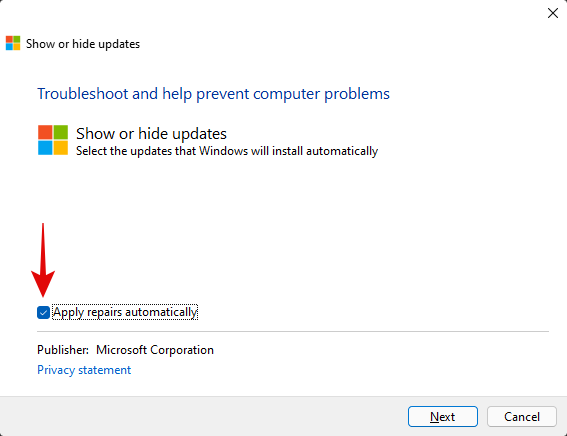
Uncheck the option for ‘Apply repairs automatically’.
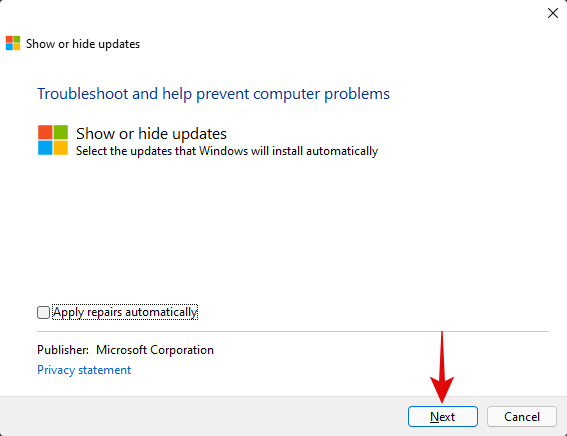
Click on ‘Next’.
The troubleshooter will now look for pending updates and display them on your screen. Click on ‘Hide updates’.
Check the boxes for all the updates you don’t wish to receive on your PC.
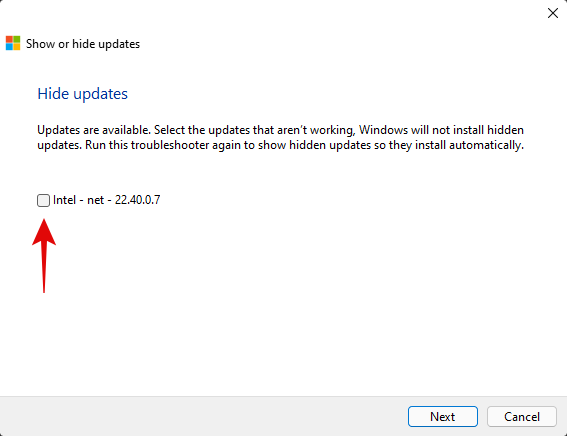
Click on ‘Next’.
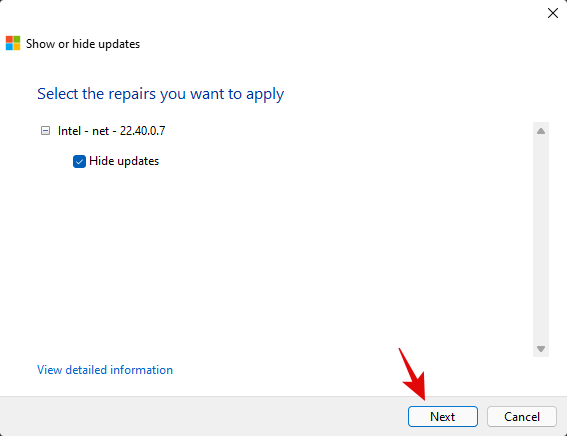
Ensure that ‘Hide updates’ is selected and click on ‘Next’.
The troubleshooter will now hide the necessary Windows updates from your PC which in turn will prevent them from ever being downloaded on your PC. Click on ‘Close’.
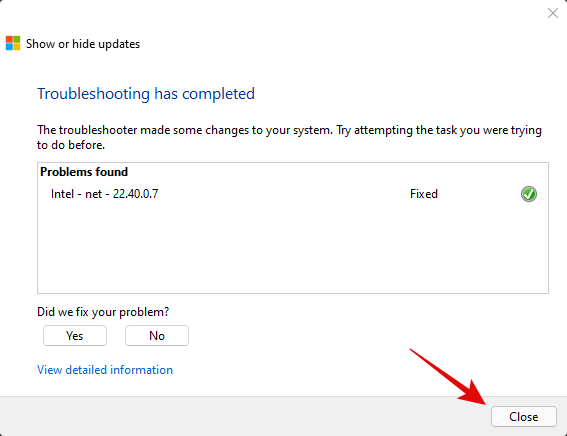
And that’s it! You will now have blocked the necessary updates on Windows 11.
Can you turn off Windows updates?
Yes, you can use certain workarounds and tricks to disable Windows updates on your PC. However, this isn’t recommended as you will lose out on important security patches which would leave you vulnerable to online threats including hackers, malware, adware, and more.
Hence we recommend you keep your PC updated or at least opt to install the latest security updates on your PC. Even if you are losing out on features it’s usually because of a hardware security vulnerability that would compromise your system.
However, if you still wish to disable Windows Updates on your PC, you can use this dedicated guide from us. If you face any issues, feel free to drop a comment.
Can’t uninstall Windows updates? Try these fixes!
If you are unable to install updates on your PC, then you can try the following fixes. However, if you are still unable to uninstall updates then this might indicate an issue with your Windows installation in which case resetting your PC might be the best option.
Follow the guides below to get you started.
Method #01: Reset Windows components and try again
If you have been unable to uninstall updates then you can try resetting your windows components. This will help fix corrupted system files in the background that might be preventing you from uninstalling updates on your system. We will be using a modified script from Mircosoft to help reset all components of Windows 11. The script was originally developed for Windows 10 or higher and hence will need some edits to work properly on Windows 11. This script will perform the following tasks on your system when executed;
- Remove older Windows updates folder
- Re-register Windows update files
- Reset your network connection
Follow the steps below to run the script on your system and reset Windows update components on your PC.
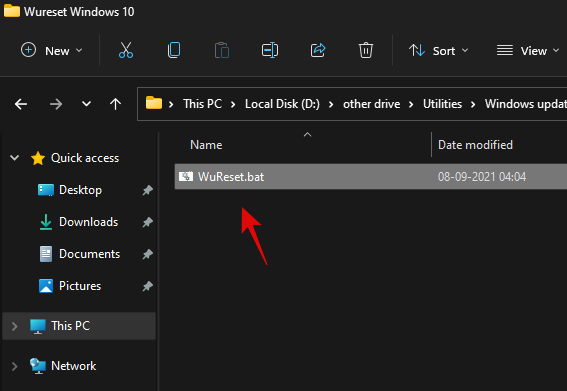
Download the script using the link above to your local storage and extract it to a convenient location. Once extracted right click on the script.
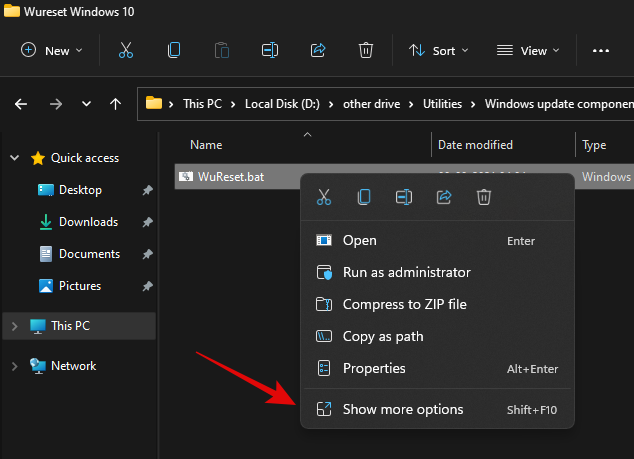
Click on ‘Show more options’.
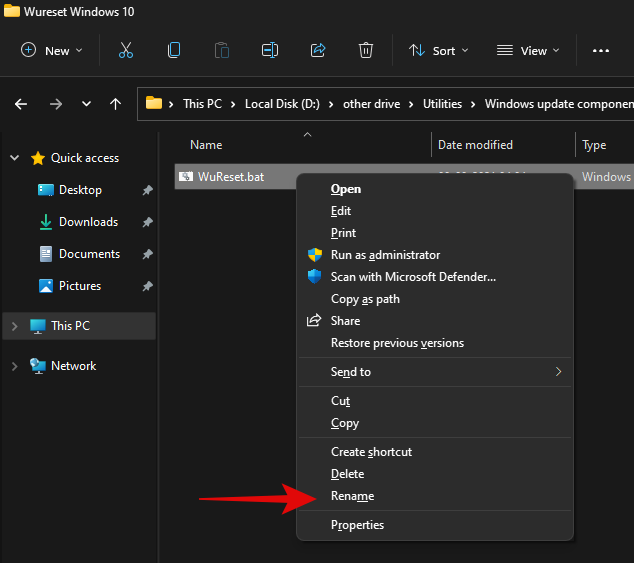
Select ‘Rename’.
Replace ‘.bat’ with ‘.txt’.
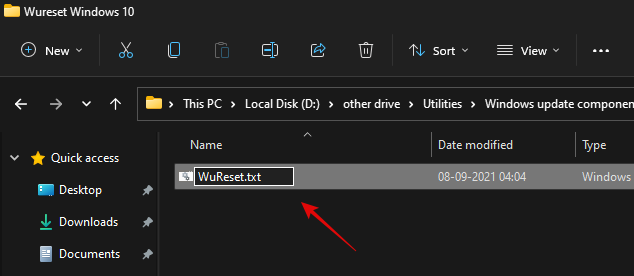
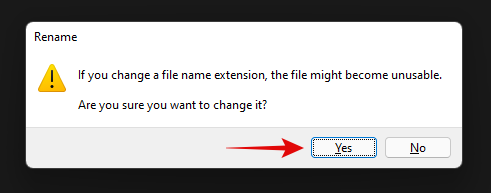
Click on ‘Yes’ to confirm your choice.
Now double click and open the file and it should open in your notepad. Once opened, scroll to the ‘:Reset’ section for resetting network commands and add the following line after the first delete command as shown below.
del /s /q /f "%SYSTEMROOT%\Logs\WindowsUpdate\*"
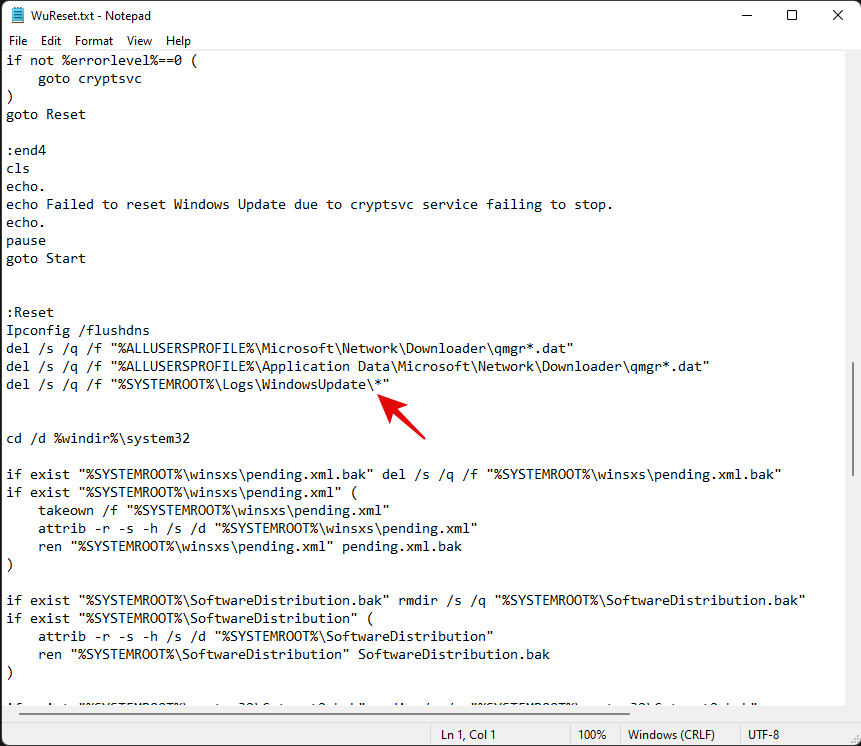
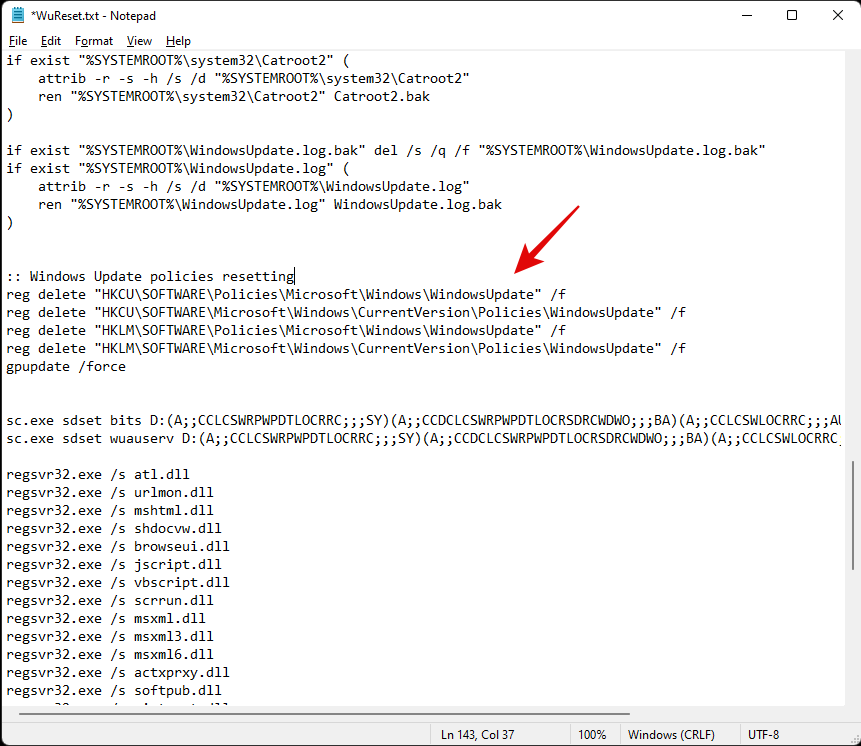
Once added, hit Ctrl + S on your keyboard. Ensure that there are no formatting changes or spaces before or after the line. The file will now be saved on your system along with its recent changes. We will now add some code to Reset Windows’s update policies on your system. Copy the lines below and paste them after your system commands. Ensure that two empty lines are available at either end of the code as shown below.
:: Windows Update policies resetting
reg delete "HKCU\SOFTWARE\Policies\Microsoft\Windows\WindowsUpdate" /f
reg delete "HKCU\SOFTWARE\Microsoft\Windows\CurrentVersion\Policies\WindowsUpdate" /f
reg delete "HKLM\SOFTWARE\Policies\Microsoft\Windows\WindowsUpdate" /f
reg delete "HKLM\SOFTWARE\Microsoft\Windows\CurrentVersion\Policies\WindowsUpdate" /f
gpupdate /force
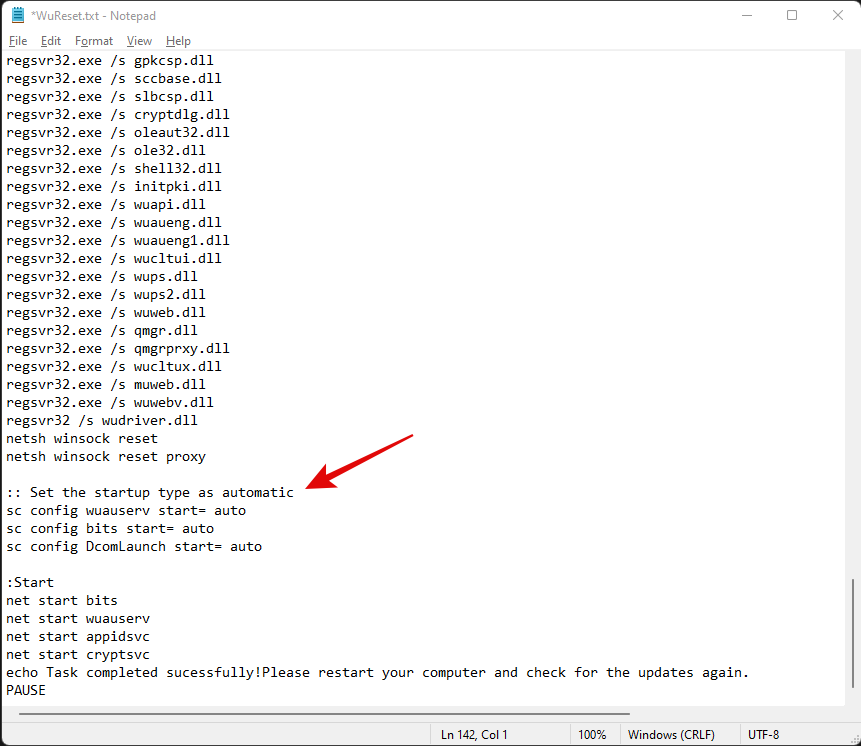
Lastly, let’s add some lines to ensure that the startup type for this service is set to ‘Automatic’. Copy the code below and add the lines after your winsock reset commands but before your service starting commands as shown below. Copy and paste the code in its respective location.
:: Set the startup type as automatic
sc config wuauserv start= auto
sc config bits start= auto
sc config DcomLaunch start= auto
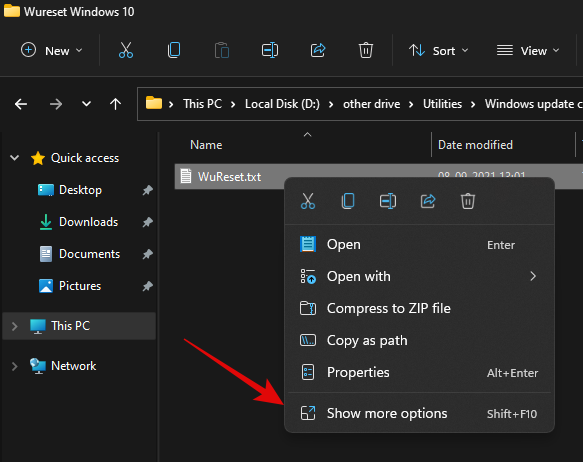
Once you are done, hit Ctrl + S on your keyboard to save your changes. Close the file and right-click on it again and select ‘Show more options’.
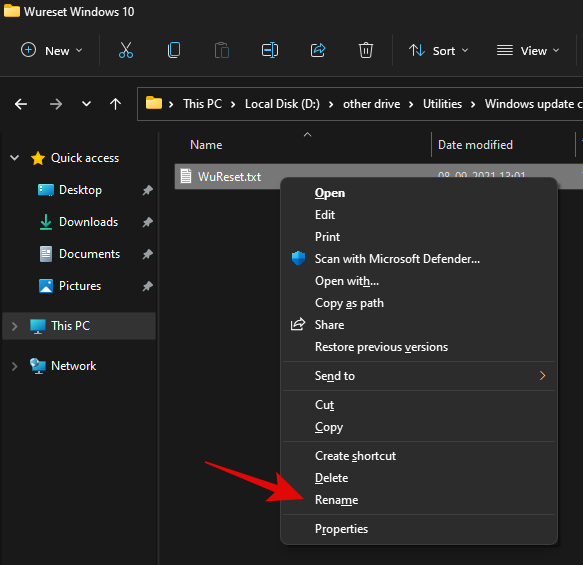
Click on ‘Rename’.
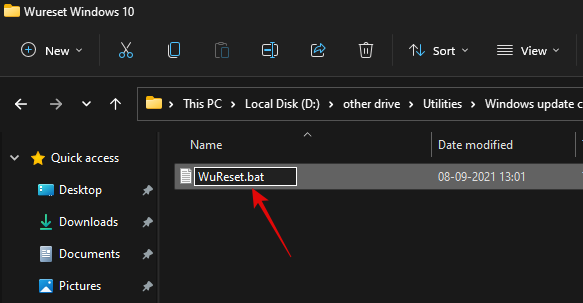
Replace ‘.txt’ with ‘.bat’.
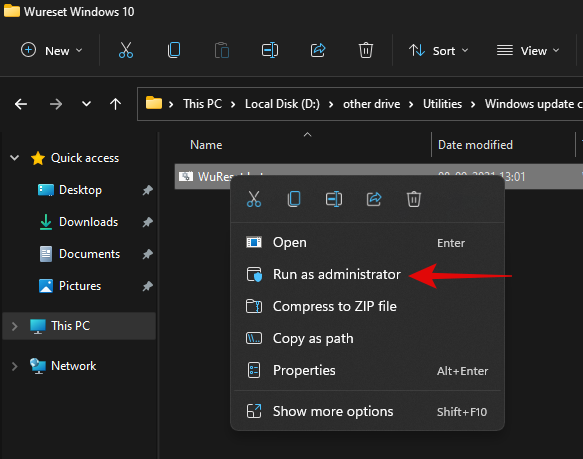
Once done, right-click on the file and select ‘Run as administrator’.
The batch script will now run on your PC and do its thing. Once the process completes, you will be asked to restart your PC. We highly recommend that you restart your PC at the earliest after running this script. Upon a restart, your Windows update should be reset and a fresh start should help you easily install pending Windows updates on your PC.
Method #02: Use DISM to uninstall the concerned packages
If you are still unable to uninstall specific Windows Update packages then simply use the DISM method to remove the concerned updates from your PC. This method force removes any available Windows updates from your PC without any issue. You will get a list of all the available updates in a table format which should make it much easier for you to find the culprit on your PC. Simply follow the guide at the top to get you started.
Method #03: Run SFC & DISM commands
At this point, if Windows still fails to update your system then you are facing a more serious issue than we anticipated earlier. This could indicate system-level corruption of files or missing system files from your system. In such cases, you can run SFC and DISM checks to fix corrupted files as well as restore missing system files. Follow the guide below to get you started.
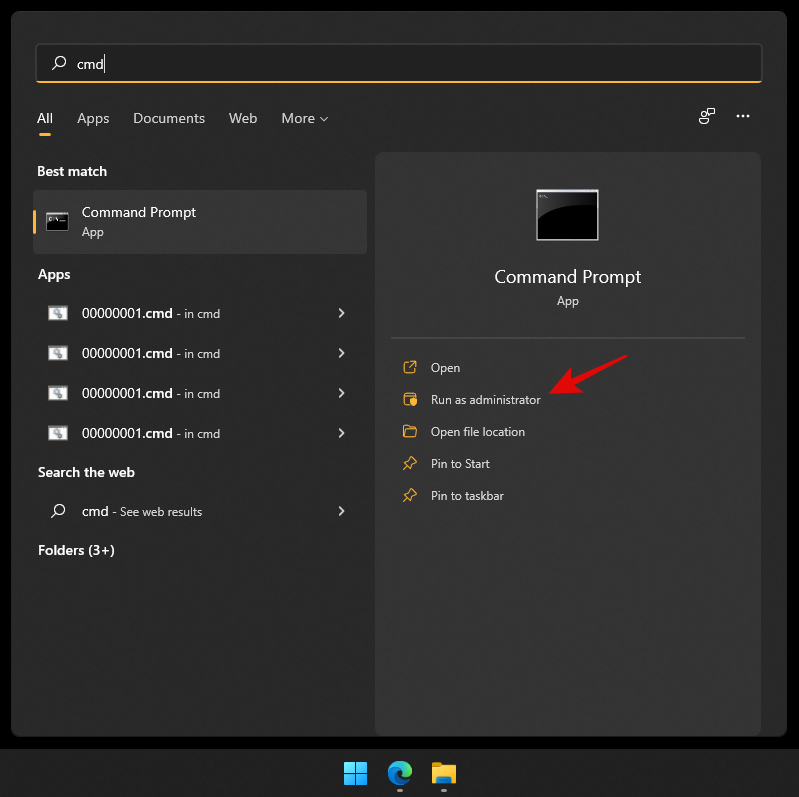
Press Windows + S on your keyboard and search for CMD. Click on ‘Run as administrator’ once it shows up in your search results.
Type in the following command and press Enter on your PC.
sfc /scannow
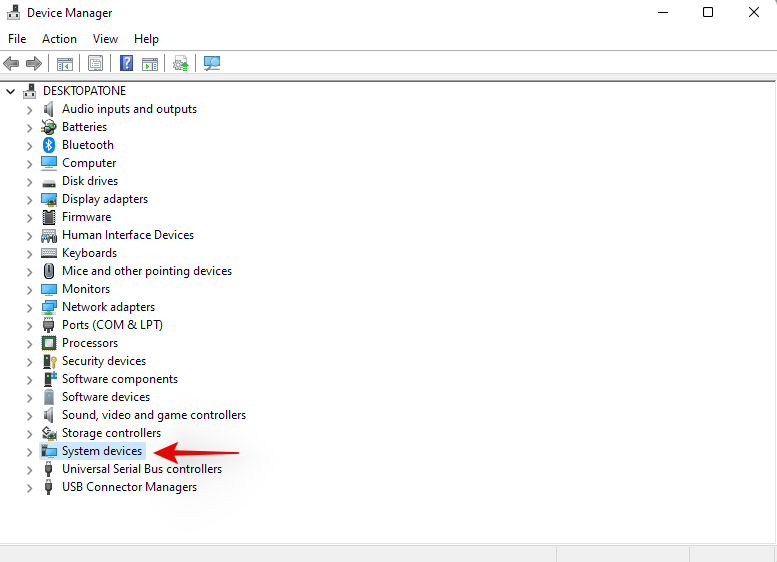
Once the SFC scan completes, type in the following command and execute it.
DISM /Online /Cleanup-Image /RestoreHealth
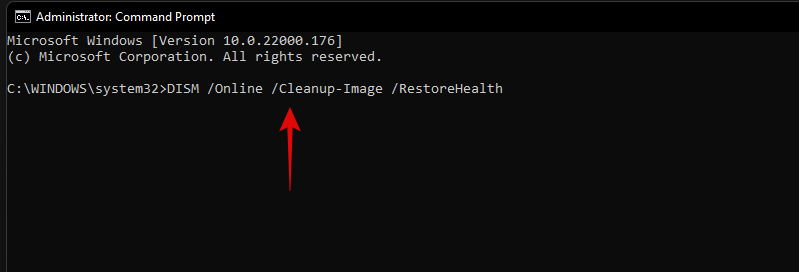
We recommend you restart your PC once the process completes.
Method #04: Last resort: Reset your PC
If nothing seems to be working for you then it might be time for a fresh installation of Windows 11 on your system. You can try getting in touch with your support team as well but if nothing works then a reset of your PC is the best option. In most cases, a reset while keeping your local files should help get Windows update working on your system.
Windows 11 connects to the update servers and updates your security definitions and drivers during OOBE. Windows will fix all update issues and reinstall necessary services on your system to get Windows update back up and running on your system during this process.
► You can use this dedicated guide from us to reset your Windows 11 PC.
We hope you were able to easily uninstall updates from your Windows 11 PC using the guide above. If you face any issues, feel free to drop a comment below.
Related:
