Vzpon strojev: aplikacije AI v resničnem svetu

Umetna inteligenca ni v prihodnosti, tukaj je prav v sedanjosti. V tem blogu preberite, kako so aplikacije umetne inteligence vplivale na različne sektorje.
TLS 1.3 is a version of the Transport Layer Security (TLS) protocol that was published in 2018 as a proposed standard in RFC 8446. It offers security and performance improvements over its predecessors.
This guide will demonstrate how to enable TLS 1.3 using the Apache web server on Fedora 30.
Requirements
A/AAAA/CNAME DNS records for your domain.2.4.36 or greater.1.1.1 or greater.Before you begin
Check the Fedora version.
cat /etc/fedora-release # Fedora release 30 (Thirty)
Create a new non-root user account with sudo access and switch to it.
useradd -c "John Doe" johndoe && passwd johndoe usermod -aG wheel johndoe su - johndoe
NOTE: Replace johndoe with your username.
Set up the timezone.
timedatectl list-timezones sudo timedatectl set-timezone 'Region/City'
Ensure that your system is up to date.
sudo dnf check-upgrade || sudo dnf upgrade -y
Install the needed packages.
sudo dnf install -y socat git
Disable SELinux and Firewall.
sudo setenforce 0 ; sudo systemctl stop firewalld ; sudo systemctl disable firewalld
Install the acme.sh client and obtain a TLS certificate from Let's Encrypt
Install acme.sh.
sudo mkdir /etc/letsencrypt git clone https://github.com/Neilpang/acme.sh.git cd acme.sh sudo ./acme.sh --install --home /etc/letsencrypt --accountemail your_email@example.com cd ~ source ~/.bashrc
Check the version.
/etc/letsencrypt/acme.sh --version # v2.8.2
Obtain RSA and ECDSA certificates for your domain.
# RSA sudo /etc/letsencrypt/acme.sh --issue --standalone -d example.com --ocsp-must-staple --keylength 2048 # ECC/ECDSA sudo /etc/letsencrypt/acme.sh --issue --standalone -d example.com --ocsp-must-staple --keylength ec-256
NOTE: Replace example.com in commands with your domain name.
Create sensible directories to store your certs and keys in. We will use /etc/letsencrypt.
sudo mkdir -p /etc/letsencrypt/example.com sudo mkdir -p /etc/letsencrypt/example.com_ecc
Install and copy certificates to /etc/letsencrypt.
# RSA sudo /etc/letsencrypt/acme.sh --install-cert -d example.com --cert-file /etc/letsencrypt/example.com/cert.pem --key-file /etc/letsencrypt/example.com/private.key --fullchain-file /etc/letsencrypt/example.com/fullchain.pem # ECC/ECDSA sudo /etc/letsencrypt/acme.sh --install-cert -d example.com --ecc --cert-file /etc/letsencrypt/example.com_ecc/cert.pem --key-file /etc/letsencrypt/example.com_ecc/private.key --fullchain-file /etc/letsencrypt/example.com_ecc/fullchain.pem
After running the above commands, your certificates and keys will be in the following locations:
/etc/letsencrypt/example.com/etc/letsencrypt/example.com_eccInstall Apache
Apache added support for TLS 1.3 in version 2.4.36. Fedora 30 system comes with Apache and OpenSSL that support TLS 1.3 out of the box, so there is no need to build a custom version.
Download and install the latest 2.4 branch of Apache and its module for SSL via the dnf package manager.
sudo dnf install -y httpd mod_ssl
Check the version.
sudo httpd -v # Server version: Apache/2.4.39 (Fedora) # Server built: May 2 2019 14:50:28
Start and enable Apache.
sudo systemctl start httpd.service sudo systemctl enable httpd.service
Configure Apache for TLS 1.3
Now that we have successfully installed Apache, we are ready to configure it to start using TLS 1.3 on our server.
Run sudo vim /etc/httpd/conf.d/example.com.conf, and populate the file with the following basic configuration.
<IfModule mod_ssl.c> <VirtualHost *:443> ServerName example.com SSLEngine on SSLProtocol all -SSLv2 -SSLv3 # RSA SSLCertificateFile "/etc/letsencrypt/example.com/fullchain.pem" SSLCertificateKeyFile "/etc/letsencrypt/example.com/private.key" # ECC SSLCertificateFile "/etc/letsencrypt/example.com_ecc/fullchain.pem" SSLCertificateKeyFile "/etc/letsencrypt/example.com_ecc/private.key" </VirtualHost> </IfModule>
Save the file and exit.
Check the configuration.
sudo apachectl configtest
Reload Apache to activate the new configuration.
sudo systemctl reload httpd.service
Open your site via HTTPS protocol in your web browser. To verify TLS 1.3, you can use browser dev tools or SSL Labs service. The screenshots below show Chrome's security tab with TLS 1.3 in action.
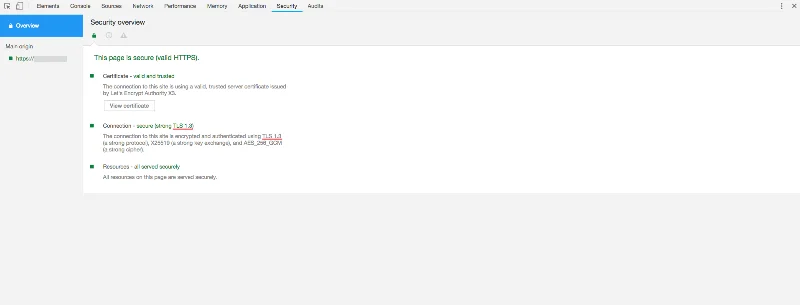

You have successfully enabled TLS 1.3 in Apache on your Fedora 30 server. The final version of TLS 1.3 was defined in August 2018, so there’s no better time to start adopting this new technology.
Umetna inteligenca ni v prihodnosti, tukaj je prav v sedanjosti. V tem blogu preberite, kako so aplikacije umetne inteligence vplivale na različne sektorje.
Ste tudi vi žrtev DDOS napadov in ste zmedeni glede načinov preprečevanja? Preberite ta članek, če želite rešiti svoja vprašanja.
Morda ste že slišali, da hekerji zaslužijo veliko denarja, a ste se kdaj vprašali, kako zaslužijo takšen denar? razpravljajmo.
Ali želite videti revolucionarne izume Googla in kako so ti izumi danes spremenili življenje vsakega človeka? Nato preberite v blogu in si oglejte Googlove izume.
Koncept samovozečih avtomobilov, ki zapeljejo na ceste s pomočjo umetne inteligence, so sanje, ki jih imamo že nekaj časa. A kljub številnim obljubam jih ni nikjer. Preberite ta blog, če želite izvedeti več…
Ker se znanost hitro razvija in prevzame veliko naših prizadevanj, se povečuje tudi tveganje, da se podvržemo nerazložljivi singularnosti. Preberite, kaj bi za nas lahko pomenila singularnost.
Preberite blog, če želite na najpreprostejši način spoznati različne plasti v arhitekturi velikih podatkov in njihove funkcionalnosti.
Metode shranjevanja podatkov so se lahko razvijale od rojstva podatkov. Ta blog pokriva razvoj shranjevanja podatkov na podlagi infografike.
V tem digitalno vodenem svetu so pametne naprave za dom postale ključni del življenja. Tukaj je nekaj neverjetnih prednosti pametnih naprav za dom o tem, kako naredijo naše življenje vredno življenja in poenostavijo.
Pred kratkim je Apple izdal macOS Catalina 10.15.4 dopolnilno posodobitev za odpravo težav, vendar se zdi, da posodobitev povzroča več težav, ki vodijo do opečenja računalnikov Mac. Preberite ta članek, če želite izvedeti več


