Kā atgūt piekļuvi cietajam diskam, novērst kļūdu, kad nevar atvērt cieto disku
Šajā rakstā mēs parādīsim, kā atgūt piekļuvi cietajam diskam, ja tas neizdodas. Sekosim līdzi!
Ja veicat jaunināšanu uz jaunu datoru, iespējams, jūs mēģināt atkārtoti izmantot vecā datora cieto disku. Ja nē, iespējams, plānojat to uzdāvināt kādam ģimenes loceklim vai draugam. Taču, pirms turpināt izmantot kādu no šīm opcijām, pilnībā noslaukiet veco cieto disku, lai nākamā persona sāktu darbu no jauna ar cieto disku.
Šajā ziņā mēs apskatīsim vairākus veidus, kā notīrīt cieto disku operētājsistēmā Windows 11 .
Saturs
Kāpēc jums vajadzētu noslaucīt cieto disku?
Pirms pārejam pie metodēm, veltīsim minūti, lai saprastu, kāpēc jums vajadzētu notīrīt cietos diskus.
Acīmredzamākais iemesls cietā diska tīrīšanai ir visu personisko failu un lietojumprogrammu izskalošana no diska, pārliecinoties, ka tos nevar atgūt ar datu atkopšanas rīkiem — pēc rūpnīcas datu atiestatīšanas vai nē. Vēl viens diska dzēšanas iemesls varētu būt vienkārši iegūt vairāk vietas jaunajiem failiem. Vai arī jūs vienkārši vēlaties iestatīt datoru no nulles, tīru Windows instalāciju un jaunus cietā diska nodalījumus.
Neatkarīgi no iemesla, apskatīsim cietā diska tīrīšanas priekšnoteikumus.
Kas jādara pirms cietā diska tīrīšanas?
Pirms diska tīrīšanas ir dažas lietas, kas jums jāparūpējas.
Apskatīsim metodes, kā notīrīt cieto disku operētājsistēmā Windows 11.
Saistīts: Kā kartēt disku operētājsistēmā Windows 11
Kā formatēt disku operētājsistēmā Windows 11 vai 10
Varat formatēt disku vairākos veidos atkarībā no jūsu sistēmas piekļuves veida. Izmantojiet kādu no tālāk sniegtajām rokasgrāmatām, kas vislabāk atbilst jūsu pašreizējai situācijai un prasībām.
Tas neapšaubāmi ir viens no vienkāršākajiem un ātrākajiem veidiem, kā notīrīt cieto disku. Process aizņem tikai dažas sekundes un ir lieliski piemērots, ja vēlaties atbrīvot vietu jauniem failiem cietajā diskā.
Piezīme. Šī metode darbosies tikai jūsu sistēmas sekundārajiem diskiem, nevis sāknēšanas diskdziņiem.
Šeit ir norādītas darbības.
Nospiediet, Win key + rlai atvērtu lodziņu Palaist. Ierakstiet 'explorer' un nospiediet enter.
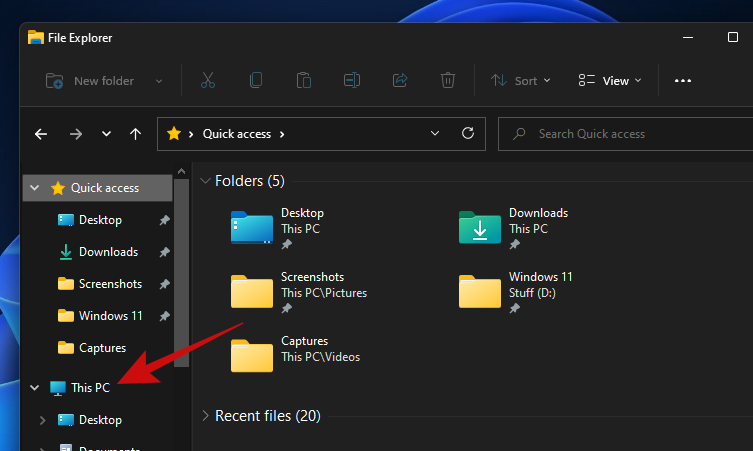
Tiks atvērts logs ar nosaukumu "File Explorer". Noklikšķiniet uz "Šis dators".
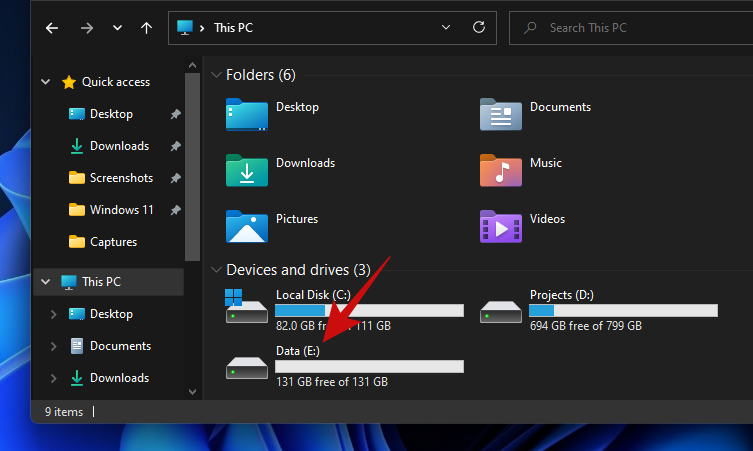
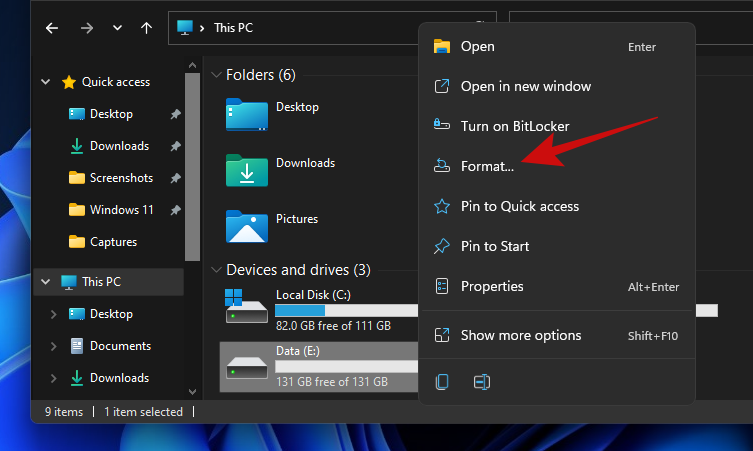
Tagad jums vajadzētu redzēt visus ar datoru savienotos diskus. Mums ir trīs diskdziņi, no kuriem mēs šajā rokasgrāmatā izmantosim datu disku.
Viss, kas jums jādara, ir ar peles labo pogu noklikšķiniet uz diska, kuru vēlaties notīrīt, un noklikšķiniet uz "Formatēt".
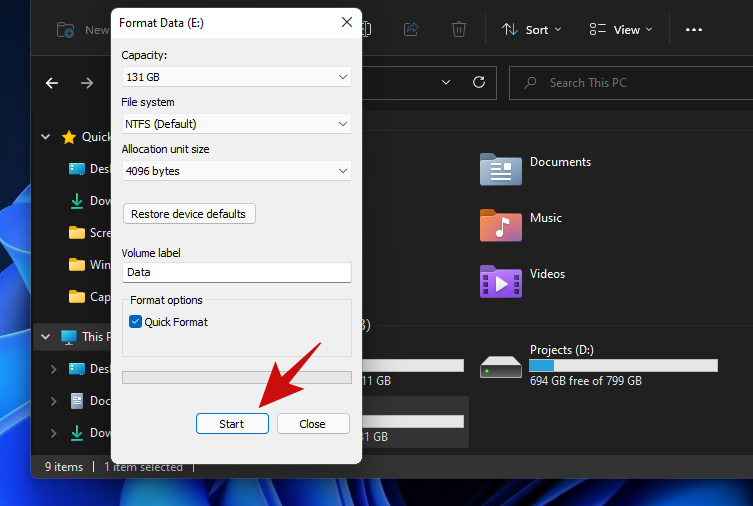
Jums vajadzētu redzēt nelielu uznirstošo logu "Formatēt" ar daudzām opcijām. Ja vēlaties ātri dzēst datus, nejaucoties ar citām opcijām, noklikšķiniet uz pogas Sākt.
Padoms. Lai nodrošinātu drošāku datu dzēšanu, noņemiet atzīmi no opcijas Ātrais formatējums un pēc tam noklikšķiniet uz Sākt. Ņemiet vērā, ka rūpīga tīrīšana prasīs daudz ilgāku laiku nekā ātra formatēšana.
Kad tīrīšana ir pabeigta, jums vajadzētu redzēt ziņojumu, kas apstiprina to pašu. Noklikšķiniet uz Labi, lai noraidītu brīdinājumu.
Jūsu disks tagad ir pilnībā tīrs un gatavs atkārtotai lietošanai.
2. metode: diska pārvaldības izmantošana
Atveriet izvēlni Sākt un ierakstiet "Diska pārvaldība". Noklikšķiniet uz meklēšanas rezultāta vai pogas Atvērt.
Lūk, kā izskatās diska pārvaldības rīks.
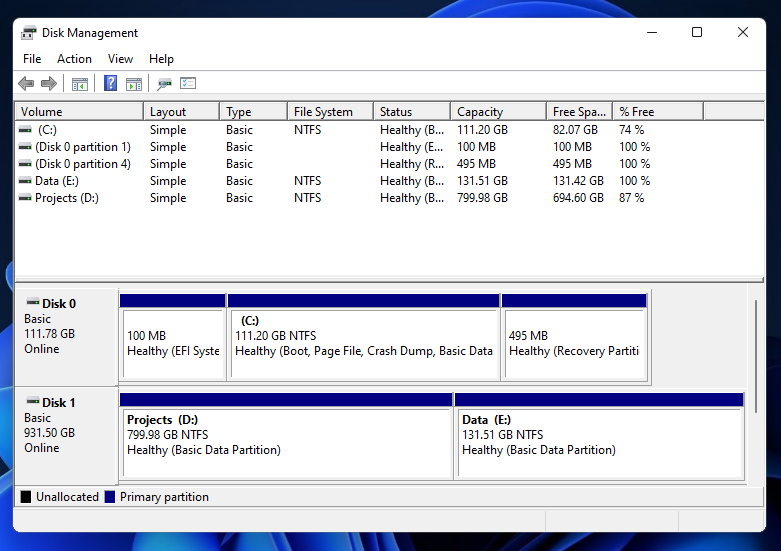
Ar peles labo pogu noklikšķiniet uz sējuma, kuru vēlaties notīrīt, un noklikšķiniet uz Formatēt.
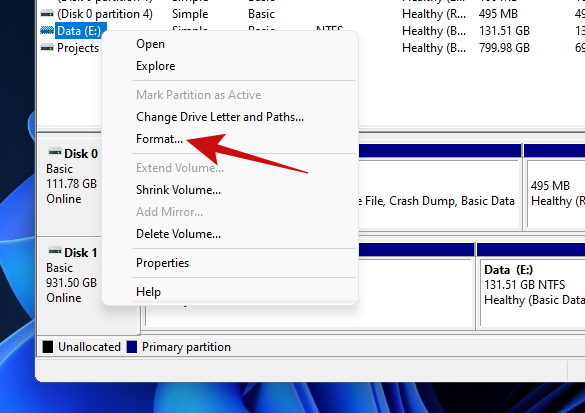
Nākamajā uznirstošajā logā jums vajadzētu būt nedaudzām opcijām, piemēram, mainīt sējuma nosaukumu, failu sistēmas un citas.
Atkal, tāpat kā iepriekšējā metodē, jums ir jāatzīmē opcija “Veikt ātru formatēšanu”, ja nevēlaties ilgi gaidīt, lai notīrītu disku.
Padoms. Lai rūpīgi notīrītu datus, kas no diska noņem visas datu pēdas, noņemiet atzīmi no opcijas Veikt ātru formatēšanu.
Noklikšķiniet uz pogas Labi, lai sāktu diska tīrīšanu.
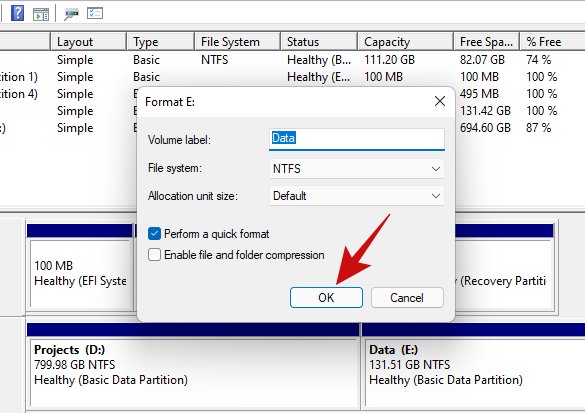
Noklikšķiniet uz pogas Labi, lai apstiprinātu datu dzēšanu, un jūsu diskam vajadzētu būt tīram dažu minūšu laikā.
3. metode: Diskpart izmantošana programmā CMD (komandu uzvedne)
Diskpart ir komandrindas utilīta, ko var izmantot, lai pārvaldītu visus datoram pievienotos diskus. Izmantojot diskpart, varat darīt visu, sākot no disku uzskaitīšanas, nodalījumu izveidošanas un dzēšanas un daudz ko citu.
Apskatīsim, kā varat notīrīt cieto disku, izmantojot diskpart.
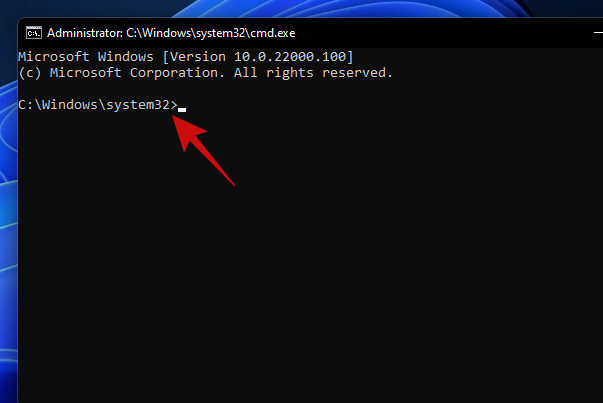
Nospiediet, Win key + rlai atvērtu lodziņu Palaist. Ierakstiet “cmd” un nospiediet Ctrl + Shift + Entertaustiņus, nevis tikai ievadīšanas taustiņu. Tas atvērs paaugstinātu komandu uzvedni.
Noklusējuma ceļam no paaugstinātas komandu uzvednes vajadzētu izskatīties šādi.
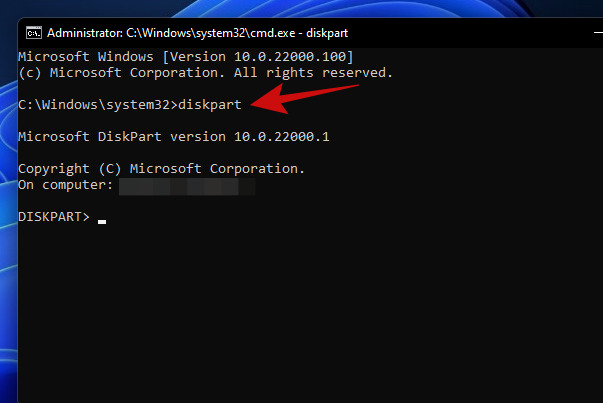
Ierakstiet “diskpart” un nospiediet taustiņu Enter. Tagad jums vajadzētu būt diskpart utilītprogrammā.
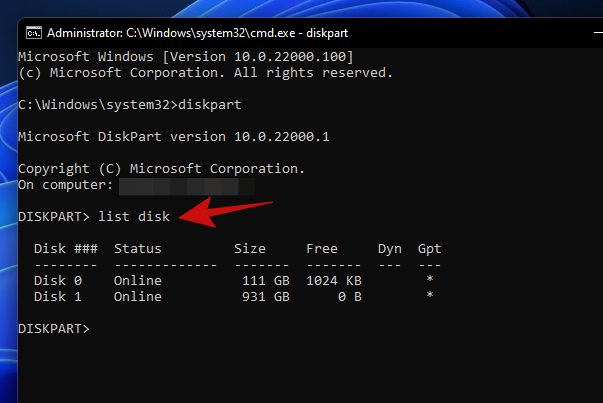
Ierakstiet “list disk” un nospiediet enter. Tajā vajadzētu uzskaitīt visus ar datoru savienotos diskus.
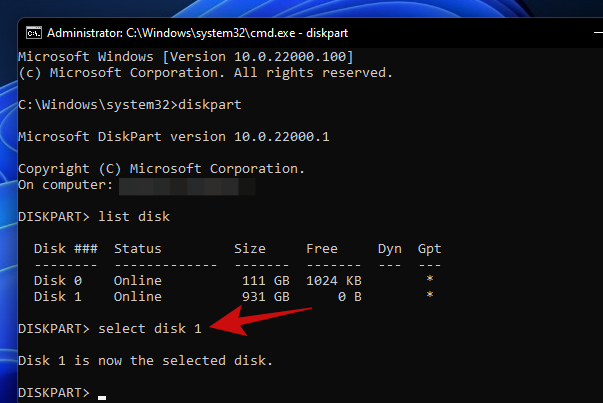
Lai turpinātu diska dzēšanu, ierakstiet “izvēlēties disku”. Mūsu klēpjdatoram ir divi cietie diski, un šajā rokasgrāmatā mēs turpināsim ar 1. disku, tāpēc ievadījām “izvēlēties 1. disku” un nospiediet taustiņu Enter.
Ierakstiet "tīrs" un nospiediet taustiņu Enter.
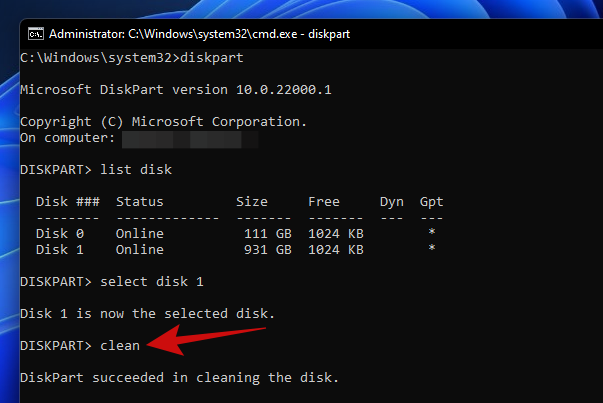
Jūsu diskam tagad jābūt pilnīgi tukšam un pārvērstam par nepiešķirtu vietu. Nākamais uzdevums ir izveidot nodalījumus, izmantojot iepriekš izmantoto disku pārvaldības rīku. Vienkārši palaidiet rīku un inicializējiet disku. Pēc tam jums vajadzētu būt iespējai izveidot jebkura izmēra nodalījumus, kas jums vislabāk atbilst.
4. metode: Atiestatīšanas opcijas izmantošana
Operētājsistēmā Windows 11 ir iekļauta opcija “Atiestatīt šo datoru”, kas atiestata Windows rūpnīcas iestatījumus. Un labākā šī datora atiestatīšanas daļa ir tā, ka tā lietotājiem piedāvā iespēju saglabāt visus savus failus un atiestatīt Windows vai noņemt visu, vienlaikus atiestatot Windows.
Ja tīrāt disku tikai, lai pārinstalētu sistēmu Windows, pirms tīras instalēšanas mēs iesakām izmēģināt šo metodi.
Lūk, kā to var izdarīt.
Atveriet izvēlni Sākt un ierakstiet “Atiestatīt šo datoru”. Noklikšķiniet uz uznirstošā meklēšanas rezultāta vai noklikšķiniet uz pogas Atvērt.
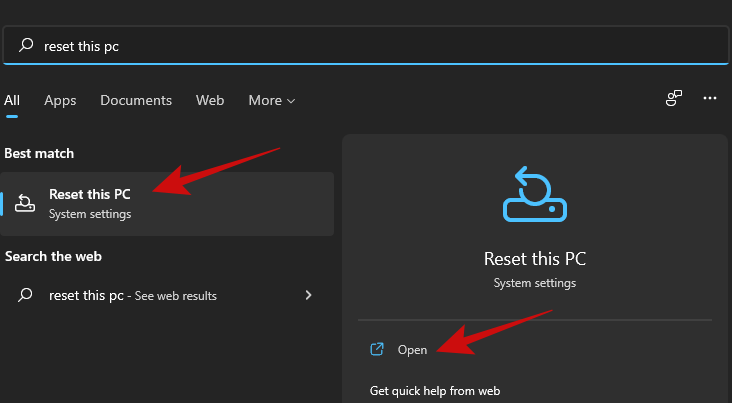
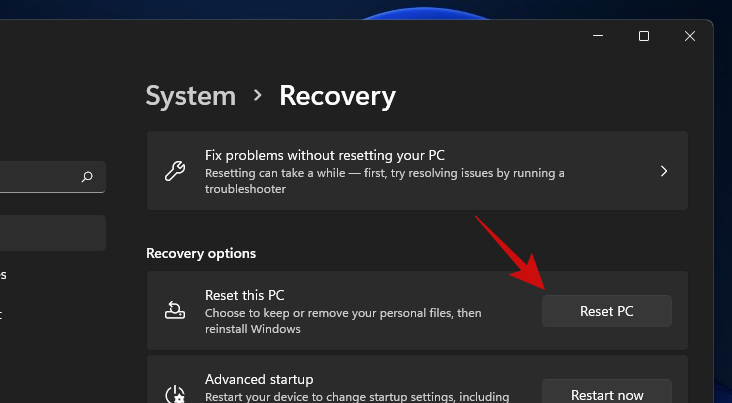
Noklikšķiniet uz pogas Atiestatīt datoru, lai aktivizētu Windows atiestatīšanas procesu.
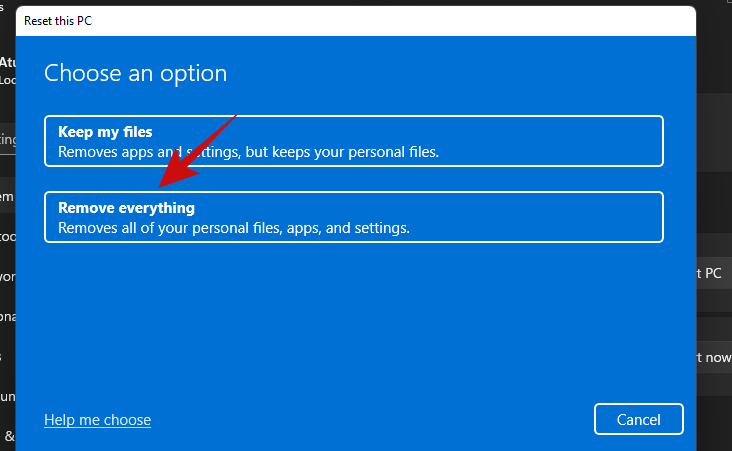
Jums vajadzētu redzēt zilu ekrānu ar divām iespējām. Noklikšķiniet uz "Noņemt visu", lai atkārtoti instalētu sistēmu Windows, vienlaikus noņemot visus failus, programmas un iestatījumus.
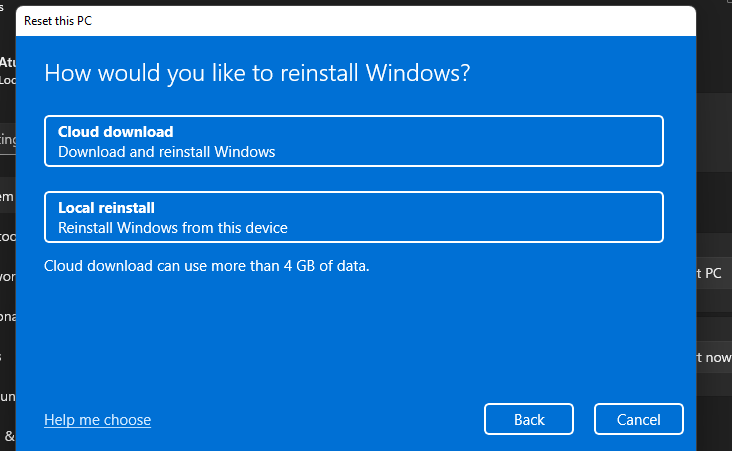
Nākamajā ekrānā jums vajadzētu jautāt, kā vēlaties pārinstalēt Windows. Ja jūsu datoram ir interneta pieslēgums, varat turpināt ar opciju “Mākoņa lejupielāde”, pretējā gadījumā turpiniet ar “Vietējā pārinstalēšana”.
Izpildiet pārējos ekrānā redzamos norādījumus, un ātri vien jūsu dators būs gatavs ar jaunu operētājsistēmas Windows 11 instalāciju, un jūsu cietajā diskā nebūs nevienas pēdas no vecajiem failiem un programmām.
5. metode: PowerShell izmantošana
Varat arī formatēt diskus, izmantojot PowerShell. Veiciet tālāk norādītās darbības, lai formatētu disku, izmantojot PowerShell operētājsistēmā Windows 11.
Nospiediet Windows + Stastatūru un meklējiet PowerShell. Noklikšķiniet uz "Palaist kā administratoram", kad tas tiek parādīts jūsu meklēšanas rezultātos.
Ievadiet šo komandu, lai iegūtu sarakstu ar visiem sējumiem no jūsu sistēmā instalētajiem diskiem. Tas palīdzēs jums noteikt un atrast disku, kuru vēlaties formatēt.
get-volume

Izvēlieties sējumu, kuru vēlaties formatēt, un pēc tam izmantojiet tālāk norādīto komandu, lai to atlasītu. Aizstājiet X ar burtu, kas piešķirts attiecīgajam sējumam.
select X

Tagad izmantojiet tālāk norādīto komandu, lai formatētu atlasīto sējumu. Aizstājiet NAME ar jūsu izvēlētu nosaukumu, kas tiks piešķirts sējumam pēc tā formatēšanas.
format-volume -filesystem NTFS -newfilesystemlabel NAME
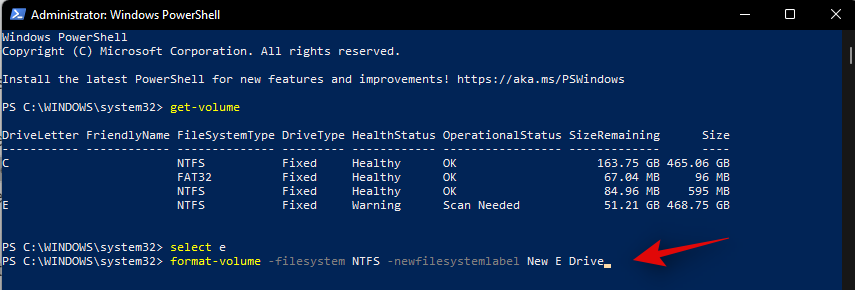
Un tas arī viss! Atlasītais sējums attiecīgajā diskā tagad tiks formatēts. Pagaidiet, līdz process ir pabeigts, un aizveriet PowerShell, lai izmantotu disku kā parasti.
6. metode: trešās puses utilīta izmantošana
Ir daudz nodalījumu pārvaldnieku, kas var palīdzēt viegli pārvaldīt un formatēt visus jūsu sistēmā instalētos diskus. Izpildiet tālāk sniegtos norādījumus, lai sāktu darbu. Šajā rokasgrāmatā mēs izmantosim Gnome Partition Manager, kas ir ilgstoši uzticams nozares rīks, kas ir pilnīgi bezmaksas. Izmantojiet tālāk norādīto saiti, lai lejupielādētu to savā vietējā krātuvē.
Kad GParted ir lejupielādēts jūsu sistēmā, varat to vienkārši uzstādīt tāpat kā jebkuru citu ISO un sākt. Ja vēlaties notīrīt un notīrīt sāknēšanas disku, ieteicams pievienot ISO noņemamam datu nesējam, kas ļautu formatēt disku ārpus pašreizējās Windows 11 instalācijas. Kad tas ir uzstādīts, restartējiet sistēmu un piekļūstiet Gnome Partition Manager no sāknēšanas izvēlnes. Mēs izmantosim Rufus, lai diska attēlu uzstādītu noņemamajā datu nesējā un pēc tam pārstartētu pašreizējo sistēmu.
Piezīme. Pārliecinieties, vai jūsu sistēmā ir atspējota drošā sāknēšana, lai varētu sāknēt no USB. Turklāt pārslēdziet krātuves konfigurāciju uz AHCI, nevis Intel Optane atmiņu, ja tā ir pieejama. GParted nevarēs atpazīt jūsu diskus, ja krātuves konfigurācija nav iestatīta uz AHCI.
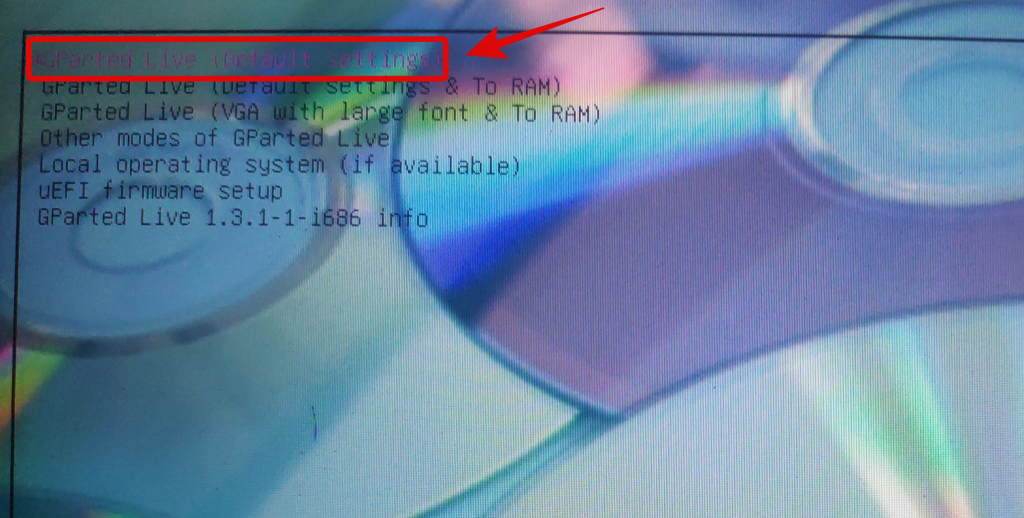
Kad esat sāknējis savu USB disku, jums būs iespēja palaist GParted ar dažādiem iestatījumiem. Mēs iesakām izvēlēties pirmo opciju un atlasīt “Palaist GParted ar noklusējuma iestatījumiem”.
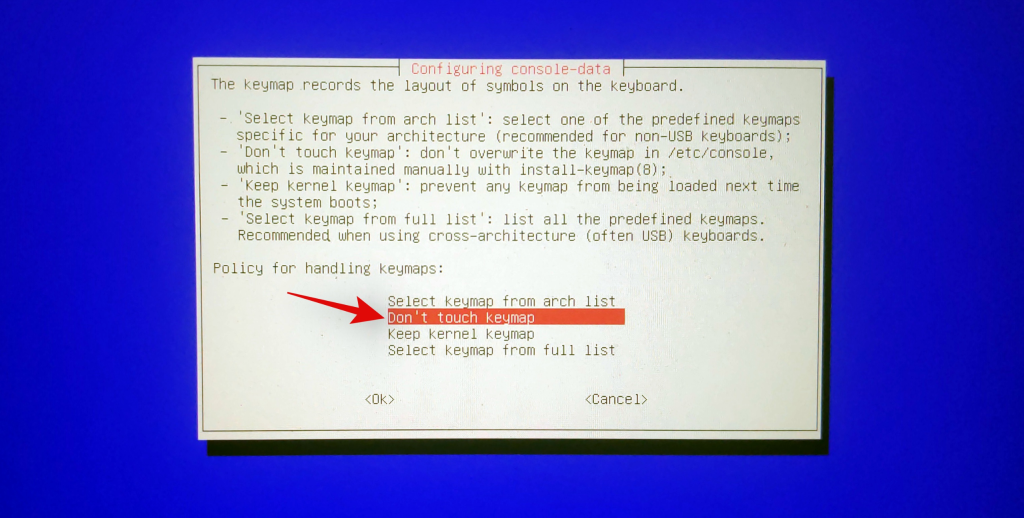
Tagad jums tiks piedāvāts izvēlēties taustiņu karti. Šī lapa noder gadījumā, ja Gnome nepareizi atpazīst jūsu tastatūru. Ja šķiet, ka tastatūra reaģē, atlasiet “Nepieskarieties tastatūrai”, lai turpinātu procesu.
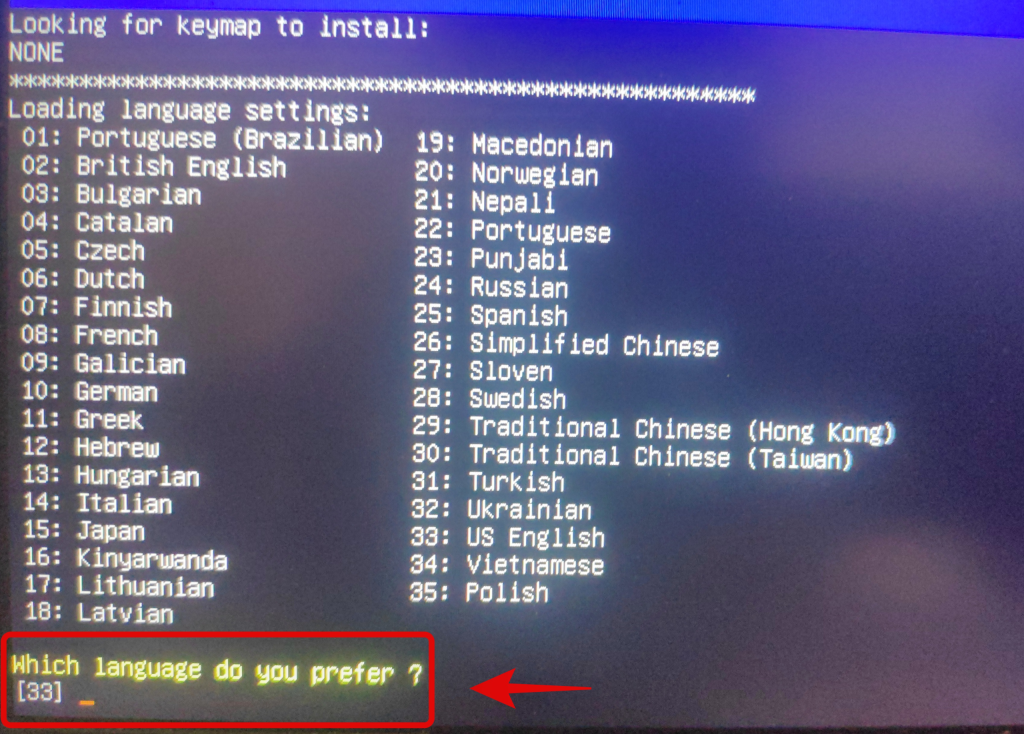
Tagad turpiniet un atlasiet valodu, ievadot tai atbilstošo numuru. Ievadiet '33', ja vēlaties atlasīt ASV angļu valodu.
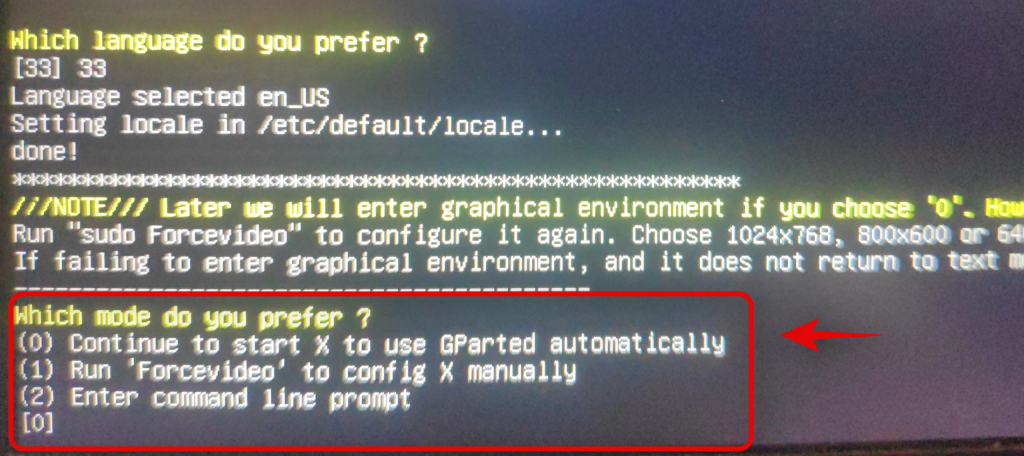
Tagad jums tiks jautāts, vai vēlaties ielādēt GParted ar piespiedu video draiveriem vai noklusējuma iestatījumiem. Piespiedu video draivera opcija noder gadījumā, ja GParted nevar atpazīt jūsu displeju vai ja sistēmā ir problēmas ar izšķirtspēju. Mēs iesakām izvēlēties pirmo opciju. Ievadiet '0', lai atlasītu opciju.
GParted tagad tiks palaists, un jūs tiksit novirzīts uz tā pagaidu darbvirsmu. Sadalījumu pārvaldniekam tagad vajadzētu automātiski palaist jūsu sistēmā. Noklikšķiniet uz nolaižamās izvēlnes augšējā kreisajā stūrī un atlasiet vajadzīgo disku, kuru vēlaties formatēt.
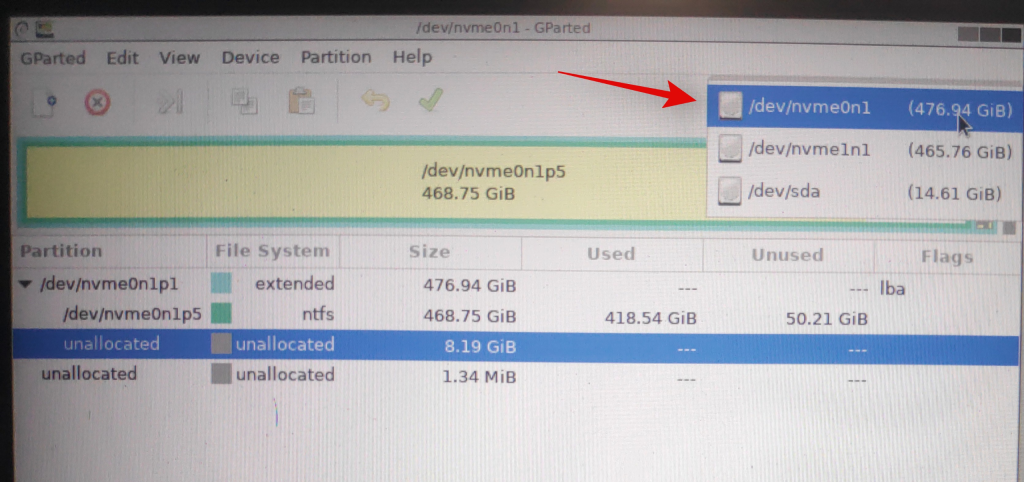
Tagad jūs iegūsit atlasītajā diskā esošo sējumu sarakstu. Noklikšķiniet un atlasiet vajadzīgo sējumu, kuru vēlaties formatēt.
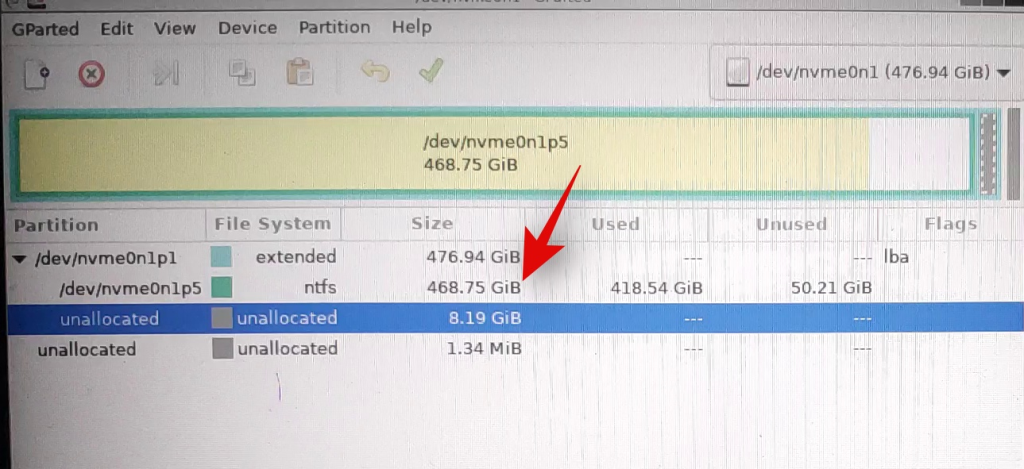
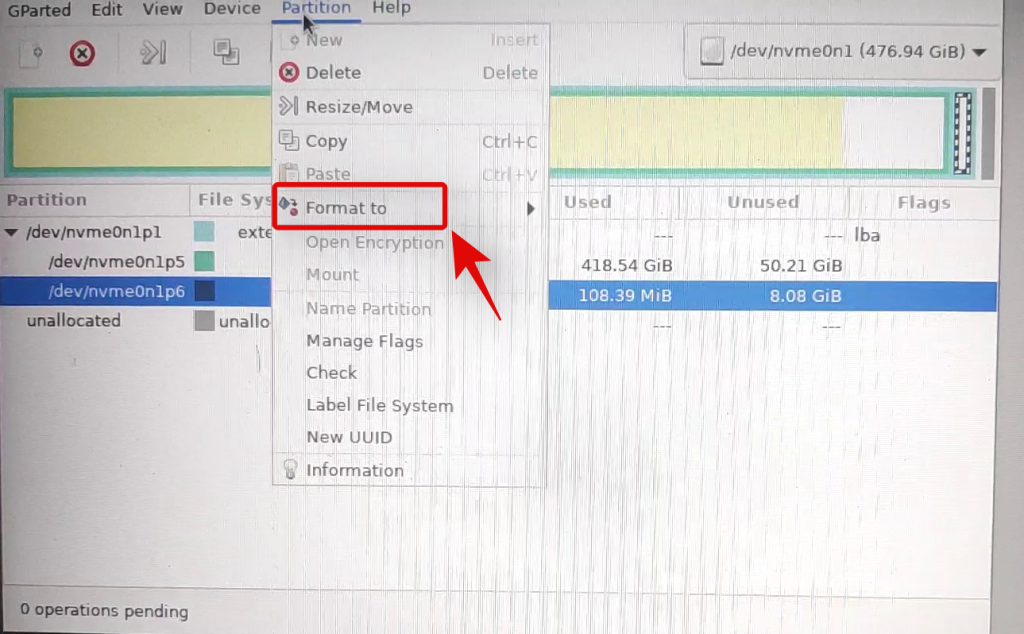
Tagad augšpusē noklikšķiniet uz "Sadalījums" un virziet kursoru virs "Formatēt uz".
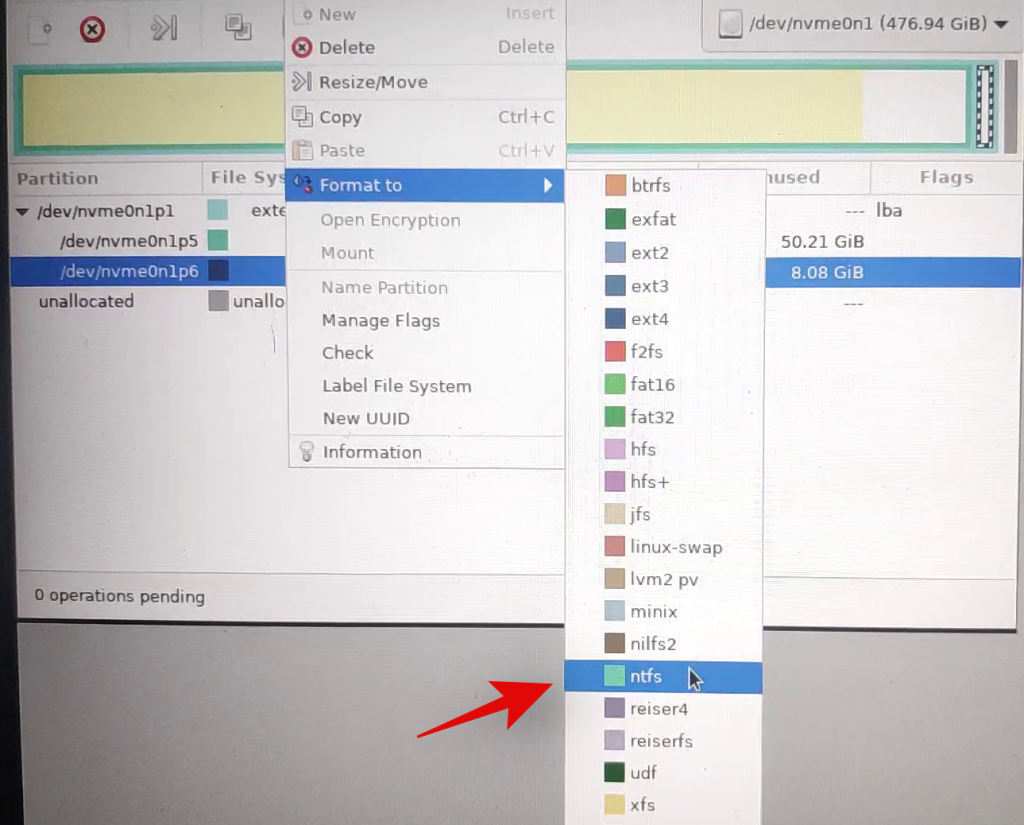
Select your desired drive format but it is recommended that you format your drive in NTFS for all modern systems.
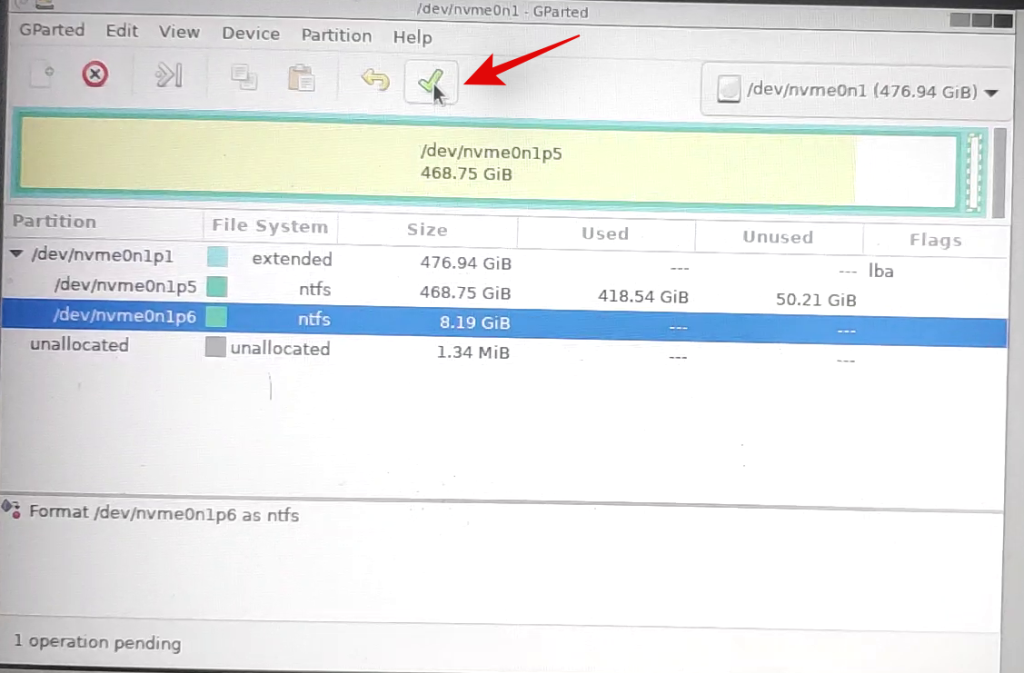
Once you select the desired disk format, GParted will cue the current operation in its task list. Click on the checkmark in the toolbar at the task to execute cued tasks.
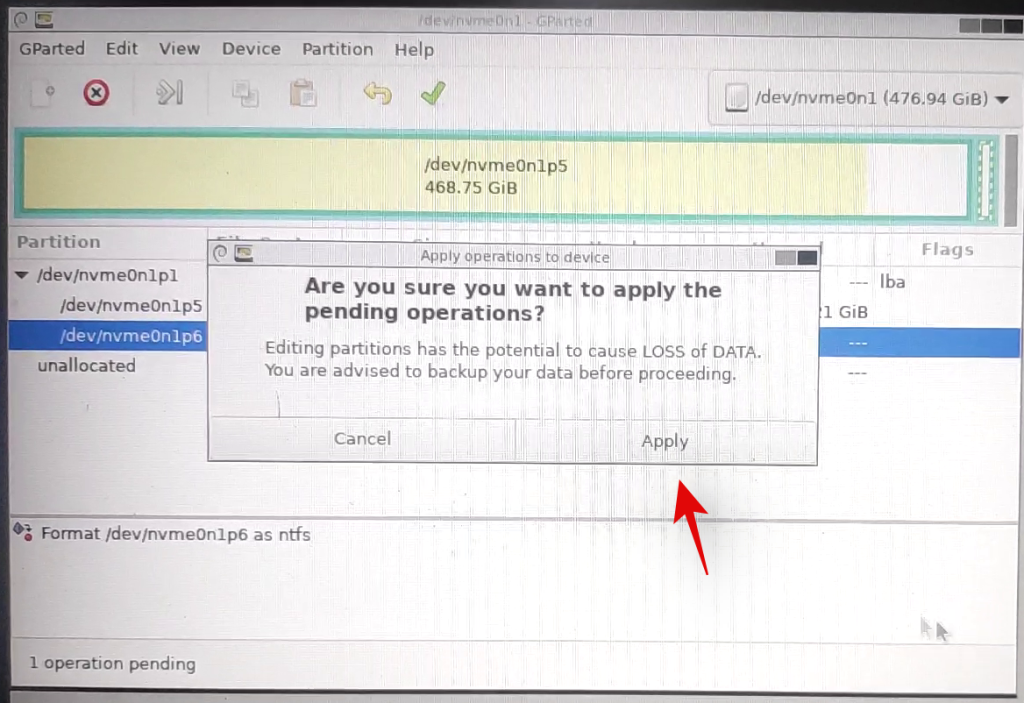
Click on ‘Apply’ to confirm your choice.
GParted will now perform the necessary operations and the selected volume should be automatically formatted at the end of this process. Close the GParted utility and click on the Power icon on the desktop. Click and select ‘Restart’ and then click on ‘Ok’.
Boot into the BIOS on your system and revert the changes you made earlier. This includes enabling secure boot, changing your storage configuration back to its default settings, and changing your boot device order.
Once you have reverted the changes, unplug your USB and exit the BIOS while saving the changes you made.
You will now be booted into Windows normally and the selected volume should now be formatted and wiped on your system.
Method #7 From Recovery
If you are in Windows Recovery Environment and unable to boot into Windows, then you can use the guide below to format a drive on your system. Please keep in mind that it is not recommended to format your boot drive using the guide below from your recovery environment as this could cause issues with your boot drive and make it unrecognizable. You will then have to completely format the drive and set it up again and install a new version of Windows on it. Hence, use the guide below only to format secondary drives from the Recovery environment or ensure that you have a Windows 11 installation media handy to reinstall the OS that you will remove from your boot drive.
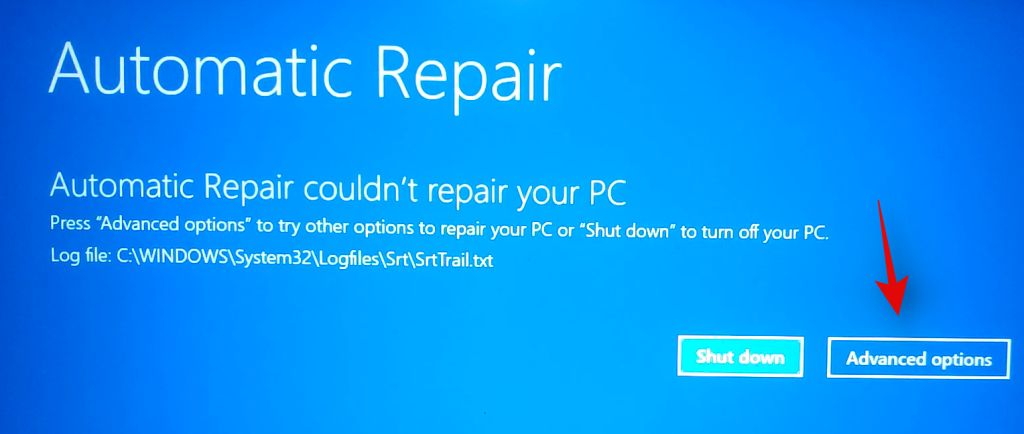
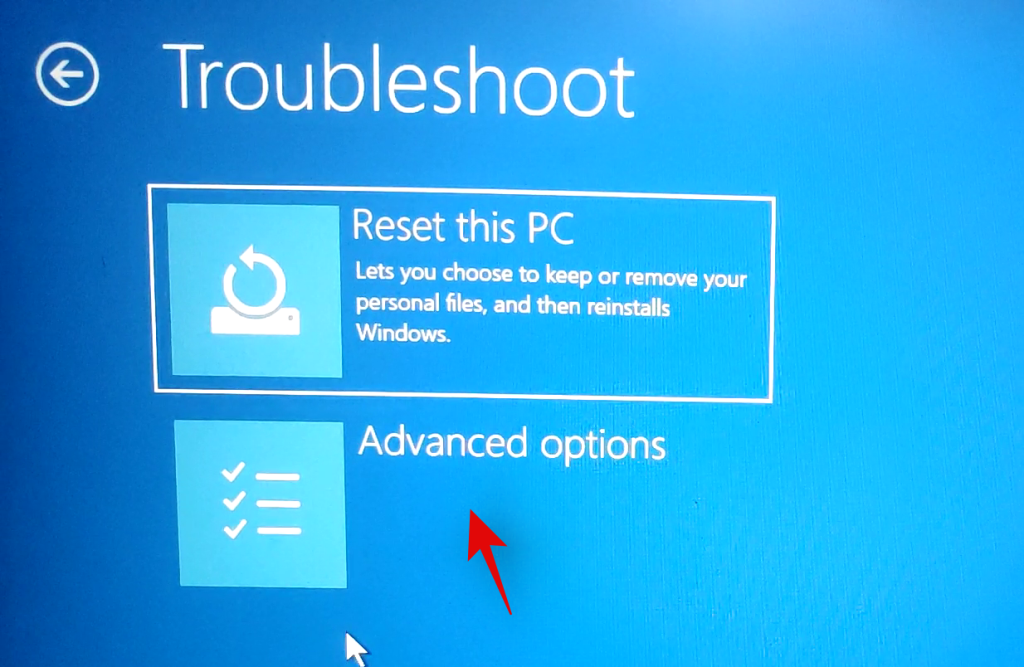
Once you are on the Windows Recovery or troubleshooting screen, click and select ‘Advanced Options’.
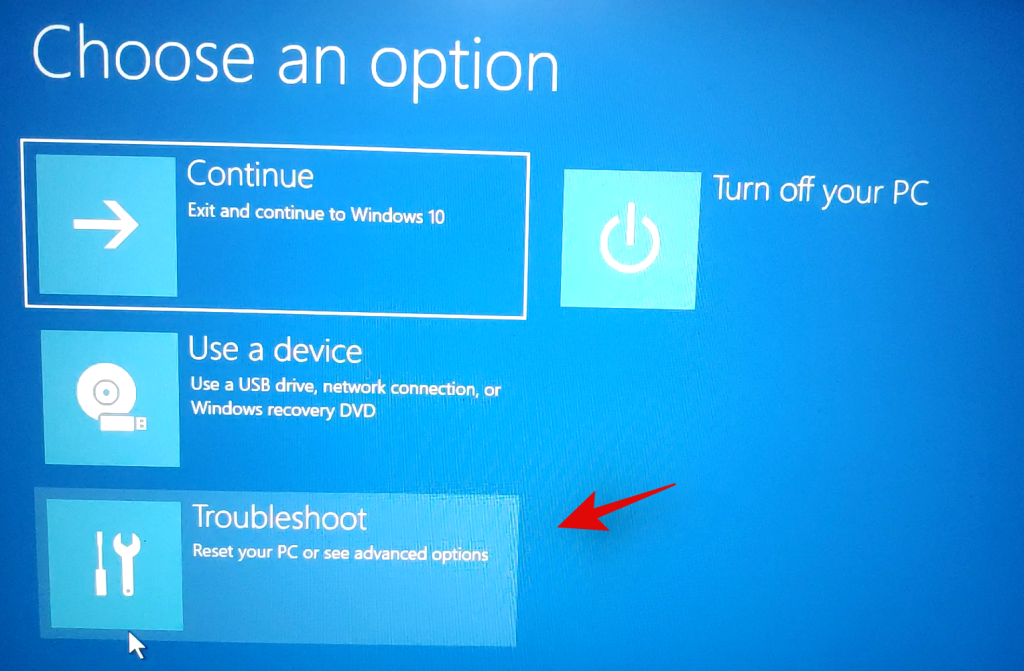
Click on ‘Troubleshoot’.
Select ‘Advanced Options’ again.
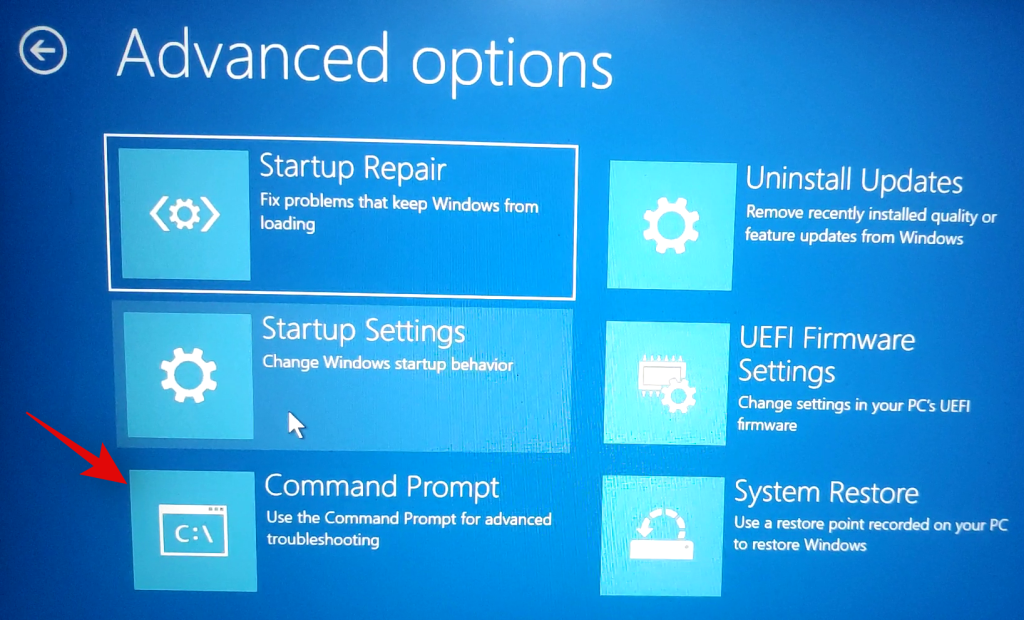
Now click on ‘Command Prompt’ to launch the command prompt.
Type in the following command to launch the diskpart utility.
diskpart
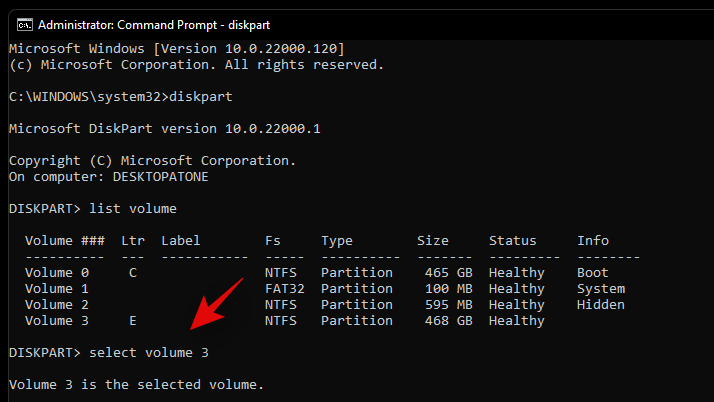
Now execute the following command.
list volume

Find the volume you wish to format and use the command below to select it. Replace X with the dedicated number of the volume you selected.
select volume x
Now use the following command to format the selected volume with NTFS as its format. Replace NAME with the name you wish to give your newly formatted volume.
format fs=ntfs quick label=NAME
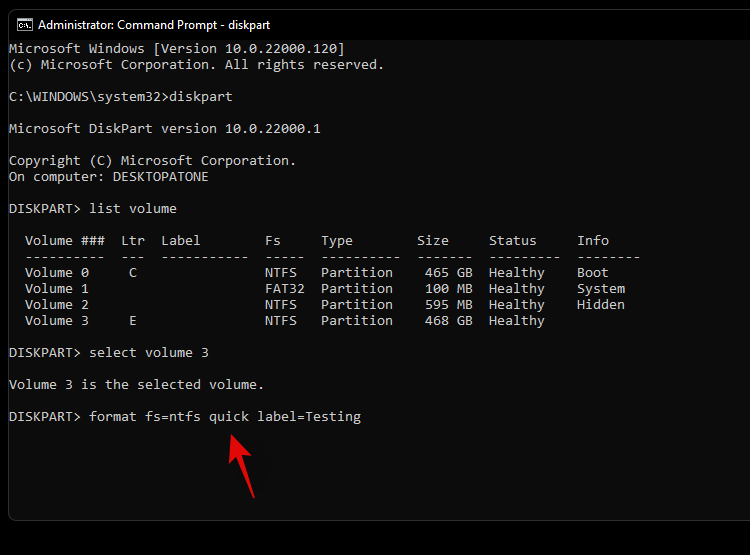
Let diskpart do its thing and the volume should be formatted within a few seconds. Once formatted, type in the following command to exit CMD.
exit
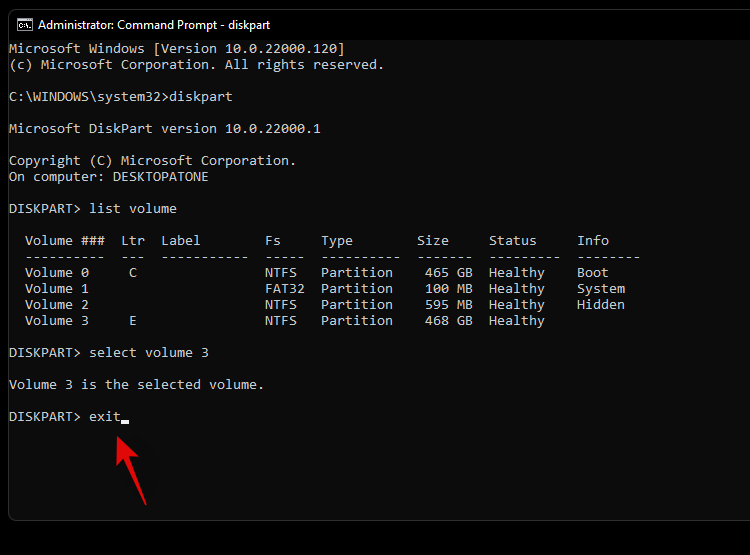
Now restart your PC and the selected volume should be formatted on your system.
Method #8: Using the Windows Setup
You can also format a drive-by directly using the Windows setup as well. Depending on your requirements, you can then exit the setup or continue installing Windows on the freshly formatted drive.
Launch the Windows setup from the installation media when prompted at the time of boot. Once the setup is launched, select your language and click on ‘Next’.
Click on ‘Install Windows’.
Windows Setup will now detect the drives installed on your system. Click and select the drive you wish to format and click on ‘Format drive’ at the bottom.
Confirm your choice and Windows will now proceed to format the selected drive.
And that’s it! Once the drive is formatted, you can continue formatting other drives on your system using the setup or continue with the Windows installation depending on your requirements.
How to completely format a drive on Windows 11 or 10
Completely formatting a drive is a little different from the traditional format methods listed above. While the above-listed methods will delete all your data from the drive, the existing partitions will remain. Additionally, if it is the boot drive that we are talking about then you will also have recovery and EFI partitions on the drive. While this shouldn’t be an issue on your system, they can cause problems when switching systems as the boot order or the recovery media can be recognized incorrectly by the new system.
In such cases, you can wipe all partitions from a drive and completely format it. You can then create new partitions and volumes on the drive depending on the need of the new system that you are switching to. Follow one of the guides below to completely format a drive and remove all partitions and volumes.
Method #1: From a third-party utility
If you wish to completely format your drive using a third-party utility then we recommend using the Gnome Partition Manager. This is an open-source and completely free utility hosted on Sourceforge. You can even compile the binaries on your own in case the privacy is a concern. Follow the guide below to get you started. The Gnome Partition Manager is available in ISO format which allows you to mount it to a removable media and use it individually as well, in case you are looking to completely format your boot drive. Use Rufus to create a USB installation media using the Gnome Partition Manager ISO.
Required
Guide
Make the necessary BIOS changes on your system and plug in the GParted USB into your system. Once plugged in, reboot your device and boot from the USB by pressing a key if prompted.
You will now be at the GParted Splash Screen where you will be requested to select the relevant version of GParted that you wish to use. We recommend you select the first one which is GParted Live with default settings.

Once booted, you will be prompted to change your keymap if needed. If your keyboard seems to be working as intended, select ‘Don’t touch keymap’ or use one of the other options to get keyboard working within Gnome.

Select your preferred language by entering its relevant number. Use number 33 for US English.

Now if you wish to manually install or configure your video output then enter 1 on the next screen. Else if the resolution and video response times seem to be fine for now then enter ‘0’.

GParted will now boot with the dictated settings. Once launched, you will be taken to the temporary desktop where the GParted utility will be launched automatically. Click on the drop-down menu in the top right corner and select the desired disk that you wish to completely format.

Now select a volume on the selected disk and click on ‘Partition’ at the top. Select ‘Format to’ and then select ‘NTFS’.

Repeat the steps above for all the partitions on the disk. Once each partition is cued for formatting, click on the checkmark in your toolbar to execute these tasks.

Confirm your choice by clicking on ‘Apply’.
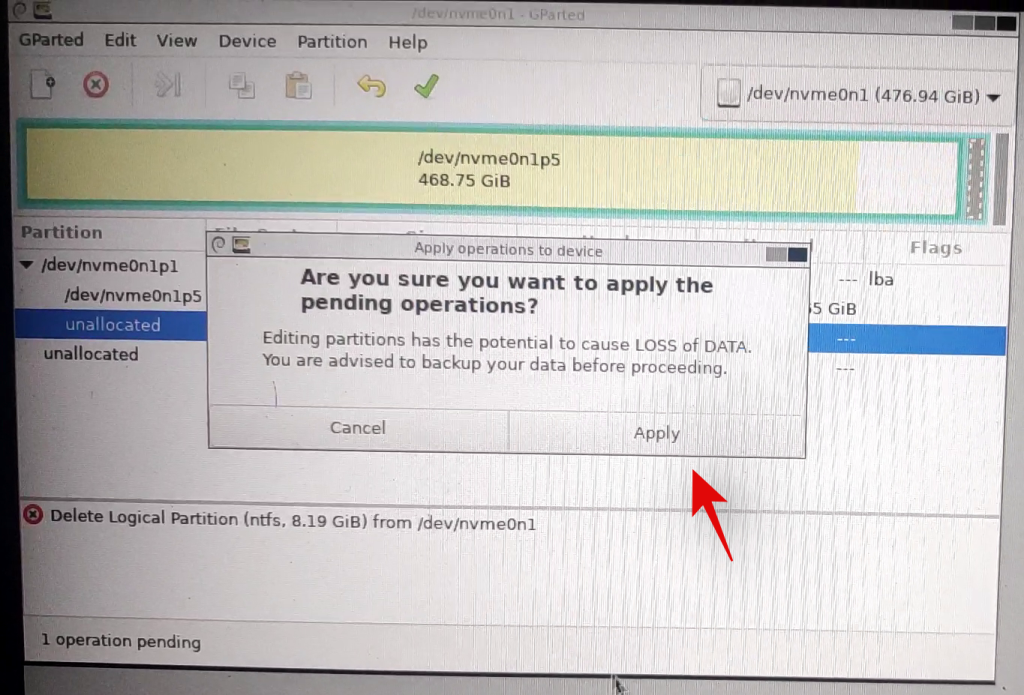
All the selected partitions will now be formatted. We can now delete these partitions. Click and select each partition one by one and then click on the X in your toolbar. This will cue each partition for deletion.
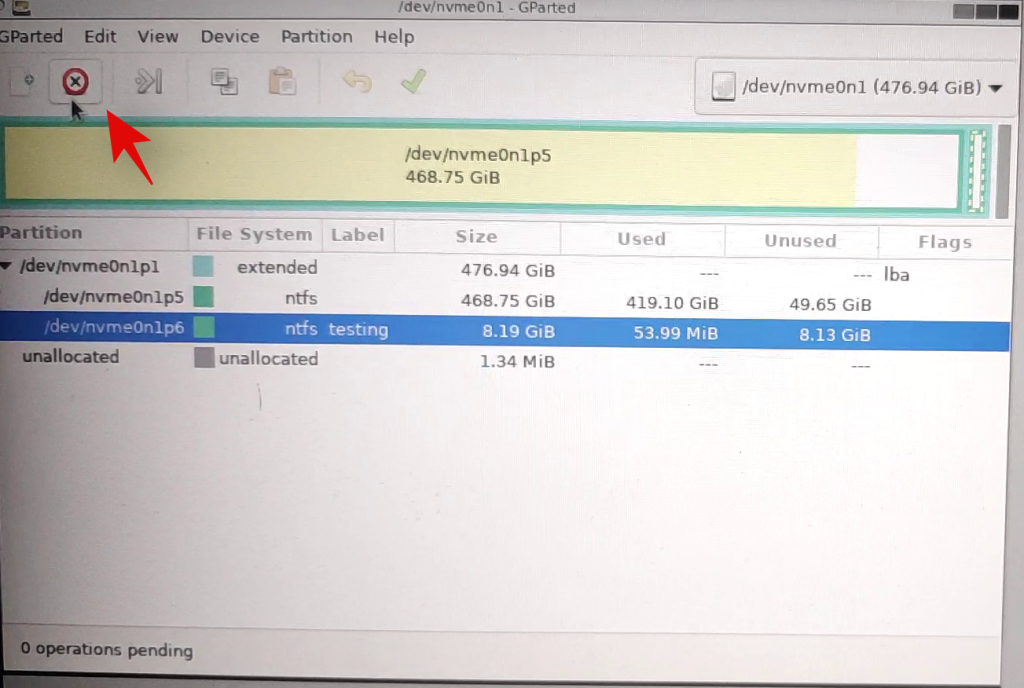
Click on the checkmark again to delete all the selected partitions.
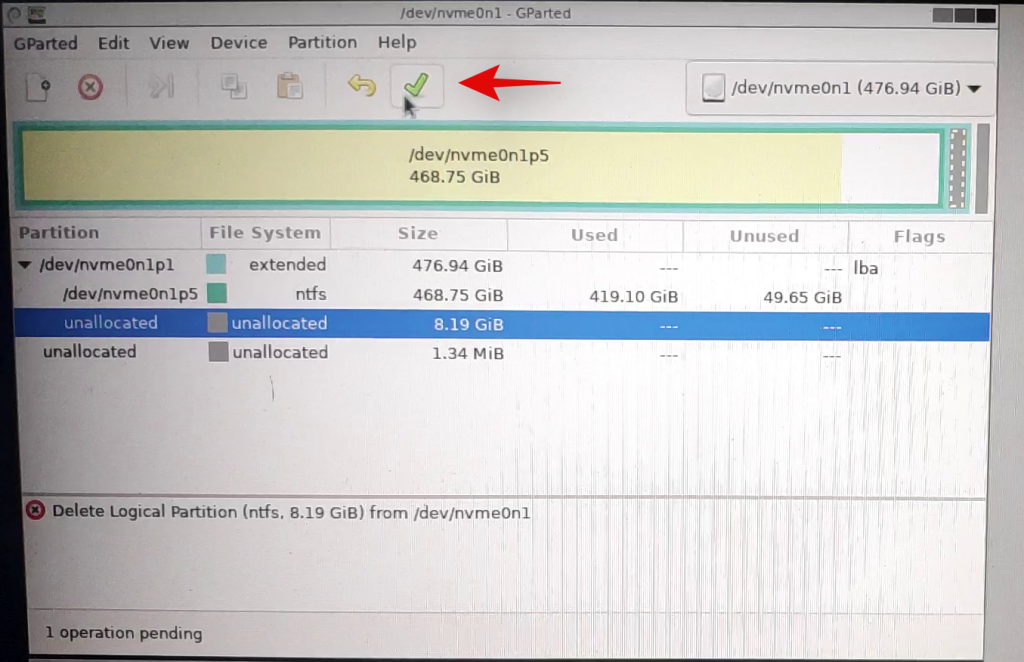
Confirm your choice by clicking on ‘Apply’.

Once all partitions are deleted from the disk, click and select the unallocated volume on the disk and then click on ‘New’ at the top. If you have an existing primary partition on the disk then select that partition and click on the ‘Resize’ icon instead.
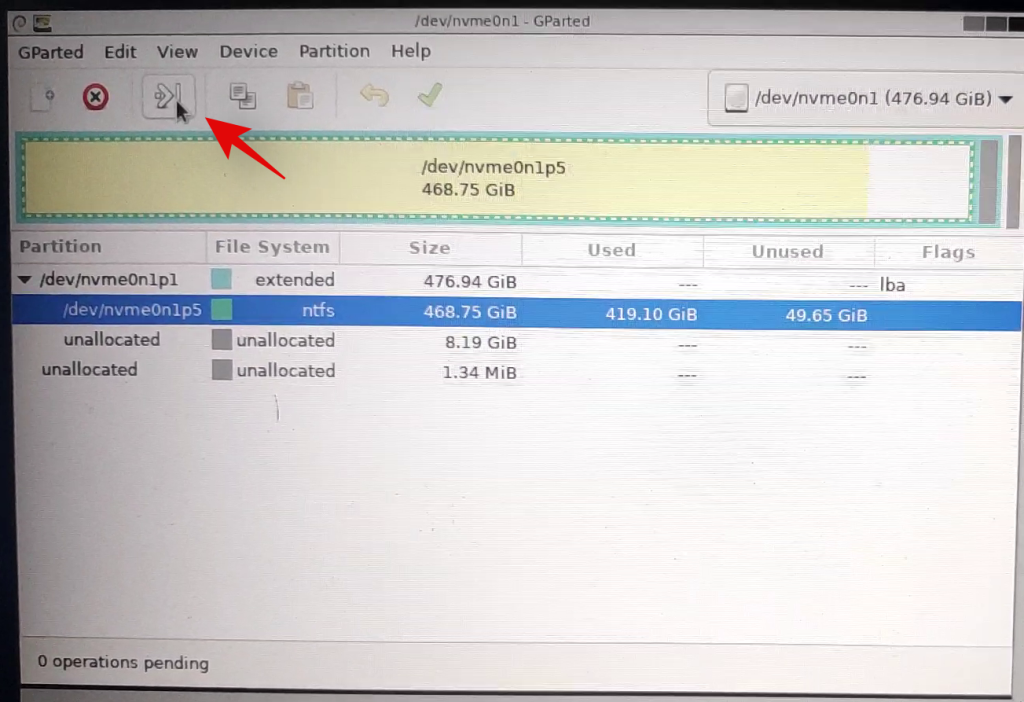
Select the entire size of your disk and enter a name for your disk beside the label text field. If resizing an existing partition, use the slider at the top to drag it to the maximum size.
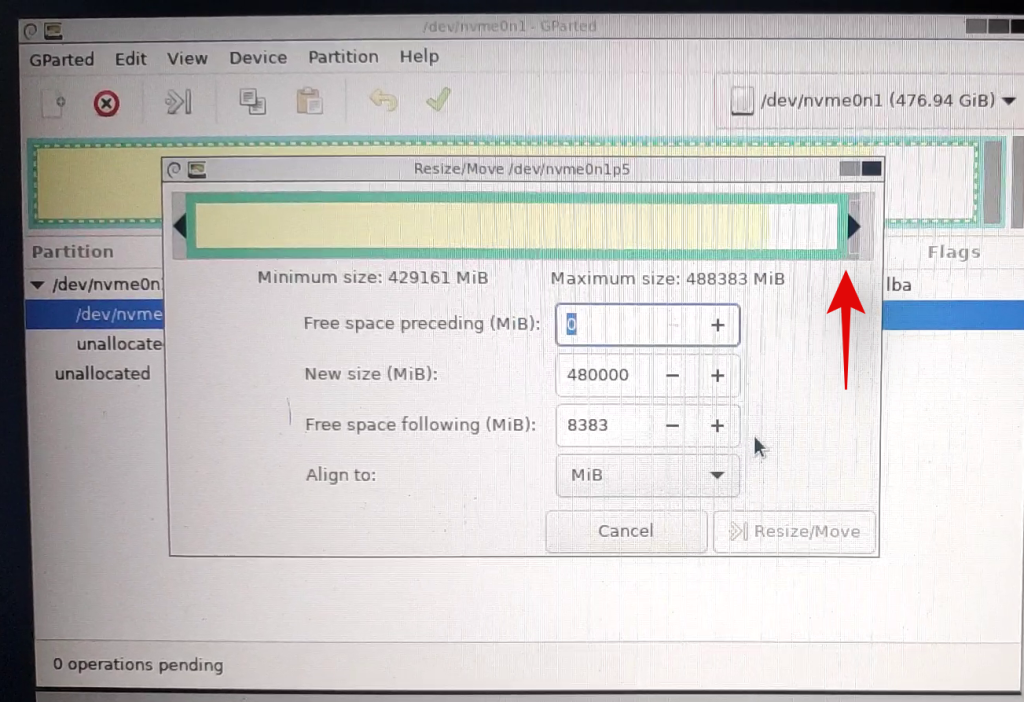
Click on ‘Ok’ or ‘Resize/Move’ depending on your choice.
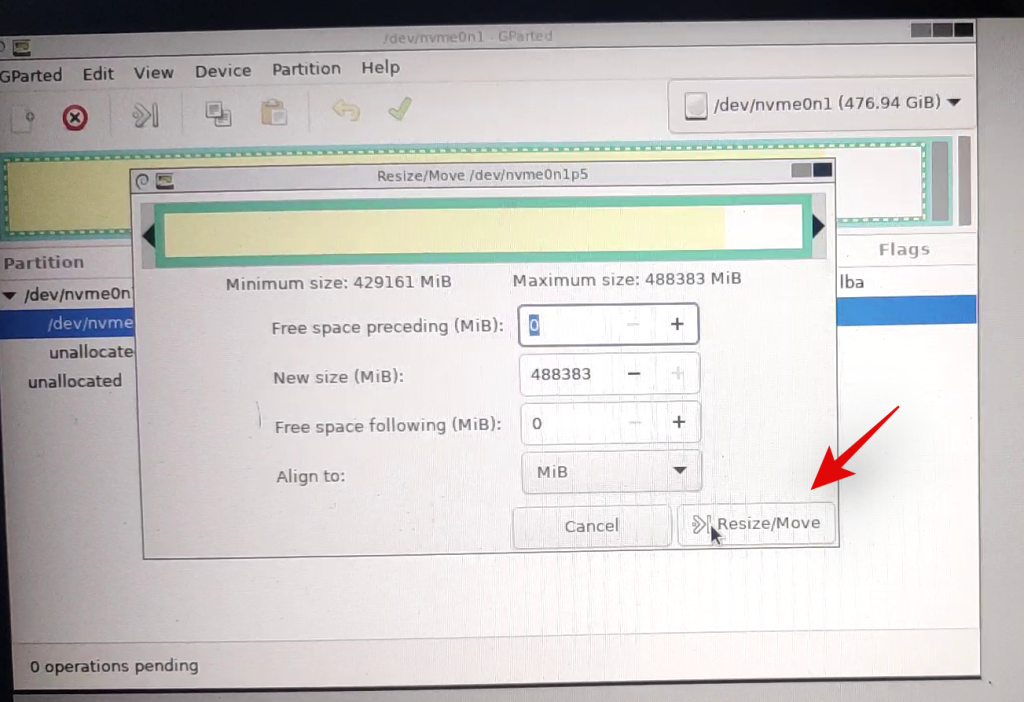
And that’s it! Your entire drive should now be formatted and a single partition equal to the entire size of your drive should now be created which will allow you to use the drive, however, you wish. You can now exit GParted by clicking on the power icon on the desktop. Once rebooting, boot into your BIOS and revert the changes you made earlier. Once reverted, unplug the USB and boot into Windows normally.
Method #2: From CMD
Diskpart is a hugely versatile utility that can be used to completely format a drive as well. Once completely formatted via diskpart, you will need to set your disk as GPT or MBR depending on your platform needs for the drive to be recognized properly.
Launch CMD using one of the guides above depending on the current state of your system. Once CMD is launched, enter the command below to launch diskpart.
diskpart

Tagad ievadiet šo komandu un atrodiet disku, kuru vēlaties pilnībā formatēt.
list disk

Pierakstiet attiecīgā diska numuru un izmantojiet tālāk norādīto komandu, lai to atlasītu. Aizstājiet N ar diska numuru, kuru atzīmējāt iepriekš.
select disk N
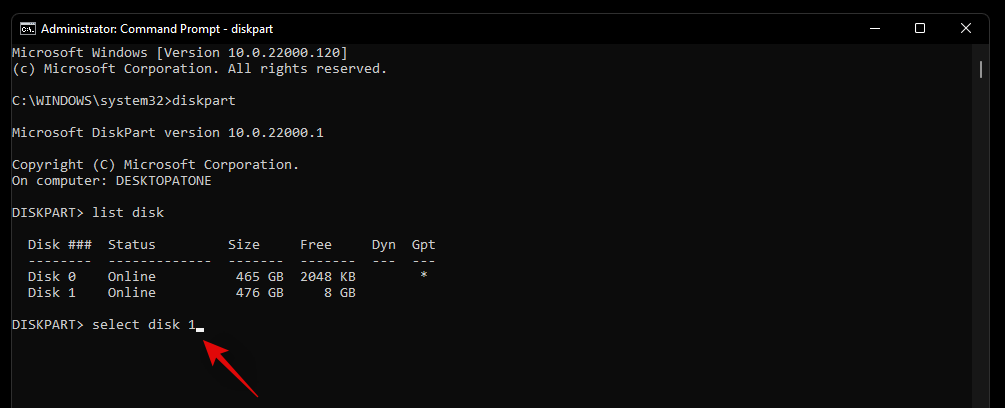
Tagad ievadiet tālāk norādīto komandu, lai notīrītu disku.
clean
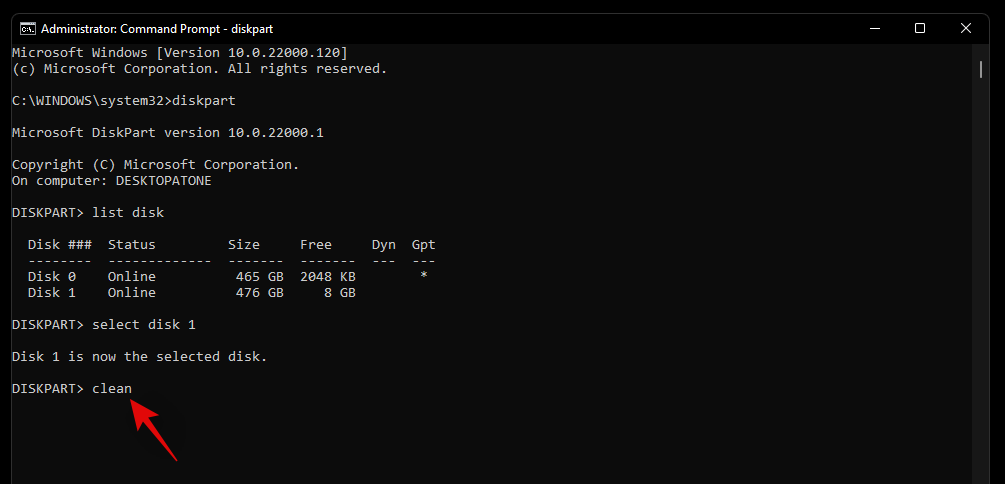
Tagad mums būs jāizveido nodalījums atlasītajā diskā, lai tas būtu lietojams. Lai sāktu, ievadiet tālāk norādīto komandu.
create partition primary
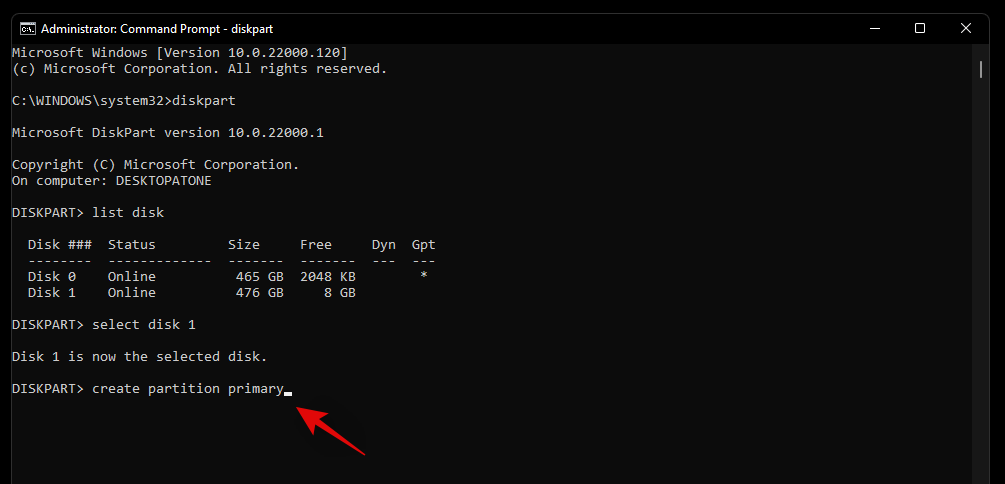
Izmantojiet tālāk norādīto komandu, lai tūlīt formatētu jaunizveidoto sējumu.
format fs=ntfs
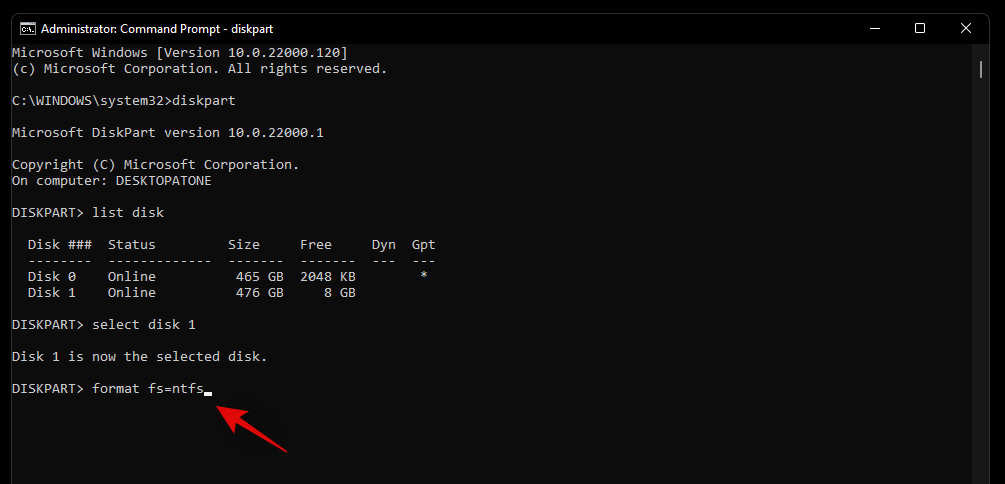
Ievadiet šo komandu, lai diskam piešķirtu burtu. Aizstājiet X ar jūsu izvēlēto burtu.
assign letter=X
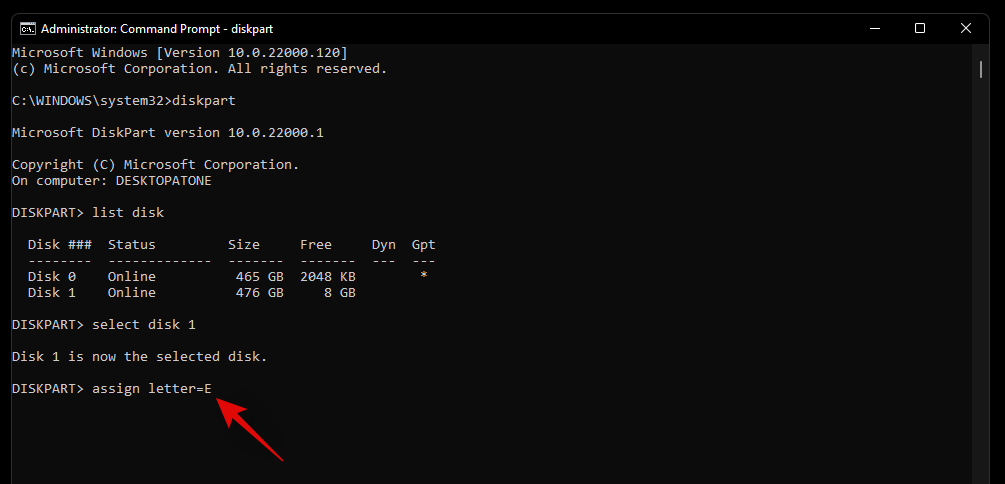
Un tas arī viss! Tagad atlasītajam diskam jābūt pilnībā formatētam. Tagad ir jāizdzēš arī visi diska atkopšanas vai EFI nodalījumi.
Kā pārslēgties starp MBR un GPT
MBR and GPT are types of disk setups that are used to install new OS on a drive. These types are essential in case you are trying to switch between platforms or use Linux on yoru system. While GPT is a new disk setup with various advantages, MBR is still the most compatible setup format out there. If you are trying to switch your disk setup from MBR to GPT or vice versa then you can use the guide below to change the disk type.
Note: When converting, your disk will be cleaned and all the data will be removed from it. You will need to create new partitions on the drive as well so ensure that you have backed up your data before proceeding with the guide below.
Launch CMD on your system either from the recovery environment or from within Windows depending on the current state of your system. Once launched enter the command below to launch the diskpart utility.
diskpart

Now enter the following command to get a list of all the disks on your system. Note down the number for the concerned list so that you can access it later on.
list disk
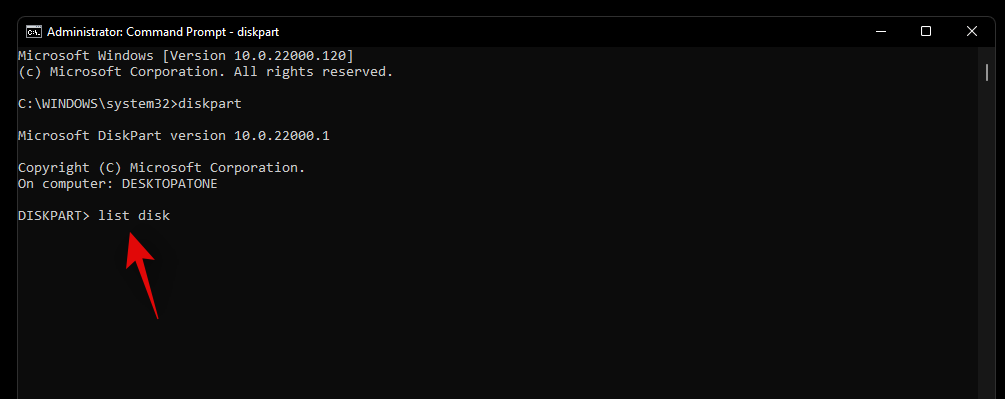
Enter the following command and replace N with the disk number you noted down earlier.
select disk N
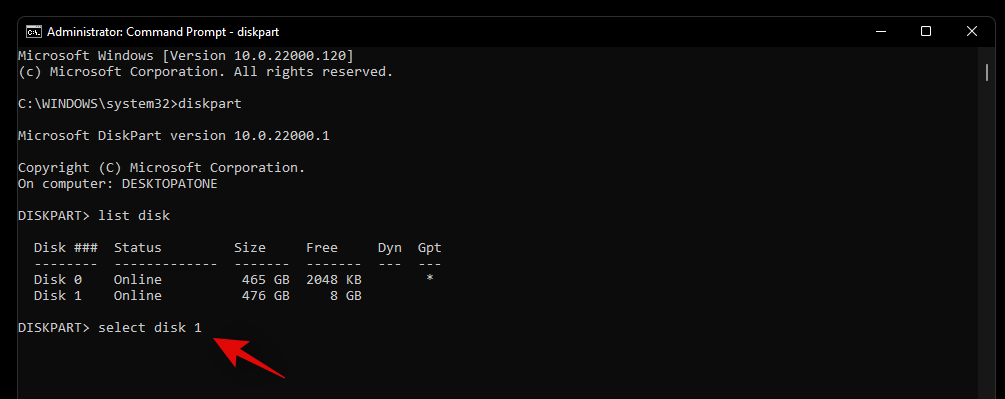
Use the command below to clean the drive.
clean
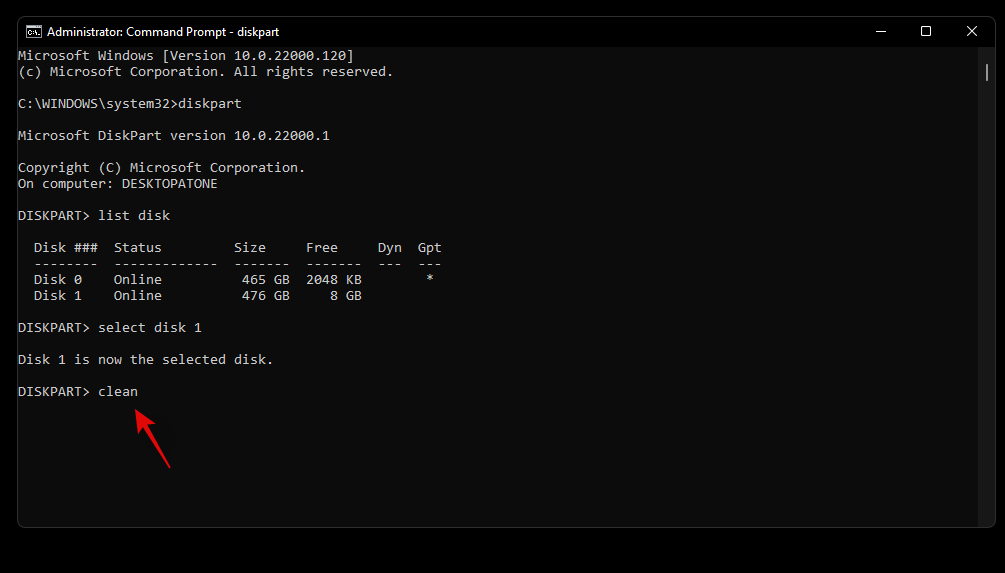
Now let’s convert the drive to your desired disk type. Replace TYPE with MBR or GPT depending on your current requirements.
convert TYPE
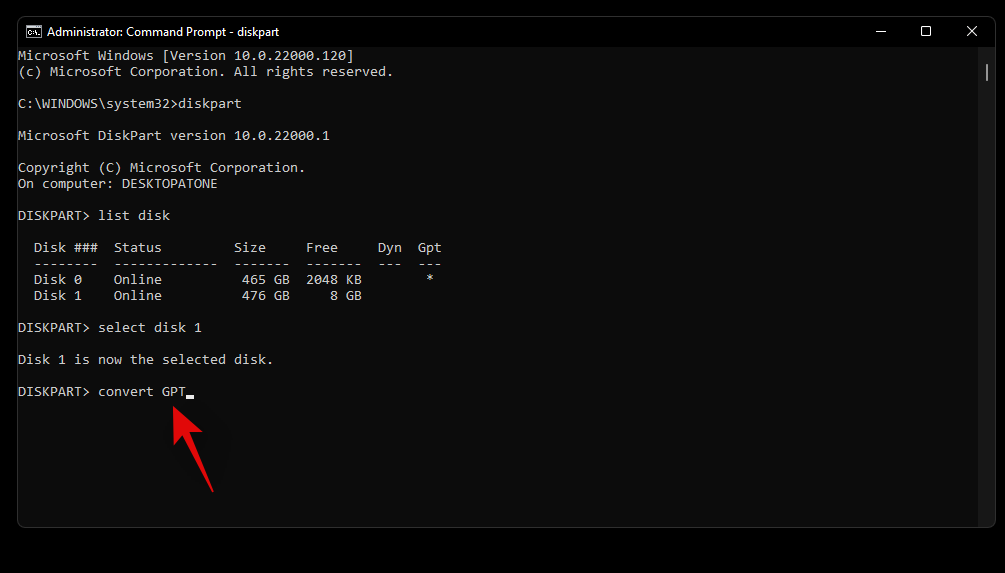
Once the disk has been converted, use the command below to create a primary partition.
create partition primary
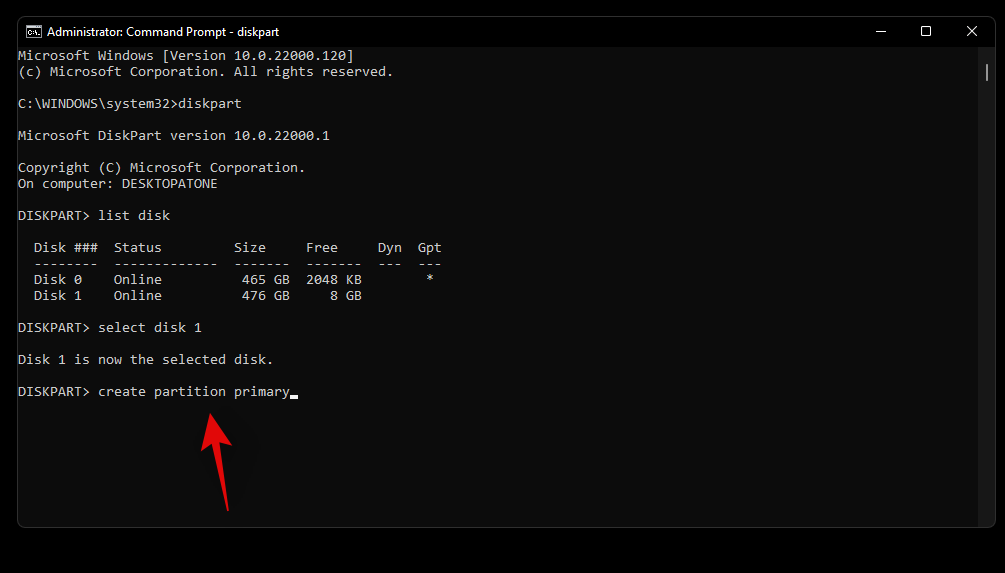
Now use the command below to assign a letter to the drive. Replace X with the drive letter of your choice.
assign letter=X
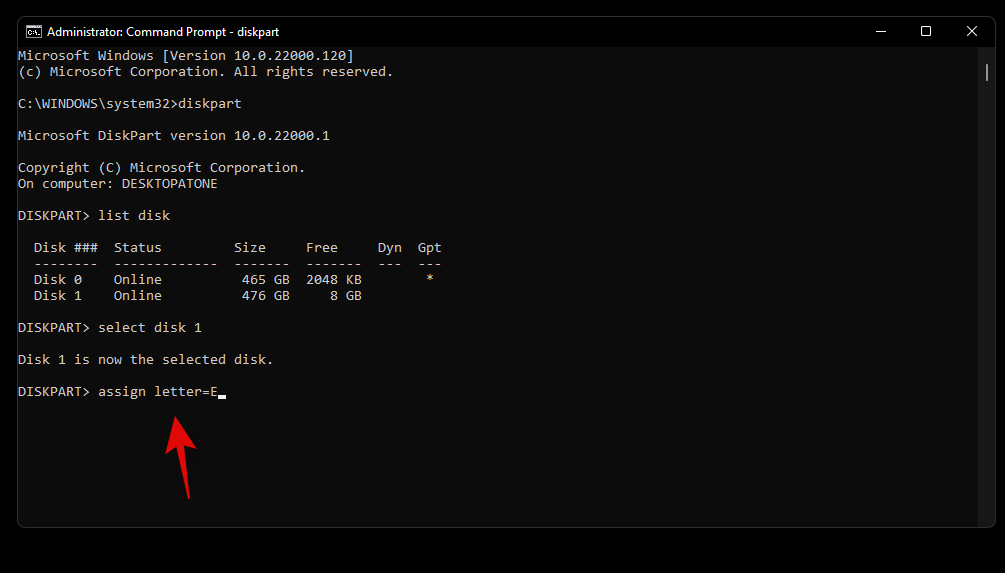
And that’s it! You will now have converted the selected drive to GPT or MBR depending on your current requirements.
How to create new volumes and partitions
Once you have formatted your drives you will find that it is not that easy to use them within Windows. Formatted drives need dedicated partitions which can then be used as storage spaces to store your data or install an OS. Use the guide below to create custom partitions for a selected drive in Windows 11.
Method #1: From CMD
Launch CMD and use the command below to enter diskpart.
diskpart
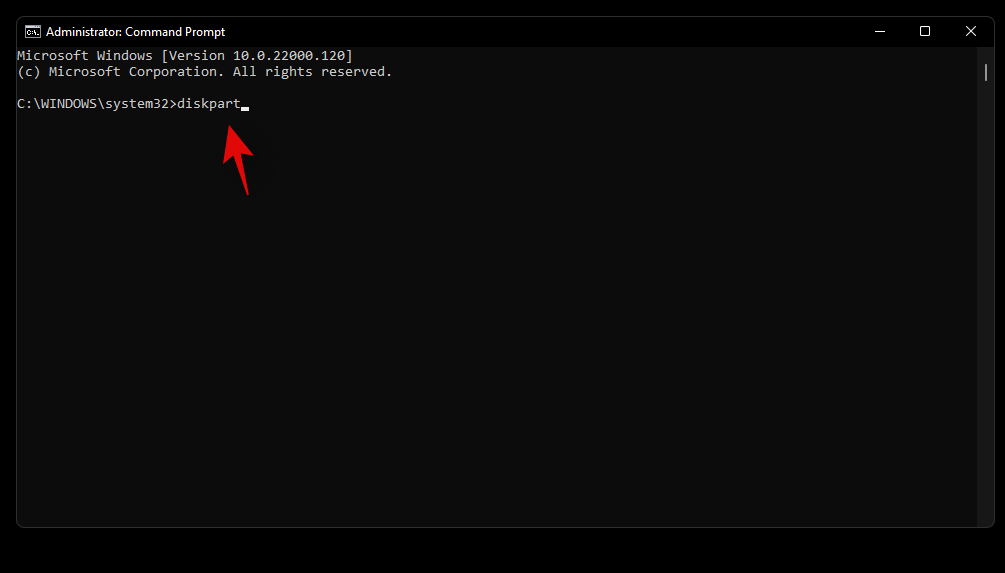
Enter the following command to get a list of all the disks installed on your system. Note down the disk number of the concerned disk.
list disk
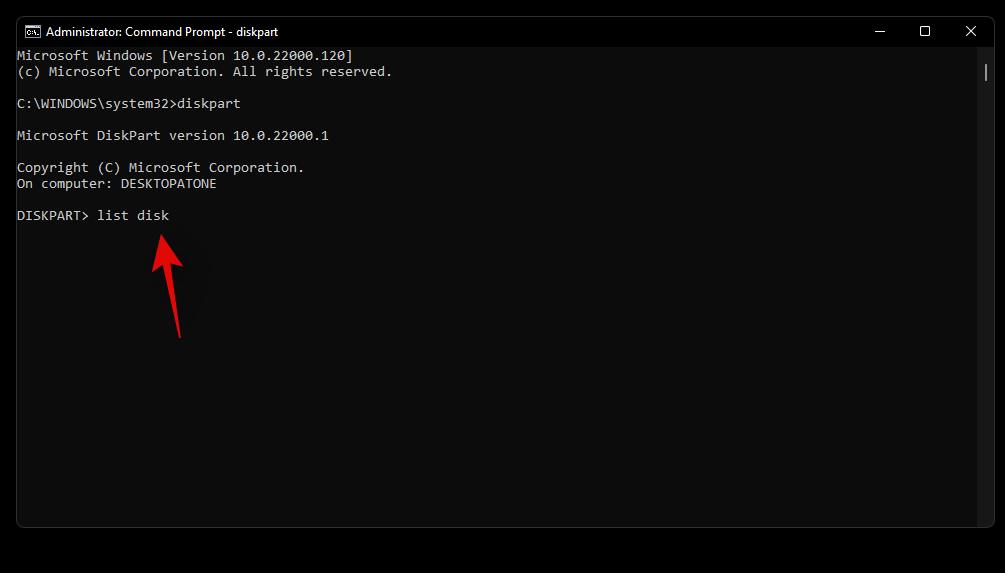
Now enter the command below and replace N with the disk number you noted down earlier.
select disk N
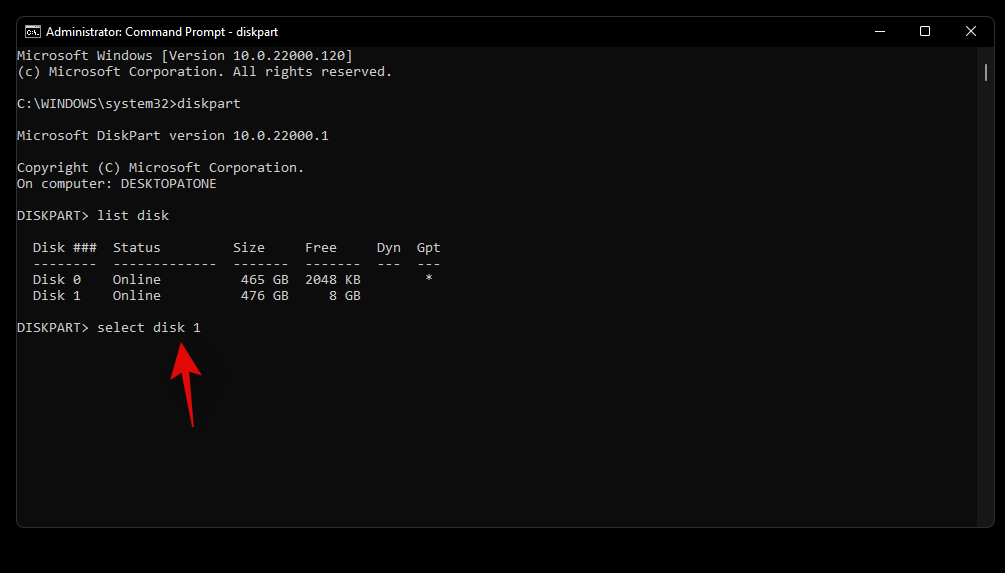
Use the command below to create a custom partition on the selected disk drive. If a partition already exists on the drive then replace ‘primary’ with ‘extended’. Additionally, replace XXXX with the size of your choice for the partition. The size is measured in megabytes where 1000MB = 1GB.
create partition primary size=SIZE
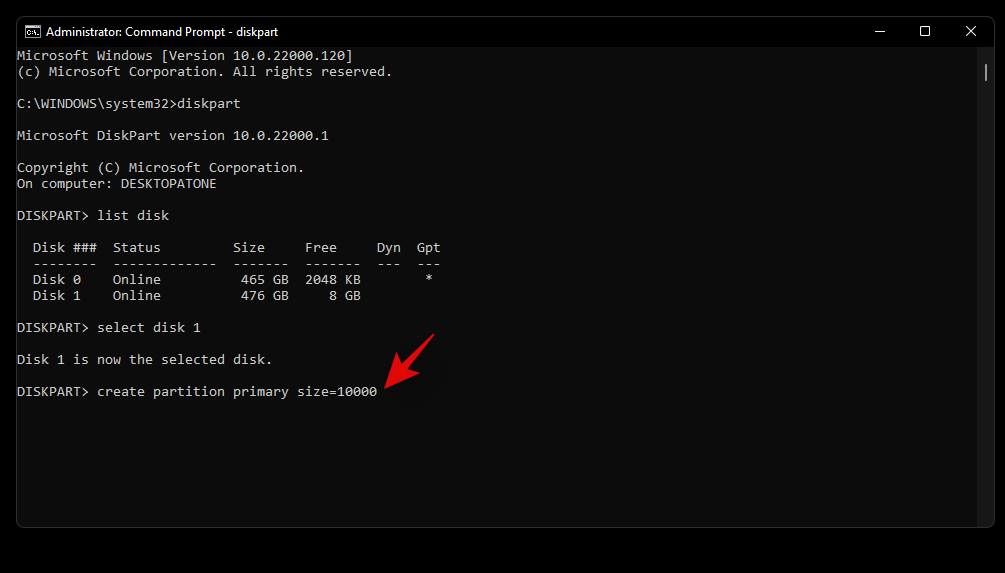
Now enter the following command. Your newly created partition will now show up in this list. Note down its volume number
list volume
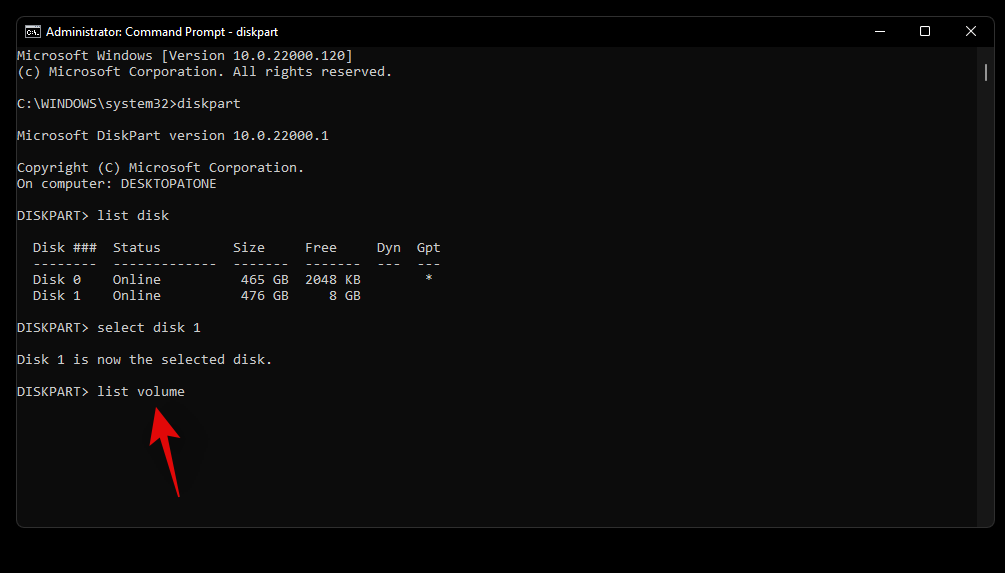
Enter the following command and replace N with the volume number you noted down earlier.
select volume N

Now use the following command to assign a letter to the selected volume. Replace X with the letter of your choice.
assign letter=X
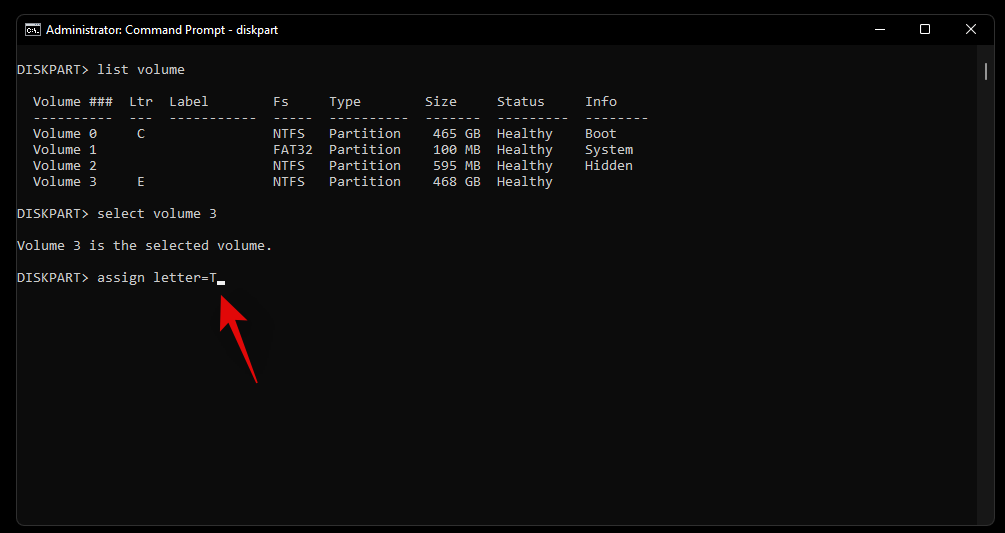
And that’s it! You will now have created a new partition on the selected drive depending on your current needs and requirements.
Method #2: From Disk Management
You can also create a new partition son your system using the Disk Management utility provided within Windows. Use the guide below to get you started.
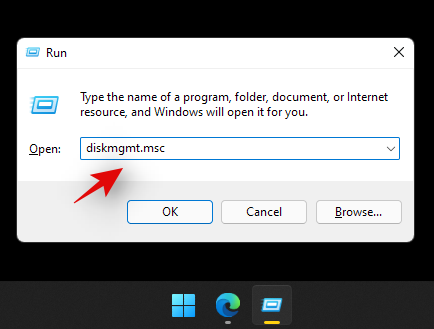
Press Windows + R on your keyboard and type in the following. Press Enter on your keyboard to launch the disk management utility.
diskmgmt.msc
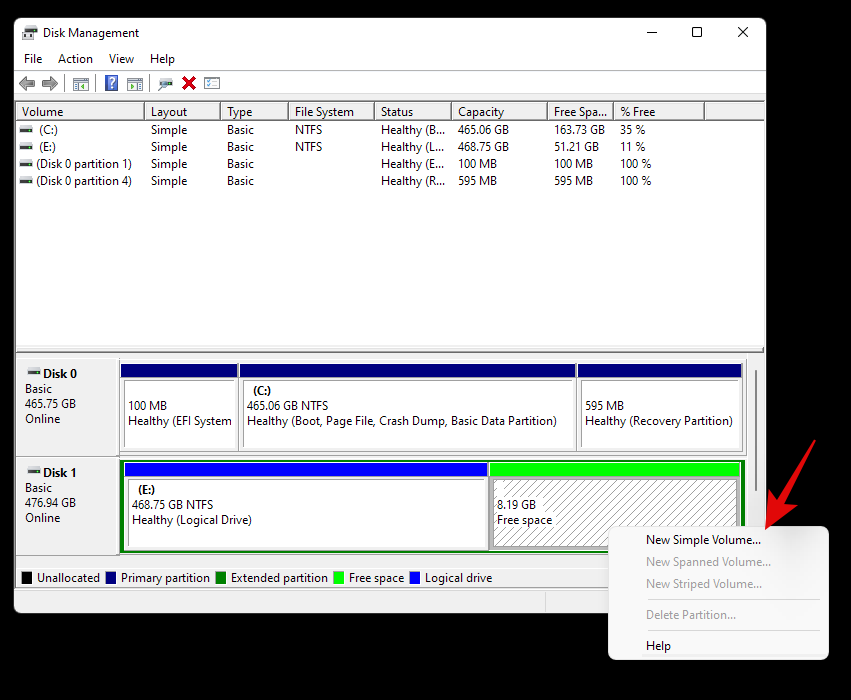
Once the disk management utility is launched, you will get a graphical representation for all your drives. Right-click on the unallocated space at the bottom of your screen and click on ‘New Simple Volume’.
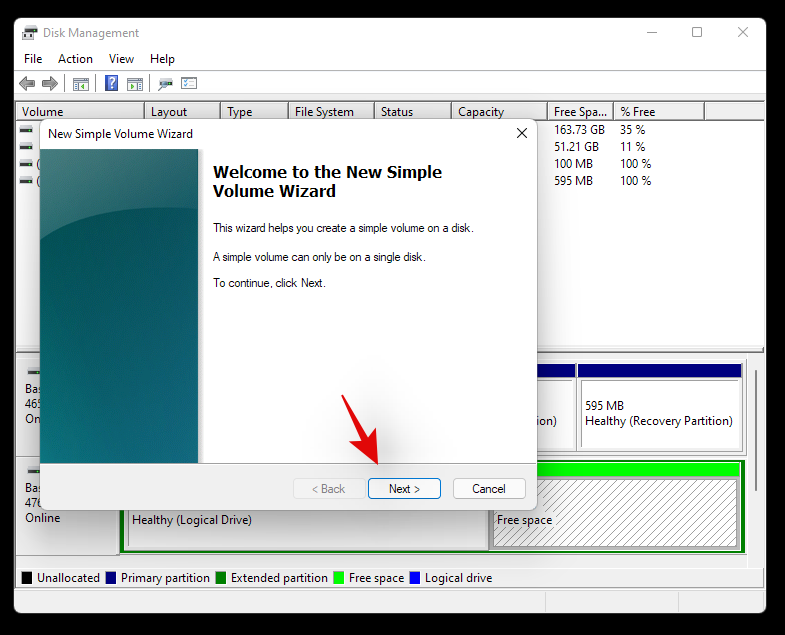
The volume creation wizard will now be launched. Click on ‘Next’ to get started.
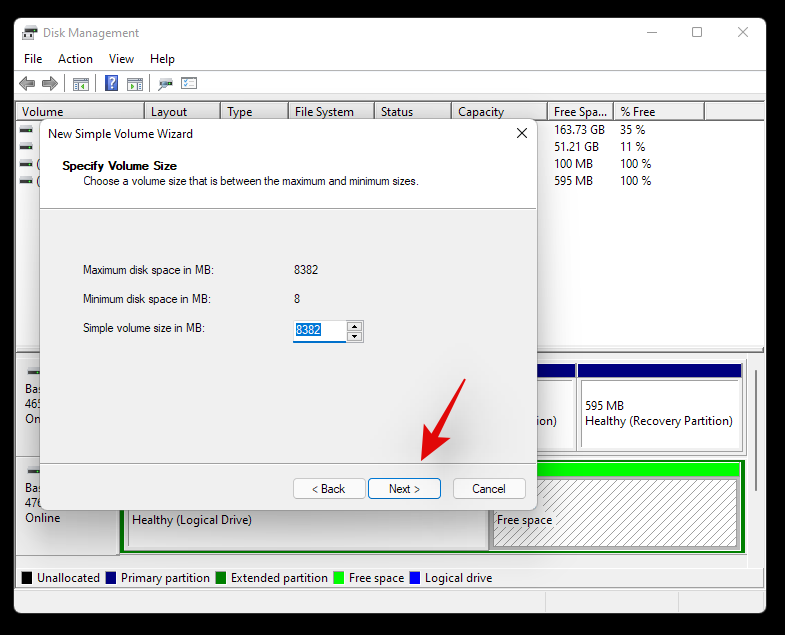
Select a custom size if needed. By default, Windows will use the entire unallocated space to create a new simple volume on your drive. Click on ‘Next’ once you have set the desired size.
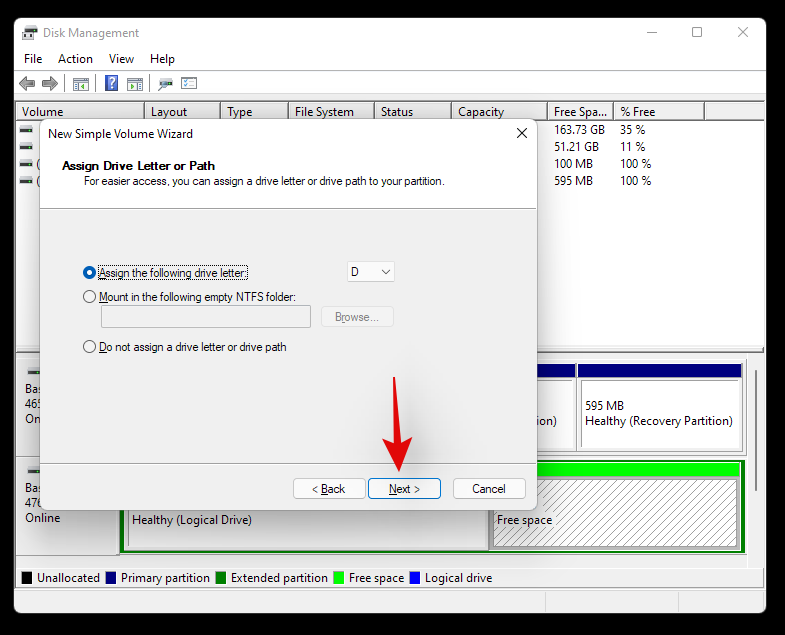
Choose a drive letter for your new volume now. Click on ‘Next’ once you are done.
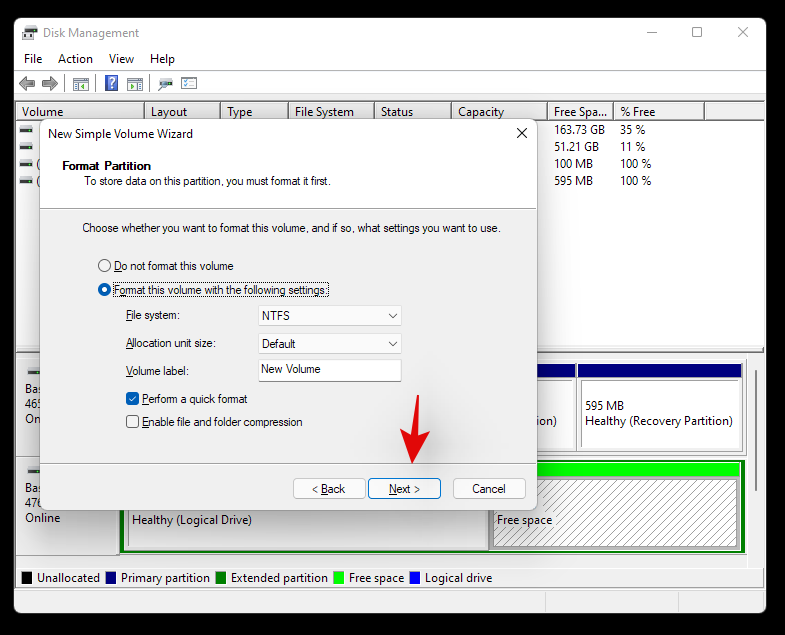
You will now be given the option to format the unallocated space before the volume is created. Choose your disk format by clicking on the drop-down menu and set a name for the new volume beside Volume Label. If you do not wish to format the unallocated space, then click and select ‘Do not format this volume’. Click on ‘Next once you are done.
Finally, click on ‘Finish’ and the new volume will now start being created.
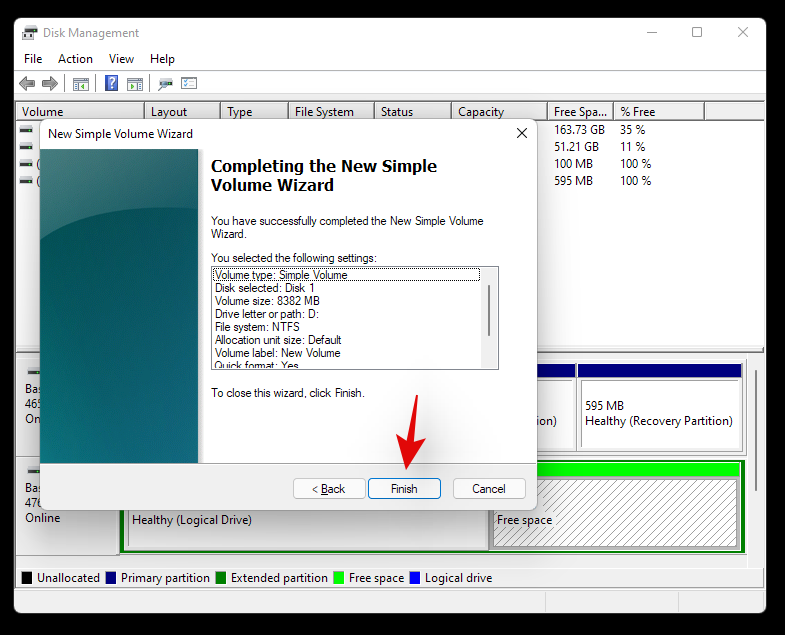
And that’s it! A new volume should now be created on the selected drive.
We hope this guide helped you easily format or wipe your drive in Windows 11 depending on your current needs and requirements. If you face any issues or have any questions for us, feel free to reach out to us using the comments section below.
Related:
Šajā rakstā mēs parādīsim, kā atgūt piekļuvi cietajam diskam, ja tas neizdodas. Sekosim līdzi!
“0x80070024 mediju ir aizsargāts pret rakstīšanu” kļūda var būt ķēpīga, jo tā patiesībā nesaka, par ko tā ir. Par laimi, vairumā gadījumu jūs varat vienkārši atzīmēt dažus atribūtus, lai to novērstu.
Vai jūs tikko iegādājāties SSD, cerot uzlabot sava PC iekšējo atmiņu, bet nezināt, kā to instalēt? Izlasiet šo rakstu tagad!
Ja veicat jaunināšanu uz jaunu datoru, iespējams, jūs mēģināt atkārtoti izmantot vecā datora cieto disku. Ja nē, iespējams, plānojat to uzdāvināt kādam ģimenes loceklim vai draugam. Bet pirms jums…
Iepazīstieties ar soli pa solim sniegtiem norādījumiem, kā pielāgot Windows 11 bloķēšanas ekrāna pulksteni ar personīgiem attēliem, fontiem un stiliem. Paaugstiniet savu darbvirsmas pieredzi bez piepūles.
Vai rodas problēmas ar GPT aizsardzības nodalījuma piekļuves liegšanas kļūdu? Atklājiet pārbaudītus soļus, lai atrisinātu šo kaitinošo problēmu un ātri un droši atgūtu piekļuvi saviem datiem. Ekspertu padomi Windows lietotājiem.
Vai rodas problēma ar kļūdu “Spēļu josla ieraksta pēdējās 30 sekundes”? Atklājiet pārbaudītus risinājumus, lai ātri un vienkārši atjaunotu tūlītējās atkārtošanas ierakstu. Vairs nekādu pazaudētu episku mirkļu!
Vai operētājsistēmā Windows 11 netiek atpazīts ārējais disks? Atklājiet pārbaudītus, soli pa solim sniegtus risinājumus, lai ātri un bez problēmām atjaunotu krātuves darbību. Nav nepieciešamas tehniskās zināšanas!
Uzziniet, kā oficiāli iegūt Windows 11 bez maksas. Izpildiet šo soli pa solim sniegto rokasgrāmatu, lai pārbaudītu saderību, ērti veiktu jaunināšanu un izbaudītu jaunākās funkcijas, netērējot ne centa. Lieliski piemērots datoru lietotājiem, kas ir gatavi modernizācijai.
Vai rodas problēmas ar Edge pārlūkprogrammas savienojuma taimauta kļūdām? Atklājiet pārbaudītus soļus, lai ātri atrisinātu šo kaitinošo problēmu un atgrieztos pie vienmērīgas pārlūkošanas. Svarīgi padomi Windows lietotājiem.
Atklājiet vienkāršu ceļvedi par to, kā mainīt Windows 11 produkta atslēgu bez atkārtotas instalēšanas. Ietaupiet laiku un izvairieties no datu zaudēšanas, izmantojot mūsu soli pa solim sniegtos norādījumus par vienkāršu aktivizēšanu. Lieliski piemērots jauninājumiem un problēmu novēršanai.
Uzziniet, kā sadalīt ekrānu operētājsistēmā Windows 11 kā profesionālis. Atklājiet vairākuzdevumu veikšanas noslēpumus, īsinājumtaustiņus un papildu padomus, lai uzlabotu savu darbplūsmu un paveiktu vairāk efektīvāk.
Vai Windows 11 atjauninājums ir iestrēdzis pie 0% vai 100%? Atklājiet ātrus un efektīvus risinājumus, lai sistēma tiktu atjaunināta vienmērīgi un bez vilšanās. Soli pa solim sniegta pamācība tūlītējam atvieglojumam.
Vai rodas problēmas ar Windows 11 veikala lejupielādi? Atklājiet pārbaudītus, soli pa solim sniegtus risinājumus, lai lietotnes atkal lejupielādētos netraucēti. Nav nepieciešamas tehniskās zināšanas!
