Kopš Windows XP laikiem Windows atjauninājumi daudziem lietotājiem vienmēr ir bijuši bēdīgi slaveni apgrūtinājumi. Par laimi, Windows atjauninājumu piegāde pēdējos gados ir krasi uzlabojusies, un ļoti maz funkciju atjauninājumu mūsdienās rada lielas problēmas .
Varat konfigurēt sistēmu Windows tā, lai tā automātiski lejupielādētu un atjauninātu fonā un pat restartētu neaktīvo stundu laikā. Tas viss ir lieliski, bet ko darīt, ja ir instalēts atjauninājums, kas jums nebija vajadzīgs? Vai arī, ja saņemat atjauninājumu, kas pasliktina jūsu mašīnas veiktspēju ? Šajā gadījumā varat atinstalēt Windows atjauninājumus operētājsistēmā Windows 11. Bet šeit ir dažas lietas, kas jums jāpatur prātā, pirms atinstalējat atjauninājumus no sava Windows 11 datora.
Saistīts: Kā atspējot atjauninājumus operētājsistēmā Windows 11
Saturs
Kāpēc atinstalēt Windows atjauninājumus?
Var būt vairāki iemesli, kāpēc vēlaties atinstalēt Windows atjauninājumus. Šeit ir daži no visbiežāk sastopamajiem. Ja pēc nesenā Windows atjaunināšanas veicat kļūdu novēršanu, varat arī skatīt šo sarakstu.
Ja sistēmā rodas šādas problēmas, varat mēģināt atinstalēt jaunāko Windows atjauninājumu, lai mēģinātu novērst problēmu.
- Pasliktināta vispārējā sistēmas veiktspēja
- Bojāti draiveru atjauninājumi
- Bojāta Windows līdzekļu funkcionalitāte
- Fonā nepareizi pārvaldīti resursi
- Augsts CPU vai diska lietojums
- Nevēlams draivera atjauninājums, no kura mēģinājāt izvairīties
- Nepareiza Windows drošības vai UAC darbība
- Nepareizi reģiona iestatījumi, kurus nevar mainīt
- Trūkst iestatījumu vai opciju operētājsistēmā Windows 11
un vēl. Var rasties daudz problēmu, ar kurām varat saskarties, instalējot jaunu Windows 11 atjauninājumu, it īpaši, ja esat abonējis beta versiju vai iekšējās informācijas kanālu. Šādos gadījumos varat mēģināt atinstalēt attiecīgo atjauninājumu, izmantojot šajā ziņojumā esošo rokasgrāmatu.
Saistīts: Kā atcelt gaidošo Windows Insider atjauninājumu
Vai ir droši atinstalēt Windows atjauninājumus?
Jā, ja vien nenoņemat Windows atjauninājumus piespiedu kārtā manuāli vai neizmantojat novecojušu utilītu, jums vajadzētu būt drošam, atinstalējot Windows atjauninājumus no savas sistēmas. Tomēr ņemiet vērā, ka Microsoft izmanto Windows atjauninājumus, lai nodrošinātu drošības ielāpus, labojumfailus un daudz ko citu, lai palīdzētu aizsargāt jūsu sistēmu pret jaunākajiem draudiem un drošības ievainojamībām.
Noņemot Windows atjauninājumus, tiks atinstalēti arī šādi ielāpi, kas savukārt padarīs jūsu sistēmu neaizsargātu pret tiešsaistes draudiem. Tas jo īpaši attiecas uz gadījumiem, kad vēlaties atinstalēt jaunākos drošības atjauninājumus.
Tāpēc, lai gan varat droši atinstalēt jebkuru atjauninājumu, ieteicams atsaukt izmaiņas, tiklīdz kļūda ir novērsta. Ja pēc atjauninājuma atkārtotas instalēšanas kļūda vai kļūda joprojām pastāv, varat pagaidīt, līdz Microsoft izlaiž nākamo atjauninājumu un labojumu.
Saistīts: Kā noņemt Bing no operētājsistēmas Windows 11
Kā atrast atjauninājumus, kurus vēlaties noņemt
Mēs varam noņemt atjauninājumus, izmantojot dažādas metodes, taču, lai atrastu, kuru atjauninājumu vēlaties noņemt, jums tas ir jāidentificē savā datorā. Katram Microsoft atjauninājumam tiek piešķirts KB numurs, kas palīdz noteikt un identificēt atjauninājumu patērētāju personālajos datoros, kā arī Microsoft serveros. Mēs varam izmantot šo numuru savā labā un noņemt attiecīgo atjauninājumu no jūsu sistēmas, izmantojot kādu no tālāk sniegtajām rokasgrāmatām. Tālāk ir norādīts, kā noteikt datorā instalētos jaunākos Windows atjauninājumus.
01. metode: iestatījumu izmantošana
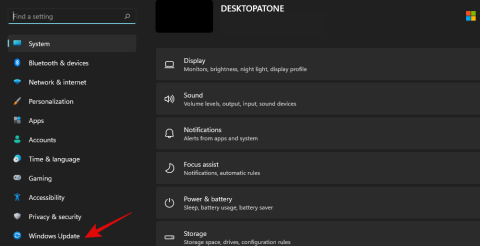
Nospiediet Windows + iuz tastatūras un kreisajā pusē atlasiet “Windows atjaunināšana”.
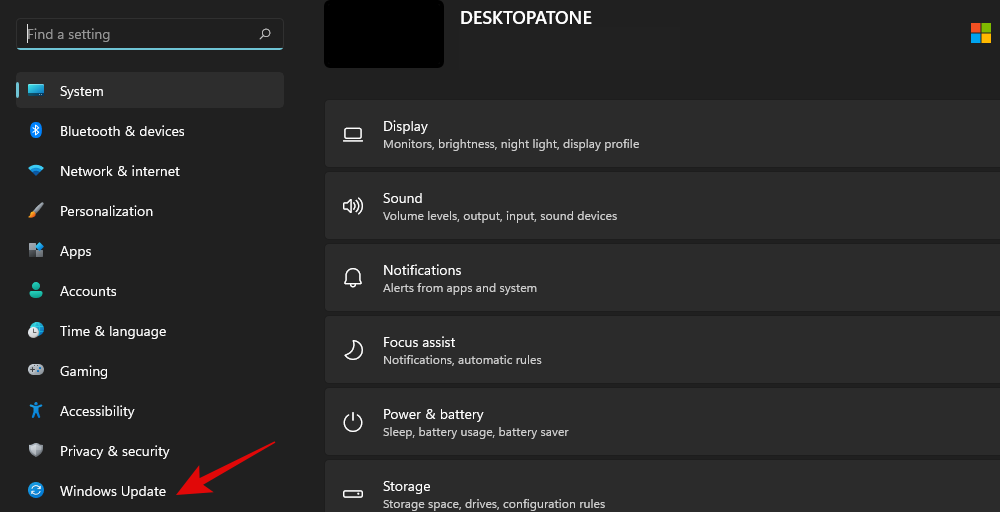
Tagad noklikšķiniet uz “Atjaunināt vēsturi”.
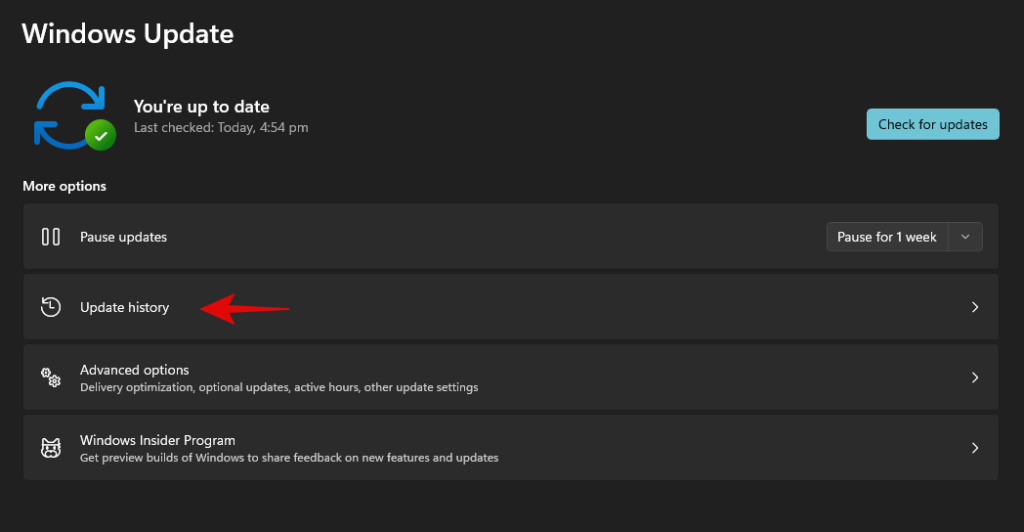
Tagad jūs saņemsit savā sistēmā nesen instalēto Windows atjauninājumu sarakstu.
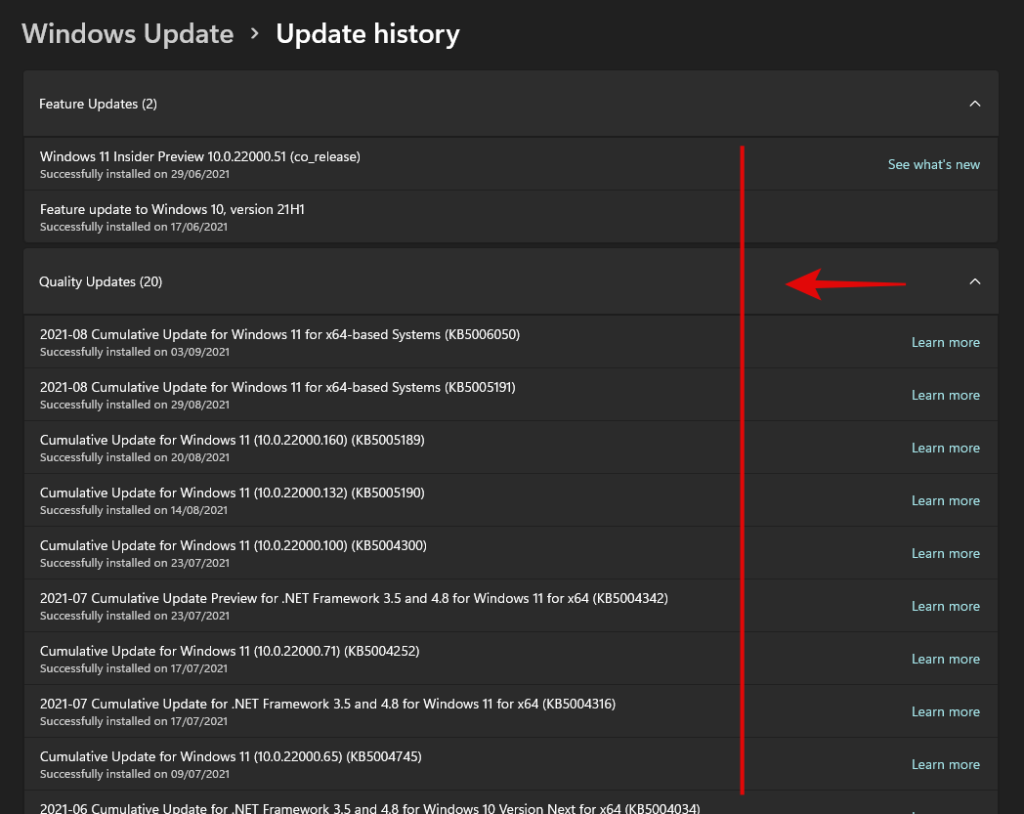
Vienkārši pierakstiet tā atjauninājuma KB numuru, kuru vēlaties noņemt no datora.
02. metode: CMD izmantošana
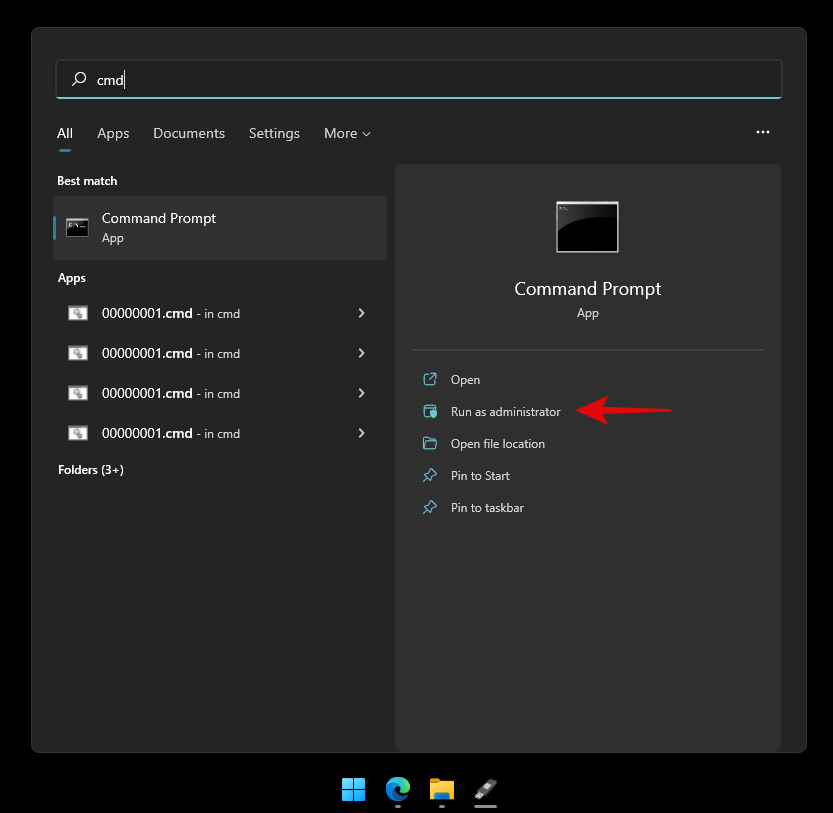
Nospiediet Windows + Stastatūru un meklējiet CMD. Kad lietotne tiek parādīta meklēšanas rezultātos, noklikšķiniet uz Palaist kā administratoram.
Ievadiet šo komandu un nospiediet tastatūras taustiņu Enter.
wmic qfe list brief /format:table
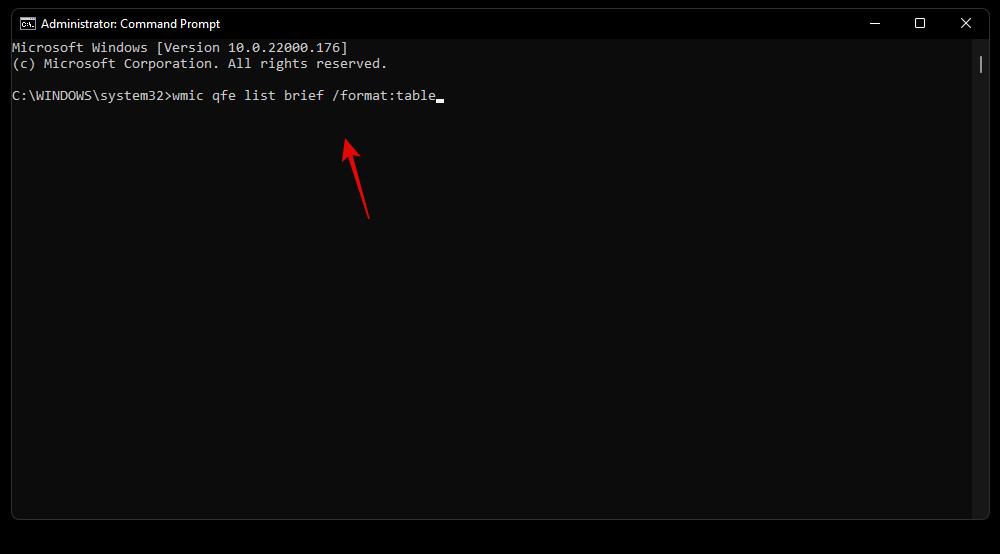
Tagad jūs saņemsit visu jūsu datorā instalēto jaunāko Windows atjauninājumu sarakstu. Tālāk esošajā sarakstā noklikšķiniet uz attiecīgās kategorijas un izvērsiet to.
- Kvalitātes atjauninājumi: funkciju atjauninājumi operētājsistēmai Windows 11, kas ievieš būtiskas izmaiņas operētājsistēmā.
- Draiveru atjauninājumi: vispārīgi/OEM draiveru atjauninājumi jūsu perifērijas ierīcēm un komponentiem, kas tiek piegādāti, izmantojot Windows atjauninājumu.
- Definīcijas atjauninājumi: drošības definīciju atjauninājumi, lai palīdzētu Microsoft Defender identificēt un karantīnā ievietot draudus jūsu sistēmā.
- Citi atjauninājumi: atjauninājumi Microsoft produktiem, līdzekļiem un citiem jūsu ierīcei raksturīgiem OEM līdzekļiem. Šajā kategorijā tiks atjauninātas arī Windows funkcijas un pieredzes pakotnes.
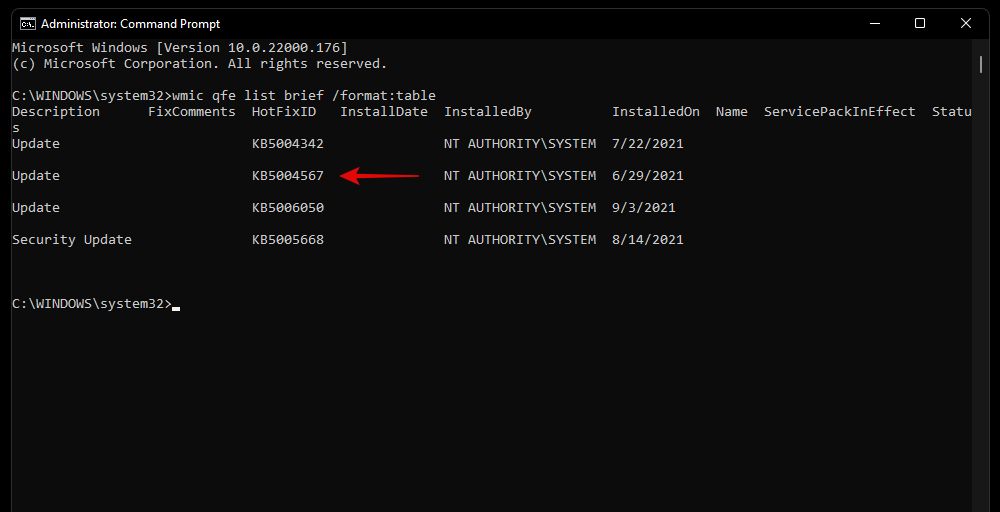
Identificējiet atjauninājumu, kuru vēlaties noņemt, un pierakstiet tā HotFixID. Mēs izmantosim šo ID, lai noņemtu attiecīgo atjauninājumu, izmantojot tālāk sniegto ceļvedi.
Kā noņemt Windows atjauninājumus no datora
Varat noņemt Windows atjauninājumus no datora, izmantojot kādu no tālāk norādītajām metodēm. Ja jums ir bloķēta piekļuve sistēmai Windows vai nevarat sāknēt darbvirsmu, ieteicams izmantot Windows RE vai CMD metodi. Ja varat piekļūt darbvirsmai, varat izmantot lietotni Iestatījumi, lai viegli noņemtu atjauninājumus no sistēmas. Izmantojiet tālāk sniegtos norādījumus, lai sāktu darbu atkarībā no jūsu vēlmēm.
01. metode: iestatījumu izmantošana
Nospiediet Windows + iuz tastatūras un kreisajā sānjoslā noklikšķiniet uz "Windows atjaunināšana".

Noklikšķiniet uz "Atjaunināt vēsturi".

Ritiniet līdz apakšai un noklikšķiniet uz "Atinstalēt atjauninājumus".
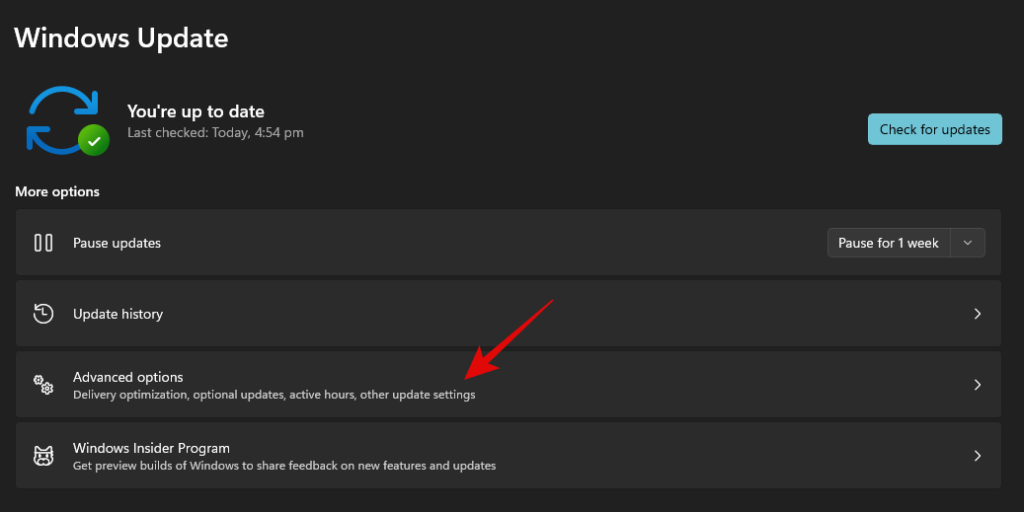
Tagad jūs tiksit novirzīts uz vadības paneli, kur atradīsit jaunāko atjauninājumu sarakstu, kurus var noņemt no jūsu sistēmas.

Atlasiet atjauninājumu, kuru vēlaties noņemt, un augšpusē noklikšķiniet uz "Atinstalēt".

Izpildiet ekrānā redzamos norādījumus, lai atinstalētu attiecīgo atjauninājumu no datora.
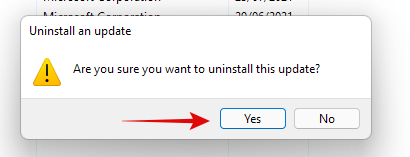
Tagad varat restartēt datoru, un visas problēmas, ar kurām saskārāties atjaunināšanas dēļ, tagad ir jānovērš.
02. metode: Windows atjaunināšanas problēmu risinātāja izmantošana
Nospiediet Windows + iuz tastatūras un noklikšķiniet uz "Problēmu novēršana".
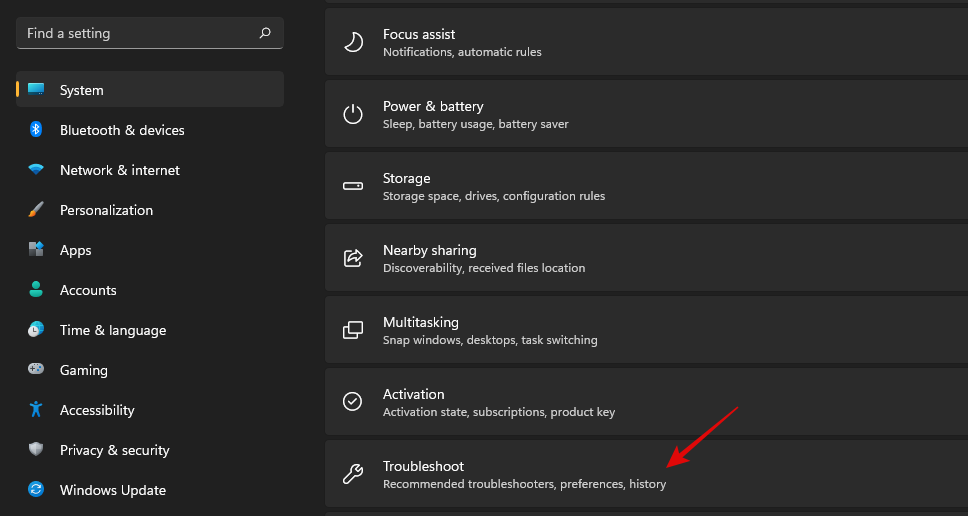
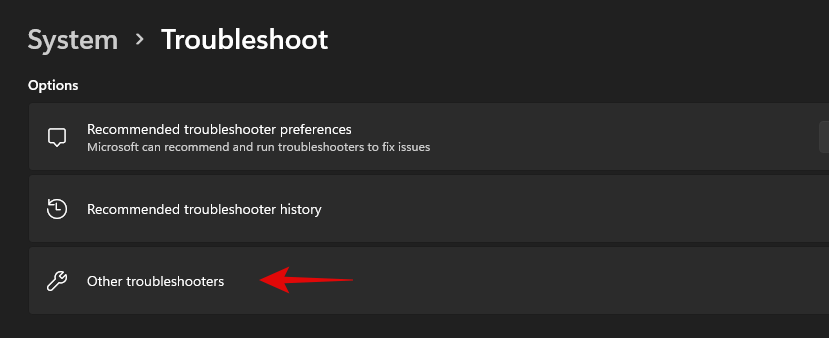
Noklikšķiniet uz "Citi problēmu risinātāji".
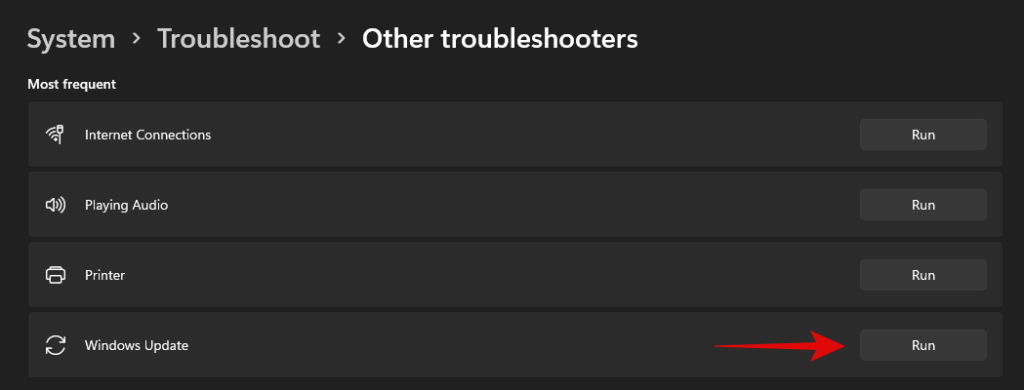
Noklikšķiniet uz Palaist blakus Windows Update.
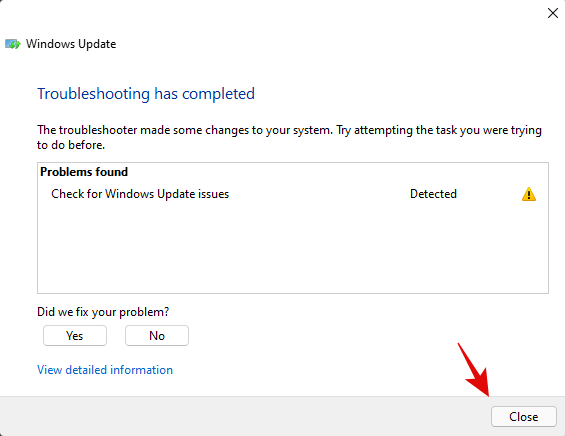
Windows problēmu novēršanas rīks tagad meklēs problēmas ar Windows atjauninājumiem un to izraisītās problēmas jūsu datorā. Ja tādi tiek atrasti, problēmu risinātājs automātiski atrisinās problēmu. Ja tiek atklāts, ka vaininieks ir nesen veikts atjauninājums, problēmu risinātājs sniegs iespēju atlasīt un atinstalēt nepieciešamo Windows atjauninājumu. Izpildiet ekrānā redzamos norādījumus, lai pilnībā noņemtu atjauninājumu.
Kad tas ir izdarīts, noklikšķiniet uz "Aizvērt".
Restartējiet datoru, lai pareizi veiktu pasākumus, un tagad problēma ir jānovērš. Ja nē, varat izmantot tālāk norādīto PowerShell metodi, lai manuāli atinstalētu vajadzīgo Windows atjauninājumu no savas sistēmas.
03. metode: PowerShell vai CMD izmantošana
Nospiediet Windows + Stastatūru un meklējiet PowerShell. Kad lietotne tiek parādīta meklēšanas rezultātos, noklikšķiniet uz Palaist kā administratoram.
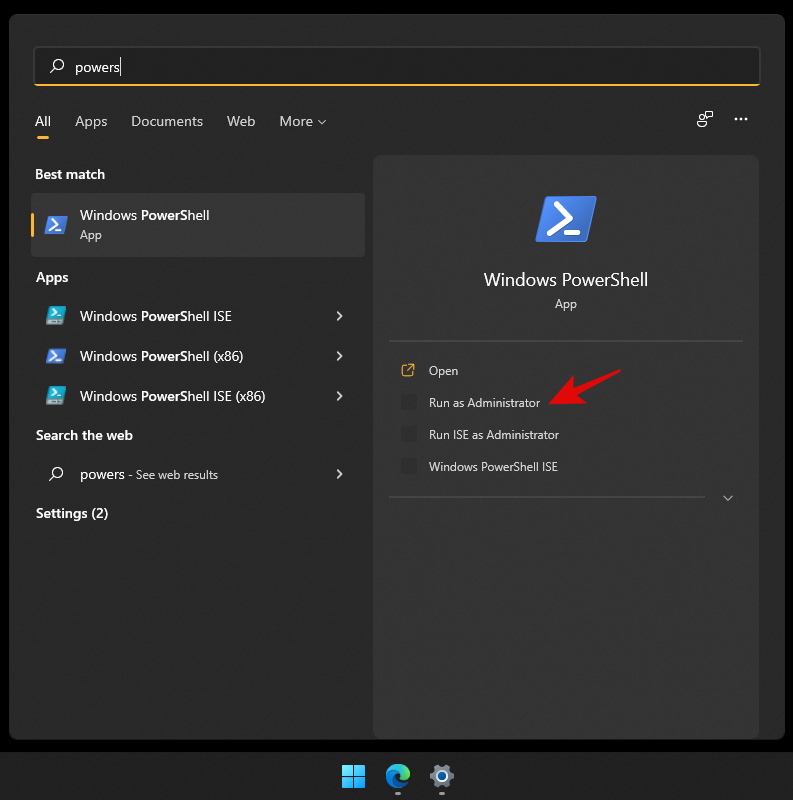
Ievadiet šo komandu un nospiediet tastatūras taustiņu Enter, lai to izpildītu.
wmic qfe list brief /format:table

Tagad jūs saņemsit sarakstu ar visiem nesen instalētajiem Windows atjauninājumiem jūsu sistēmā tabulas formātā. Pierakstiet atlasītā Windows atjaunināšanas KB numuru.
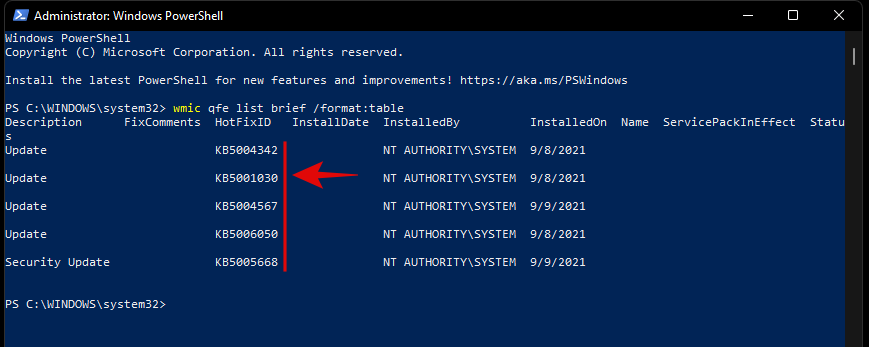
Piezīme: ir nepieciešams tikai cipars, nevis burti pirms tā.
Kad tas ir izdarīts, ierakstiet tālāk esošo komandu un izpildiet to. Aizstājiet "NUMBER" ar KB numuru, kuru pierakstījāt iepriekš.
wusa /uninstall /kb:NUMBER
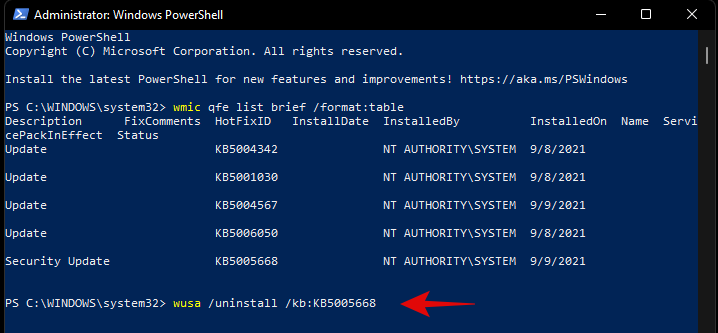
Kad tas tiek prasīts, apstipriniet savu izvēli.
Ja tiek prasīts restartēt, ieteicams restartēt sistēmu ne agrāk kā, saglabājot darbu fonā.
Ja tomēr nevēlaties saņemt apstiprinājumus pirms atinstalēšanas un restartēšanas, varat izmantot tālāk norādīto komandu.
wusa /uninstall /kb:NUMBER /quiet
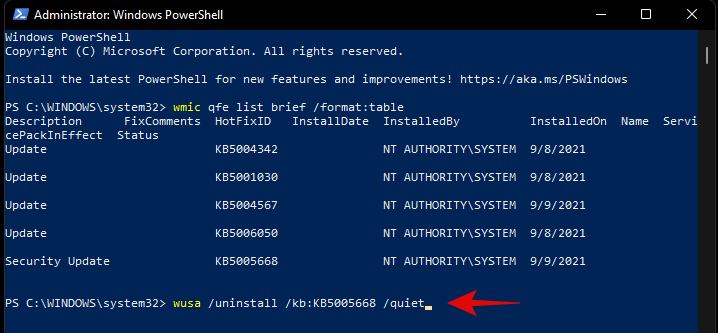
Lai gan iepriekš minētā komanda neprasīs apstiprinājumu, tā gaidīs, līdz jūsu lietotnes fonā tiks normāli izslēgtas. Ja vēlaties piespiest aizvērt savas lietotnes un nekavējoties restartēt sistēmu, varat izmantot tālāk norādīto komandu.
wusa /uninstall /kb:NUMBER /quiet /forcerestart
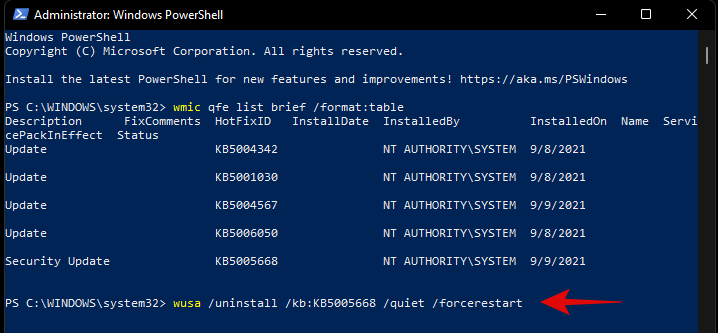
Pēc tam, ja vēlaties tikai apstiprināt restartēšanu, varat izmantot tālāk norādīto komandu.
wusa /uninstall /kb:NUMBER /quiet /promptrestart
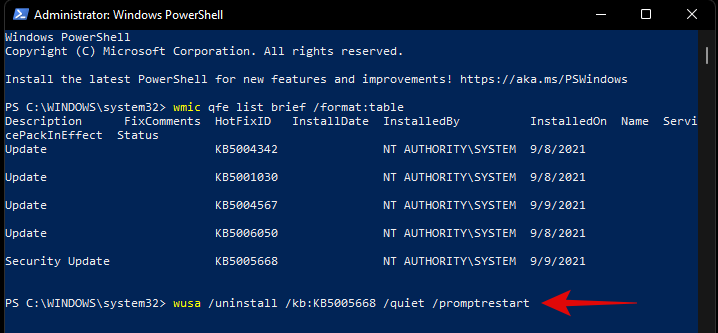
Un tas arī viss! Tagad problemātiskais Windows atjauninājums ir jāatinstalē no datora.
04. metode: no Windows RE
Windows atkopšanas vide ļauj arī atinstalēt konfliktējošos atjauninājumus. Izmantojiet tālāk sniegto ceļvedi, lai sāktu darbu. Ja saskaraties ar BSOD un jau esat atkopšanas vidē, varat izlaist šīs rokasgrāmatas pirmās darbības.
Nospiediet Windows + iuz tastatūras un kreisajā pusē atlasiet Windows Update.
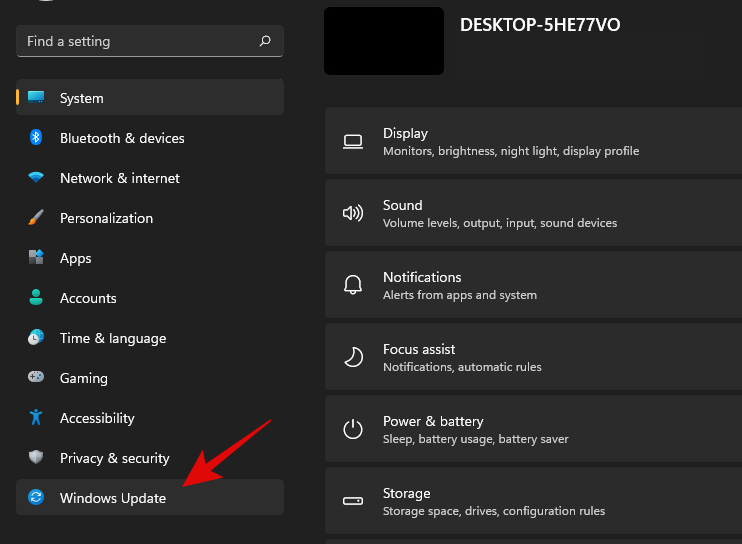
Tagad noklikšķiniet uz Papildu opcijas.
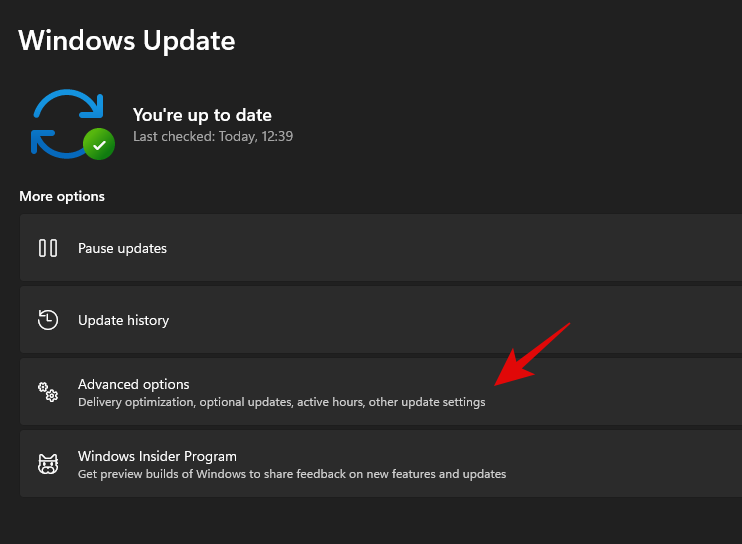
Izvēlieties "Atkopšana".
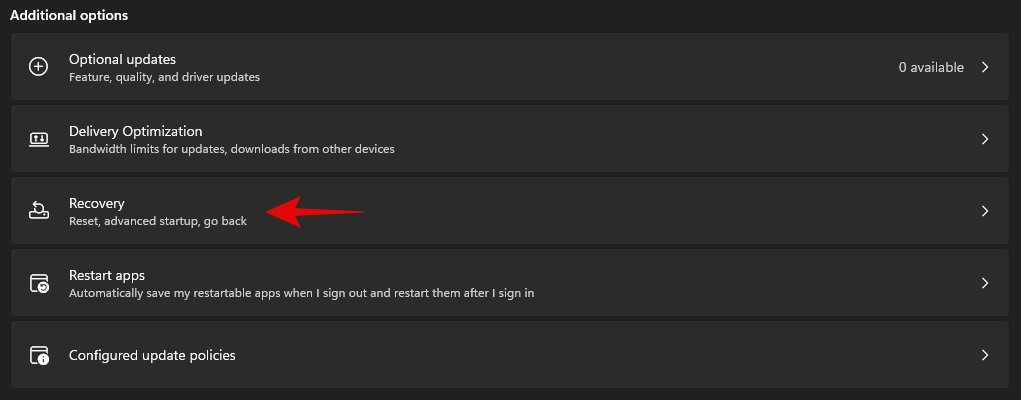
Click on ‘Restart now’ beside Advanced Startup.

You will now boot into the recovery environment. Click on ‘Troubleshoot’.
Now click on ‘Advanced Options’.
Select ‘Uninstall updates’.
Click and select the type of update you wish to install from the options on your screen.
- Uninstall latest quality update
- Uninstall latest feature update
Note: In case you are confused, feature updates refer to major updates to your Windows system that include new features, updated integrations, and sometimes new UI. Quality updates on the other hand encompass everything else including Security updates, Driver updates, Intelligence updates, Telemetry updates, and more.
Click on your administrator account and log in with your password.
Click on ‘Uninstall quality/feature’ update to confirm your choice.
Click on ‘Done’ once the process finishes.
Restart your PC and boot into Windows normally. You shouldn’t face any more issues caused by a problematic Windows update.
Method #05: Using DISM
DISM or Deployment Image Servicing and Management tool is an administrative tool within Windows that helps repair your Windows image and even mount images if needed. DISM supports image formats like .wim, .vhd, and more.
The tool can help you fix issues with your Windows installation and even remove problematic Windows updates. If you are looking to remove windows updates using DISM, then you can follow the steps below to get you started.
Note: DISM can be accessed via CMD and thus, you can use this guide from a recovery environment or an installation media as well. Follow the guide above to get CMD working on your lock screen or within Windows Recovery Environment.
Launch CMD and type in the following command. Press Enter on your keyboard once you are done.
dism /online /get-packages /format:table
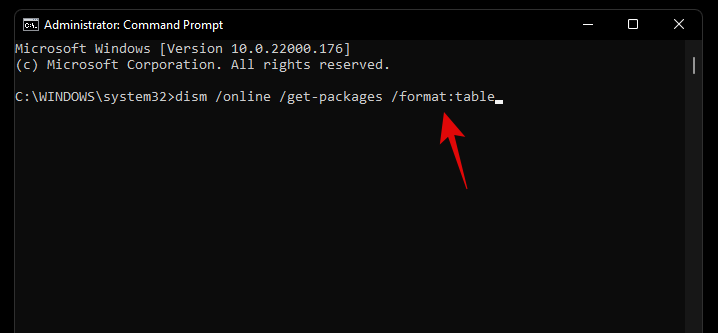
Unlike the WUSA commands we used earlier with PowerShell and CMD, you will need to note down the entire name of the Windows Update package we need to remove. Unfortunately, this includes special characters, spaces, and everything else included in the name. Thankfully you can easily copy the entire name to your clipboard by selecting it with your mouse and then using the keyboard shortcut. Once done, type in the command below and replace NAME with the package name you noted down earlier.
Note: This includes the term ‘Package_for_’ prefixed before some updates.
dism /online /Remove-Package /PackageName:NAME

The selected Windows Update will now be uninstalled from your system. In some cases, you will be prompted to restart your system, type in ‘Y’, and hit Enter on your keyboard to restart your system immediately.
How to stop receiving an update
While removing an update can help you, this does not mean that the broken Windows Update will stop showing up in your Updates section. This can be annoying and if you have automatic updates then you run the risk of automatically installing the problematic update in the background. In all such cases, you can try blocking Windows Updates on your system using the guides below depending on your preferences.
Method #01: Stop OEM driver updates through Windows update
OEM driver updates are delivered through Windows updates as well depending on their importance. Security vulnerabilities and bugs that have been recently found in components like CPU, GPU, or your wireless card, are instantly patched through such updates.
However, if you do not wish to install an OEM driver update provided by Windows update, then you can follow the guide below to block your OEM driver updates.
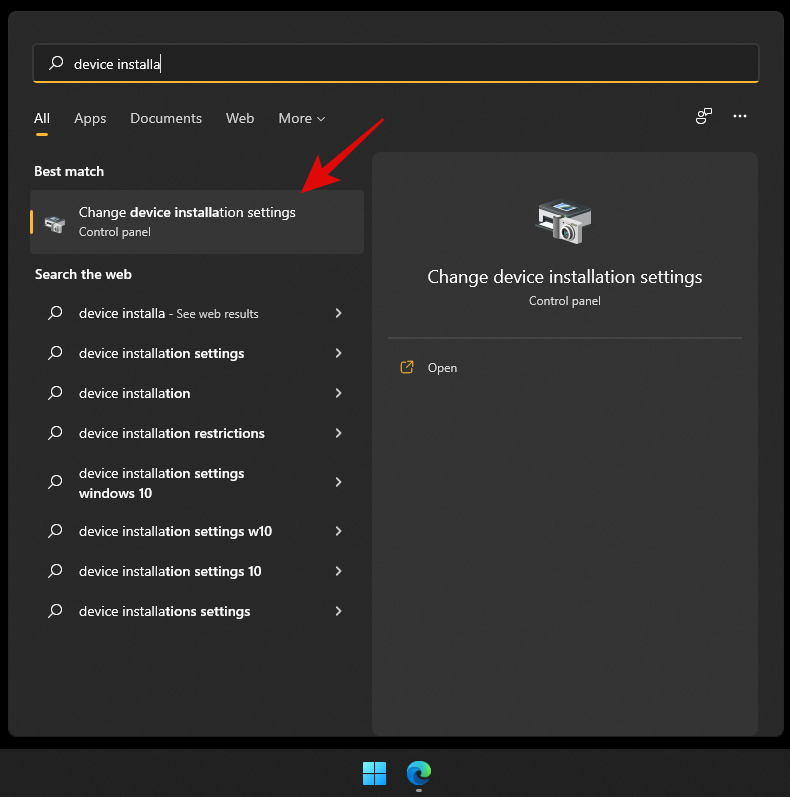
Press Windows + S on your keyboard and search for ‘Change device installation settings’. Click and launch the app from your search results.
Select ‘No’.
Click on ‘Save changes’.
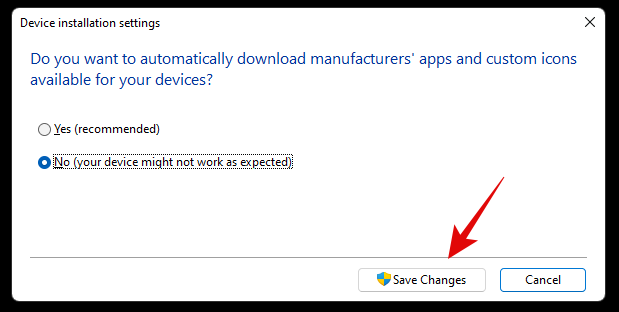
The changes will now be saved and you will no longer receive OEM driver updates through Windows Update.
Related: 6 Ways to Update Drivers on Windows 11
Method #02: Stop updates for Microsoft products
If you have been receiving constant updates for new Microsoft features and old products that keep messing up your system, then you can use the guide below to disable updates for Microsoft products via Windows Update.
Press Windows + i on your keyboard to open the Settings app and select ‘Windows Update’ from the left sidebar.

Click on ‘Advanced options’.

Now turn off the toggle for ‘Receive updates for other Microsoft products’ at the top.
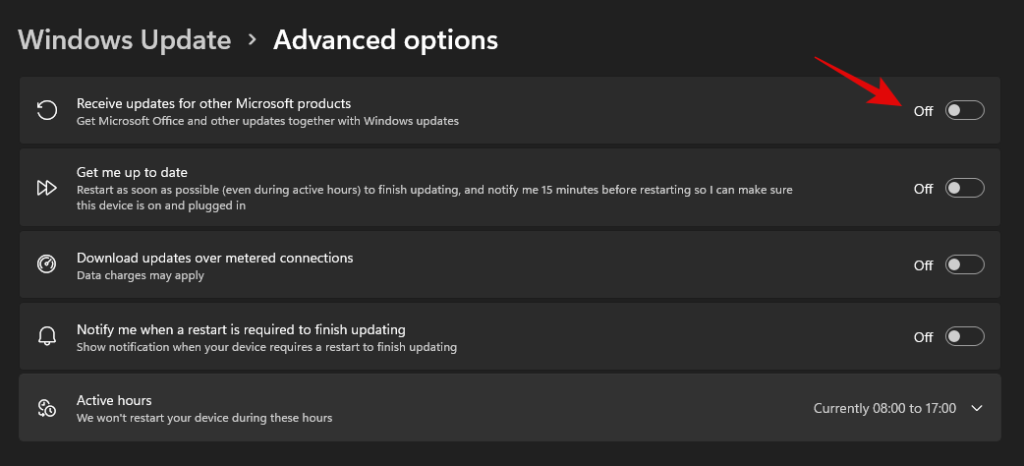
You will no longer receive updates for Microsoft products installed on your system via Windows update.
Method #03: Change active hours for background download and installation for updates
If you’re just looking to dismiss updates so that they don’t interfere with your work hours, then this is the perfect option for you. You can decide when Windows can download and update your PC in the background which will prevent Windows from interfering with your work hours. Follow the guide below to get you started.
Press Windows + i on your keyboard and click on ‘Windows Update’ on your left.

Click on ‘Advanced options’.

Now turn off the toggle for ‘Get me up to date’.
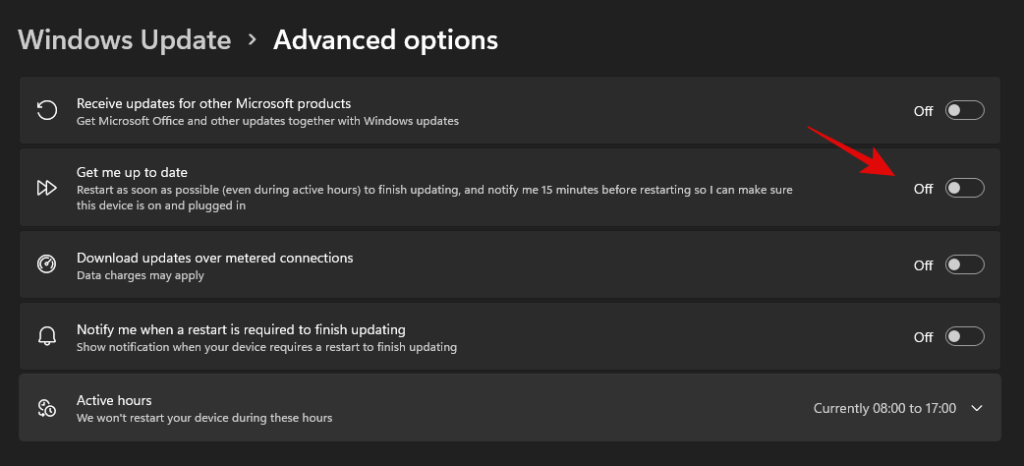
Click on ‘Active hours’.
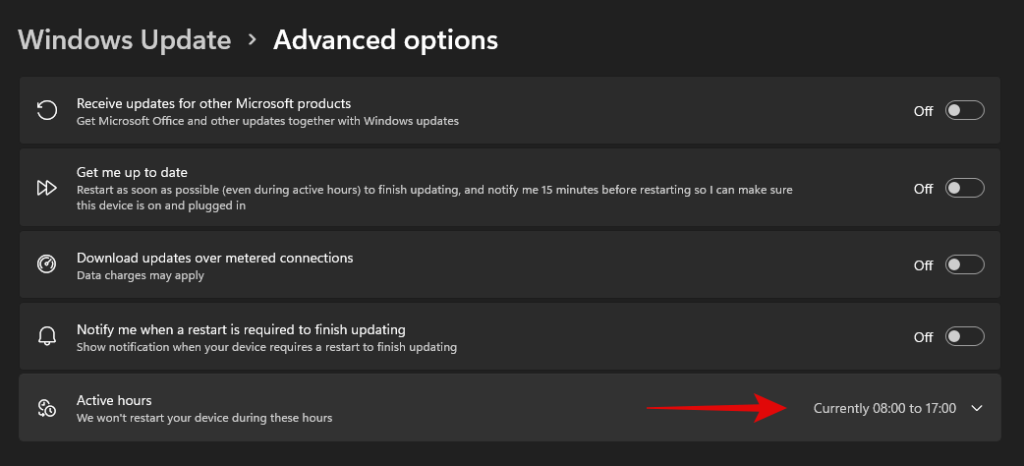
Click on the drop-down menu and select ‘Manually’.
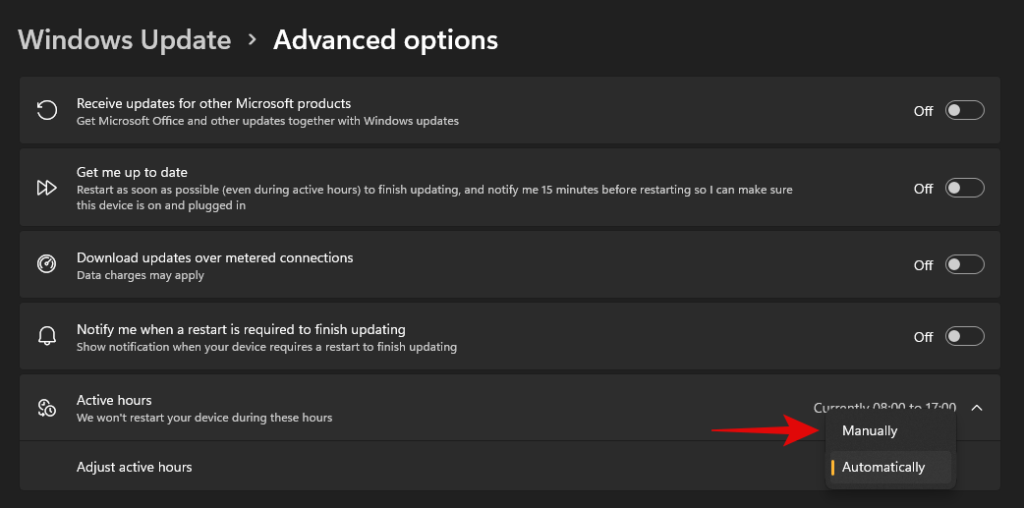
Define your desired start and end time. Windows won’t download updates and restart your PC during these hours.

And that’s it! Active hours should now be enabled for your system.
Method #04: Block Windows updates that you never wish to install
If you are receiving forced Windows updates that you don’t ever wish to install on your system then you can use a dedicated Windows troubleshooter to solve your issue.
This can be helpful in case you are trying to stop an update that disables a certain feature on your system that you don’t want disabled. This could be access to voltage controls, clock speed controls, turbo controls, fan controls, RGB control, and more. Follow the guide below to get you started.
Download the Windows Update Show Hide troubleshooter using the link above and launch it on your PC. Click on ‘Advanced’.
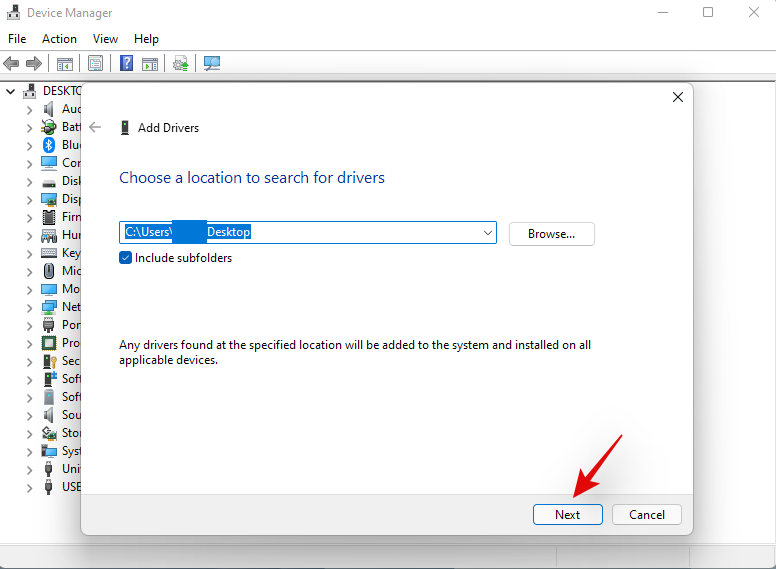
Uncheck the option for ‘Apply repairs automatically’.
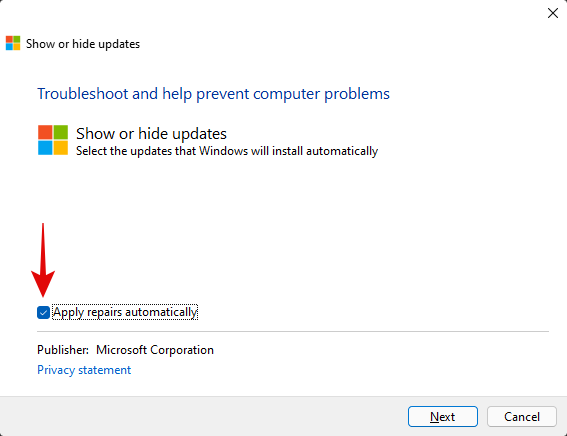
Click on ‘Next’.
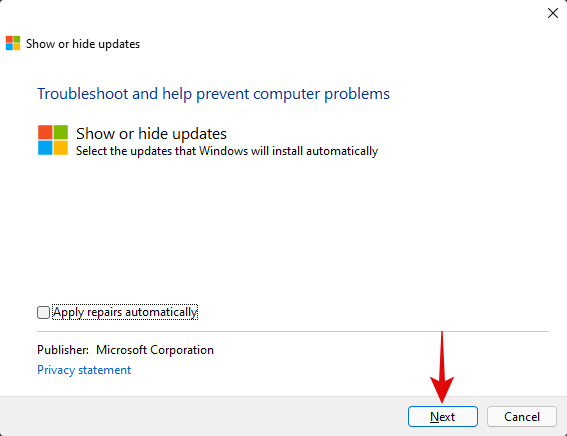
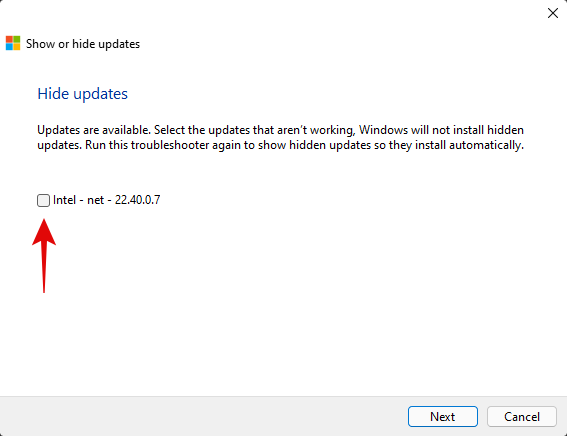
The troubleshooter will now look for pending updates and display them on your screen. Click on ‘Hide updates’.
Check the boxes for all the updates you don’t wish to receive on your PC.
Click on ‘Next’.
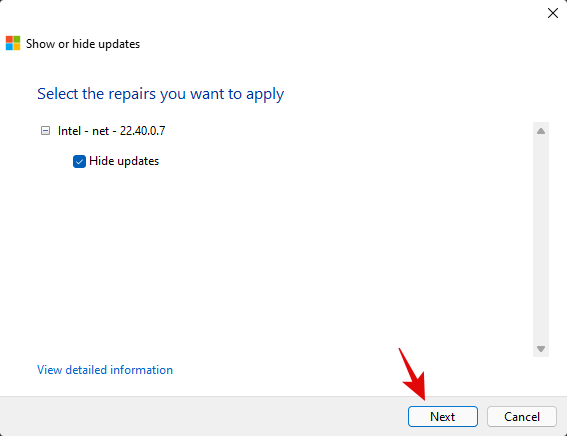
Ensure that ‘Hide updates’ is selected and click on ‘Next’.
The troubleshooter will now hide the necessary Windows updates from your PC which in turn will prevent them from ever being downloaded on your PC. Click on ‘Close’.
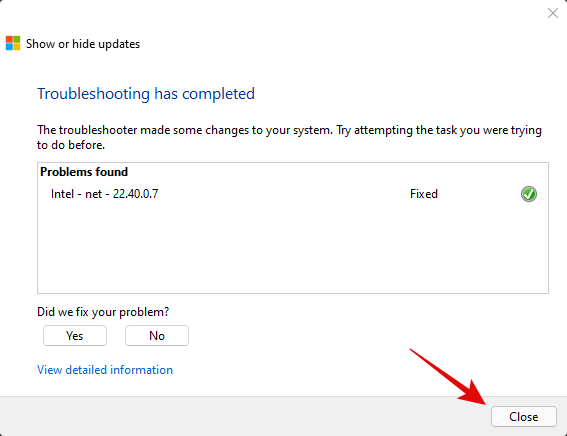
And that’s it! You will now have blocked the necessary updates on Windows 11.
Can you turn off Windows updates?
Yes, you can use certain workarounds and tricks to disable Windows updates on your PC. However, this isn’t recommended as you will lose out on important security patches which would leave you vulnerable to online threats including hackers, malware, adware, and more.
Hence we recommend you keep your PC updated or at least opt to install the latest security updates on your PC. Even if you are losing out on features it’s usually because of a hardware security vulnerability that would compromise your system.
However, if you still wish to disable Windows Updates on your PC, you can use this dedicated guide from us. If you face any issues, feel free to drop a comment.
Can’t uninstall Windows updates? Try these fixes!
If you are unable to install updates on your PC, then you can try the following fixes. However, if you are still unable to uninstall updates then this might indicate an issue with your Windows installation in which case resetting your PC might be the best option.
Follow the guides below to get you started.
Method #01: Reset Windows components and try again
If you have been unable to uninstall updates then you can try resetting your windows components. This will help fix corrupted system files in the background that might be preventing you from uninstalling updates on your system. We will be using a modified script from Mircosoft to help reset all components of Windows 11. The script was originally developed for Windows 10 or higher and hence will need some edits to work properly on Windows 11. This script will perform the following tasks on your system when executed;
- Remove older Windows updates folder
- Re-register Windows update files
- Reset your network connection
Follow the steps below to run the script on your system and reset Windows update components on your PC.
Download the script using the link above to your local storage and extract it to a convenient location. Once extracted right click on the script.
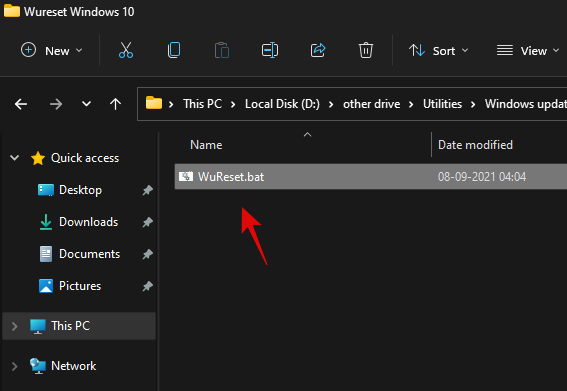
Click on ‘Show more options’.
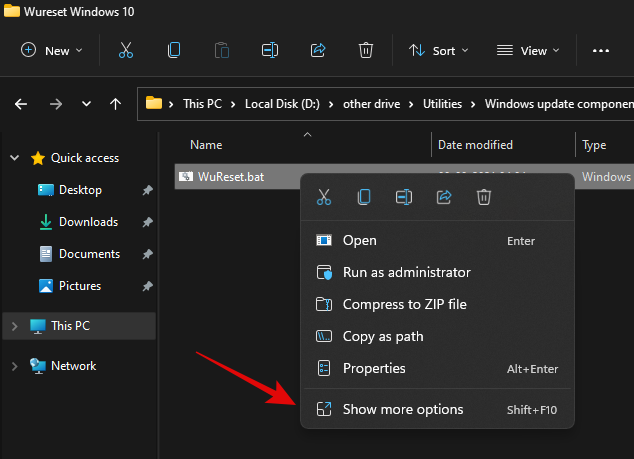
Select ‘Rename’.
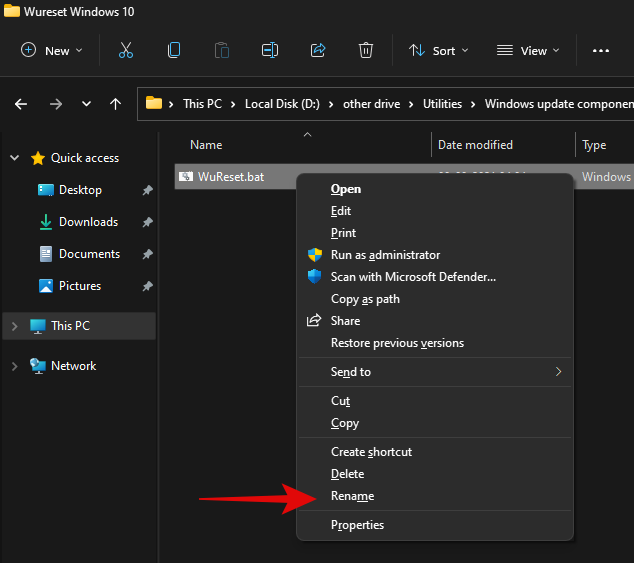
Replace ‘.bat’ with ‘.txt’.
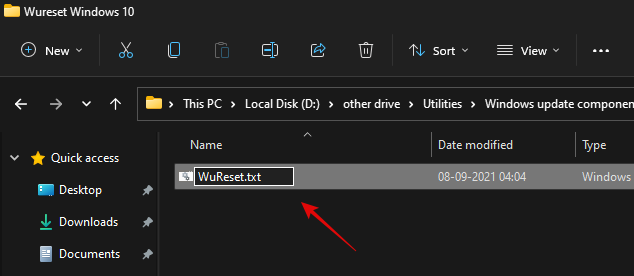
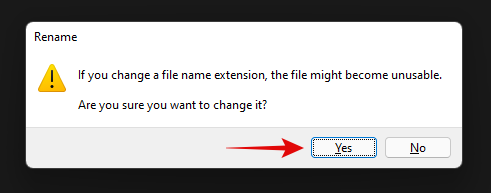
Click on ‘Yes’ to confirm your choice.
Now double click and open the file and it should open in your notepad. Once opened, scroll to the ‘:Reset’ section for resetting network commands and add the following line after the first delete command as shown below.
del /s /q /f "%SYSTEMROOT%\Logs\WindowsUpdate\*"
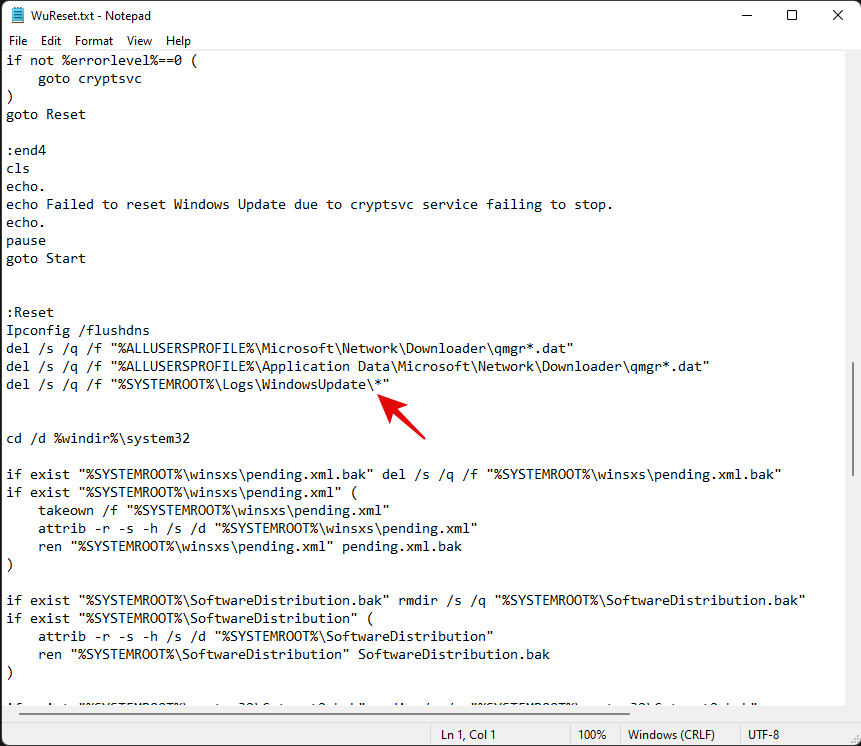
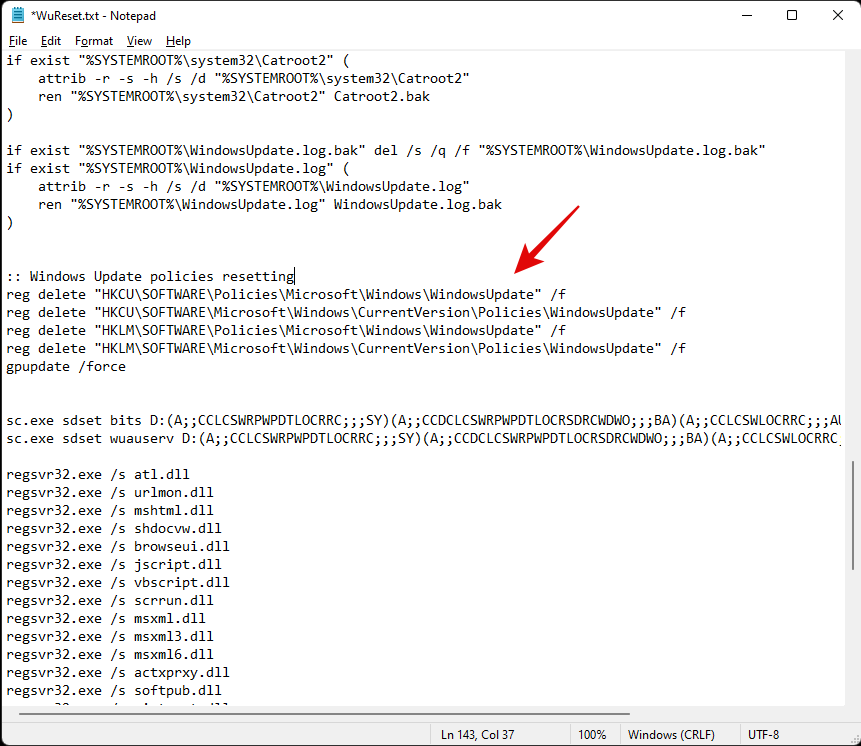
Once added, hit Ctrl + S on your keyboard. Ensure that there are no formatting changes or spaces before or after the line. The file will now be saved on your system along with its recent changes. We will now add some code to Reset Windows’s update policies on your system. Copy the lines below and paste them after your system commands. Ensure that two empty lines are available at either end of the code as shown below.
:: Windows Update policies resetting
reg delete "HKCU\SOFTWARE\Policies\Microsoft\Windows\WindowsUpdate" /f
reg delete "HKCU\SOFTWARE\Microsoft\Windows\CurrentVersion\Policies\WindowsUpdate" /f
reg delete "HKLM\SOFTWARE\Policies\Microsoft\Windows\WindowsUpdate" /f
reg delete "HKLM\SOFTWARE\Microsoft\Windows\CurrentVersion\Policies\WindowsUpdate" /f
gpupdate /force
Lastly, let’s add some lines to ensure that the startup type for this service is set to ‘Automatic’. Copy the code below and add the lines after your winsock reset commands but before your service starting commands as shown below. Copy and paste the code in its respective location.
:: Set the startup type as automatic
sc config wuauserv start= auto
sc config bits start= auto
sc config DcomLaunch start= auto
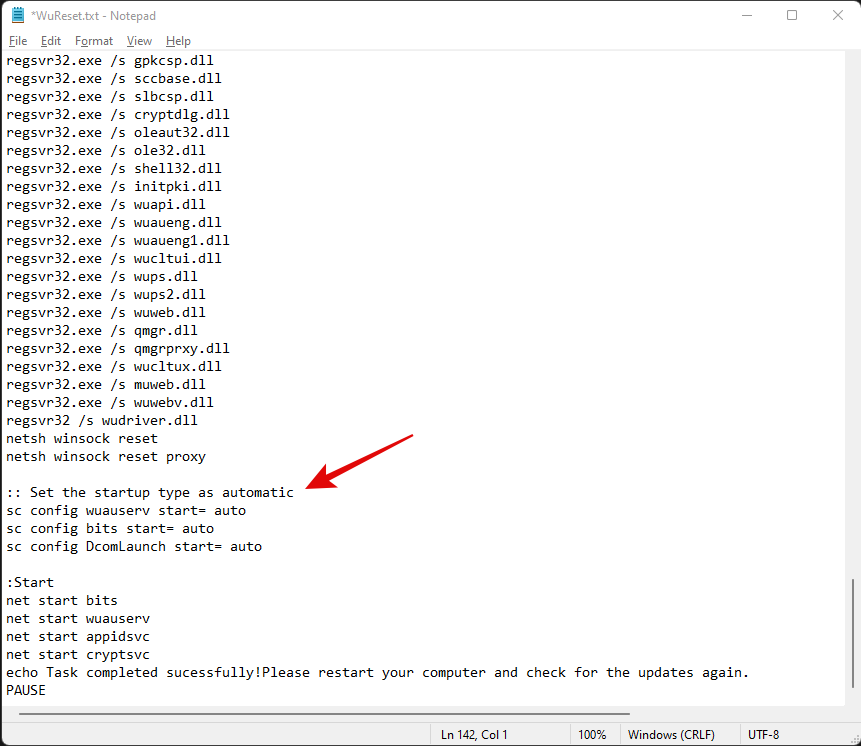
Once you are done, hit Ctrl + S on your keyboard to save your changes. Close the file and right-click on it again and select ‘Show more options’.
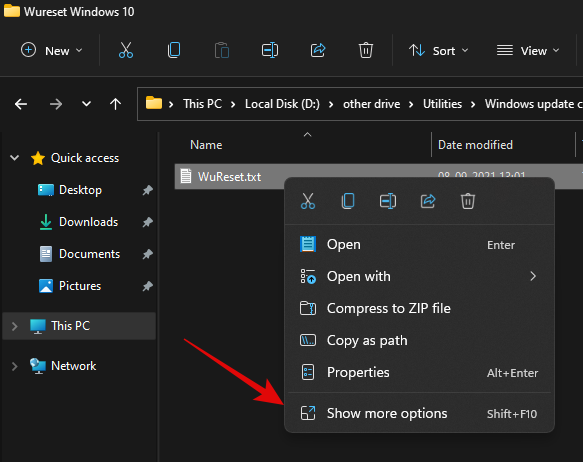
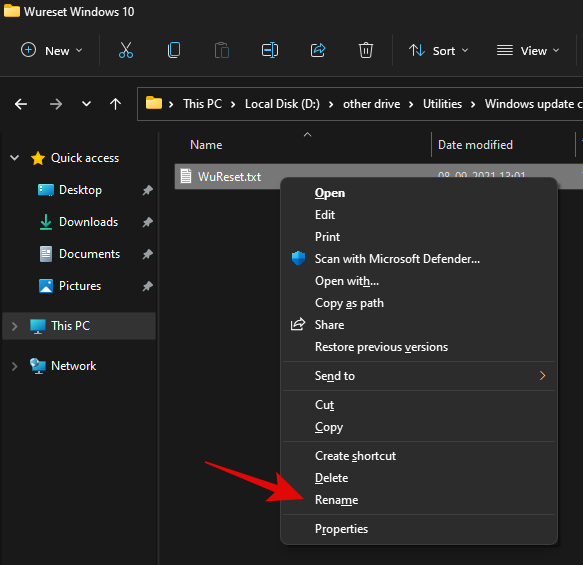
Click on ‘Rename’.
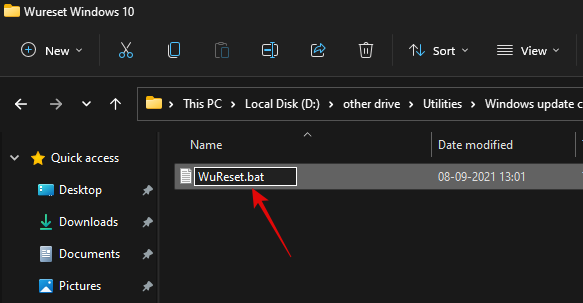
Replace ‘.txt’ with ‘.bat’.
Once done, right-click on the file and select ‘Run as administrator’.
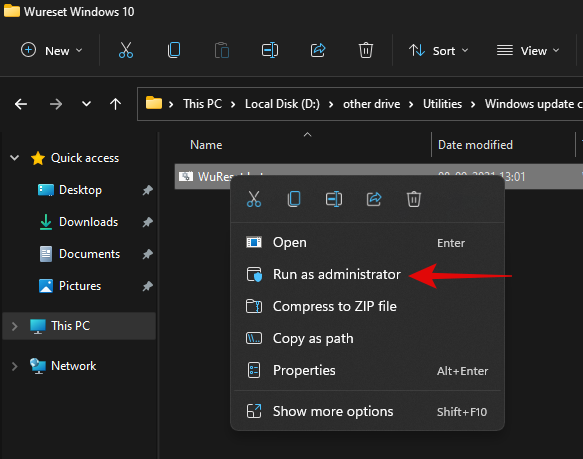
The batch script will now run on your PC and do its thing. Once the process completes, you will be asked to restart your PC. We highly recommend that you restart your PC at the earliest after running this script. Upon a restart, your Windows update should be reset and a fresh start should help you easily install pending Windows updates on your PC.
Method #02: Use DISM to uninstall the concerned packages
If you are still unable to uninstall specific Windows Update packages then simply use the DISM method to remove the concerned updates from your PC. This method force removes any available Windows updates from your PC without any issue. You will get a list of all the available updates in a table format which should make it much easier for you to find the culprit on your PC. Simply follow the guide at the top to get you started.
Method #03: Run SFC & DISM commands
At this point, if Windows still fails to update your system then you are facing a more serious issue than we anticipated earlier. This could indicate system-level corruption of files or missing system files from your system. In such cases, you can run SFC and DISM checks to fix corrupted files as well as restore missing system files. Follow the guide below to get you started.
Press Windows + S on your keyboard and search for CMD. Click on ‘Run as administrator’ once it shows up in your search results.
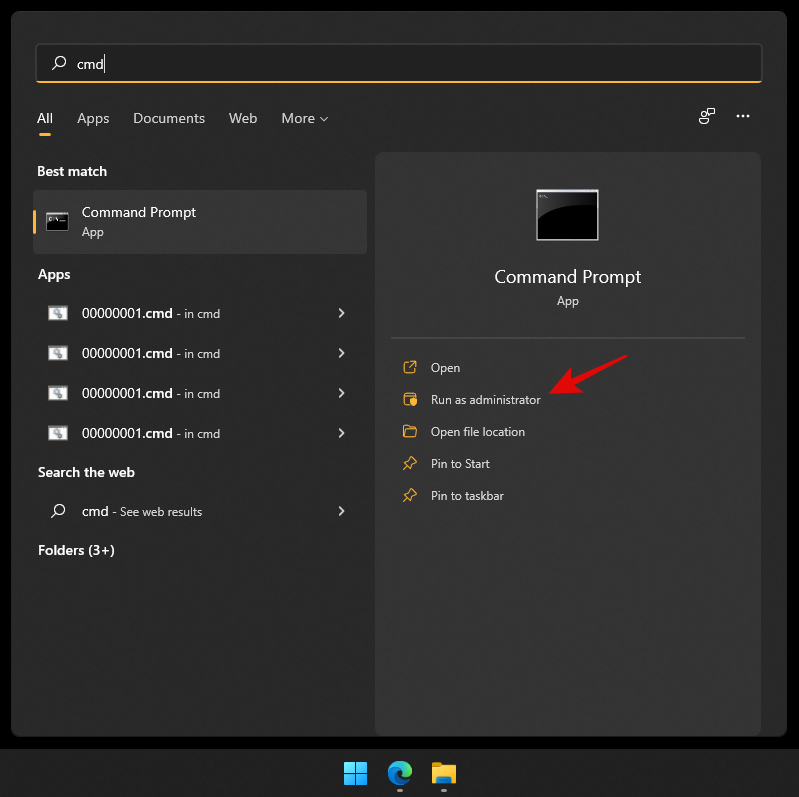
Type in the following command and press Enter on your PC.
sfc /scannow
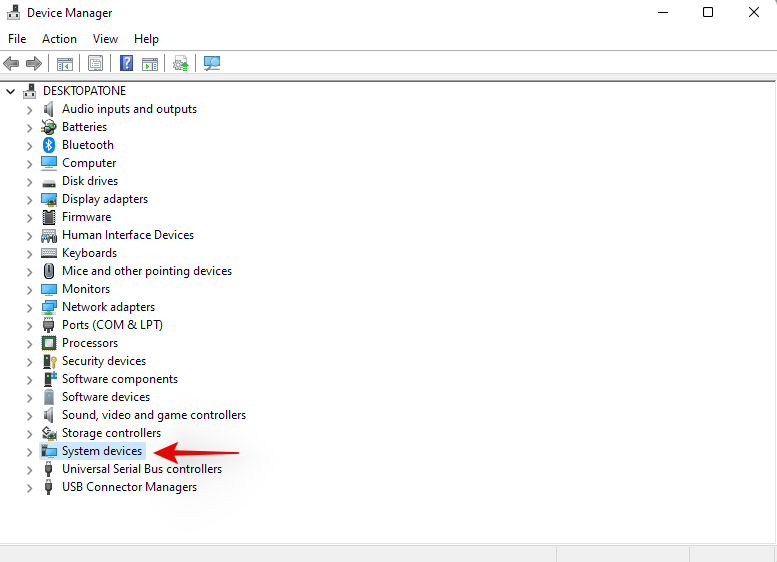
Once the SFC scan completes, type in the following command and execute it.
DISM /Online /Cleanup-Image /RestoreHealth
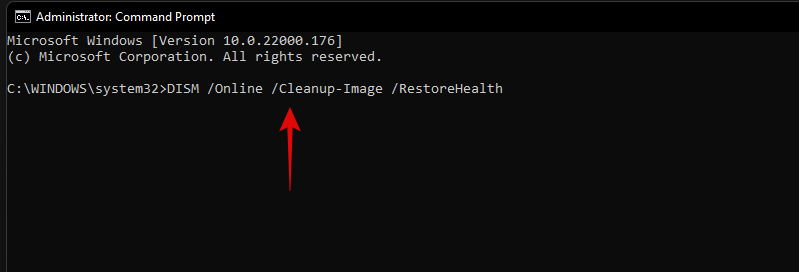
We recommend you restart your PC once the process completes.
Method #04: Last resort: Reset your PC
If nothing seems to be working for you then it might be time for a fresh installation of Windows 11 on your system. You can try getting in touch with your support team as well but if nothing works then a reset of your PC is the best option. In most cases, a reset while keeping your local files should help get Windows update working on your system.
Windows 11 connects to the update servers and updates your security definitions and drivers during OOBE. Windows will fix all update issues and reinstall necessary services on your system to get Windows update back up and running on your system during this process.
► You can use this dedicated guide from us to reset your Windows 11 PC.
We hope you were able to easily uninstall updates from your Windows 11 PC using the guide above. If you face any issues, feel free to drop a comment below.
Related:



![Kā atinstalēt McAfee operētājsistēmā Windows 11 [5 veidi] Kā atinstalēt McAfee operētājsistēmā Windows 11 [5 veidi]](https://blog.webtech360.com/resources8/images31/image-4917-0105182719945.png)
