„Windows“ yra išsami operacinė sistema, leidžianti diktuoti ir valdyti prieigos leidimus pagal šiuo metu aktyvią paskyrą. Tai leidžia administratoriams lengviau valdyti savo organizacijos kompiuterius, nes jie gali suteikti padidintus leidimus pasirinktiems asmenims.
Bet ką daryti, jei turite savo kompiuterį? Kaip tvarkote vietines paskyras? Ką daryti, jei neturite administratoriaus paskyros? Ar esi uždarytas visam laikui? Jei turite šių klausimų arba neseniai susidūrėte su klaida, kai reikėjo administratoriaus leidimo, turime jums puikų vadovą.
Štai viskas, ką reikia žinoti apie administratoriaus paskyras sistemoje „Windows 11“.
Pastaba apie „Windows 10“ suderinamumą: šiame puslapyje esantys vadovai buvo sudaryti naudojant „Windows 11“, todėl ekrano kopijose naudojama „Windows 11“ vartotojo sąsaja. Tačiau šie vadovai taip pat visiškai tinka „Windows 10“. Taigi nedvejodami naudokite „Windows 11“ ir „Windows 10“ asmeninio kompiuterio vadovus.
Susiję: Kaip ieškoti sistemoje „Windows 11“.
Turinys
Kas yra administratoriaus paskyra sistemoje „Windows 11“?
Administratoriaus paskyra yra aukščiausia „Microsoft Windows“ paskyra, turinti didžiausias privilegijas. Tai leidžia jums, kaip administratoriui, valdyti savo kompiuterį, bet jūs norite. Galite keisti sistemos failus, įdiegti padidintas programas, modifikuoti "Windows" diegimą, nustatyti pasirinktinį automatizavimą ir dar daugiau. Leidimas atlikti tokias užduotis nėra prieinamas standartiniams arba svečiams. Be to, kaip administratorius galite valdyti „Windows“ funkcijas ir nurodyti, kurios iš jų yra prieinamos ir pasiekiamos jūsų vartotojams.
Kodėl jums reikia administratoriaus paskyros?
Administratoriaus paskyra yra paskyra, turinti didžiausias „Windows“ teises. Tai reiškia, kad galite atlikti sistemos lygio operacinės sistemos pakeitimus naudodami administratoriaus paskyrą be jokių apribojimų. Štai keletas dažniausiai pasitaikančių priežasčių, kodėl gali prireikti administratoriaus paskyros kompiuteryje.
- Norėdami atlikti sistemos lygio pakeitimus
- Norėdami redaguoti / modifikuoti ar taisyti sistemos failus
- Norėdami paleisti administratoriaus lygio komandas ir scenarijus
- Norėdami įjungti arba išjungti „Windows“ funkcijas
- Norėdami įdiegti sistemos lygio programas ir patobulinimus
- Norėdami pakeisti arba iš naujo įdiegti tvarkykles
- Norėdami pasiekti personalizavimo nustatymus sistemoje „Windows“.
- Norėdami iš naujo nustatyti arba pakeisti vietinių paskyrų slaptažodžius
ir daug daugiau. Gali būti daug priežasčių, kodėl jums reikia administratoriaus paskyros sistemoje „Windows 11“, bet ar žinojote, kad sistemoje „Windows“ yra dviejų tipų administratoriaus paskyros. Na ne visai, bet štai viskas, ką apie juos reikia žinoti.
Susiję: Kaip išjungti „Windows 11“ įspėjimo garsus
Prisijunkite kaip administratorius: dalykai, kuriuos reikia žinoti
Pagal numatytuosius nustatymus „Windows“ turi integruotą administratoriaus paskyrą, net jei jos nėra jūsų užrakinimo ekrane. Ši numatytoji paskyra sukuriama „Windows“ diegimo metu, kad būtų patvirtinti visi sistemos pakeitimai, atlikti jūsų kompiuteryje nustatant „Windows“.
Be to, „Windows“ taip pat leidžia nustatyti papildomą administratoriaus paskyrą iš vietinės paskyros, jei turite reikiamus leidimus. Taip pat galite konvertuoti dabartinę paskyrą į administratoriaus paskyrą, jei šiuo metu naudojate standartinę paskyrą sistemoje „Windows 11“.
Kiekvienos iš šių paskyrų nustatymas turi skirtingus reikalavimus ir, priklausomai nuo dabartinės sąrankos, galite pasirinkti bet kurią iš sąrankų. Bet jei bandote atkurti vietinės paskyros slaptažodį, geriausia yra naudoti numatytąją administratoriaus paskyrą, nes tokiu atveju negalėsite praeiti užrakinimo ekrano.
Be to, čia yra keletas bendrų dalykų, kuriuos turėtumėte atsiminti prieš tęsdami toliau pateiktus vadovus.
- Numatytasis administratorius neturi prisijungimo slaptažodžio, nebent jį tinkino jūsų administratorius
- Jei jūsų vienetą išdavė jūsų organizacija arba švietimo įstaiga, toliau nurodyti metodai greičiausiai jums netiks. Numatytąją administratoriaus paskyrą užrakins jūsų organizacija, o dabartinė paskyra neturės reikiamų privilegijų, kad būtų galima tęsti kitus šiame vadove nurodytus metodus. Jei turite tokį įrenginį, greičiausiai turėsite susisiekti su administratoriumi.
- Jei dalijatės įrenginiu su kitais vartotojais, atlikę reikiamus sistemos pakeitimus turėtumėte išjungti administratoriaus paskyrą, kad išvengtumėte neteisėtos prieigos prie neskelbtinos informacijos. Taip pat tokiais atvejais rekomenduojama nustatyti numatytosios administratoriaus paskyros slaptažodį.
- Kai kurie toliau nurodyti metodai reikalauja, kad jūsų sistemoje būtų įdiegta „Windows 11 Pro“ arba naujesnė versija. Jei naudojate „Windows 11“ namų leidimą, jūsų parinktys bus ribotos.
Skirtumas tarp numatytosios administratoriaus paskyros ir administratoriaus prieigos prie vartotojo abonemento suteikimo
Numatytoji administratoriaus paskyra yra atskira paskyra, kuri yra kiekviename „Windows“ diegime, neatsižvelgiant į jūsų įrenginį ar „Windows“ versiją. Kita vertus, konvertuota paskyra yra standartinė arba svečio paskyra jūsų kompiuteryje, kuriai suteikta administratoriaus teisė.
Kai bus padidinta, jūsų paskyra priklausys administratorių grupei ir turėsite visus reikalingus administratoriaus leidimus, kad galėtumėte savo kompiuteryje atlikti sistemos lygio pakeitimus. Numatytasis administratorius dažniausiai naudojamas bandant atkurti prarastus vietinių vartotojų paskyrų slaptažodžius kompiuteryje.
Kita vertus, paskyros konvertavimas yra paprastas dabartinės paskyros leidimų padidinimo procesas, kuris leis jums dirbti kaip dabartinio įrenginio administratorius. Numatytąjį administratorių jūsų sistemoje galima išjungti naudojant paprastą komandą, o vietinę paskyrą reikės konvertuoti dar kartą, jei norite atšaukti pakeitimus. Naudokite vieną iš toliau pateiktų būdų, kurie geriausiai atitinka jūsų dabartinius poreikius.
Susiję: Kaip išjungti klaviatūrą „Windows 11“.
Kaip prisijungti kaip administratorius sistemoje Windows 11
Galite prisijungti kaip administratorius sistemoje „Windows 11“, naudodami įvairius anksčiau aprašytus metodus. Galite įjungti numatytąją administratoriaus paskyrą, jei norite atlikti laikinus pakeitimus kompiuteryje arba atkurti prarastą slaptažodį. Taip pat galite nustatyti naują administratoriaus paskyrą naujam vartotojui, jei norite bendrinti įrenginį su kuo nors. Galiausiai, dabartinę vietinę paskyrą galite konvertuoti į administratoriaus paskyrą, jei norite gauti administratoriaus teises dabartiniame įrenginyje. Vykdykite vieną iš toliau pateiktų metodų, kurie geriausiai atitinka jūsų dabartinius poreikius ir reikalavimus.
01 metodas: naudokite numatytąją administratoriaus paskyrą
Galite naudoti numatytąją administratoriaus paskyrą „Windows 11“ kompiuteryje, kad atliktumėte reikiamus pakeitimus, vadovaudamiesi toliau pateiktu vadovu. Atlikę pakeitimus galite išjungti paskyrą naudodami tolesnį vadovą. Pradėkime.
1.1 Įgalinkite numatytąją administratoriaus paskyrą
Pirmiausia turėsime įjungti / neslėpti administratoriaus abonemento jūsų kompiuteryje. Tai galima padaryti naudojant įvairius metodus. Jei galite praeiti pro užrakinimo ekraną, galite naudoti bet kurį iš šių būdų. Tačiau, jei negalite praeiti užrakinimo ekrano, turėsite pasiekti CMD iš užrakinimo ekrano ir naudoti toliau pateiktą vadovą. Tokiais atvejais galite naudoti apačioje esantį vadovą, kad suaktyvintumėte CMD tiesiai iš pagrindinio ekrano. Pradėkime.
1.1.1 CMD naudojimas
Paleiskite CMD savo sistemoje ir įveskite toliau pateiktą komandą. Baigę paspauskite klaviatūros klavišą Enter, kad jį paleistumėte.
net user administrator /active:yes

Dabar komanda turėtų būti sėkmingai įvykdyta.

Paspauskite klaviatūros „Windows“ klavišą ir apatiniame kairiajame kampe spustelėkite savo vartotojo vardą. Dabar šioje skiltyje turėtų būti matoma administratoriaus paskyra.
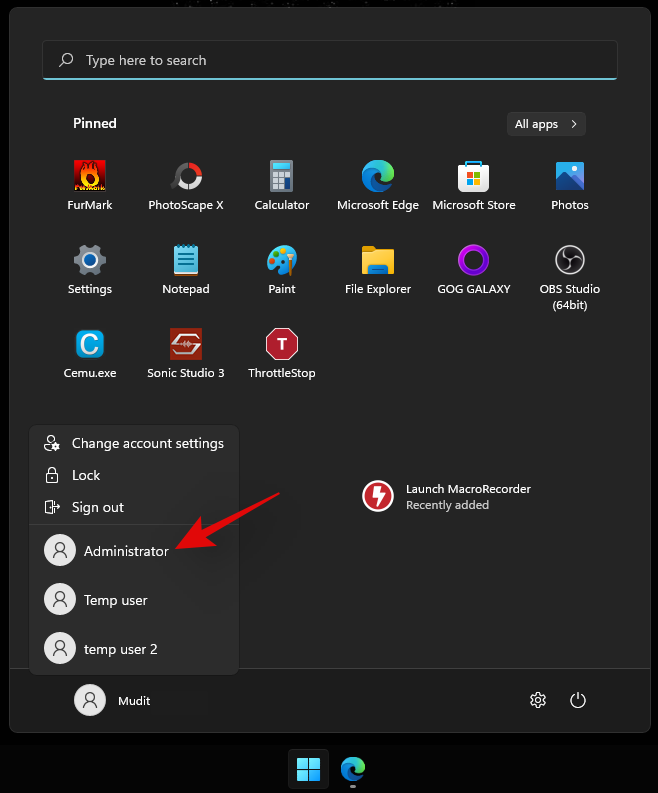
Tai reiškia, kad procesas buvo sėkmingas. Dabar galite atsijungti nuo paskyros ir prisijungti prie administratoriaus paskyros. Numatytoji administratoriaus paskyra neturi slaptažodžio, o kai prisijungsite prie paskyros, jus pasveikins OOBE. Dabar galite naudoti tolesnius vadovus, kad iš naujo nustatytumėte „Windows“ slaptažodį, jei reikia.
1.1.2 Administratoriaus įrankių naudojimas
Paspauskite Windows + Rklaviatūrą, kad paleistumėte paleidimo dialogo langą. Paleidę įveskite šį terminą ir klaviatūroje paspauskite Enter.
lusrmgr.msc
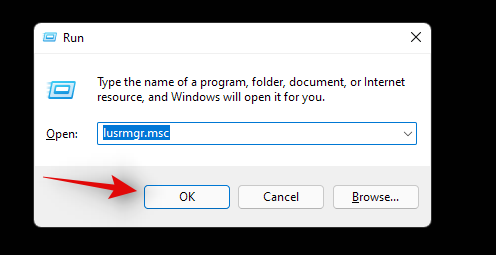
Dabar jūsų kompiuteryje bus paleista vietinių grupių tvarkyklė. Pradėkite kairėje pusėje pasirinkę „Vartotojai“.
Dešinėje pusėje spustelėkite Administratorius . Dabar spustelėkite Daugiau veiksmų , tada – Ypatybės .
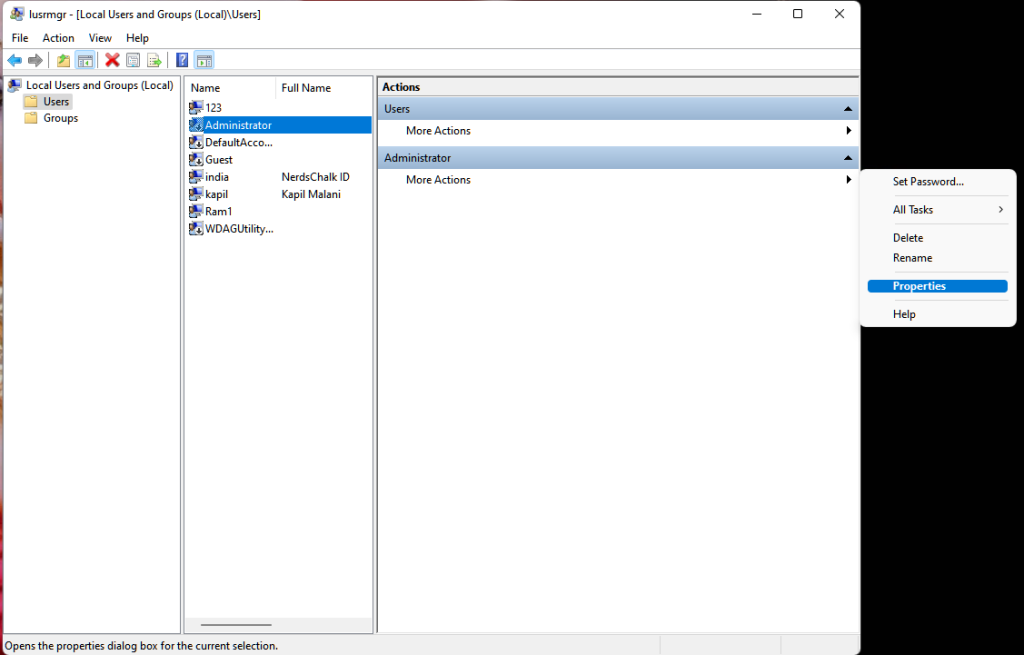
Dabar jūsų ekrane bus paleistas naujas langas. Atžymėkite parinktį „Paskyra išjungta“.
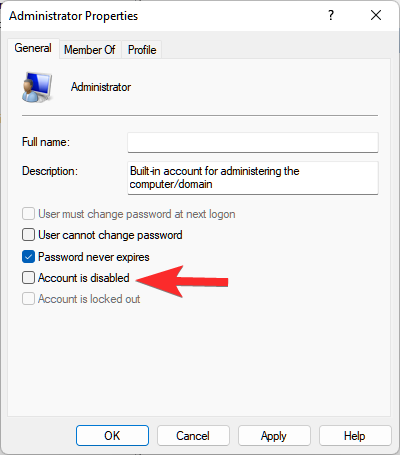
Spustelėkite „Taikyti“, tada „Gerai“.
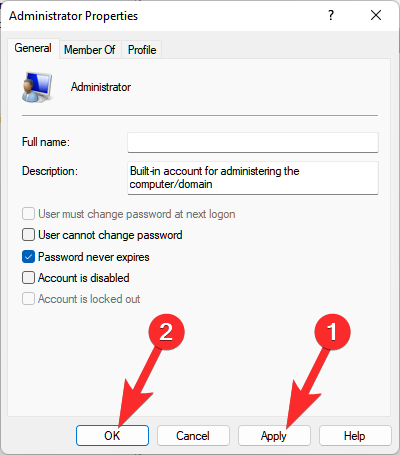
Uždarykite vietinių grupių tvarkyklę ir suaktyvinkite meniu Pradėti. Dabar apačioje kairėje spustelėkite savo vartotojo vardą ir šioje skiltyje turėtų būti pasiekiama nauja „Administratoriaus“ paskyra. Dabar galite atsijungti nuo dabartinės paskyros ir prisijungti prie naujos administratoriaus paskyros. Paskyra neturės slaptažodžio, todėl turėtumėte turėti galimybę lengvai prie jos prisijungti tiesiog spustelėdami „Prisijungti“.
1.1.3 Registro rengyklės naudojimas
Registro rengyklės metodas taikomas tik tiems vartotojams, kurių sistemose įdiegta „Windows 11 Pro“ ar naujesnė versija. Taip yra todėl, kad registro kelias, prie kurio turime pasiekti šį metodą, yra prieinamas tik „Windows 11 Pro“ ar naujesnės versijos vartotojams. Jei esate „Windows 11 Home“ vartotojas, galite naudoti aukščiau nurodytą CMD metodą.
Paspauskite Windows + Rklaviatūrą ir įveskite šį terminą. Baigę paspauskite klaviatūros klavišą Enter.
regedit
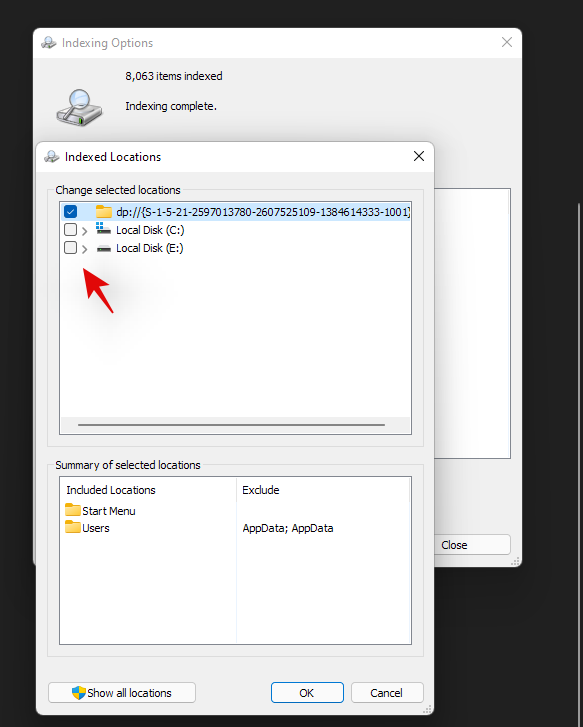
Dabar eikite į šį kelią. Taip pat galite nukopijuoti ir įklijuoti tą patį adreso juostoje viršuje.
Computer\HKEY_LOCAL_MACHINE\SOFTWARE\Microsoft\Windows NT\CurrentVersion\Winlogon\SpecialAccounts\UserList

Kai kairėje pusėje pasirinkote UserList, dešiniuoju pelės mygtuku spustelėkite tuščią sritį dešinėje ir pasirinkite „Naujas“.
Spustelėkite „DWORD (32 bitų) reikšmė“.
Pavadinkite reikšmę kaip „Administratorius“ ir klaviatūroje paspauskite Enter.
Kai vertė bus pridėta, uždarykite registro rengyklę ir iš naujo paleiskite kompiuterį, kad galėtumėte tinkamai įvertinti. Administratoriaus paskyra dabar turėtų būti pasiekiama apatiniame kairiajame ekrano kampe, kai esate užrakinimo ekrane.
1.1.4 GPO naudojimas
Jei naudojate įmonės įrenginį, taip pat galite naudoti grupės strategijos rengyklę, kad įgalintumėte numatytąją administratoriaus paskyrą savo kompiuteryje. Tačiau ši parinktis nebus prieinama vartotojams, turintiems „Windows 11 Home“ leidimą. Norėdami pradėti, vadovaukitės toliau pateiktu vadovu.
Paspauskite Windows + R, įveskite šį terminą ir klaviatūroje paspauskite Enter, kad atidarytumėte grupės strategijos rengyklę savo kompiuteryje.
gpedit.msc
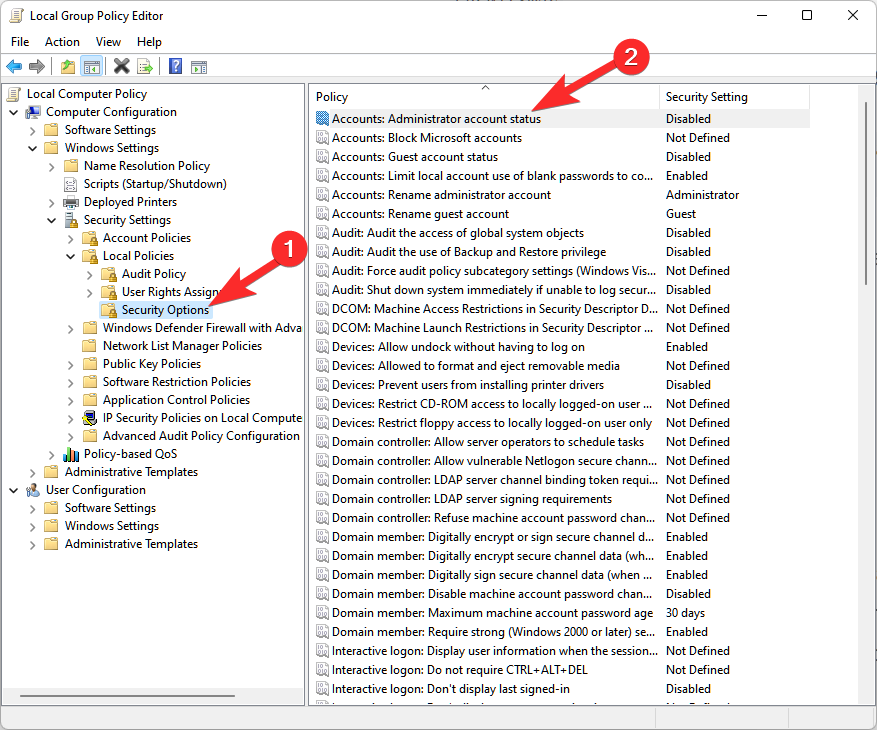
Eikite į šį katalogą naudodami kairę šoninę juostą.
Computer Configuration\Windows Settings\Security Settings\Local Policies\Security Options\
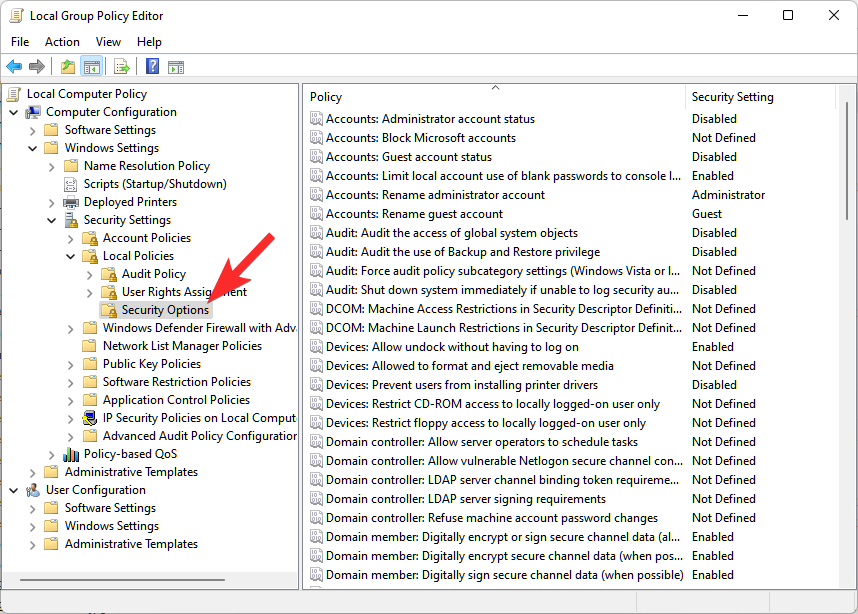
Dabar dukart spustelėkite šią reikšmę dešinėje: Paskyros: Administratoriaus paskyros būsena
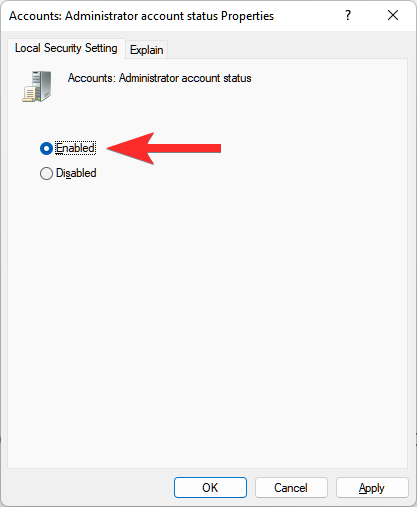
Pasirinkite „Įjungta“.
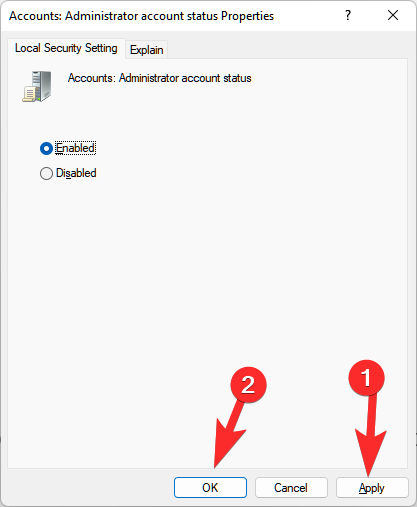
Spustelėkite „Taikyti“, tada „Gerai“.
Uždarykite GPO langą dabar ir paspauskite klaviatūros Windows klavišą, kad atidarytumėte meniu Pradėti. Dabar spustelėkite savo vartotojo vardą apatiniame kairiajame ekrano kampe ir jums turėtų būti prieinama nauja administratoriaus paskyra.
1.2 Išjunkite numatytąją administratoriaus paskyrą
Dabar, kai baigėte administravimo užduotis, rekomenduojama išjungti administratoriaus paskyrą, kad išvengtumėte neteisėtos prieigos prie jūsų sistemos. Naudokite vieną iš toliau pateiktų metodų, kurie geriausiai atitinka jūsų dabartinius poreikius ir reikalavimus. Pradėkime.
1.2.1 CMD naudojimas
Suaktyvinkite CMD savo kompiuteryje, atsižvelgdami į dabartinę sąranką, ir įveskite šią komandą. Paspauskite klavišą Enter klaviatūroje, kad jį paleistumėte.
net user administrator /active:no

Štai ir viskas! Numatytoji administratoriaus paskyra dabar turėtų būti išjungta jūsų kompiuteryje.
1.2.2 Administratoriaus įrankių naudojimas
Paspauskite Windows + Rir dialogo lange Vykdyti įveskite šį terminą. Baigę paspauskite klaviatūros klavišą Enter.
lusrmgr.msc

Kairėje šoninėje juostoje pasirinkite „Vartotojai“ ir dešinėje spustelėkite „Administratorius“.
Pažymėkite parinkties „Paskyra išjungta“ žymimąjį laukelį.
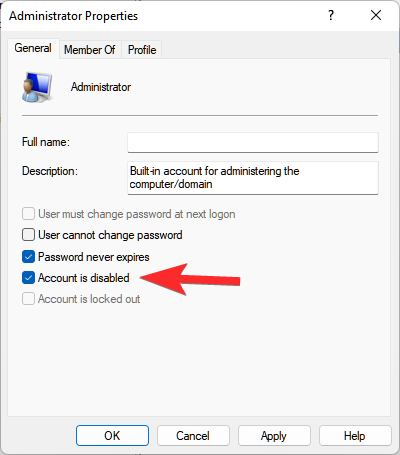
Spustelėkite Taikyti ir tada Gerai .

Uždarykite administratoriaus įrankių langą ir dabar jūsų kompiuteryje turėtų būti išjungta numatytoji administratoriaus paskyra.
1.2.3 Registro rengyklės naudojimas
Paspauskite Windows + R, įveskite toliau pateiktą informaciją ir klaviatūroje paspauskite Enter, kad kompiuteryje atidarytumėte registro rengyklę.
regedit

Kai atsidarys registro rengyklė, eikite į toliau pateiktą kelią.
Computer\HKEY_LOCAL_MACHINE\SOFTWARE\Microsoft\Windows NT\CurrentVersion\Winlogon\SpecialAccounts\UserList

Dešinėje spustelėkite „Administratorius“ ir klaviatūroje paspauskite Del.
Patvirtinkite savo pasirinkimą spustelėdami „Taip“.
Iš naujo paleiskite kompiuterį ir numatytoji administratoriaus paskyra užrakinimo ekrane nebebus pasiekiama.
1.2.4 GPO naudojimas
Paspauskite Windows + Rir įveskite toliau pateiktą informaciją. Baigę paspauskite klaviatūros klavišą Enter.
gpedit.msc
Dabar eikite į šį kelią.
Computer Configuration\Windows Settings\Security Settings\Local Policies\Security Options\

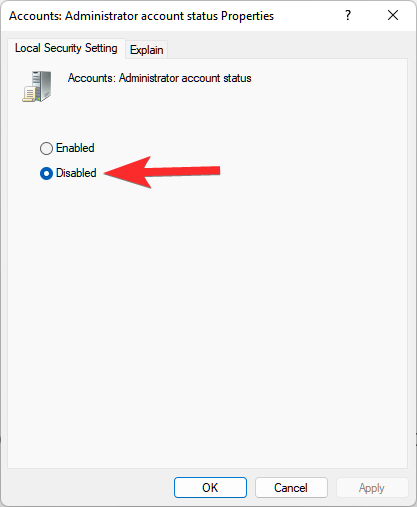
Dabar dukart spustelėkite šią reikšmę dešinėje: Paskyros: Administratoriaus paskyros būsena

Pasirinkite „Išjungta“.
Spustelėkite „Taikyti“, tada „Gerai“.
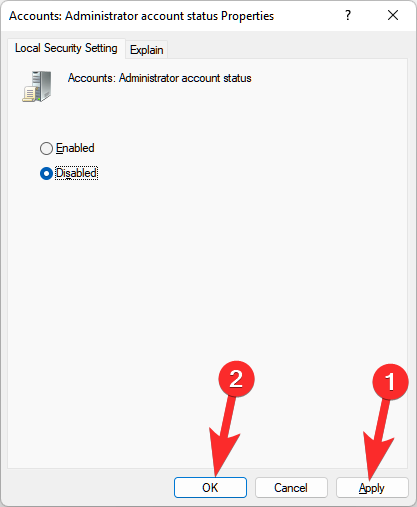
Uždarykite GPO langą.
Numatytoji administratoriaus paskyra dabar bus išjungta jūsų kompiuteryje naudojant grupės strategijos rengyklę sistemoje „Windows 11“.
1.3 Prisijunkite kaip administratorius naudodami komandų eilutę (negalite išspręsti užrakinimo ekrano problemos)
Jei nesate užblokuotas „Windows“ ir norite pasiekti administratoriaus paskyrą, kad iš naujo nustatytumėte slaptažodį, pirmiausia turėsite paleisti CMD iš užrakinimo ekrano. Norėdami tęsti šį vadovą, jums reikės atkūrimo aplinkos.
Šiam vadovui pirmiausia turėsite pasiekti CMD naudodami „Windows“ diegimo laikmeną („ Windows“ įkrovos USB ), tada atlikite toliau nurodytus veiksmus. Jei naudojate diegimo laikmeną, paspauskite Shift + F10sąrankos metu, kad bet kur paleistumėte CMD.
Vykdykite toliau pateiktą vadovą, kad pradėtumėte, kai paleisite CMD, kaip nurodyta aukščiau.
Kai bus paleista komandų eilutė, įveskite šią komandą ir klaviatūroje paspauskite Enter.
cd windows

Dabar būsite nukreipti į numatytąjį įkrovos diską CMD. Įveskite šią komandą ir vykdykite ją paspausdami Enter klaviatūroje.
cd system32

You will now be in the System32 directory. Execute the command below to create a backup of utilman.exe.
copy utilman.exe utilman.exe.back

Execute the command below within CMD now.
copy cmd.exe cmd1.exe

Now let’s delete the default utilman.exe.
del utilman.exe

We will now rename CMD so that it can be accessed as utilman.exe.
rename cmd.exe utilman.exe

Once all the commands are executed successfully, close the command prompt by typing in the following command.
exit

Restart your PC and proceed to the Windows lock screen as you normally would. Click on the accessibility icon in the bottom right corner and you should now be able to access CMD on your lock screen. Follow the guide above to enable administrator account on your system. Once enabled, you can use the guide below to reset a local account’s password. Once you have reset your password it is highly recommended that you revert the changes we made to cmd.exe and utilman.exe earlier. Use the steps below to revert your changes.
Press Windows + S on your keyboard and search for CMD. Click on ‘Run as administrator’ once it shows up in your search results.
Now enter the following commands one by one and execute them to revert your changes. Make sure to execute each command one after the other without changing their order.


rename utilman.exe.back utilman.exe

CMD functionality should now be restored within Windows 11. You can check for the same by pressing Windows + R on your keyboard, typing in CMD, and hitting Enter on your keyboard. If CMD launches on your system then all the necessary changes have been reverted successfully.
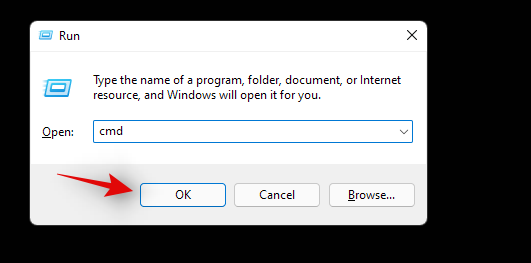
However, if CMD does not launch, make sure that you executed each command successfully on your system by re-verifying each one in the list above.
And that’s it! You should now be able to access CMD from your lock screen.
1.4 Reset password for a local account
You can now reset your local account’s password with the default administrator account we just enabled. Follow the steps below to get you started.
Log in to the Windows administrator account and then press Windows + S on your keyboard. Search for Control Panel and click and launch the app once it shows up in your search results.
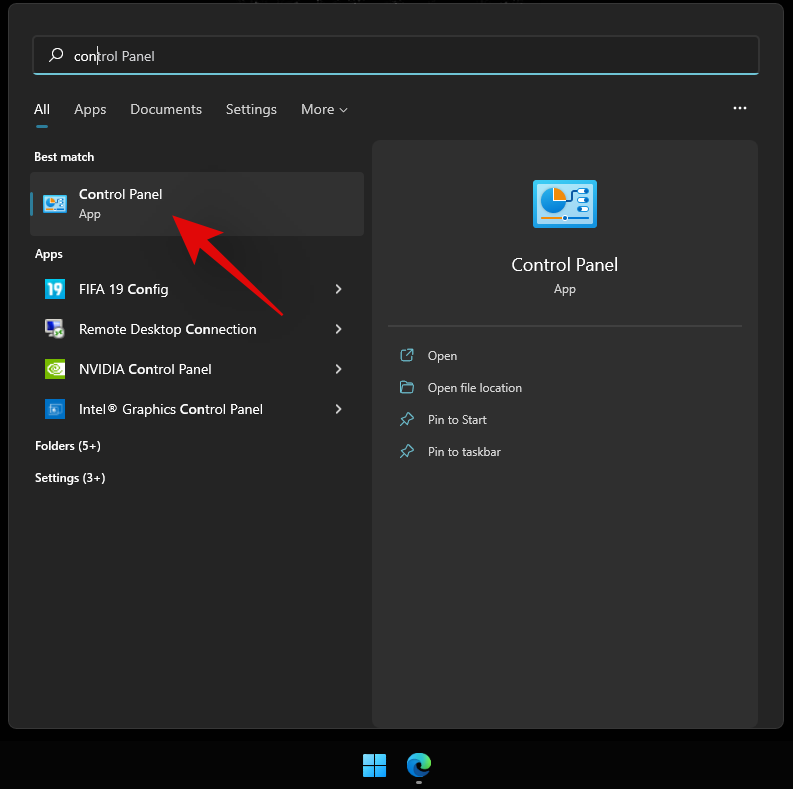
Click on ‘User Accounts’.
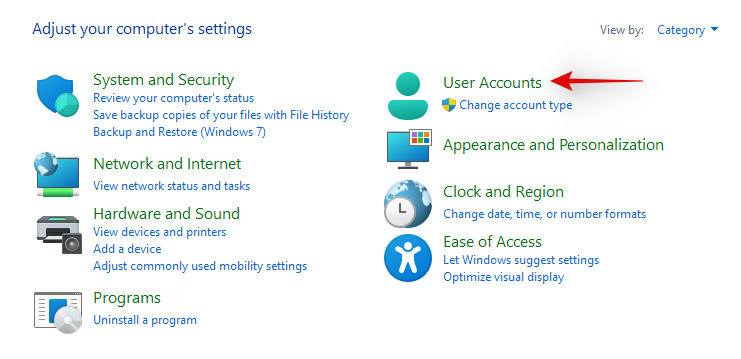
Click on ‘User Accounts’ again.
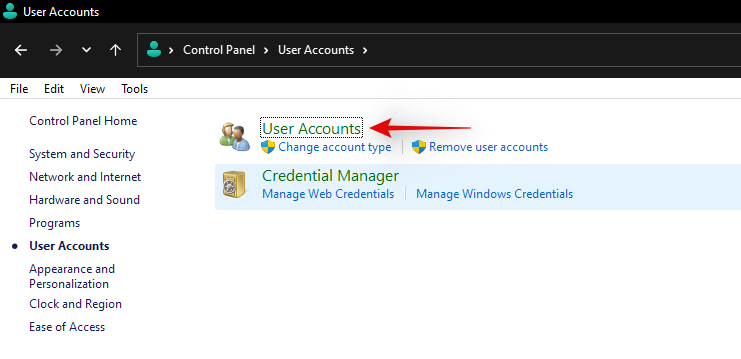
Click on ‘Manage another account’.
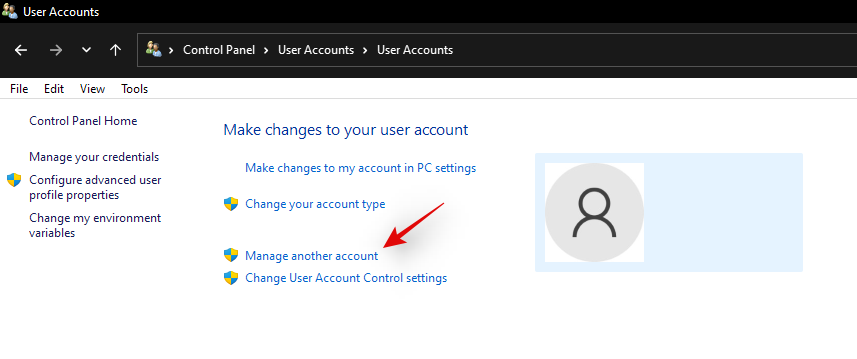
Click and select the account for which you wish to change the password.
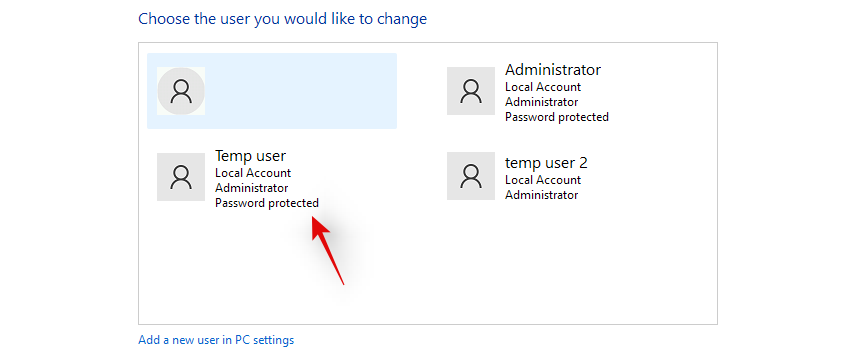
Now click on ‘Change the password’.

Type in your new password and confirm the same in the respective text boxes
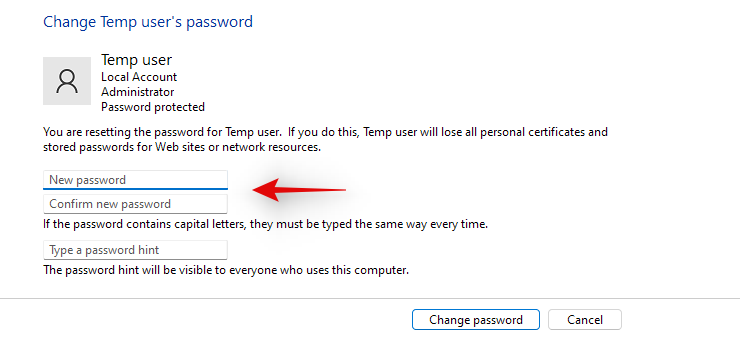
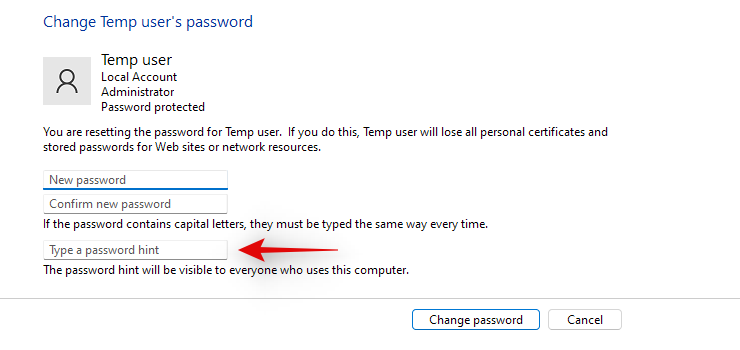
Set a password hint if needed.
Click on ‘Change password’ once you are done.
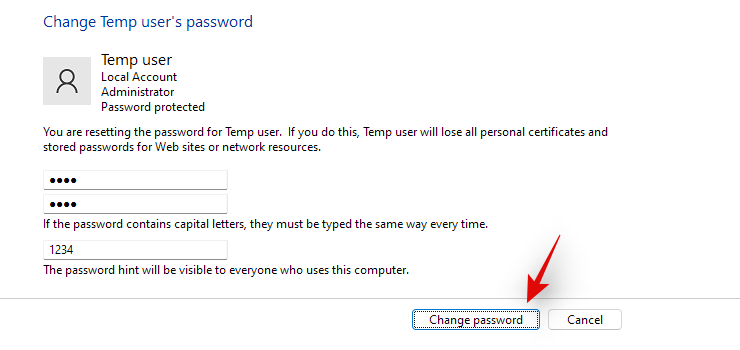
And that’s it! The password for the selected account should now be changed. You can now visit the lock screen and log into your local account using your new password. We recommend you revert any changes made at this point to maintain your security and privacy. You should revert any CMD changes made as well as disable the default administrator account on your system using the guides above.
Method #02: Create a new administrator account in Windows 11
If you wish to create a new administrator account in Windows 11, then you can follow the steps below. Please keep in mind that you will need administrator privileges to create a new administrator user account on your device. Follow the guide below to get you started.
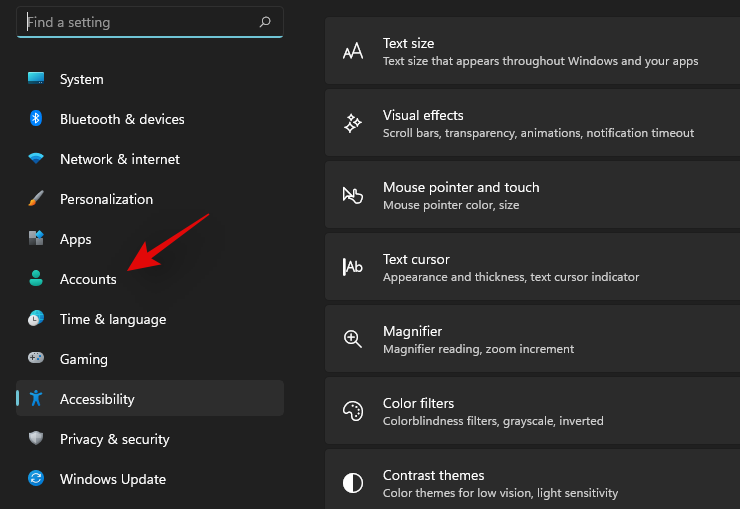
Press Windows + i on your keyboard and select ‘Accounts’ from the left sidebar.
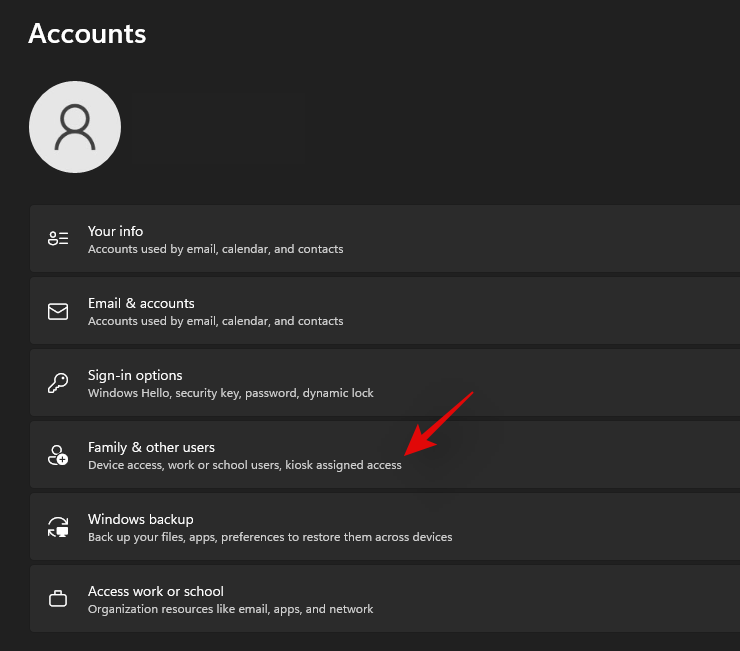
Click on ‘Family & other users’.
Click on ‘Add account’.

At this point, you can enter the Microsoft Account details of the new user and follow the on-screen steps to set up a new account. However, if you are looking to create a new local account then you can continue with the steps below.
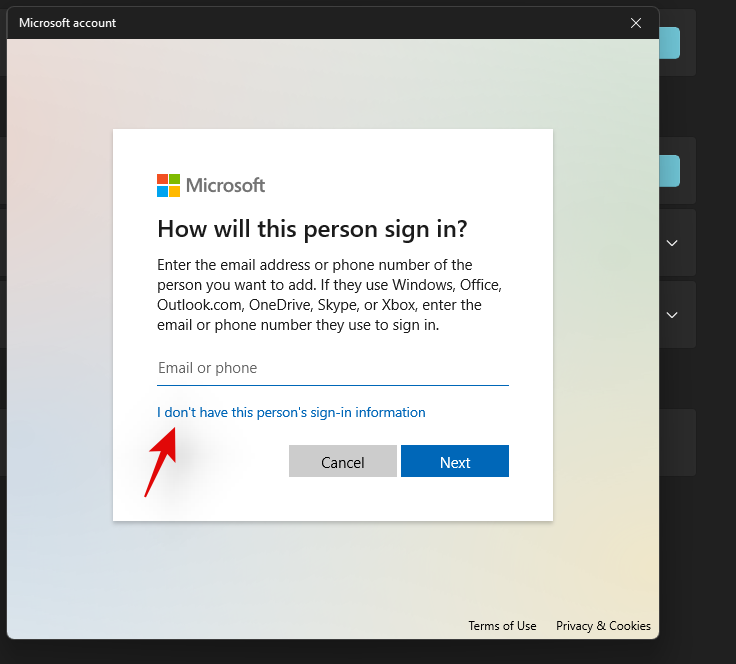
Click on ‘I don’t have this person’s sign-in information’.
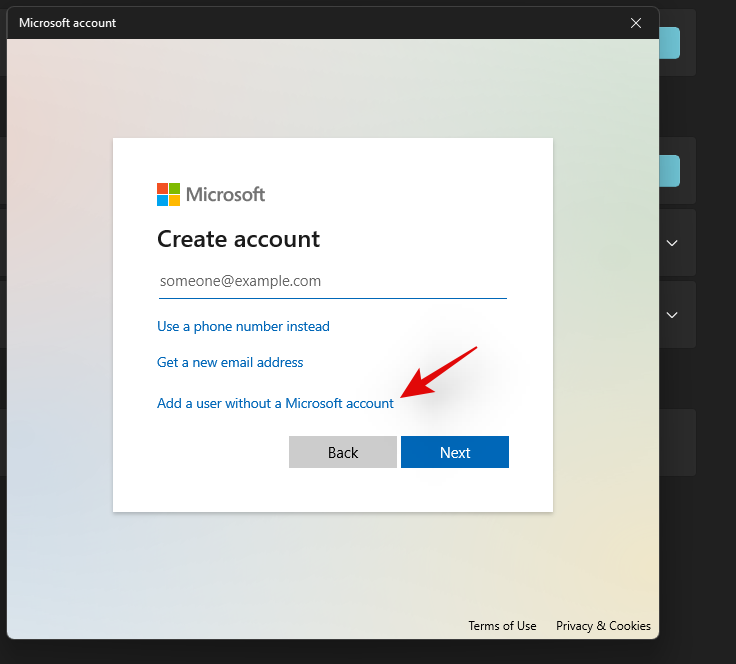
Click on ‘Add a user without a Microsoft account’.
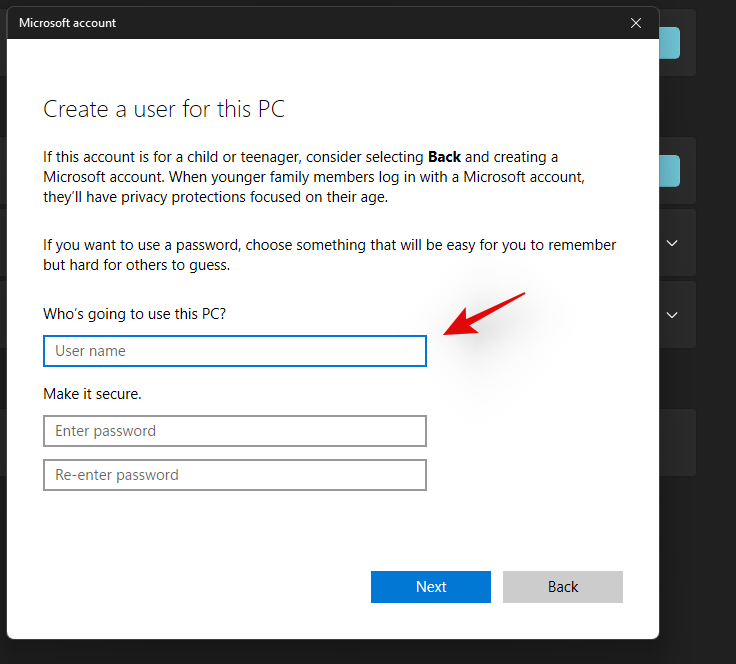
Enter the name of the new user.
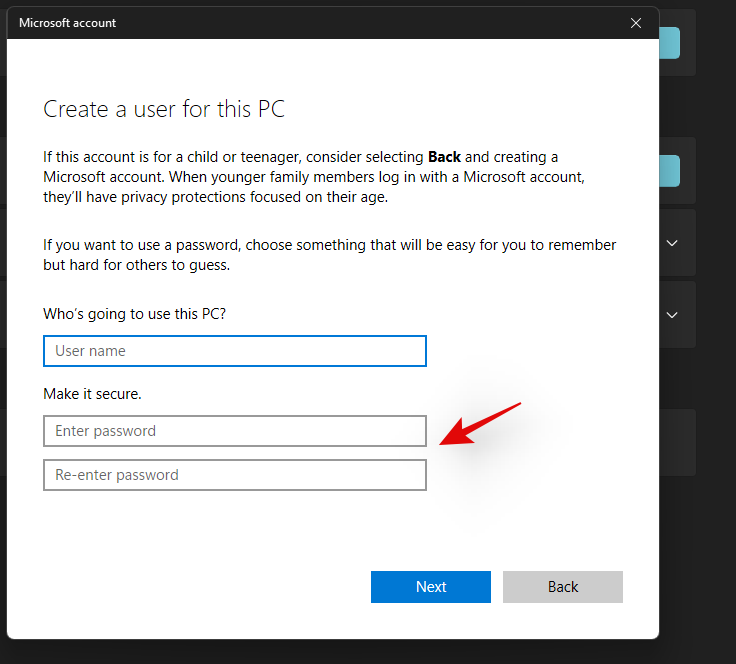
Now set a password and confirm the same.
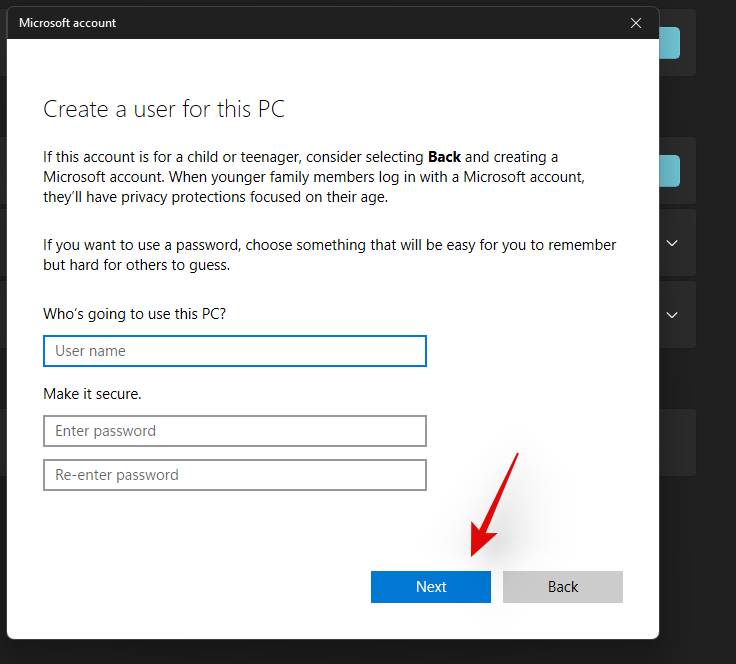
Click on ‘Next’ once you are done.
 \
\
A new account will now be added to your PC. However, the newly added account is a standard account. Let’s convert it into an administrator account. Press Windows + S on your keyboard and search for Control Panel. Click and launch the app from your search results.
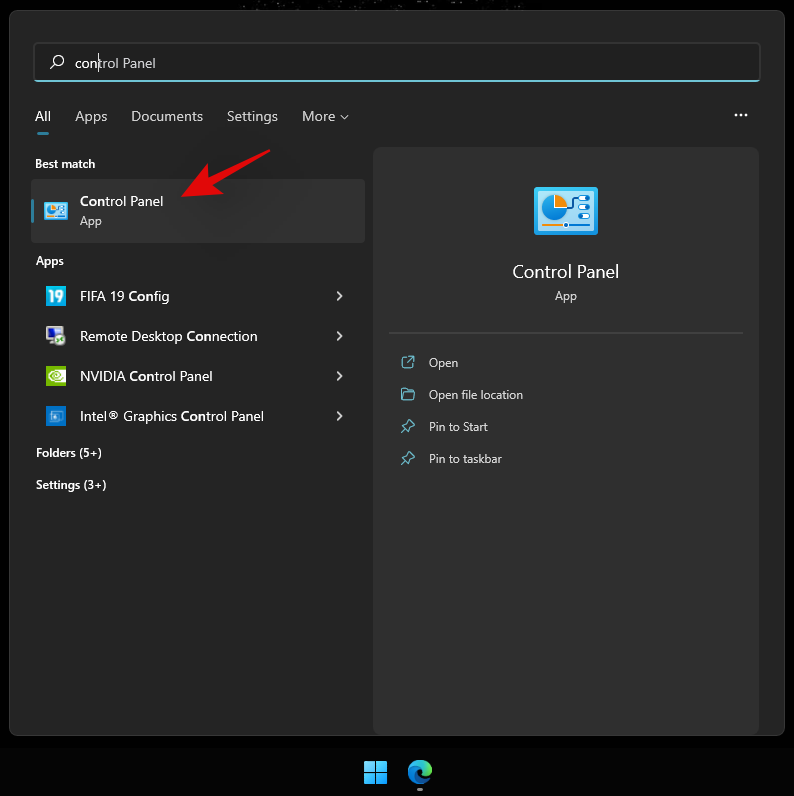
Click on ‘User Accounts’.
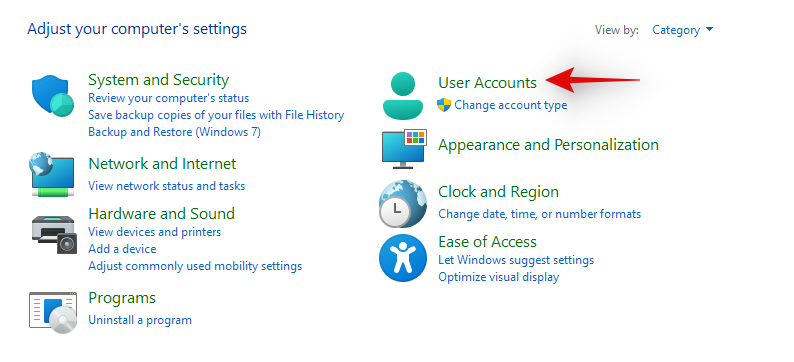
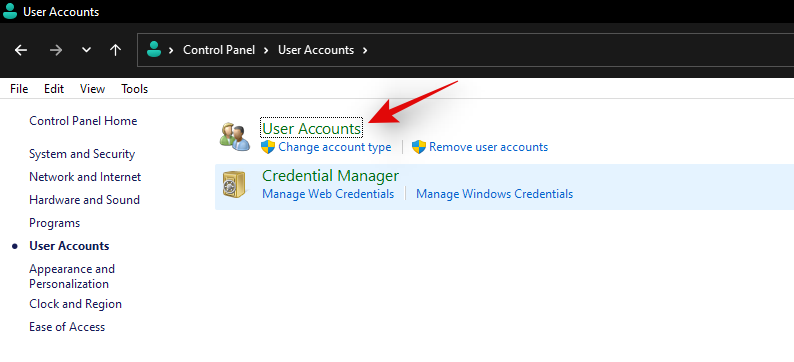
Click on ‘User Accounts’ again.
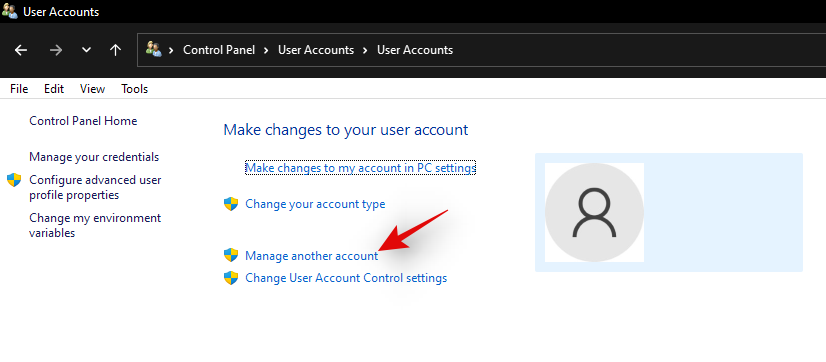
Click on ‘Manage another account’.
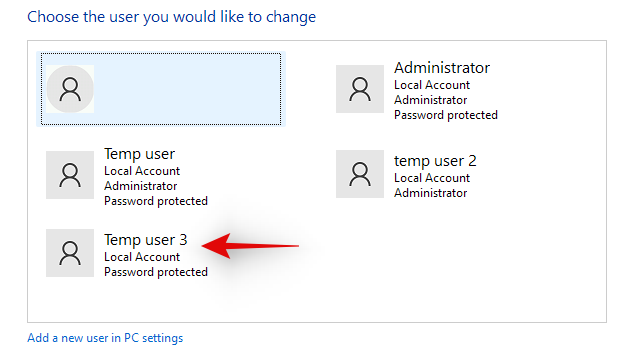
Now click and select the new account you just created.
Click on ‘Change the account type’.

Click and select ‘Administrator’.
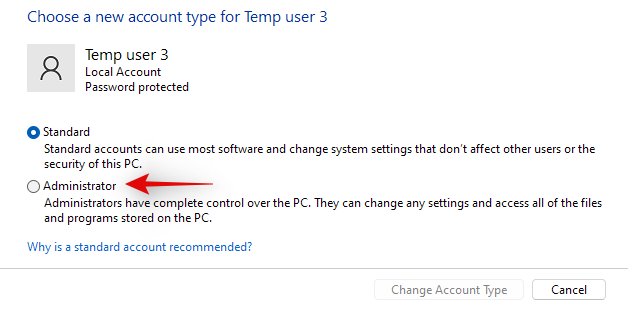
Finally, click on ‘Change account type’.
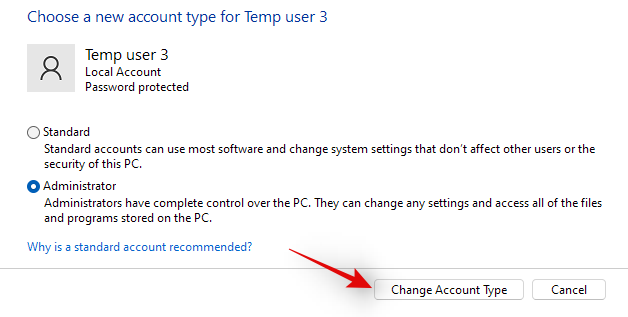
And that’s it! You will now have created a new local administrator account on your device.
Method #03: Change a standard account to an administrator account
If you have a standard account then you can simply switch to an administrator account. If using the Windows Home edition then you can either use the Control Panel method or the ‘netplwiz’ method. On the other hand, Windows Pro and higher users can use either of the methods listed below. Let’s get started.
Note: If you are logged in as a standard user and would like to convert the same account to an administrator account then we recommend you use the netplwiz guide in the methods below.
3.1 Using Control Panel (Windows home)
Press Windows + S on your keyboard, search for Control Panel and launch the app once it shows up in your search results.

Click on ‘User Accounts’.

Click on ‘User Accounts’ again.

If you wish to change your own account’s type then click on ‘Change your account type’. If you wish to convert another local account then select ‘Manage another account’ and select the concerned account. Once selected, click on ‘Change account type’.

Select ‘Administrator’.

Click on ‘Change account type’.

And that’s it, the concerned account should now be an administrator account on your system.
3.2 Using netplwiz
You can also use netplwiz to your advantage and convert user accounts on your PC. Follow the guide below to get you started.
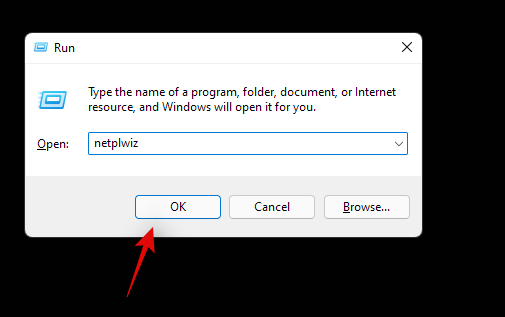
Press Windows + R on your keyboard to launch the run dialog box. Once launched, type in the following and press Enter on your keyboard.
netplwiz
Check the box for ‘Users must enter a user name and password to use this computer’ at the top.
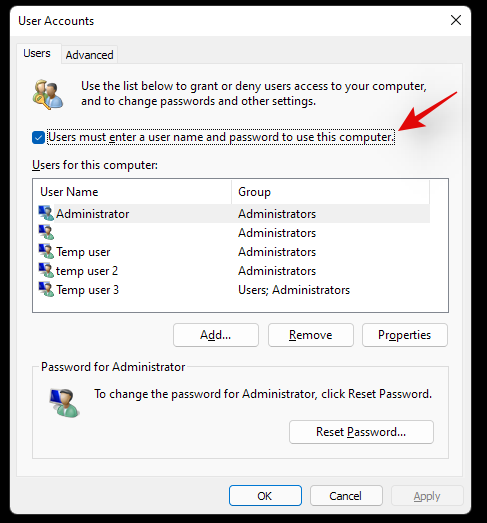
Now click and select the user account you wish to convert from the list below.
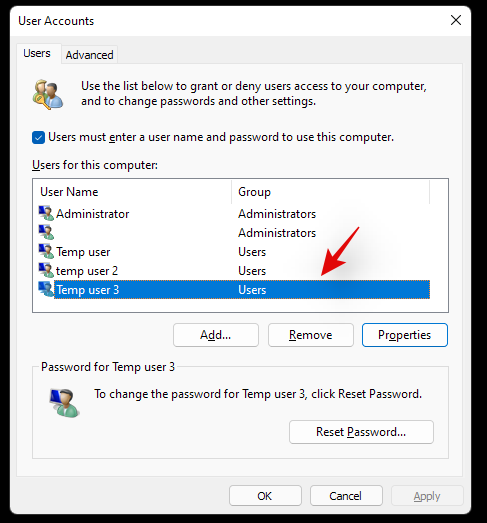
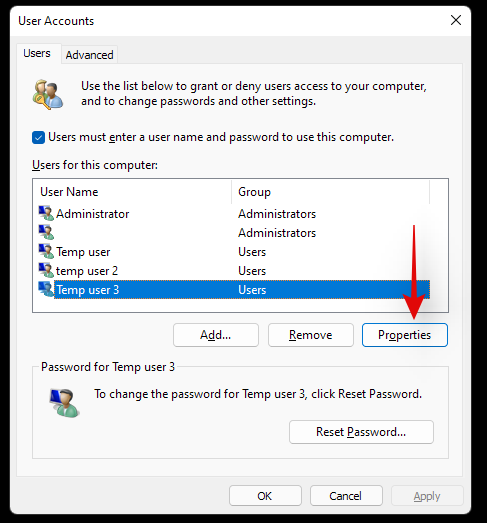
Click on ‘Properties’.
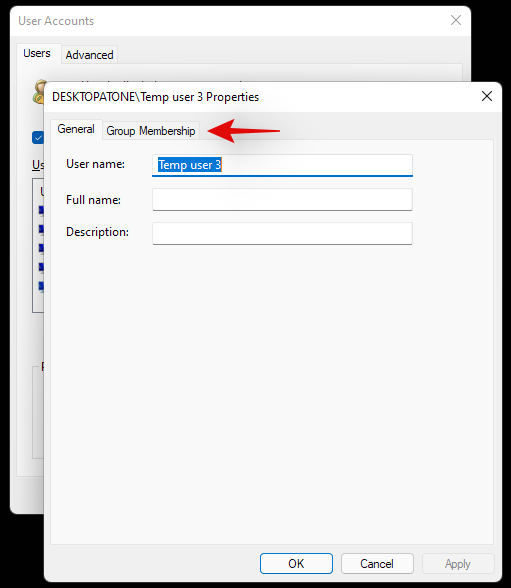
Switch to the ‘Group Membership’ tab at the top.
Click and select ‘Administrator’.
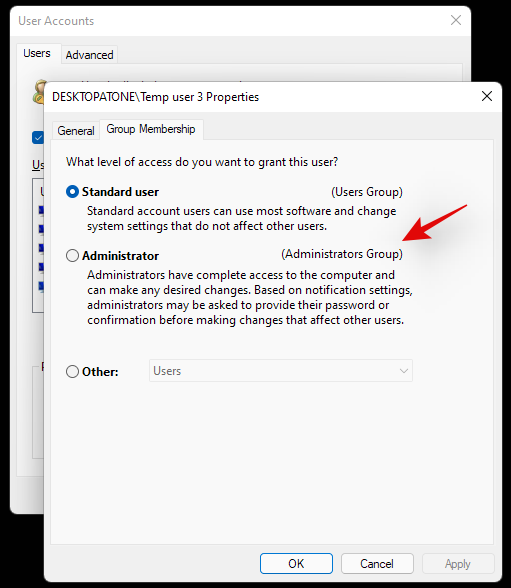
Click on ‘Ok’ twice, once you are done.
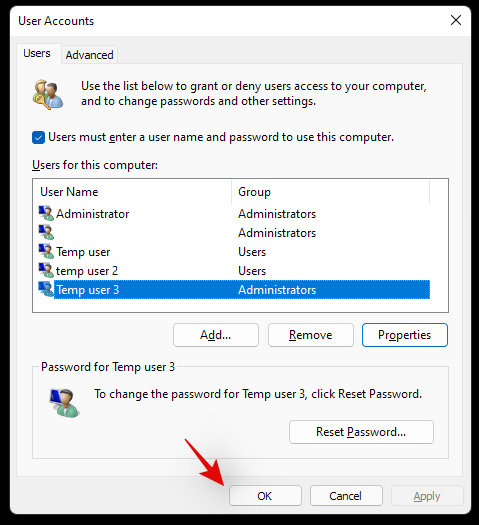
If you converted the current local account that you are signed in with then you will be prompted to re-login to the account for the changes to take effect. Click on ‘Yes’ to confirm your choice.
You will now be taken to the lock screen. Login to the concerned account and you should now have administrator privileges within it.
3.3 Using Local groups manager (Windows Pro and higher)
Press Windows + R on your keyboard, type in the following, and press Enter on your keyboard.
lusrmgr.msc
The local groups manager should now launch on your PC. Click and open ‘Users’ on your left.
Now select the desired User account that you wish to convert from your right and double click on it.
Switch to the ‘Member of’ tab and select the ‘Administrator’ group.
Click on ‘Ok’ once you are done.
And that’s it! The selected account will now have elevated administrator privileges within Windows.
Can you set or reset a password when logged in as an administrator?
Yes, you can easily reset your password as an administrator in Windows 11. This can be done in multiple ways and you can reset the password for a standard account or an administrator account using this method. This can be quite useful if you have forgotten your password and would like to get back into your system without losing your data.
However, you should keep in mind that this can be used by anyone to change your password and get access to your system. Hence, it is recommended that you set a secure password for your default account whenever possible.
For now, you can use the guide below to reset a password in Windows 11 when logged in as an administrator.
How to reset the password once logged in as an administrator
Resetting your password is quite easy when you are logged in to Windows 11 as an administrator. The best way to do this is by using either the Control Panel or CMD. Use one of the guides below that best fits your current needs and requirements. Follow any one of the guides below to get you started.
1. Using Control Panel
Press Windows + S and search for Control Panel. Click and launch the app from your search results.

Click on ‘User Accounts’.

Now click on ‘User Accounts’ again.

Click on ‘Manage another account’.

Now click and select your local account for which you wish to reset your password.

Click on ‘Change the password’.

Add a new password for your local account and confirm the same in their respective text boxes.

Now add a password hint if required.

Click on ‘Change password’ once done.

And that’s it! The password for the selected account should now be changed based on your preferences.
2. Using CMD
You can also reset a local account’s password using CMD. Follow the guide below to get you started.
Press Windows + S on your keyboard and search for CMD. Click on ‘Run as administrator’ once the app shows up in your search result.
Type in the following and press Enter on your keyboard.
net user

You will get a list of all the accounts currently available on your PC. Make a note of the desired account’s username and then type in the command below. Replace ‘NAME’ with the name you noted down earlier and replace ‘PASSWORD’ with your new password. Once done, press Enter on your keyboard.
net user NAME PASSWORD
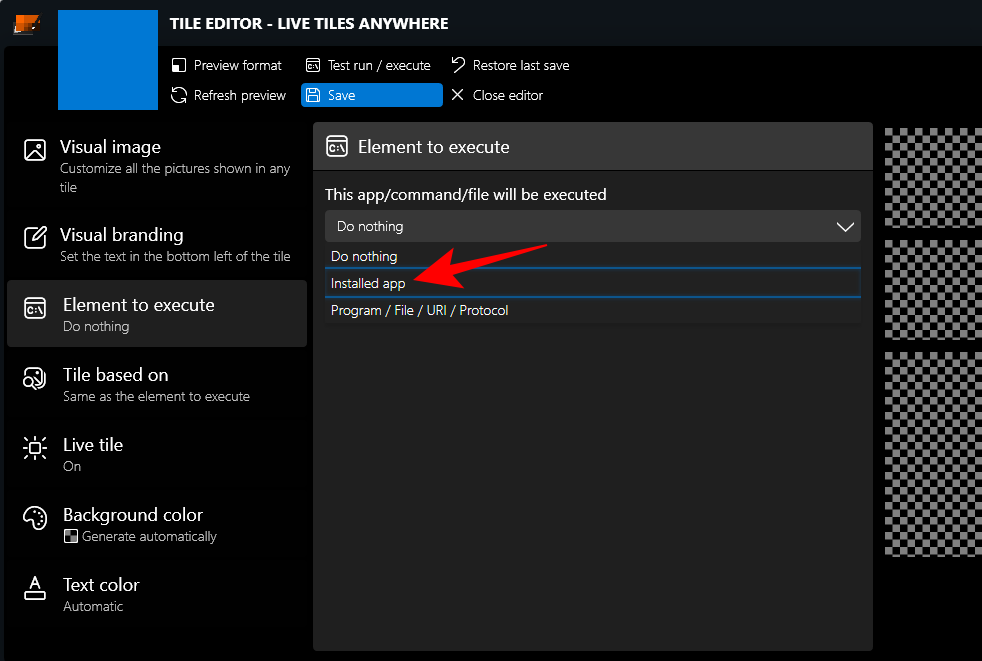
And that’s it! Once the command is executed, the password for the desired account should be automatically changed on your PC.
How to add a password for the administrator account
If you are looking to secure your PC further then it is recommended that you add a password for the default administrator account. This will ensure that no one aware of this trick can access your Windows account without your authorization. We can add a password for your default admin account in several ways but we recommend you do so either via the advanced menu or via the CMD method. Follow any one of the guides below to get you started.
1. Using Ctrl + Alt + Del
Log in to the default administrator account and press Ctrl + Alt + Del on your keyboard.
Now click and select ‘Change password’.
Enter a new password and confirm the same in their respective fields.
Add a password hint or security question depending on your preferences.
Click on ‘Ok’ once you are done.
And that’s it! Your default administrator account’s password should now be changed on your PC.
2. Using CMD
Log in to the default administrator account and press Windows + S on your keyboard. Search for CMD and click on ‘Run as administrator’ once the app shows up in your search results.
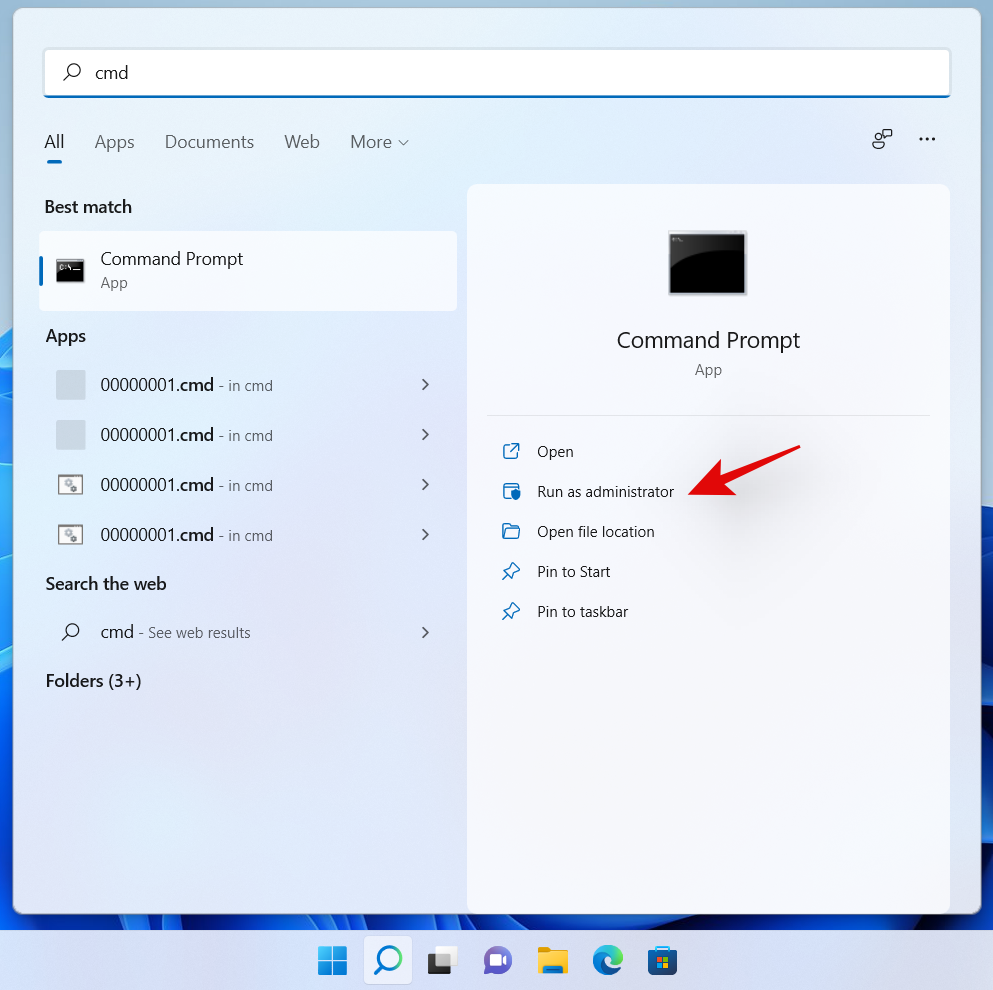
Now enter the following command. Replace ‘PASSWORD’ with a password of your desired choice.
net user Administrator PASSWORD

And that’s it! The new password should now be set for your default administrator account.
Should you keep the administrator account enabled?
No, it is not recommended to keep your default/super administrator account enabled. This account has higher and more elevated privileges when compared to a normal administrator account in Windows. This account is used by Windows to perform system-level tasks in the background as well hence it could cause several privacy issues on your system.
In case somebody can access this account, they would have access to your entire data and hardware. The user could then proceed to take control of your entire system or simply infect it with malware, adware, and in the worst cases, ransomware.
We hope you were able to easily log in as an administrator in Windows 11 using the guide above. If you face any issues or have any more questions for us, feel free to reach out to us using the comments section below.
Related:


 \
\


