A tárhely a rendszer egyik alapvető eleme, és tetszik, ha nem, a jövőben nagy valószínűséggel kifogy belőle. Tárhely felszabadításának jó módja a legnagyobb fájlok kezelése. Áthelyezheti őket egy másik meghajtóra , felhőtárhelyre, vagy akár törölheti is őket, ha már nincs rájuk szükség.
Bizonyos esetekben akár tömörítheti is a fájljait, ha nem kívánja a közeljövőben használni őket. De hogyan találhat nagy fájlokat? Az egyes mappák manuális áttekintése fárasztó lehet, és a tisztítószer használata egyszerűen nem elég hatékony. Szerencsére van néhány ügyes módszer a nagy fájlok megkeresésére a Windows 11 rendszerben. A kezdéshez használja az alábbi útmutatókat.
Tartalom
Nagy fájlok keresése Windows 11 rendszeren: Tippek
A nagy fájlok rendezése történhet típus, fajta, dátum és egyebek alapján. Ennek legjobb módja a Windows Search használata a fájlkezelőben. Dedikált kifejezések segítségével meghatározhatja a keresett fájlokat, és méretük alapján szűrheti őket. Ezután használhatja a fájlkezelő rendezési beállításait, hogy megtalálja a legnagyobbakat a keresési eredmények között.
Következésképpen, ha ez nem felel meg az Ön kritériumainak, vagy nem találja a keresett fájlokat, akkor használhatja az útmutatóban felsorolt módszerek egyikét.
Kapcsolódó: A tálca színének megváltoztatása Windows 11 rendszerben
01. módszer: Keresés használata az Intézőben (ajánlott)
Most nagyméretű fájlokat fogunk keresni az Ön kritériumai alapján.
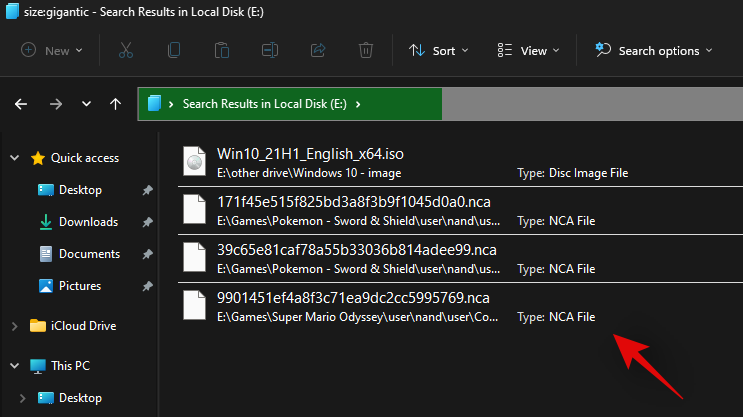
Nyomja Windows + Emeg a billentyűzetet a fájlkezelő megnyitásához, majd kattintson a jobb felső sarokban található keresőmezőre. Keresse meg a következő kifejezést.
size:gigantic
Az eredményeket kiszűrjük, és a 4 GB-nál nagyobb fájlok megjelennek a képernyőn. Válassza ki azokat a felesleges fájlokat, amelyekre nincs szüksége a számítógépén, és egyszerűen törölje őket, hogy helyet szabadítson fel. Ha kisebb minimális fájlméretet szeretne használni, akkor a kívánt mérettől függően cserélje ki a „gigantic” szót az alábbi kifejezések egyikére.
- Nagy: 128 MB és 1 GB közötti fájlok
- Hatalmas: 1 GB és 4 GB közötti fájlok
- Közepes: 1 MB és 128 MB közötti fájlok
És ez az! A Windows Search segítségével így méretük alapján szűrheti a fájlokat, és megkeresheti a számítógépén jelenleg található legnagyobbakat.
Megjegyzés: Abban az esetben, ha a számítógépe a rendszerfájlokat is indexeli és megjeleníti, javasoljuk, hogy még egyszer ellenőrizze a fájlokat törlésük előtt, hogy elkerülje a létfontosságú rendszerfájlok törlését a rendszerből.
A Windows Search segítségével most nagy fájlokat találhat a számítógépén.
1.1 Mi a teendő, ha a keresés nem működik az Ön számára: Tippek a kipróbáláshoz
Ha a „size:gigantic” beírása nem működik az Ön számára, akkor át kell váltania a Windows 10 régi fájlkezelőjére. A kezdéshez használja az alábbi útmutatót.
Miután visszaváltott a régi fájlkezelőre, használja a fenti útmutatót a nagy fájlok kereséséhez. Ha megtalálta, használja az alábbi útmutatót az új Windows 11 fájlkezelő visszaállításához a rendszerére.
1.1.1 Váltson a régi fájlkezelőre
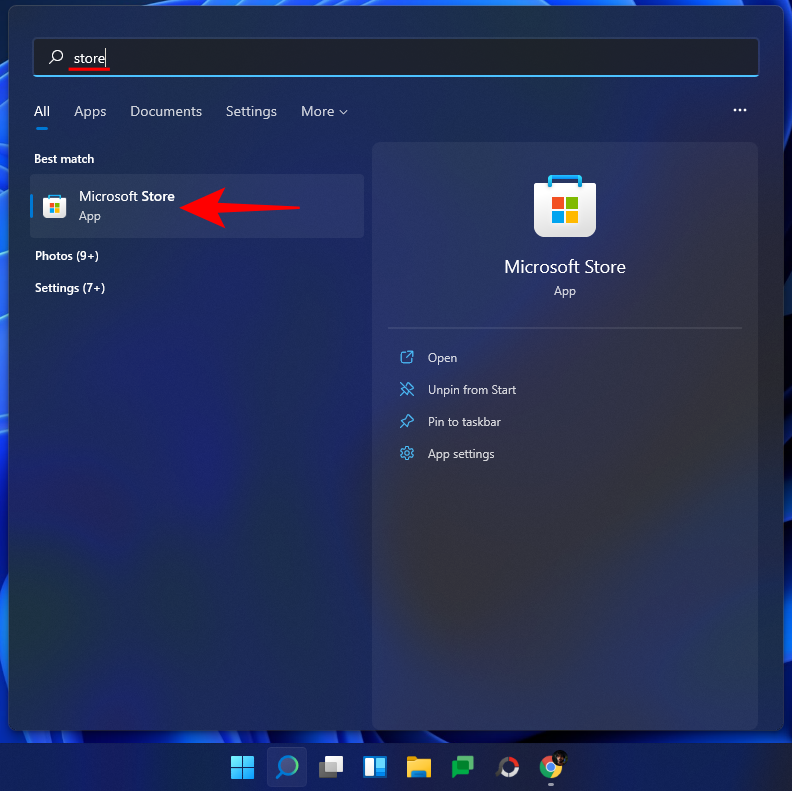
Nyomja Windows + Smeg a billentyűzetet, és keresse meg a „Regedit” kifejezést. Kattintson, és indítsa el az alkalmazást a keresési eredmények közül.
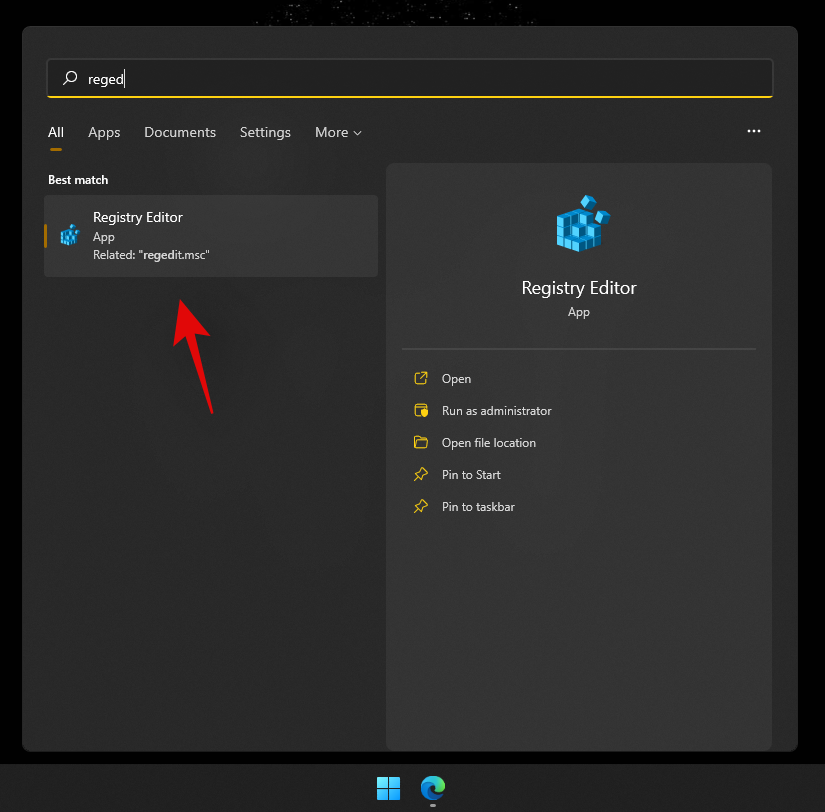
Keresse meg a következő könyvtárat, vagy másolja be az alábbi címet a címsorba.
HKEY_LOCAL_MACHINE\SOFTWARE\Microsoft\Windows\CurrentVersion\Shell Extensions
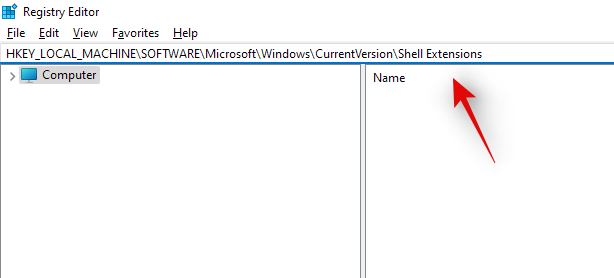
Kattintson a 'Blocked' nevű mappára.
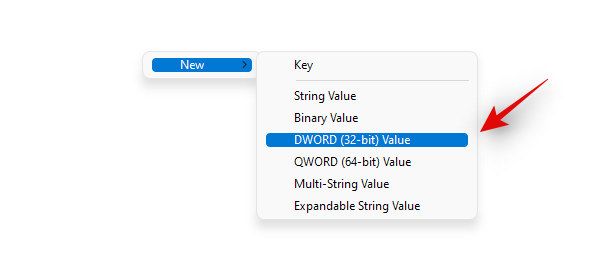
Kattintson a jobb gombbal egy üres területre a jobb oldalon, válassza az „Új” lehetőséget, majd kattintson a „DWORD (32 bites) értékre”.
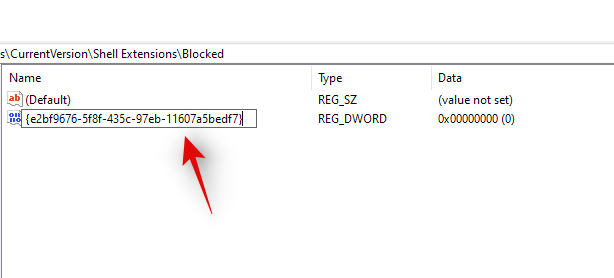
Írja be a következő nevet, és nyomja meg az Enter billentyűt a billentyűzeten. Javasoljuk, hogy ugyanezt másolja és illessze be, hogy elkerülje az elnevezési hibákat.
{e2bf9676-5f8f-435c-97eb-11607a5bedf7}
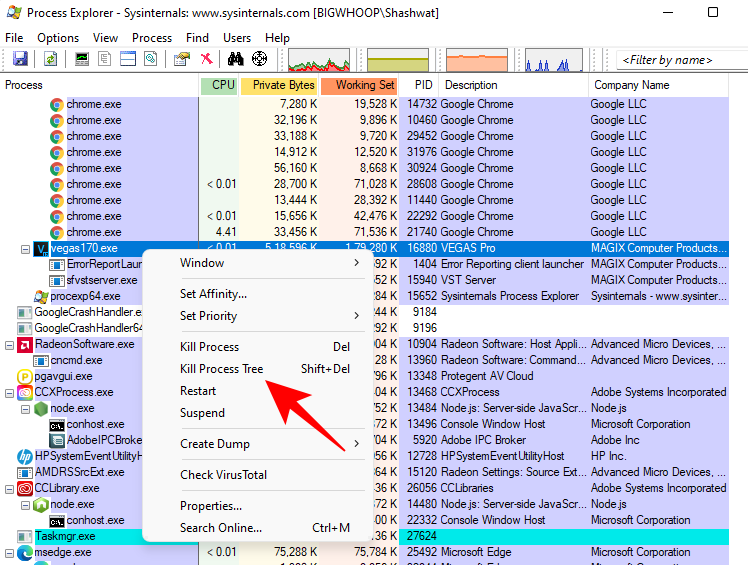
Zárja be a beállításszerkesztőt, és nyomja meg a Ctrl + Shift + Esc billentyűket a Feladatkezelő megnyitásához. Váltson a "Részletek" fülre.
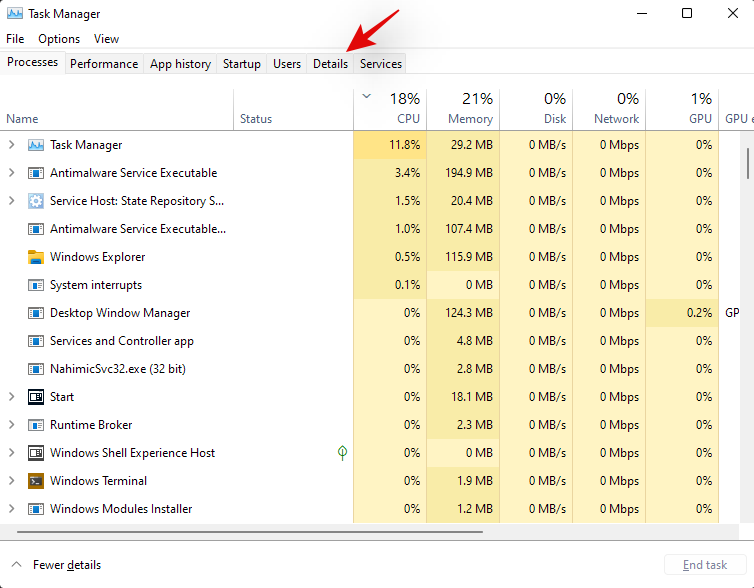
Kattintson az „Explorer.exe” elemre, és nyomja meg a Del gombot a billentyűzeten.
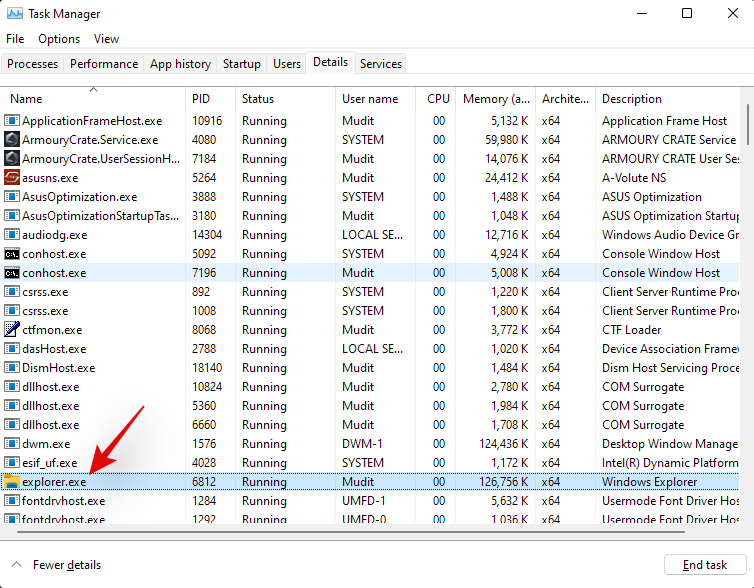
Kattintson a „Folyamat befejezése” gombra a választás megerősítéséhez.
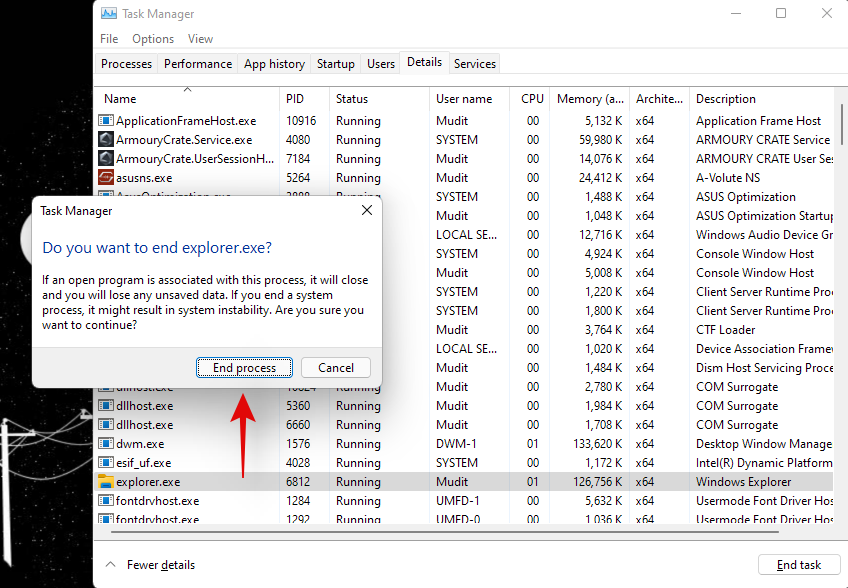
Kattintson a "Fájl" elemre, és válassza az "Új feladat futtatása" lehetőséget.
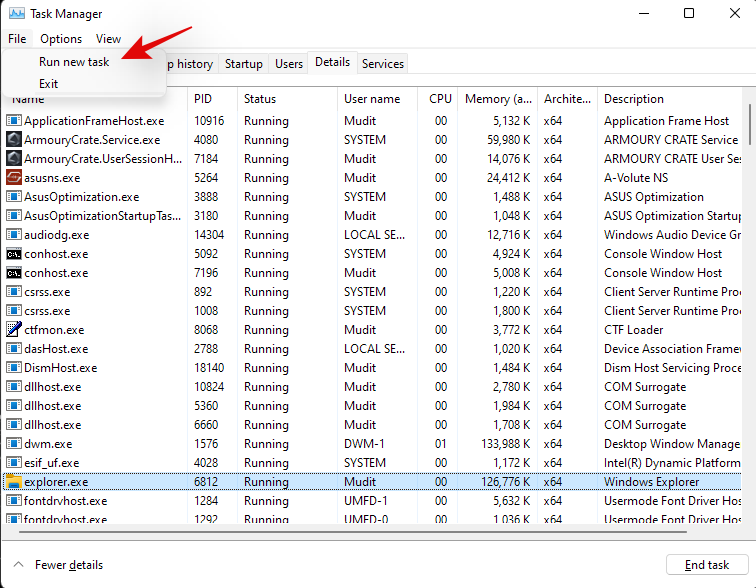
Írja be a következőket a szövegmezőbe, majd kattintson az „Ok” gombra.
explorer.exe
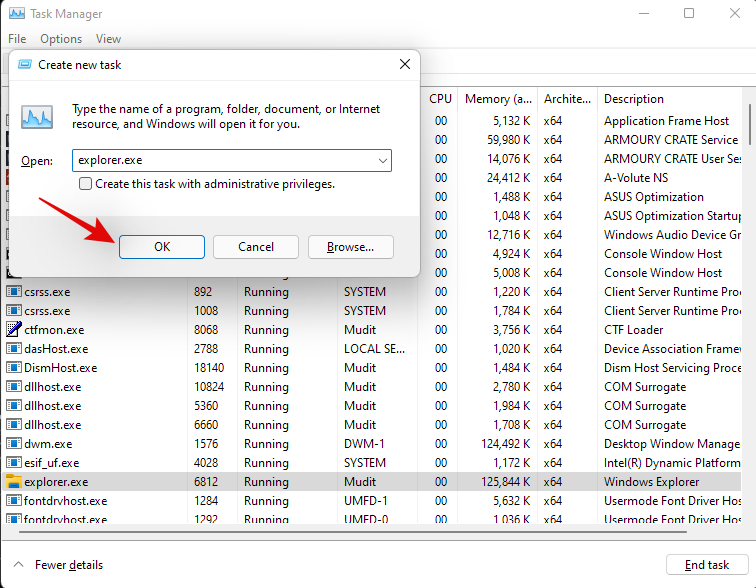
A Windows Fájlkezelő most újraindul a rendszeren, és vissza kell állítani a Windows 10 Fájlkezelőhöz. Megnyithat egy véletlenszerű mappát, hogy ellenőrizze ugyanezt. Erősítse meg, hogy visszatért a régi fájlkezelőhöz, és használja a fenti útmutatót a nagy fájlok megkereséséhez a rendszeren.
1.1.2 Váltson vissza az új fájlkezelőre
Most visszatérhetünk a régi fájlkezelőhöz. A kezdéshez kövesse az alábbi útmutatót.
Nyomja Windows + Smeg a billentyűzetet, és keresse meg a Regedit kifejezést. Kattintson és indítsa el az alkalmazást, amint megjelenik a keresési eredmények között.

Keresse meg az alábbi útvonalat, vagy másolja be a címsorba.
HKEY_LOCAL_MACHINE\SOFTWARE\Microsoft\Windows\CurrentVersion\Shell Extensions

Egyszerűen kattintson a korábban létrehozott DWORD (32 bites) értékre, és nyomja meg a Del gombot a billentyűzeten. A választás megerősítéséhez kattintson az „Igen” gombra.

Nyomja meg a Ctrl + Shift + Esc billentyűket a billentyűzeten, és váltson a „Részletek” lapra.

Kattintson az „explorer.exe” elemre, és nyomja meg a Del gombot a billentyűzeten.

Kattintson a „Folyamat befejezése” gombra.

Kattintson a "Fájl" elemre, és válassza az "Új feladat futtatása" lehetőséget.

Írja be az „explorer.exe” parancsot, és nyomja meg az Enter billentyűt a billentyűzeten.

Most bezárhatja a feladatkezelőt és a rendszerleíró adatbázis-szerkesztőt a számítógépén.
És ez az! Mostantól visszatért az új Fájlkezelőhöz a Windows 11 rendszeren. A méret paraméteren kívül az alábbi parancsokkal is kereshet különböző fájlokat a számítógépén, és méret szerint rendezheti őket. Így megtalálhatja rendszerén a legnagyobbakat.
1.2 Keresés fájltípusok szerint
A fenti parancshoz hasonlóan a 'kind:' paraméterrel is megkereshet bizonyos fájlokat az aktuális könyvtárban. A „kind” paraméter segítségével naptárfájlokat, szöveges dokumentumokat, képeket, videojátékokat és egyebeket kereshet.
A kind paraméter ilyen módon történő használatakor nem korlátozódik a Windows előre definiált kategóriáira, ehelyett meghatározott fájlkiterjesztéseket is megadhat, hogy megtalálja azokat a számítógépén, az alábbiak szerint.
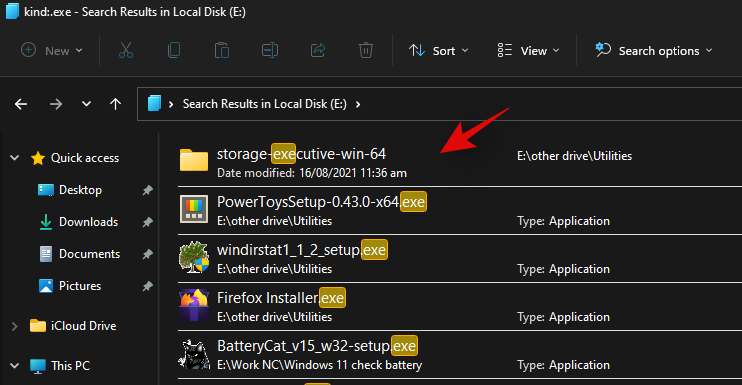
kind:.exe
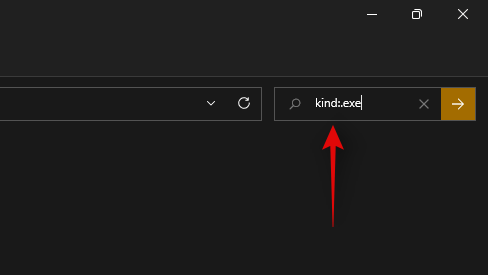
A fenti parancs segít megkeresni a végrehajtható fájlokat az aktuális könyvtárban.
Hasonlóképpen, az alábbi parancs segítségével megtalálhatja a PDF-fájlokat a kiválasztott könyvtárban.
kind:.pdf
És ez az! Ezekkel a parancsokkal megkereshet bizonyos fájlokat a számítógépén a Windows Search segítségével.
1.3 Fájlok keresése dátum szerint
Használhatja a „dátum:” paramétert is egy adott napon létrehozott fájlok kereséséhez. Ezenkívül ez a parancs az alábbi logikai szűrőkkel együtt használható, hogy megkeresse a számítógépén egy bizonyos dátum előtt vagy után létrehozott vagy módosított fájlokat. Például, ha egy 2020. január 1-jén létrehozott fájlt keres, akkor az alábbi parancsot használhatja.
date: 1/1/2020
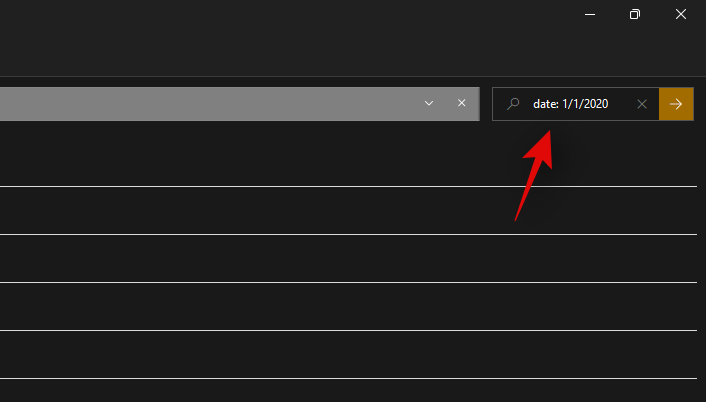
Hasonlóképpen, ha egy 2021. január 1-jén létrehozott fájlt keres, használhatja a következő parancsot.
date: 1/1/2021
1.4 Logikai szűrők használata
A logikai szűrők segíthetnek több kifejezés egyidejű vagy egymással együttes keresésében. Használja az alábbi szűrőket, amelyek a legjobban megfelelnek az Ön jelenlegi követelményeinek.
1.4.1 Az „ÉS” paraméter
You can use the AND parameter to search for two search terms together. This way you can look for a file containing both the terms and not either one of them which should help you filter out unwanted results containing either of the terms.
For example, if looking for a file containing the words ‘Samsung and ‘galaxy’ in its name then I can use the following term to search for your file.
Samsung AND galaxy
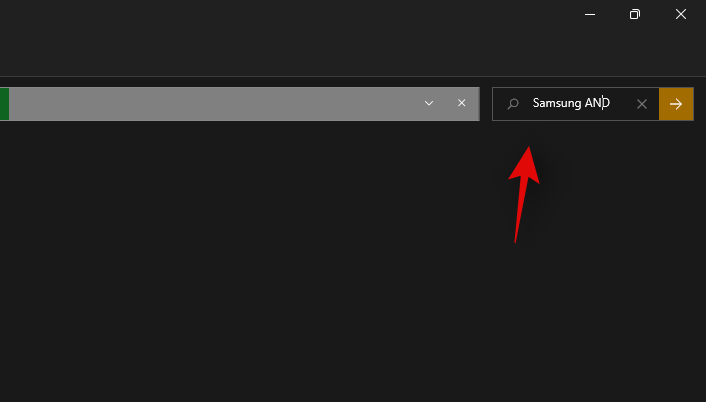
This will filter out files with only ‘Samsung’ and ‘Galaxy’ in their name. Files with either term will be filtered out.
The ‘OR’ parameter
The OR parameter is opposite to the AND parameter and allows you to search for files containing either of the terms in your search term. For example, if I wish to search for files with either ‘Apple’ or ‘Airpods’ in their name, then I can use the following search term.
apple OR airpods
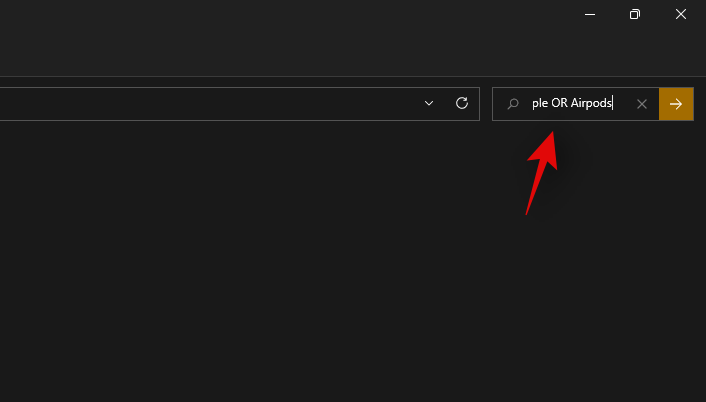
Similarly, if I am looking for PDF and EXE files in a particular directory, then I can use the following command below.
kind:.exe OR .pdf
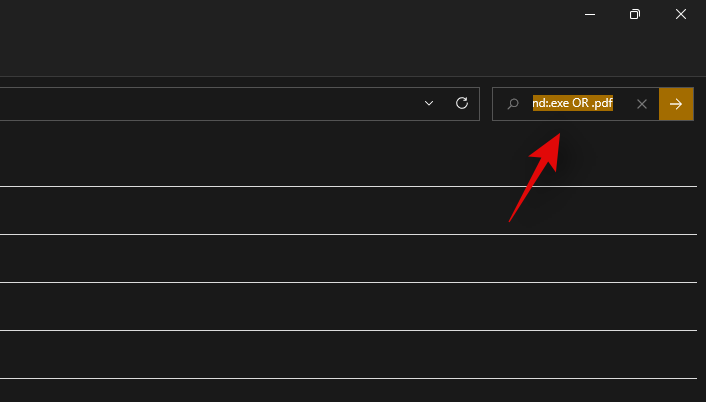
And that’s how you can use the OR parameter to look for multiple search terms in a single file name.
1.4.2 The ‘NOT’ parameter
If you are looking to filter out a certain search term or a filet type then you can use the NOT parameter. The NOT parameter will exclude the desired file type, kind, size, or name depending on your choice.
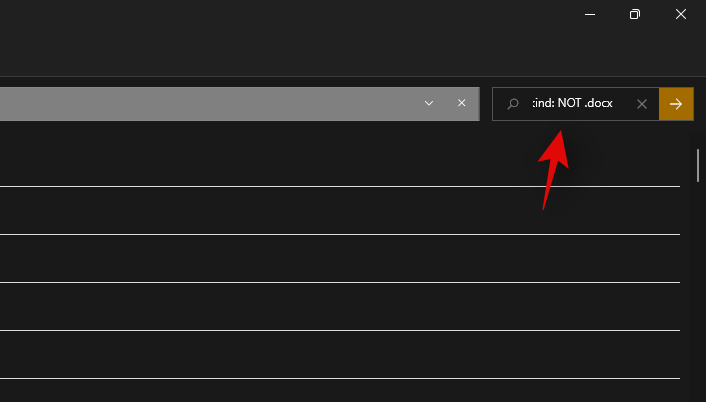
For example, if in a folder full of .docx files you are looking for other file types and wish to filter them all out, then you can use the following command.
kind: NOT .docx
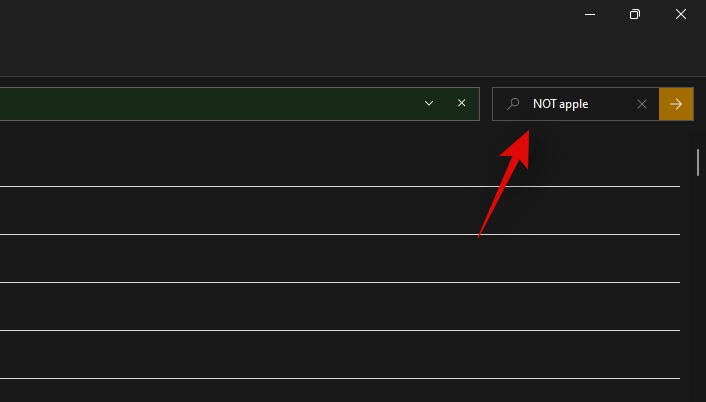
Similarly, if I am looking for a file that does not have ‘Apple” in its name then I can use the following search term.
NOT apple
1.4.3 Parentheses
Parentheses is a Boolean filter that is usually used when you are searching file contents as well. Anything included between the parentheses () is searched for and files with either or all of the terms are displayed on your screen.
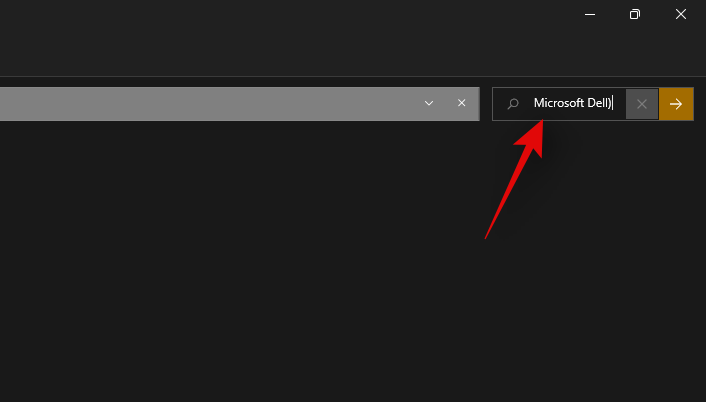
For example, if looking for a file containing either ‘Apple, Samsung, Mi, Microsoft, and Dell’ or all of these terms, then you can use the following term.
(Apple Samsung Mi Microsoft Dell)
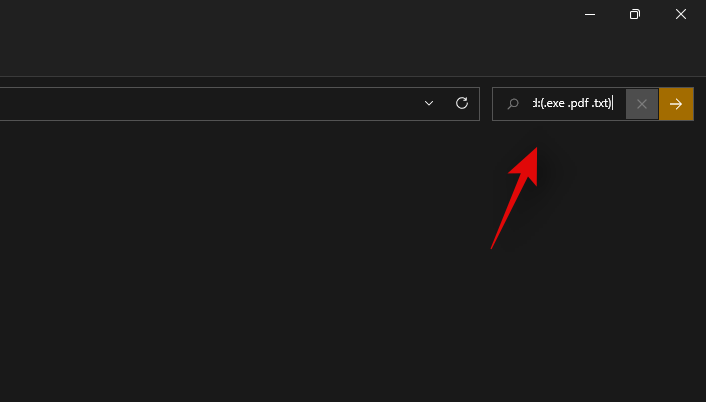
Similarly, you can use the following command if looking for multiple file types.
kind:(.exe .pdf .txt)
And that’s it! You will now have used parentheses to your advantage to look for multiple search terms in a particular file.
1.4.4 ‘>’ and ‘<‘>
These two Boolean filters are usually used when looking for file types or when sorting your results based on a parameter.
The greater than and less than parameters can be used to filter your results based on a number. For example, if looking for files dated after 1st January 2021 then you can use the following command.
date: >1/1/2021
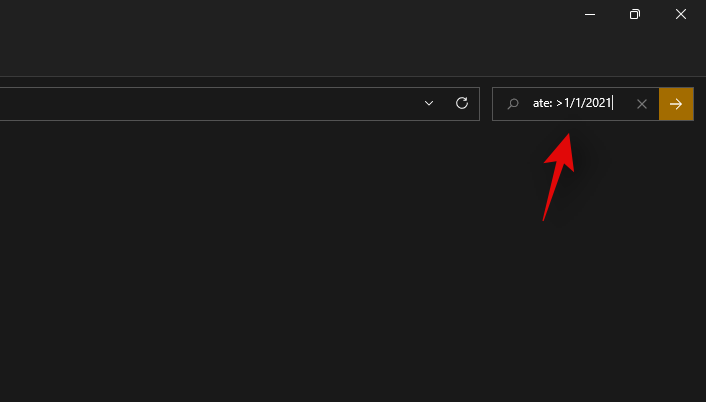
Similarly, if looking for files less than 10GB then you can use the following command.
size: <>
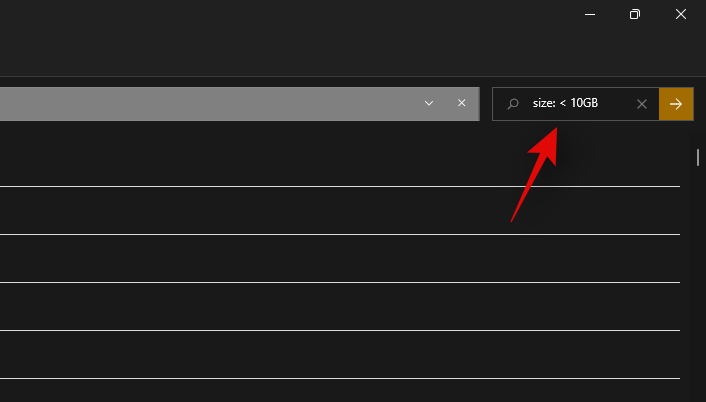
You can use the greater than and less than parameters to your advantage this way and find the desired files on your system.
Advanced methods to find large files on Windows
Some other ways in which you can find large files on your system have been listed below. Follow the guides to get you started.
Method #02: Using CMD
CMD can also help you find large files on your system. Use the guide below to get you started.
Press Windows + E on your keyboard and navigate to a location where you wish to search for large files and click on the address bar at the top.
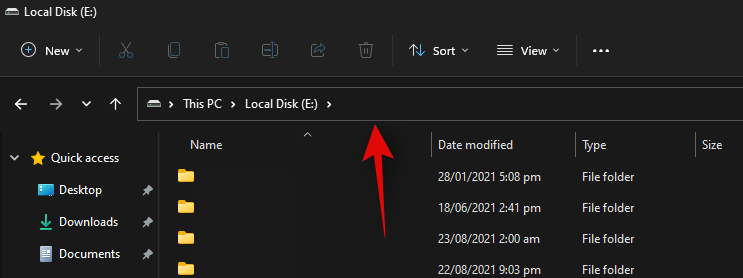
Type in CMD and press Enter on your keyboard.
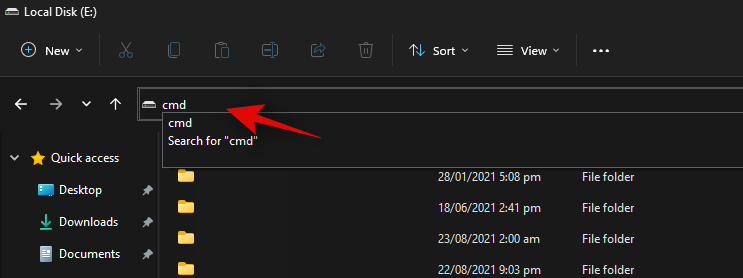
CMD will now be launched in the particular folder. Type in the following command and replace ‘PATH’ with the path we copied to your clipboard.
forfiles /S /M * /C “cmd /c if @fsize GEQ 1073741824 echo @path > largefiles.txt
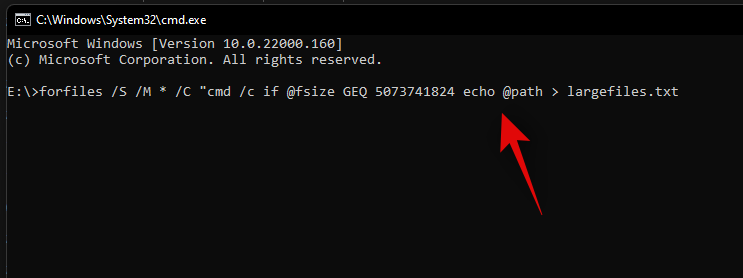
The above command will look for files larger than 1GB on your PC. If you wish to define a larger minimum size, then replace ‘1073741824’ with one of the following options below.
- 2GB: 2147483648
- 5GB: 5368709120
- 10GB: 10737418240
Execute the command with your desired variables and a text file will be created in the same location with a list of all the large files found on your system based on your criteria. You will also find the path for each file on your local storage in the text file.
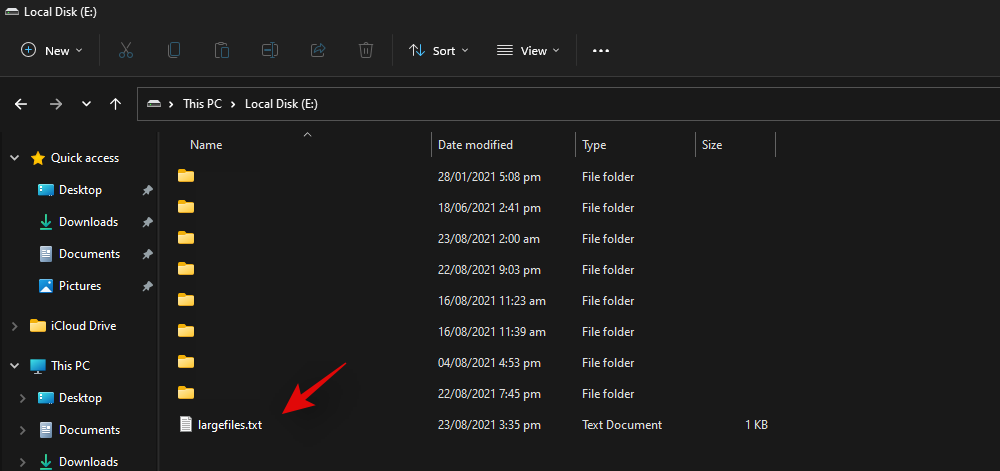
You can use this list to identify the largest files in the current location and then delete them at your discretion to free up some disk space on your system.
Method #03: Using PowerShell
You can also find large files on your system using PowerShell. Just like the command for CMD, PowerShell will scour your local files based on a minimum size and display all the files larger than it. Use the guide below to get you started.
Press Windows + E on your keyboard and navigate to the location where you wish to look for large files. Click on the address bar at the top and type in ‘PowerShell’. Press Enter on your keyboard once you are done.
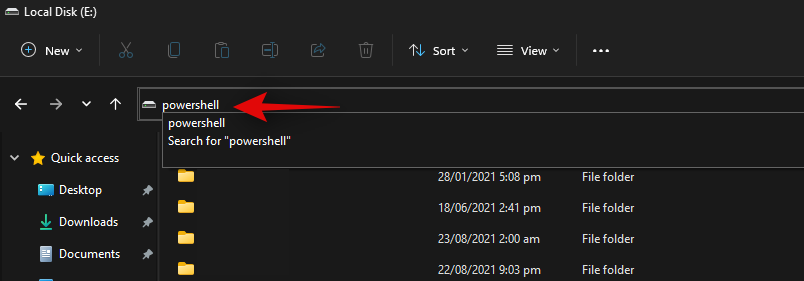
Copy-paste the command below in the PowerShell window and press Enter on your keyboard.
gci -r| sort -descending -property length | select -first 10 name, length

You will now get a list of the top 10 largest files currently taking the most disk space on your system. If you wish to view the top 20 files, then replace ‘select-first 10’ with ‘select-first 20’.
PowerShell will now find and display the 20 largest files on your system along with their size. The file size will be in bytes which can make it a bit difficult to judge the size of files in terms of gigabytes.
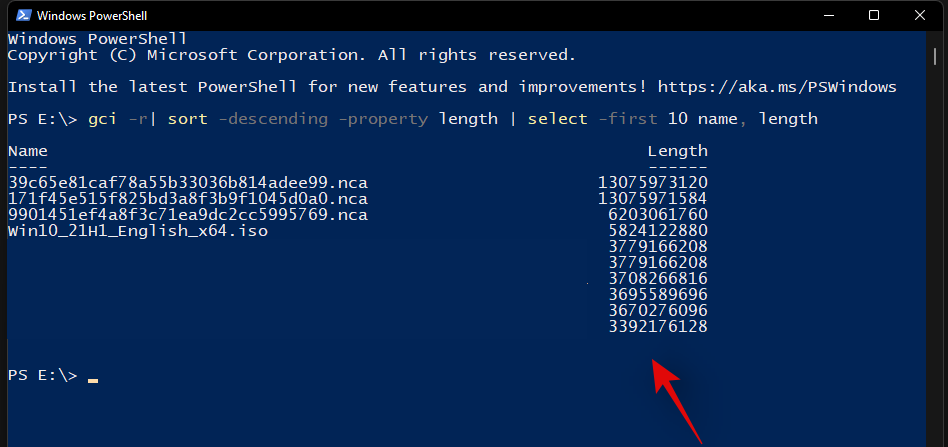
And that’s it! You will now have found the largest files on your PC using PowerShell in Windows 11.
2 Best apps to find large files on Windows
Many third-party tools allow you to view a visual representation of your PC’s disk usage.
This makes it much easier for you to identify large chunks of files taking significant space on your hard drive. Our recommended tools would be SpaceSniffer and WinDirStat. Use one of the guides below depending on the tool that you wish to use.
Method #04: Using SpaceSniffer
Space Sniffer is another popular third-party utility used to analyze disk space usage on Windows 11. SpaceSniffer can help you identify large files using huge amounts of space on your system. You can also find hidden files taking huge disk space on your PC using the SpaceSniffer. Use the guide below to get you started.
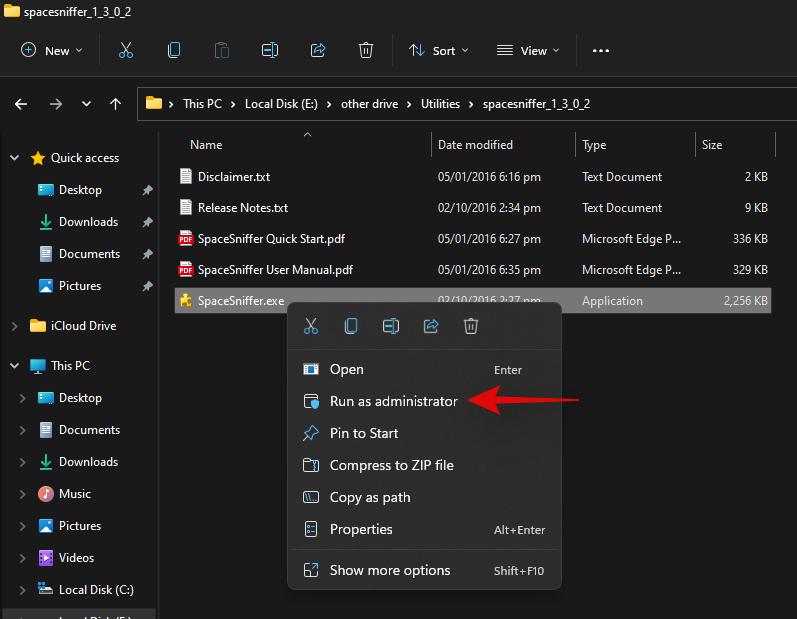
Download SpaceSniffer to your PC using the link above. A portable .exe will be downloaded to your system. Extract the archive and right-click on the .exe file.
Select ‘Run as administrator’.
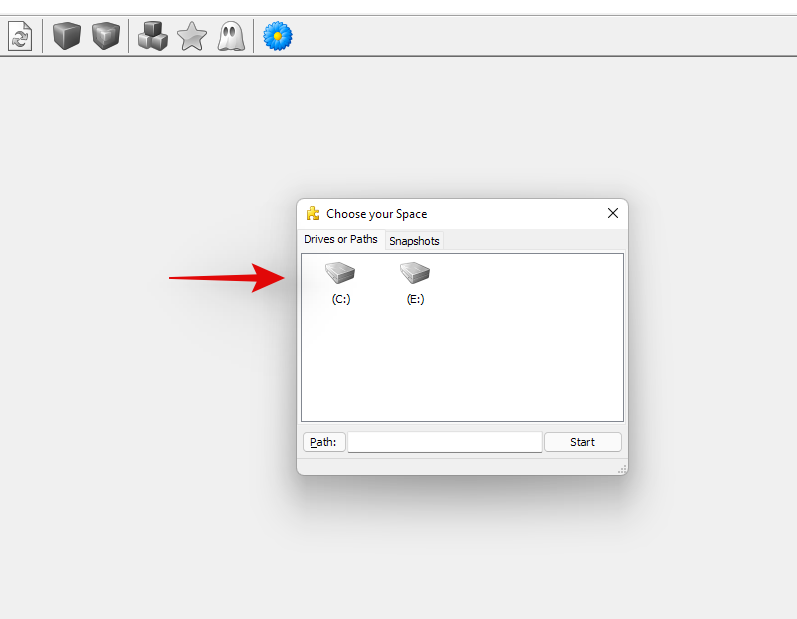
Now select the drive you wish to scan. If you wish to analyze and find large files in a particular directory, then you can enter its path in the text box below.
You will now be shown a graphical representation of your disk space usage on your screen. Simply hover over the largest chunk and you will be shown the name of the folder or file occupying that space.
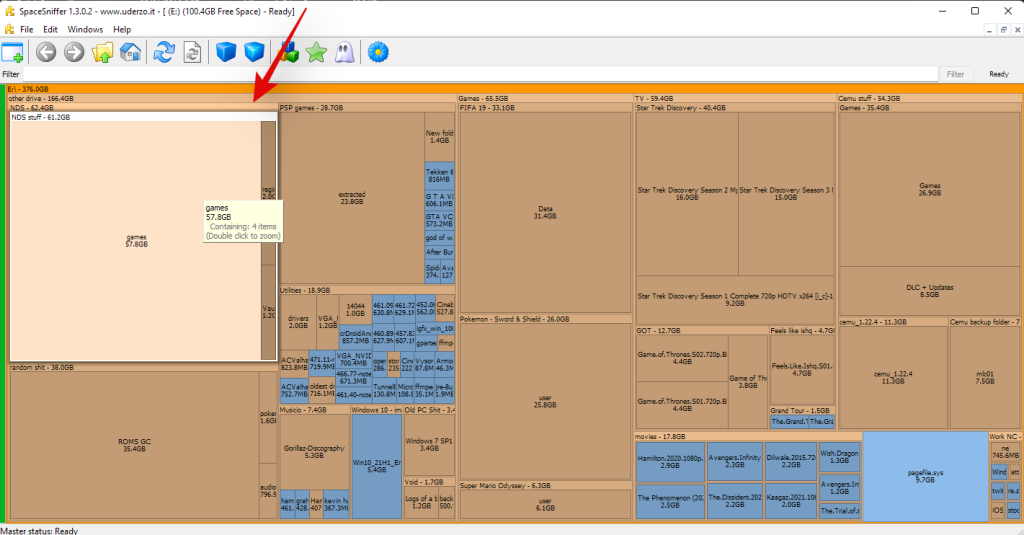
And that’s it! You can use SpaceSniffer this way to identify the largest files on your system by simply looking at the largest chunks on your screen.
Method #05: Using WinDirStat
WinDirStat is a popular open-source utility often used to generate a graphical representation of your local storage space in a user-friendly manner. This makes it easier to identify large chunks of your disk space occupied by a single file, folder, or archive, which in turn will make it easier for you to free up some space on your PC. Use the guide below to identify what is taking up space on your Windows 11 PC.
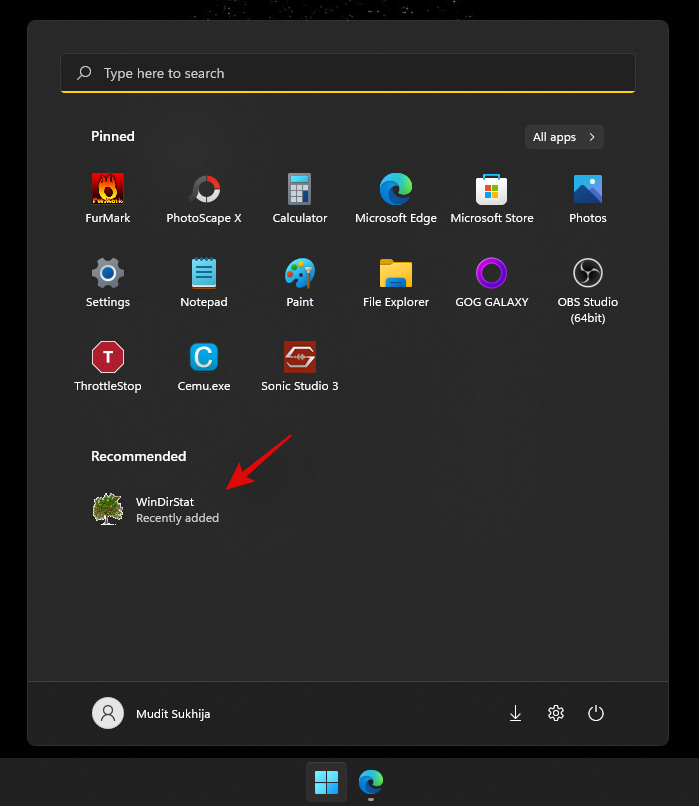
Download and install WinDirStat on your PC using the link above. Once installed, launch the app.
Now select one of the options that best suit your needs. If you only have a single drive installed on your system with a single partition, then you can skip this step. Click on ‘Ok’ once you are done.
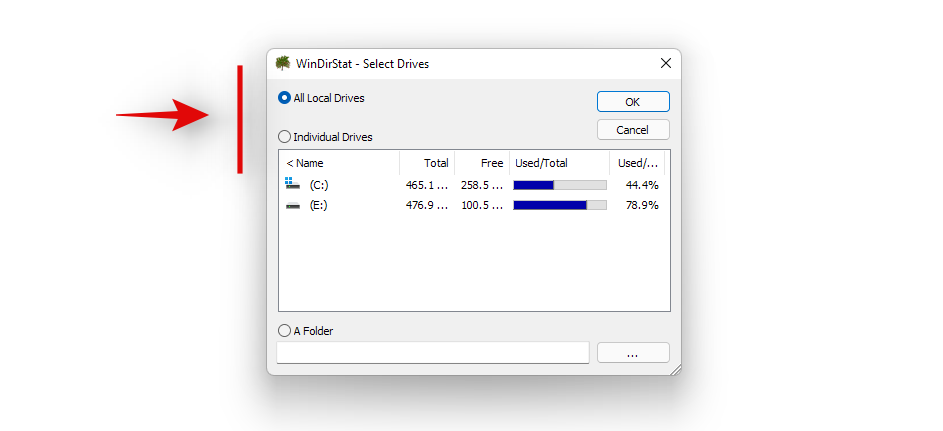
- All Local Drives: This will make WinDirStat analyze all your disks and display their data graphically.
- Individual Drives: Select one of your installed drives to be analyzed for disk space usage. You can select this option and then select the drive you wish to use.
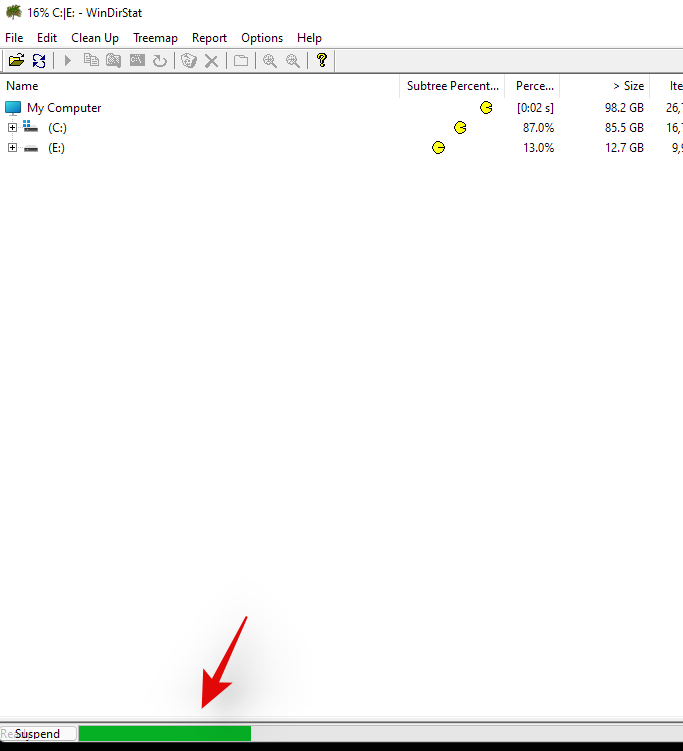
Your drives will now be analyzed and you can track the progress for the same at the bottom of the window.
Once analyzed, a color-coded graphical representation of the disk space usage on the selected drive(s) will be shown on your screen. Simply click on the largest chunks to identify the largest files.
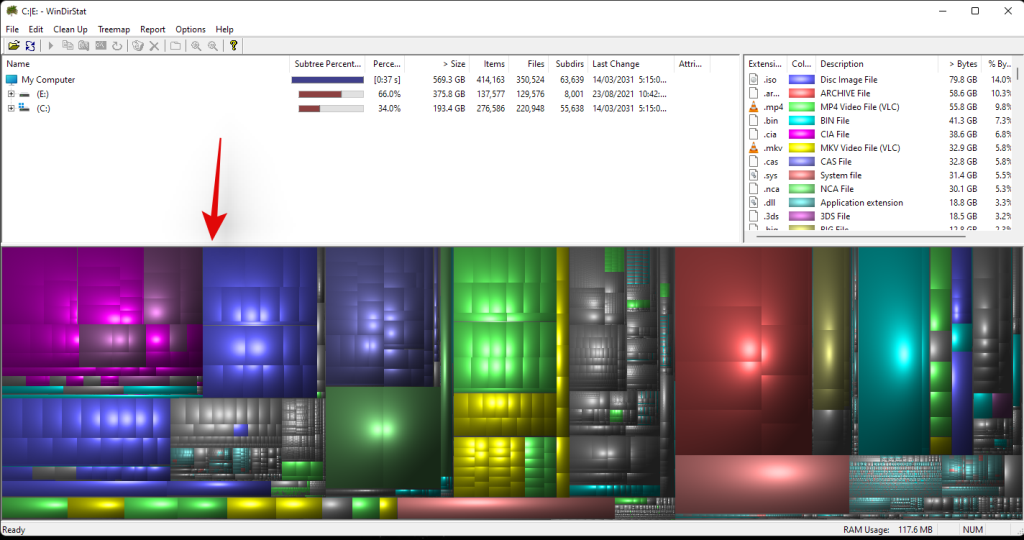
Press Del on your keyboard to delete the file. This will send it to your recycle bin and you can decide its fate when reviewing your recycle bin items. Alternatively, you can use Shift + Del to permanently delete the item from your system.
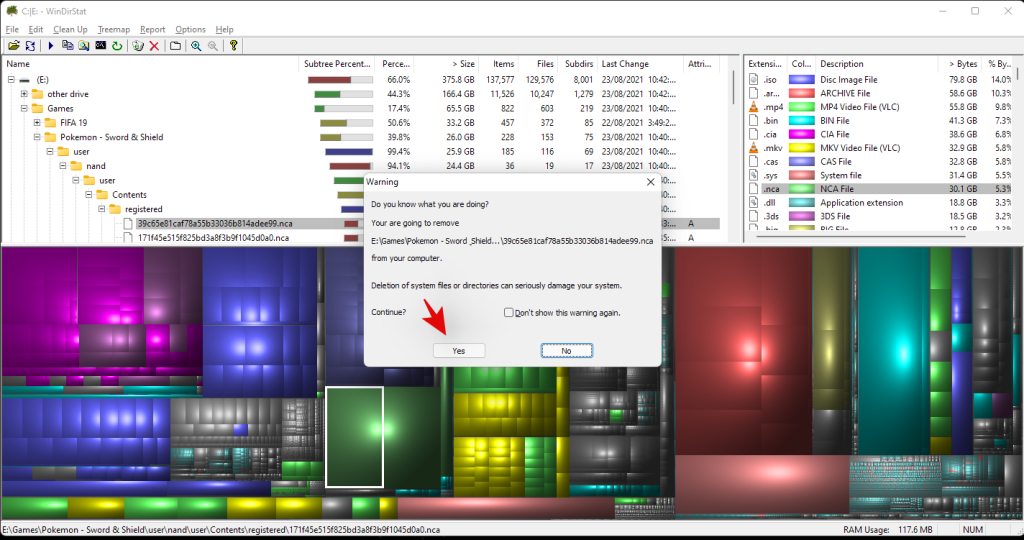
And that’s it! You can repeat the last steps to delete more of the largest files from your system.
Other Third-Party apps as alternative
The world of third-party alternatives is a huge one and thus, the above-mentioned tools are not the only ones that you can use to analyze your disk usage. Here are some alternatives with unique features that might be more suited for your current needs and requirements.
More ways to clear storage on Windows 11
If you’re looking to reclaim your storage space then there are tons of more things that you can do besides clearing or moving your largest files. You can clear caches, stop programs, reduce dedicated storage space, clear temporary files, remove leftover files, and much more. Refer to this dedicated guide by us that should help you clear space on Windows 11 in every way possible.
Should you use disk space analyzers?
Disk Space Analyzers have long been the ultimate utility to identify where exactly your disk space is being used. Most of them stem from long-standing communities while others have over decades of experience. If you’re divided on using disk space analyzers, then your best bet would be to opt for something that is open source.
The modern world of the internet is centered around data collection and like it or not, every service is gathering and collecting some type of data from your usage of their tool. Hence most disk analyzers nowadays, also have the option to share your usage data and more. Additionally, if you decide to opt for something new and untested then the risks are even higher.
Hence, we recommend you use disk space analyzers but do verify their origin and reputation before running them on your system. If you do not wish to go through the hassle of reading reviews, we recommend you simply try an open-source alternative from a trusted source.
We hope this guide helped you easily find the largest files using disk space on your system. If you face any issues or errors during the process, feel free to reach out to us using the comments section below.
