Windows je sveobuhvatan operativni sustav koji vam omogućuje da diktirate i upravljate dopuštenjima pristupa na temelju trenutno aktivnog računa. To administratorima prilično olakšava upravljanje računalima u svojoj organizaciji dopuštajući im da daju povišena dopuštenja odabranim pojedincima.
Ali što ako posjedujete svoje računalo? Kako upravljate lokalnim računima? Što ako nemate administratorski račun? Jeste li zauvijek zaključani? Ako ste imali ova pitanja ili ste se nedavno suočili s pogreškom u kojoj ste zahtijevali dopuštenje administratora, imamo savršen vodič za vas.
Evo svega što trebate znati o administratorskim računima u sustavu Windows 11.
Napomena o kompatibilnosti sa sustavom Windows 10: Vodiči na ovoj stranici sastavljeni su pomoću sustava Windows 11, stoga je korisničko sučelje koje se koristi na snimkama zaslona za Windows 11. Ali ovi vodiči u potpunosti rade i na sustavu Windows 10. Dakle, slobodno koristite vodiče za Windows 11, kao i Windows 10 PC.
Povezano: Kako pretraživati u sustavu Windows 11
Sadržaj
Što je administratorski račun u sustavu Windows 11?
Administratorski račun je najviši račun u sustavu Microsoft Windows s najvišim privilegijama. To vam omogućuje da kao administrator upravljate svojim računalom kako god to želite. Možete mijenjati sistemske datoteke, instalirati uzvišene programe, mijenjati instalaciju sustava Windows, postaviti prilagođenu automatizaciju i još mnogo toga. Dozvola za obavljanje takvih zadataka nije dostupna standardnim ili gostujućim korisnicima. Štoviše, kao administrator, možete upravljati značajkama sustava Windows i diktirati koje su dostupne i dostupne vašim korisnicima.
Zašto vam je potreban administratorski račun?
Administratorski račun je račun s najvišim privilegijama u sustavu Windows. To znači da možete napraviti promjene na razini sustava na svom operativnom sustavu koristeći administratorski račun bez ikakvih ograničenja. Evo nekih od uobičajenih razloga zašto bi vam možda trebao administratorski račun na računalu.
- Za promjenu sustava na razini sustava
- Za uređivanje/izmjenu ili popravak vaših sistemskih datoteka
- Za pokretanje naredbi i skripti na razini administratora
- Da biste omogućili ili onemogućili značajke sustava Windows
- Za instaliranje programa i podešavanja na razini sustava
- Za izmjenu ili ponovnu instalaciju upravljačkih programa
- Za pristup postavkama personalizacije unutar sustava Windows
- Za poništavanje ili promjenu lozinki lokalnog računa
i puno više. Moglo bi biti mnogo razloga zašto vam treba administratorski račun u sustavu Windows 11, ali jeste li znali da postoje dvije vrste administratorskih računa u sustavu Windows. Pa ne baš, ali evo svega što trebate znati o njima.
Povezano: Kako onemogućiti zvukove upozorenja u sustavu Windows 11
Prijavite se kao administrator: stvari koje trebate znati
Windows prema zadanim postavkama dolazi s ugrađenim administratorskim računom čak i ako on nije dostupan na vašem zaključanom zaslonu. Ovaj zadani račun kreira se u vrijeme vaše instalacije sustava Windows kako bi se odobrile sve promjene sustava napravljene na vašem računalu prilikom postavljanja sustava Windows.
Osim toga, Windows vam također omogućuje postavljanje dodatnog administratorskog računa s vašeg lokalnog računa ako imate potrebna dopuštenja. Također možete pretvoriti svoj trenutni račun u račun administratora ako trenutno koristite standardni račun u sustavu Windows 11.
Postavljanje svakog od ovih računa ima različite zahtjeve i ovisno o vašim trenutnim postavkama možete se odlučiti za bilo koju od postavki. Ali u slučaju da pokušavate oporaviti zaporku lokalnog računa, najbolje je koristiti zadani administratorski račun jer u ovom slučaju nećete moći proći preko zaključanog zaslona.
Osim toga, evo nekoliko uobičajenih stvari koje biste trebali imati na umu prije nego što nastavite s vodičima u nastavku.
- Zadani administrator nema lozinku za prijavu osim ako je nije prilagodio vaš administrator
- Ako je vašu jedinicu izdala vaša organizacija ili obrazovni institut, metode u nastavku vjerojatno vam neće raditi. Vaša organizacija će zaključati zadani administratorski račun i vaš trenutni račun neće imati potrebne privilegije za nastavak s drugim metodama u ovom vodiču. Najvjerojatnije ćete morati stupiti u kontakt sa svojim administratorom ako posjedujete takvu jedinicu.
- Ako dijelite uređaj s drugim korisnicima, trebali biste onemogućiti administratorski račun nakon što izvršite potrebne promjene na svom sustavu kako biste izbjegli bilo kakav neovlašteni pristup osjetljivim informacijama. Također se preporučuje da u takvim slučajevima postavite lozinku za svoj zadani administratorski račun.
- Neke metode u nastavku zahtijevaju da na vašem sustavu imate instaliran Windows 11 Pro ili noviji. Ako koristite Windows 11 home edition, vaše će mogućnosti biti ograničene.
Razlika između zadanog administratorskog računa i davanja administratorskog pristupa korisničkom računu
Zadani administratorski račun je zaseban račun koji se nalazi u svakoj instalaciji sustava Windows bez obzira na vaš uređaj ili verziju sustava Windows. Konvertirani račun s druge strane je standardni ili gostujući račun na vašem računalu koji je povišen na administratorske privilegije.
Nakon povišenja, vaš će račun pripadati grupi administratora i imat ćete sva potrebna administratorska dopuštenja za izmjene na razini sustava na vašem računalu. Zadani administrator se uglavnom koristi kada pokušavate oporaviti izgubljene lozinke računa za lokalne korisničke račune na vašem računalu.
S druge strane, pretvaranje računa jednostavan je proces podizanja dopuštenja vašeg trenutnog računa koji će vam omogućiti da radite kao administrator trenutnog uređaja. Zadani administrator može se onemogućiti na vašem sustavu jednostavnom naredbom, dok će se vaš lokalni račun morati ponovno konvertirati ako želite poništiti promjene. Upotrijebite jednu od metoda u nastavku koja najbolje odgovara vašim trenutnim potrebama.
Povezano: Kako onemogućiti tipkovnicu u sustavu Windows 11
Kako se prijaviti kao administrator u Windows 11
Možete se prijaviti kao administrator u sustavu Windows 11 korištenjem različitih metoda koje smo gore spomenuli. Možete omogućiti zadani administratorski račun ako želite napraviti privremene promjene na računalu ili oporaviti izgubljenu lozinku. Također možete postaviti novi administratorski račun za novog korisnika u slučaju da svoj uređaj želite podijeliti s nekim. Na kraju, možete pretvoriti svoj trenutni lokalni račun u račun administratora ako i sami želite dobiti administratorske privilegije na trenutačnom uređaju. Slijedite jednu od metoda u nastavku koja najbolje odgovara vašim trenutnim potrebama i zahtjevima.
Metoda #01: Koristite zadani administratorski račun
Možete koristiti zadani administratorski račun na računalu sa sustavom Windows 11 kako biste izvršili potrebne promjene pomoću vodiča u nastavku. Nakon što izvršite promjene, možete onemogućiti račun koristeći sljedeći vodič. Započnimo.
1.1 Omogućite zadani administratorski račun
Prvo ćemo morati omogućiti/otkriti administratorski račun na vašem računalu. To se može učiniti raznim metodama. Ako možete proći kroz zaključani zaslon, možete koristiti bilo koji od ovih načina. Međutim, ako ne možete proći kroz zaključani zaslon, morat ćete pristupiti CMD-u sa zaključanog zaslona i koristiti vodič u nastavku. U takvim slučajevima možete koristiti vodič na dnu za aktiviranje CMD-a izravno s početnog zaslona. Započnimo.
1.1.1 Korištenje CMD-a
Pokrenite CMD na svom sustavu i upišite naredbu u nastavku. Kada završite, pritisnite Enter na tipkovnici da biste ga izvršili.
net user administrator /active:yes

Naredba bi sada trebala biti uspješno dovršena.

Pritisnite tipku Windows na tipkovnici i kliknite na svoje korisničko ime u donjem lijevom kutu. Administratorski račun sada bi trebao biti vidljiv u ovom odjeljku.
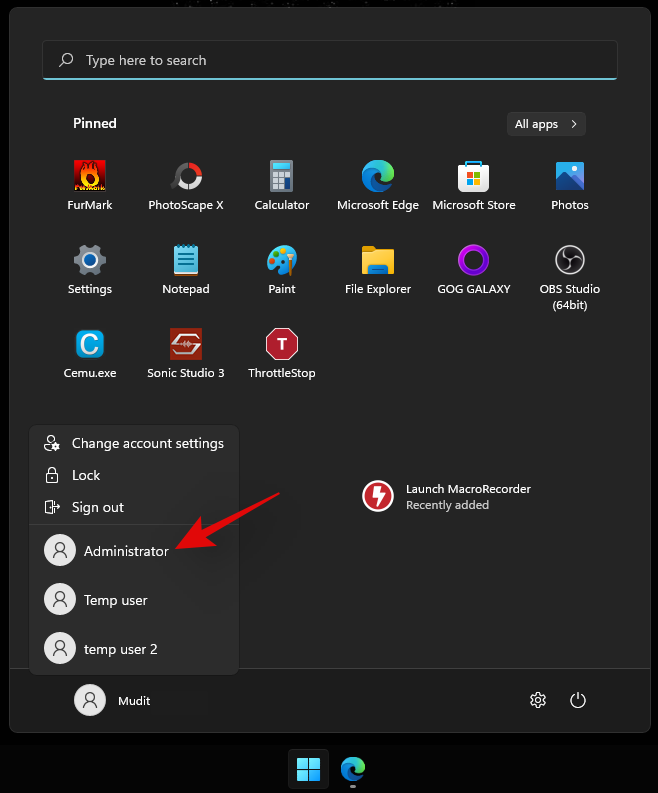
To znači da je proces bio uspješan. Sada se možete odjaviti sa svog računa i prijaviti se na administratorski račun. Zadani administratorski račun nema lozinku i pozdravit će vas OOBE nakon što se prijavite na račun. Sada možete koristiti sljedeće vodiče za poništavanje lozinke za Windows ako je potrebno.
1.1.2 Korištenje administratorskih alata
Pritisnite Windows + Rna tipkovnici za pokretanje dijaloškog okvira za pokretanje. Nakon pokretanja upišite sljedeći izraz i pritisnite Enter na tipkovnici.
lusrmgr.msc
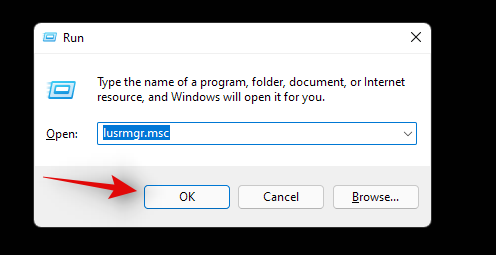
Upravitelj lokalnih grupa sada će se pokrenuti na vašem računalu. Započnite odabirom "Korisnici" na lijevoj strani.
Kliknite Administrator na desnoj strani. Sada kliknite Više radnji, a zatim Svojstva .
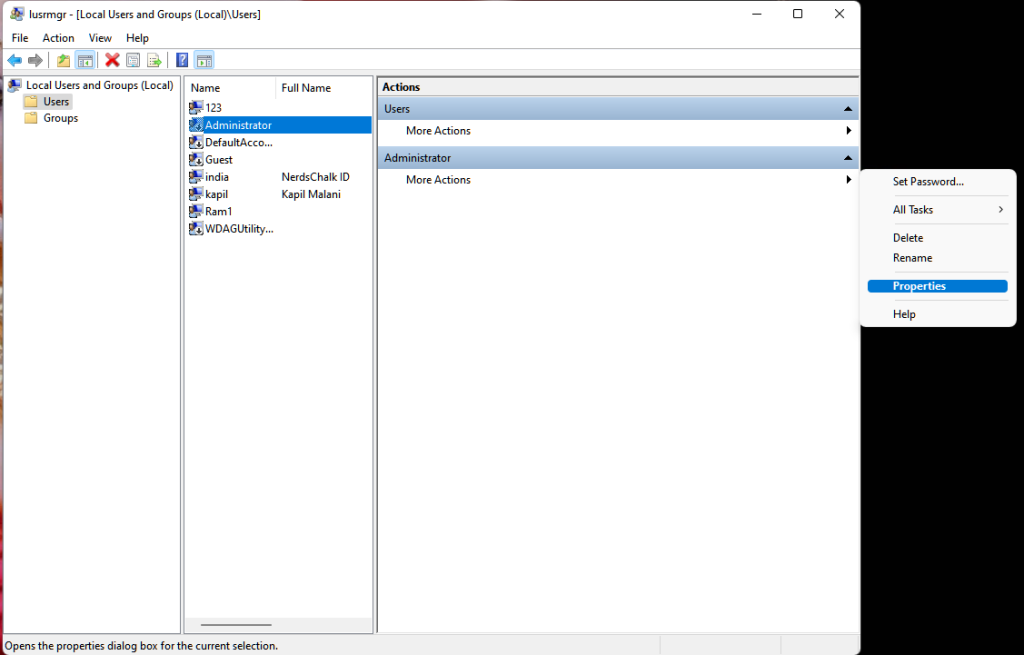
Sada će se na vašem zaslonu pokrenuti novi prozor. Poništite opciju za "Račun je onemogućen".
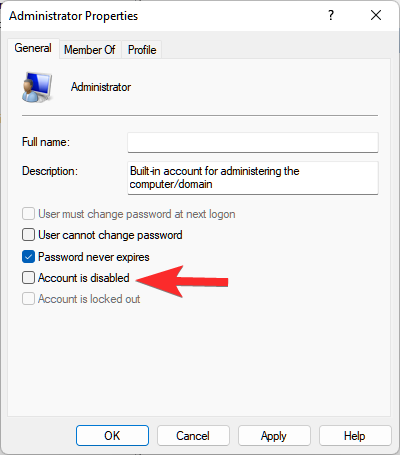
Kliknite na 'Primijeni', a zatim na 'U redu'.
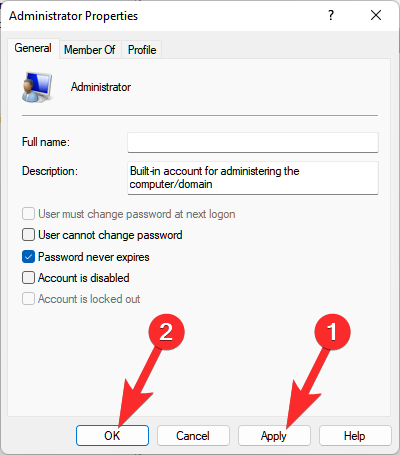
Zatvorite upravitelja lokalnih grupa i aktivirajte izbornik Start. Sada kliknite na svoje korisničko ime u donjem lijevom kutu i novi 'Administratorski' račun bi sada trebao biti dostupan u ovom odjeljku. Sada se možete odjaviti sa svog trenutnog računa i prijaviti se na novi administratorski račun. Račun neće imati lozinku i trebali biste se moći lako prijaviti na njega jednostavnim klikom na 'Prijava'.
1.1.3 Korištenje uređivača registra
Metoda uređivača registra primjenjiva je samo na korisnike s Windows 11 Pro ili novijim instaliranim na njihovim sustavima. To je zato što je put registra kojem trebamo pristupiti za ovu metodu dostupan samo korisnicima Windows 11 Pro ili novijim. Ako ste korisnik Windows 11 Home, umjesto toga možete koristiti gore navedenu CMD metodu.
Pritisnite Windows + Rna tipkovnici i upišite sljedeći izraz. Pritisnite Enter na tipkovnici kada završite.
regedit
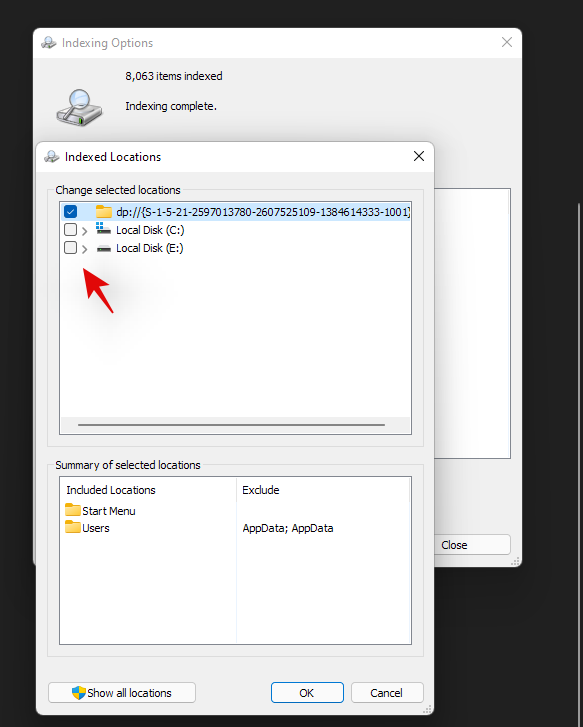
Sada idite na sljedeći put. Isto tako možete kopirati i zalijepiti u svoju adresnu traku na vrhu.
Computer\HKEY_LOCAL_MACHINE\SOFTWARE\Microsoft\Windows NT\CurrentVersion\Winlogon\SpecialAccounts\UserList

S odabranim UserList na lijevoj strani, desnom tipkom miša kliknite prazno područje s desne strane i odaberite 'Novo'.
Kliknite na 'DWORD (32-bitna) vrijednost'.
Imenujte vrijednost kao 'Administrator' i pritisnite Enter na tipkovnici.
Nakon što se vrijednost doda, zatvorite uređivač registra i ponovno pokrenite računalo za dobru mjeru. Administratorski račun sada bi trebao biti dostupan u donjem lijevom kutu vašeg zaslona kada ste na zaključanom zaslonu.
1.1.4 Korištenje GPO-a
Ako koristite poslovni stroj, možete koristiti i uređivač grupnih pravila kako biste omogućili zadani administratorski račun na vašem računalu. Međutim, ova opcija neće biti dostupna korisnicima sa Windows 11 Home izdanjem. Slijedite vodič u nastavku da biste započeli.
Pritisnite Windows + R, unesite sljedeći izraz i pritisnite Enter na tipkovnici kako biste otvorili uređivač grupnih pravila na računalu.
gpedit.msc
Idite na sljedeći direktorij pomoću lijeve bočne trake.
Computer Configuration\Windows Settings\Security Settings\Local Policies\Security Options\
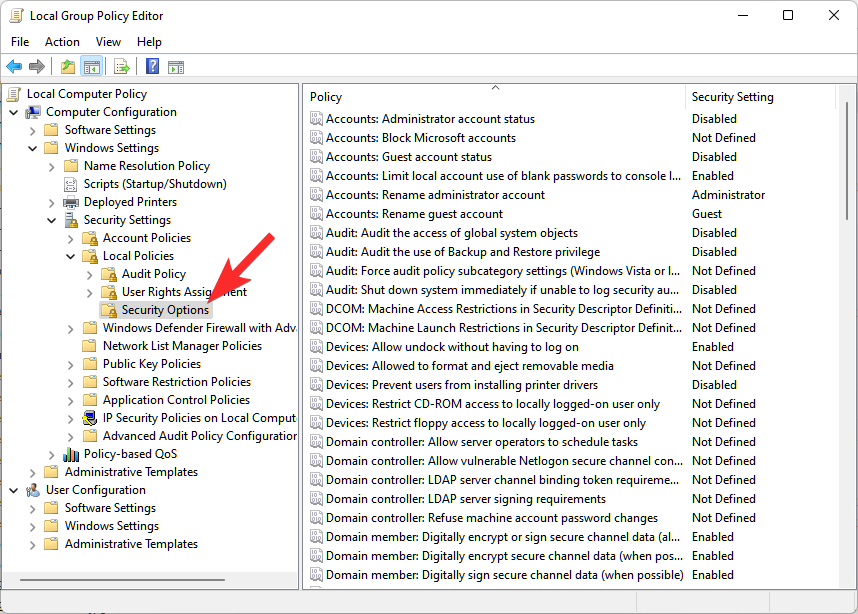
Sada dvaput kliknite na sljedeću vrijednost s vaše desne strane: Računi: status administratorskog računa
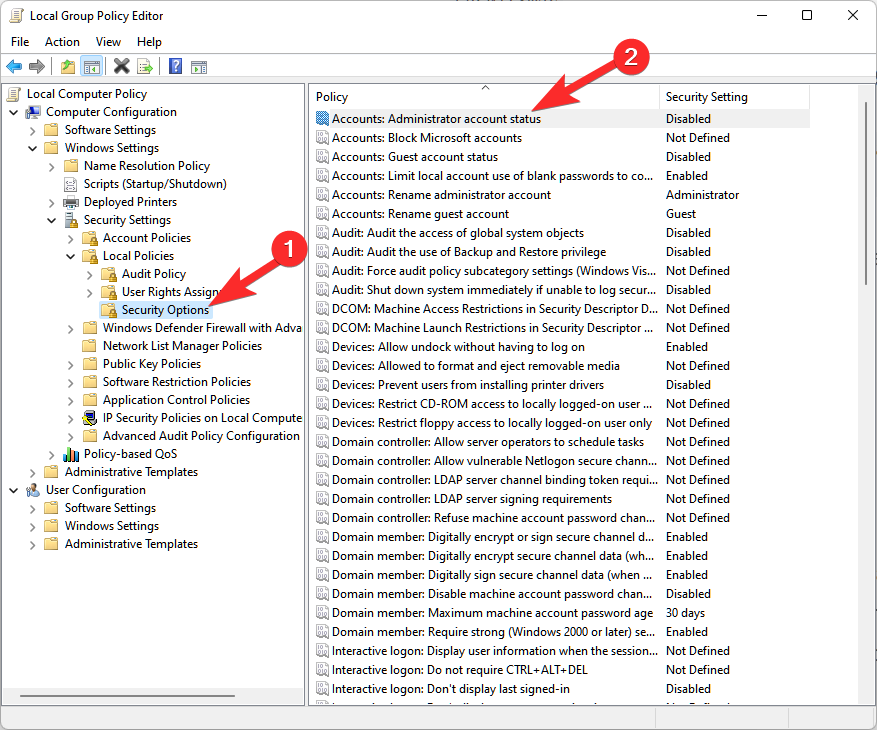
Odaberite "Omogućeno".
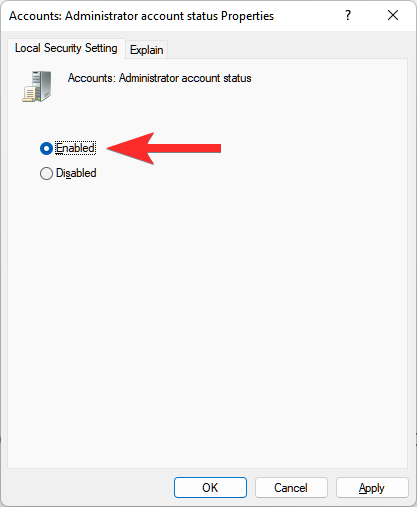
Kliknite na 'Primijeni', a zatim na 'U redu'.
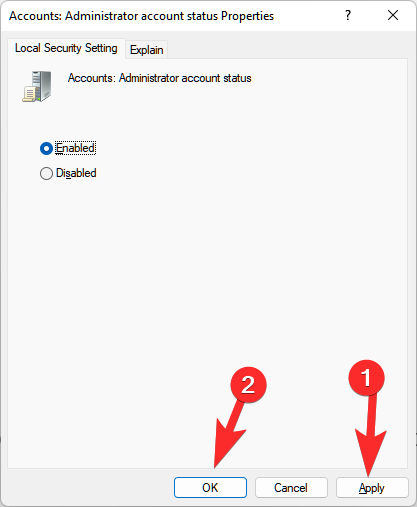
Sada zatvorite GPO prozor i pritisnite tipku Windows na tipkovnici da otvorite izbornik Start. Sada kliknite na svoje korisničko ime u donjem lijevom kutu zaslona i sada bi vam trebao biti dostupan novi administratorski račun.
1.2 Onemogućite zadani administratorski račun
Sada kada ste završili sa svojim administrativnim zadacima, preporuča se da onemogućite svoj administratorski račun kako biste spriječili neovlašteni pristup vašem sustavu. Upotrijebite jednu od metoda u nastavku koja najbolje odgovara vašim trenutnim potrebama i zahtjevima. Započnimo.
1.2.1 Korištenje CMD-a
Aktivirajte CMD na svom računalu ovisno o trenutačnim postavkama i upišite sljedeću naredbu. Pritisnite Enter na tipkovnici da biste ga izvršili.
net user administrator /active:no

I to je to! Zadani administratorski račun sada bi trebao biti onemogućen na vašem računalu.
1.2.2 Korištenje administratorskih alata
Press Windows + R and enter the following term in the Run dialog box. Press Enter on your keyboard once you are done.
lusrmgr.msc

Select ‘Users’ from the left sidebar and click on ‘Administrator’ on your right.
Select the checkbox for ‘Account is disabled’ option.
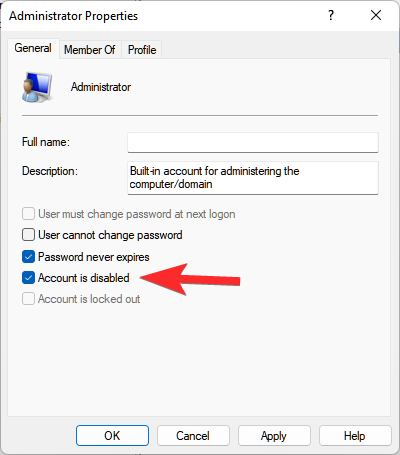
Click Apply and then OK.

Close the admin tools window and the default administrator account should now be disabled on your PC.
1.2.3 Using Registry Editor
Press Windows + R, type in the following, and press Enter on your keyboard to open the Registry Editor on your PC.
regedit

Once the registry editor opens, navigate to the path given below.
Computer\HKEY_LOCAL_MACHINE\SOFTWARE\Microsoft\Windows NT\CurrentVersion\Winlogon\SpecialAccounts\UserList

Click on ‘Administrator’ on your right and hit Del on your keyboard.
Confirm your choice by clicking on ‘Yes’.
Restart your PC and the default admin account should no longer be available on your lock screen.
1.2.4 Using GPO
Press Windows + R and type in the following. Press Enter on your keyboard once you are done.
gpedit.msc
Now navigate to the following path.
Computer Configuration\Windows Settings\Security Settings\Local Policies\Security Options\

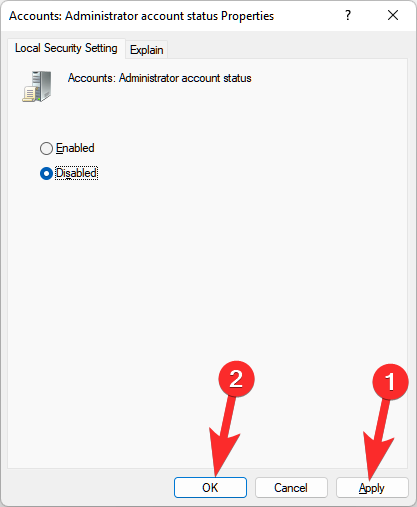
Now double click on the following value on your right: Accounts: Administrator account status

Select ‘Disabled’.
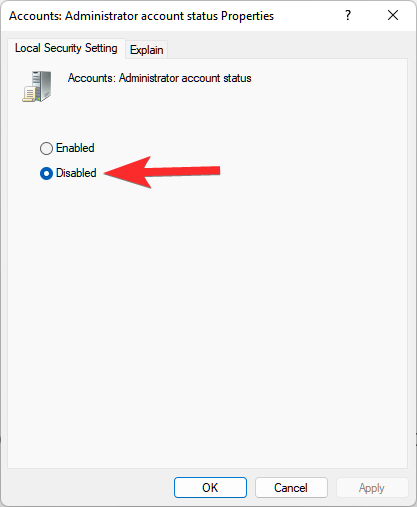
Click on ‘Apply’ and then on ‘OK’.
Close the GPO window.
The default administrator account will now be disabled on your PC via the Group Policy Editor in Windows 11.
1.3 Login as admin using command prompt (can’t get past the lock screen issue)
If you are locked out of Windows and would like to access the administrator account to reset your password then you will need to launch CMD from your lock screen first. You will need a recovery environment to proceed with this guide.
You will need to first access CMD using Windows installation media (a Windows bootable USB) for this guide and then follow the steps below. If using an installation media press Shift + F10 during the setup to launch CMD anywhere.
Follow the guide below to get you started once you have launched CMD as given above.
Once the command prompt launches, enter the following command and press Enter on your keyboard.
cd windows

You will now be taken to your default boot drive in CMD. Enter the following command and execute it by press Enter on your keyboard.
cd system32

You will now be in the System32 directory. Execute the command below to create a backup of utilman.exe.
copy utilman.exe utilman.exe.back

Execute the command below within CMD now.
copy cmd.exe cmd1.exe

Now let’s delete the default utilman.exe.
del utilman.exe

We will now rename CMD so that it can be accessed as utilman.exe.
rename cmd.exe utilman.exe

Once all the commands are executed successfully, close the command prompt by typing in the following command.
exit

Restart your PC and proceed to the Windows lock screen as you normally would. Click on the accessibility icon in the bottom right corner and you should now be able to access CMD on your lock screen. Follow the guide above to enable administrator account on your system. Once enabled, you can use the guide below to reset a local account’s password. Once you have reset your password it is highly recommended that you revert the changes we made to cmd.exe and utilman.exe earlier. Use the steps below to revert your changes.
Press Windows + S on your keyboard and search for CMD. Click on ‘Run as administrator’ once it shows up in your search results.
Now enter the following commands one by one and execute them to revert your changes. Make sure to execute each command one after the other without changing their order.


rename utilman.exe.back utilman.exe

CMD functionality should now be restored within Windows 11. You can check for the same by pressing Windows + R on your keyboard, typing in CMD, and hitting Enter on your keyboard. If CMD launches on your system then all the necessary changes have been reverted successfully.
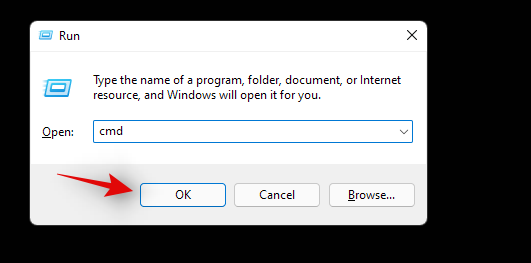
However, if CMD does not launch, make sure that you executed each command successfully on your system by re-verifying each one in the list above.
And that’s it! You should now be able to access CMD from your lock screen.
1.4 Reset password for a local account
You can now reset your local account’s password with the default administrator account we just enabled. Follow the steps below to get you started.
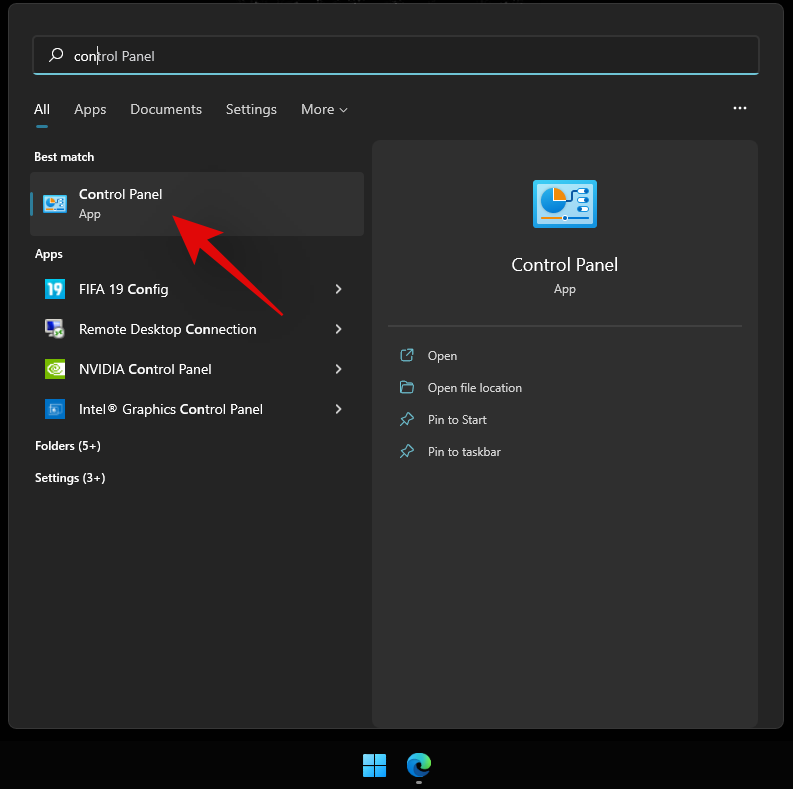
Log in to the Windows administrator account and then press Windows + S on your keyboard. Search for Control Panel and click and launch the app once it shows up in your search results.
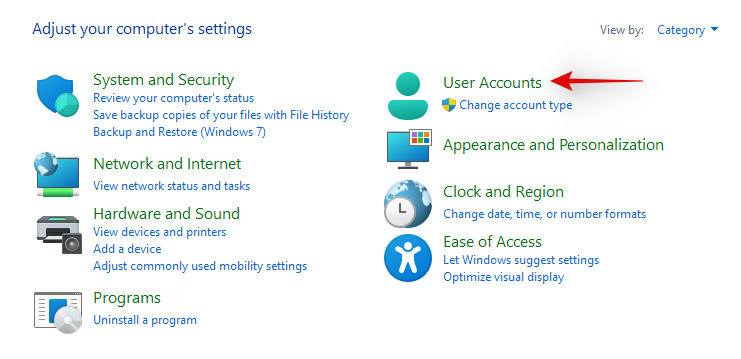
Click on ‘User Accounts’.
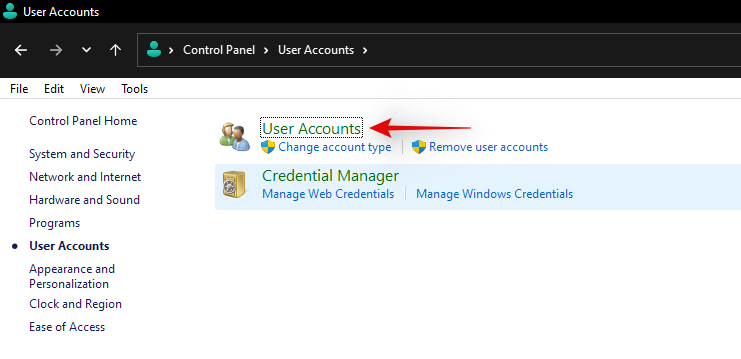
Click on ‘User Accounts’ again.
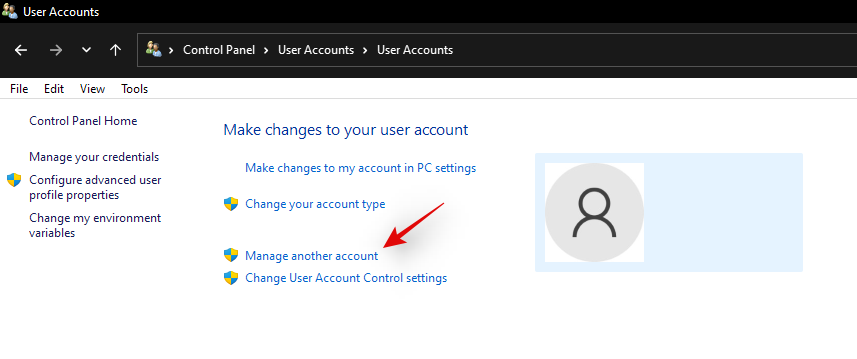
Click on ‘Manage another account’.
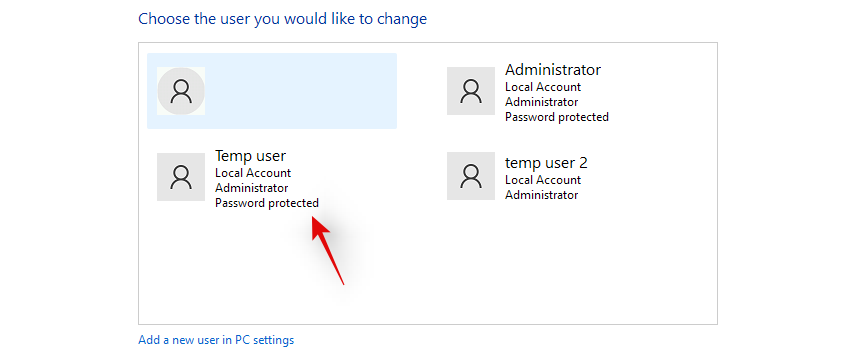
Click and select the account for which you wish to change the password.
Now click on ‘Change the password’.

Type in your new password and confirm the same in the respective text boxes
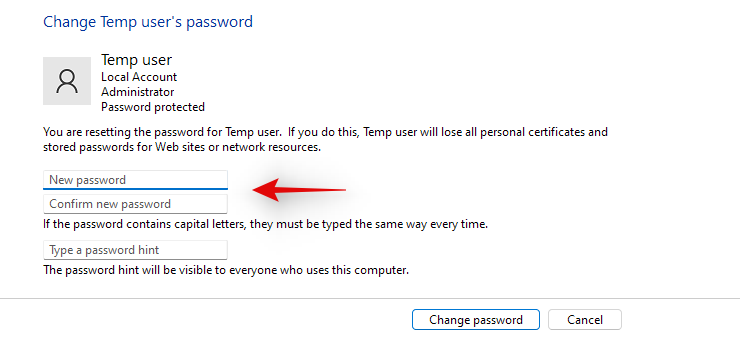
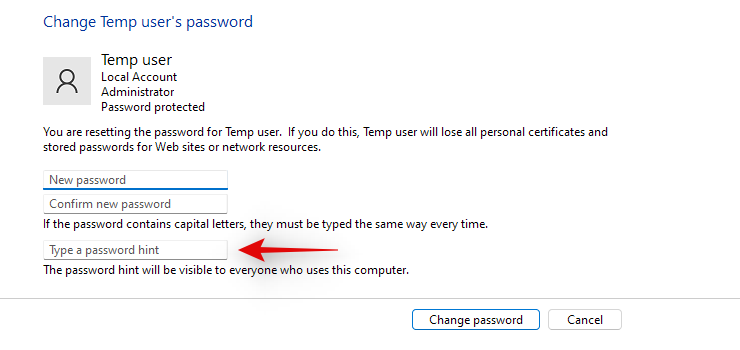
Set a password hint if needed.
Click on ‘Change password’ once you are done.
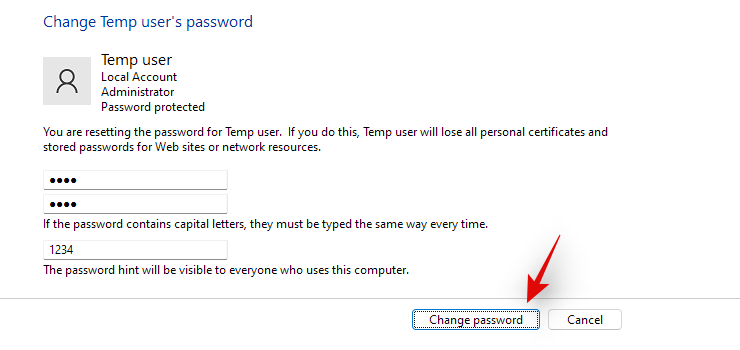
And that’s it! The password for the selected account should now be changed. You can now visit the lock screen and log into your local account using your new password. We recommend you revert any changes made at this point to maintain your security and privacy. You should revert any CMD changes made as well as disable the default administrator account on your system using the guides above.
Method #02: Create a new administrator account in Windows 11
If you wish to create a new administrator account in Windows 11, then you can follow the steps below. Please keep in mind that you will need administrator privileges to create a new administrator user account on your device. Follow the guide below to get you started.
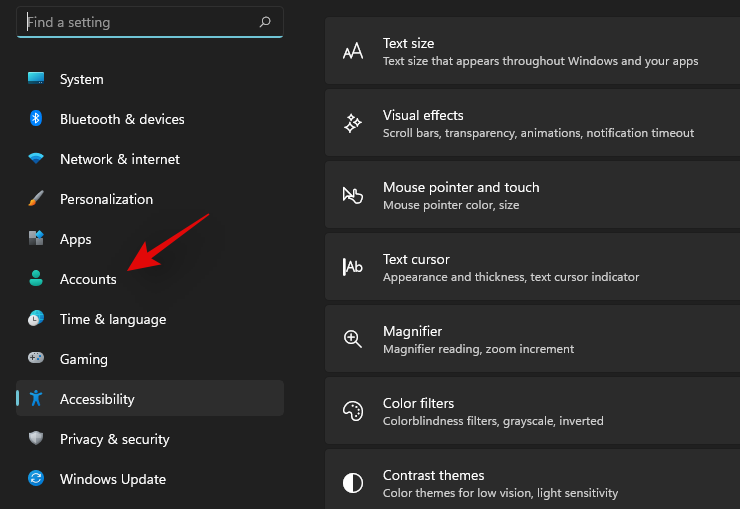
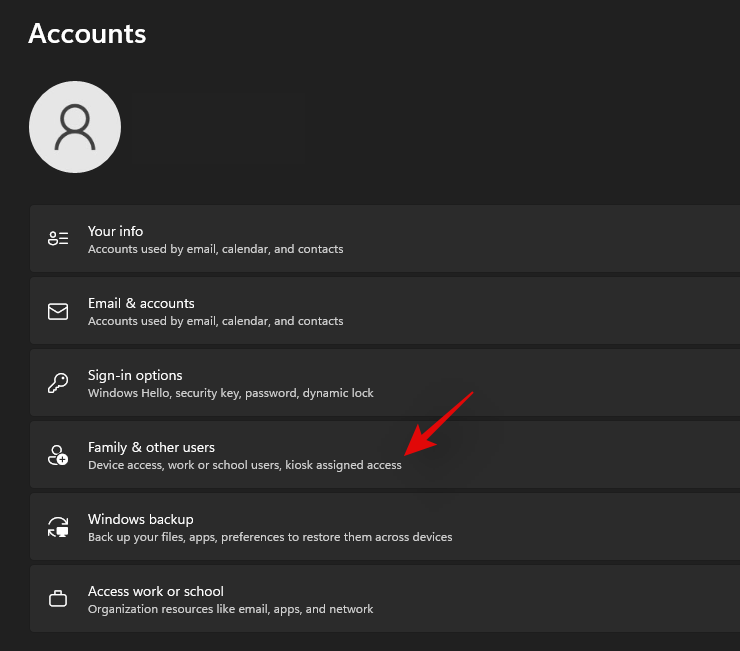
Press Windows + i on your keyboard and select ‘Accounts’ from the left sidebar.
Click on ‘Family & other users’.
Click on ‘Add account’.

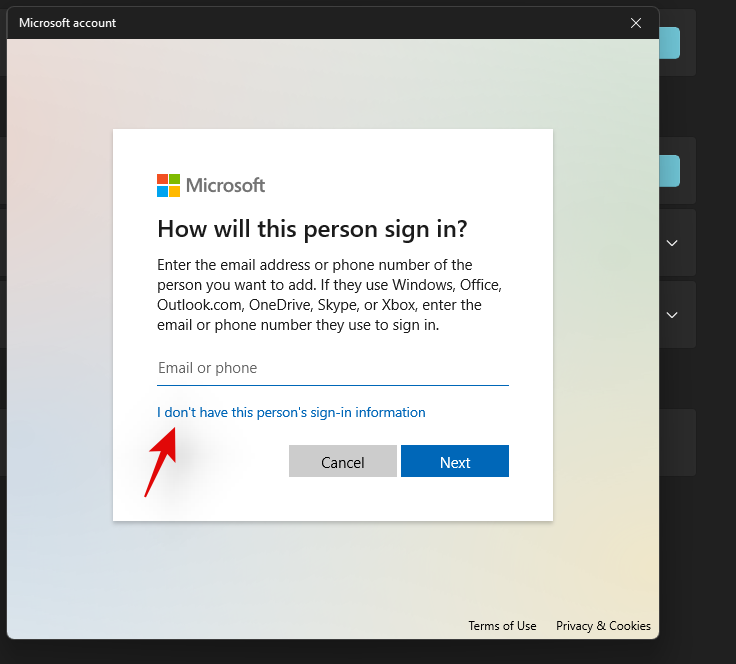
At this point, you can enter the Microsoft Account details of the new user and follow the on-screen steps to set up a new account. However, if you are looking to create a new local account then you can continue with the steps below.
Click on ‘I don’t have this person’s sign-in information’.
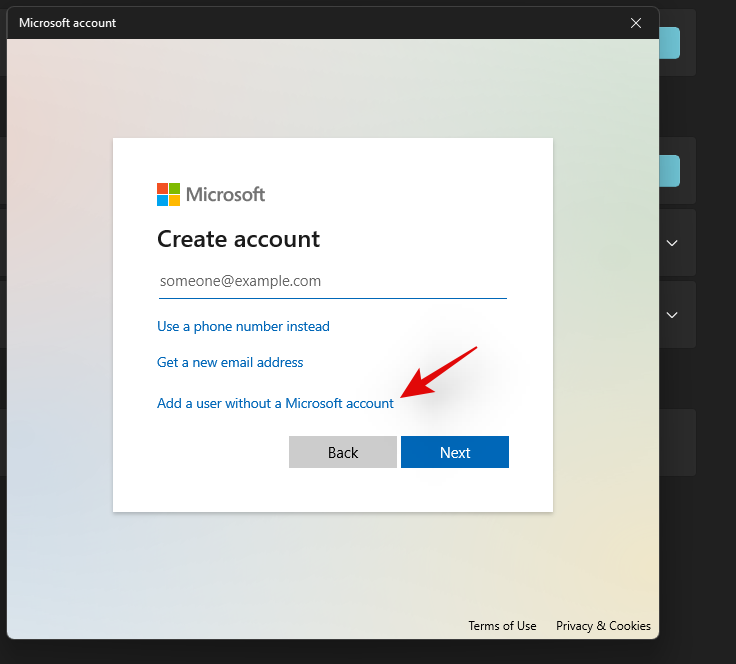
Click on ‘Add a user without a Microsoft account’.
Enter the name of the new user.
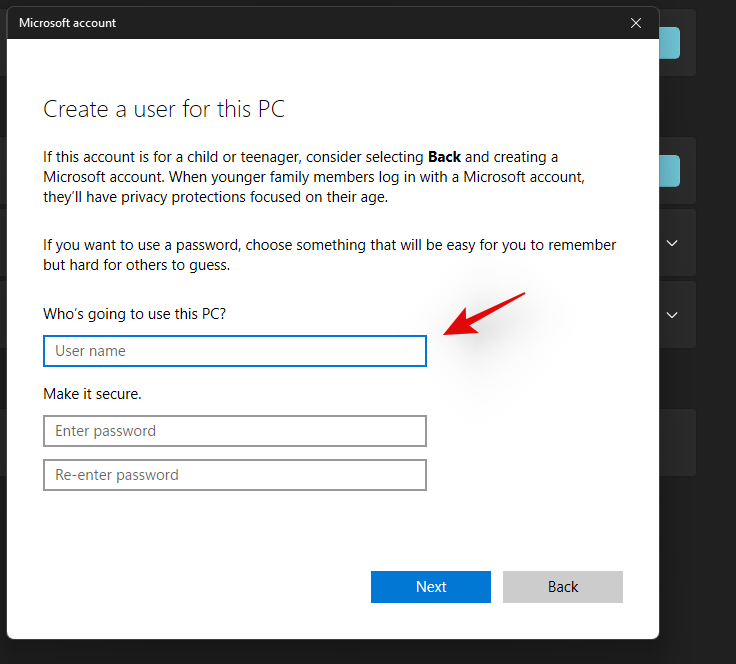
Now set a password and confirm the same.
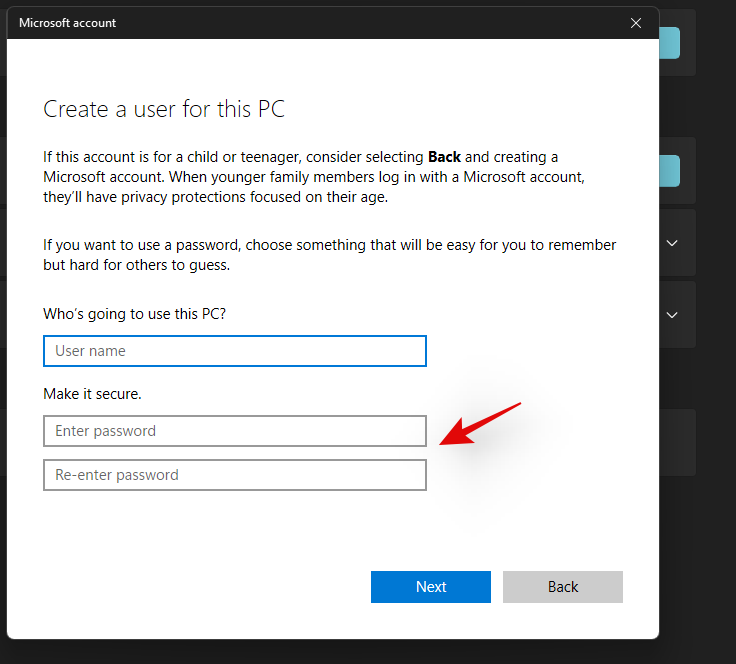
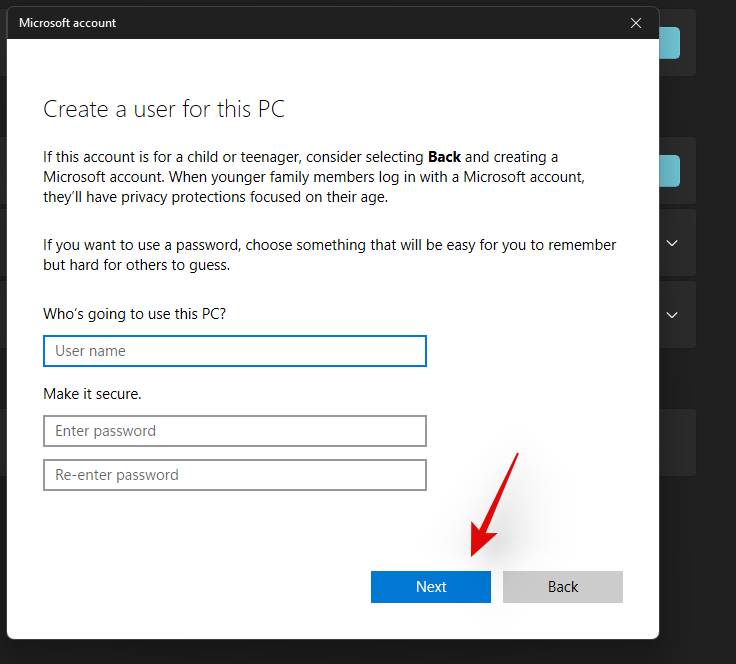
Click on ‘Next’ once you are done.
 \
\
A new account will now be added to your PC. However, the newly added account is a standard account. Let’s convert it into an administrator account. Press Windows + S on your keyboard and search for Control Panel. Click and launch the app from your search results.
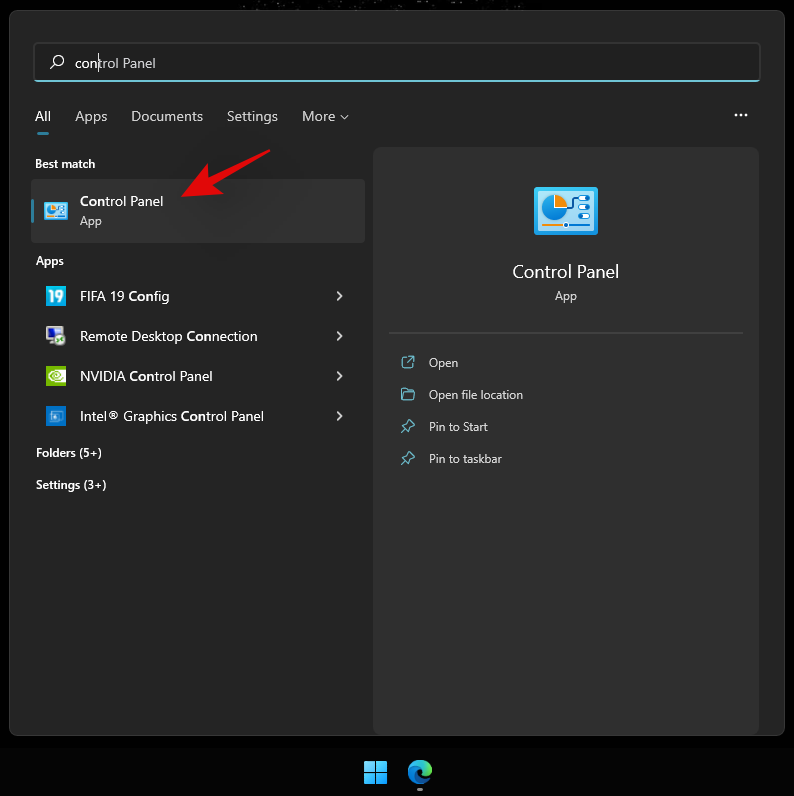
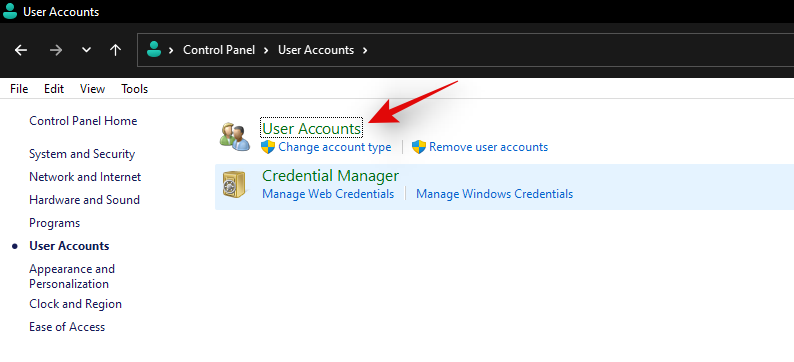
Click on ‘User Accounts’.
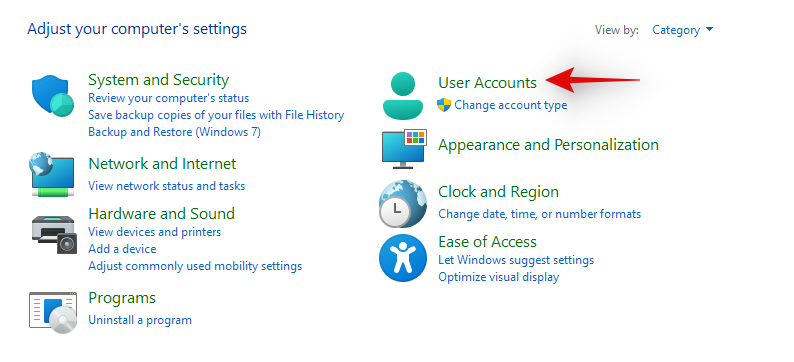
Click on ‘User Accounts’ again.
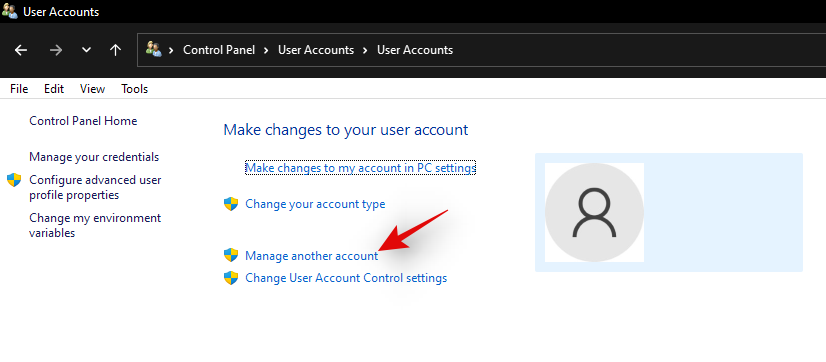
Click on ‘Manage another account’.
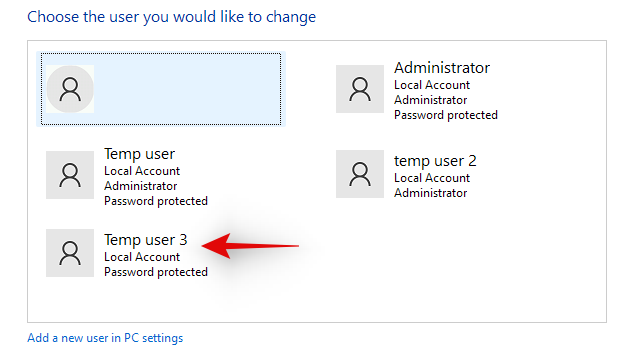
Now click and select the new account you just created.
Click on ‘Change the account type’.

Click and select ‘Administrator’.
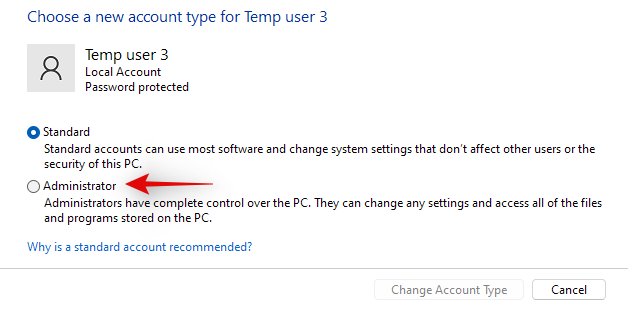
Finally, click on ‘Change account type’.
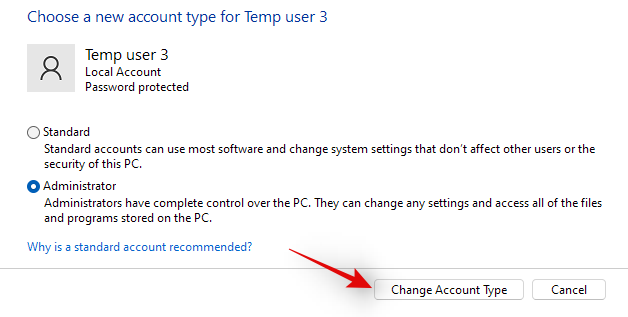
And that’s it! You will now have created a new local administrator account on your device.
Method #03: Change a standard account to an administrator account
If you have a standard account then you can simply switch to an administrator account. If using the Windows Home edition then you can either use the Control Panel method or the ‘netplwiz’ method. On the other hand, Windows Pro and higher users can use either of the methods listed below. Let’s get started.
Note: If you are logged in as a standard user and would like to convert the same account to an administrator account then we recommend you use the netplwiz guide in the methods below.
3.1 Using Control Panel (Windows home)
Press Windows + S on your keyboard, search for Control Panel and launch the app once it shows up in your search results.

Click on ‘User Accounts’.

Click on ‘User Accounts’ again.

If you wish to change your own account’s type then click on ‘Change your account type’. If you wish to convert another local account then select ‘Manage another account’ and select the concerned account. Once selected, click on ‘Change account type’.

Select ‘Administrator’.

Click on ‘Change account type’.

And that’s it, the concerned account should now be an administrator account on your system.
3.2 Using netplwiz
You can also use netplwiz to your advantage and convert user accounts on your PC. Follow the guide below to get you started.
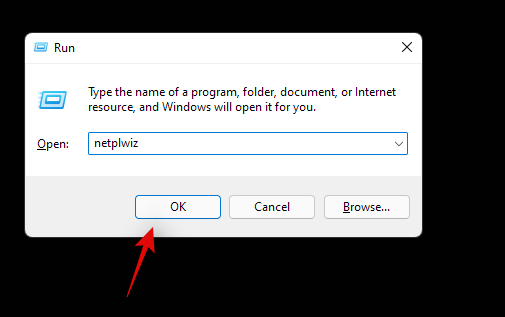
Press Windows + R on your keyboard to launch the run dialog box. Once launched, type in the following and press Enter on your keyboard.
netplwiz
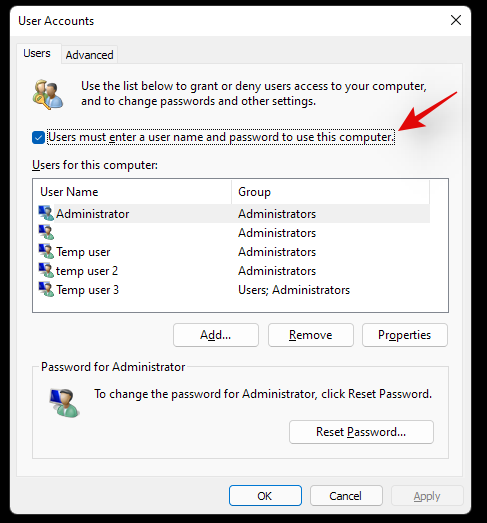
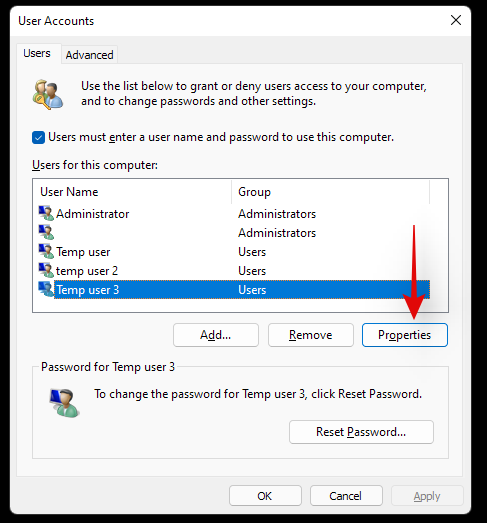
Check the box for ‘Users must enter a user name and password to use this computer’ at the top.
Now click and select the user account you wish to convert from the list below.
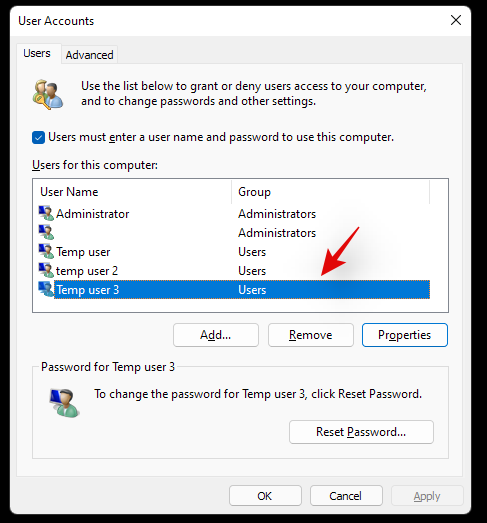
Click on ‘Properties’.
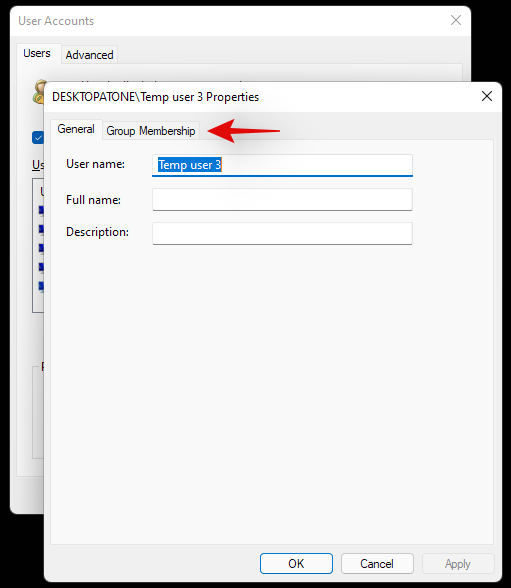
Switch to the ‘Group Membership’ tab at the top.
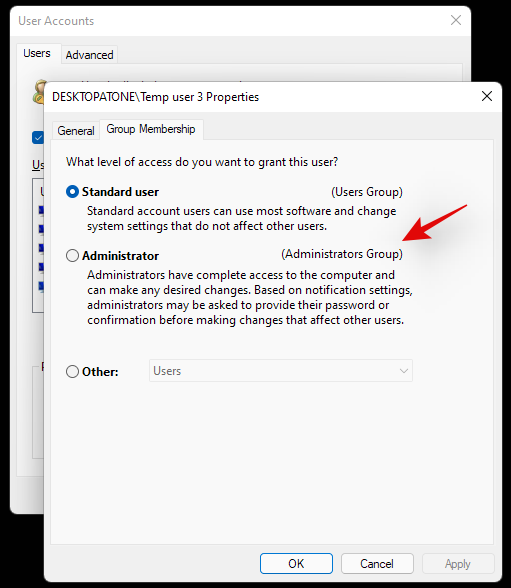
Click and select ‘Administrator’.
Click on ‘Ok’ twice, once you are done.
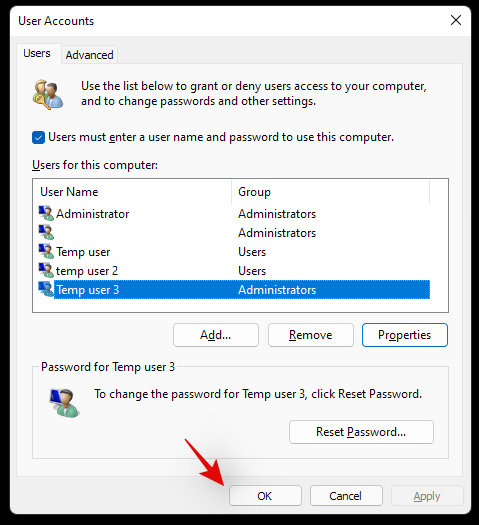
If you converted the current local account that you are signed in with then you will be prompted to re-login to the account for the changes to take effect. Click on ‘Yes’ to confirm your choice.
You will now be taken to the lock screen. Login to the concerned account and you should now have administrator privileges within it.
3.3 Using Local groups manager (Windows Pro and higher)
Press Windows + R on your keyboard, type in the following, and press Enter on your keyboard.
lusrmgr.msc
The local groups manager should now launch on your PC. Click and open ‘Users’ on your left.
Now select the desired User account that you wish to convert from your right and double click on it.
Switch to the ‘Member of’ tab and select the ‘Administrator’ group.
Click on ‘Ok’ once you are done.
And that’s it! The selected account will now have elevated administrator privileges within Windows.
Can you set or reset a password when logged in as an administrator?
Yes, you can easily reset your password as an administrator in Windows 11. This can be done in multiple ways and you can reset the password for a standard account or an administrator account using this method. This can be quite useful if you have forgotten your password and would like to get back into your system without losing your data.
However, you should keep in mind that this can be used by anyone to change your password and get access to your system. Hence, it is recommended that you set a secure password for your default account whenever possible.
For now, you can use the guide below to reset a password in Windows 11 when logged in as an administrator.
How to reset the password once logged in as an administrator
Resetting your password is quite easy when you are logged in to Windows 11 as an administrator. The best way to do this is by using either the Control Panel or CMD. Use one of the guides below that best fits your current needs and requirements. Follow any one of the guides below to get you started.
1. Using Control Panel
Press Windows + S and search for Control Panel. Click and launch the app from your search results.

Click on ‘User Accounts’.

Now click on ‘User Accounts’ again.

Click on ‘Manage another account’.

Now click and select your local account for which you wish to reset your password.

Click on ‘Change the password’.

Add a new password for your local account and confirm the same in their respective text boxes.

Now add a password hint if required.

Click on ‘Change password’ once done.

And that’s it! The password for the selected account should now be changed based on your preferences.
2. Using CMD
You can also reset a local account’s password using CMD. Follow the guide below to get you started.
Press Windows + S on your keyboard and search for CMD. Click on ‘Run as administrator’ once the app shows up in your search result.
Type in the following and press Enter on your keyboard.
net user

You will get a list of all the accounts currently available on your PC. Make a note of the desired account’s username and then type in the command below. Replace ‘NAME’ with the name you noted down earlier and replace ‘PASSWORD’ with your new password. Once done, press Enter on your keyboard.
net user NAME PASSWORD
And that’s it! Once the command is executed, the password for the desired account should be automatically changed on your PC.
How to add a password for the administrator account
If you are looking to secure your PC further then it is recommended that you add a password for the default administrator account. This will ensure that no one aware of this trick can access your Windows account without your authorization. We can add a password for your default admin account in several ways but we recommend you do so either via the advanced menu or via the CMD method. Follow any one of the guides below to get you started.
1. Using Ctrl + Alt + Del
Log in to the default administrator account and press Ctrl + Alt + Del on your keyboard.
Now click and select ‘Change password’.
Enter a new password and confirm the same in their respective fields.
Add a password hint or security question depending on your preferences.
Click on ‘Ok’ once you are done.
And that’s it! Your default administrator account’s password should now be changed on your PC.
2. Using CMD
Log in to the default administrator account and press Windows + S on your keyboard. Search for CMD and click on ‘Run as administrator’ once the app shows up in your search results.
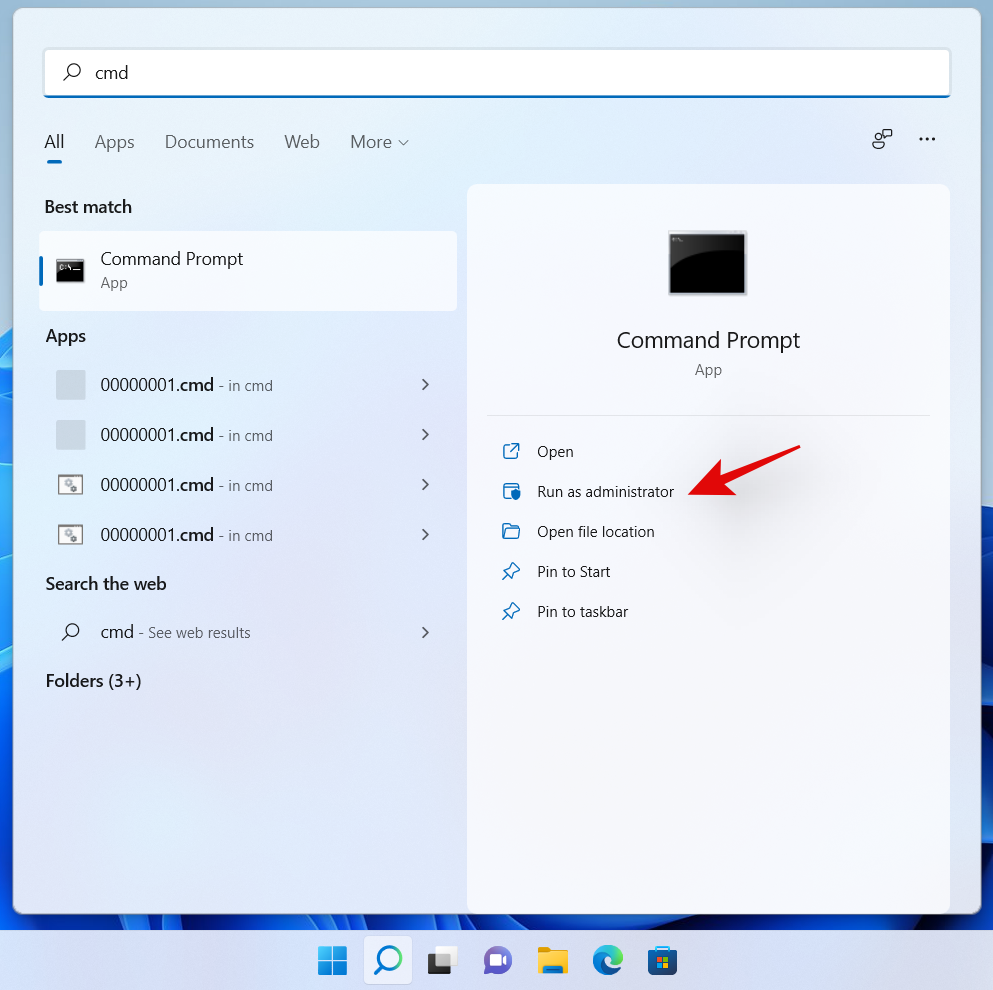
Now enter the following command. Replace ‘PASSWORD’ with a password of your desired choice.
net user Administrator PASSWORD

And that’s it! The new password should now be set for your default administrator account.
Should you keep the administrator account enabled?
No, it is not recommended to keep your default/super administrator account enabled. This account has higher and more elevated privileges when compared to a normal administrator account in Windows. This account is used by Windows to perform system-level tasks in the background as well hence it could cause several privacy issues on your system.
In case somebody can access this account, they would have access to your entire data and hardware. The user could then proceed to take control of your entire system or simply infect it with malware, adware, and in the worst cases, ransomware.
We hope you were able to easily log in as an administrator in Windows 11 using the guide above. If you face any issues or have any more questions for us, feel free to reach out to us using the comments section below.
Related:


 \
\


